Configure API Rate Limiting
Objective
This guide provides instructions on how to enable API rate limiting feature in the HTTP load balancer. The API rate limiting controls rate of requests made to your API endpoints and uses user identification to identify the clients sending requests to your application APIs. For conceptual information on rate limiting, see Rate Limiting.
Using the instructions provided in this guide, you can apply granular rate limiting to API requests to base path or specific API endpoints.
Prerequisites
The following prerequisites apply:
-
An F5 Distributed Cloud Account. If you do not have an account, see Getting Started with Console.
-
An HTTP Load Balancer.
Note: See HTTP Load Balancer and vK8s Deployment for more information on load balancer and app deployment.
Configuration
Do the following to enable API rate limiting for your application:
Step 1: Log into Console, go to HTTP Load Balancer Settings.
- From the Console homepage, select
Multi-Cloud App Connectservice.
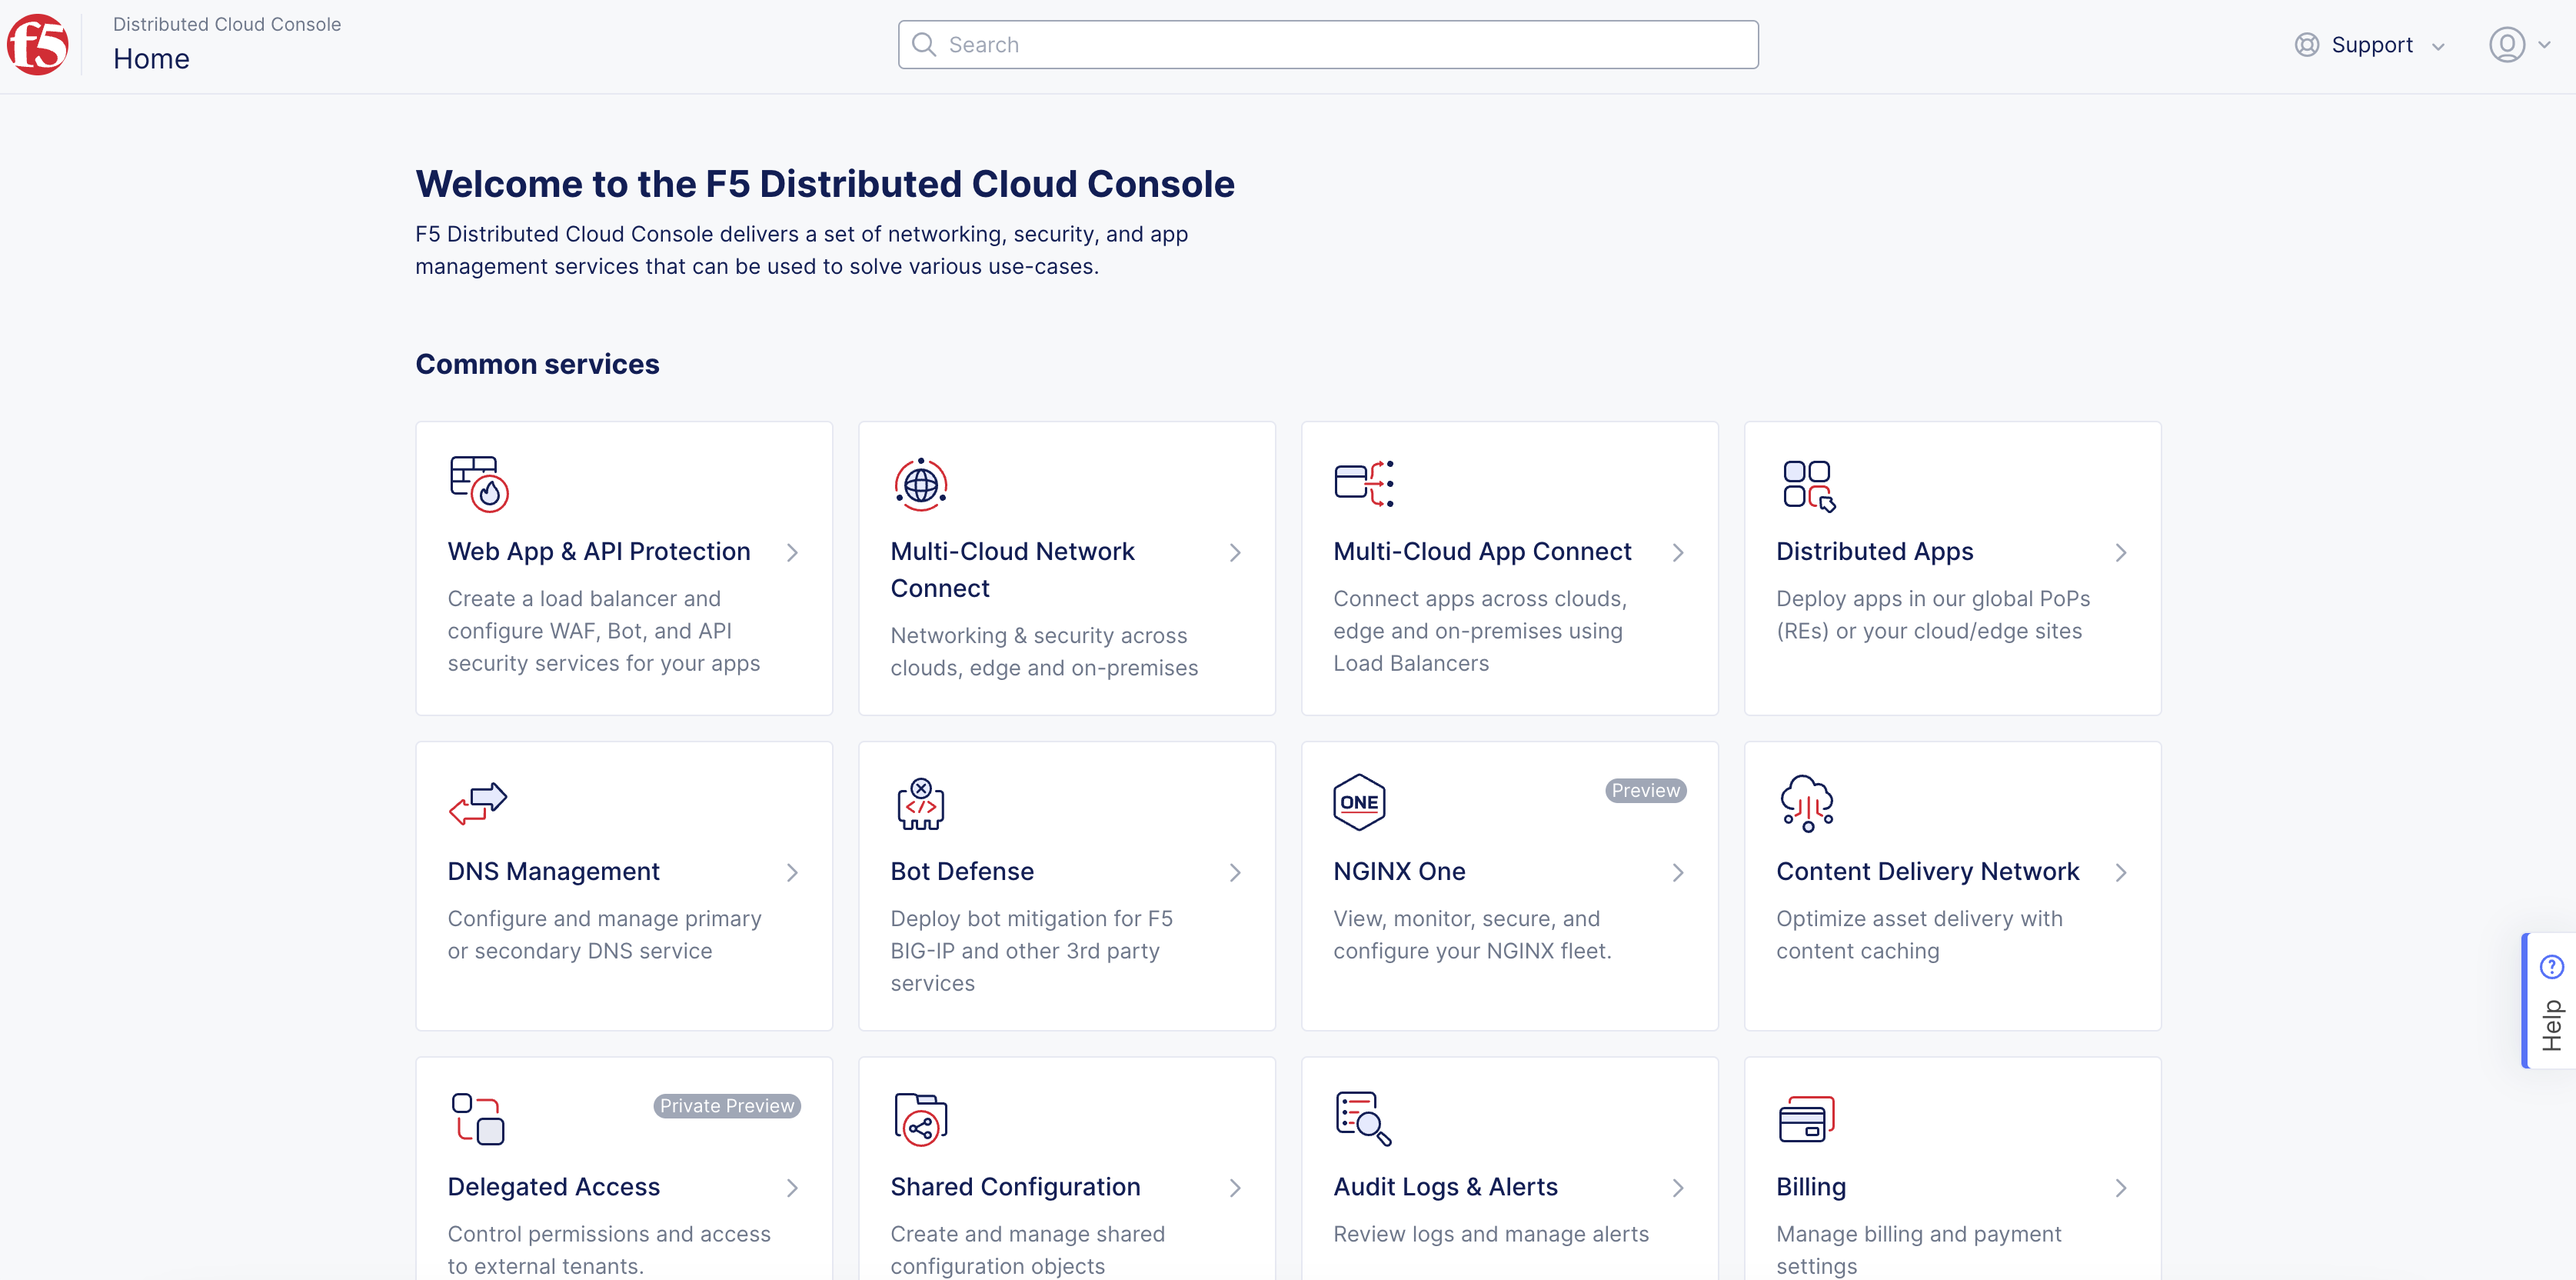
Figure: Console Homepage
-
Select your namespace.
-
Navigate to
Manage>Load Balancers>HTTP Load Balancers. -
Select
...for your load balancer and selectManage Configurationto open load balancer configuration form. -
Select
Edit Configurationoption located in the top right corner of the form.

Figure: Edit Load Balancer Configuration
Step 2: Start configuring API rate limits.
-
Scroll down to the
Common Security Controlssection. -
Select the
API Rate Limitoption from theRate Limitingdrop-down menu.
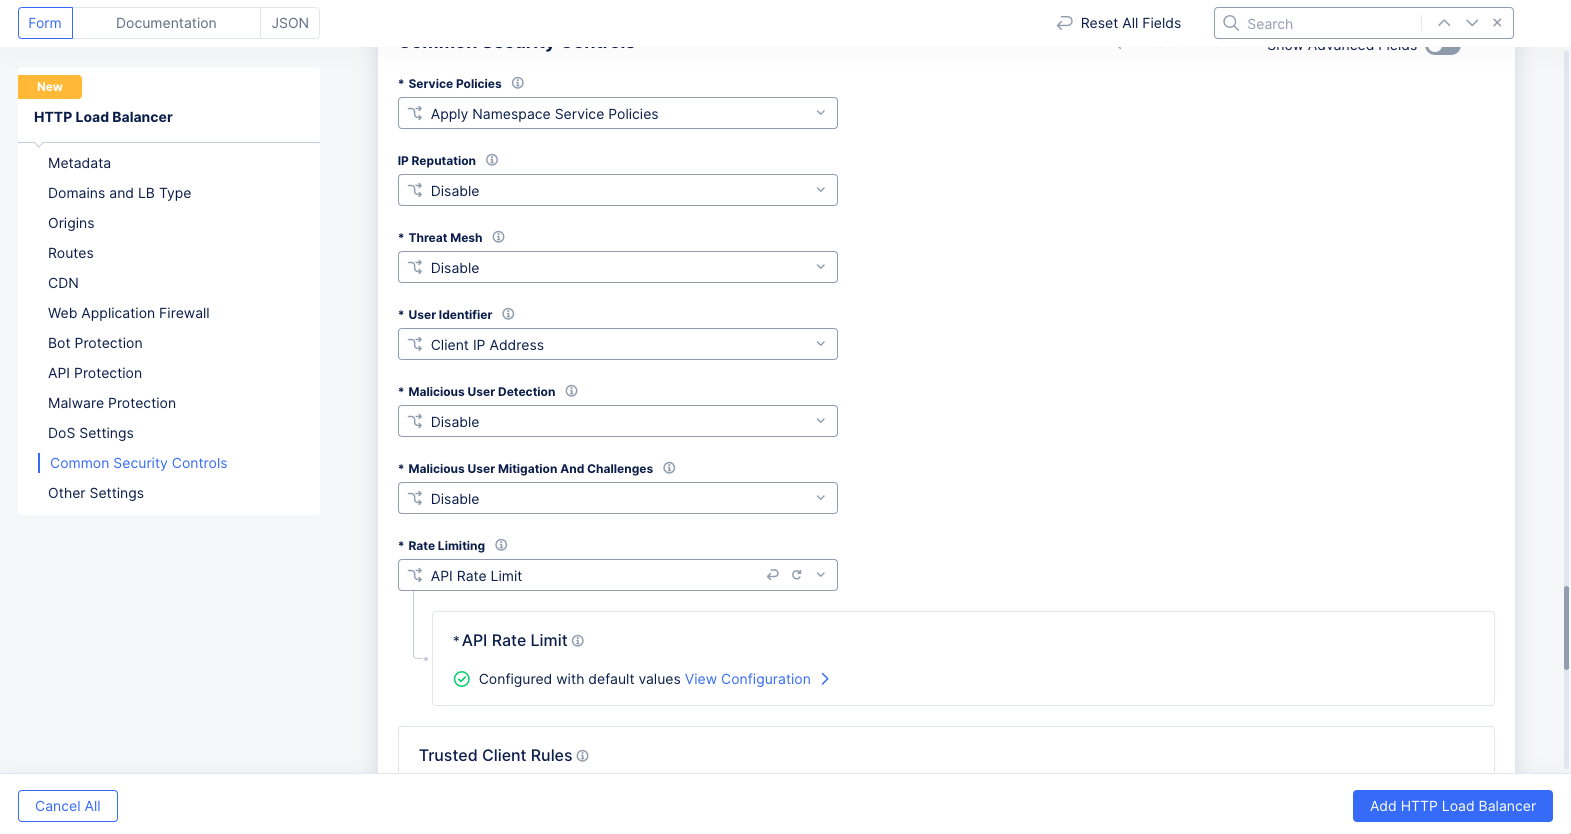
Figure: Rate Limiting Options
- Select
View Configurationto see the rate limiting configuration options.
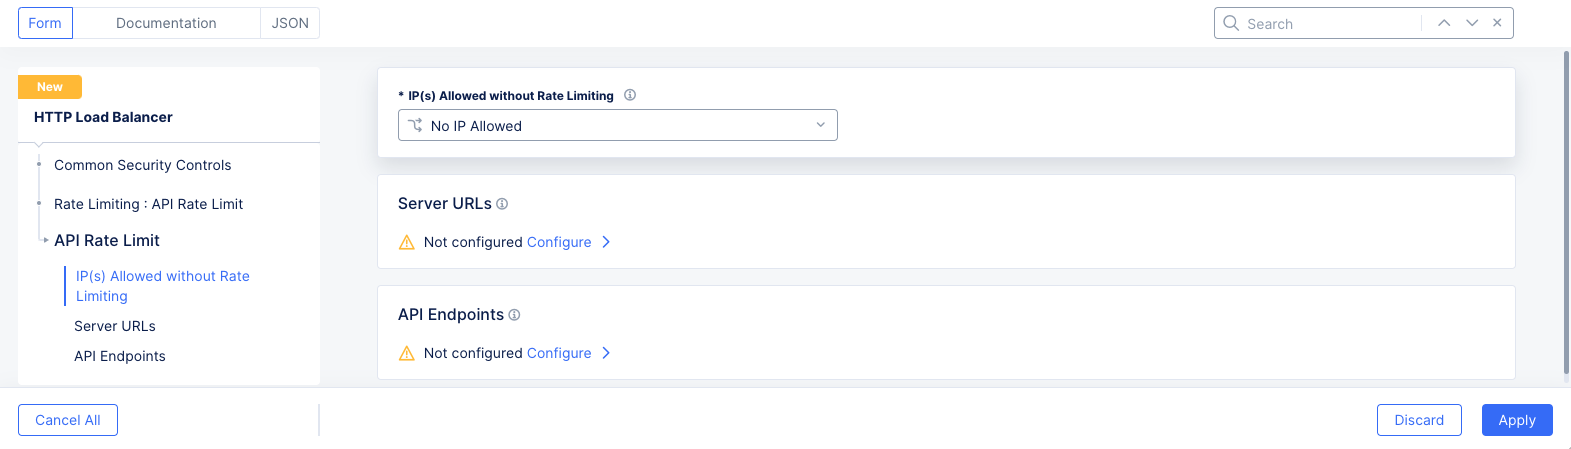
Figure: Rate Limiting Configuration
-
Optionally in the
IP(s) Allowed without Rate Limitingfield, select one of the following to exclude IP addresses from rate limiting:-
No IP Allowed- There are not exceptions to API rate limiting: all clients can be rate limited. -
IP Allowed List- Enter IP addresses in theIPv4 Prefix Listfield. You can add more than one using theAdd itemoption. At least one IP address must be entered for this option. -
IP Allowed List using IP Prefix Set(s)- Select IP prefix sets using theList of IP Prefix Setsdrop-down menu. You can add more than one using theAdd itemoption. At least one pre-configured IP prefix set is required for this option. -
Bypass Rate Limiting- With this option, you can define rules by URL or API group to decide if rate limiting should be bypassed.
-
Note:
No IP Allowedis the default for theIP(s) Allowed without Rate Limitingfield.
Step 3: Set server URL rules.
The server URL rules apply rate limiting for an entire domain or base path that contains multiple API endpoints.
-
Select
Configurefollowed byAdd Itemin theServer URLssection and do the following in the form: -
Select the
Domainfield and select eitherAny DomainorSpecific Domain. In case of specific domain, enter the domain in theSpecific Domainfield. Default option isAny Domain. -
Select on the
Base Pathfield and enter a base path.
Note: Select the
Base Pathfield and clickSee Suggestionsto display suggested list of paths. This shows suggestions only if you have configured an API definition. To know how to create and configure API definition, see Import Swagger and Define APIs.
-
Select one of the following client specifiers from the
Clientsdrop-down menu:-
Any Client: This URL rule will apply to all clients. -
List of IP Threat Categories: Select them by the type of attacks they are known for, such asScanners,Phishing, andMobile Threats. -
Group of Clients by Label Selector: This option allows you to specify clients using a powerful set of expressions based on the TLS certificate or the Distributed Cloud internal control plane.
-
-
Select one of the following options in the
Rate Limiter Values:
Specific Values
-
Enter a number for both of the
ThresholdandDurationfields. The threshold represents the number of allowed requests for the time period set in the duration field. -
The
Count Byfield sets the HTTP load balancer user identifier for the client identification. You can change this to use a custom user identification. SelectUser Identification Policyfor theCount Byfield and then select an existing user identification policy or use theAdd Itemoption to create and apply a new user identification policy.
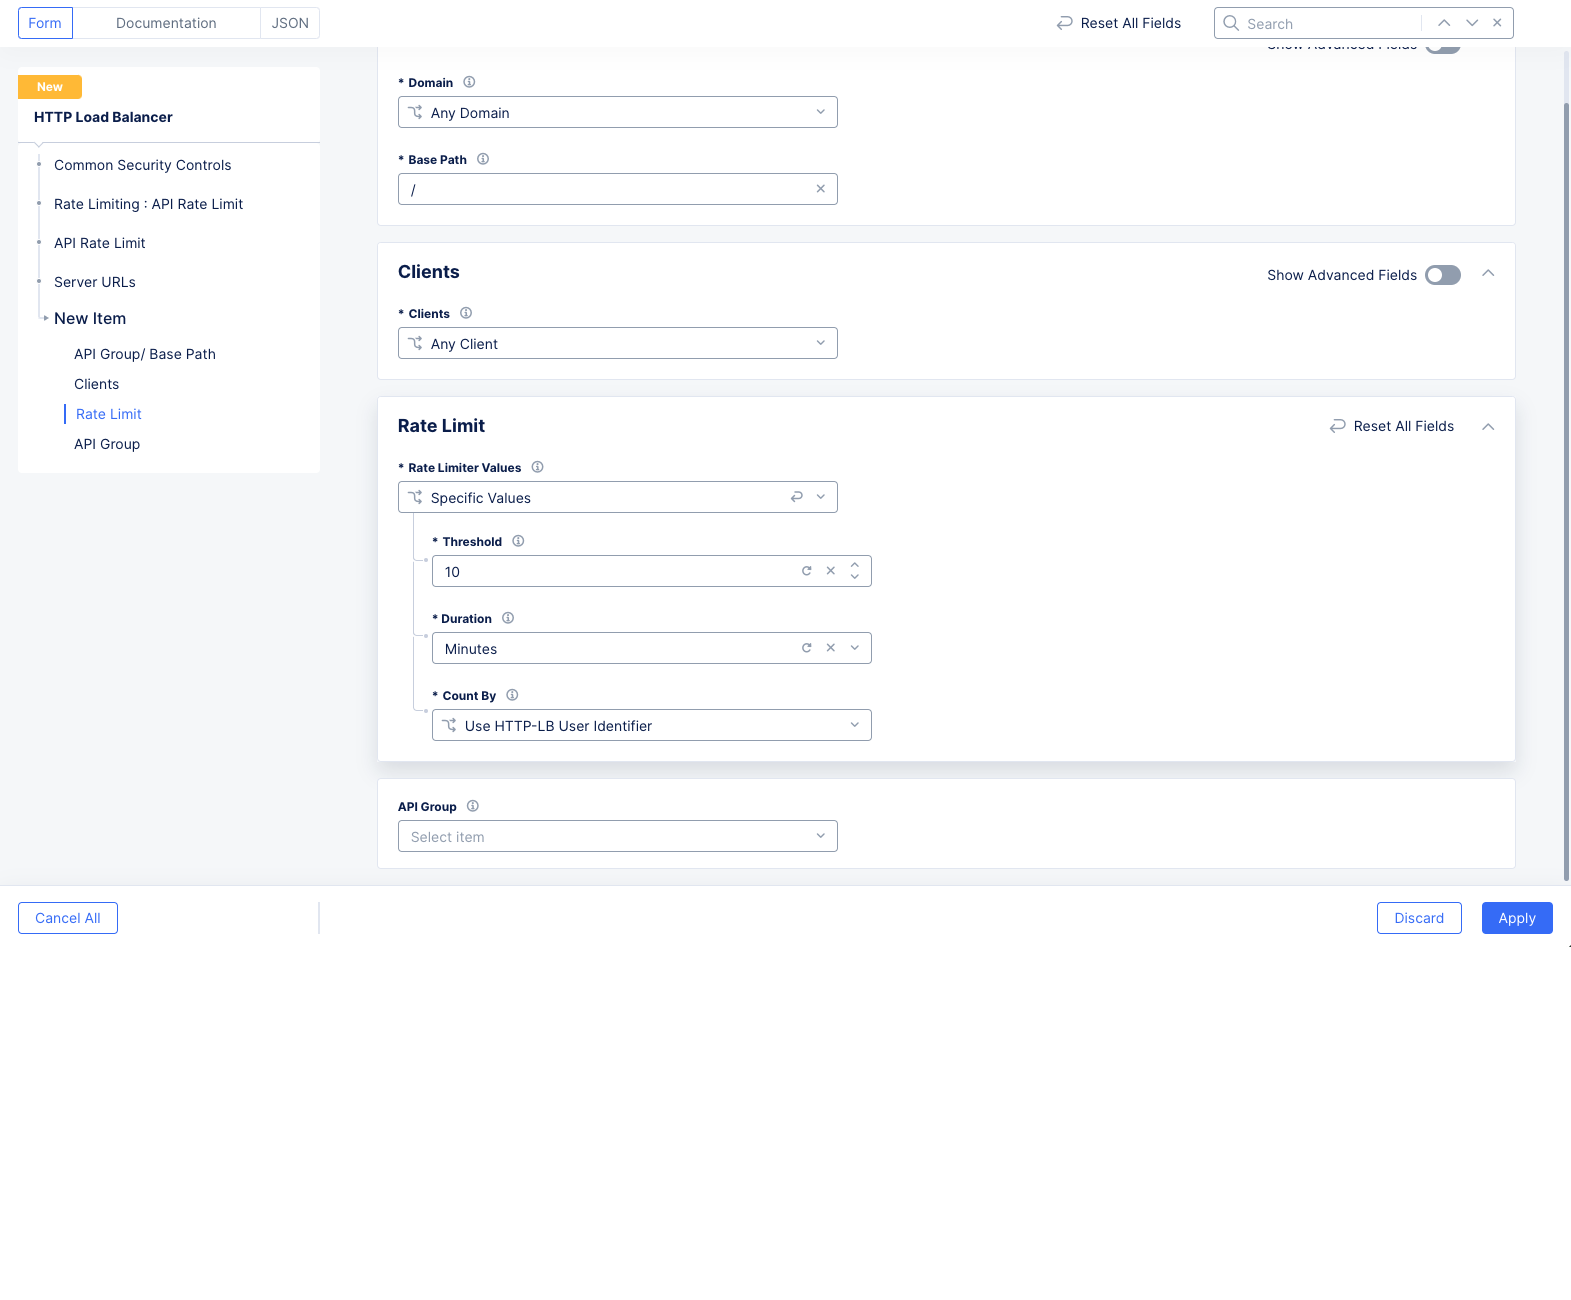
Figure: Server URL Rule
External Rate Limiter
-
In the
External Rate Limiterfield, select an existing rate limiter. If you don't have one or want to create a new one, selectAdd Itemto see theRate Limiterform.-
Enter a
Nameand optionallyLabelsandDescription. -
Select
Edit Configurationto configure the new rate limiter.- Enter the maximum number of requests per period in the
Number of Requestsfield. - Select a unit of time in the
Per Periodfield. Supported units areSeconds,Minutes, andHours. - Enter the number of periods to apply the rate. As an example, If you enter [1,
Seconds, 60] or [1,Minutes, 1] for [Number of Requests, Per Period, Periods] both would be the same as 1 request per minute. Another example, enter [15,Seconds, 1] to set 15 requests per second as the rate limit. A user who exceeds that would be blocked until the rate drops below the limit. - Optionally enter a value for the
Burst Multiplierfield, which indicates how many times a user can hit the requests/unit limit. *Optionally selectBlockfor theMitigation Actionif you want a user to be blocked for all requests for some duration of time after exceeding the rate limit.
- Enter the maximum number of requests per period in the
-
Select the
User Identification Policy.
-
The following example sets 15 requests per second as the rate limit. A user who exceeds that would be blocked until the rate drops below the limit, and the mitigation action would force that blocking to happen for a minimum of 5 seconds.
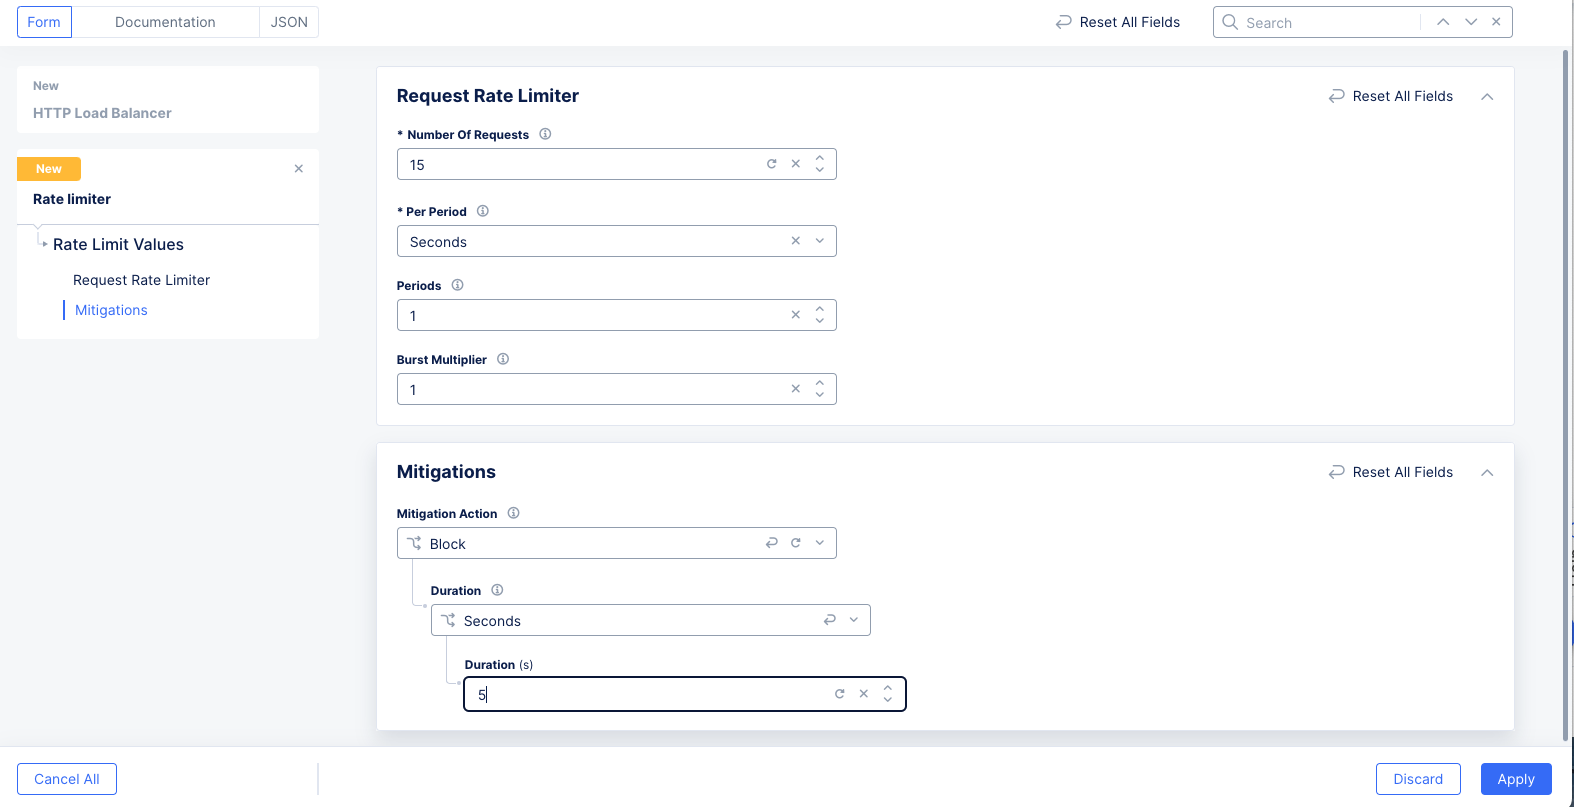
Figure: Server URL External Rule
- Optionally make a selection from the
API Groupdrop-down menu. API groups are derived from the API swaggers.
Note: See Configure Rate Limiting guide for instructions on how to create rate limiter and user identifiers.
- Select
Applyto add the server URL rule. - Use the
Add Itemin theServer URLssection to add more rules.
Note: The rules are processed in the order in which you configure the server rules. The first rule matching the request triggers rate limiting and rest of the rules after that are not executed. Therefore, ensure you set the order of rules as per your requirements.
- Select
Applyto save your server rules list.
Step 4: Set API endpoint rules.
The API endpoint rules apply rate limiting for specific endpoints.
-
Select
Configurefollowed byAdd Itemin theAPI Endpointssection and do the following in theNew Itemform: -
In the
Domainfield, select eitherAny DomainorSpecific Domain. In the case of specific domain, enter the domain in theSpecific Domainfield. The default option isAny Domain. -
In the
API Endpointfield and enter a specific API endpoint path.
Note: You can use the
API Endpointfield's drop-down capability and selectSee Suggestionsto display suggested list of endpoints. The suggestions are shown only if you have configured an API definition. To know how to create and configure API definition, see Import Swagger and Define APIs.
-
In the
Method Listfield underHTTP Methods, select the methods for which the rate limiting is to be applied. You can select more than one method. Alternatively, you can select the methods you for which you don't want to apply rate limiting and then check theInvert Method Matcher, which effectively select all the other methods for rate limiting. -
Select one of the following client specifiers from the
Clientsdrop-down menu:-
Any Client: This URL rule will apply to all clients. -
List of IP Threat Categories: Select them by the type of attacks they are known for, such asScanners,Phishing, andMobile Threats. -
Group of Clients by Label Selector: This option allows you to specify clients using a powerful set of expressions based on the TLS certificate or the Distributed Cloud internal control plane.
-
-
Select one of the following options for the
Rate Limiter Valuesfield:
Specific Values
-
Enter a number for both of the
ThresholdandDurationfields. The threshold represents the number of allowed requests for the time period set in the duration field. -
The
Count Byfield sets the HTTP load balancer user identifier for the client identification. You can change this to use a custom user identification. SelectUser Identification Policyfor theCount Byfield and then select an existing user identification policy or use theAdd Itemoption to create and apply a new user identification policy.
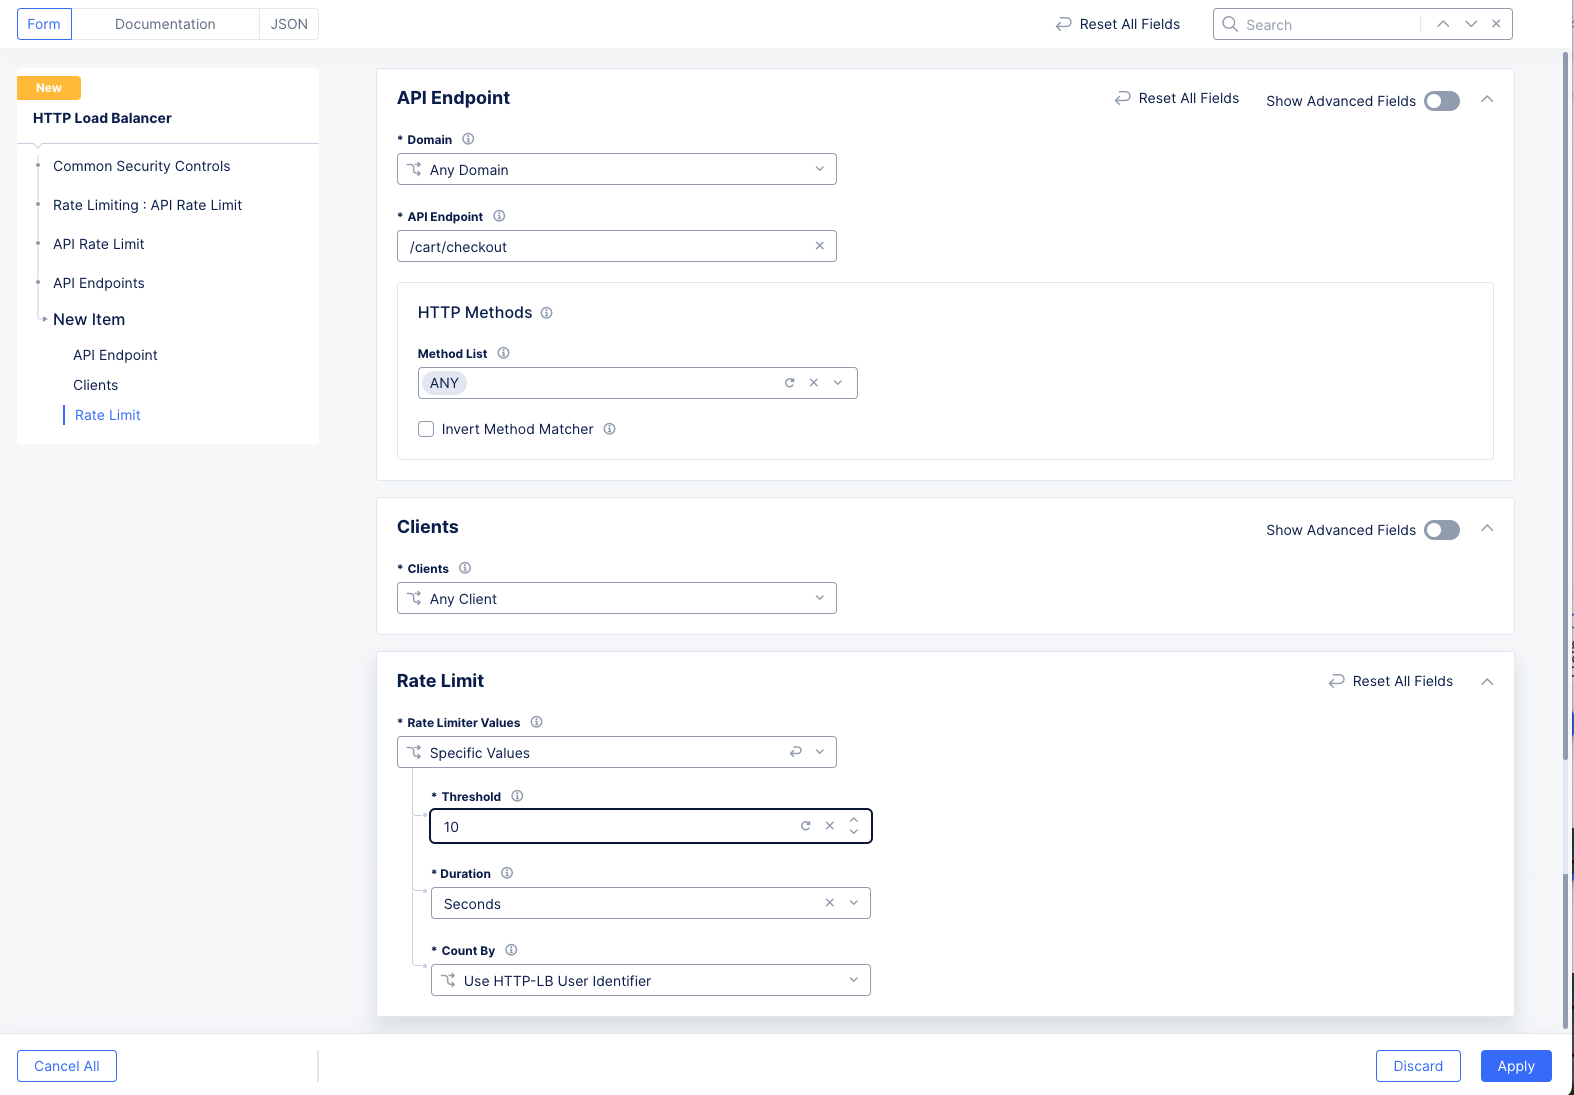
Figure: API Endpoint Rule
External Rate Limiter
-
In the
External Rate Limiterfield, select an existing rate limiter. If you don't have one or want to create a new one, selectAdd Itemto see theRate Limiterform.-
Enter a
Nameand optionallyLabelsandDescription. -
Select
Edit Configurationto configure the new rate limiter.- Enter the maximum number of requests per period in the
Number of Requestsfield. - Select a unit of time in the
Per Periodfield. Supported units areSeconds,Minutes, andHours. - Enter the number of periods to apply the rate. As an example, If you enter [1,
Seconds, 60] or [1,Minutes, 1] for [Number of Requests, Per Period, Periods] both would be the same as 1 request per minute. Another example, enter [15,Seconds, 1] to set 15 requests per second as the rate limit. A user who exceeds that would be blocked until the rate drops below the limit. - Optionally enter a value for the
Burst Multiplierfield, which indicates how many times a user can hit the requests/unit limit. *Optionally selectBlockfor theMitigation Actionif you want a user to be blocked for all requests for some duration of time after exceeding the rate limit.
- Enter the maximum number of requests per period in the
-
Select the
User Identification Policy.
-
The following example sets 15 requests per second as the rate limit. A user who exceeds that would be blocked until the rate drops below the limit, and the mitigation action would force that blocking to happen for a minimum of 5 seconds.
Figure: Server URL External Rule
Note: See Configure Rate Limiting guide for instructions on how to create rate limiter and user identifiers.
- Select
Applyto add the API endpoint rule. - Use the
Add Itemin theAPI Endpointssection to add more rules.
Note: The rules are processed in the order in which you configure the API endpoint rules. The first rule matching the request triggers rate limiting and rest of the rules after that are not executed. Therefore, ensure you set the order of rules per your requirements.
- Select
Applyto save your to save your API endpoints list.
Step 5: Complete configuration and save the new settings.
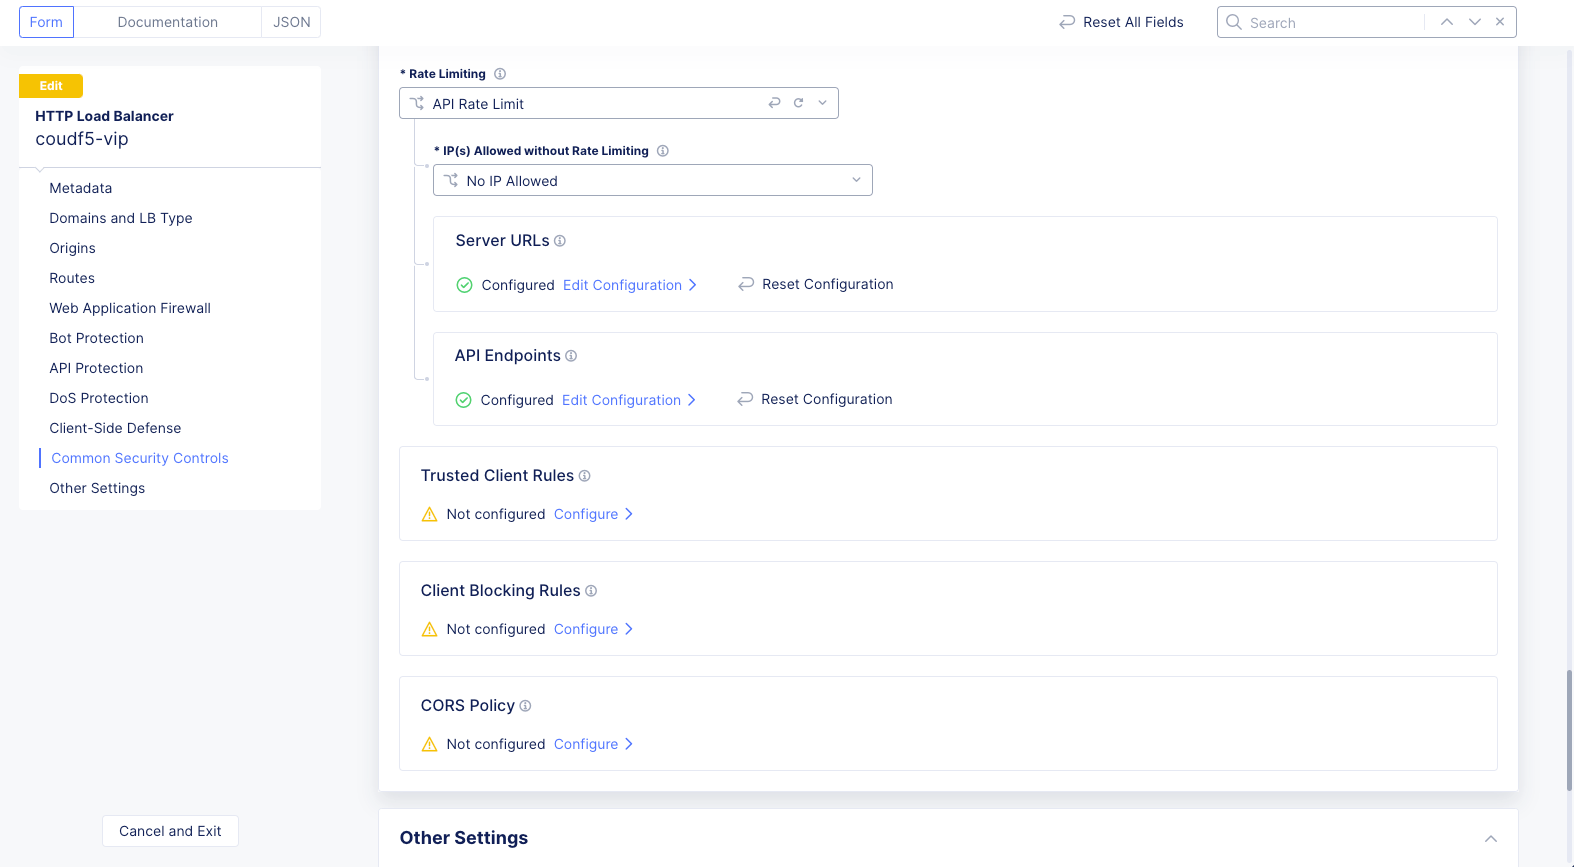
Figure: API Rate Limit Rules
After you finish, select Save and Exit.
Rate Limiting & Rules Behavior
It is important that you plan the order of the rules based on the behavior of rate limiting. Go through the following scenarios to understand the behavior:
Server URL Rules vs API Endpoint Rules
In the case of a server URL rule for a generic path and another API endpoint rule for a specific endpoint extending out of the same generic path, then the limit for the specific endpoint is separately counted. The following is an example scenario:
-
A Server URL rule sets 100 requests per second as the limit for path
/api/v1 -
An API endpoint rule sets 10 requests per second as limit for the specific endpoint
/api/v1/checkoutand methodPOST.
In this case, a user accessing /api/v1 is limited to 100 requests per second, whereas a user accessing POST /api/v1/checkout is limited to 10 requests per second. Meaning, if a user sends 10 requests for POST /api/v1/checkout, then that user reached the limit for that path but can still send 90 requests for path /api/v1.
Overlapping Rules within Same Category
If there are different rules within same category and they overlap, ensure that you add the more specific rule before a general rule. This causes the specific rule gets matched first and will not be skipped by matching the general rule first.
The following is an example for server URL rules:
-
A specific rule sets 10 requests per second as the limit for path
/api/v1and is added first. -
A general rule sets 20 requests per second as the limit for general path
/apiand added after the specific rule.
In this case, a user accessing /api/v1 is limited to 10 requests per second. Once a request matches /api/v1, rate limiting starts for it for that user. The general rule for /api will not count the request for path /api/v1. This essentially means any path starting with /api except /api/v1 is limited to 20 requests per second, and /api/v1 has 10 requests per second as the limit.
The following is an example for API endpoint rules:
-
A specific rule setting 10 requests per second as the limit for endpoint
/product/{productId}and methodGETis added first. -
A general rule setting 20 requests per second as limit for endpoint
/product/{productId}and methodALLis added after the specific rule.
In this case, a user accessing GET /product/{productId} is limited to 10 requests per second. Once a request matches GET /product/{productId}, rate limiting starts for it for that user. The general rule for that endpoint with any method will not count the GET requests. This essentially means any method for the endpoint except GET is limited to 20 requests per second, and GET has 10 requests per second as the limit for the same endpoint for the same user.