Enable F5 Distributed Cloud Private Link
Objective
This guide presents information on F5® Distributed Cloud Private Link, provides instructions on how to enable it, deploy Distributed Cloud Sites using it, and perform advertisement/discovery on the Private Link. The Private Link provides private connectivity between private customer networks, services of F5 Distributed Cloud SaaS, and other SaaS endpoints, without exposing traffic to the public Internet. Private Link makes it easy to securely connect services across environments and abstracts the functionality as Private Network. For more information on network concepts, see Networking.
Using the instructions provided in this guide, you can request for Private Link, obtain a Virtual Network, and set up a static route from this network. You can also deploy sites and perform advertisement/discovering using the Virtual Network.
Private Link Overview
Private Link is a Virtual Network configuration managed by F5 Distributed Cloud Services for customers who request it. This private virtual network is only visible and usable to that customer.
For customers sites that are deployed on networks that are isolated from the Internet, the sites require the following as part of installation and registration:
- Downloading a set of configurations.
- Downloading of images from Docker repositories for various site services.
- Establishing SSL tunnels to the Regional Edge (RE) sites.
- Communicating with PKI/Identity Authority.
Note: Private link does not support IPsec. Therefore, use only SSL tunnels to connect to the RE sites.
After site installation, it is also required to enable the ability to advertise services, configure end points, and enable service discovery for these isolated networks.
Private Network connects the isolated networks to a set of RE sites using the Private Link. The Sites in the isolated network are provisioned using this Private Network as opposed to the regular Sites that connect to the RE Sites and Global Controller over the Internet.
The following list presents the benefits of using the Private Link:
Secure traffic: You can connect sites to SaaS services in a secure and scalable manner using the Private Link. In this way, network traffic that uses Private Link does not traverse the public internet, reducing exposure to brute force and Distributed Denial-of-Service (DDoS) attacks, along with other threats. You can use private IP connectivity so that services function as though they are hosted directly on Private Network. This provides better control to define precise network and service access policies while delivering visibility, scalability, and performance.
Simplified network management: The Private Link simplifies DC network extensions to F5 Distributed Cloud Edge. This makes it easier to manage, observe, and monitor.
Accelerate Secure SaaS and Cloud Adoption: You can easily migrate additional traditional on-premises applications to F5 Distributed Cloud Edge, hosted and managed by F5 Distributed Cloud using Private Link. The data is not exposed to the internet, reducing the risk of data compromise so that you can migrate more cloud services.
After the Private Network is enabled, the following objects are created for your tenant:
- Virtual Network object representing the Private Network.
- Global configuration object containing DNS IP address to be used in the private virtual network.
- HTTP Connect/DRP Proxy object for site installation and management over the Private Network.
Note: The created Virtual Private Network represents the enabled Private Link.
Prerequisites
The following prerequisites apply:
-
An F5 Distributed Cloud Services Account. If you do not have an account, see Getting Started with Console.
-
Hardware devices or virtual machines (VMs) on networks isolated from the public Internet. See Supported Hardware for hardware that is supported for installing a F5 Distributed Cloud Site.
-
An HTTP load balancer to advertise services. If you do not already set up a load balancer, see HTTP Load Balancer.
Configuration
To use the Private Link, it is required to first enable it via raising a support request. After the Private Link is enabled for your tenant, a Virtual Private Network object is created, and you can deploy Sites using the created Private Network. You can also perform various activities such as advertising services, configuring endpoints, setting up discoveries, etc.
Enable Private Link
The process of enabling Private Link requires you to raise a support request.
In case of enabling a physical direct connection between the Private Network and your on-premises network, the following apply:
-
F5 Distributed Cloud provides 1 (or 2 if you require 2 links) Letter of Authorization (LOA) so that you can order the interconnects in the data center towards F5 Distributed Cloud.
-
In case of 2 physical interconnections, F5 Distributed Cloud will deliver them on two separate devices for resiliency.
-
Only 10GBase-LR and 100GBase-LR4 modules are supported.
-
You can assign the interconnection subnets (preferably
/31IPv4 networks) over the direct private physical link between the on-premises network and F5 Distributed Cloud network. If required, F5 Distributed Cloud also can assign the IPv4 interconnection subnet and validate with you that there is no overlap with your network. -
F5 Distributed Cloud uses public IP addresses for its network so that there is no overlap with your on-premises network.
-
F5 Distributed Cloud transports the Private Network over F5 Distributed Cloud Global Backbone using a dedicated L3VPN for you.
-
You can use multiple Regional Edge (RE) sites on multiple Points of Presence (POPs) in the Backbone. Unicast traffic is directed to the corresponding POP using the shortest path in the network. Anycast traffic is directed to the closest location using the shortest path.
Perform the following to enable the Private Link for your tenant:
Step 1: Log into F5® Distributed Cloud Console and start creating a support request.
-
Switch to
Administrationservice from the Home page. If you do not see it in the common services, search for it using the search on the top of the Home page. -
Select
RequestsinSupportsection. -
Select
+ Add Request. This opens a new support request form.
Step 2: Fill the request information and create request.
- Select
Servicedrop-down menu.
Note: Select service you are requesting for Example:
Web App & API Protection.

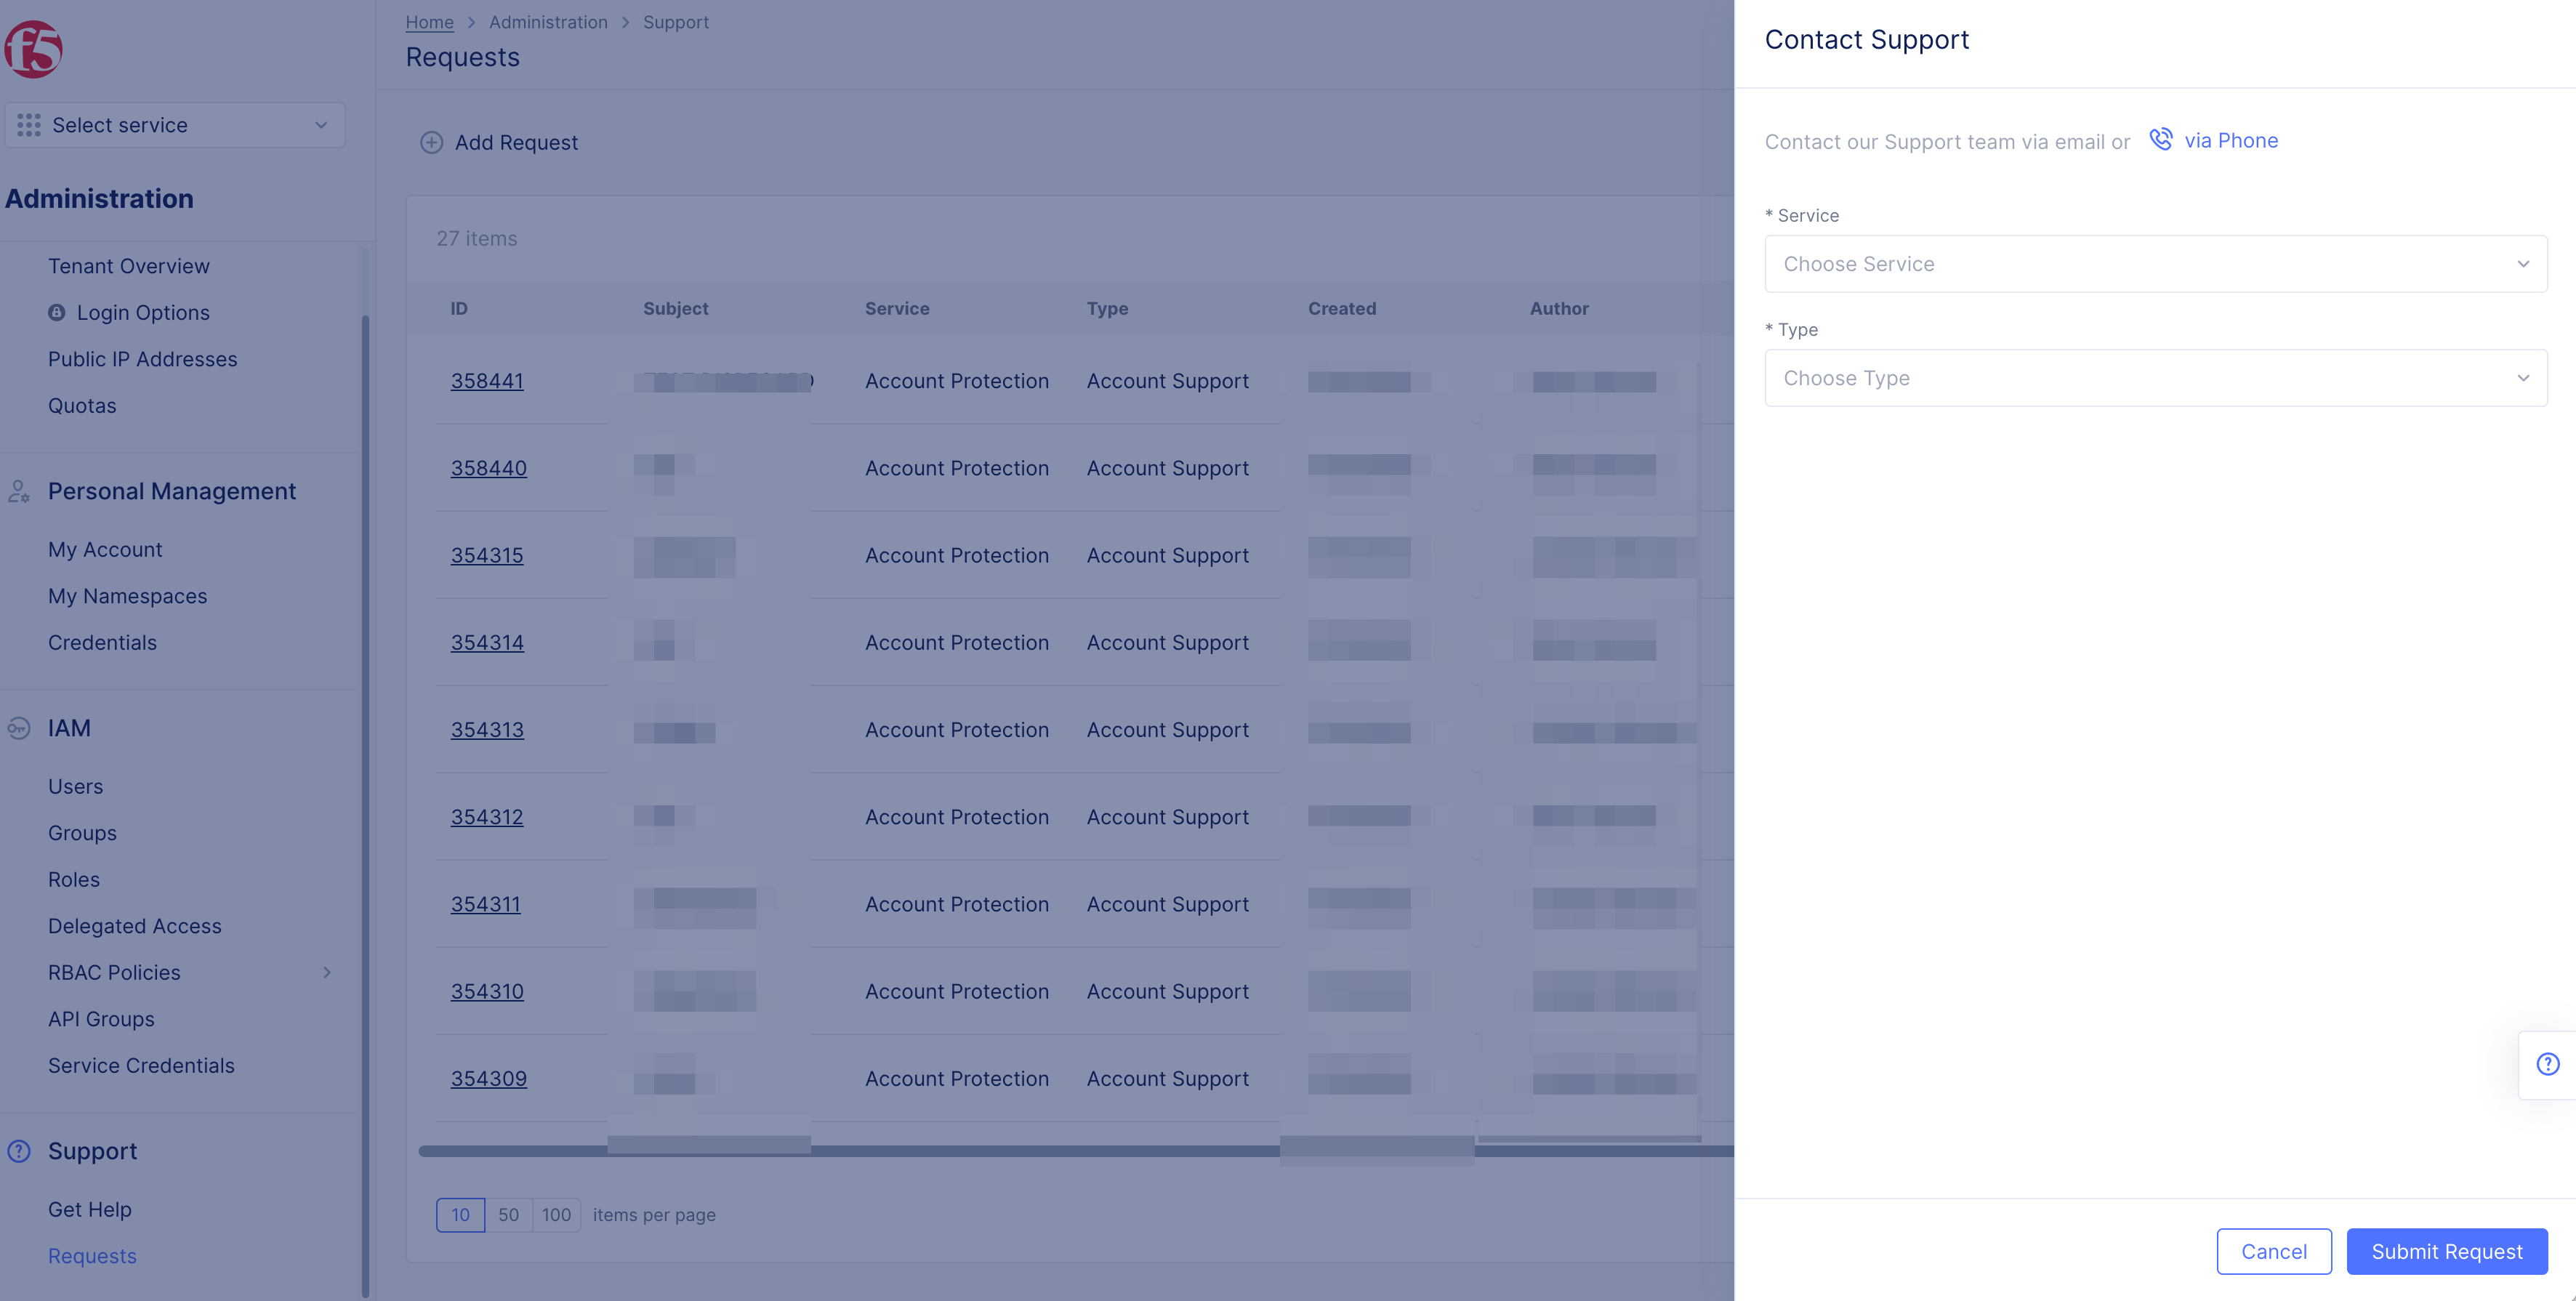
Figure: Support Requests
-
Select
Typedrop-down menu.-
Account Support -
Technical Support -
Incident Support
-
-
Select
OtherinTopicdrop-down menu. -
Select
Priority.Normal,High, orUrgentoptions.
-
Enter
subjectinPlease provide a subject for your issuebox. -
Enter details in
Please explain the issue belowbox. It is recommended that you furnish the details as per the following guidelines:- Required interface speed - specify 10G LR or 100G LR4.
- Access or Trunk (specify the VLAN such as VLAN 200).
- Specify whether Link Aggregation Control Protocol (LACP) is required or not.
- Interconnection prefix - F5 Distributed Cloud Services can provide with CGNAT but if you have a prefix, specify it.
- Specify if you wish to use a dedicated VIP (specify a public IP) or default VIP (provided by F5 Distributed Cloud Services).
- ASN you want to use.
- City and Country - Specify the city and country so that F5 Distributed Cloud Services can suggest 2 RE Sites.
Note: Prefix filtering is not available. A maximum prefix of 1000 per BGP session is supported by default.
- Select
Submit Requestbutton.
Note: F5 Distributed Cloud Services support enables the Private Network and configures it for your tenant in the
sharednamespace.
Step 3: Verify the Private Link after it is enabled.
-
Switch to
Multi-Cloud Network Connectservices. -
Go to
Manage>Networking>Virtual Networks. -
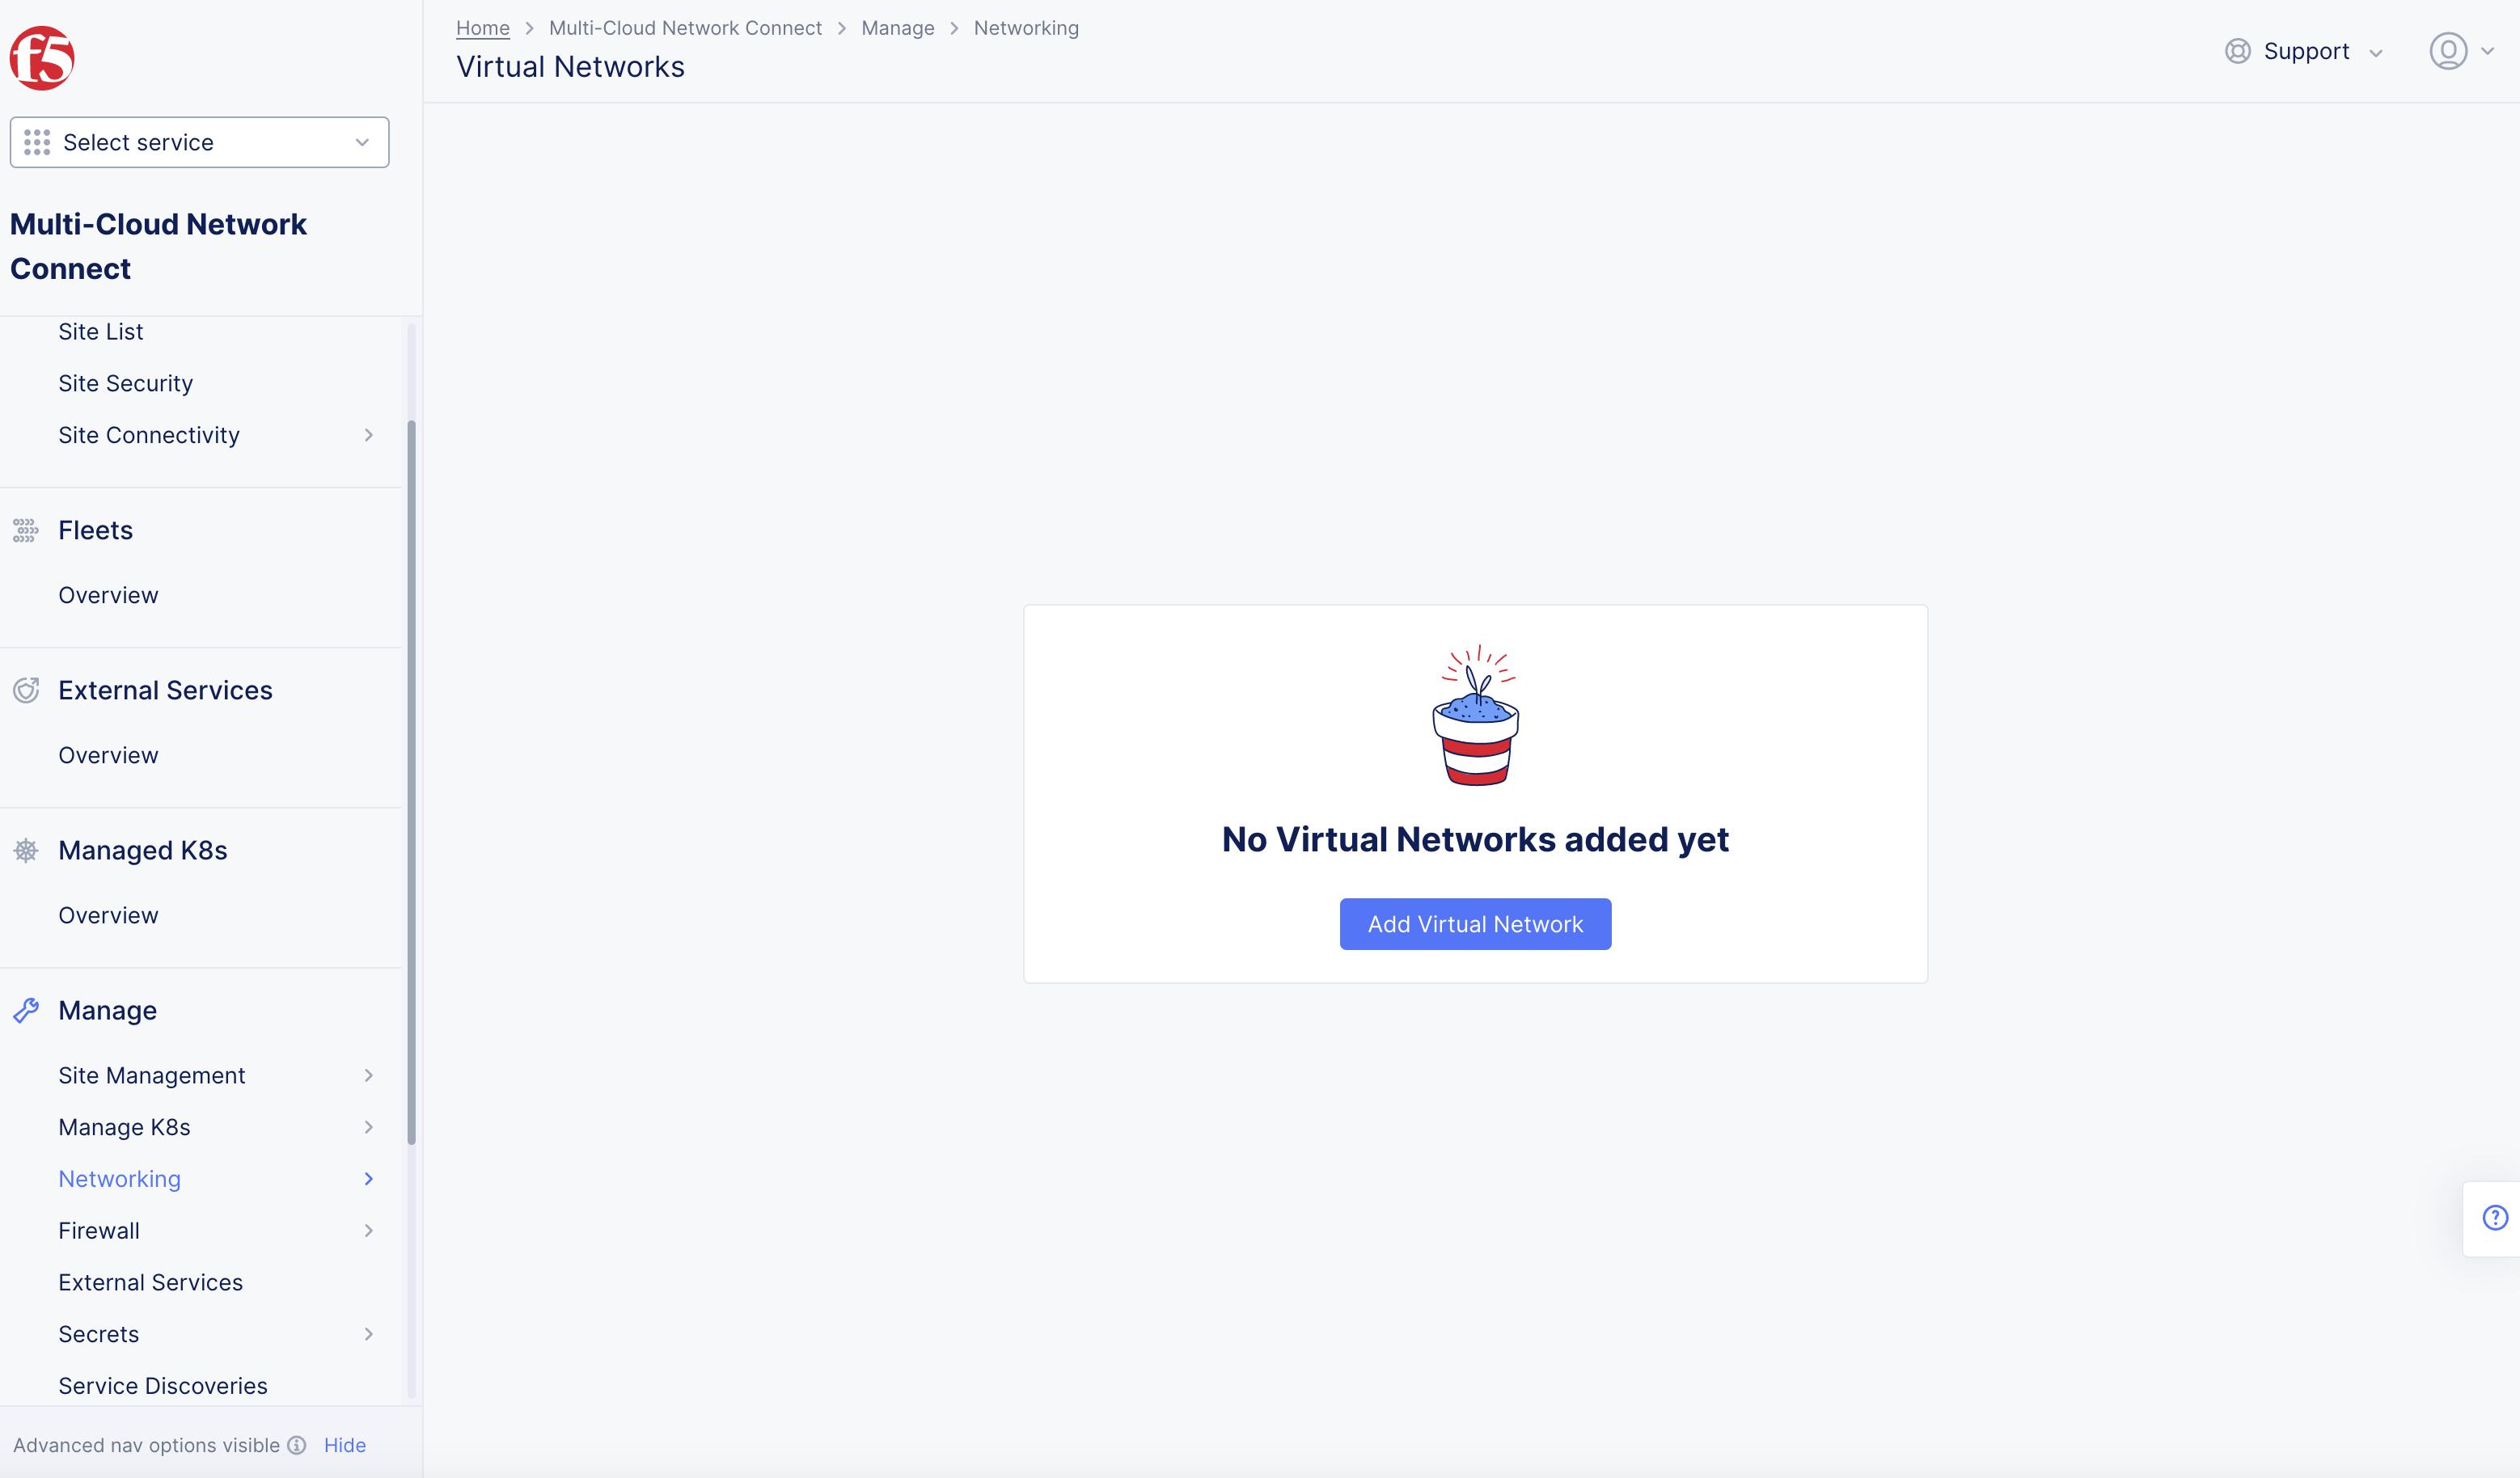
Verify that there is a network entry whose name is in the
adn-private-vn-<tenant-name>format and listed insharednamespace.

Figure: ADN Private Network in Shared Namespace
- Expand the network object to view its details in JSON format. The value
VIRTUAL_NETWORK_VOLTADN_PRIVATE_NETWORKfor thelegacy_typefield indicates that it is the F5 Distributed Cloud Private Network configured for this tenant.
Deploy Site Using Private Link
You can use the Private Link in one of the following two ways:
-
Using HTTP-Connect proxy - This is a recommended method.
-
Using Dynamic Reverse Proxy (DRP).
Perform the following to deploy the Sites using the Private Link:
Step 1: Install Site image in your isolated network location.
- Start installing the Site on a location in your isolated network. You can download and install the image on a VM or a hardware device.
Note: For information on site installation requirements and instructions, see the documentation in the Site Management guides. For information on the software image, see the image downloads in the Images guides. In case of F5 Distributed Cloud Services hardware, such as IGW or ISV, the box is shipped with a pre-installed image. Therefore, you do not require performing installation.
- Power up the VM or the device.
Step 2: Perform post-installation configuration.
After switching on the VM or device with the Site image installed, perform initial configuration using one of the following methods:
Using HTTP Proxy
-
You will be prompted to enter login credentials. Enter
adminusername andVolterra123password. Login for the first time prompts you to update the password for theadminuser. -
Enter
configureand enter the Private Virtual Network name. -
Perform rest of the configuration as per your requirements. For more information, see Site Management guides.
Using DRP
In case of DRP, make sure that your corporate HTTP proxy is resolving against F5 Distributed Cloud DNS or manually configure all DNS records. Perform the following:
-
You will be prompted to enter login credentials. Enter
adminusername andVolterra123password. Login for the first time prompts you to update the password for theadminuser. -
Enter
configure-network. -
Enter the HTTP proxy for the
? Set HTTP_PROXYfield. Enter the HTTP proxy in thehttp://username:password@10.0.0.1:3129format. Ensure that you configure your HTTP Proxy used internally. -
Optionally, enter
configureand enter the private virtual network name. However, you can also set this option at the registration time. -
Perform rest of the configuration per your requirements. For more information, see the Site Management guides.
Step 3: Perform site registration
-
Log into Console, go to
Multi-Cloud Network Connect. -
Go to
Manage>Site Management>Registrations. -
Click ✅ to load the registration acceptance form.
-
Set F5 Distributed Cloud Private Network using one of the following:
-
In case you are using HTTP Proxy method for site installation, verify that the Private Network name is reflecting in the registration acceptance form in the
Private Network Namefield. -
In case you are using DRP Proxy method and did not set the Private Network during the post-install configuration, enter the Private Network name in the
Private Network Namefield.
-
-
Set the rest of the registration fields per your requirements. Enter all mandatory fields marked with the
*character. -
Click
Save and Exitbutton. -
Wait for the site status to become
ONLINE. You can check this in theSites>Site Listfor your site in theSite Admin Statecolumn.
Advertise on Private Link
Advertising services on the Private Link requires you to select the Private Network for advertising. In case you set the default VIP in advertising configuration, the VIP of the Private Network is used as listener IP.
Perform the following to advertise on the Private Network:
Note: This step only shows advertisement configuration of load balancer. For full set of load balancer creation instructions, see the HTTP Load Balancer guide.
Step 1: Log into Console and start creating load balancer.
-
Go to
Multi-Cloud App Connectservice and select your namespace from the drop-down list. -
Select
Manage>Load Balancers>HTTP Load Balancers. -
Click
+ Add HTTP load balancerto start creating the load balancer. -
Enter
Name. -
Enter
LabelsandDescriptionas needed. -
Enter
Domain. -
Select
Load Balancer Typedrop-down menu. -
Select
+ Add IteminOrigin Poolto setupOriginssection.
Step 2: Perform VIP configuration for advertising on the Private Network.
-
In
Other Settingssection, selectVIP Advertisementdrop-down menu, selectCustomoption. -
Click
Configurelink inCustombox. Custom VIP advertise configuration page opens. -
Click
+ Add itemin theList of Sites to Advertisesection. -
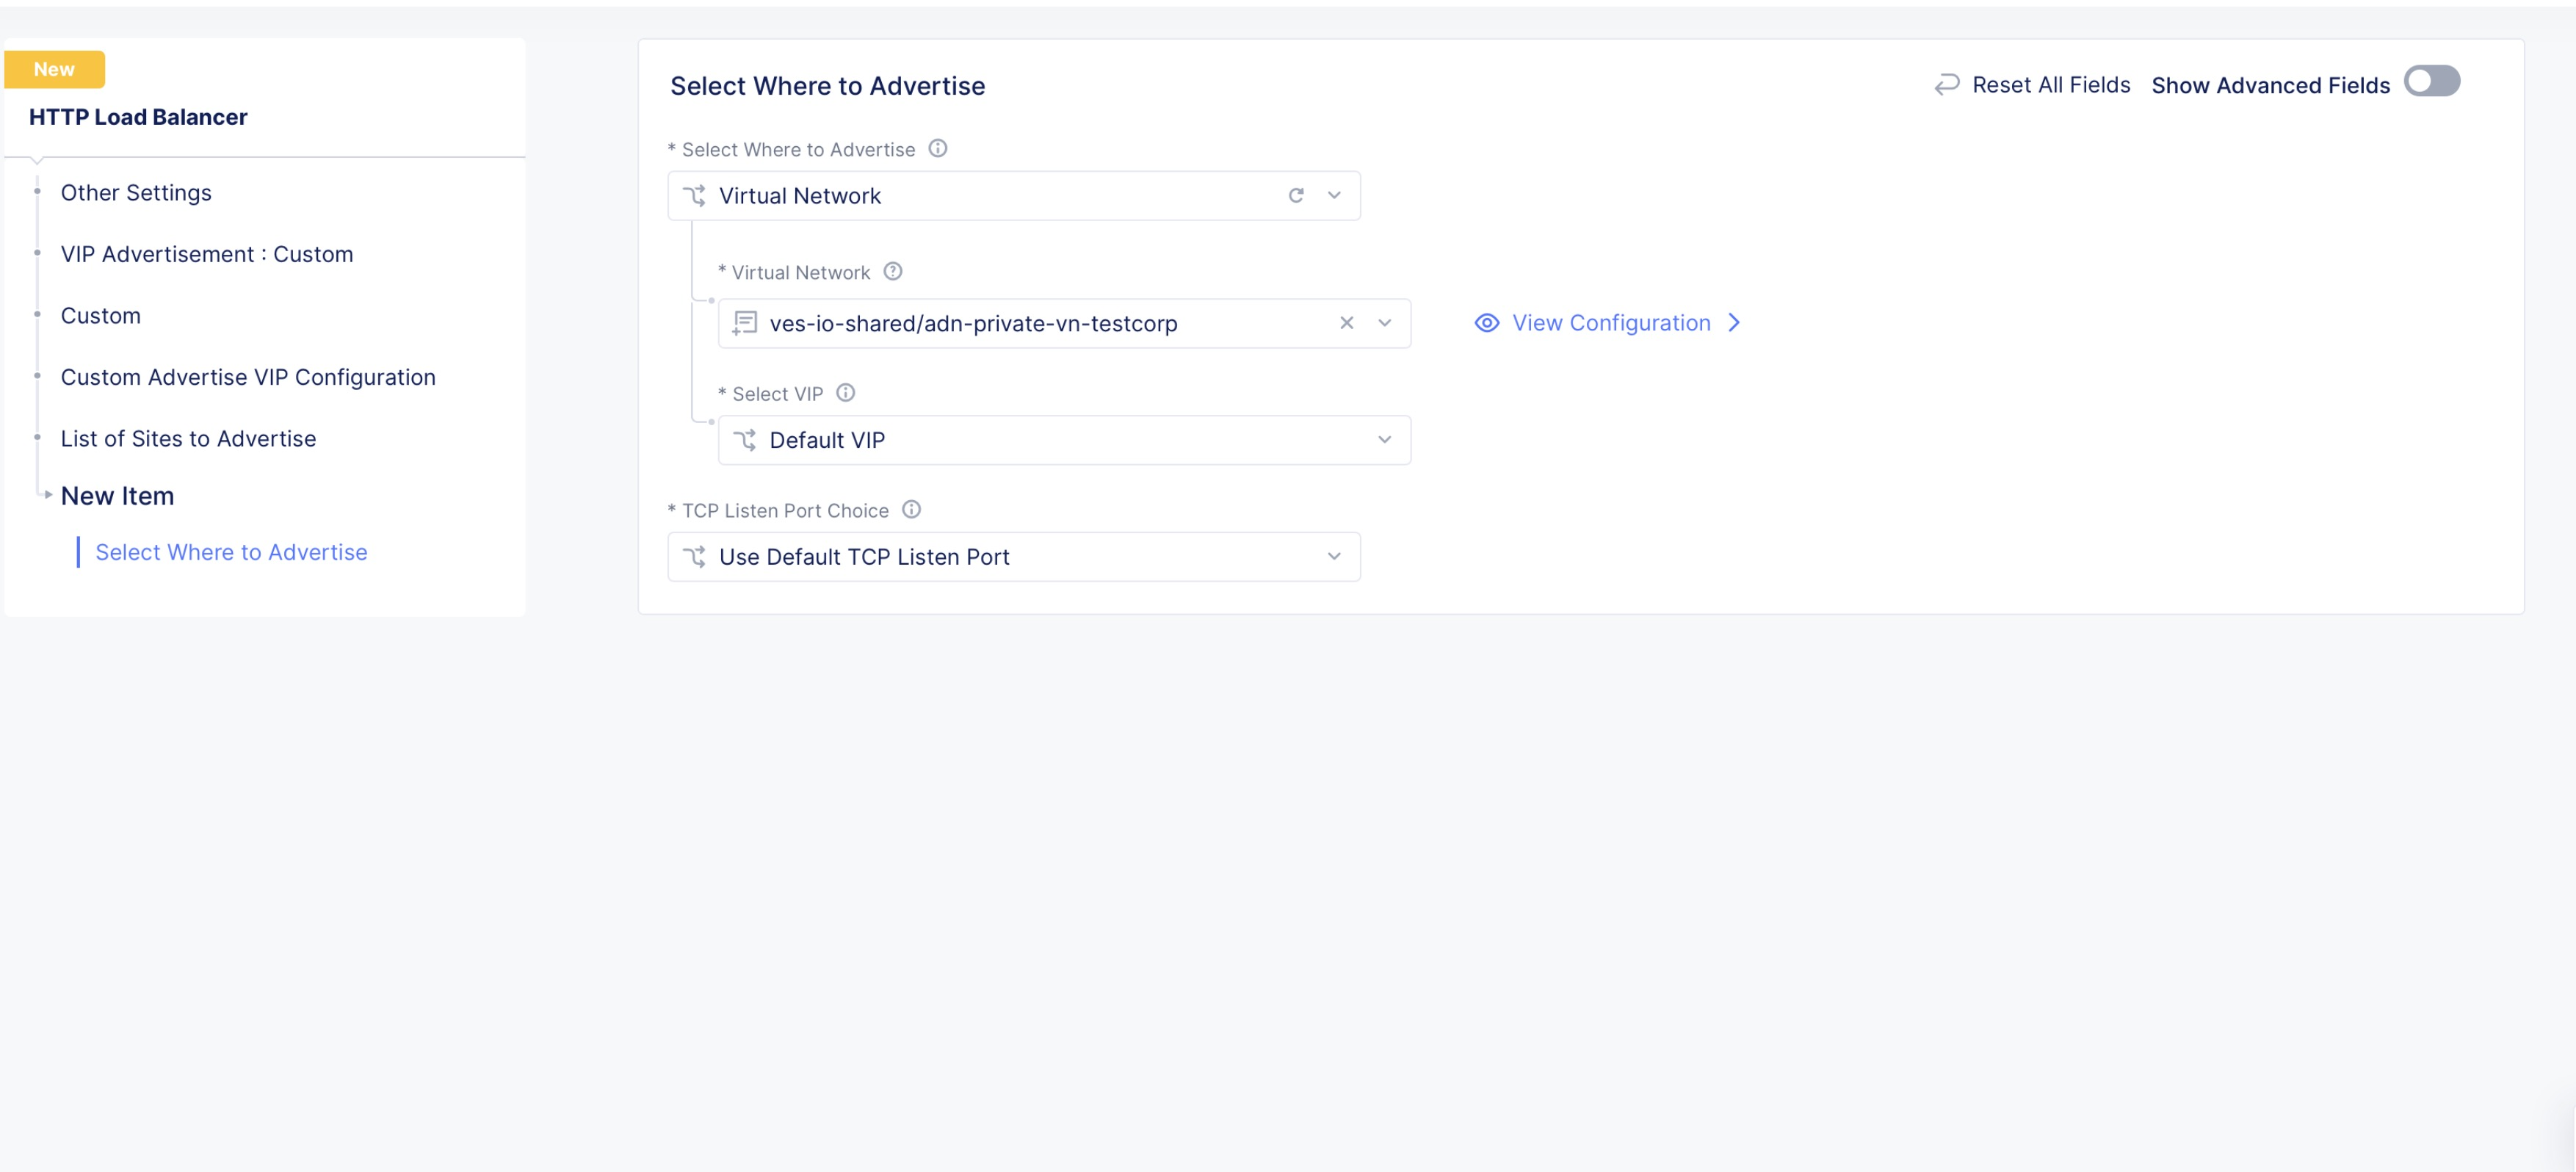
Select Where to Advertisedrop-down menu optionVirtual Network. -
Click
Virtual Networkdrop-down, select Private Network object from displayed list of network objects. -
Click
Applyto return toList of Sites to Advertisesection. -
Click
Applyto return to theOther Settingssection.

Figure: Advertising on the Private Network
Note: The option
Default VIPis set by default for theSelect VIPoption and the default VIP is used as a listener IP.
Step 3: Complete creating the load balancer.
In the load balancer configuration page, click Save and Exit button.
Configure Service Discovery on Private Link
Perform the following to discover services on the Private Link:
Note: This step only shows configuration of where the discovery is valid. For full set of service discovery creation instructions, see Service Discovery - K8s guide for K8s discovery. See Service Discovery - Consul guide for consul discovery.
Step 1: Log into Console and start creating service discovery.
-
Go to
Multi-Cloud Network Connectservice. -
Select
Manage>Service Discoveryand clickAdd discovery. -
Enter a name for the discovery object in the metadata section.
Step 2: Set that discovery is visible on the Private Network.
-
Navigate to the
Wheresection and enable theShow Advanced Fieldsoption. -
Select
Virtual Networkfor theVirtual-Site or Site or Networkfield. -
Click on the
Referencefield and select the Private Network object from the displayed list.
Step 3: Complete creating the service discovery object.
-
Perform the configuration for the discovery method as per the instructions in the Service Discovery - K8s guide and Service Discovery - Consul guide for K8s discovery and Consul discovery, respectively.
-
Click
Save and Exit.
Configure Origin Server over Private Link
Perform the following to configure origin server on the Private Link:
Note: This step only shows origin server configuration part of origin pool. For full set of origin pool creation instructions, see the Origin Pools guide.
Step 1: Log into Console and start creating origin pool.
-
Go to
Multi-Cloud App Connectservice. Select your namespace from the drop-down menu to change to it. -
Select
Manage>Load Balancers>Origin Poolsand clickAdd Origin Pool. -
Enter a name for the origin pool in the
Metadatasection.
Step 2: Specify the origin server IP address or DNS name reachable over the Private Network.
-
Navigate to the
Basic Configurationsection, clickAdd itemin theOrigin Serversfield. -
Select one of the following options for the
Select Type of Origin Serverfield:-
Select
IP address on Virtual Networkand enter the IP address of origin server in theIPfield. Click onVirtual Networkfield and select the Private Network from the displayed list of network objects. -
Select
Name on Virtual Networkand enter DNS name of the origin server in theDNS Namefield. Click onVirtual Networkfield and select the Private Network from the displayed list of network objects.
-
Note: Ensure that origin servers are running so that the endpoint discovery will be successful while attempting to use the origin pools.
Step 3: Complete creating the origin pool object.
-
Perform configuration for the rest of origin pool sections per your requirements. See the Origin Pools guide for more information.
-
Select
Save and Exitbutton.