Resize CE Site
Objective
This document provides instructions on how to resize an F5 Distributed Cloud Customer Edge (CE) across all supported site types (such as Secure Mesh v2, Secure Mesh v1, AWS VPC, AWS TGW, Azure VNet, GCP VPC) and Service Providers (on-premises providers such as VMware, KVM, Nutanix, and OpenStack; public cloud providers such as AWS, Azure, and GCP)
Planning
Read the following documents before resizing this in any environment:
General Prerequisites
-
An F5 Distributed Cloud Services Account is required. If you do not have an account, see Getting Started with Console.
-
Resources required per node: Minimum 8 vCPUs, 32 GB RAM, and 80 GB disk storage. For a full listing of the resources required, see the Customer Edge Site Sizing Reference guide. All the nodes in a given CE Site should have the same resources regarding the compute, memory, and disk storage. When deploying in cloud environments, these nodes should use the same instance flavor.
-
Internet Control Message Protocol (ICMP) needs to be opened between the CE nodes on the Site Local Outside (SLO) interfaces. This is needed to ensure intra-cluster communication checks.
-
Ensure that the CE site is running on the latest software version. If the CE site is not on the latest software version, ensure that you upgrade to the latest version before you start resizing the site.
-
There will be an impact on the application traffic during this procedure. Therefore, it is recommended that you resize your CE Site nodes during a maintenance window.
-
Ensure that you do not modify any other settings in the Cloud Service Providers (such as AWS VPC/TGW Sites and Azure VNET Sites) in conjunction with instance type updates on the F5 Distributed Cloud Console.
-
For more information regarding sites, see Site Management.
Validate Customer Edge (CE) Site is Online | Healthy
Ensure that your CE site meets the following requirements on the F5 Distributed Cloud Console, before you start resizing the nodes:
- Ensure that the site is online, and at 100% health.

Figure: CE Site Health
- Ensure that the site has connectivity to an RE (Regional Edge).

Figure: CE Site Connected
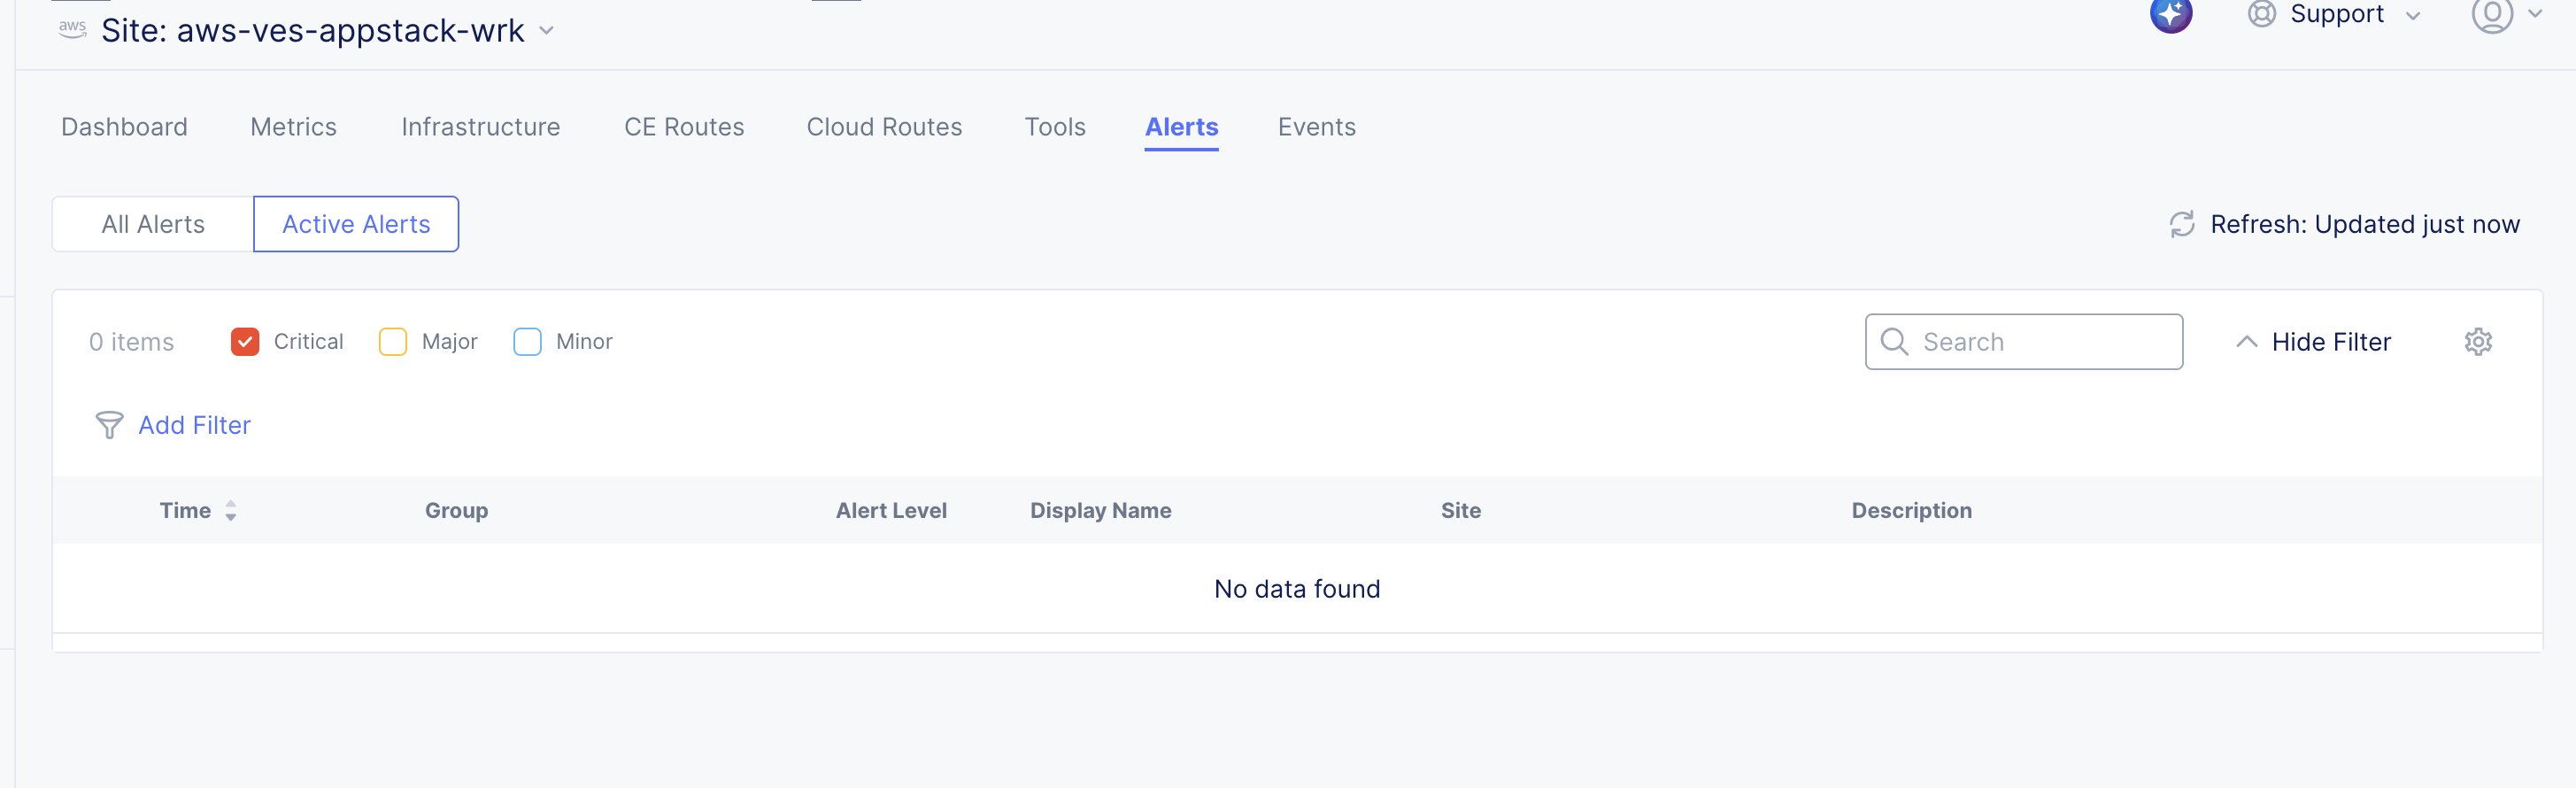
- Ensure that the site has no critical alerts in the Alerts tab.

Figure: CE Site Alerts
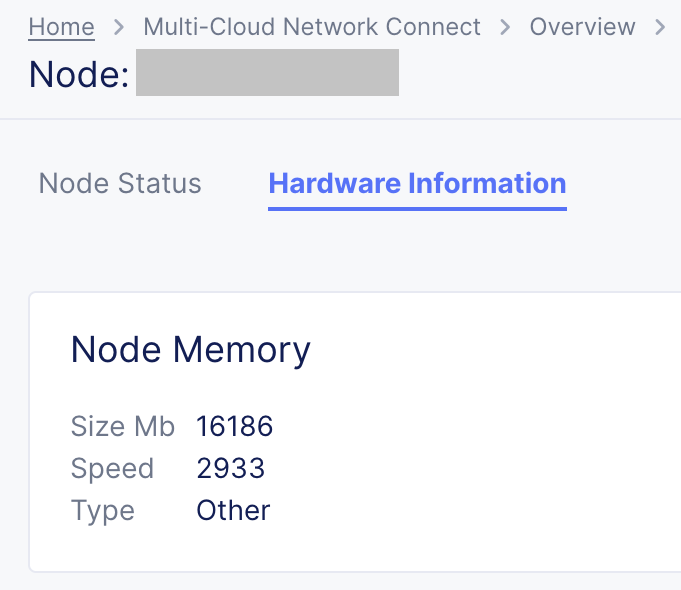
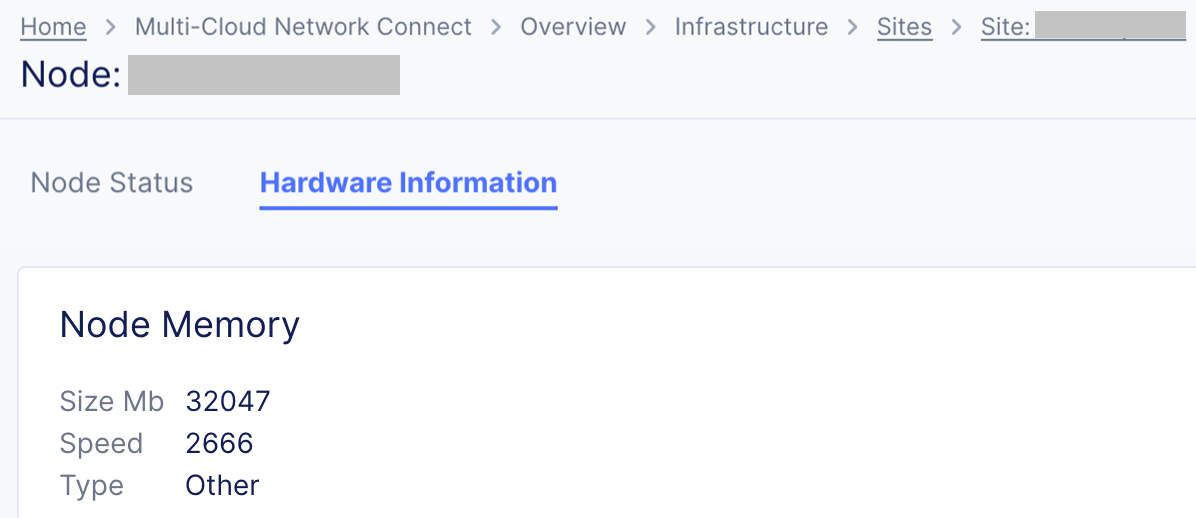
- Check the Hardware Information of the site for the current Node Memory and Node CPU statistics.

Figure: CE Site Hardware Information - Node Memory

Figure: CE Site Hardware Information - Node CPU


Introduction
Currently, there are multiple site workflows that have been used to deploy customer edge (CE) sites. The site types are as follows:
- Secure Mesh Site v2
- Secure Mesh Site v1
- AWS VPC Site
- AWS TGW Site
- Azure VNet Site
- GCP VPC Site
Additionally, both Secure Mesh Site v2 and Secure Mesh Site v1 sites have multiple supported service providers. This document provides information about each of these site types and provides step-by-step instructions to follow for resizing the CE nodes.
Secure Mesh Site v2
Secure Mesh Site v2 is a simplified workflow for deploying Customer Edge (CE) Sites across different providers, both on-premises and in public clouds. This is the recommended workflow for all CE deployments.
Determine the Site Type
In the Multi-Cloud Network Connect workspace, navigate to Manage > Site Management > Secure Mesh Sites v2.
This page displays a list of the Secure Mesh Site v2 sites deployed in the tenant.
On-premises Providers
Here are the steps to follow for resizing CE sites of on-premises providers such as VMware, KVM, OpenStack, and Nutanix:
-
Shutdown one node of the Customer Edge (CE) site at a time.
-
Update the node resources to medium (8 vCPU and 32 GB) or large (16 vCPU and 64 GB). See Update Node Resources for the steps to follow for each Service Provider.
-
Reboot the node and wait for the node to be fully up and running.
-
Verify that the node is reporting the updated infrastructure resources. See Verify Resized Site Resources for the steps to follow.
-
Repeat steps 1 through 4 for all the remaining nodes in the site.
Notes:
- The Service resources are updated only after all the nodes of the CE Site are resized, which may take up to an hour. To track updates during the resize process, refer Check Instance Update Status.
- There will be an impact on the application traffic during this procedure. Therefore, it is recommended that you resize your CE Site nodes during a maintenance window.
Cloud Service Providers
Here are the steps to follow for resizing CE sites of cloud service providers such as AWS, Azure, GCP and OCI:
-
Shutdown one Customer Edge (CE) node at a time.
-
Update the instance type to medium (8 vCPU and 32 GB) or large (16 vCPU and 64 GB) through the cloud provider console. Refer to this Customer Edge Site Sizing Reference Guide to select the right instance type. See Update Instance Type for the steps to follow for each Service Provider.
-
Reboot the node and wait for the node to be fully up and running.
-
Verify that the node is reporting the updated infrastructure resources. See Verify Resized Site Resources for the steps to follow.
-
Repeat steps 1 through 4 for all the remaining nodes in the site.
Notes:
- The Service resources are updated only after all the nodes of the CE Site are resized, which may take up to an hour. To track updates during the resize process, refer Check Instance Update Status.
- There will be an impact on the application traffic during this procedure. Therefore, it is recommended that you resize your CE Site nodes during a maintenance window.
Legacy Site Configurations
Secure Mesh Site v1
Secure Mesh Site v1 is the legacy workflow for deploying Customer Edge (CE) Sites across different providers, both on-premises and in public clouds.
Determine the Site Type
In the Multi-Cloud Network Connect workspace, navigate to Manage > Site Management > Secure Mesh Sites (Legacy Configurations).
This page displays a list of the Secure Mesh Site v1 sites deployed in the tenant.
On-premises Providers
Here are the steps to follow for resizing CE sites of on-premises providers such as VMware and KVM:
-
Shutdown one node of the Customer Edge (CE) site at a time.
-
Update the node resources to medium (8 vCPU and 32 GB) or large (16 vCPU and 64 GB). See Update Node Resources for the steps to follow for each Service Provider.
-
Reboot the node and wait for the node to be fully up and running.
-
Verify that the node is reporting the updated infrastructure resources. See Verify Resized Site Resources for the steps to follow.
-
Repeat steps 1 through 4 for all the remaining nodes in the site.
Notes:
- The Service resources are updated only after all the nodes of the CE Site are resized, which may take up to an hour. To track updates during the resize process, refer Check Instance Update Status.
- There will be an impact on the application traffic during this procedure. Therefore, it is recommended that you resize your CE Site nodes during a maintenance window.
Cloud Service Providers
Here are the steps to follow for resizing CE sites of cloud service providers such as AWS, Azure, and GCP:
-
Shutdown one Customer Edge (CE) node at a time.
-
Update the instance type to medium (8 vCPU and 32 GB) or large (16 vCPU and 64 GB) through the cloud provider console. Refer to this Customer Edge Site Sizing Reference Guide to select the right instance type. See Update Instance Type for the steps to follow for each Service Provider.
-
Reboot the node and wait for the node to be fully up and running.
-
Verify that the node is reporting the updated infrastructure resources. See Verify Resized Site Resources for the steps to follow.
-
Repeat steps 1 through 4 for all the remaining nodes in the site.
Notes:
- The Service resources are updated only after all the nodes of the CE Site are resized, which may take up to an hour. To track updates during the resize process, refer Check Instance Update Status.
- There will be an impact on the application traffic during this procedure. Therefore, it is recommended that you resize your CE Site nodes during a maintenance window.
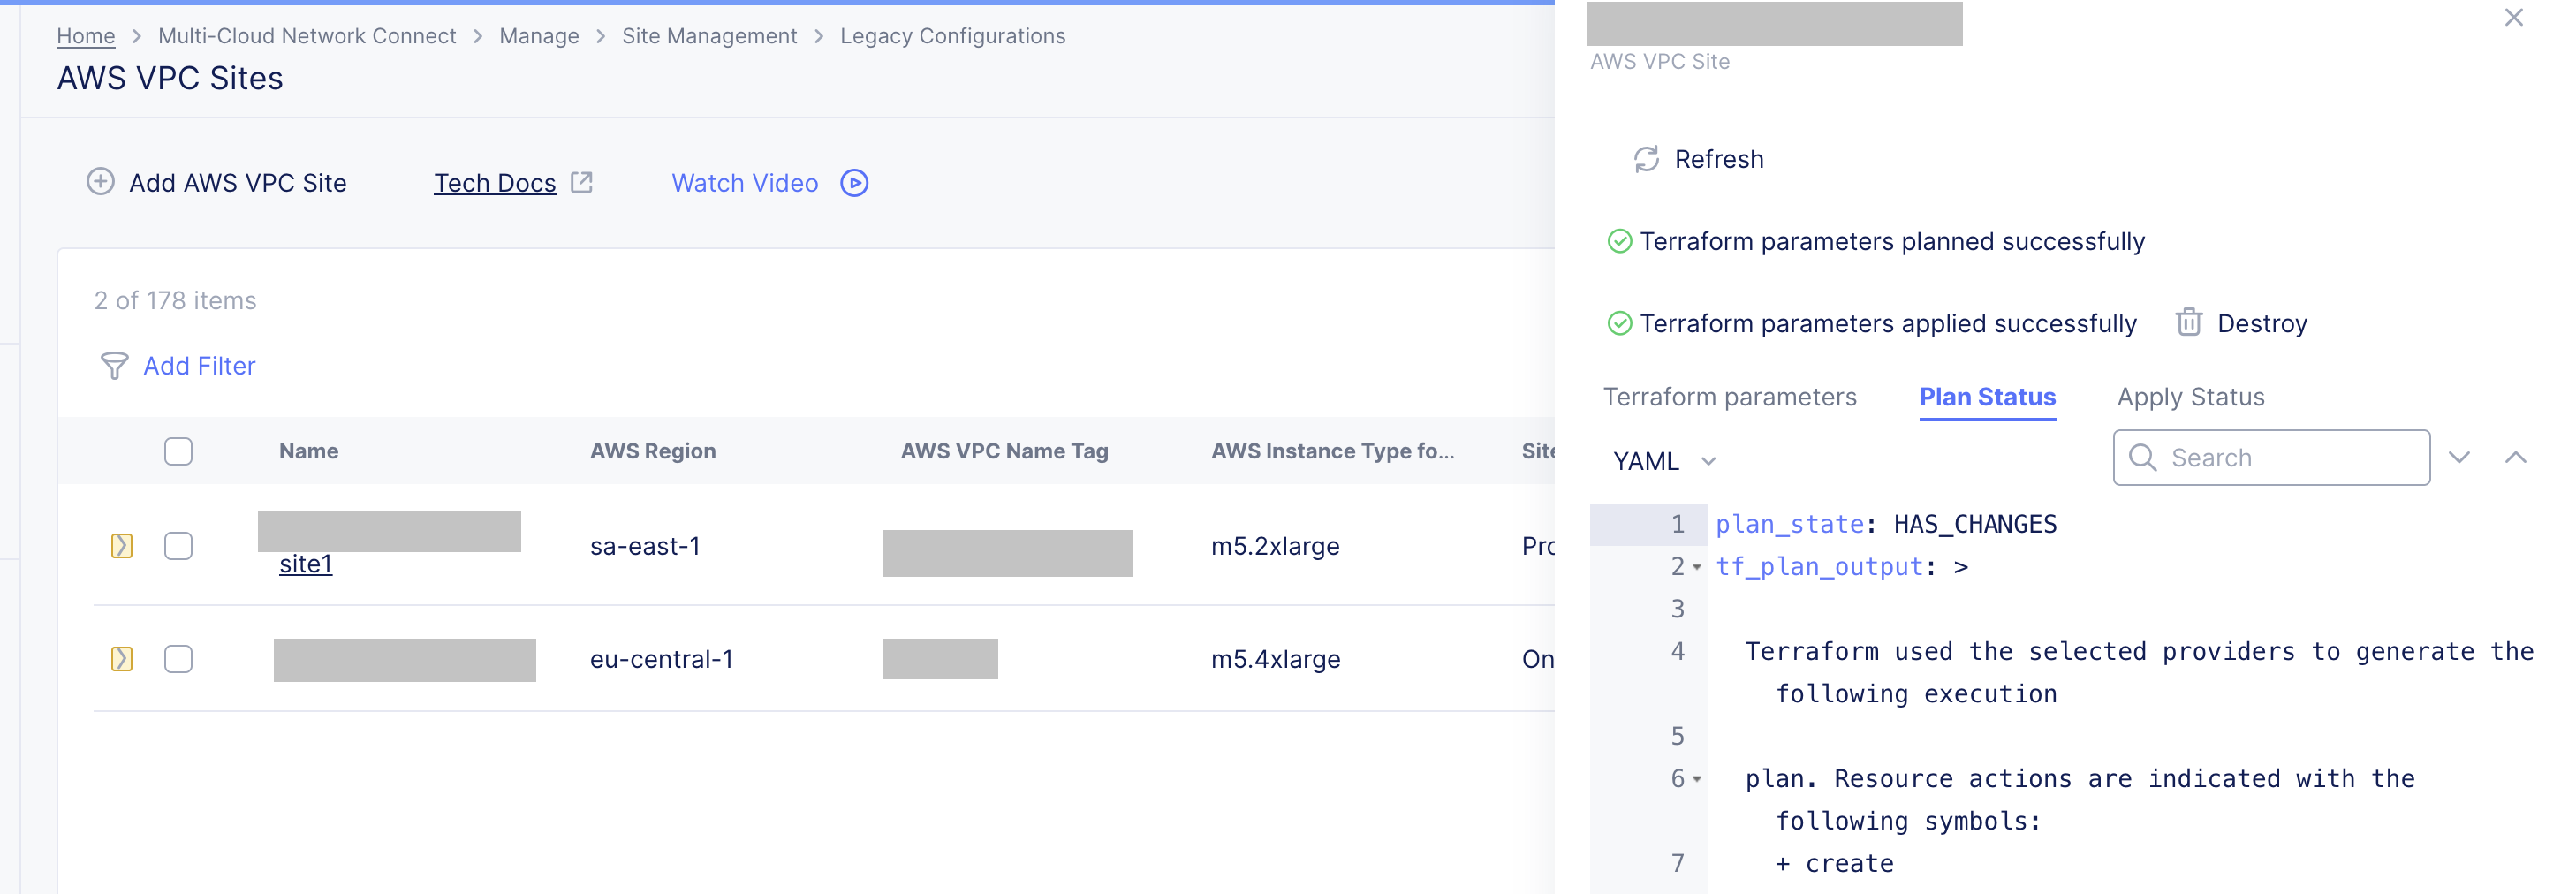
AWS VPC Site
- Navigate to the AWS VPC Sites page on the F5 Distributed Cloud console.
- From the Actions column of the site that you want to update, select Manage Configuration.

Figure: Site Management - AWS VPC Sites
- In the Site Configuration page, click Edit Configuration.

Figure: AWS VPC Site - Configuration
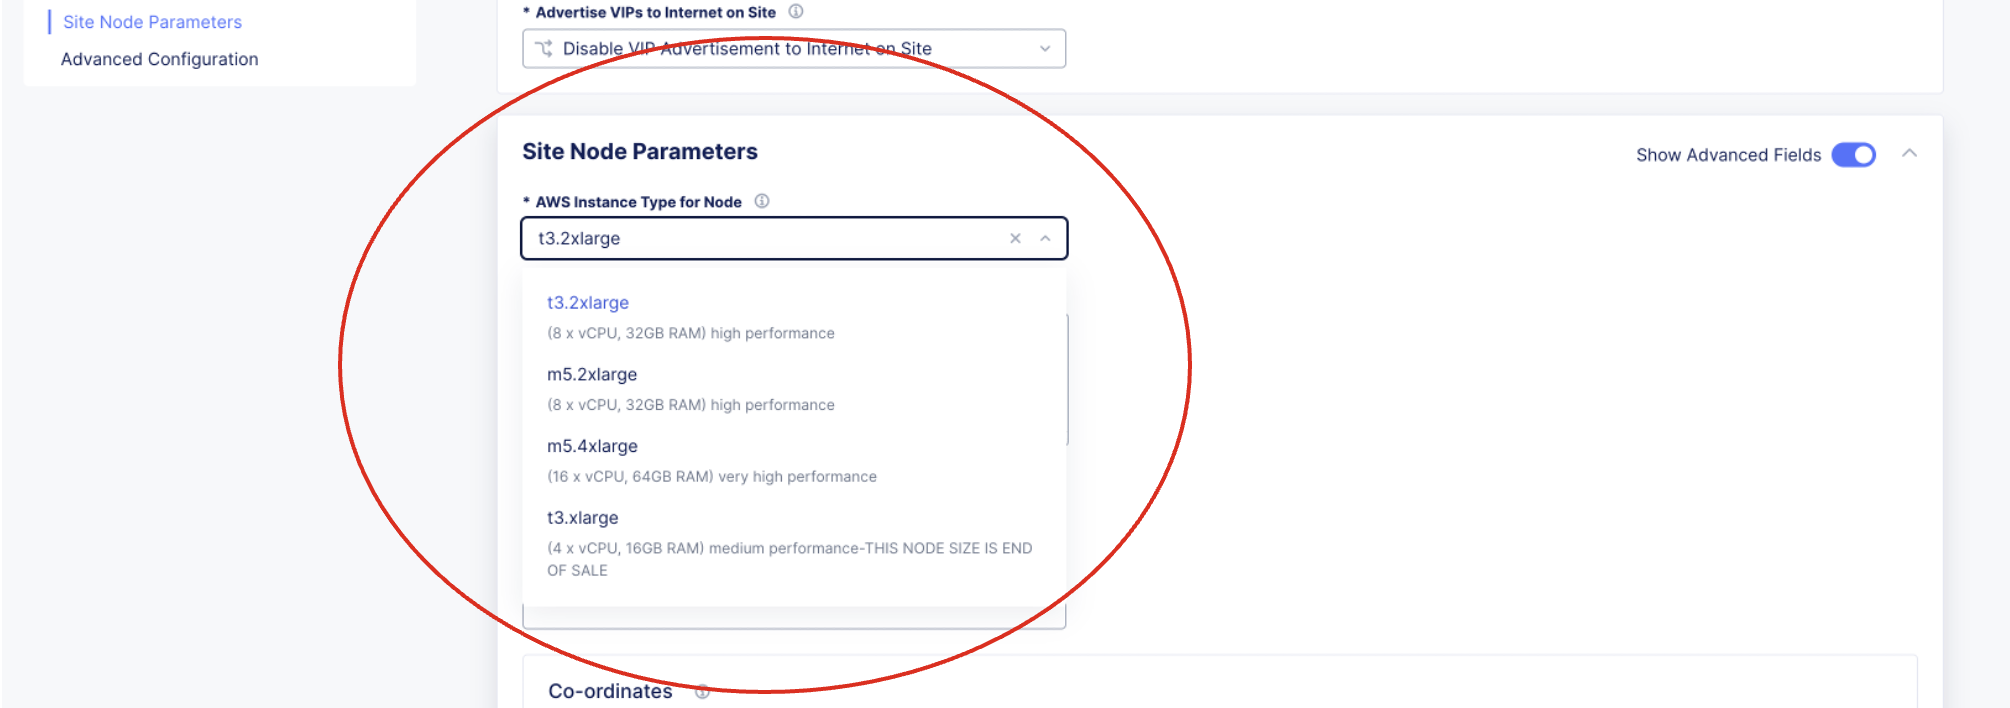
- Navigate to the Site Node Parameters section, and update the AWS Instance Type for the Node field to the desired flavor.

Figure: AWS VPC Site - Configuration
- Save the configuration.
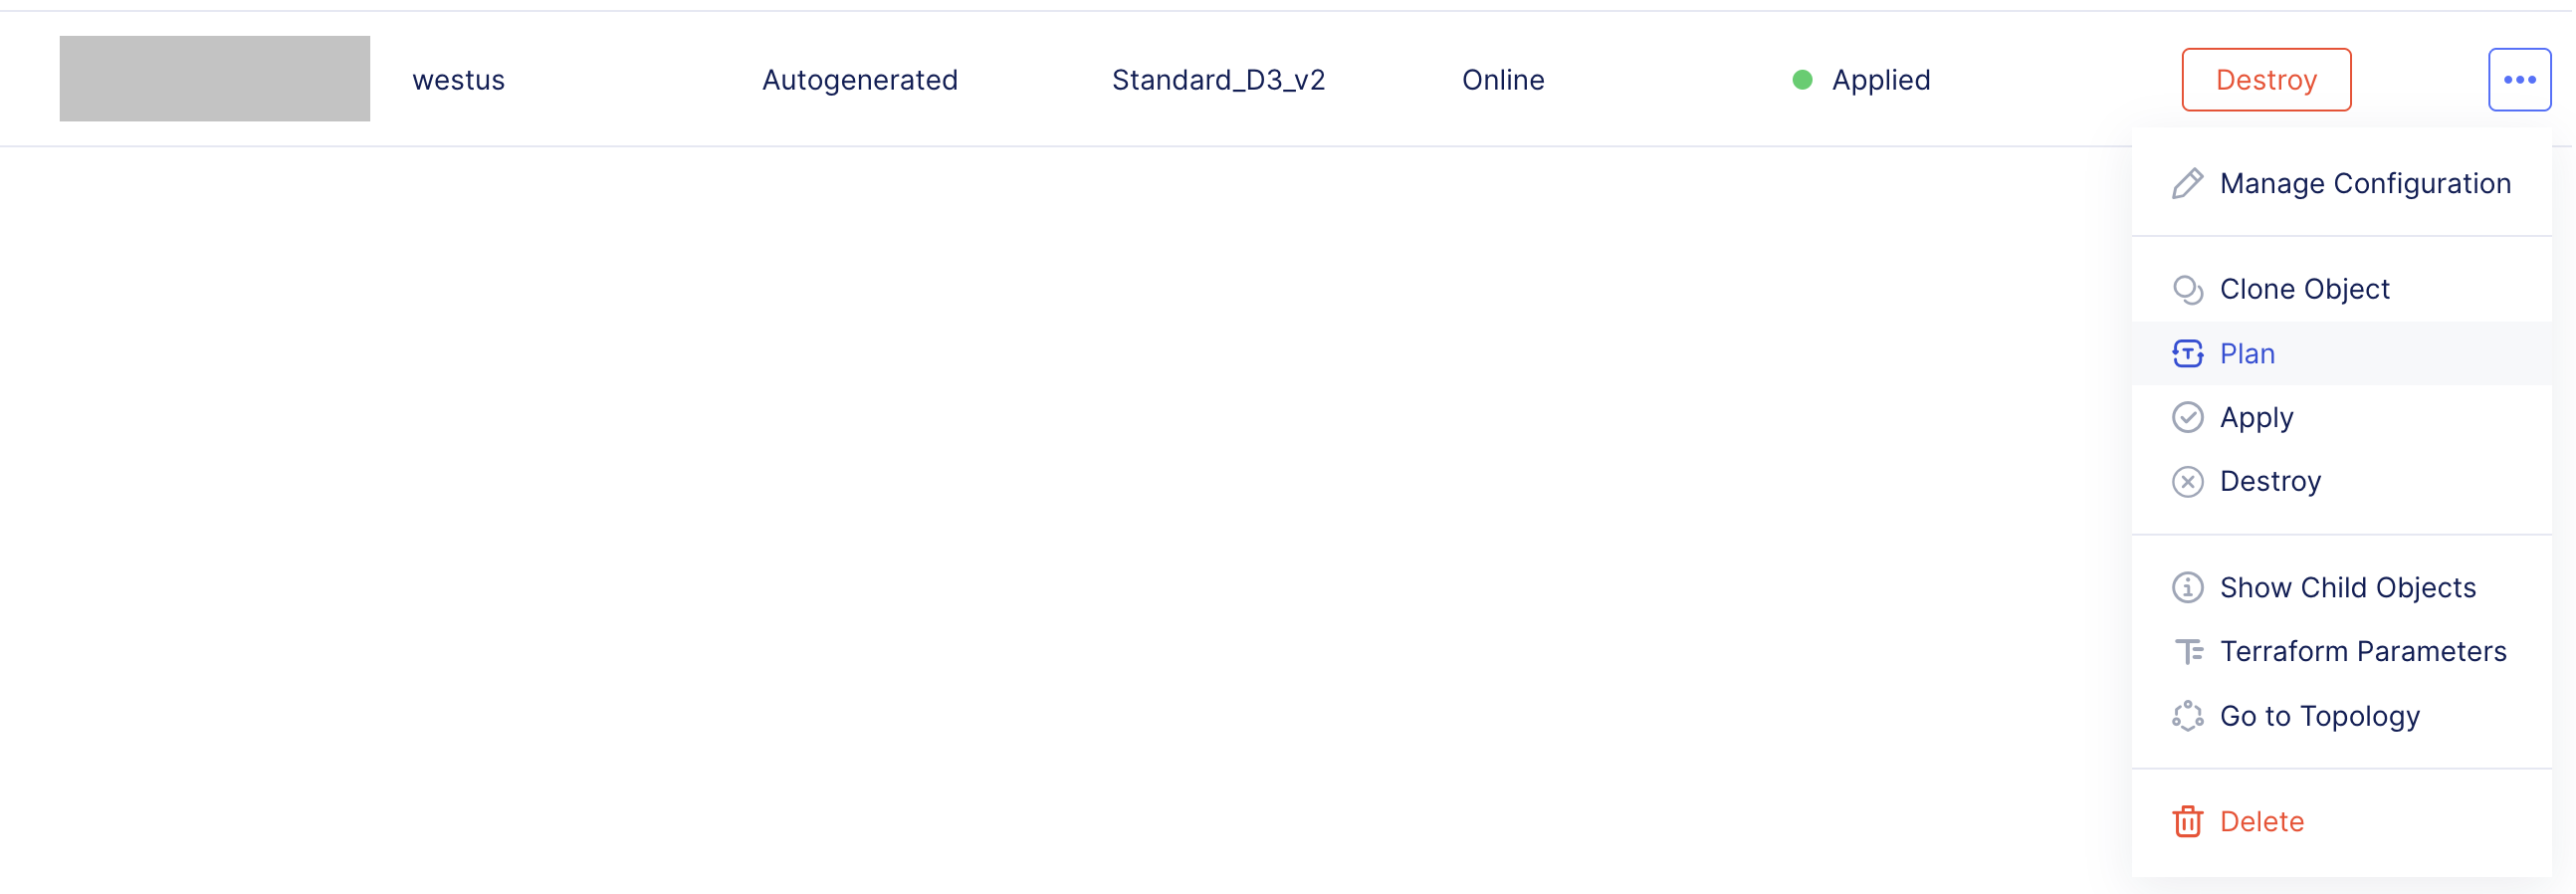
- From the Actions column of the site that you updated, click
...> Plan to start the action of Terraform plan.
Figure: AWS VPC Site - Plan Action
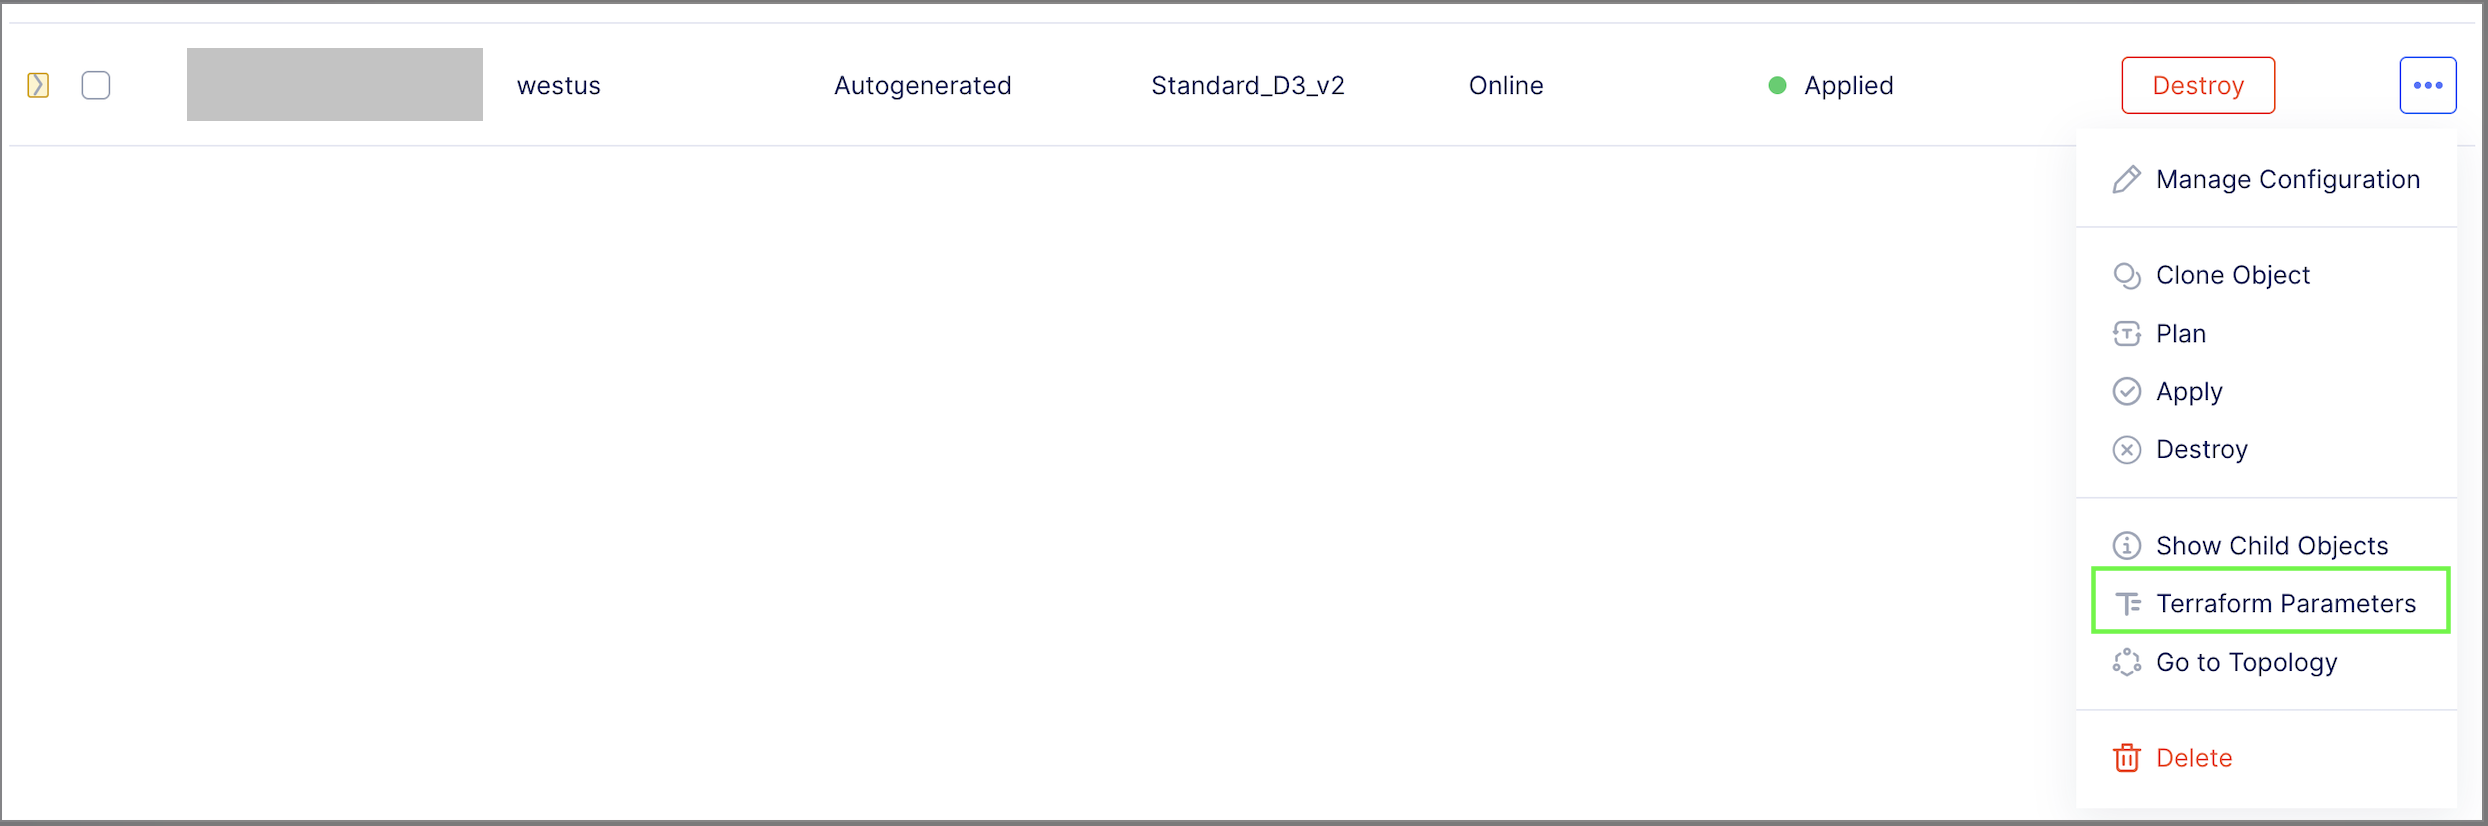
- Click
...> Terraform Parameters for the site object, and select the Plan Status tab to review the output.
Figure: AWS VPC Site - Terraform Parameters Action

Figure: AWS VPC Site - Terraform Parameters > Plan Status
- Click
...> Apply.
Figure: AWS VPC Site - Apply Action
- Click
...> Terraform Parameters for the site object, and select the Apply Status tab to verify the status for the apply action.Figure: AWS VPC Site - Terraform Parameters Action

Figure: AWS VPC Site - Terraform Parameters > Apply Status
- Verify that the node is reporting the updated infrastructure resources. See Verify Resized Site Resources for the steps to follow.


Notes:
- Ensure that you do not make modifications other than instance type during the resizing.
- If you make any modifications to these instances directly in the cloud provider console (resources not managed by the F5 Distributed Cloud Console), the modifications will be removed during reconciliation. You can view a detailed summary of all the changes that will be applied in the plan output.
- If the site contains worker nodes, resizing will not be allowed until the number of worker nodes are scaled down to zero. After the worker nodes count is brought down to zero, you can follow the mentioned steps for resizing. For information on scaling down worker nodes, refer Scaling Worker Nodes.
- There will be an impact on the application traffic during this procedure. Therefore, it is recommended that you resize your CE Site nodes during a maintenance window.
- Ignore any updates reported as null_resources, volterra_set_cloud_site_info, aws_autoscaling_group, aws_launch_template, and aws_launch_configuration.
Scaling Worker Nodes in AWS VPC Site
Follow these steps to scale down the worker nodes to zero on an AWS VPC Site:
- Navigate to the AWS VPC Sites page on the F5 Distributed Cloud console.
- From the Actions column of the site that you want to update, select Manage Configuration.
Figure: Site Management - AWS VPC Sites
- In the Site Configuration page, click Edit Configuration.
Figure: AWS VPC Site - Configuration
- In the Desired Worker Nodes Selection field, select the No Worker Nodes option.

Figure: AWS VPC Site - Worker Node Selection
- Click Save AWS VPC SITE.
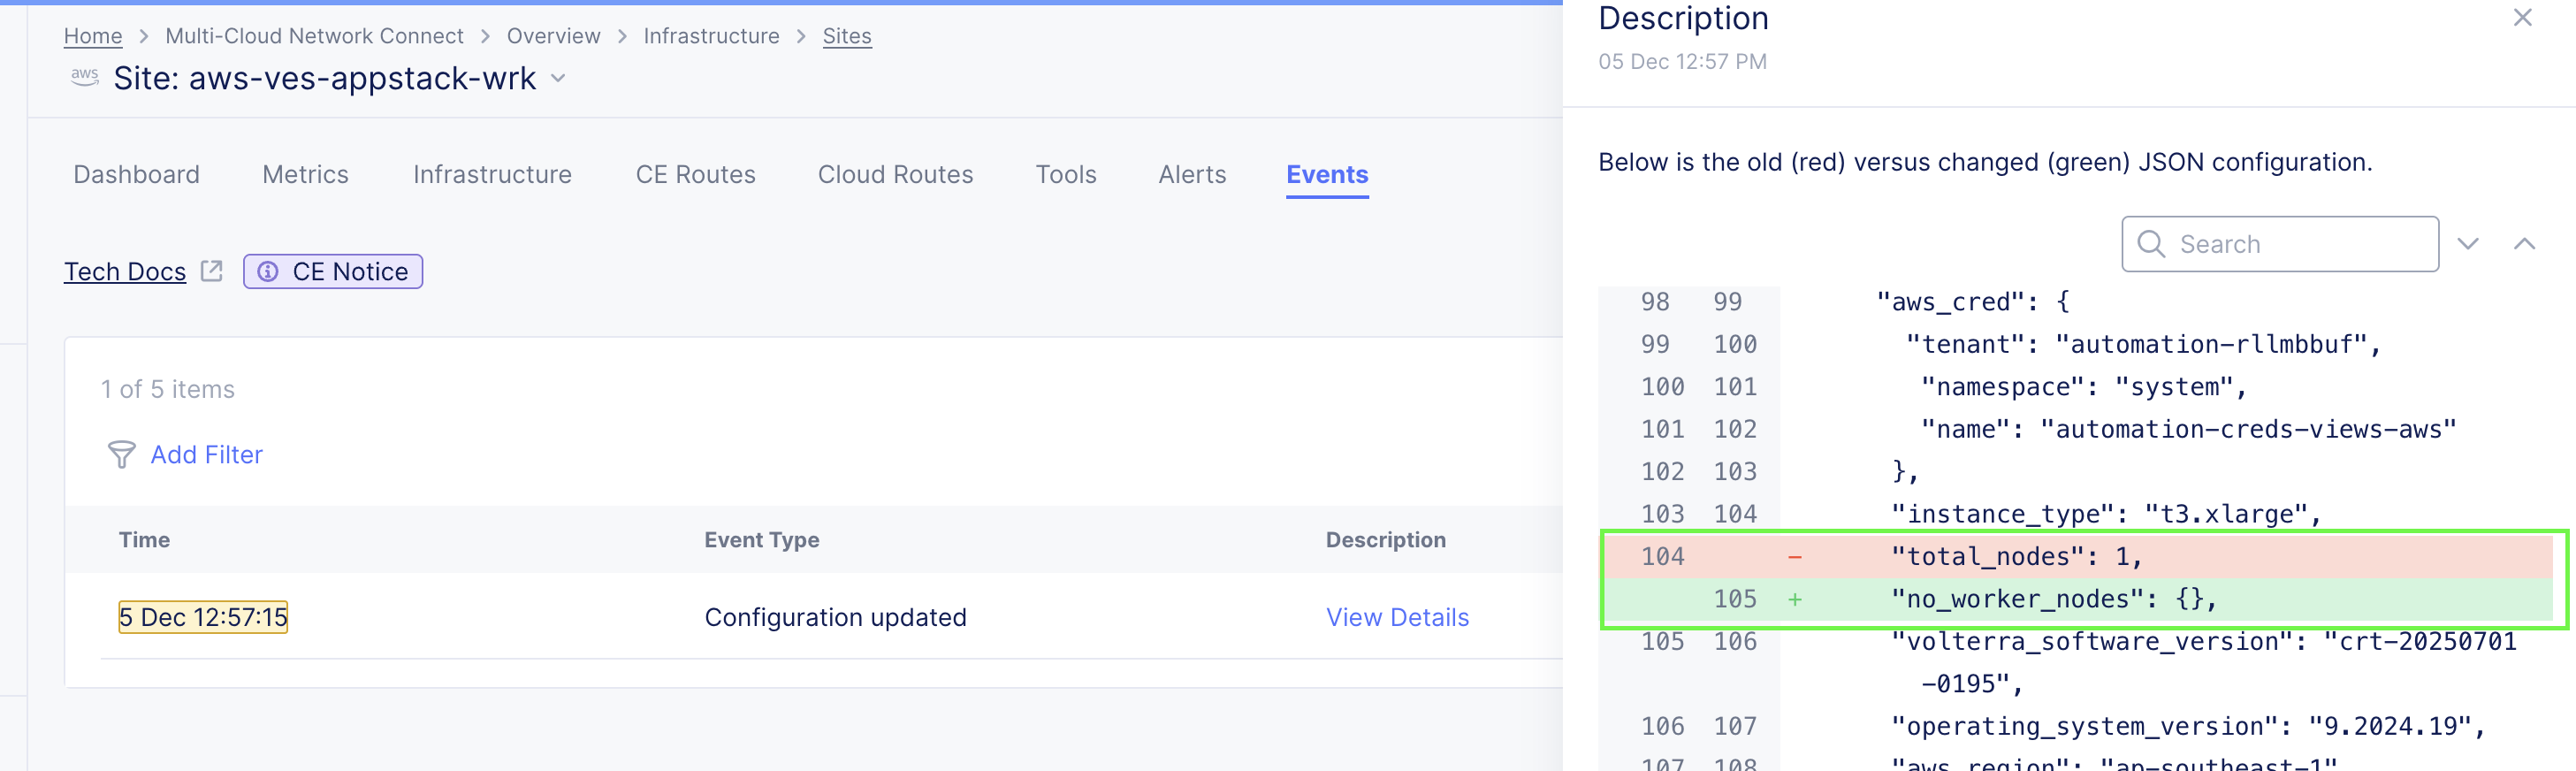
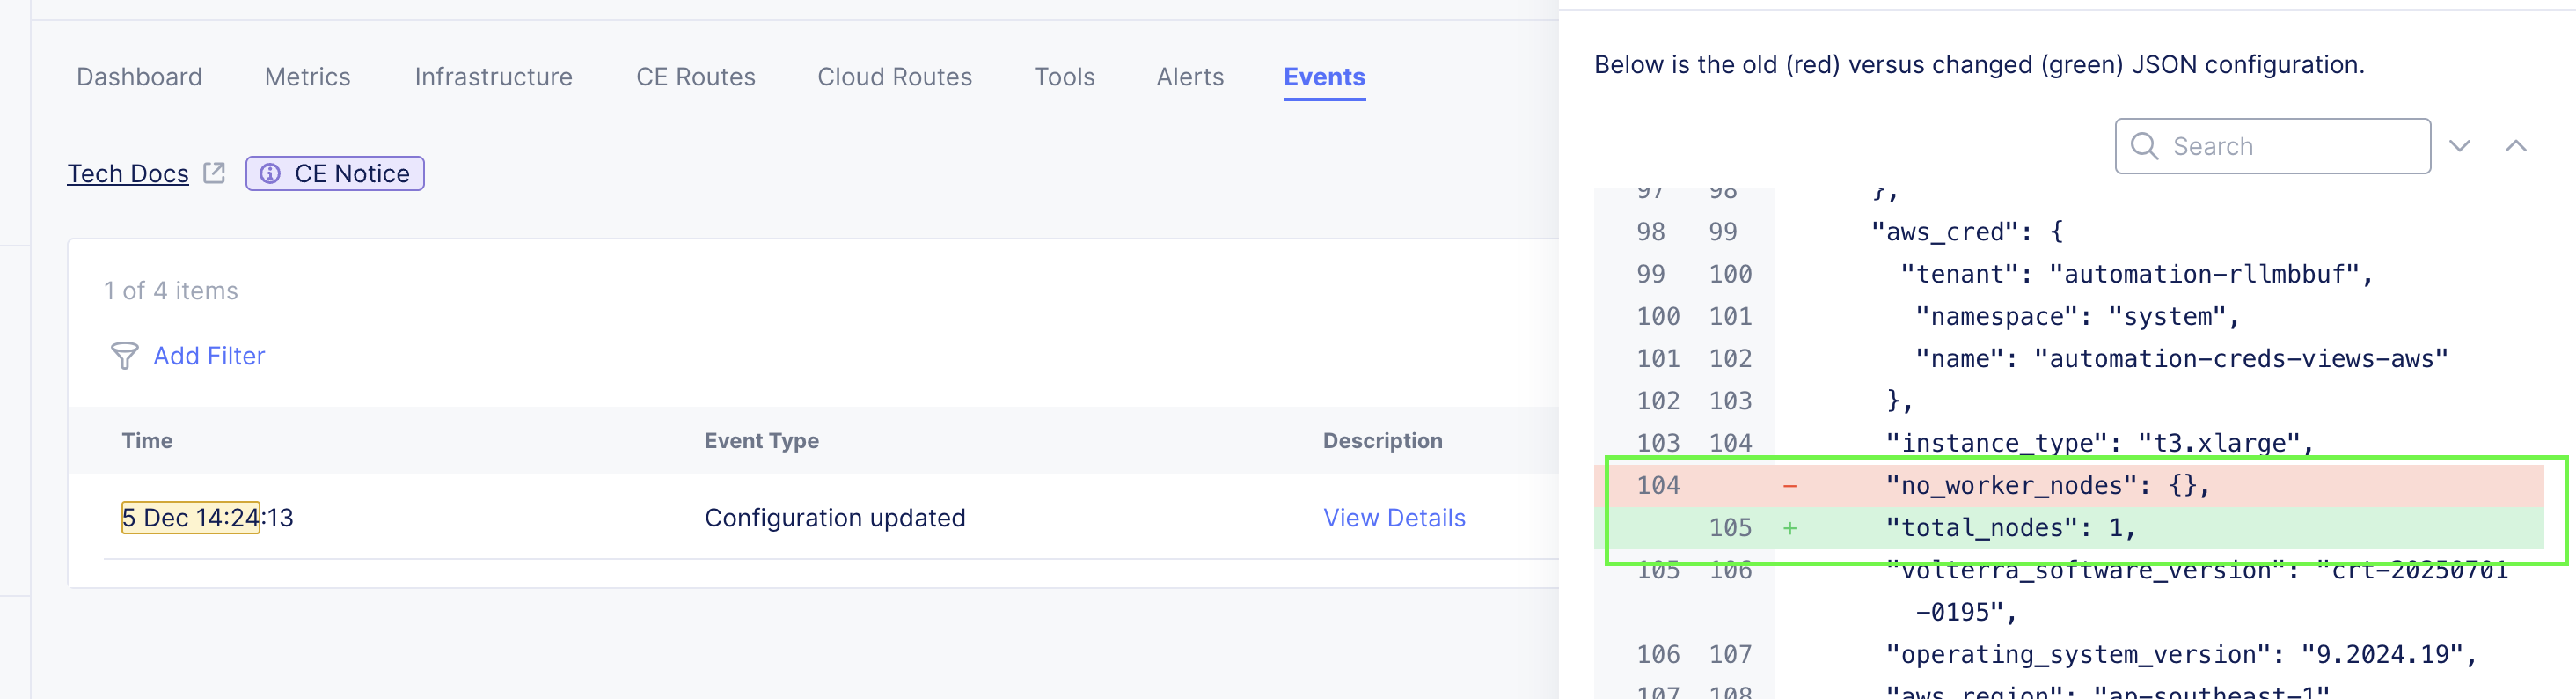
- Navigate to the Events tab to verify that the settings are updated, and the actions are triggered.
- To verify that the worker nodes are updated, click View Details for the Configuration updated and Node de-registered Events.

Figure: AWS VPC Site - Worker Node Event

Figure: AWS VPC Site - Worker Node Deregister
- Navigate to the Infrastructure tab and verify that there are no worker nodes listed.
- Navigate to the Dashboard Tab, and ensure that the site is online, and at 100% health.
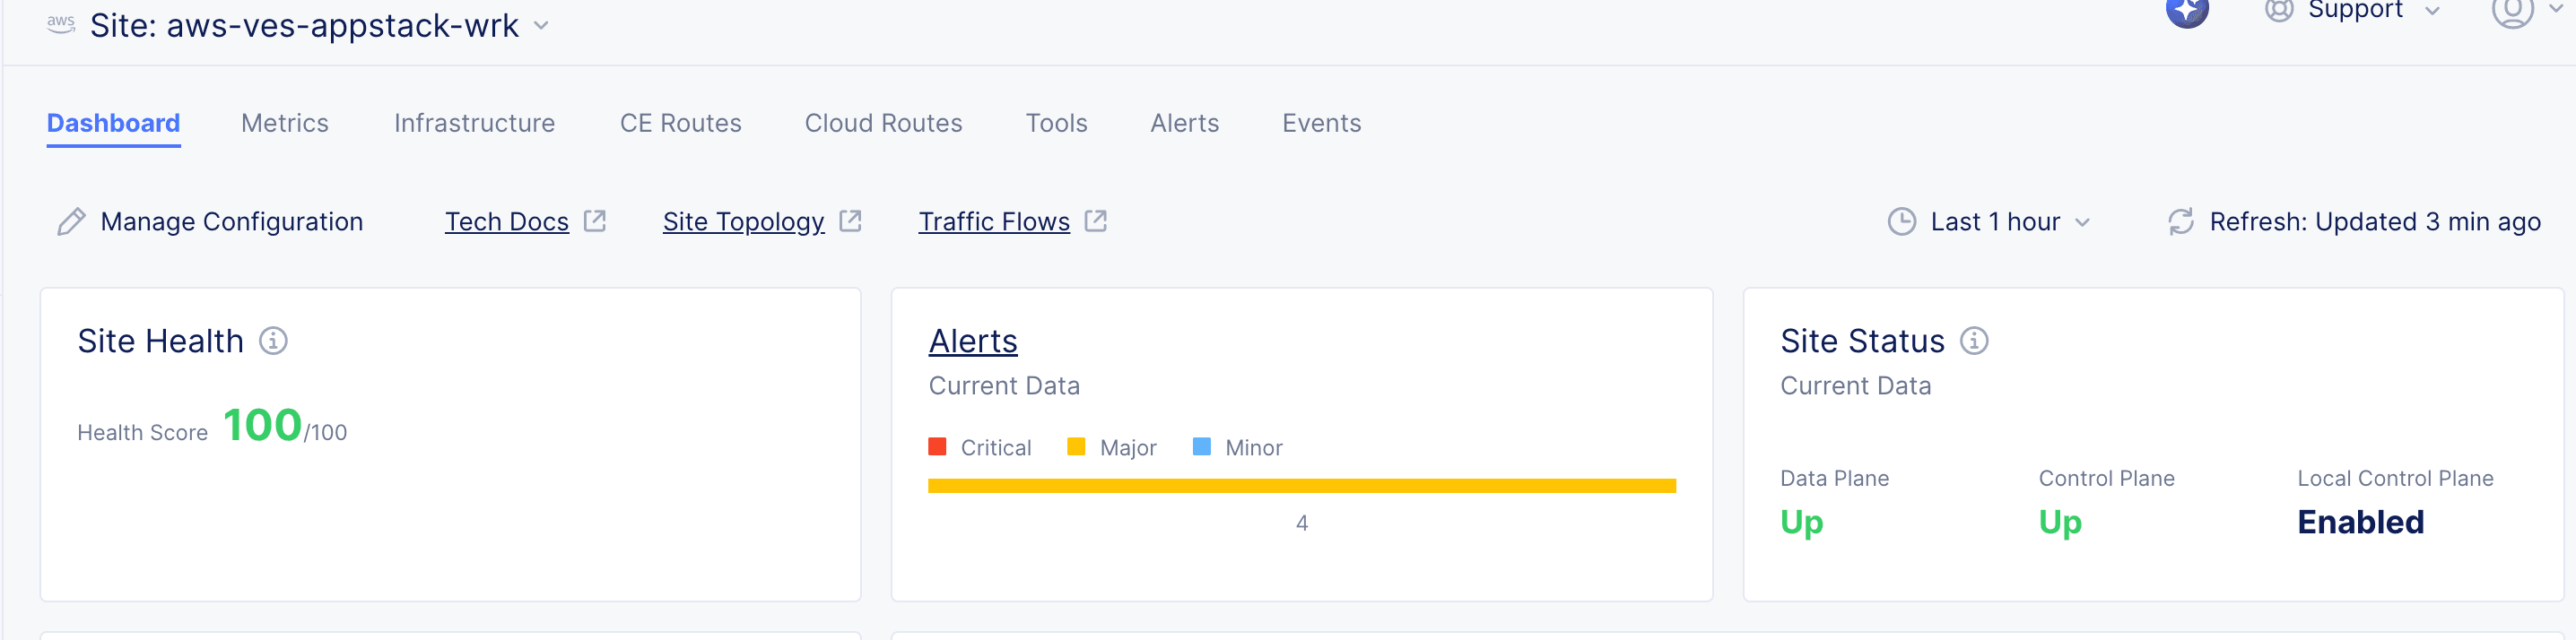
Figure: CE Site Health
- Navigate to the Alerts tab, and ensure that the site has no critical alerts.

Figure: CE Site Alerts
- Follow the steps to Resize the AWS VPC Site.
- To add the worker nodes to the site after resizing, follow these steps:
- From the Actions column of the site that you want to update, select Manage Configuration.
Figure: Site Management - AWS VPC Sites
- In the Site Configuration page, click Edit Configuration.
Figure: AWS VPC Site - Configuration
- In the Desired Worker Nodes Selection field, select the Total number of Worker Nodes for a Site option.
- In the Total number of Worker Nodes for a Site field, provide the value for the number of worker nodes you want to add.

Figure: AWS VPC Site - Worker Node Selection
- Click Save AWS VPC SITE.
- Navigate to the Events tab to verify that the settings are updated, and the actions are triggered.
- To verify that the worker nodes are updated, click View Details for the Configuration updated Event.
Figure: AWS VPC Site - Worker Node Event
- Navigate to the Infrastructure tab and verify that the worker nodes are listed, and are online.
- Navigate to the Dashboard Tab, and ensure that the site is online, and at 100% health.
Figure: CE Site Health
- Navigate to the Alerts tab, and ensure that the site has no critical alerts.
Figure: CE Site Alerts
- From the Actions column of the site that you want to update, select Manage Configuration.


Scaling Worker Nodes in AWS VPC Site
Follow these steps to scale down the worker nodes to zero on an AWS VPC Site:
- Navigate to the AWS VPC Sites page on the F5 Distributed Cloud console.
- From the Actions column of the site that you want to update, select Manage Configuration.
Figure: Site Management - AWS VPC Sites
- In the Site Configuration page, click Edit Configuration.
Figure: AWS VPC Site - Configuration
- In the Desired Worker Nodes Selection field, select the No Worker Nodes option.
Figure: AWS VPC Site - Worker Node Selection
- Click Save AWS VPC SITE.
- Navigate to the Events tab to verify that the settings are updated, and the actions are triggered.
- To verify that the worker nodes are updated, click View Details for the Configuration updated and Node de-registered Events.
Figure: AWS VPC Site - Worker Node Event
Figure: AWS VPC Site - Worker Node Deregister
- Navigate to the Infrastructure tab and verify that there are no worker nodes listed.
- Navigate to the Dashboard Tab, and ensure that the site is online, and at 100% health.
Figure: CE Site Health
- Navigate to the Alerts tab, and ensure that the site has no critical alerts.
Figure: CE Site Alerts
- Follow the steps to Resize the AWS VPC Site.
- To add the worker nodes to the site after resizing, follow these steps:
- From the Actions column of the site that you want to update, select Manage Configuration.
Figure: Site Management - AWS VPC Sites
- In the Site Configuration page, click Edit Configuration.
Figure: AWS VPC Site - Configuration
- In the Desired Worker Nodes Selection field, select the Total number of Worker Nodes for a Site option.
- In the Total number of Worker Nodes for a Site field, provide the value for the number of worker nodes you want to add.
Figure: AWS VPC Site - Worker Node Selection
- Click Save AWS VPC SITE.
- Navigate to the Events tab to verify that the settings are updated, and the actions are triggered.
- To verify that the worker nodes are updated, click View Details for the Configuration updated Event.
Figure: AWS VPC Site - Worker Node Event
- Navigate to the Infrastructure tab and verify that the worker nodes are listed, and are online.
- Navigate to the Dashboard Tab, and ensure that the site is online, and at 100% health.
Figure: CE Site Health
- Navigate to the Alerts tab, and ensure that the site has no critical alerts.
Figure: CE Site Alerts
- From the Actions column of the site that you want to update, select Manage Configuration.
AWS TGW Site
- Navigate to the AWS TGW Sites page on the F5 Distributed Cloud console.
- From the Actions column of the site that you want to update, select Manage Configuration.
- In the Site Configuration page, click Edit Configuration.
- Navigate to the Site Node Parameters section, and update the AWS Instance Type for the Node field to the desired flavor.
- Save the configuration.
- From the Actions column of the site that you updated, click
...> Plan to start the action of Terraform plan. - Click
...> Terraform Parameters for the site object, and select the Plan Status tab to review the output. - Click
...> Apply. - Click
...> Terraform Parameters for the site object, and select the Apply Status tab to verify the status for the apply action. - Verify that the node is reporting the updated infrastructure resources. See Verify Resized Site Resources for the steps to follow.
Notes:
- Ensure that you do not make modifications other than instance type during the resizing.
- If you make any modifications to these instances directly in the cloud provider console (resources not managed by the F5 Distributed Cloud Console), the modifications will be removed during reconciliation. You can view a detailed summary of all the changes that will be applied in the plan output.
- If the site contains worker nodes, resizing will not be allowed until the number of worker nodes are scaled down to zero. After the worker nodes count is brought down to zero, you can follow the mentioned steps for resizing. For information on scaling down worker nodes, refer Scaling Worker Nodes.
- There will be an impact on the application traffic during this procedure. Therefore, it is recommended that you resize your CE Site nodes during a maintenance window.
- Ignore any updates reported as null_resources, volterra_set_cloud_site_info, aws_autoscaling_group, aws_launch_template, aws_lb_target_group_attachment, and aws_launch_configuration. You can also ignore any resources that show the module.volterra_site.module.ce_worker.resource will be destroyed message, as these are specific to the worker nodes.
Scaling Worker Nodes in AWS TGW Site
Follow these steps to scale down the worker nodes to zero on an AWS TGW Site:
- Navigate to the AWS TGW Sites page on the F5 Distributed Cloud console.
- From the Actions column of the site that you want to update, select Manage Configuration.
Figure: Site Management - AWS TGW Sites
- In the Site Configuration page, click Edit Configuration.
Figure: AWS TGW Site - Configuration
- In the Desired Worker Nodes Selection field, select the No Worker Nodes option.
Figure: AWS TGW Site - Worker Node Selection
- Click Save AWS TGW SITE.
- Navigate to the Events tab to verify that the settings are updated, and the actions are triggered.
- To verify that the worker nodes are updated, click View Details for the Configuration updated and Node de-registered Events.
Figure: AWS TGW Site - Worker Node Event
Figure: AWS TGW Site - Worker Node Deregister
- From the Actions column of the site that you updated, click
...> Plan to start the action of Terraform plan. - Click
...> Terraform Parameters for the site object, and select the Plan Status tab to review the output. - Click
...> Apply. - Click
...> Terraform Parameters for the site object, and select the Apply Status tab to verify the status for the apply action. - Navigate to the Infrastructure tab and verify that there are no worker nodes listed.
- Navigate to the Dashboard Tab, and ensure that the site is online, and at 100% health.
Figure: CE Site Health
- Navigate to the Alerts tab, and ensure that the site has no critical alerts.
Figure: CE Site Alerts
- Follow the steps to Resize the AWS TGW Site.
- To add the worker nodes to the site after resizing, follow these steps:
- From the Actions column of the site that you want to update, select Manage Configuration.
Figure: Site Management - AWS TGW Sites
- In the Site Configuration page, click Edit Configuration.
Figure: AWS TGW Site - Configuration
- In the Desired Worker Nodes Selection field, select the Total number of Worker Nodes for a Site option.
- In the Total number of Worker Nodes for a Site field, provide the value for the number of worker nodes you want to add.
Figure: AWS TGW Site - Worker Node Selection
- Click Save AWS TGW SITE.
- Navigate to the Events tab to verify that the settings are updated, and the actions are triggered.
- To verify that the worker nodes are updated, click View Details for the Configuration updated Event.
Figure: AWS TGW Site - Worker Node Event
- From the Actions column of the site that you updated, click
...> Plan to start the action of Terraform plan.
- From the Actions column of the site that you want to update, select Manage Configuration.
- Click
...> Terraform Parameters for the site object, and select the Plan Status tab to review the output. - Click
...> Apply. - Click
...> Terraform Parameters for the site object, and select the Apply Status tab to verify the status for the apply action.- Navigate to the Infrastructure tab and verify that the worker nodes are listed, and are online.
- Navigate to the Dashboard Tab, and ensure that the site is online, and at 100% health.
Figure: CE Site Health
- Navigate to the Alerts tab, and ensure that the site has no critical alerts.
Figure: CE Site Alerts
Azure VNet Site
- Navigate to the Azure VNet Sites page on the F5 Distributed Cloud console.
- From the Actions column of the site that you want to update, select Manage Configuration.
- In the Site Configuration page, click Edit Configuration.
- Navigate to the Site Node Parameters section, and update the Azure Machine Type for the Node field to the desired flavor.
- Save the configuration.
- From the Actions column of the site that you updated, click
...> Plan to start the action of Terraform plan. - Click
...> Terraform Parameters for the site object, and select the Plan Status tab to review the output. - Click
...> Apply. - Click
...> Terraform Parameters for the site object, and select the Apply Status tab to verify the status for the apply action. - Verify that the node is reporting the updated infrastructure resources. See Verify Resized Site Resources for the steps to follow.
Notes:
- Ensure that you do not make modifications other than instance type during the resizing.
- If you make any modifications to these instances directly in the cloud provider console (resources not managed by the F5 Distributed Cloud Console), the modifications will be removed during reconciliation. You can view a detailed summary of all the changes that will be applied in the plan output.
- If the site contains worker nodes, resizing will not be allowed until the number of worker nodes are scaled down to zero. After the worker nodes count is brought down to zero, you can follow the mentioned steps for resizing. For information on scaling down worker nodes, refer Scaling Worker Nodes.
- There will be an impact on the application traffic during this procedure. Therefore, it is recommended that you resize your CE Site nodes during a maintenance window.
- Ignore any updates reported as null_resources, volterra_set_cloud_site_info, azurerm_virtual_machine_scale_set, and azurerm_virtual_machine_extension.
Scaling Worker Nodes in Azure VNET Site
Follow these steps to scale down the worker nodes to zero on an Azure VNET Site:
- Navigate to the Azure VNET Sites page on the F5 Distributed Cloud console.
- From the Actions column of the site that you want to update, select Manage Configuration.
Figure: Site Management - Azure VNET Sites
- In the Site Configuration page, click Edit Configuration.
Figure: Azure VNET Site - Configuration
- In the Desired Worker Nodes Selection field, select the No Worker Nodes option.
Figure: Azure VNET Site - Worker Node Selection
- Click Save Azure VNET SITE.
- Navigate to the Events tab to verify that the settings are updated, and the actions are triggered.
- To verify that the worker nodes are updated, click View Details for the Configuration updated and Node de-registered Events.
Figure: Azure VNET Site - Worker Node Event
Figure: Azure VNET Site - Worker Node Deregister
- Navigate to the Infrastructure tab and verify that there are no worker nodes listed.
- Navigate to the Dashboard Tab, and ensure that the site is online, and at 100% health.
Figure: CE Site Health
- Navigate to the Alerts tab, and ensure that the site has no critical alerts.
Figure: CE Site Alerts
- Follow the steps to Resize the Azure VNET.
- To add the worker nodes to the site after resizing, follow these steps:
- From the Actions column of the site that you want to update, select Manage Configuration.
Figure: Site Management - Azure VNET Sites
- In the Site Configuration page, click Edit Configuration.
Figure: Azure VNET Site - Configuration
- In the Desired Worker Nodes Selection field, select the Total number of Worker Nodes for a Site option.
- In the Total number of Worker Nodes for a Site field, provide the value for the number of worker nodes you want to add.
Figure: Azure VNET Site - Worker Node Selection
- Click Save Azure VNET SITE.
- Navigate to the Events tab to verify that the settings are updated, and the actions are triggered.
- To verify that the worker nodes are updated, click View Details for the Configuration updated Event.
Figure: Azure VNET Site - Worker Node Event
- Navigate to the Infrastructure tab and verify that the worker nodes are listed, and are online.
- Navigate to the Dashboard Tab, and ensure that the site is online, and at 100% health.
Figure: CE Site Health
- Navigate to the Alerts tab, and ensure that the site has no critical alerts.
Figure: CE Site Alerts
- From the Actions column of the site that you want to update, select Manage Configuration.
GCP VPC Site
Resizing a GCP VPC Site through F5 Distributed Cloud Services is currently not supported, as the underlying terraform workflow would recreate the site instead of resizing the existing one. This may result in unexpected behavior. As GCP VPC Sites are a legacy site type, we recommend migrating to Secure Mesh Site v2 to ensure full support and access to the latest capabilities.
Refer to the migration guide to transition your site.
Update Node Resources
This section provides steps on how to update node resources for on-premise providers.
VMware using vSphere
You can resize the VMware Sites through Vsphere Client by performing the following steps in the Vsphere Client console:
Step 1: Stop the existing Virtual Machines
- From the list of available Virtual Machines, select the VM that you want to turn off.
- From the Actions menu, select Power, and then select Power Off.

Figure: VMware - Power Off VM
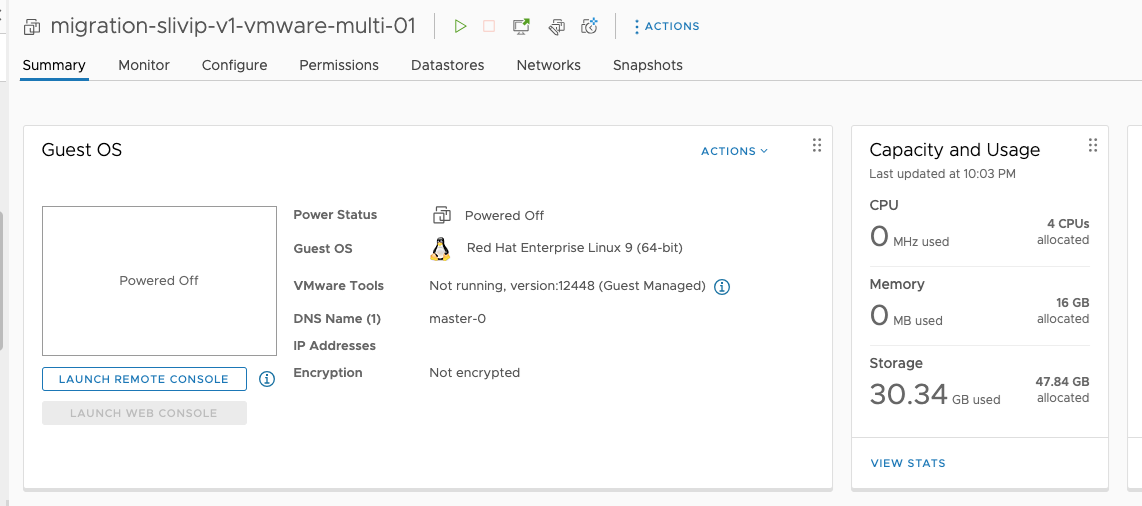
The Power status changes to powered off for the specific Virtual Machine.
Figure: VMware - VM Powered Off
- Repeat the steps for each Virtual Machine that you want to turn off.

Step 2: Update the CPU and Memory for each Virtual Machine
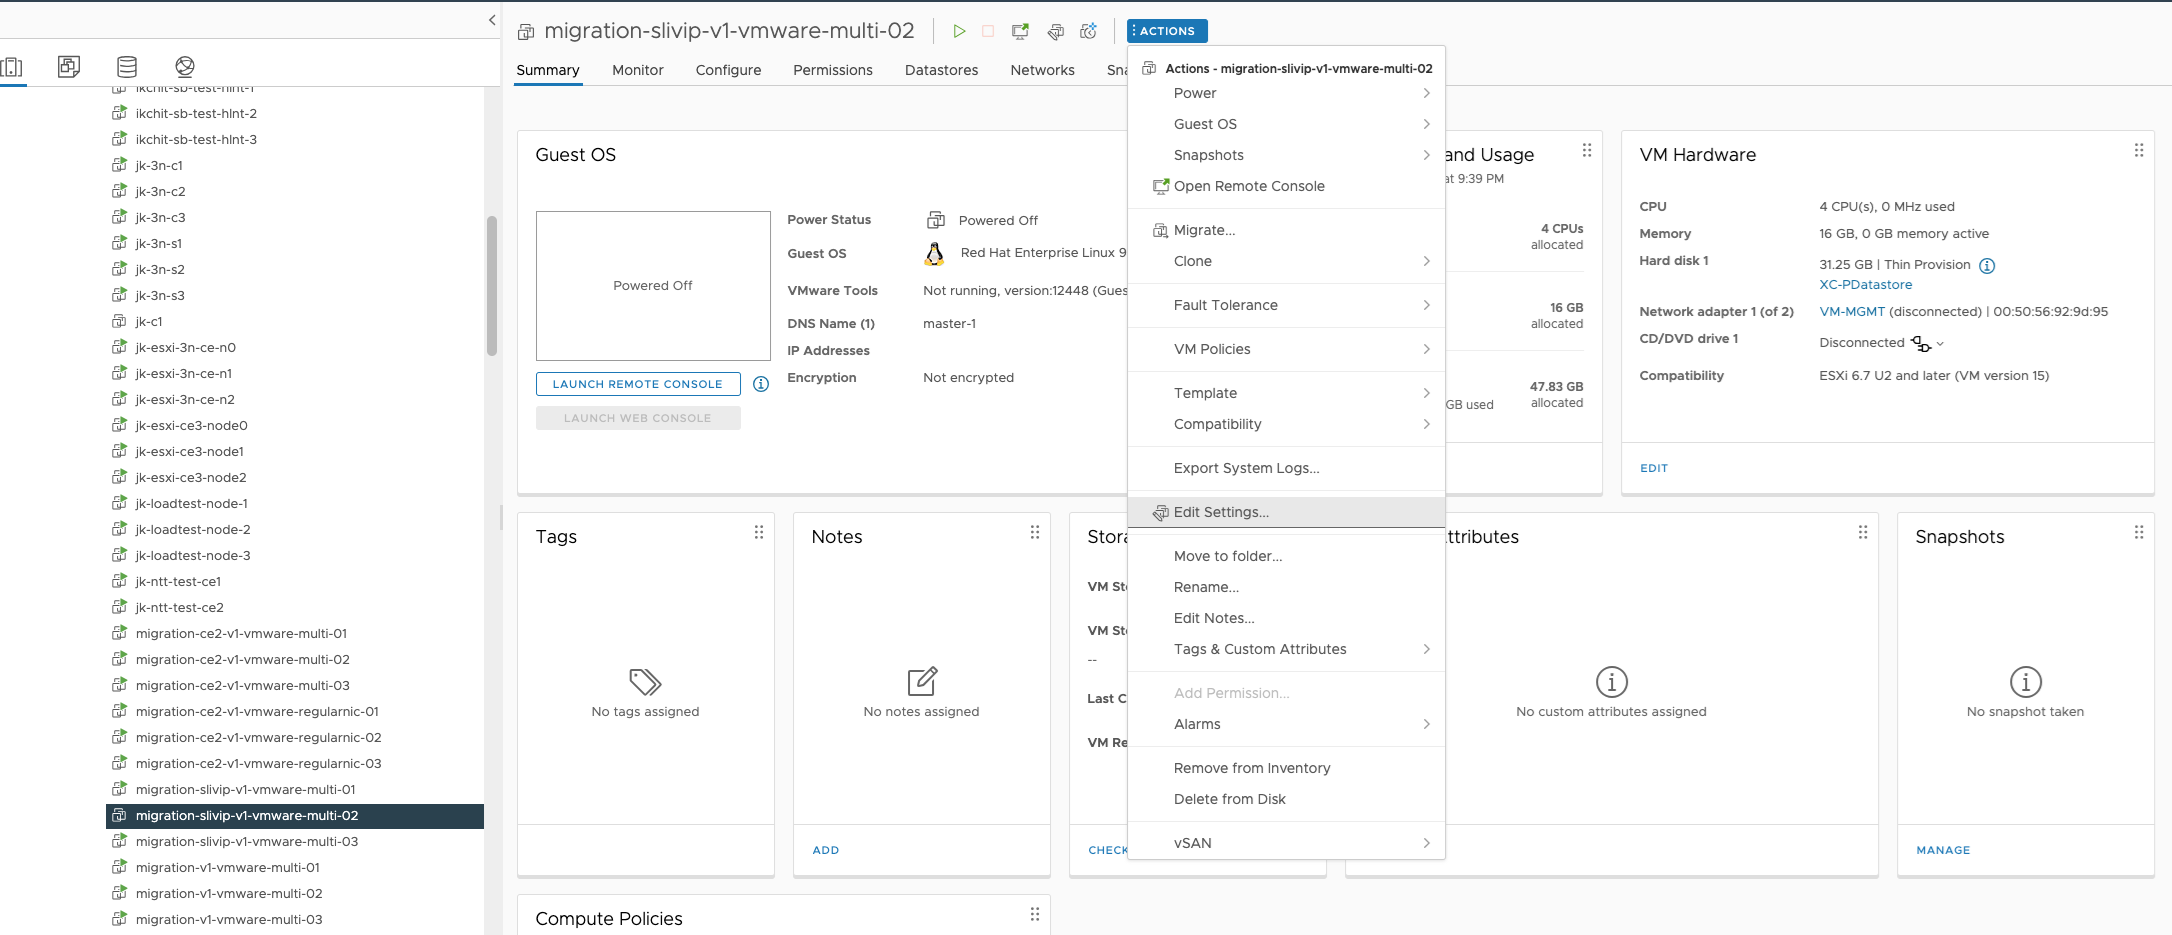
- From the list of available Virtual Machines, select the Virtual machine that you want to update.
- From the Actions menu, select Edit Settings.

Figure: VMware - Edit Settings
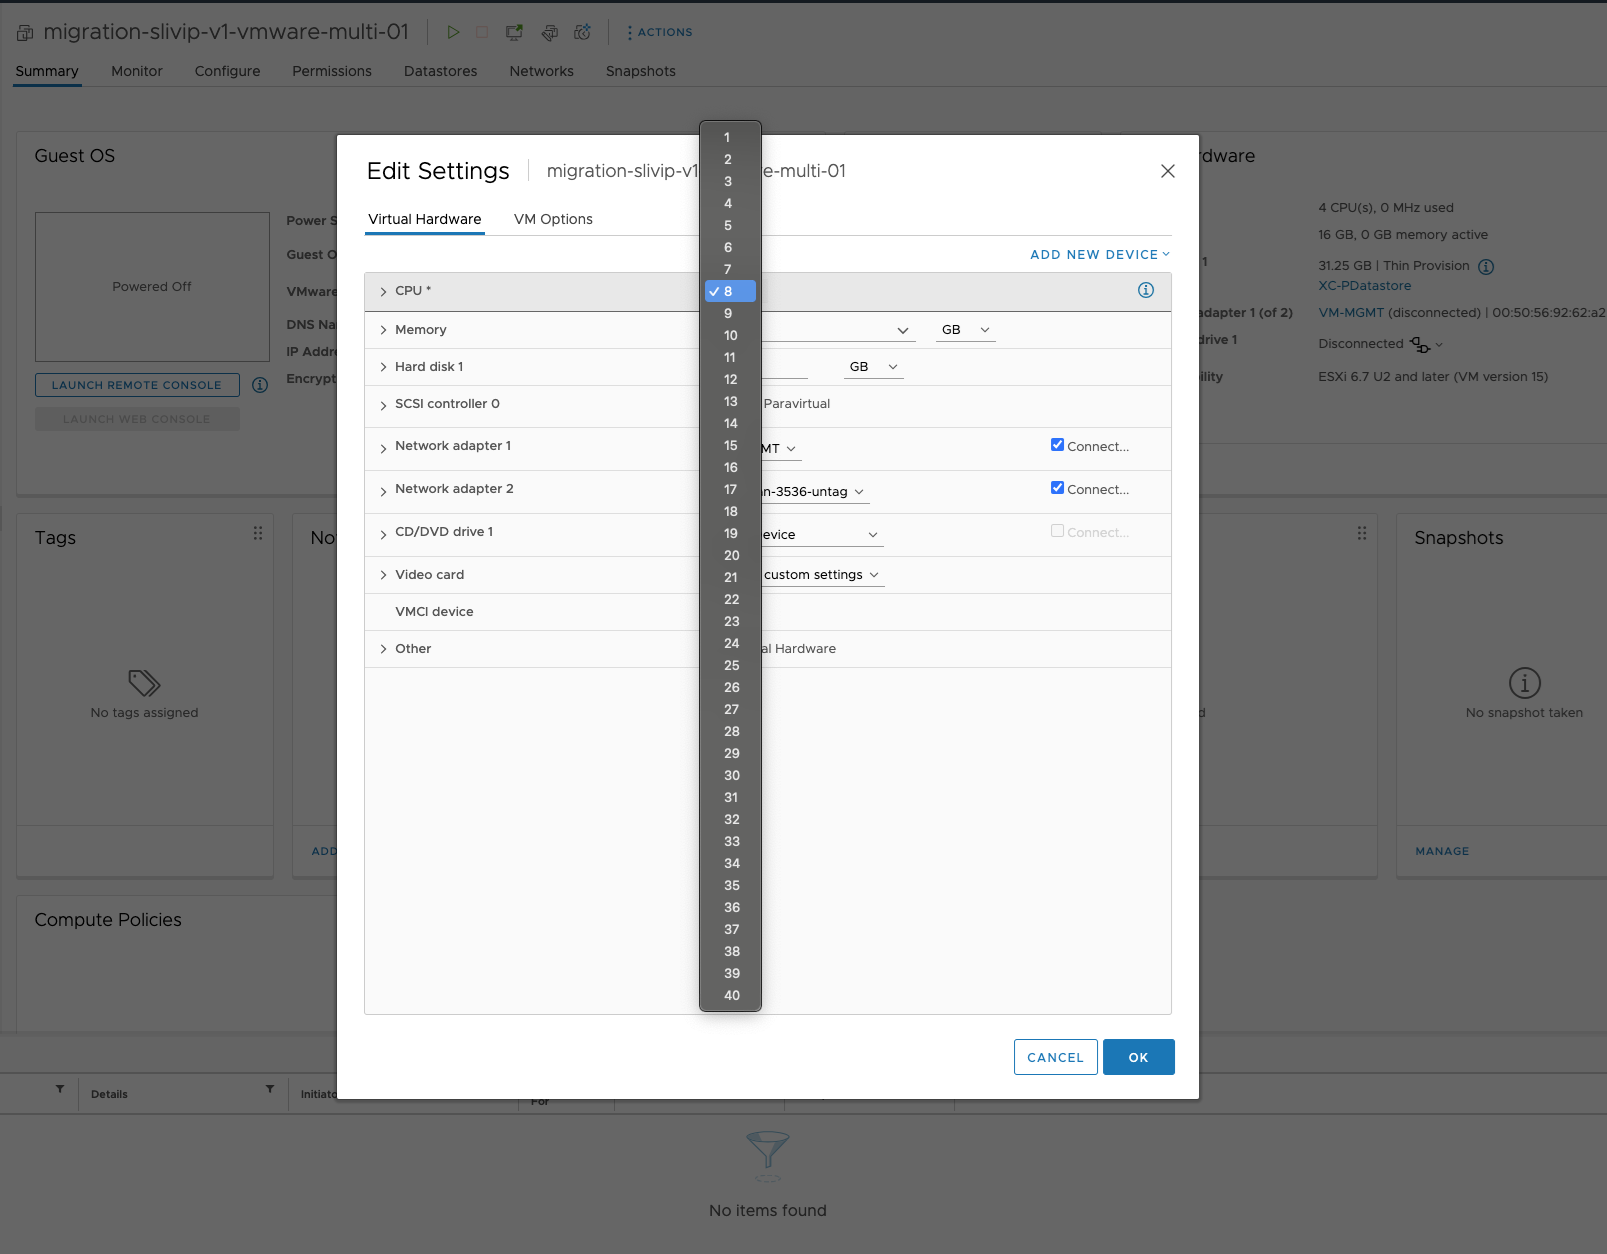
- In the CPU field, update the value to 8 or 16 (depending on whether you want to resize to a medium or large instance).

Figure: VMware - CPU Resize
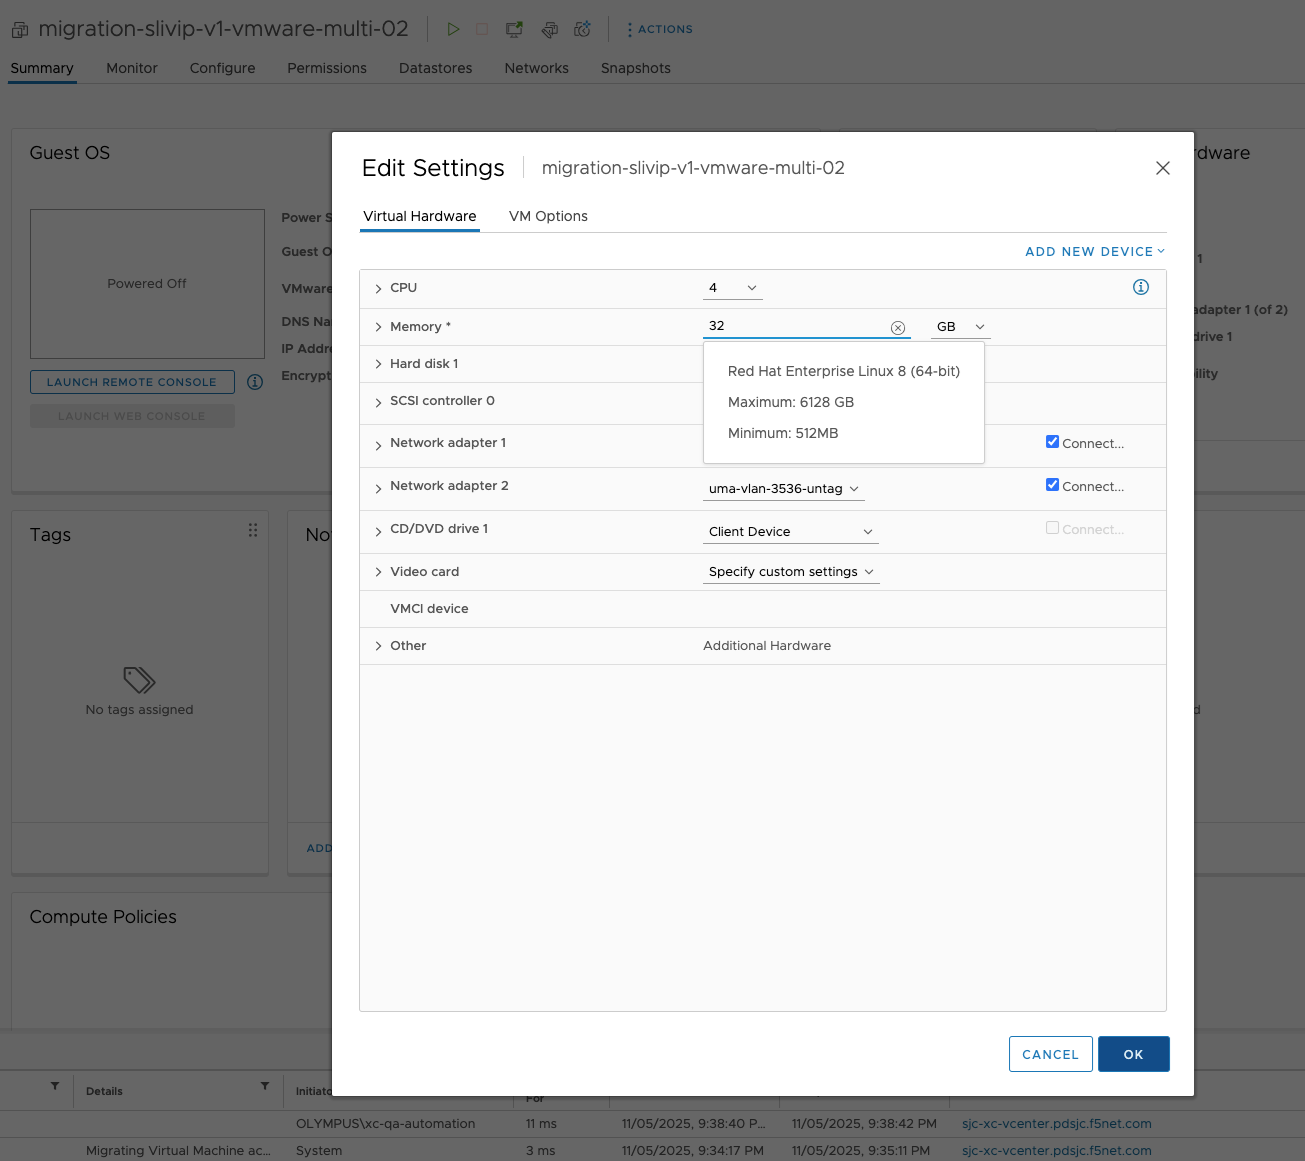
- In the Memory field, update the value to 32 or 64 GB (depending on whether you want to resize to a medium or large instance).

Figure: VMware - Memory Resize
- Repeat the steps for each Virtual Machine that you want to update.
Step 3: Start the Virtual Machines
- From the list of available Virtual Machines, select the VM that you want to restart.
- From the Actions menu, select Power, and then select Power On.
Figure: VMware - Power On VM
- Repeat the steps for each CE instance that you want to restart.
KVM using Host Command Line
You can resize the KVM Sites by performing the following steps in the host:
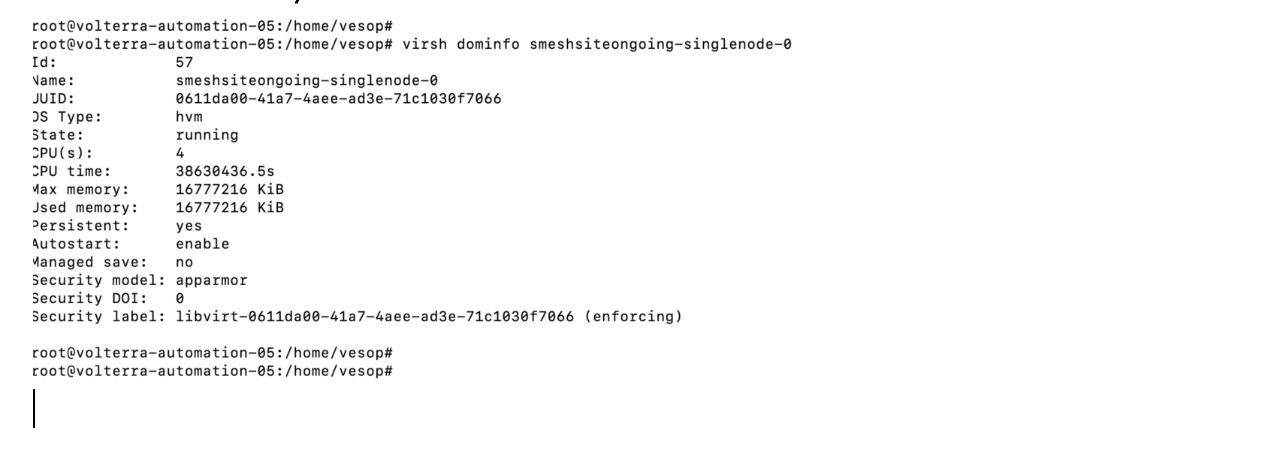
- Verify the CPU and Memory size by running the following command:
virsh dominfo <virtual machine name>
Figure: KVM - Verify size
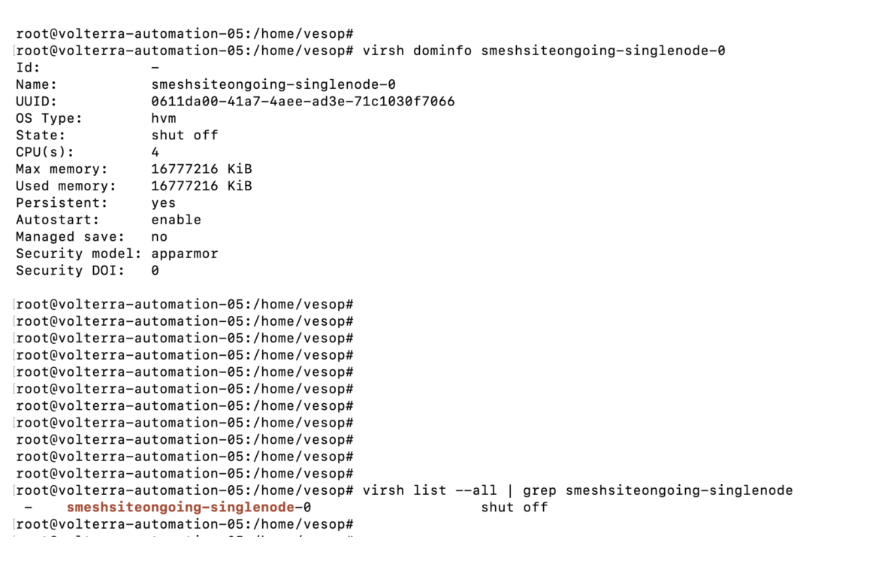
- Turn the power off for all the Virtual Machines (nodes) of the CE by running the following command:
virsh shutdown <virtual mcahine name>
Figure: KVM - Power off nodes

Figure: KVM - Shutdown nodes
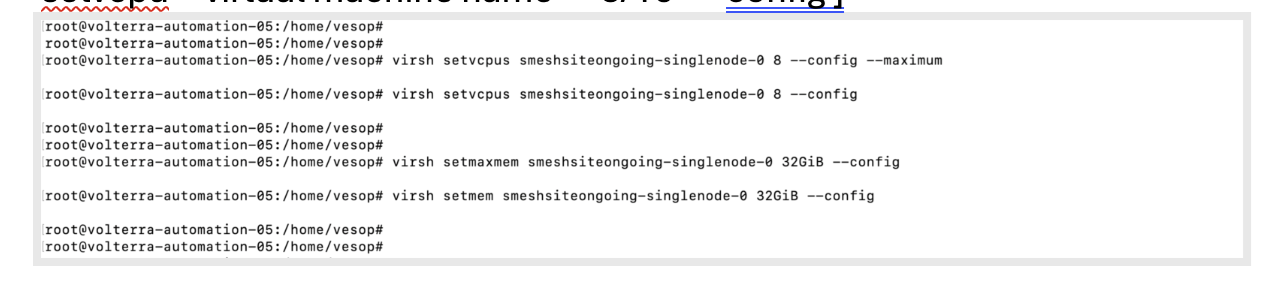
- Update the CPU (to 8 or 16) and Memory (to 32 or 64) for each Virtual Machine by running the following command:
virsh setvcpu <virtual machine name> <8/16> --config
Figure: KVM - Update CPU and Memory for the VM
- Verify the CPU and Memory size after resizing by running the following command:
virsh dominfo <virtual machine name>
Figure: KVM - Verify size after Resizing
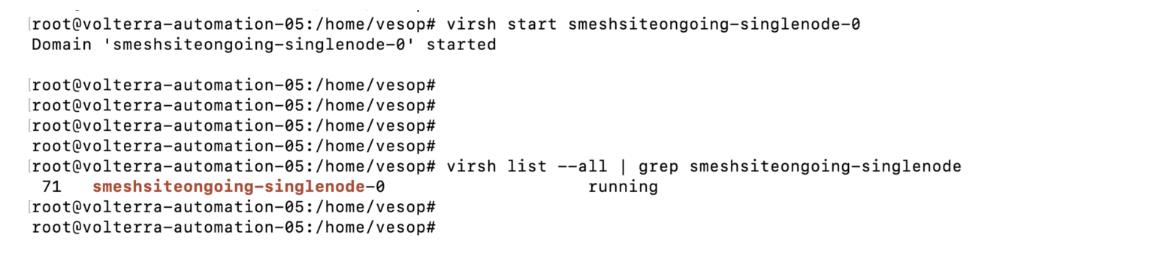
- Turn the power on for the Virtual Machine by running the following command:
virsh start <virtual machine name> - Verify the status of the Virtual Machine by running the following command:
virsh list –all | grep <virtual machine name>
Figure: KVM - Verify status after Resizing


Nutanix
You can resize the Nutanix Sites by performing the following steps in the Nutanix admin console:
Step 1: Stop the existing Virtual Machines
- Login to the Nutanix Admin Console, and navigate to the list of Virtual Machines in the console.
- Filter the list of Virtual Machines, and select the Virtual Machine that you want to power off.
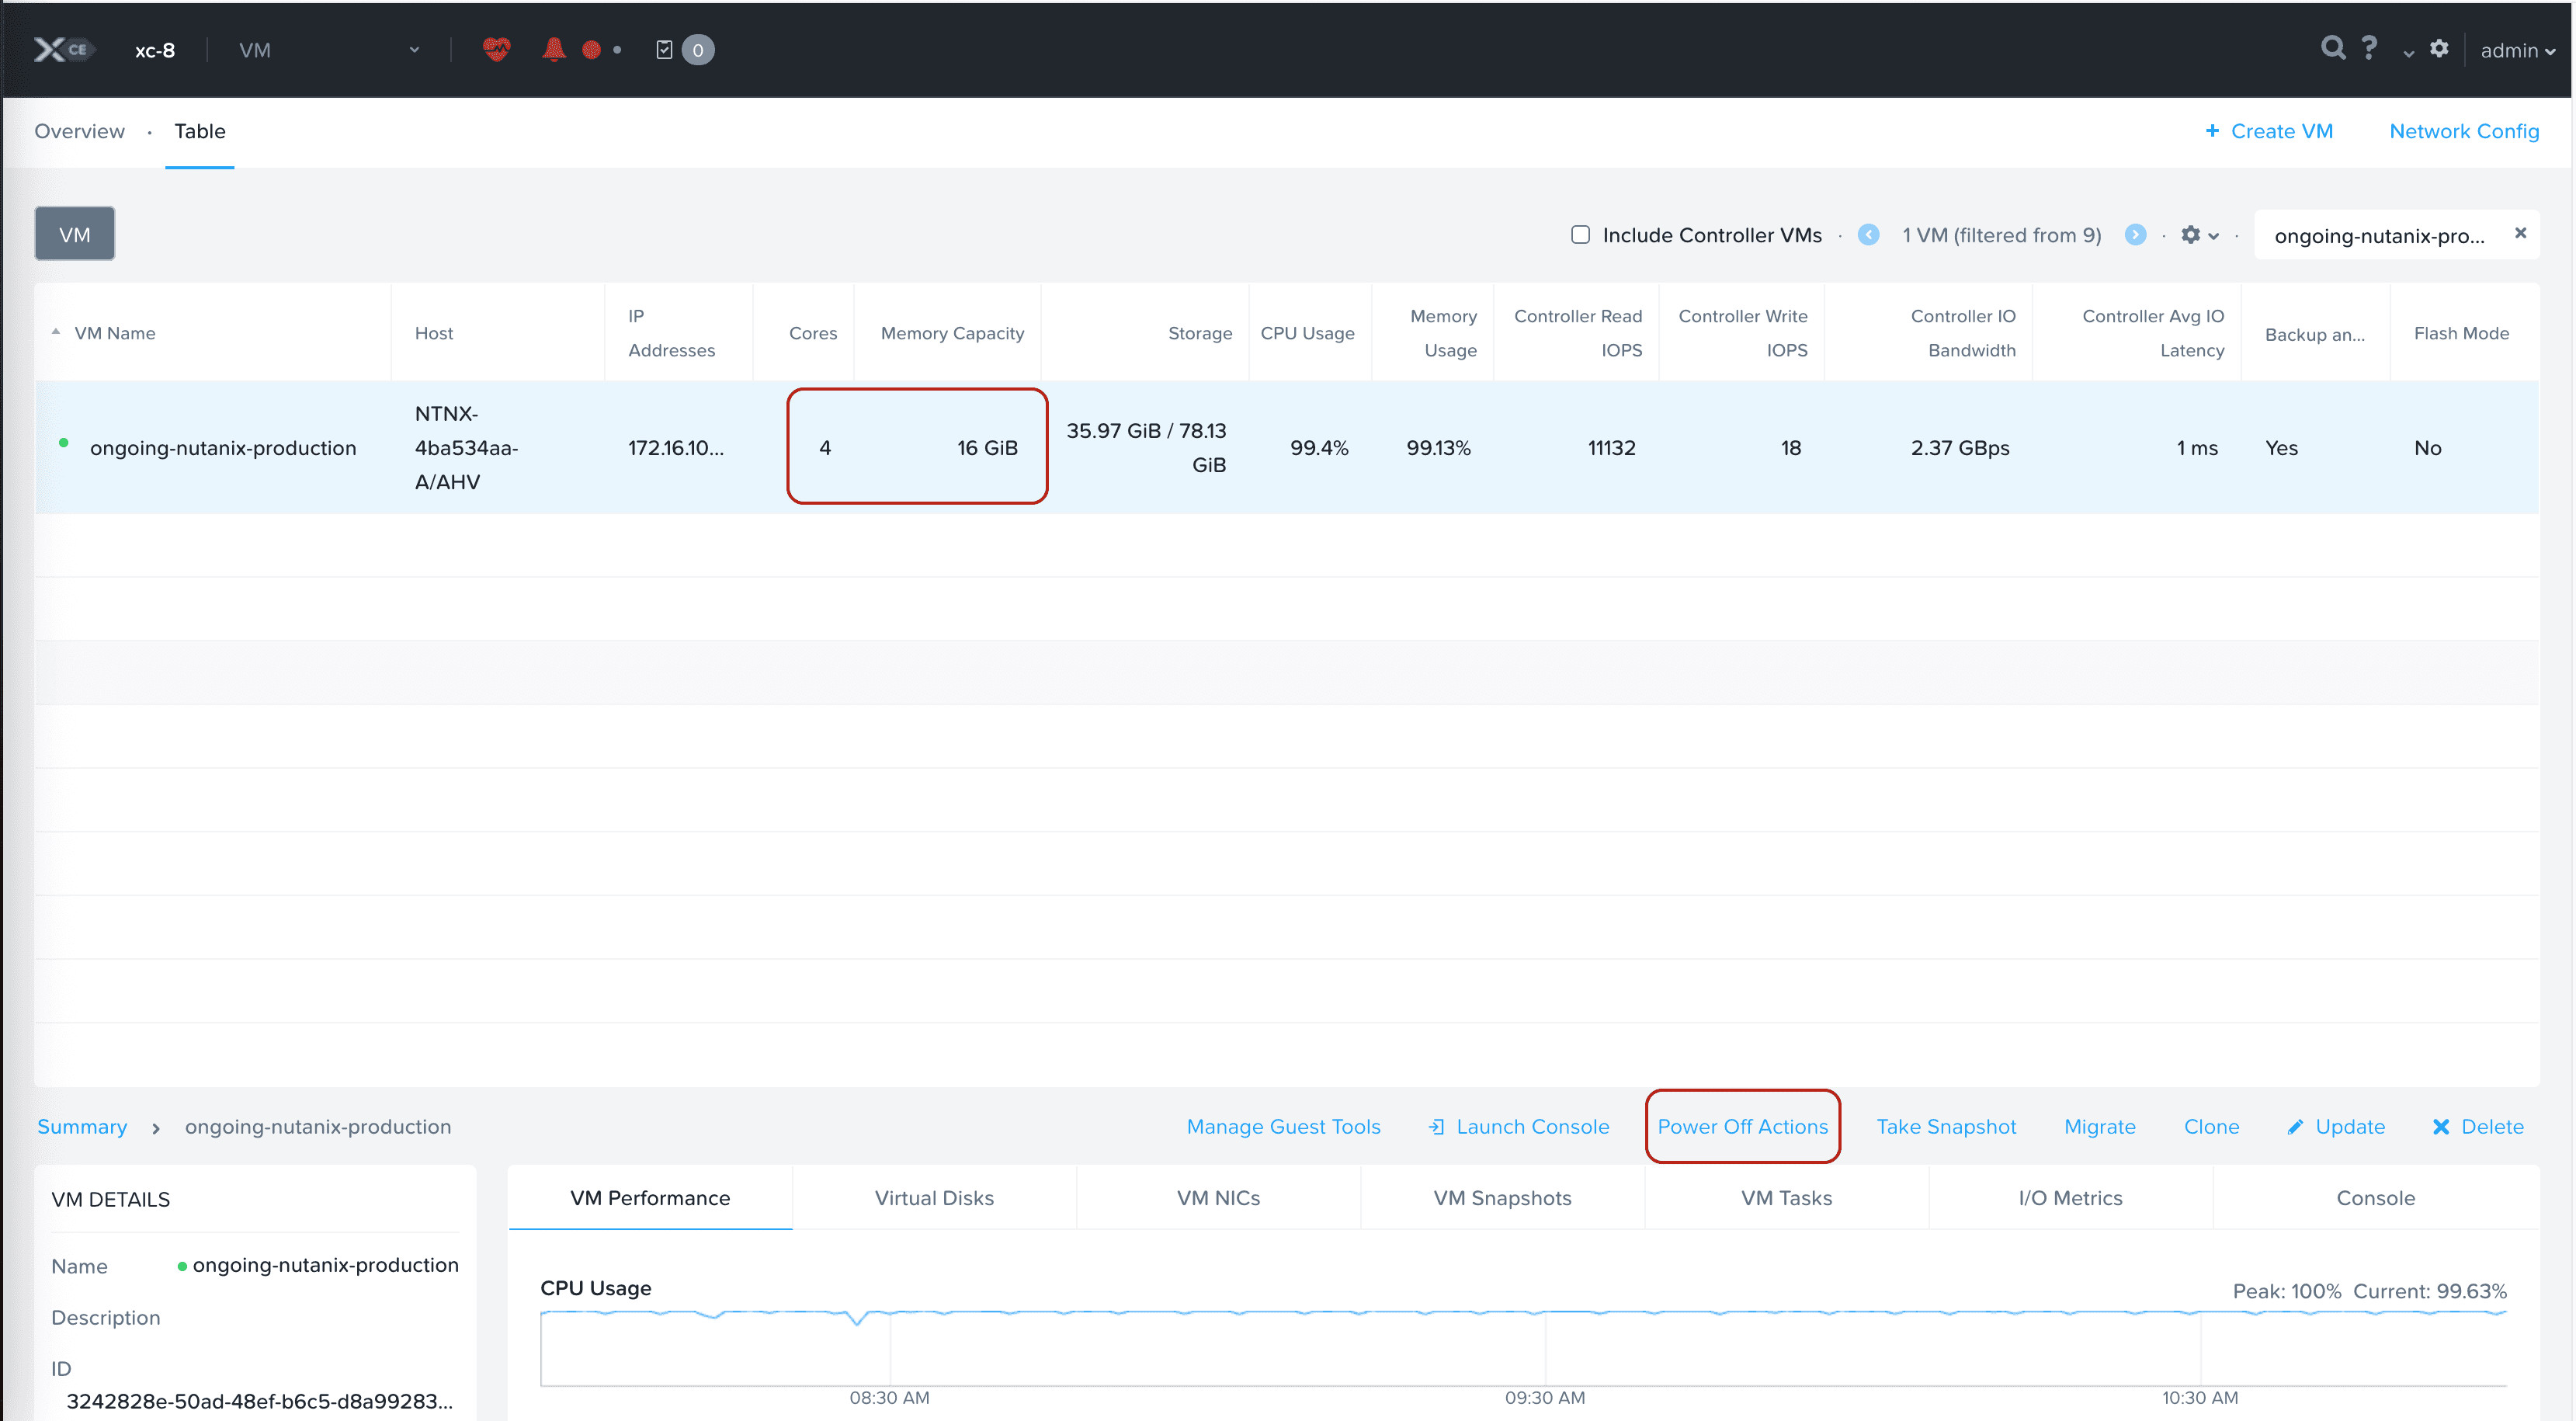
Figure: Nutanix - VM Power Off Actions
- From the Power Off Actions for the specific Virtual Machine, select the Guest Shutdown option.
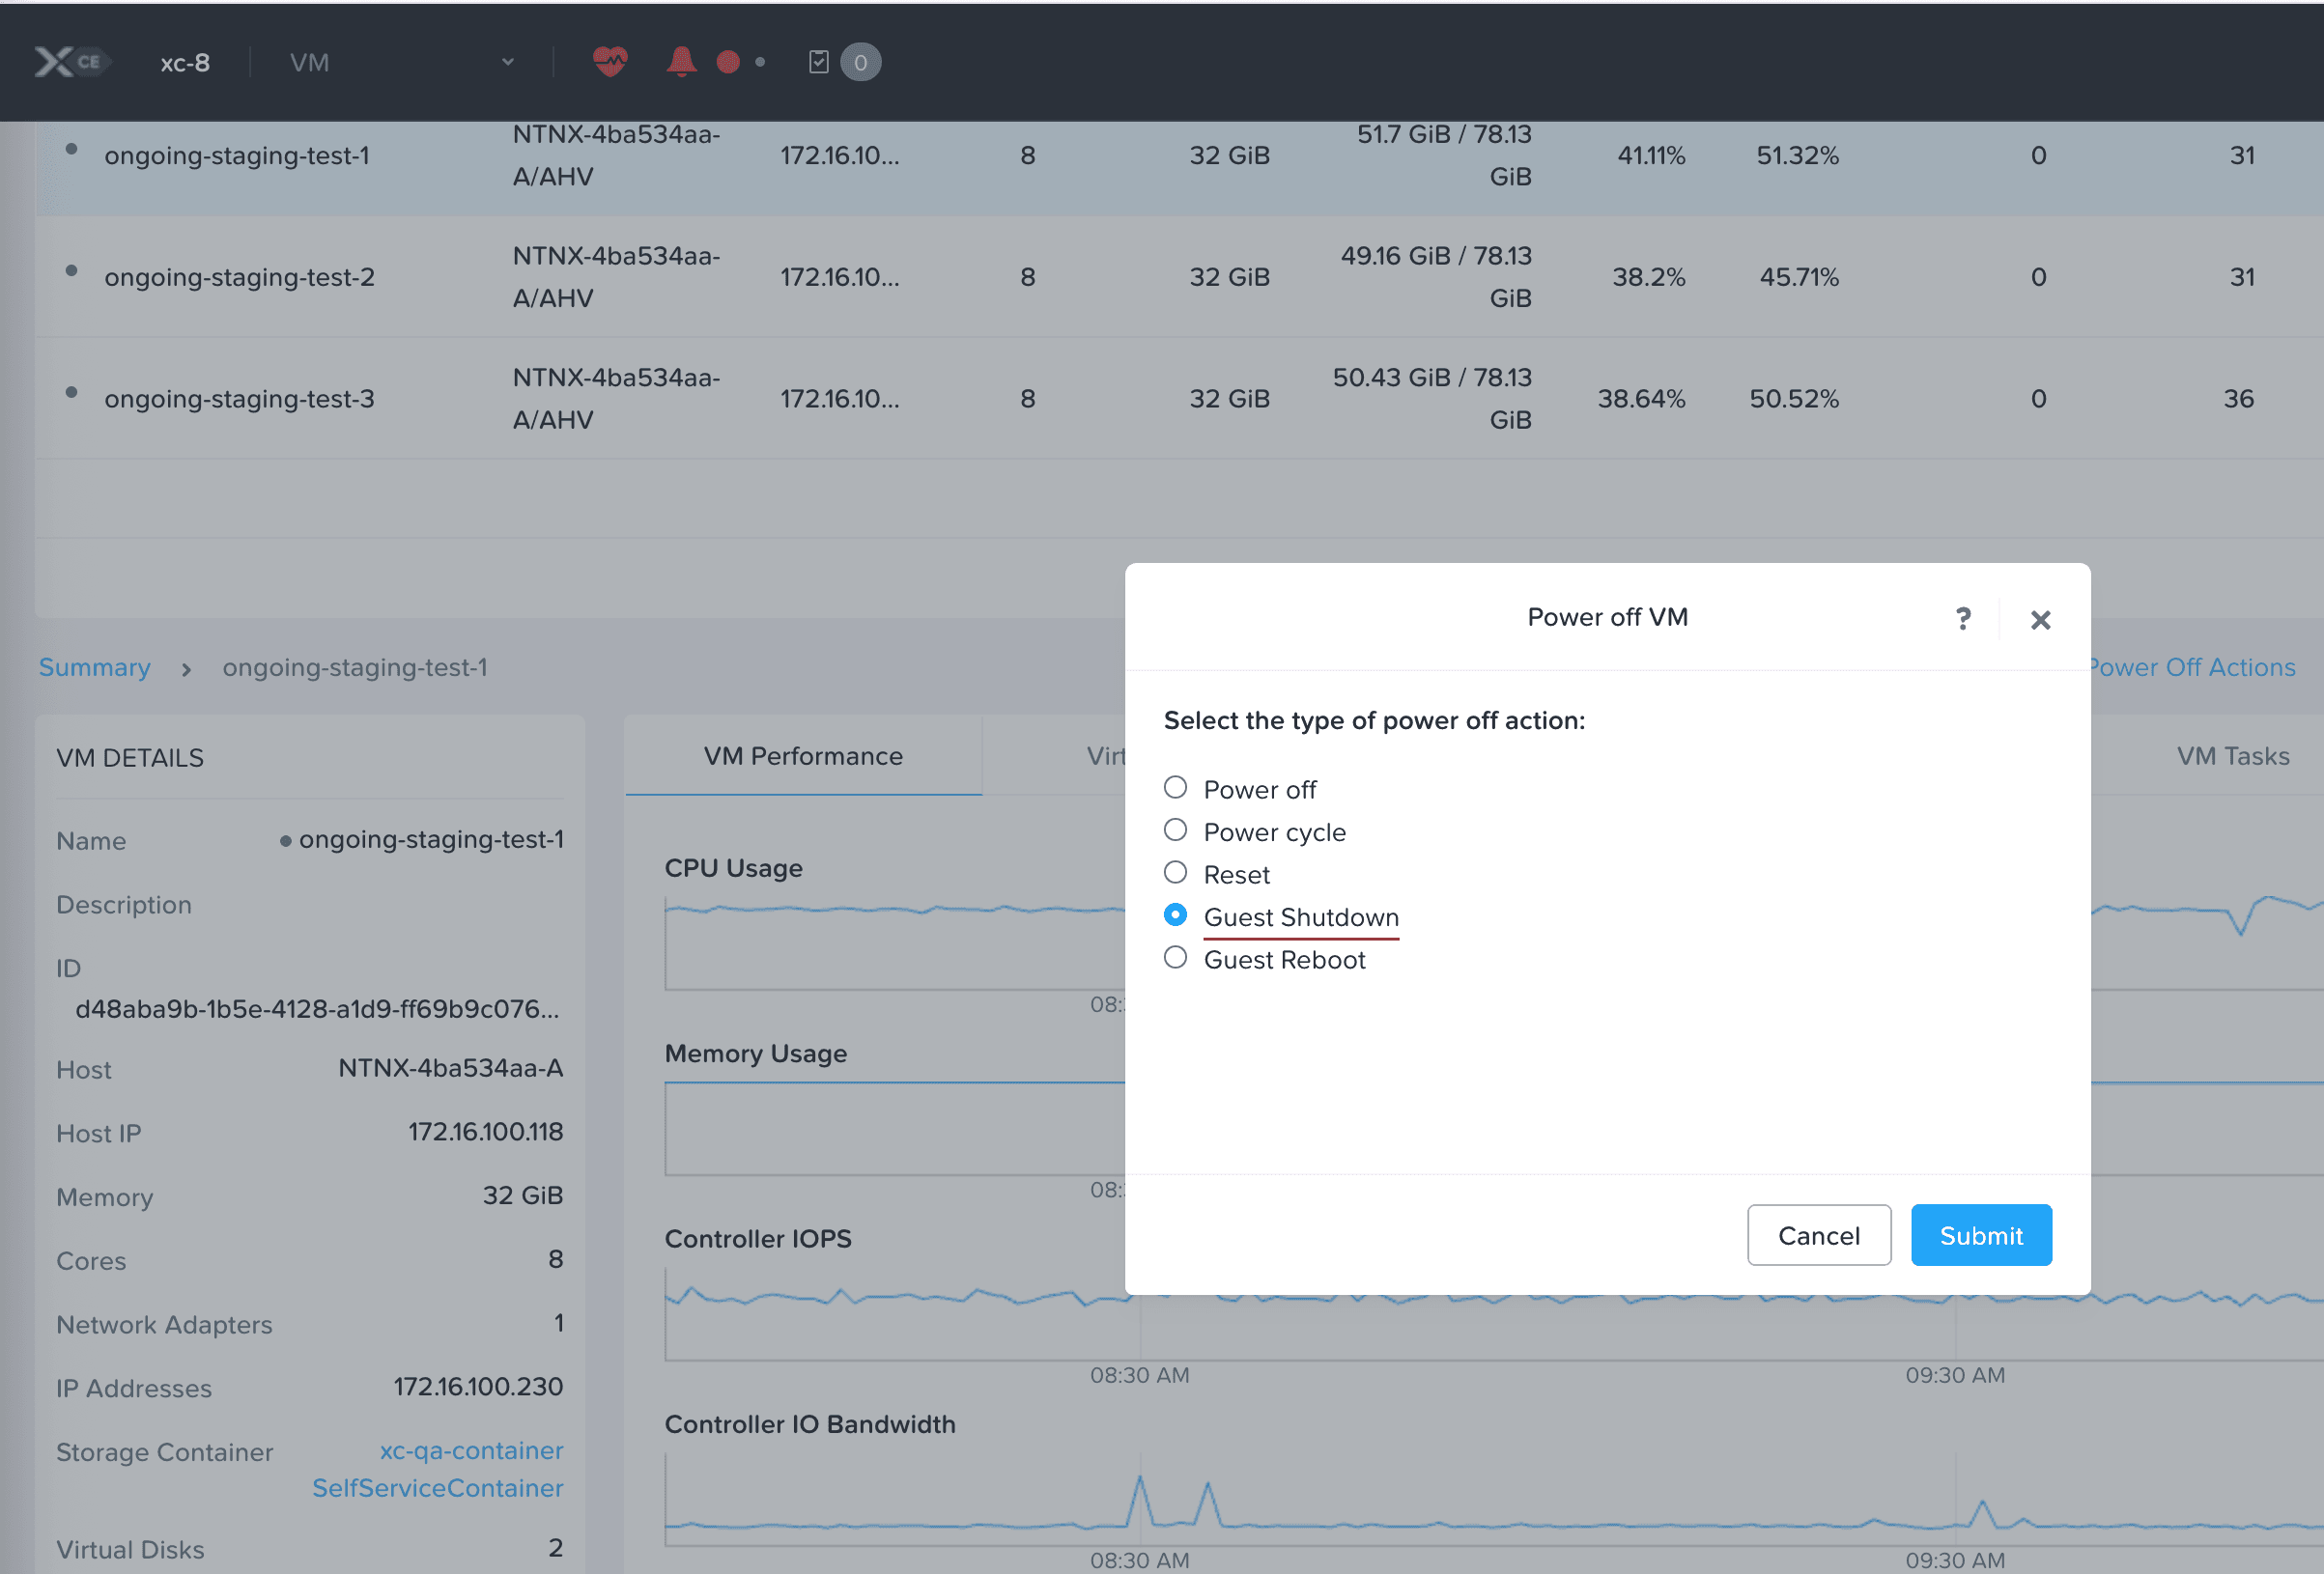
Figure: Nutanix - VM Guest Shutdown
- Repeat the steps for each Virtual Machine that you want to turn off.


Step 2: Update the Compute Details for each Virtual Machine
- From the list of available Virtual Machines, select the Virtual machine that you want to update.
- Select the Update option.
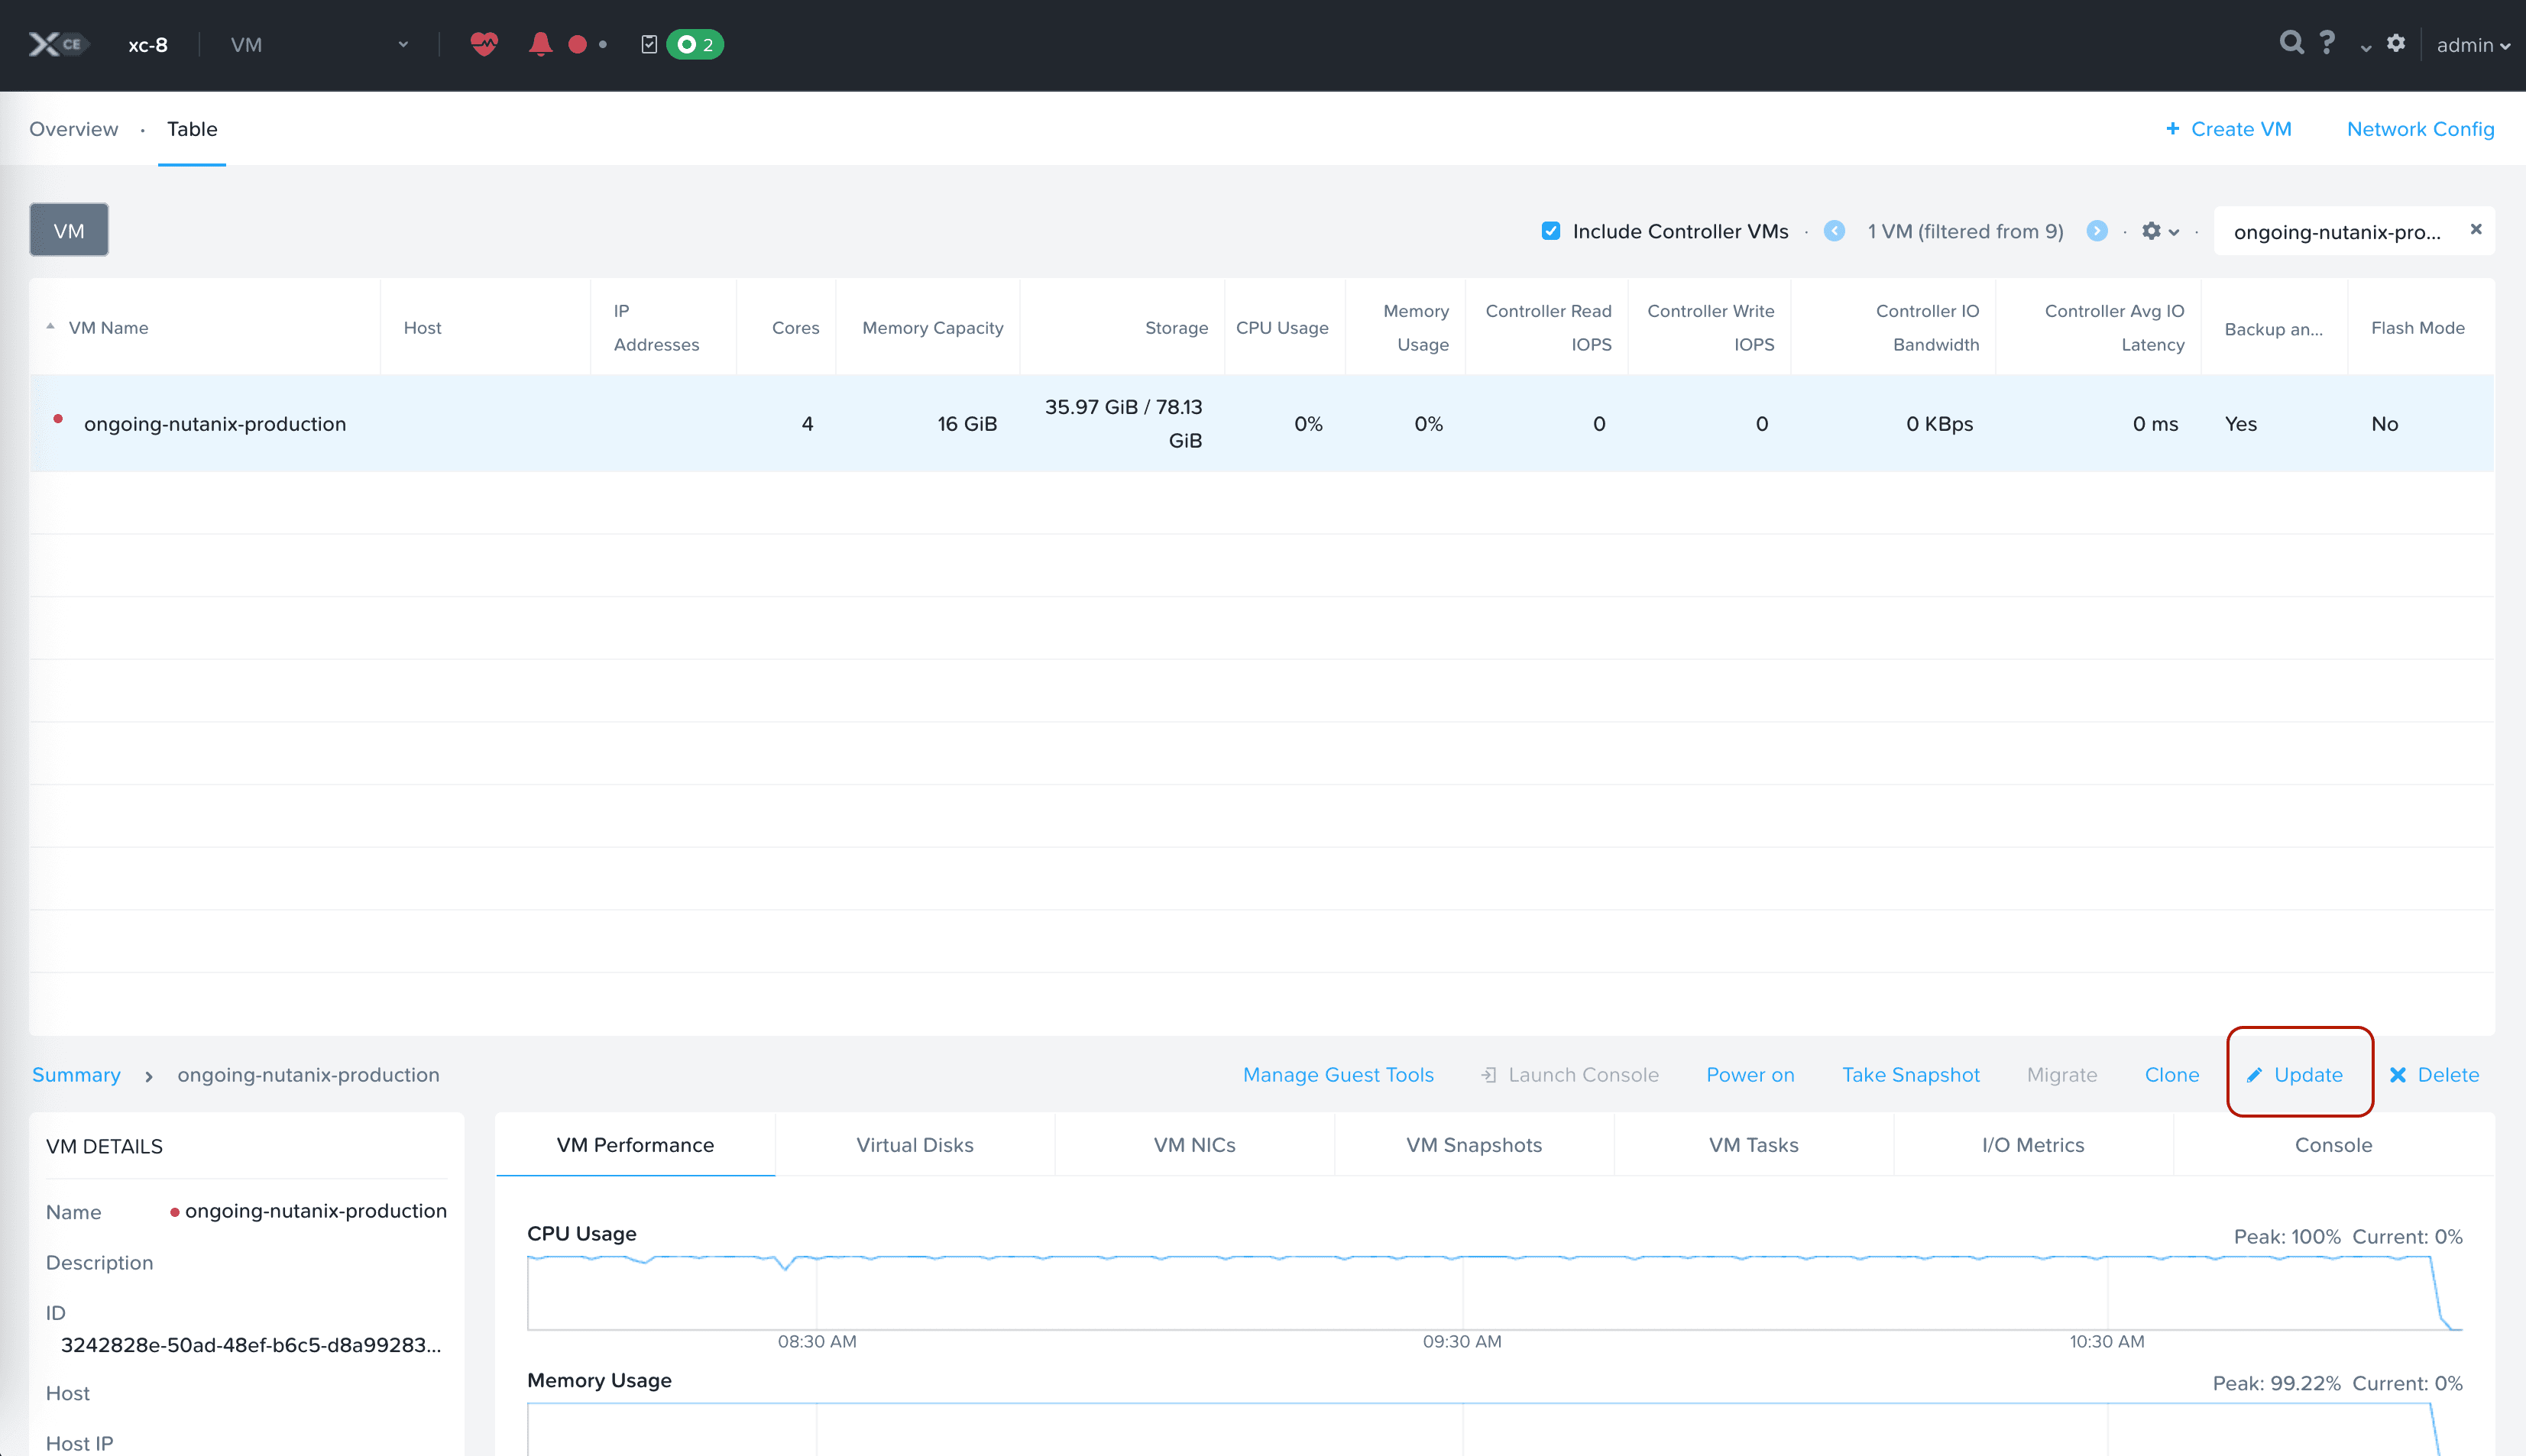
Figure: Nutanix - Update VM
- In the vCPUs field, update the value to 8 or 16 (depending on whether you want to resize to a medium or large instance).
- In the Memory field, update the value to 32 or 64 GB (depending on whether you want to resize to a medium or large instance).
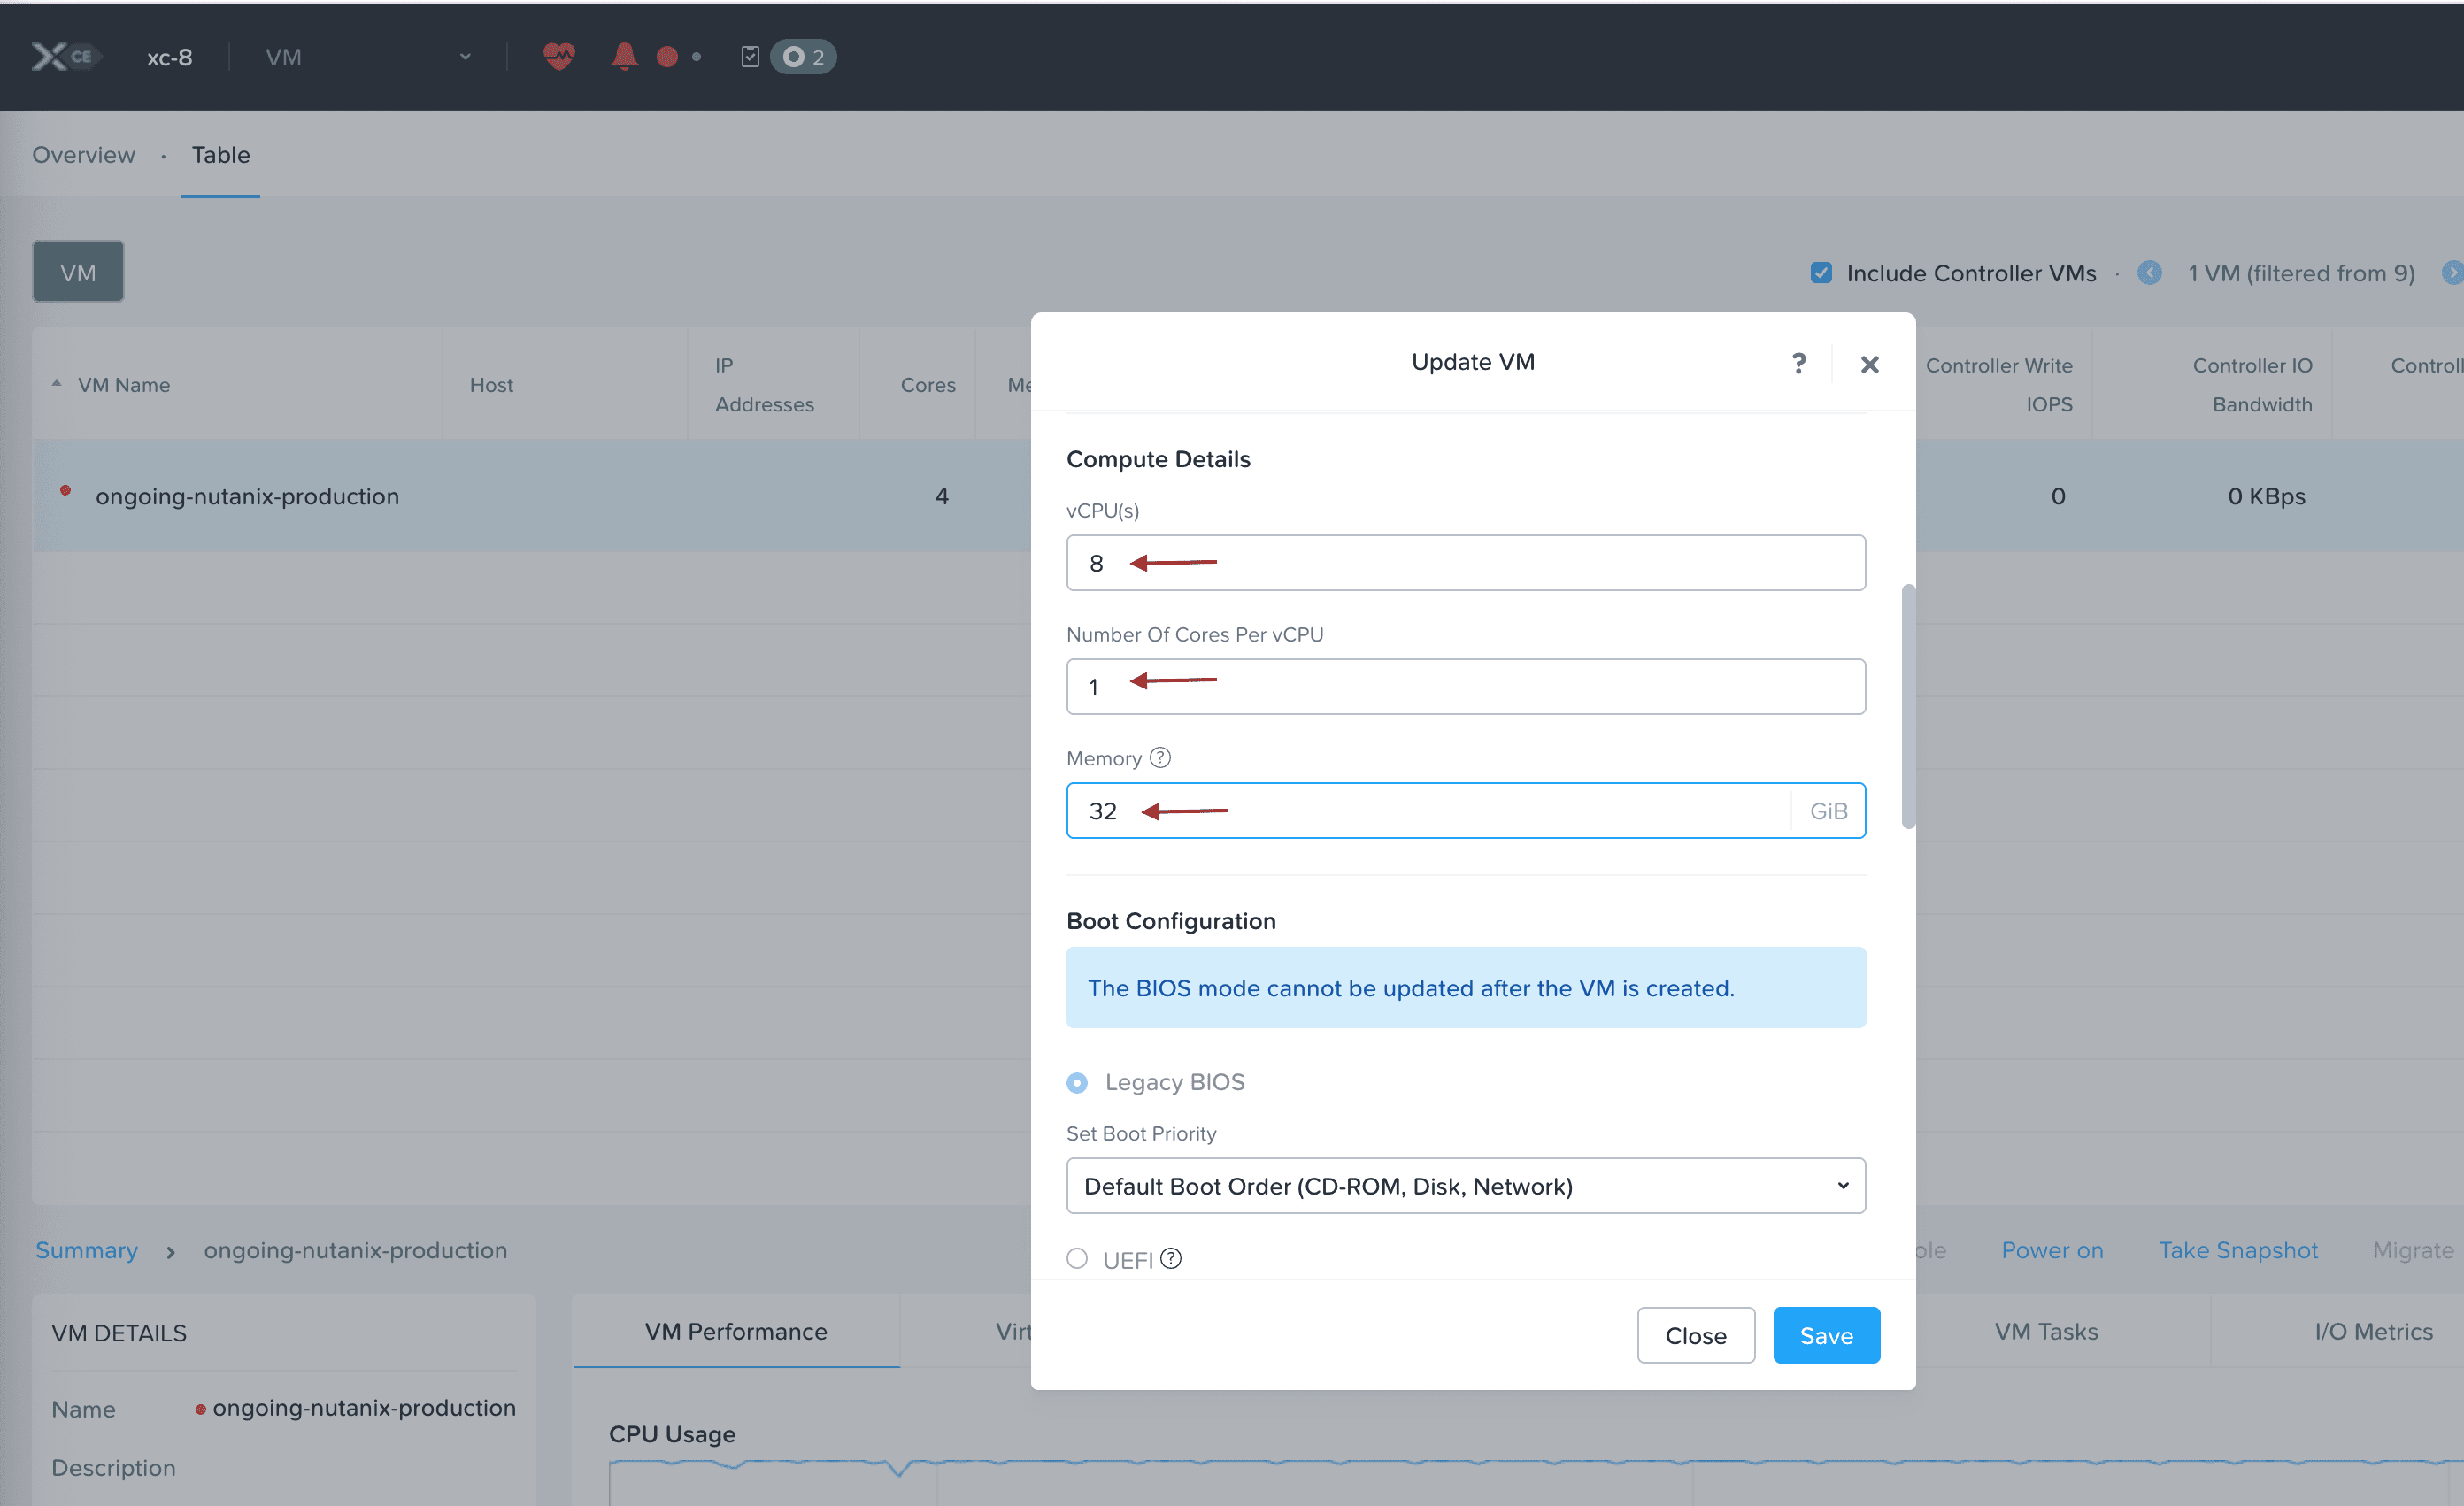
Figure: Nutanix - Update VM
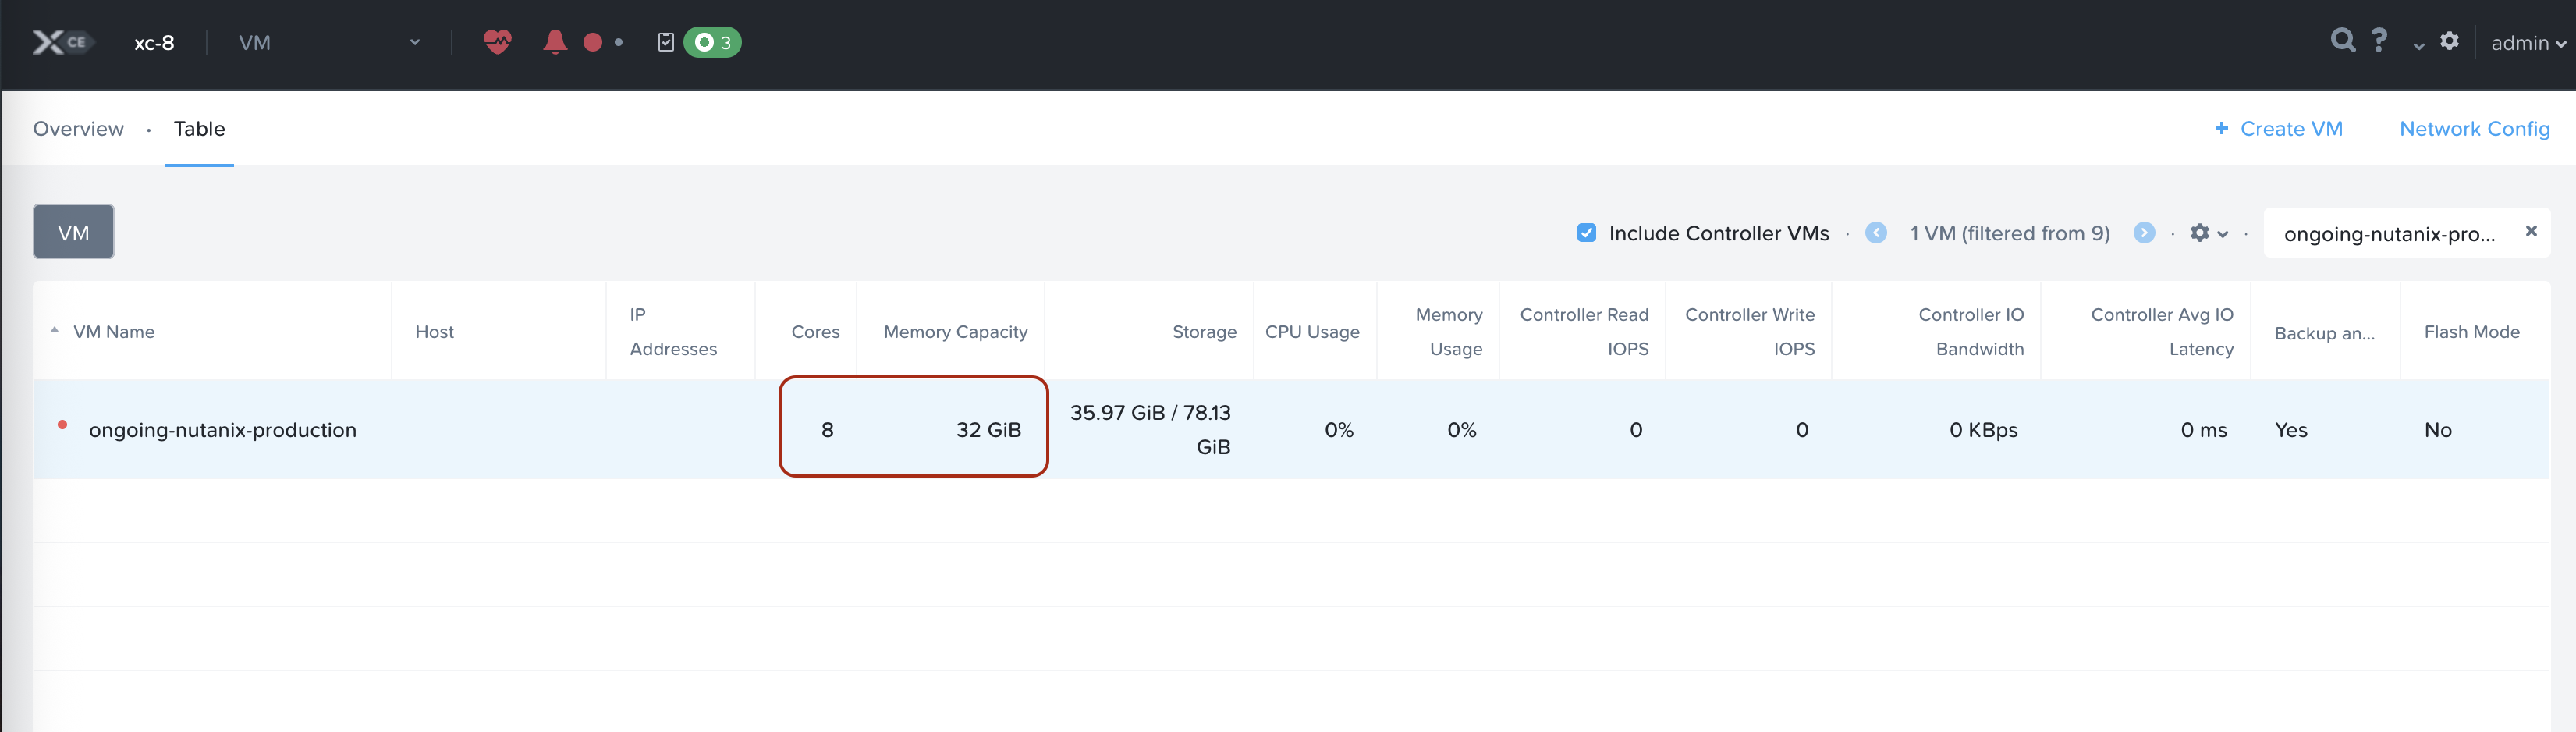
- Verify that the Virtual Machine has been resized.

Figure: Nutanix - Update VM
- Repeat the steps for each Virtual Machine that you want to update.


Step 3: Start the Virtual Machines
- From the list of available Virtual Machines, select the VM that you want to restart.
- Select Power On.

Figure: Nutanix - Power On VM
- Repeat the steps for each CE instance that you want to restart.

OpenStack
You can resize the OpenStack Sites by performing the following steps in the OpenStack console:
Step 1: Create Custom Flavours
- Create custom flavours to meet the resizing requirement in Openstack as follows:
- Medium Instance – 8 vCPUs, 32GB RAM, 100GB Disk Space
- Large Instance – 16 vCPUs, 64GB RAM, 100GB Disk Space
Step 2:Stop the existing Instances
- Login to the OpenStack Console, and navigate to the list of instances in the console.
- Filter the list of available nodes, and select the node that you want to turn off.
- From the More Actions menu, select Shut Off Instances.
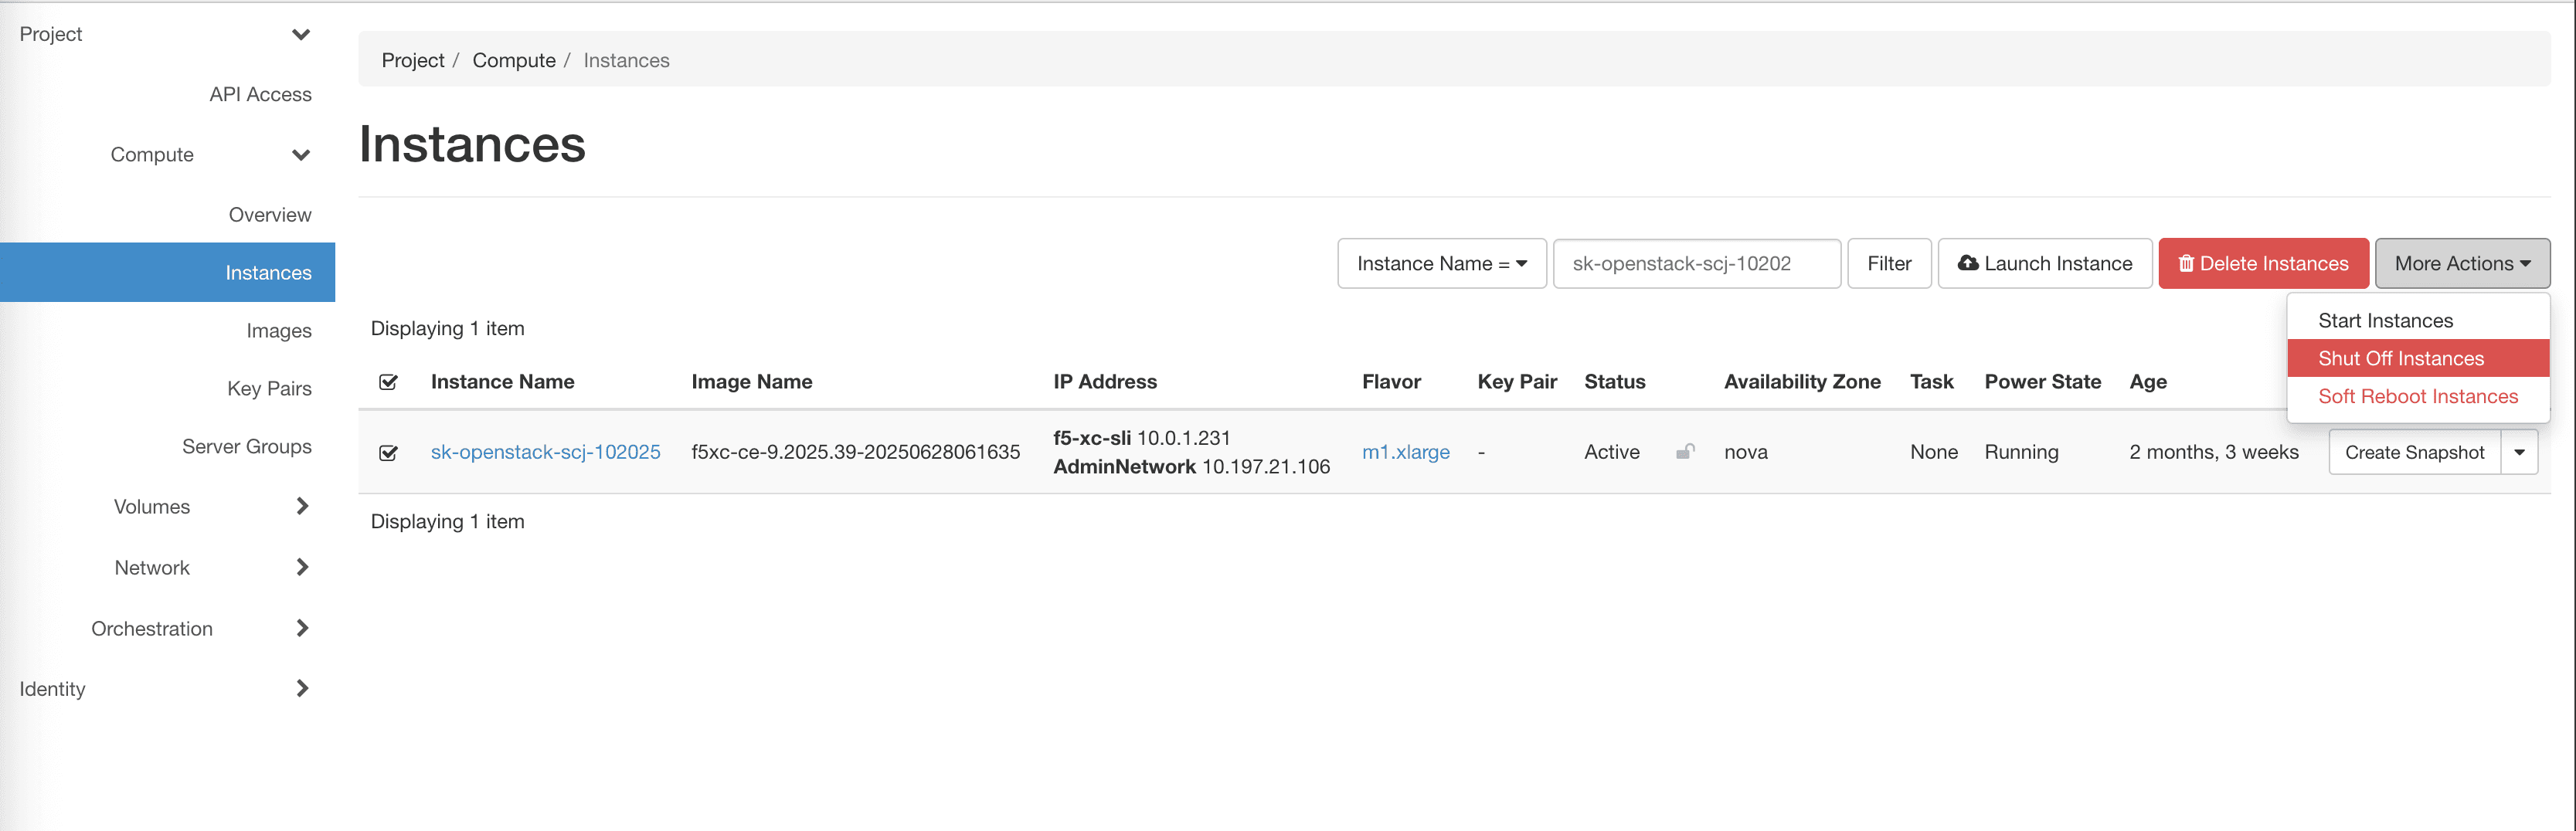
Figure: OpenStack - Shut Off Instance
- Repeat the steps for each node that you want to turn off.

Step 3:Update the CPU and Memory for each Node
- From the list of available Nodes, select the node that you want to update.
- From the Actions menu, select Resize Instance.
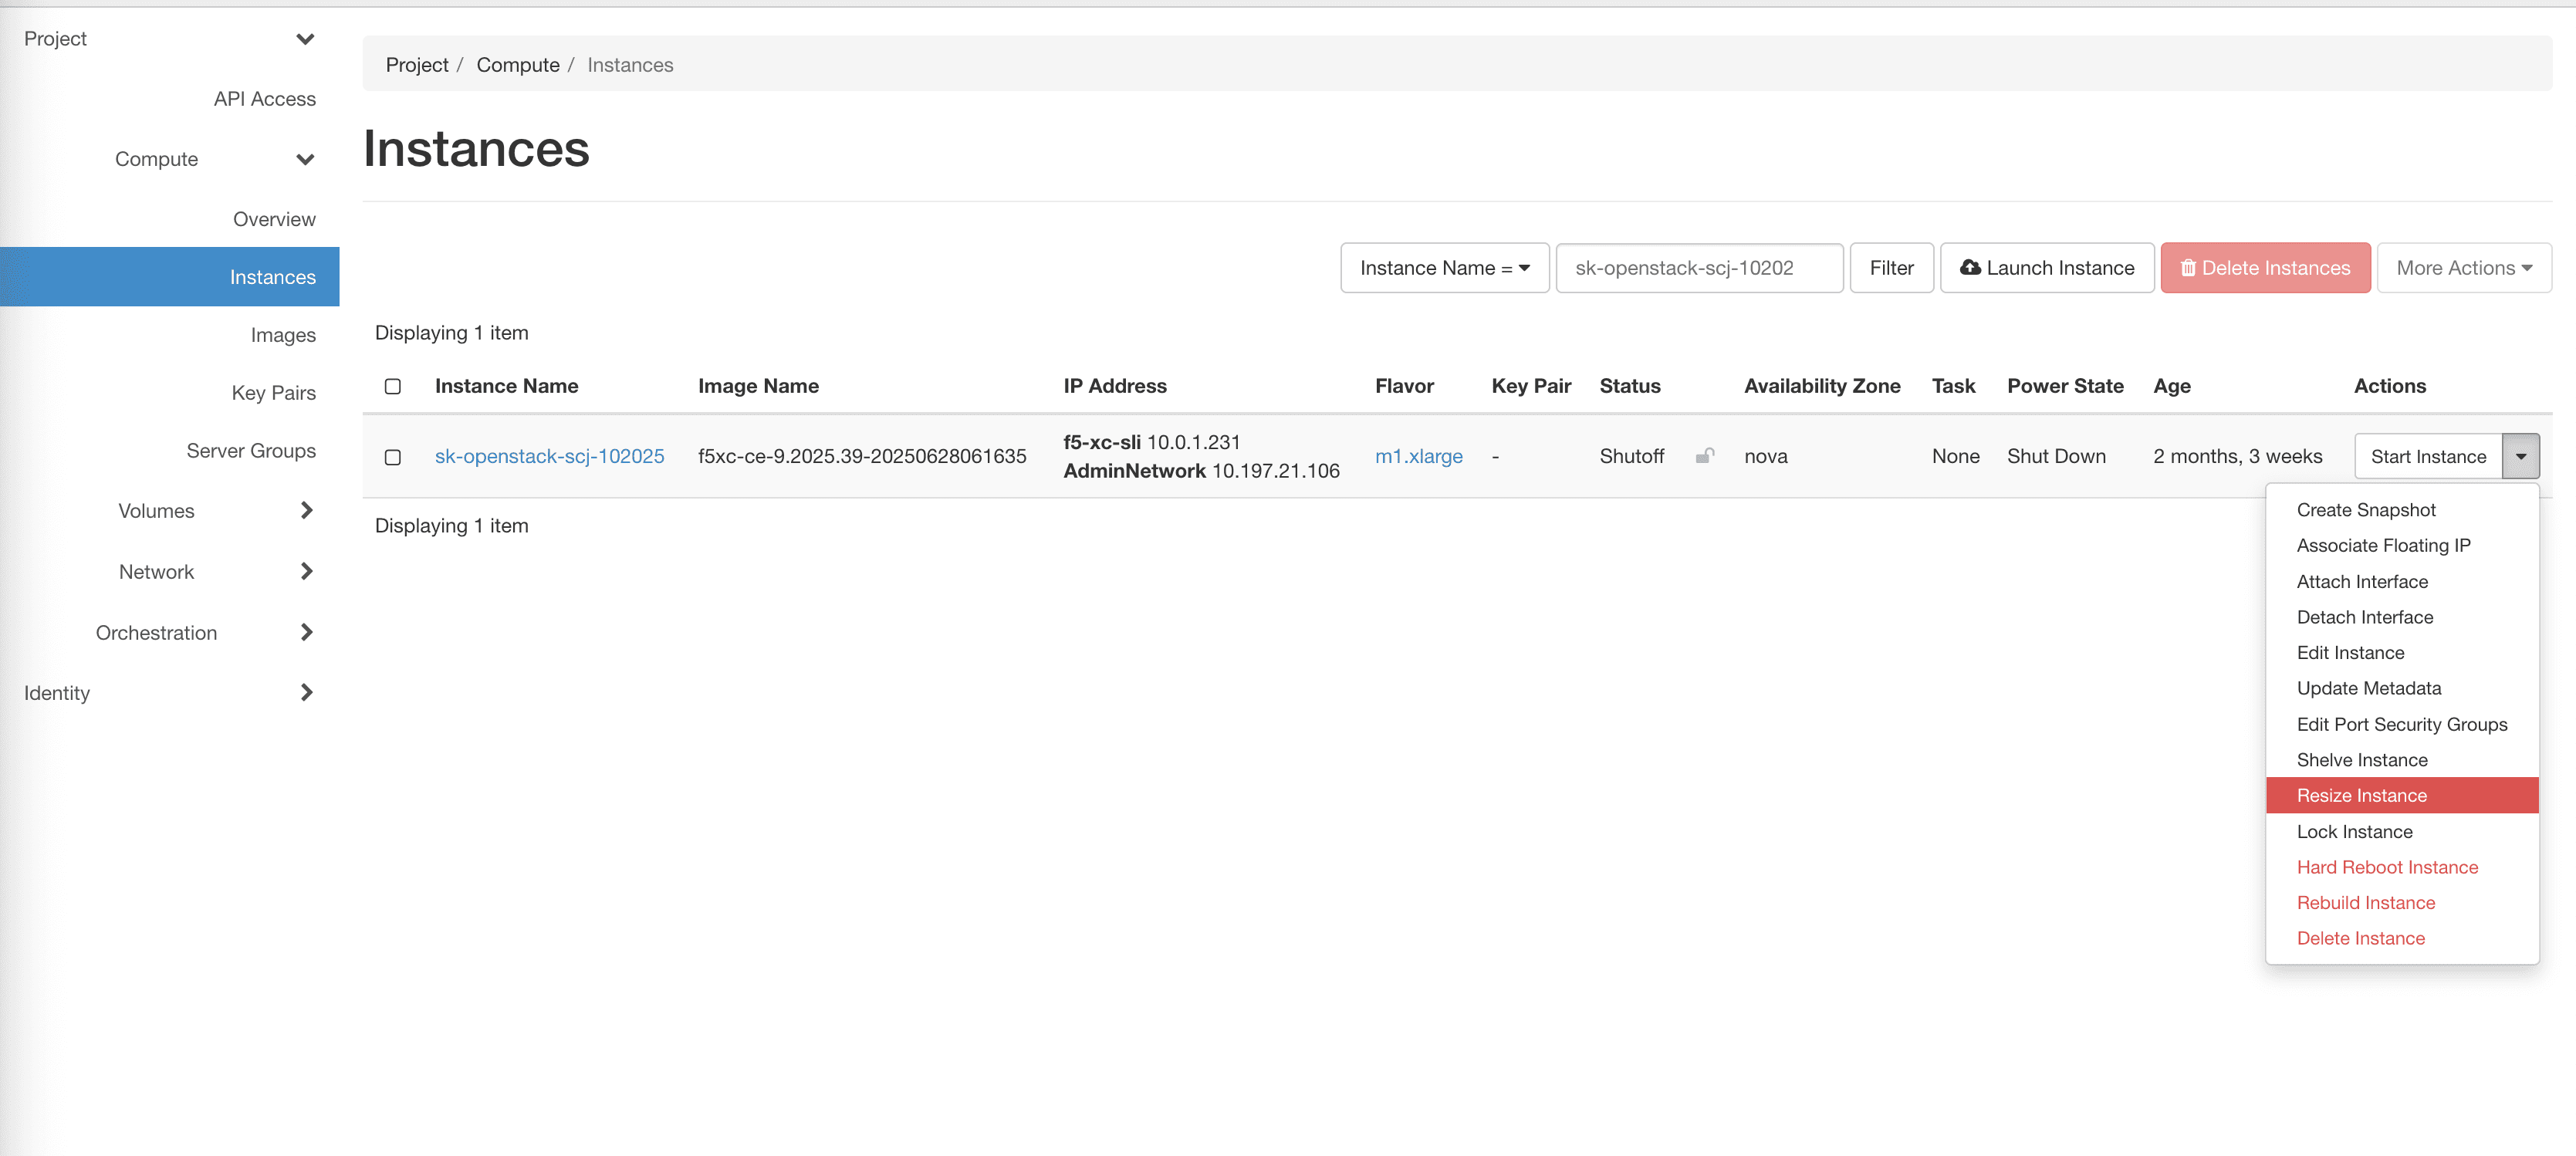
Figure: OpenStack - Resize Node Instance
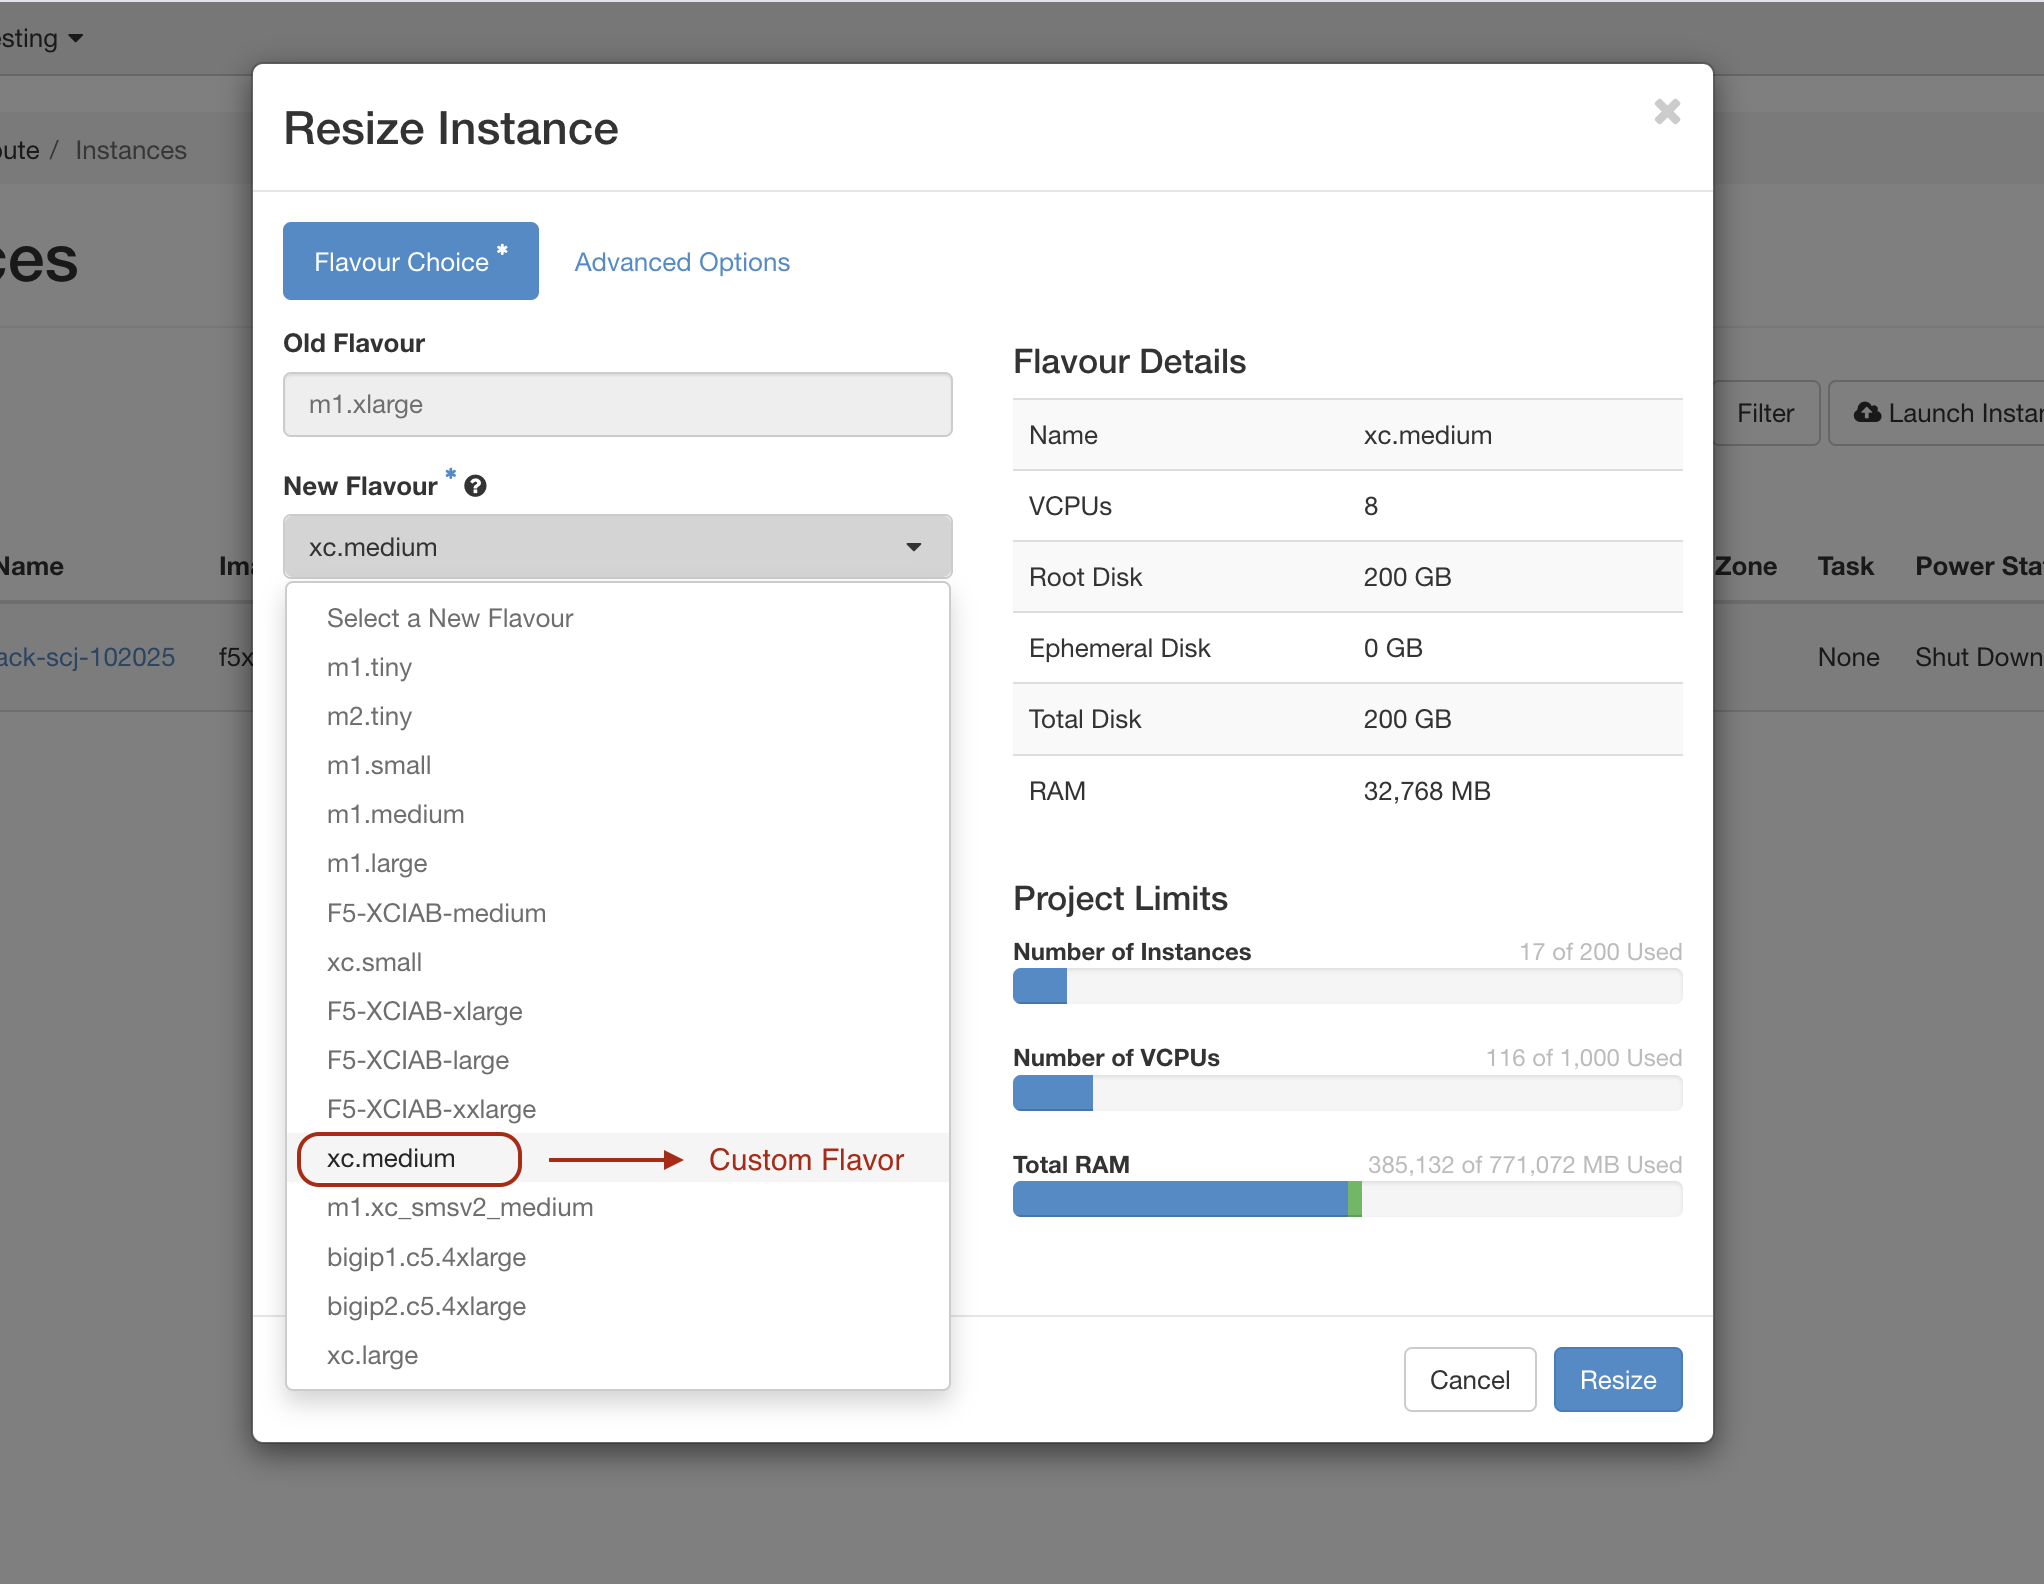
- In the New Flavour field, select the custom flavour that you created for resizing, and then click Resize.
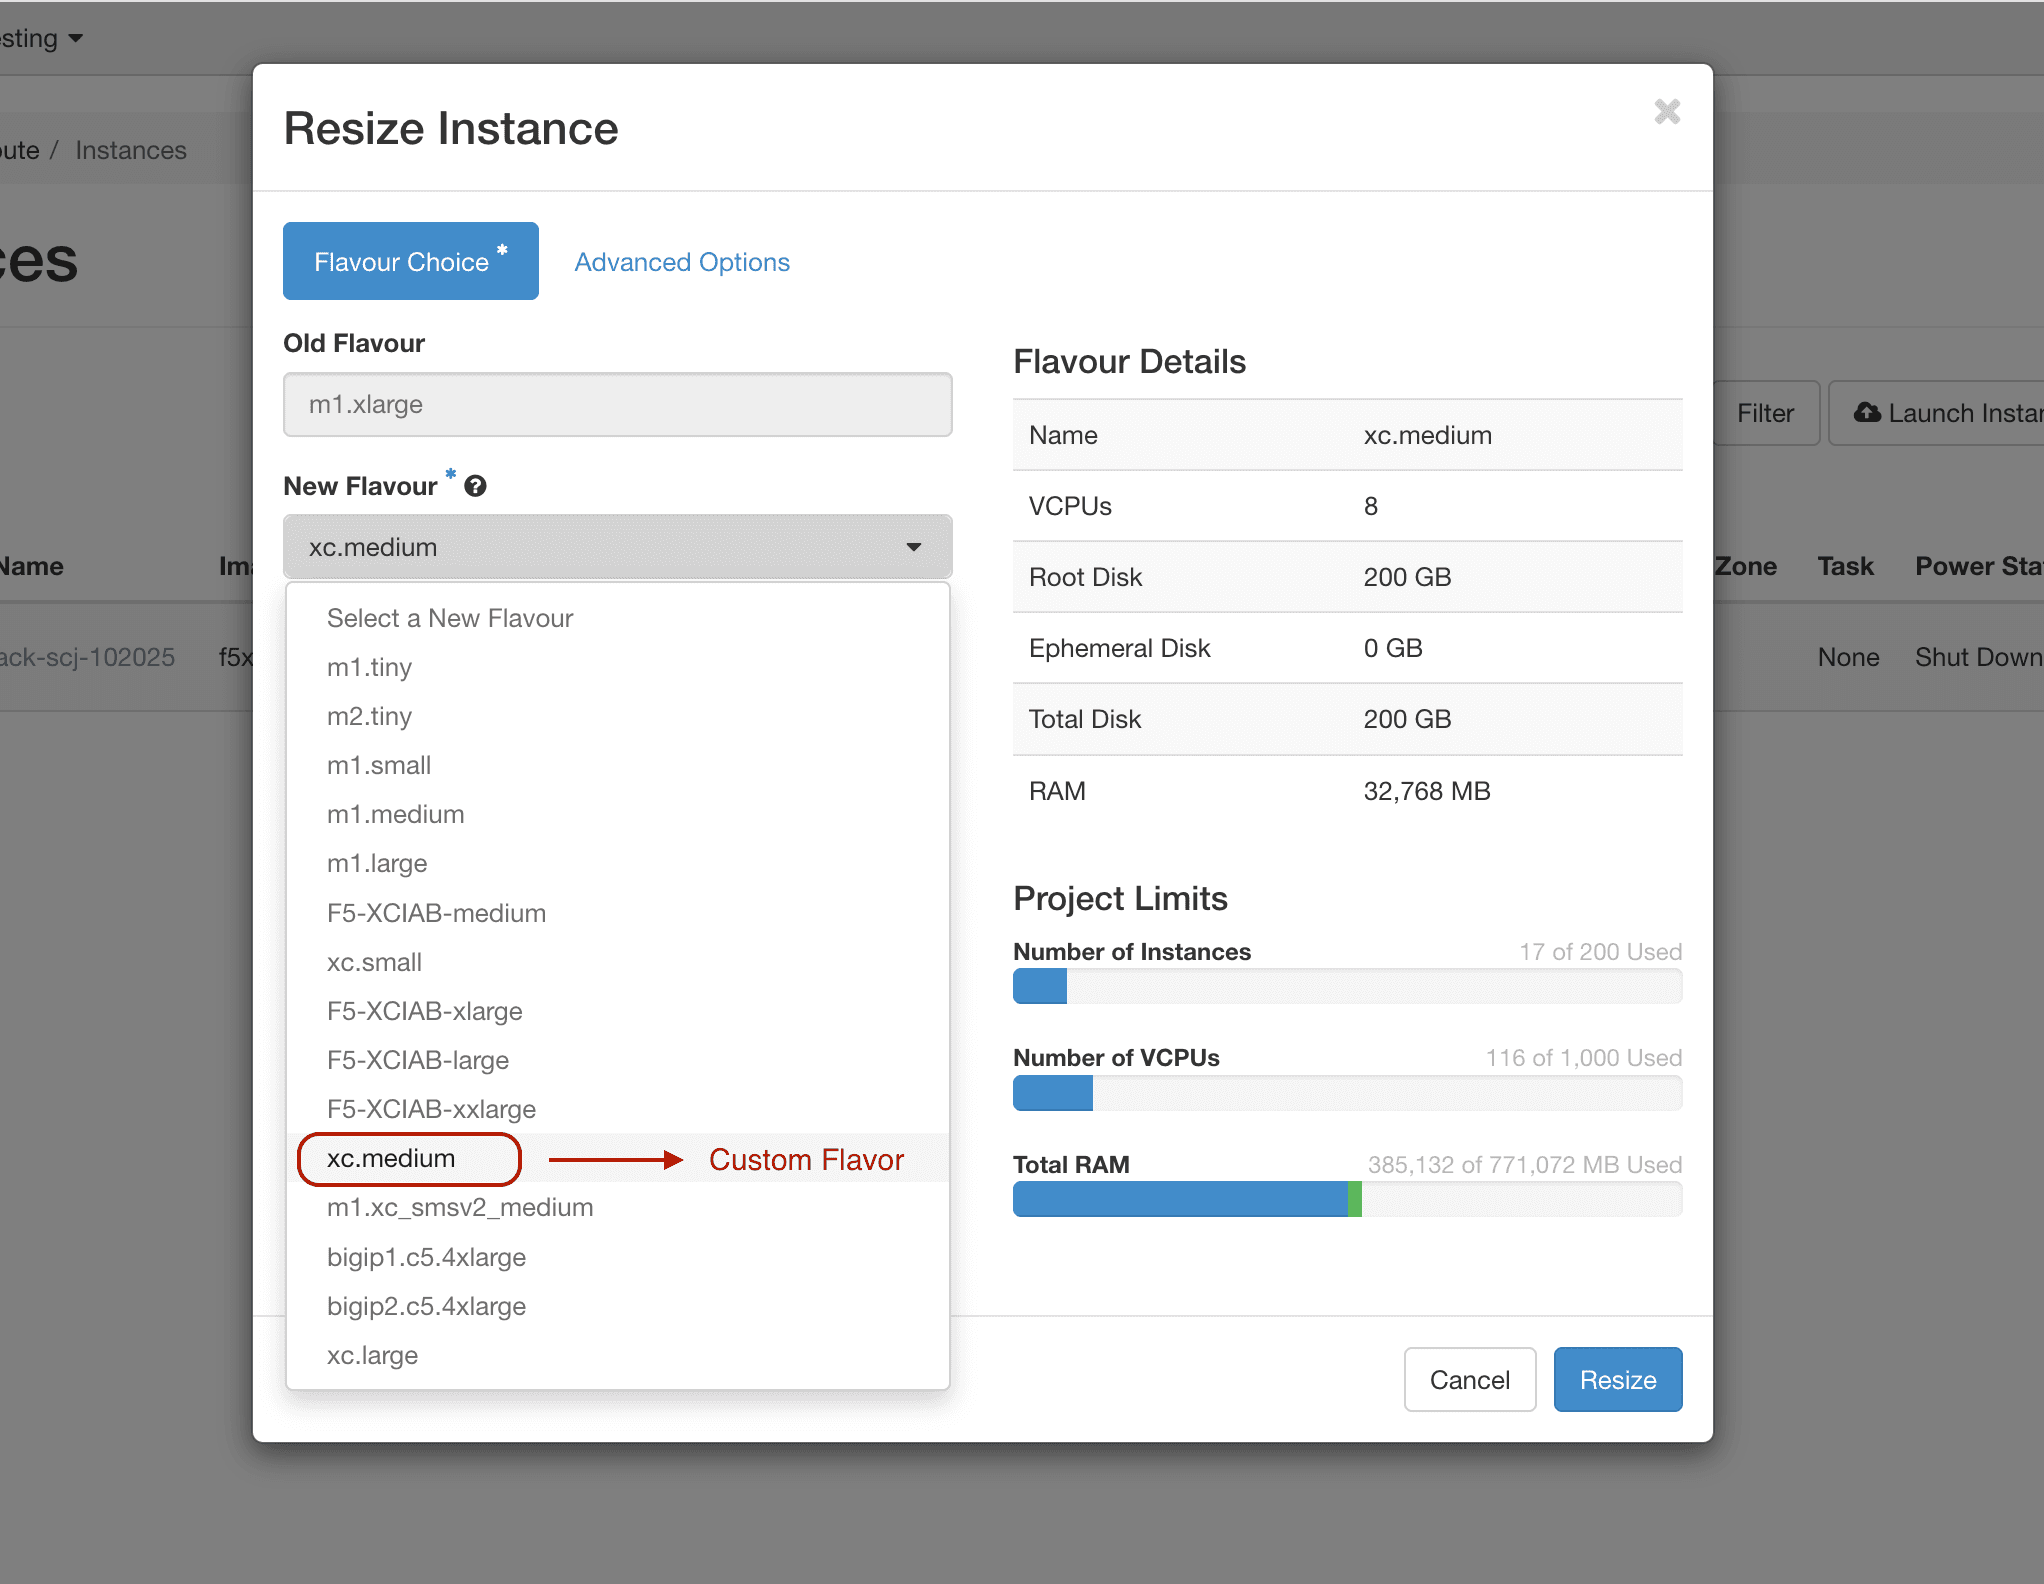
Figure: OpenStack - Shape Configuration Resized
- Repeat the steps for each node that you want to update.

Step 4:Start the Nodes
- From the list of available nodes, select the node that you want to restart.
- From the More Actions menu, select Start Instances.
- Repeat the steps for each node instance that you want to restart.
OCI Site
You can resize the OCI Sites by performing the following steps in the OCI Cloud web console:
Step 1: Stop the existing Nodes
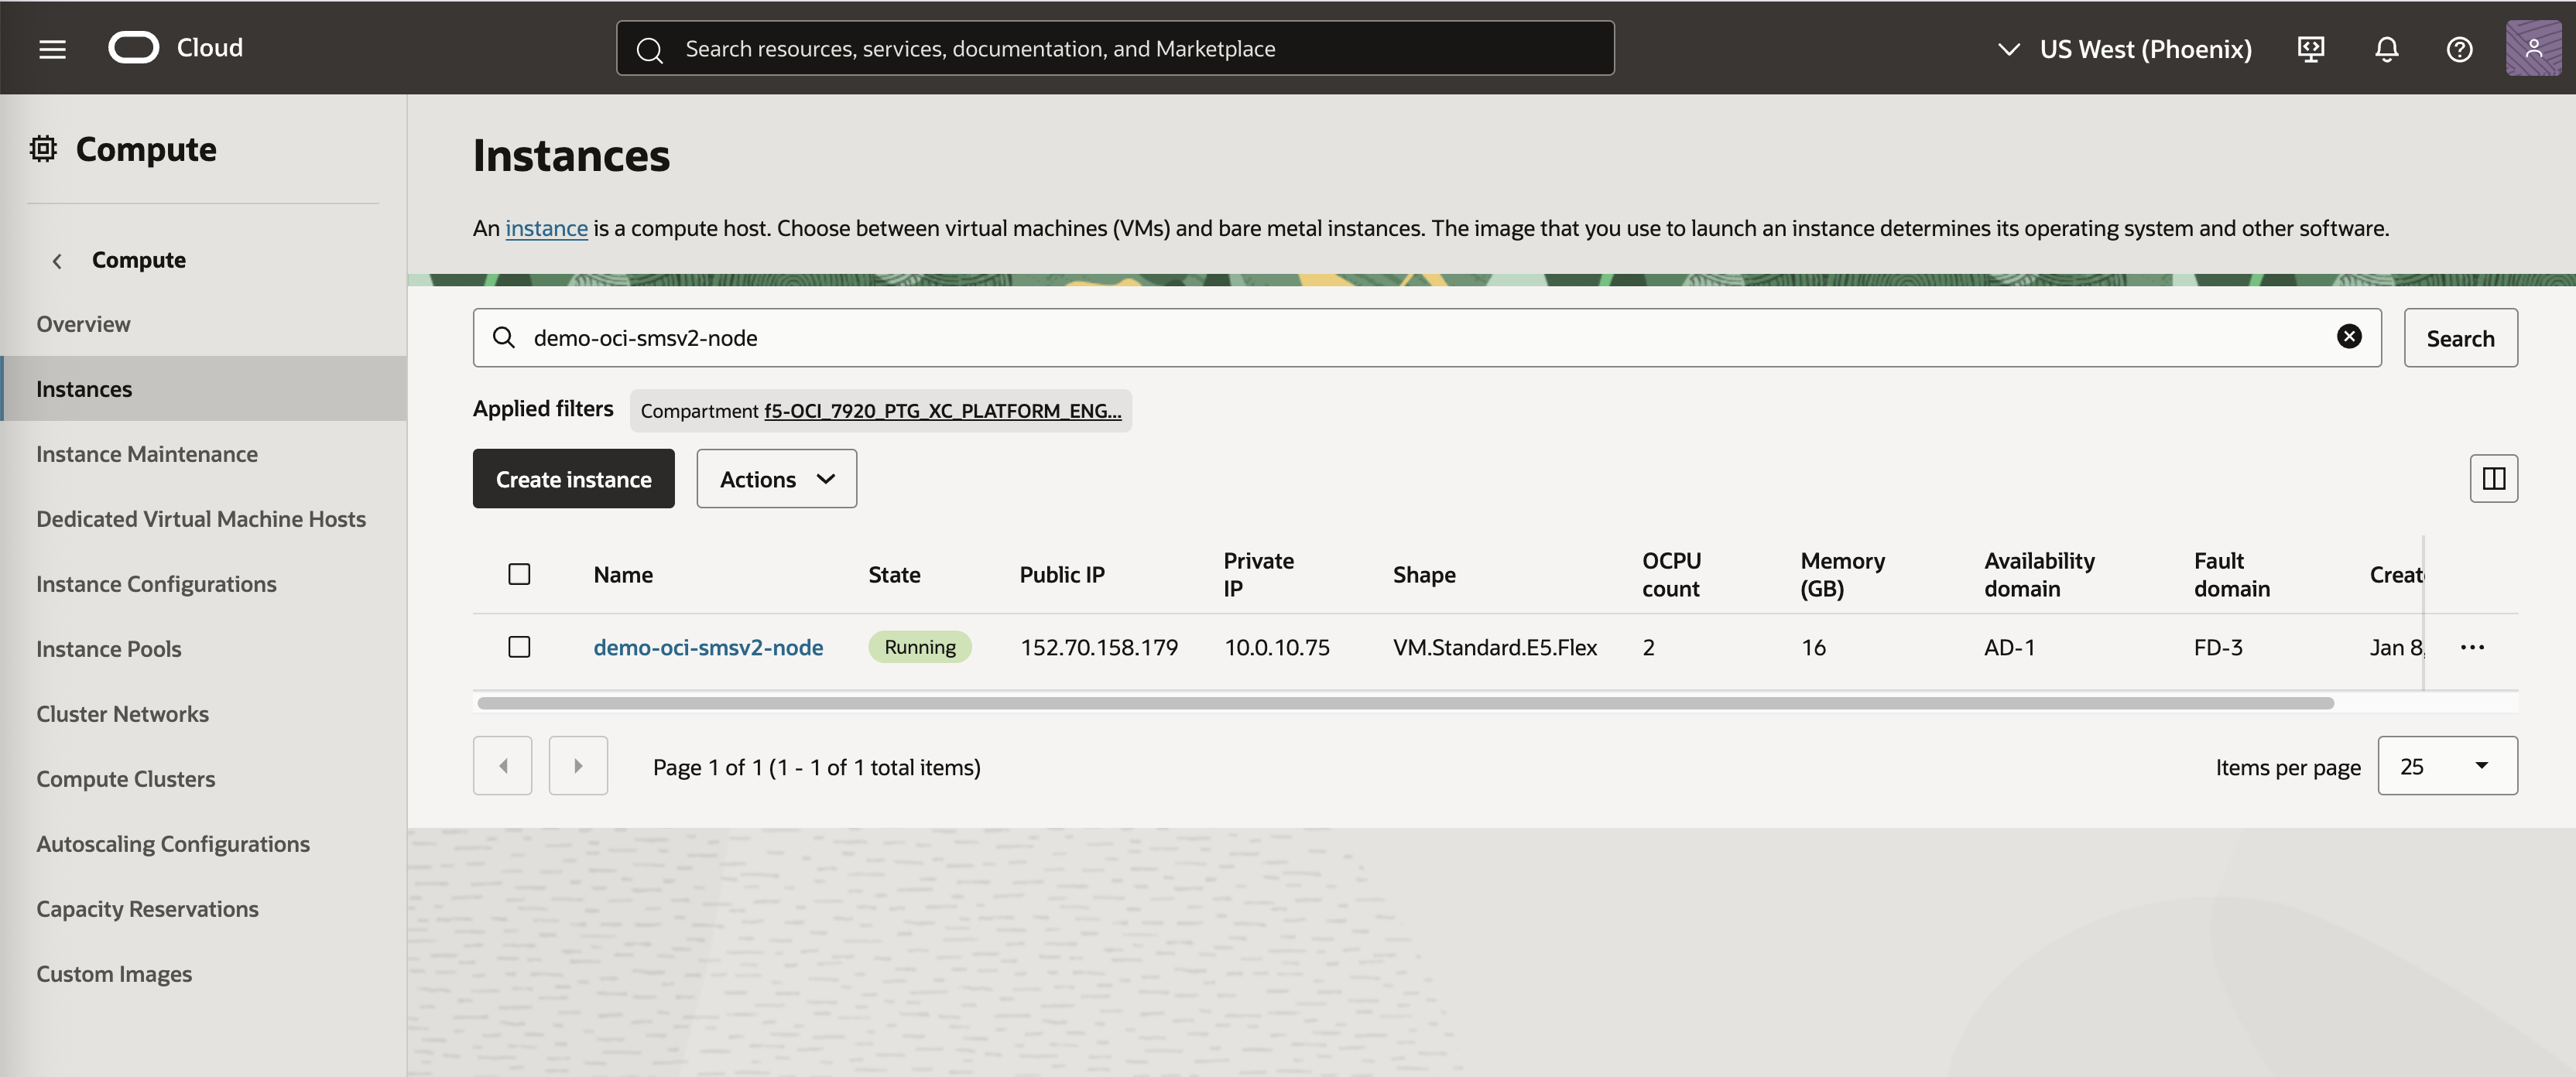
- Login to the OCI Cloud Web Console, and navigate to the list of instances in the console.
- Filter the list of available nodes, and select the node that you want to turn off.
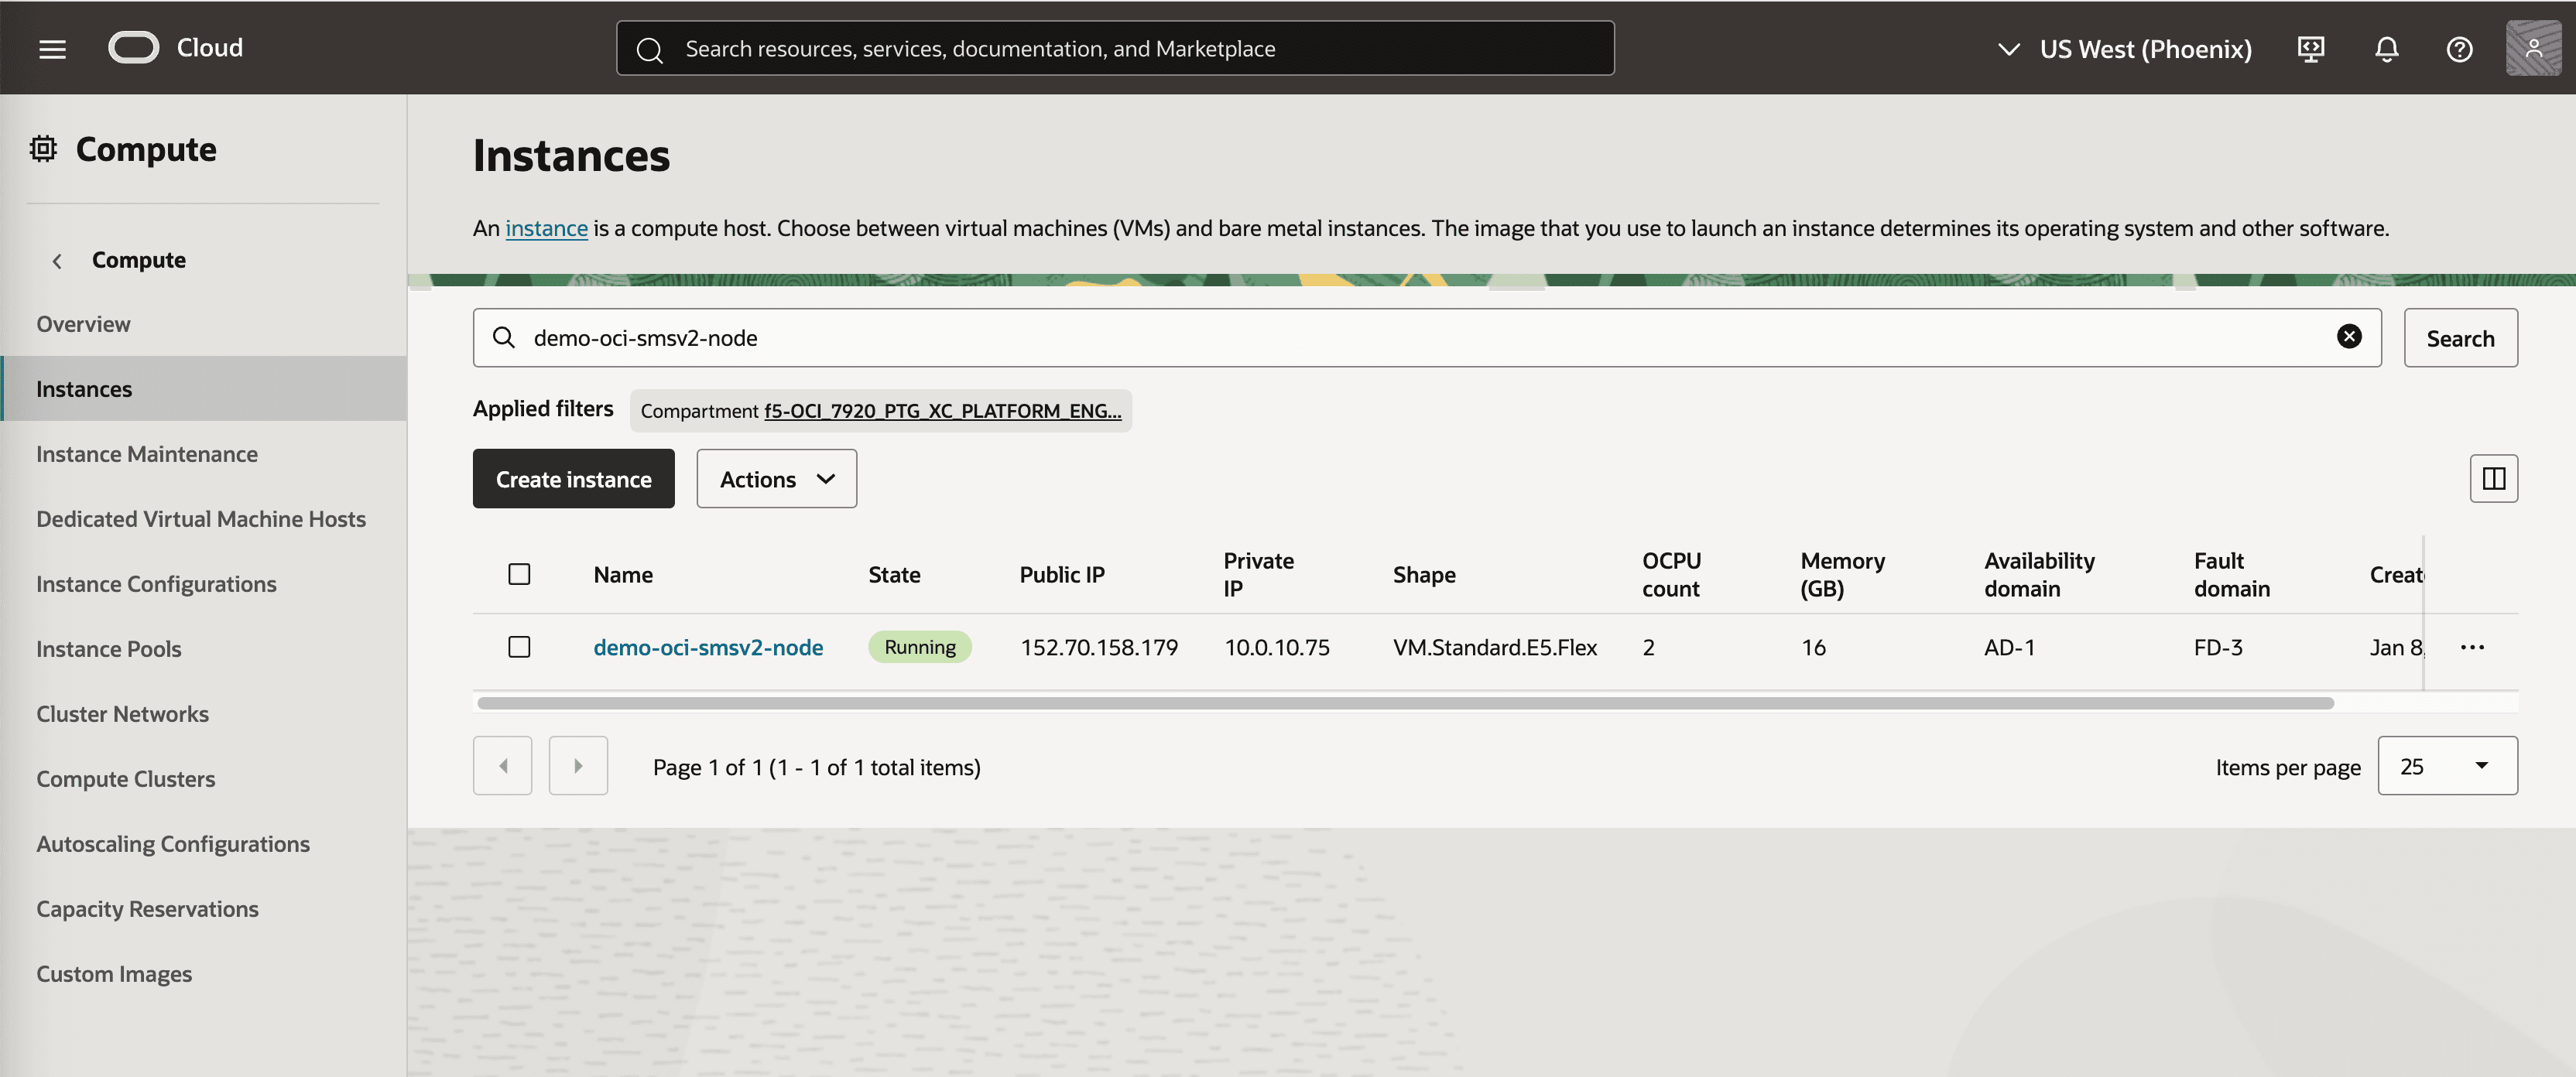
Figure: OCI - Node Instances
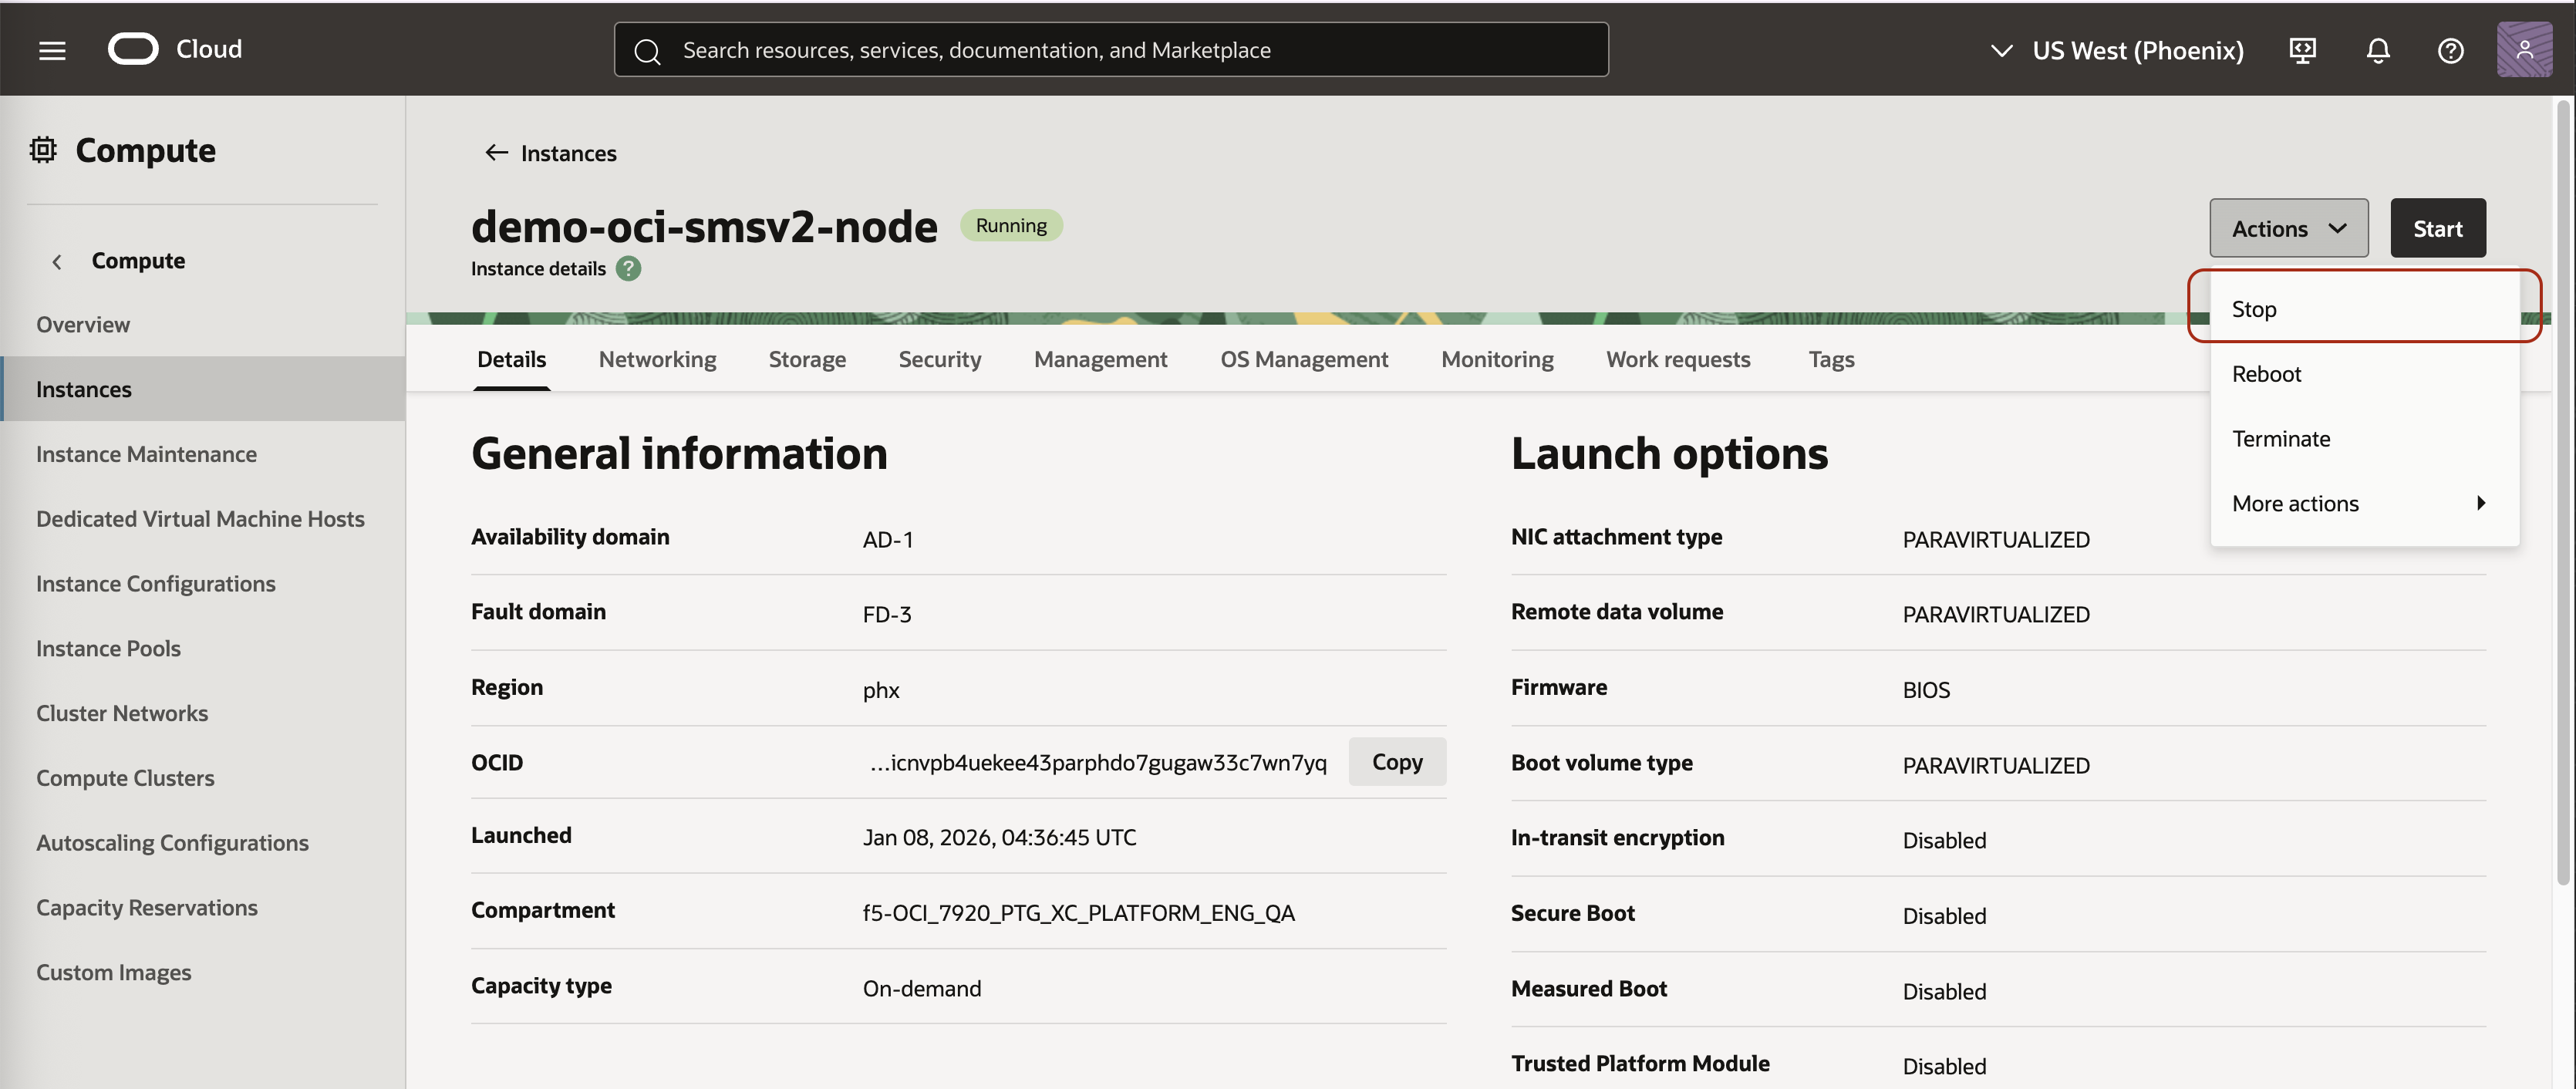
- From the Actions menu, select Stop.

Figure: OCI - Stop Node Instance
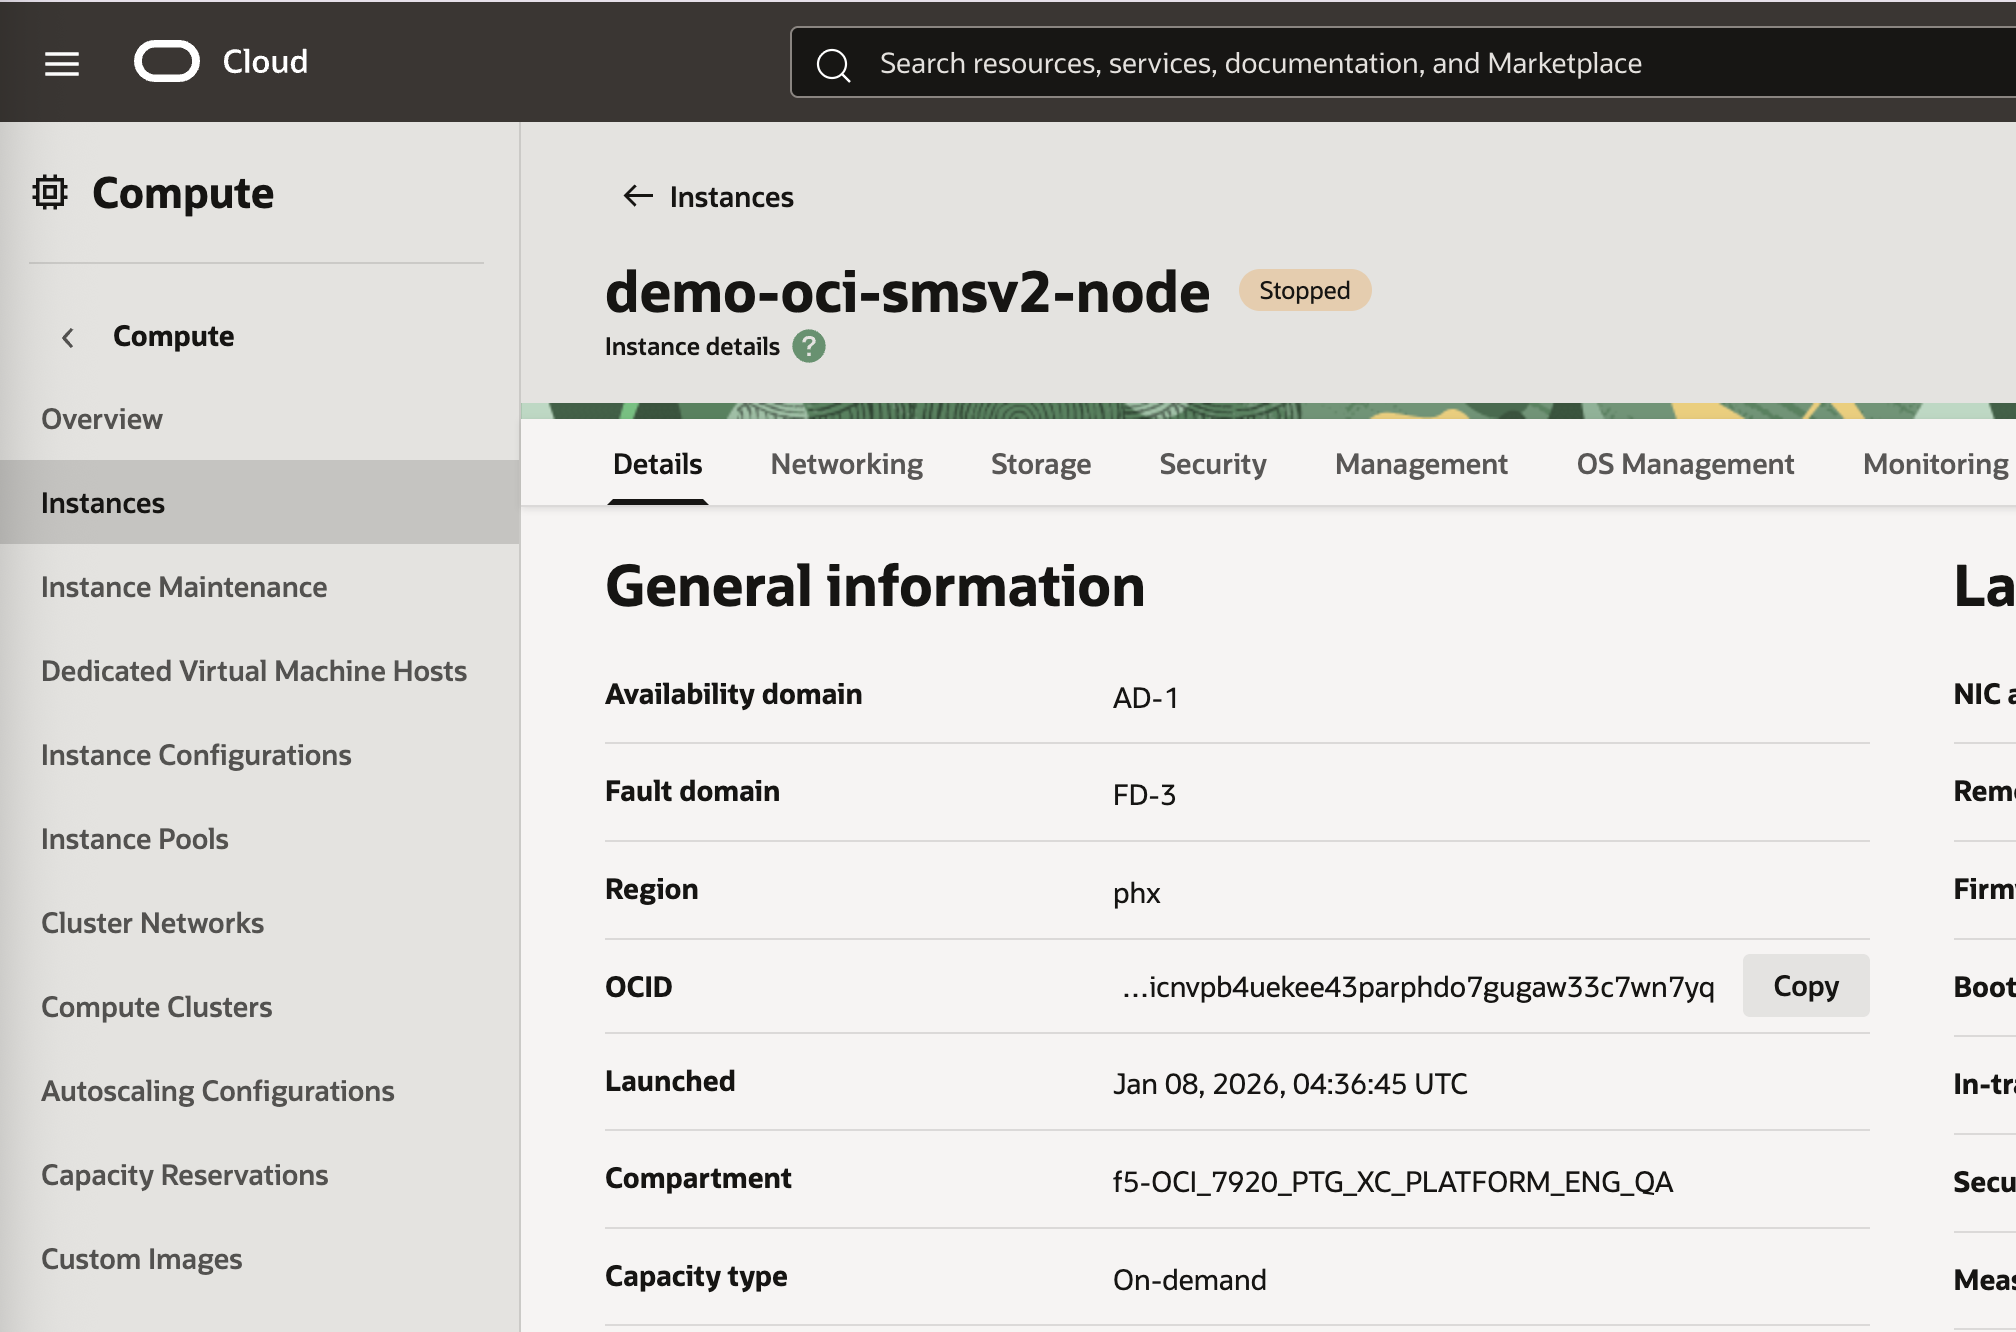
The Instance status changes to Stopped for the specific node.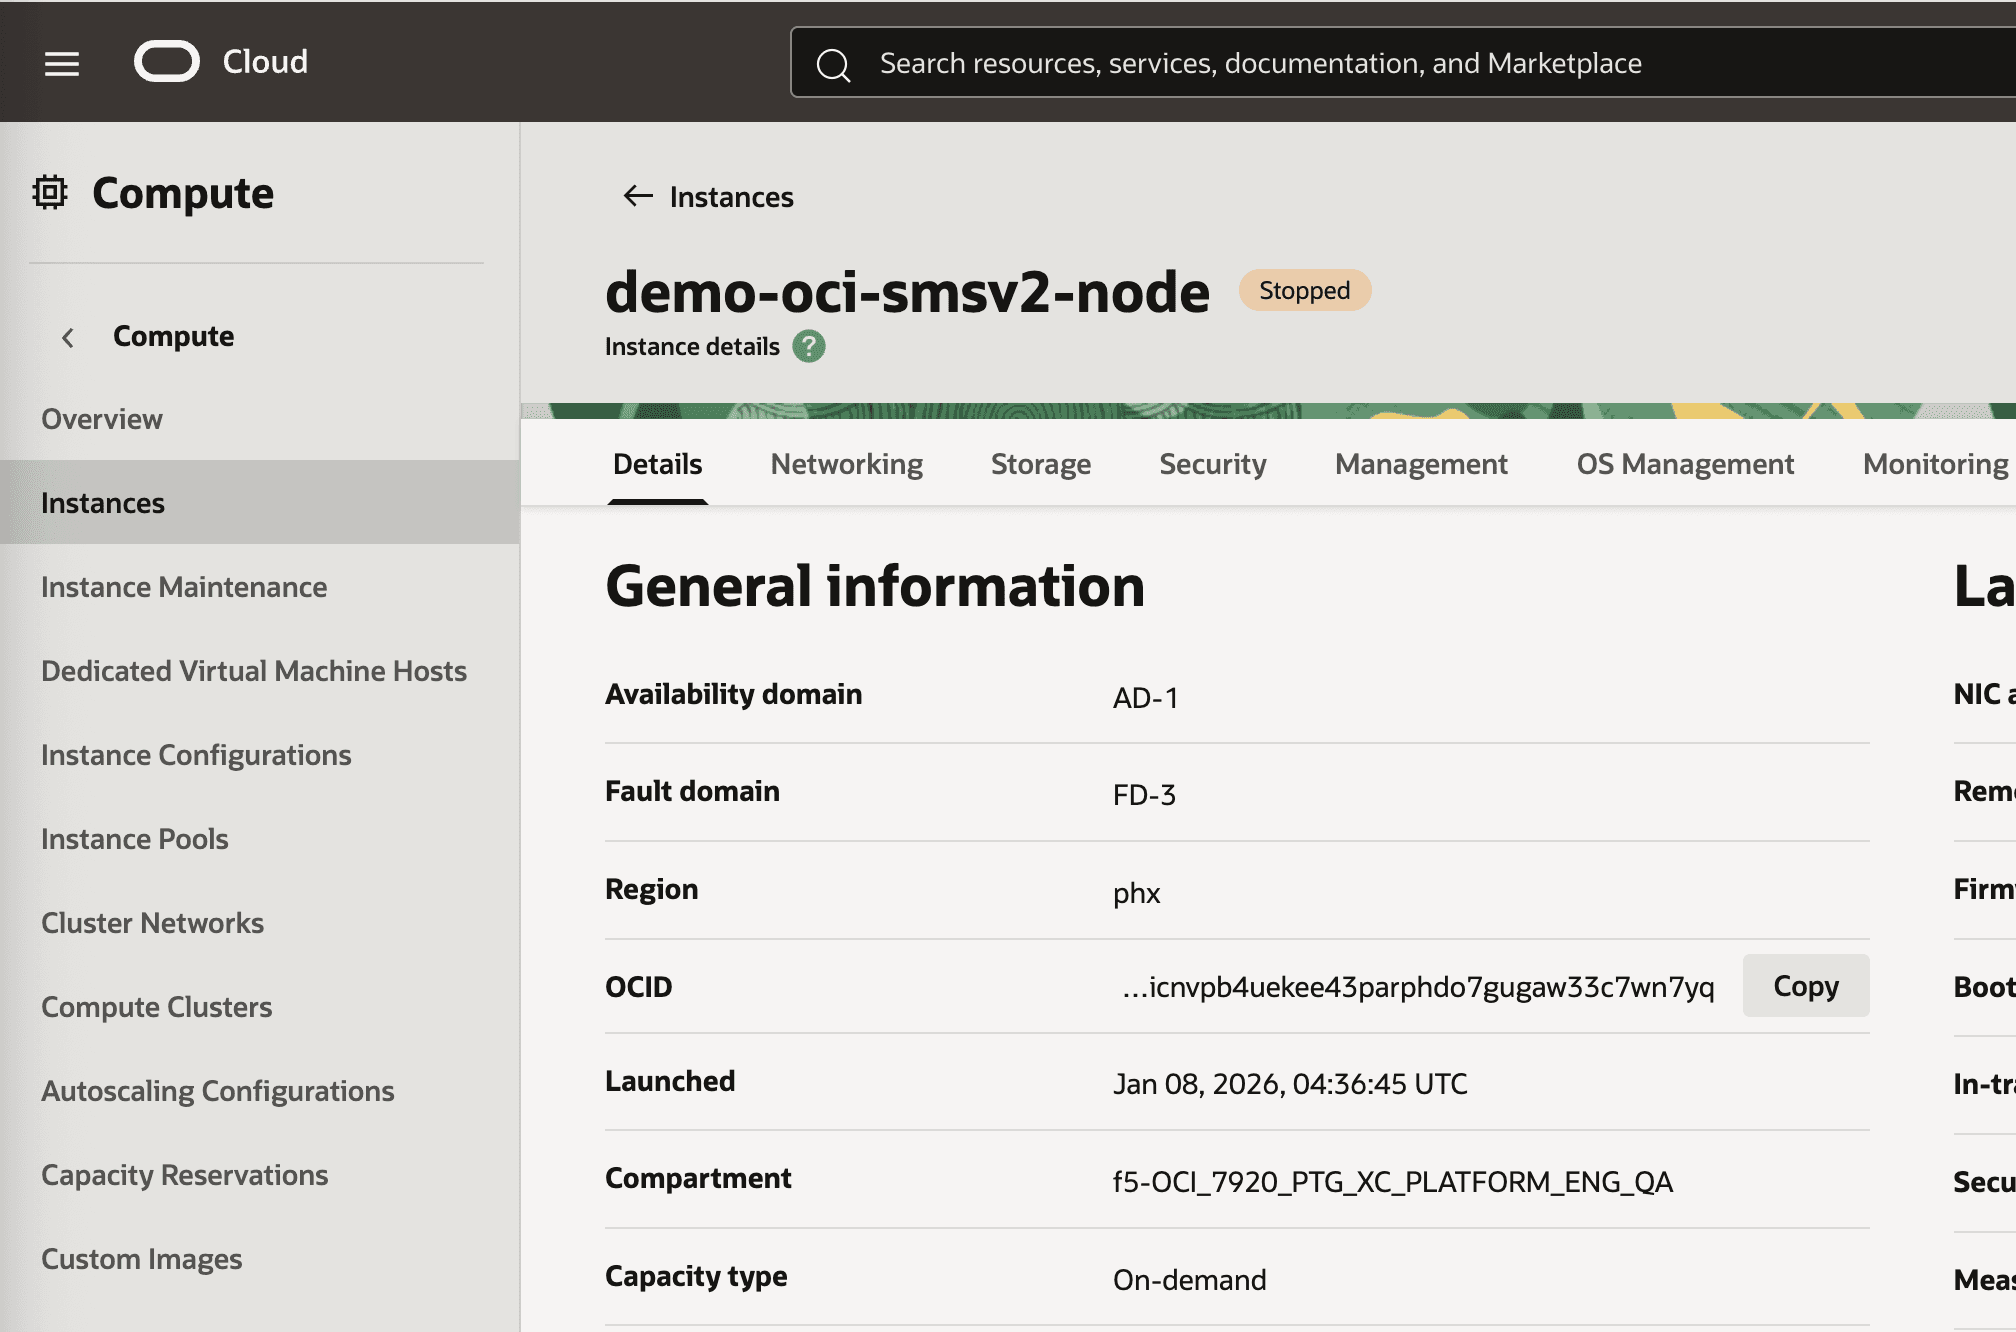
Figure: OCI - Node Instance Stopped
- Repeat the steps for each node that you want to turn off.
Step 2: Update the CPU and Memory for each Node
- From the list of available Nodes, select the node that you want to update.
- From the Actions menu, select More Actions, and then select Edit.
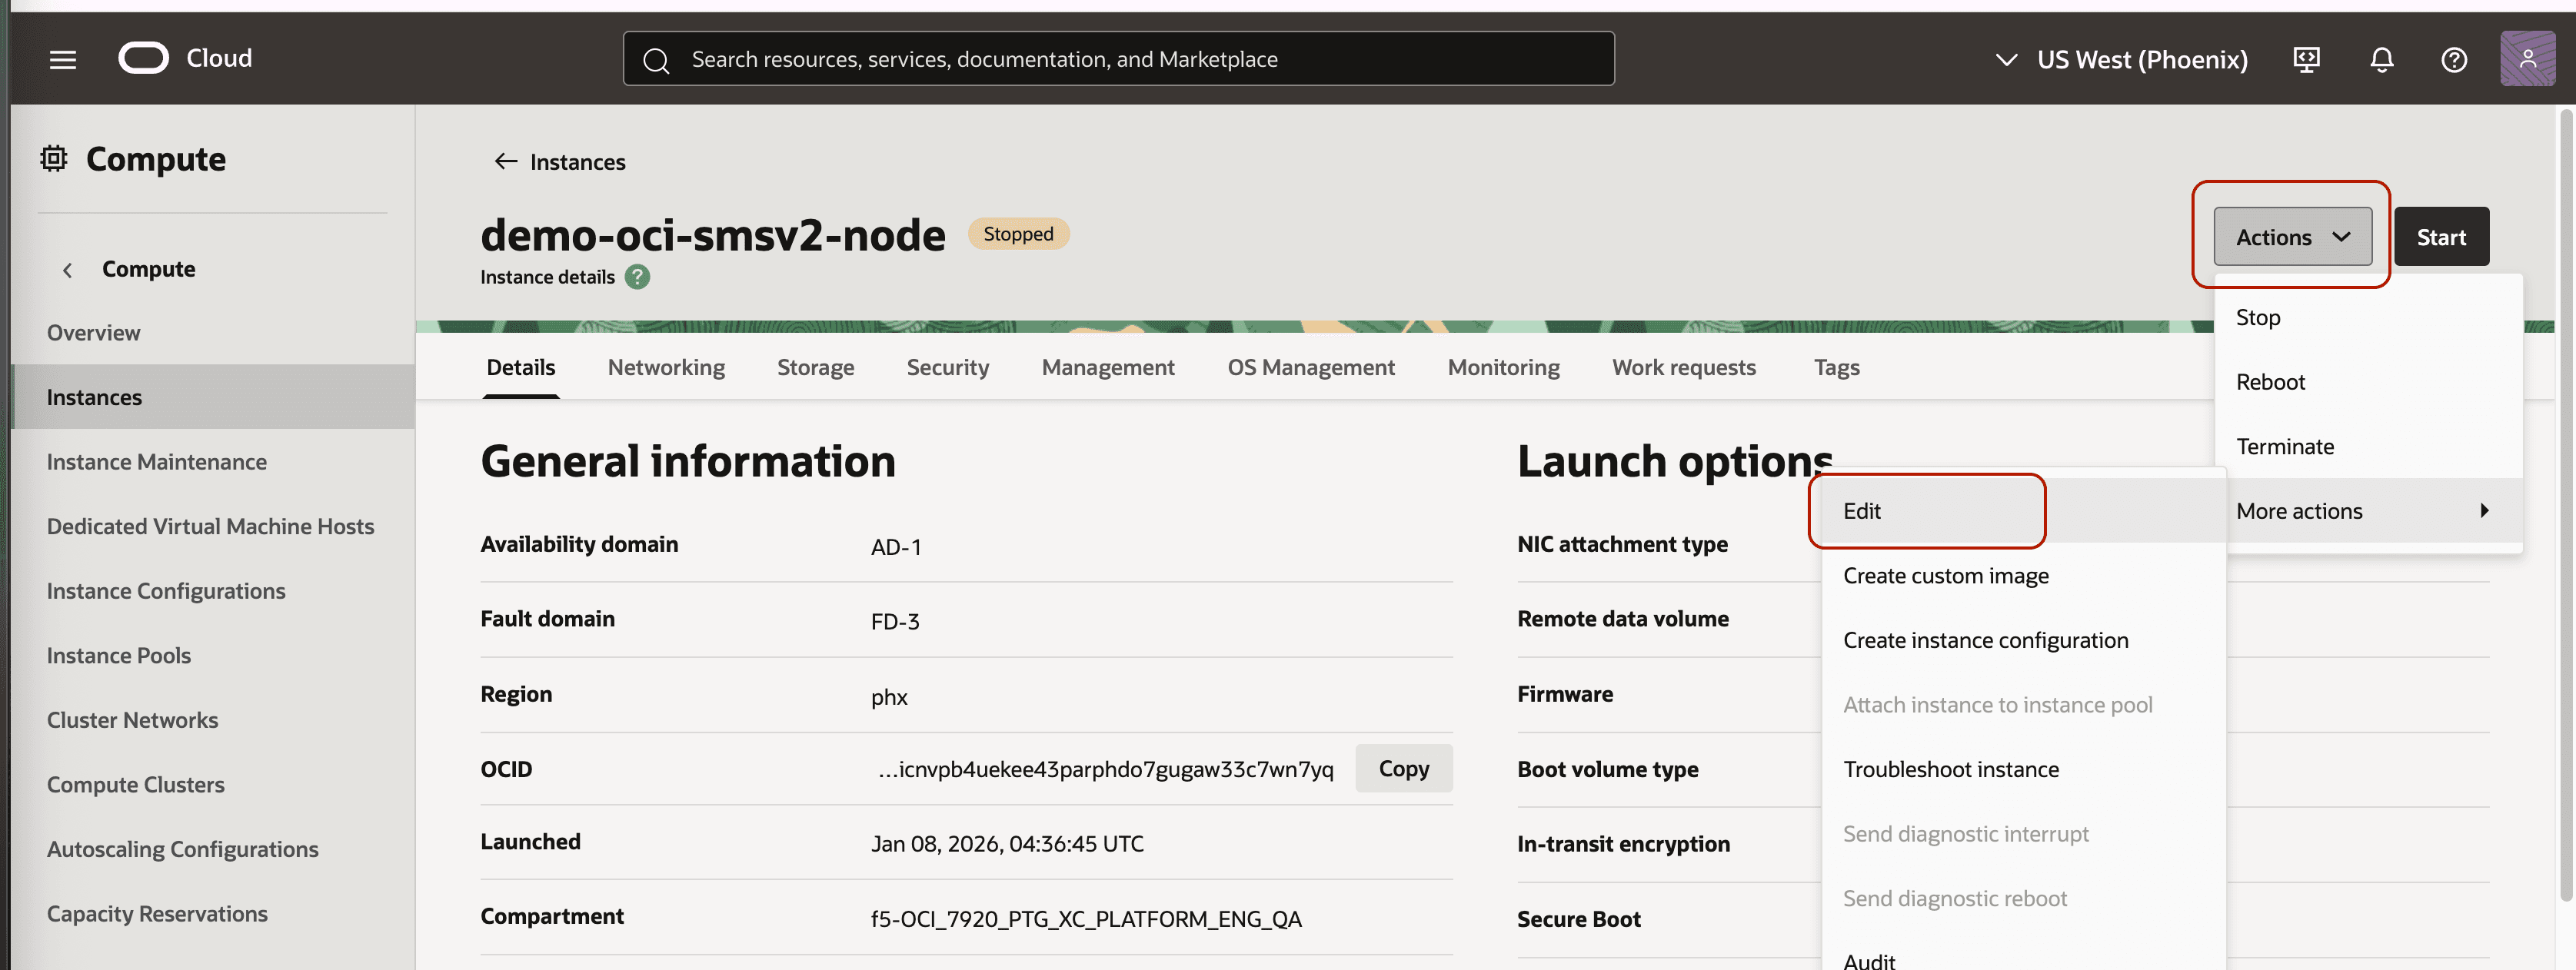
Figure: OCI - Edit Action
- In the Shape name field, select the VM.Standard.E4.Flex option.
- In the number of OCPUs field, update the value to 4 or 8 (depending on whether you want to resize to a medium or large instance).

Note: In the OCI Console, 1 OCPU is equivalent to 2 vCPUs.
- In the Amount of Memory field, update the value to 32 or 64 GB (depending on whether you want to resize to a medium or large instance).
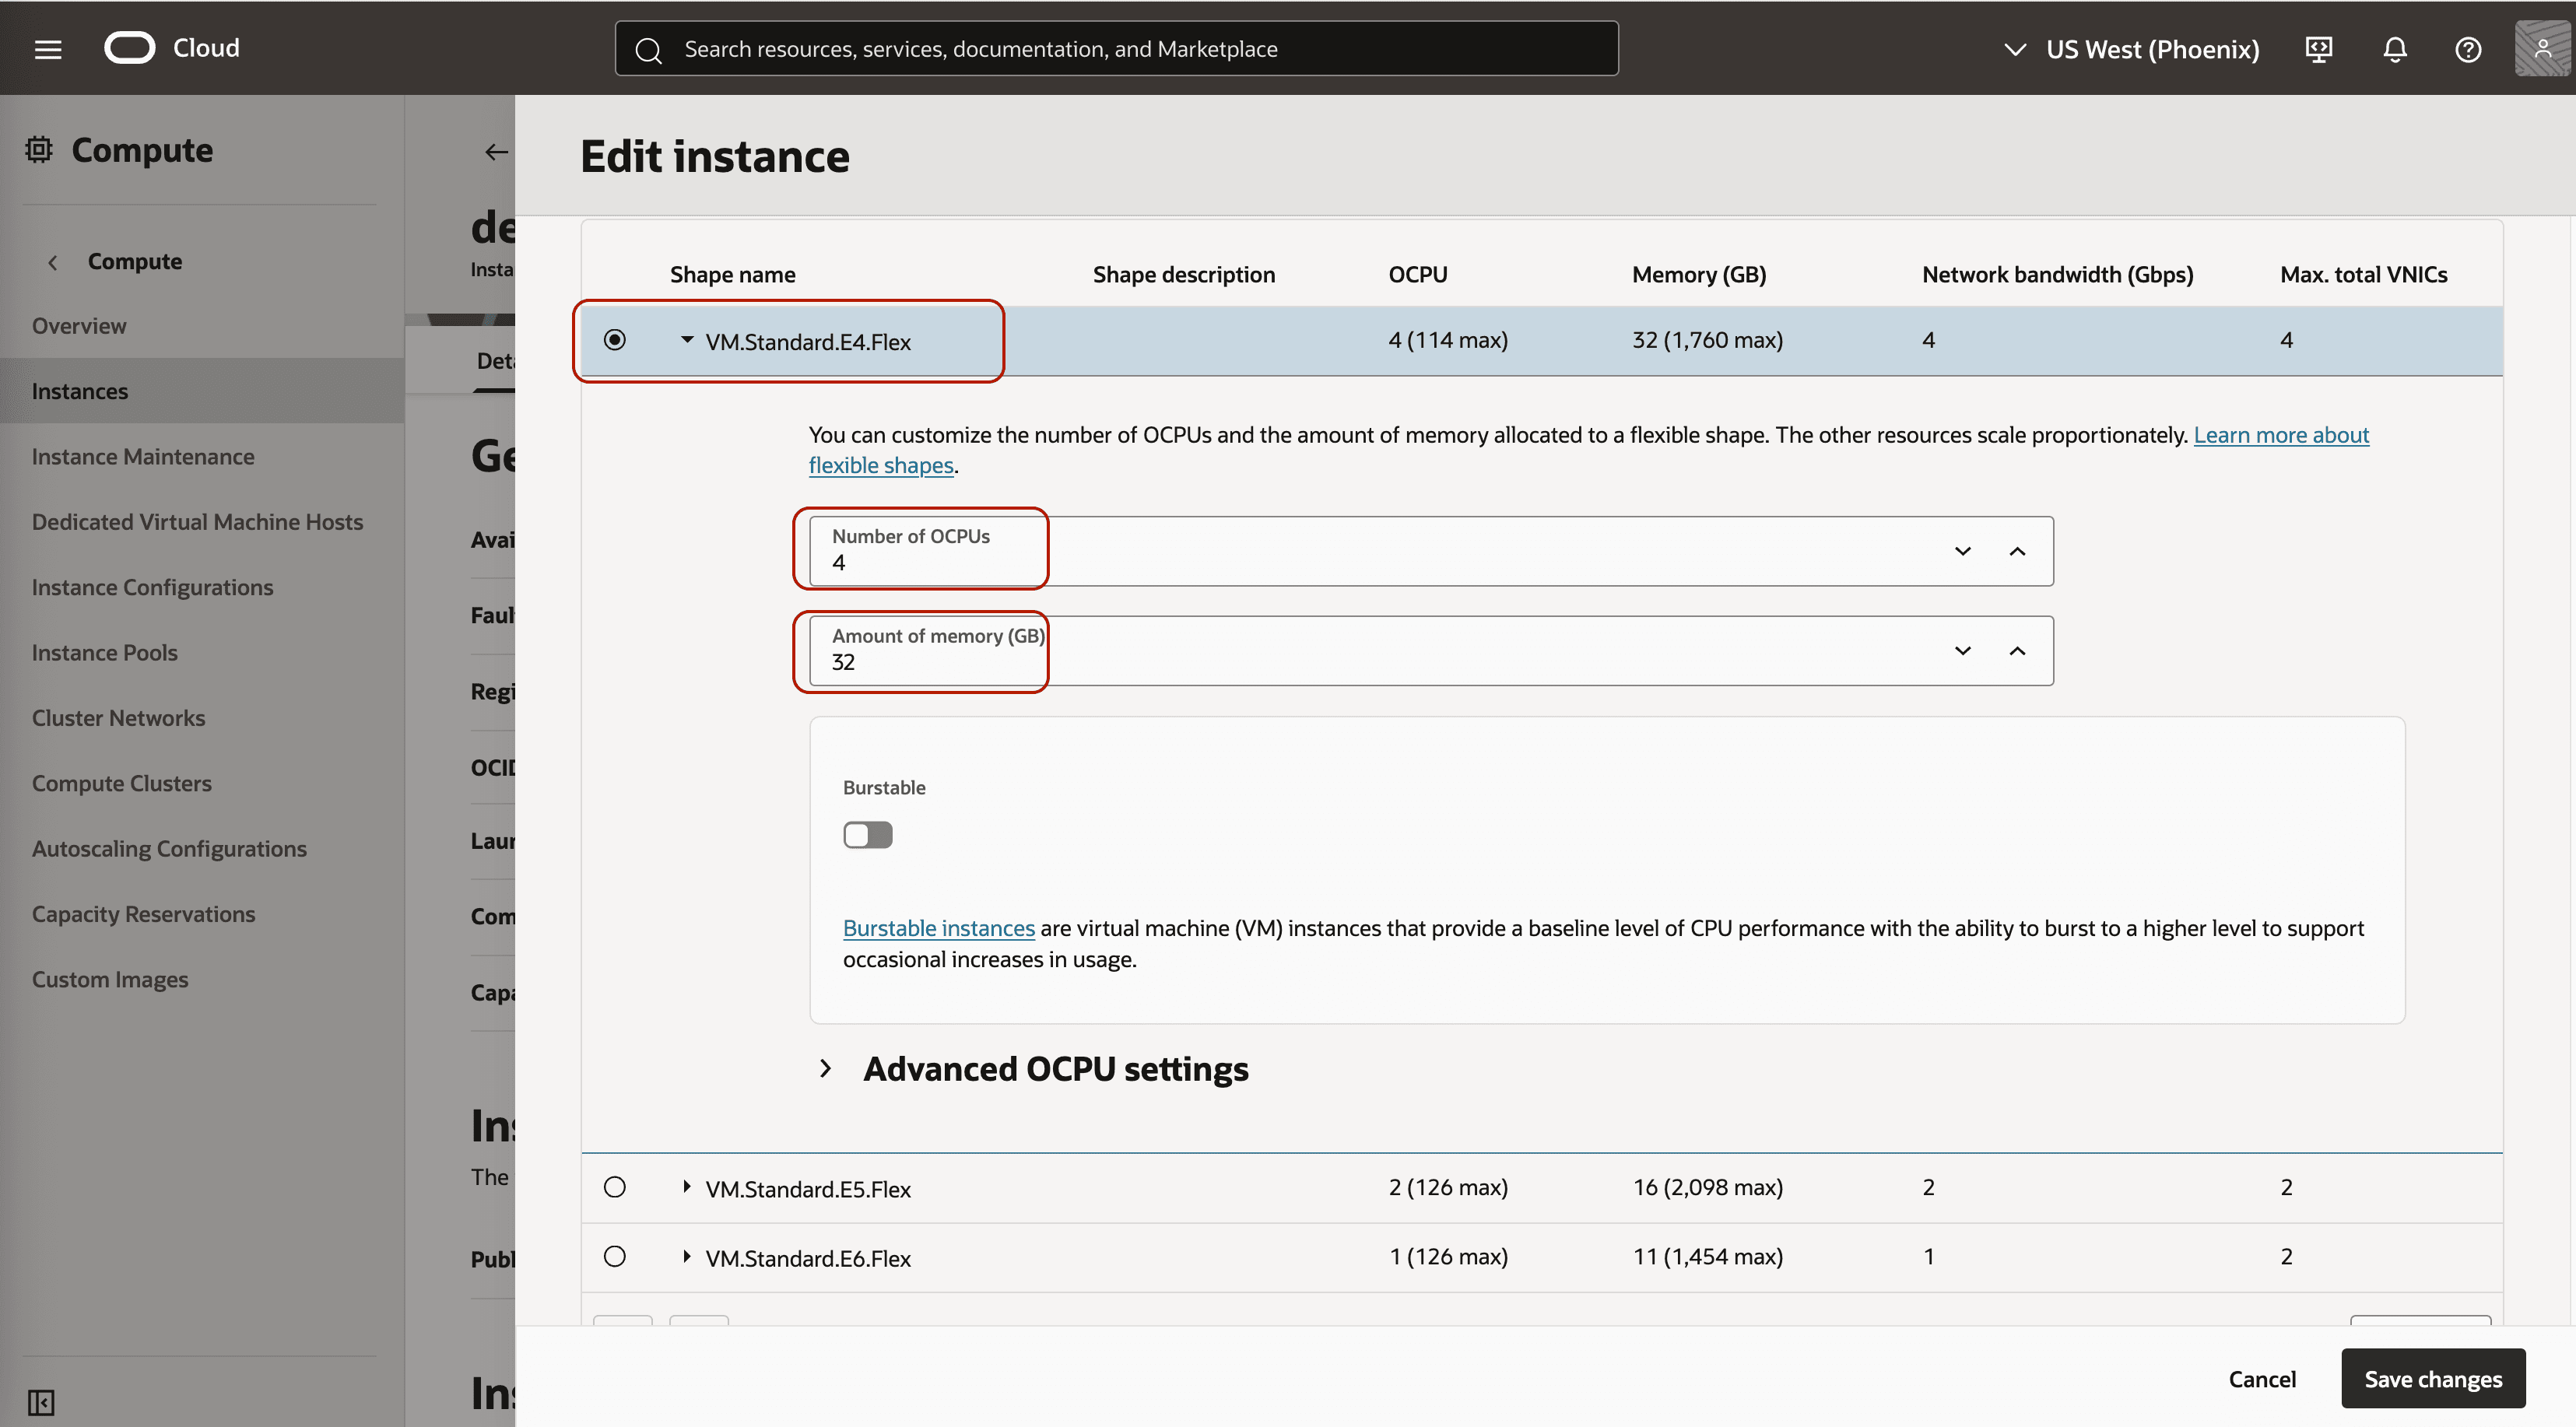
Figure: OCI - Node Instance Resize
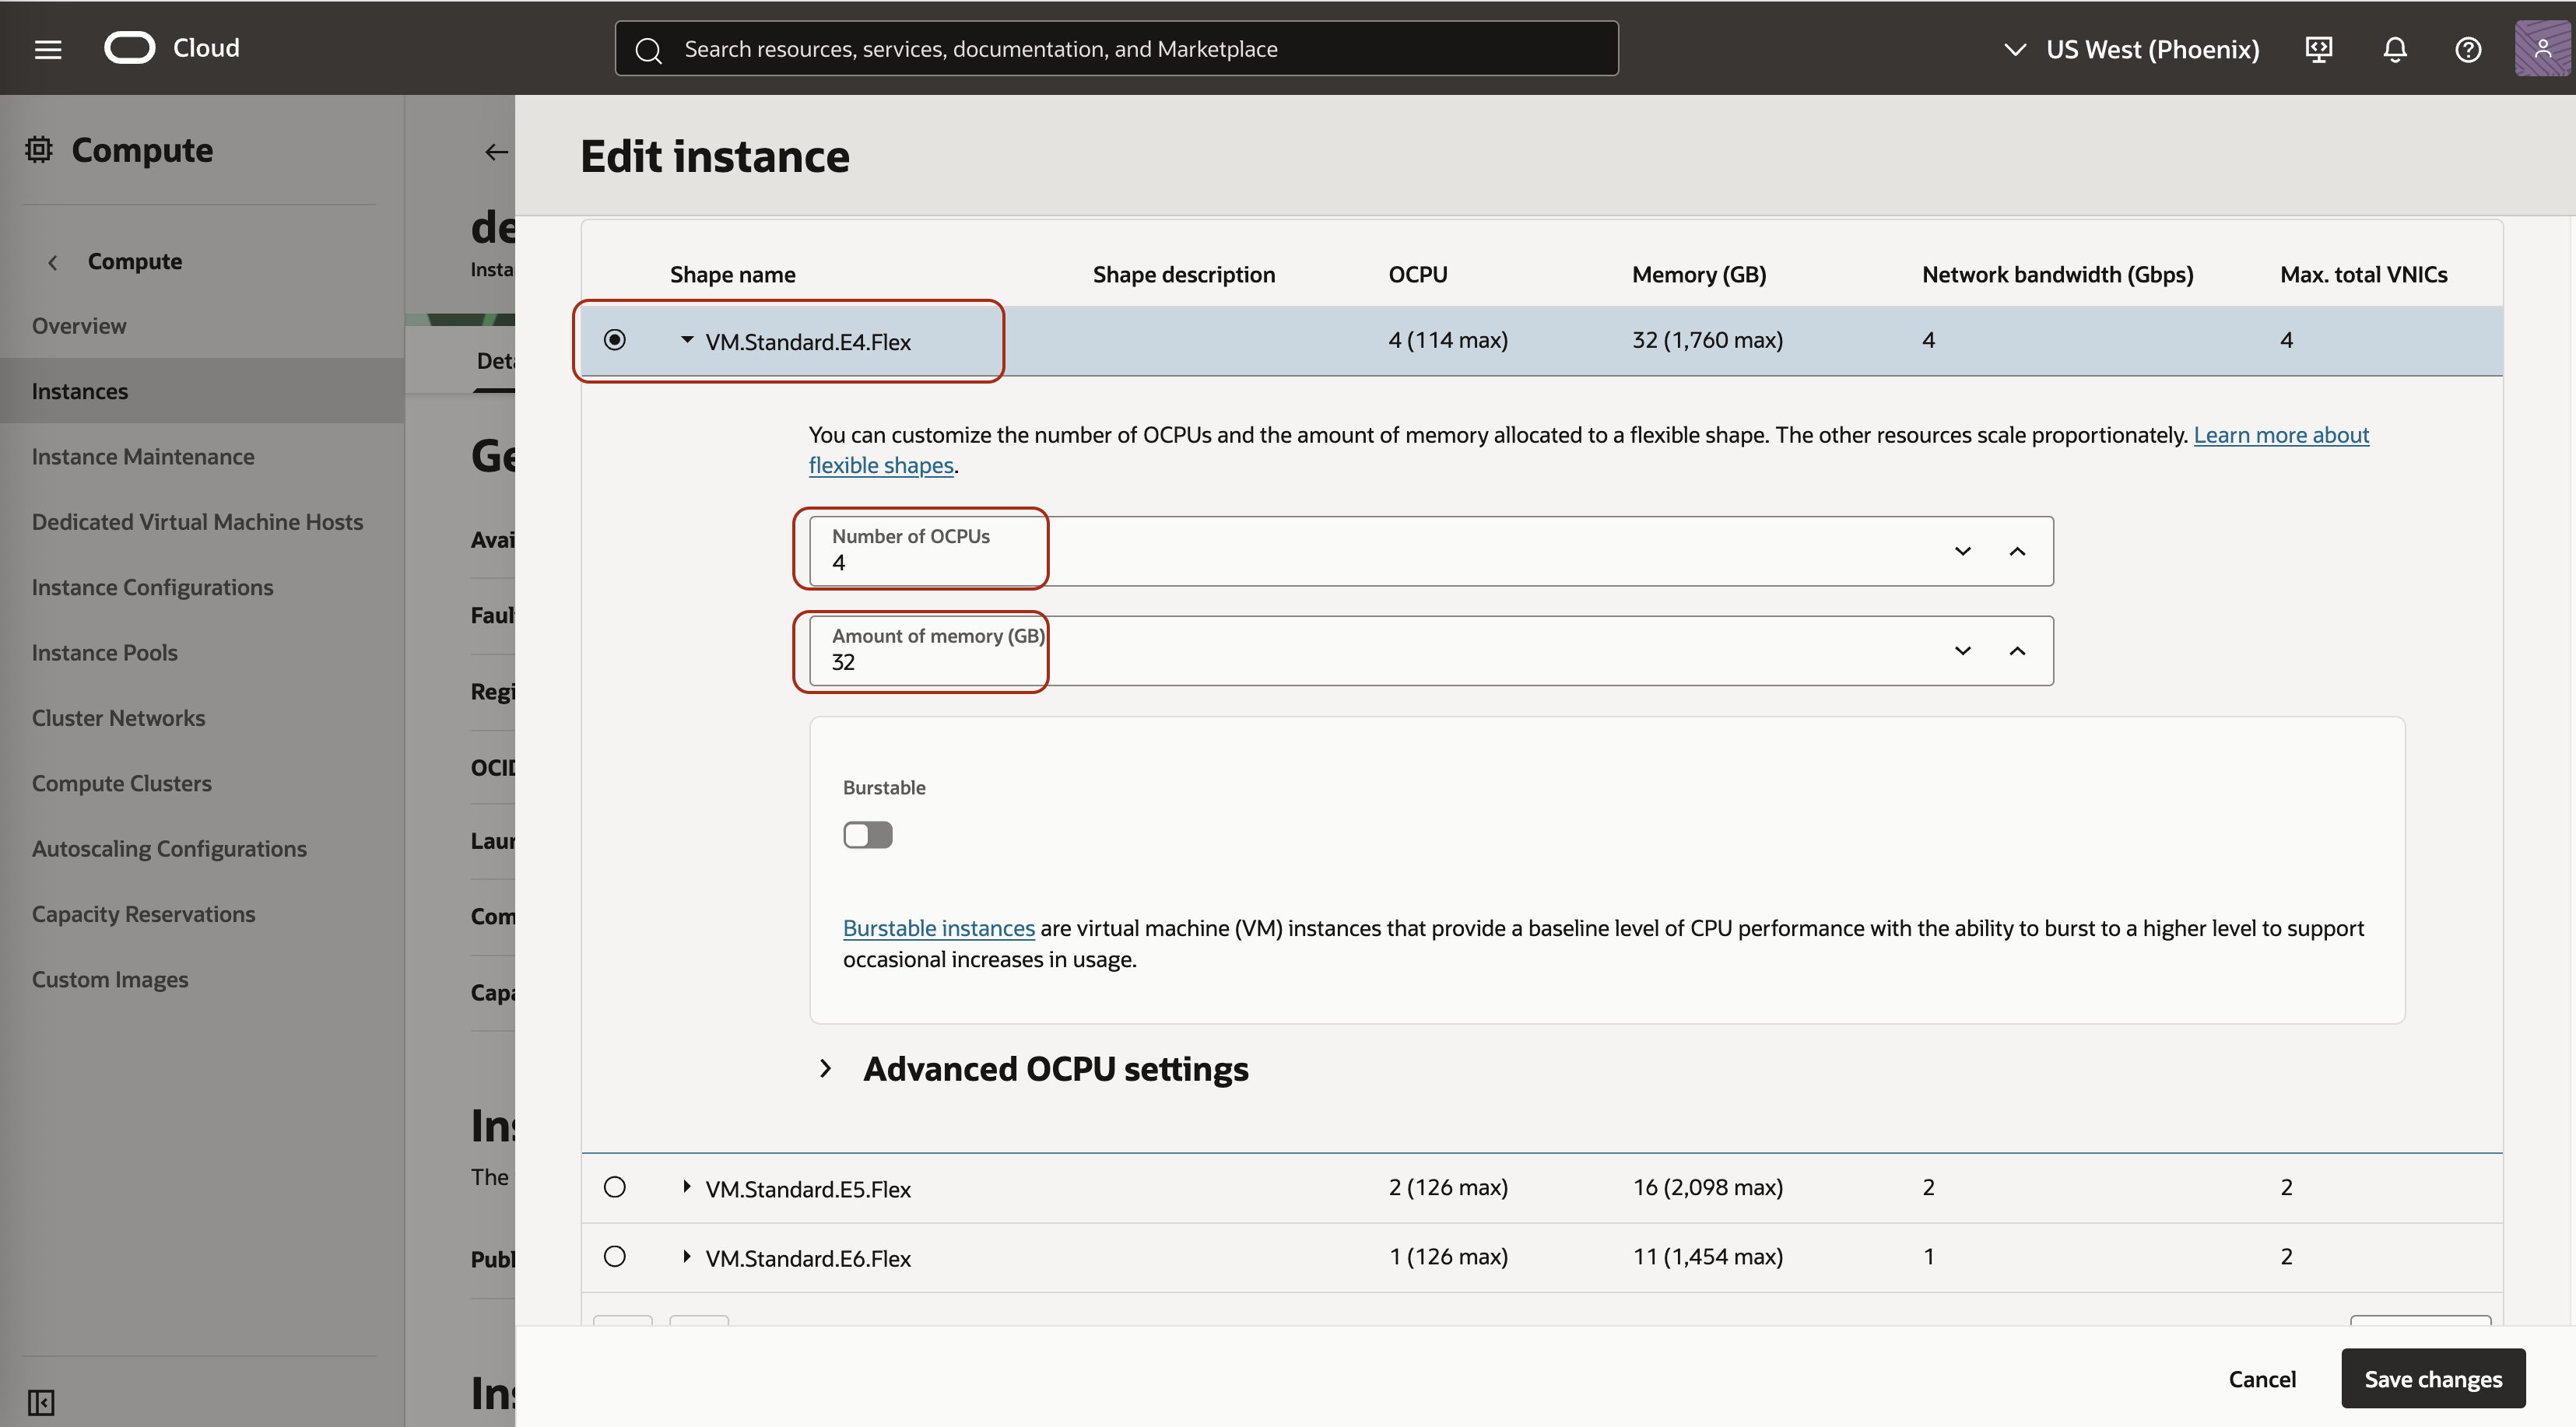
- Verify that the Shape Configuration of the Node Instance has been resized.

Figure: OCI - Shape Configuration Resized
- Repeat the steps for each node that you want to update.

Step 3: Start the Nodes
- From the list of available nodes, select the node that you want to restart.
- From the Actions menu, select Start.
- Repeat the steps for each node instance that you want to restart.
Update Instance Type
This section will provide steps on how to update instance types for cloud providers.
AWS EC2 Instance
You can resize the AWS EC2 node instances by performing the following steps in the AWS console:
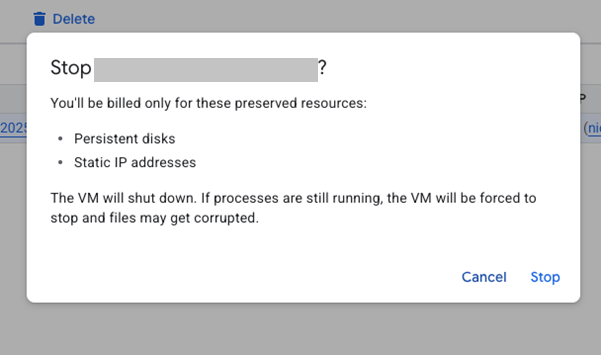
Step 1: Stop the existing CE instances
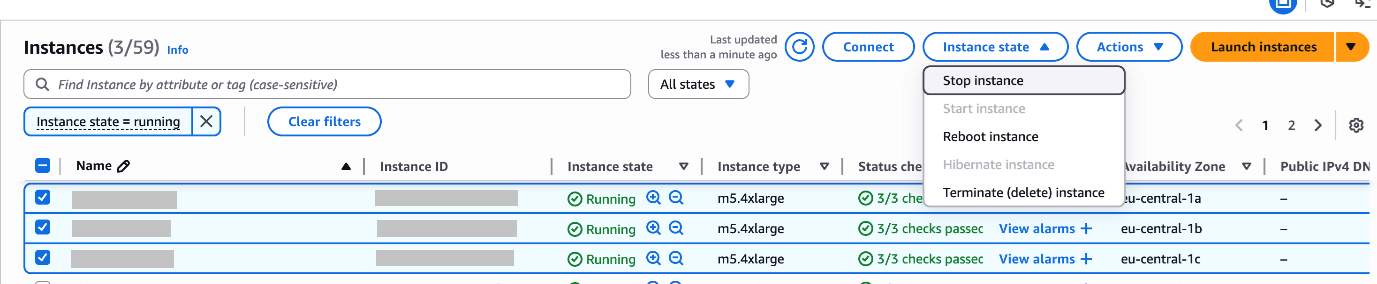
- From the list of available CE EC2 instances, select the instance that you want to stop.
- From the Instance state drop-down, select Stop instance.
The instance state changes to stopped for the specific instance.

Figure: AWS - Stop Instance

Figure: AWS - Stopped Instances
- Repeat the steps for each CE instance that you want to stop.

Step 2: Update the Instance Type of each Node
- From the list of available CE EC2 instances, select the instance that you want to update.
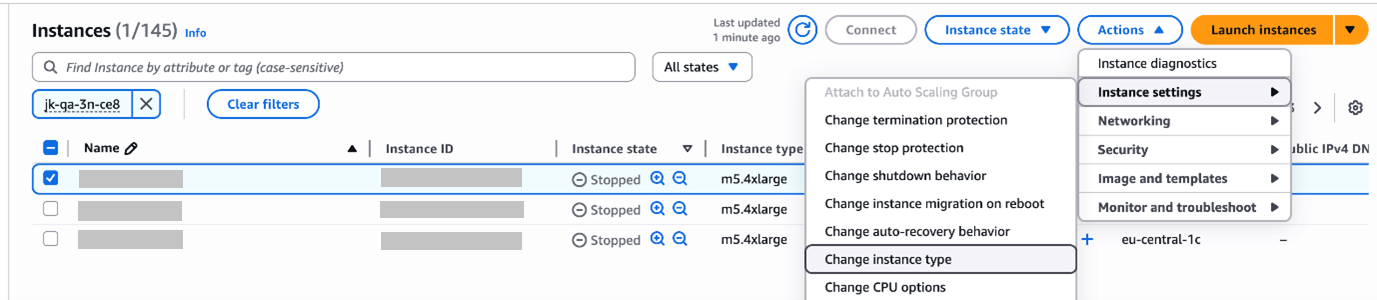
- From the Actions drop-down, select Instance Settings, and then select Change Instance Type.
The Change Instance Type screen appears.

Figure: AWS - Instance Settings
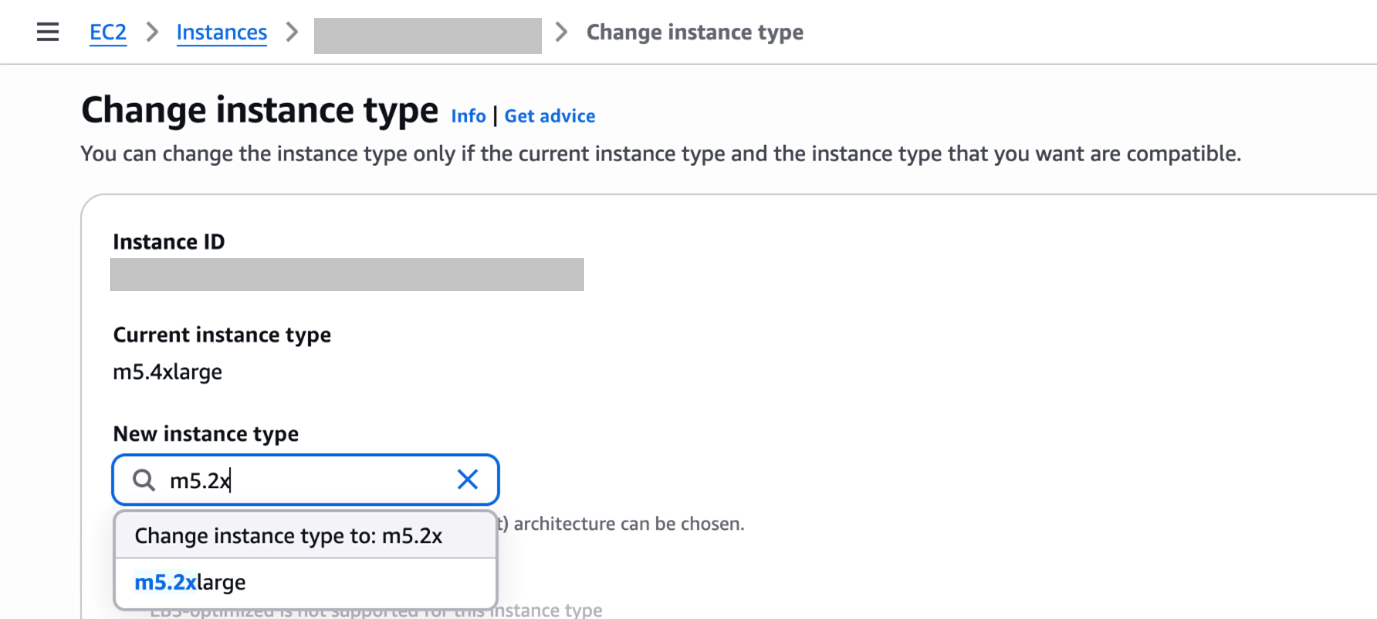
- In the New Instance Type field, select the m5.2xlarge (8 vCPU + 32 GB Memory) or the m5.4xlarge (16 vCPU + 64 GB Memory) based on your requirement.

Figure: AWS - Change Instance Type
- Repeat the steps for each CE instance for which you want to update the instance type.
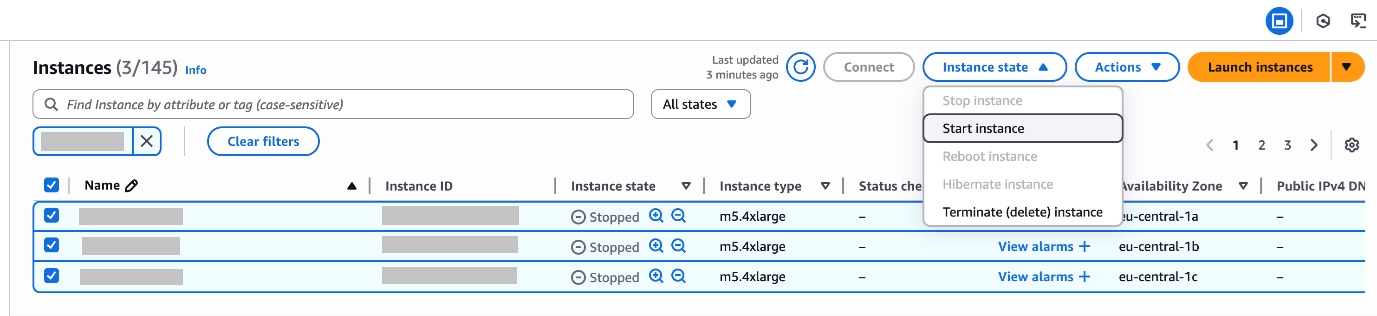
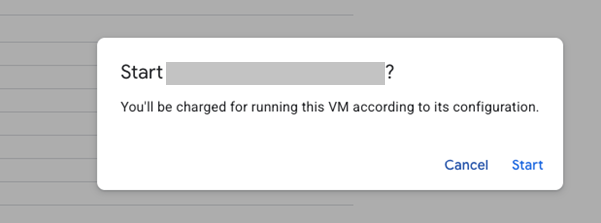
Step 3: Start the CE Instances
- From the list of available CE EC2 instances, select the instance that you want to restart.
- From the Instance state drop-down, select Start instance.
The instance state changes to Running for the specific instance.

Figure: AWS - Start Instance

Figure: AWS - Running Instances
- Repeat the steps for each CE instance that you want to restart.

Azure Virtual Machine Instance
You can resize the Azure instances by performing the following steps in the Azure console:
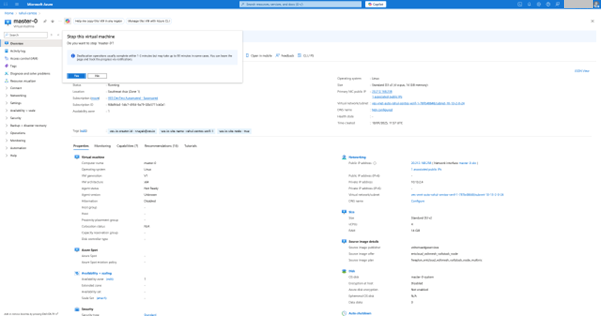
Step 1: Stop the existing CE instances
- From the list of available instances, select the instance that you want to stop.
- From the menu bar in the Overview section, select Stop.
The instance state changes to stopped for the specific instance.

Figure: Azure - Stop Instance
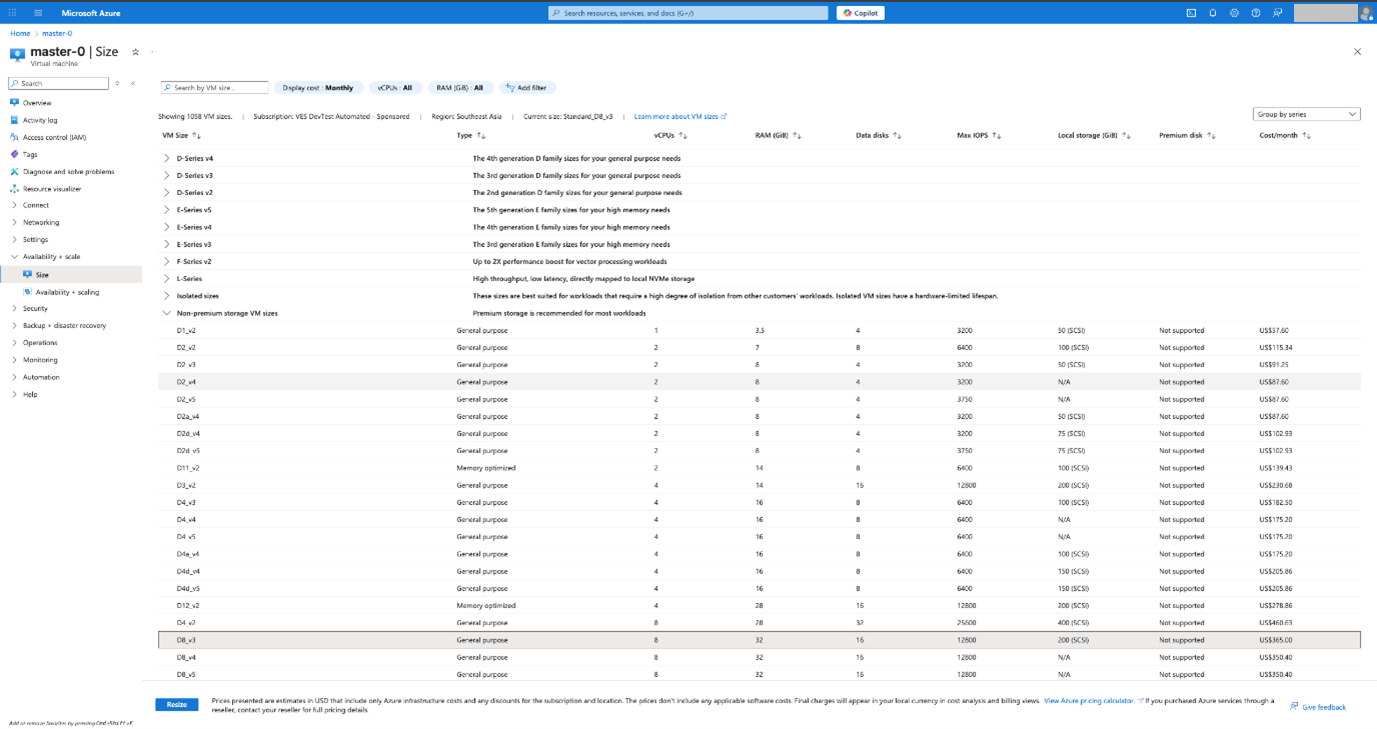
Step 2: Update the Instance Type of each Node
- From the left pane, select the Size option.
- In the Size tab, select the new instance flavor based on your requirement.

Figure: Azure - Change Instance Type
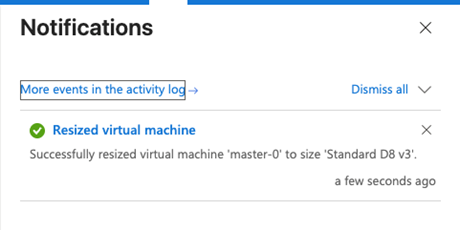
- Click Resize.
The Virtual Machine Resized Notification appears.
Figure: Azure - Resized Virtual Machine
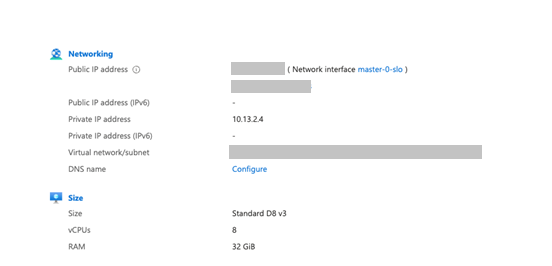
- Verify that the instance has been resized.

Figure: Azure - Verify Resized Virtual Machine
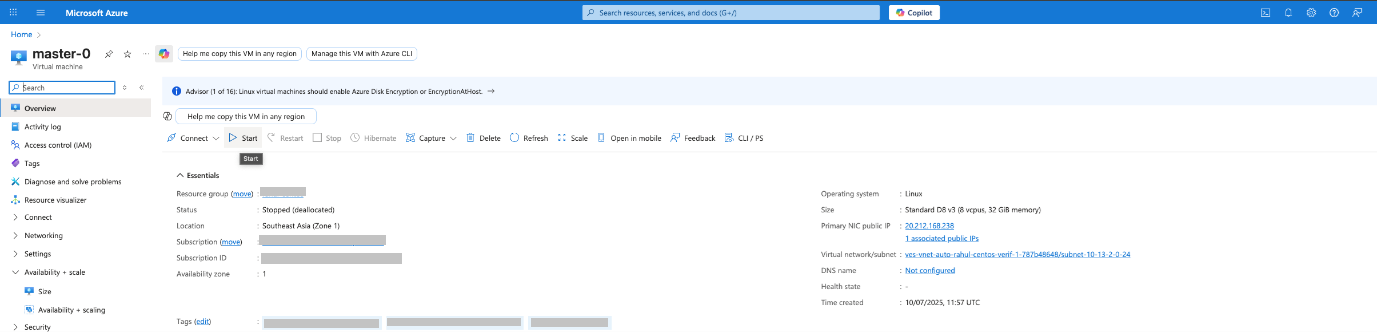
Step 3: Start the CE Instances
- From the list of available instances, select the instance that you want to restart.
- From the menu bar in the Overview section, select Start.
The instance state changes to running for the specific instance.

Figure: Azure - Start Instance
GCP Compute Engine Instance
You can resize the GCP instances by performing the following steps in the GCP console:
Step 1: Stop the existing CE instances
- From the list of available instances, select the instance that you want to stop.
- From the menu bar in the Overview section, select Stop.

Figure: GCP - Stop Instance
- In the dialog box that appears, click Stop.
The instance state changes to stopped for the specific instance.

Figure: GCP - Stop Instance Confirmation
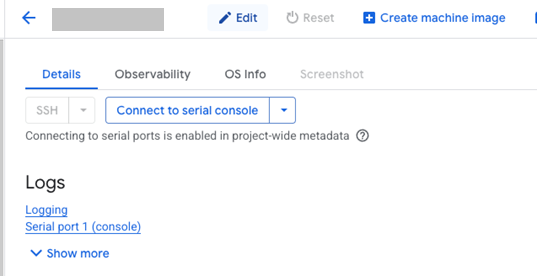
Step 2: Update the Instance Type of each Node
- From the Details tab, select the Edit option.

Figure: GCP - Edit Instance Type
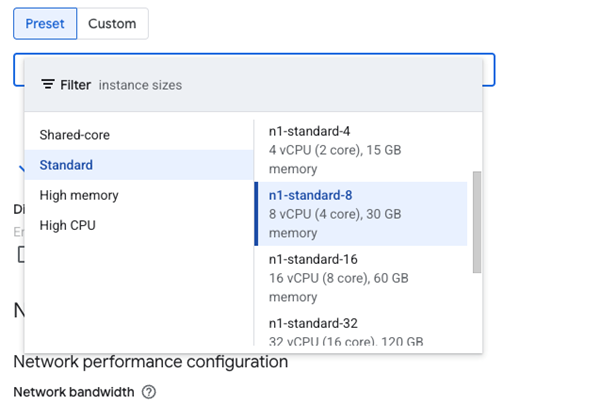
- In the Preset tab, select the new instance flavor based on your requirement.

Figure: GCP - Update Instance Type
Step 3: Start the CE Instances
- From the list of available instances, select the instance that you want to restart.
- From the menu bar in the Overview section, select Start.
- In the dialog box that appears, click Start.
The instance state changes to running for the specific instance.

Figure: GCP - Start Instance
Check Instance Update Status
This section provides steps on how to check the status of the instance type updates while the site is being resized.
Follow these steps to check the status of the Instance Type updates on the F5 Distributed Cloud Console:
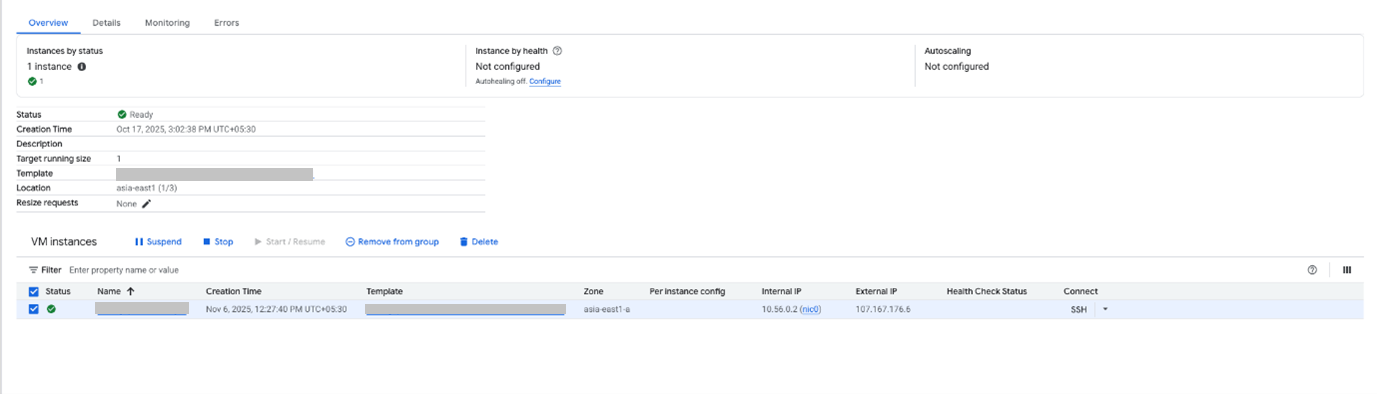
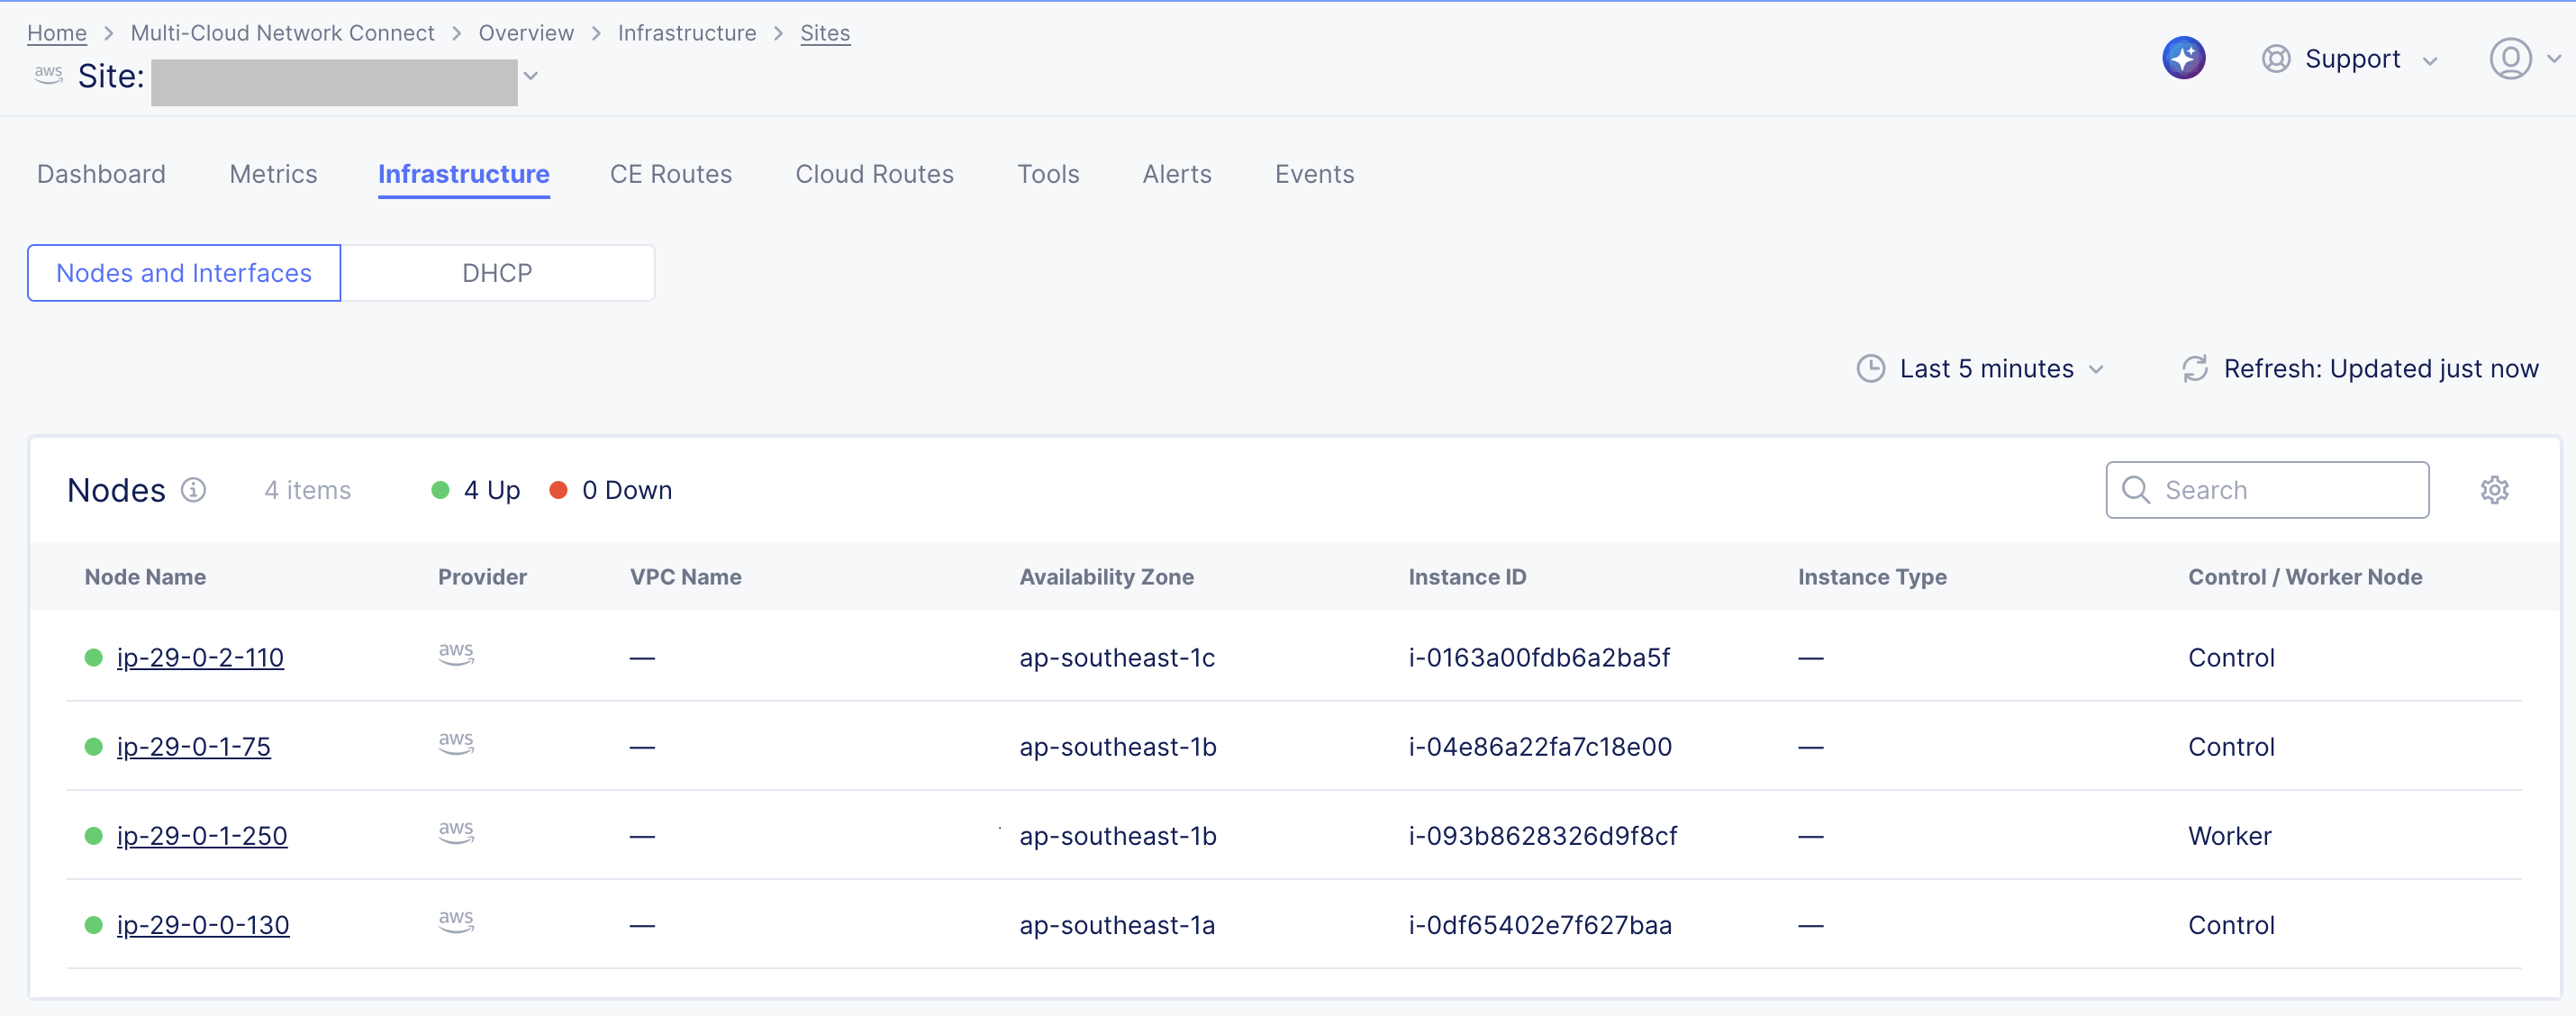
- In the Multi-Cloud Network Connect workspace, select Overview > Infrastructure > Sites.
- For the site that you updated, navigate to the Infrastructure tab to view the status of the nodes in the site.

Figure: Site Infrastructure
- After all the nodes are online with the new instance type, navigate to the Events tab to view the status of events for each node.

Figure: Site Flavor Change Event
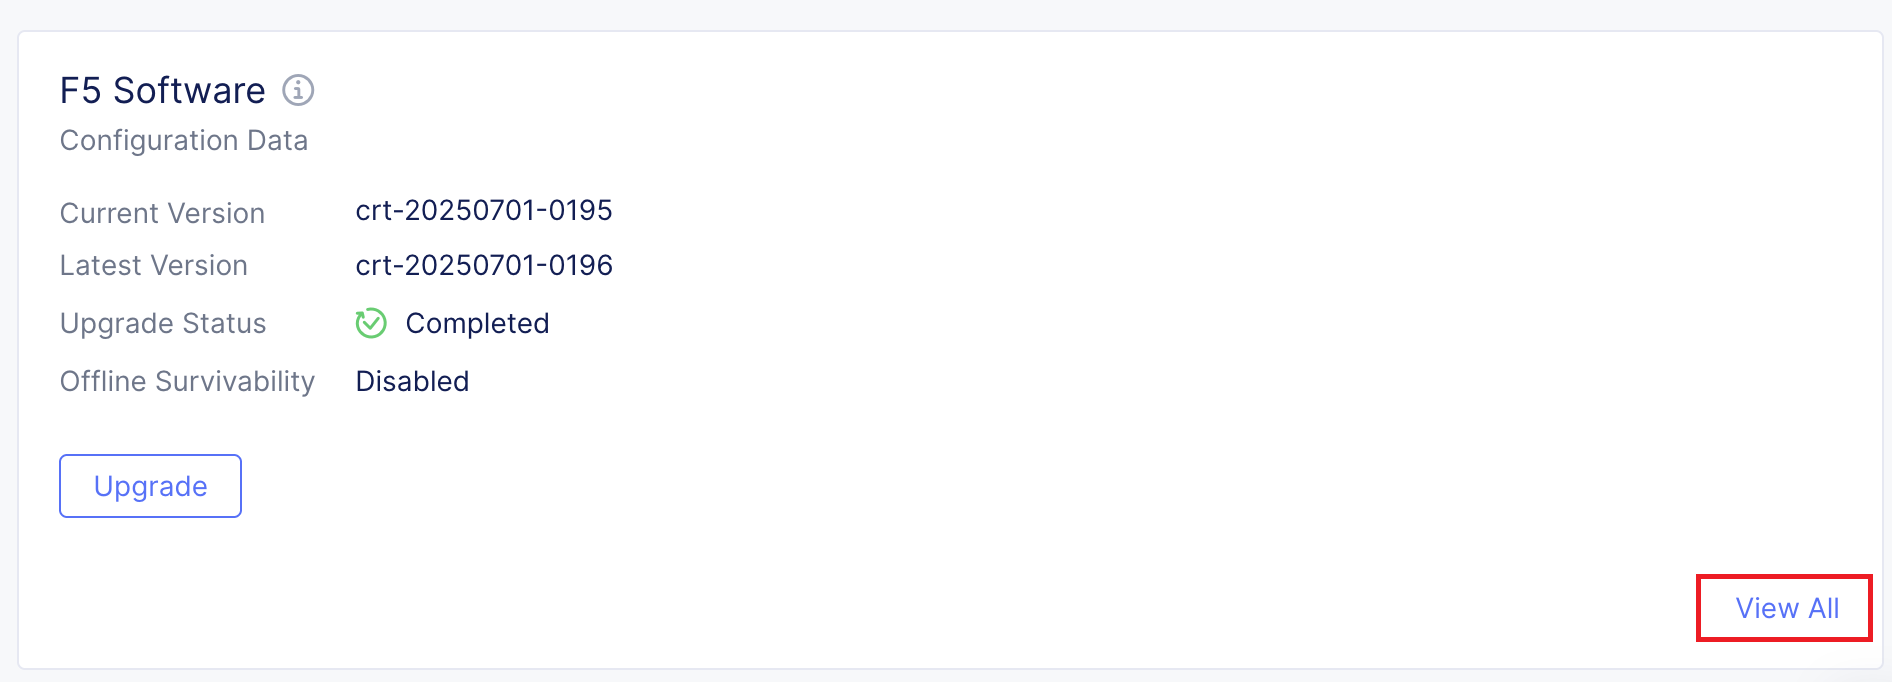
- Click View Details > View All to monitor the status of the CE updates to the service resources.

Figure: Site Upgrade
- After the resizing is complete, the phase parameter displays the UPGRADE_COMPLETED state.

Figure: Phase - Upgrade Completed


Verify Resized Site Resources
This section provides steps on how to check if the site has been successfully resized as per the resource settings provided.
Follow these steps to verify the resized CE site statistics on the F5 Distributed Cloud Console:
- Ensure that the site is online, and at 100% health.
Figure: CE Site Health
- Ensure that the site has connectivity to an RE (Regional Edge).
Figure: CE Site Connected
- Ensure that the site has no critical alerts in the Alerts tab.
Figure: CE Site Alerts
- Verify the Hardware Information of the site to view the resized Node Memory and Node CPU statistics.

Figure: CE Site Hardware Information - Resized Node Memory

Figure: CE Site Hardware Information - Resized Node CPU

On this page:
- Objective
- Planning
- General Prerequisites
- Validate Customer Edge (CE) Site is Online | Healthy
- Introduction
- Secure Mesh Site v2
- Legacy Site Configurations
- Secure Mesh Site v1
- AWS VPC Site
- AWS TGW Site
- Azure VNet Site
- GCP VPC Site
- Update Node Resources
- VMware using vSphere
- KVM using Host Command Line
- Nutanix
- OpenStack
- OCI Site
- Update Instance Type
- AWS EC2 Instance
- Azure Virtual Machine Instance
- GCP Compute Engine Instance
- Check Instance Update Status
- Verify Resized Site Resources