Migrate Legacy CE Site to Secure Mesh Site v2
Objective
This guide provides instructions for NetOps teams migrating a legacy Customer Edge (CE) Site — whether standalone or part of a Virtual Site (vSite) — to the Secure Mesh Site v2 in F5 Distributed Cloud Console. The goal is to ensure a seamless, phased, and verifiable transition with minimal service disruption, while offering rollback paths and validation procedures at each stage.
This guide also provides a detailed walkthrough to help you successfully migrate a legacy CE site to the newer Secure Mesh Site v2. This explains the complete migration workflow for CE sites deployed as:
This guide includes pre-migration planning, maintenance window execution, traffic redirection, rollback, and post-migration cleanup.
Planning
Read the following documents before deploying a Secure Mesh Site in any provider environment:
- Create Secure Mesh Site v2
- Compare Legacy and Secure Mesh Site v2 Settings
- Understanding F5 Distributed Cloud - Customer Edge (CE)
- CE Datasheet
- CE Supported Platforms Guide
- Customer Edge Site Sizing Reference
- CE Performance Guide: Contact your account representative for CE performance-related information.
- Proxy for CE Registration and Upgrades Reference
- Secure Mesh Site v2 Frequently Asked Questions
- Customer Edge Registration and Upgrade Reference
- F5 Customer Edge IP Address and Domain Reference for Firewall or Proxy Settings
Important: After you deploy the CE Site, the IP address for the SLO interface cannot be changed. Also, the MAC address cannot be changed.
Prerequisites
-
An F5 Distributed Cloud Account. If you do not have an account, see Getting Started with Console.
-
One or more devices or virtual machines (VMs) consisting of interfaces with Internet reachability for site deployment.
-
Resources required per node: Minimum 8 vCPUs, 32 GB RAM, and 80 GB disk storage. For a full listing of the resources required, see Customer Edge Site Sizing Reference guide. All the nodes in a given CE Site should have the same resources regarding the compute, memory, and disk storage. When deploying in cloud environments, these nodes should use the same instance flavor.
-
Internet Control Message Protocol (ICMP) needs to be opened between the CE nodes on the Site Local Outside (SLO) interfaces. This is needed to ensure intra-cluster communication checks.
-
Optional, configure your firewall or proxy server to allow connections from and to the IP addresses listed in the F5 Customer Edge IP Address and Domain Reference for Firewall or Proxy Settings guide.
Determine Whether Your Site Uses the Virtual Site Model
To determine whether your CE Site is using the Virtual Site (vSite) deployment model, follow the steps below.
-
Navigate to the Multi-Cloud Network Connect workspace.
-
Locate your Site and select it.
-
Select Manage Configuration > Edit Configuration.
-
Check whether any virtual site labels are configured under the Labels field, in the Metadata section. Compare these labels with any deployed virtual site at Multi-Cloud App Connect > Manage > Virtual Sites.
-
If a label is present, follow the procedure in the Virtual Site (vSite) deployment model section.
-
If no label is present, follow the procedure in the Standalone Cluster deployment model section.
High-Level Migration Process Overview
Here is a high-level summary of the migration process from legacy CE Site types to Secure Mesh Site v2. This migration process involves creating a new Secure Mesh v2 Site, validating its functionality, redirecting traffic during a planned maintenance window, and finally decommissioning the legacy Site once the migration is successfully validated.
Two migration paths are supported: one for Standalone Cluster deployments and one for Virtual Site (vSite) deployments. Refer to this section to determine which option applies to your Site.
The migration process is executed in the following phases:
Pre-Maintenance Window
-
Provision a new Secure Mesh Site v2 using the same settings as the existing site.
-
Plan for changes to user-managed infrastructure components (for example, DNS records, network load balancers, and NAT gateways) that must be updated during migration.
-
Optionally, create a temporary test load balancer and test origin pool to validate that the new Secure Mesh Site v2 is functioning as expected.
During Maintenance Window
-
Redirect all production traffic to the newly provisioned Secure Mesh Site v2.
-
Update any user-managed infrastructure components (for example, DNS records, network load balancers, and NAT gateways) as required for production traffic to divert to the new Secure Mesh Site v2.
-
If an issue occurs, traffic can be reverted to the existing legacy site.
Note: For CE sites that use a Site Mesh Group or a DC Cluster Group, both legacy Site and new Site may temporarily communicate during phased migration.
- Once traffic is fully operating through the new Secure Mesh Site v2 and validation is complete, decommission the legacy Site.
Identify Migration Path and Deployment Model
There are two migration paths that you can use, depending on how your existing CE Site is deployed. Before you begin the migration, you must identify which deployment model applies to your site, as the end-to-end workflow differs for each model.
Standalone Cluster Deployment Model
In this model, the CE Site operates independently and is not attached to a vSite construct. The migration procedure involves provisioning a new Secure Mesh Site v2 instance that mirrors the existing configuration, validating functionality, and then shifting traffic during a planned maintenance window all at once.
Virtual Site Deployment Model
In this model, the CE Site participates in a vSite configuration using labels. The migration workflow includes additional steps to ensure the new Secure Mesh Site v2 is properly added to the vSite grouping.
Refer to the appropriate section below for the step-by-step procedure based on your deployment model.
Standalone Cluster Deployment Model
For standalone cluster deployments, follow the step-by-step instructions in phases.
Phase-1: Pre-Maintenance Window
These steps can be executed before the maintenance window happens.
Step 1: Run migration utility tool.
On your legacy CE Site, run the migration utility tool. Use the infrastructure information provided by the script to deploy your new Secure Mesh Site v2 so that it matches your legacy CE Site.
Step 2: Create Secure Mesh Site v2.
- You must deploy your new Secure Mesh Site v2 with the same settings and same provider as your existing legacy site. See the Create Secure Mesh Site v2 guide for more information.
Important: If the Common V4 IP option is configured for your legacy site, F5 recommends that you use a different VIP address in the Common V4 IP setting of the new Secure Mesh Site v2 to avoid IP address conflict. This is because both the legacy Site and the new Secure Mesh Site v2 will co-exist until the legacy Site is powered off or destroyed.
- After the new Secure Mesh Site v2 is online, compare site settings using the Compare Legacy and Secure Mesh v2 Site Settings guide. Review and update any differences or missing settings. Note that some differences are addressed in the Phase-2: During Maintenance Window.
Step 3: Identify the DNS, network load balancer, and routing infrastructure changes.
Identify and plan for necessary DNS, network load balancer, and routing infrastructure changes that need to be executed during the maintenance window for traffic to switch to the new Secure Mesh Site v2.
Step 4: Optionally, create test HTTP or TCP load balancer.
This optional step is only needed if you want to test the newly created Secure Mesh Site v2 for traffic handling (before using this site for production traffic).
Create a new test load balancer and test origin pool that use the newly created Secure Mesh Site v2 and validate it with test traffic.
Phase-2: During Maintenance Window
You must execute these steps only within the maintenance window. During this window, all production traffic switches to the newly provisioned Secure Mesh Site v2.
Step 1: Validate Secure Mesh Site v2 is healthy and online.
-
Validate that the Secure Mesh Site v2 admin state is online and the Site Health score is 100.
-
Ensure that there are no active alerts with alert level Critical for the newly provisioned Secure Mesh Site v2.
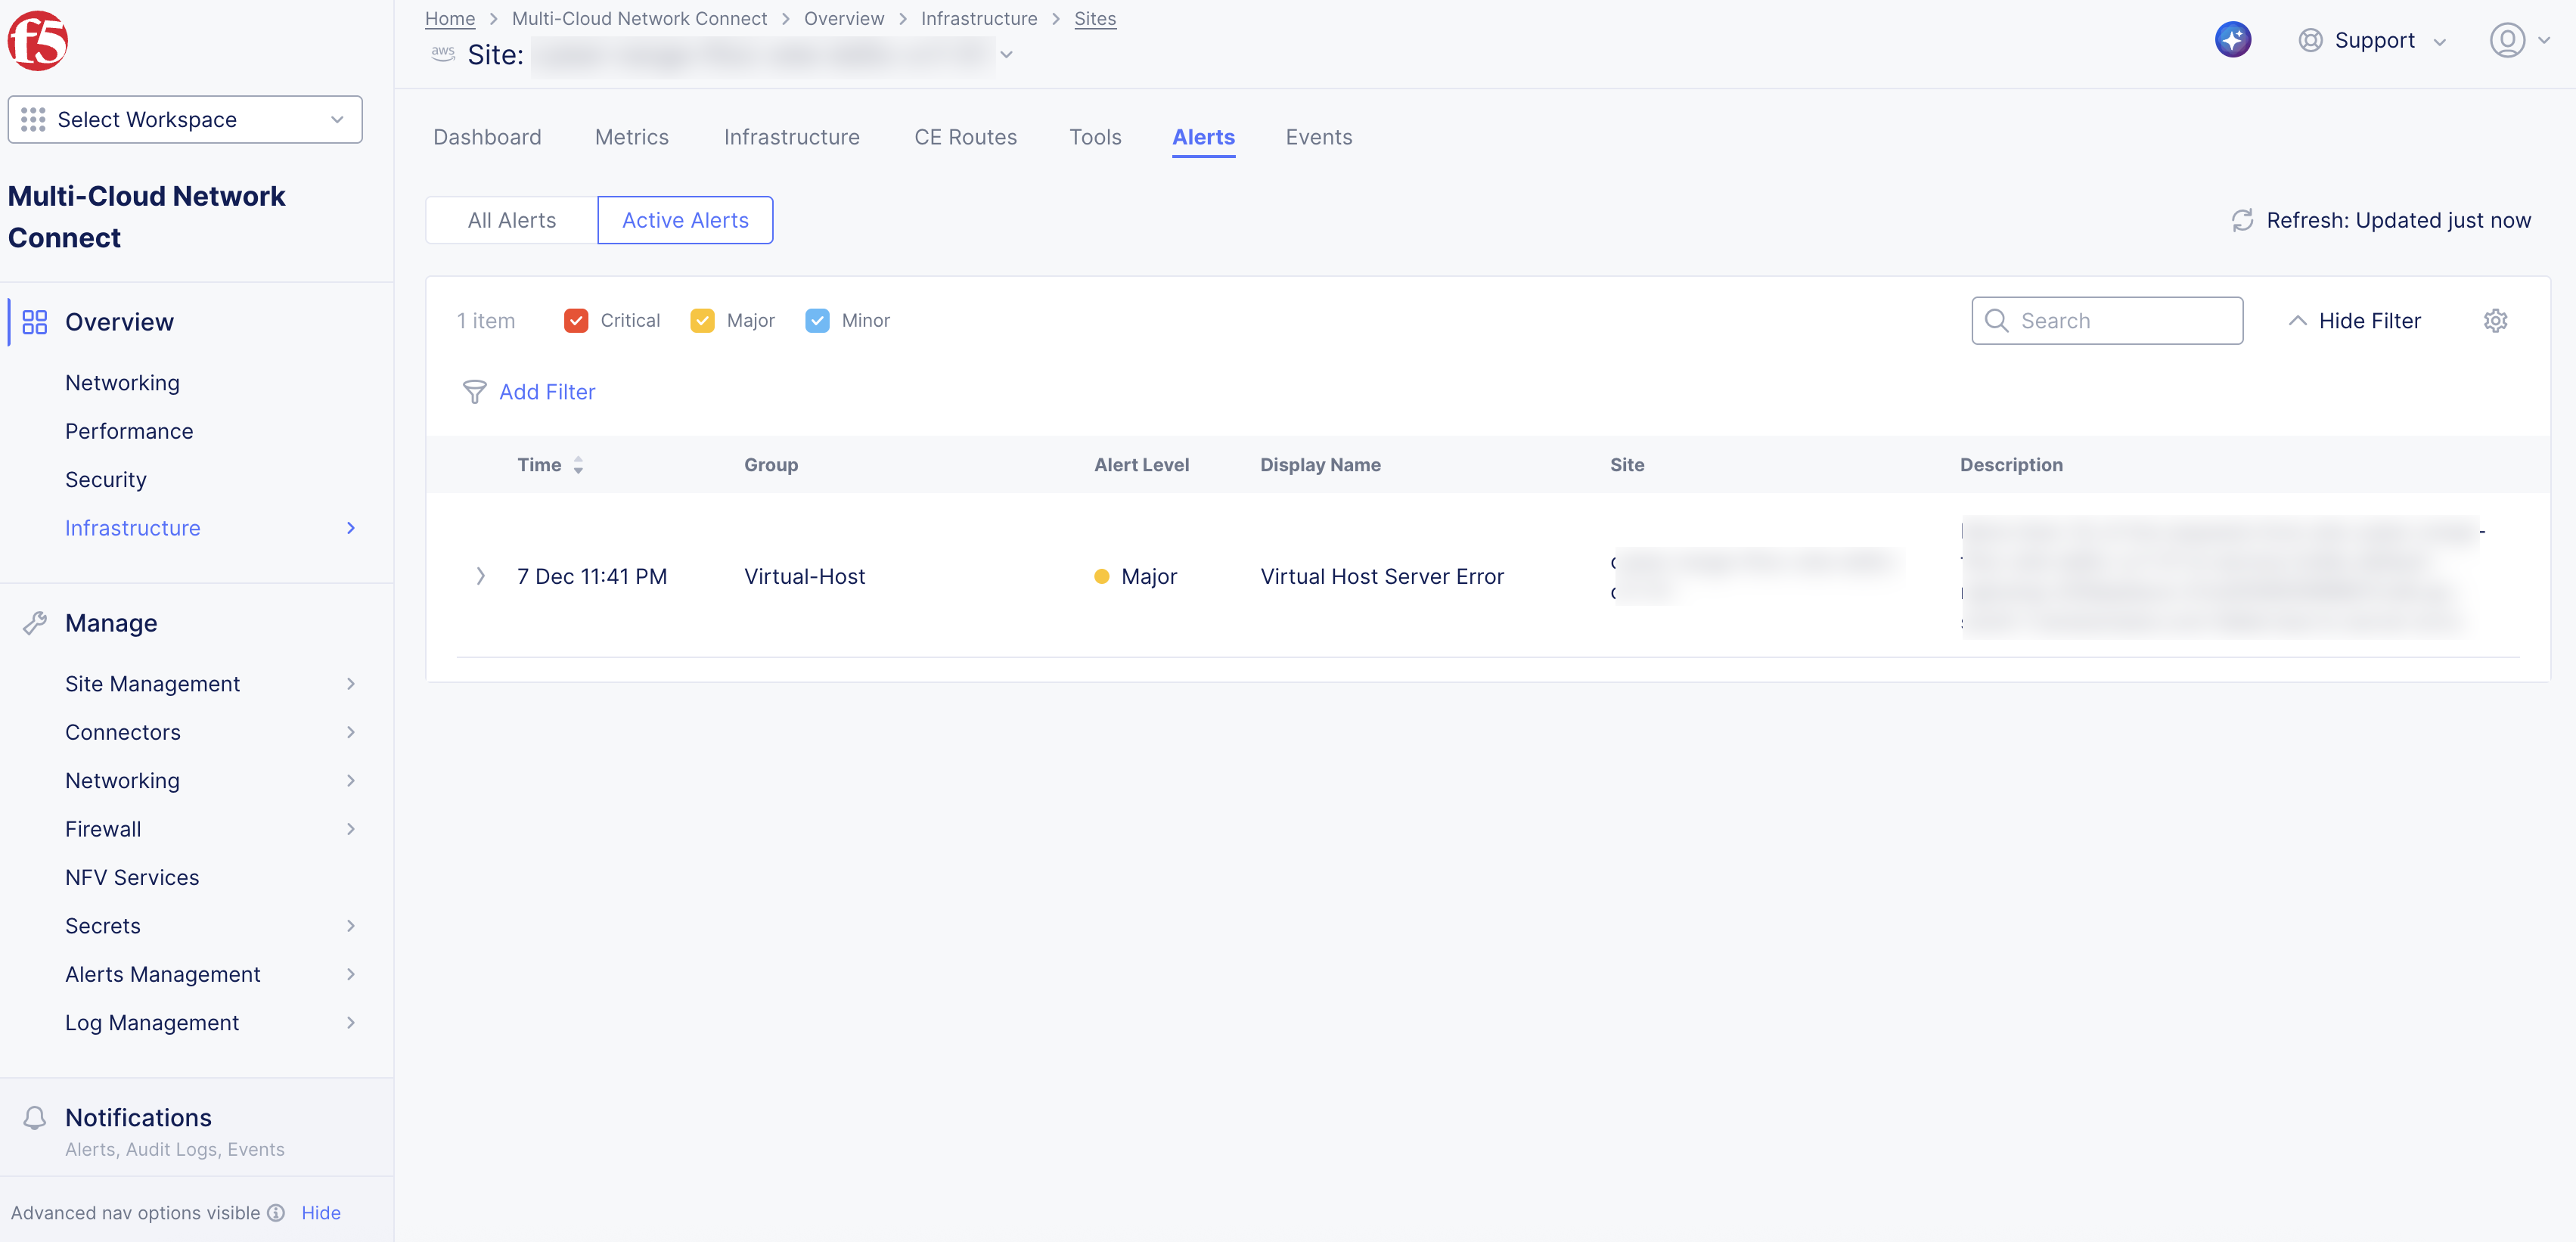
Figure: CE Site Alerts
Step 2: Create a new origin pool.
- Create a new origin pool using the new Secure Mesh Site v2 created in the previous step. Refer to the Create Origin Pools guide.

Figure: Create New Origin Pool
- Ensure the new origin pool has the same settings as the origin pool used with the legacy site.
Step 3: Transition load balancer to use the new Secure Mesh Site v2.
After you verify that the Secure Mesh Site v2 is online and healthy, you can move the load balancer over to the new Secure Mesh Site v2. All services, like load balancing and original pools, need to move from the Legacy CE Site to the Secure Mesh Site v2. Repeat this step for each load balancer and origin pool object. You can run the migration utility tool after each load balancer is migrated to see differences.
Depending on where the VIP is advertised, the steps to follow vary:
-
Refer to Step 3A if the VIP is advertised on the Internet.
-
Refer to Step 3B if the VIP is advertised on the CE Site.
Step 3A: Configure load balancer advertised on Internet (specified VIP).
-
Find and select the load balancer in the Multi-Cloud App Connect workspace.
-
Edit the Origin section settings to add a new origin pool with the desired Weight. Examples include:
- With 100 (legacy origin pool) and 0 (new-origin-pool), 100% of production traffic is served by legacy site.
- With 80 (legacy origin pool) and 20 (new-origin-pool), 80% of production traffic is served by legacy site and 20% by the new site.
- With 0 (legacy origin pool) and 100 (new-origin-pool), 100% of production traffic is served by new site.
Note: You can modify the Weight while keeping the same Priority for all origin pools. This provides for a gradual transition. After the Weight of new origin pool is set to 100, all production traffic is served by the new Secure Mesh Site v2.
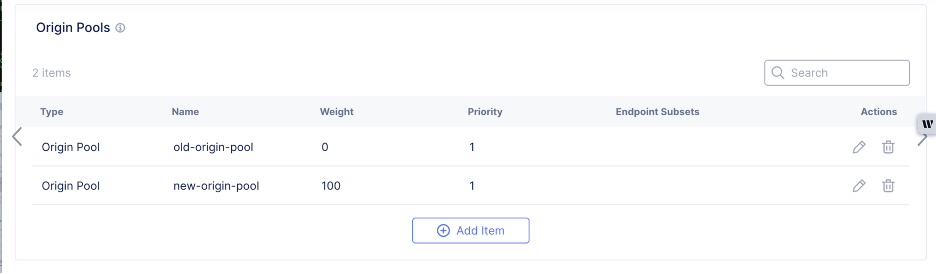
Figure: Load Balancer Weights
-
Once the new Secure Mesh Site v2is serving production traffic, verify all production traffic is working as expected.
-
Verify that the new Secure Mesh Site v2 remains healthy and that there are no critical active alerts on the Secure Mesh Site v2 dashboard.
-
After you validate that the new Secure Mesh Site v2 is operating as expected, delete your legacy site from the Origins configuration in the load balancer.

Figure: Delete Legacy Site from Load Balancer Configuration
- If any issues with the new Secure Mesh Site v2, revert the traffic back to the legacy site:
- Edit the load balancer Origins settings to modify the Weight with 100 (legacy origin pool) and 0 (new-origin-pool). This returns 100% of the production traffic back to the legacy site.
Step 3B: Configure load balancer advertised on CE Site.
-
Find and select the load balancer in the Multi-Cloud App Connect workspace.
-
Modify the load balancer Other Settings. From the VIP Advertisement drop-down menu, select Custom. Select Configure.
-
Add the new Secure Mesh Site v2 and the legacy site to Custom Advertise VIP Configuration. This configuration setting advertises the load balancer on both the legacy and new CE sites.
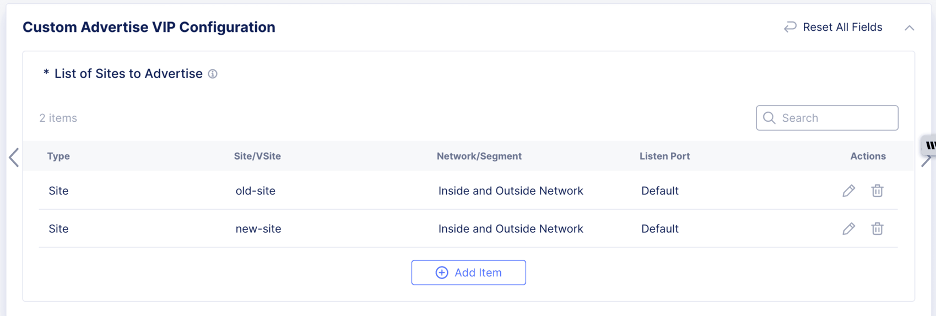
Figure: Add Custom VIP Configuration
-
Add a new origin pool to the load balancer, with the following Weight, so that traffic gradually moves to the new Secure Mesh Site v2. Examples include:
- With 100 (legacy origin pool) and 0 (new-origin-pool), 100% of production traffic is served by legacy site.
- With 80 (legacy origin pool) and 20 (new-origin-pool), 80% of production traffic is served by legacy site and 20% by the new site.
- With 0 (legacy origin pool) and 100 (new-origin-pool), 100% of production traffic is served by new site.
Note: You can modify the Weight while keeping the same Priority for all origin pools. This provides for a gradual transition.
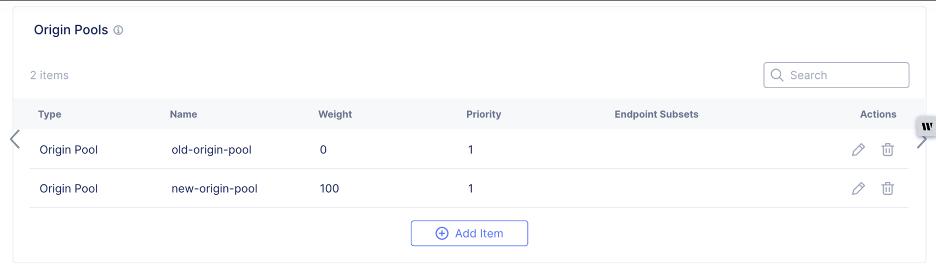
Figure: Load Balancer Weights
-
Update any public DNS records so that all production traffic lands only on the new Secure Mesh Site v2. All production traffic is now migrated to the new Secure Mesh Site v2.
-
Verify all production traffic is working as expected.
-
Verify that the new Secure Mesh Site v2 remains healthy and that there are no critical active alerts on the Secure Mesh Site v2 dashboard.
-
Modify the load balancer settings to delete the legacy site entry from the Custom Advertise VIP Configuration settings.
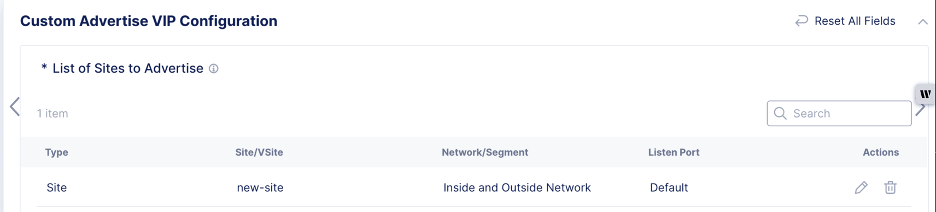
Figure: Remove Custom VIP for Legacy Site
- Remove the legacy site from the Origins section origin pool settings.

Figure: Remove Origin Pool for Legacy Site
-
If any issues with the new Secure Mesh Site v2, revert the traffic back to the legacy site:
- Modify the load balancer settings to remove the new Secure Mesh Site v2 from the Custom Advertise VIP Configuration settings.
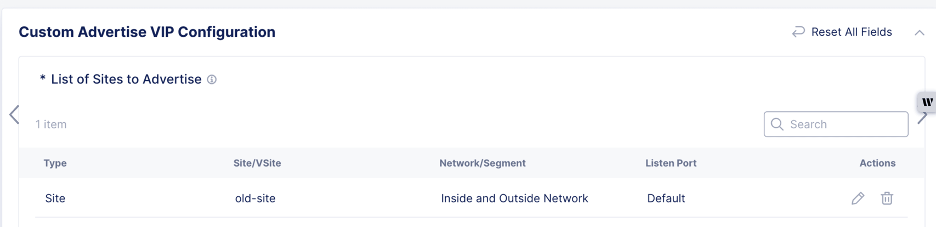
Figure: Revert to Legacy Site
- For the Origins settings, modify Weight to 100 (legacy origin pool) and 0 (new-origin-pool). This action returns 100% of the production traffic to the legacy site.

Figure: Revert to Legacy Site
Step 4: Confirm configuration for DC Cluster Group.
This step applies to sites that are part of a DC Cluster Group.
-
For your legacy CE Site, disable Site To Site Connectivity. Set the Connect using SLO Local VRF option to Disabled.
-
For your new Secure Mesh Site v2, enable Site To Site Connectivity. Set the Connect using SLO Local VRF option to Member of DC Cluster Group. Then, select the DC Cluster Group from the corresponding drop-down menu.
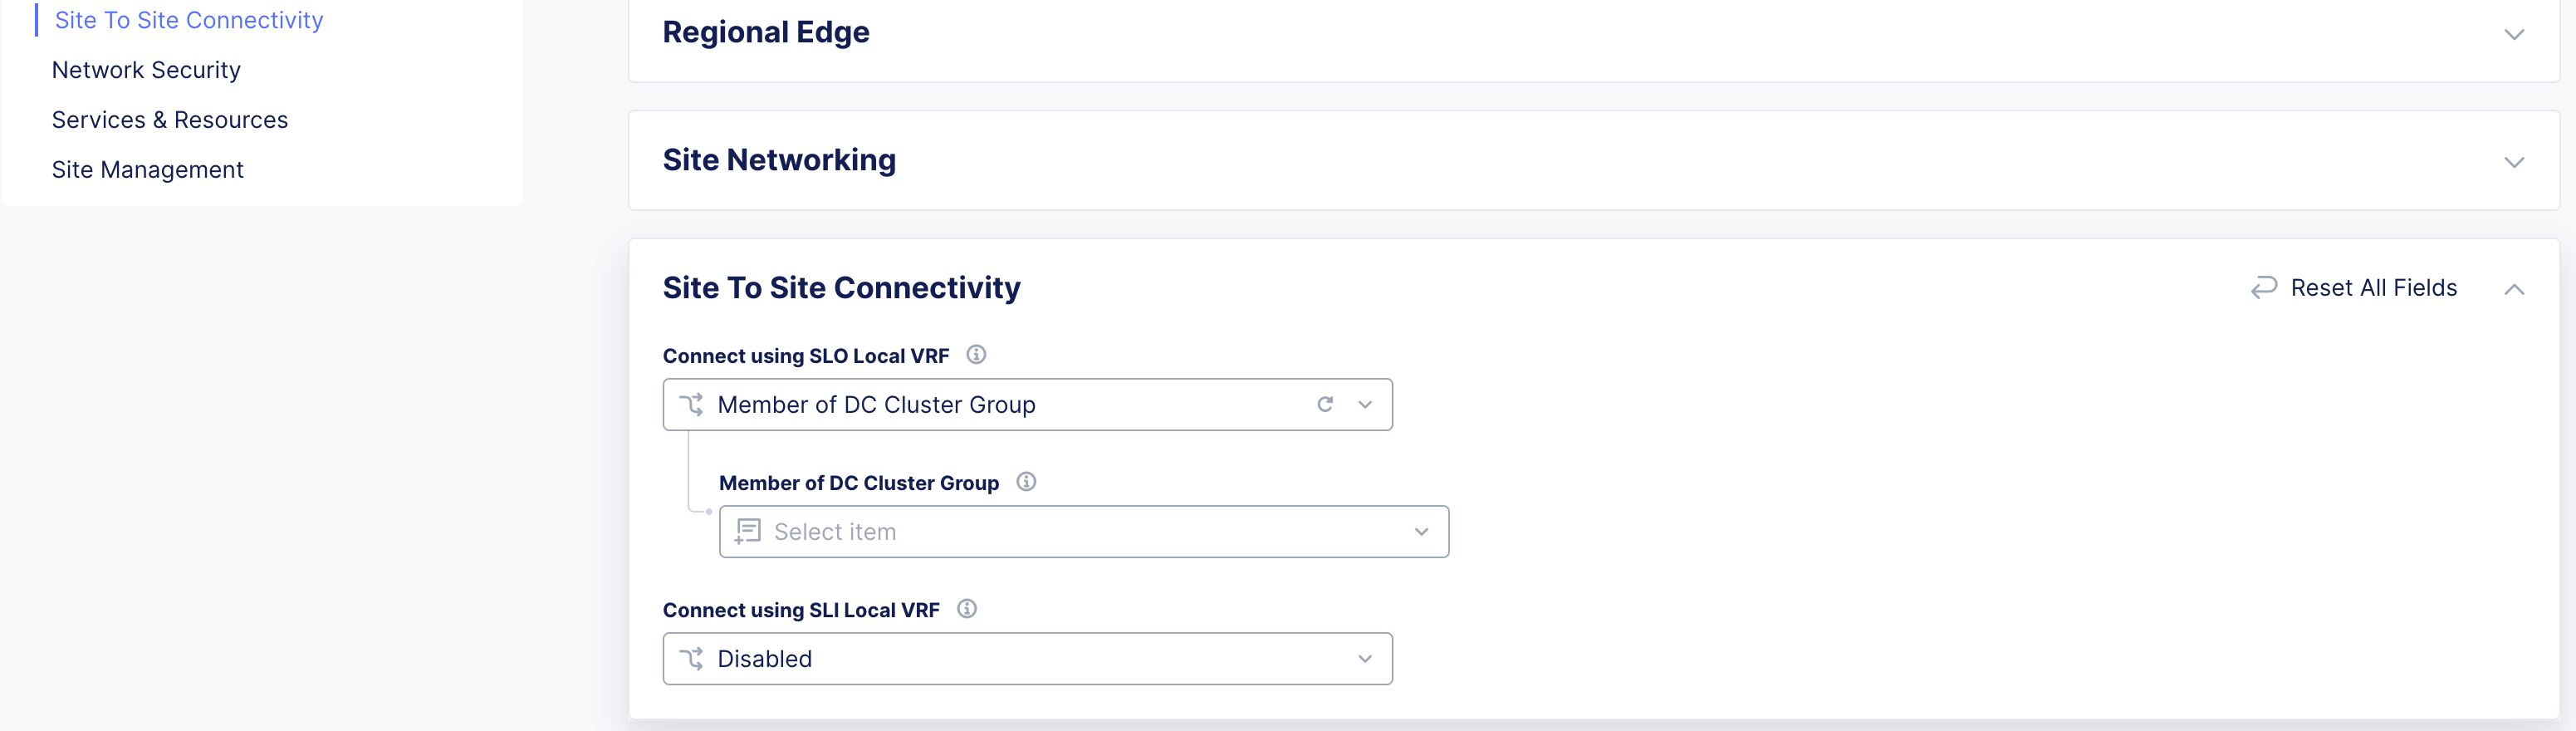
Figure: Add New Site to DC Cluster Group
Step 5: Confirm health of Secure Mesh Site v2.
-
Verify the new Secure Mesh Site v2 health is 100%.
-
Ensure the new Secure Mesh Site v2 has connectivity to a Regional Edge (RE).
-
Ensure the new Secure Mesh Site v2 has no active critical alerts in the Alerts tab.
-
After you confirm the new Secure Mesh Site v2 is working correctly:
- Power off your legacy site.
- Remove the association of the legacy origin pools in all load balancers. The maintenance window is now closed.
Virtual Site Deployment Model
If your CE Site is part of a Virtual Site, follow the step-by-step instructions in phases.
Phase-1: Pre-Maintenance Window
These steps can be executed before the maintenance window happens.
Step 1: Run migration utility tool.
On your legacy CE Site, run the migration utility tool. Use the infrastructure information provided by the script to deploy your new Secure Mesh Site v2 so that it matches your legacy CE Site.
Step 2: Create a new Secure Mesh Site v2.
Create a new Secure Mesh Site v2 with the same infrastructure properties (in other words, vCPU, RAM, disk, and number of interfaces) and same provider as the existing legacy site. See the Create Secure Mesh Site v2 guide for more information.
Important: If the Common V4 IP option is configured for your legacy site, F5 recommends that you use a different VIP address in the Common V4 IP setting of the new Secure Mesh Site v2 to avoid IP address conflict. This is because both the legacy and the new Secure Mesh Site v2 sites will co-exist until the legacy Site is powered off or destroyed.
Step 3: Identify the DNS, network load balancer, and routing infrastructure changes.
Identify and plan for necessary DNS, network load balancer, and routing infrastructure changes that need to be executed during the maintenance window for traffic to switch to the new Secure Mesh Site v2.
Step 4: Optionally, create a new test HTTP or TCP load balancer.
This optional step is only needed if you want to test the newly created Secure Mesh Site v2 for traffic handling (before using this Site for production traffic).
Create a new test load balancer and test origin pool that use the newly created Secure Mesh Site v2 and validate it with test traffic.
Phase-2 - During Maintenance Window
You must execute these steps only within the maintenance window. During this window, all production traffic switches to the newly provisioned Secure Mesh Site v2.
Step 1: Validate Secure Mesh Site v2 is healthy and online.
-
Validate that the Secure Mesh Site v2 admin state is online and the Site Health score is 100.
-
Ensure that there are no active alerts with alert level Critical for the newly provisioned Secure Mesh Site v2.
Figure: CE Site Alerts
Step 2: Add new Secure Mesh Site v2 to vSite.
Edit the new Secure Mesh Site v2 configuration to add the required labels to add to the vSite (that the legacy site is part of).
Step 3: Transition the load balancer to use the new Secure Mesh Site v2.
After you verify the Secure Mesh Site v2 is online and healthy, you can transition the load balancer over to the new Secure Mesh Site v2. The steps vary depending on how the virtual site is used in the load balancer and the origin pool settings:
-
If the vSite is used on both the load balancer and origin pool, refer to Step 3A below.
-
If the vSite is used either on the load balancer or the origin pool, refer to Phase 2 - Step 3 of the Standalone Cluster deployment.
Step 3A: Transition to new Secure Mesh Site v2.
When both the load balancer and origin pool are using the vSite construct, and the vSite label is added to the new Secure Mesh Site v2, the origin is discovered on the new Secure Mesh Site v2. The load balancer is advertised to the new Secure Mesh Site v2 as well.
Step 4: Remove the legacy Site from vSite.
Edit the legacy site configuration to remove the required labels to dissociate it from the vSite. After you execute this step, your load balancer (and origin pool associated with the legacy Site) is no longer deployed.
Step 5: Update other network infrastructure.
Update the public DNS records, network load balancer, and any other routing infrastructure to ensure all production traffic diverts to the new Secure Mesh Site v2.
Step 6: Validate that the Secure Mesh Site v2 is healthy.
-
Once the new Secure Mesh Site v2 is serving production traffic, verify all production traffic works as expected.
-
Verify that new Secure Mesh Site v2 remains healthy and the Alerts tab does not have any critical active alerts.
-
If the legacy site was part of a Site Mesh Group (SMG), ensure that all site-to-site tunnels are formed with the new Secure Mesh Site v2. Validate those tunnels are up and running.
-
Verify the new Secure Mesh Site v2 health is 100%.
-
Ensure the new Secure Mesh Site v2 has connectivity to a Regional Edge (RE).
-
After you confirm the new Secure Mesh Site v2 is working correctly, power off the legacy Site. The maintenance window is now closed.
Related How-To Guides
To create a load balancer on the CE Site, see the HTTP Load Balancer guide, or the TCP Load Balancer guides.
To create an origin pool, see the Create Origin Pool guide.
Concepts
On this page:
- Objective
- Planning
- Prerequisites
- Determine Whether Your Site Uses the Virtual Site Model
- High-Level Migration Process Overview
- Identify Migration Path and Deployment Model
- Standalone Cluster Deployment Model
- Phase-1: Pre-Maintenance Window
- Phase-2: During Maintenance Window
- Virtual Site Deployment Model
- Phase-1: Pre-Maintenance Window
- Phase-2 - During Maintenance Window
- Related How-To Guides
- Concepts