Configure Bot Defense Advanced with F5 Distributed Cloud Web App & API Protection
Important: Bot Defense Self-Service Management is an Early Access feature.
This guide provides instructions on how to configure a basic Bot Defense Advanced test system using an HTTP load balancer configured in Web App & API Protection or Multi-Cloud App Connect for Web traffic that originates from web browsers. F5 recommends that you deploy and thoroughly test your policies and configurations in the Test environment provided to you by F5 before you deploying your production environment.
Important: To configure your production system or a test system for mobile traffic, see Get Started with Bot Defense for complete planning and configuration information.
To configure your test system, complete the following steps:
- Step 1: Meet the Prerequisites
- Step 2: Configure your Bot Defense Infrastructure
- Step 3: Configure Bot Defense Policies
- Step 4: Enable Bot Defense on an HTTP Load Balancer
- Step 5: Test Your Deployment
Step 1: Meet the Prerequisites
Before you can configure your Bot Defense Advanced test system, you must meet the following prerequisites:
- Bot Defense Advanced must be enabled in your Distributed Cloud environment. If Bot Defense Advanced is not already enabled, contact your F5 account team for assistance.
- You must have the following accounts and permissions:
-
A valid Distributed Cloud Console account. For information, see Getting Started with Distributed Cloud Console.
-
The f5xc-bot-defense-admin-role (or ves-io-power-developer-role or greater).
If you do not have any of these roles, contact your Bot Defense administrator or F5 account team.
-
You must have an HTTP load balancer created in Web App & API Protection or Multi-Cloud App Connect. For information about how to create an HTTP load balancer, see Step 2 of the Web App Security & Performance Quick Start.
-
Next Steps
Configure the infrastructure that hosts your Bot Defense components. See Step 2: Configure your Bot Defense Infrastructure.
Step 2: Configure Your Bot Defense Infrastructure
Use the F5 Distributed Cloud Console to add and configure your Bot Defense infrastructure in the F5 Hosted Cloud. Bot Defense infrastructures are the virtual machines that host the Bot Defense components that process and evaluate your traffic to determine what traffic is human and what traffic is automated.
-
In the F5 Distributed Cloud Console, go to Bot Defense.
-
From the Bot Defense navigation panel, select Manage > Bot Infrastructure.
-
Select Add Bot Infrastructure.

Figure: Add a Bot Defense Infrastructure
-
Enter a unique Name to identify the new Bot Defense infrastructure.
-
From the Traffic Type drop-down menu, select Web so that only web traffic, including browser-based traffic from mobile devices, is routed through this Bot Defense infrastructure.
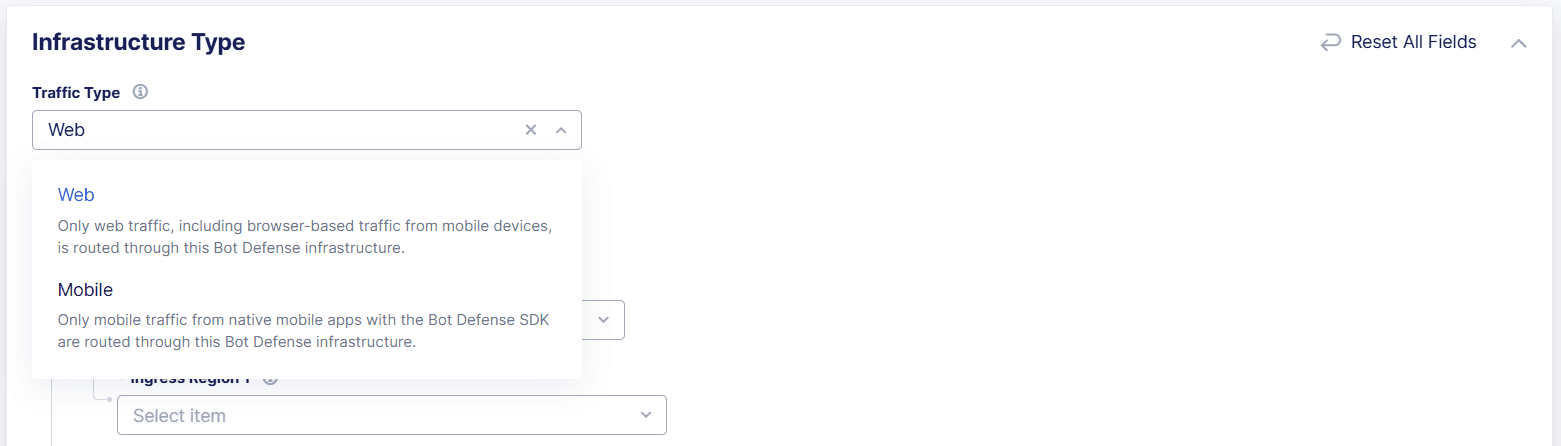
Figure: Select the Traffic Type
-
From the Environment Type drop-down menu, select Testing. This allows you to evaluate new features, settings, and system performance. A test infrastructure has a single infrastructure region that processes all traffic.
-
From the Ingress Region 1 drop-down menu, select a region that is geographically close to your traffic.
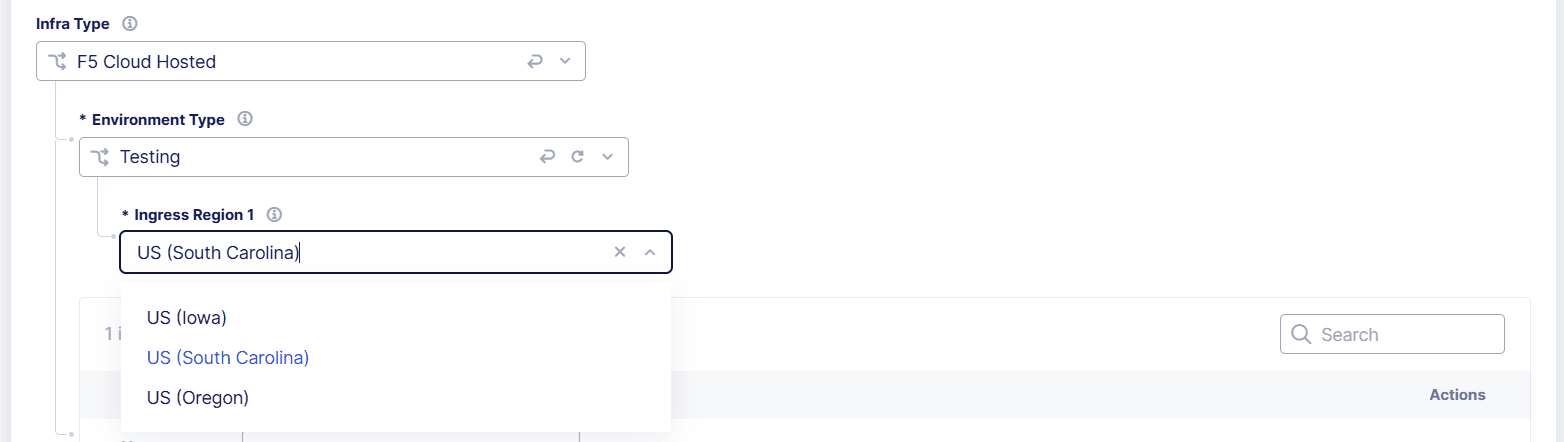
Figure: Select the Environment Type
-
Add entries to the Ingress IP Access Control List. Only traffic from these IP addresses is allowed to access this Bot Defense infrastructure. To add IP addresses, select Add Item.
-
When you finish, select Add Bot Infrastructure.
After you save your new infrastructure, it takes a few minutes for Bot Defense to finish setting up the infrastructure and default policies. Select Refresh on the Bot Infrastructure page to see the latest list of Bot Defense infrastructures.
Note: To quickly get started with your initial testing, you can add 0.0.0.0/0 to allow all traffic. However, for regular testing, to protect the infrastructure from bad actors, make sure to provide the specific set of IP addresses from which you want to allow traffic.


Next Steps
Configure the Bot Endpoint Policy and Bot Allowlist Policy. See Step 3: Configure Bot Defense Policies.
Step 3: Configure Bot Defense Policies
Configure the Bot Defense Endpoint Policy. Allowlist Policy, and Network Policy. When you finish configuring the policies, you can deploy the policy updates to your Bot Defense Test infrastructure so that you can thoroughly test your system.
Configure the Bot Endpoint Policy
The Bot Endpoint Policy defines the endpoints you want to protect with Bot Defense and the mitigation actions that Bot Defense takes when it detects automated traffic.
Note: For information about additional Bot Endpoint Policy settings and configuration, see Configure the Bot Endpoint Policy in the Bot Defense documentation.
-
From the Bot Defense navigation menu, select Manage > Bot Policies and then select Bot Endpoint Policy.
-
From the list of saved Bot Endpoint Policies, in the Actions column, select the Action menu (…) next to the most recent policy version.
For the policy you select, make sure the Type is Web.
-
Select Manage Configuration and then select Edit Configuration.
-
To add a new protected endpoint, in the Protected Endpoints section, select Add Item and then configure the endpoint settings.
-
Enter a Name and Description for the new endpoint.
-
Specify the Domain from which you accept traffic on this endpoint. For your test system, select ANYTHING so that the endpoint accepts traffic from any domain.
Note: When you configure your production system, you must decide what specific domains to protect.
-
Enter the Path for the endpoints you want to protect. From the Operator drop-down list, select ANYTHING so that all endpoint paths are protected.
Note: When you configure your production system, you choose specific endpoint paths to protect.
-
Configure the HTTP Methods you want to protect with Bot Defense:
- GET(XHR/Fetch): Use when the protected application makes an XHTTPRequest or Fetch API call to get the content of the page. GET requests are protected only if they are sent by XHTTPRequest from a page with Bot Defense JavaScript injected, not from direct navigation using the address bar or link.
- POST: The most commonly attacked method. F5 recommends that you protect all POST requests. Bot Defense analyzes POST requests to determine if they are part of a bot attack such as credential stuffing or form submission abuse.
- PUT: Use to protect PUT requests and prevent data uploads or modifications from bots.
- PATCH: Use to protect PATCH requests and prevent bots from altering resource data.
- DELETE: Use to protect DELETE requests and prevent bots from deleting content or resources.
- GET(Document): Use to protect pages on a web site that can be accessible by GET requests without visiting the main page. When you configure an endpoint using GET(Document), Bot Defense displays an interstitial page that is transparent to the user but that allows it to collect telemetry data about the requests. Note that you cannot use GET(Document) with mobile endpoints.
- HEAD: Use to protect HEAD requests and to prevent bots from repeatedly pinging a server to check metadata.
- OPTIONS: Use to protect OPTION requests and to prevent bots from checking to find out what CORS options are supported by a server.
- TRACE: Use to protect TRACE requests to and prevent bots from repeatedly pinging a server with diagnostic requests.
-
Specify the Mitigation Action to take when Bot Defense detects automated traffic:
- Continue: Allows requests to continue to the origin. A log record is created. You can optionally add headers to the request.
- From the Include Mitigation Headers drop-down menu, select Add Headers if you want to add a header to automated requests that Bot Defense allows to continue to the origin.
- From the Automation Type Header Name drop-down menu, select the header that you want to add. You create the headers when you configure the protected endpoint.
- Block: The endpoint returns a status code and message that you configure. F5 recommends that you configure the response to mimic the behavior of other blocked responses from your web application so that an attacker does not know their request was intercepted by Bot Defense.
- From the Status drop-down menu, select the status code you want to display when Bot Defense blocks a request.
- Select Add Item and enter a Header Name and corresponding Value to add to the blocked request. You can add multiple headers.
- Enter the Body of the message you want to display when Bot Defense blocks a request.
- Redirect: The endpoint forwards the browser to a URL that you specify. You can only select Redirect for web endpoints.
- In the Status field, enter the status code that you want to display when Bot Defense redirects a request.
- In the Location field, enter the URL where you want to send requests redirected by Bot Defense.
- Transform: Allows the request to continue to the origin. Headers are added to the request for inference and automation type. Use transform when you want to allow the request to continue and use a system other than Bot Defense to mitigate.
- In the Add Header(s) to Request drop-down menu, select whether you want to add a header name and value pair to the request.
- If you choose to add a header, select Add Item and then add a Header Name and Value to add to requests.
- Continue: Allows requests to continue to the origin. A log record is created. You can optionally add headers to the request.
-
When you finish configuring the protected endpoint, select Apply.
-
When you finish adding protected endpoints, select Save Bot Endpoint Policy.
-
Review the summary of changes and select Save Final. The policy version is saved and added to the list of policy versions that you can deploy in your Bot infrastructure.
Next Steps
Configure the Bot Allowlist Policy.
Configure the Allowlist Policy
Configure an allowlist policy that allows requests from entries on the list to reach the origin destination without being evaluated by Bot Defense.
- From the Bot Defense navigation menu, select Manage > Bot Policies and then select Bot Allowlist Policy.
- From the list of saved policies, in the Actions column, select the Action menu (…) next to the allowlist-web policy.
- Select Manage Configuration, and then select Edit Configuration.
- To add an entry by either IP address or IP prefix:
- In the IP & IP Prefix section, select Add Item, and then select one of the following client identifiers:
- IP Address: Enter a Value, such as
172.16.0.0. - IP Prefix: Enter a Value, such as
172.16.0.0/12.
- IP Address: Enter a Value, such as
- When you finish, select Apply.
- In the IP & IP Prefix section, select Add Item, and then select one of the following client identifiers:
- To add an entry by IP address range, in the IP Range section, select Add Item.
- Enter the start and end of the IP range.
- When you finish, select Apply.
- When you finish making changes, select Save Bot Allowlist Policy.
- Review the summary of changes and select Save Final. The policy version is saved and added to the list of policy versions that you can deploy in your Bot infrastructure.
Configure the Network Policy
- From the Bot Defense navigation menu, select Manage > Bot Policies and then select Bot Network Policy.
- From the list of saved Bot Network Policies, in the Actions column, select the Action menu (…) next to the policy you want to configure.
- Select Manage Configuration and then select Edit Configuration.
- In either the Upstream Routing section or Manual Routing section, select Add Item and enter the hostname of the HTTP load balancer where you plan to enable Bot Defense. For example, enter
lb.example.com. If you enable Bot Defense on multiple load balancers, add an entry for each hostname. - When you finish making changes, select Save Bot Network Policy.
- Review the summary of changes and select Save Final. The policy version is saved and added to the list of policy versions that you can deploy in your Bot infrastructure.
Next Steps
After you configure your Bot Defense policies, you are ready to deploy your policies. See Deploy Policy Updates.
Deploy Policy Updates
Important: F5 recommends that you deploy and thoroughly test your policies in the Test environment provided to you by F5 before you move policy updates to your production environment.
-
In the Bot Defense navigation menu, select Manage > Bot Infrastructure.
-
On the Bot Infrastructure page, in the Actions column, select the Action menu (…) next to the Bot Infrastructure you want to update.
-
Select Deploy Policy Versions to deploy your policies.
-
Select the Policy Name and Deployment Version of the Endpoint Policy and Allowlist Policy that you want to deploy. Make sure the policies you select are the Web policy type policy type.
-
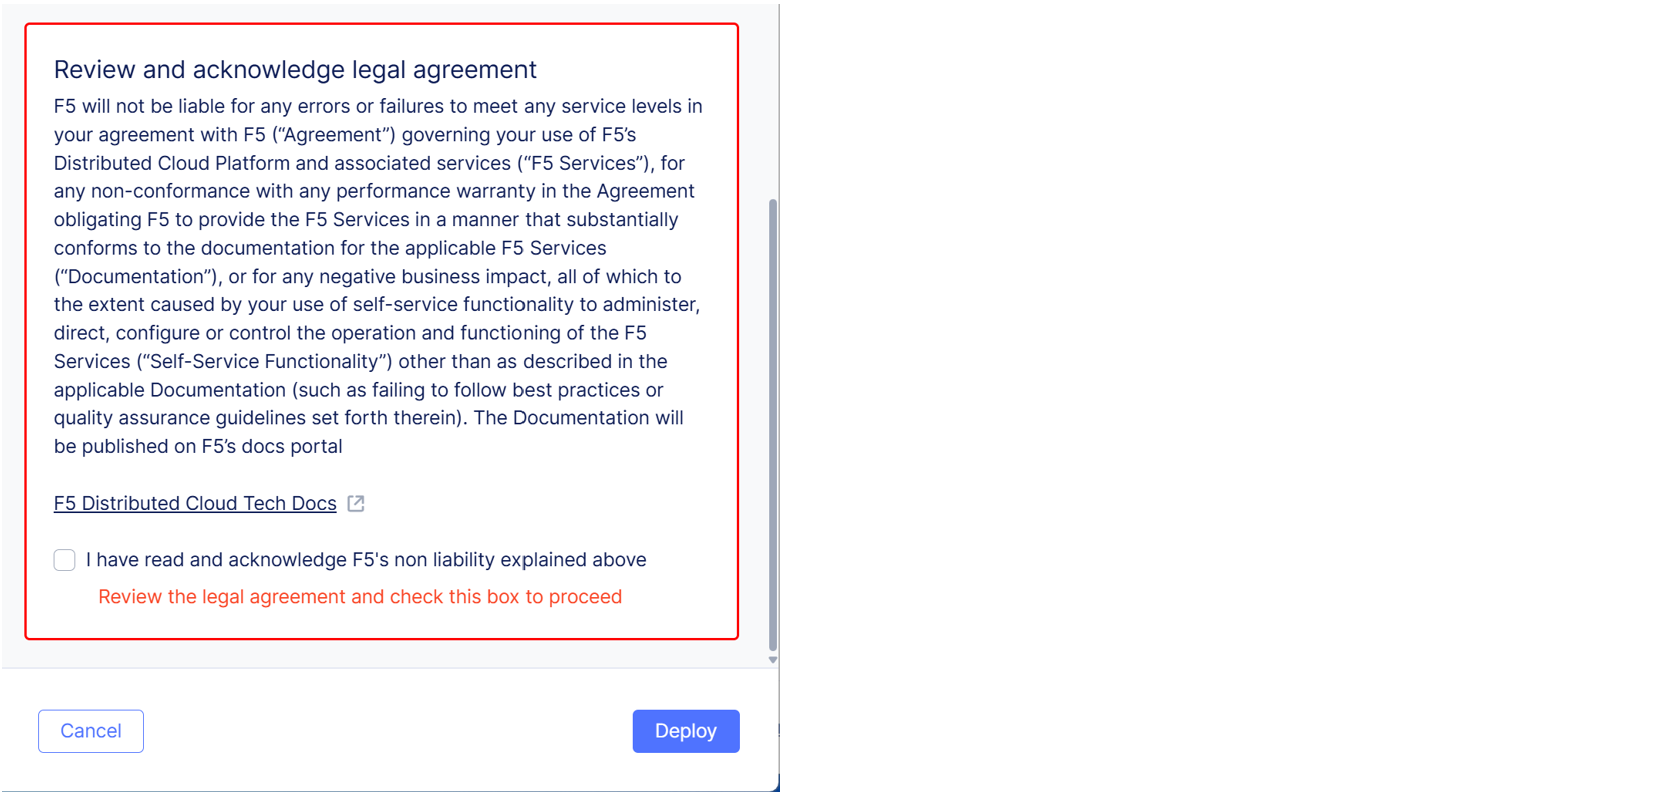
Review and acknowledge the legal agreement. F5 recommends that you review the text of the legal agreement before you agree.
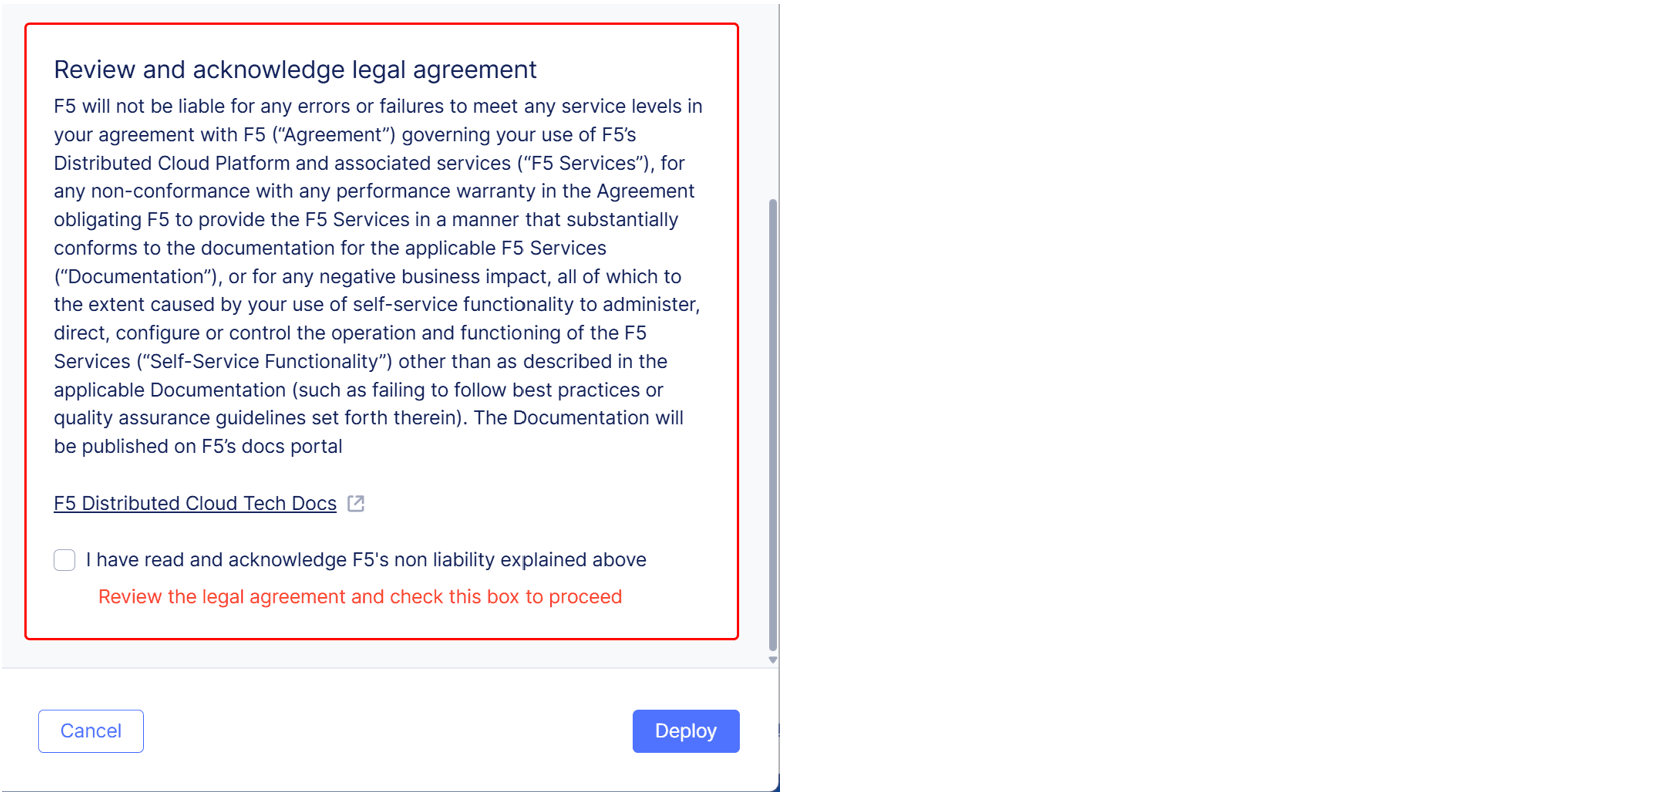
Figure: Deployment Acknowledgement Checkbox
-
Select Deploy. Then select Show Bot Infrastructure Status to view the deployment status for the infrastructure you updated.
Next Steps
When you finish deploying your policies, enable Bot Defense on an HTTP load balancer.
Step 4: Enable Bot Defense on an HTTP Load Balancer
You can enable Bot Defense on one or more HTTP load balancers that you have configured in the F5 Distributed Cloud Console in either Web App & API Protection or Multi-Cloud App Connect.
-
From the Distributed Cloud Console Homepage, select Web App & API Protection or Multi-Cloud App Connect.
-
From the navigation menu, confirm that you selected the correct namespace. You must select the namespace where Bot Defense is deployed.
-
Select Manage > Load Balancers > HTTP Load Balancers.
-
From the Actions column, select the Action (…) menu next to the load balancer where you want to configure Bot Defense and then select Manage Configuration.
-
Select Edit Configuration and then select Bot Protection.
-
In the Bot Protection section, from the Bot Defense drop-down menu, select Enable Bot Defense.
-
From the Infrastructure for Web drop-down menu, select the Bot Defense infrastructure that you want to use to process your web-based traffic.
-
Enable Show Advanced Fields.
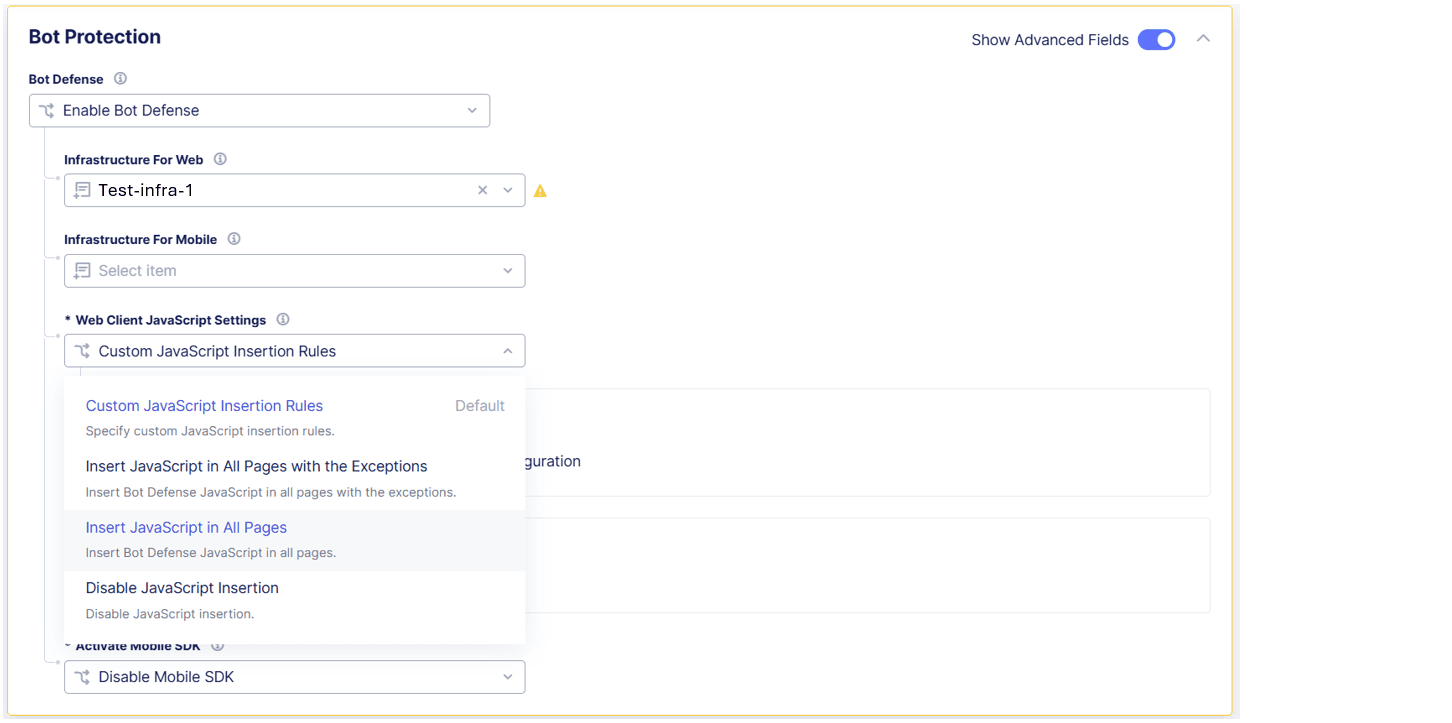
Figure: Insert JavaScript
-
From the Web Client JavaScript Settings drop-down menu, select Insert JavaScript in All Pages so that Bot Defense injects JavaScript tags in all your HTML pages.
Note: JavaScript insertions count against your daily Bot Defense transactions. To help you control transaction costs, when you configure your production system, select specific pages where you want Bot Defense to inject JavaScript tags.
-
In the JavaScript Location drop-down menu, specify where in your HTML pages you want Bot Defense to inject JavaScript tags:
After <head>After </title>Before <script>
F5 recommends that you select
After <head>so that the JavaScript is executed early in the page loading process. This helps to avoid conflicts with other scripts and allows time for the Bot Defense JavaScript to be executed while the rest of page renders.If you select
After </title>, be sure your application pages have the<title>tag. -
Select Save HTTP Load Balancer.
Next Steps
Test your Bot Defense deployment.
Step 5: Test Your Deployment
Perform the following tests to help confirm that Bot Defense correctly identifies web traffic.
Check JavaScript Injection
To confirm that JavaScript tags are injected in your entry pages, use the following procedure to inspect the pages in your browser and look for Bot Defense-specific headers.
-
Open one of the application pages you chose to protect.
-
Use the developer tools in your browser or view the page source to inspect the page and confirm that Bot Defense has inserted JavaScript tags with the query string parameter,
?single. For example,yourscript.js?single.
Figure: JavaScript tags
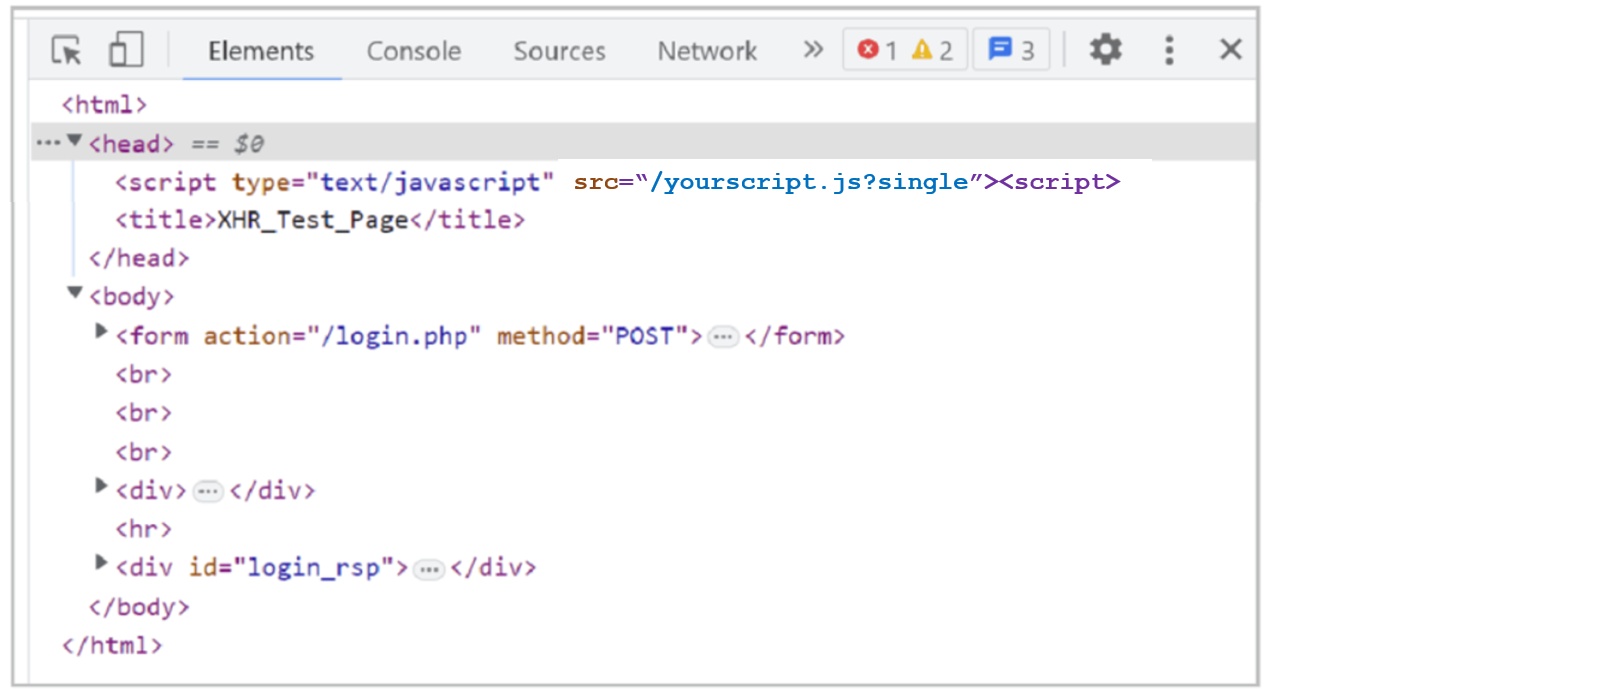
If the JavaScript tags appear correctly, then the JavaScript tags are being correctly injected into your entry pages. If you do not see the JavaScript tags, check your configuration to confirm it is correct. If necessary, contact F5 Support for additional assistance.
Analyze Protected Web Traffic
Perform the following tests to help confirm that Bot Defense identifies web traffic correctly.
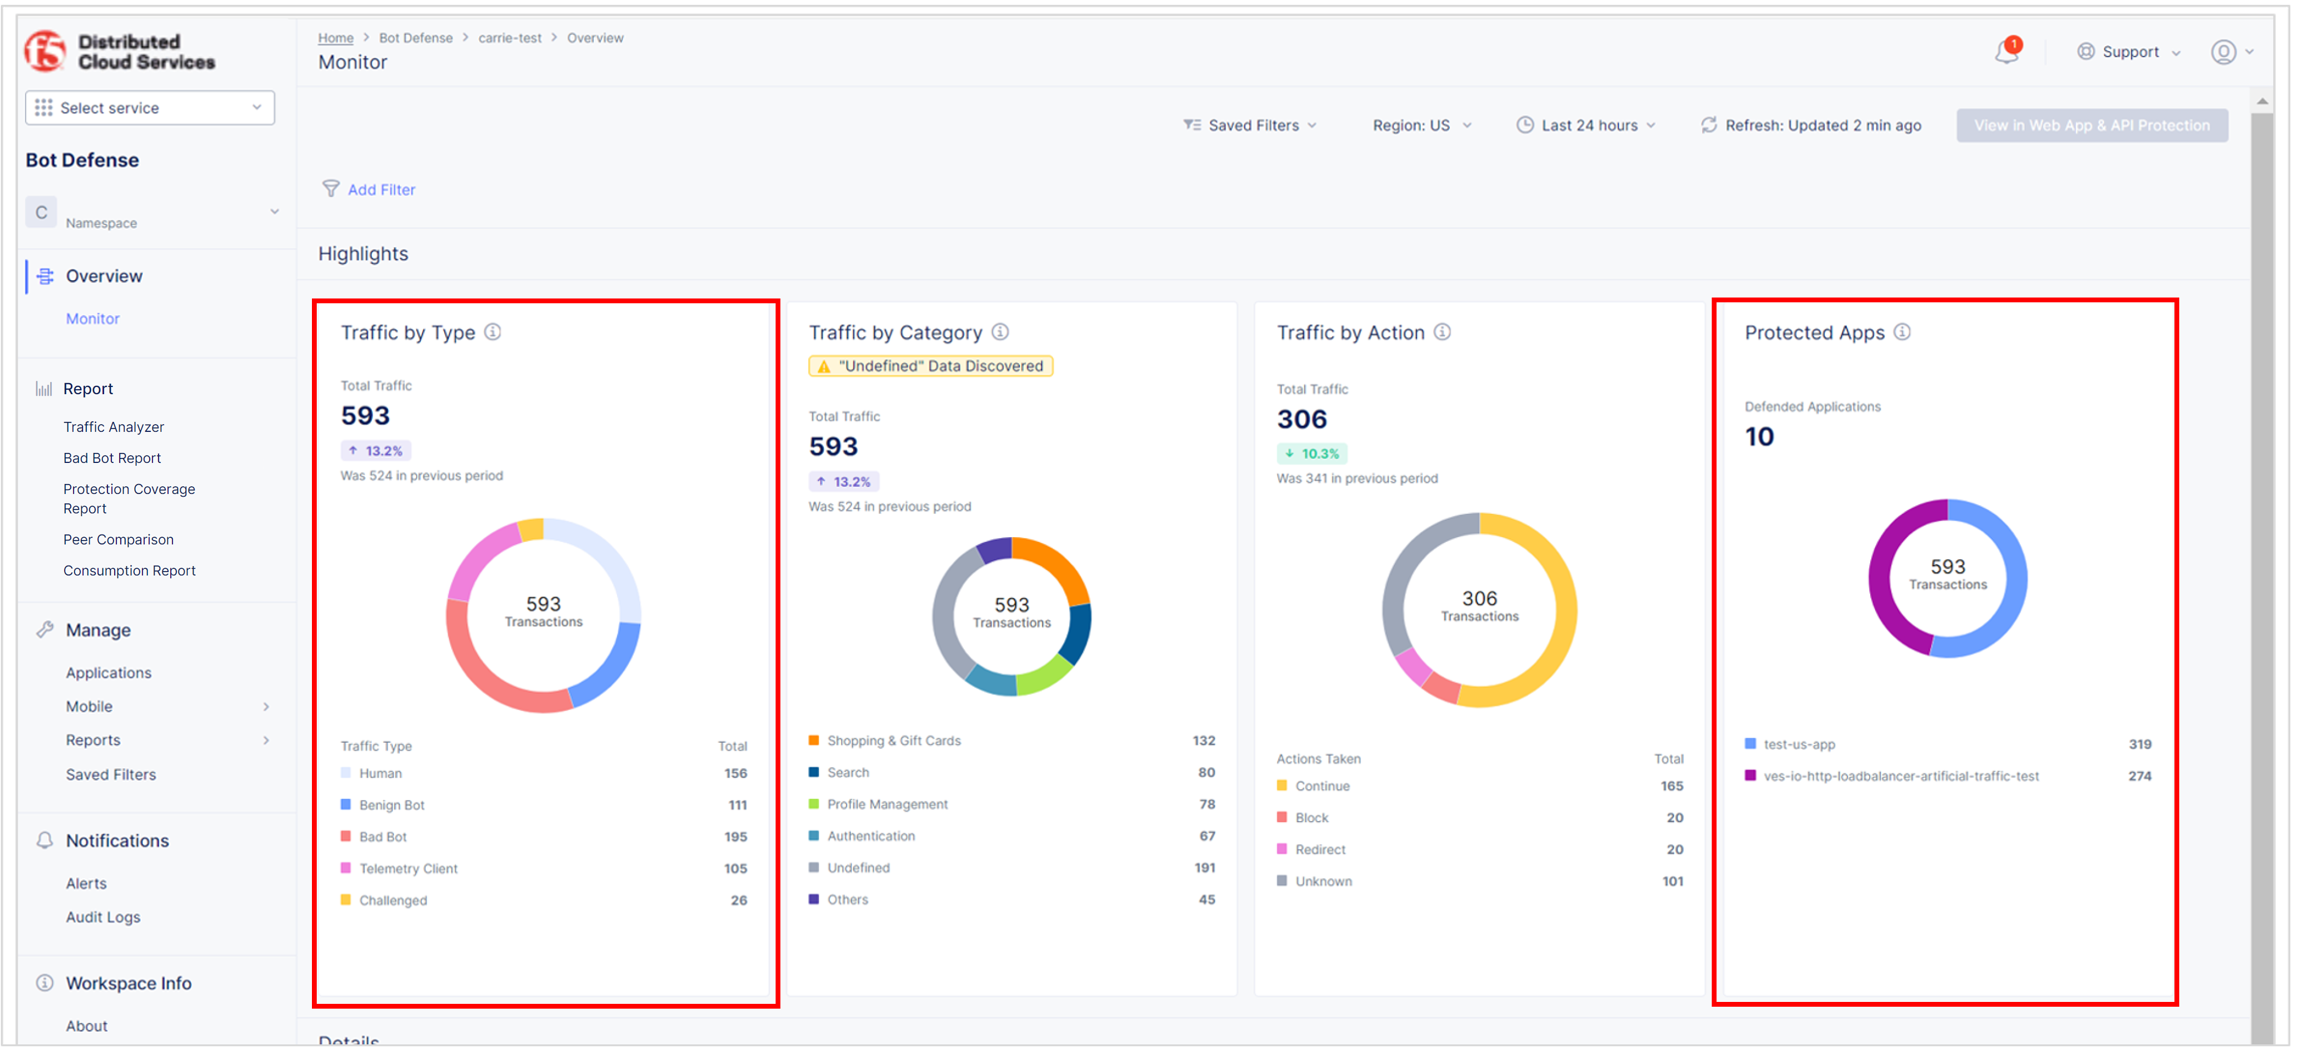
-
Review the Bot Defense dashboard to see the types of traffic identified by Bot Defense. From the Bot Defense Home page, select Overview > Monitor.
- In the Protected Apps Overview widget, check that your protected application is listed and that the amount of traffic is appropriate.
- In the Traffic Overview widget, check that the level of human, known bot, bad bot and other activity is appropriate.

Figure: Bot Defense Dashboard
From the time-period drop-down menu, select Last 24 hours. In the Traffic Visualized section, check whether traffic marked as malicious increases during the day and decreases at night. If so, this might indicate that it is human traffic.

Figure: Time frame controls
From the Bot Defense Home page, select Report > Traffic Analyzer.
- Look at the distribution of IP addresses and the countries of origin. Confirm that this distribution looks like it comes from your normal user base.
- Look at the User Agent column and decide if there are suspicious user agents present. You can also use this technique to identify wanted automation (known bots), such as test tools or SEO bots.
- Select Add Filter. From the drop-down menu, select Bot Reason, select In, select Token Missing and select Apply. Review the traffic and determine if it appears to be legitimate.
If a normal user request appears in the "token missing" results, it could mean that one of the following occurred:
- The Bot Defense JavaScript did not run.
- Another JavaScript on the page interfered with the Bot Defense JavaScript.
- The request was made before the Bot Defense JavaScript loaded.
For additional information about how to check for false positive results, see Test Your Bot Defense Configuration.
Next Steps
Now that you have configured a basic test system, you are ready to configure additional options and to configure your production system. For information, see Get Started with Bot Defense.
On this page:
- Step 1: Meet the Prerequisites
- Step 2: Configure Your Bot Defense Infrastructure
- Step 3: Configure Bot Defense Policies
- Configure the Bot Endpoint Policy
- Configure the Allowlist Policy
- Configure the Network Policy
- Deploy Policy Updates
- Step 4: Enable Bot Defense on an HTTP Load Balancer
- Step 5: Test Your Deployment
- Check JavaScript Injection
- Analyze Protected Web Traffic
- Next Steps