Configure on an HTTP Load Balancer (WAAP)
The following information explains how to configure Bot Defense Standard on an HTTP load balancer that you have configured with F5 Distributed Cloud.
Prerequisites
- You must have an active F5 Distributed Cloud account. If you do not have an account, see Getting Started with Distributed Cloud Console.
- You must have Bot Defense Standard enabled in the Distributed Cloud Console. See Enable Distributed Cloud Bot Defense Standard.
- You must have Web App & API Protection (WAAP) enabled and have an HTTP load balancer configured.
WAAP or Distributed Mesh best practices
- If you have CORS policy enabled on your application, make sure you enable the CORS policy on the load balancer. When the CORS policy is configured, specific headers are automatically added to requests that use CORS, which Bot Defense requires to process the requests. For information about the CORS policy, see the HTTP Load Balancer configuration documentation.
- If your site is served from an apex domain, configure a redirect from the apex domain to the FQDN domain (for example,
customer.comredirects towww.customer.com). This is required because your domain must point to a Distributed Cloud-provided CNAME. Pointing a CNAME from an apex domain is not recommended as that prevents you from having SOA and all other DNS records at apex. - Do not use IP-based session persistence to load-balance internally. F5 Distributed Cloud has a range of egress IPs and if you have IP-based load balancing at the origin, this may break your session persistence. Use cookie-persistence, if possible.
- Lock down your infrastructure to Distributed Cloud egress IPs only. This prevents attackers from bypassing Distributed Cloud altogether and hitting your origin directly.
- Validate your internal tools (such as logging tools or fraud tools) see the traffic accurately when going through Bot Defense.
- If you have a CDN (such as CloudFront) implemented before F5 Distributed Cloud (Client > CDN > F5 Distributed Cloud > Origin), ensure:
- The Bot Defense JavaScript file is excluded from the cached entities.
- The CDN passes the origin User-Agent rather than injecting CDN User-Agent, such as "Cloud Front".
Configure a Bot Defense Test System in Web App & API Protection
The following video explains how to set up a basic test system for Bot Defense in Web App & API Protection. To configure a production system, see additional configuration options included in the sections below.
Enable Bot Defense on an HTTP Load Balancer
- From the Distributed Cloud Console dashboard, select Web App & API Protection.
- From the navigation menu, confirm that you are in the correct namespace.
- Select Manage > Load Balancers > HTTP Load Balancers.
- From the Actions column, select the Actions (…) menu next to the load balancer where you want to configure Bot Defense and then select Manage Configuration.
- Select Edit Configuration and then select Bot Protection.
- In the Bot Protection section, from the Bot Defense drop-down menu, select Enable.

Figure: Enable Bot Defense on WAAP
Important: For load balancers with types “HTTPS with Custom Certificate” and “HTTPS with Automatic Certificate” set the Path normalize field to Enable path normalization. This is the default setting for new load balancer objects.
Next Steps
Configure protected application endpoints. For information, see the following sections:
- To protect web-based endpoints, see Configure Protected App Endpoints.
- To protect mobile endpoints, see Configure F5 Mobile SDK Settings for WAAP.
Configure Protected App Endpoints
To protect web-based endpoints, such as a web page, in the Bot Protection section, perform the following steps:
-
From the Bot Defense Region drop-down menu, select the region where the origin server for the application is located.
-
(Optional) Enable Show Advanced Fields. In the Timeout field, enter the number of milliseconds Bot Defense should wait for the inference check to complete before timing out. The default value is 1000.
-
In the Bot Defense Policy section, select Configure.
-
In the Protected App Endpoints section, select Configure and then select Add item.
-
Enter the following information for each endpoint:
-
Name: Enter the name of the endpoint. The name must follow DNS-1035 format.
-
HTTP Methods: Select the HTTP methods you want to protect on this endpoint.
- ANY: Includes GET(XHR/Fetch), POST and PUT. Does not include GET(Document). To select all methods including GET(Document), instead of ANY, you must select each method from the list.
- GET(XHR/Fetch): Use when the protected application makes an XHTTPRequest or Fetch API call to get the content of the page. Note that GET requests are protected only if they are sent by XHTTPRequest from a page with Bot Defense JavaScript injected, not from direct navigation using the address bar or link.
- POST: The most commonly attacked method. F5 recommends that you protect all POST requests. Bot Defense analyzes POST requests to determine if they are part of a bot attack such as credential stuffing or form submission abuse.
- PUT: Use to protect PUT requests and prevent data uploads or modifications from bots.
- GET(Document): Use to protect pages on a web site that can be accessible by GET requests without visiting the main page. When you configure an endpoint using GET(Document), Bot Defense displays an interstitial page that is transparent to the user but that allows it to collect telemetry data about the requests. Note that you cannot use GET(Document) with mobile endpoints.
You can select multiple methods.
Note: If you select both GET(XHR/Fetch) and GET(Document), only GET(XHR/Fetch) requests are protected. If you need to protect both methods, add the endpoint separately for each method.
Important: If you choose to protect all pages and endpoints (
/*), F5 recommends that you select specific HTTP methods to protect and that you do not select the ANY option. Protecting all HTTP methods for all pages can adversely impact performance.-
Endpoint Label: F5 strongly recommends that you select endpoint labels to allow more granular attack intent identification and reporting when Bot Defense detects automation.
For example, to identify a multi-factor authentication flow on an endpoint, select Specify Endpoint label category > Authentication > Login MFA.
For a full list of available endpoint labels, see Endpoint Labels.
Note: For web scraping labels, select Specify Endpoint label category > Search and select an available flow label.
-
Protocol: Select the protocols you want to protect. Select HTTP, HTTPS or Both.
-
Domain Matcher: Specify the domains you want to protect. Enter an exact value, a suffix value, or a regex value. Note that Bot Defense only supports JS regex and does not support inline modifiers.
-
Path: Enter the path to the endpoint you want to protect. For example, enter
/login. Enter a prefix, exact path, or regex value. Note that Bot Defense only supports JS regex and does not support inline modifiers. -
Traffic Channel: Select the type of traffic that accesses this endpoint. Select Web Traffic, Mobile Traffic or Web and Mobile Traffic. If you select Web and Mobile Traffic, you must provide a header to distinguish mobile request from web requests. You can use a wildcard (*) in the header value to match a substring.
-
Bot Traffic Mitigation: Specify what action to take when a bot is detected.
- Block: The endpoint returns a status code and message. You can enter a status code and edit the message here.
- Redirect: The endpoint forwards the browser to the URI that you specify. You can only select Redirect for web endpoints.
- Flag: Allows requests to continue to the origin. Select No headers to create a log record only or select Append Headers to create custom headers for inference and automation type.
-
Good Bot Detection Settings: Specify whether the mitigation actions you selected above apply to both malicious automation and good bots. You can choose to flag good bots but allow them to continue to origin, or you can apply the mitigation actions to all automation. By default, mitigation actions are applied to all automation.
Important: Good bots, also called benign bots, are bots that perform specific, helpful tasks, such as search engine bots, social media crawlers and aggregator bots. Many of these bots can be useful to your business and therefore you might decide to allow them to continue to origin.
-
-
Select Apply.
-
Select Add Item to add another endpoint or select Apply when you finish adding endpoints.
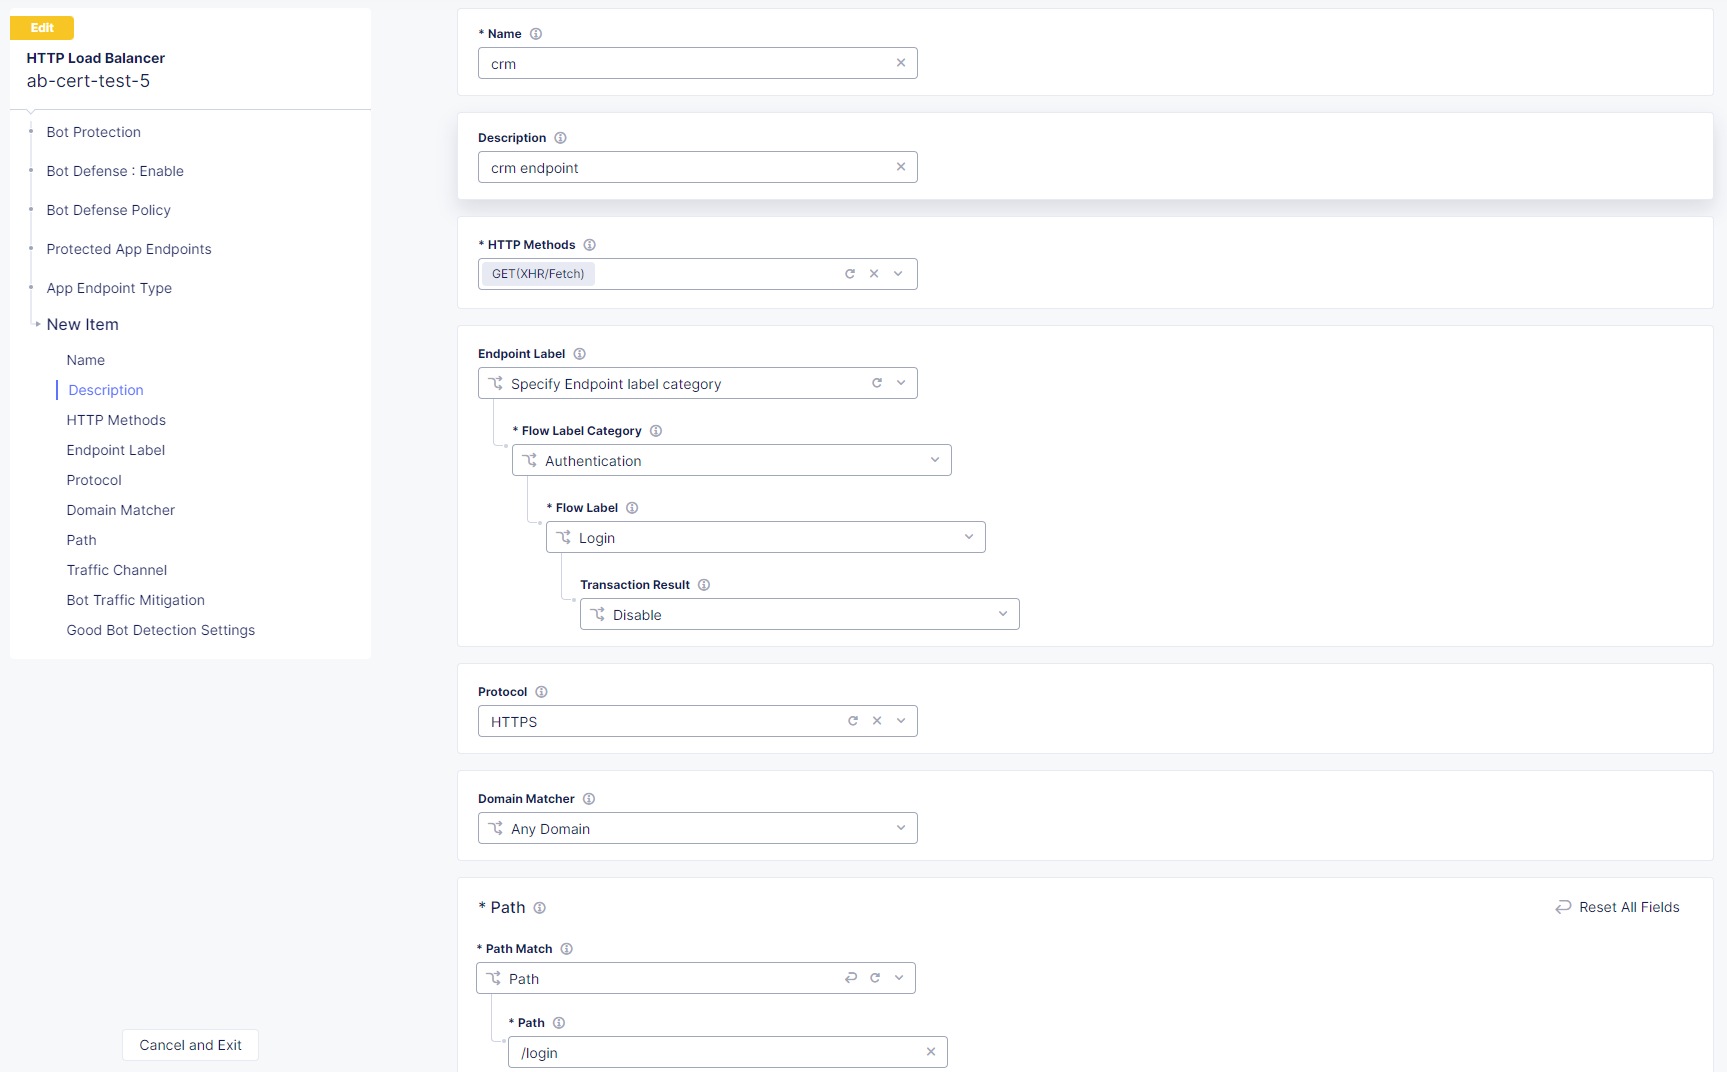
Figure: Configure protected app endpoints
Next Steps
Configure how Bot Defense injects JavaScript into your application pages.
Configure JavaScript Injection
To protect web-based endpoints, Bot Defense injects JavaScript tags. The Bot Defense JavaScript collects telemetry data about requests to your endpoint. If you configure web-based endpoints, you must configure how the Bot Defense JavaScript tags are injected into the pages that you want to protect.
In the JavaScript Insertion section:
-
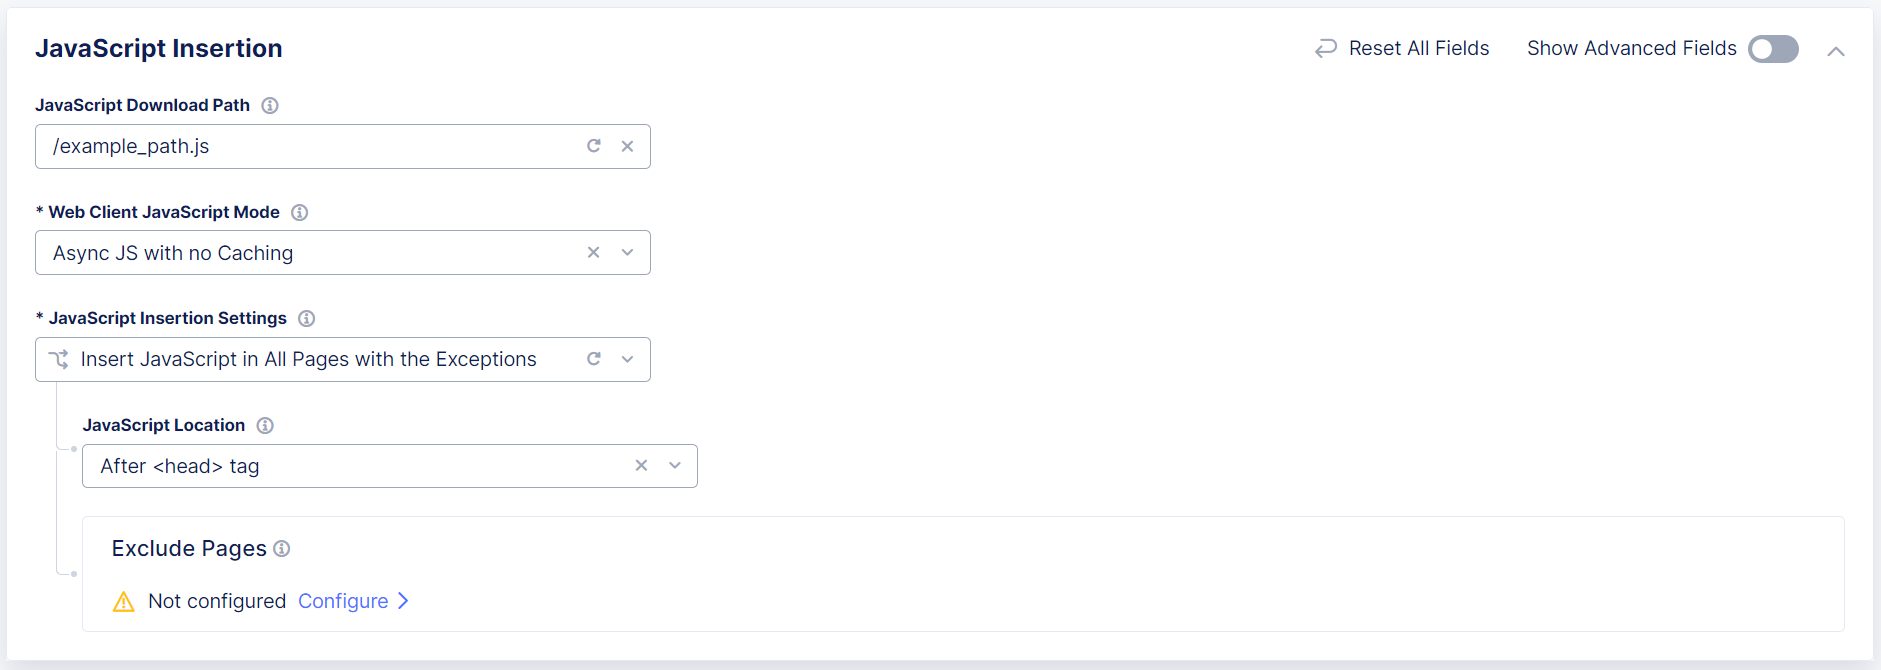
In the JavaScript Download Path field, enter a path to display to the browser and in the page source code in place of the actual download path for the Bot Defense JavaScript. This prevents malicious actors from determining what system you are using to protect your application.
F5 recommends that you choose a URL or path that is similar to your existing JavaScript files, but that does not include “F5,” “Bot Defense” or other indications that it is used for security purposes. Enter a simple path that starts with
/or a complete URL such ashttps://example.com/customer1.js. The URL or path you choose cannot conflict with your existing JavaScript files. -
From the Web Client JavaScript Mode drop-down menu, determine how the protection JavaScript is loaded into the web page. The JavaScript is loaded in two parts. The larger part can be loaded in two possible ways:
- Asynchronous: The page can continue to load while the Bot Defense JavaScript downloads and executes. This method provides the best performance.
- Synchronous: The Bot Defense JavaScript must be loaded and executed completely before the web page can load. This option ensures that the Bot Defense JavaScript has loaded before any other functionality on the website loads.
You can also choose to cache the larger part of the JavaScript so it can be used in page reloads.
Choose one of the following options:
- Async JS with no Caching: JavaScript is loaded asynchronously and is not cached.
- Async JS with Caching: JavaScript is loaded asynchronously and cached. F5 recommends that you use this method as it typically provides the best performance.
- Sync JS with no Caching: JavaScript is loaded synchronously and is not cached.
- Sync JS with Caching: JavaScript is loaded synchronously and cached.
-
From the JavaScript Insertion Settings drop-down menu, specify if the HTTP load balancer should insert JavaScript into all pages, or if some pages should be excluded. F5 recommends that you select specific pages used to access the endpoints you want to protect.
Important: When you choose the JavaScript location, F5 recommends that you select
After <head>so that the Bot Defense JavaScript is executed early as possible in the page loading process. This allows time for the Bot Defense JavaScript to be fetched and executed while the rest of page is rendered. If you selectAfter </title>, be sure your application pages have the<title>tag.If you select Insert JavaScript in All Pages, choose where you want to insert the JavaScript:
After <head>tagAfter </title>tagBefore <script>tag

Figure: Configure JavaScript Injection
If you select Insert JavaScript in All Pages with the Exceptions:
-
Choose where you want to insert the JavaScript:
After <head>tagAfter </title>tabBefore <script>tag
-
Create a list of pages where Bot Defense should not insert JavaScript tags:
-
In the Exclude Pages section, select Configure and then select Add Item.
-
Enter the following information for each page in your application where you do not want to insert the Bot Defense JavaScript.
- Name: The name of the page. The name must follow DNS-1035 format.
- Description: A human-readable description of the endpoint.
- Domain Matcher: Specify domains you want to exclude. Enter an exact value, a suffix value, or a regex value.
- Path: Specify protected paths here. Enter a prefix, exact path, or regex value.
-
Select Apply. Select Add Item to add additional JavaScript insertion paths.
-
-
When you finish configuring JavaScript insertion settings, select Apply.
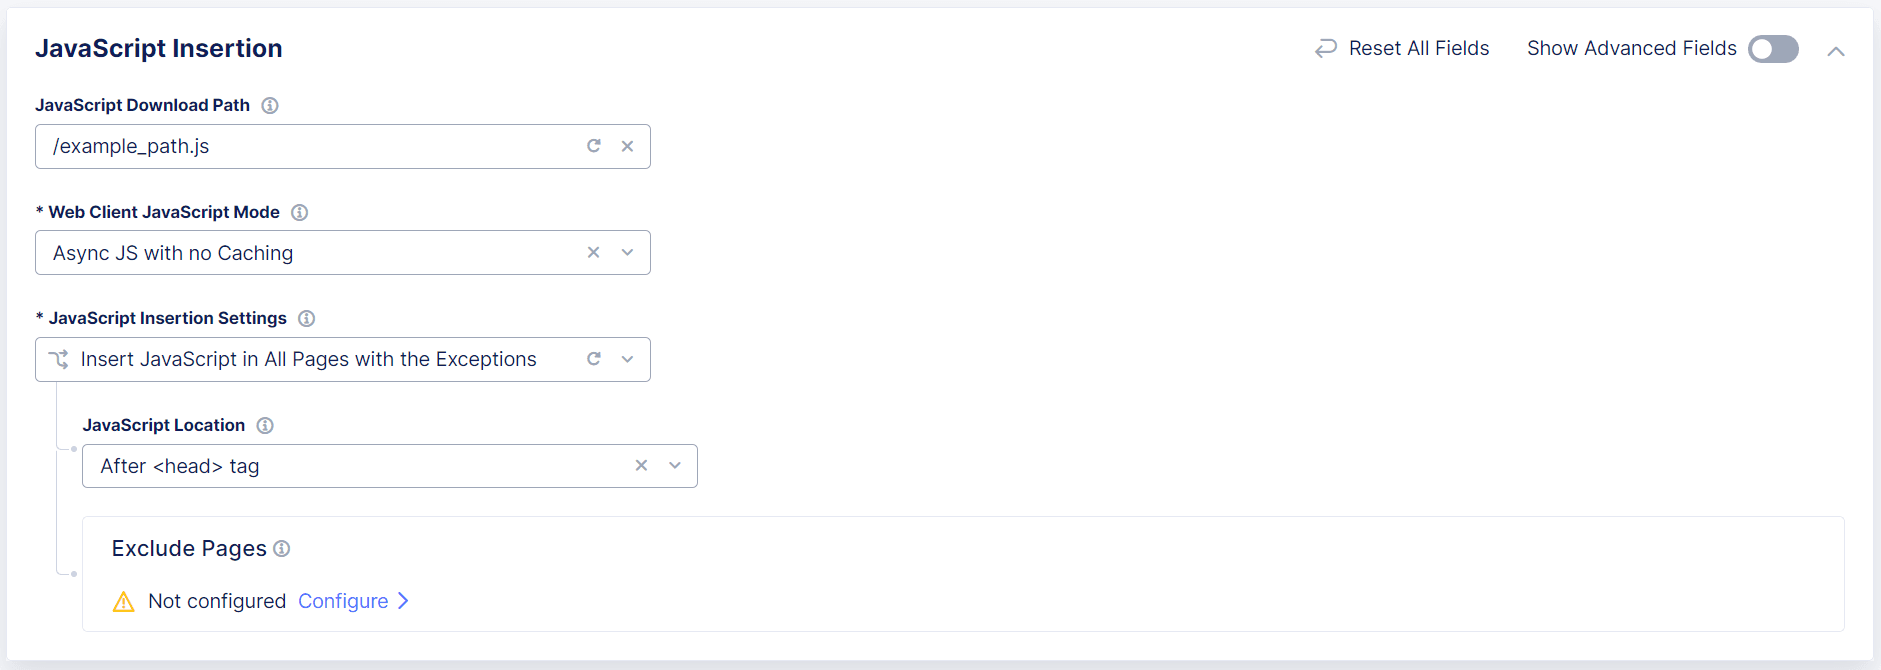
Figure: Configure JavaScript Injection with Exceptions
Insert JavaScript Tags in specific pages
You can optionally configure Bot Defense to only insert JavaScript tags in specific pages. Be sure to select paths to HTML pages that end users are likely to visit before they browse to any protected endpoint. In Bot Defense, these are called “entry pages.”
Note: F5 recommends that you use wildcards to select JavaScript insertion paths for HTML pages to which end users are likely to go, such as
/index.htmand/login/*.
- Select Show Advanced Fields.
- From the JavaScript Insertion Settings drop-down menu, select Custom JavaScript Insertion Rules.
- Use the descriptions above to configure the JavaScript Insertions and Exclude Paths sections.
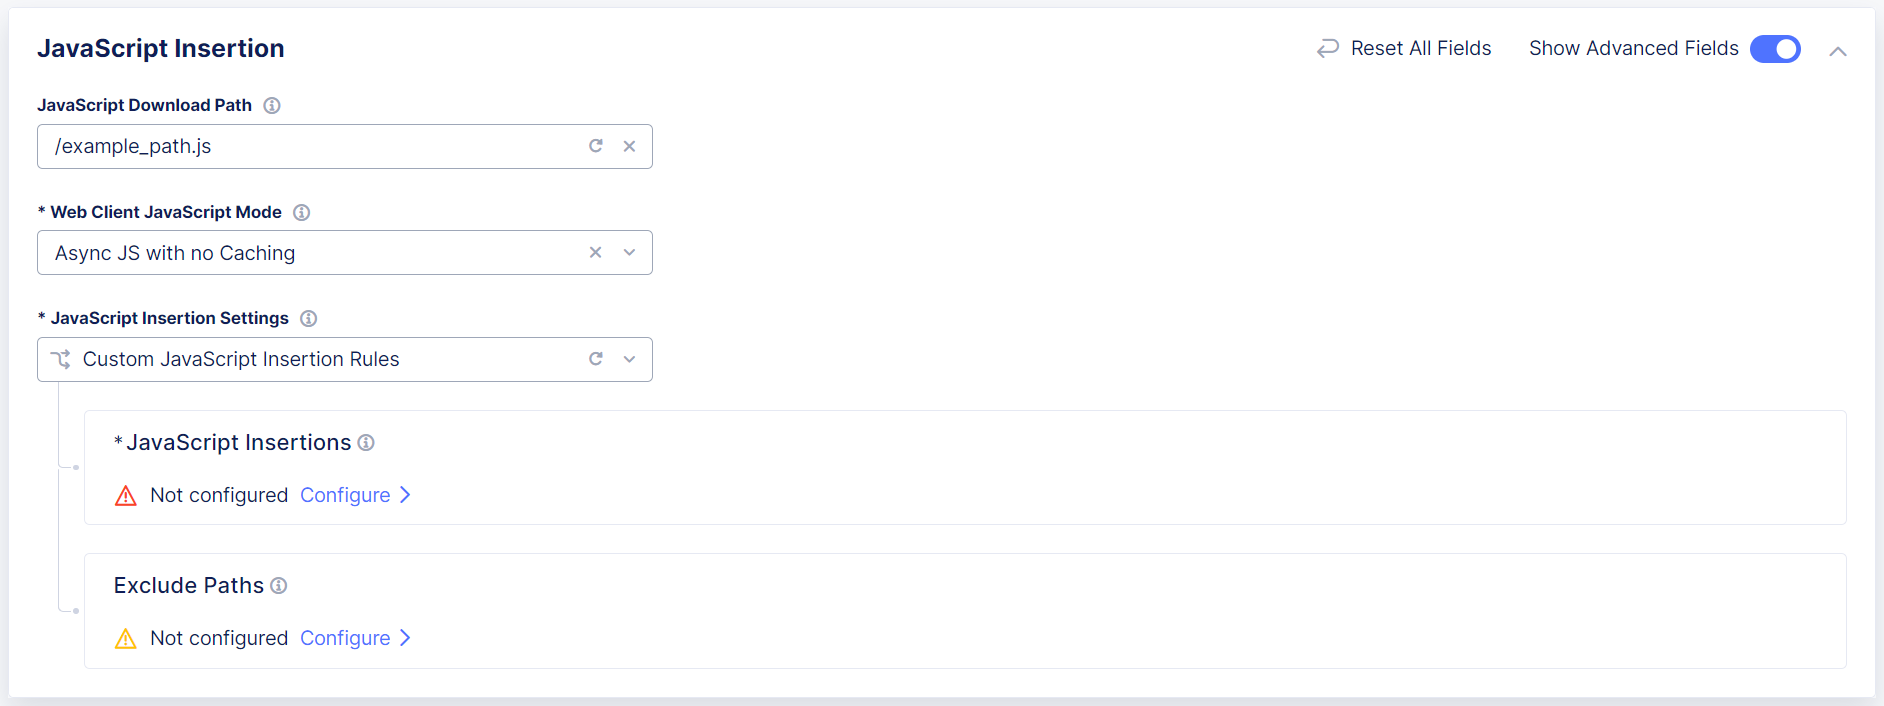
Figure: Configure JavaScript Injection in Specific Pages
Disable JavaScript Insertion
If necessary, you can optionally disable JavaScript insertion.
Important: For maximum effectiveness, Bot Defense requires you to enable JavaScript insertion. F5 recommends that you do not disable JavaScript insertion.
- Select Show Advanced Fields.
- From the JavaScript Insertion Rules drop-down menu, select Disable JavaScript Insertion.
- Select Apply and then select Apply again.
Note: When you select Disable JavaScript Insertion, you are required to have a value in the JavaScript Download Path and Web Client JavaScript Mode fields even though Bot Defense ignores the actual values in those fields.
Next Steps
If you configured mobile endpoints, you must you must configure F5 Distributed Cloud Mobile SDK settings for WAAP. The F5 Distributed Cloud Mobile SDK must be integrated with your mobile application to route requests to Bot Defense for inspection.
If you did not configure mobile endpoints, you do not need to configure the Mobile SDK settings and can test Bot Defense to make sure it is handling requests to your web endpoints correctly. For information, see Test your Bot Defense configuration.
Configure F5 Mobile SDK Settings for WAAP
Important: Before you configure mobile settings, see Protect Mobile Endpoints for important best practices, required configuration, and information about integrating the F5 Distributed Cloud Mobile SDK with your mobile endpoints.
If you added a mobile endpoint in the Protected App Endpoints section, you must enable the F5 Distributed Cloud Mobile SDK and specify a specific header for mobile requests. If you did not add any mobile endpoints, then you do not need to configure Mobile SDK settings.
-
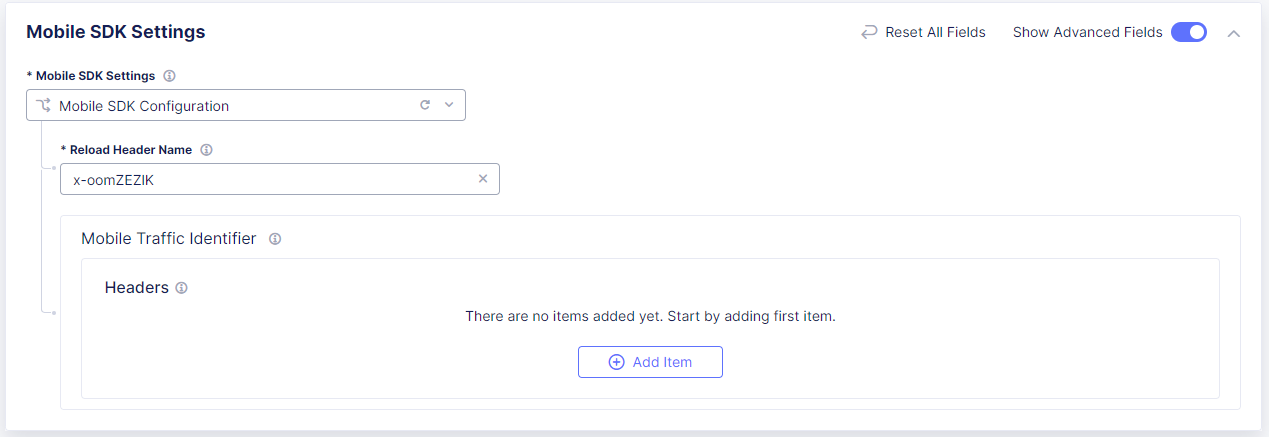
In the Mobile SDK Settings section, select Show Advanced Fields.
-
From the Mobile SDK Settings drop-down menu, select Mobile SDK Configuration.

Figure: Configure Distributed Cloud Mobile SDK Settings
-
In the Mobile Traffic Identifier section, select Add Item.
-
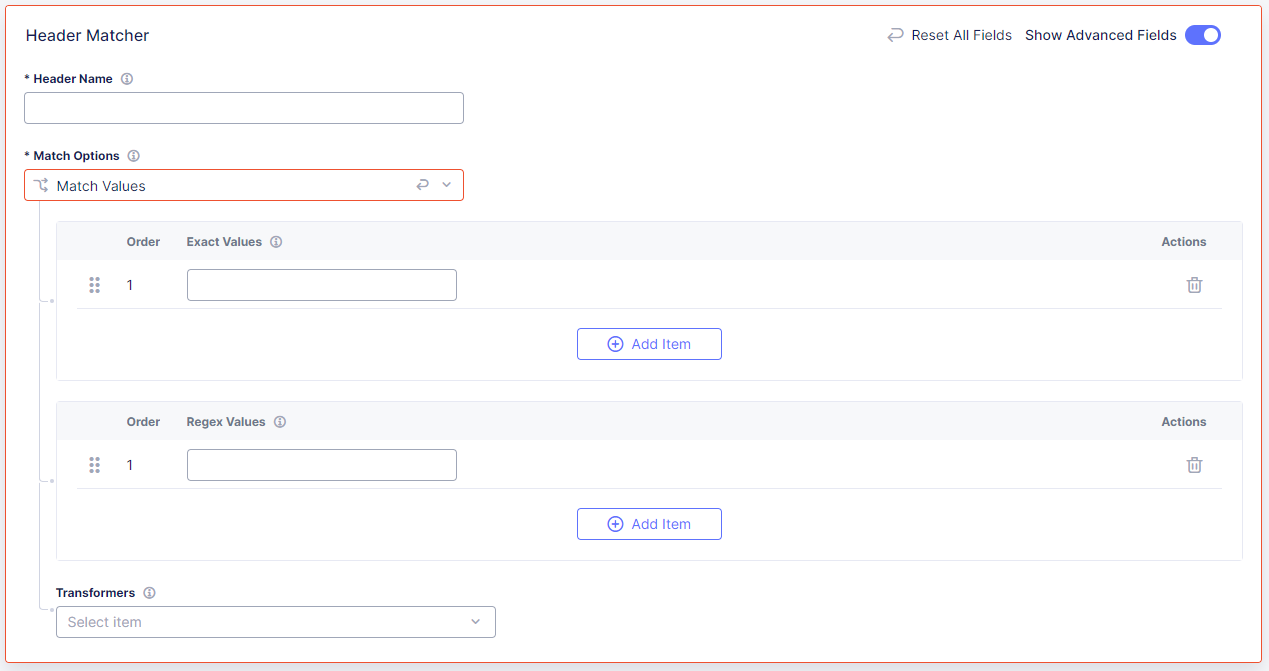
Enter a Header Name to identify mobile requests. The header name is case sensitive.
-
From the Match Options drop-down menu, select one of the following options:
- Present: Matches only if a header is present.
- Not Present: Matches only if a header is not present.
- Match Values: Select Add Item to enter an exact value or a regex value. You can enter multiple values. When you finish adding values to match, select Apply.
-
If you selected Match Values, select Show Advanced Fields. From the Transformers drop-down menu, optionally select any transformers, such as converting the path to lower case or removing blank spaces, that you want to apply to your paths before matching. Transformers are applied in the order you add them.
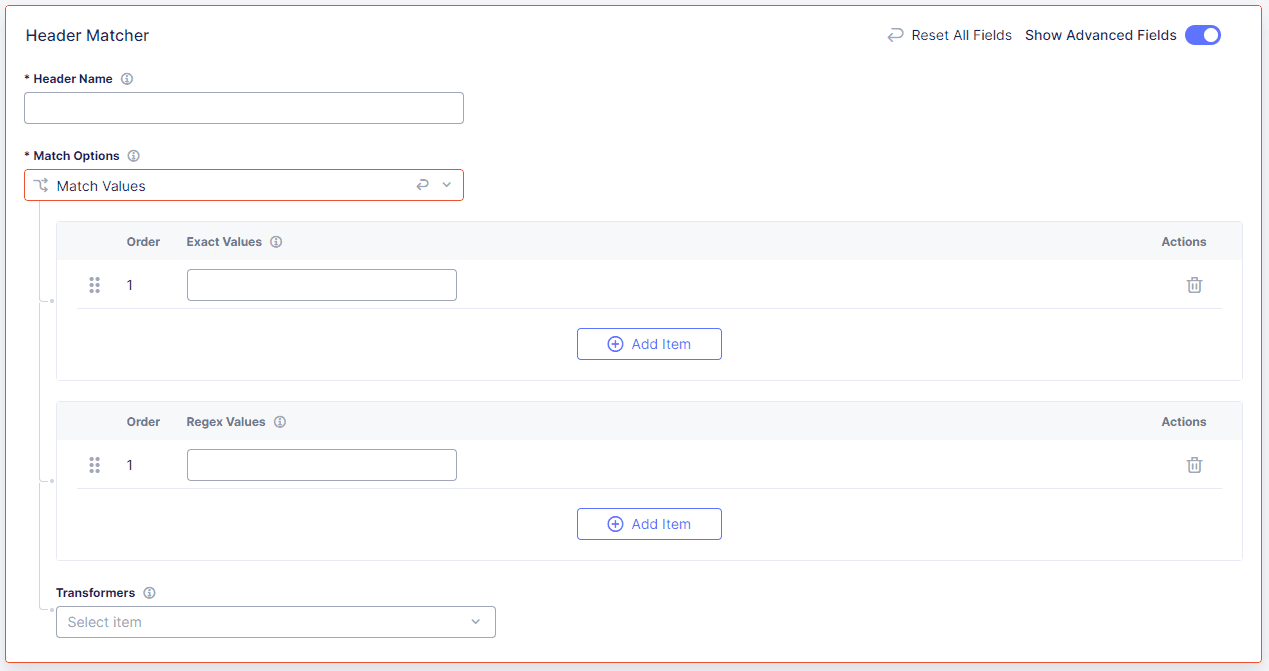
Figure: Configure Mobile Header
-
When you finish configuring mobile SDK settings, select Apply.
Next Steps
Make sure you have configured Bot Defense correctly. For information, see Test your Bot Defense configuration.

