Enable with Amazon CloudFront
The following information explains how to configure Bot Defense Standard with Amazon CloudFront.
Prerequisites
- You must have an active F5 Distributed Cloud account. If you do not have an account, see Getting Started with Distributed Cloud Console.
- You must have Bot Defense Standard enabled in the Distributed Cloud Console. See Enable Distributed Cloud Bot Defense Standard.
Create a new Bot Defense application for Amazon CloudFront
- On the Distributed Cloud Console Dashboard, select Bot Defense.
- Select Manage > Applications > Add Application. If no applications exist, you are prompted to add a protected application.
- Add a Name and Description for the Application.
- Select the Application Region where the origin server for the new protected application resides: US, EU, or Asia. Note that selecting the wrong region can increase latency.
- From the Connector Type drop-down menu, select Amazon CloudFront and select Configure. Options appear to enter Amazon Reference Information.
Add AWS Reference Information
- From the AWS Configuration drop-down menu, select how you want to associate your protected application with your AWS distribution. Choose Select AWS CloudFront Distribution ID or Select AWS CloudFront Distribution by tag matching.
- Select Configure and then depending on how you chose to associate your application with your distribution, enter the Distribution ID from your CloudFront console, or a Distribution Tag.
- Select Add Item to add another distribution or select Apply.

Figure: Associate a protected application with your AWS distribution
Note: You can choose to manually associate your distributions after you download the integration package. For information, contact
support@cloud.f5.com.
Add Protected Endpoints
-
In the Protected Endpoints section, select Configure and then select Add Item.
-
Enter a Name and Description for the new endpoint.
-
Specify the Domain Matcher. You can choose any domain or specify a specific host value.
-
Specify the Path to the endpoint. For example, enter
/login. -
Specify a Query parameter, if needed. If a Query value is defined, Bot Defense looks at the Path and Query values.
-
Choose the HTTP Methods that are protected on this endpoint by Bot Defense. You can select multiple methods.
-
Enter Endpoint Labels to allow more granular attack intent identification and reporting when Bot Defense detects automation. For example, to identify a multi-factor authentication flow on an endpoint, select Specify Endpoint label category > Authentication > Login MFA. F5 strongly recommends that you select endpoint labels.
For a full list of available endpoint labels, see Endpoint Labels.
Note: For web scraping labels, select Specify endpoint label category > Search and select an available flow label.
-
Select the type of client that accesses this endpoint (Web Client, Mobile Client, or Web and Mobile Client).
-
Select the mitigation action for this endpoint when automation is detected:
-
Continue (request continues to origin). For reporting purposes, you can optionally add a header to capture traffic that is going to the origin. Provide the header name in the Define Mitigation Header section.
-
Redirect. Provide the appropriate Status Code and URI.
-
Block. Enter the Status Code, Content Type, and Body of the response message.
Note: Mobile clients only allow Continue and Block. If you select Web and Mobile Client, you can select mitigation actions for each client type.
Note: If you select Web and Mobile Client, you must enter a Mobile Request Identifier Header when you enable F5 Distributed Cloud Mobile SDK Settings. For instructions, see Define Mobile SDK Settings.
-
-
When you finish configuring the endpoint, select Apply.
Your protected endpoint is added to the table. To modify the endpoint, select Actions > Edit. To add additional endpoints, select the Add Item button.
-
When you finish adding endpoints, select Apply.
Define Web Client JavaScript Settings
Note: You only configure Web Client JavaScript Settings if you have web-protected endpoints. If you only protect mobile endpoints, then select Disable JavaScript Insertion and skip to Define Mobile SDK Settings.
Note: To manually insert the protection JavaScript in your application, enable Show Advanced Fields, select Insert JavaScript Manually, and enter a Web Client JavaScript Path. Then see Manual JS Insertion for information.
-
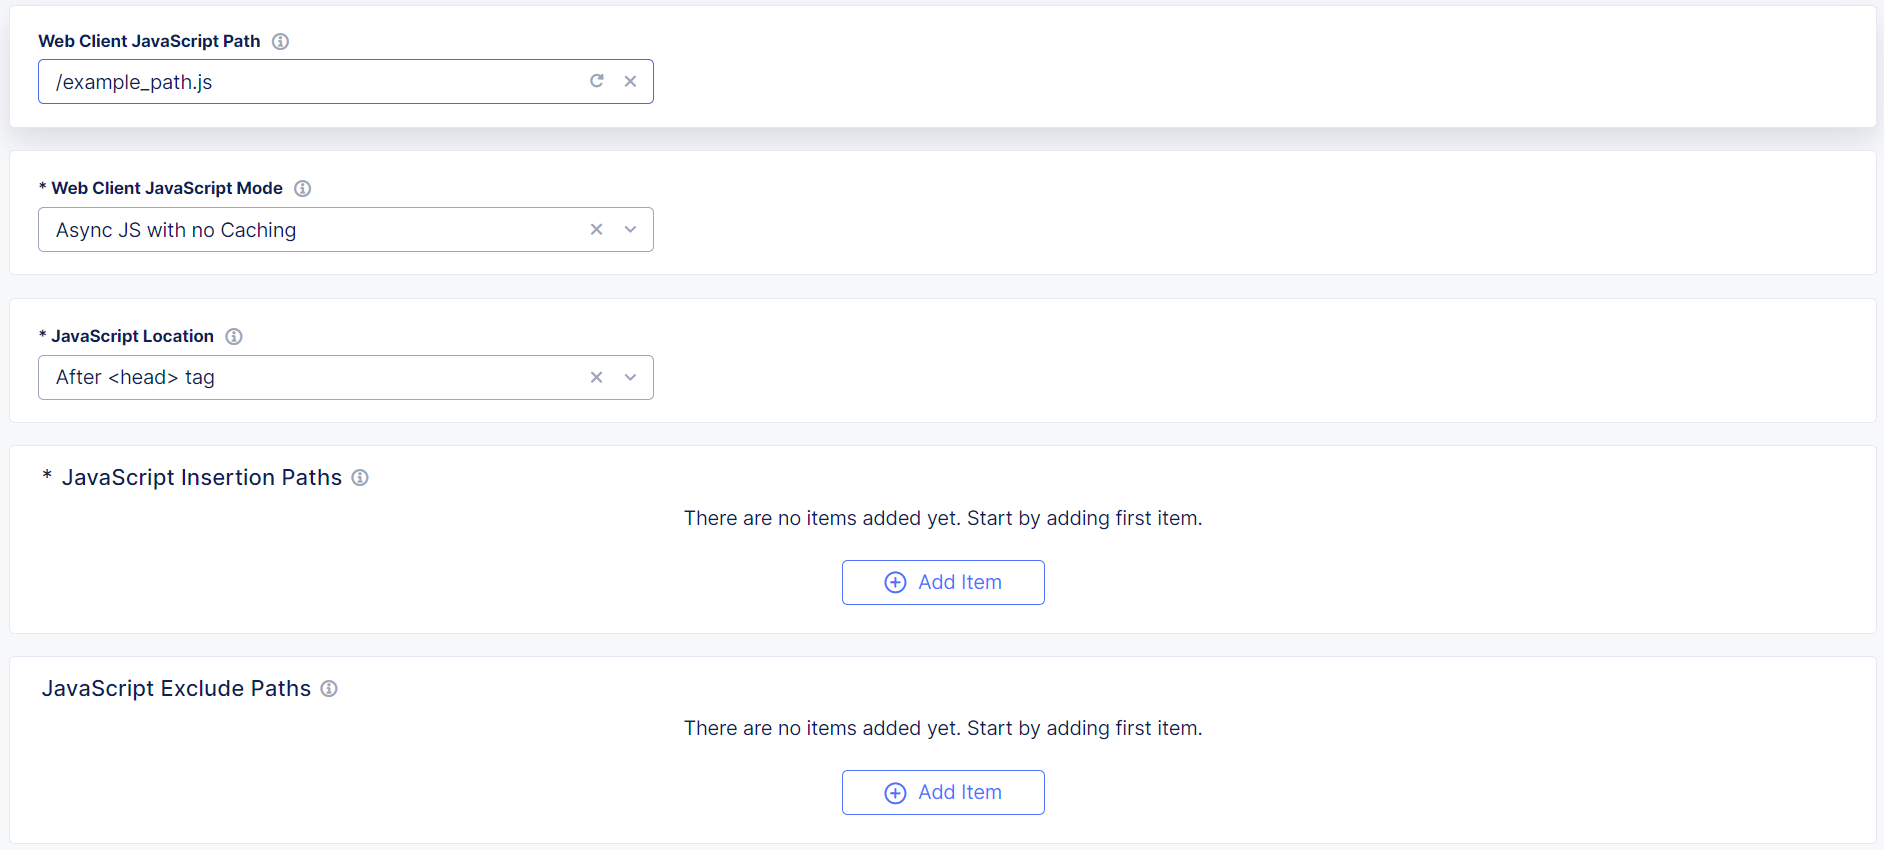
From the Web Client JavaScript Insertion Settings drop-down menu, select Specify JavaScript Insertion Rules and select Configure.
-
Add the Web Client JavaScript Path. The web client fetches the F5 Client JavaScript from this path. F5 recommends that you choose a URL or path that is similar to your existing JavaScript files, but that does not include “F5,” “Bot Defense” or other indications that it is used for security purposes. Enter a simple path that starts with
/or a complete URL such ashttps://example.com/customer1.js. The URL or path you choose cannot conflict with your existing JavaScript files.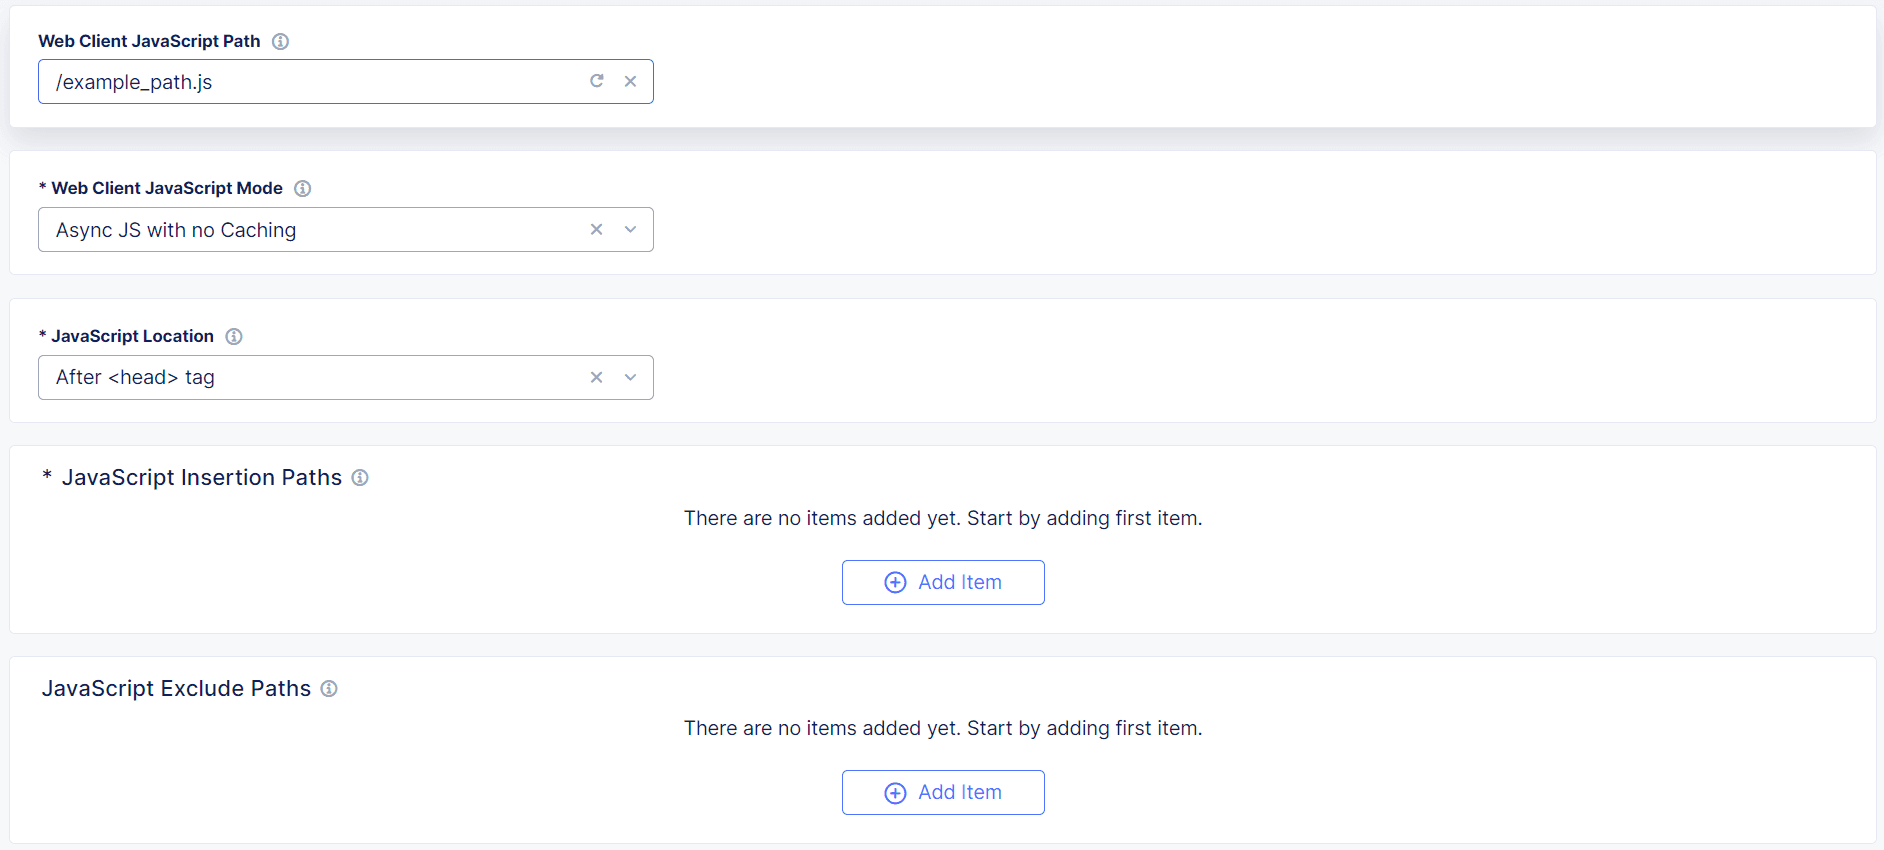
Figure: Web Client JavaScript Settings
-
From the Web Client JavaScript Mode drop-down menu, determine how the protection JavaScript is loaded into the entry page. The JavaScript is loaded in two parts. The larger part can be loaded in two possible ways:
- Asynchronously: The JavaScript runs as soon as it is loaded and does not block the page from loading.
- Synchronously: The page does not continue loading until the JavaScript has been loaded and executed.
You can also choose to cache the larger part of the JavaScript so it does not have to be downloaded each time it is loaded into a new page.
Choose one of the following options:
- Async JS with no Caching: JavaScript is loaded asynchronously and is not cached.
- Async JS with Caching: JavaScript is loaded asynchronously and cached. F5 recommends that you use this method as it typically provides the best performance.
- Sync JS with no Caching: JavaScript is loaded synchronously and is not cached.
- Sync JS with Caching: JavaScript is loaded synchronously and cached.
-
From the JavaScript Location drop-down menu, choose the location where you want to insert the JavaScript in the code:
- After
<head>tag - After
</title>tag - Before
<script>tag
- After
-
In the JavaScript Insertion Paths section, select Add Item.
-
Enter a Name, Description, Domain Matcher, and Path for each page in your application where you want to insert the protection JavaScript.
Note: Be sure to select paths to HTML pages that end users are likely to visit before they browse to any protected endpoint.
Note F5 recommends that you use wildcards to select JavaScript insertion paths for HTML pages to which end users are likely to go, such as
/index.htmand/login/*. -
Select Apply. The JavaScript Insertion Path is added to the table. Select Add Item to add additional JavaScript Insertion Paths.
-
-
To exclude the protection JavaScript from specific web pages, in the JavaScript Exclude Paths section, select Add Item.
-
Enter a Name, Description, Domain Matcher, and Path to exclude.
-
Select Apply. This adds an item to the table. Select Add Item to add additional exclusion paths.
Note F5 recommends that you carefully add JavaScript Insertions and that you do not add a long list of exclusions. A small cost is incurred for each inclusion request for AWS lambda to check for exclusions.
- JavaScript insertion path examples:
/login/*/catalog
- JavaScript exclusion path examples:
/login/images/catalog/soldout/*
-
-
When you finish configuring JavaScript Insertion Rules, select Apply.
Define Mobile SDK Settings
Important: Before you configure mobile settings, see Protect Mobile Endpoints for important best practices, required configuration, and information about integrating the F5 Distributed Cloud Mobile SDK with your mobile endpoints.
- If you added mobile endpoints to your configuration, select Enable Mobile SDK.
- If you selected Web and Mobile Client as your client type during endpoint configuration, add a mobile header to distinguish the endpoints. This is not required if you selected only Web Client or Mobile Client.
-
Enable Show Advanced Fields.
-
In the Mobile Request Identifier Headers section, Select Add Item.

Figure: Show Advanced Fields
-
Enter a Name and the corresponding Value. Specify if the value must be exact or if it can be regex.
-
Select Apply.
-
Configure More Options
Enable Show Advanced Fields to see all options.
Trusted Client Rules (Allow List)
Trusted Client Rules add headers and IP addresses to an Allow List. Pages that have a specific IP address or that contain specific headers are allowed to proceed to the origin and are not sent to the Bot Defense engine for evaluation. There is no logging for pages on the Allow List.
- In the Trusted Client Rules section, select Configure and then select Add Item.
- Enter a Name and specify the Client Identifier:
- If you choose IP Prefix, enter a string.
- If you choose HTTP Header, select Add Item, enter a Name and Value and then select Apply.
Note: You can add multiple headers to the table at the same time. You must add IP addresses individually.
- Select Apply when you finish adding Trusted Client Rules and then select Apply again to configure More Options.
Set Logging Level
Note: Enable Show Advanced Fields to see the following options.
Select a logging level to determine the verbosity of logs that are written to AWS storage:
- Error – Includes connection and network errors. Does not include transaction errors.
- Warning – Includes information about malicious transactions. The Warning level also includes all Error-level log information.
- Info – Includes information about both human and malicious transactions. The Info level also includes all Warning-level log information.
- Debug – Full transaction logs that include all available log data, including all data from Error, Warning and Info levels.
Define Continue Mitigation Header
Note: Enable Show Advanced Fields to see the following option.
The Header Name for Continue Mitigation Action field is the header that is added to a request when automation is detected and you have set the mitigation action to Continue and Add Header for the endpoint. You made these selections when you configured your protected endpoints. For information, see Add Protected Endpoints.
Timeout and Body Sample Size Limit
Note: Enable Show Advanced Fields to see the following options.
- Timeout – This defines the maximum time to send the requests to the Bot Defense Engine for analysis. If the timeout is exceeded, the request continues to the origin (this is tracked in AWS CloudWatch). By default, the field is set to 700 ms based on performance efficiency.
- Body Sample Size - This allows additional request body data (other than F5 telemetry) to be sent for analysis. By default, this is set to 0 MB. Max size limit is 1 MB. If you exceed the size limit, the load balancer responds with a 413 error, "Payload Too Large."
Manual JS Insertion
If you require Manual JavaScript Insertion, add the following tags to one of the recommended locations:
- Immediately After
<head> - Immediately After
</title> - Before
<script>(first script tag on the page).
Matcher Config JavaScript:
<script type='text/javascript' src='INJECTION_PATH?matcher'></script>
I/O Hook JavaScript:
<script type='text/javascript' src='INJECTION_PATH?single'></script>
Replace INJECTION PATH with the value you specified for Web Client JavaScript Path.
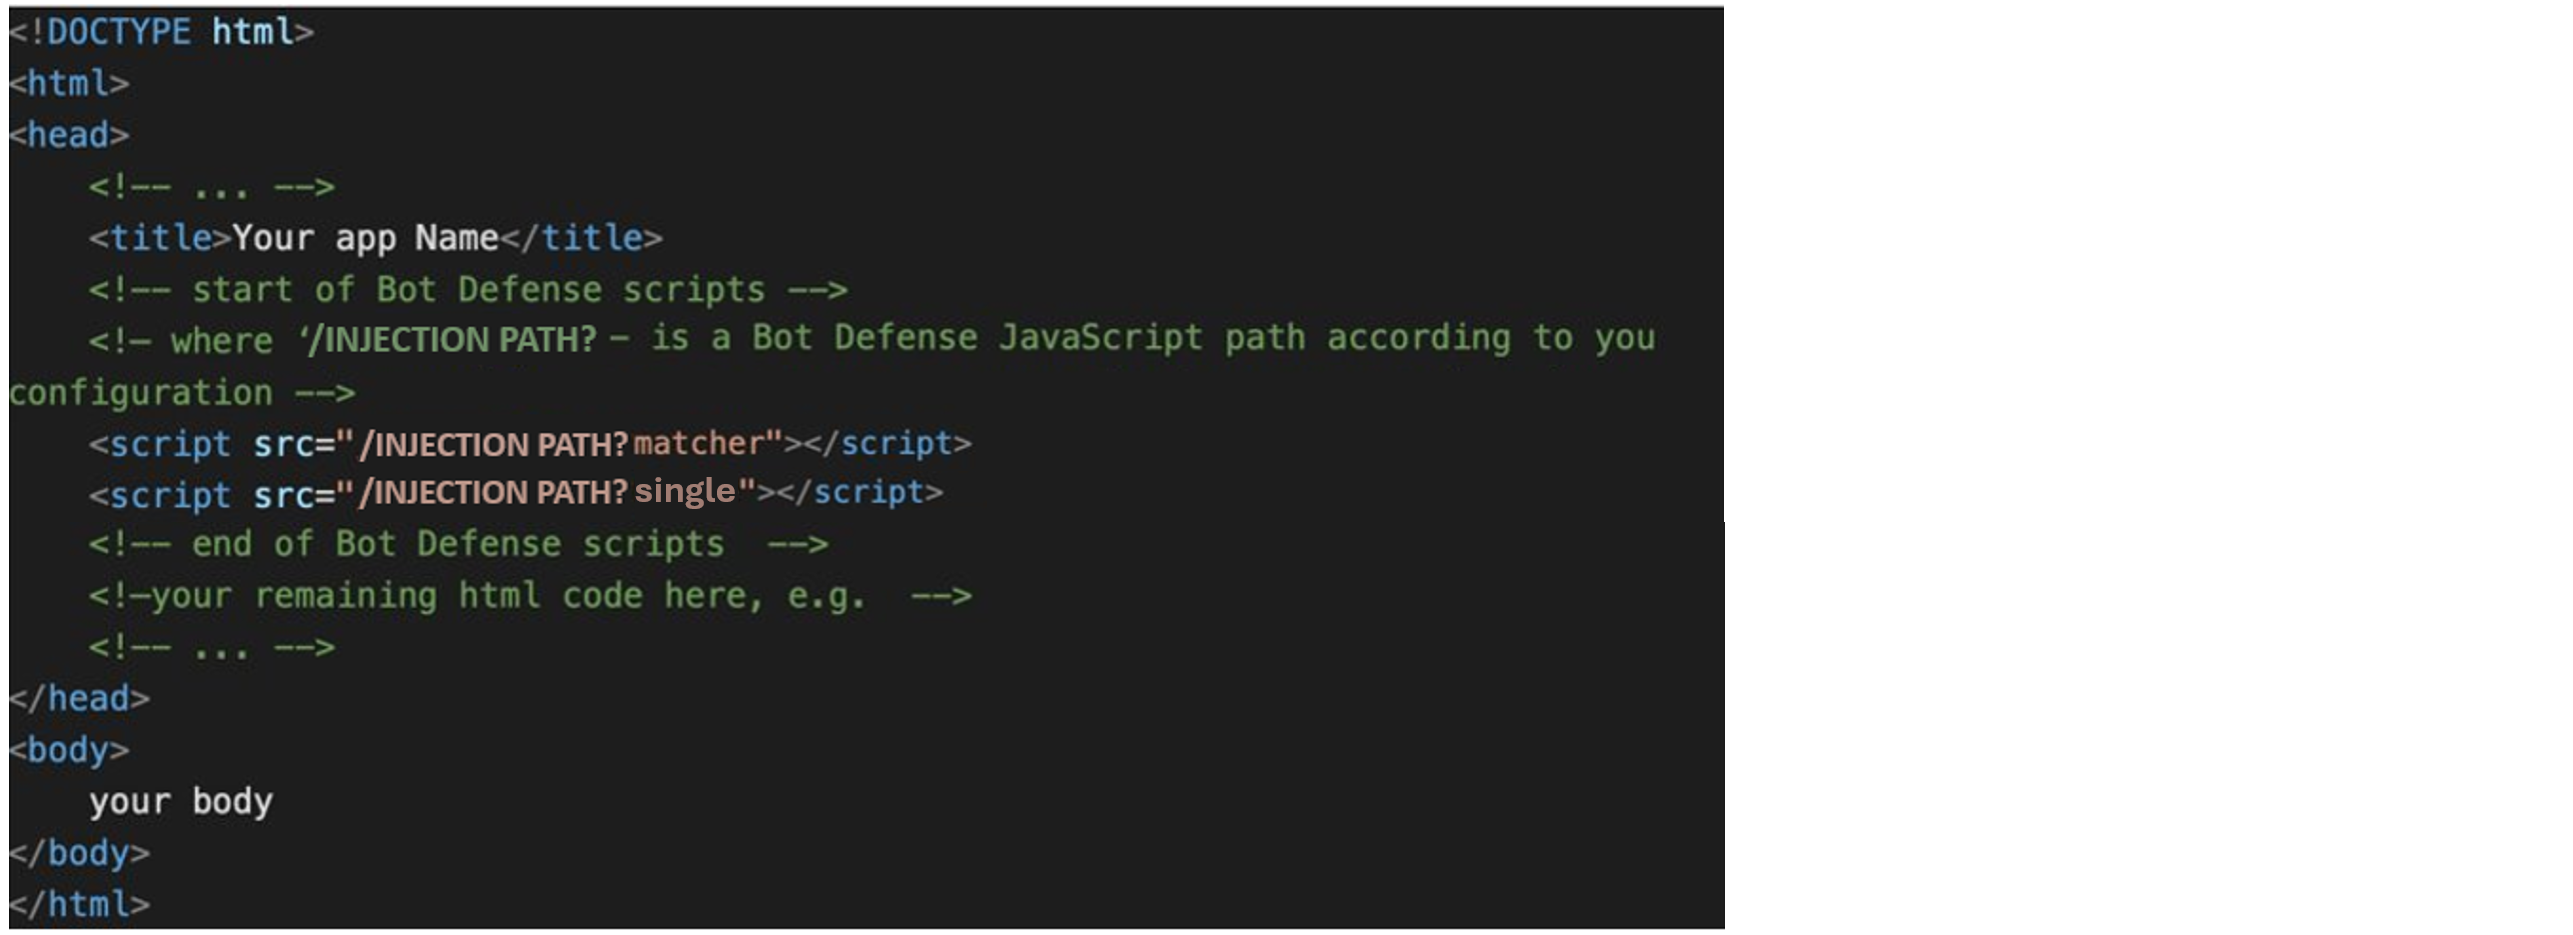
Figure: Manual Javascript insertion
Download Config File and AWS Installer Tool
- In the Actions column of the Applications table, select the Action menu (…) for your application.
- Select Download Config File.
- Select Download AWS Installer.
Deploy the F5 Connector Using Amazon CloudFront
Note: The CloudFront Connector does not support legacy cache policies in “Cache key and origin requests.” You must configure “Cache policy and origin request policy” as recommended by Amazon CloudFront for Bot Defense. For information, see your Amazon CloudFront documentation.
-
Log in to AWS Console home page.
-
Select AWS Region Northern Virginia (US-EAST-1).
-
Use the search to find
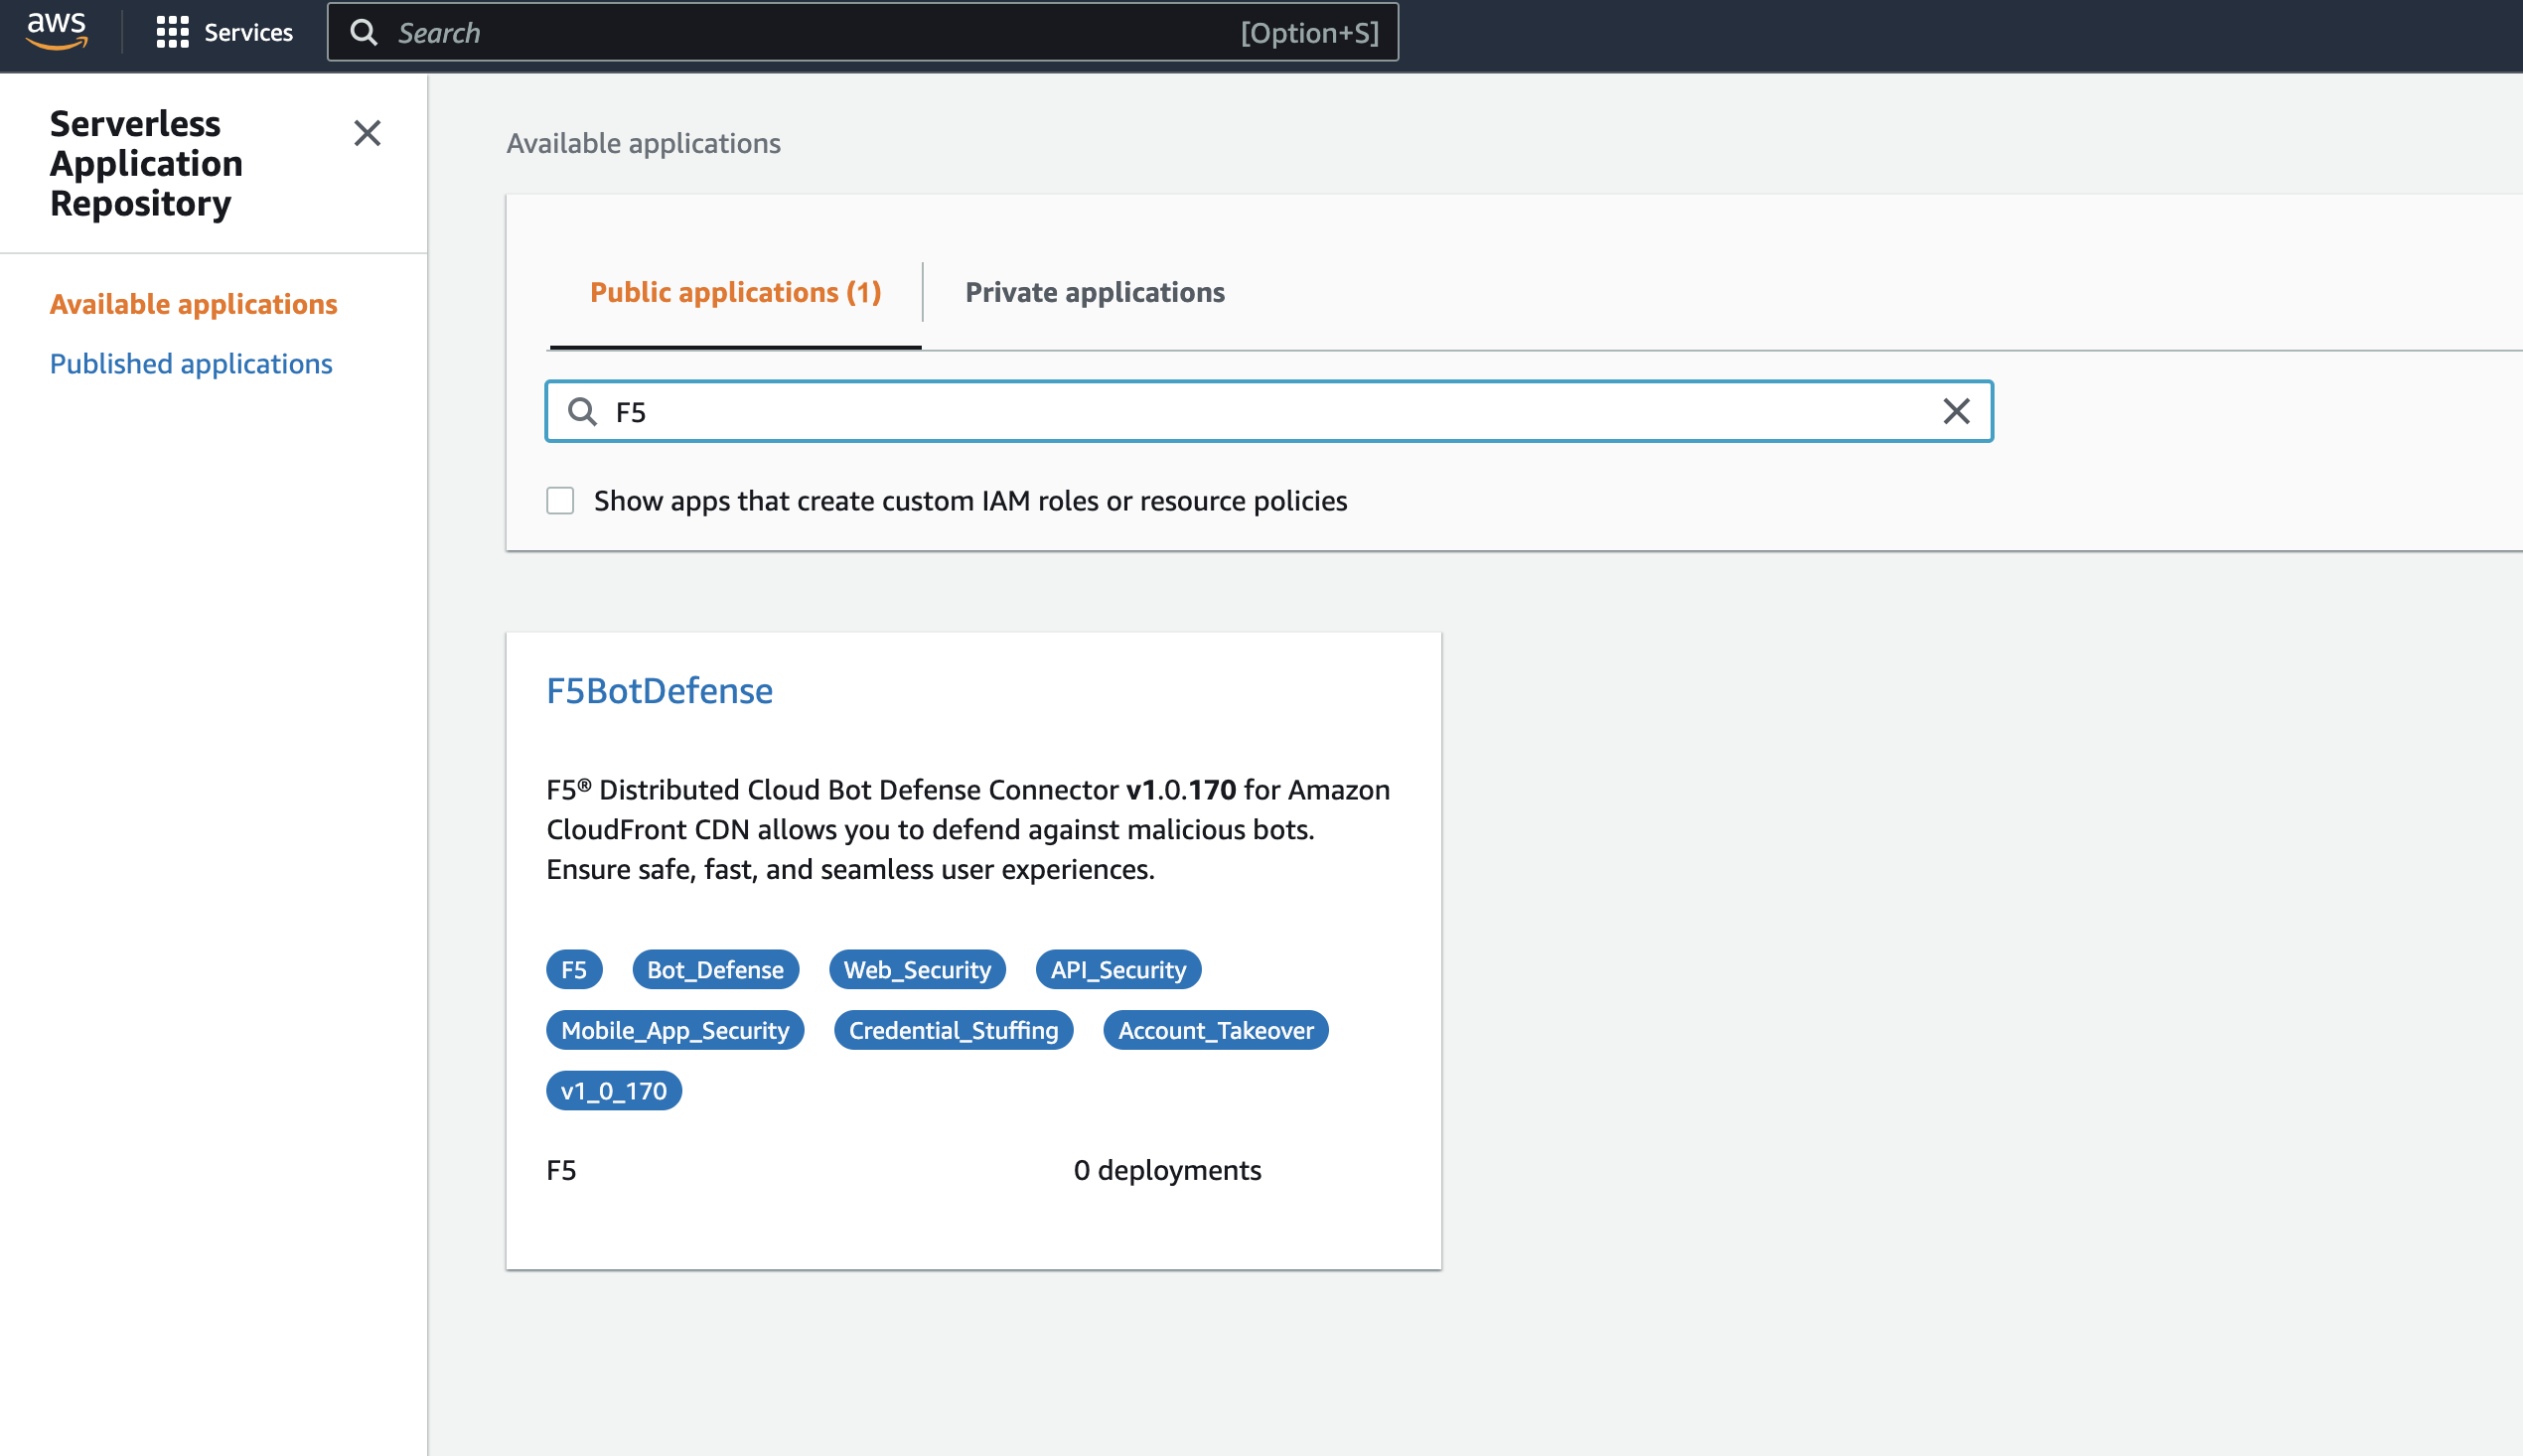
Serverless Application Repositoryand select it. -
Select Available Applications.
-
Select Public Applications.
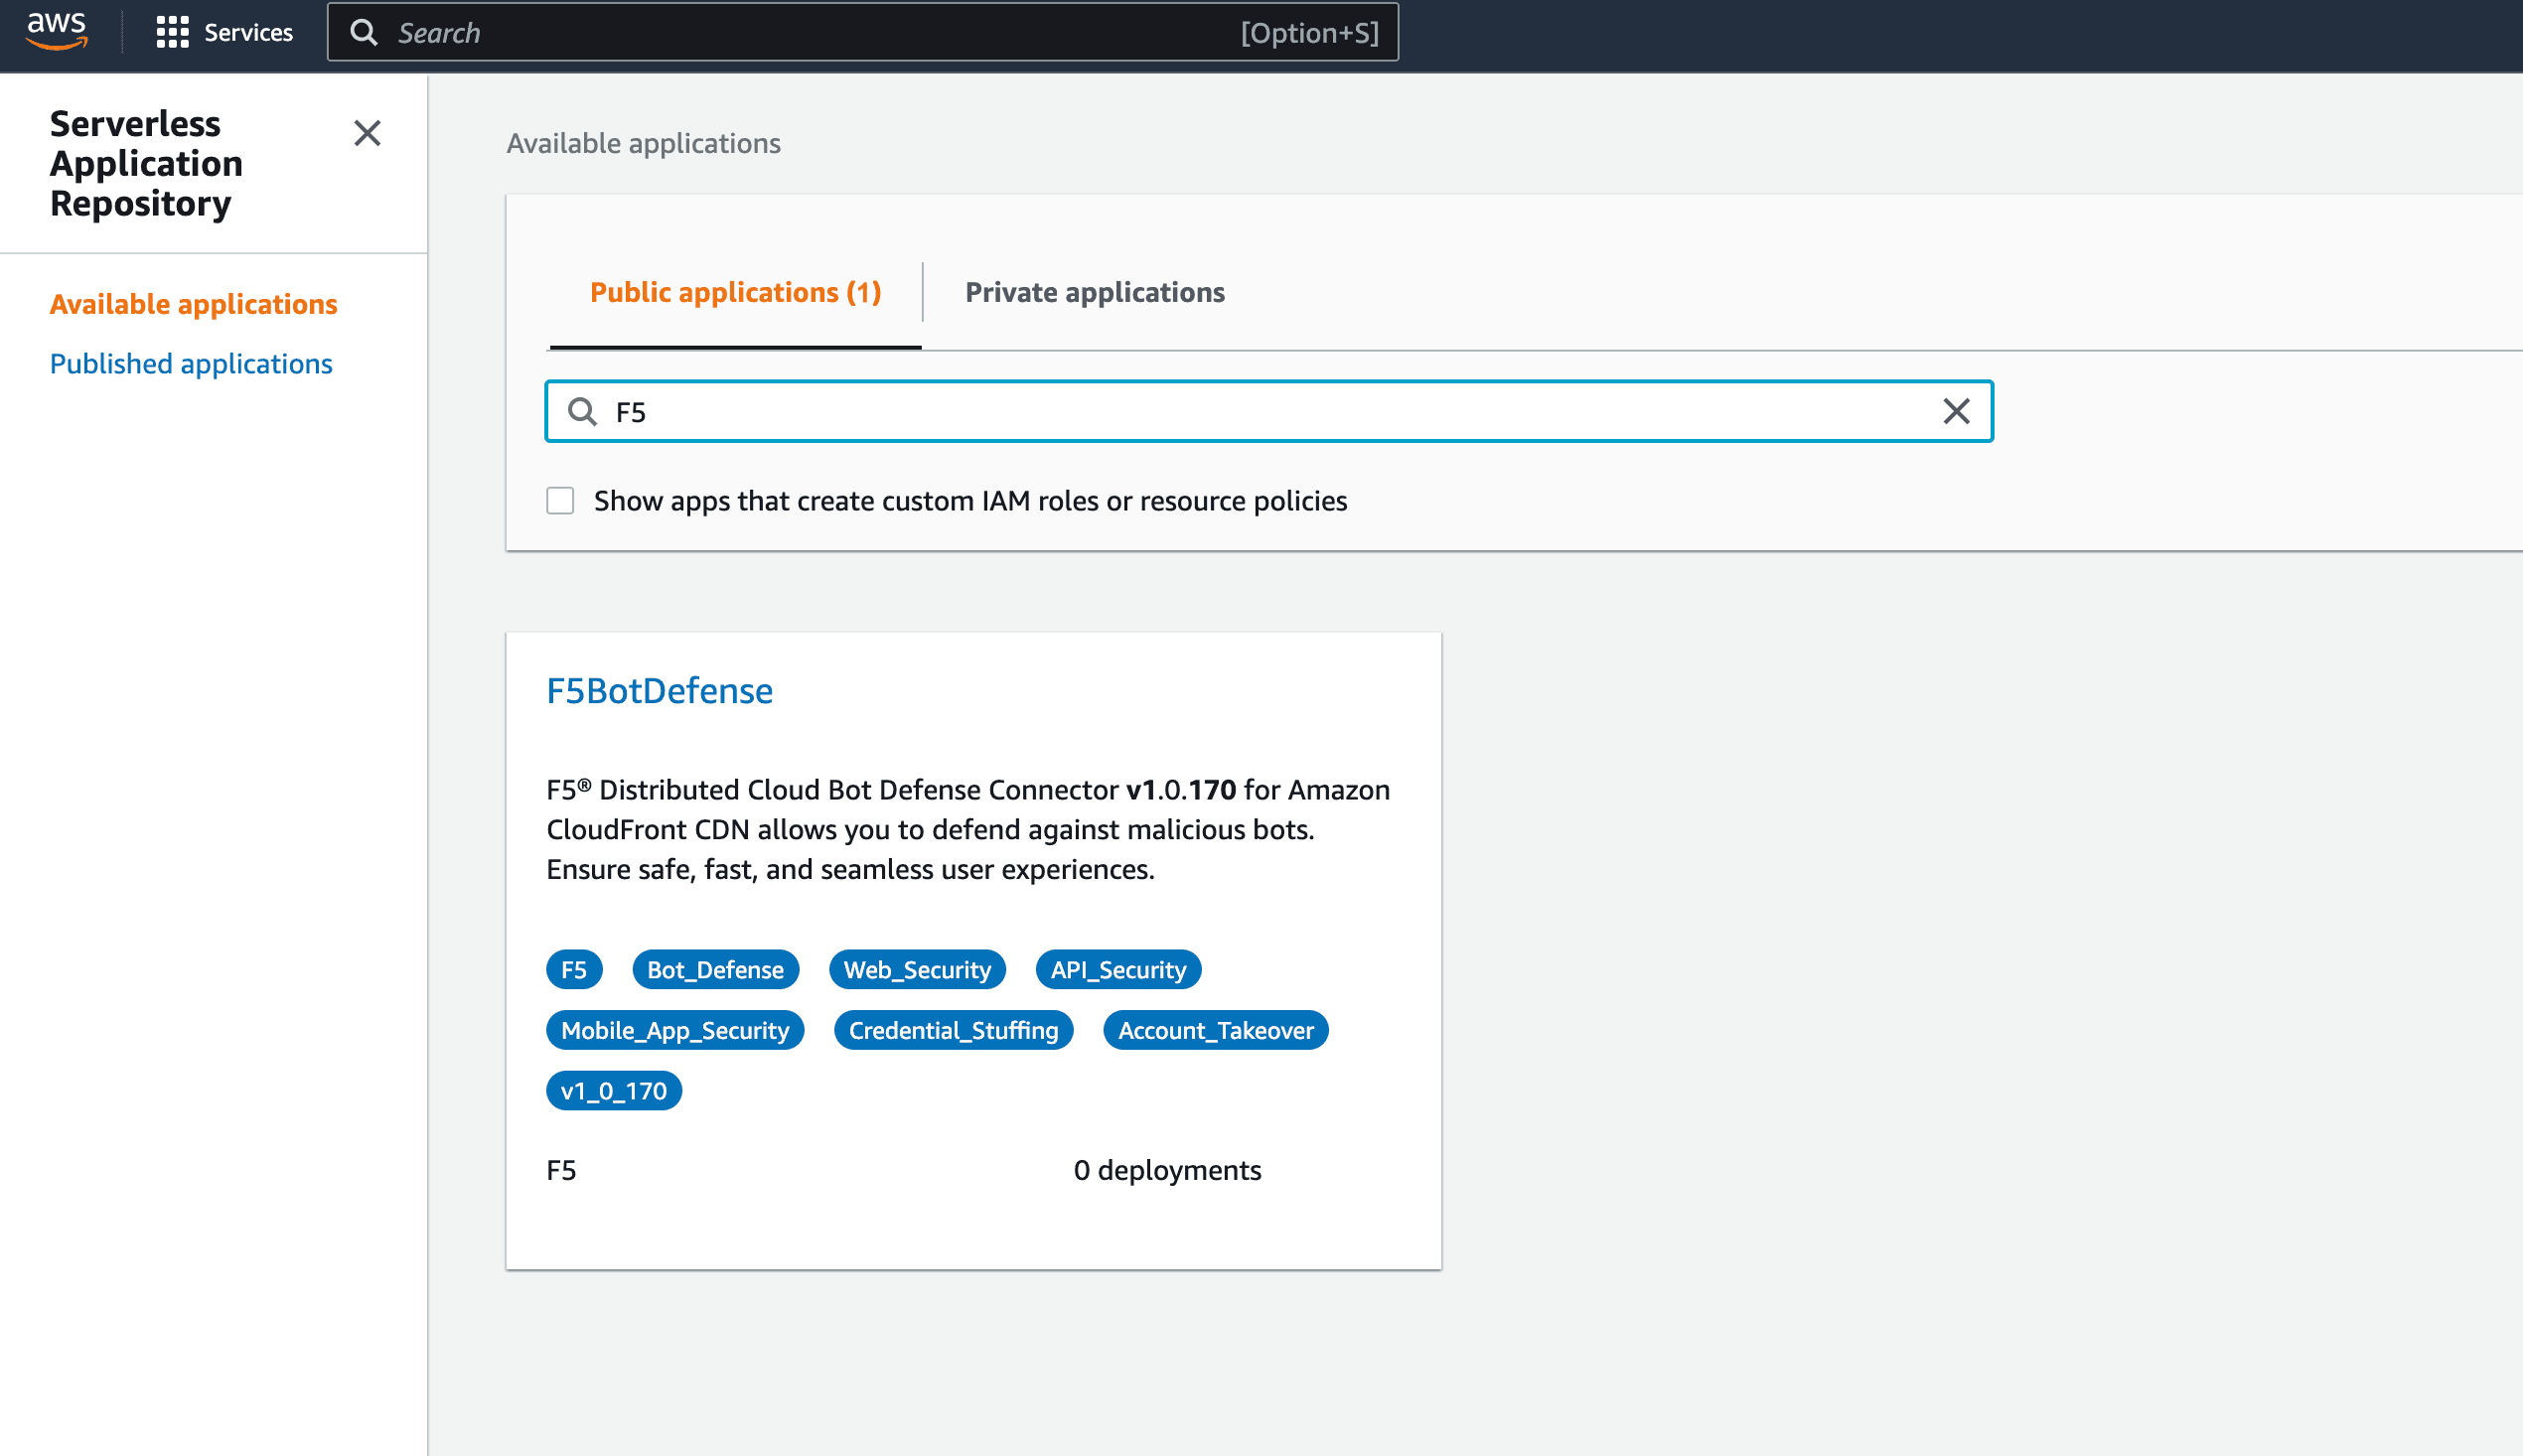
Figure: Public Application Tab
-
Select the F5BotDefense tile to install the F5 XC Connector for Amazon CloudFront code module.
Important: Be sure to download the latest version of F5BotDefense in the Serverless Application Repository.
- If there are too many tiles here, search for
f5. - If the F5 connector tile does not appear, validate the AWS Account number you provided to F5.
- If there are too many tiles here, search for
-
Select Deploy to install the F5 Connector for CloudFront.
Deploying the F5 Connector creates a new Lambda Application in your AWS Account. AWS sets the name of the new Lambda Application to start with serverlessrepo-.
The deployment can take a few minutes to complete. It is complete when you see the F5BotDefense of type Lambda Function.
Select the name F5BotDefense to review contents of the installed Lambda Function.
Important: The available rate limit for Lambda functions is shared by all functions in your AWS account. If you reach the Lambda rate limit, an error displays in AWS. The rate limit for Bot Defense is 1000 per second. If you reach the Bot Defense rate limit, user traffic is allowed to continue to the origin with no mitigation from Bot Defense. F5 recommends that you increase the rate limit so that it accommodates all of the Lambda functions in your AWS account. For instructions, see your AWS documentation.
Configure the F5 Bot Defense Connector in AWS
F5 recommends that you use the F5 CLI tool to configure the F5 Bot Defense Connector in AWS. For best results, F5 recommends that you use the AWS CloudShell.
- After you start AWS CloudShell, select Actions and Upload file.
- Upload config.json and *f5tool, which you downloaded from the Distributed Cloud Console.
- When the upload is finished, run
lsto confirm that the files were uploaded. - Run
bash f5tool -–install config.json. Installation can take up to 5 minutes.
The installation tool saves the previous configuration of each CloudFront Distribution in a file. You can use the F5 tool to restore a saved Distribution config (thus removing F5 Bot Defense).
Note: Your Bot Defense configuration is sensitive security information and is stored in AWS Secrets Manager. You should delete config.json after CLI installation.
AWS CloudWatch
AWS CloudWatch contains logs for Lambda function deployed by f5ConnectorCloudFront serverless application.
The Log group name starts with /aws/lambda/us-east-1.serverlessrepo-f5ConnectorCl-f5ConnectorCloudFront-.
The logs of lambda function can be found in the region closest to the location where the function executed.
For troubleshooting, look for error messages contained in the links under Log steams.
View Traffic
After your configuration is added, navigate to Monitor to view all traffic that the F5 XC Defense Engine has recorded for valid and invalid requests. This tool can help analyze thousands or millions of requests.
Next Steps
Make sure you have configured Bot Defense correctly. For information, see Test your Bot Defense configuration.
On this page:
- Prerequisites
- Create a new Bot Defense application for Amazon CloudFront
- Add AWS Reference Information
- Add Protected Endpoints
- Define Web Client JavaScript Settings
- Define Mobile SDK Settings
- Configure More Options
- Trusted Client Rules (Allow List)
- Set Logging Level
- Define Continue Mitigation Header
- Timeout and Body Sample Size Limit
- Manual JS Insertion
- Download Config File and AWS Installer Tool
- Deploy the F5 Connector Using Amazon CloudFront
- Configure the F5 Bot Defense Connector in AWS
- AWS CloudWatch
- View Traffic

