Enable with Adobe Commerce Cloud (Magento)
The following information explains how to configure Bot Defense Standard with Adobe Commerce Cloud (Magento).
Prerequisites
- You must have an active F5 Distributed Cloud account. If you do not have an account, see Getting Started with Distributed Cloud Console.
- You must have Bot Defense Standard enabled in the Distributed Cloud Console. For information, see Enable Distributed Cloud Bot Defense Standard.
- You must have Adobe Commerce Cloud (Magento) configured.
- You must have sufficient privileges in Adobe Commerce Cloud to configure Bot Defense.
Add Adobe Commerce Cloud to Bot Defense
The following task explains how to add Adobe Commerce Cloud as a protected application in Bot Defense.
- Log on to the Distributed Cloud Console. From the Dashboard page, select Bot Defense.
- Verify that you are in the correct namespace. For information about namespaces, see https://docs.cloud.f5.com/docs-v2/platform/concepts/core-concepts#namespaces.
- Select Manage > Applications and then select Add Application.
- Add a Name and Description for the protected application.
- Select the Application Region where the origin server for the new protected application resides: US, EU or Asia.
- From the Connector Type drop-down menu, select Adobe Commerce.
- Select Add Protected Application.
Next Steps
Copy information from your protected application in the Distributed Cloud Console that you need to configure the F5_DistributedCloudConnector extension in Adobe Commerce Cloud. For information, see Copy required information from your protected application.
Copy required information from your protected application
The following task explains how to copy information from your new protected application that you need to configure the F5_DistributedCloudConnector extension.
- In the Distributed Cloud Console, from the Bot Defense page, select Manage > Applications.
- From the Actions column, select the Action menu (…) next to the protected application you just added for Adobe Commerce Cloud.
- From the drop-down menu, select the following options and save the copied information in a location you can access later:
- Copy App ID
- Copy Tenant ID
- Copy API Key
- Copy API Hostname
- Copy Telemetry Header Prefix

Figure: Action Menu
Next Steps
Download the F5_DistributedCloudConnector extension from the Magento Marketplace and install it. For information, see: Install the F5_DistributedCloudConnector extension.
Install the F5_DistributedCloudConnector extension
- To download the
F5_DistributedCloudConnectorextension from the Magento Marketplace, go to https://marketplace.magento.com/f5-distributed-cloud-connector.html. Or, from the Magento Marketplace, search for "F5 Distributed Cloud Services." - Run
composer require f5/distributed_cloud_connector:VERSION(for example,f5/distributed_cloud_connector:1.0.2). You can find the extension version in thecomposer.jsonfile. - Run
php bin/magento set:up. - Run
php bin/magento s:d:c. - Run
php bin/magento setup:static-content:deploy. If Magento is in developer mode, add an-fargument. Developer mode is not officially supported in the extension.
Next Steps
Use the information you just copied to configure the F5_DistributedCloudConnector extension. See: Configure the F5_DistributedCloudConnector extension.
Configure the F5_DistributedCloudConnector extension
To configure the F5_DistributedCloudConnector extension, in Adobe Commerce Cloud, go to Admin Panel > Stores > Configuration > F5® DISTRIBUTED CLOUD SERVICES.
Configuration modules include:
- Bot Defense
- Account Protection
- Authentication Intelligence
To enable the Bot Defense module, configure the following sections:
- General
- JS Insertion
- Login Protection
- Protected Endpoints
- Web Scraping
- Allow List
General
Note: To configure some of the options in this section, you need information that you copied from your protected application. If you have not yet copied that information, see Copy required information from your protected application.
Configure the following options:
- Enable Service: Enable/disable the module.
- Mode: Select one of the following options:
- Enterprise: The dedicated mode of usage where the “Application ID” and “Tenant ID” fields are not required. If you purchased Bot Defense Advanced, select Enterprise.
- Standard: The multi-tenant mode of operation. If you purchased the Standard of Bot Defense, select Standard.
Choose the mode based on the F5 Distributed Cloud plan that you have.
- API Hostname: Enter the API Hostname value that you copied from the protected application you added in the Distributed Cloud Console.
- Backend API path: The path to the Bot Defense script on the website backend. F5 recommends that you enter
api/v1/decisionfor this value. - API Key: The key used for authentication of the API calls to the F5 system. Enter the API Key value that you copied from the protected application you added in the Distributed Cloud Console.
- Telemetry Header Prefix: Enter the Telemetry Header Prefix value that you copied from the protected application you added in the Distributed Cloud Console.
- Application ID: Enter the App ID value that you copied from the protected application you added in the Distributed Cloud Console. Note that this field is only available when you select Standard mode.
- Tenant ID: Enter the Tenant ID value that you copied from the protected application you added in the Distributed Cloud Console. Note that this field is only available when you select Standard mode.
- Timeout API response: The time (in milliseconds) that the module waits for a response from the F5 server. After that, the request is processed by the Adobe Commerce backend. The default is 700.
- Source for Client IP address: Decide how Bot Defense gathers your client IP address:
- Connecting IP: From your connection information.
- X-forwarded-For: From the X-forwarded-For header.
- Custom: From a custom header name that you define.
- Custom Ip address source: The custom header name for getting your IP address. In the configured header, the first character of each word must be upper case.
- Enable Debug: Enable this to record requests and responses to/from the F5 service in the log file on the website server.

Figure: Configure General Options
JS Insertion
Configure the following options to determine how Bot Defense inserts JavaScript tags in your application.
-
JS Path: Enter an absolute path or a relative path to the JavaScript tags:
-
Absolute example:
https://<FQDN+JS_location>, such ashttps://www.foo.com/abc.js.If you enter an absolute path, verify that the JavaScript requests are routed to Bot Defense.
-
Relative example:
</JS_location>, such as/abc.js.
-
-
Insert JS option: Specify where in the page to add the JavaScript tags:
- Before
<script> - After
</title> - After
<head>
F5 recommends that you select After
<head>so that the Bot Defense JavaScript is executed early. This allows time to fetch and execute the Bot Defense JavaScript while the rest of page is rendered. - Before
Note: If you select After
</title>, be sure your application pages have the<title>tag.
-
JavaScript load mode: Select the load mode of the JavaScript on the page:
- Async with caching
- Async with no caching
- Sync with caching
- Async with caching and defer XHR
-
Insert JS to specific web pages: Displays the Specific pages list, which lists the pages in which Bot Defense should insert JavaScript tags.
- If you select Yes, the Specific pages list displays.
- Enter only the path to the page, such as
/about-us. - Enter each page on a new line.
- You can use wildcards used for page path definitions, such as
*, and so on. - To insert JavaScript tags on all pages, enter only an asterisk (*).
- Enter only the path to the page, such as
If this field is empty, Bot Defense does not insert JavaScript tags in any pages.
- If you select No, the Specific page list field is hidden and JavaScript tags are inserted in all available pages that are not defined in the Excluded pages list field.
- If you select Yes, the Specific pages list displays.
-
Exclude JS from specific web pages: Displays the Excluded pages list, which lists all the pages in which Bot Defense must not insert JavaScript tags.
- If you select Yes, the Excluded pages list displays.
- Enter the path to the page, such as
/about-us. - Enter each page on a new line.
- You can use wildcards for page path definitions, such as
*, and so on.
- Enter the path to the page, such as
- If you select No, the Excluded pages list field is hidden and JavaScript tags are inserted according to the configuration in Insert JS to specific web pages.
- If you select Yes, the Excluded pages list displays.
Login Protection
Configure the following options to protect your login pages.
- Protection type: Select one of the following protection types:
- Disable: Disables login protection.
- Collect txn: Customer verification is performed after sending the login request to the origin destination.
- Ignore txn: Customer verification is performed right after selecting the Login button on the storefront, but before the Login request is performed to the origin destination.
- Login Url: Defines the login action URL that should be protected by Bot Defense. By default, this is set to
/customer/account/loginpost*, which is used by the Adobe Commerce Cloud platform. You only need to update this field if you use a non-default login URL on your website. - Mitigation: Choose one of the following actions when Bot Defense detects automated traffic:
- Continue: The bot is allowed to visit the destination page but is flagged by the header defined in the Mitigation Continue header field.
- Block: The bot is blocked from reaching the destination page. It is routed to a blank page with the content defined in the Blocked Response Body field and the response code defined in the Blocked Response Code field.
- Redirect: The bot is redirected to the path defined in the Mitigation Redirect path field.
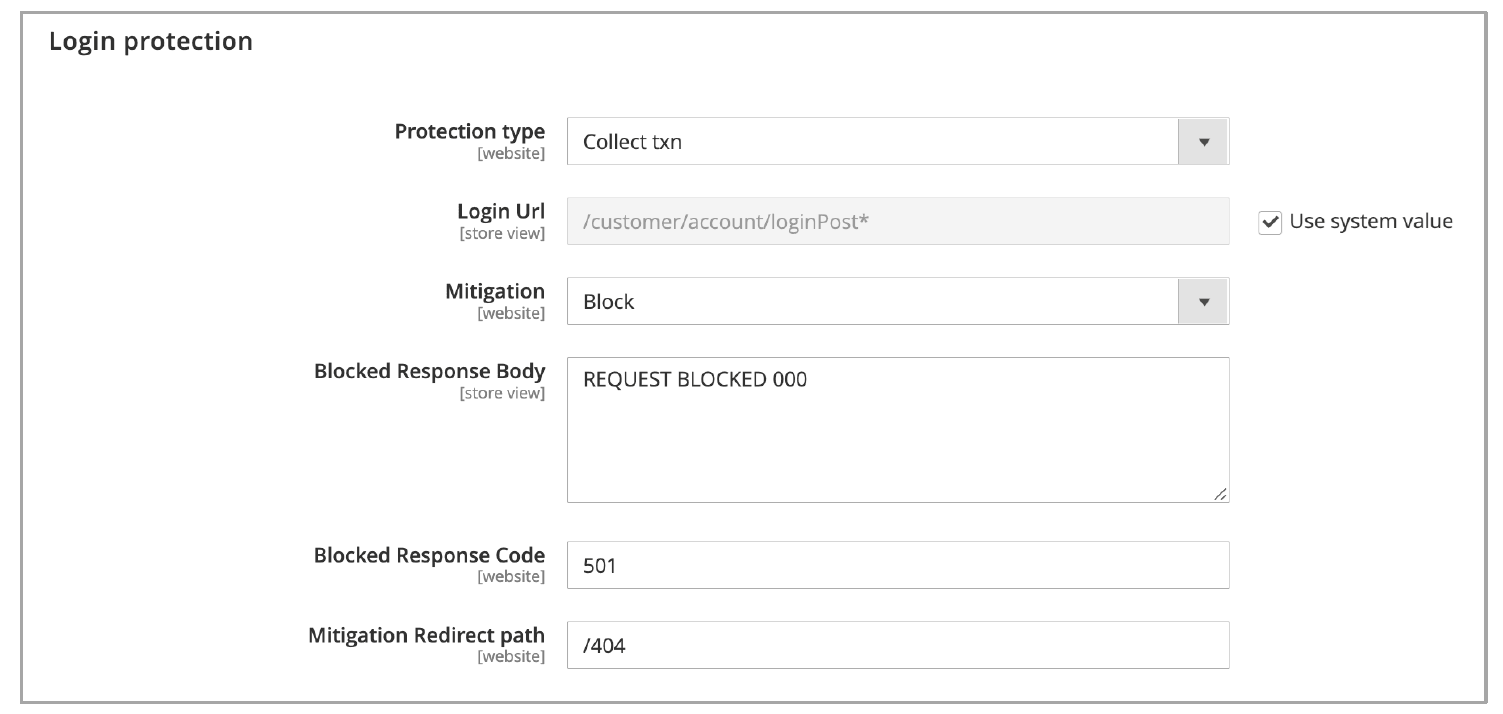
Figure: Configure Login Protection
Protected Endpoints
Configure the following options in the Protected Endpoints section to define pages and sources on the website that you want to protect with Bot Defense.
- URL endpoint: Enter the path to the page or action that should be protected by Bot Defense. Use wildcards to define complex URLs.
- Method: Enter the type of HTTP methods that Bot Defense protects on this endpoint:
- GET XHR: Use when the protected application makes an XHTTPRequest to get the content of the page.
- POST: The most commonly attacked method. F5 recommends that you protect all POST requests. Bot Defense analyzes POST requests to determine if they are part of a bot attack such as credential stuffing or form submission abuse.
- PUT: Use to protect PUT requests and prevent data uploads or modifications from bots.
- Mitigation: Select the mitigation action you want to take for this endpoint if Bot Defense detects automation:
- Continue: The bot is allowed to visit the destination page but is flagged by the header defined in the Flag Header name field.
- Block: The bot is blocked from reaching the destination page. It is routed to a blank page with the content defined in the Block Response Body field and the response code defined in the Block Response Code field.
- Redirect: The bot is redirected to the path defined in Redirect location.
Web Scraping
Configure web scraping protection for documents and pages on a web site that is accessible by GET requests without visiting the main page, for example, from a link on social media, from an email or from a saved bookmark. This direct access to resources prevents Bot Defense from inserting the protection JavaScript tags. When you configure an endpoint for web scraping, Bot Defense displays an interstitial page that is transparent to the user but that allows it to collect telemetry data about the requests.
- URL endpoint: Enter the path to the page or action you want to protect. Use wildcards to define complex URLs.
- Mitigation: Select the mitigation action you want to take for this endpoint if Bot Defense detects automation:
- Continue: The bot is allowed to visit the destination page but is flagged by the header defined in the Flag Header name field.
- Block: The bot is blocked from reaching the destination page. It is routed to a blank page with the content defined in the Block Response Body field and the response code defined in the Block Response Code field.
- Redirect: The bot is redirected to the path defined in Redirect location.
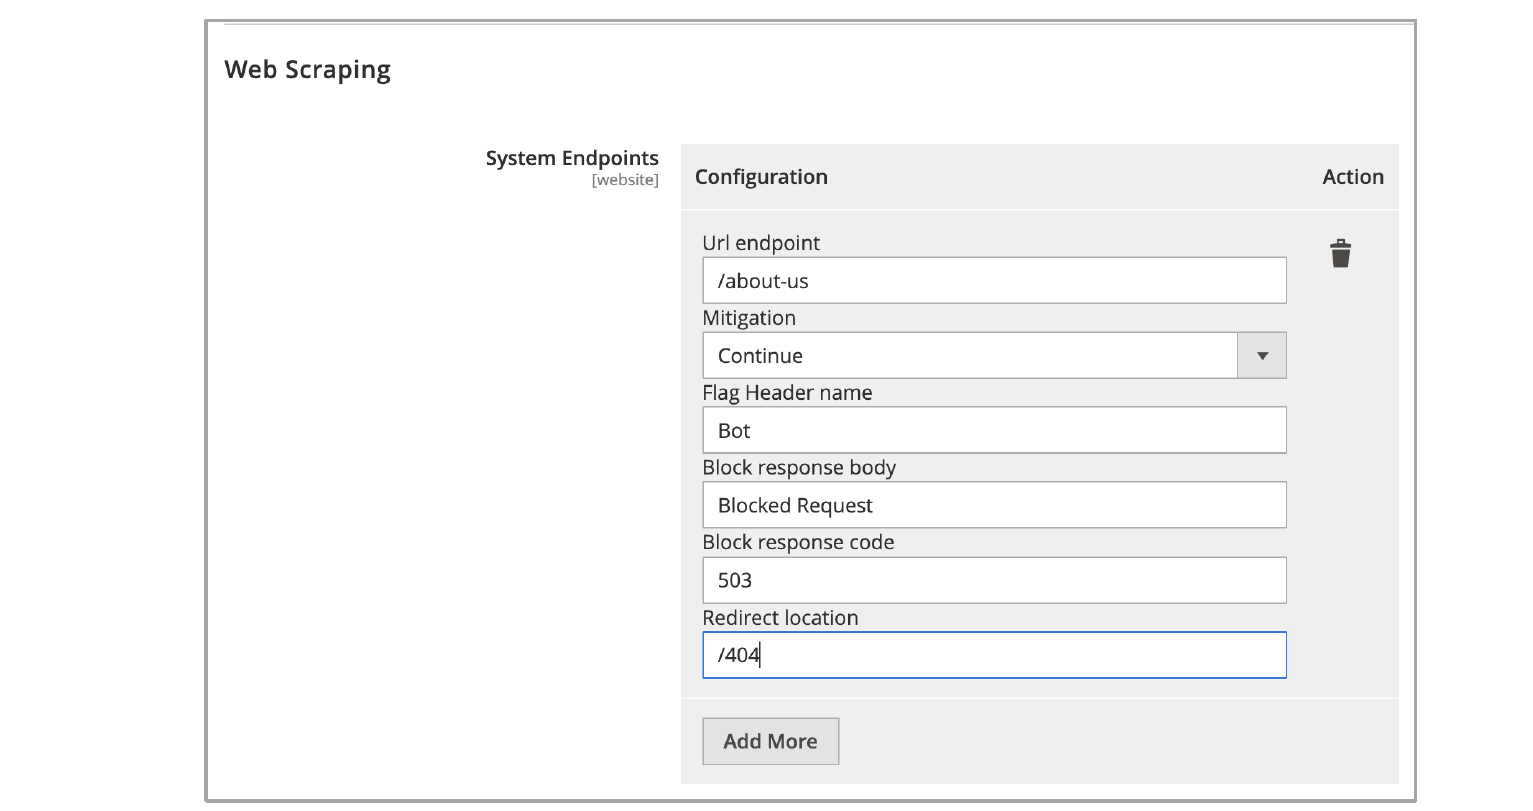
Figure: Configure Web Scraping
Allow List
Configure the Allow List to let requests get to the origin destination without being verified by Bot Defense. Create your Allow List using either IP addresses or request headers.
- Allowed IP Addresses: Requests sent from IP addresses defined in the Allowed IP addresses field are delivered to the endpoint without being verified by Bot Defense. You must enter each IP address on a new line.
- Allow Header: Requests that contain the
[header]:[value]pair are delivered to the endpoint without being verified by Bot Defense. You must enter each[header]:[value]pair on a new line. Bot Defense supports wildcards for both header name and header value.
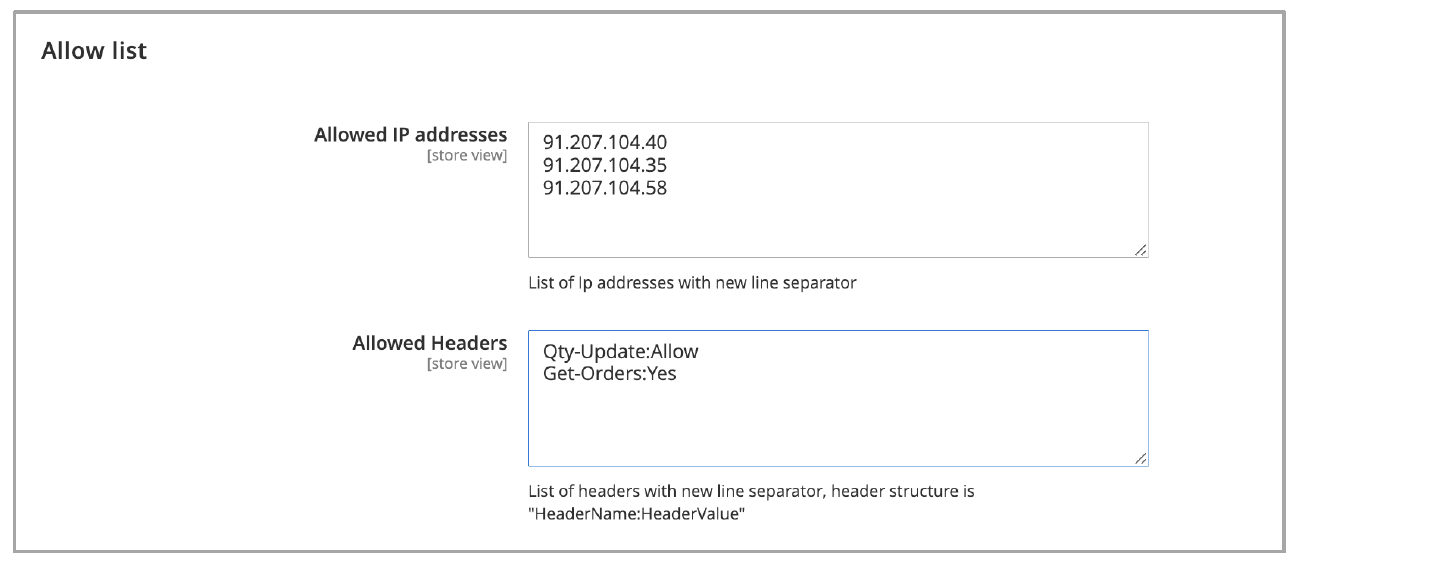
Figure: Configure an Allow List
Account Protection
F5 Distributed Cloud Account Protection provides a converged solution for application security and fraud protection powered by a real-time, closed-loop engine and large-scale unified telemetry to reduce customer friction and stop fraud before it happens.
The Account Protection module contains these sections:
- General
- Protected Endpoints
- Action
General
The General section contains options to enable and configure the connection of the Account Protection` module with the F5 Service. The path to the module is:
Admin panel > Stores > Configuration > F5® DISTRIBUTED CLOUD SERVICES > Account Protection
The configuration options are:
- Enable Service - Enables or disables the module.
- API Hostname - The host name of the Account Protection service.
- Script Tag - Path to the F5 Account Protection script
- JS Path - Path to the JavaScript file.
- Customer ID - The customer identifier, can be obtained from the F5 Service.
- Cookie name - The name of the cookie from the Account Protection service that should be decrypted and processed.
- Decryption key - The key that decrypts the
frvalue in the cookie received from the Account Protection service.
Protected Endpoints
Configure the following options to define the endpoints that you want to protect with Account Protection.
-
URL endpoint - The path to the page or action that should be protected. You can use wildcards to define complex URLs.
-
Mitigation - The mitigation action options:
- Continue - The bot is allowed to visit the destination page, but is flagged by the header defined in the Mitigation Continue header field.
- Block - The bot is blocked from reaching the destination page and is routed to a blank page that displays the content you defined in the Blocked response Body field and the response code you defined in the Blocked response Code field.
- Redirect - The bot is redirected to the path defined in Mitigation Redirect path.
-
Method - The type of request being performed on the defined page. These types of request methods are supported:
- GET
- POST
- PUT
-
Blocked Response Body - The message to display on the blank page when the Block mitigation action is performed.
-
Blocked Response Code - The status code to deliver when the Block mitigation action is performed.
-
Redirect location - The path the user is redirected to when the Redirect mitigation action is performed.
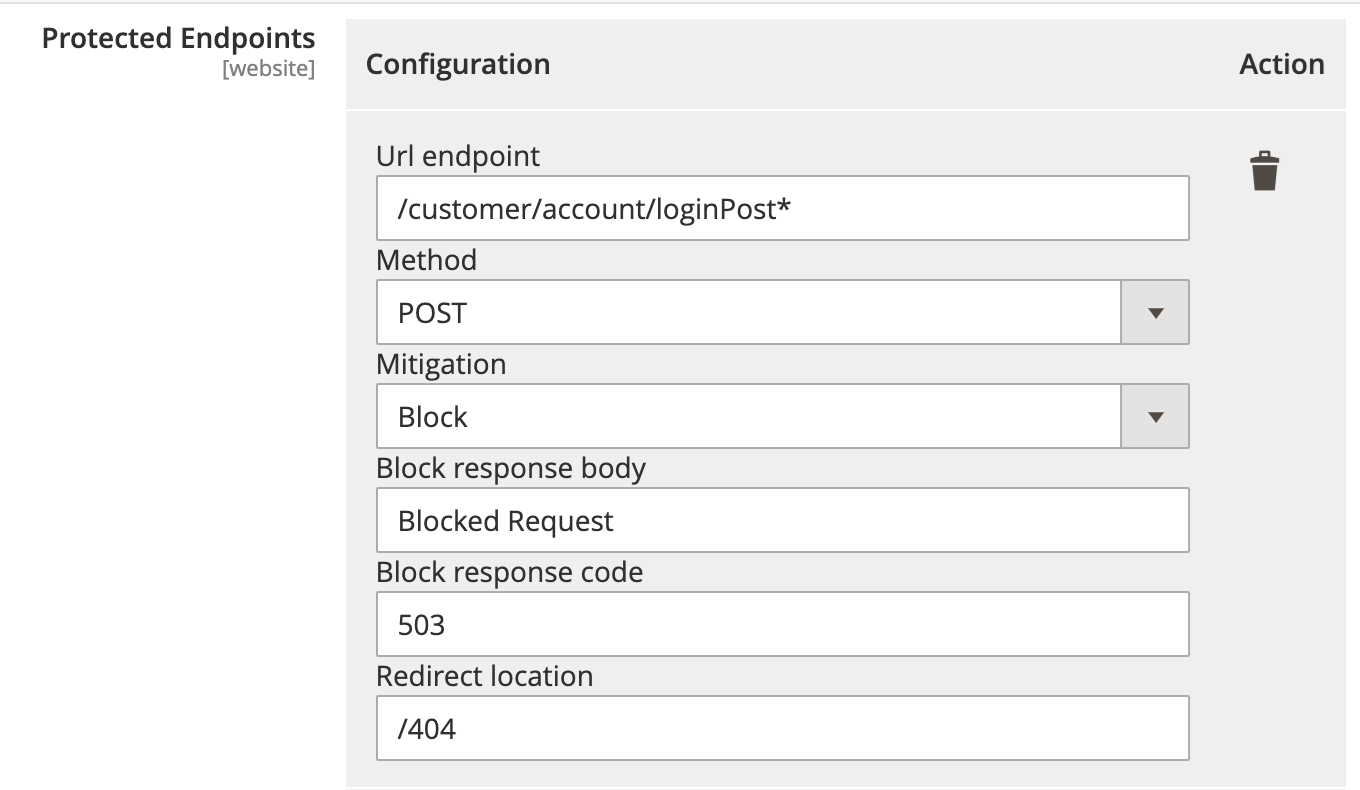
Figure: Protected endpoint options
Action
The Action section contains the mitigation actions settings, such as:
- Missing Cookie - Allows you to select the mitigation action for cases when the Account Protection cookie is missing. There are three options:
- Continue
- Block
- Redirect
- Invalid Cookie - Allows you to select the mitigation action for cases when the Account Protection cookie is invalid. There are three options:
- Continue
- Block
- Redirect
Authentication Intelligence
Authentication Intelligence extends the login session lifetime for non-malicious users, after they are verified by F5.
General
The General section contains the following configuration options to enable and configure the connection of the Authentication Intelligence module with the F5 Service.
- Enable Service - Enables or disables the module.
- API Hostname - The host name of the Authentication Intelligence service.
- Script Tag - Path to the F5 Authentication Intelligence script.
- JS Path - Path to the JavaScript file.
- Customer ID - The customer identifier, can be obtained from the F5 Service.
- Cookie name - The name of the cookie from the Authentication Intelligence service that should be decrypted and processed.
- Decryption key - The key that decrypts the
cvalue in the cookie received from the Authentication Intelligence service.
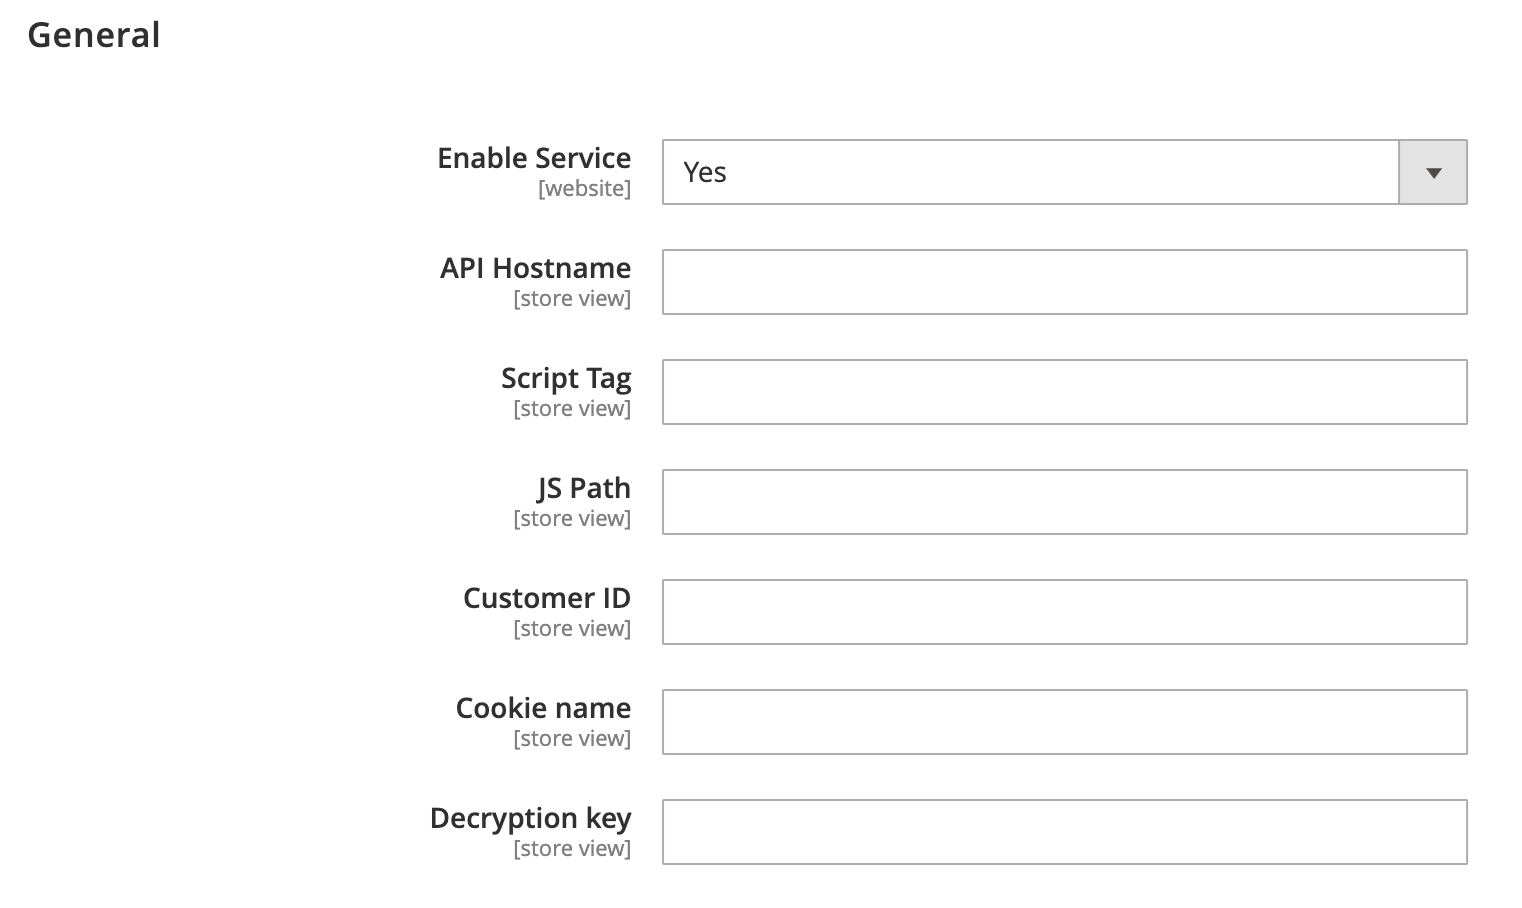
Figure: Authentication Intelligence section of Adobe Commerce Cloud connector
Next Steps
Make sure you have configured Bot Defense correctly. For information, see Test your Bot Defense configuration.
On this page:
- Prerequisites
- Add Adobe Commerce Cloud to Bot Defense
- Copy required information from your protected application
- Install the F5_DistributedCloudConnector extension
- Configure the F5_DistributedCloudConnector extension
- General
- JS Insertion
- Login Protection
- Protected Endpoints
- Web Scraping
- Allow List
- Account Protection
- General
- Protected Endpoints
- Action
- Authentication Intelligence
- General