Configure Bot Defense Standard with the BIG-IP v14-16 Connector
This guide provides instructions on how to quickly configure a basic Bot Defense Standard test system using the BIG-IP v14-16 iApp Connector and how to protect a test application from automated traffic (bad bots).
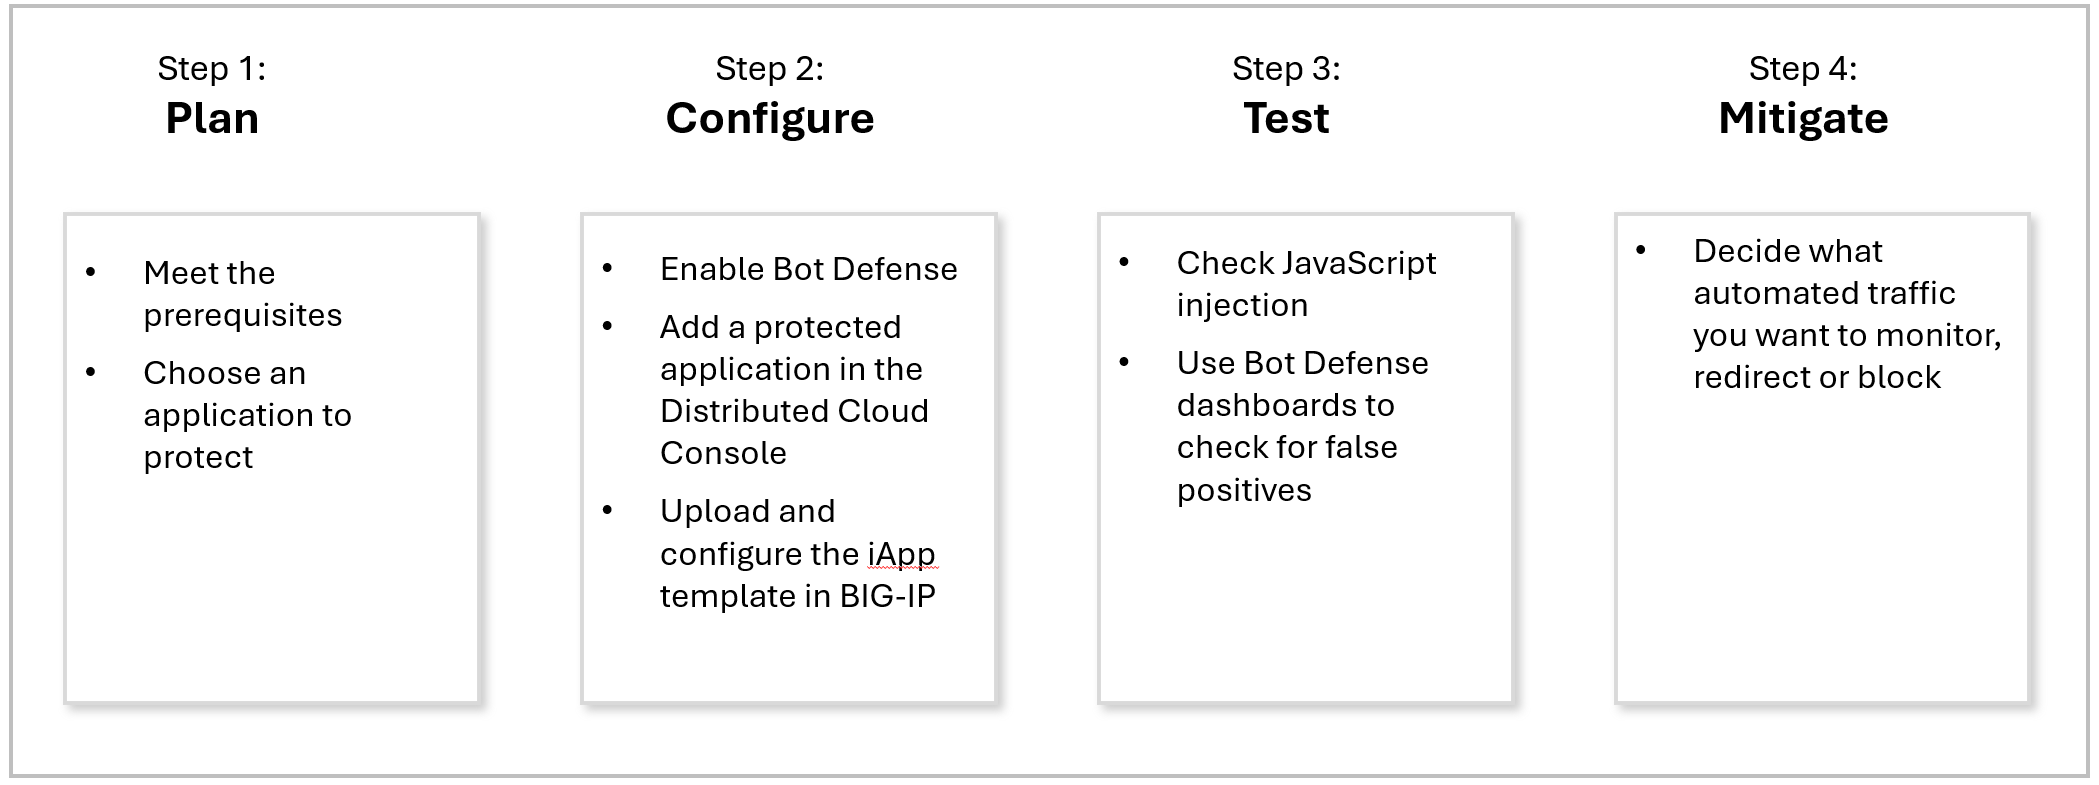
Figure: Steps to Deploy a Bot Defense Test System
To configure your production system with the BIG-IP v14-16 iApp Connector, see the iApp Connector documentation for additional configuration information.
Note: If you use F5 Distributed Cloud Web App & API Protection or host your application on a content delivery network (CDN), see Configure Bot Defense (Connectors) in the Bot Defense Standard documentation for configuration instructions.
Step 1: Plan Your Bot Defense Deployment
Complete the following tasks to plan your Bot Defense deployment.
Meet the Prerequisites
To enable and configure Bot Defense, you must have the following accounts and permissions:
- A valid Distributed Cloud Console account. For information, see Getting Started with Console.
- An Organization plan. To see plan information, from the Distributed Cloud Console Home page, select Billing.
- The f5xc-bot-defense-user-role (or ves-io-power-developer-role or greater).
Choose an Application to Protect
Choose an application and endpoint that you want to protect with Bot Defense. For example, for your initial system testing, you can protect a login endpoint that users typically reach when they first visit your website.
You must have the following information:
- The application domain name.
- The login HTTP URL path.
- Which HTTP methods you want to protect. Bot defense can protect GET, POST, and PUT methods.
Next Steps
Use an iApp template to configure Bot Defense. For information, see Step 2: Configure Bot Defense.
Step 2: Configure Bot Defense
To configure Bot Defense, complete the following tasks.
Enable Bot Defense
To use Bot Defense, you must enable it in the Distributed Cloud Console.
- On the Distributed Cloud Console Home page, select Billing.
- Select Manage > Billing Plan and scroll to the Organization Plan.
- Under the Organization Plan, select Bot Defense. If Bot Defense is not already enabled, the Bot Defense landing page appears.
Note: If Bot Defense is already enabled, the Bot Defense Monitor page appears.
- From the Bot Defense landing page, select Request Service.
Add a New Application and Download the iApp Connector Template
-
Log on to the Distributed Cloud Console. From the Home page, select Bot Defense.
-
Verify that you are in the correct namespace. For information, see Namespaces.
-
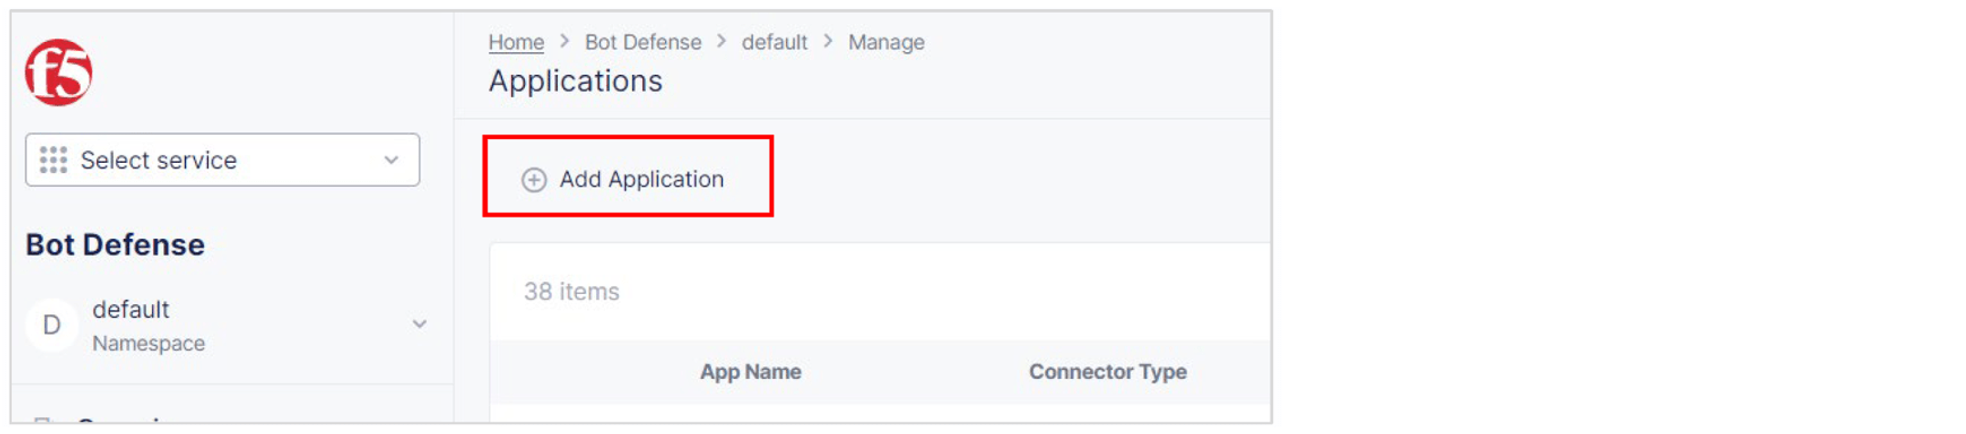
Select Add Application.

Figure: Add Application
-
Add a Name and Description for the new application.
-
Select an Application Region. This is the region where the origin server for your application is located. Select US, EU or Asia.
-
From the Connector Type drop-down list, select F5 BIG-IP iApp.
-
Select Add Protected Application.
-
On the Applications page, from the Action column in the list of applications, select the Action menu (…) next to your new application and select Download Template. Save the template in a location you can access later.

Figure: Download iApp Template

Upload the iApp Template to BIG-IP
The following procedure explains how to import the BIG-IP v14-16 iApp Connector Template into BIG-IP and create a new application.
-
Log on to the BIG-IP instance where you want to add your application.
-
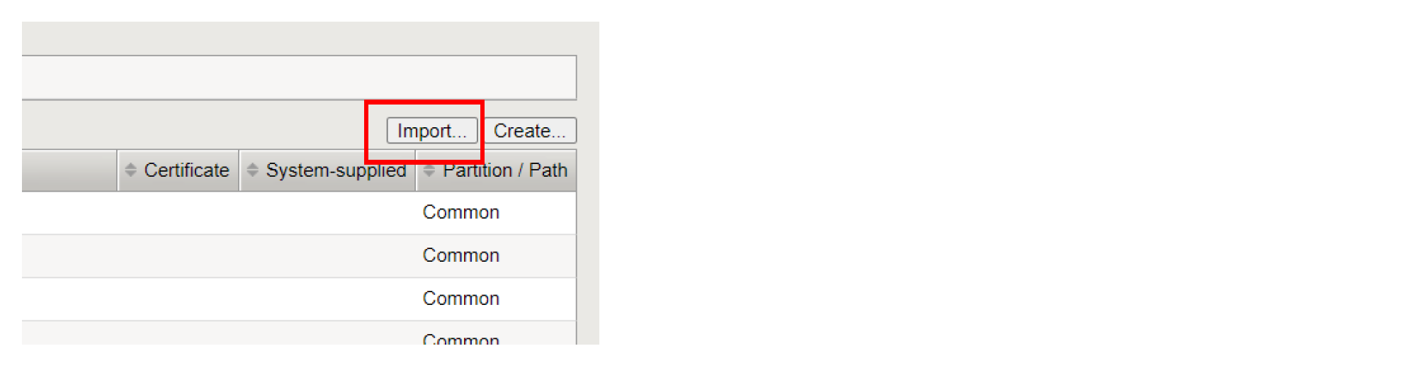
In BIG-IP, select iApps > Templates > Import.

Figure: Import iApp Template
-
Select Choose File and navigate to the location where you saved the template you downloaded above.
-
Select the template you want to import and select Open.
-
Select Upload and then select OK to confirm.
Perform the Required Initial Configuration of a New Application
After you use the Bot Defense iApp template to create a new application in BIG-IP, you must perform the following required initial configuration steps before you configure any additional settings.
-
In BIG-IP, select iApps > Application Services > Applications and then select Create.
-
Enter a Name for the new application. The name cannot contain any spaces or special characters.
-
From the Template drop down, select f5.ibd.cs.
-
In the One-Time Install/Upgrade Setup section, select No, I will select the FINISHED button now and then review the information in the Important section.
Important: Do not make any other configuration changes before you select Finished. You can make only configuration changes after you select Finished.

Figure: Finished drop-down list
-
Scroll to the bottom of the page and select Finished.

Figure: Finished button


Configure the iApp Template
-
In BIG-IP, select iApps > Application Services > Applications.
-
From the list of applications, select the name of your new application.
-
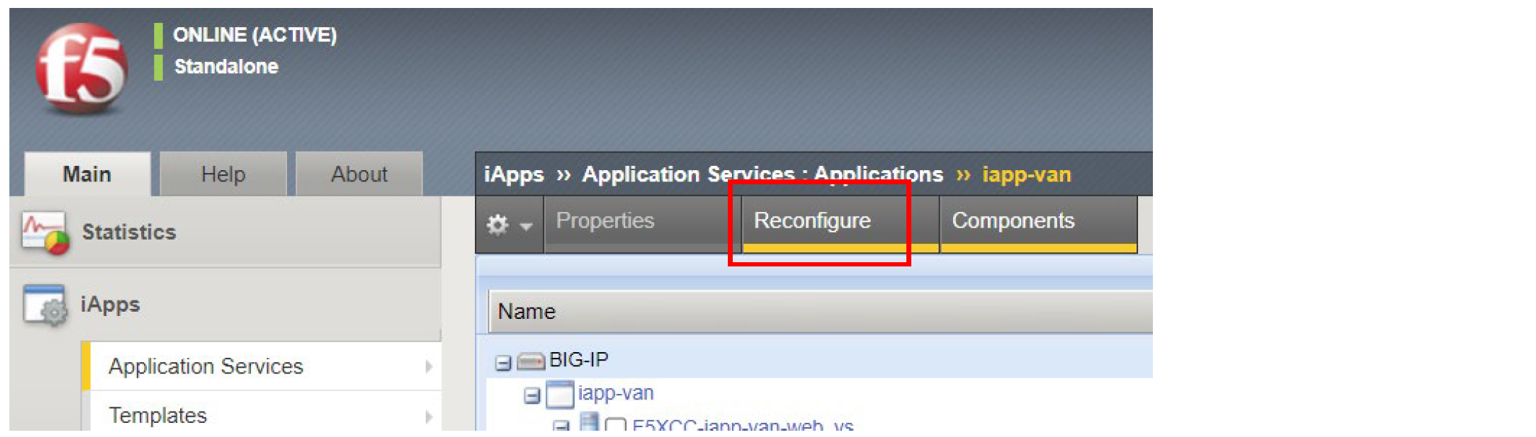
Select Reconfigure.

Figure: Reconfigure
-
In the JavaScript Injection Configuration section, enter the path or URL where clients can access the F5 Client JavaScript tags to insert in your application.
Enter a simple path that starts with
/or a complete URL, such ashttps://example.com/customer1.js.Keep the default setting to allow BIG-IP to inject F5 Client JavaScript tags.

Figure: JavaScript Injection Configuration
-
In the F5 XC Bot Defense Protected Endpoints Configuration section, specify an endpoint from your web application to protect against automated traffic.
a. The Mitigation Handler field is informational only. Do not make changes to this field.
b. In the Host field, enter the host domain of your web application. For example, enter
identity.<your domain>.com.c. In the Path field, enter the site flow path for the endpoint you want to protect. For example, for a login flow, enter
/login/.d. From the Endpoint Label drop-down list, select a label to help identify the type of endpoint. Endpoint labels allow more granular attack intent identification and reporting when Bot Defense detects automation.
For a full list of available endpoint labels, see Endpoint Labels in the Bot Defense Standard documentation.
e. Choose the HTTP Methods that you want to protect for this web application. Select Yes for at least one of the following methods:
-
ANY: Select Yes to protect the path with any type of method. Select No to limit protection to only certain methods.
-
GET (XHR): Select Yes to protect the path when it has a GET (XHR) method.
-
POST: Select Yes to protect the path when it has a POST method.
-
PUT: Select Yes to protect the path when it has a PUT method.
Important: For best performance, F5 recommends that you protect specific HTTP methods and that you set the ANY option to No.
f. From the Action (...) drop-down list, select Continue. This setting puts Bot Defense in monitoring mode and allows requests to continue to the origin. You can select Block or Redirect mitigation actions after you confirm that Bot Defense is correctly identifying automated traffic.

Figure: Endpoint Configuration
-
-
In the Application Virtual Servers section, select the application virtual servers that you want to assign to your iApp. Your iApp does not run if it is not assigned to at least one virtual server.
You must know the following about selecting a virtual server:
-
The virtual server you select must have an HTTP profile attached to it.
-
The virtual server you select must have a default pool attached to it.
-
F5 recommends that each protected server have a Client SSL profile and SNAT profile, but these are not required.
Note: You create virtual servers in BIG-IP. For information, see your BIG-IP documentation.

Figure: Application Virtual Server Configuration
Note: Do not add the same virtual server to more than one iApp application.
-
-
To save your configuration, select Finished.


Next Steps
When you finish configuring Bot Defense, test your deployment to make sure it is working as intended. For information, see Step 3: Test Your Deployment.
Step 3: Test Your Deployment
Perform the following tests to help confirm that Bot Defense is identifying web traffic correctly.
Check JavaScript Injection
Open the application page where you injected the F5 Client JavaScript tags. Use the developer tools in your browser or view the page source to inspect the page and confirm that Bot Defense has inserted JavaScript tags with the following query string parameters:
?matcher?cache?async
For additional information about confirming proper JavaScript tag injection, see Test Your Bot Defense Standard Configuration in the Bot Defense Standard documentation.
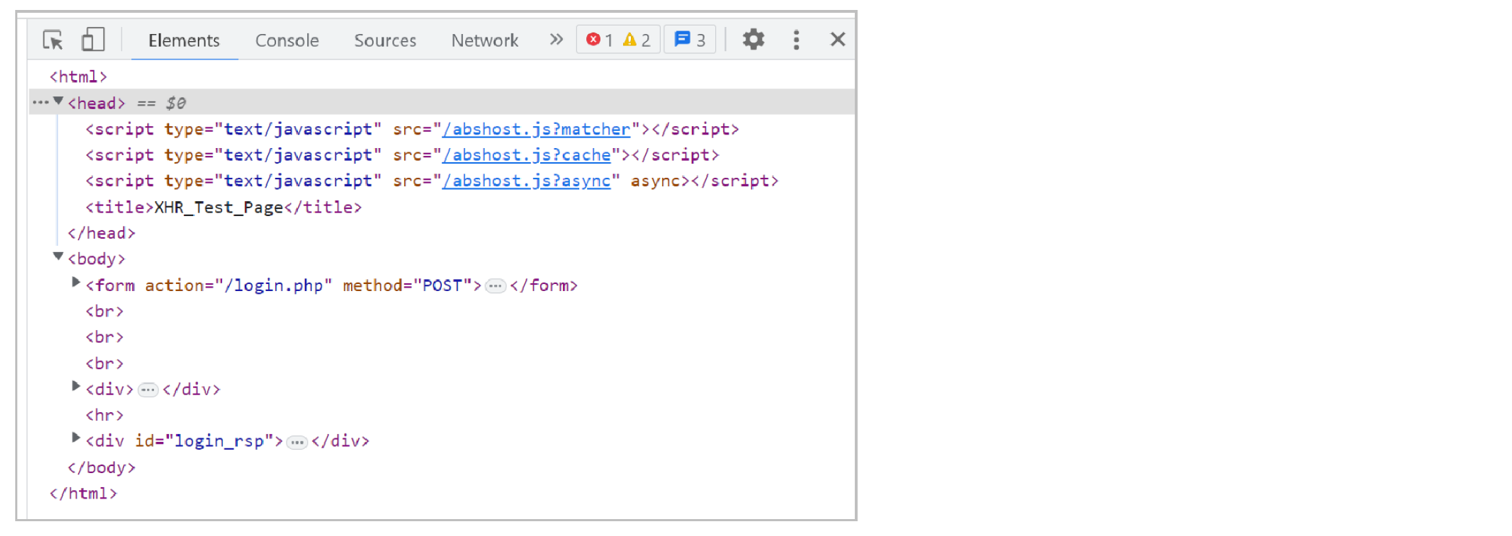
Figure: JavaScript Injection
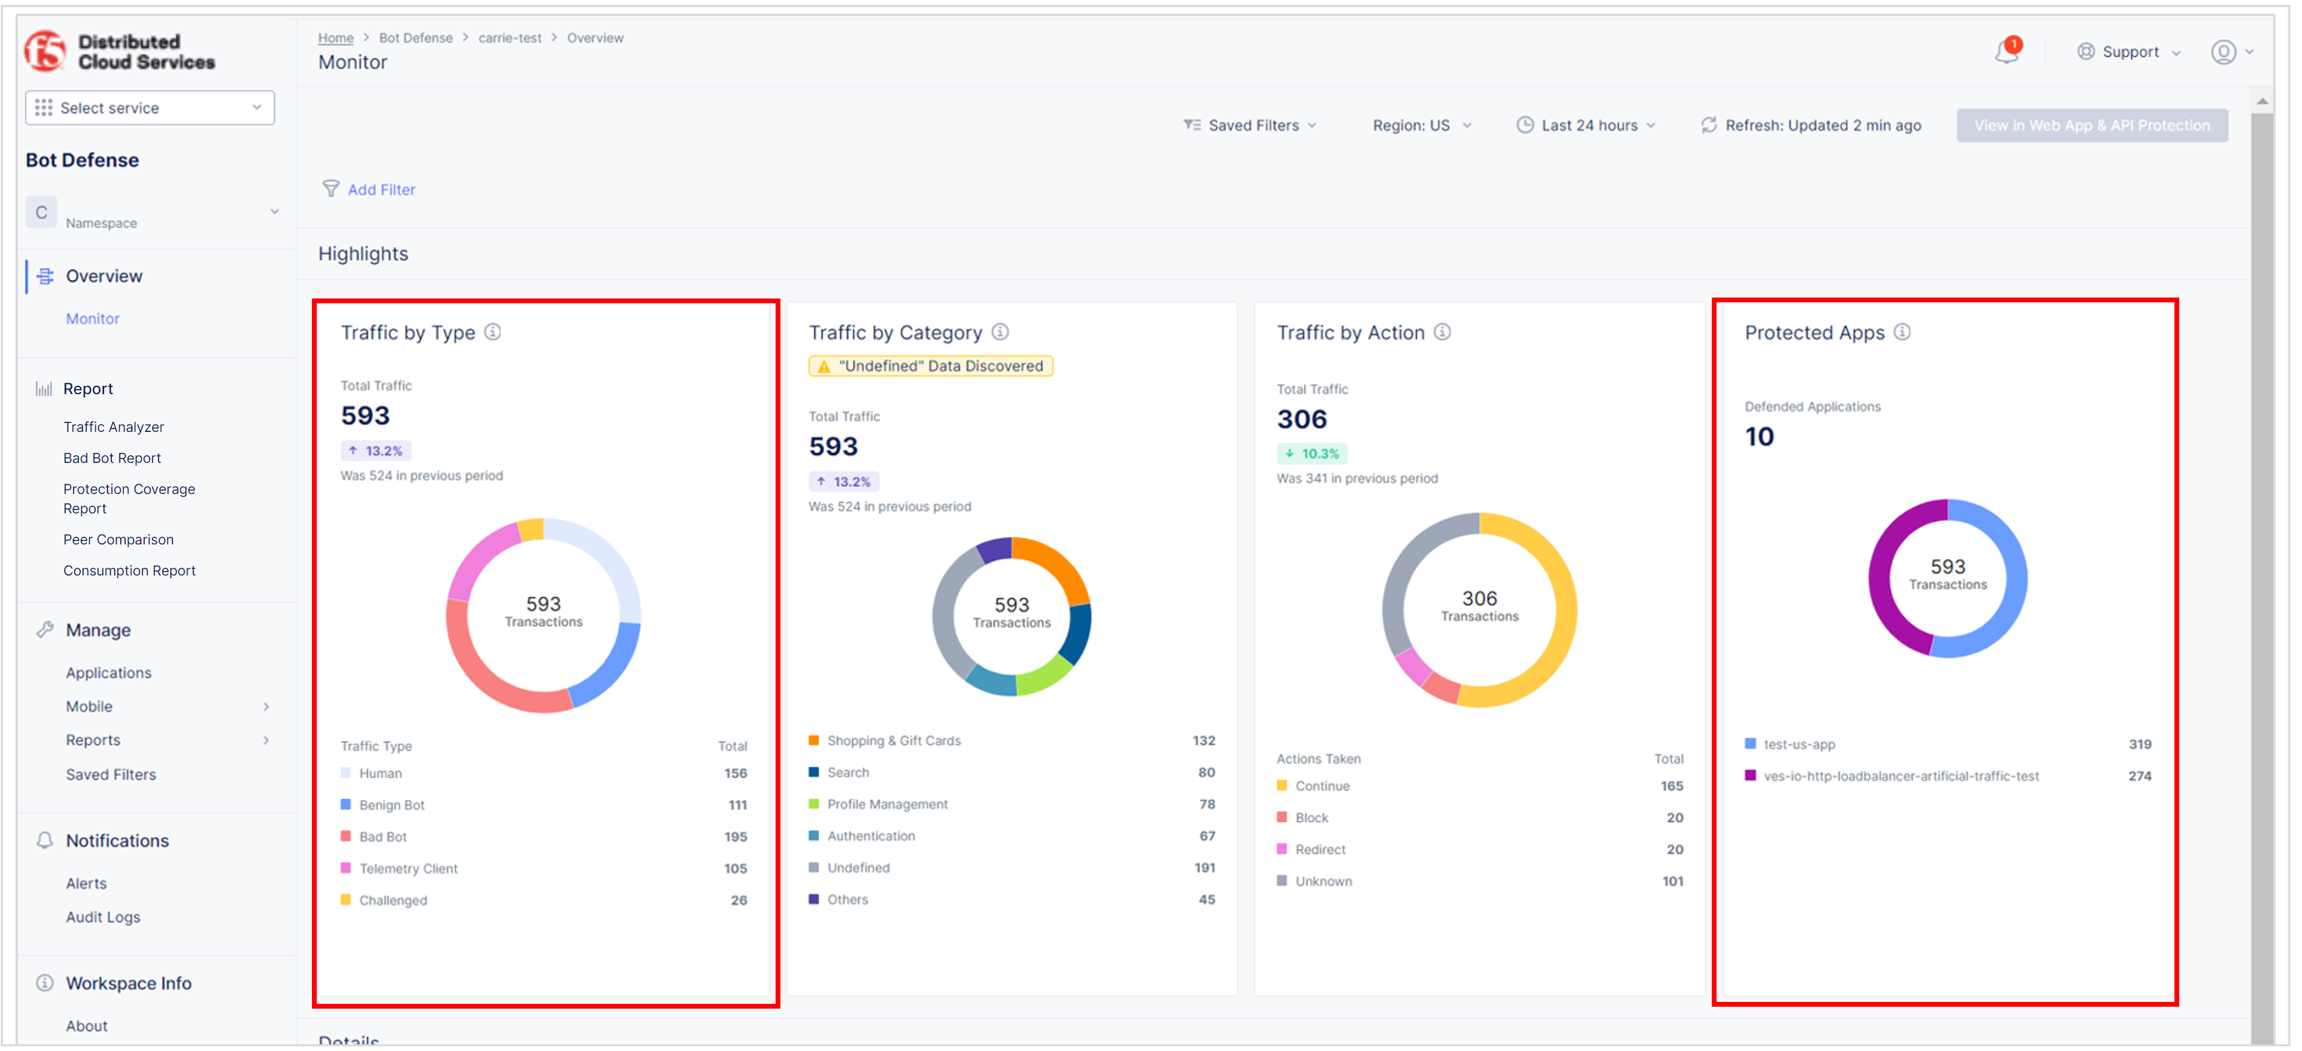
Check for False Positives
Review the Bot Defense dashboard to see the types of traffic identified by Bot Defense and confirm that no legitimate traffic is being incorrectly identified as automation (false positives). From the Bot Defense Home page, select Overview > Monitor.
-
In the Protected Apps widget, check that your new application is listed and that the amount of traffic is appropriate.
-
In the Traffic by Type widget, check that the level of human, benign bot, bad bot and other activity is appropriate.

Figure: Bot Defense Dashboard
-
From the time-period drop-down list, select Last 24 hours. In the Traffic Visualized section, check whether traffic marked as malicious increases during the day and decreases at night. If so, this might indicate human traffic.
From the Bot Defense Home page, select Report > Traffic Analyzer.
- Look at the distribution of IP addresses and the countries of origin. Decide if this distribution looks like it comes from your normal user base.
- Look at the User Agent column and decide if there are suspicious user agents present. You can also use this technique to identify wanted automation (benign bots), such as test tools or SEO bots.
- Select Add Filter. From the drop-down list, select Bot Reason, select In, select Token Missing and select Apply. Review the traffic and determine if it looks legitimate.
For additional information about how to check for false positive results, see Analyze Bot Defense Results in the Bot Defense documentation.
Next Steps
When you are ready to block or redirect automated traffic, see Step 4: Configure Mitigation Actions.
Step 4: Configure Mitigation Actions
When you are sure that Bot Defense is correctly identifying automated traffic, you can configure mitigation actions so that Bot Defense blocks or redirects automated traffic.
- In BIG-IP, select iApps > Application Services > Applications.
- From the list of applications, select the application you want to configure.
- Select the Reconfigure tab.
- In the section, F5 XC Bot Defense Protected Endpoints Configuration, from the Action drop-down list, select one of the following options:
- Redirect. The Bot is sent to a different page. You provide the URL where the Bot is redirected in the Define Mitigation Actions section.
- Block. The Bot is presented with a message that it has been blocked. You provide the Response Code and Body of the response message in the Define Mitigation Actions section.
- When you finish making configuration changes, double-check your configuration settings and select Finished.
Next Steps
Now that you have protected one endpoint, checked to make sure the system is functioning properly and configured a mitigation for the endpoint, try protecting additional endpoints.
For additional information about advanced configuration steps, see the BIG-IP v14-16 iApp Connector documentation.
On this page:
- Step 1: Plan Your Bot Defense Deployment
- Meet the Prerequisites
- Choose an Application to Protect
- Step 2: Configure Bot Defense
- Enable Bot Defense
- Add a New Application and Download the iApp Connector Template
- Upload the iApp Template to BIG-IP
- Perform the Required Initial Configuration of a New Application
- Configure the iApp Template
- Step 3: Test Your Deployment
- Check JavaScript Injection
- Check for False Positives
- Step 4: Configure Mitigation Actions