Enable on BIG-IP v14-16 (iApp Connector)
The following information explains how to use an iApp template to configure Bot Defense Standard with F5 BIG-IP v14-16.
Prerequisites
Before you deploy or upgrade an iApp in the F5 BIG-IP system, you must meet the following requirements:
- You must have Bot Defense Standard enabled in the Distributed Cloud Console. See Enable Distributed Cloud Bot Defense Standard.
- You have access to the F5 Distributed Cloud Console to download the latest iApp template.
- You have BIG-IP versions 14.1 or later.
Note: The Distributed Cloud Bot Defense iApp template is required for BIG-IP versions 14 to 16. For BIG-IP version 17.0 or later, Bot Defense is integrated natively with BIG-IP and provides improved performance. For information, see https://techdocs.f5.com/en-us/bigip-17-1-0/big-ip-saas-bot-defense.html.
- You have backed up your BIG-IP configuration. For information, see “Back up your BIG-IP system configuration”: https://support.f5.com/csp/article/K13132#BackingUp.
- The virtual server that you want to protect with Bot Defense must have an HTTP profile and default pool attached to it.
- To protect mobile endpoints, you must download the Mobile Base Configuration. See your F5 Distributed Cloud Mobile SDK documentation for information.
- F5 BIG-IP Application Services Templates (FAST) are the next-generation successor to now deprecated iApp templates. F5 strongly recommends that you do not use both FAST and iApp templates together. They are not compatible with each other.
Download the iApp Connector Template from the Distributed Cloud Console
- Log on to the Distributed Cloud Console. From the Dashboard page, select Bot Defense.
- Verify that you are in the correct namespace. For information about namespaces, see https://docs.cloud.f5.com/docs/ves-concepts/core-concepts.
- Select Add Application. If you have not already added any protected applications, you are instructed to add one.
- Add a Name and Description for the application.
- Select the region where the origin server is located: US, EU, Asia.
- From the Connector Type drop-down menu, select F5 BIG-IP iApp.
- Select Add Protected Application.
- From the Actions column in the list of applications, select the Action menu … and then select Download template. Save the template in a location you can access later.
Next Steps
After you download the iApp Connector Template, perform one of the following steps:
- To configure a new application, see Create a New Application From Your iApp Template.
- To upgrade an existing application, see Upgrade an application from iApp Template v3.0.3 to a New iApp Template.
Create a New Application From Your iApp Template
Import the iApp Template to BIG-IP for a New Application
The following steps explain how to import an iApp Connector Template into BIG-IP to create a new application.
Note: To upgrade an existing application from the v3.0.3 template to v3.0.4, see Upgrade an Application from iApp Template v3.0.3 to a New iApp Template.
- Log on to the BIG-IP where you want to add your application.
- Select iApps > Templates > Import.
- Select Choose File and navigate to the location where you saved the iApp template.
- Select the template you want to import and select Open.
- Then select Upload and OK to confirm.
Required Initial Configuration of a New Application from iApp Template
When you use the Bot Defense iApp Template v3.0.4 or later to create a new Bot Defense Standard Application instance, you must perform the following required initial configuration steps in BIG-IP before you configure any additional settings.
- In BIG-IP, select iApps, Application Services > Applications and then select Create.
- Enter a Name for the new application. The name cannot contain any spaces or special characters.
- From the Template drop down, select f5.ibd.cs.
- In the One-Time Install/Upgrade Setup section, make sure No, I will select the FINISHED button now is selected and then review the information in the Important section. Then scroll to the bottom of the page and select Finished.
Important: Do not make any other configuration changes before you select Finished. You can make only configuration changes after you select Finished.

Figure: iApp Connector One-Time Install/Upgrade screen
Next Steps
After you select Finished, you can safely make changes to the application configuration. See Configure an Application That Uses the iApp Connector Template.
Upgrade an Application from iApp Template v3.0.3 to a New iApp Template
The following sections explain how to upgrade an existing Bot Defense Standard Application on BIG-IP from template v3.0.3 or later to v3.0.4 or later.
Important: You can only upgrade from iApp template v3.0.3 or later. To upgrade from templates older than v3.0.3 and maintain your existing configuration settings, you must first upgrade your existing iApp template to v3.0.3.
Important: To upgrade a group of Bot Defense Standard Applications (more than one application on the same BIG-IP with the same F5 Security API hostname) contact F5 Customer Support for upgrade assistance.
Import the iApp Template for an Existing Application
- Log on to BIG-IP where your application is protected and hosted.
- Select iApps > Templates > Import.
- Select Overwrite Existing Templates.
- Select Choose File and navigate to the location where you saved the template you downloaded from the Distributed Cloud Console.
- Select the template you want to import and select Open.
- Select Upload and OK to confirm.
Upgrade the Template for an Existing Application
-
Select Application Services > Applications and then select the name of the application you want to upgrade.
-
Select the Reconfigure tab.
-
In the Template section, select Change.
-
From the Template drop down menu, select f5.ibd.cs.
-
In the One-Time Install/Upgrade Setup section, make sure No, I will select the FINISHED button now is selected and then review the information in the Important section. Then scroll to the bottom of the page and select Finished.
Important: Do not make any other configuration changes before you select Finished. You can only make configuration changes after you select Finished.

Figure: iApp Connector One-Time Install/Upgrade screen
Next Steps
After you select Finished, you can safely make changes to the application configuration. See Configure an Application That Uses the iApp Connector Template.
Configure an Application That Uses the iApp Connector Template
The following instructions explain how to configure the following:
- A new application that uses iApp Connector Template v3.0.4 or later.
- An existing application that has been upgraded from v3.0.3 to v3.0.4 or later.
- In the BIG-IP that hosts your applications, select iApps > Application Services > Applications.
- From the list of applications, select the application you want to configure.
- Select the Reconfigure tab.
The following sections explain how to configure each option in your application.
General Settings
-
Decide if you want to Activate Bypass Mode, which allows all HTTP traffic to bypass the Bot Defense processing engine. Only select Yes if you want to temporarily disable Bot Defense. For example, enable bypass mode if you suspect there is an issue with Bot Defense, such as too many false positive results.
-
Decide if you want to send all web form contents to the F5 XC Defense Engine API for analysis or if you want to send only telemetry data. You might decide to send only telemetry data (the default selection) if you must adhere to strict regulatory compliance rules, such as GDPR.
-
To see information about pattern and regular expression wildcard matching displayed in the user interface, select Yes from the drop-down menu. This information can be useful when you configure which client requests should be inspected by Bot Defense.

Figure: iApp Connector General Configuration screen
Mobile SDK Options
-
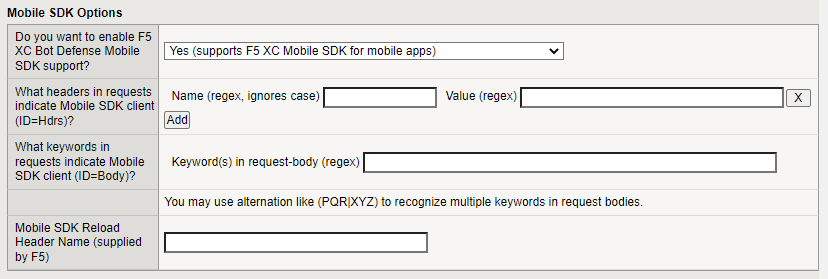
If you have mobile endpoints, in the Do you want to enable F5 XC Bot Defense Mobile SDK support, select Yes (supports F5 XC Mobile SDK for mobile apps).
-
Decide how you want Bot Defense to identify requests from your Mobile SDK Clients and to help distinguish between mobile and web traffic through the same virtual server. Choose either headers or body keywords:
- Enter the header Name and Value and select Add. For example, for the header name, you might enter
sample-mobile-app, and for the value you might entertrue. You can specify multiple headers. - Enter keywords that appear in request bodies. To enter multiple keywords, use the following format, “keyword1|keyword2|keyword3”.
- Enter the header Name and Value and select Add. For example, for the header name, you might enter
-
In the Mobile SDK Reload Header Name field, enter the Reload Header Name from the Distributed Cloud Console. This value you enter is included in the response message when Bot Defense blocks a request. To find the Reload Header Name:
- Log in to the Distributed Cloud Console. From the Dashboard page, select Mobile Base Configurations.
- Copy the Reload Header Name for the appropriate mobile base configuration.
- Enter the value in the Mobile SDK Reload Header Name field in the iApp template.
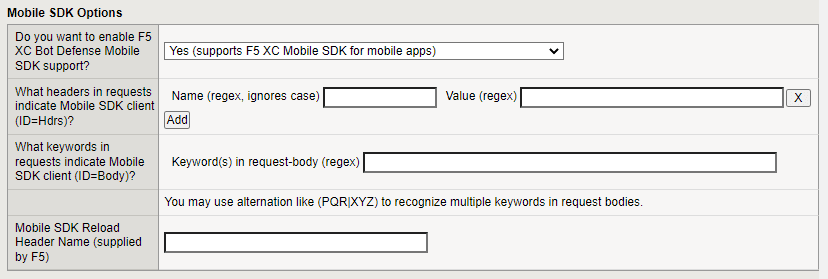
Figure: iApp Connector Mobile SDK Options screen
JavaScript Injection Configuration
To protect web-based endpoints, decide if you want your BIG-IP to automatically insert the Bot Defense protection JavaScript into your application pages or if you want to add the JavaScript manually.
-
If you want BIG-IP to insert the JavaScript, perform the following steps:
-
From the BIG-IP Handles F5 Client JavaScript Injections drop-down menu, select Yes.
-
Enter the path or URL to display to the browser and in the page source code in place of the actual download path for the Bot Defense JavaScript. This prevents malicious actors from determining what system you are using to protect your application.
F5 recommends that you choose a URL or path that is similar to your existing JavaScript files, but that does not include “F5,” “Bot Defense” or other indications that it is used for security purposes. Enter a simple path that starts with
/or a complete URL such ashttps://example.com/customer1.js. The URL or path you choose cannot conflict with your existing JavaScript files. -
From the Web Client JavaScript Mode drop-down menu, determine how the JavaScript is loaded into the web page. The JavaScript is loaded in two parts. The larger part can be loaded in two possible ways:
- Asynchronous: The page can continue to load while the Bot Defense JavaScript downloads and executes. This method provides the best performance.
- Synchronous: The Bot Defense JavaScript must be loaded and executed completely before the web page can load. This option ensures that the Bot Defense JavaScript has loaded before any other functionality on the website loads.
You can also choose to cache the larger part of the JavaScript so it can be used in page reloads. Choose one of the following options:
- Async JS with no Caching: JavaScript is loaded asynchronously and is not cached.
- Async JS with Caching: JavaScript is loaded asynchronously and cached. F5 recommends that you use this method as it typically provides the best performance.
- Sync JS with no Caching: JavaScript is loaded synchronously and is not cached.
- Sync JS with Caching: JavaScript is loaded synchronously and cached.
-
Select the location in the application pages where you want BIG-IP to insert the protection JavaScript. F5 recommends that you select
After <head>so that the JavaScript is executed early. This helps to avoid conflicts with other scripts and allows time to for the protection JavaScript to be executed while the rest of page is rendered.Note: If you select
After </title>, be sure your application pages have thetitletag.
Figure: iApp Connector JavaScript Injection Configuration screen
-
To inject JavaScript into Telemetry data, in the Telemetry JavaScript Injection drop-down menu, select Enable. Otherwise, select Disable.
-
If you enabled Telemetry JavaScript Injection, decide if you want to inject the JavaScript in the
<Body>tag. If you select No, the JavaScript is inserted in the same location as the protection JavaScript. -
Specify whether want to inject the protection JavaScript only in specific webpages:
- To inject JavaScript in specific webpages, in the Do you want to choose which pages are injected with protection Javascript drop-down menu, select Yes. Then enter the path for the pages where you want to inject the JavaScript and select Add.
Note: Not all pages require JavaScript, but JavaScript must be inserted at all entry points, such as login forms.
- To inject JavaScript in all pages, select No.
- To inject JavaScript in specific webpages, in the Do you want to choose which pages are injected with protection Javascript drop-down menu, select Yes. Then enter the path for the pages where you want to inject the JavaScript and select Add.
-
To exclude the protection JavaScript injection from specific webpages, in the Do you want to avoid injecting F5 Client Javascript into certain pages drop-down menu, select Yes. Then enter the path for the page you want to exclude and select Add.

Figure: iApp Connector JavaScript Injection Options
-
-
To manually insert the JavaScript in your application, perform the following steps:
Note: Not all webpages require JavaScript, but JavaScript must be inserted at all entry points, such as login forms.
-
From the BIG-IP Handles F5 Client JavaScript Injections drop-down menu, select No.
-
Enter the path or URL to display to the browser and in the page source code in place of the actual download path for the Bot Defense JavaScript. This prevents malicious actors from determining what system you are using to protect your application. F5 recommends that you choose a URL or path that is similar to your existing JavaScript files, but that does not include “F5,” “Bot Defense” or other indications that it is used for security purposes. Enter a simple path that starts with
/or a complete URL such ashttps://example.com/customer1.js. The URL or path you choose cannot conflict with your existing JavaScript files. -
If you require Manual JavaScript Insertion, add the JavaScript code snippets below to one of the following locations in the code of your web application:
- Immediately after
<head> - Immediately after
</title> - Before
<script>(first script tag on the page).
Matcher Config JavaScript:
<script type='text/javascript' src='INJECTION_PATH?matcher'></script>I/O Hook JavaScript:
<script type='text/javascript' src='INJECTION_PATH?single'></script>Note: Replace INJECTION PATH with the value you specified for Web Client JavaScript Path.

Figure: iApp Connector JavaScript Injection Manual Configuration screen
- Immediately after
-
F5 XC Bot Defense Protected Endpoints Configuration
Specify pages and sources on the website that should be protected by Bot Defense.
-
The Mitigation Handler field is informational only. You do not need to make any changes to this field.
-
If you previously enabled F5 XC Bot Defense Mobile SDK support, select the type of client requests that should be inspected and then mitigated by F5 XC Bot Defense: Web, MSDK (Mobile Client), or Both (Web and Mobile).
Note: If you select Both, you must provide a header which distinguishes Mobile requests from Web. For example:
User-Agent: Android 10; MyApp/1.0User-Agent: Android 9; MyApp/2.0X-App-Version: 4.1X-App-Version: 4.3
The specified header value can use a wildcard (*) to match a substring.
-
In the Host field, enter the host domain of the protected endpoint. For example, enter identity.<your domain>.com.
-
In the Path field, enter the path to the endpoint. The path must meet the following requirements:
- Only uses lowercase letters.
- Starts with
/. For example,/login/. - Can use glob patterns:
*?[ ]. - Closes any open bracket
[with]. - Brackets must include only valid URL characters.
- Uses
/to protect the root. - Does not specify any of the following as protected URLs:
*/*
For example:
- Example 1:
/application/version[0-9]/login - Example 2:
/myapp/service/* - Example 3:
/*/login.aspx - Example 4:
/api/*/connection/*/* - Example 5:
/api/connection/[a-zA-Z0-9_]*/set*
-
(Optional) In the Query field, if you want to protect specific sections of a page, enter the criteria for the section you want to protect.
For example, if the query string of a URI you want to protect is
<yourdomain>/account.do/issue?account=moneytransfer, enter the parameter name and parameter value ‘account=moneytransfer’ to protect the “moneytransfer” function.When you enter a Query parameter, Bot Defense looks at the Path and Query values. The Query field is regex matched.
-
Choose the HTTP Methods that are protected on this endpoint. You must set at least one of the options to Yes. HTTP requests are not routed if no methods are set to Yes.
Select Yes or No for each of the following methods:
-
ANY: Select Yes to protect the path with any type of method. Select No to limit protection to only certain methods.
-
GET: Select Yes to protect the path when it has a GET method.
-
POST: Select Yes to protect the path when it has a POST method. Bot Defense analyzes POST requests to determine if they are part of a bot attack such as credential stuffing or form submission abuse.
-
PUT: Select Yes to protect the path when it has a PUT method and prevent data uploads or modifications from bots.
Note: If you have CORS policy enabled on your application, BIG-IP automatically adds the following headers to the request before sending the request to Bot Defense:
Xa4vrhYP3Q-a,Xa4vrhYP3Q-a0,Xa4vrhYP3Q-b,Xa4vrhYP3Q-c,Xa4vrhYP3Q-d,Xa4vrhYP3Q-e,Xa4vrhYP3Q-f,Xa4vrhYP3Q-a1andXa4vrhYP3Q-z. Bot Defense requires these headers to support requests that use CORS. -
-
In the Action drop-down menu, select the mitigation action you want to take for this endpoint if Bot Defense detects automation:
- Continue (request continues to origin). For reporting purposes, you can optionally add a header to capture traffic that is going to the origin. You provide the header name in the Define Mitigation Actions section.
Important: When you initially deploy the iApp connector, F5 recommends that you set mitigation action to Continue for the first 24-48 hours and then monitor the system to confirm that it is functioning properly.
- Redirect. The Bot is sent to a different page. You provide the URL where the Bot is redirected later in the Define Mitigation Actions section. The redirect must go to:
- An absolute URL, for example,
https://example.com/redirect.html - A domain that you own.
- An absolute URL, for example,
- Block. The Bot is presented with a message that it has been blocked. You provide the Response Code and Body of the response message later in the Define Mitigation Actions section.
- Drop. This is not a valid selection. If you select Drop, Bot Defense defaults to Block.
When you select mitigation actions, you must be aware of the following important information:
Client Type Valid Actions Additional Information MSDK (mobile) Continue, Block -- Redirect and Drop are visible but are not valid actions. If you select an invalid action, the system defaults to Block. -- You must specify a header, otherwise the endpoint is treated as a web endpoint. For information, see “Define Mitigation Actions.” Web Client Continue, Block, Redirect Drop is visible but is not a valid action. If you select Drop, Bot Defense defaults to Block. Both (mobile and web) If you select Both (web and mobile clients): -- Drop is not a valid action. If you select Drop, Bot Defense defaults to Block. -- You can select mitigation actions for each client type. -- In the MSDK Req ID drop-down menu (see below), you must select either Hdrs or Body. Otherwise, Bot Defense treats the endpoint as a web endpoint. -- You must specify a header, otherwise Bot Defense treats the endpoint as a web endpoint. For information, see Define Mitigation Actions. - Continue (request continues to origin). For reporting purposes, you can optionally add a header to capture traffic that is going to the origin. You provide the header name in the Define Mitigation Actions section.
-
In the MSDK Req ID drop-down menu, specify how you want Bot Defense to identity mobile endpoints.
- If your endpoint type is MSDK (mobile), select Hdrs or Body. Otherwise, Bot Defense treats the endpoint as a web endpoint by default.
- If your endpoint type is Both (web and mobile), select Hdrs or Body. Otherwise, Bot Defense treats the endpoints as a web endpoint by default.
- If your endpoint type is Web, then you do not need to choose a setting. This field is ignored for web endpoints.
-
Specify whether you want to ignore letter case while matching request paths. If you select Yes, letter case is ignored when matching the path of a request URL. If you select No then matching is case sensitive.

Figure: iApp Connector Protected Endpoint Configuration screen
Select Add to add additional protected endpoints.
After you finish adding endpoints, all protected endpoints are displayed in a table. You can modify or delete endpoints.
Web-Scraping Protection Endpoints
Configure web scraping protection for documents and pages on a web site that is accessible by GET requests without visiting the main page, for example, from a link on social media, from an email or from a saved bookmark. This direct access to resources prevents Bot Defense from inserting the protection JavaScript. When you configure an endpoint for web scraping, Bot Defense displays an interstitial page that is transparent to the user but that allows it to collect telemetry data about the requests.
-
The Mitigation Handler field is informational only. You do not need to make any changes to this field.
-
In the Host field, enter the host domain of the protected endpoint.
-
In the Path field, enter the path to the endpoint. The path must meet the following requirements:
- Only uses lowercase letters.
- Starts with
/. For example, enter/login/. - Can use glob patterns:
*?[ ]. - Closes any open bracket
[with]. - Brackets must include only valid URL characters.
- Uses
/to protect the root. - Does not specify any of the following as protected URLs:
*/*
For example:
- Example 1:
/application/version[0-9]/login - Example 2:
/myapp/service/* - Example 3:
/*/login.aspx - Example 4:
/api/*/connection/*/* - Example 5:
/api/connection/[a-zA-Z0-9_]*/set*
-
(Optional) In the Query field, if you want to protect specific sections of a page, enter the criteria for the section you want to protect.
For example, if the query string of a URI you want to protect is
<yourdomain>/account.do/issue?account=moneytransfer, enter the parameter name and parameter value ‘account=moneytransfer’ to protect the “moneytransfer” function.When you enter a Query parameter, Bot Defense looks at the Path and Query values. The Query field is regex matched.
-
In the Action drop-down menu, select the mitigation action you want to take for this endpoint if Bot Defense detects automation:
- Continue (request continues to origin). For reporting purposes, you can optionally add a header to capture traffic that is going to the origin. You provide the header name in the Define Mitigation Actions section.
Important: When you initially deploy the iApp connector, F5 recommends that you set mitigation action to Continue for the first 24-48 hours and then monitor the system to confirm that it is functioning properly.
- Redirect. The Bot is sent to a different page. You provide URL where the Bot is redirected later in the Define Mitigation Actions section. The redirect must go to:
- An absolute URL, for example, “
https://example.com/redirect.html”. - A domain that you own.
- An absolute URL, for example, “
- Block. The Bot is presented with a message that it has been blocked. You provide the Response Code and Body of the response message later in the Define Mitigation Actions section.
- Drop. This is not a valid selection. If you select Drop, Bot Defense defaults to Block.
- Continue (request continues to origin). For reporting purposes, you can optionally add a header to capture traffic that is going to the origin. You provide the header name in the Define Mitigation Actions section.
-
Specify whether you want to ignore letter case while matching request paths. If you select Yes, letter case is ignored when matching the path of a request URL. If you select No then matching is case sensitive.

Figure: iApp Connector Web Scraping Configuration screen
Define Mitigation Actions
-
In the Specify redirect path field, enter the URL to which you want to redirect Bots when you select Redirect as a mitigation action.
-
In the Specify ‘Block’ response fields, enter a Response Code and then enter the body of the response message that you want to send to malicious traffic if you specify Block as a mitigation action. You must include the correct HTML tags in the body of the response.
-
When you select Continue as a mitigation response, specify whether you want to add a header to requests that provides Bot Defense information. If you select Yes, add an F5 XC Bot Defense info header to requests sent to origin, then specify the header.

Figure: iApp Connector Define Mitigation Actions screen
Allow-Listed Entities
Optionally, create an Allow List that allows requests to reach the origin destination without being evaluated by Bot Defense. You are not charged for request that are not evaluated by the Bot Defense Engine. You can create a list by IP Address or by request headers.
-
To specify an IP Address Allowlist, in the IP field, enter the IP addresses you want to allow. Select Add after you enter each IP address.
-
Specify if you want to Use advanced header matching.
- If you select Yes, Bot Defense uses regex to match the header name and value.
- If you select No, then header names are matched exactly as you specify and header values are matches using simple * and ? wildcards.
Header name matching is always case insensitive.
-
To specify an HTTP Header Allowlist, enter a Name and Value for each header you want to allow. Select Add after you enter each name and value.

Figure: iApp Connector Allow List screen
Application Virtual Servers
In the Application Virtual Servers section, select the application virtual servers that you want to assign to your iApp. You iApp does not run if it is not assigned to at least one virtual server.
Note: You create virtual servers in BIG-IP. For information, see your BIG-IP documentation.
Know the following about selecting a virtual server:
- The virtual server you select must have an HTTP profile attached to it.
- The virtual server you select must have a default pool attached to it.
- F5 recommends that each protected server have a Client SSL profile and SNAT profile, but these are not required.

Figure: iApp Connector Application Virtual Server screen
Note: If you have deployed an application on an iApp using a virtual server, you cannot deploy Bot Defense on an iApp using the same virtual server. You must choose a different virtual server.
F5 XC Defense Engine API Service Settings
Define the API settings that allow you to route traffic to the Bot Defense engine and define pools.
-
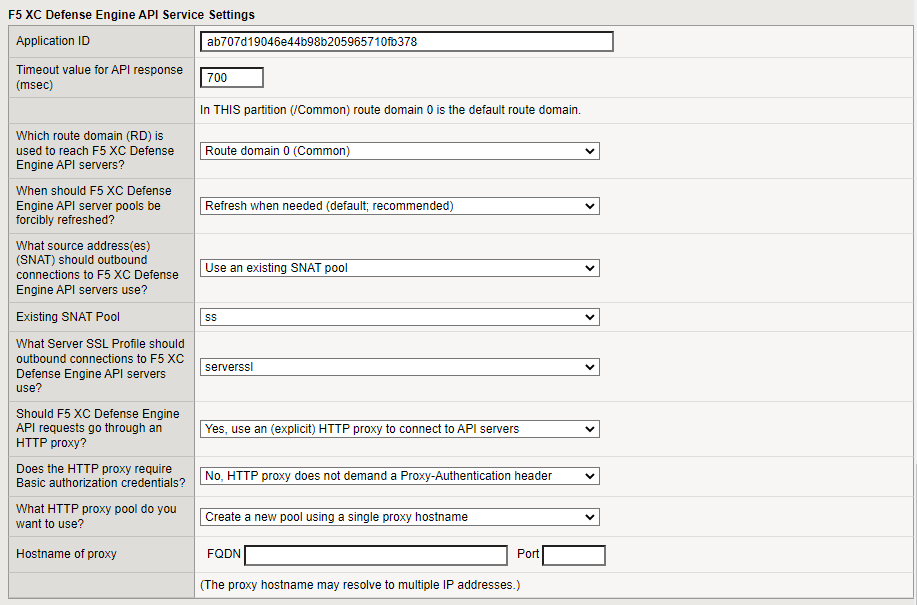
The Application ID is automatically populated in the template.
-
Enter a Timeout value for API response. The default is 700 milliseconds. If the API response exceeds the configured value, then the request is allowed to continue without being checked for automation.
-
Enter the hostname of the F5 XC Web Defense Engine API service.
-
Enter the hostname of the F5 XC Mobile SDK Defense Engine API service.
-
Enter the route domain that is used to reach the F5 XD Defense Engine API servers. The default is route domain 0. For information about route domains, see: https://techdocs.f5.com/en-us/bigip-14-1-0/big-ip-tmos-routing-administration-14-1-0/route-domains.html.
-
Specify when F5 XC Defense Engine API server pools are forcibly refreshed.
-
Specify the source addresses that outbound connections to F5 XC Defense Engine API servers must use:
- The default selection is Use SNAT Automap.
- If you select, Create a SNAT pool, enter the list of APIs in the pool. After you enter each IP address, select Add.
- If you select, Use an existing SNAT pool, select the Existing SNAT Pool from the drop-down menu.
For information about SNAT Automap and SNAT pools, see: https://support.f5.com/csp/article/K7820.
-
Specify the Server SSL Profile that you want to use for outbound connections to F5 XD Defense Engine API servers.
-
To require that F5 XC Defense Engine API requests are routed through a proxy, select Yes, use an (explicit) HTTP proxy to connect to API servers, then do the following:
- If the HTTP proxy requires basic authorization credentials, select Yes, send username and password in Proxy-Authentication header and then enter the Username and Password.
- Select the HTTP proxy pool that you want to use. Perform one of the following tasks:
- Select Create a new pool using a single proxy hostname and then enter the fully-qualified domain name (FQDN) and Port number of the new pool.
- Select Create a new pool from one or more proxy IP addresses and then enter the proxy IP addresses and Port numbers you want to use. Select Add after each IP and Port number.
- Select Choose an existing proxy pool and then select a proxy pool from the drop-down menu.
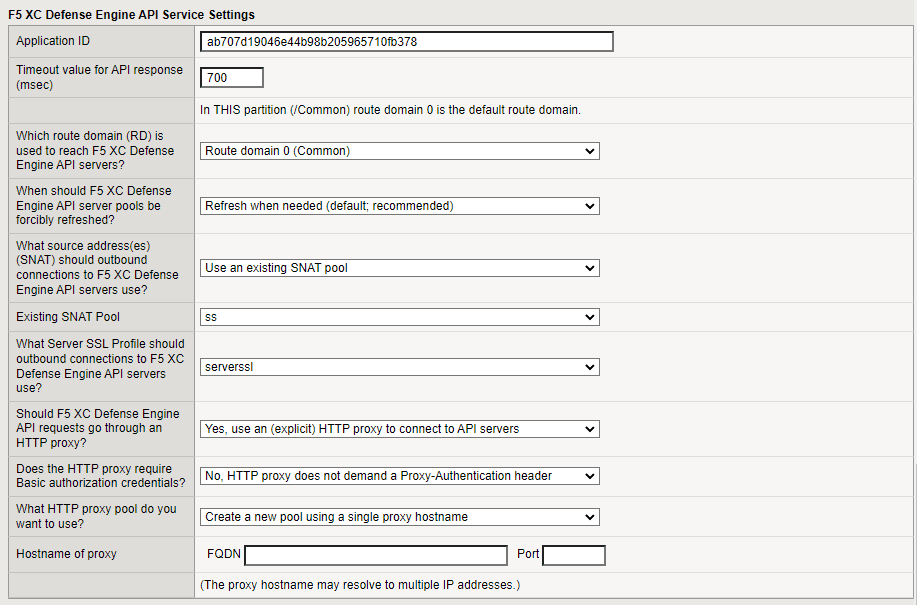
Figure: iApp connector F5 XC Defense Engine API Service Settings screen
F5 XC Defense Engine API Service(s) Health Monitor
If you do not require F5 XC Defense Engine API requests to go through a proxy, you can configure a health monitor to monitor the availability of your API service on both web and mobile clusters.
Health monitors display one of the following statuses for each cluster:
- Available: The monitor is successfully monitoring the pool member.
- Unknown: The monitor is unable to determine if the pool member is up or down.
- Down: The monitor has determined that the pool member is currently down.
For detailed status information, see your BIG-IP Local Traffic Manager documentation.
To configure the health monitor, decide if you want to use the HTTP monitor or default monitor. The default monitor is not as sensitive as the HTTP monitor. The HTTP monitor is more sensitive but does not use TLS.
If you select Prefer HTTP monitor, review the following settings. You should not need to change the default settings.
-
Review which TCP port the HTTP monitor should query.
-
Review which HTTP path the HTTP monitor should query.
-
Review what HTTP status code means that the service is unavailable.

Figure: iApp connector health monitor screen
Advanced Features
-
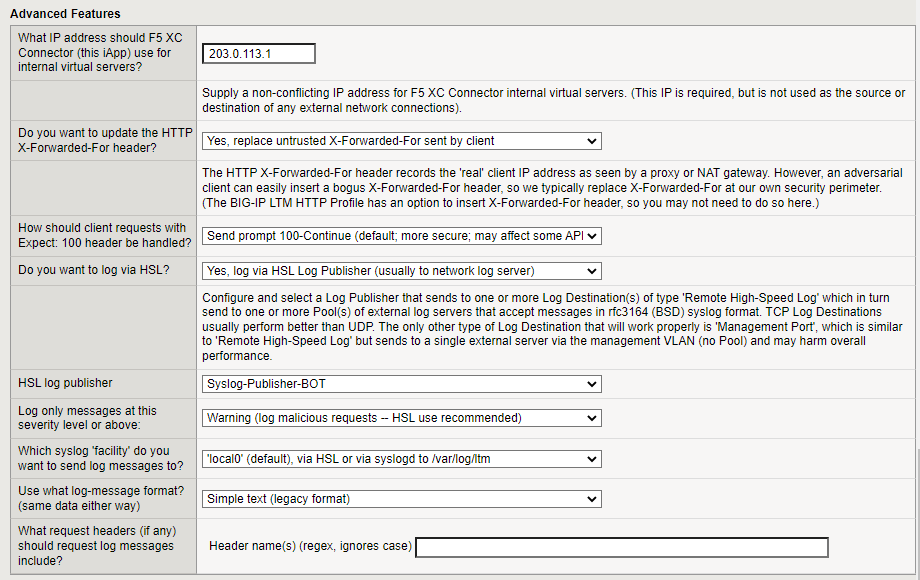
Enter the IP address that the F5 XC Connector should use to contact internal virtual servers.
-
In the field, Do you want to update the HTTP X-Forwarded-For header, decide if you want BIG-IP to replace X-Forwarded-For IP address at the security perimeter.
-
Specify how you want to handle client requests with Expect: 100 header. Select Send prompt 100-Continue if you want BIG-IP to wait for larger requests to complete rather than time out.
-
Decide if you want to use an HSL log publisher or use the BIG-IP
syslogd. If you choose to use the HSL log publisher, from the HSL log publisher drop-down menu, select the publisher you want to use. -
Select a logging level to determine the verbosity of the logging data this is collected:
- Error – Includes connection and network errors. Does not include transaction errors.
- Warning – Includes information about malicious transactions. The Warning level also includes all Error-level log data.
- Info – Includes information about both human and malicious transactions. The Info level also includes all Warning-level log data.
- Debug – Full transaction logs that include all available log data, including all data from Error, Warning and Info levels.
Note: Under normal circumstances, you can set a lower logging level, such as Error or Warning. If you suspect that an incident is occurring, you can change logging levels to Info or Debug to help your investigation and defense, and then change it back later.
-
In the field, Which syslog ‘facility’ do you want to send log messages to, decide where you want the syslog file to be written.
-
In the field, Use what log-message format, enter the log format you want to use for syslog.
-
In the field, What request headers (if any) should request log messages include, enter a Header name. The header name can be exact or regex.
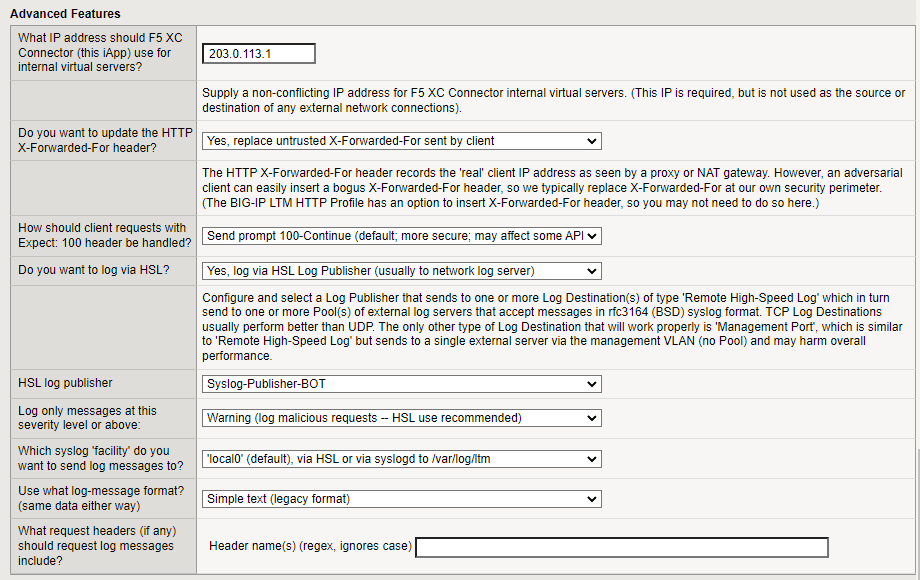
Figure: iApp connector advanced features screen
Save the Application
When you finish making configuration changes, double-check your configuration settings and select Finished.
Delete an iApp Application
Deleting an iApp application is two-step process. First you must run a cleanup process. Then you can safely delete the iApp application. Note that deleting an iApp application removes all configuration information for the application.
- In the BIG-IP that hosts your applications, select iApps > Application Services > Applications.
- From the list of applications, select the application you want to delete.
- Select the Reconfigure tab.
- In the General section, select Yes to Clean Before Deletion. This removes or restores all the BIG-IP configuration components which were added/modified by the Bot Defense iApp template that are not automatically restored when you delete the iApp Application
- Then scroll to the bottom of the page and select Finished.
- When the cleanup process finishes, from the list of applications, select the application you want to delete.
- Select Delete.
On this page:
- Prerequisites
- Download the iApp Connector Template from the Distributed Cloud Console
- Next Steps
- Create a New Application From Your iApp Template
- Import the iApp Template to BIG-IP for a New Application
- Required Initial Configuration of a New Application from iApp Template
- Next Steps
- Upgrade an Application from iApp Template v3.0.3 to a New iApp Template
- Import the iApp Template for an Existing Application
- Upgrade the Template for an Existing Application
- Next Steps
- Configure an Application That Uses the iApp Connector Template
- General Settings
- Mobile SDK Options
- JavaScript Injection Configuration
- F5 XC Bot Defense Protected Endpoints Configuration
- Web-Scraping Protection Endpoints
- Define Mitigation Actions
- Allow-Listed Entities
- Application Virtual Servers
- F5 XC Defense Engine API Service Settings
- F5 XC Defense Engine API Service(s) Health Monitor
- Advanced Features
- Save the Application
- Delete an iApp Application

