Configure CDN Distribution
Objective
This guide provides instructions on how to configure Content Delivery Network (CDN) Distribution using the F5 Distributed Cloud CDN service. Using the CDN service, you can enhance application performance by caching content across a geographically distributed network of servers that serve content with high scale and low latency.
The WAF, API, DoS, and common security controls are currently in Early Access.
The F5 Distributed Cloud CDN service can be deployed with the following TLS configurations:
- HTTP traffic without TLS
- HTTPS with your own TLS certificate (also known as HTTPS with custom certificate)
- HTTPS with automatic TLS certificate (minted by F5® Distributed Cloud Services)
Important: Multiple certificates in a single CDN distribution are not supported.
Prerequisites
The following prerequisites apply:
-
A Distributed Cloud Services Account. If you do not have an account, see Create an Account.
-
A valid DNS domain delegated to Distributed Cloud Services in case you want Distributed Cloud Services to act as domain name server (DNS). For instructions on how to create a primary or secondary DNS zone, see Manage DNS Zone.
-
TLS certificates in case of using HTTPS distribution with custom certificates.
-
Origin server with a valid DNS name and reachable by F5 Distributed Cloud Services.
Note: Ensure that the origin server hosts the content that needs to be served using the CDN Distribution.
Configuration
Create and Verify CDN distribution
Step 1: Log into Console and create new CDN distribution.
-
Log into Console.
-
Click the
Content Delivery Networkservice. The CDN distribution configuration page opens. -
Go to
Manage>CDN Distributions.
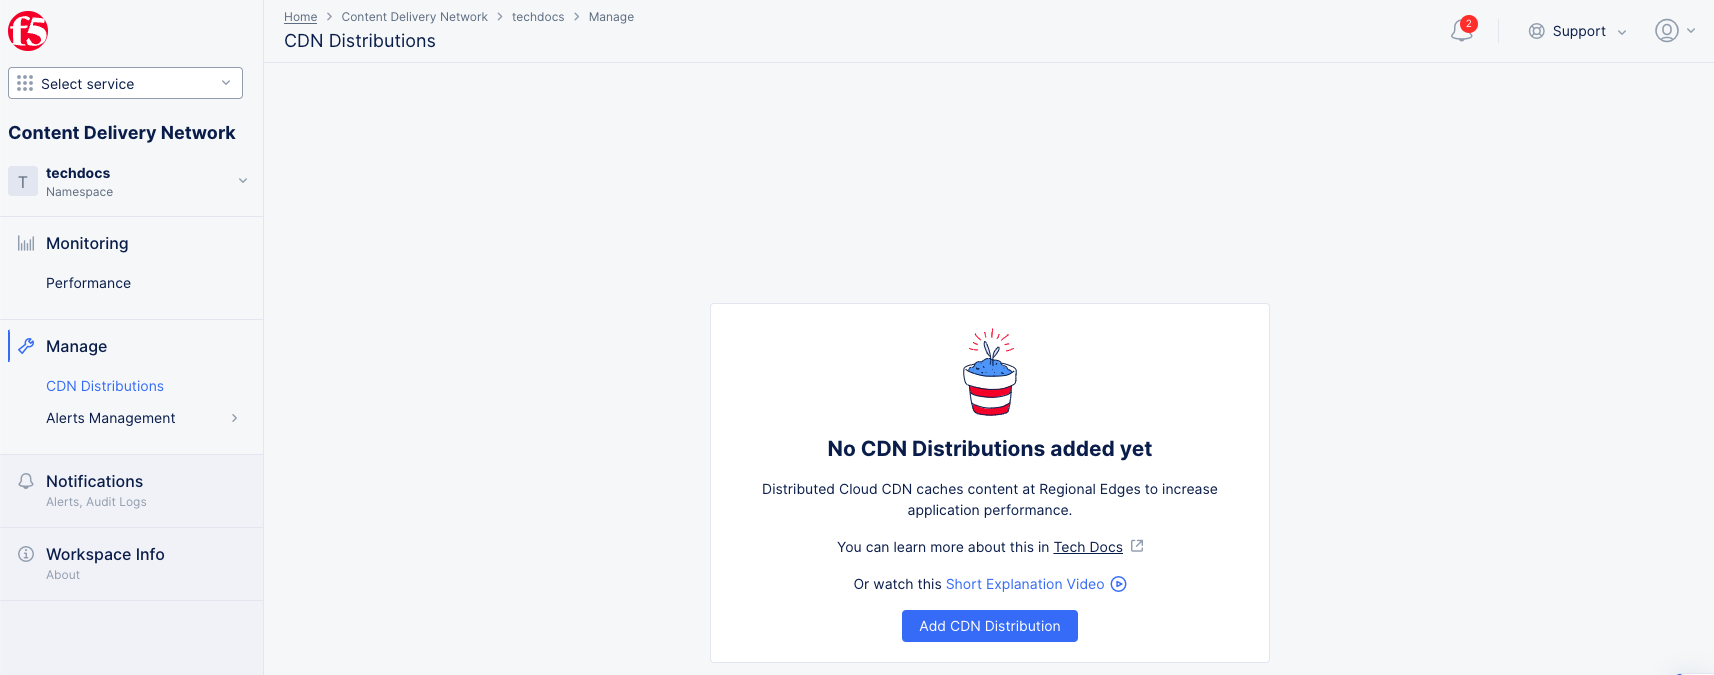
Figure: CDN Distributions Page
- Click
Add CDN Distribution.
Step 2: Configure metadata, domains, and distribution type.
-
In the
Namefield, enter a name for the distribution. -
Optionally, select a label and enter a description.
-
Go to
Basic Configurationand enter a domain name in theDomainsfield. Ensure that you enter a Fully Qualified Domain Name (FQDN). FQDN is the complete address of an internet host, specifying its exact location within the Domain Name System (DNS). It includes the hostname, domain name, and top-level domain (TLD). For example, www.f5.com. -
Click
Add itemto add more domains, if needed. -
Select an option for the
Select Type of CDN Distribution. The following options are supported:-
Select
HTTPto create the HTTP Distribution. Click theAutomatically Manage DNS Recordscheckbox if your domain is delegated to F5 Distributed Cloud. Else, ensure in your DNS provider configuration that your domain is resolved. -
Select
HTTPS with Automatic Certificateto create the HTTPS Distribution with an automatic TLS certificate. Ensure that the domain is delegated to F5 Distributed Cloud. Optionally, clickHTTP Redirect to HTTPSandAdd HSTS Headercheckboxes to enable those functions. You can also select theTLS Security Levelto be high or medium. TheHighoption is TLS v1.2+ PFS ciphers with strong cryptographic algorithms. TheMediumoption is TLS v1.1+ PFS ciphers with medium strength cryptographic algorithms. -
Select
HTTPS with Custom Certificateto create the HTTPS Distribution with your custom TLS certificate. Optionally, clickHTTP Redirect to HTTPSandAdd HSTS Headercheckboxes to enable those functions.
-
-
If you are using the
HTTPS with Custom Certificateoption:-
Use the
TLS Configurationdrop-down menu to choose betweenTLS CertificatesorInline Certificate (legacy)options, and then clickConfigure. -
From the
TLS Security Leveldrop-down menu, select high, medium, low, or custom. -
From the
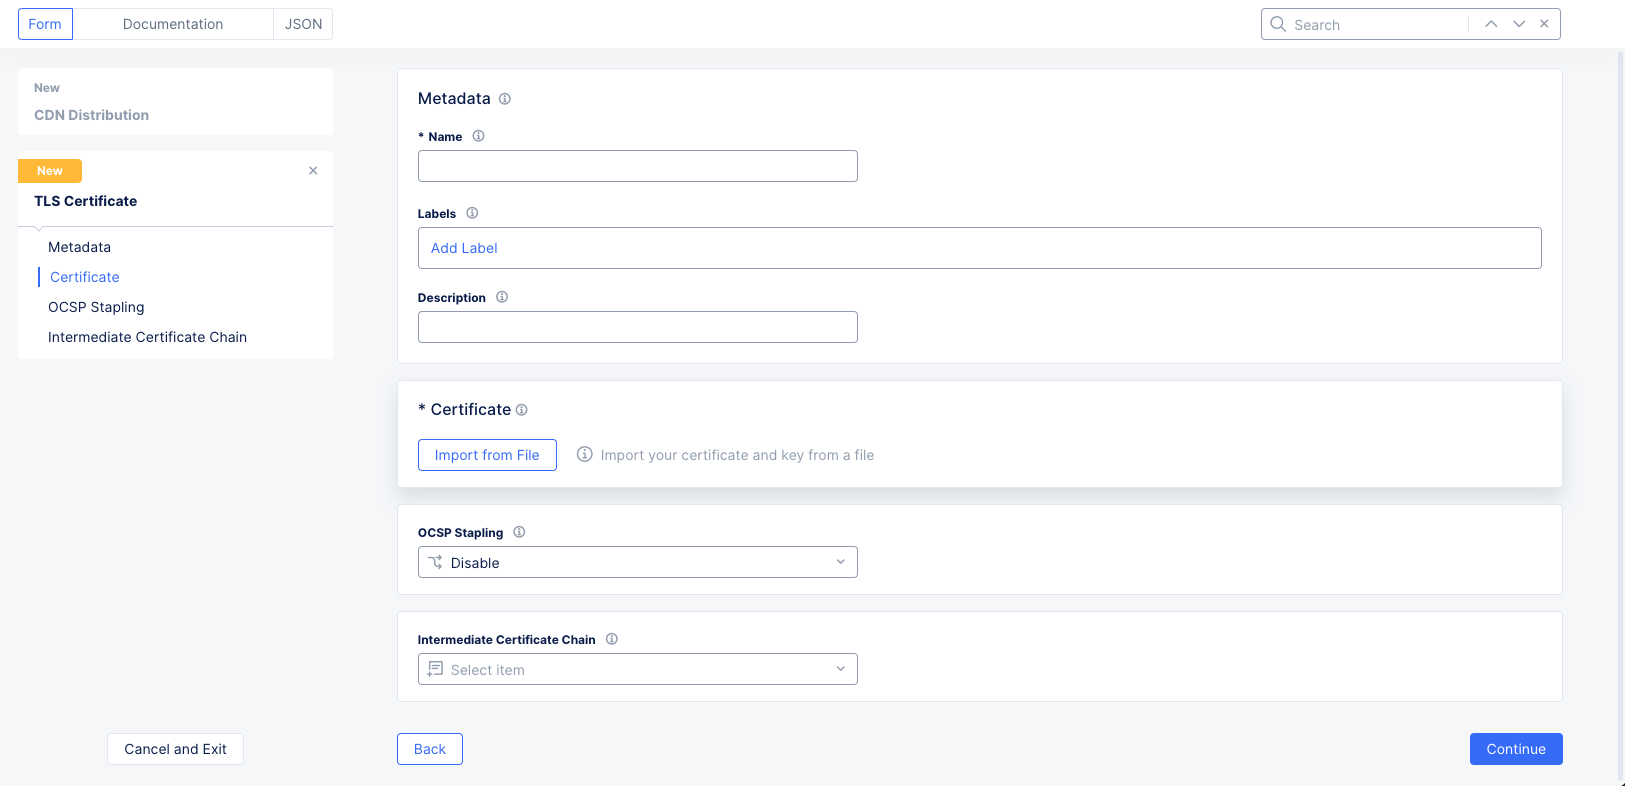
Certificatesdrop-down menu, either select an existing certificate or selectAdd Itemto see theTLS Certificateform. For a new certificate,
Figure: TLS Certificate Form
-
Enter a name and optionally labels and a description.
-
Click
Import from Fileto see the sliding import panel. ClickUpload Fileand select your file using the system file browser. Then clickImport. -
From the
OCSP Staplingchoice drop-down menu, select an OCSP stapling choice.
-
-
Note: OCSP stapling is not supported when the shared certificate is used in a CDN distribution.
-
If you have an intermediate chain, select
Add Itemfrom theIntermediate Certificate Chaindrop-down menu. Then upload the intermediate chain the same way you uploaded the certificate. -
Click
Continue. -
Click
Applyto save your TLS parameters.
This example configures a CDN Distribution of type HTTPS with Automatic Certificates.
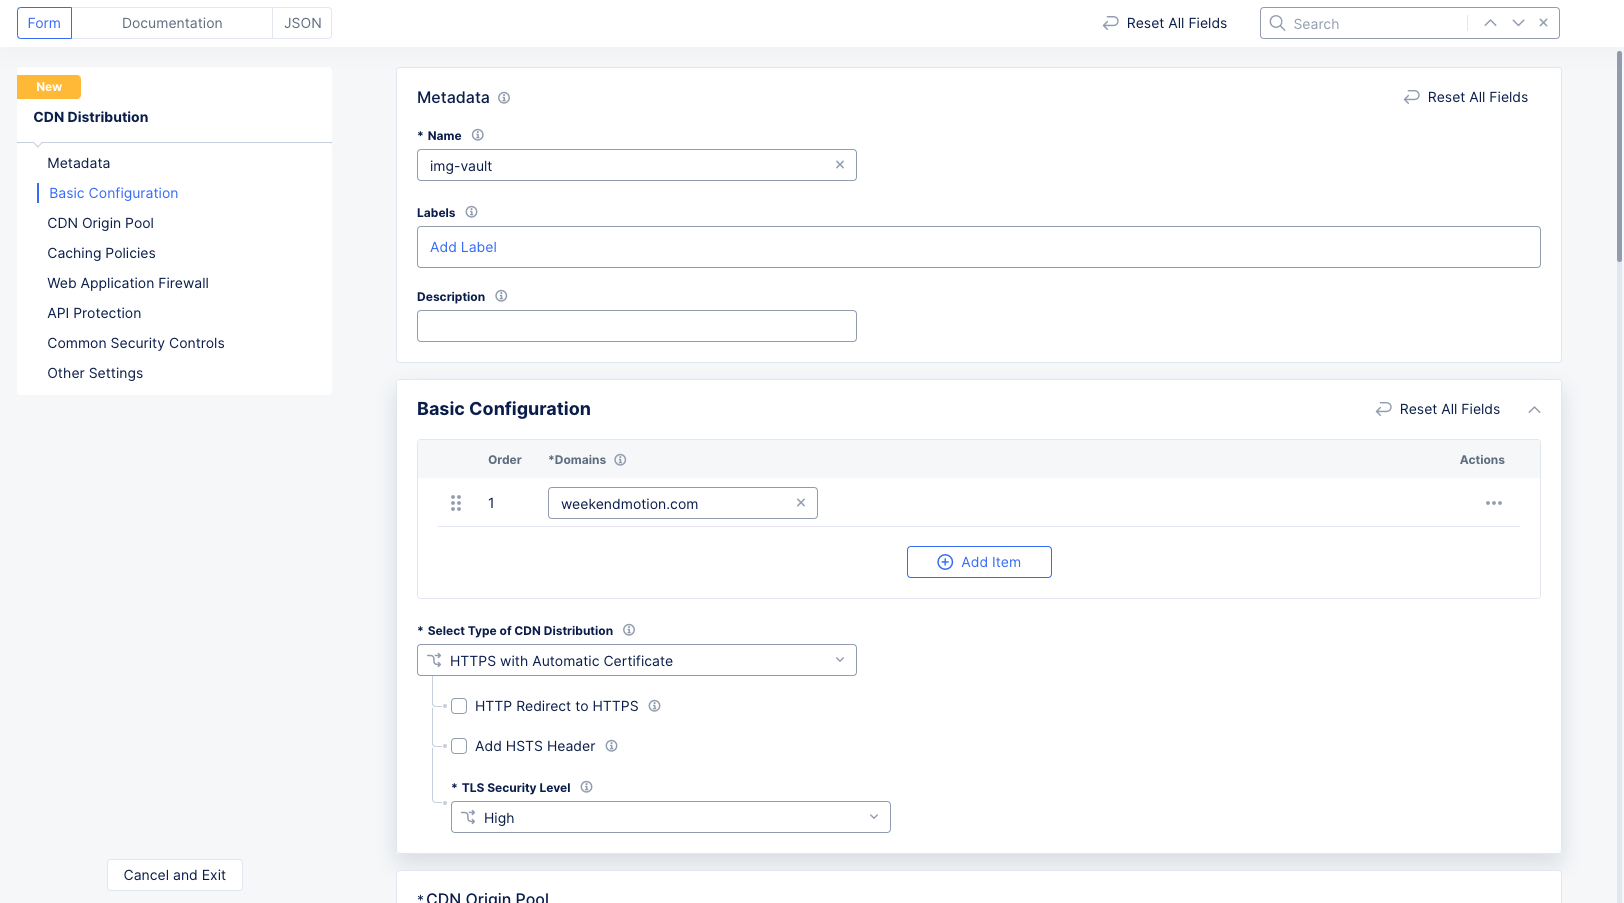
Figure: Distribution of Type HTTPS with Automatic Certificate
Step 3: Configure CDN origin pool.
-
Click
Configurein theCDN Origin Poolssection. The CDN origin pool configuration page opens. -
Enter the CDN origin domain name in the
DNS Namefield. The requests to origin servers use this name in the host header. -
Select a TLS choice in the
Enable TLS for Origin Serversfield. Ensure that this matches your origin server configuration. -
Click
Add Itemin theList of Origin Serverssection. In the origin servers page, enter public DNS name or public IP of your origin server. ClickApply. -
Enter a time value in the
Origin Request Timeout Durationfield. The default is 60s (sixty seconds). -
Click
Applyin the CDN origin pool configuration page.
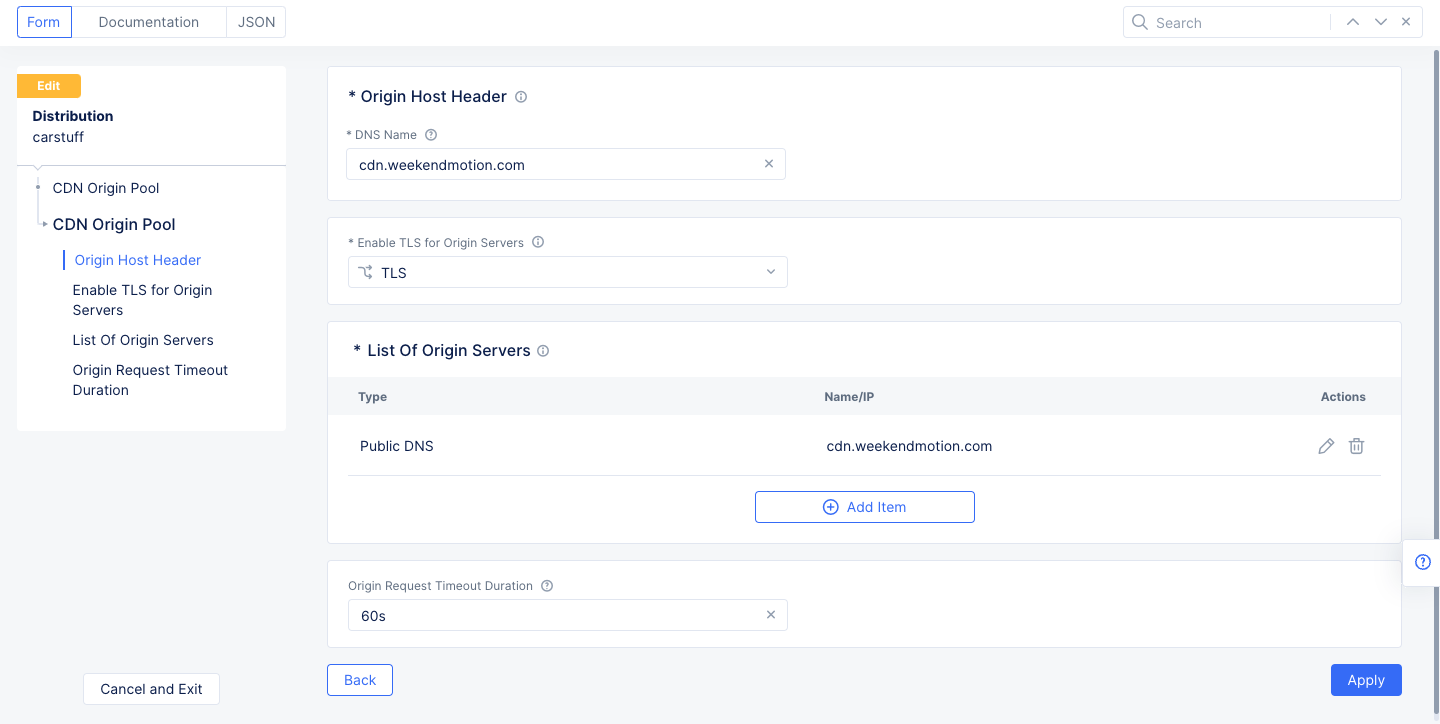
Figure: Origin Pool Configuration
Step 4: Optionally configure caching policies.
-
In the
Caching Policiessection, select an option for theCache Actionsfield using following guidelines:- Select
Default Cache TTLif the origin server does not provide a TTL value. Set the value in theDefault Cache TTLfield. - Select
Override Cache TTLif the origin server provides a TTL in the response, and you want to override it. Set the value in theOverride Cache TTLfield. - Select
Disable Cacheto disallow caching content from the origin.
- Select
-
Optionally create rules in the
Cache Rulessection to determine the content that is or is not cached:-
Click
Add Itemto create a new rule. -
Enter name in the
Rule Namefield. -
Click
Add Itemin theExpressionssection. If you create more than one expression, the rule will execute if any of the expressions match.-
Enter a name in the
Expression Namefield and clickAdd Itemin theTermsSection- Configure the match condition by using the
Path Match,Query Parameters,Cache Headers, and/orCookie Matchers. - Click
Applyto save the match condition.
- Configure the match condition by using the
-
Click
Applyto save the expression name.
-
-
Select an option in the
Cache Actionssection. The option you select will determine what happens to your cache if one of your expressions matches.-
Bypass Cachewill not cache the resource/content if the rule matches. -
Eligible for Cachewill cache the resource/content based on the following fields:- In the
Eligible for Cachefield, clickScheme + Proxy Host + URIorScheme + Proxy Host + Request URI. - In the
Cache TTLfield, enter the time the cached resource/content will be valid (Time To Live). - Check the
Ignore-Response-Cookiecheckbox if you want to cache the response even if theset-cookieheader is present (Overrideset-cookie). - Check the
Cache Overridecheckbox if you want to honor a cache override.
- In the
-
-
-
Click
Apply.
Step 5: Configure a web application firewall (WAF).
You can choose to disable WAF application (default setting) or you can select a WAF that was previously created, configured, and apply it in your load balancer security settings. In addition, you can also create and enable a new WAF and have your load balancer configured to exclude specific WAF rules from processing certain requests.
-
Go to the
Web Application Firewallsection. -
From the
Web Application Firewall (WAF)drop-down menu, select whether to enable the WAF for this CDN distribution.Disableis the default value. -
If you click
Enable for All Requests, use theEnable for All Requestsdrop-down menu to select your WAF to apply to this load balancer, or selectAdd Itemto create a new WAF.
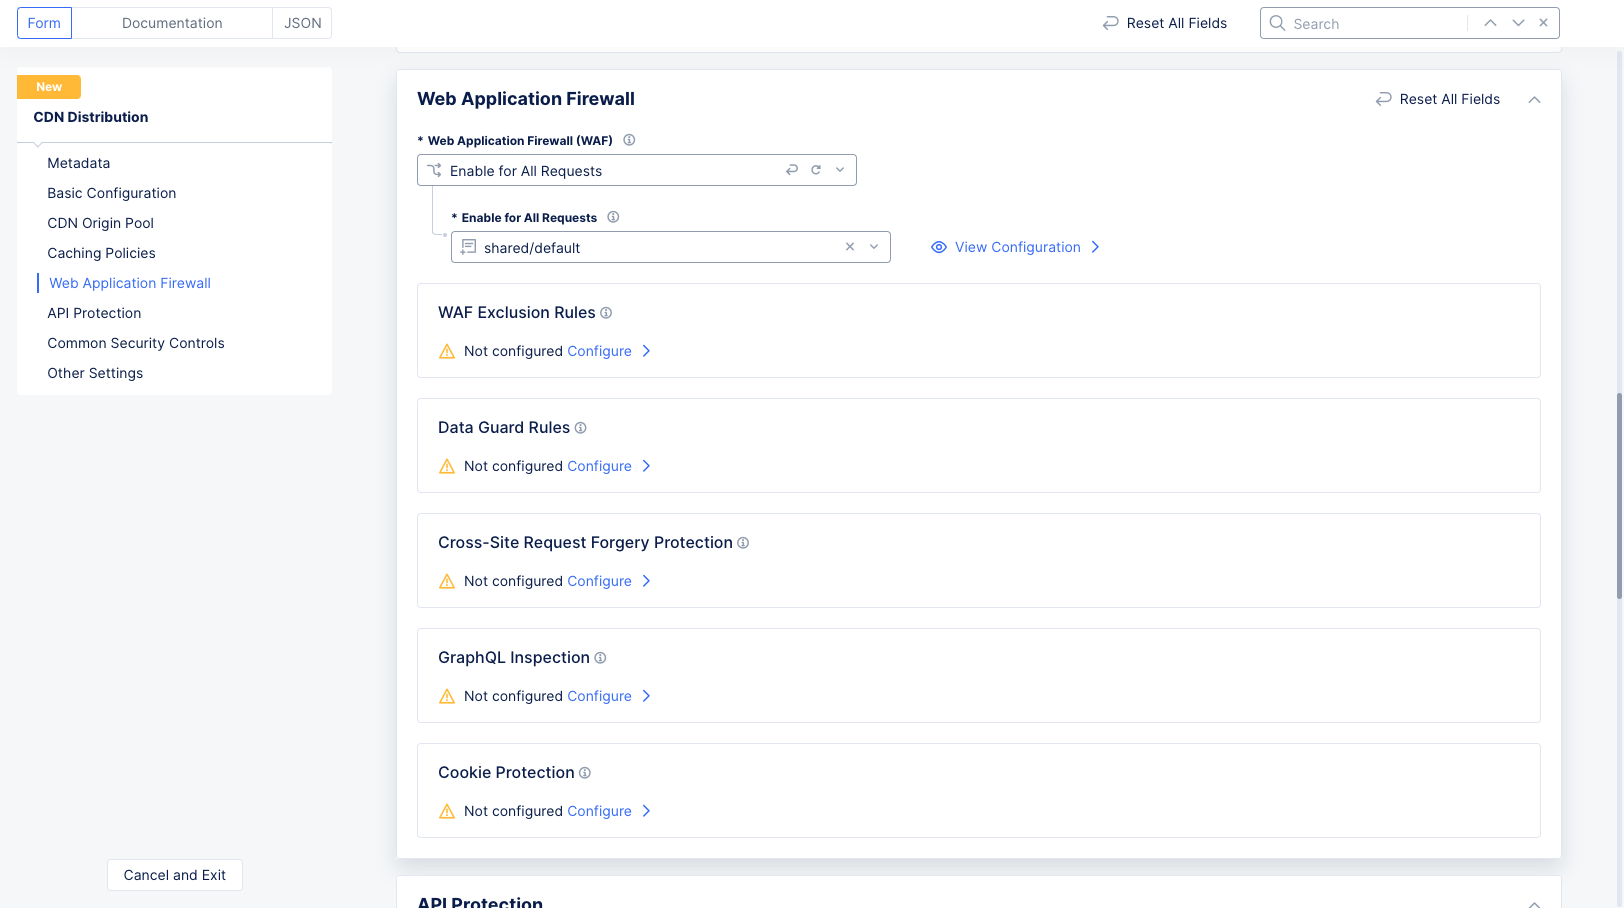
Figure: Add App Firewall
-
To add exclusion rules for the WAF, follow the instructions at Create WAF Exclusion Rules.
-
Click
Configurein theData Guard Rulessection and follow the instructions listed in Configure Data Guard to set data guard rules. -
Click
Configurefor theCross-Site Request Forgery Protectionoption. Specify allowed domains in theAllowed Domains (Source Origin)field in the CSRF protection page, and clickApply. You can either configure to allow all load balancer domains or set specific domains to the allow list.
Note: You can verify the CSRF mitigation in the load balancer security monitoring page. The CSRF mitigation event is displayed as a
Service Policyevent. Expand the security event's JSON view. Thesec_event_namefield with valueCSRF Policy Violationindicates that CSRF mitigation is active. For more information on load balancer monitoring, see Monitor HTTP Load Balancer.
-
To configure the settings for GraphQL inspection, perform the following:
-
Under the
GraphQL Inspectionsection, clickConfigure. -
Click
Add Item. -
In the
Namefield, enter a name for this rule. -
From the
Domaindrop-down menu, select an option that corresponds to your domain setting. Default value isAny Domain. You can choose an option match byExact ValueorSuffix Value. -
From the
Pathdrop-down menu, select an option for the location of your GraphQL server endpoint. Default value is/graphql. -
From the
HTTP Methoddrop-down menu, select an option that specifies the method used to access the GraphQL endpoint server. -
In the
GraphQL Settingssection, perform the following:-
From the
Maximum Total Lengthmenu, enter a value to specify the maximum total length in bytes for a query. -
From the
Maximum Structure Depthmenu, enter a value to specify the maximum depth for a query. -
From the
Maximum Batched Queriesmenu, enter a value to specify the maximum number of single batch queries. -
From the
Introspection Queriesmenu, select whether to enable introspection of GraphQL schema.
-
-
Click
Applyto save settings. -
Click
Applyto apply settings to load balancer configuration.
-
-
Optionally, in the
Cookie Protectionfield, clickConfigureto add attributes to an HTTP Response cookie that is sent to the client:-
Click
Add Item. -
In the
Cookie Namefield, enter a name for this cookie.
-
Note: Wildcards and regular expressions (regex) are not supported. You must use the exact cookie name.
-
From the
SameSitemenu, select if or how the new cookie is sent with same-site and cross-site requests. You can select from the following:IgnoreStrictLaxNone
-
From the
Securemenu, select whether this new cookie is sent only over an HTTPS encrypted connection to the server. Default option isIgnore. -
From the
HttpOnlymenu, select whether this new cookie is inaccessible to JavaScript Document.cookie API. Default option isIgnore. ClickAddto ensure the cookie is inaccessible. -
Click
Enablefor theCookie Tampering Protectionfield to enable cookie tampering protection. This prevents attackers from modifying the values of session cookies. -
Click
Applyto save settings. -
Click
Applyto apply settings to load balancer configuration.
Step 6: Configure API protection.
Go to API Protection section and do the following:
-
Under
JWT Validation, clickConfigure. -
In the
Targetmenu,Base Pathsis selected. Enter one or morePrefix Valuesfor token validation. -
Target location (Bearer Token)will look for the JWT token in the Authorization HTTP header with Bearer authentication scheme. -
Action (Block)will block the request is the JWT is not valid. -
Under
JSON Web Key Set (JWKS), clickConfigure. -
In the text box, copy and paste the JSON Web Key Set (JWKS) used for authorization with the server. JWKS should be in JSON format.
-
Click
Applyto save the JWKS. -
Click
Applyto complete JWT validation rules.
Step 7: Configure DoS Protection.
-
From the
L7 DDoS Auto Mitigationmenu, select an option:-
Default: This option blocks traffic from suspicious sources. No JavaScript challenge is returned. -
Block: This option blocks traffic from suspicious sources. No JavaScript challenge is returned. -
JavaScript Challenge: This option serves a JavaScript challenge to all traffic from suspicious sources. ClickView Configurationto change the default settings and message for the JavaScript challenge.
-
-
Under
DDoS Mitigation Rules, selectConfigureto open the rules list page. UseAdd Itemto add a rule:-
In the
DDoS Mitigation Rulepage, set a name for the rule. -
Select a choice for the
Mitigation Choicemenu. The mitigation choice can be either a list of IP addresses or combination of ASN, Region, and TLS Fingerprinting. -
Click
Applyto add the rule to the list of rules. -
Click
Applyto add the rules list to the DDoS protection configuration.
-
-
From the
Slow DDoS Mitigationmenu, select an option:- For the
Customoption, enterRequest Headers TimeoutandTotal Request Timeoutvalues.
- For the
Note: See the
Explore Security Monitoringsection in the Monitor HTTP Load balancer guide to learn more about observing and reacting to an active DDoS attack.
Step 8: Configure common security controls.
The Common Security Controls section allows you to configure a number of common security measures to protect your CDN distribution.
Step 8.1: Service Policies.
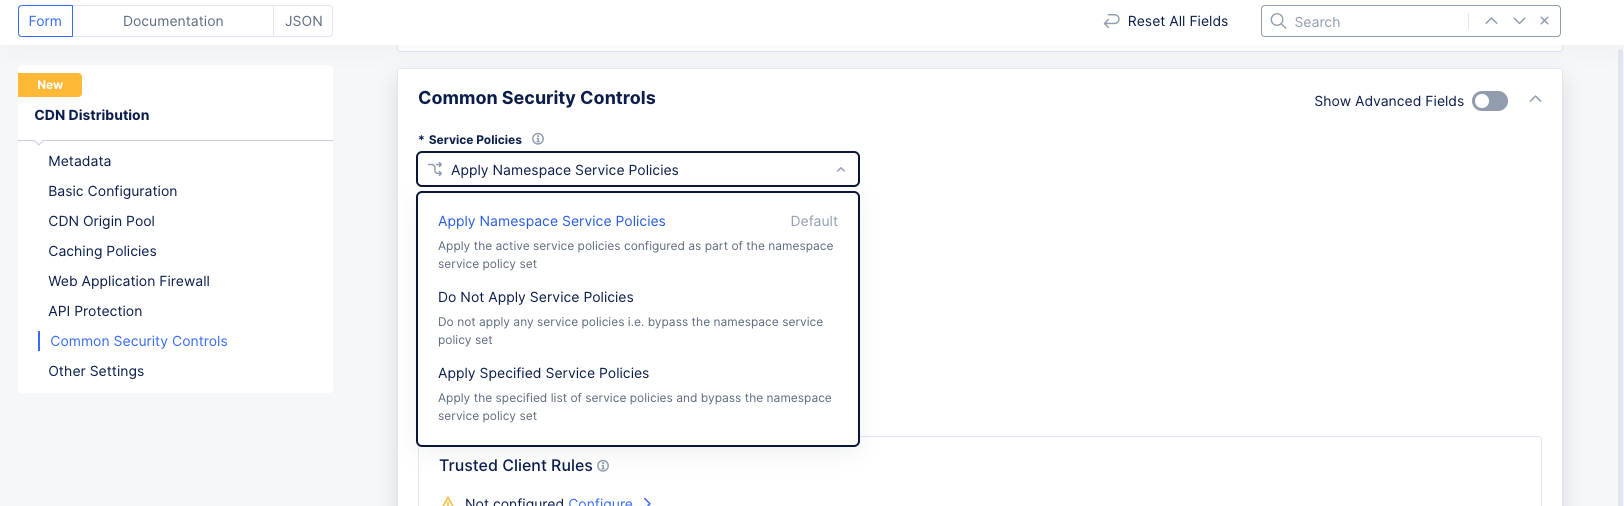
Figure: Service Policy Configuration
-
From the
Service Policiesmenu, select an option to apply the service policy. The following options are available:-
Apply Namespace Service Policies: This option applies the service policy to an entire namespace. -
Do Not Apply Service Policies: This option does not apply any service policy. -
Apply Specified Service Policies: This option applies a service policy to a specified load balancer, not the entire namespace.
-
-
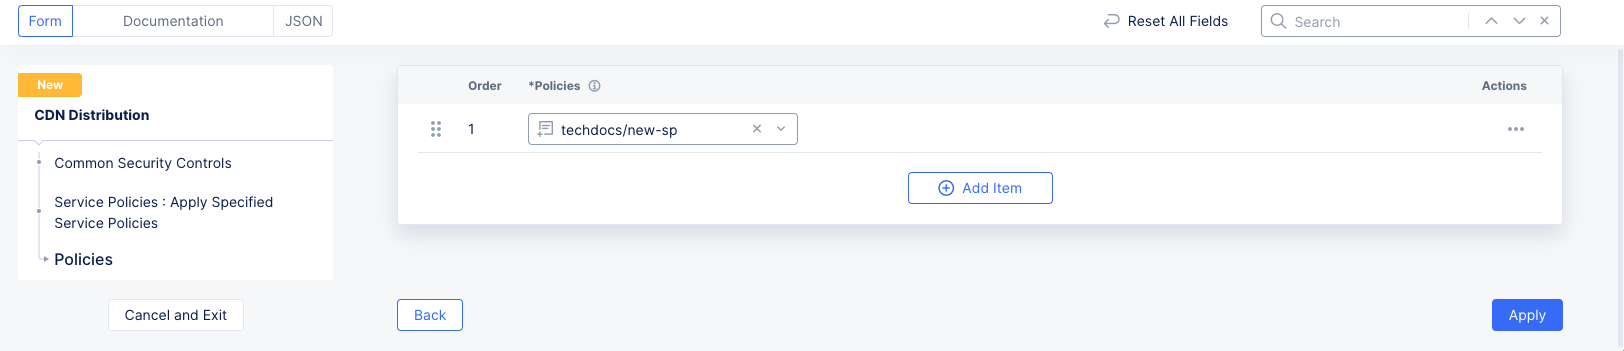
To apply a specific service policy, select
Apply Specified Service Policies, and perform the following:- Click
Configure.

Figure: Apply Specific Service Policy
- From the
Policiesmenu, select a service policy, and then clickApply.

Figure: Select Specific Service Policy
- Click

Step 8.2: IP Reputation.
The IP reputation service analyzes IP threats and publishes a dynamic data set of millions of high-risk IP addresses, to protect users from inbound traffic from malicious IPs. IP threat categories include Spam Sources, Windows Exploits, Web Attacks, BotNets, Scanners, Denial of Service, Reputation, Phishing, Proxy, Mobile Threats, and TOR Proxy.
For more information, see Deny Malicious IPs Using IP Threat Categories.
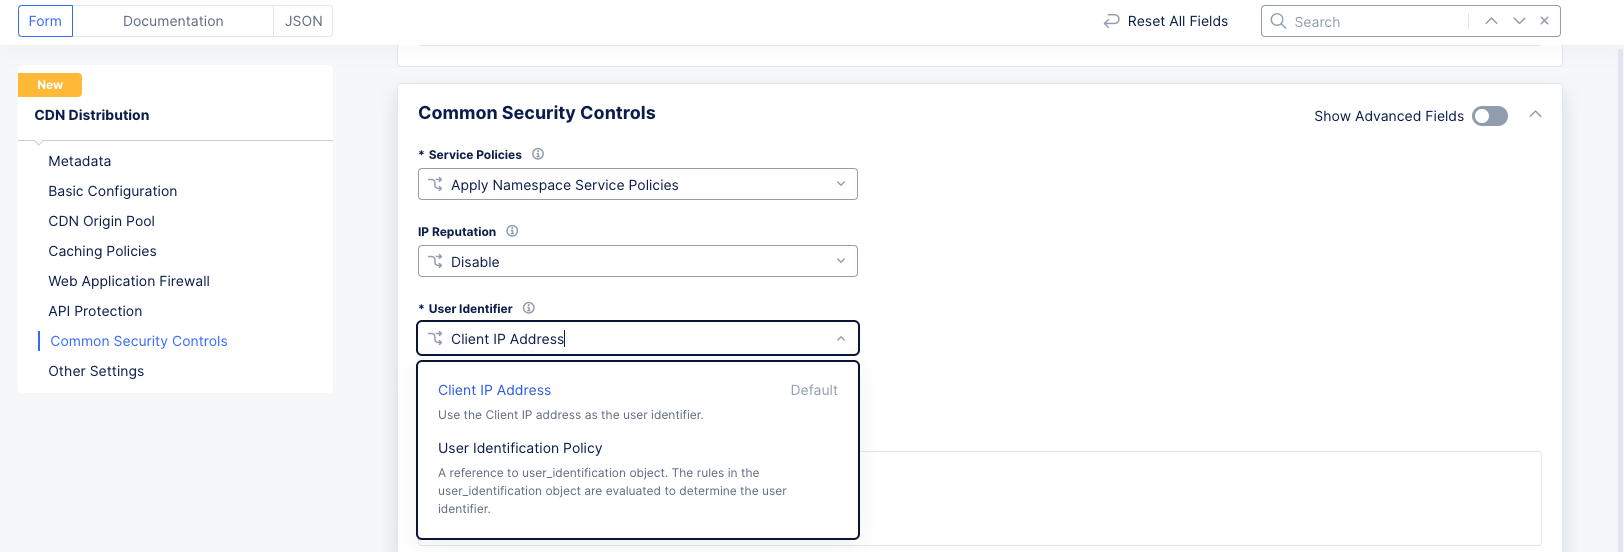
Step 8.3: User Identifier.
Select a user identifier for rate limiting and malicious user mitigation.
-
From the
User Identifierdrop-down menu, select the method for user identification:-
Select
Client IP Addressto use the user's IP address. -
Select
User Identification Policyto use an existing policy to evaluate the identity. Alternatively, selectAdd itemto create a new policy.

Figure: User ID Policy
-
Note: For more information, see Configure Rate Limiting per User.
Step 8.4: Configure Malicious User Detection.
Malicious User Detection performs user behavior analysis and assigns a risk score and threat level of low, medium or high based on the suspicious activity of the user. The risk score of the user is decayed over time, if no further suspicious activity is noticed. The feature can be configured also via external app_type and labeling this HTTP Load Balancer. In this case, the external app_type configuration overrides the internally disabled feature. Enabling the feature internally is allowed only when there is no labeling to an external app_type.
From the Malicious User Detection drop-down menu, select Enable.
Step 8.5: Configure Malicious User Mitigation And Challenges.
-
In the
Common Security Controlssection, enable theShow Advanced Fieldsoption. -
From the
Malicious User Mitigation And Challengesdrop-down menu, selectEnable. This option enables you to configure a challenge for users detected as malicious.
Note: For the
JavaScript Challenge,Captcha Challenge, andPolicy Based Challengeoptions, you can enable a challenge for all users and/or requests matching specific conditions. For any of these options, clickView Configurationto create that challenge for users/requests that meet specific criteria.
-
From the
Malicious User Mitigation Settingsmenu, select an option for malicious users at different threat levels:-
Default: Applies low, medium, and high levels. -
Custom: Defines different levels and actions to take. Select an option from theCustommenu. Or clickAdd Itemto create a custom option.
-
-
From the
JavaScript Challenge Parametersmenu, select the type of JavaScript challenge to enable:-
JavaScript Challenge Parameters: This option enables you to configure a custom JavaScript challenge for this load balancer. ClickConfigure. Set the delay value, cookie expiration value, and custom message to use. After you finish, clickApply. For more information, see Configure JavaScript Challenge. -
Use Default Parameters: This option sets the default challenge with no customization.
-
-
From the
Captcha Challenge Parametersmenu, select the type of captcha challenge to enable:-
Use Default Parameters: This option takes the default settings and applies them. -
Captcha Challenge Parameters: This option enables you to define the challenge parameters. ClickConfigure. Set the cookie expiration value and the custom message to use. After you finish, clickApply.
-
Step 8.6: Rate Limiting.
Rate Limiting allows you to control the rate of requests sent to your origin servers and protect against API traffic surge and denial of services attacks.
-
To configure Rate Limiting, select an option from the list:
-
Disable: Default option. No rate limiting enabled for this load balancer. -
API Rate Limit: Set rate limiting for specific API endpoints. -
Custom Rate Limiting Parameters: Allows you to set custom parameters to rate limit.
-
Note: For detailed instruction to set up rate limiting, see Configure API Rate Limiting.
Step 8.7: Trusted Client Rules.
These rules define specific clients for which WAF processing and Bot Defense will be skipped. Add rules to allow trusted clients based on the match conditions configured. You can skip WAF, skip bot processing, or both. The match conditions include IP prefix, AS number, and HTTP headers to identify specific clients.
-
To configure the
Trusted Client Rulesoption:-
Click
Configure, and then clickAdd Item. -
Complete the configuration process to add rules to allow trusted clients and to prevent the WAF from applying the block rules you previously configured.
-
Click
Apply. -
Select the newly created rules option and then click
Apply.
-
Step 8.8: Client Blocking Rules.
You can choose match condition rules, such as IP prefix, AS number, and HTTP headers to identify specific clients to block from accessing your applications.
-
To configure the
Client Blocking Rulesoption:-
Click
Configure, and then clickAdd Item. -
Complete the configuration process to add rules to block specific clients from making requests.
-
Click
Apply. -
Select the newly created rules option, and then click
Apply.
-
Step 9: Configure CORS Policy.
The Cross-Origin Resource Sharing (CORS) policy is an HTTP-header based mechanism that allows a server to indicate any origins (domain, scheme, or port) other than its own from which a browser should permit loading resources.
-
In the
CORS Policyfield, clickConfigure. -
To enable a specific origin server, click
Add itemunder theAllow Originfield. -
To enable origin servers by regex, click
Add itemunder theAllow Origin Regexfield. -
In the
Allow Methodsfield, enter information to be used for theaccess-control-allow-methodsheader. -
In the
Allow Headersfield, enter information to be used for theaccess-control-allow-headersheader. -
In the
Expose Headersfield, enter information to be used for theaccess-control-expose-headersheader.
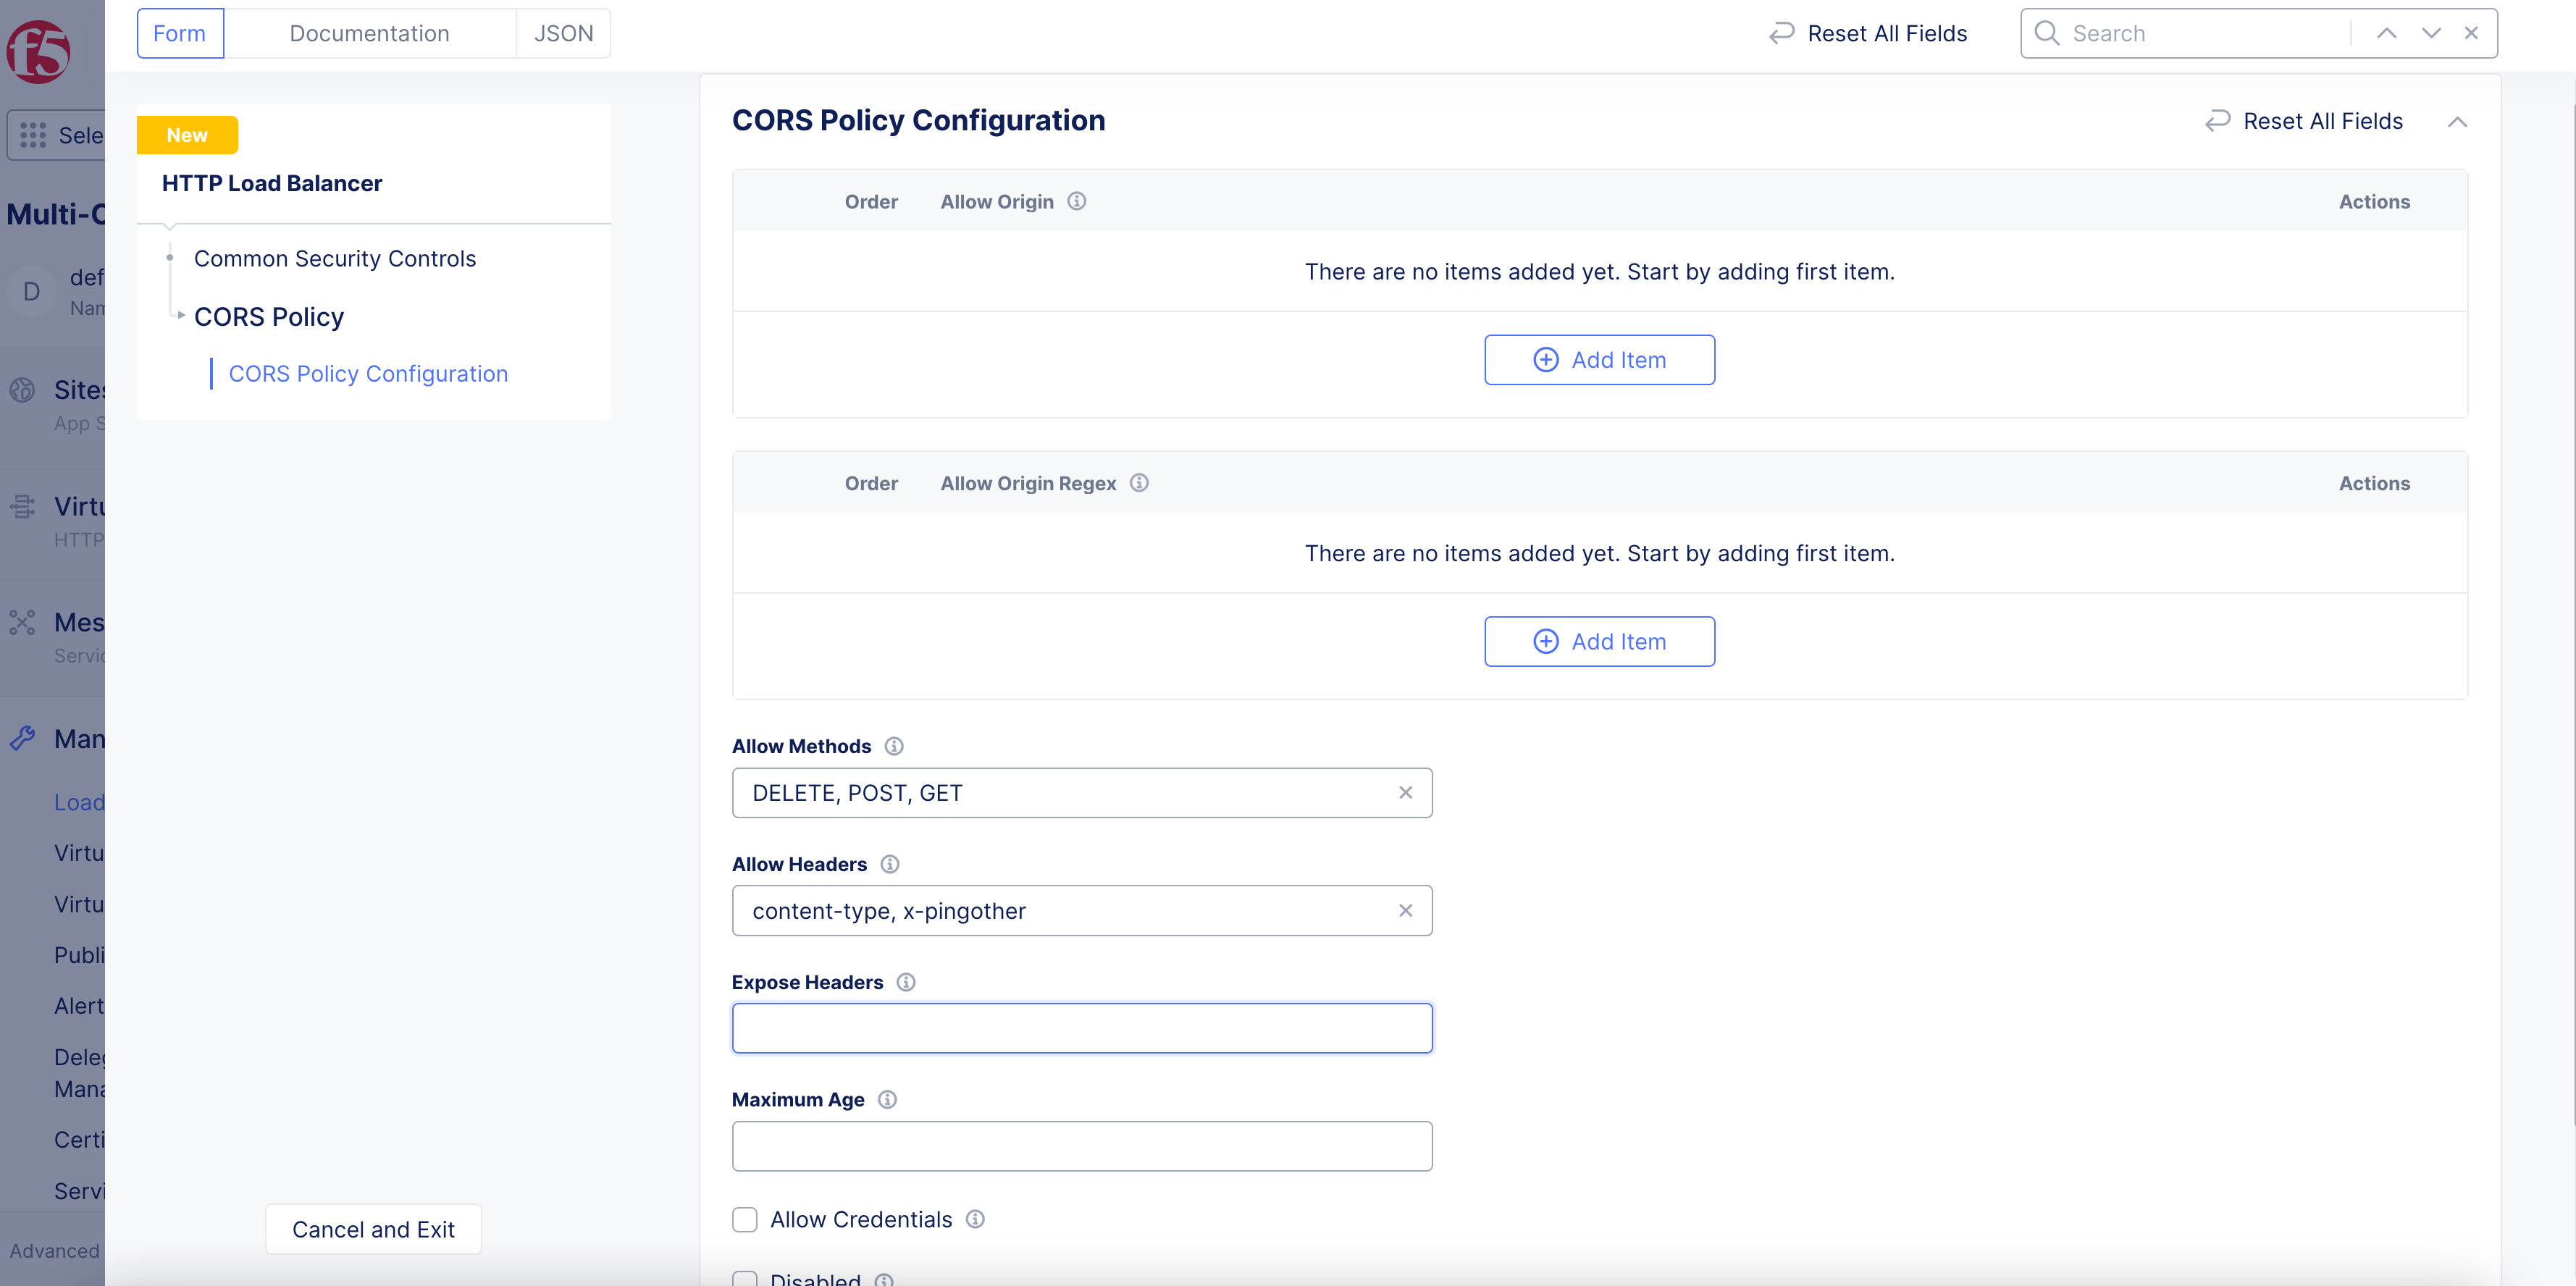
Figure: CORS Policy
-
In the
Maximum Agefield, enter information in seconds to cache the headers. -
After you finish, click
Apply.
Step 10: Optionally, configure other settings to control your content delivery operation.
- Click the
Add Locationcheckbox to append the location header in the response. Value for this header is the Regional Edge Site name that serves your request.
Step 10.1: Configure logging options.
Click Configure in the Logging Options field and do the following:
Client Request Headers to Log.
-
Click
ConfigureinClient Request Headers to Log. -
Click
Add Itemand add headers for logging. -
Click
Apply.
Origin Response Headers to Log
-
Click
ConfigureinOrigin Response Headers to Log. -
Click
Add Itemand add headers for logging. -
Click
Apply.
Click Apply to apply logging option settings.
Step 10.2: Configure header control.
Click Configure in the Header Control field and do the following:
Add Origin Request Headers
-
Click
ConfigureinAdd Origin Request Headers. ClickAdd Itemin the next screen, and enter a name for the header to be added. -
Click
ValueorSecretfor the header value. If it is value, enter a string value for the header. In case of secret, clickConfigurein theSecret Valuefield, enter the secret using theTexttype, clickBlindfold, wait for the encryption to complete, and clickApply. -
Click
Applyin theHeaders to Addpage. -
Click
Applyin theAdd Origin Request Headerspage.
Note: Use the
Add Itemoption to add more headers.
Remove Origin Request Headers
-
Click
ConfigureinRemove Origin Request Headers. -
Click
Add Itemand enter a name for the header to be removed. -
Click
Apply.
Note: Use the
Add Itemoption to specify more headers to be removed.
Add Response Headers
-
Click
ConfigureinAdd Response Headers. ClickAdd Itemin the next screen, and enter a name for the header to be added. -
Click
ValueorSecretfor the header value. If it is value, enter a string value for the header. In case of secret, clickConfigurein theSecret Valuefield, enter the secret using theTexttype, clickBlindfold, wait for the encryption to complete, and clickApply. -
Click
Applyin theHeaders to Addpage. -
Click
Applyin theAdd Response Headerspage.
Note: Use the
Add Itemoption to add more headers.
Remove Response Headers
-
Click
ConfigureinRemove Origin Request Headers. -
Click
Add Itemand enter a name for the header to be removed. -
Click
Apply.
Note: Use the
Add Itemoption to specify more headers to be removed.
Click Apply to apply header control settings.
Step 11: Complete creating the distribution.
Click Save and Exit.
Step 12: Verify the distribution status.
It might take a few minutes for your CDN Distribution to be deployed and to be ready to cache and serve content at Regional Edges. Check your distribution in the CDN Distributions table and verify its status is listed as Active. Click > against your distribution object and expand its JSON view. Verify that the service domain is created.
Delegated Domain with Automatic Certificates:
- Wait for the
DNS InfoandCertificate statusto display theVIRTUAL_HOST_READYandCertificate Validvalues.
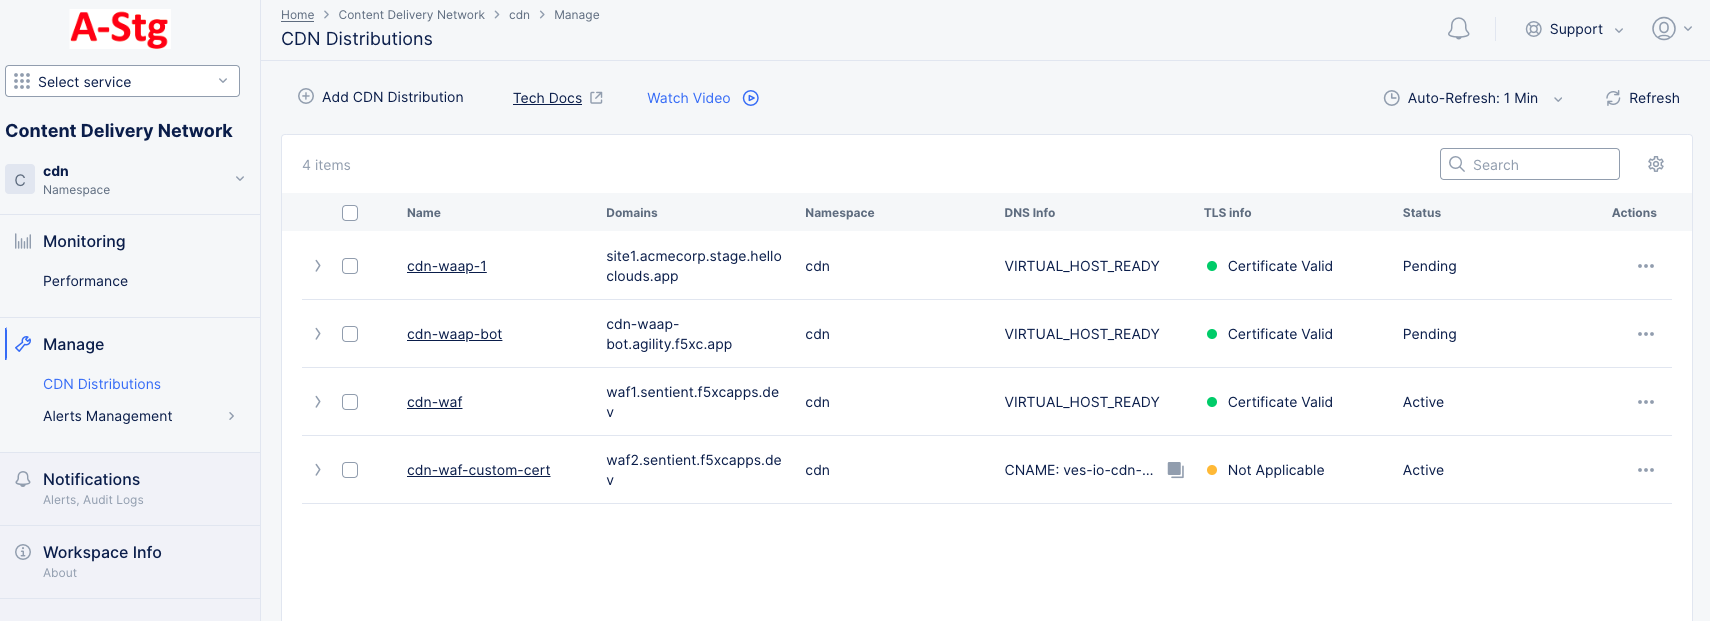
Figure: Distribution Created
- Verify that the requests to your CDN domain are processed, and the content is returned.
Delegated Domain with No Automatic Certificates:
Verify that the requests to your CDN domain are processed, and the content is returned.
Non-Delegated Domain:
Verify that the requests to your CDN domain are processed and the content is returned.
Note: In case of content updates in your origin servers, you can force the CDN servers to fetch the updated content using the purge option. Click
...>Purgefor your distribution object and the CDN service initiates purge for all the cache servers. Purging manually does not immediately delete content, but marks content as expired. When expired content is requested, the CDN service performs aHEADrequest to the origin. If the CDN finds that the content time stamp is not changed, the existing expired entry is marked as active. This prevents a re-fetch from the origin and saves time and bandwidth in re-downloading the content.
Purge Content in Cache
You can purge stale content from your cache either to remove them or to refresh them with new content. Perform the following steps to purge Content:
Purge Content From Cache
-
In the
Content Delivery Networkservice, clickManage>CDN Distributions. The CDN distribution configuration page opens. -
Click
...for the distribution for which you want to purge content, and then clickPurge.
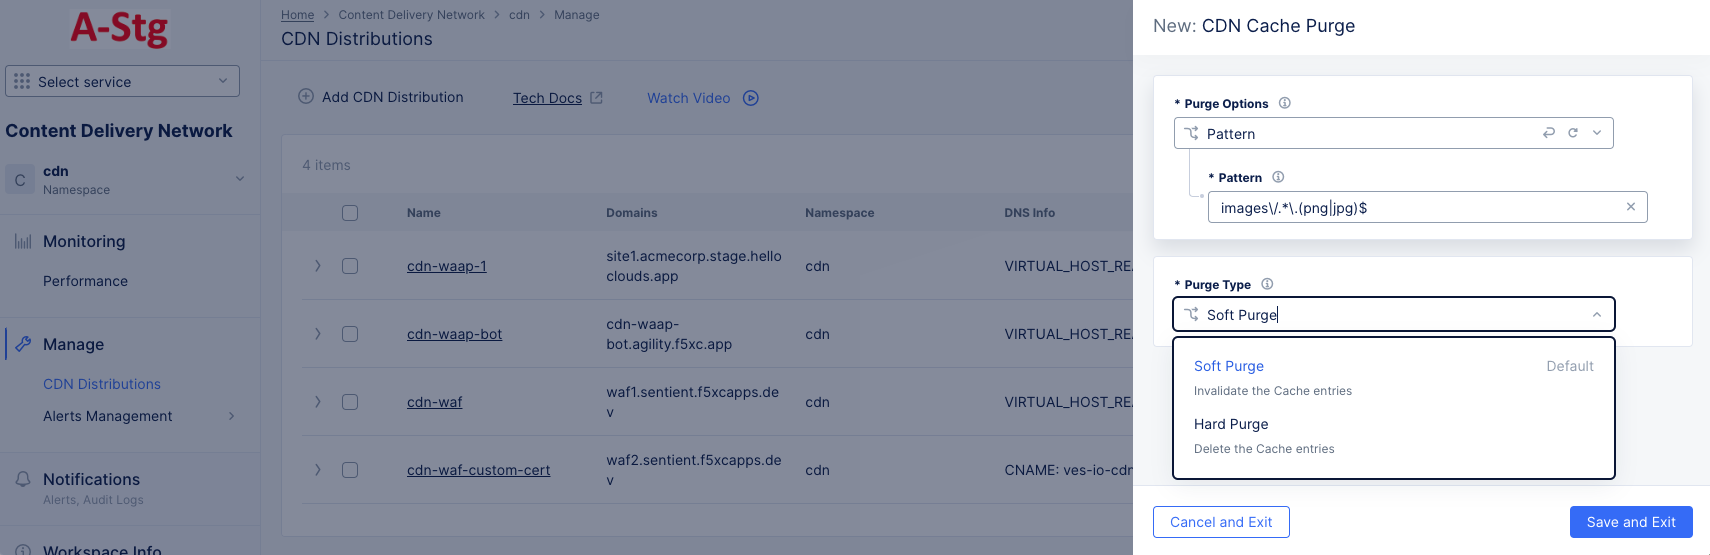
Figure: Purge Content From Distribution
-
Select what to purge from the
Purge Optionsdrop-down list.All: Your entire cache will be purged.URL: Purge that portion of your cache identified by the entered URL.Hostname: Purge all content for the entered hostname.Pattern: Purge all content that matches the entered pattern. The string should be entered in Regex form. For example, "images/.*.(png|jpg)" will match PNG and JPEG files in the images directory.
-
Select an option from the
Purge Typedrop-down menu to specify how the purge is to operate.Soft Purgeinvalidates the cache entries, which means the content will be replaced on the next request if the content is stale.Hard Purgeremoves the content from the distribution and forcing the next request to retrieve the content from the origin server.
-
Click
Save and Exitto deploy the purge.
Note: You can also deploy a purge from the
Cache Purgestab of thePerformanceMonitoringpage. See Cache Purges Tab below.
Monitor a CDN Distribution
You can view your distribution performance dashboards either via the Manage > Distributions page or Monitoring > Performance page. Click on your distribution name from the list of displayed distributions to open the monitoring view.
Dashboard Tab
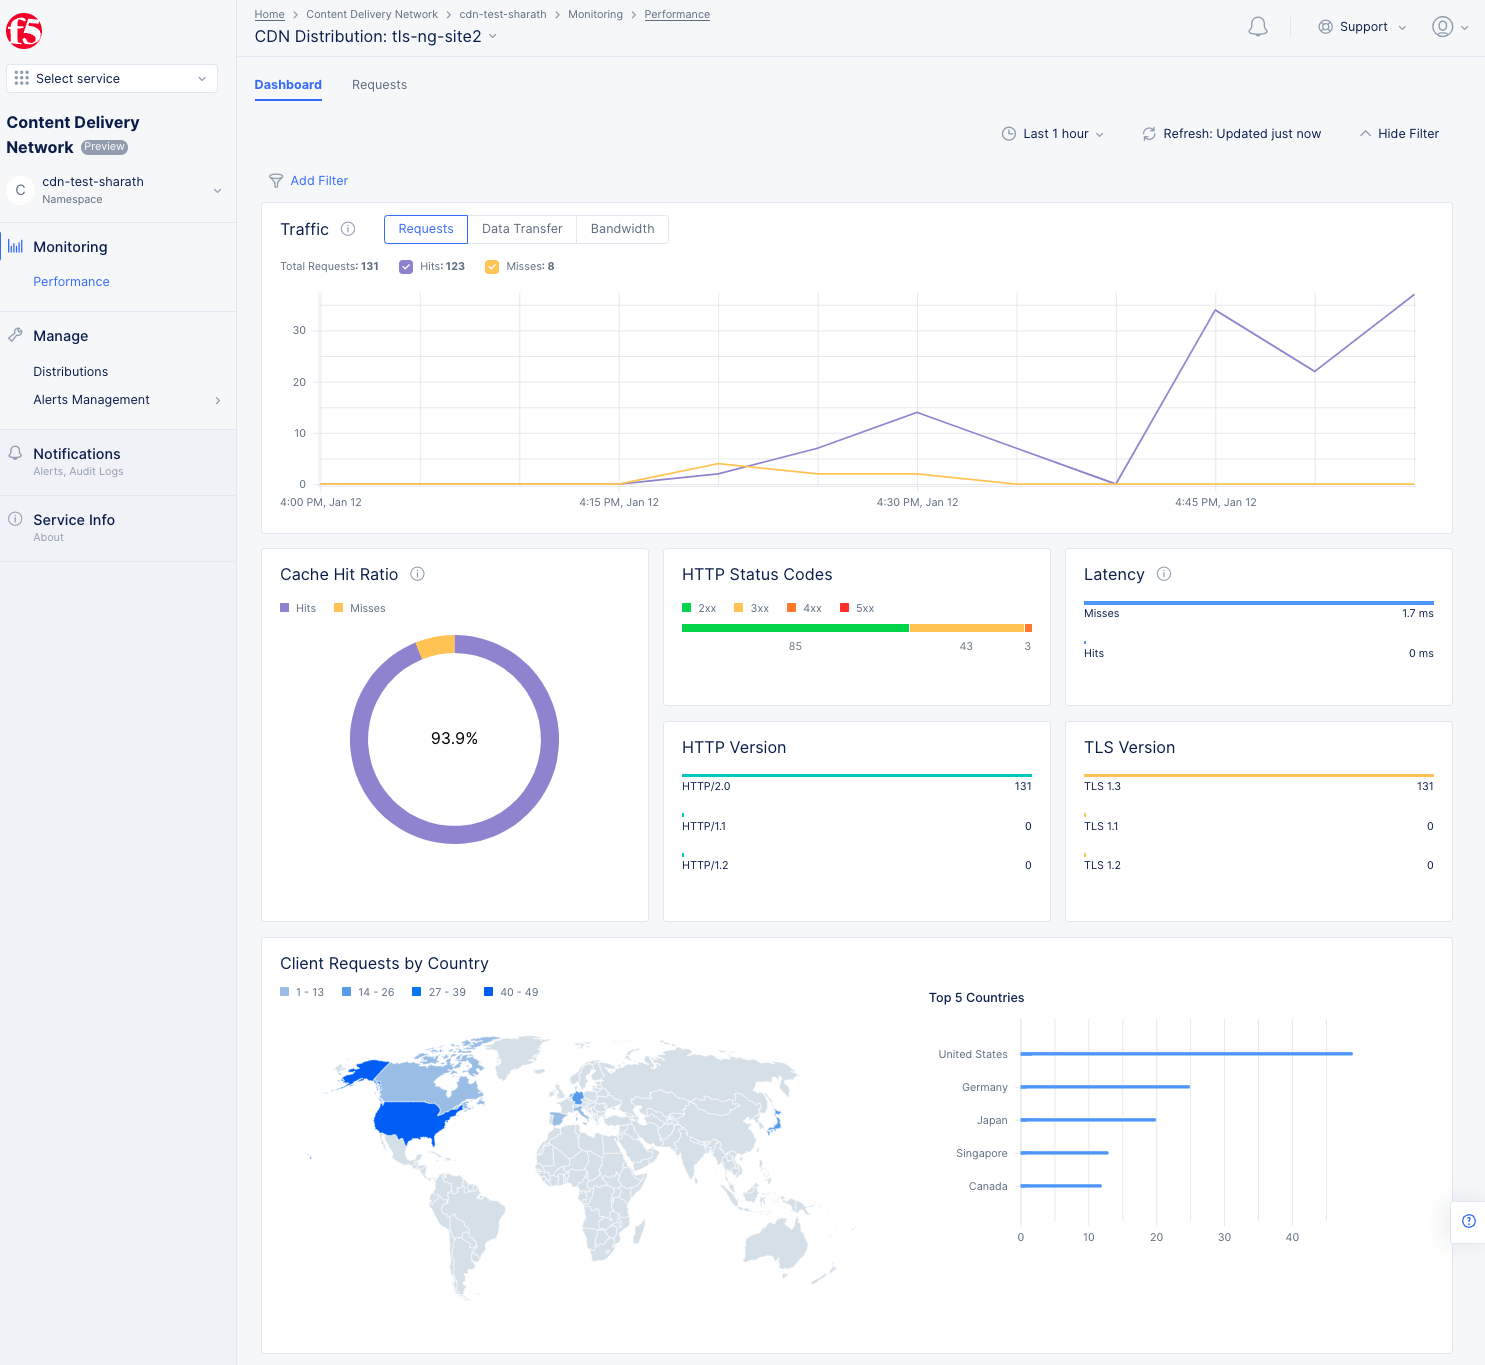
Figure: Distribution Monitoring View
The Dashboard view offers the following:
-
Time series view for statistics such as Requests, Data Transfer, and Bandwidth. This is shown in a graph where hits and misses are displayed. Hover over the graph to see specific quantity information for that time point.
-
Donut chart for cache hit versus miss ratio.
-
HTTP Status codes show the number of response codes in each of the categories. Hover over the horizontal bar to see the values expressed as percentages.
-
Latency shows the time taken between requests and responses for both hits and misses.
-
HTTP version metrics.
-
TLS version metrics.
-
Client requests by country. Hover over a country to see the number of requests originating from that country.
-
Top 5 countries providing requests, shown as a bar chart. Hover over a bar to get the specific value for that country.
Requests Tab
Figure: Distribution Requests Monitoring View
The Requests tab provides greater insight into requests. There is a bar chart as well as a list of the incoming requests. Use the time period drop-down menu and refresh button to set the time constraint and update the data shown.
Interact with the bar chart as follows:
-
The bar chart at the top shows the number of requests and response codes in each time period.
-
Use the
Add Filterto see only certain request based on your filter selection. -
Use the colored check-boxes below
Add Filterto quickly filter out specific response types. -
Hover over a bar to get specific bar values (request counts) for that time period.
-
Click and drag within the bar chart to zoom into a range of time. Use the time period drop-down menu to zoom back out.
The list view below the chart shows specific information for individual requests. The time period and filters also affect the requests shown in the list view.
Interact with the list view as follows:
-
Use the
Searchfield to only show list entries that match your search criteria. The search will work for all items in the list, not just the items on the current page; however, the search will not find information in columns that are not displayed (see the gear icon description below). -
Click the gear icon ( ⚙ ) to select which columns are shown in the list view.
TimeandClient IPwill always be shown. -
Click the arrow ( > ) at the beginning of the row to see the specific request in JSON or YAML format.
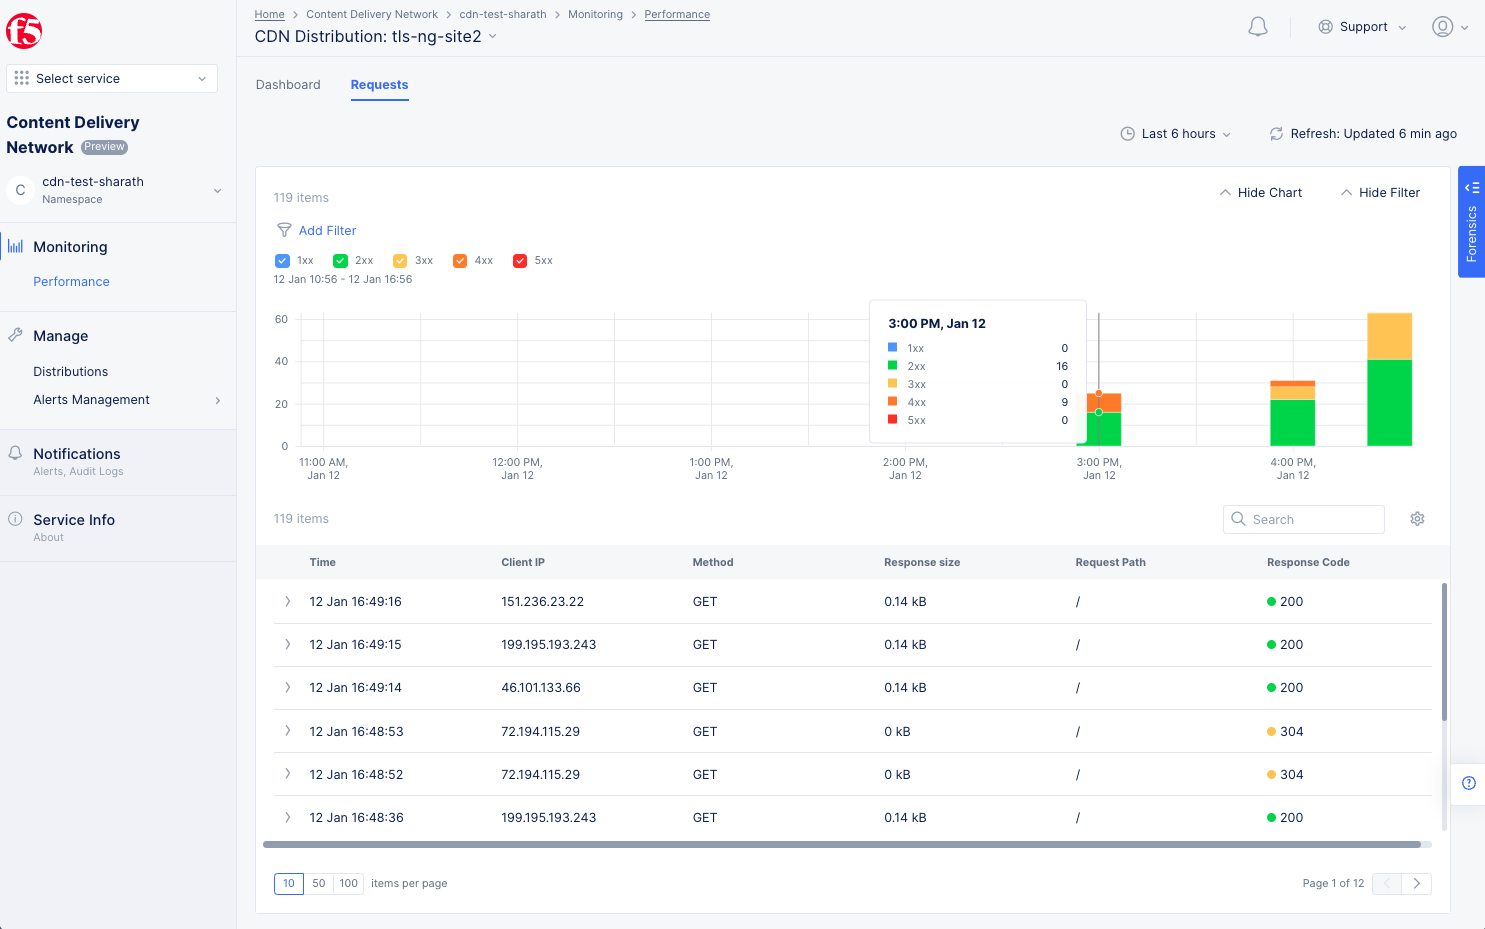
Figure: Distribution Monitoring Requests
You can also click the blue Forensics side tab to view the Forensics side panel. This is an easier way to filter your request to zero in on specific issues. For instance, you can filter by site and by top request page simply by selecting check boxes in the Forensics panel. This will create a search query for the filter at the top of the window.
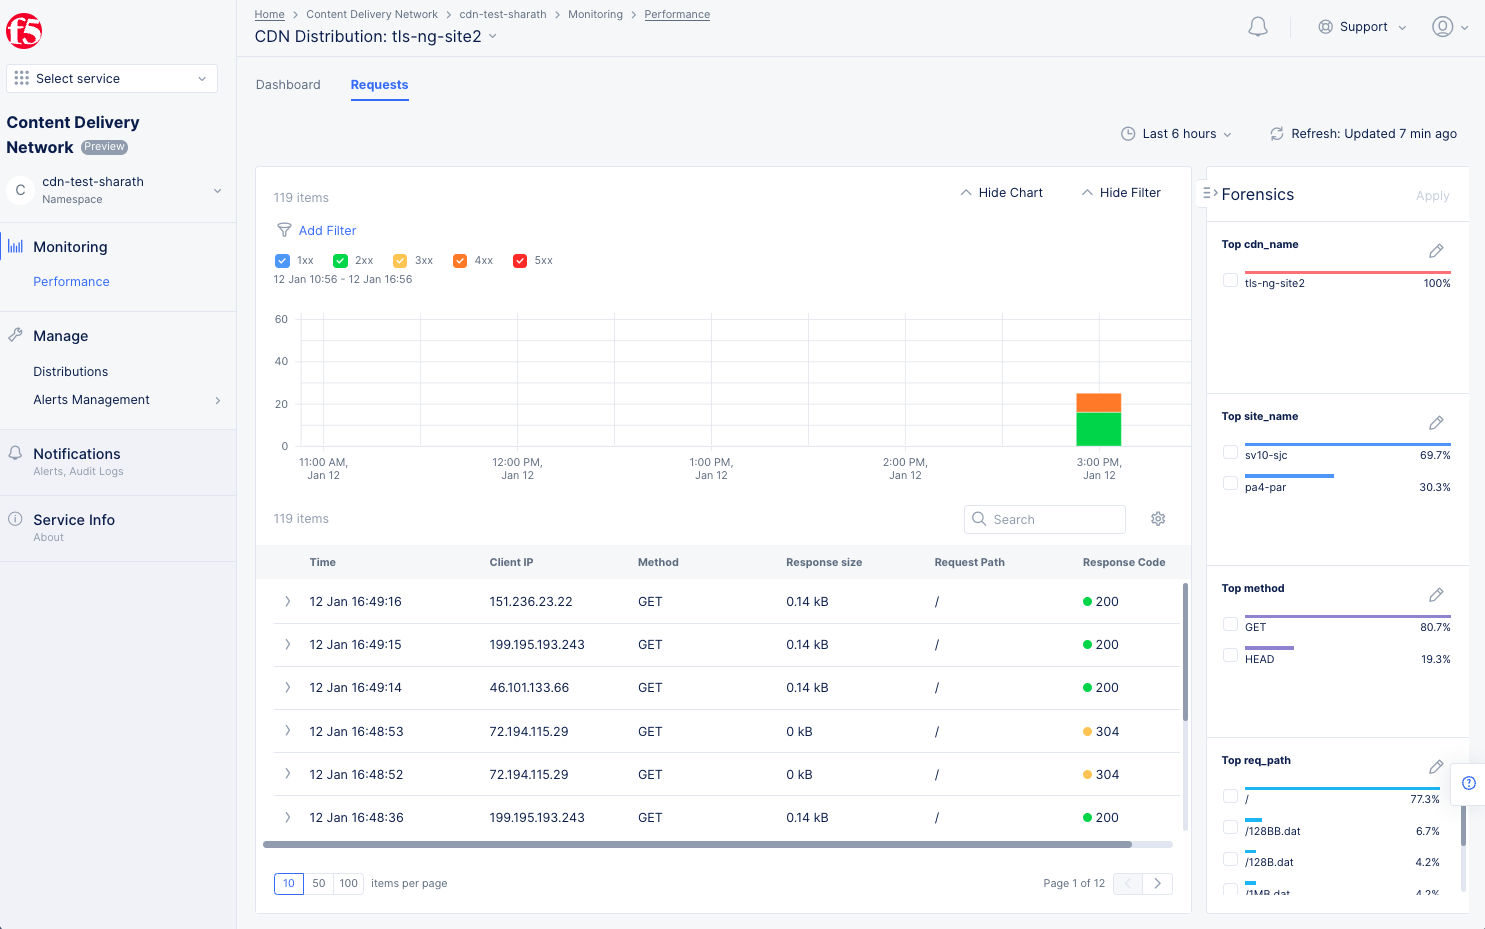
Figure: Distribution Monitoring Requests Using Forensics
Alerts Tab
Click the Alerts tab to load the alerts view. The active alerts are displayed by default.
You can filter the display for alerts of a specific severity using the severity selection options. All severity types are selected by default. Select a severity selection option to hide the alerts for that severity. You can again select it to display alerts for that severity.
Note: Severity selection options are color-coded and located above the
Add filteroption.
Use the toggle selector and click All Alerts. The All Alerts view shows graph for alerts over a specific period. The list of alerts is displayed beneath the graph.
Hover mouse pointer over a graph bar to view the alerts information specific to the time interval in which the bar is generated. Selecting the bar updates the graph and the list beneath the graph for the interval in which the bar is generated.
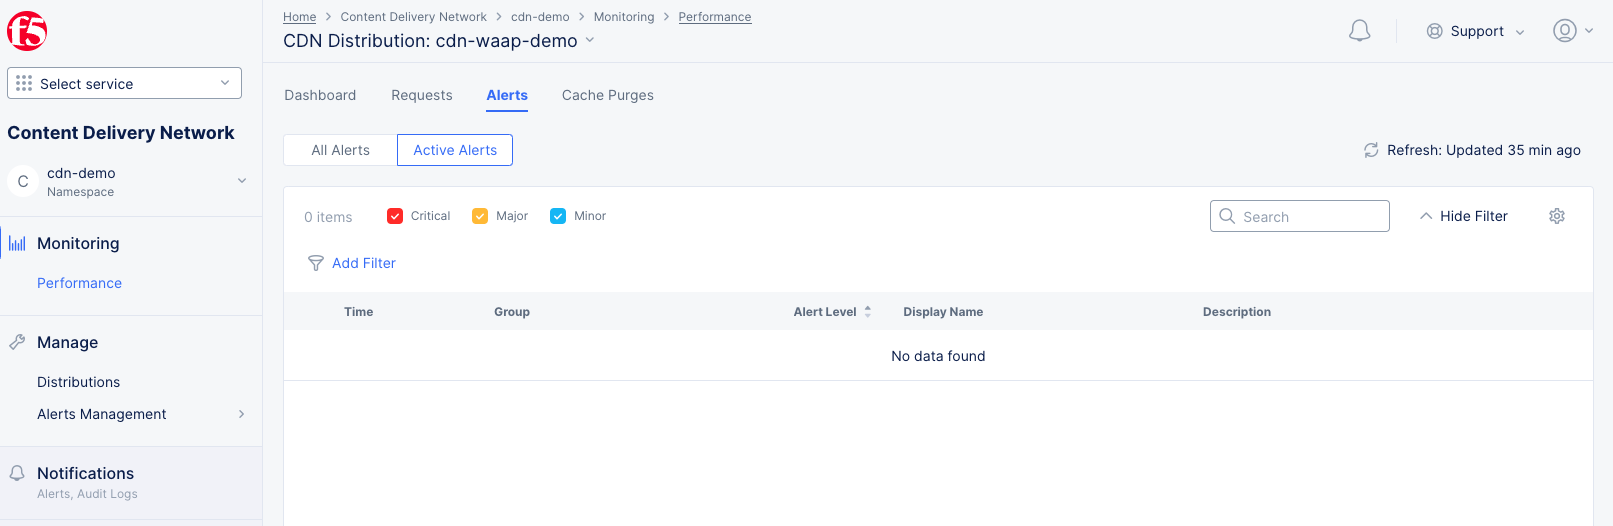
Figure: CDN Alerts
Click > for any alert entry to display its details in JSON format.
Cache Purges Tab
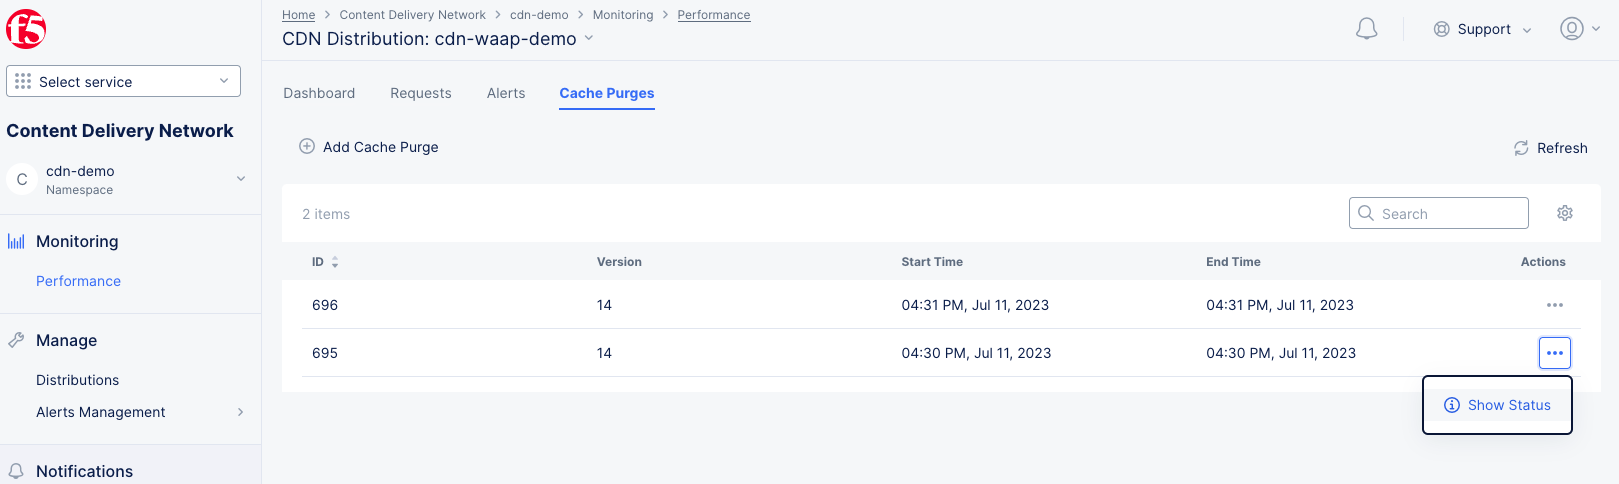
Figure: Distribution Cache Purges
The Cache Purges tab show past purges for your distribution in a table. Each row in the table provides a unique ID for the purge, the version and information on the date/time of the purge. To see details of the purge, click ... > Show Status in the Actions column for the purge you want to view.
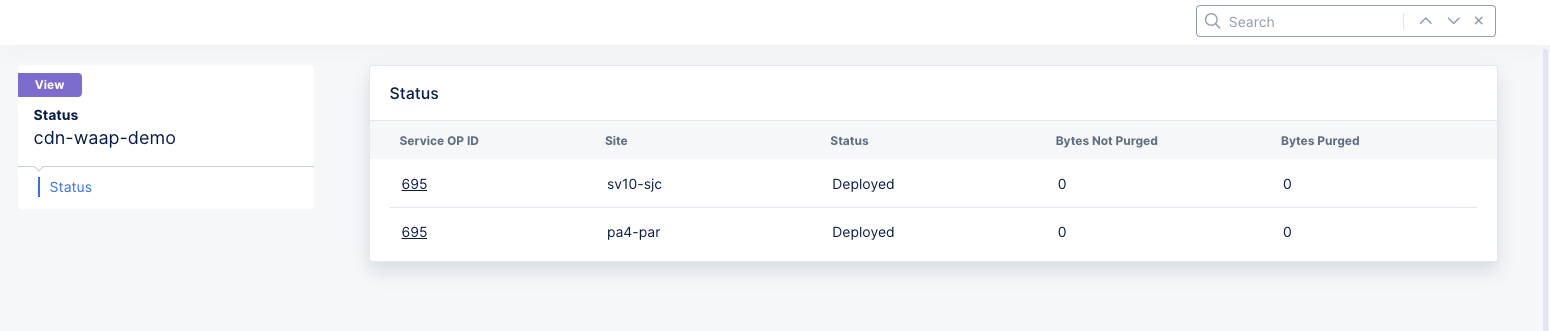
Figure: Distribution Cache Purge Status
This displays a table showing the sites that were purged and some overview information about each site's purge. For details on the site purge, click the ID in the Service OP ID column for the site.
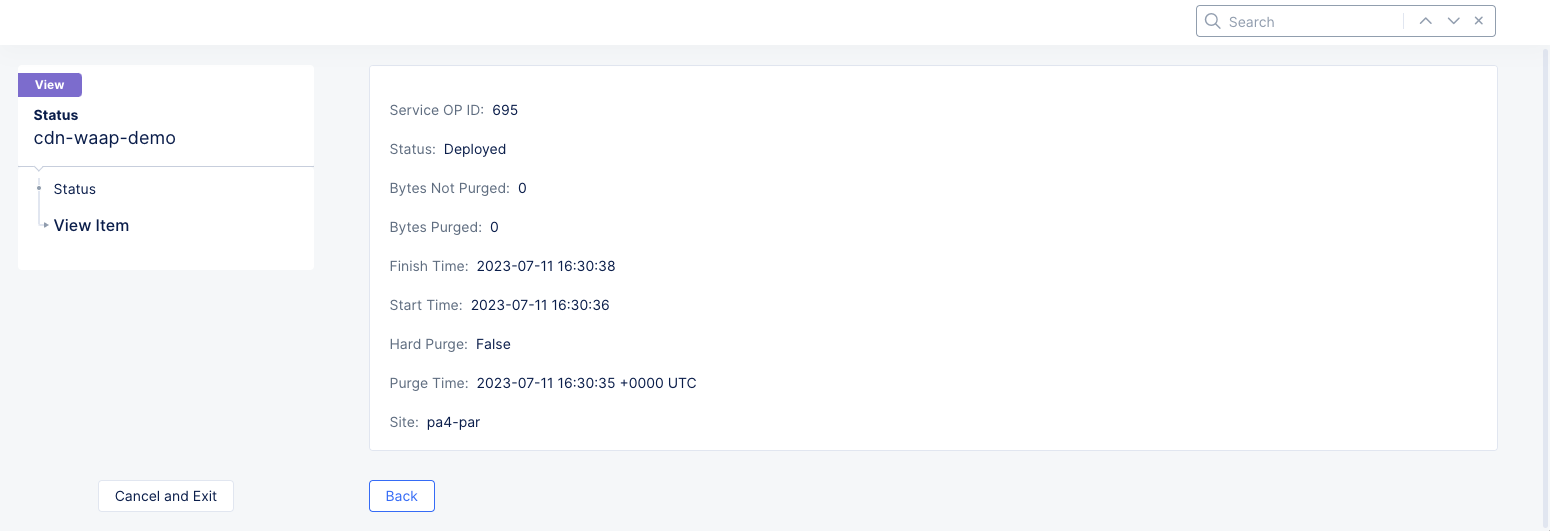
Figure: Distribution Cache Purge Site Details
Click Back to view more site purges or click Cancel and Exit to return to the Cache Purges page.
You can also deploy a cache purge from here by following these steps:
-
Click
Add Cache Purge.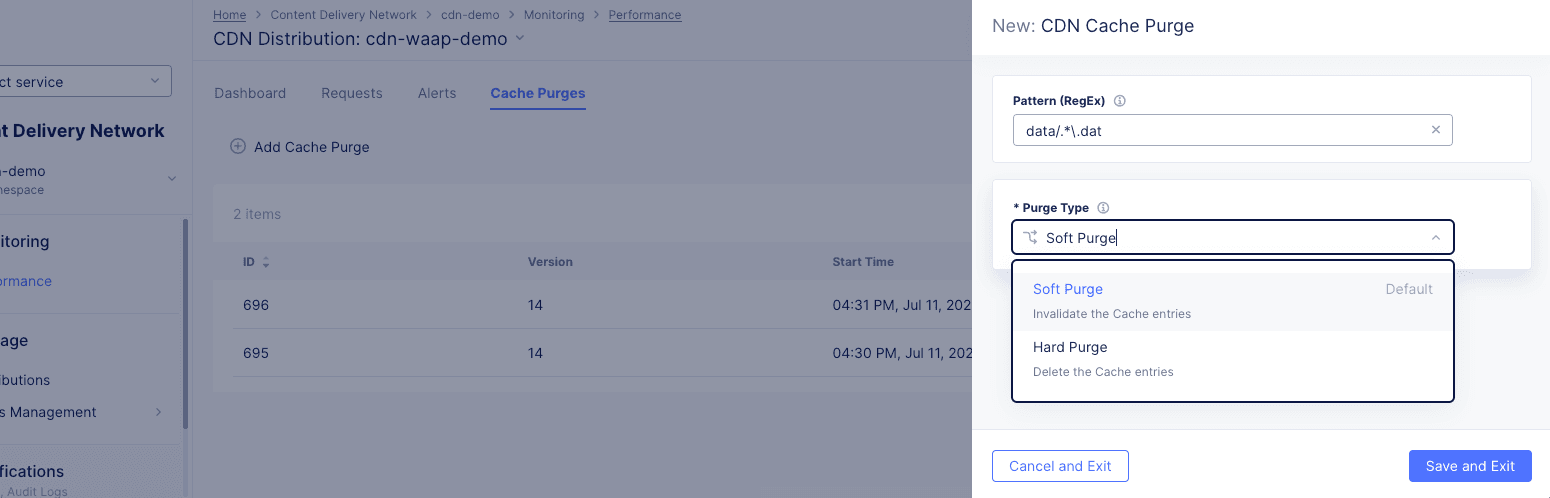
Figure: Distribution Cache Purge Request
-
Select what to purge from the
Purge Optionsdrop-down list.All: Your entire cache will be purged.URL: Purge that portion of your cache identified by the entered URL.Hostname: Purge all content for the entered hostname.Pattern: Purge all content that matches the entered pattern. The string should be entered in Regex form. For example, "images/.*.(png|jpg)" will match PNG and JPEG files in the images directory.
-
Select an option from the
Purge Typedrop-down menu to specify how the purge is to operate.Soft Purgeinvalidates the cache entries, which means the content will be replaced on the next request if the content is stale.Hard Purgeremoves the content from the distribution and forcing the next request to retrieve the content from the origin server.
-
Click
Save and Exitto deploy the purge.

This will create a new entry in the Cache Purges table providing information on your purge.
Note: You can also deploy a purge from the
Distributionspage. See Purge Content in Cache above.