Manage DNS Zone
Objective
This guide provides instructions on how to set up primary and secondary Domain Name System (DNS) zones and associated DNS service for your applications using F5® Distributed Cloud Services. A DNS zone is a distinct division or subdivision of domain namespace that is managed by an entity such as an organization. A DNS zone allows you to exercise granular control on the components such as name servers which hold the DNS records for the domain namespace represented by the zone.
Using this service, you can set up zones for your primary and secondary DNS servers and configure encrypted connection between them for record synchronization.
Prerequisites
The following prerequisites apply:
-
A Distributed Cloud Services Account. If you do not have an account, see Getting Started with Console.
-
A DNS domain for your web application. Obtain a domain from the Internet domain registrar.
-
Name servers for managing your DNS records.
-
To ensure that zone transfers are successful, add the following IP addresses to your firewall or ACL
allowlist:52.14.213.2083.140.118.214
Configuration
Creating and managing zones involve creating a primary DNS zone and a secondary zone, configuring settings such as records, encryption mechanism, and more.
Create Primary Zone
Log into Console and perform the following:
Step 1: Navigate to DNS management and start adding a zone.
- Click
DNS Managementworkspace on the Console home page.
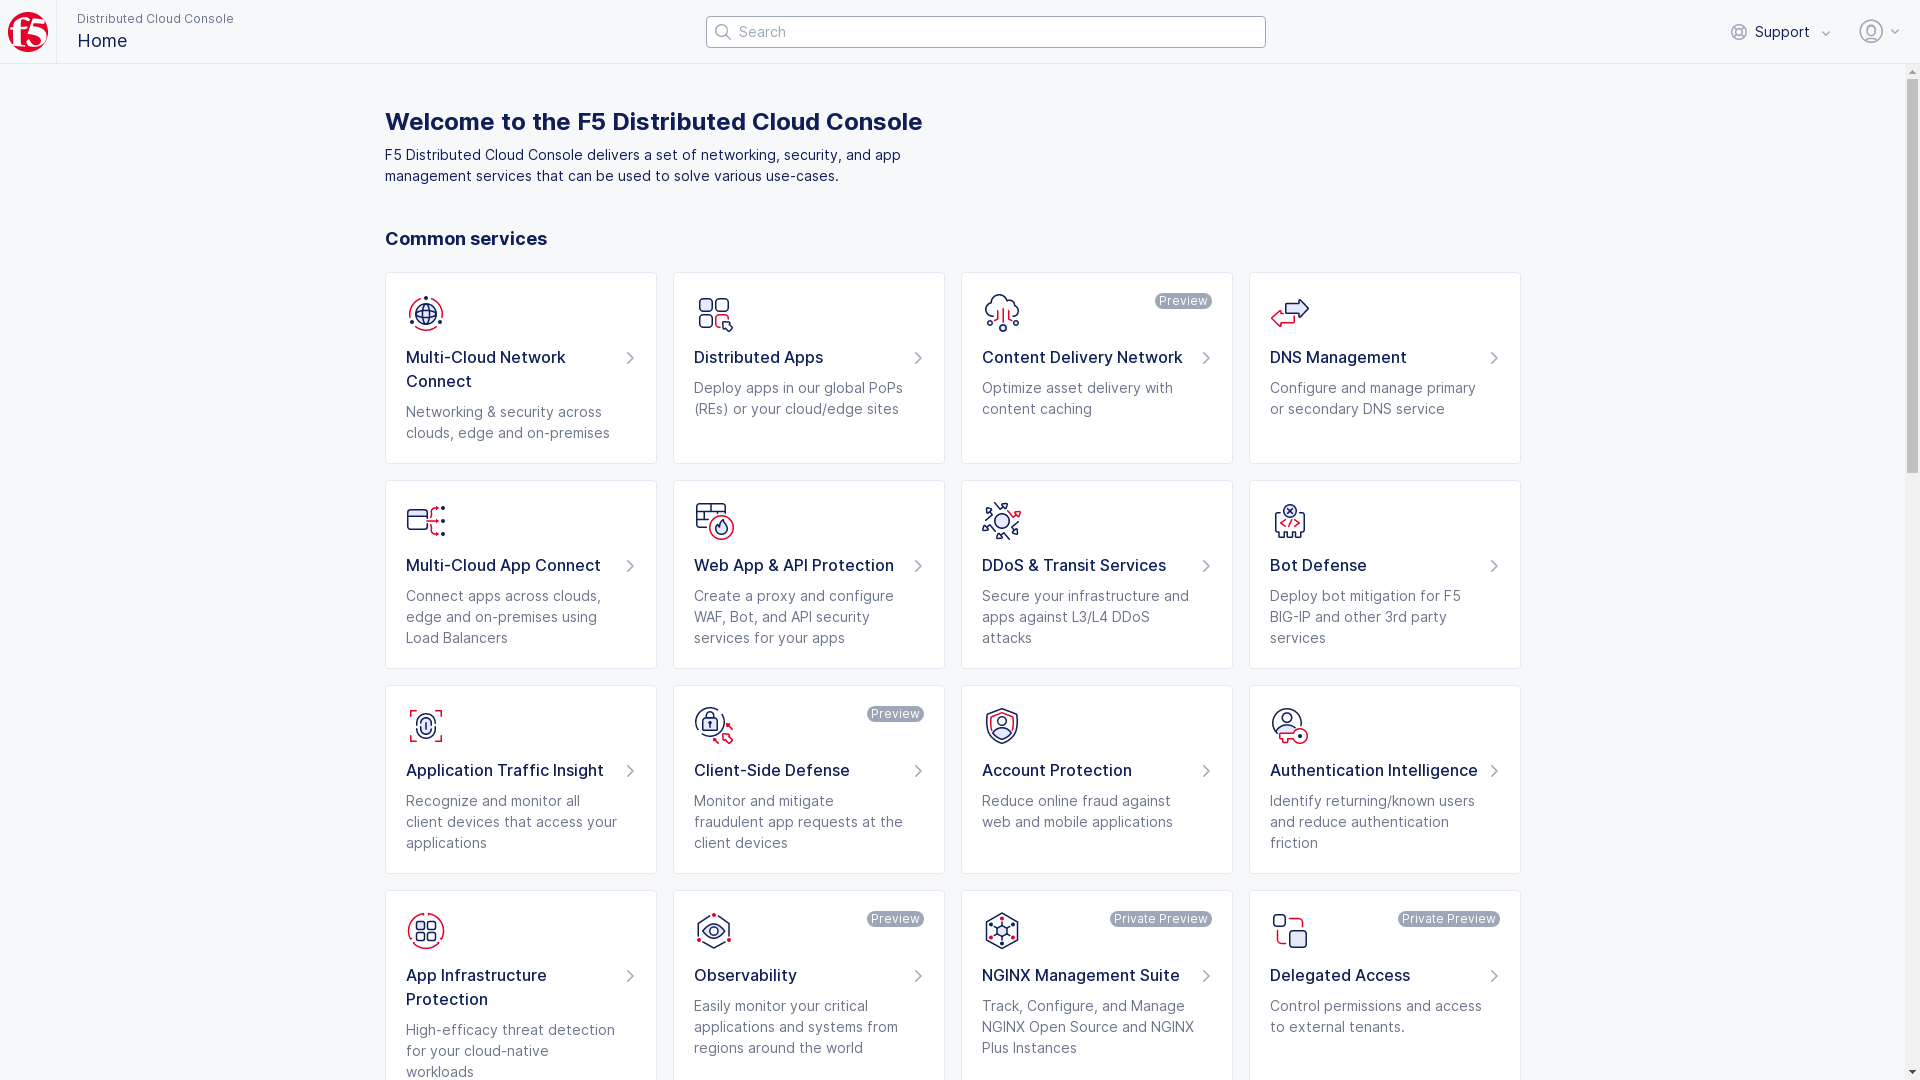
Figure: Navigate to DNS Management
-
Select
DNS Managementoption in the primary navigation menu located on the left side of the page. -
Click
Add Zone.
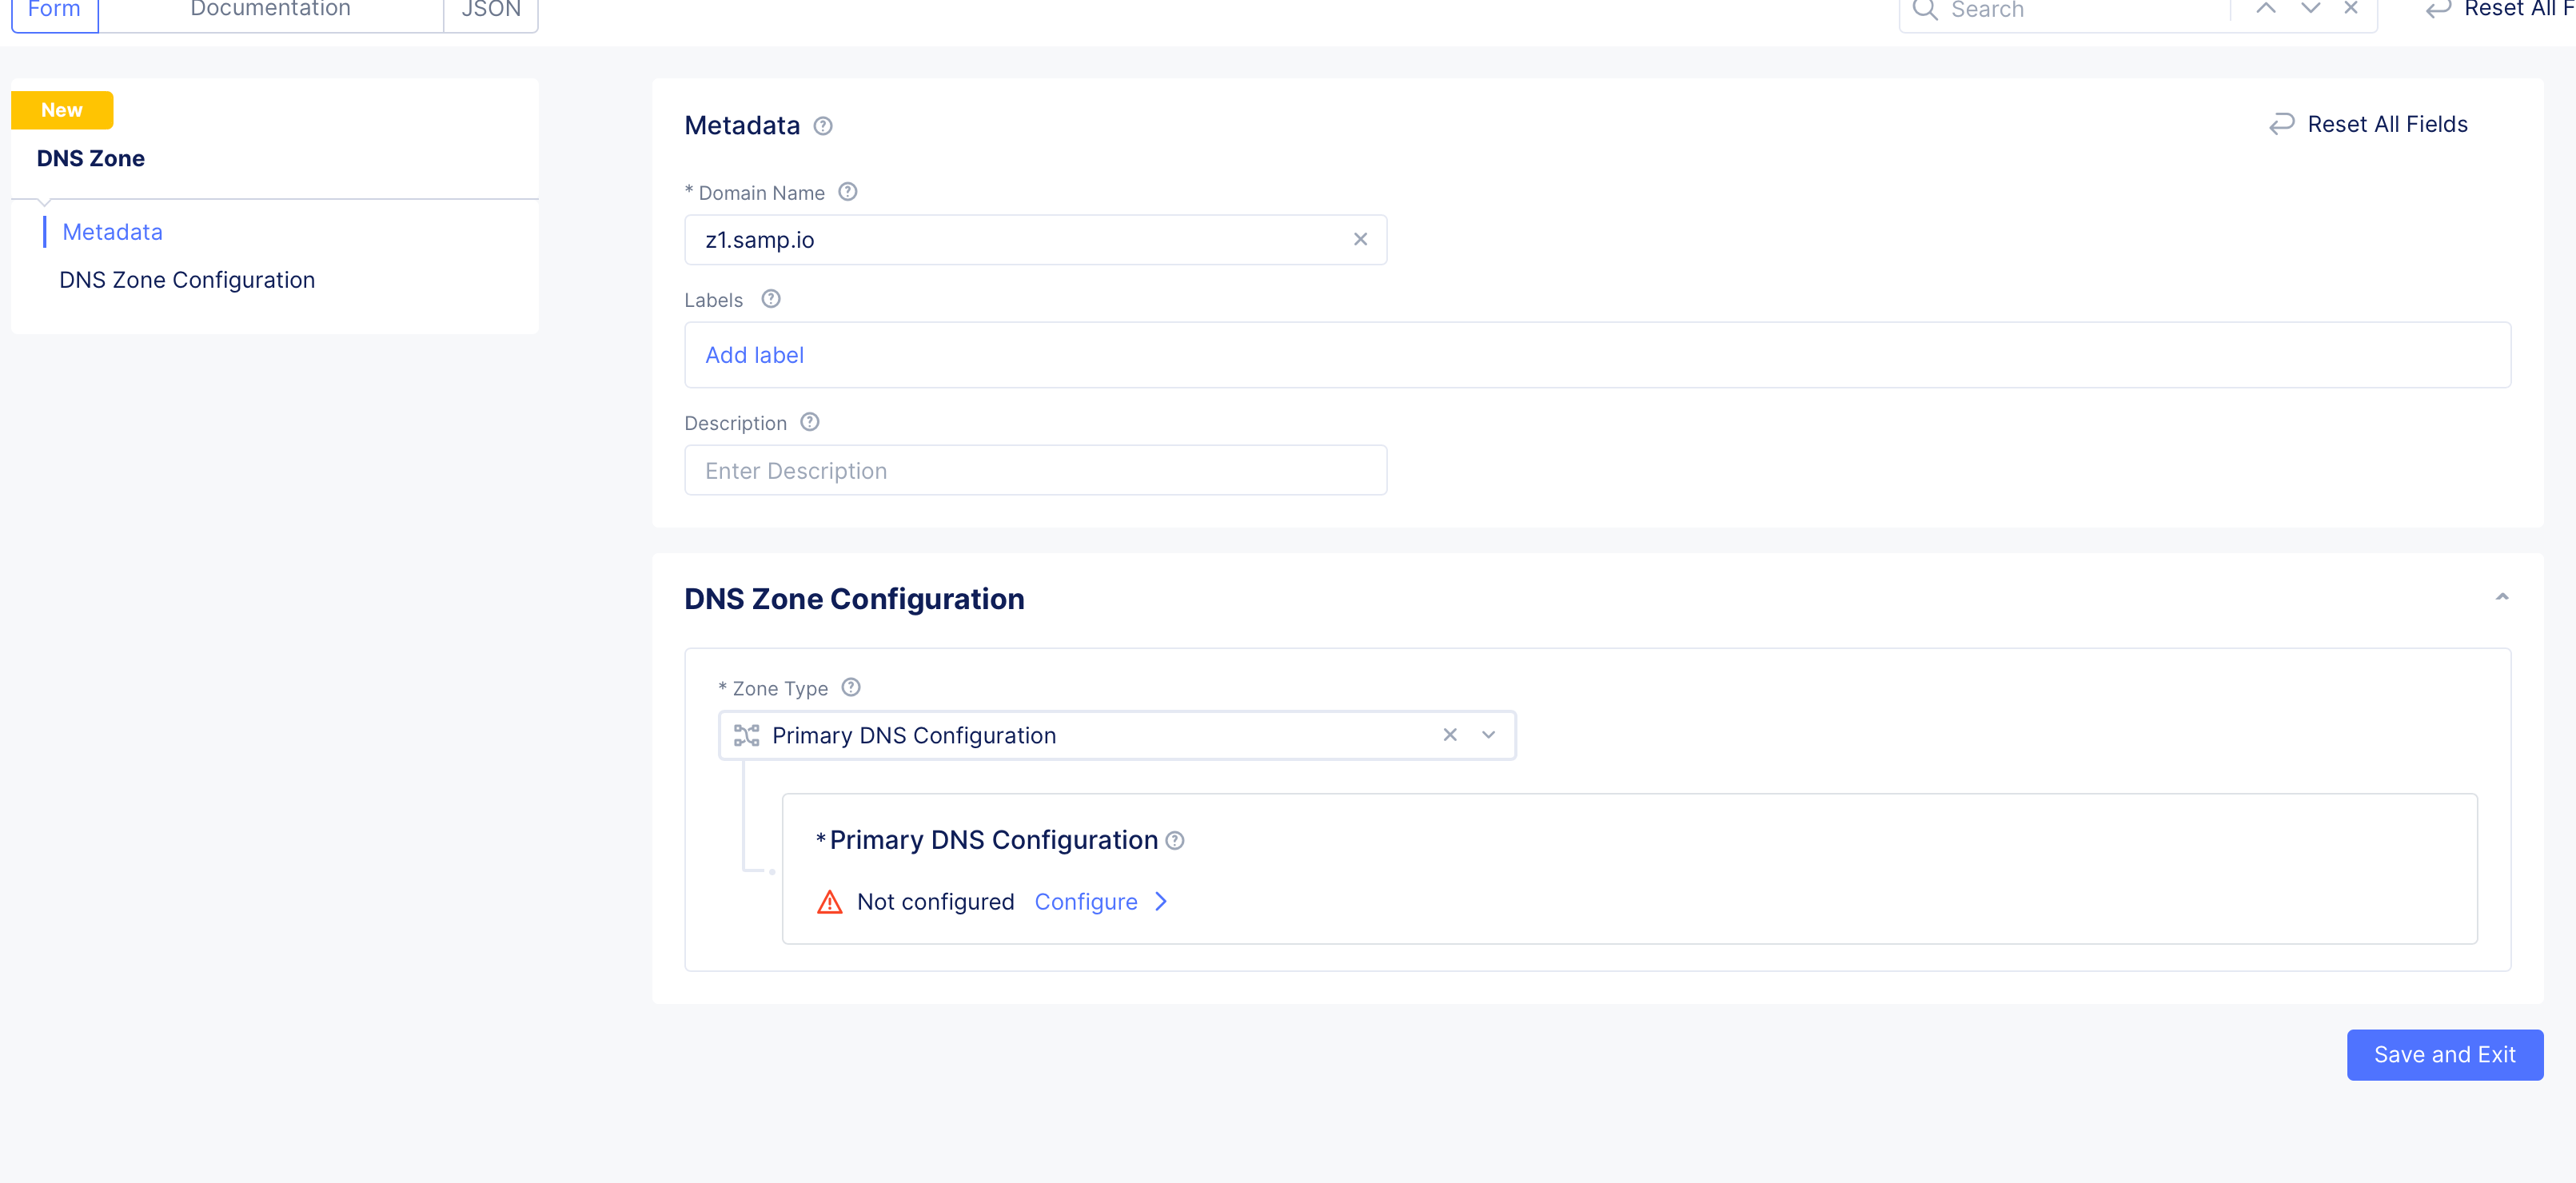
Figure: Add Zone
-
Enter domain or subdomain name in the
Domain Namefield in the metadata section. -
Optionally, set labels and add a description for your zone.
Step 2: Start configuring primary zone.
Select Primary DNS Configuration for the Zone Type field in the DNS Zone Configuration section. Click Edit Configuration under the Primary DNS Configuration field. Do the following in the zone configuration form:
- In the
SOA Record Parameterssection, theUse Default Parametersis populated by default. To customize this, selectSOA Record Parametersoption, clickView Configuration, and set the SOA parameters such as refresh interval, retry interval, TTL, and more.
Note: The internal DNS refresh time used by Distributed Cloud DNS for Origin Endpoint resolution is set to 15 minutes. If the DNS refresh values for the origin server are configured to less than 900 seconds, they will be overridden, resulting in a DNS refresh interval of 15 minutes or more.
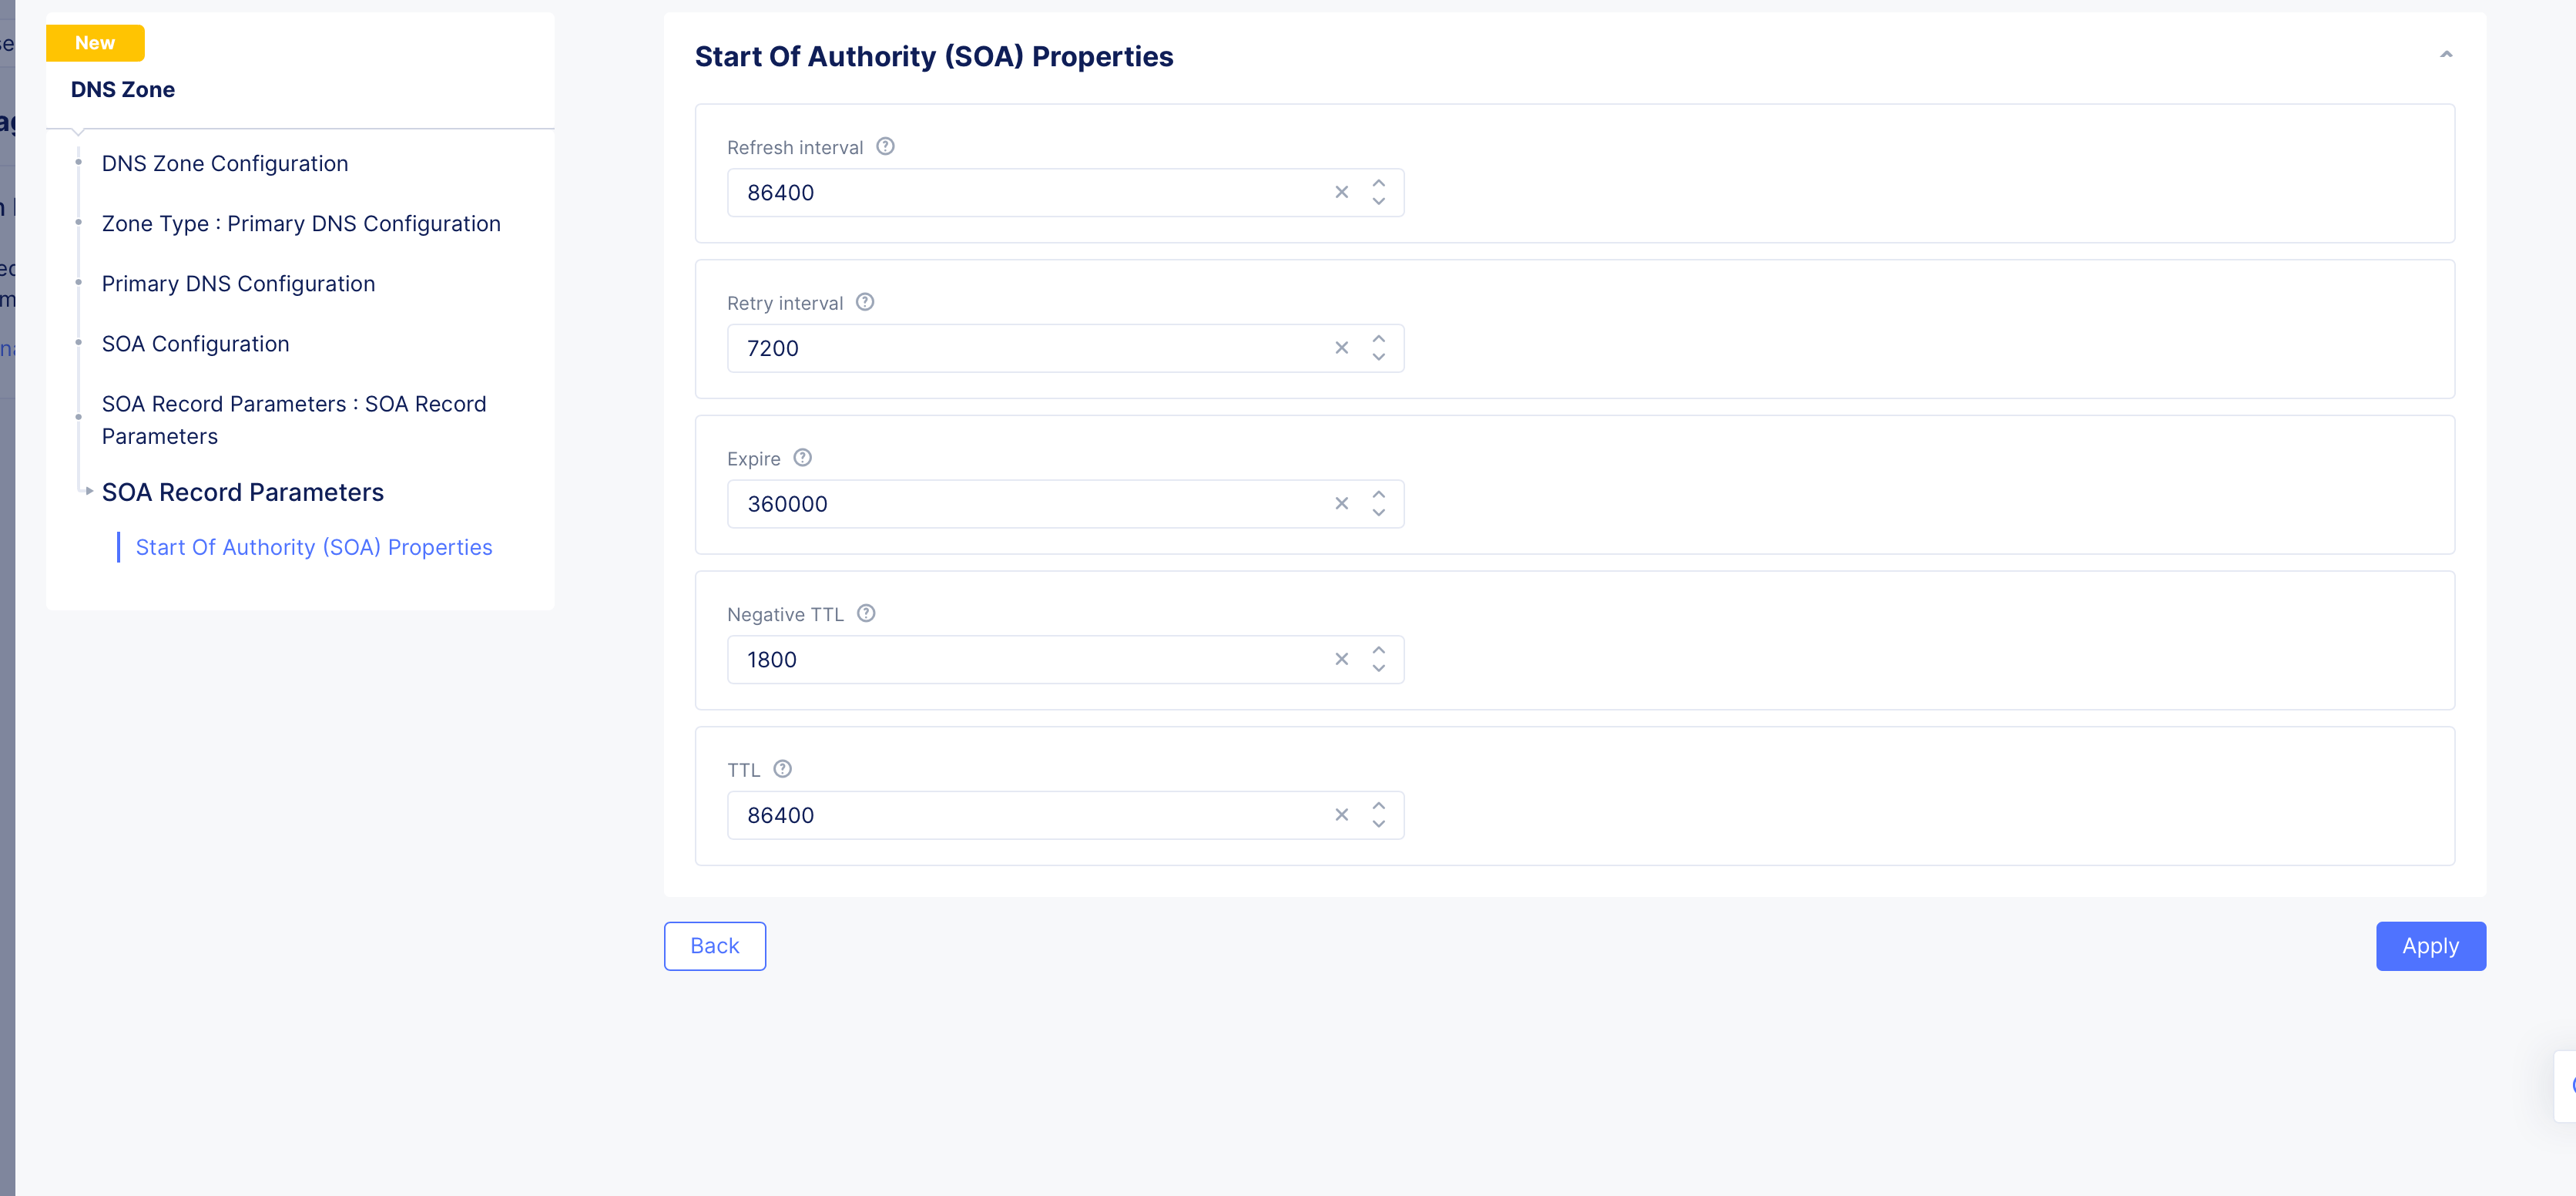
Figure: SOA Custom Configuration
Step 3: Configure resource record sets for the default group.
-
Go to
Resource Record Setssection and clickAdd Item. The resource record sets configuration form opens. -
Enter a value for the
Time to livefield. -
Select a record type for the
Record Setfield, enter a name for your record name in theRecord Namefield, and set the fields as per your record type selection. Refer to the following table for the record type and field mapping:
| Record Type | Fields | Notes |
|---|---|---|
| A | List of IPv4 Addresses | Enter IPv4 addresses. |
| AAAA | List of IPv6 Addresses | Enter IPv6 addresses. |
| ALIAS | Domain | Enter alias domain name. |
| CAA | Tags and Value | Enter a tag and its value. |
| CNAME | Domain | Enter domain name. |
| MX | Domain and Priority | Enter domain and priority in the MX Record Value section. |
| NS | List of Name servers | Enter the FQDN for the name servers. |
| PTR | List of Name servers | Enter the FQDN for the name servers. |
| SRV | Priority, Weight, Port, Target | Click Add Item in the SRV Value section and set the parameters. |
| TXT | List of Text | Add the TXT record. |
| DNS Load Balancer | DNS Load Balancer Records | Add the DNS Load Balancer record. |
| NAPTR | Naming Authority Pointer | Enter regex based domain names used in URIs. |
| DS | Delegation signer | Enter the signer to identify DNSSEC signing key of a delegated zone. |
| CDS | Child DS | Enter Child copy of DS record, for transfer to parent. |
| EUI48 | MAC address (EUI-48) | Add uniquely identified MAC address as per the EUI-48 specification. |
| EUI64 | MAC address (EUI-64) | Add uniquely identified MAC address as per the EUI-48 specification. |
| AFS | AFS record | Enter the AFS record. |
| DNSKEY | DNS Key | Enter the type, protocol, algorithm, and public key. |
| CDNSKEY | Child DNS Key | Enter the type, protocol, algorithm, and public key. |
| LOC | Location information | Enter geographical details such as latitude, longitude, hemispheres, and more. |
| SSHFP | SSH Key Fingerprint | Enter the fingerprint algorithm, type, and hexadecimal hash result of the ssh key. |
| TLSA | TLS Certificate Association | Enter the usage, selector, matching type, and association data. |
| CERT | Public Key Certificate | Enter the type, key tag, algorithm, and certificate. |
Note: Use the
Add itembutton available in each record type configuration to add more than one record for that record. See DNS Load Balancer for instructions on how to configure DNS load balancer for your zone.
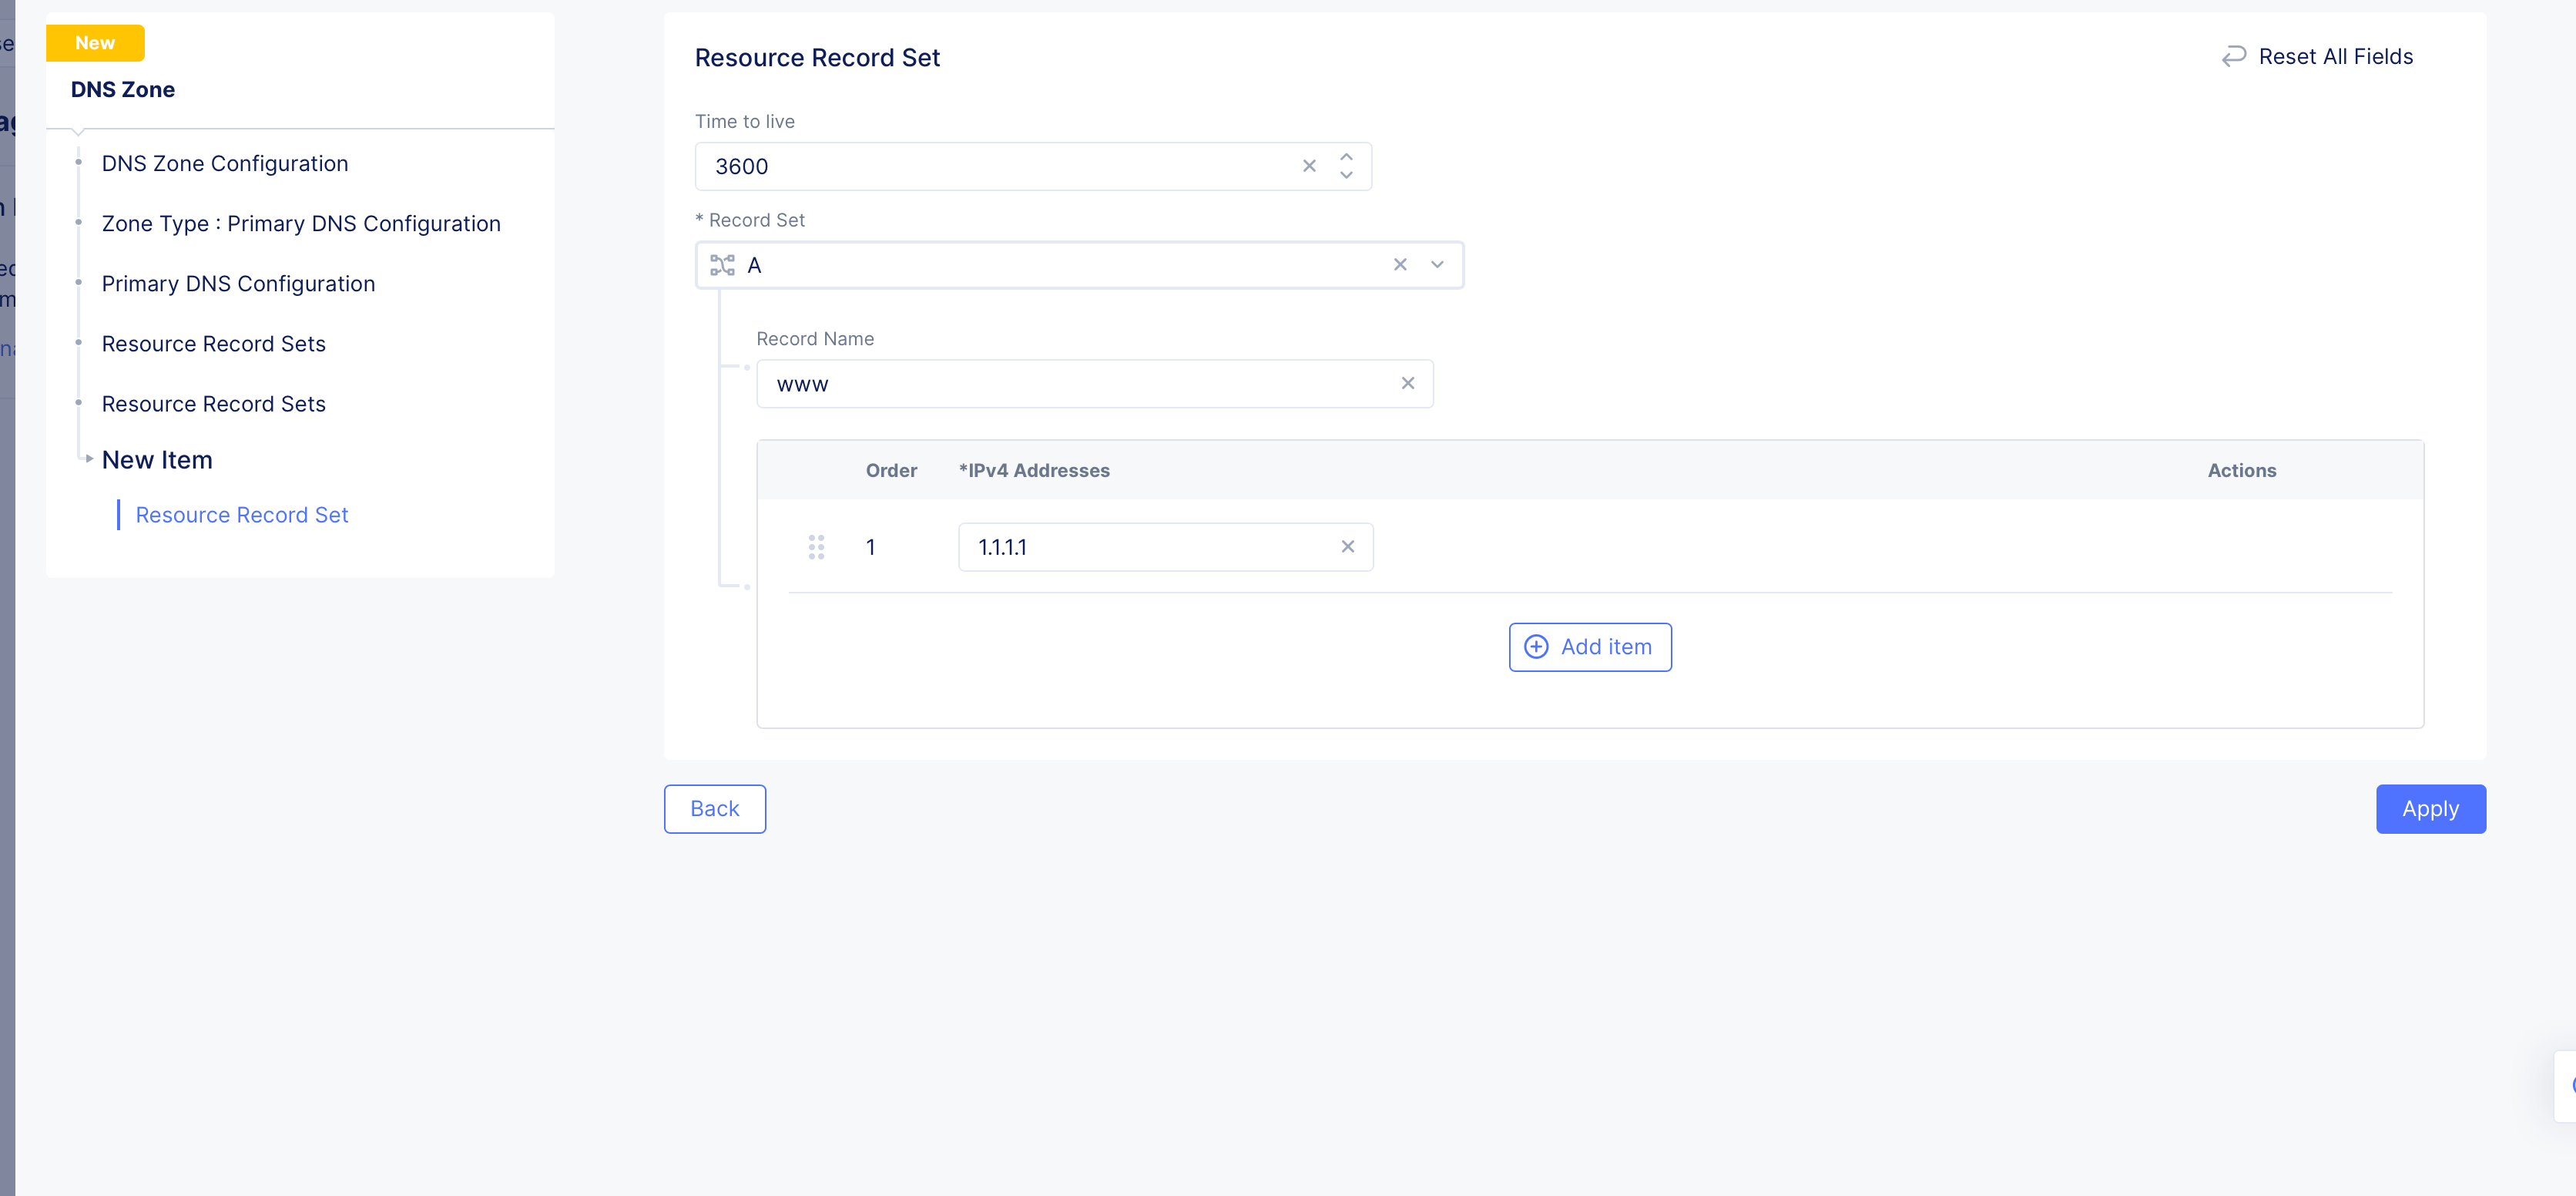
Figure: Resource Record Set
- Click
Add Itemto add the resource record set to the list of resource record sets. Use theAdd Itembutton to add more than one resource record step.
Step 4: Configure specific resource record sets group.
This step configures specific groups for resource record sets. A resource record sets group allows grouping of DNS records to make it easier to manage them. For example, you can group DNS records that belong to the same application.
-
Enable
Show Advanced Fieldsin theResource Record Setssection. -
Click
Add Itemin the appearedAdditional Resource Record Setssection. This opens new resource record sets form. -
Enter a
Namein the metadata section. -
Click
Add Itemin theResource Record Setssection. This opens the resource record sets configuration form. -
Configure the records in the same way as mentioned in previous step.
-
Click
Add Itemto add the resource record set to the group. Use theAdd Itembutton to add more than one resource record set. -
Click
Add Itemin theResource Record Setsform to add the group to theAdditional Resource Record Setssection. Use theAdd Itembutton to add more than one group.
Step 5: Optionally, enable DNSSEC and load balancer management.
- In the
DNSSEC Modesection, selectEnablefor theDNSSEC Modefield if you want to use DNS security extensions (DNSSEC) to authenticate DNS response data.
Note:
DNSSEC Modeis disabled by default.
- Check the
Allow HTTP Load Balancer Managed Records. This is only optional for a legacy delegated domain.
Note:
Allow HTTP Load Balancer Managed Recordsis unchecked by default, which might have made sense for a delegated domain. However, Distributed Cloud Services has deprecated the Delegated Domain capability, which means that new domains will need to be setup as a Primary DNS zone corresponding to your HTTP Load Balancer (which is what you created in these steps), and you must check theAllow HTTP Load Balancer Managed Recordscheckbox for the HTTP Load Balancer to work properly.
Step 6: Complete creating the primary zone.
- Click
Applyin the primary zone configuration form.
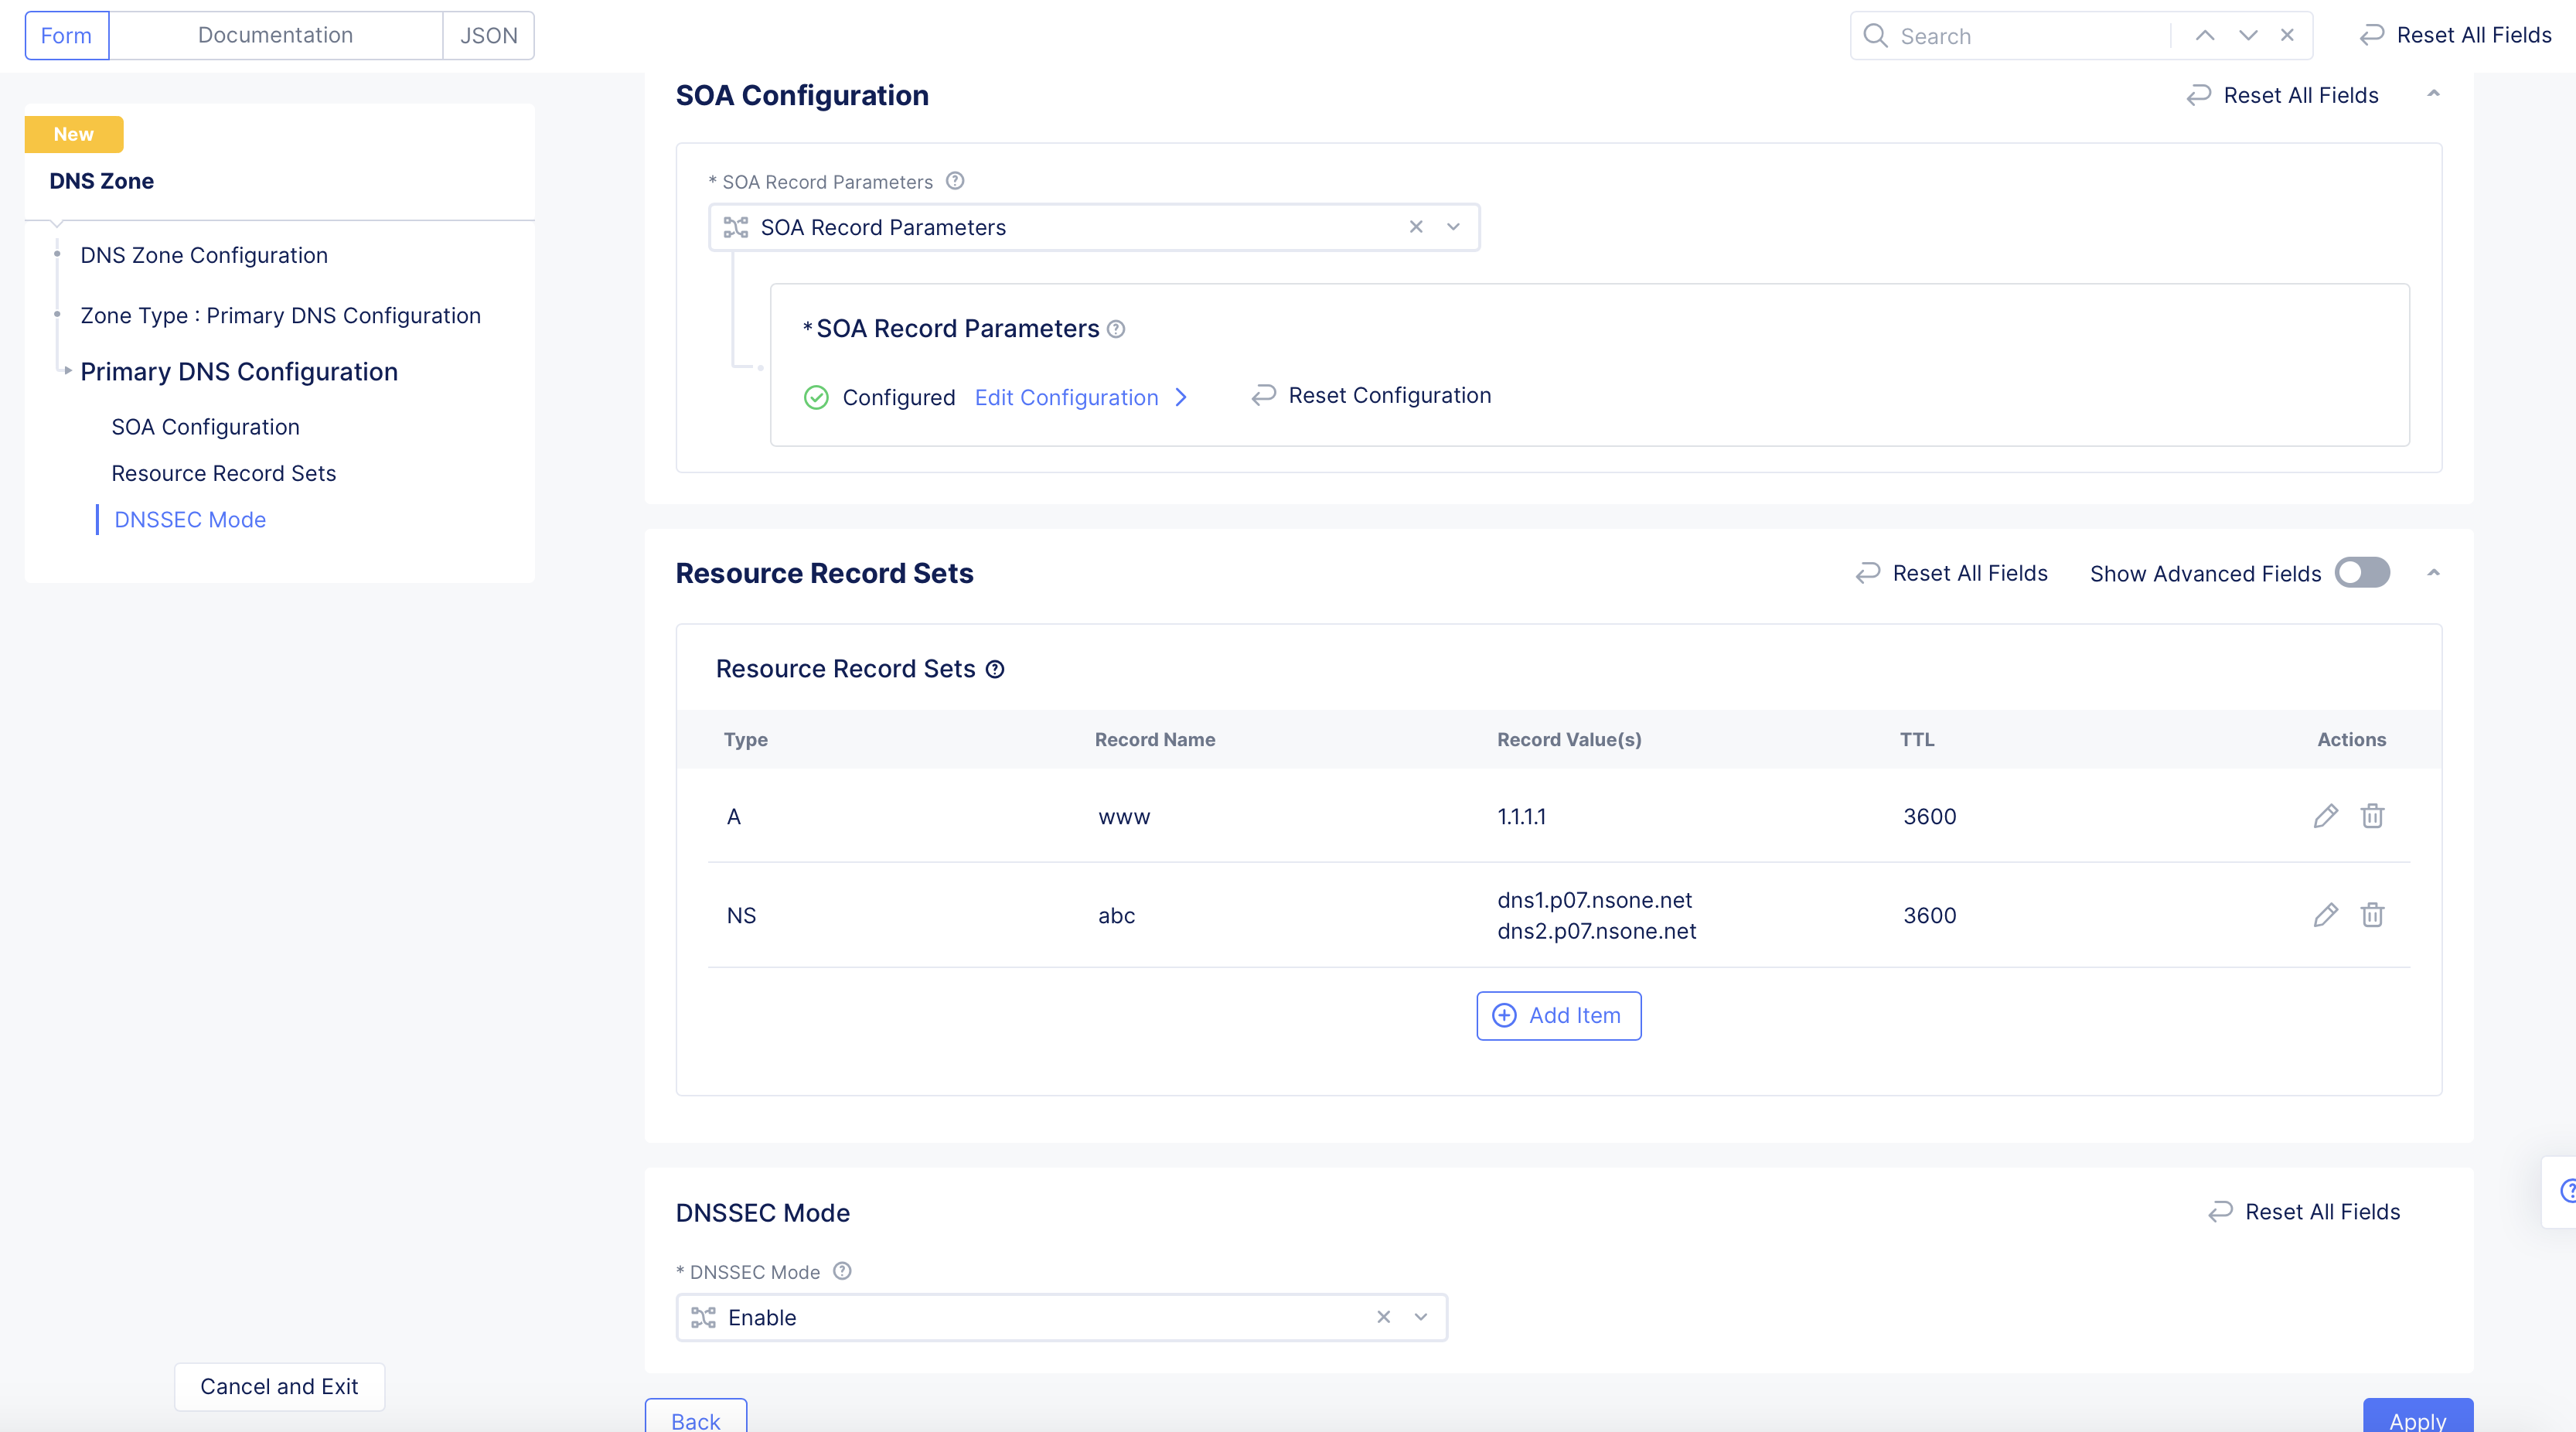
Figure: Primary Zone Configuration
- Click
Add DNS Zonein the main zone configuration form to complete creating the primary zone.
Note: In case you enabled the DNSSEC, the system generates a DS record and displays it in the
DNSSEC DS Recordcolumn. Click on the displayed value, clickCopy DS Recordon the displayed window, add the DS record to your parent zone. After primary zone is created, you can use thedig ds <domain name>command to verify that the DS record digest is displayed in the output. This indicates that DNSSEC is functional.
Create Secondary Zone
Prior to creating secondary zone, ensure that you allow queries from F5 Distributed Cloud IP ranges to your DNS servers.
Log into Console and perform the following:
Step 1: Navigate to zone management and start adding a zone.
- Click
DNS Managementworkspace on the Console home page.
Figure: Navigate to DNS Management
-
Select
DNS Managementoption in the primary navigation menu located on the left side of the page. -
Click
Add Zone. -
Enter domain or subdomain name in the
Domain Namefield in the metadata section. Ensure that you enter the same domain name used in primary zone configuration. -
Optionally, set labels and add a description.
Step 2: Start configuring secondary zone.
Select Secondary DNS Configuration for the Zone Type field in the DNS Zone Configuration section. Click Configure under the Secondary DNS Configuration field. Do the following in the zone configuration form:
-
Enter IP addresses for the list of primary zone servers in the
List of zone primary serversfield. Use theAdd itembutton to add more than one primary server. -
Enter the Transaction Signature (TSIG) key name in the
TSIG key name as used in TSIG protocol extensionfield. -
Click on the
TSIG Key algorithmfield and select an algorithm from the drop-down. Ensure that the key value for the key specified is compatible with the algorithm being selected.
Note: Configuring TSIG key and algorithm is optional. However, it is recommended that you use at least the
HMAC-SHA256algorithm in case you configure TSIG.
-
Click
Configurein theTSIG key value in base 64 formatsection to encrypt your secret, and do one of the following:- Paste your secret in the
Secret to Blindfoldfield, and clickApply. The secret typeBlindfolded Secretand actionBlindfold New Secretare set by default and your secret is encrypted using Blindfold. You can optionally change the action toUse Existing Blindfolded Secretto add an existing encrypted secret, or use a custom policy instead of a built-in policy using thePolicy Typefield. - In case you want to use a clear secret, select
Clear Secretfor theSecret Typefield, and paste secret in theSecretfield. The optiontextis populated by default, and you can apply Base64 encoding by changing the selection toBase64. ClickApply
- Paste your secret in the
Note: Ensure you obtain the base64 encoded secret if you choose
Base64option for clear secret. You can useecho -n <TSIG KEY> | base64to convert your secret to Base64 encoded format.
- Click
Apply.
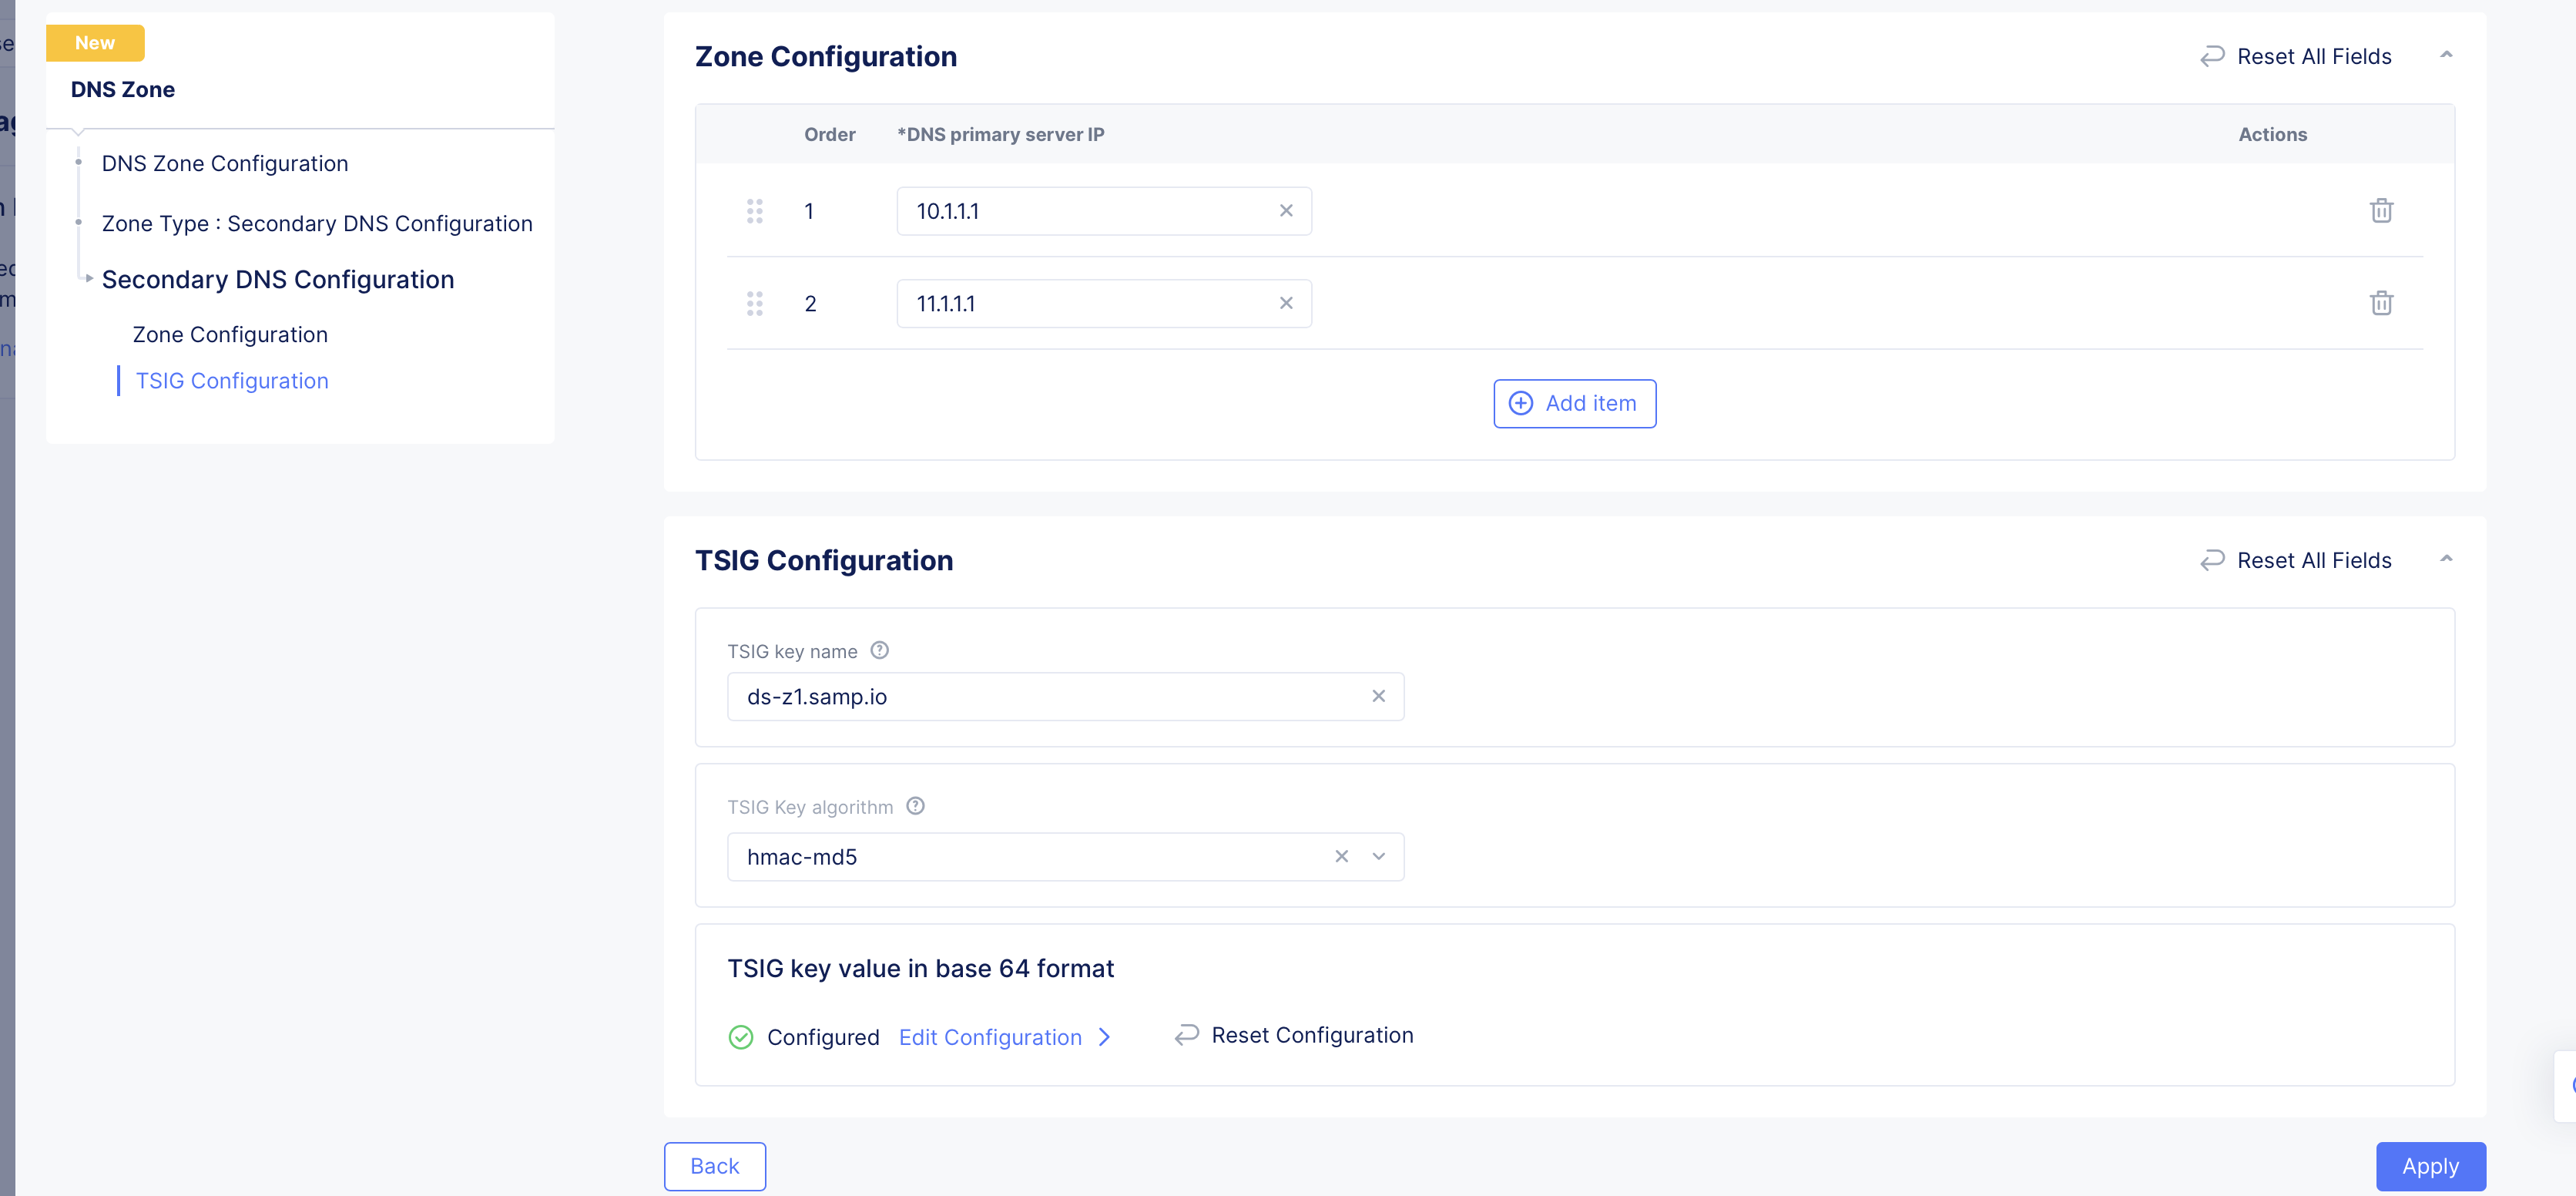
Figure: Secondary Zone Configuration
Step 3: Complete configuring secondary zone.
Click Add DNS Zone in the main zone configuration form to create secondary zone.
Step 4: Inspect the secondary zone file.
-
Select
...>View Zone Filein theActionscolumn for your secondary zone object. This opens the secondary zone file records in a read-only window and displays the record name, TTL, record type, and record values. -
Click on any record name to open detailed information of that record.
Initiate Zone Transfer
For secondary zones hosted on F5® Distributed Cloud, zone transfers occur automatically to keep the secondary zone synchronized with its primary server. A transfer is initiated when the primary server notifies the secondary of zone changes, or when the secondary zone's refresh interval expires and it checks for updates. If you need to synchronize records immediately, you can manually initiate a zone transfer from the secondary zone.
Ensure the following-
-
The primary DNS server IP addresses configured for the secondary zone are valid.
-
Any configured TSIG key is valid and correctly configured.
-
F5 Distributed Cloud IP ranges are allowed on your DNS servers.
To initiate a Zone Transfer
-
Log in to the Distributed Cloud Console.
-
Navigate to the DNS Management workspace from the Console home page.
-
Select DNS Management from the left navigation menu.
-
In the DNS Zone Management page, locate the secondary zone for which you want to initiate the zone transfer.
-
Click on the three-dot menu in the Actions for the secondary zone and select "Initiate Zone Transfer" from the dropdown menu.
-
Confirm the initiation of the zone transfer when prompted.
The system immediately requests a zone transfer from the configured primary server(s) and re-synchronizes the secondary zone records.
Note: Zone transfers normally occur automatically when the primary server notifies the secondary of changes. Manual initiation is intended for on-demand re-synchronization and does not replace the automatic transfer process
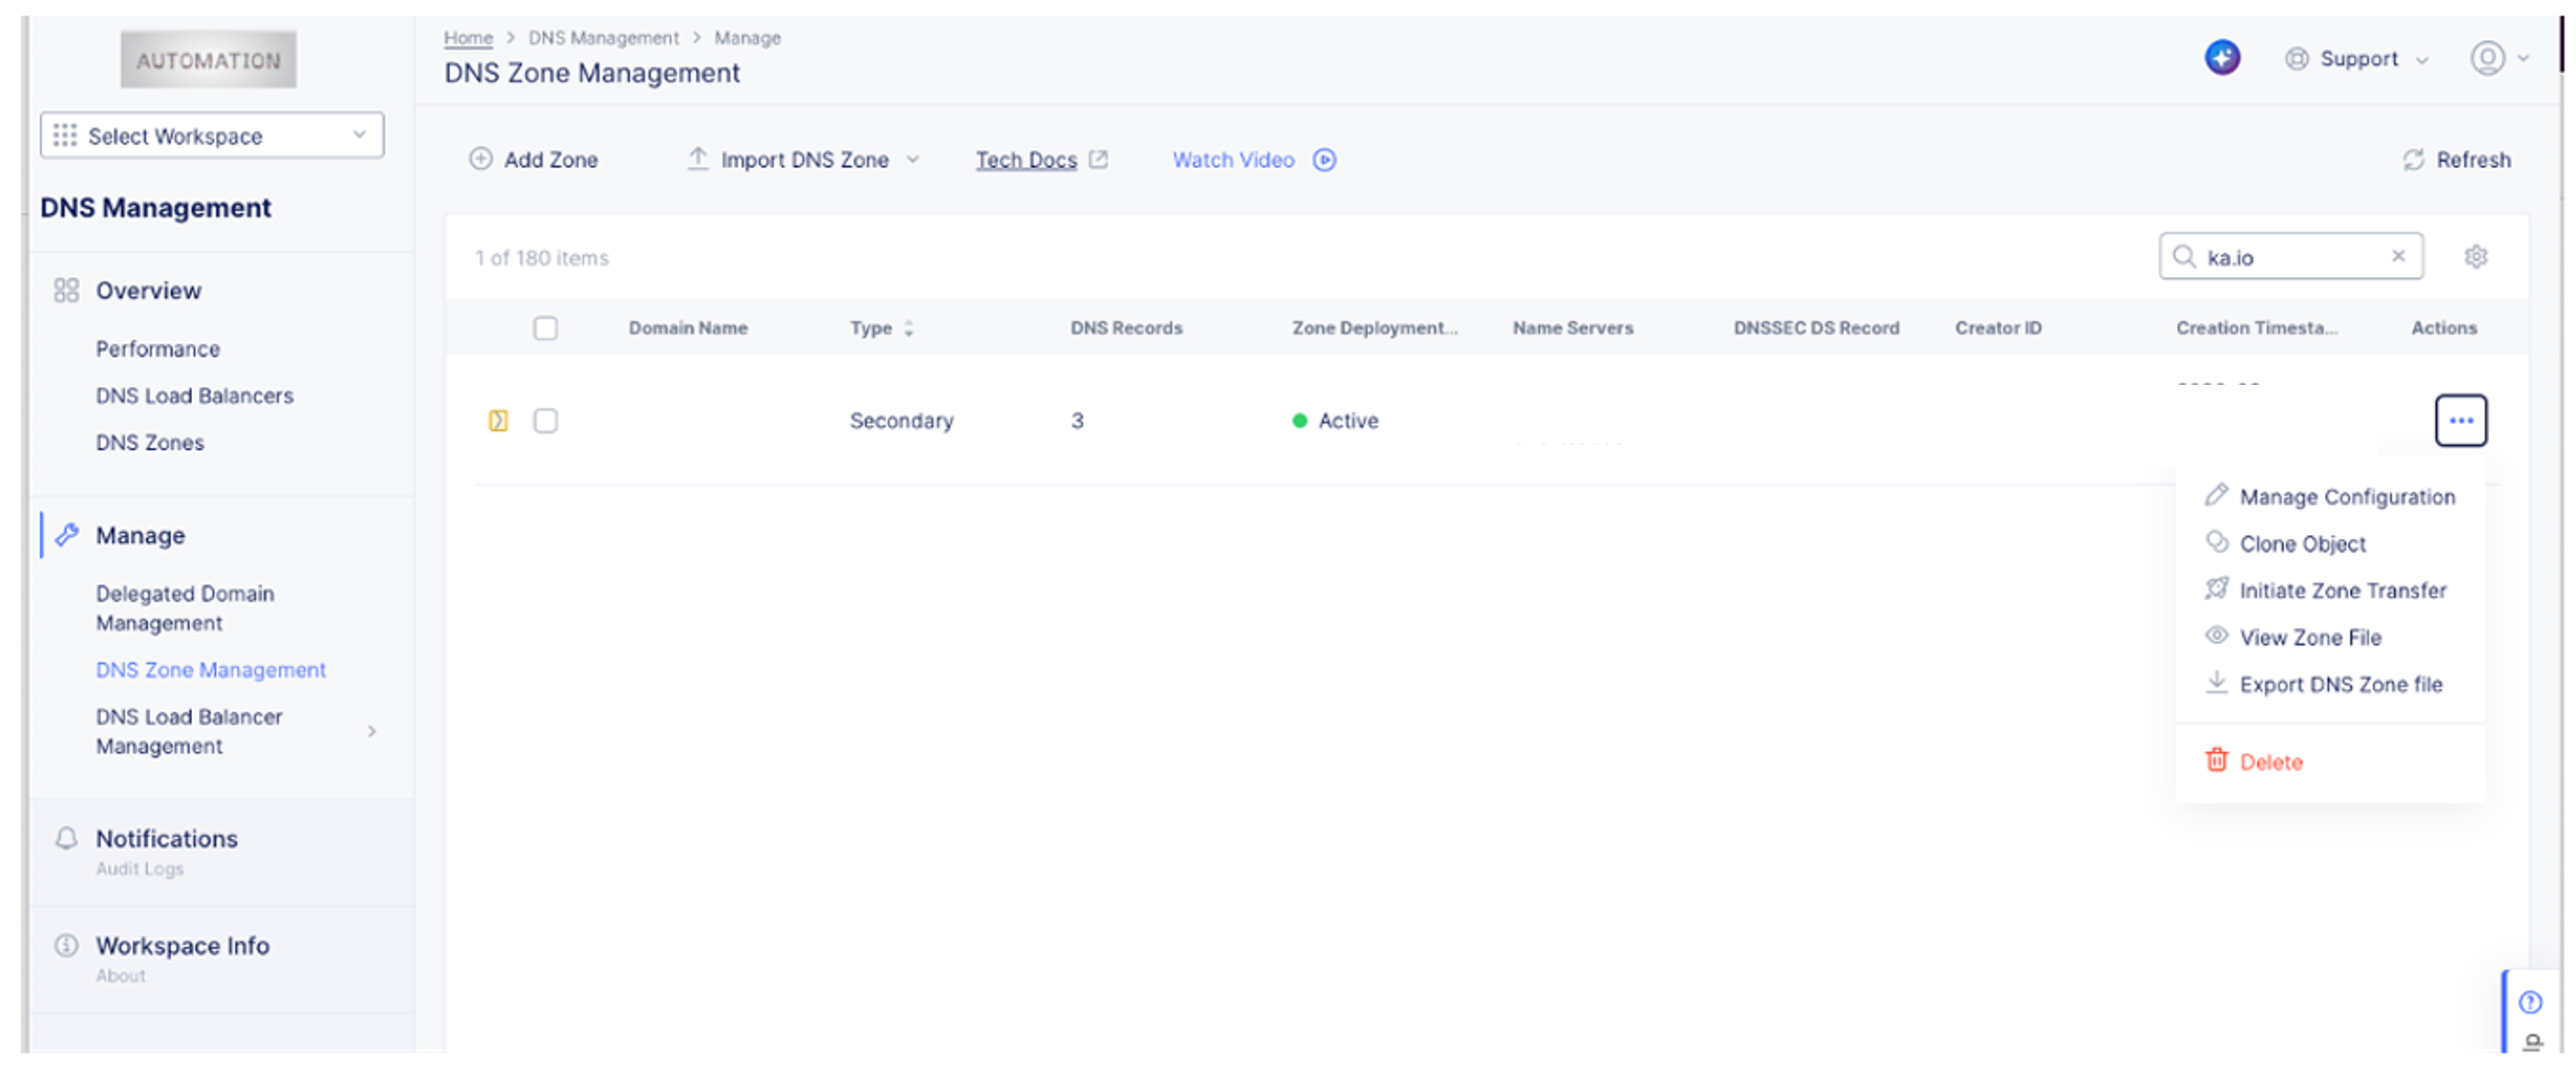
Figure: Initiate Zone Transfer
Import Zone
If you have an existing zone outside of F5 Distributed Cloud, you can import the zone. Note that only the primary zone can be imported using the import option.
Note: If you have DNSSEC records, those records are not imported. Also, importing an ALIAS record (or any other type of DNSLB record) is not supported.
Do the following to import a zone:
Step 1: Navigate to DNS Zone Management.
-
Click
DNS Managementworkspace on the Console home page. -
Select
DNS Zone Managementoption in the primary navigation menu located on the left side of the page.
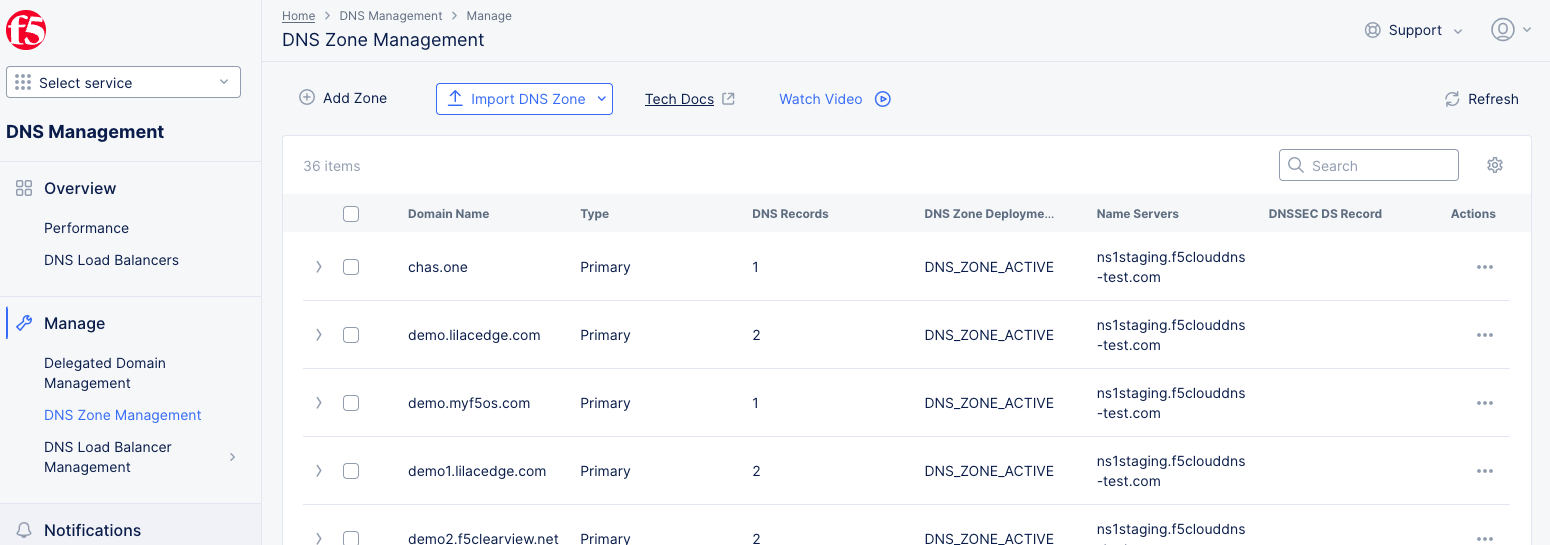
Figure: DNS Zone Management
Step 2: Import from a zone file
Use the Import DNS Zone drop-down menu to import from one of the following zone file types:

Figure: DNS Zone Management
Import from an AXFR zone file
- Select
AXFR Importfrom theImport DNS Zonedrop-down menu.
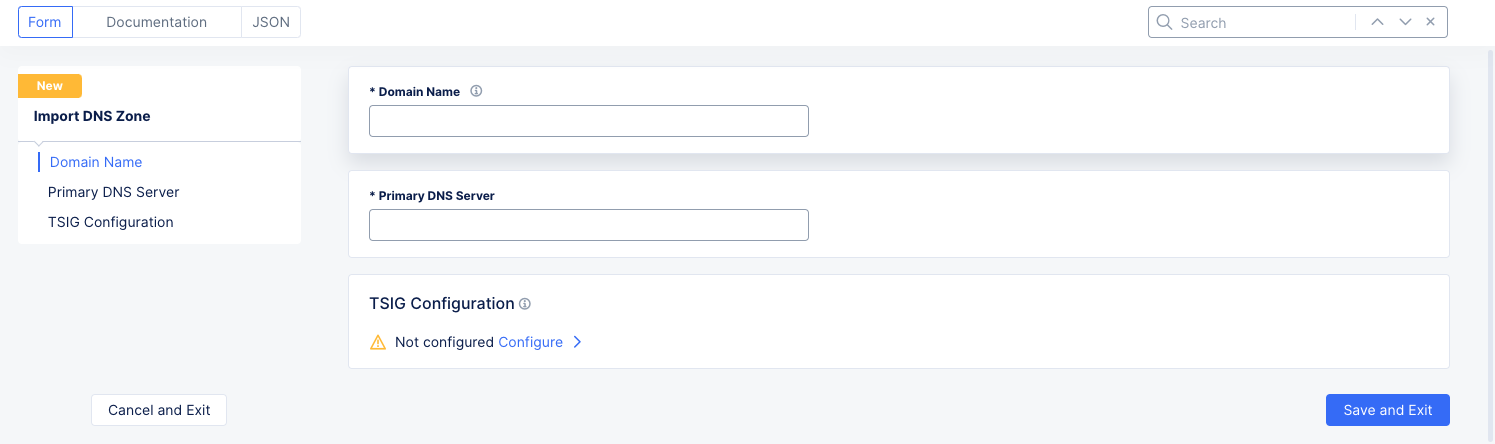
Figure: Import from AXFR
-
Enter domain name in the
Domain Namefield. -
Enter the IP address of your primary DNS server in the
Primary DNS Serverfield. -
Optionally, set TSIG configuration.
-
Click
Configurein theTSIG Configurationsection. -
Enter the Transaction Signature (TSIG) key name in the
TSIG key namefield. -
Click on the
TSIG Key algorithmfield and select an algorithm from the drop-down. Ensure that the key value for the key specified is compatible with the algorithm being selected. -
Click
Configurein theTSIG key value in base 64 formatsection. -
Encrypt your secret. Paste your secret in the
Secret to Blindfoldsection. ClickApply. -
Click
Applyin the TSIG configuration form.
-
Import from a BIND zone file
- Select
BIND Importfrom theImport DNS Zonedrop-down menu.
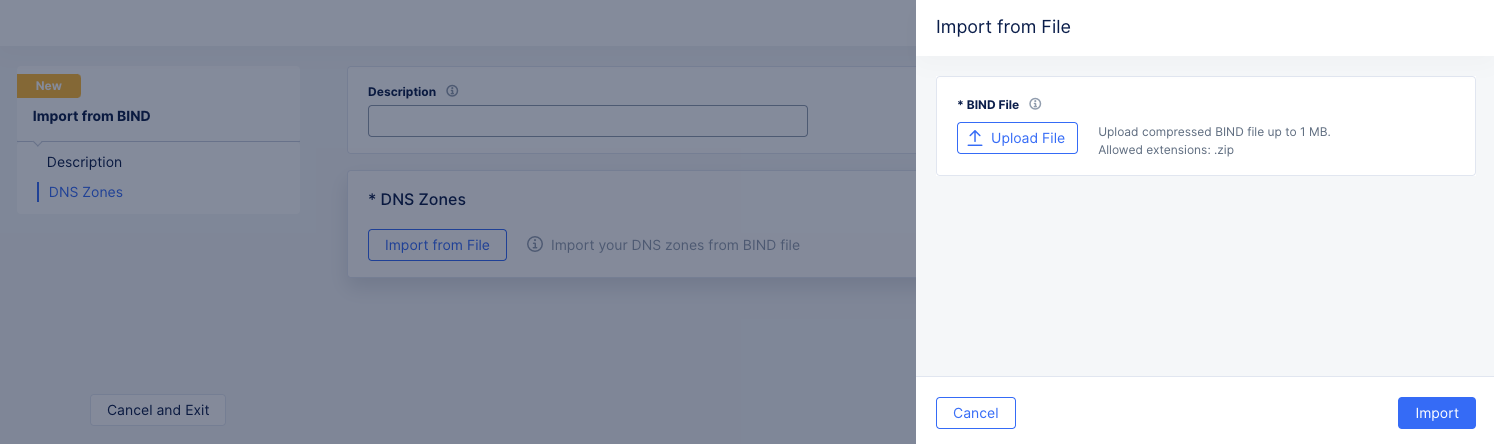
Figure: Import from BIND file
-
Optionally enter a description.
-
Click
Import from Filein theDNS Zonessection. -
Click
Upload Filein theImport from Filepanel. -
Use the system file browser to select and open your BIND File. The BIND file must be a compressed zip file no larger than 1 MB.
-
Click
Importat the bottom of theImport from Filepanel.
Step 4: Complete importing the zone.
Click Add Import DNS Zone or Add Import from BIND in the import configuration form to import your zone.
Monitor DNS Load Balancers
To monitor your overall DNS system, DNS Performance, DNS zones, and DNS load balancers, see Monitor DNS.