Configure Client-Side Defense
This guide provides instructions about how to enable Client-Side Defense (CSD) and how to apply it to your web applications using F5 Distributed Cloud Console. For more information about CSD, see About Client-Side Defense.
Prerequisites
A valid F5 Distributed Cloud Console Account. If you do not have an account, see Get Started with Distributed Cloud Console.
Enable CSD
To enable CSD in the Distributed Cloud Console:
-
From the Distributed Cloud Console homepage, select Client-Side Defense.
-
In the Client-Side Defense screen that appears, select Enable Client-Side Defense.
CSD is now enabled and ready for use. For assistance, contact your F5 account representative, or write to csd@f5.com.
Add a domain for CSD protection
After you enable CSD in the Distributed Cloud Console, add the root domain for all domains where you want to apply CSD protection:
Note: You can add up to 100 domains per namespace. If you need to add additional domains, contact your F5 account team.
- In CSD, go to Manage > Configuration.
- Select Add domain to protect. The Domain to protect screen appears.
- In the Domain to protect screen, enter the root domain you want to protect and select Add Domain to Protect.
The domain you added now appears in the list of domains to protect.
Inject the CSD JS on your web pages
After you add the domains on which to apply CSD protection, you must inject the CSD JavaScript on the web pages in the domain. F5 recommends injecting the CSD JavaScript on all web pages in the domain to maximize CSD protection.
Note: You can use content management systems, a CDN, a load balancer, or F5 BIG-IP to inject the CSD JavaScript in your website pages. However, the steps for each platform vary. For information about using F5 BIG-IP, see https://techdocs.f5.com/en-us/bigip-17-1-0/big-ip-dcs-client-side-defense-implementation.html.
Important: For security reasons, F5 recommends against using tag managers to inject the CSD JS.
To inject the CSD JavaScript on web pages:
- In the CSD dashboard, go to Configuration.
- Select How to Inject JS. The How to Inject JS screen appears.
- Follow the instructions for injecting the CSD JavaScript in the How to Inject JS screen.
Verify your email on the Alert Receiver
When you enable CSD, CSD automatically creates an Alert Receiver using the email address you entered for your account on Distributed Cloud Console. CSD also automatically creates an Alert Policy and adds a CSD alerts group to this policy. To ensure that you receive alerts when CSD detects suspicious activity, you need to verify your email on the Alert Receiver.
To verify your email on the Alert Receiver:
-
In the System namespace, in the left navigation pane, go to Manage > Alerts Management > Alert Receivers.
-
In the Alert Receivers screen, find the
client-side-defense-receiverrow and in its Actions column select the icon with three dots. A pop-up menu appears. -
Select Verify Email, and then select Send email to send the verification email.
-
After you receive the email, return to the Alert Receivers screen.
-
Find the
client-side-defense-receiverrow and in its Actions column select the icon with three dots. A pop-up window appears. -
Select Enter verification code, enter the verification from the email, and then select Verify receiver.
For information about how to create and configure Alert Receivers and Alert Policies, see Alerts - Email & SMS.
Configure CSD alerts
You can configure F5 Distributed Cloud alerts to notify you when a script communicates with a new suspicious domain or when a script reads a sensitive form field.
- From the Distributed Cloud Console Homepage, select the Audit Logs & Alerts workspace.
- From the navigation menu, select Manage > Alert Policies.
- Select Add Alert Policy.
- Enter a Name for the Alert policy. Then, from the Alert Receivers drop-down menu, select an alert receiver.
- In the Policy Rules section, select Configure, and then select Add Item.
- From the Select Alerts drop-down menu, select Matching Alertname.
- From the Matching Alertname drop-down menu, select one of the alerts listed below, such as ClientSideDefenseSuspiciousDomain.
- From the Action drop-down menu, select Send, and then select Apply.
- When finished, select Apply and then select Add Alert Policy.
CSD JavaScript monitors and collects the payload on end-user browsers. The payload is sent to F5 for threat analysis and evaluation. You can configure Distributed Cloud to notify you about the following alerts.
ClientSideDefenseSuspiciousDomain
-
Sample Scenario: Script exfiltrates data to two domains: magecart[.]net and googleanalytics[.]com.
-
Alerting Mechanism: Payload received is processed and evaluated against F5 proprietary domain classification machine learning service that categorizes magecart[.]net as high risk. An alert is visible on the dashboard (alerts landing page). Note that the system does not generate alerts for high-risk domains that are already part of a mitigation list or allow list.
ClientSideDefenseSensitiveFieldRead
-
Sample Scenario: Script reads two fields: credit_card and random_field.
-
Alerting Mechanism: Payload received is processed and evaluated against an F5 proprietary field classification algorithm that categorizes random_field as non-sensitive and credit_card field as sensitive. An alert is generated and can be accessed from the alerts landing page. Note that once a field is classified as sensitive, the system does not generate a new alert for the remaining lifecycle of the script, regardless of how many times it reads the same field. However, if a new field is identified, the system generates a new alert.
Security Header Monitoring Process (ClientSideDefenseHttpHeaderCompromised, ClientSideDefenseHttpHeaderModified)
CSD tracks and collects security header information directly from your web server.
-
Data Collection and Processing
- Source: Data collection occurs across multiple browser sessions belonging to different end-users from the same customer.
- Cycles: This collected data is processed in discrete, sequential processing cycles (or periods).
-
Alerting Mechanism
- Criteria: Criteria for CSD to issue a "modified" or "compromised" alert is based on a continuous comparison process.
- Baseline Establishment: In any given cycle, the collected and persisted security header data is established as the current baseline.
-
Comparison and Detection: In the subsequent cycle, the newly received data is compared against this established baseline.
-
Dynamic Baseline: The baseline is dynamic; it continuously "moves ahead." The data from the current cycle becomes the new baseline for the next comparison, ensuring continuous monitoring against the most recent state.
VesClientSideDefenseNewScriptsDetected
-
Sample Scenario: CSD JS tracks a webpage called Webpage abc[.]com for a period of time. A new script is now actively executing code (either legitimate, for example, a customer deployed a new webpage version to production, or injected script by extensions, or other CDN compromised supply chain attack).
-
Alerting Mechanism: While processing the payload in next cycle, the system identifies this new behavior and raises an alert, which you can access in the alerts landing page.
VesClientSideDefenseScriptNetworkBehaviorChanged
-
Sample Scenario: A script that is either active or inactive on a webpage starts exfiltrating data to the domain google[.]com.
-
Alerting Mechanism: This alert is only generated if the script changes its course of action and starts to exfiltrate data to external domains (regardless of the domain's risk level). Note that the system generates an alert only if it finds that the script previously had zero recorded network interactions or exfiltrations and only recently began exfiltrating data. This alert is never generated again for the same script, even if its network interaction behavior changes subsequently (for example, network interaction count from 1 to 5, 5 to 10, 10 to 5, and so on).
VesClientSideDefenseScriptFormFieldReadBehaviorChanged
-
Sample Scenario: A script that is either active or inactive on a webpage starts reading form fields like credit_card, random_fields, and so on.
-
Alerting Mechanism: This alert is only generated if the script changes its course of action and starts reading form fields (regardless of the field sensitivity classification). Note that the system generates an alert only if it finds that the script previously had zero recorded form field reads, and only recently began reading data. This alert is never generated again for the same script, even if its field reading behavior changes subsequently (for example, form field read count from 1 to 5, 5 to 10, 10 to 5, and so on).
Test the JS injection on your web pages
After you add domains for CSD protection and inject the CSD JavaScript on your web pages, you can test if the JavaScript injection was successful on a web page. Testing for the CSD JavaScript injection is not required, but F5 recommends performing this test to verify that your web pages are receiving CSD protection.
To test CSD JavaScript injection:
- In CSD, go to Manage > Configuration.
- Find the domain in the list that contains the web page that you want to test, and select Test JS Injection. The Test JS Injection screen appears.
- In the Test JS Injection screen, paste the URL of the web page that you want to test and select Test JS Injection.
When the test finishes, the CSD dashboard displays a confirmation message indicating whether or not the CSD JavaScript was detected on the web page.
Use the CSD dashboard
Monitoring > Dashboard
The CSD Monitoring Dashboard page displays the suspicious network interactions with additional information for deciding whether to mitigate or allow a suspicious domain. When a web page with CSD protection is loaded on the end-user’s browser, scripts running on that webpage interact with other domains. The Suspicious Domains list displays a list of the domains that those scripts interact with and which CSD detected to be potentially malicious.
Monitoring > Script List
The Script List displays all JavaScript scripts discovered by CSD for a protected page and provides an overview of which scripts interact with the different webpage elements. You can approve or reject scripts to control whether they can interact with your pages in the future. The Script List displays up to 100 location results for each script.
To view the Script List, from the CSD navigation menu, go to Monitoring > Script List.
By default, the dashboard displays data from the last 24 hours. You can choose to display data from the last 7 days or last 30 days.
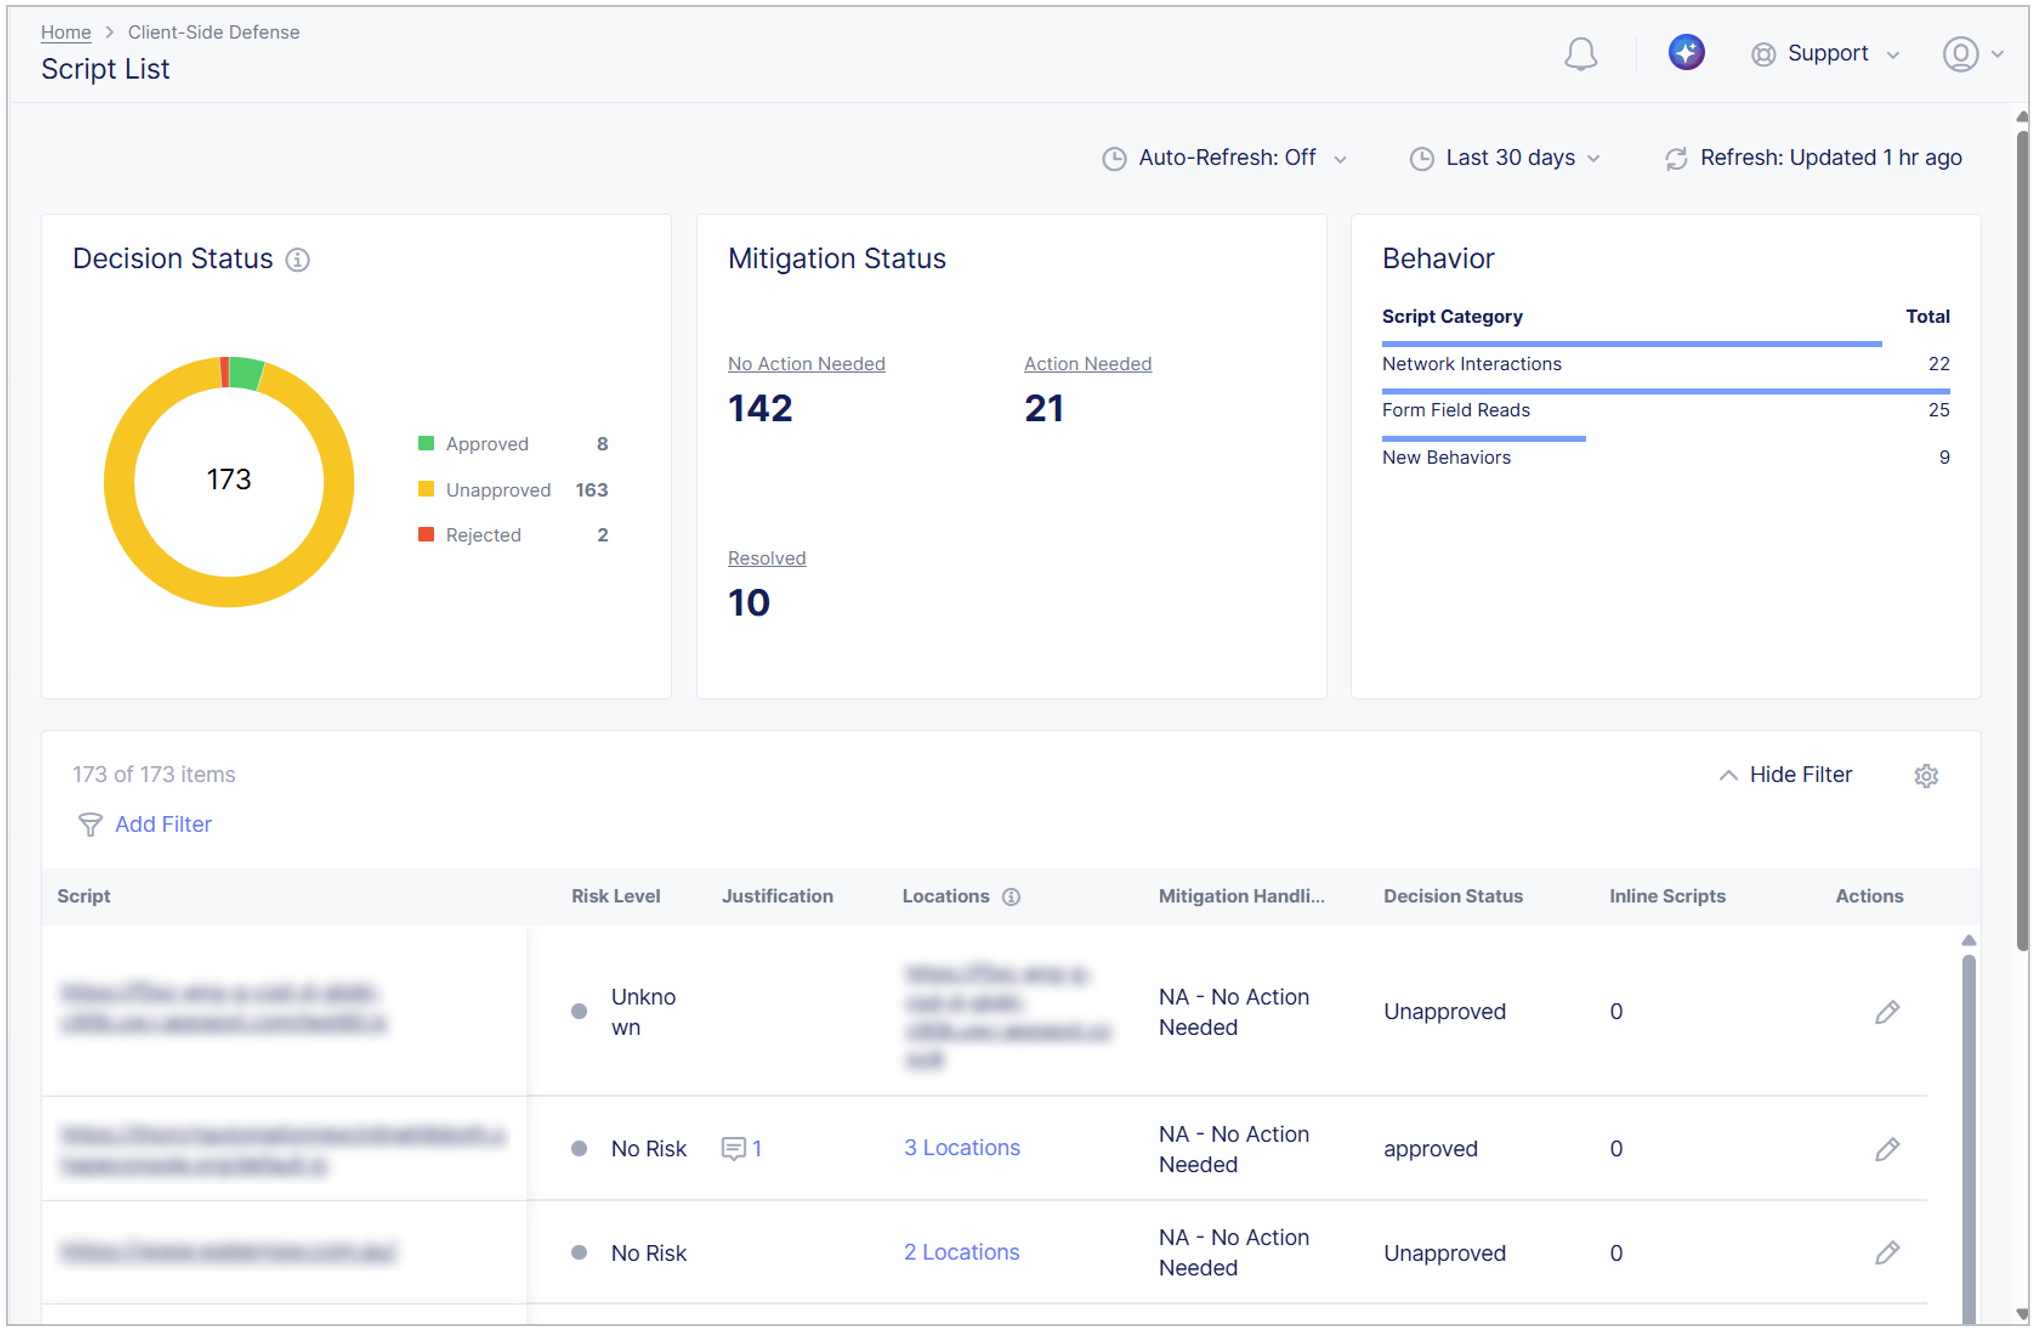
Figure: Script List
The script list displays the following information:
-
Decision Status:
- Approved: Number of scripts that were reviewed and explicitly approved by you or another user.
- Unapproved: Number of scripts that were not reviewed and explicitly approved by you or another user.
- Rejected: Number of scripts that were reviewed and explicitly rejected by you or another user. You should remove rejected scripts from your code base as soon as possible.
-
Mitigation Status:
- No Action Needed: CSD did not find anything suspicious with this script.
- Action Needed: CSD found some suspicious behaviors with the script that needs your attention.
- Resolved: CSD found some suspicious behaviors with this script that a user has already taken action on.
Select a status to filter the list of scripts displayed in the table
-
Behavior:
- Network Interactions: All network interactions for the script.
- Form Field Reads: All form fields read by this script.
- New Behaviors: Script behaviors (new or otherwise) over time.
Select a script to view the following information:
- Overview: Information about new and existing script behaviors over time. Toggle to view All Behaviors or only New Behaviors.
- Network: All network interactions for the script.
- Form Fields: All form fields read by this script, up to 50 locations.
- Affected Users: Devices on which the script ran, including IP address, whether web or mobile, and when it the script was last run.
- Inline Script List: List of scripts that were observed inline in an HTML page.
Approve or reject scripts
You can approve or reject JavaScript in the Script List, add justifications for the scripts and take mitigation actions.
-
For a script on which you want to take action, from the Actions column, select the Add Justification icon.
-
From the Decision Status drop-down menu, select whether you want to approve or reject the script. Note that this is informational only. A rejected script is not blocked. You should remove rejected scripts from your code base as soon as possible.
-
In the Comment field, add a justification that explains the decision status you chose.
-
In the Network Connection section, add each domain with which the script communicates to an Allow List or Mitigation List. Select a Domain Name and then from the Actions column, select the Action menu (…).
Important: Adding a domain to the mitigation list blocks the domain for all scripts.
-
In the Form Fields section, select whether you want to allow the script to read form fields on the protected page or if you want to block the script from reading fields.
-
Select one of the following options:
- Review & Save Script Status: Display a read-only view of your changes to review. Then, optionally save your changes.
- Save Script Status: Save your changes.
Monitoring > Network
The CSD Monitoring Network page displays several tabs for displaying holistic network data, which can assist you when deciding whether to mitigate or allow a suspicious domain:
- All Domains: When a web page with CSD protection is loaded, scripts running on that web page interact with other domains. The All Domains list displays a list of the domains that those scripts interact with.
- Mitigate List: Displays a list of domains that the user has assigned for mitigation. When a domain is assigned for mitigation, CSD blocks that domain and it cannot be accessed by any script running on the end-user's browser when accessing a CSD protected web page.
- Allow List: Displays a list of domains that the user has decided don't need mitigation and are allowed free access.
The Network page displays up to 50 location results.
Monitoring > Form Fields
The CSD Monitoring Form Fields page displays a list of the form fields in your site that were read by scripts during the time period you select.
- Form Field: The name of the form field.
- Last Read Time: The last time the field was read by a script.
- First Read Time: The first time the field was read by a script.
- Associated Scripts: The scripts that read the field. Click to see the list of specific scripts.
- Locations Found: The URLs where the fields are located. Click to see the list of specific locations.
- Analysis: Whether the field is Sensitive or Not Sensitive and whether that was determined by the user or by the system.
- Actions: Optionally, change the field analysis to Sensitive or Not Sensitive.
Manage configurations
Use the Configuration page to configure your web application for CSD protection. In CSD, select Manage > Configuration.
The page displays a list of your root domains that are configured for CSD protection. You can perform the following tasks:
- Add domains for CSD protection. Select Add Domain to Protect.
- Display instructions for injecting the CSD JS on web pages in a domain. Select How to Inject JS.
- Test whether CSD successfully injects JS in a specific web page. For information, see Test the JS injection on your web pages.
- Schedule a CSD training session. Select Schedule a session.
View suspicious domains
When CSD detects suspicious activity on a domain that has been configured for CSD protection, the user is alerted and that domain is added to the dashboard.
Filter suspicious domains by location
You can filter the Suspicious Domains list according to a specific location or locations where CSD detected suspicious activity.
To filter the Suspicious Domains list by location:
- In the upper-right of the page, select Select Page. A pop-up list appears.
- Select one or more locations, and then select Apply.
The list now displays only those domains containing the locations you selected.
Add a domain to the Mitigate List or Allow List
To add a domain to the Mitigate List or Allow List:
- From the Client-Side Defense navigation panel, select Monitoring > Network.
- Go to the Suspicious Domains list or All Domains list.
- Go to the row for the relevant domain. In the Actions column, select the Action menu (...). A pop-up menu appears.
- Select Add to Allow List/Add to Mitigate List.
Alternatively, you can add a domain directly from the Mitigation List or Allow List as follows:
- In the Mitigation List or Allow List, select Add domain. A new screen appears.
- Enter the domain name and then select Add Mitigated Domain or Add Allowed Domain.
After you add a domain to the Mitigate List or Allow List, you can delete it from the list by selecting the Action menu (...) in the Actions column, and then selecting Delete.
View domain details
From the Suspicious Domains list or All Domains list, you can view the following domain information by selecting the domain from the list:
- Reasons why this domain may be at risk
- Risk score
- Web pages on this domain with CSD protection
- Scripts that are potentially networking with the domain
Modify the CSD JS for asynchronous loading
By default, the CSD JavaScript is configured to load synchronously and F5 highly recommends against changing this configuration. However, if there is a strong need, you can modify the CSD JavaScript to load asynchronously. To modify the CSD JavaScript for asynchronous loading, add async defer to the beginning of the script, as follows:
Change: <script src="https://us.gimp.zeronaught.com/js/example.js"></script>
To: <script async defer src="https://us.gimp.zeronaught.com/js/example.js"></script>
The CSD JavaScript should always be the first JavaScript or script to load on the web page to ensure that the CSD JavaScript can detect any malicious scripts running on the web page.
Script versioning by name change
When you release a new version of a script with an updated name and path, you receive redundant alerts for the updated script. To stop the redundant alerts, contact F5 Support for information about how to define regex expressions that represent your script.
Configure Client-Side Defense in Web App & API Protection
You can optionally enable and configure Client-Side Defense on one or more HTTP load balancers that you have configured in the F5 Distributed Cloud Console in either Web App & API Protection or Multi-Cloud App Connect.
Complete the following tasks to configure Client-Side Defense on an HTTP load balancer:
-
In Client-Side Defense, add the root domain for all the domains that you want to protect.
-
Enable Client-Side Defense on each HTTP load balancer on which you want to configure Client-Side Defense.
-
Configure the Client-Side Defense Policy on each HTTP load balancer on which you want to configure Client-Side Defense, which controls how you want Client-Side Defense to inject JavaScript tags in the HTTP pages in your application.
Client-Side Defense inserts JavaScript in your application to detect network requests and form field reads by malicious scripts that may attempt to exfiltrate PII data.
Before you Begin:
- You must purchase Client-Side Defense. Contact your F5 Account Representative for assistance.
- You must have an active F5 Distributed Cloud account. If you do not have an account, see Get Started with Distributed Cloud Console.
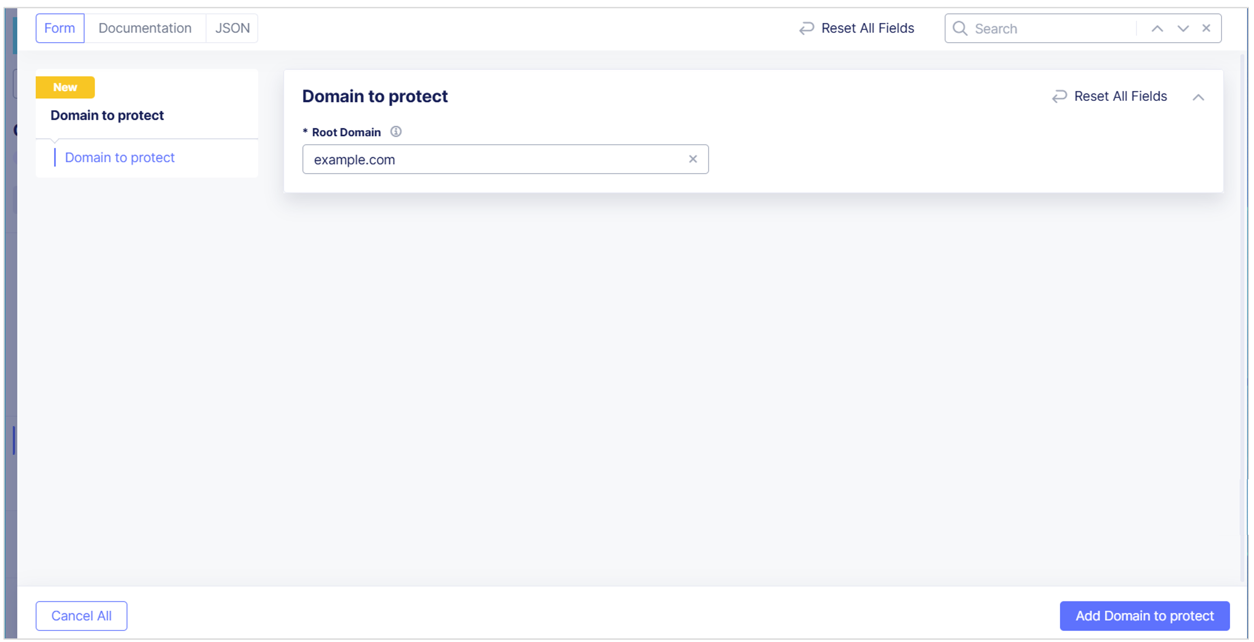
Add a root domain to protect with Client-Side Defense
Add the root domain for all domains you want to protect with Client-Side Defense.
-
From the Distributed Cloud Console Homepage, select Client-Side Defense.
-
From the navigation menu, select Manage > Configuration and then select Add Domain to Protect.
-
In the Root Domain field, enter the domain you want to protect. This should be the root of the pages where you inject JavaScript. Then select Add Domain to Protect to save the domain.

Figure: Protect a Root Domain
Enable Client-Side Defense on an HTTP load balancer
Enable and configure Client-Side Defense on one or more HTTP load balancers in Web App & API Protection.
Important: You must add the root domain you want to protect in Client-Side Defense before you can configure Client-Side Defense on your HTTP load balancer.
- From the Distributed Cloud Console Homepage, select Web App & API Protection.
- From the navigation menu, confirm that you selected the correct namespace.
- Select Manage > Load Balancers > HTTP Load Balancers.
- From the Actions column, select the Action (…) menu next to the load balancer where you want to configure Client-Side Defense and then select Manage Configuration.
- Select Edit Configuration and then select Client-Side Defense.
- From the Client-Side Defense drop-down menu, select Enable.
Configure Client-Side Defense policy
Configure the Client-Side Defense policy to control in which of your application pages Client-Side Defense inserts JavaScript tags.
-
From the Client-Side Defense Policy box, select Edit Configuration.

Figure: Enable Client-Side Defense on an HTTP Load Balancer
-
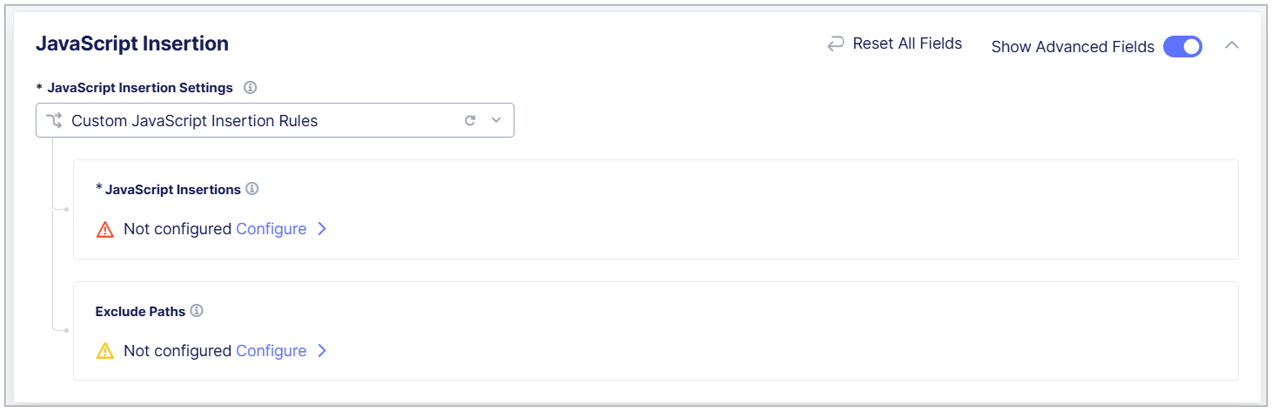
From the JavaScript Insertion Settings drop-down menu, select the pages in which you want Client-Side Defense to insert JavaScript. Select one of the following options:
-
Insert JavaScript in All Pages: Client-Side Defense inserts JavaScript tags in all your application pages.
-
Insert JavaScript in All Pages with the Exceptions: Configure the pages in which you do not want Client-Side Defense to insert JavaScript tags:
-
In the JavaScript Insertions section, select Configure and then select Add Item.
-
Enter a Name and Description to identify the new exclusion rule.
-
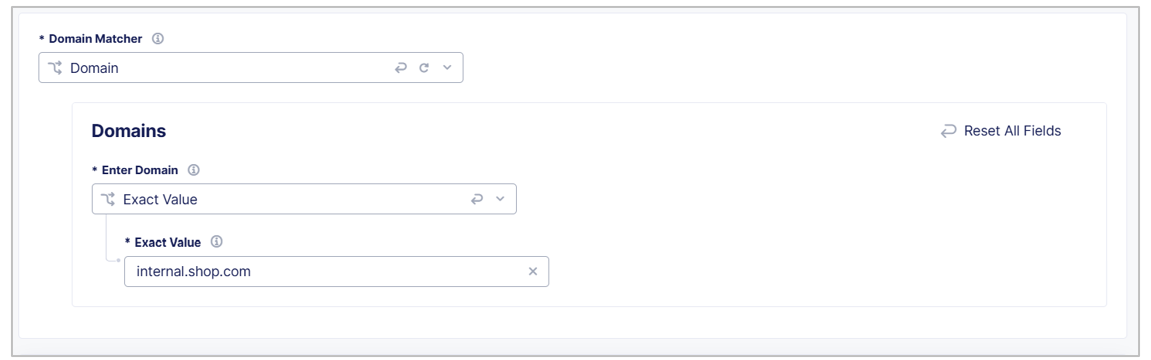
Use the Domain Matcher fields to specify domains you want to exclude from JavaScript insertion. Enter an Exact Value, a Suffix Value, or a Regex Value. If you select** Any Domain**, then Client-Side Defense injects JavaScript tags in HTML pages from all domains.

Figure: Configure a Domain Matcher
-
Use the Path fields to specify paths of pages in which you do not want to insert JavaScript tags, such as
/helpor/about. Enter a Prefix, Exact path, or Regex value.
Figure: Configure a Path Matcher
-
Select Apply.
-
Select Apply.
-
-
Custom JavaScript Insertion Rules: Select Show Advanced Fields and then use the instructions above to add the pages you want to include and exclude from JavaScript insertion.

Figure: Configure JavaScript Insertion
-
-
Select Apply.
-
Select Save HTTP Load Balancer.


Disable Client-Side Defense JavaScript insertion
The following steps explain how to optionally disable JavaScript tag insertion in environments where you have enabled Client-Side Defense on an HTTP load balancer.
Important: For maximum effectiveness, Client-Side Defense requires you to enable JavaScript insertion. F5 recommends that you do not disable JavaScript insertion.
To disable JavaScript insertion in Client-Side Defense on an HTTP load balancer:
- From the Distributed Cloud Console Homepage, select Web App & API Protection.
- From the navigation menu, confirm that you selected the correct namespace.
- Select Manage > Load Balancers > HTTP Load Balancers.
- From the Actions column, select the Action (…) menu next to the load balancer on which you want to disable JavaScript tag insertion and then select Manage Configuration.
- Select Edit Configuration and then select Client-Side Defense.
- In the Client-Side Defense Policy section, select Edit Configuration.
- Enable Show Advanced Fields.
- From the JavaScript Insertion Settings drop-down menu, select Disable JavaScript Insertion and then select Apply.
- To save your changes, select Save HTTP Load Balancer.
On this page:
- Prerequisites
- Enable CSD
- Add a domain for CSD protection
- Inject the CSD JS on your web pages
- Verify your email on the Alert Receiver
- Configure CSD alerts
- Test the JS injection on your web pages
- Use the CSD dashboard
- Monitoring > Dashboard
- Monitoring > Script List
- Approve or reject scripts
- Monitoring > Network
- Monitoring > Form Fields
- Manage configurations
- View suspicious domains
- Filter suspicious domains by location
- Add a domain to the Mitigate List or Allow List
- View domain details
- Modify the CSD JS for asynchronous loading
- Script versioning by name change
- Configure Client-Side Defense in Web App & API Protection
- Add a root domain to protect with Client-Side Defense
- Enable Client-Side Defense on an HTTP load balancer
- Configure Client-Side Defense policy
- Disable Client-Side Defense JavaScript insertion