Import OpenAPI Specification to Define API Definition
Objective
This guide provides instructions on how to import an OpenAPI Specification (formerly Swagger) file to define API groups and set rules to control access to APIs, enabling granular API access control ability. To learn more about security concepts, see Security.
Enabling this feature includes preparing the OpenAPI Specification files for your API definitions, importing them to F5 Distributed Cloud Services, and applying them to your load balancer. Also, you can enable API validation to ensure that traffic to your API complies with a specified schema.
Using the instructions provided in this guide, you can import OpenAPI Specification files, attach them to your load balancer, and apply service policies to restrict access to the API groups defined in the OpenAPI Specification files.
OpenAPI Validation
Many issues in the Open Web Application Security Project (OWASP) API Security Top 10 list are triggered because of missing input validation. To protect APIs from such issues, OpenAPI Validation is used. The OpenAPI Validation enables you to ensure that traffic to your API complies with a specified schema. If the traffic does not conform to your API schema, you can enable action to block the traffic, ensuring the security and integrity of your API.
OpenAPI Validation offers flexibility to configure validation of traffic on a per-endpoint, per-group, or per-base-path basis, so that you can customize the validation to suit your specific requirements.
In addition to blocking non-compliant traffic, OpenAPI Validation also supports reporting and allowing actions. It also supports identifying Shadow APIs and actions to report or block traffic to Shadow APIs. For more information on Shadow APIs, see API Endpoint Discovery and Schema Learning guide.
Note: The report action allows the traffic while raising an API security event.
OpenAPI Validation allows specifying of Allowed IPs list. This list can include specific IP addresses for which you want to skip validation, allowing you to control who has access to your API. Also, OpenAPI Validation can be enforced according to the authentication scheme that you have defined for your API. By doing so, you can ensure that only authenticated users can access your API, further enhancing the security of your system.
Prerequisites
The following prerequisites apply:
-
F5 Distributed Cloud Services Account. If you do not have an account, see Getting Started with Console.
-
An HTTP load balancer advertising your application. For instructions on creating load balancer, see HTTP Load Balancer. See the vK8s Deployment guide for deploying your applications on the F5 Distributed Cloud's Network Cloud or Edge Cloud.
Configuration
You can create the API definition as part of the HTTP load balancer configuration or separately using the Manage > API Definition option. This guide presents instructions on creating a separate API definition and later applying it to a load balancer.
Importing OpenAPI Specification files to define API groups and control access to those groups includes the following sequence of activities:
-
Prepare OpenAPI Specification files containing API groups and definitions and import them using Console.
-
Define service policy to control access to the API groups.
Import OpenAPI Specification Files and Create API Definitions
Perform the following to prepare and import OpenAPI Specification files containing API groups and definitions.
Step 1: Prepare OpenAPI Specification files.
Prepare OpenAPI Specification files on your local machine with the API groups and definitions per your requirements.
The following are sample files for your reference. One file is for user API and the other file is for REST API:
User API
{  "swagger": "2.0",  "info": {    "description": "Juice Shop User API",    "title": "Juice Shop User API",    "version": "v0"  },  "basePath": "/api",  "schemes": [    "http",    "https"  ],  "paths": {    "/Addresss": {      "get": {        "consumes": [          "application/json"        ],        "description": "Swagger auto-generated from learnt schema",        "responses": {          "200": {            "description": ""          }        }      }    },    "/Addresss/{id}": {      "get": {        "consumes": [          "application/json"        ],        "description": "Swagger auto-generated from learnt schema",        "parameters": [          {            "name": "id",            "in": "path",            "description": "ID",            "required": true,            "type": "integer",            "format": "int64"          }        ],        "responses": {          "200": {            "description": ""          }        }      }    },    "/BasketItems/": {      "post": {        "consumes": [          "application/json"        ],        "description": "Swagger auto-generated from learnt schema",        "parameters": [          {            "description": "",            "in": "body",            "name": "body",            "schema": {              "example": [                "{\"ProductId\":6,\"BasketId\":\"6\",\"quantity\":1}",                "{\"ProductId\":9,\"BasketId\":\"6\",\"quantity\":1}",                "{\"ProductId\":24,\"BasketId\":\"6\",\"quantity\":1}"              ],              "properties": {                "BasketId": {                  "description": "Integer",                  "pattern": "-?\\d+",                  "type": "string"                },                "ProductId": {                  "type": "integer"                },                "quantity": {                  "type": "integer"                }              },              "required": [                "quantity",                "BasketId",                "ProductId"              ],              "type": "object"            }          }        ],        "responses": {          "200": {            "description": ""          }        }      }    },    "/BasketItems/{id}": {      "get": {        "consumes": [          "application/json"        ],        "description": "Swagger auto-generated from learnt schema",        "parameters": [          {            "description": "",            "in": "body",            "name": "body",            "schema": {              "example": [                "{\"ProductId\":6,\"BasketId\":\"6\",\"quantity\":1}",                "{\"ProductId\":9,\"BasketId\":\"6\",\"quantity\":1}",                "{\"ProductId\":24,\"BasketId\":\"6\",\"quantity\":1}"              ],              "properties": {                "BasketId": {                  "description": "Integer",                  "pattern": "-?\\d+",                  "type": "string"                },                "ProductId": {                  "type": "integer"                },                "quantity": {                  "type": "integer"                }              },              "required": [                "quantity",                "BasketId",                "ProductId"              ],              "type": "object"            }          },          {            "name": "id",            "in": "path",            "description": "ID",            "required": true,            "type": "integer",            "format": "int64"          }        ],        "responses": {          "200": {            "description": ""          }        }      }    },    "/Cards/{id}": {      "get": {        "consumes": [          "application/json"        ],        "description": "Swagger auto-generated from learnt schema",        "parameters": [          {            "name": "id",            "in": "path",            "description": "ID",            "required": true,            "type": "integer",            "format": "int64"          }        ],        "responses": {          "200": {            "description": ""          }        }      }    },    "/Cards": {      "get": {        "consumes": [          "application/json"        ],        "description": "Swagger auto-generated from learnt schema",        "responses": {          "200": {            "description": ""          }        }      }    },    "/Cards/": {      "post": {        "consumes": [          "application/json"        ],        "description": "Swagger auto-generated from learnt schema",        "responses": {          "200": {            "description": ""          }        }      }    },    "/Challenges/": {      "get": {        "consumes": [          "application/json"        ],        "description": "Swagger auto-generated from learnt schema",        "parameters": [          {            "description": "",            "in": "query",            "name": "name",            "type": "string"          }        ],        "responses": {          "200": {            "description": ""          }        }      }    },    "/Products/{id}": {      "get": {        "consumes": [          "application/json"        ],        "description": "Swagger auto-generated from learnt schema",        "parameters": [          {            "name": "id",            "in": "path",            "description": "ID",            "required": true,            "type": "integer",            "format": "int64"          }        ],        "responses": {          "200": {            "description": ""          }        }      }    },    "/Quantitys/": {      "get": {        "consumes": [          "application/json"        ],        "description": "Swagger auto-generated from learnt schema",        "parameters": [
        ],        "responses": {          "200": {            "description": ""          }        }      }    },    "/Deliverys": {      "get": {        "consumes": [          "application/json"        ],        "description": "Swagger auto-generated from learnt schema",        "parameters": [
        ],        "responses": {          "200": {            "description": ""          }        }      }    },    "/Deliverys/{id}": {      "get": {        "consumes": [          "application/json"        ],        "description": "Swagger auto-generated from learnt schema",        "parameters": [          {            "name": "id",            "in": "path",            "description": "ID",            "required": true,            "type": "integer",            "format": "int64"          }        ],        "responses": {          "200": {            "description": ""          }        }      }    },    "/SecurityAnswers": {      "post": {        "consumes": [          "application/json"        ],        "description": "Swagger auto-generated from learnt schema",        "parameters": [          {            "description": "",            "in": "body",            "name": "body",            "schema": {              "example": [                "{\"UserId\":22,\"answer\":\"09/77/33\",\"SecurityQuestionId\":3}"              ],              "properties": {                "SecurityQuestionId": {                  "type": "integer"                },                "UserId": {                  "type": "integer"                },                "answer": {                  "description": "Integer",                  "pattern": "-?\\d+",                  "type": "string"                }              },              "required": [                "UserId",                "SecurityQuestionId",                "answer"              ],              "type": "object"            }          }        ],        "responses": {          "200": {            "description": ""          }        }      }    }  }}
REST API
{  "swagger": "2.0",  "info": {    "description": "Juice Shop REST",    "title": "Juice Shop REST",    "version": "v1"  },  "basePath": "/rest",  "schemes": [    "http",    "https"  ],  "paths": {    "/basket/{id}": {      "get": {        "consumes": [          "application/json"        ],        "description": "Swagger auto-generated from learnt schema",        "parameters": [          {            "name": "id",            "in": "path",            "description": "ID",            "required": true,            "type": "integer",            "format": "int64"          }        ],        "responses": {          "200": {            "description": ""          }        }      }    },    "/captcha": {      "get": {        "consumes": [          "application/json"        ],        "description": "Swagger auto-generated from learnt schema",        "parameters": [
        ],        "responses": {          "200": {            "description": ""          }        }      }    },    "/languages": {      "get": {        "consumes": [          "application/json"        ],        "description": "Swagger auto-generated from learnt schema",        "parameters": [
        ],        "responses": {          "200": {            "description": ""          }        }      }    },    "/memories": {      "get": {        "consumes": [          "application/json"        ],        "description": "Swagger auto-generated from learnt schema",        "parameters": [
        ],        "responses": {          "200": {            "description": ""          }        }      }    },    "/saveLoginIp": {      "get": {        "consumes": [          "application/json"        ],        "description": "Swagger auto-generated from learnt schema",        "parameters": [
        ],        "responses": {          "200": {            "description": ""          }        }      }    },    "/products/{id}/reviews": {      "get": {        "consumes": [          "application/json"        ],        "description": "Swagger auto-generated from learnt schema",        "parameters": [          {            "name": "id",            "in": "path",            "description": "ID",            "required": true,            "type": "integer",            "format": "int64"          }        ],        "responses": {          "200": {            "description": ""          }        }      },      "put": {        "consumes": [          "application/json"        ],        "description": "Swagger auto-generated from learnt schema",        "parameters": [          {            "name": "id",            "in": "path",            "description": "ID",            "required": true,            "type": "integer",            "format": "int64"          }        ],        "responses": {          "200": {            "description": ""          }        }      }    },    "/products/{id}": {      "get": {        "consumes": [          "application/json"        ],        "description": "Swagger auto-generated from learnt schema",        "parameters": [          {            "name": "id",            "in": "path",            "description": "ID",            "required": true,            "type": "integer",            "format": "int64"          }        ],        "responses": {          "200": {            "description": ""          }        }      },      "post": {        "consumes": [          "application/json"        ],        "description": "Swagger auto-generated from learnt schema",        "parameters": [          {            "name": "id",            "in": "path",            "description": "ID",            "required": true,            "type": "integer",            "format": "int64"          }        ],        "responses": {          "200": {            "description": ""          }        }      }    },    "/basket/{id}/checkout": {      "post": {        "consumes": [          "application/json"        ],        "description": "Swagger auto-generated from learnt schema",        "parameters": [          {            "name": "id",            "in": "path",            "description": "ID",            "required": true,            "type": "integer",            "format": "int64"          }        ],        "responses": {          "200": {            "description": ""          }        }      }    },    "/wallet/balance": {     "get": {        "consumes": [          "application/json"        ],        "description": "Swagger auto-generated from learnt schema",        "parameters": [
        ],        "responses": {          "200": {            "description": ""          }        },        "x-volterra-api-group":"sensitive"      }    },    "/track-order/{id}": {    "get": {        "consumes": [          "application/json"        ],        "description": "Swagger auto-generated from learnt schema",        "parameters": [          {            "name": "id",            "in": "path",            "description": "ID",            "required": true,            "type": "integer",            "format": "int64"          }        ],        "responses": {          "200": {            "description": ""          }        }      }    },    "/user/whoami": {    "get": {        "consumes": [          "application/json"        ],        "description": "Swagger auto-generated from learnt schema",        "parameters": [
        ],        "responses": {          "200": {            "description": ""          }        },        "x-volterra-api-group":"sensitive"      }    }  }}
Step 2: Log into Console, and import OpenAPI Specification files.
-
Navigate to the
Web App & API Protectionservice and change to desired namespace. -
Select
Manage>Files>OpenAPI Files. -
Click
Add OpenAPI File.
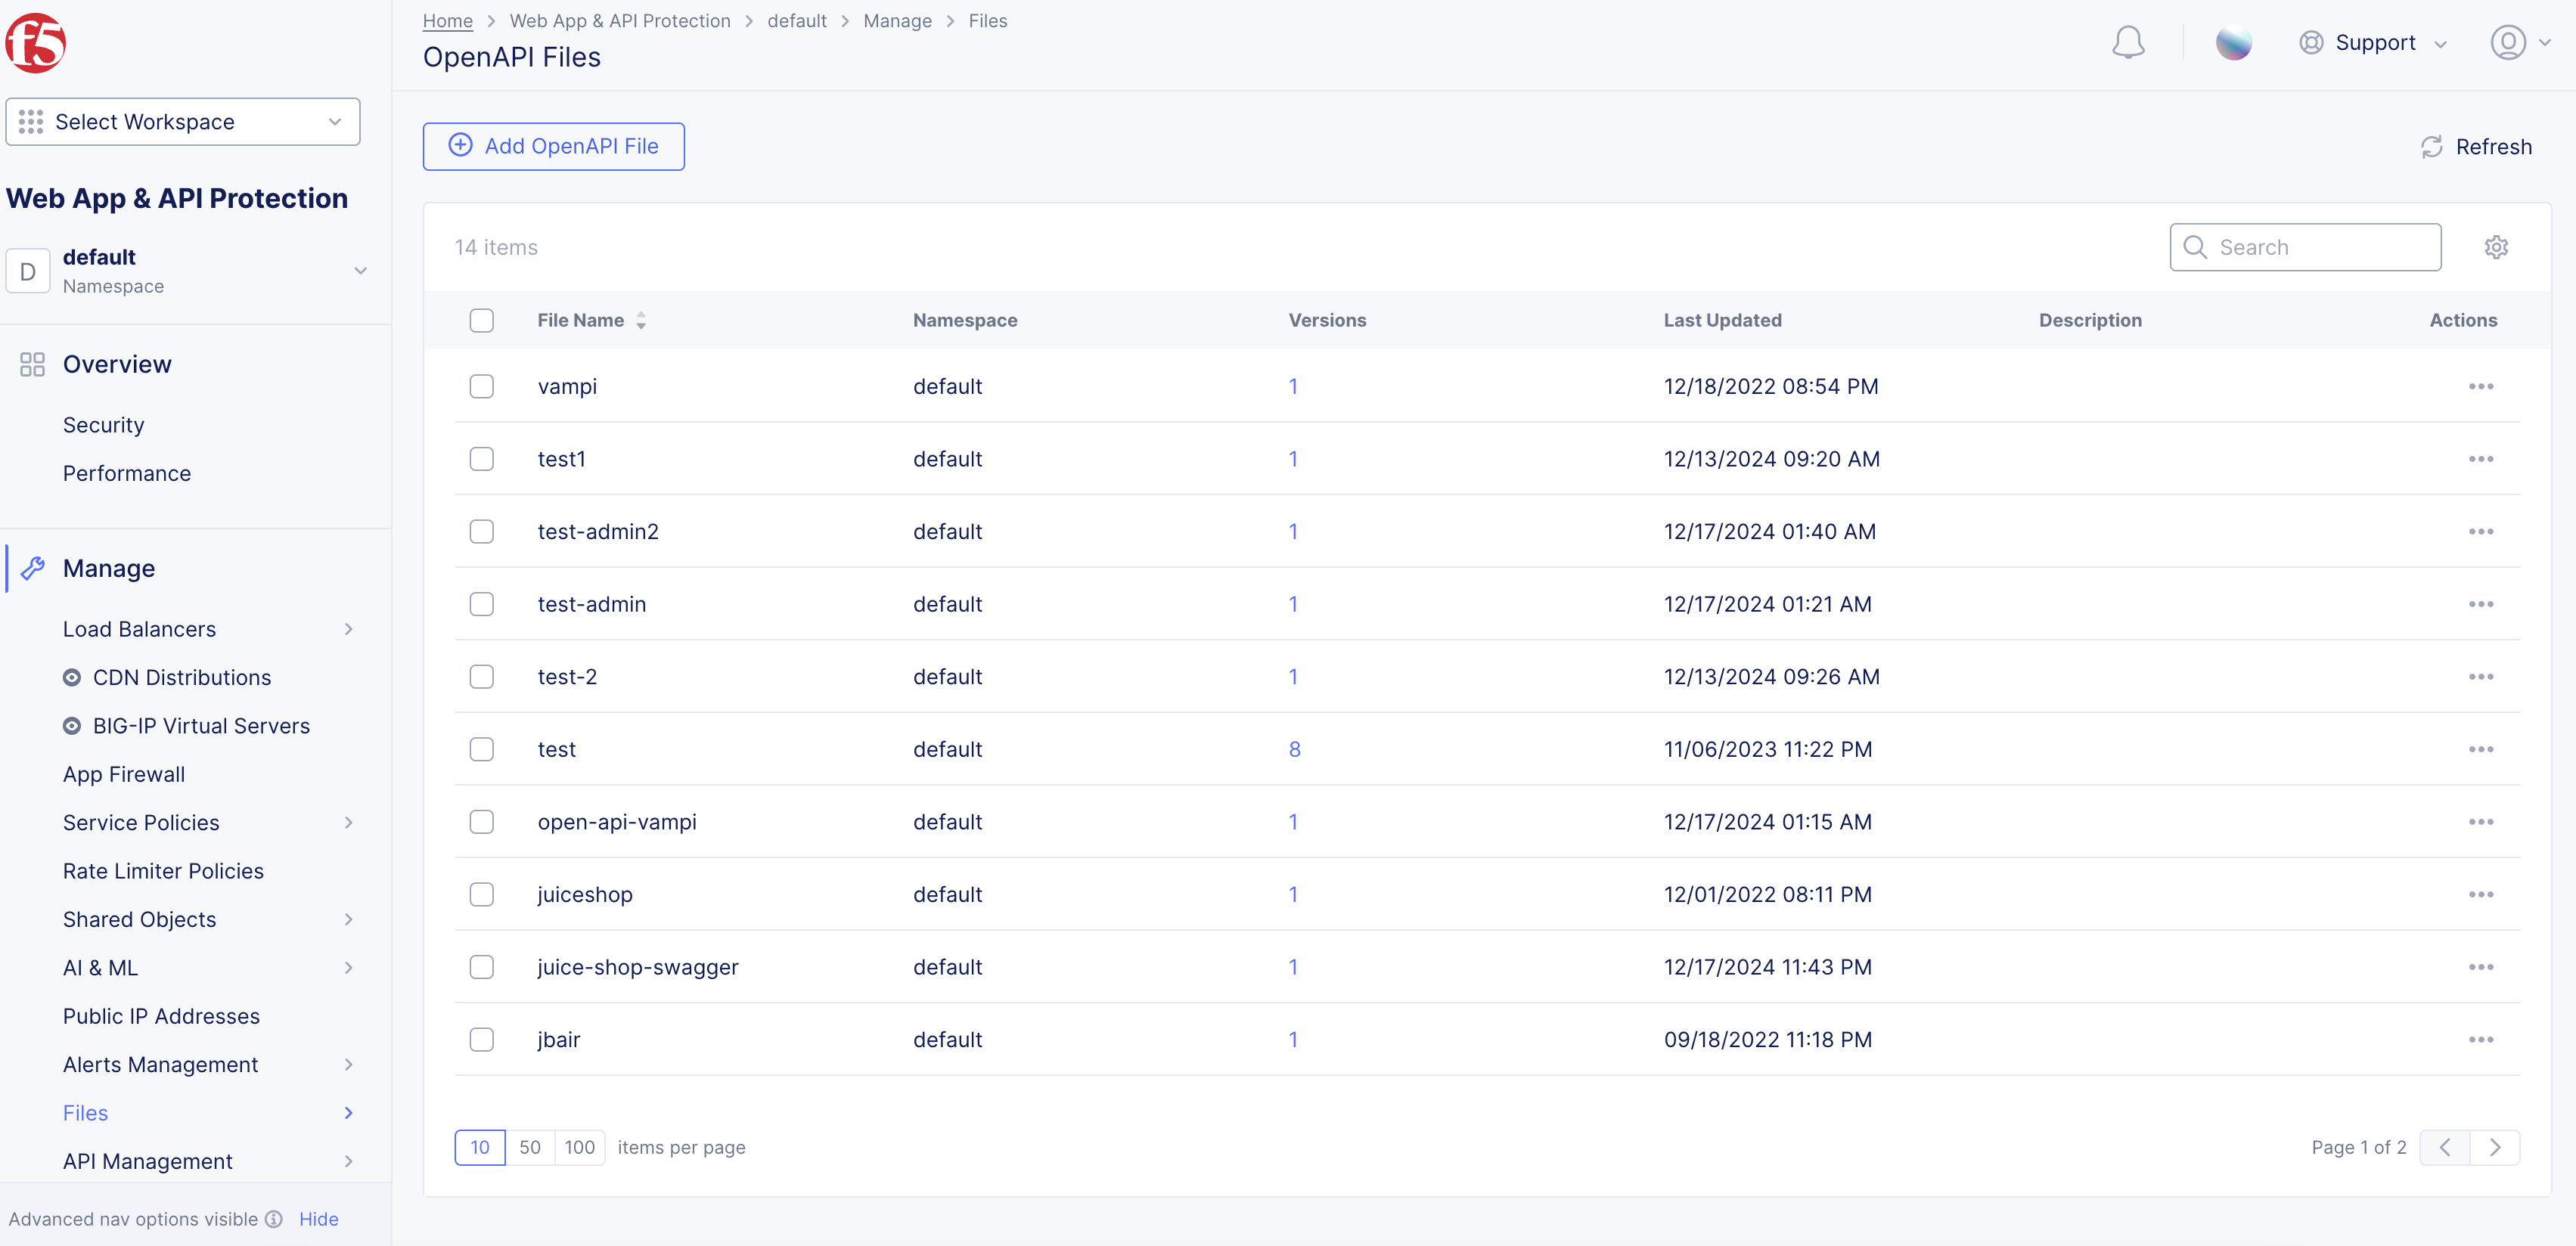
Figure: File Page Path
-
Enter
Namein metadata section. -
Under the
OpenAPI Uploadfield, selectUpload File.
Important: The supported versions are OpenAPI Version 2.0 (Swagger) and OpenAPI Version 3.0.X.
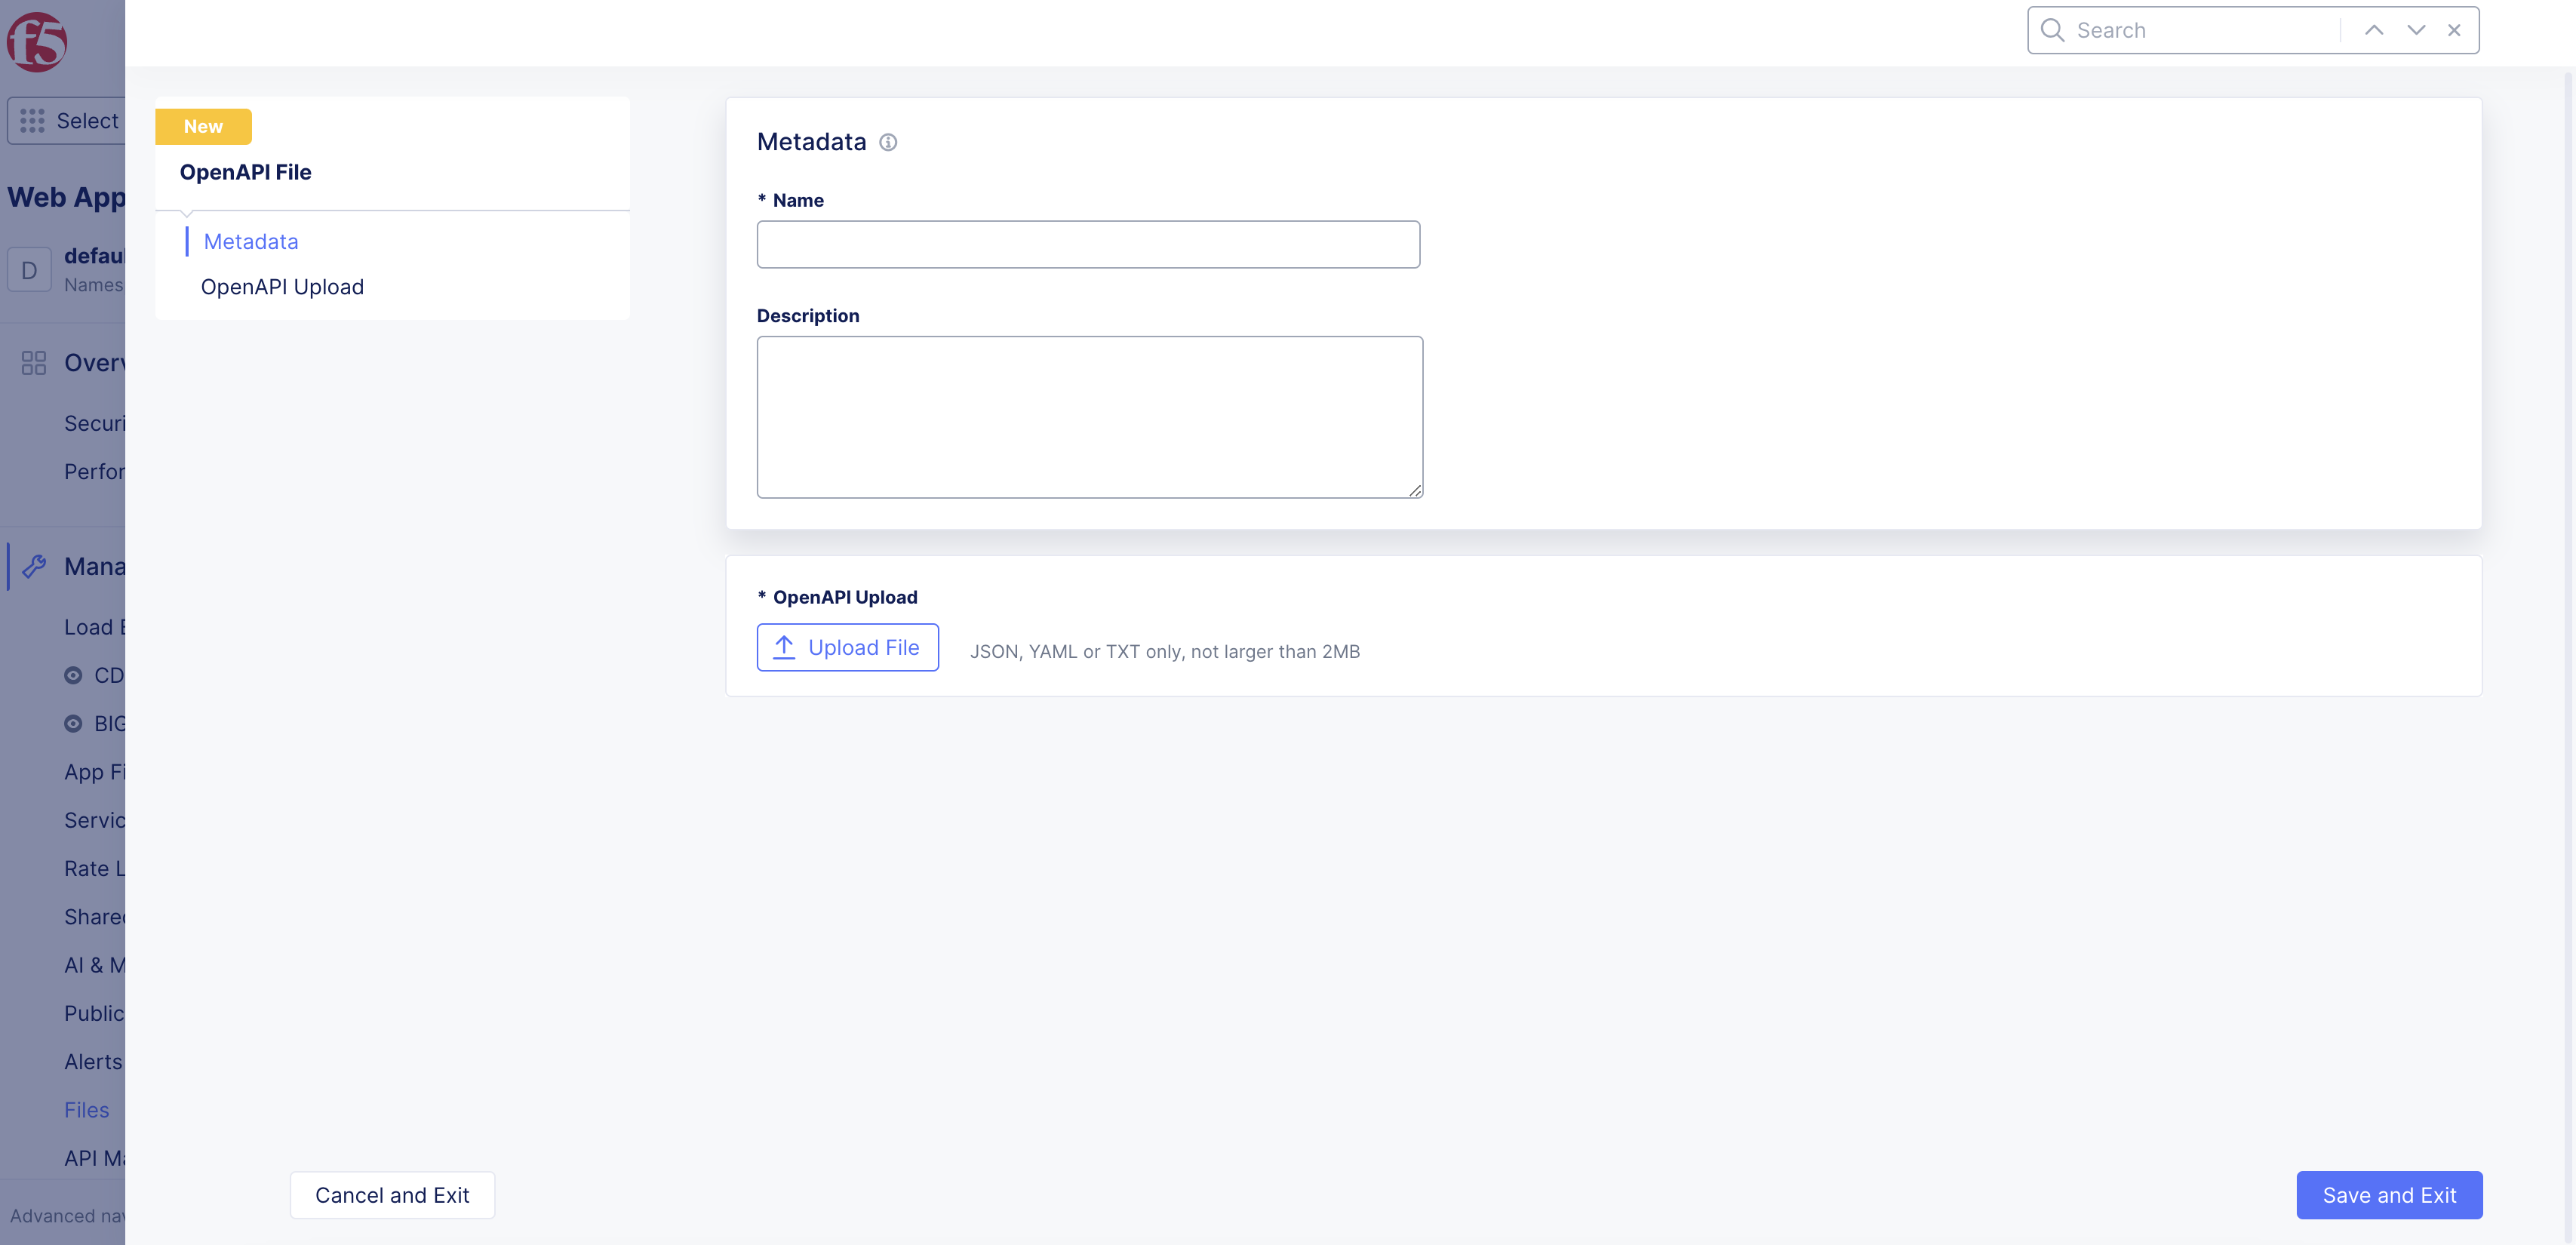
Figure: Upload Files
-
Select file in pop-up window and then click
Open. -
Click
Save and Exitto create file objects in Console. -
Repeat the previous steps for importing more files.
Step 3: Create API definition.
- In
Web App & API Protectionservice, selectManage>API Management>API Definition.
Note: You can also add and edit definitions in
Multi-Cloud App Connect>Manage>Load Balancers>HTTP Load Balancers.
- Click
Add API Definition.
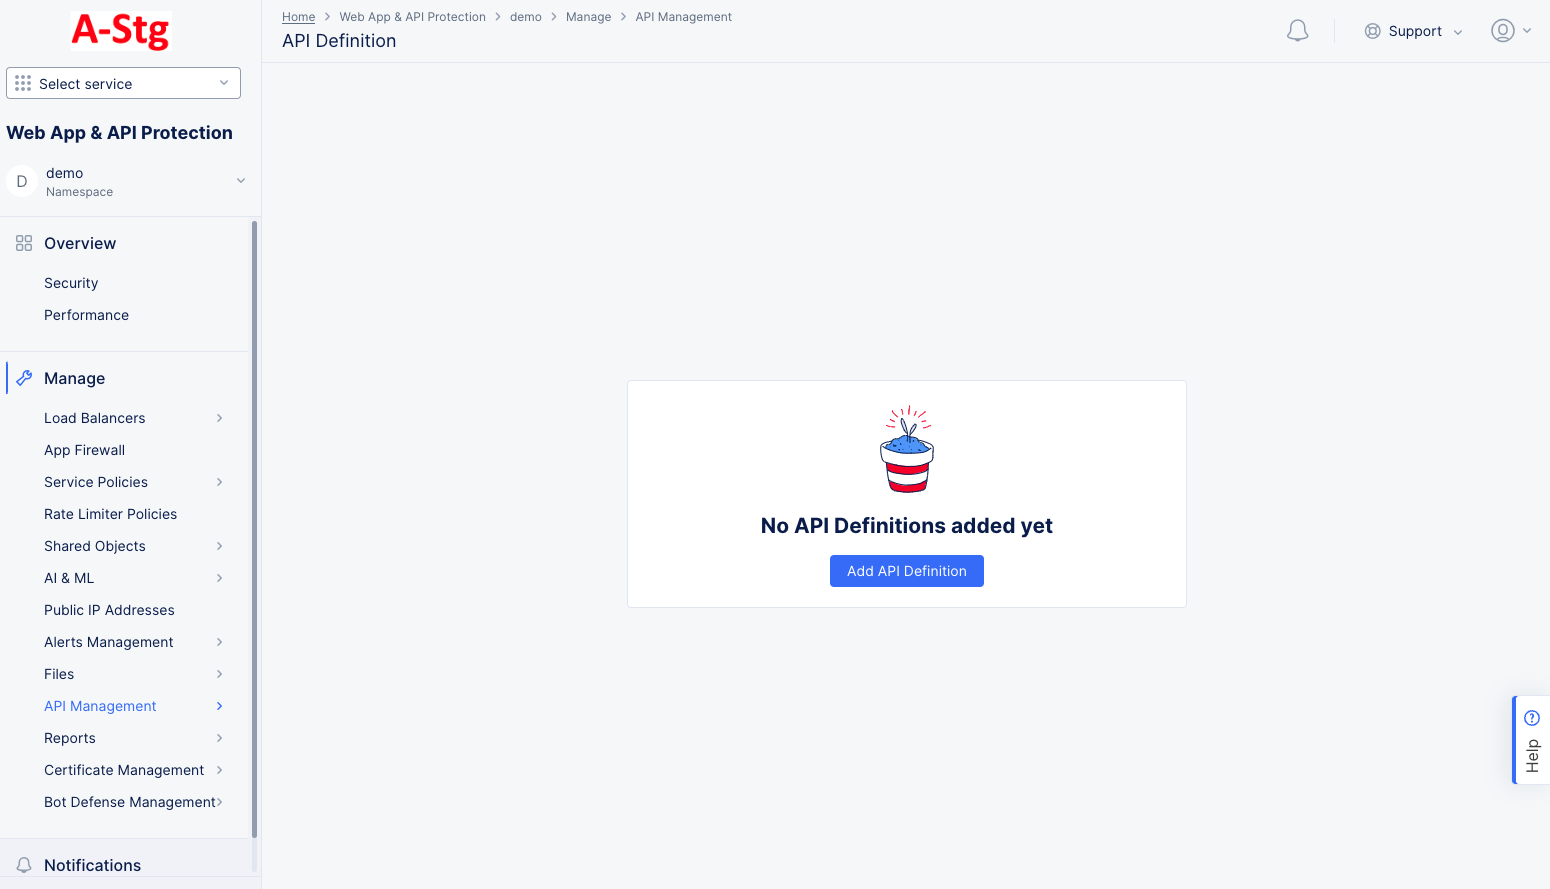
Figure: Create API Definition
-
Enter
Namein metadata section. -
In
OpenAPI Specification Filessection, clickAdd Itemto add a file. -
From the
File Pathmenu, select existing file or selectUpload OpenAPI fileto upload a new file.
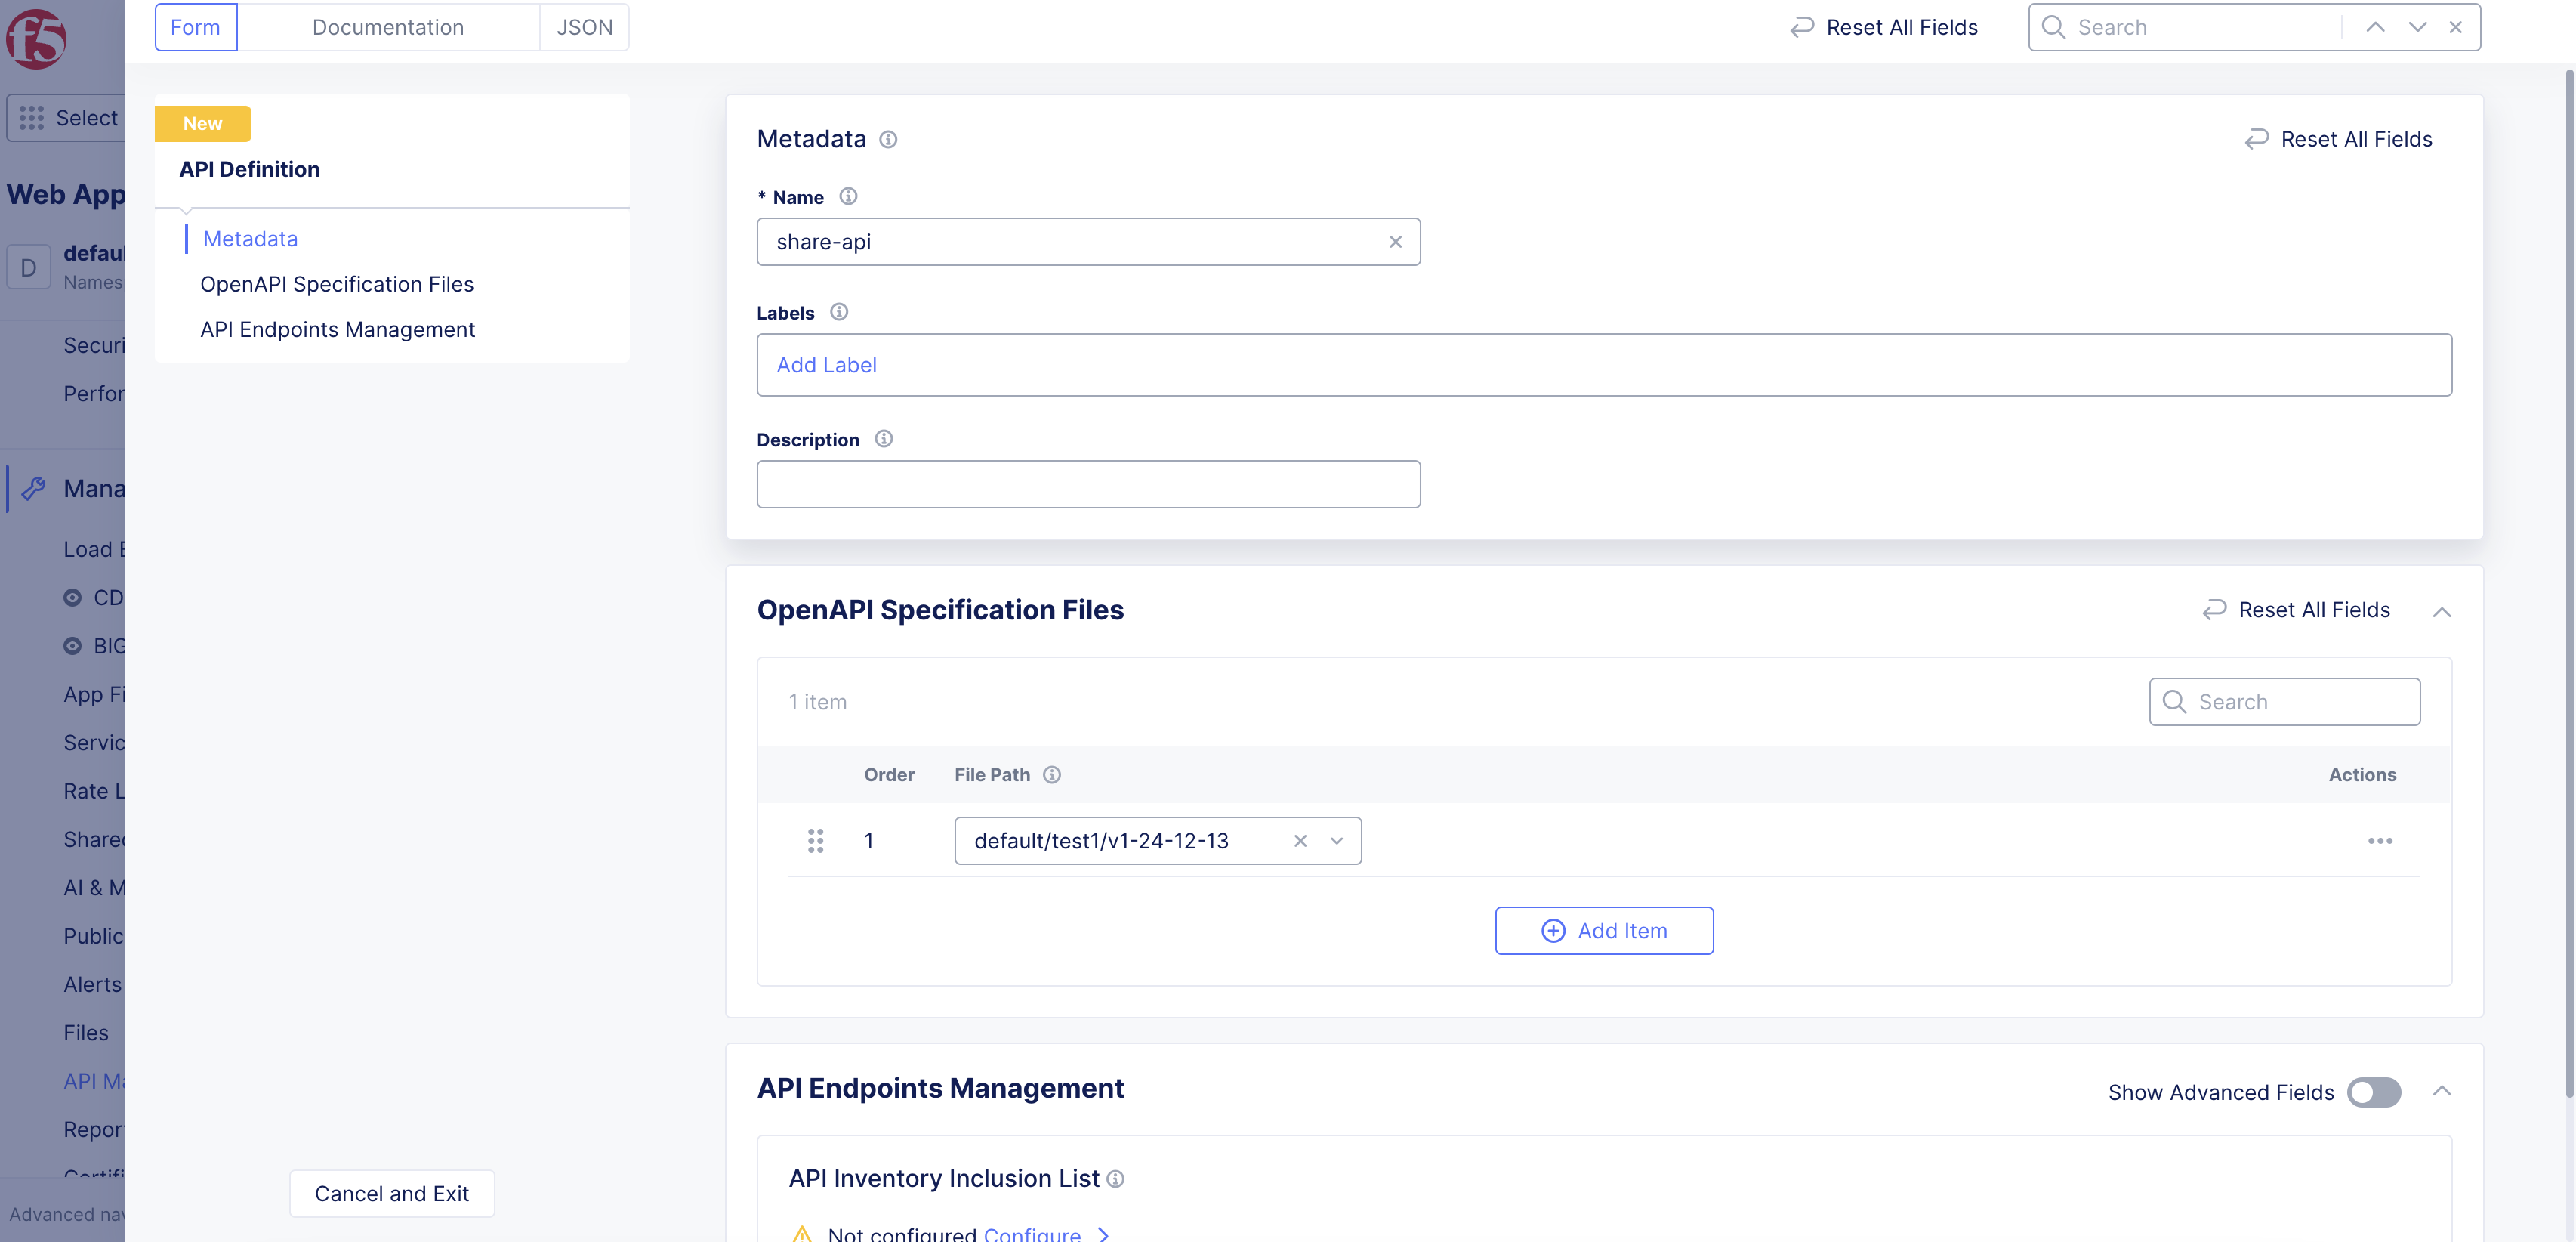
Figure: Create API Definition
Step 3.1: Optionally, manage your inventory of endpoints.
- In the
API Endpoints Managementsection, enableShow Advanced Fields.
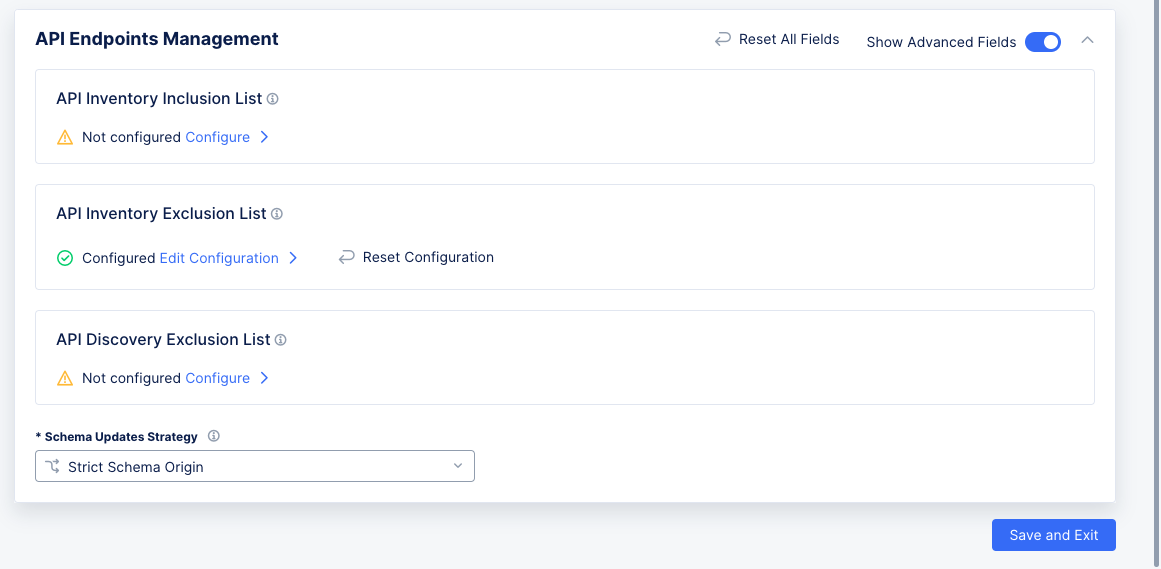
Figure: API Endpoints Management
-
Perform the following:
-
API Inventory Inclusion List: This lists the endpoints in your inventory that are not in your file. You can configure them here, or you can view them here after moving a discovered endpoint to inventory in security monitoring for this load balancer. -
API Inventory Exclusion List: These are the endpoints from your file that you are excluding from your inventory. You can configure them here, or you can view them here after removing them from inventory in security monitoring for this load balancer. -
API Discovery Exclusion List: These are discovered endpoints that are not part of your API. You can view them here after marking them asNon-APIin security monitoring for this load balancer. -
Schema Updates Strategydrop-down list: Used to specify how to work with API Inventory that is associated with multiple AppTypes:-
Strict Schema Origin: Restricts schema updates to a single AppType. The origin of the schema update is stored and validated separately for each endpoint. -
Mixed Schema Origin: The schema can be updated from all associated load balancers.
-
-
-
Click
Save and Exitto create API definition object in Console.
Step 4: Add API definition to load balancer.
-
In the
Web App & API Protection, selectManage>Load Balancers>HTTP Load Balancers. -
In the
Actionscolumn for your load balancer, selectManage Configuration. SelectEdit Configurationin the upper right corner to edit your load balancer. -
In the
API Protectionsection, use theAPI Definitiondrop-down menu to selectEnable. -
Select one of your API definitions from the
API Definitiondrop-down menu.
Step 5: Optionally, configure OpenAPI validation.
Validation is disabled by default. You can select Disable from the Validation menu to turn off validation at any time.
Select an option from the Validation drop-down and configure per the options.
Step 5.1: Enable validation for all endpoints specified in API Inventory.
-
Select
API Inventory. ClickView Configuration. -
Select
ValidateorSkipfor theOpenAPI Validation Request Processing Modemenu to enforce validation or skip validation, respectively. -
Select
ReportorBlockfor theRequest Validation Enforcement Typeto report or block the traffic, respectively. In case of reporting, the traffic is allowed along with triggering an API security event. -
Select validation parameters from the
OpenAPI Validation Response Processing Modedrop-down to specify which parameters should be validated with the specification. You can add more than one parameter. -
After you finish with configuration, click
Apply.
Step 5.2: Enable validation for specific endpoints in API Inventory.
-
Select
Custom Listto set specific list of endpoints. ClickView Configuration. -
Click
ConfigureunderValidation List. -
Select
Add Itemin the validation list page, and enter a name for the list in the DNS-1035 format. -
Set the
OpenAPI Validation Request Processing Modeoption. -
Select
Any DomainorSpecific Domainfrom theDomainmenu. In case of specific domain, enter a domain in theSpecific Domainfield. You can also use theSee Suggestionsoption to choose from one of the suggested values. -
Select an option from the
Typedrop-down menu to set a specific endpoint type. You can select a group or specific endpoint or a specific base path. In case of selecting a specific endpoint, enter a path in thePathfield, and select methods from theMethodsdrop-down menu. You can select more than one method or setANYmethod. -
Select
Applyto apply the list to the validation list page. SelectApplyin the validation list page to apply the custom list to the validation settings in the API protection section of load balancer. -
Configure the
Fall Through Modeoption to specify action for endpoints that are not specified in the file or in the custom rules list. By default, the fall through mode is to allow traffic for endpoints that are not specified in the file. Change the setting toCustomto control the traffic to these endpoints in a granular manner per the following guidelines:-
Click
ConfigureunderCustom Fall Through Rule Listto open the custom list page and selectAdd Item. -
Enter a name for the list item in the DNS-1035 format.
-
Select
Skip,Report, orBlockfor theActiondrop-down menu to skip processing or report or block the traffic, respectively. Report option allows the traffic while raising an API security event. -
Select an option from the
Typedrop-down menu to set a specific endpoint type. You can select a group or specific endpoint or a specific base path. In case of selecting a specific endpoint, enter a path in thePathfield, and select methods from theMethodsdrop-down menu. You can select more than one method or setANYmethod. -
From the
OpenAPI Validation Response Processing Modemenu, selectValidateto check for OpenAPI mismatches, and then perform the following:-
From the
Response Validation Enforcement Typemenu, selectReportto only notify of a violation orBlockto prevent the mismatches. -
From the
Response Validation Propertiesmenu, select the properties in the response to validate. You can choose from the three options provided.
-
-

Figure: Validate Response for OpenAPI Mismatch
Note: The custom error responses feature is not supported for OpenAPI Validation.
- Select
Applyto apply the list to the validation list page. SelectApplyin the validation list page to apply the custom list to the validation settings in the API protection section of load balancer.
Note: The validation for the request/response payload is skipped if you provide an unsupported content type. Therefore, ensure that you provide one of the following supported values as the content-type:
- application/json
- application/json-patch+json
- application/octet-stream
- application/problem+json
- application/x-www-form-urlencoded
- application/x-yaml
- application/yaml
- application/zip
- multipart/form-data
- text/csv
- text/plain
Step 6: Apply API definition to load balancer.
Click Save and Exit to save your load balancer configuration.
Figure: Select an API definition
Step 7: Create API group.
-
Select
Manage>API Management>API Groups. -
Select
Add API Group.
Figure: Create API Groups
-
Enter a
Namein metadata section. -
In the
API Endpointssection, select a load balancer from theHTTP Load Balancerdrop-down menu. This will expand theAPI Endpointssection to show more options as well as a table of your existing endpoints (if you uploaded a file). If you did not upload a file, then the endpoints will be discovered as the load balancer operates.
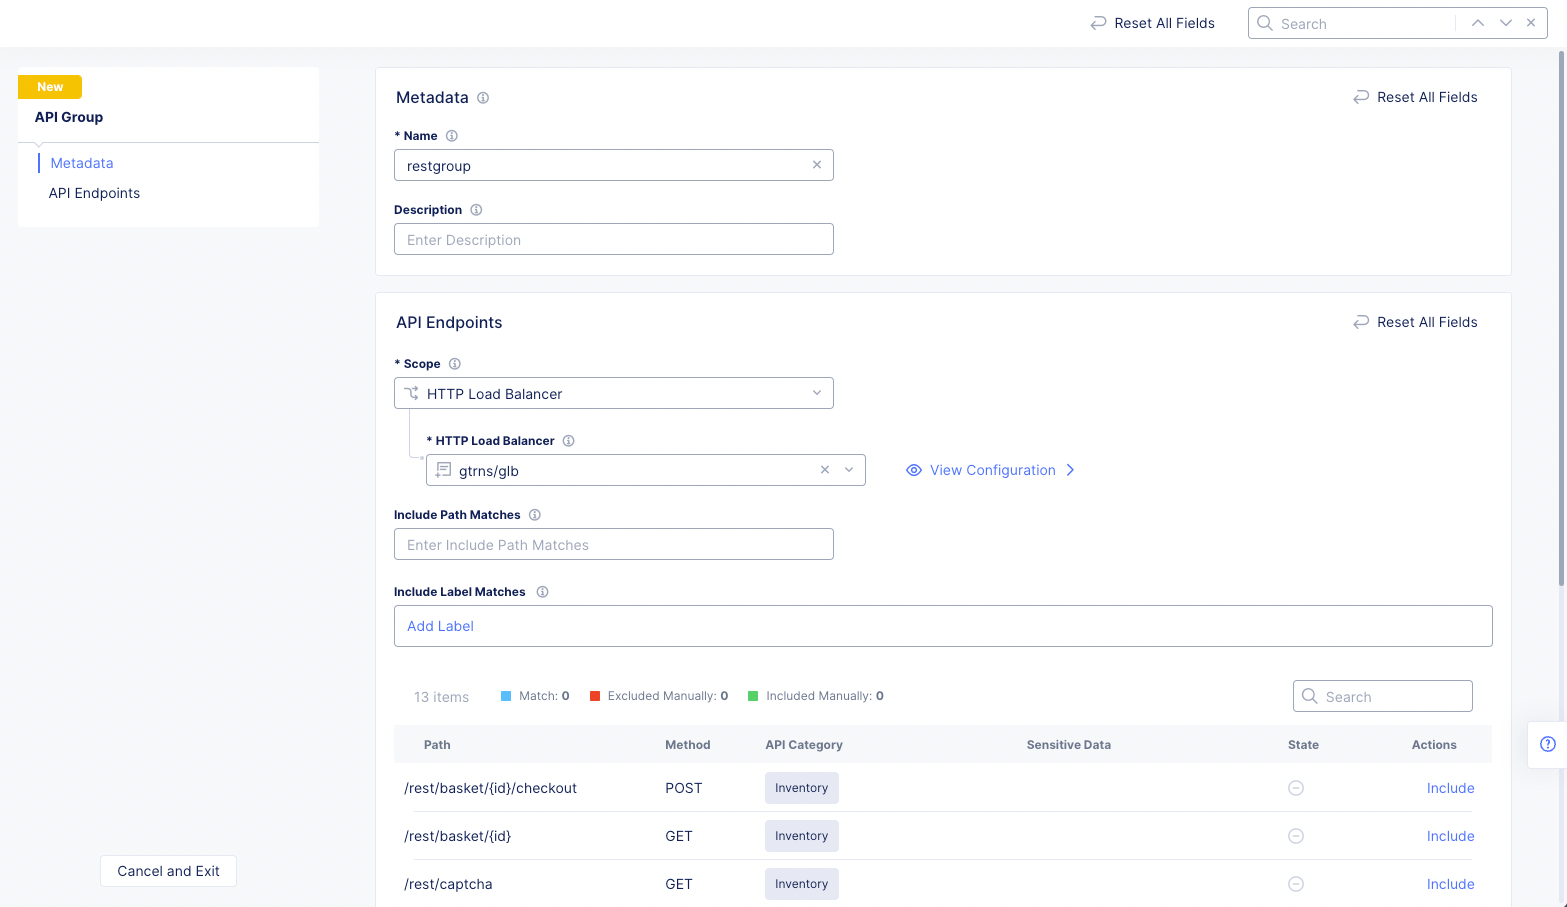
Figure: Create API Group
Note: By default, none of the endpoints in this table are included in your new group. You can configure the API group to include endpoints now as part of its creation, or you can configure it later.
- Configure your API group using the
Include Path MatchesandInclude Label Matchesfields and the options in theActionscolumn. The result will be to modify the states for each endpoint with respect to this group. In the example below, no endpoints are included in the group, so the only action available isInclude. SelectingIncludefor a path will force its inclusion in the group regardless of other selections.
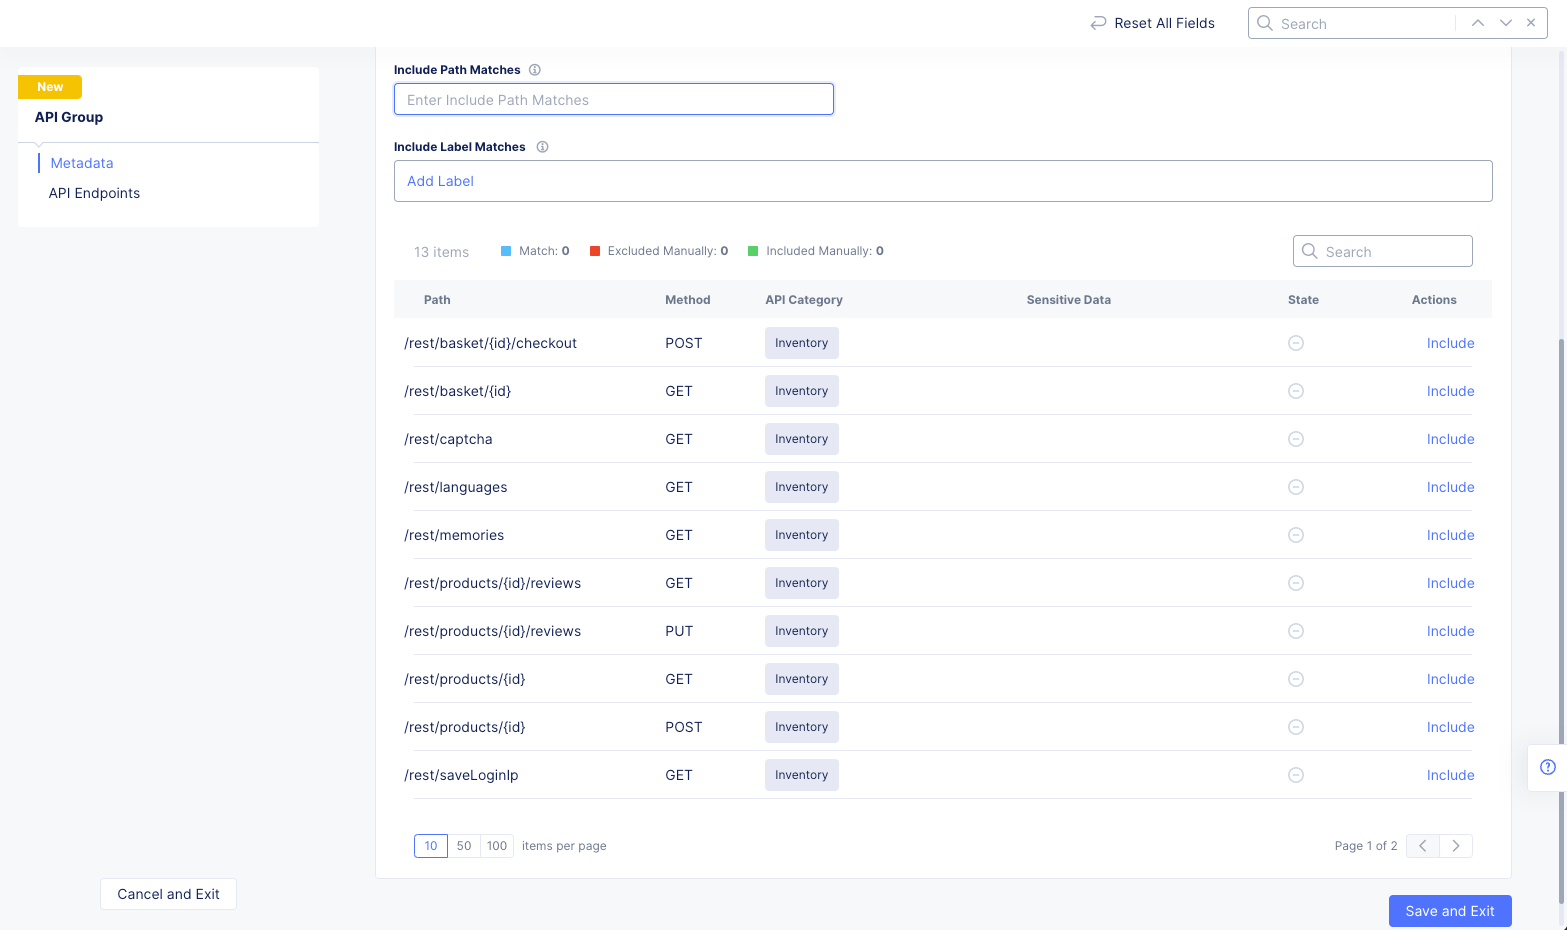
Figure: Configure API Group
Include Path Matches: Enter a path substring to select matching API endpoints into the group. Endpoint paths that include the entered string will have their states changed to "included" which is denoted by a circled check mark. Also, the action for this state isExclude, which would remove the endpoint from the group even though it matches the include path string you entered.

Figure: API Group Path Matches
Include Label Matches: Use this field to create one or more labels to match. To create a label, selectAdd Labeland then select a key, an operator, and a value/type (if necessary). This will include all endpoints that match the label. If you have multiple labels, all labels must match for an endpoint to be included. If you have both a path match and a label match, then only endpoints that match both will be included.
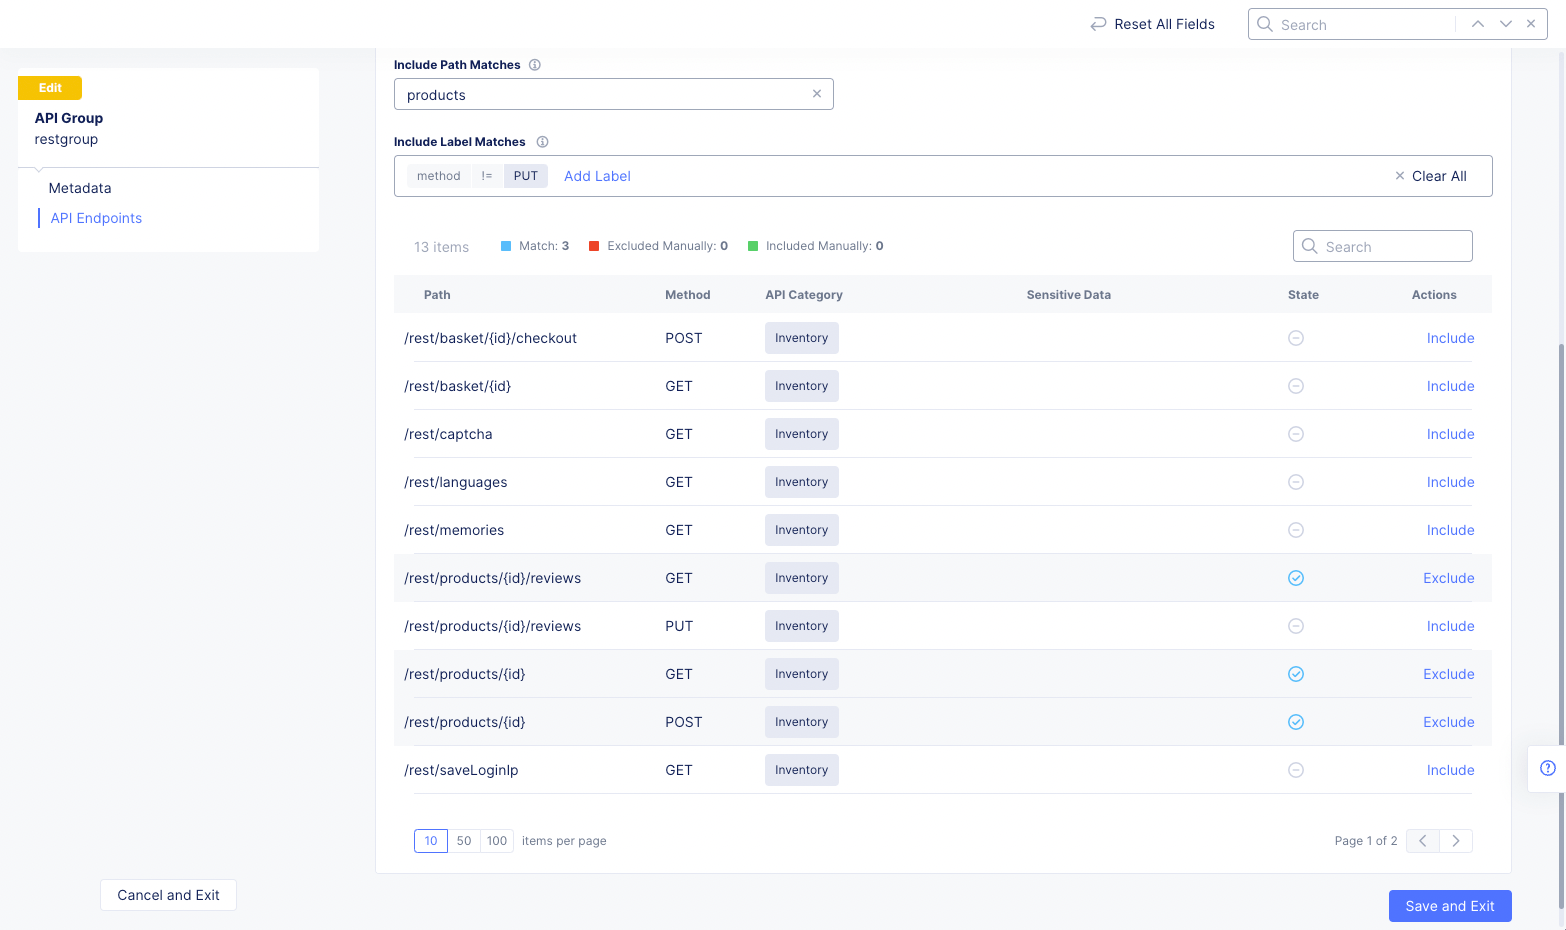
Figure: API Group Label Matches
State Column: The column entry shows whether the endpoint is included (circled check mark) or not included (circled minus sign). If the circled check mark is green, the endpoint was included manually. If the circled minus sign is red, the endpoint was excluded manually. States that are set manually can be changed using the Reset option in the Actions column.
Endpoint state counts bar: Just above the table header is a set of counts to help you understand the group as a whole.
-
Superset: The first count is the number of endpoints in the superset (all endpoints that are known). This number can change as new endpoints are discovered, or endpoints are removed. Endpoints that are discovered (added to the superset) will go through the same match process to possibly include them in the group; however, they are not included unless you edit the group and then selectSave and Exit. Endpoints that are removed will have theirAPI Categoryset toNot in Superset(currently not available). For endpoints that are no longer in the superset, the action isDelete(remove it from the table). You might not want to remove the endpoint if you expect the endpoint to add to the superset at a later date, which would allow it to automatically return to its prior configuration/state. -
Match: This shows the number of endpoints is included by match, including those that are not shown in the table due to theitems per pagesetting or theSearchentry. Manually excluded endpoints do not affect this count. -
Excluded Manually: This shows the number of endpoints manually excluded from the match. If this value is non-zero, there is aResetoption to undo all manual excludes. -
Included Manually: This shows the number of endpoints manually included in the group. If this value is non-zero, there is aResetoption to undo all manual includes.
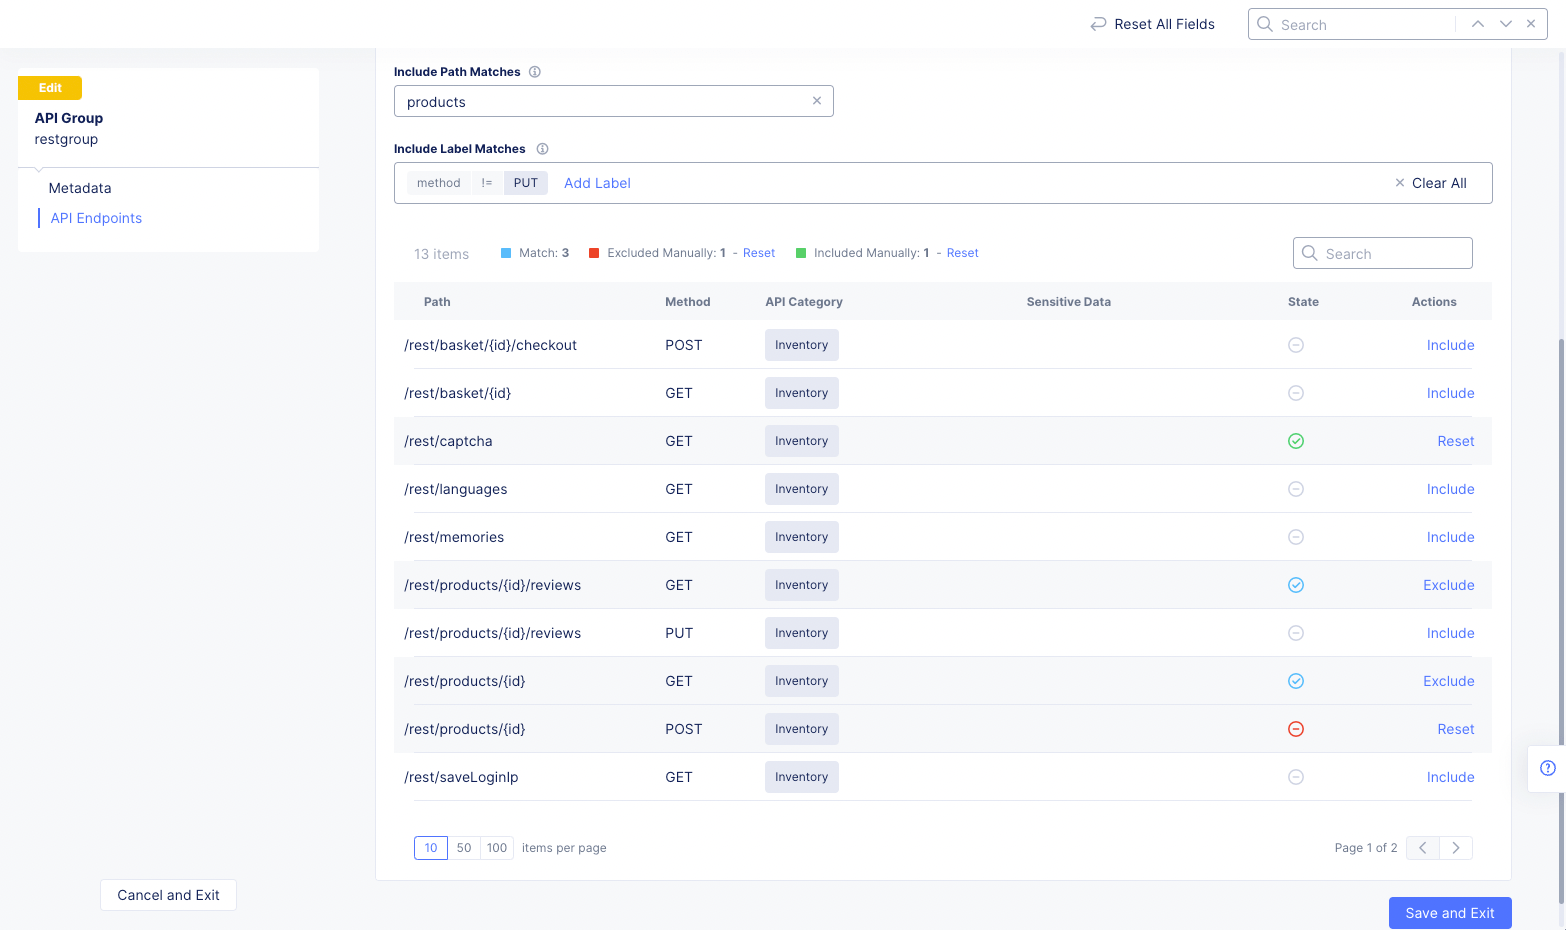
Figure: API Group State Column
- Select
Save and Exitto save the configuration changes.
Step 8: Update API group.
- In the
Web App & API Protection, selectManage>API Management>API Groupsto see a list of your API groups. Each row represents a group and shows the group name, the load balancer it works with, how many endpoints are included in the group, when it was created, and if any endpoints have been added to the group since you last configured it (Updated Endpointscolumn).
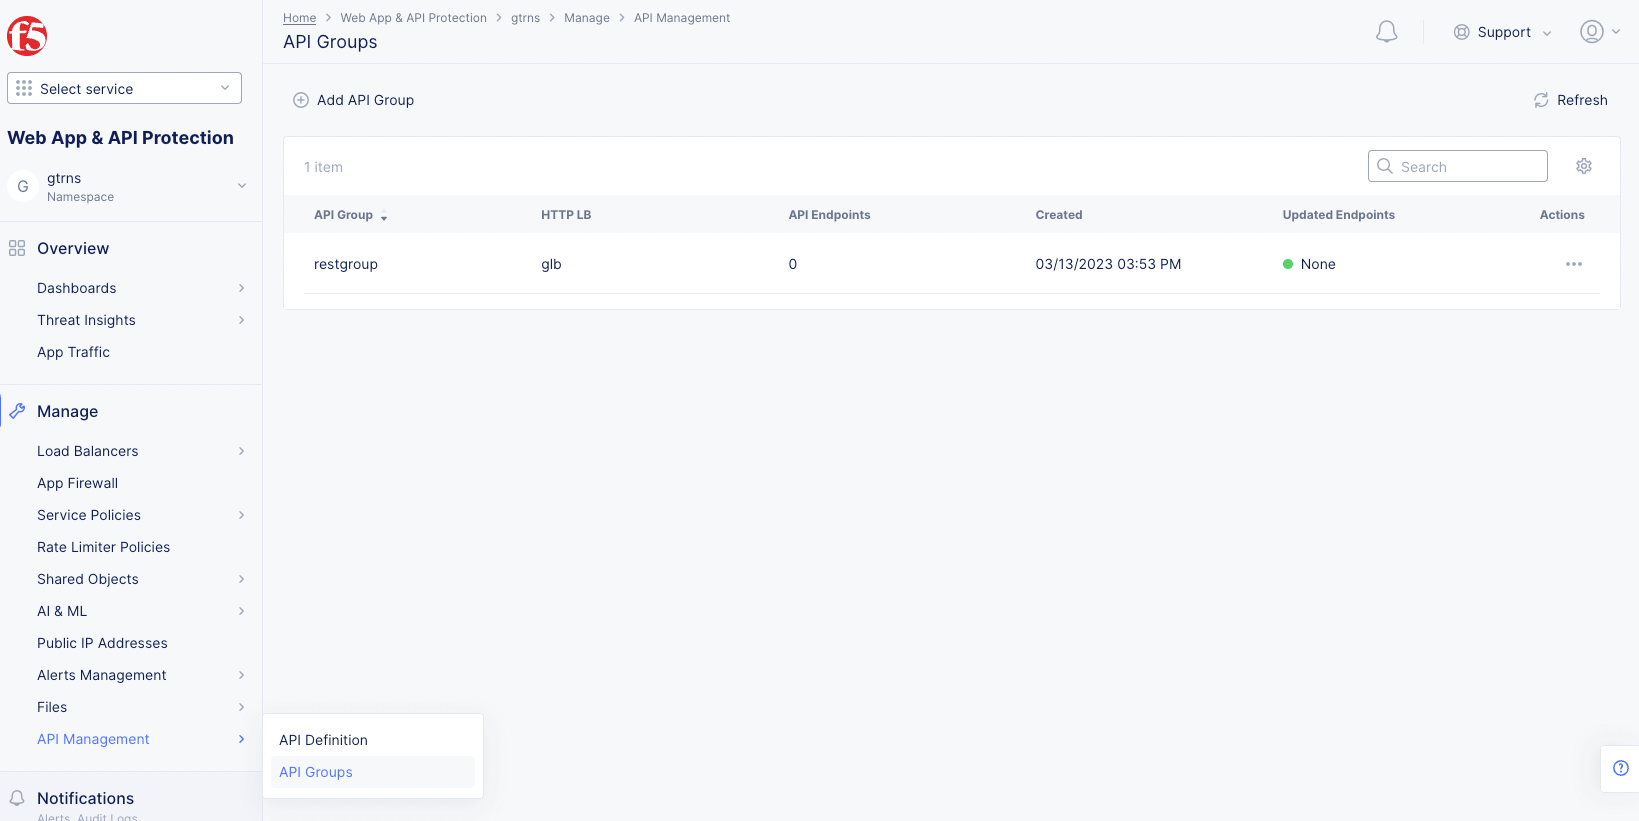
Figure: API Groups
-
Select
Manage Configurationfrom the Actions menu for your load balancer. Then selectEdit Configurationto allow configuring of the group. Make configuration changes as described in the previous step. -
Select
Save and Exitto save the configuration changes.
Note: If you have newly discovered endpoints, and those endpoints were included by match, then selecting
Save and Exitwill automatically include those matched endpoints into the group even though you may not have taken any other action. If you selectCancel and Exit, newly discovered endpoints will not be added to your group regardless of match, and they will continue to be counted asUpdated Endpoints.
Create Service Policy to Control Access to APIs
Perform the following to create service policies to control access to API groups based on API definitions and apply them to a load balancer.
Note: Rules can be configured and applied from within load balancers API EP monitoring view. See API Endpoint Discovery and Schema Learning guide for more info. Rules can also be applied to Shadow APIs. The discovered endpoints have an option to create protection rules and API rate limiting.
Step 1: Go to load balancers and start editing your load balancer.
-
Switch to
Multi-Cloud App Connectservice, and change to desired namespace. -
Select
Manage>Load Balancers>HTTP Load Balancers. A list of load balancers is presented. -
Select
...>Manage Configurationfor your load balancer. -
Select
Edit Configuration.
Note: The three types of APIs are distinguished only in Load Balancer API EP view.
Step 2: Start creating service policy.
In the Common Security Controls section, perform the following:
Step 2.1: Select existing service policy.
-
From the
Service Policiesdrop-down menu, selectApply Specified Service Policies. -
Select
ConfigureorEdit Configurationlink. -
Select the existing policy from the
Policiesmenu. -
Click
Apply.
Step 2.2: Create new service policy.
-
Select
Add Itemfrom thePoliciesmenu. -
Enter
Namefor the policy in the metadata section. -
Select
Allowfrom theActiondrop-down menu. -
In
Advanced Matchsection, selectConfigureinAPI Group Matcherfield. -
Select an API group name string from the
Exact valuesdrop-down menu. UseAdd Itemto specify more than one group. -
Select
Applyto add the matcher. -
Select
Applyto add the new rule. -
Create one more rule using the
Add Itemoption in the rules section. -
Enter a new name for this rule.
-
Set
Denyas theActionand specify another API group to which you want to deny access (for example, all base URLs). -
Select
Apply.
Examples
Rule examples.
Note: This example creates a positive security model that only allows requests to operations that are specified in the file for each specified base URL. Requests to all operations (path plus the method) specified in files are allowed and requests to any unspecified operations under base URLs are denied. Requests sent to other URLs that do not match base URL are allowed.
Allow: The first rule allows the APIs.
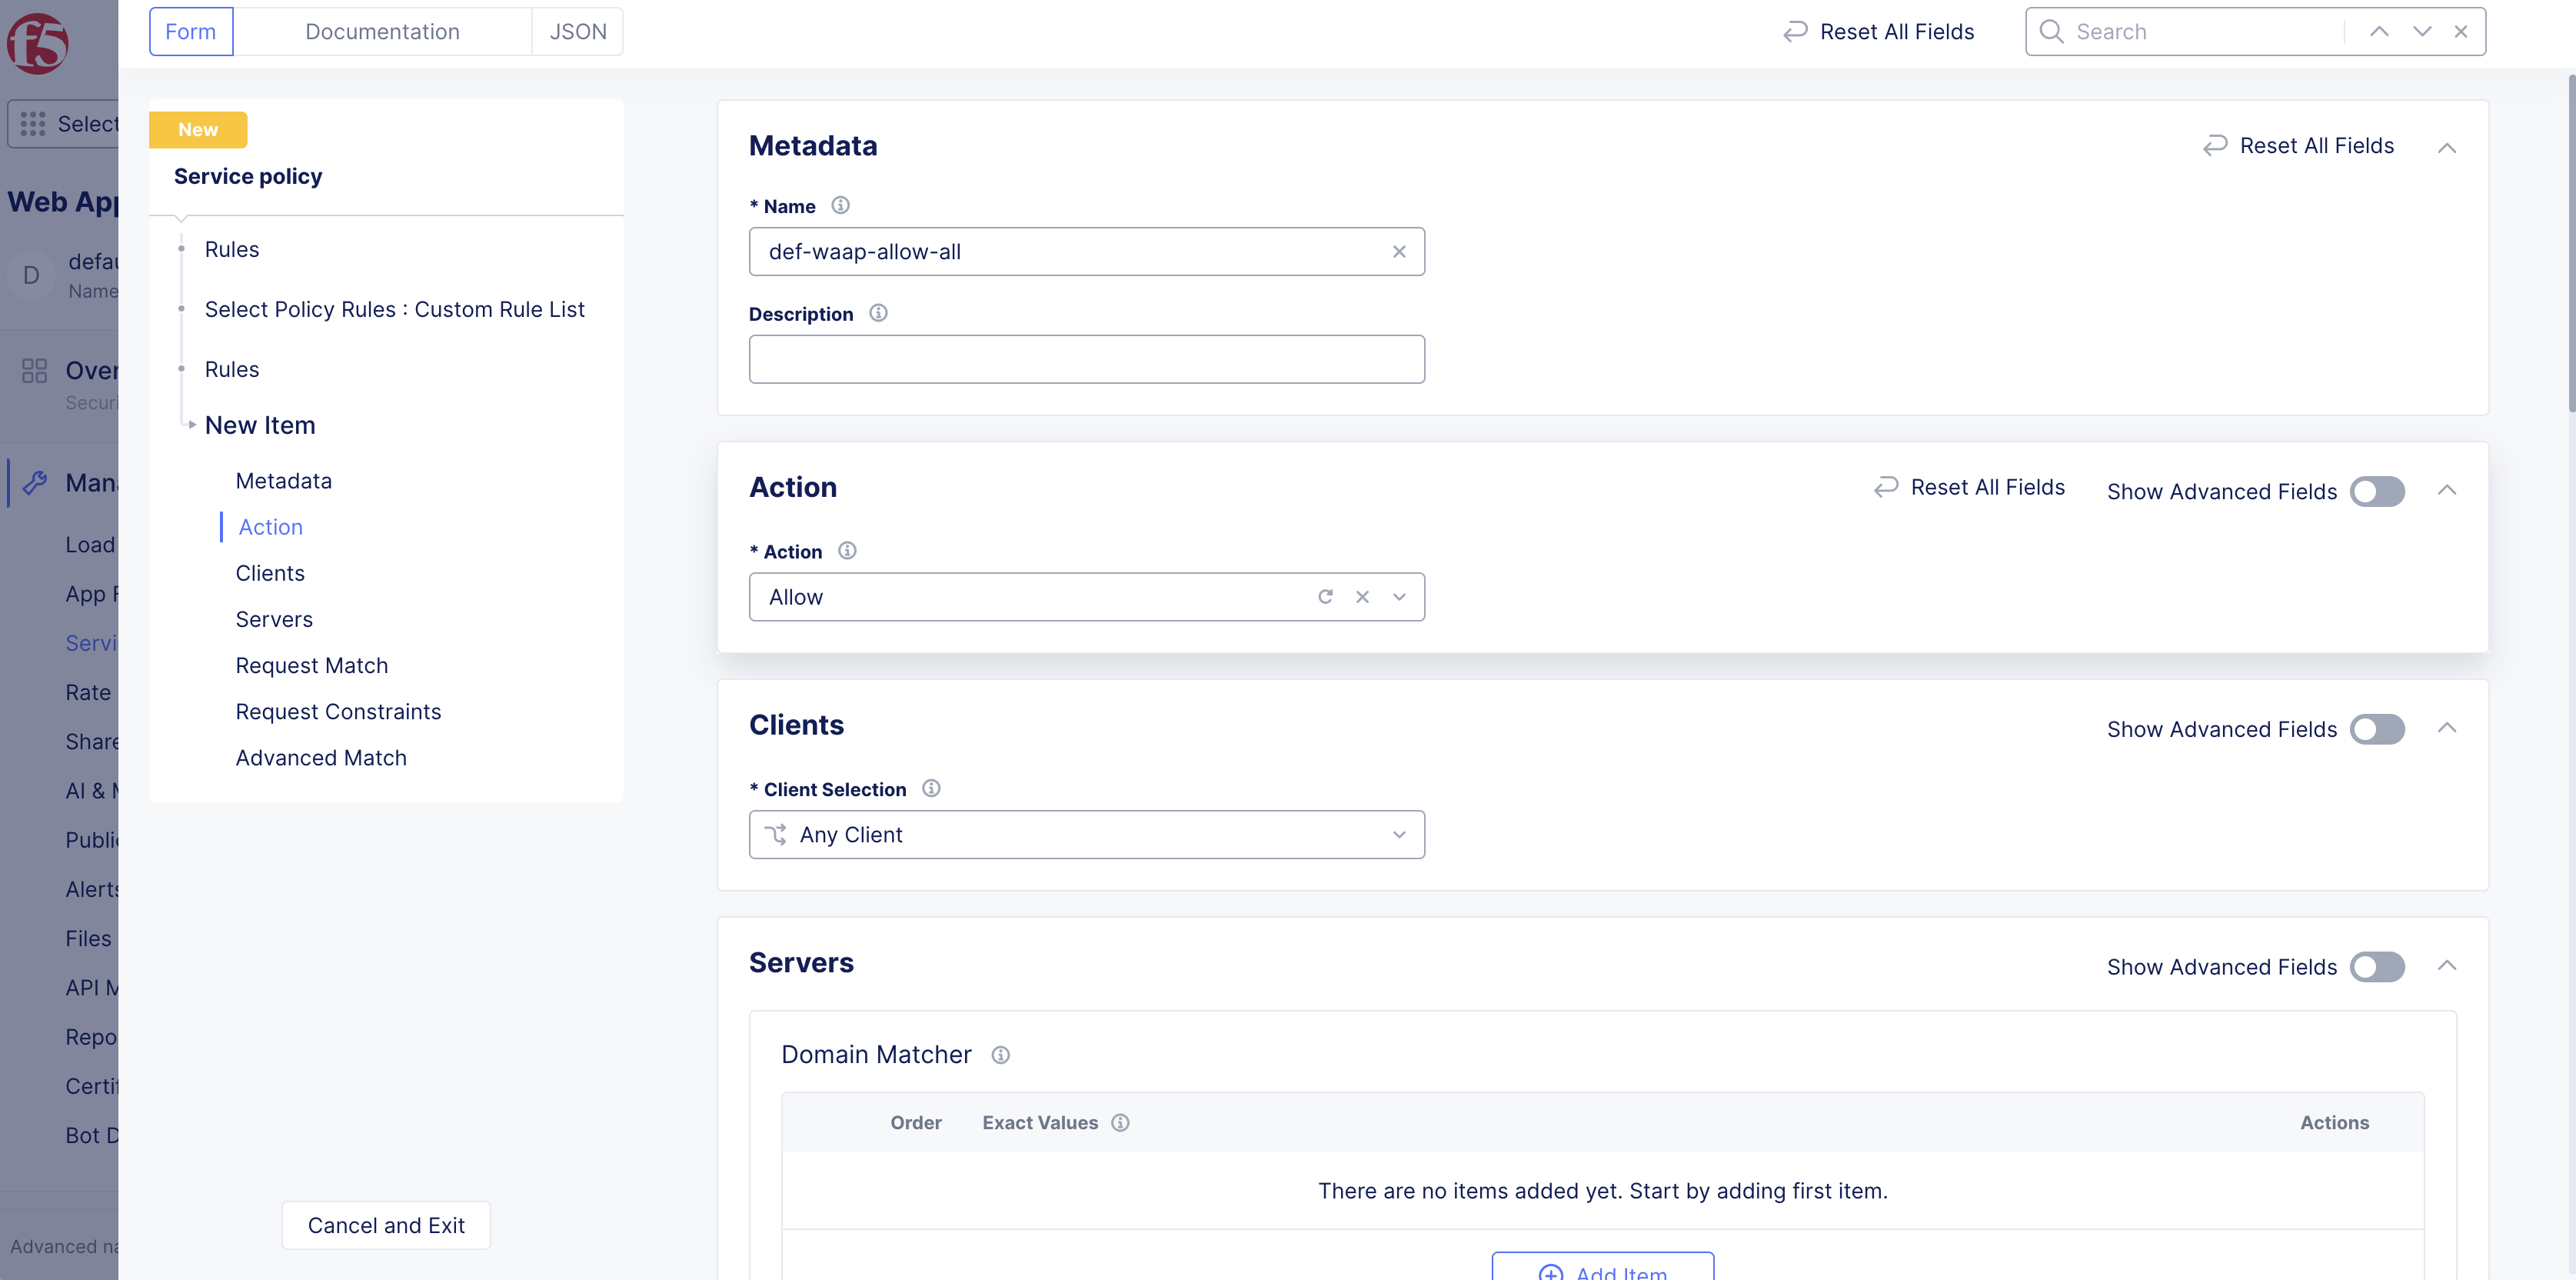
Figure: API Matcher to Allow All Operational API URLs
Deny: The second rule denies the base URLs APIs.
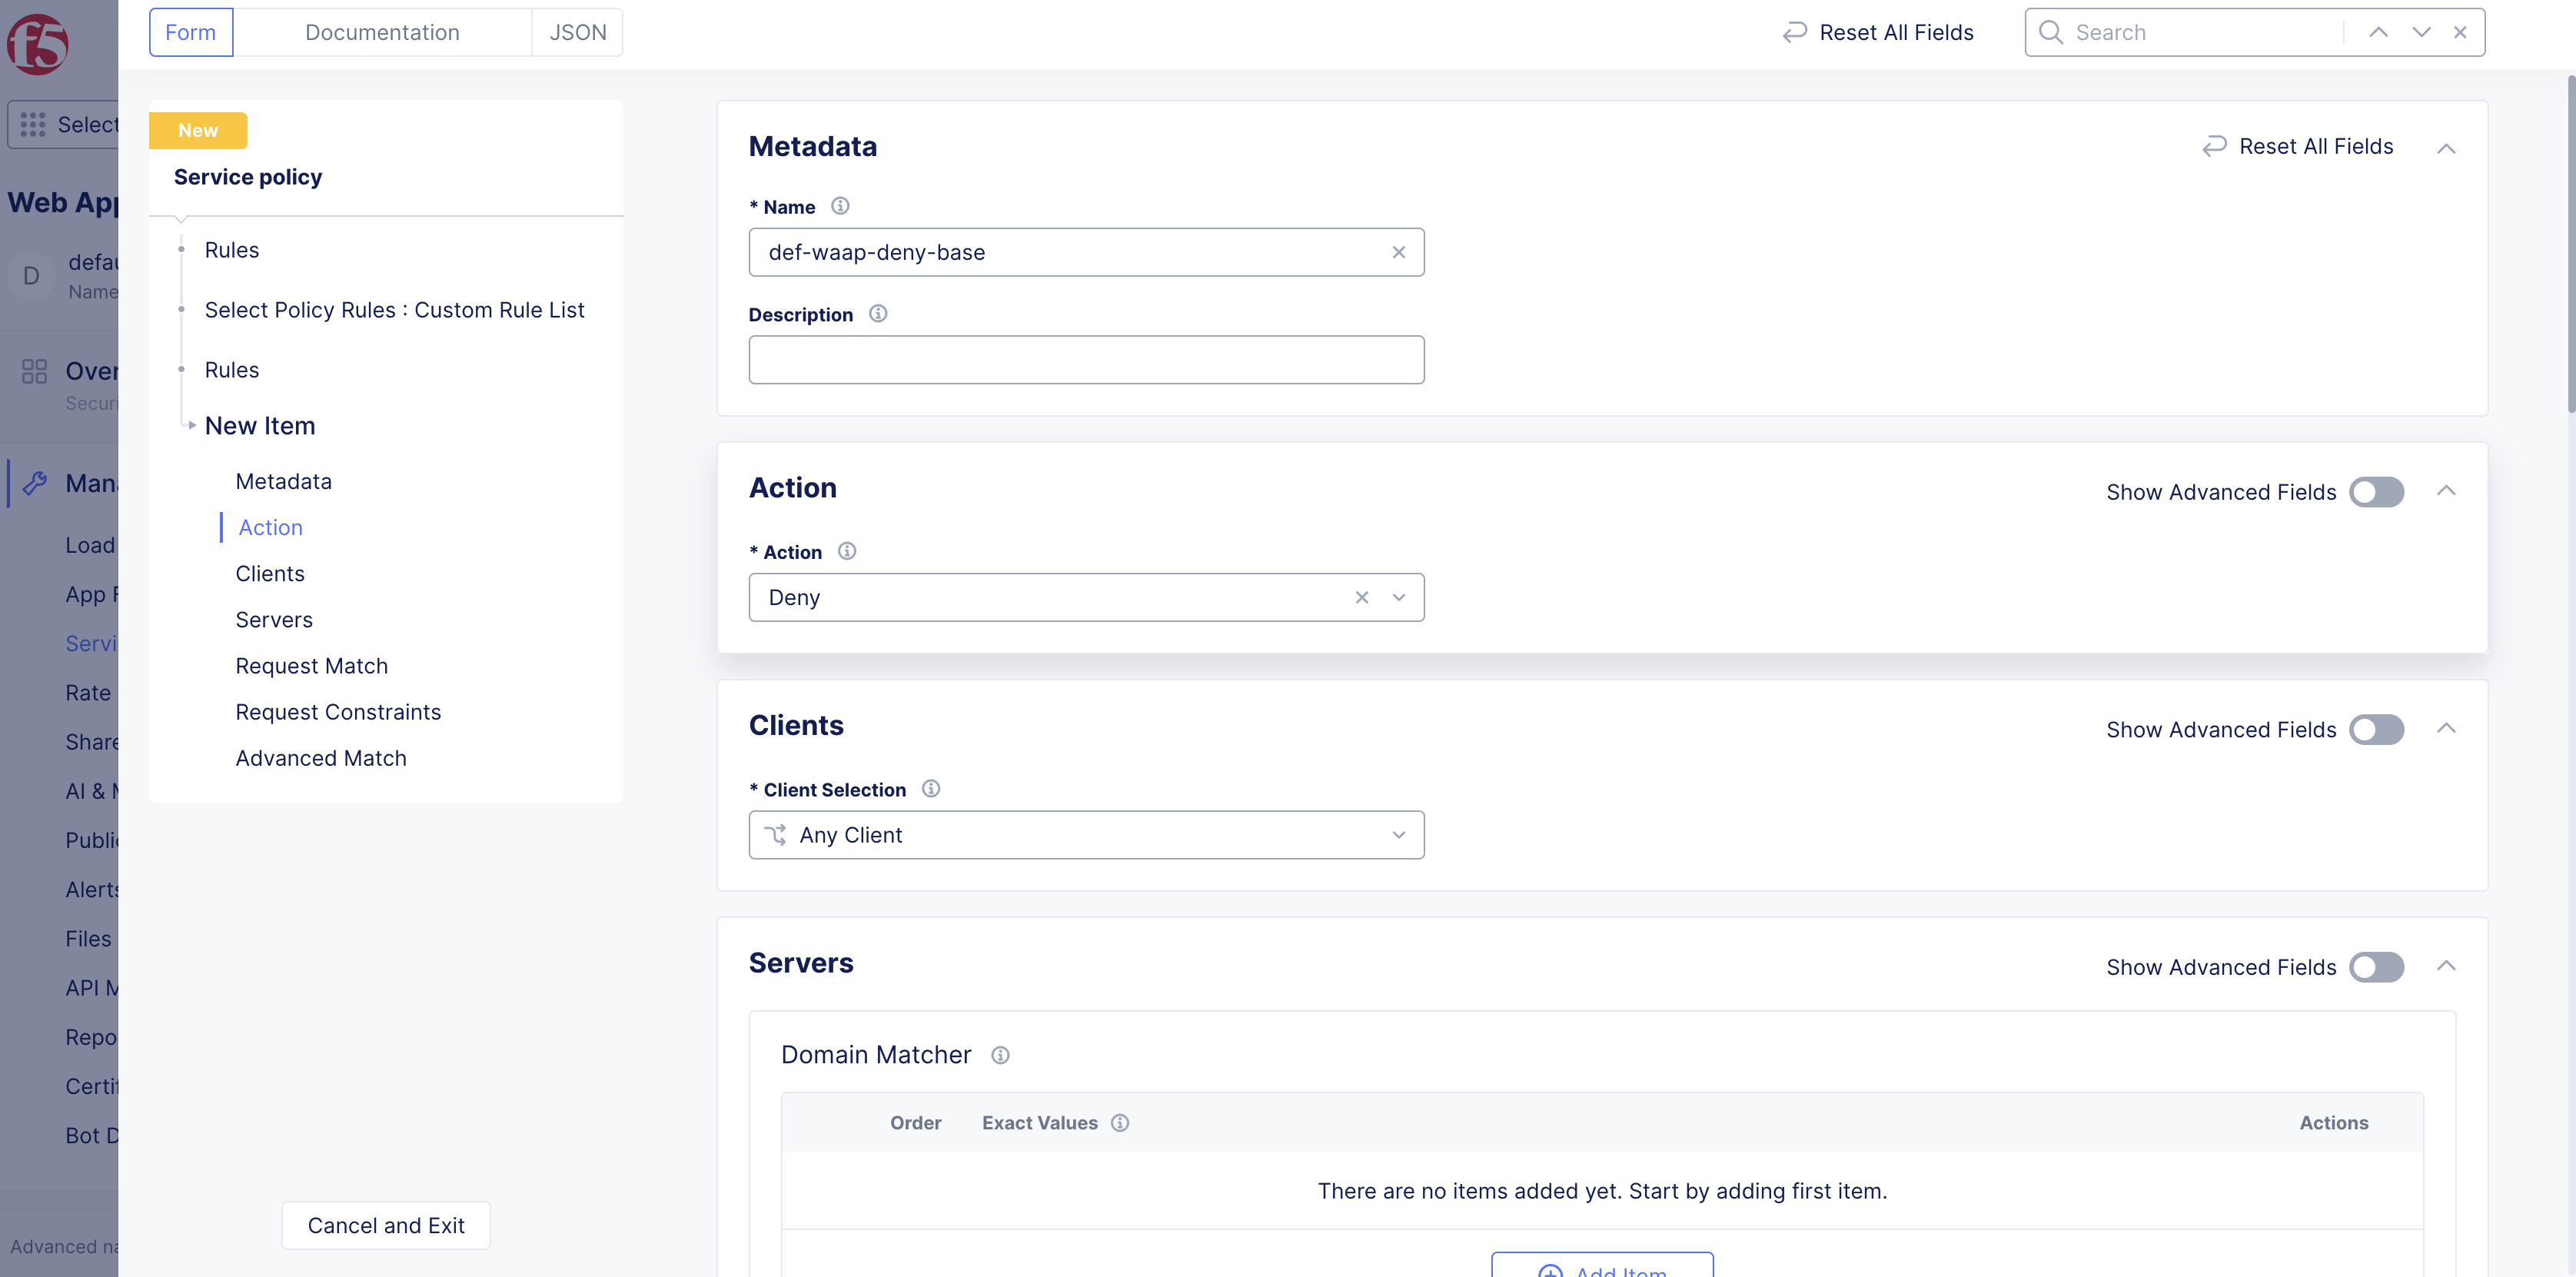
Figure: Deny All Base URLs
- The third rule allows all with the action as
Allow. There is no need ofAPI Matchingfor the third rule.
The sample order of service policy rules is as shown in the following image. This order is important as the rules are executed in the same order.
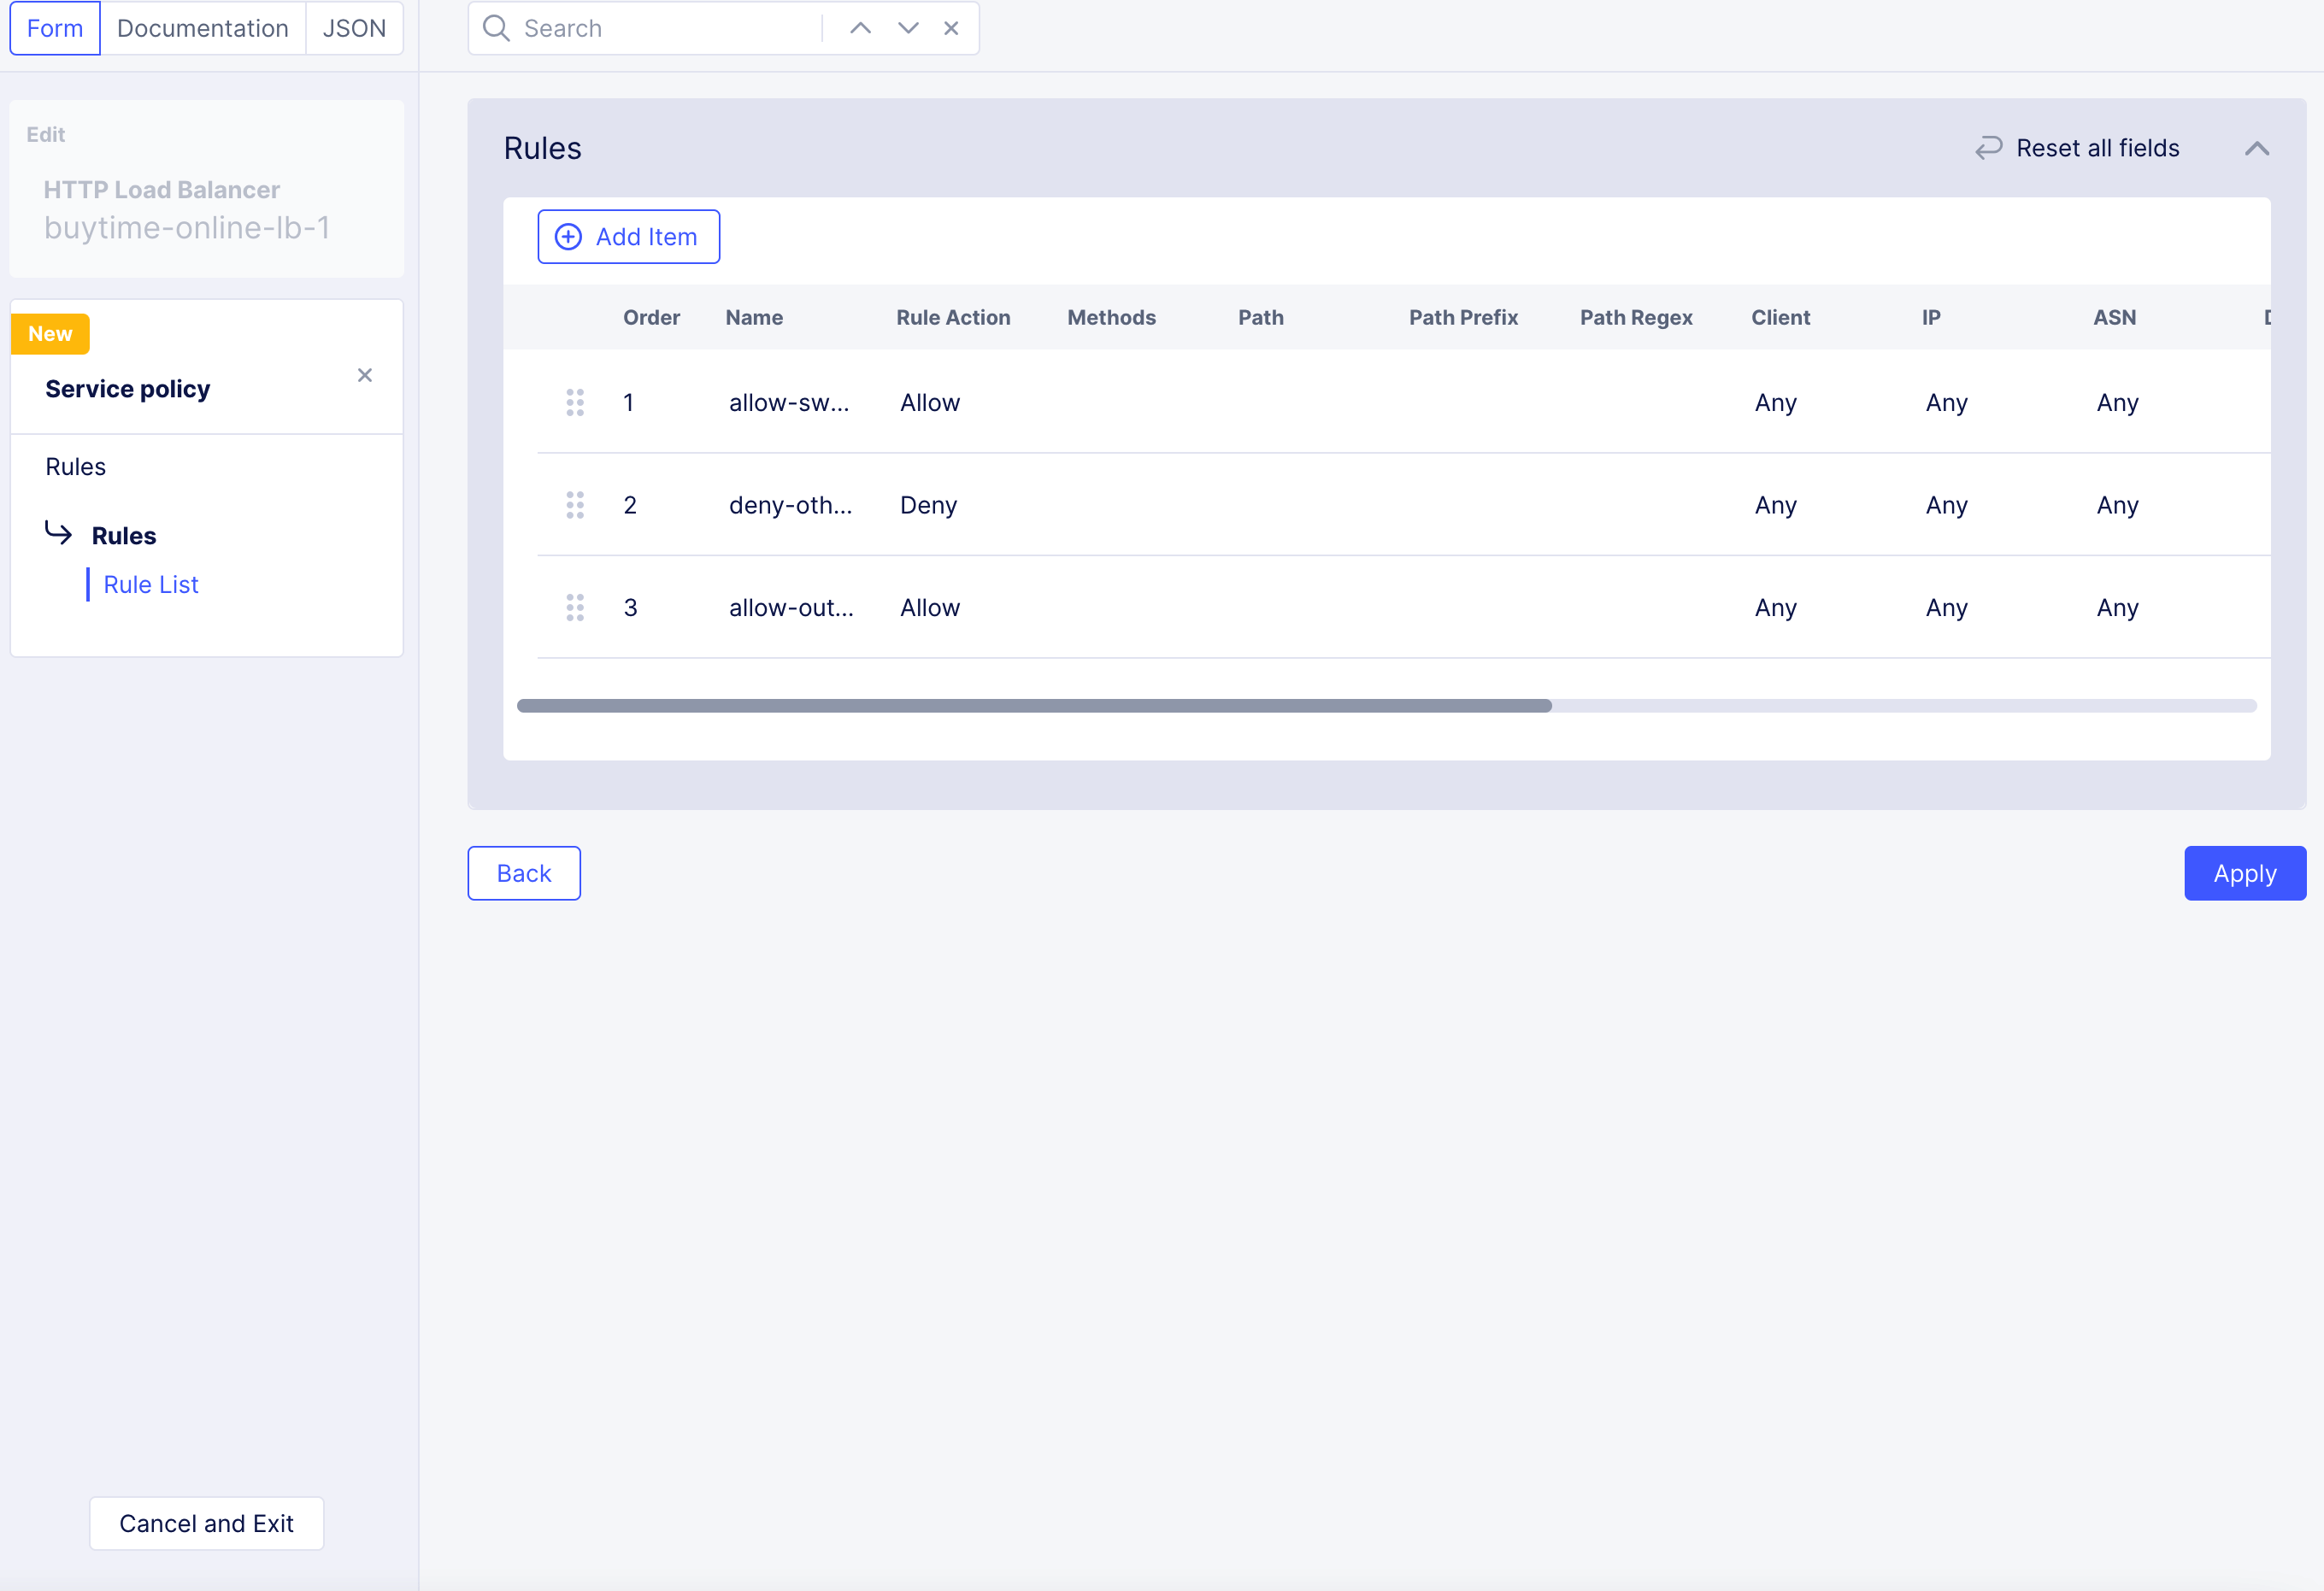
Figure: Order of Rules for Service Policy
Step 3: Complete creating service policy rules and policy.
-
Check that you created all rules per your requirements.
-
In
Rulessection, selectApply. -
Select
Continueto add the service policy to the load balancer. -
Select
Save and Exitto apply changes to load balancer configuration. -
Refresh the page to view current API results when any changes are made in the Console. After APIs are learned, you can download the file, edit it if needed and import. Imported file will define API Inventory and groups, which can be used to create API protection rules.