Create Fast ACLs
Objective
This guide provides instructions on how to configure F5® Distributed Cloud service Fast Access Control Lists (ACLs). A Fast ACL protects F5 sites from Denial of Service (DoS) attacks and can be applied to both Customer Edge (CE) sites and Regional Edge (RE) sites.
Note: Fast ACLs are not supported for Kubernetes Site (Site as a K8s pods). Currently, Fast ACLs are not supported for Secure Mesh Site v2 deployments.
Using the F5® Distributed Cloud Console Fast ACLs, you can block traffic from specific sources, or apply rate limit to the traffic from the specific source. You can also enhance protection by filtering traffic based on source address, source port, destination address, destination port, and protocol.
The Fast ACL consists of the following types of objects:
-
Fast ACLs: The Fast ACL object combines one or more rules and specifies the destination for the packets. You can also specify protocol for the destination using the policer. A rule specifies the source to which the incoming traffic belongs and the action for those packets. The source can be an IP prefix or prefix set. The action can be to allow, reject, or a policer specifying rate limit. You can also specify the protocol of the source packets using the policer.
-
Fast ACLs for Internet VIPs: The set combines one or more Fast ACLs and is applied on an RE site.
Unlike session-based ACLs where action is calculated only on first packet in session, the Fast ACL rules are evaluated for each ingress packet. Also, the Fast ACL picks source based on the longest prefix match for faster processing. This differs from traditional ACLs where rules are evaluated in order.
Note: If none of the rules match, then the default action is to forward the packet.
Prerequisites
The following prerequisites apply:
-
A valid Account is required. If you do not have an account, see Getting Started with Console.
-
An F5 CE site in case of applying the fast ACLs on CE site. If you do not have a site, create a site using the instructions in the Customer Edge Deployment guides.
-
A Fleet in case of applying the fast ACLs on a CE site. See Create Fleet guide for instructions on creating fleet.
-
An application deployed using F5 vK8s or served using an HTTP/HTTPS load balancer. See vK8s Deployment guide to deploy your applications on network cloud or edge cloud. See Create HTTP Load Balancer for instructions on configuring load balancer.
Configuration
Applying Fast ACLs for a CE site requires you to associate the Fast ACLs to a Fleet in which that CE site is a member. The following image illustrates the sequence of applying Fast ACLs to a CE site:
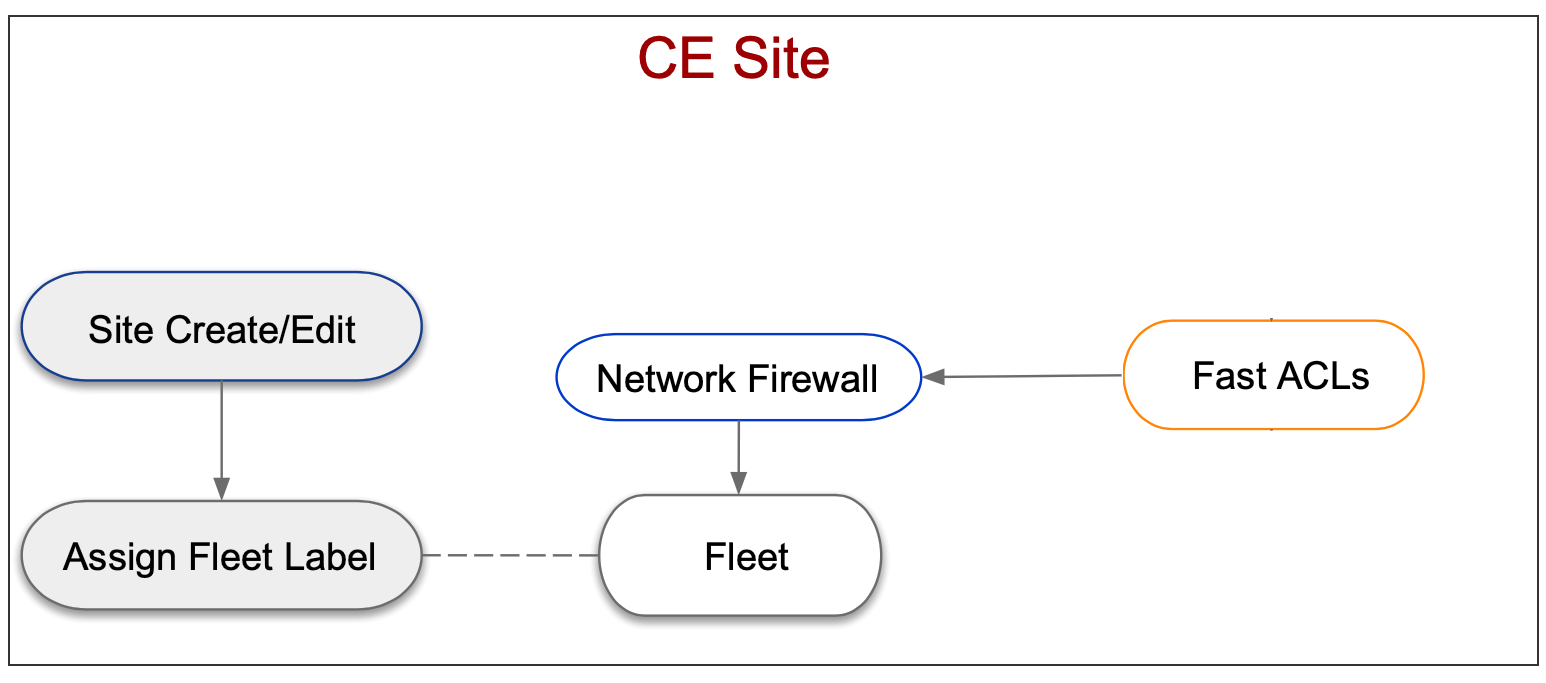
Figure: Fast ACL Configuration Sequence For CE Site
Applying Fast ACLs for an RE site requires you to create the Fast ACLs for Internet VIPs object with the Fast ACLs objects. The following image illustrates the sequence of applying Fast ACLs to a RE site:
Note: The Fast ACLs for Internet VIPs must be created in the Routed DDoS workspace. If the Routed DDoS workspace is disabled, as a workaround, a manual API call is required to configure Fast ACLs for Internet VIPs. For more information on the API, see the F5 Distributed Cloud Services API for ves.io.schema.fast_acl.
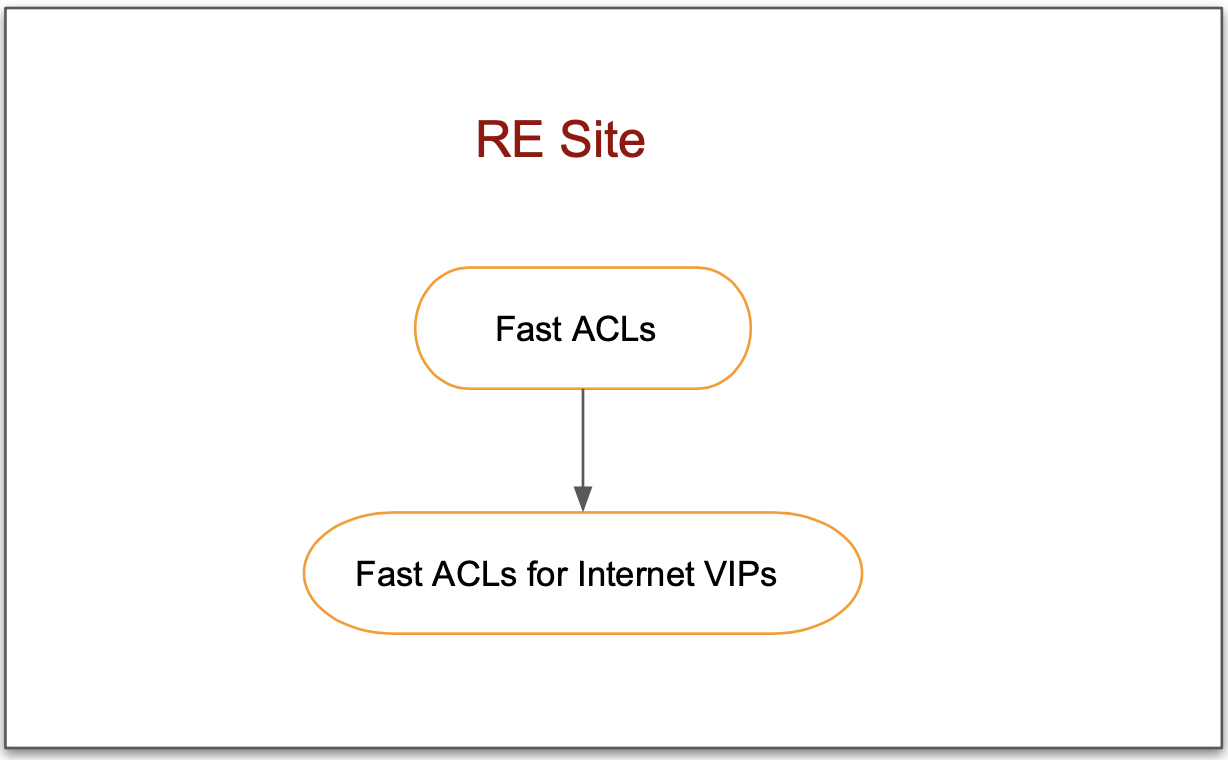
Figure:Fast ACL Configuration Sequence For RE Site
Creating Fast ACLs and applying on CE site requires you to create Fast ACL object with the rules in F5® Distributed Cloud Console, and applying it in the network firewall that is associated with a fleet. The Fleet label is then applied to the CE site for which you want to apply the Fast ACLs.
Note: You can create and apply fast ACLs and network firewall as part of Fleet creation itself. Alternatively, you can create fast ACLs and apply them to existing network firewall that is associated with an existing Fleet.
Fast ACL Limits
Maximum Fast ACL Objects per Tenant: Varies per tenant quota.
Note: Inquire upgrading plan with additional objects if quota exceeded.
Maximum Rules per Fast ACL: 128
Maximum IP Addresses (prefixes) per Fast ACL Rule: 1024 prefixes
IP Prefix Sets per Fast ACL Rule: 1
Configure Fast ACLs
Configuring fast ACLs for the CE site requires you to create fast ACLs, apply them to a network firewall, apply the firewall to the Fleet, and adding the fleet label to the CE site.
In case of RE site, creating Fast ACLs and Fast ACLs for Internet VIPs is sufficient.
Note: This example assumes that you have an application provisioned using a F5® Distributed Cloud Console HTTP load balancer, and another application deployed using F5 vK8s.
Fast ACLs can be viewed and managed in multiple workspaces: Multi-Cloud Network Connect, and Routed DDoS.
This example shows Fast ACL configuration in Multi-Cloud Network Connect.
Step 1: Start Fast ACL creation.
- From the Console homepage, select Multi-Cloud Network Connect.
Note: Homepage is role based, and your homepage may look different due to your role customization.
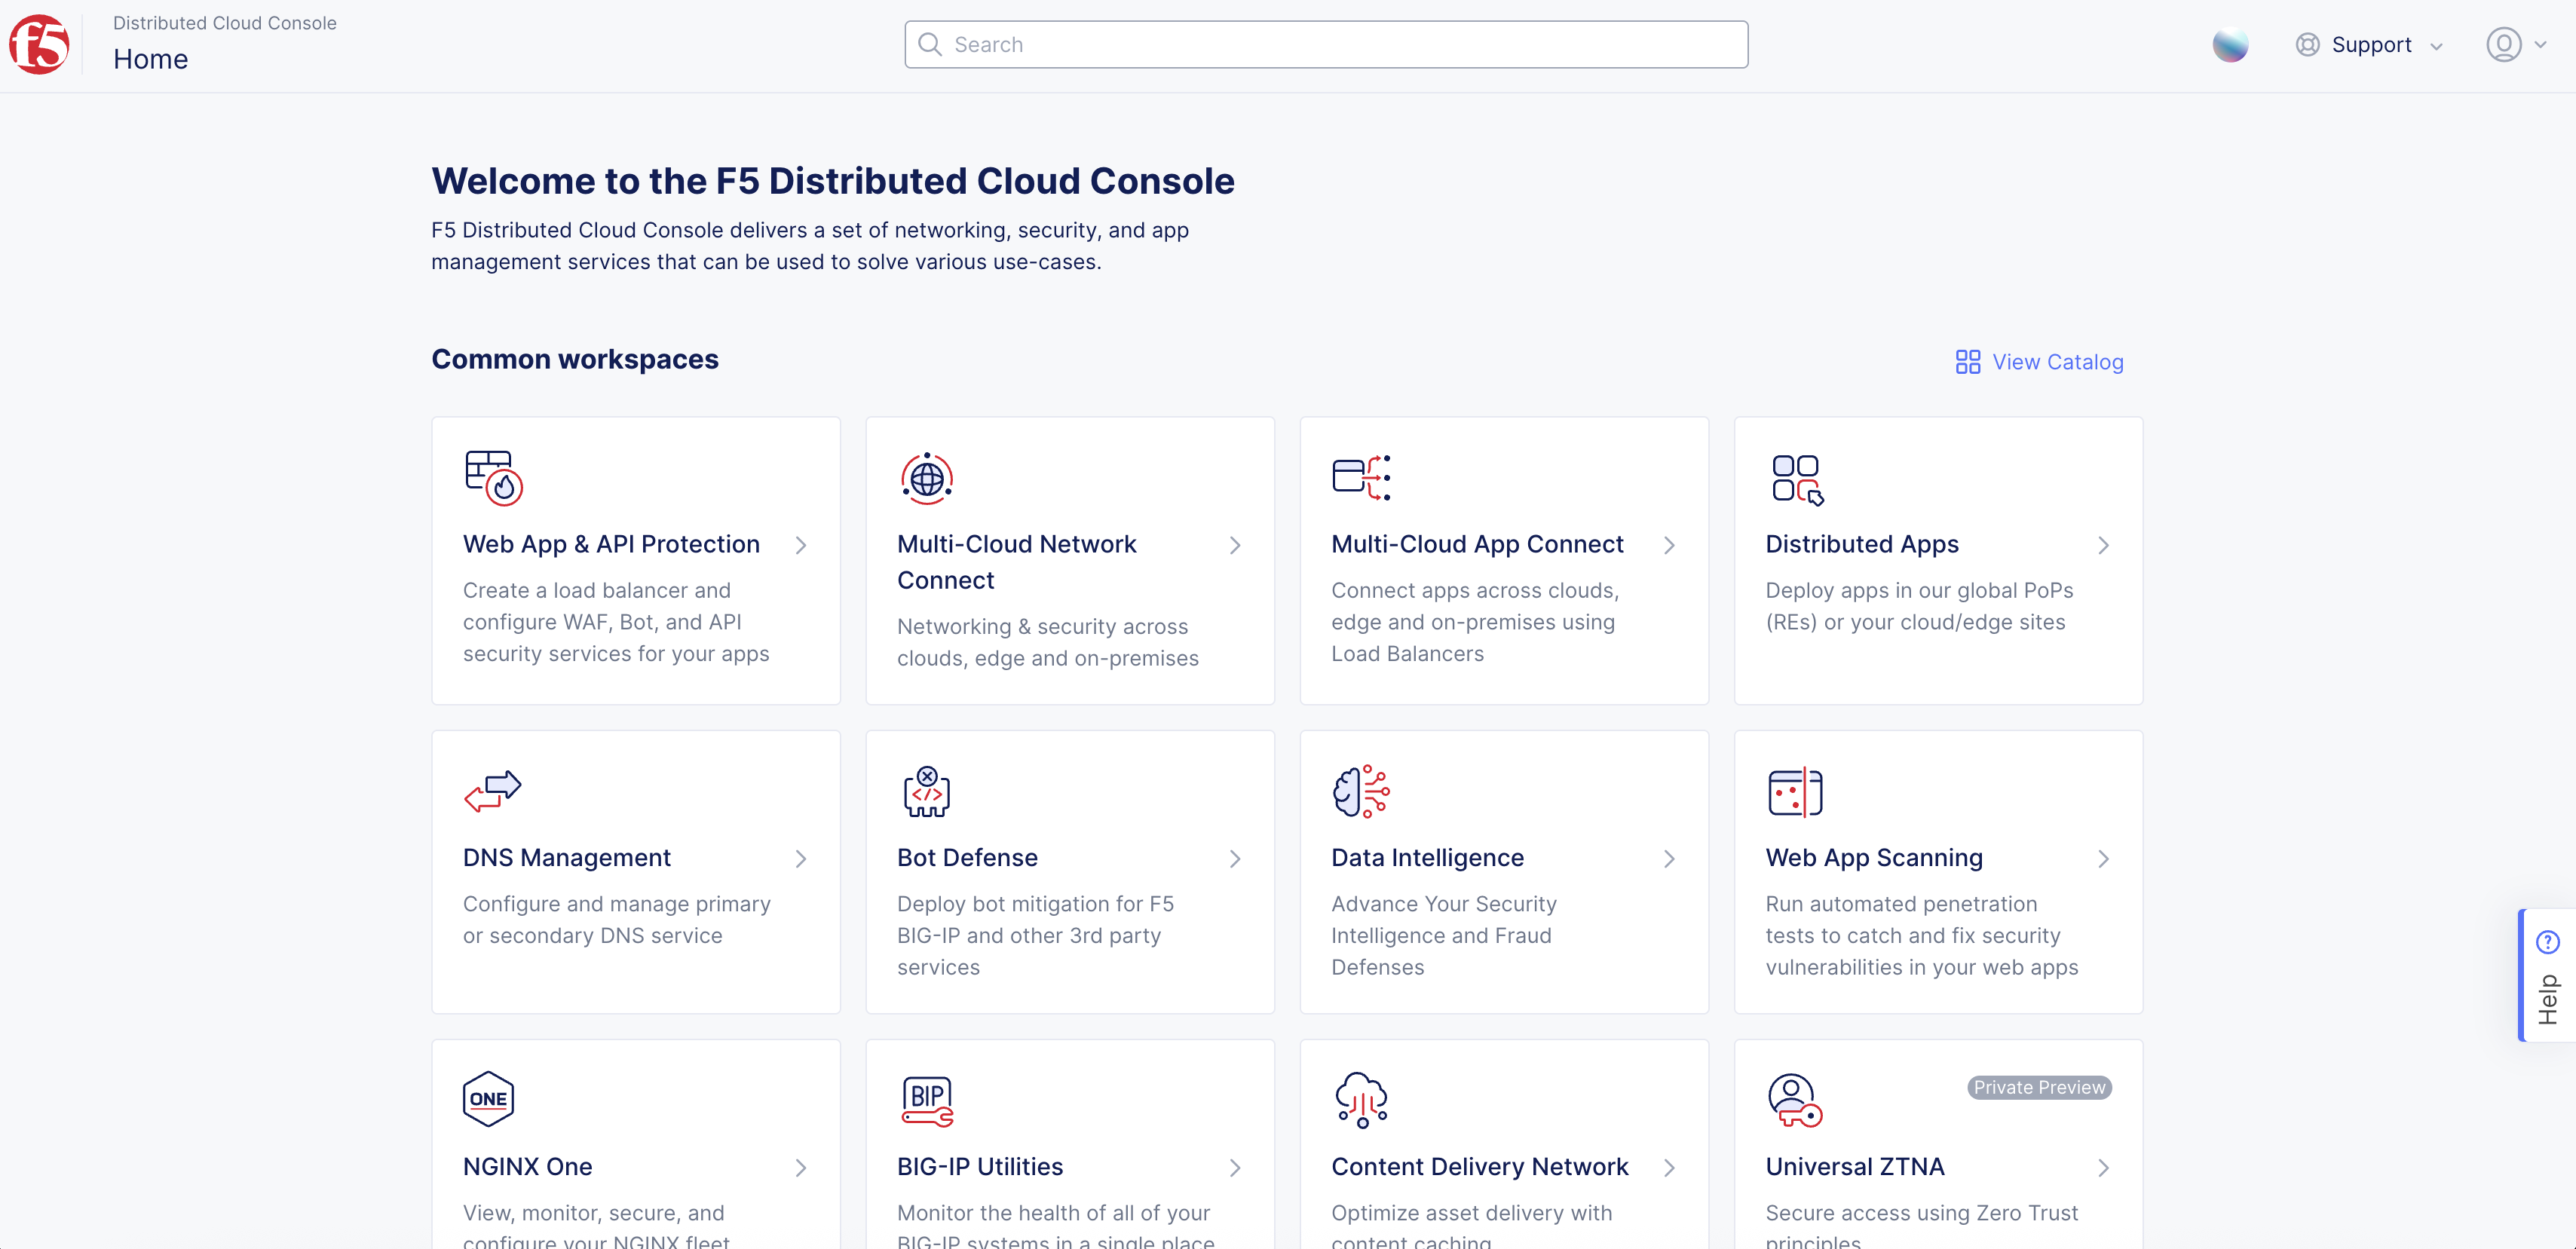
Figure: Homepage
-
Confirm the Namespace feature is in correct namespace. Not available in all workspaces.
-
Select Manage in left column menu and select Firewall > Fast ACLs > Add Fast ACL.
Note: If options are not available, select the Show link in Advanced nav options visible in bottom left corner. If needed, select Hide to minimize options from Advanced nav options mode.
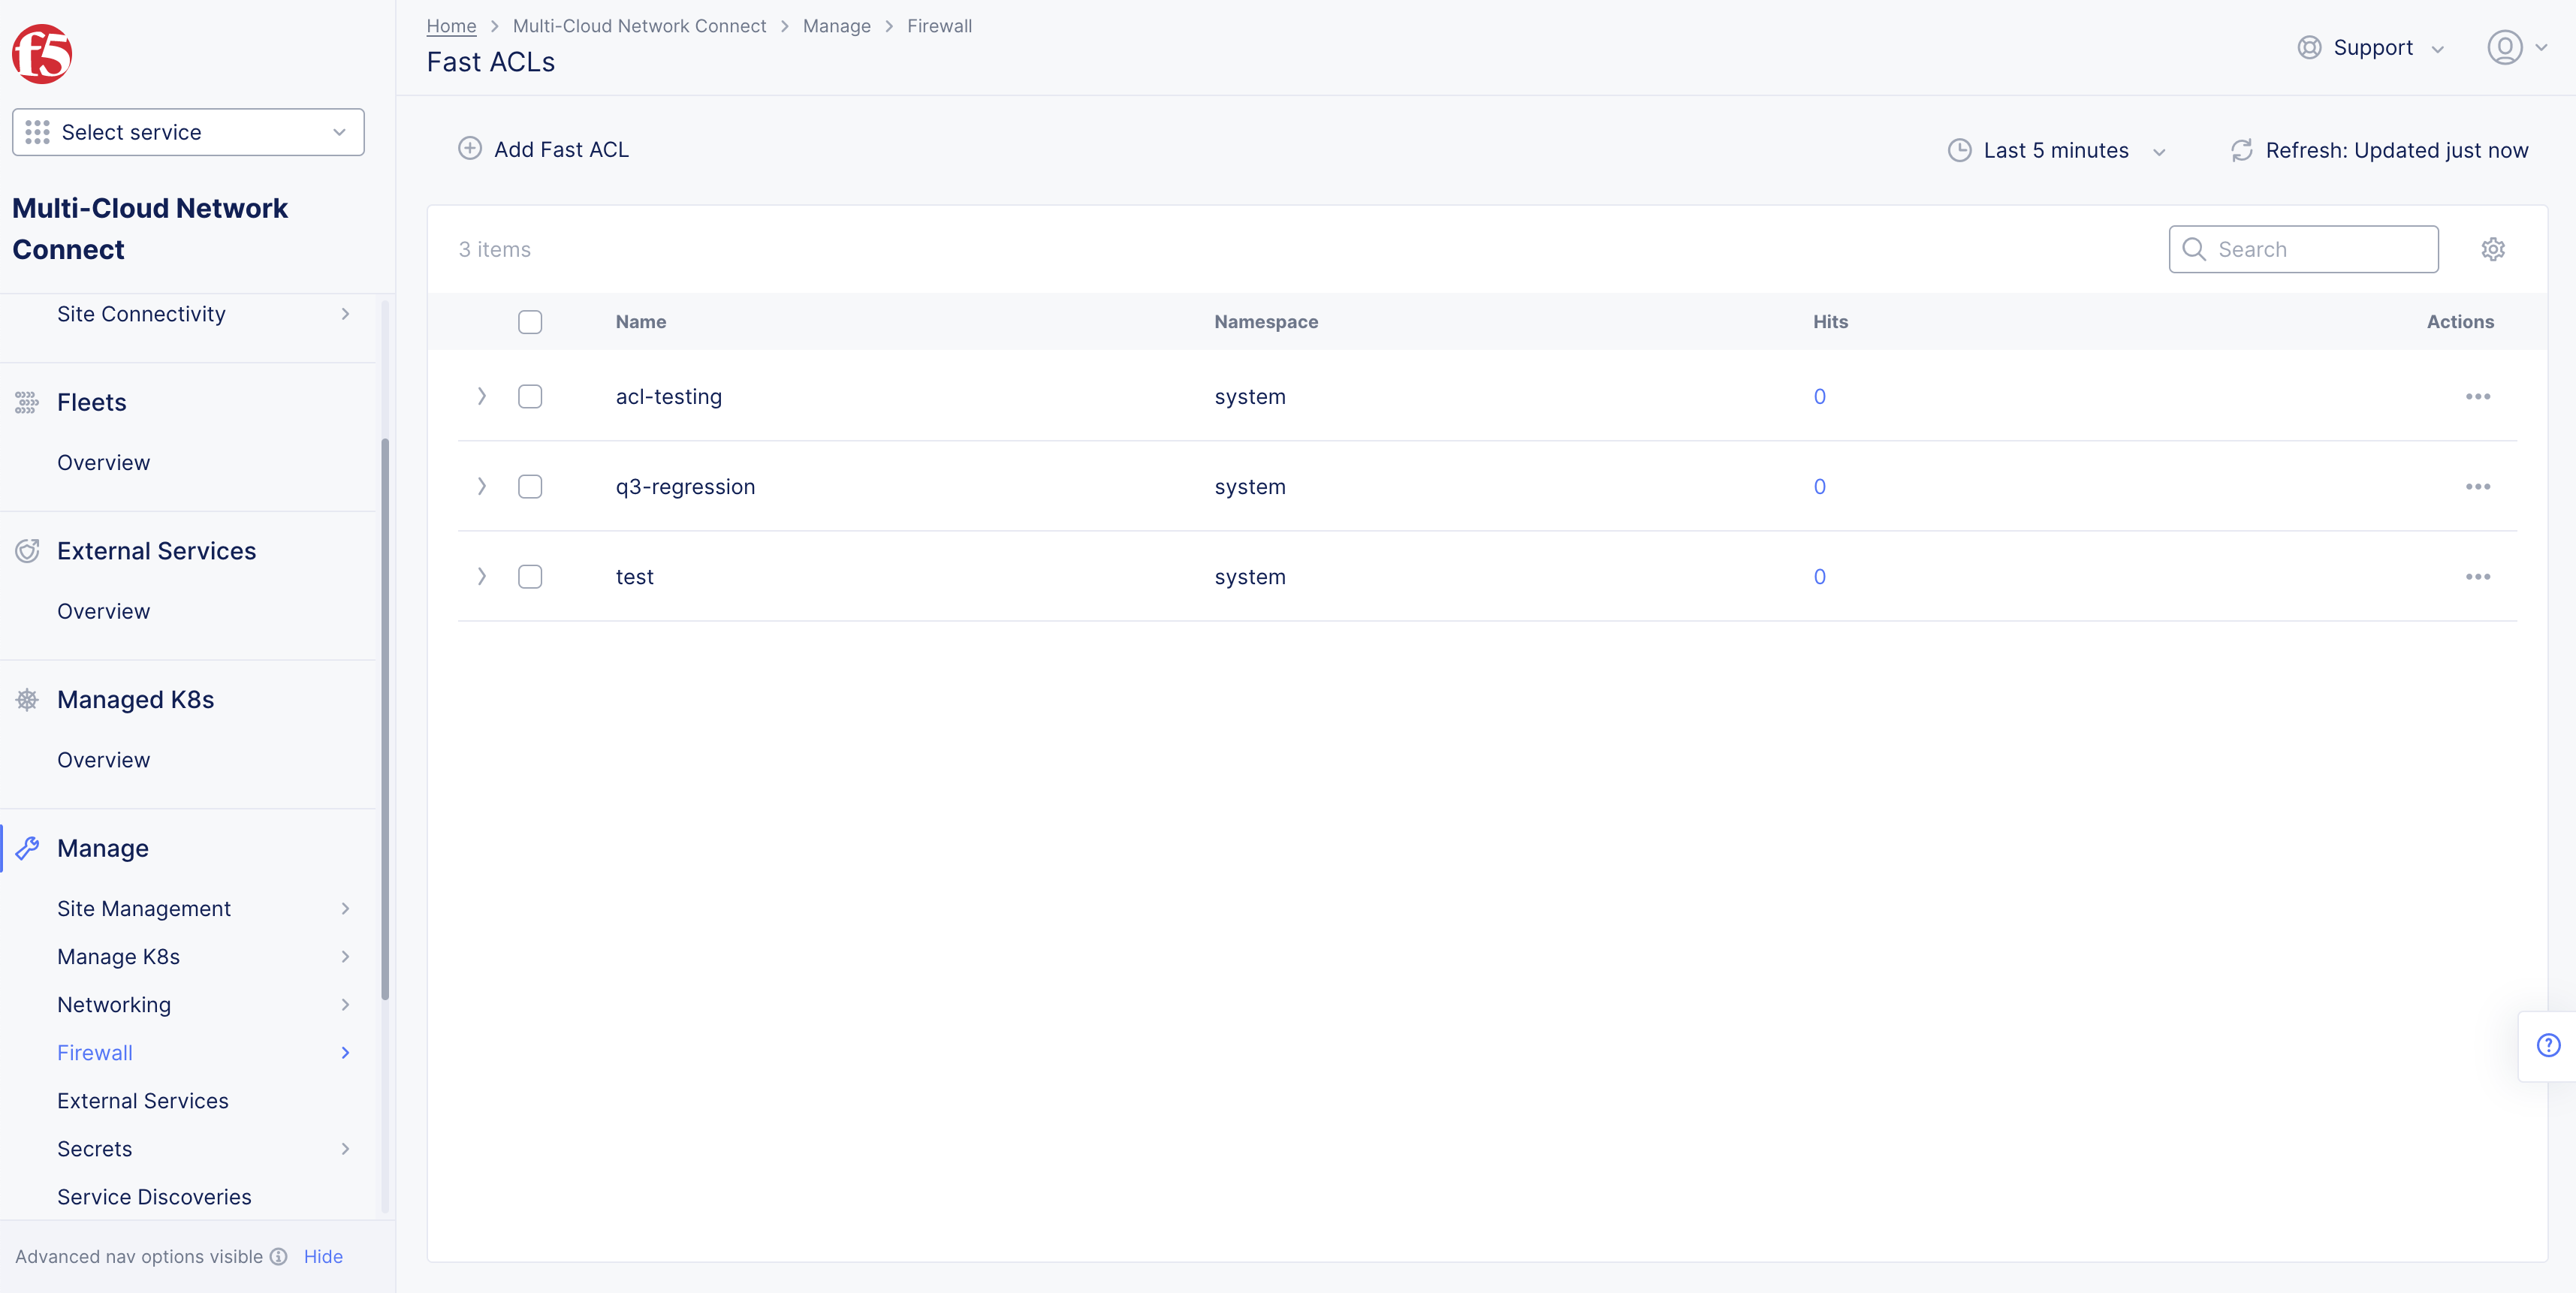
Figure: Fast ACLs
Step 2: Configure Site Type.
-
Enter Name, Labels, and Description as needed.
-
In the Fast ACL Type section, perform the following:
-
Select an option from the Select Site Type For acl drop-down menu. Select Site Type Customer Edge for CE sites or Site Type Regional Edge for RE sites.
-
Select View Configuration under the Site Type Customer Edge or Site Type Regional Edge field per your site type selection.
-
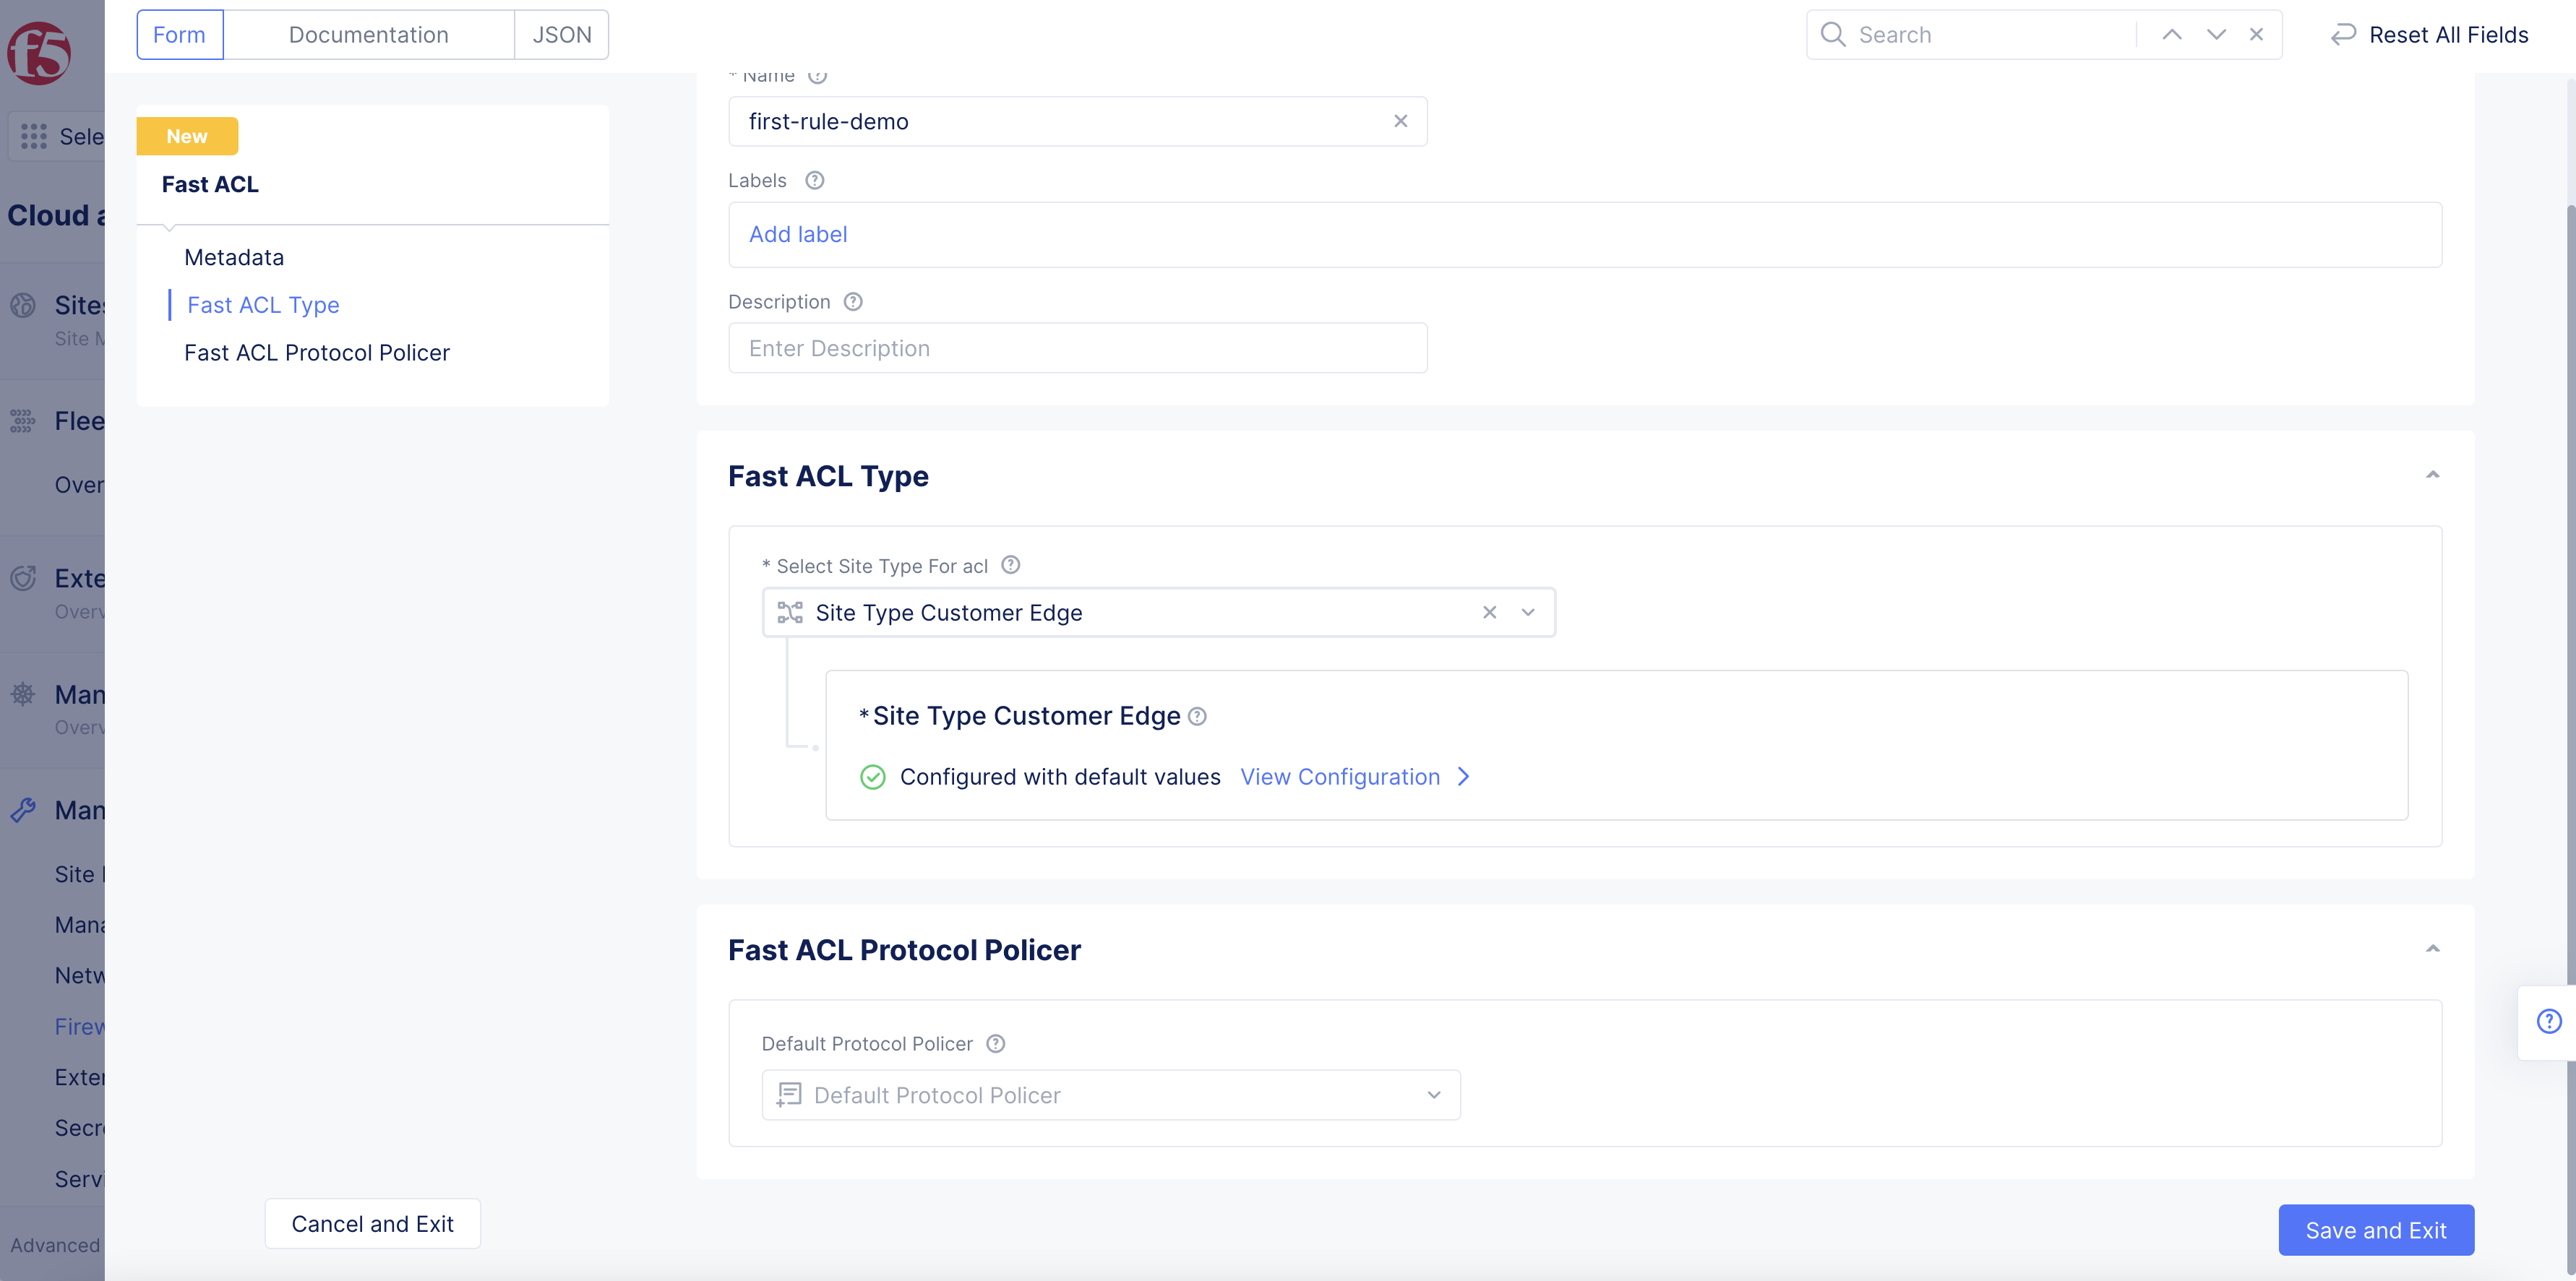
Figure: Fast ACL Creation
Step 2.1: Site Type Customer Edge.
-
From the Select Network drop-down menu, select an option for the destination that the ACL will be applied at:
-
Inside Network: This option is for the site local inside network.
-
Outside Network: This option is for the site local outside network.
-
-
From the Select Destination IP drop-down menu, select an option:
-
Select All Interface IP(s) as VIP to match all IP addresses assigned to the interfaces.
-
Select Configured VIP(s) to match configured VIPs for the destinations.
-
Select All VIP(s) to match all interface VIPs and configured VIPs.
-
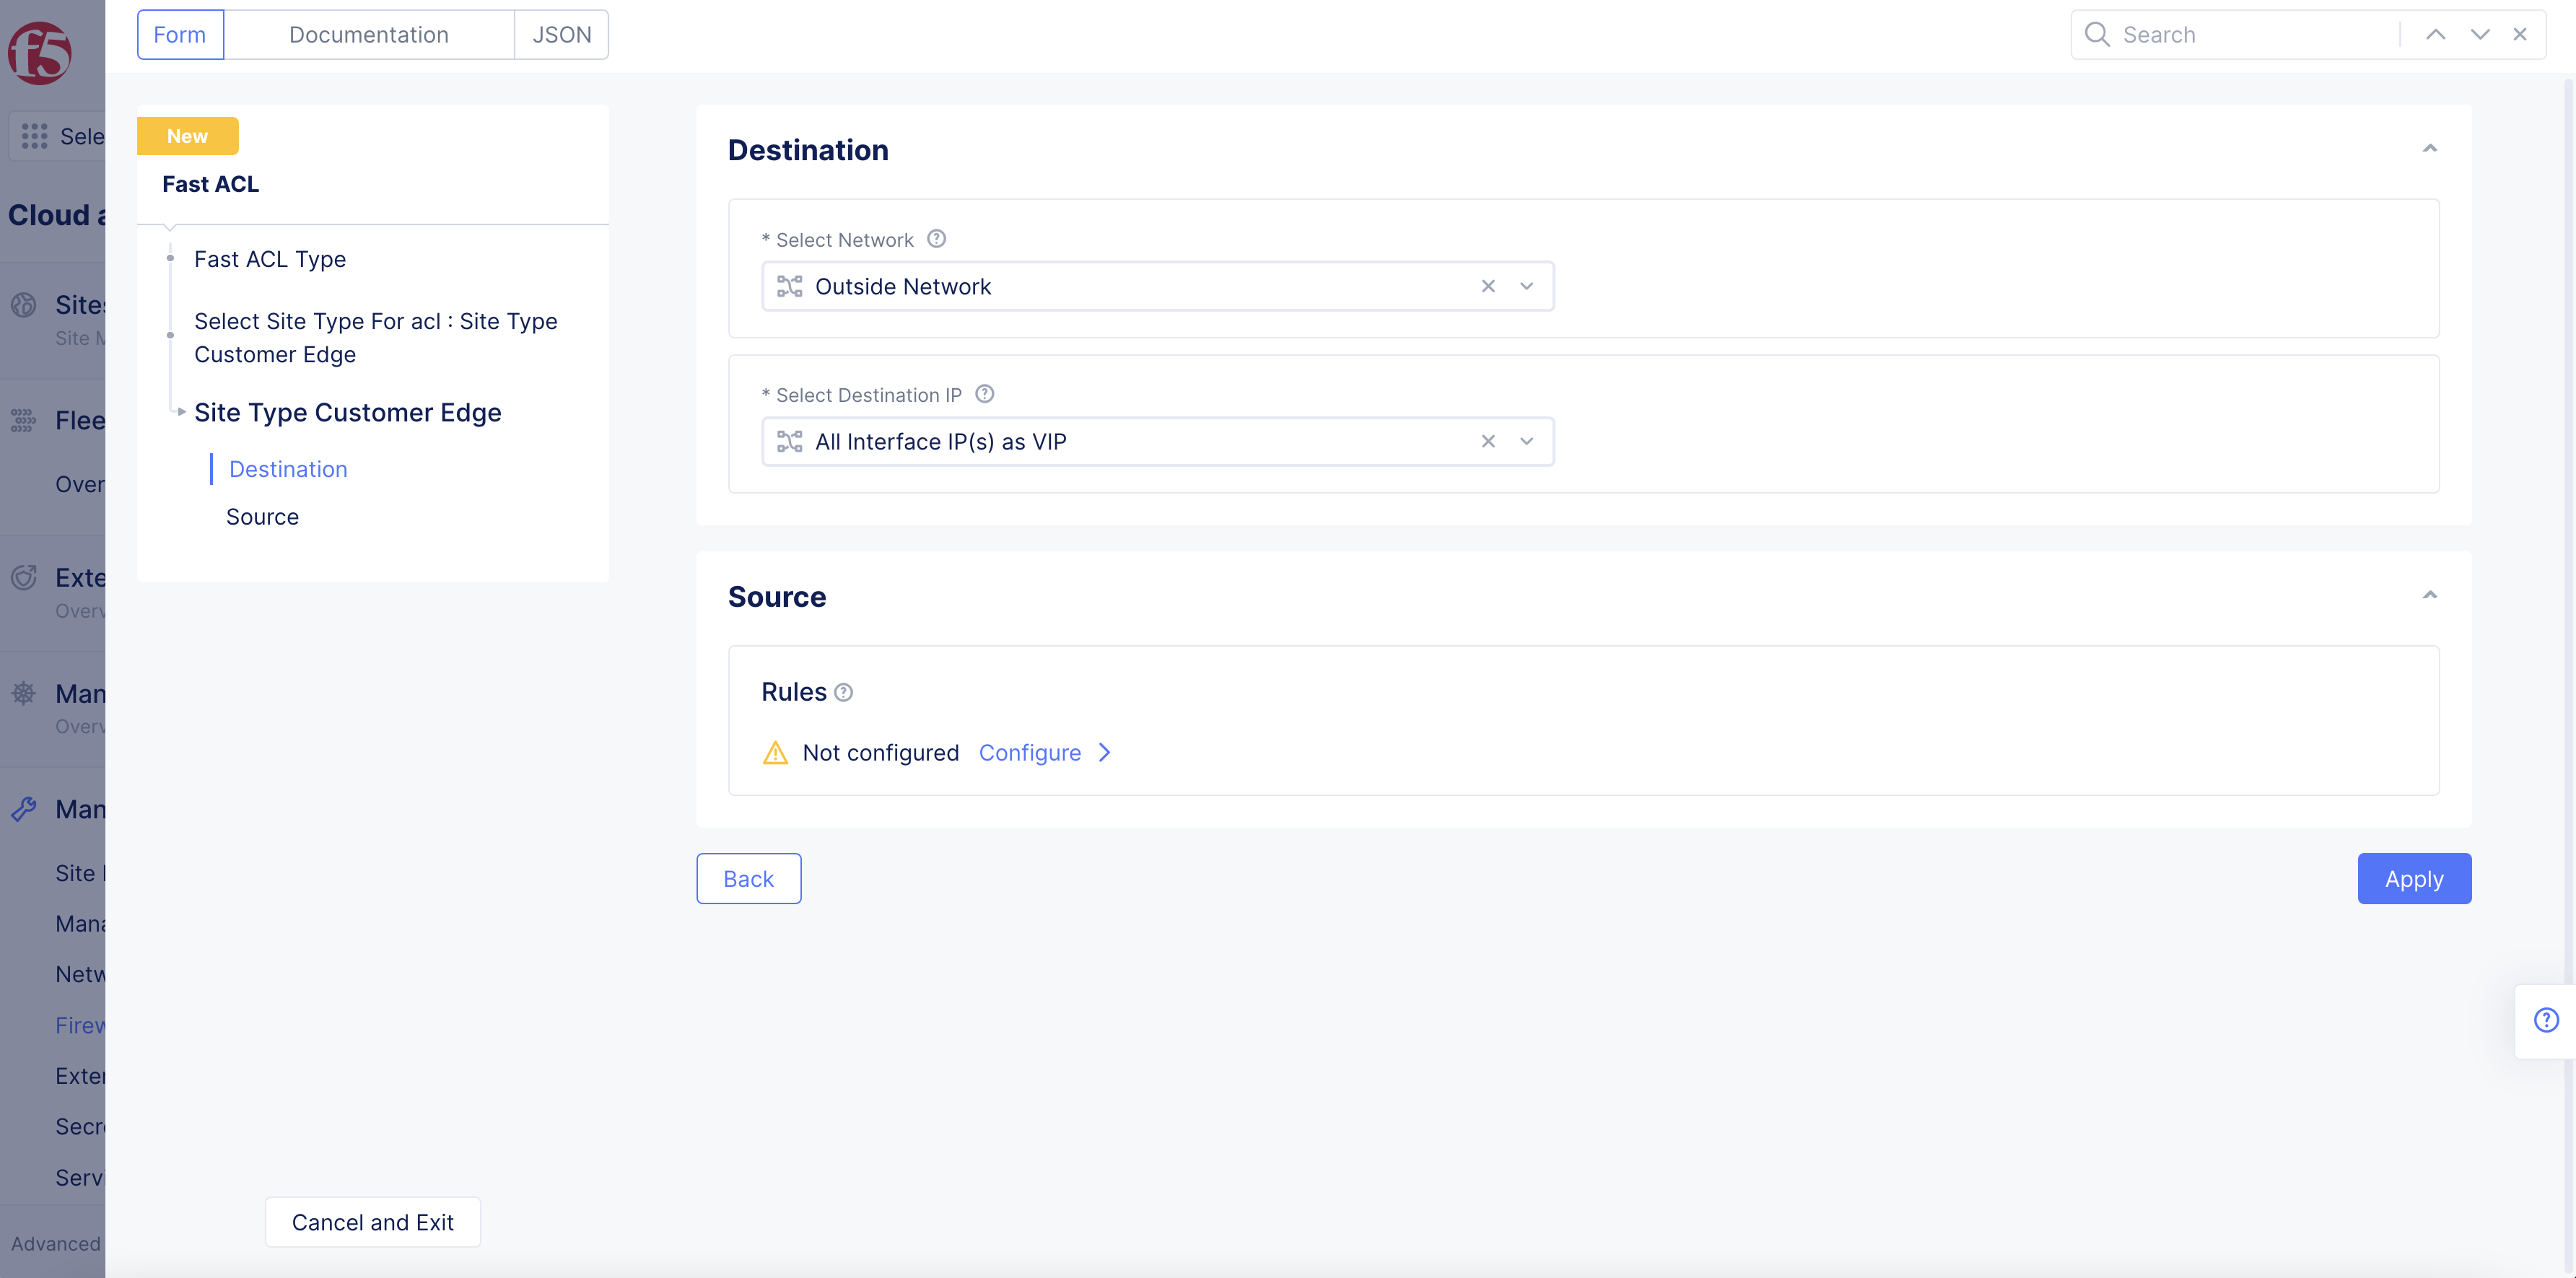
Figure: Site Type CE Destination Configuration
Step 2.2: Site Type Regional Edge.
-
Select an option from the Select VIP(s) drop-down menu per the following guidelines:
-
ALL Public VIP(s): To apply the fast ACL to all VIPs for the destinations.
-
Default Tenant VIP: To apply the fast ACL to the default VIP of the tenant.
-
List of Specific VIP(s):
-
Optionally, enable the Include Tenant VIP option.
-
Select one or more public IPs for the Select Public VIP(s) field. You can add more than one entry using the Add item option.
-
-
Note: Public IPs are a prerequisite for the List of specific VIP(s) option.
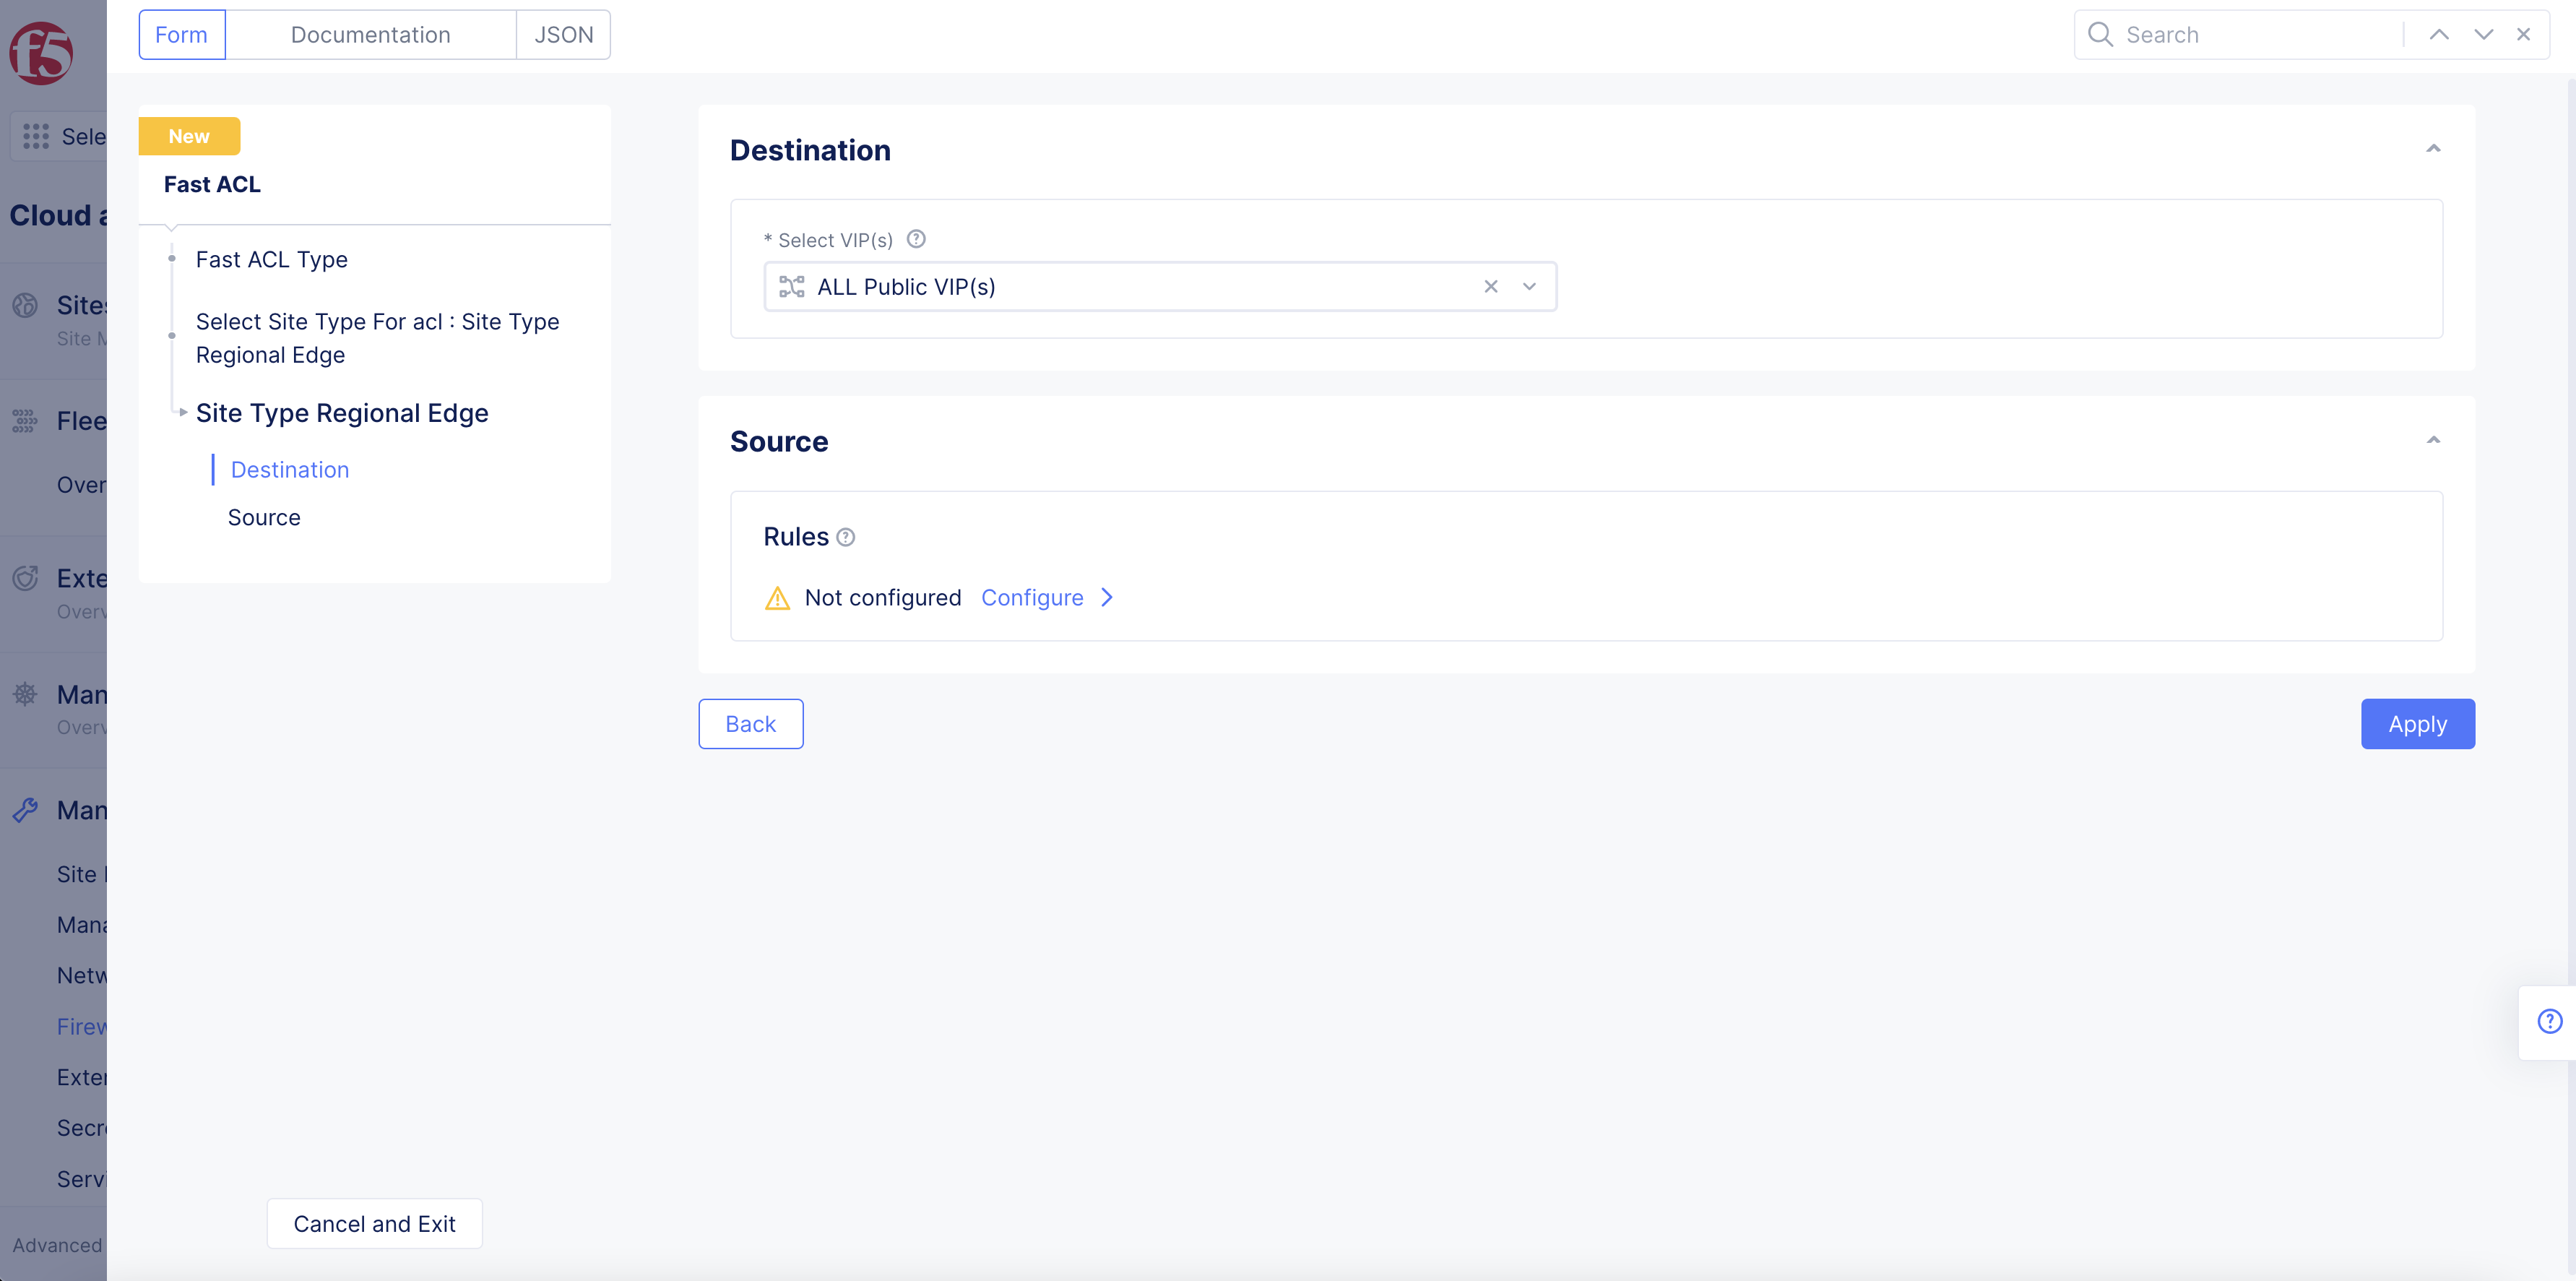
Figure: Site Type RE Destination Options
Step 3: Configure Source Rules.
-
In the Source section, select Configure.
-
Select Add Item in Rules section.
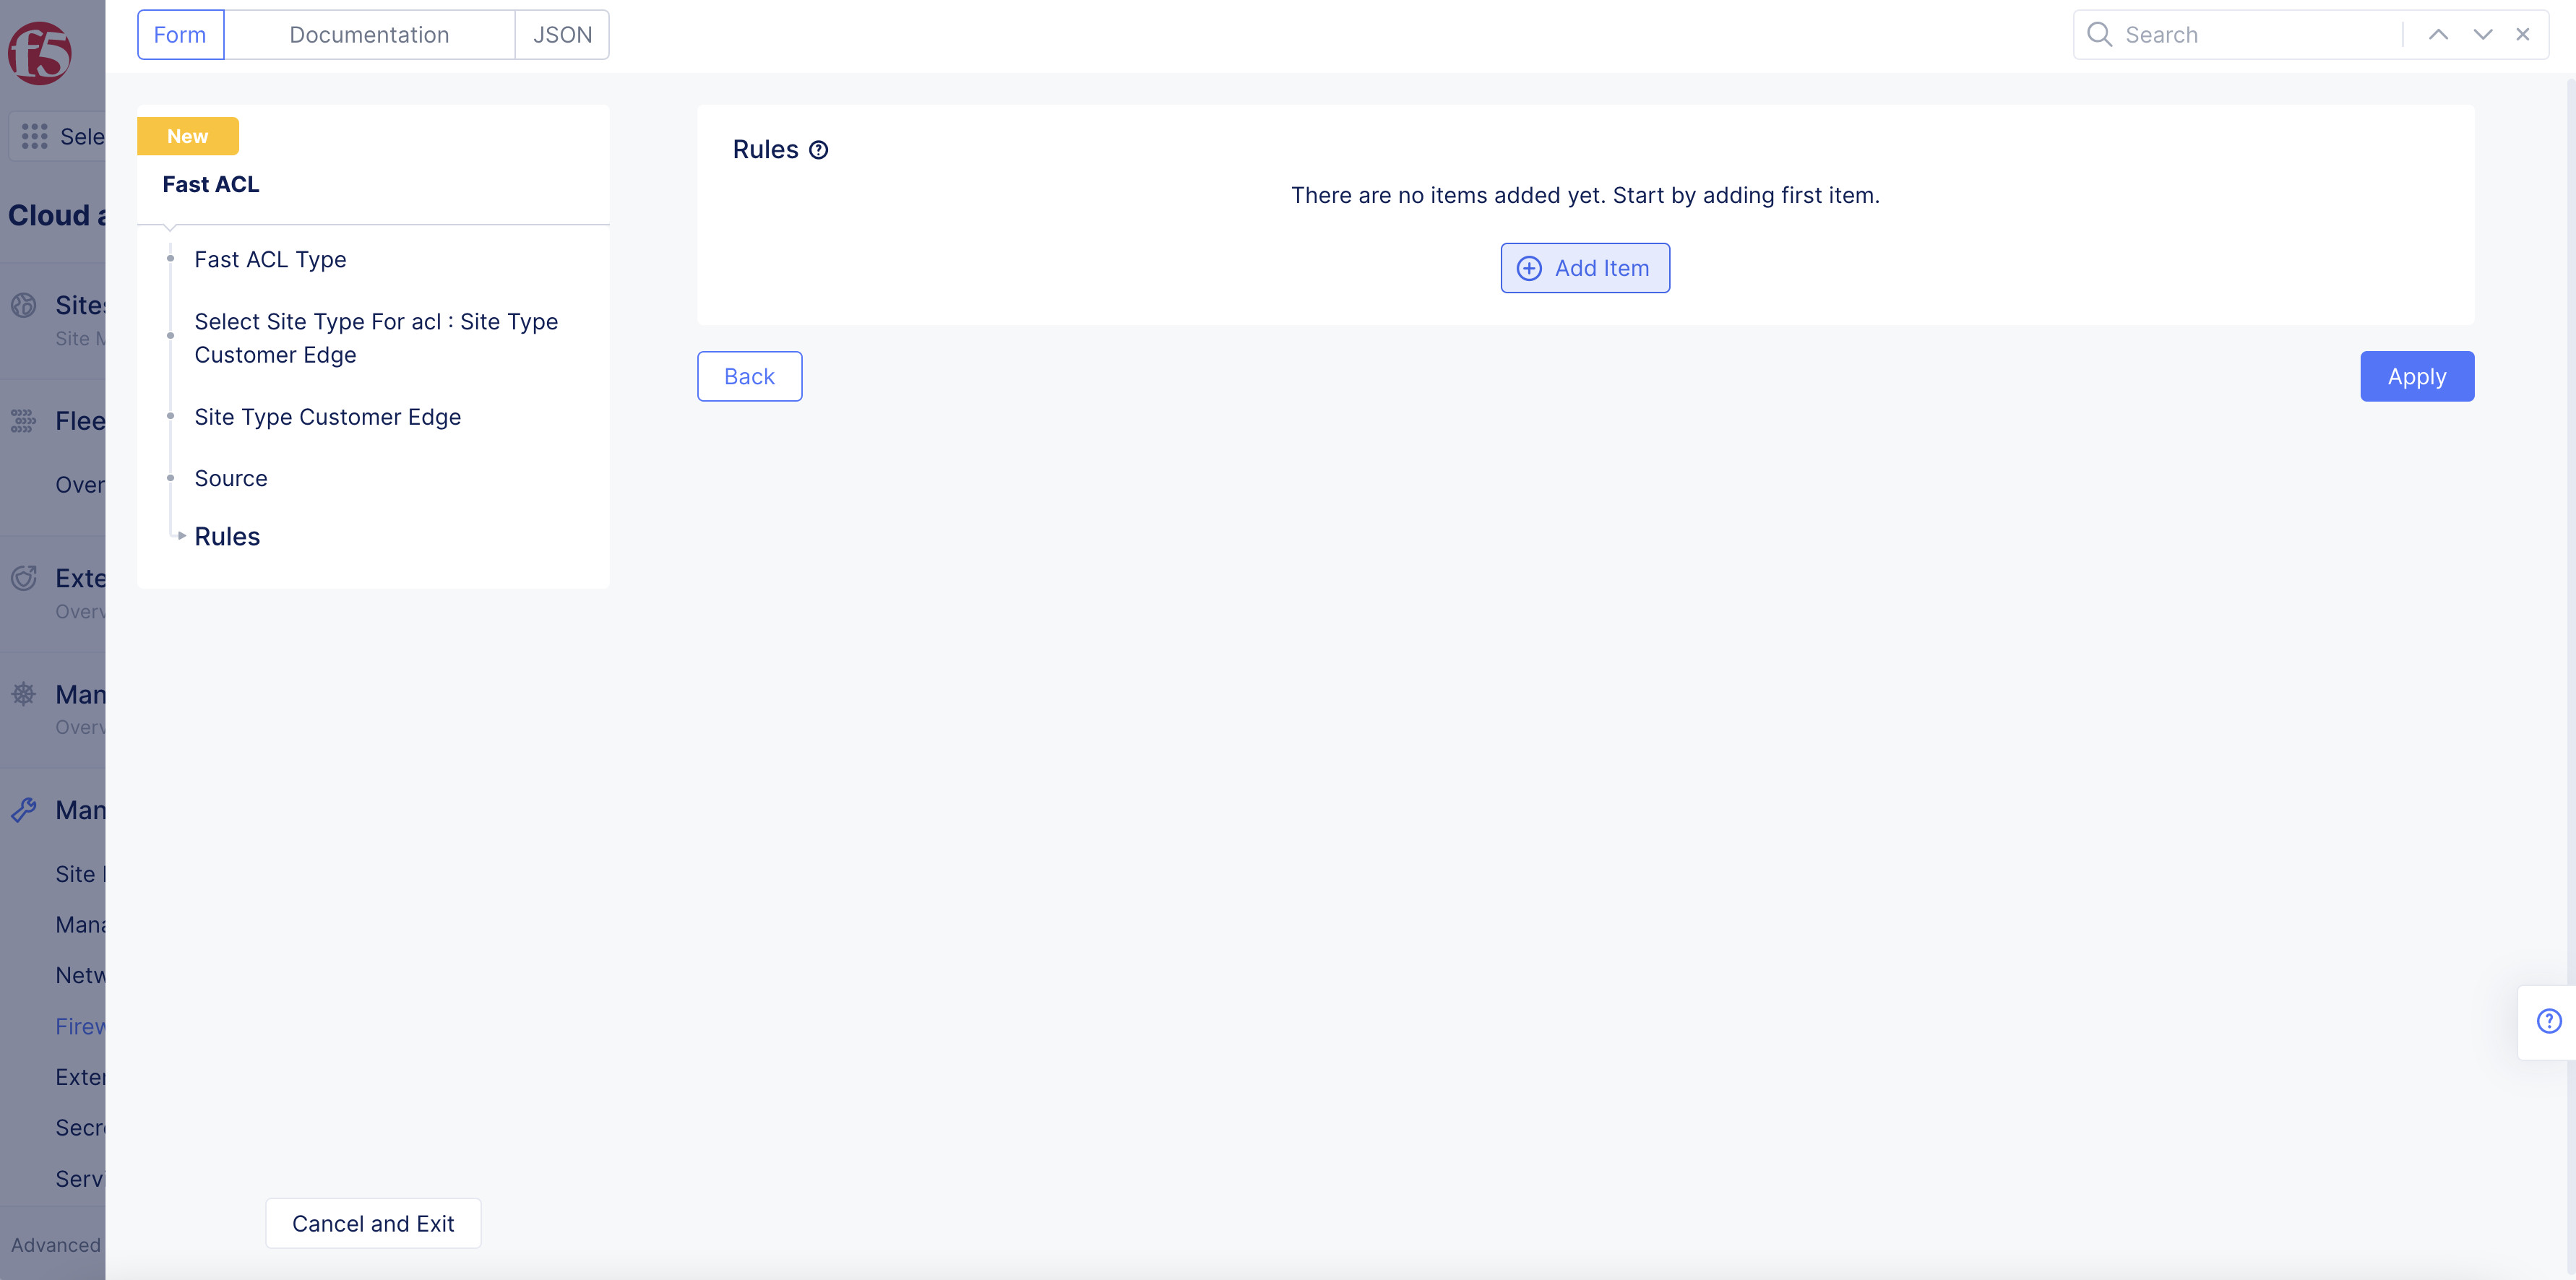
Figure: Source Rules Configuration
- Enter Name and Description as needed.
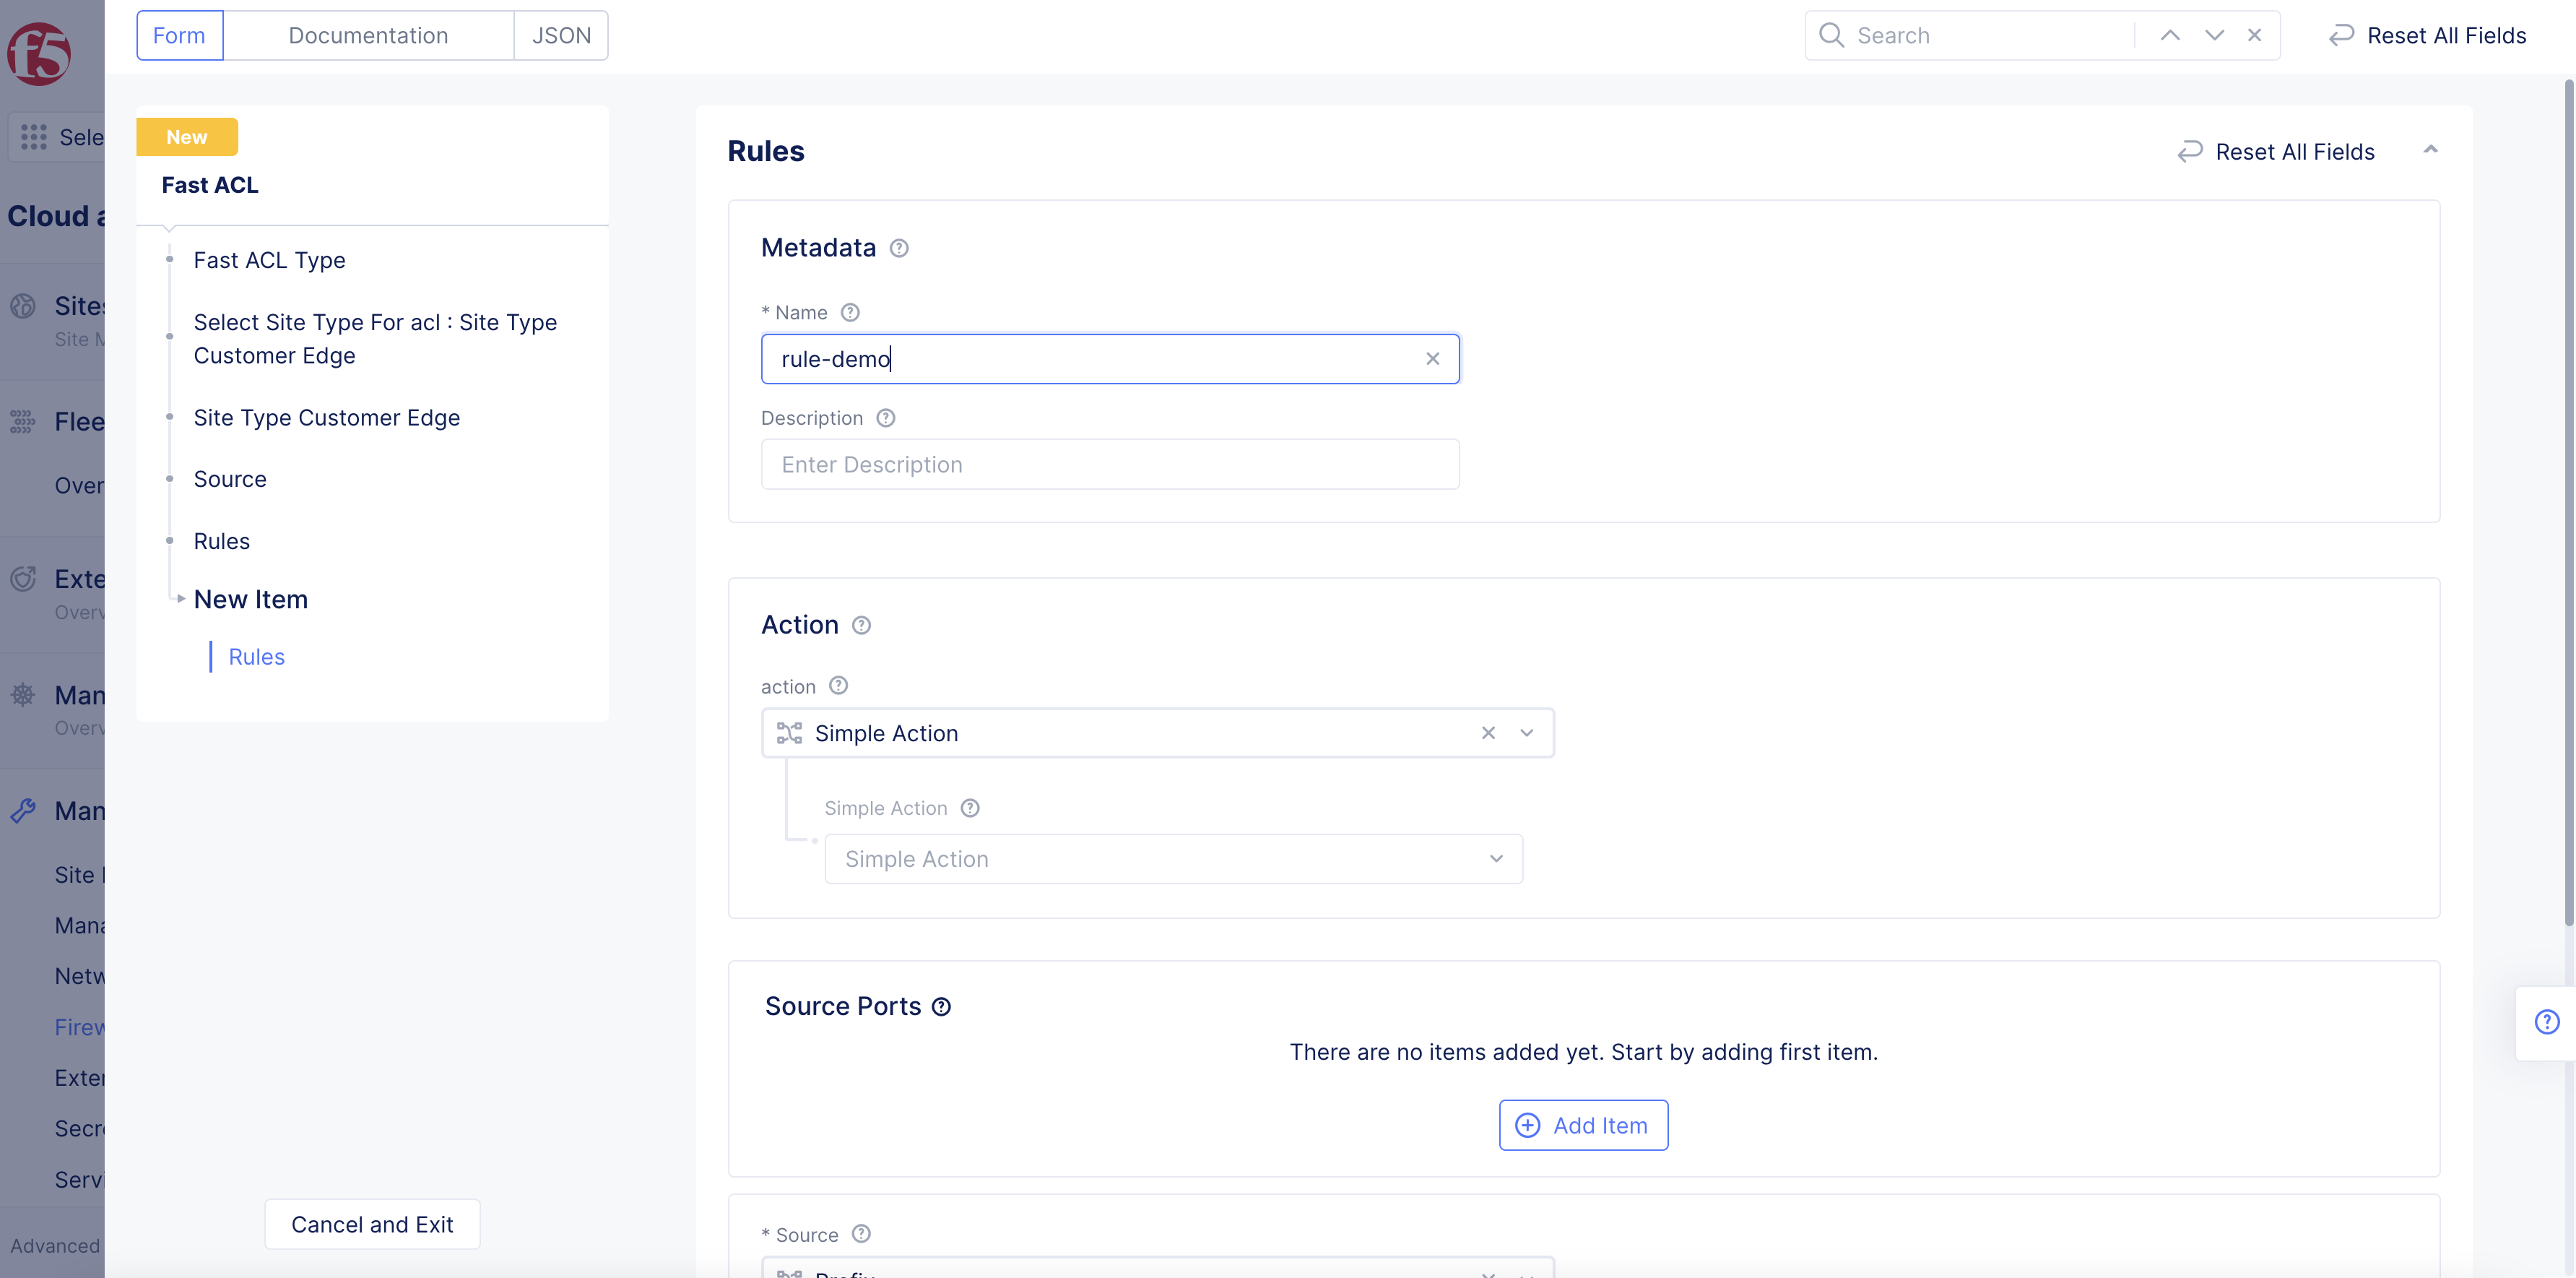
Figure: Fast ACL Rules Configuration
Step 3.1: Configure an action.
-
From the action drop-down menu, select the type of action to perform:
-
Simple Action: Select Simple Action drop-down menu options Deny or Allow. This creates a rule that rejects or allows traffic from the configured source.
-
Policer Action: Select Reference drop-down menu option to select and apply existing policer or click Add Item. This applies rate limiting for traffic originating from the configured source.
-
Protocol Policer Action: Select Protocol policer Reference drop-down option to select and apply an existing protocol policer or click Add Item. This applies rate limiting for the traffic of the specified protocol originating from the configured source. The supported protocols are TCP, UDP, ICMP, and DNS.
-
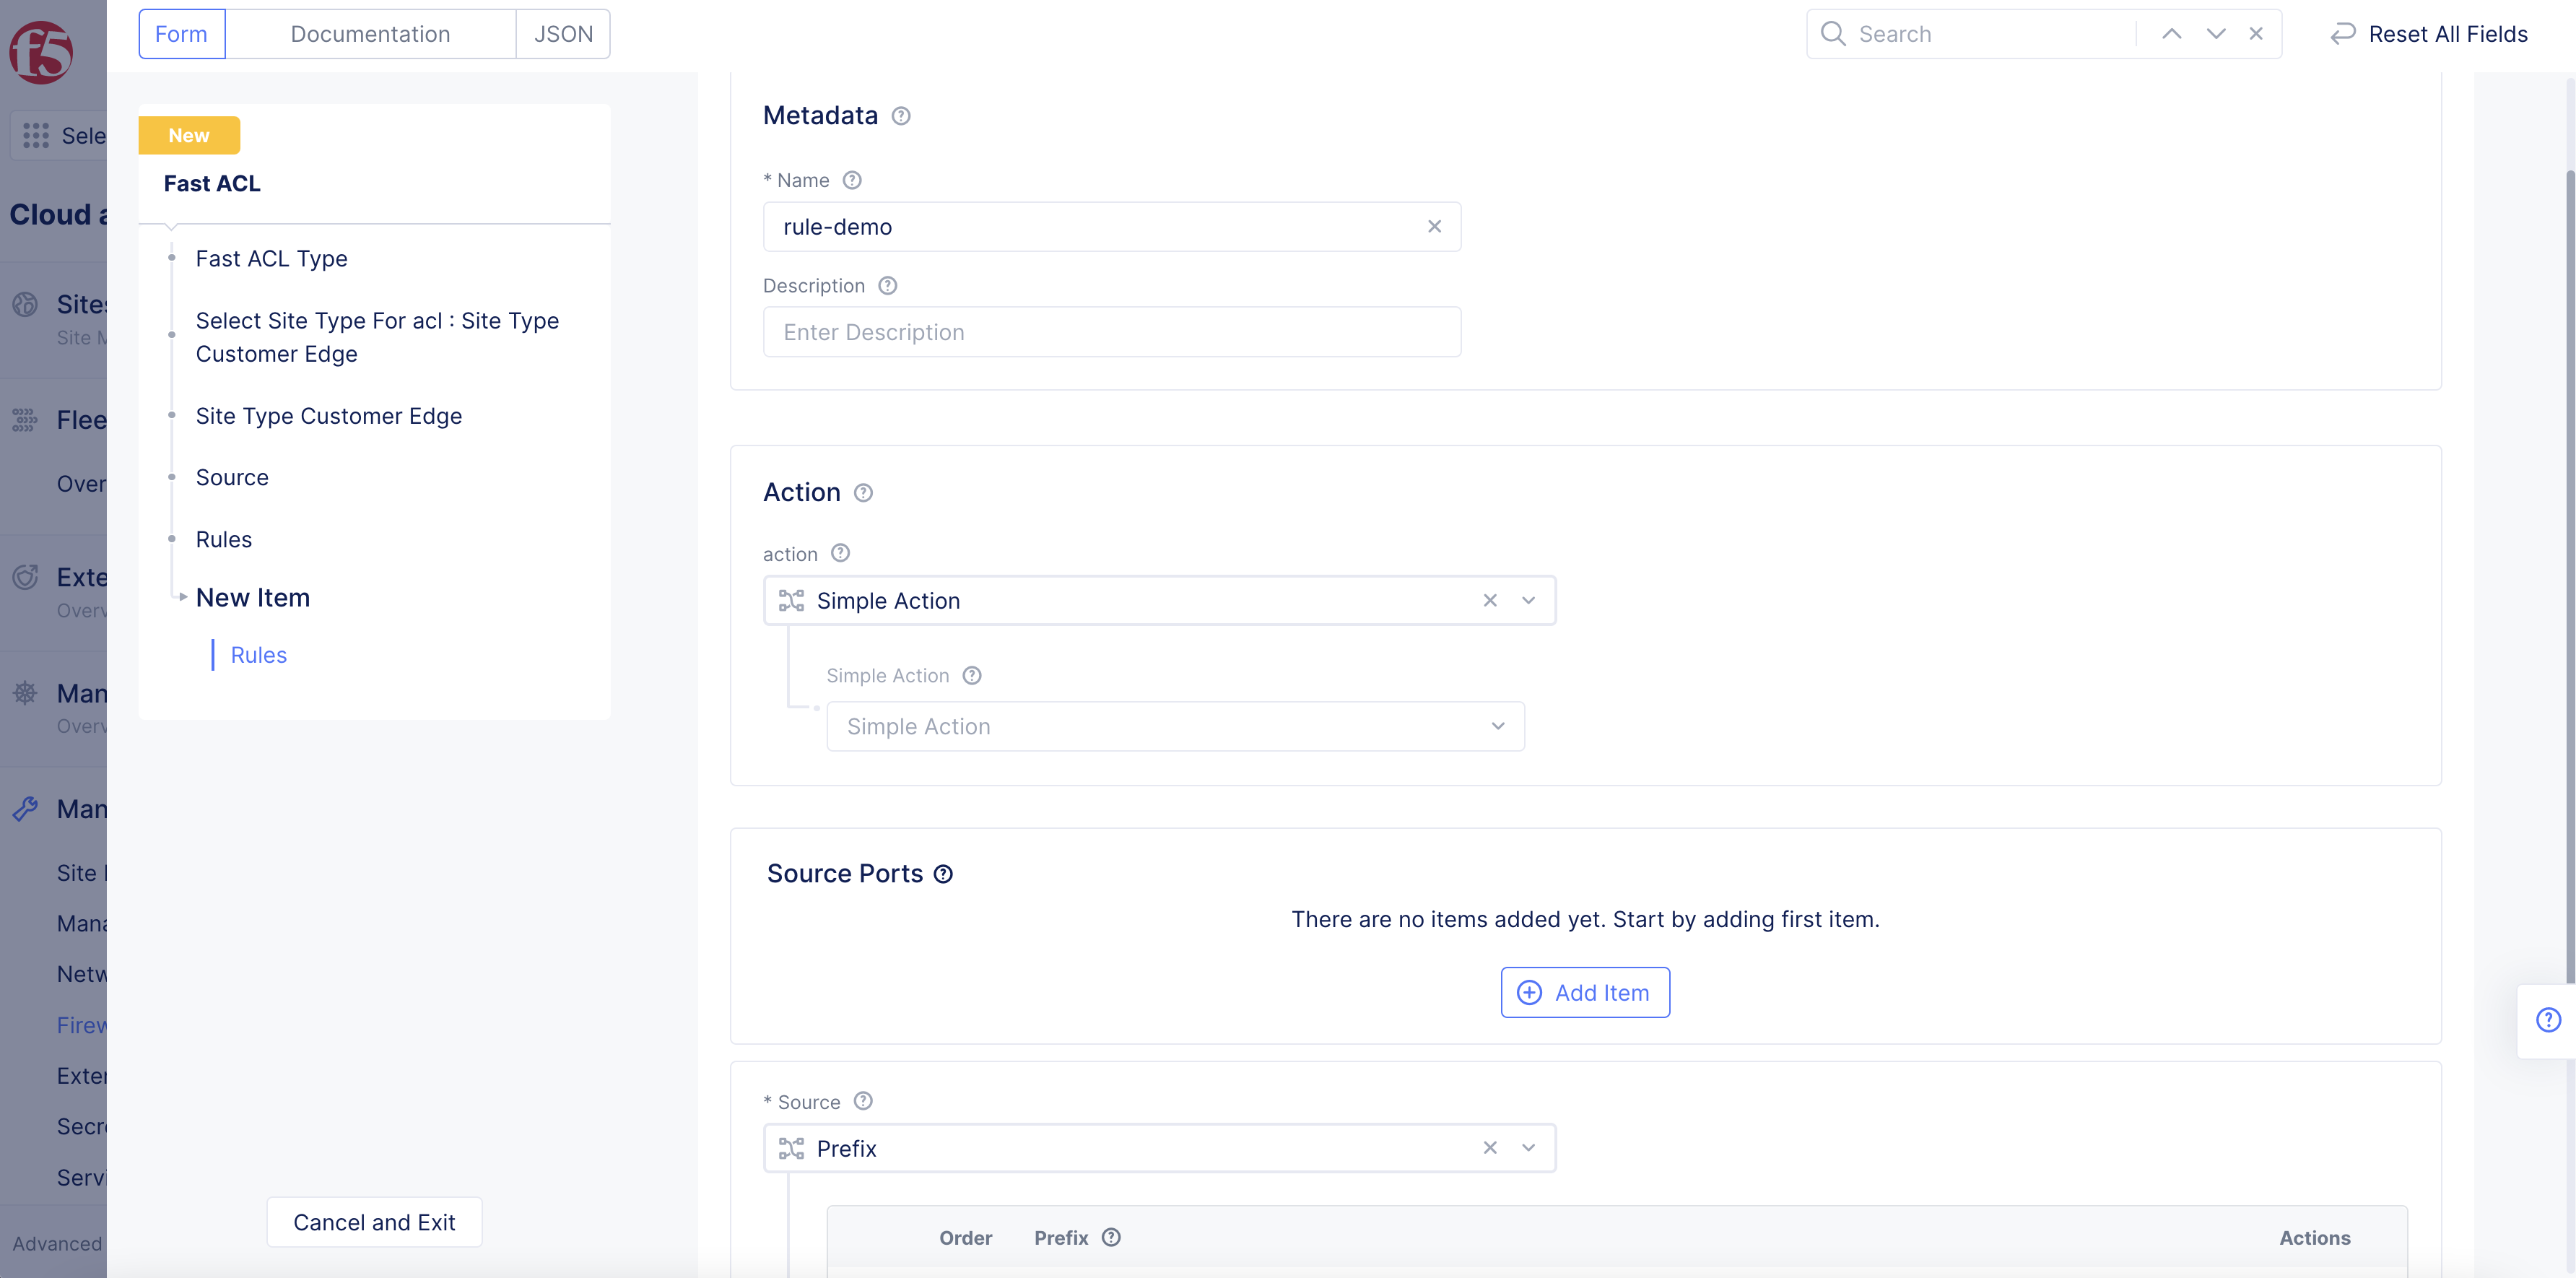
Figure: Fast ACL Action Configuration
Note: Before applying policer action or protocol policer action, you are required to create them using the Policer or Protocol Policer options in the Security configuration.
Step 3.2: Set Source Ports.
-
In the Source Ports section, configure per the following guidelines:
-
Click Add Item in Source Ports section.
-
Select Port Value Type options from the drop-down menu:
-
All port: Match all source ports.
-
User defined port: A user-defined port. Select ^ to adjust number.
-
DNS port: Match DNS port (53).
-
Click Apply after you finish configuring ports.
-

Figure: Fast ACL Source Ports
- Use the Add item option to add more ports.
Step 3.3: Set Source Prefix or Prefix Set.
-
From the Source drop-down menu, select an option to match based on IP.
-
For the Prefix option, click Add item, and then enter an IP prefix.
-
For the IP prefix Set option, select a reference set from the Reference drop-down menu.
This example adds a prefix using the Prefix option.
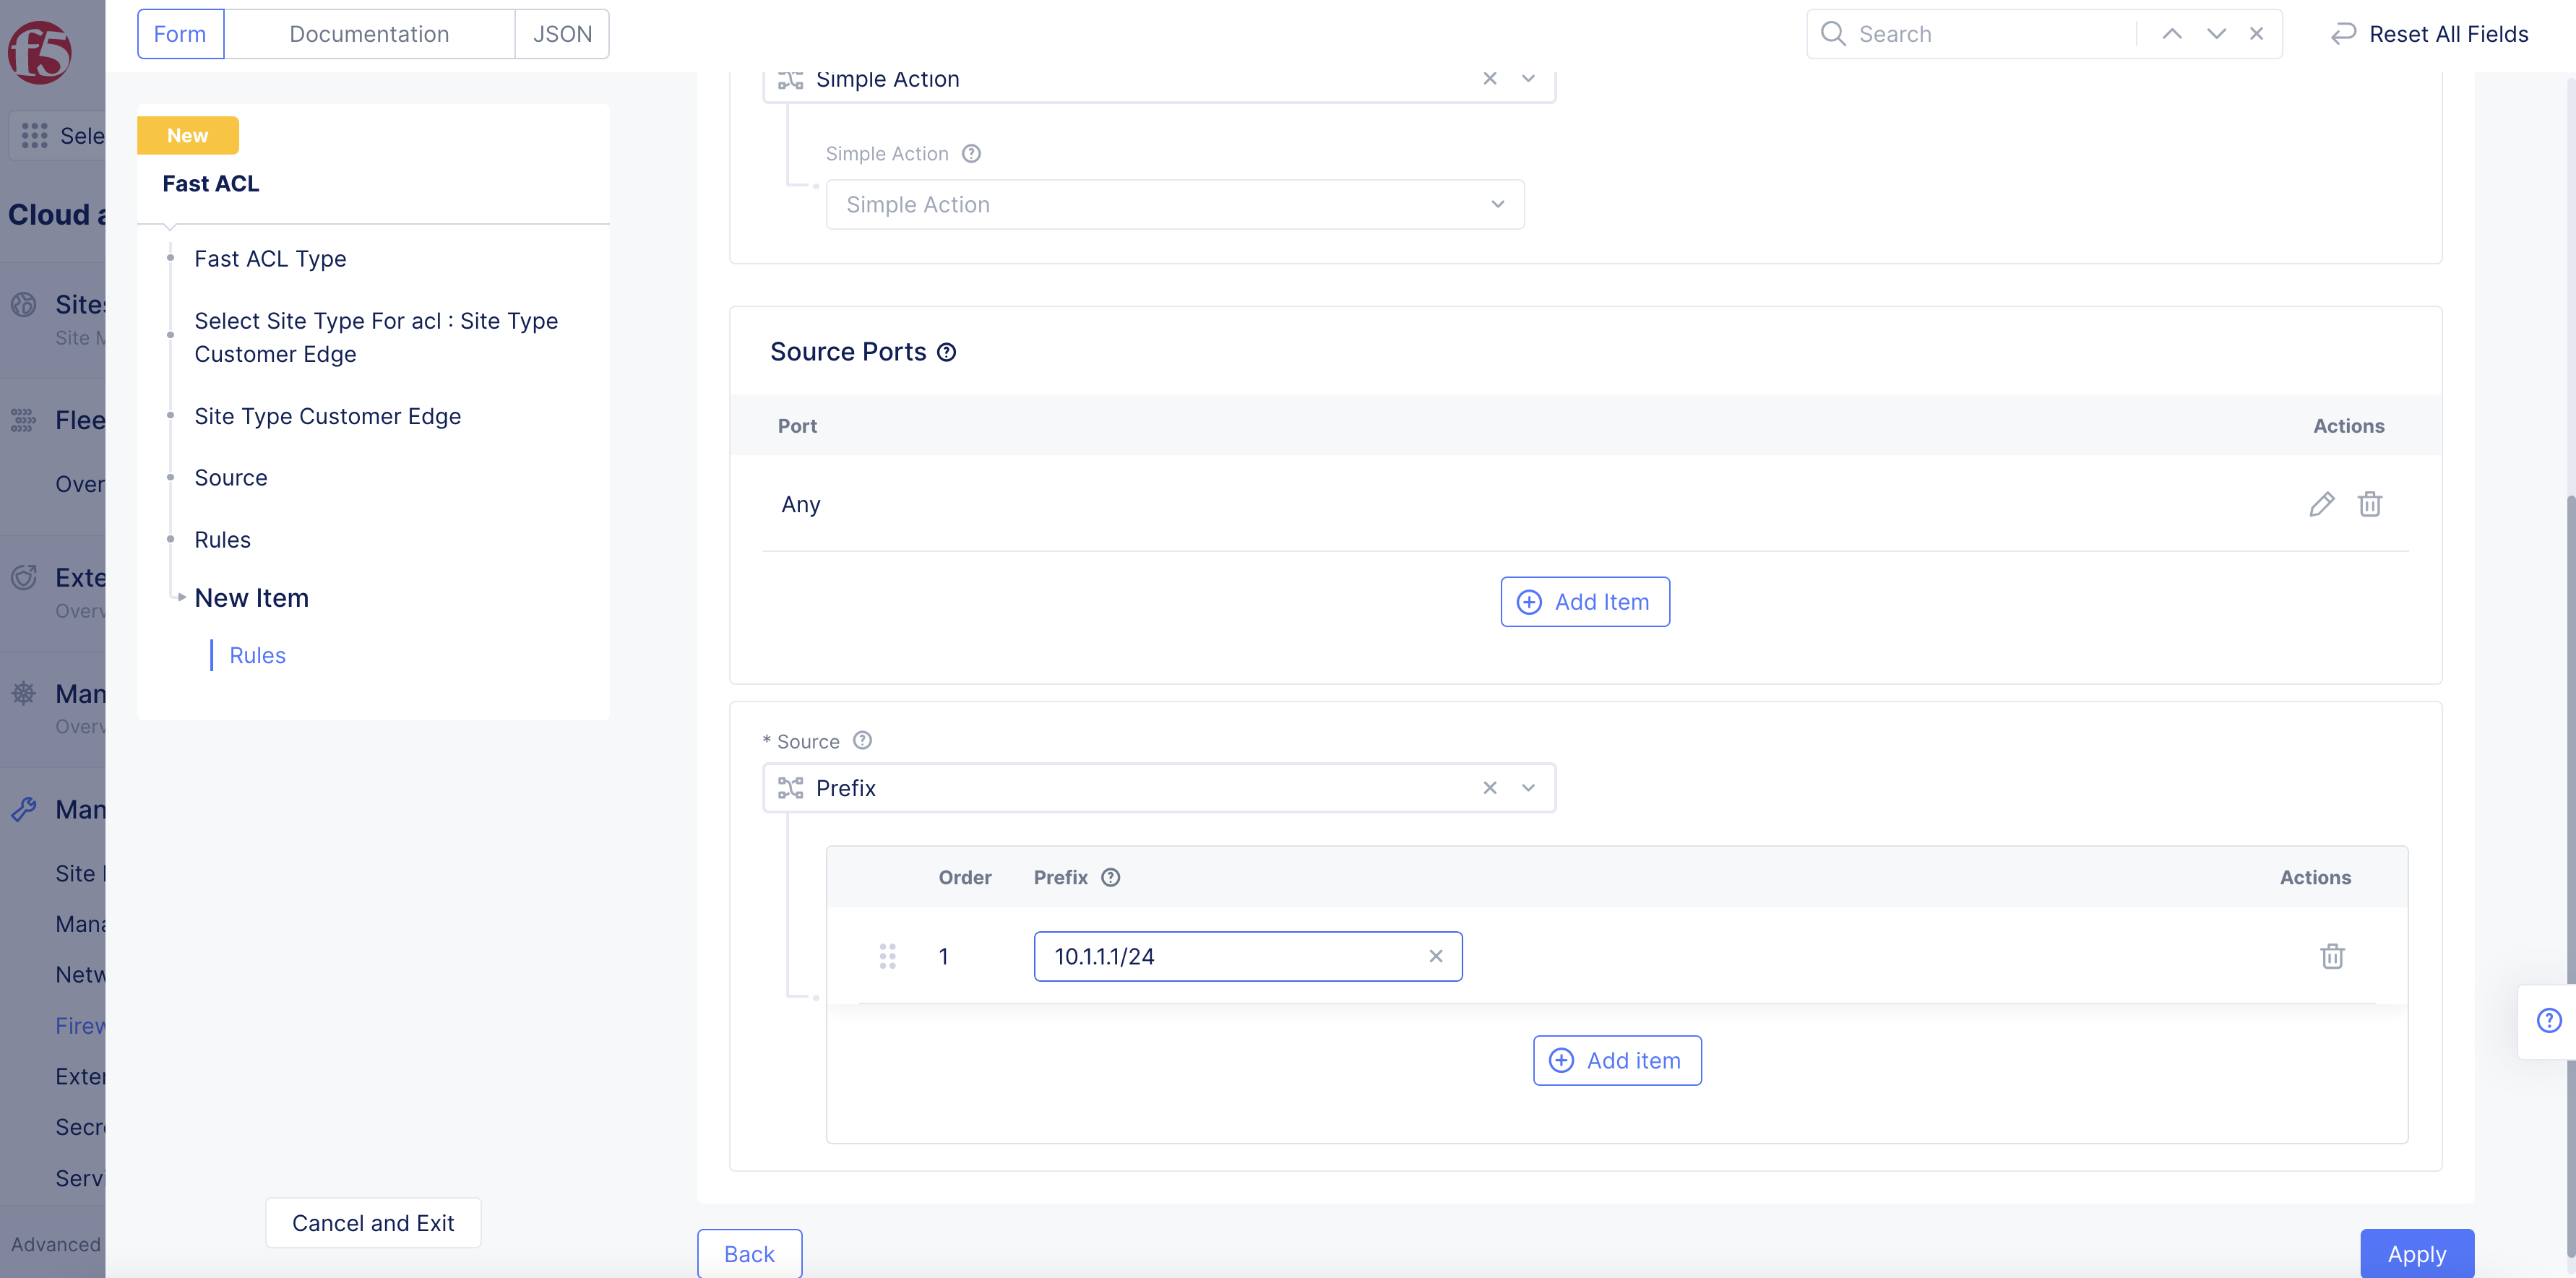
Figure: Fast ACL Rule Creation
-
Select Apply.
-
Select Apply.
-
Select Apply to return to the fast ACL configuration form.
Step 4: Validate Fast ACL creation.
-
In the Fast ACL Protocol Policer section, perform the following:
-
Select a protocol policer object, or select Add Item from the Default Protocol Policer drop-down menu.
-
If you select Add Item option, select Continue in the new protocol policer configuration page after configuring all the fields to create the policer, and then return to the fast ACL configuration form.
-
Select Save and Exit in the fast ACL configuration form. This creates the fast ACL object.
In the case of RE sites, there could be rule overlapping due to the following:
- The ves.io tenant and non ves.io tenant create rules for same destination.
- ves.io tenant creates rules for subnet which contains destination IP configured by the non ves.io tenant.
The conflict due to the overlapping is addressed using the following mechanism:
- Any rule which has action DENY has the highest priority irrespective of tenant.
- If action is not DENY, then rules from the ves.io tenant gets priority over the non ves.io tenant.
Create Fast ACLs for Internet VIPs
Applying Fast ACLs for RE sites require you to create the Fast ACLs for Internet VIPs object, and associate the Fast ACL objects with it. You can either attach an existing Fast ACL object for RE site or create a new Fast ACL object from within the Fast ACLs for Internet VIPs object. This example shows attaching existing Fast ACL object.
Note: The Fast ACLs for Internet VIPs must be created in the Routed DDoS workspace. If the Routed DDoS workspace is disabled, as a workaround, a manual API call is required to configure Fast ACLs for Internet VIPs. For more information on the API, see the F5 Distributed Cloud Services API for ves.io.schema.fast_acl.
Perform the following to create and apply Fast ACLs to RE sites:
Step 1: Open Fast ACLs for Internet VIPs.
From the Console homepage, select Routed DDoS.
Step 2: Attach Fast ACL objects.
-
Select Manage in left column menu, and then select Fast ACLs for Internet VIPs.
-
Select the Select Fast ACLs for Internet VIPs option to create and attach a new Fast ACL.
-
Select + Add Item button.
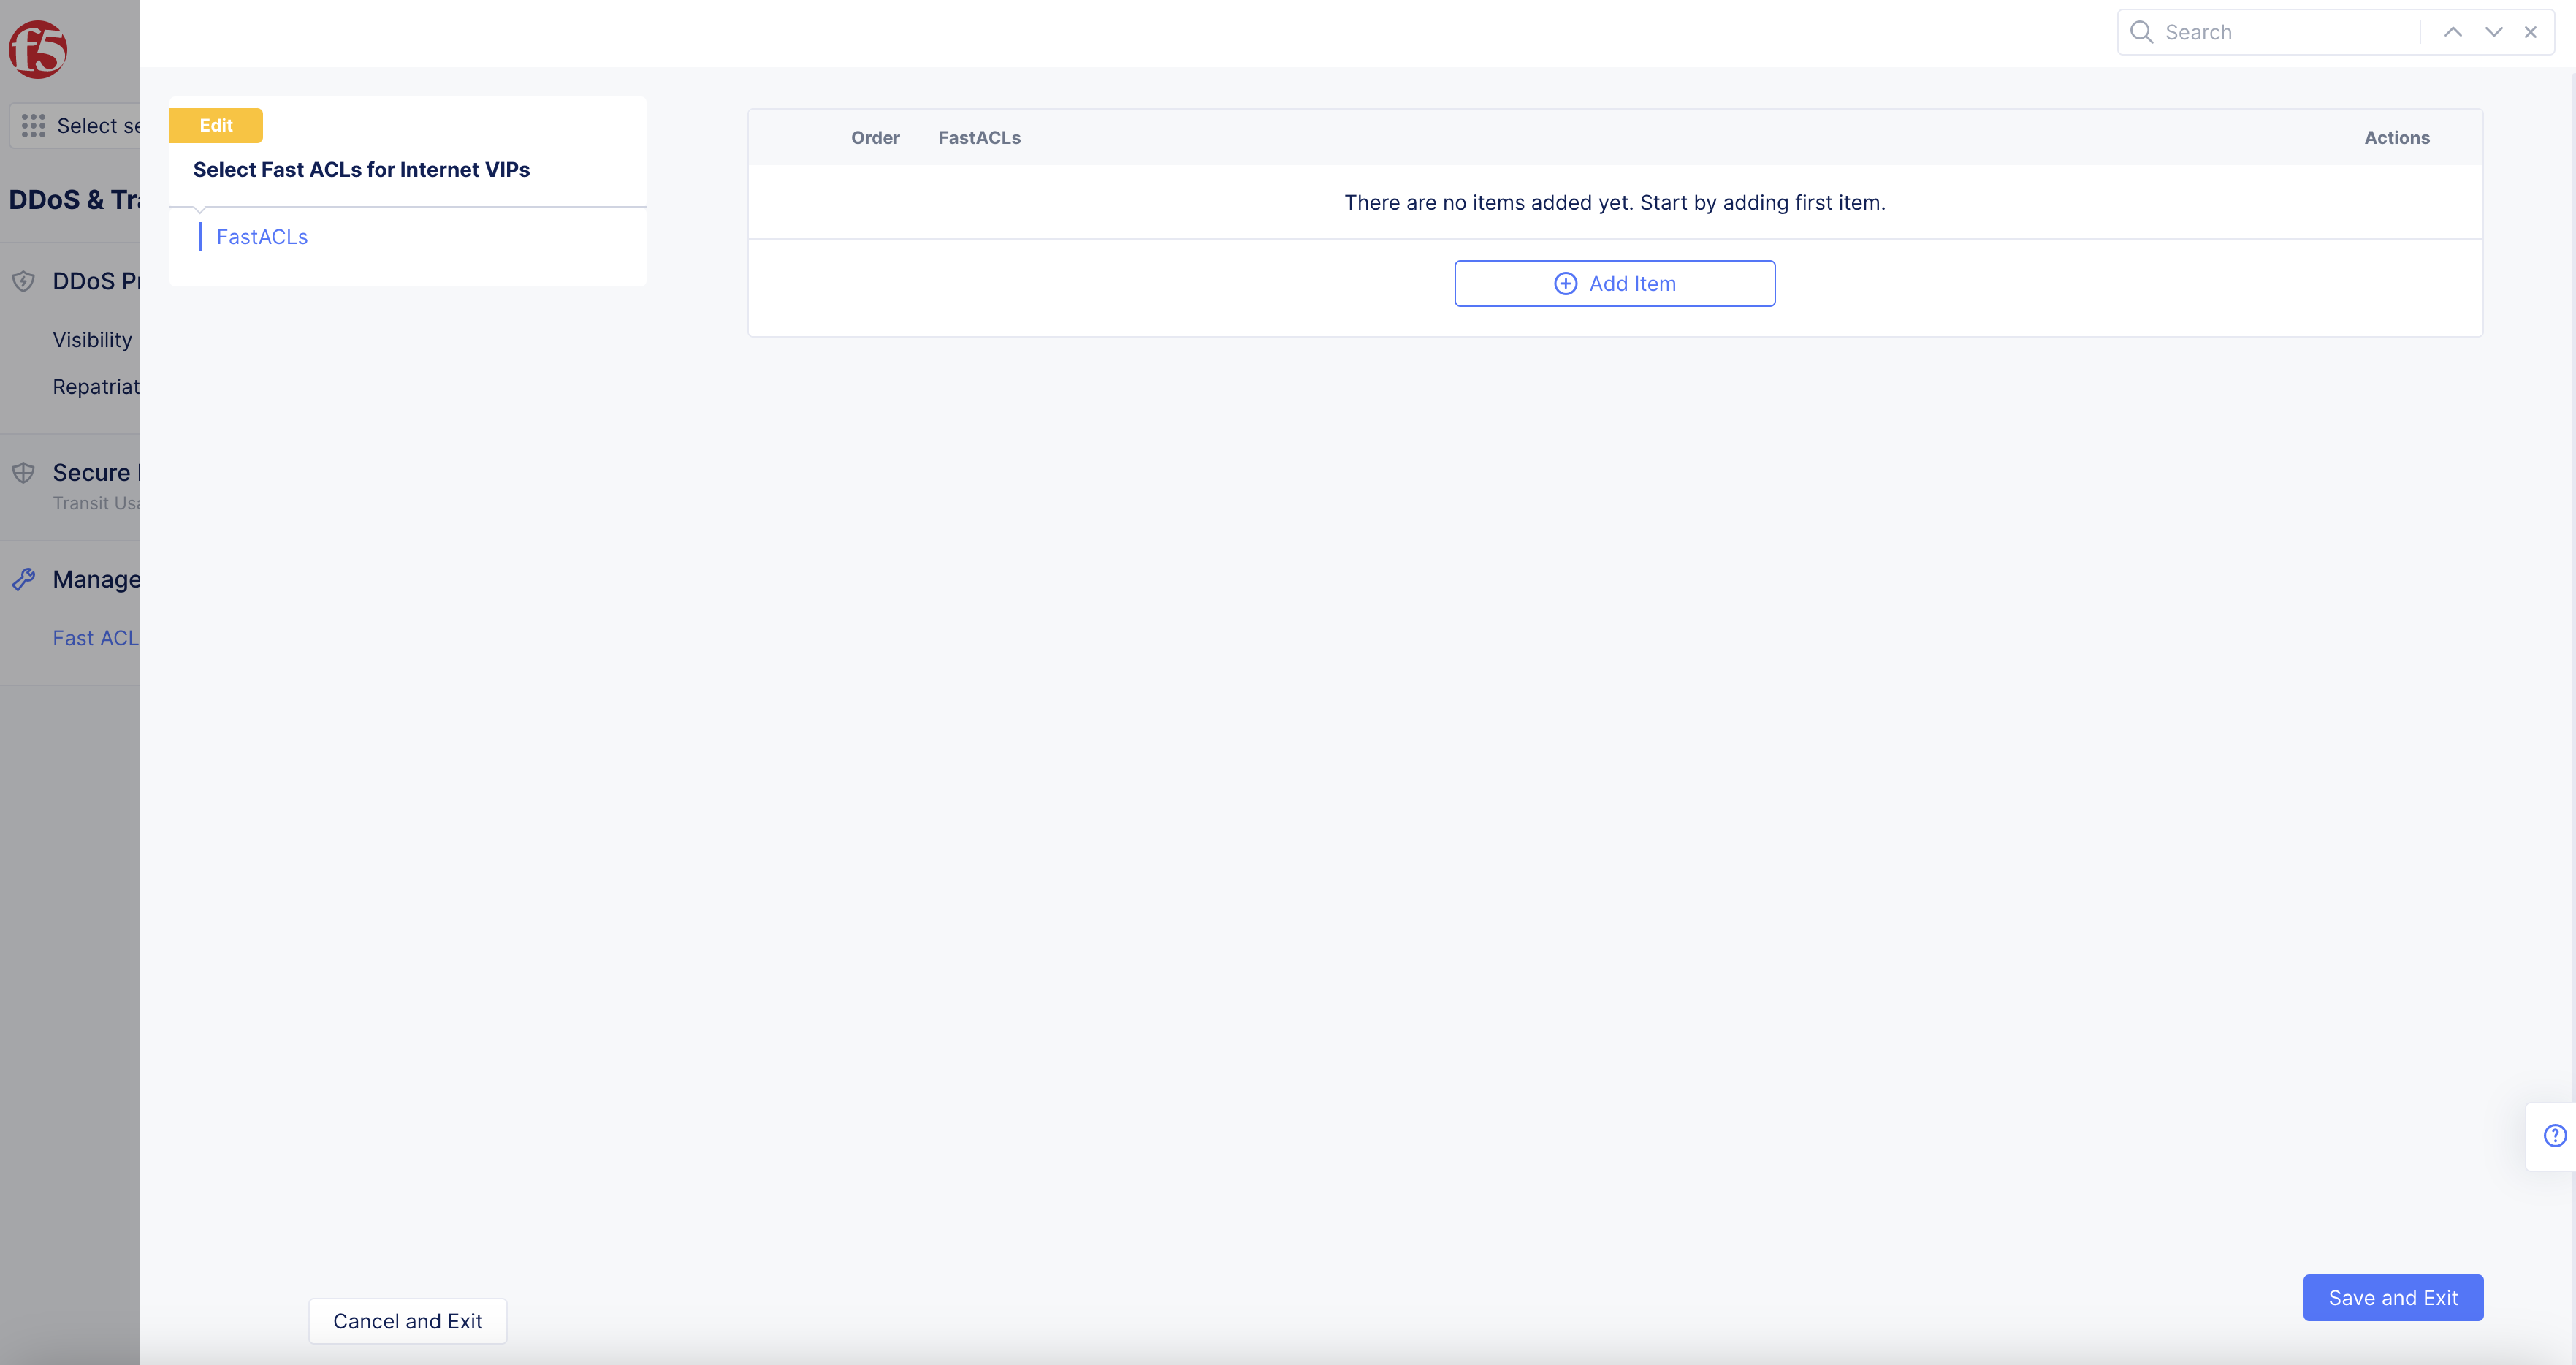
Figure: Select Fast ACL
-
Find and then select the Fast ACL rule created previously.
-
Select Select Fast ACL to attach the Fast ACL object to the Fast ACLs for Internet VIPs object configuration.
Step 3: Complete creating Fast ACLs for Internet VIPs object.
Select Add Fast ACL button to complete creating the Fast ACLs for Internet VIPs object.
Apply Fast ACLs to a CE Site
Fast ACLs created for a CE site requires you to add the Fast ACL to the network firewall associated with the fleet which includes that CE site. See Create a Fleet for information fleet creation. See Network Firewall for information on firewall creation. This example shows how to apply fast ACL to an existing firewall associated with a fleet of sites.
To enable fast ACLs for a CE site, perform the following:
Step 1: Navigate to the network firewall and edit its configuration.
-
From the Console homepage, select Multi-Cloud Network Connect.
-
Select Manage > Firewall > Network Firewalls.
-
Select ... > Manage Configuration for your firewall that is part of the fleet to which your site belongs.
-
Select Edit Configuration.
Step 2: Attach the fast ACLs to network firewall and save configuration.
-
In the Fast ACL section, perform the following:
- From the Select Fast ACL Configuration menu, select Active Fast ACL(s).

Figure: Select Fast ACL
-
Select the Fast ACL accordingly from the displayed selection in the drop-down menu.
-
Select Add Fast ACL button.
Concepts
- System Overview
- Core Concepts
- Networking
- F5 Distributed Cloud - Customer Edge
- Security
- Virtual Site
- vK8s