Enable CDN Caching on a HTTP Load Balancer
Note:
The onboarding steps outlined in this document apply only to new deployments and are not intended for use with existing deployments. For assistance with enabling CDN or migrating an existing deployment to the new model, contact your respective account team members.
Introduction
F5 Distributed Cloud CDN is natively integrated with your HTTP Load Balancer. It lets you activate edge caching in minutes. You won't need to re-architect your application, manage separate distributions or domains, or change your security policies.
Your WAF, bot defense, and DDoS protections continue to apply to all traffic. This includes both cache-hit and cache-miss scenarios.
This Quick Start Guide walks you through the fastest path to enabling CDN caching. It covers validating your cacheable content, estimating your savings, and activating CDN caching with just a few clicks.
Objective
This document helps you identify the volume of cacheable requests and data transfers. You'll learn to estimate the potential benefits of enabling CDN caching on your HTTP Load Balancer.
The guide then covers identifying cache-busting patterns. These include unnecessary headers, query parameters, and cookies that may limit your cache hit rate. You'll find direction on correcting them to maximize CDN value.
Next, the guide covers enabling CDN caching directly on the HTTP Load Balancer. You can use either the Cacheable Content Widget's Configure button or the Load Balancer management page.
Finally, the guide shows you how to verify that CDN caching is active. Content will be served from the nearest F5 Regional Edge node. This ensures you realize the full performance and cost benefits from day one.
Expected Outcome
Once CDN caching is enabled on your HTTP Load Balancer, you can expect the following:
| Outcome | Detail |
|---|---|
| ⚡ Faster Page Load Times | Faster load times by serving cached content from F5 edge nodes closest to your users |
| 💰 Lower Egress Costs | Cached content is served from CDN instead of your origin, reducing cloud data transfer charges |
| 🖥️ Reduced Origin Compute Load | Fewer requests reach your origin servers, freeing up compute resources and reducing infrastructure costs |
| 🔒 Security Maintained | All existing WAAP, WAF, and security policies remain active and enforced across all CDN traffic |
| 📊 Unified Observability | CDN and HTTP LB traffic appear as a single unified service in your Distributed Cloud Console dashboards |
Prerequisites
- You have an active F5 Distributed Cloud account
- You have at least one HTTP Load Balancer configured and serving live traffic
- You have NetOps or Administrator role permissions in the Distributed Cloud Console
Estimated Time to Complete: 10–15 minutes
Configuration
Step 1: Navigate to Your HTTP Load Balancer Performance Dashboard
The first step is to understand your current traffic profile. Identify how much of it can be served from CDN cache before enabling CDN.
Actions:
- Log in to the F5 Distributed Cloud Console and select Web App & API Protection.
- From the left Overview menu, select Performance → Dashboard.
- Scroll to the bottom of the performance dashboard and locate the HTTP Load Balancer for the application you want to accelerate.
- Click on the Load Balancer name to open its details page.
- Navigate to the Dashboard tab.
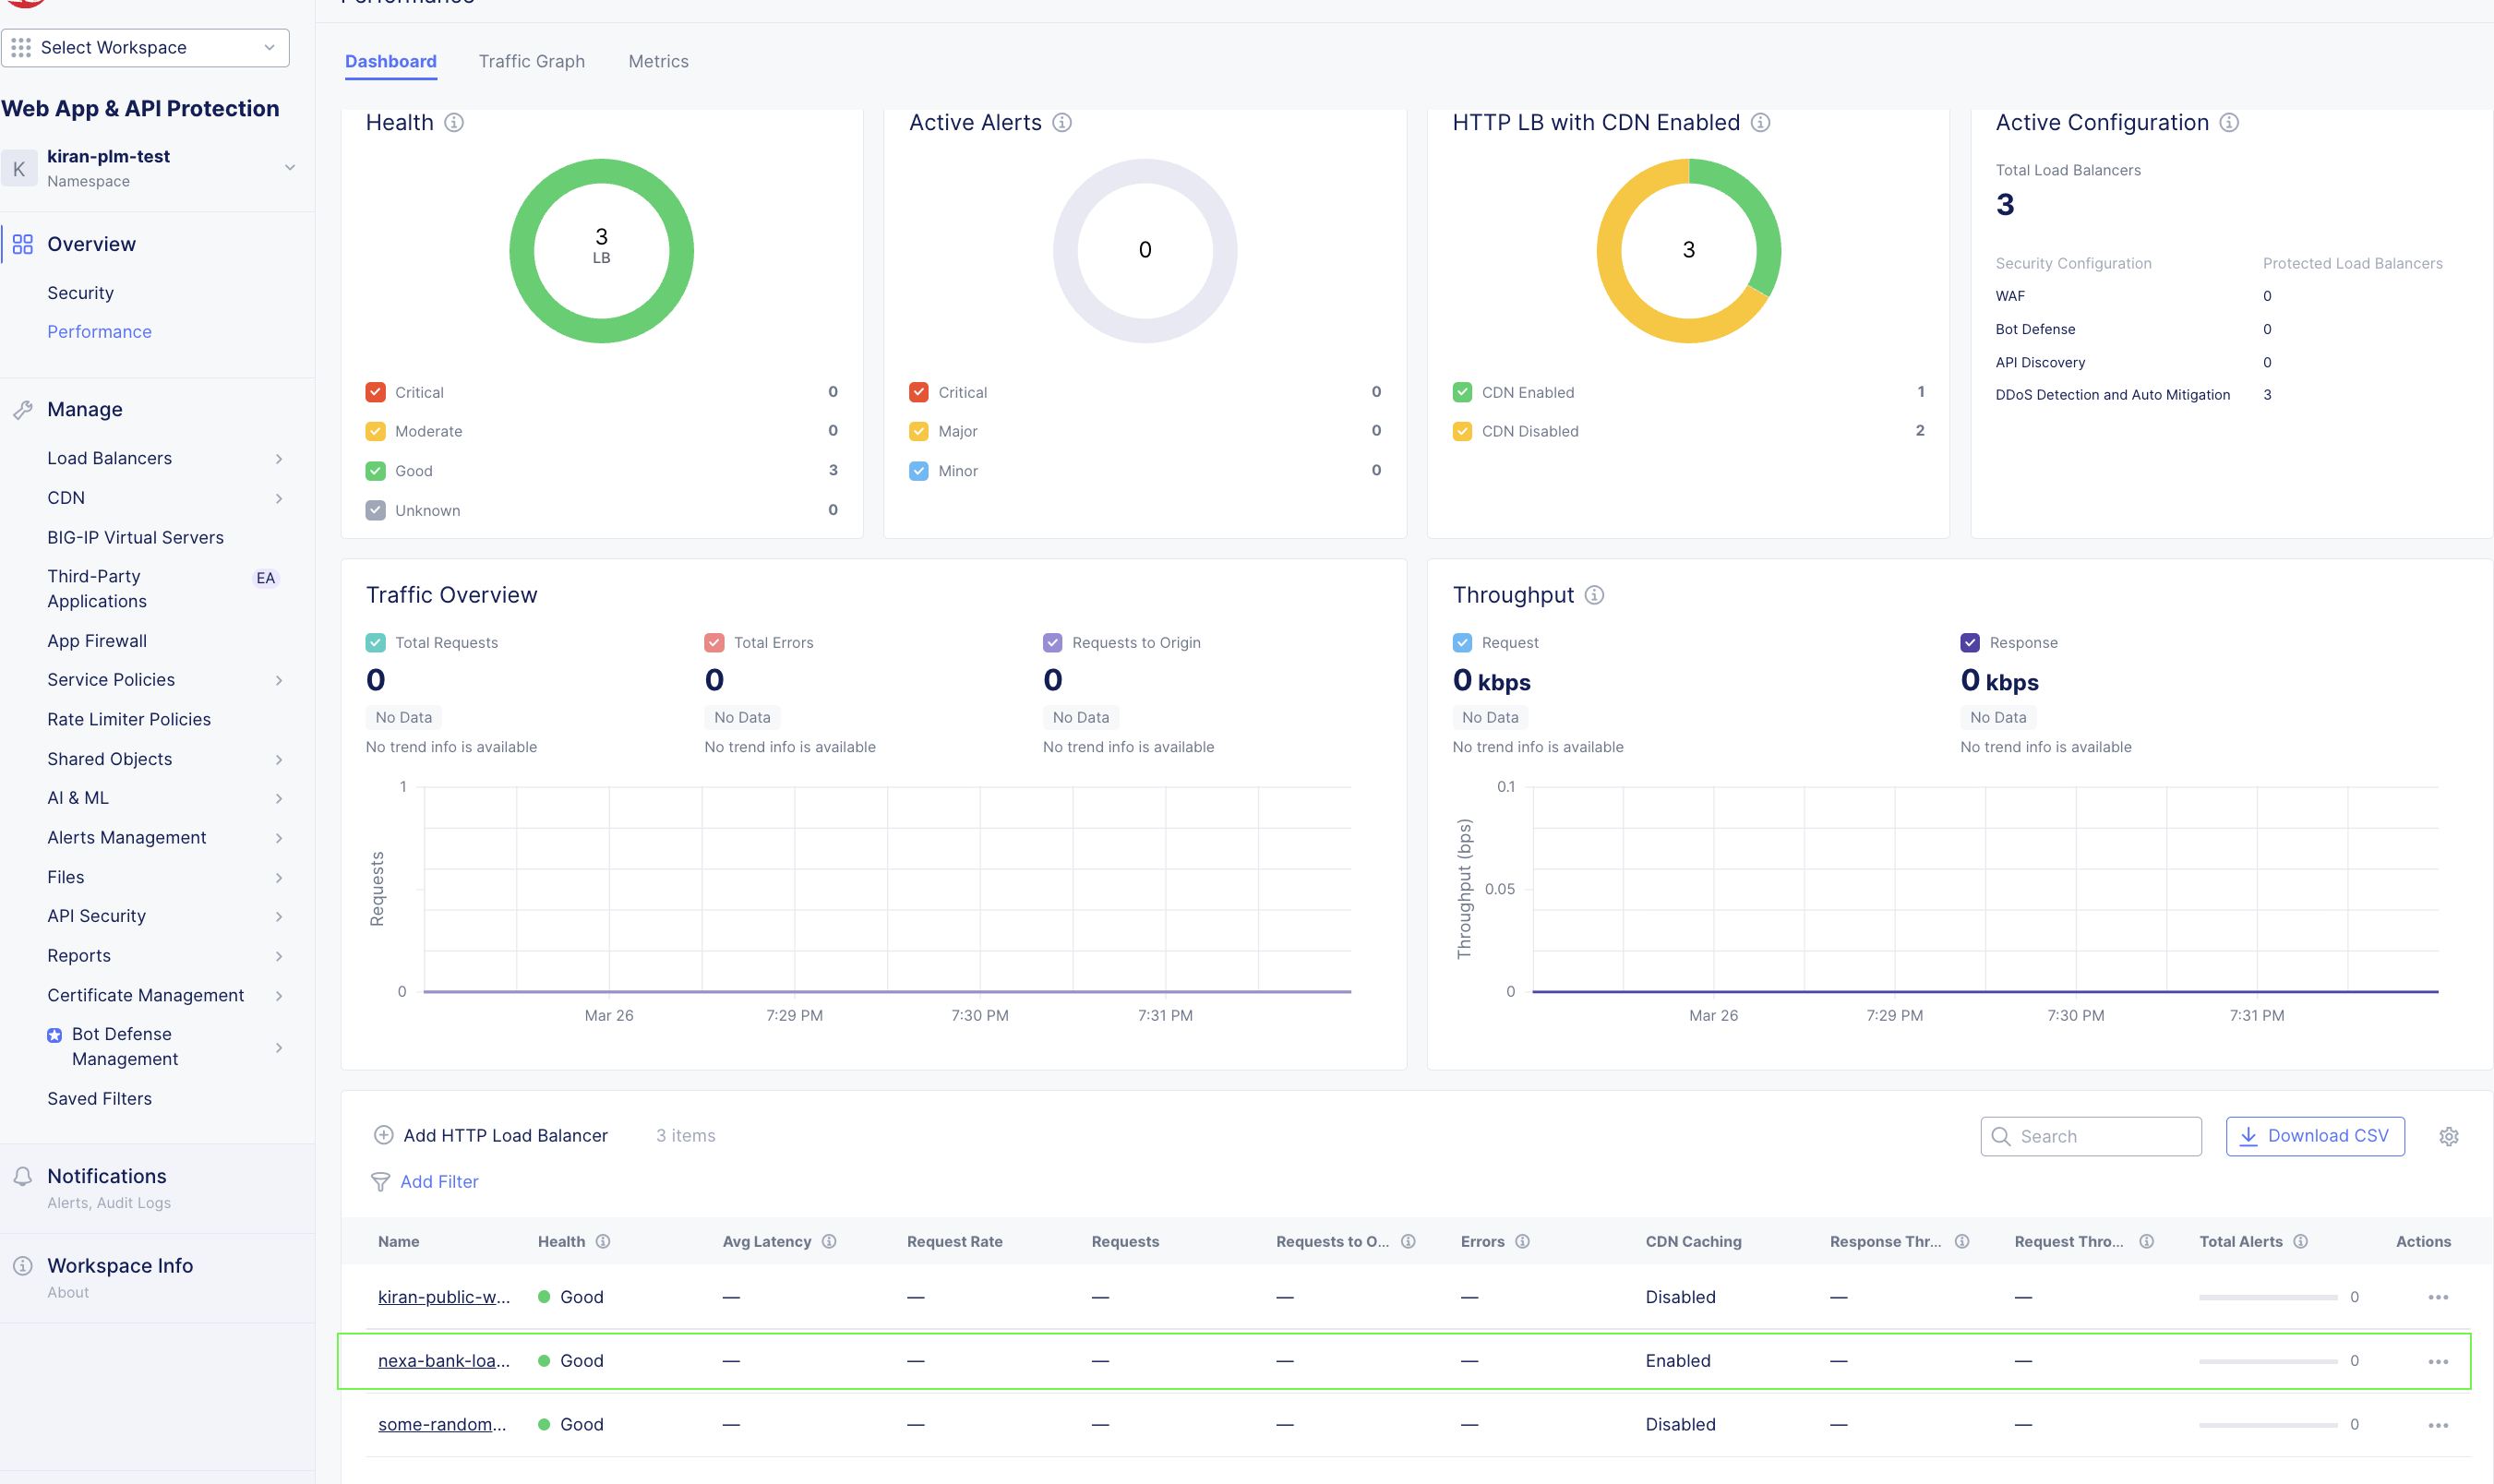
Figure: Performance Dashboard
Step 2: Review the Cacheable Content Widget
Once on the Performance Dashboard, locate the Cacheable Content Widget. This is your first and most important stop. It gives you a real-time view of your traffic's cacheability profile. Understanding this helps you see the value CDN will deliver before you commit to enabling it.
What the Cacheable Content Widget Shows:
- 📊 Volume of cacheable requests - The percentage and absolute count of requests in your traffic for the specified time period that are eligible to be served from CDN cache
- 💾 Cacheable data transfer volume - The volume of data transfer that could have been offloaded from your origin for the specified time period, which directly maps to potential egress cost savings
- ⚠️ Cache-busting patterns - Indicators of reasons for requests that could impact content cacheability. These include headers, query parameters, or cookies in your requests
💡 Why this matters - The Cacheable Content Widget gives you a projected CDN offload estimate. This is a concrete, data-driven picture of the origin compute demand and egress costs you can eliminate by enabling CDN. Use this to estimate your TCO savings before making any decisions
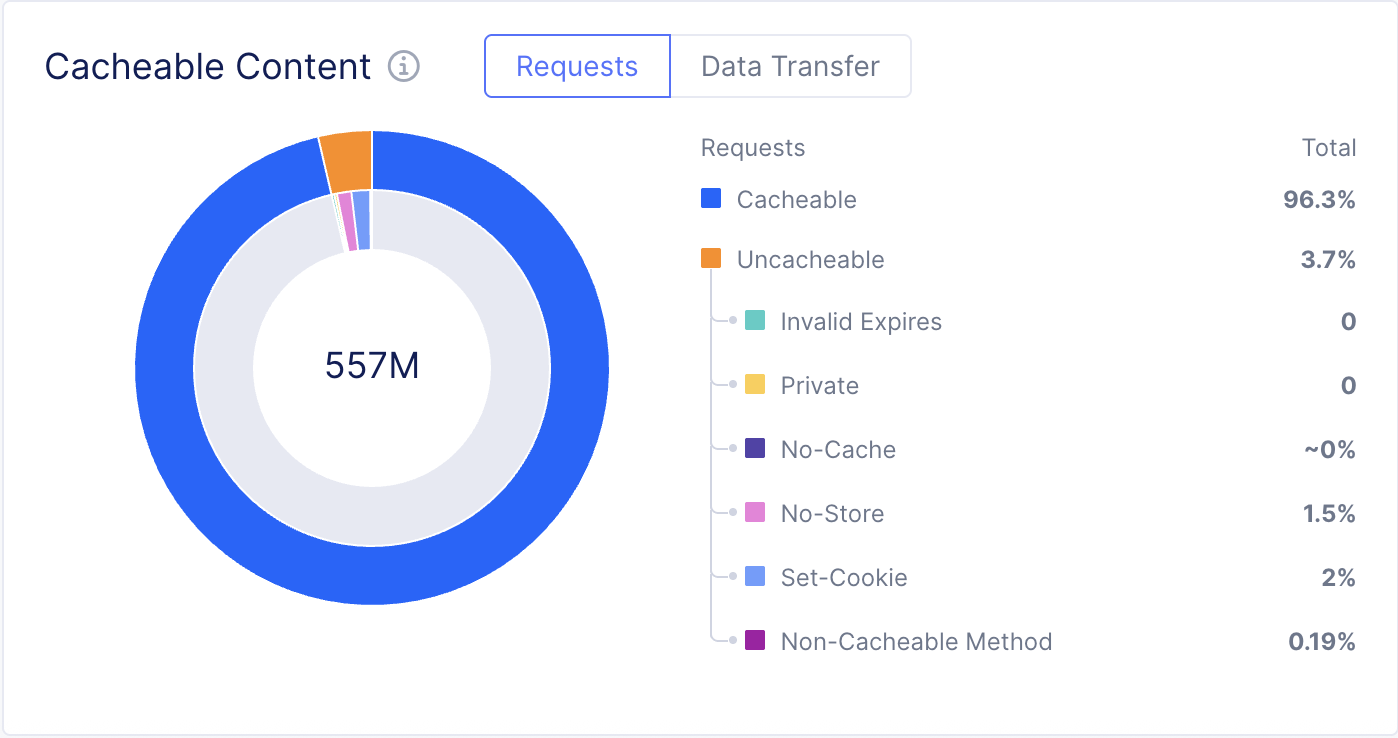
Figure: Cacheability Widget - Requests Tab
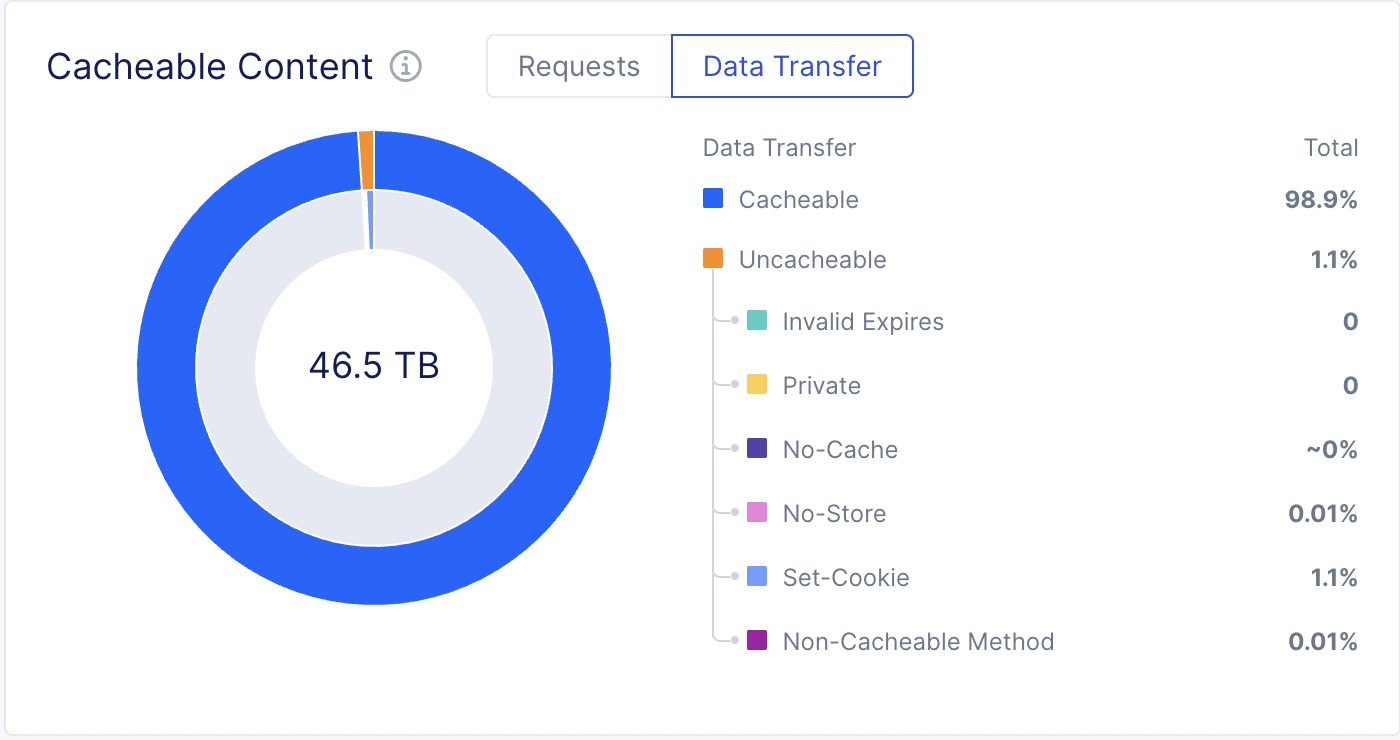
Figure: Cacheability Widget - Data Transfer Tab
Understanding Your Cacheability Score
Use the following reference to interpret what you see in the Cacheable Content Widget:
| Cacheable Traffic % | What It Means | Expected Benefit |
|---|---|---|
| 70–90% | Most of your content is static and highly cacheable | Very high origin offload and egress savings potential |
| 50–70% | Mix of static and dynamic content, typical of e-commerce or SaaS apps | Significant offload and meaningful egress savings |
| 30–50% | Dynamic-heavy app (e.g., banking, personalized portals) | Moderate but still valuable savings; review cache-busting patterns |
| Below 30% | Highly dynamic content | Address identified patterns before enabling CDN for best results |
Tip: If the widget identifies cache-busting patterns, use the requests tab to identify the reasons. Address those first. Correcting cache-busting patterns can significantly increase your effective cache hit rate. This maximizes the value you get from CDN caching.
Step 3: Estimate Your Savings
Before enabling CDN, use the data in the Cacheable Content Widget. This helps estimate the impact on your infrastructure costs.
Origin Compute Savings
If your widget shows that X% of your requests are cacheable, enabling CDN means X% of your current origin compute load can be offloaded to the F5 edge. That is X% fewer requests for your origin servers to process.
This translates directly into reduced compute consumption and lower infrastructure costs.
Egress Cost Savings
Every cacheable request served from the F5 CDN edge instead of your origin avoids an outbound data transfer charge from your cloud provider.
Multiply your current daily cacheable data transfer volume (shown in the widget) by your cloud egress rate. This estimates your monthly savings.
Example: If your application serves 10TB of data per month and 70% of that traffic is cacheable, enabling CDN could offload up to 7TB of monthly egress from your origin. This is a direct reduction in cloud data transfer costs every month, starting from day one of enablement.
Step 4: Enable CDN Caching
You are now ready to enable CDN caching. There are two ways to do this from within the Distributed Cloud Console. Choose the one that fits your workflow.
Option A: Enable CDN via the Cacheable Content Widget (Recommended)
This is the fastest path. Directly from the Cacheable Content Widget on the Performance Dashboard:
- Click the Configure button within the Cacheable Content Widget.
- The CDN caching configuration panel appears.
- Toggle Enable Caching to ON.
- Review the default cache settings - smart defaults are pre-applied based on your traffic profile.
- Click Save to activate CDN caching.
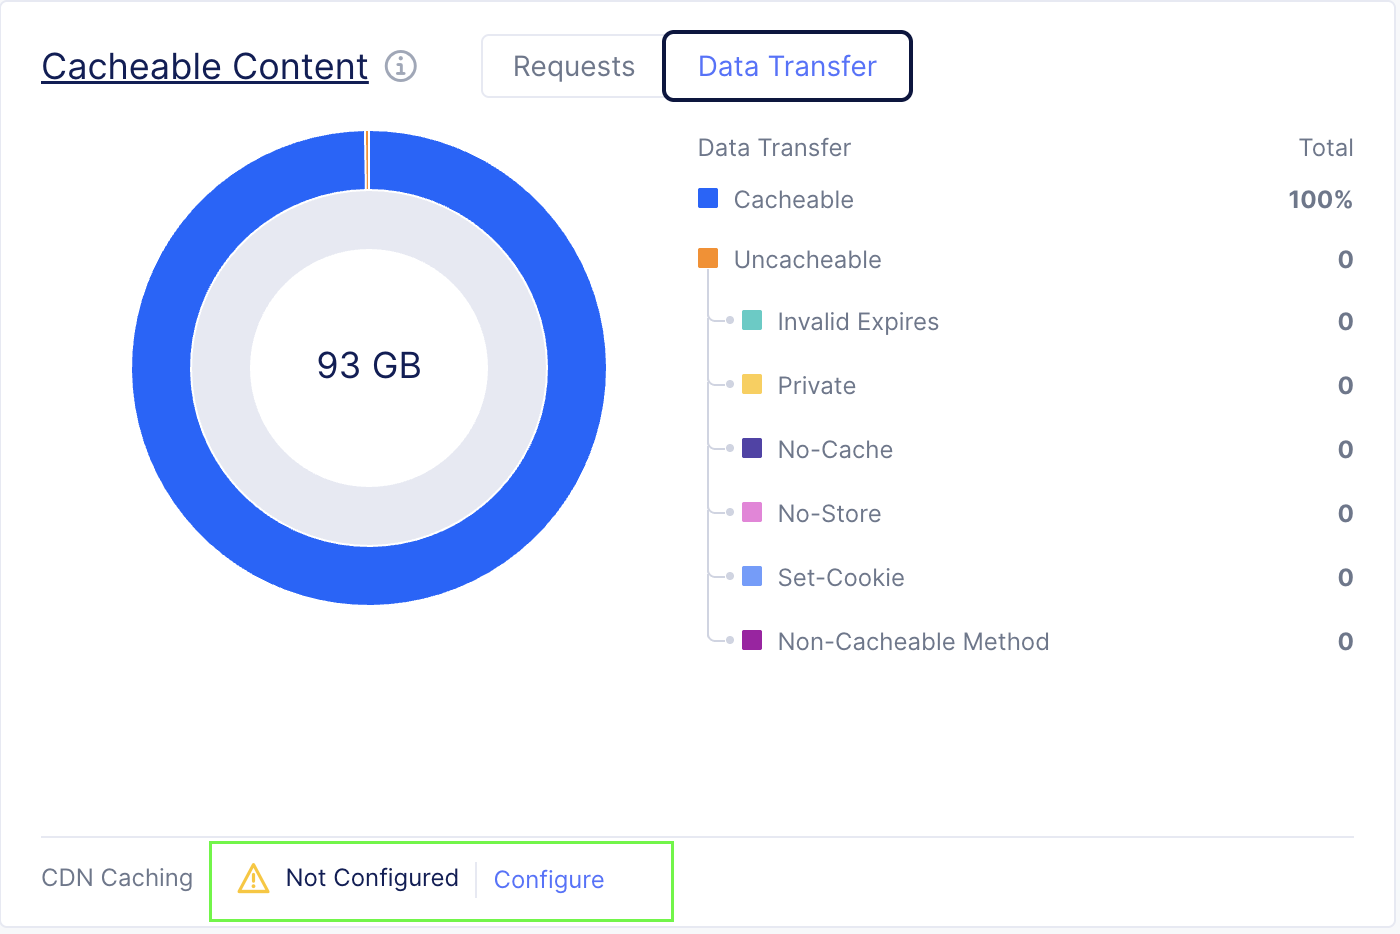
Figure: Cacheability Widget - Data Transfer Tab
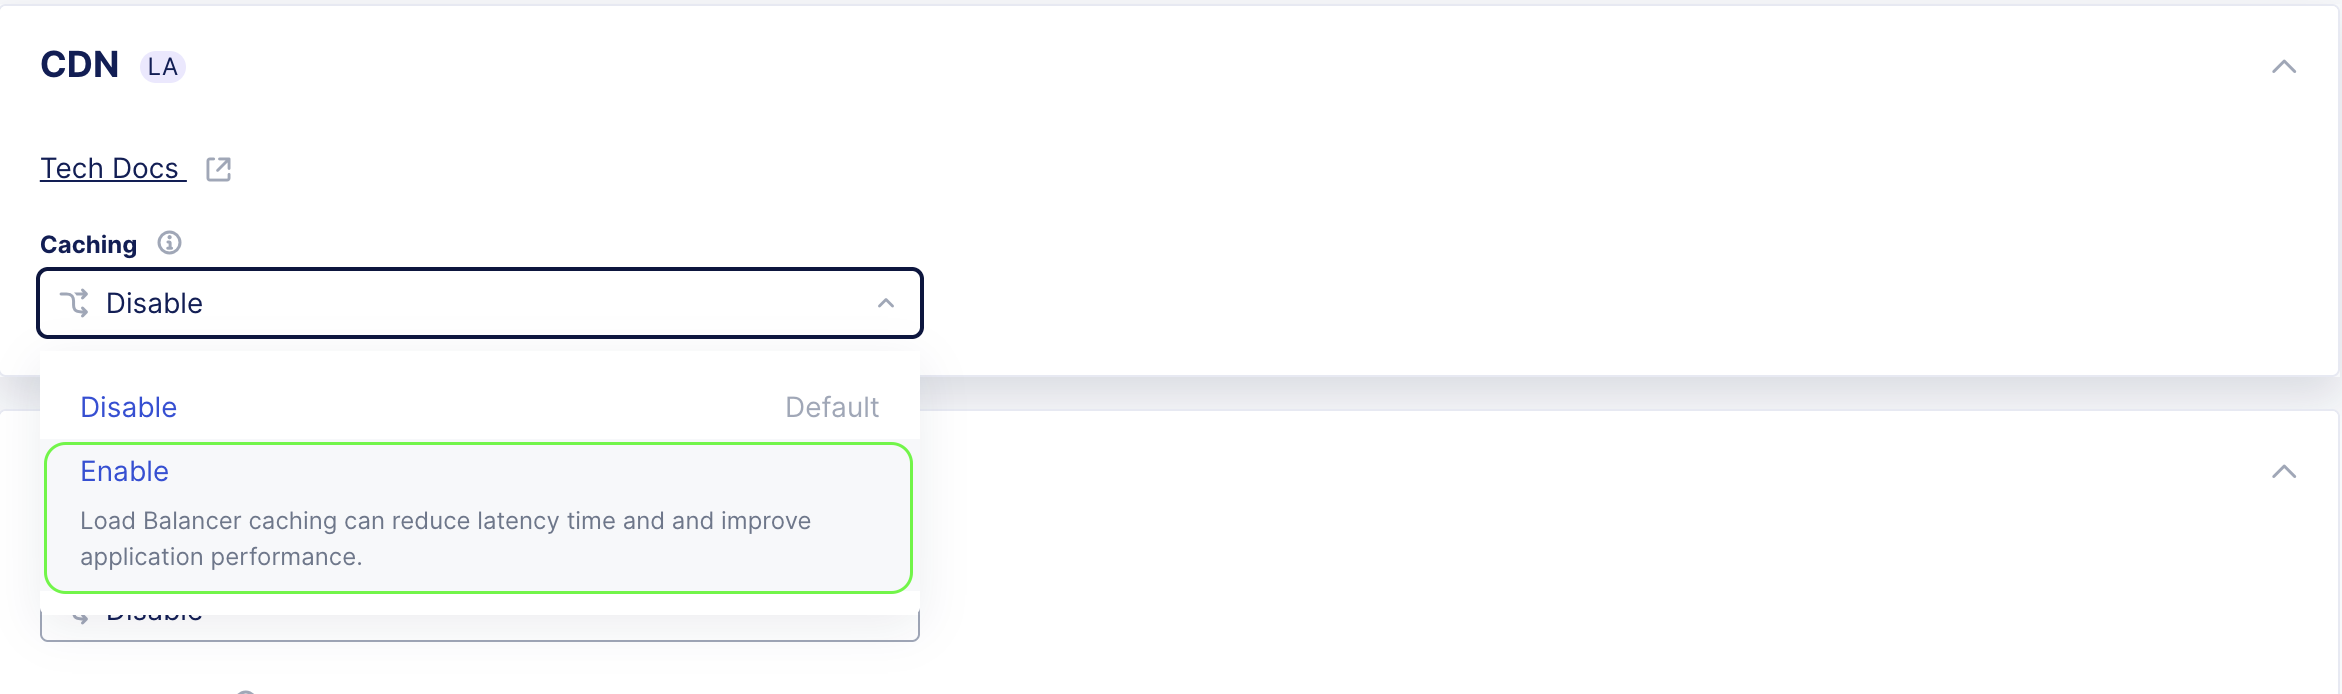
Figure: Enable CDN Caching

Figure: CDN Caching Policies
CDN caching is now active. Content will begin being served from the nearest F5 Regional Edge immediately after deployment completes.
Note: CDN Caching is set by default to honor the TTL values set by the origin for minimal onboarding efforts. It is recommended to set a fallback TTL.
The fallback TTL acts as a safety net. It is applied only when the origin does not provide explicit cache-control directives. This ensures cacheable content is still served from the edge rather than being fetched from the origin on every request.
A well-chosen fallback TTL improves cache hit rates, reduces origin compute load, and maximizes egress cost savings. It does this without compromising the freshness of content that already has origin-defined TTLs in place.

Figure: Default Cache Action
Option B: Enable CDN via the HTTP Load Balancer Manage Page
If you prefer to enable CDN from the main Load Balancer configuration page:
- From the HTTP Load Balancer details page, click Manage Configuration or the Edit icon.
- Scroll to the CDN section.
- Toggle CDN Caching to ON.
- Review and confirm default cache policy settings and set a fallback TTL.
- Click Save and Apply.
Figure: Enable CDN Caching
Step 5: Verify CDN Caching is Active
Once CDN caching is enabled, verify that it is working correctly.
Actions:
- Return to the Performance Dashboard of your HTTP Load Balancer.
- Confirm that the CDN Caching Status indicator shows Active.
- Allow a few minutes for traffic to flow through the CDN edge nodes.
- Monitor the following metrics in the dashboard:
- Hits - The number of requests being served from CDN cache.
- Misses - Requests being forwarded to origin (this should decrease as the cache warms up).
- Cache Hit Ratio - Displays the percentage of requests served from cache.
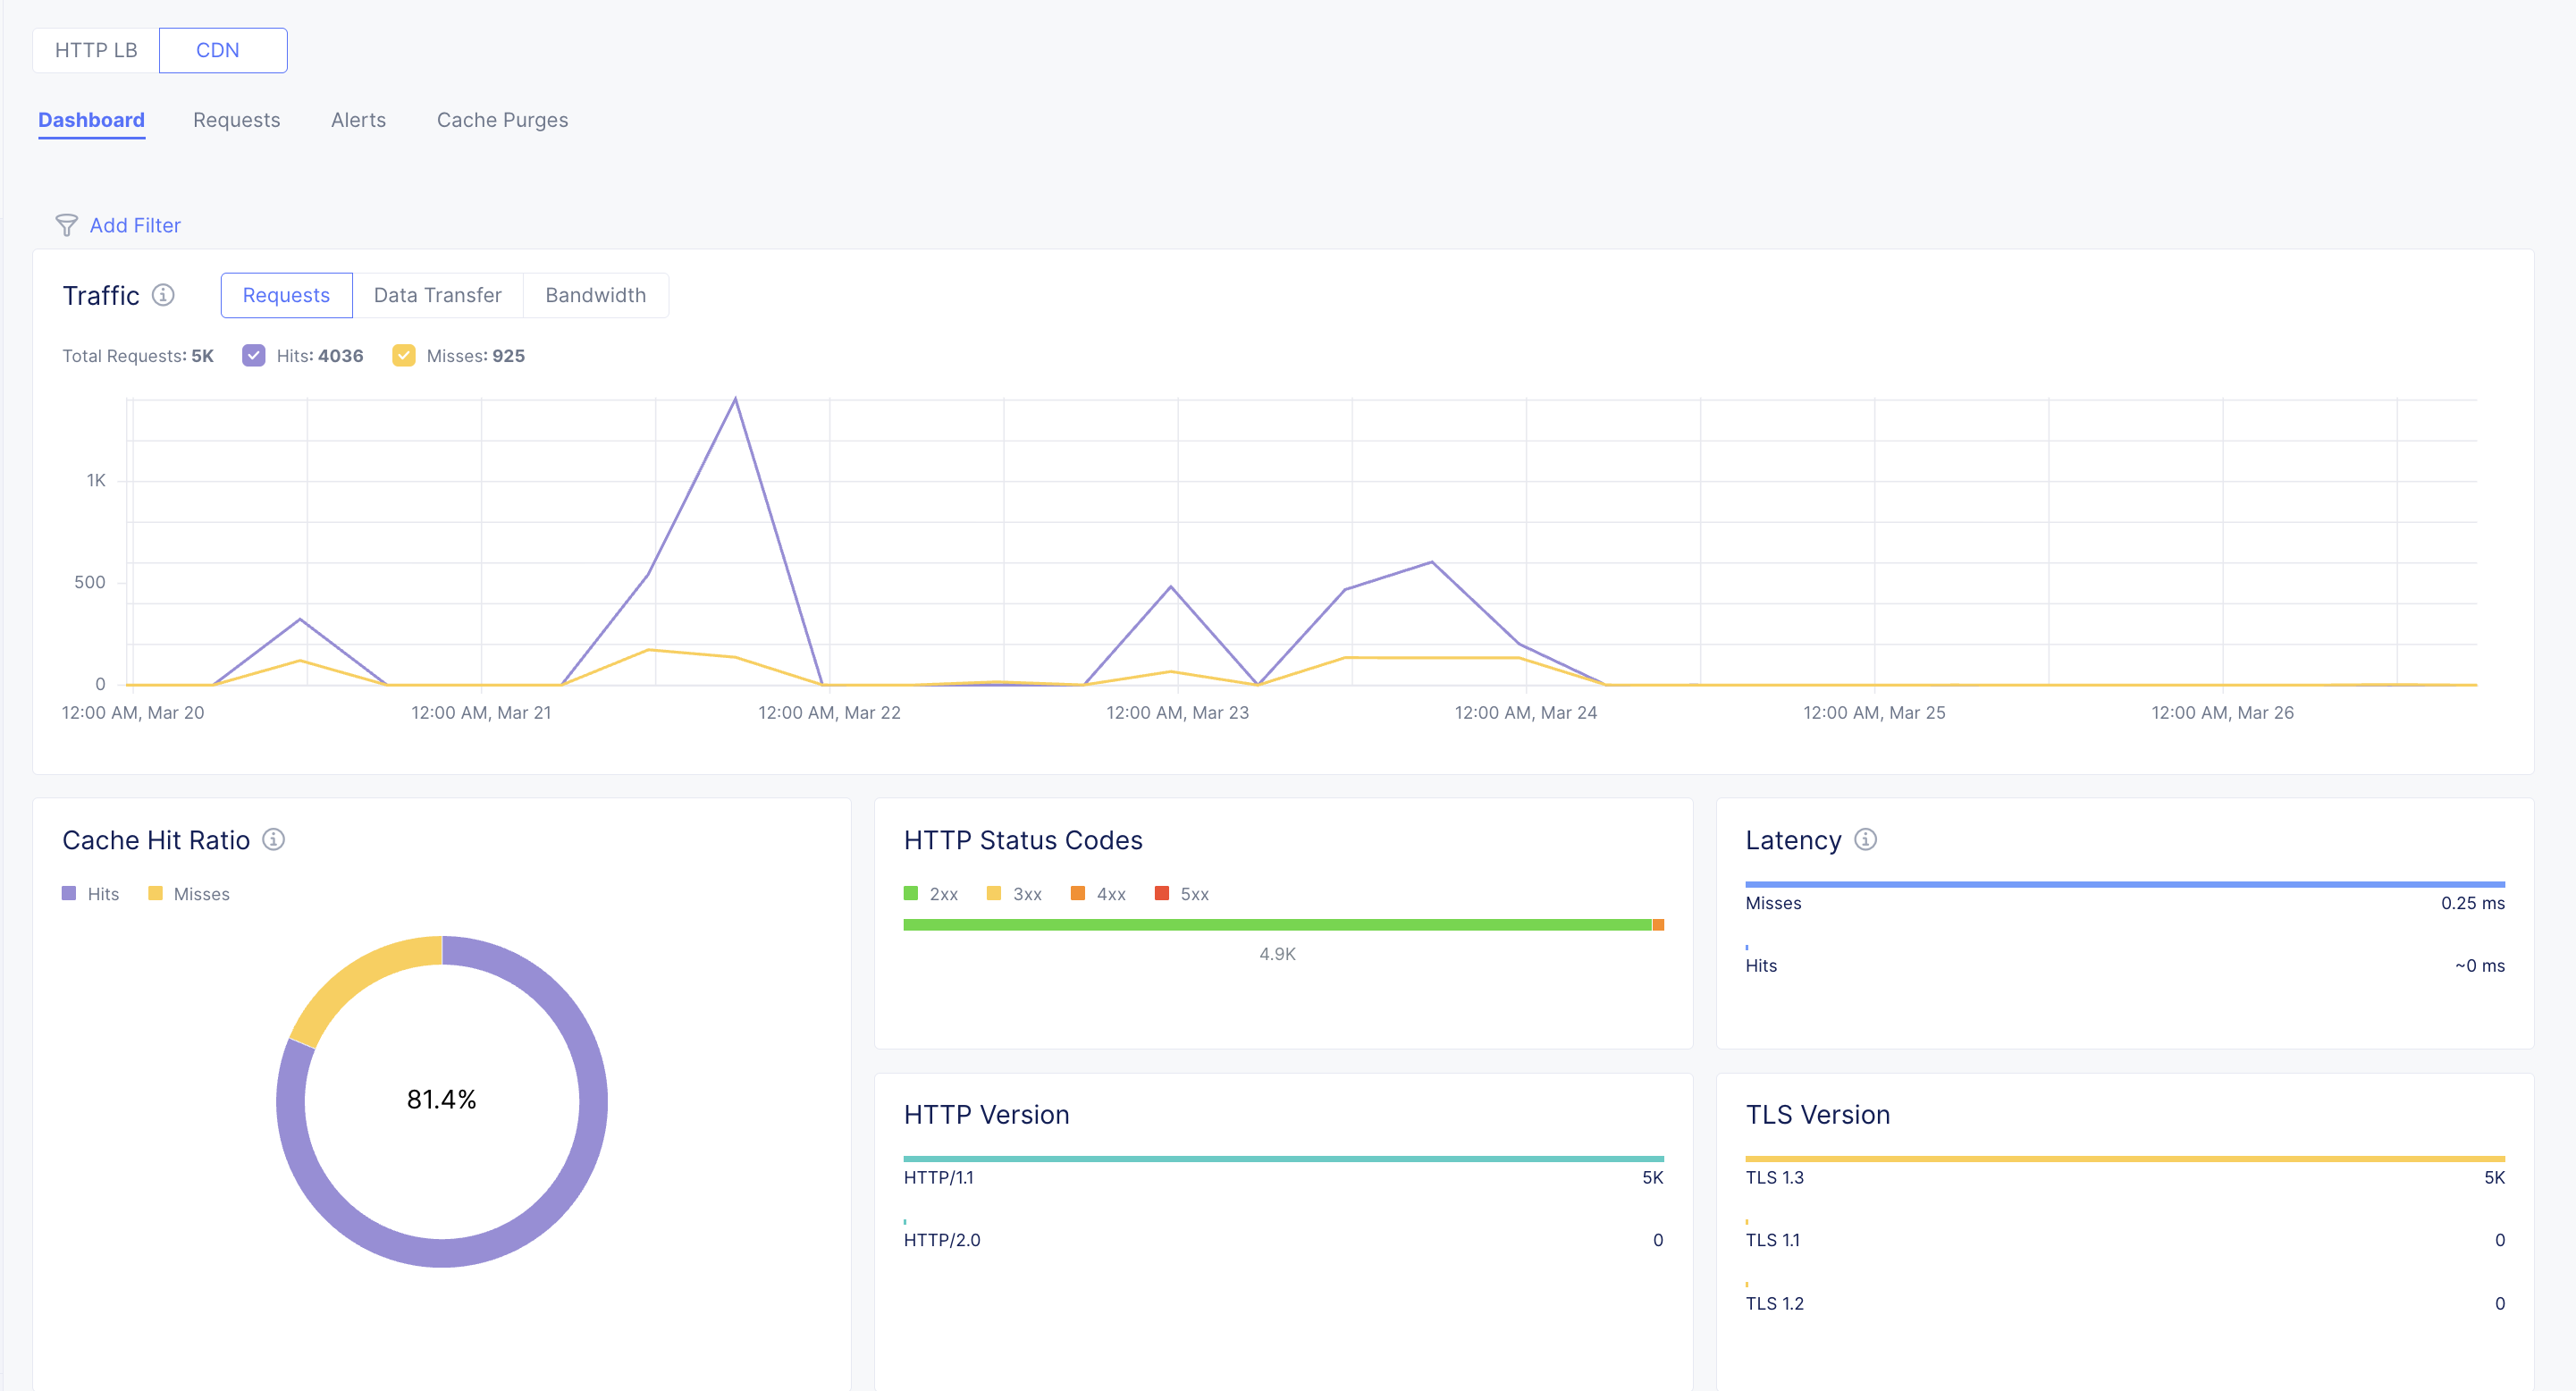
Figure: CDN Dashboard
Step 6: Fine-Tune Your Cache Configuration (Optional)
CDN caching is now active and working with smart default settings.
Optionally, tune the configuration to maximize your cache hit rate. Create and use CDN Cache Rules tailored to your application's requirements.
Caveats
The following caveats exist in the limited availability phase of HTTP load balancer (HTTP LB) and content delivery network (CDN) one-click enablement:
-
CDN caching can only be enabled on HTTP load balancers that serve HTTPS traffic.
-
CDN caching cannot be enabled on load balancers configured to serve only HTTP/2.0 traffic.
-
CDN caching is not available for HTTP load balancers configured to use mutual TLS (mTLS).
-
HTTP load balancer source IP stickiness and CDN caching cannot be enabled at the same time.
-
HTTP load balancer origin server subset rules cannot be enabled with CDN caching.
-
CDN caching does not apply to routes configured to serve WebSocket traffic.