Integrating Distributed Cloud Mesh with Red Hat OCP
Objective
This guide provides instructions on how to integrate an F5® Distributed Cloud Services site with Red Hat OpenShift Container Platform (OCP). For more information on sites, see Site.
Using the instructions provided in this guide, you can integrate the Distributed Cloud Services site with Red Hat OCP, discover services, and advertise them.
Note: The following information applies:
Distributed Cloud Services site in this document refers to the F5® Distributed Cloud Mesh (Mesh) capabilities only.
This feature provides basic functionality of launching a site on K8s with limited functionality, tools, and observability.
Deployment Methods
The instructions provided in this guide cover how to deploy Mesh as pods and how to discover services for web apps deployed in the OCP cluster using the features, such as service discovery and advertising.
You can deploy Mesh in the following methods:
-
Deploy site as ingress/egress gateway for OCP.
-
Deploy site as pods in OCP.
Note: The site as pods supports only Mesh functionalities and does not support F5® Distributed Cloud App Stack. The supported Kubernetes version is 1.23.
The following image is a high-level view for a sample deployment showing both deployment methods:
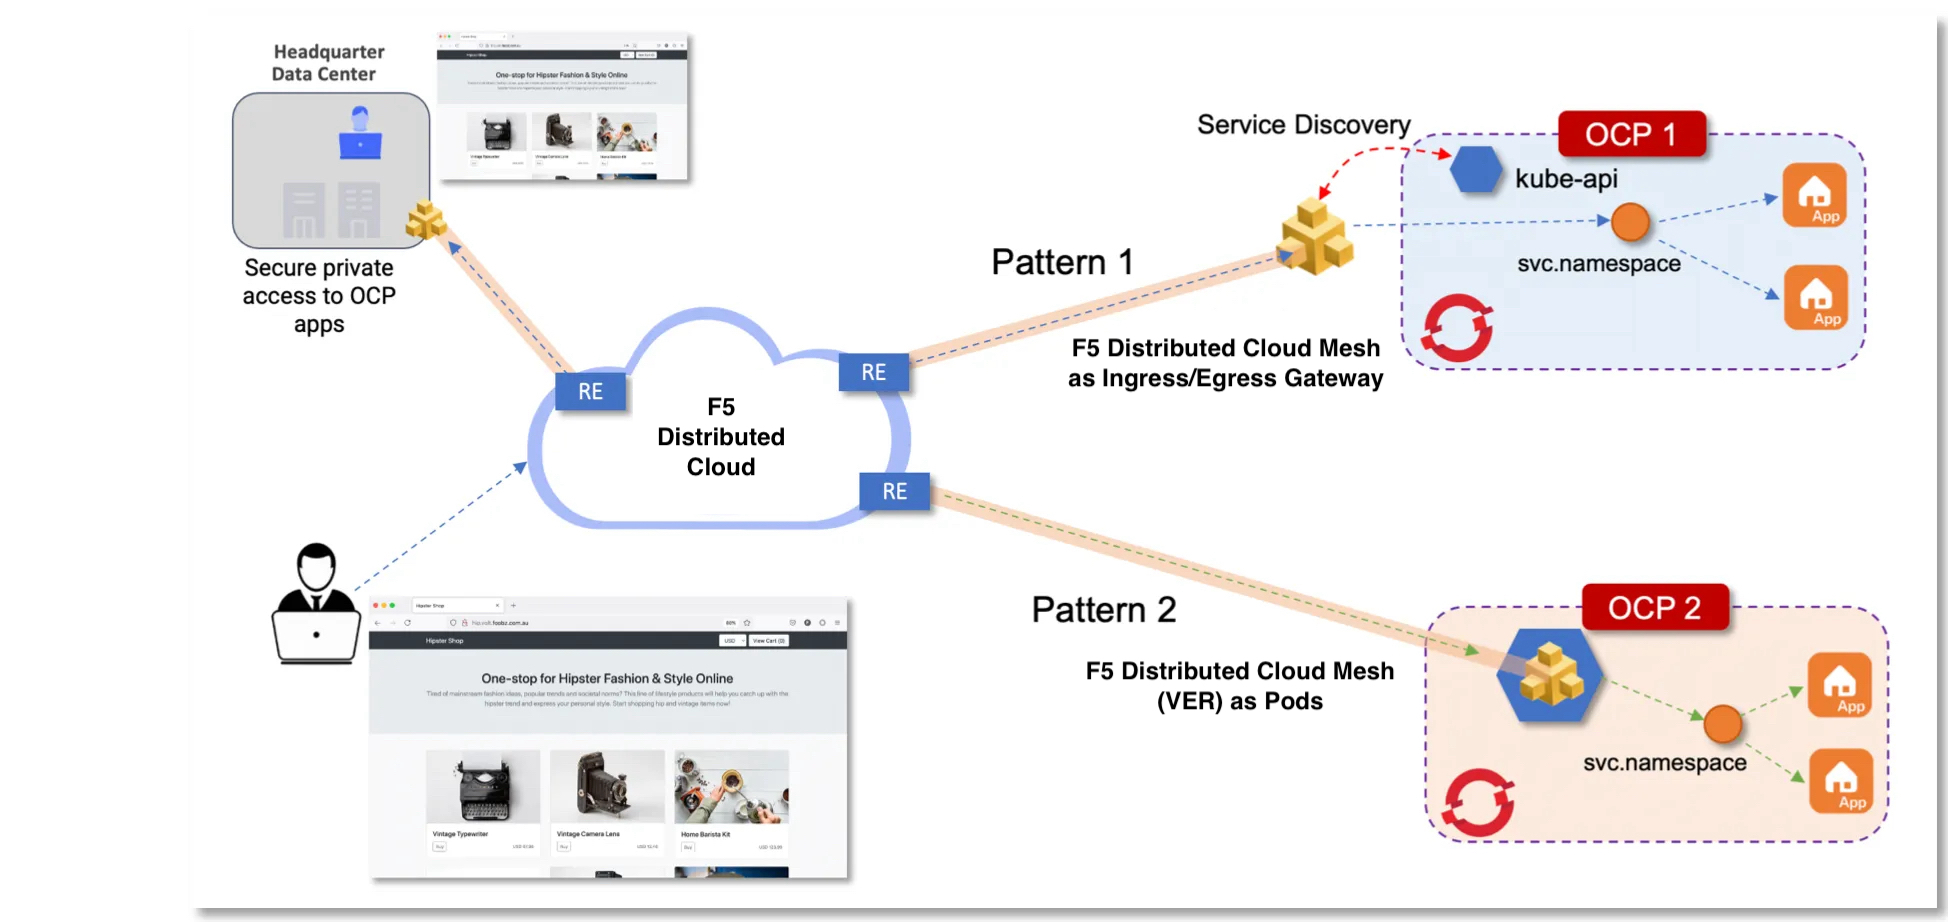
Figure: Deployment Methods
When deploying Mesh as an ingress/egress gateway for an OCP cluster, you will need to deploy web apps in OCP, set up service discovery, and advertise the services using an HTTP load balancer.
When deploying Mesh as OCP pods in the OCP cluster, you will need to deploy web apps in OCP and advertise services using an HTTP load balancer. Mesh site deployed as pods will automatically discover services running in the OCP cluster by querying the kube-api for services.
Prerequisites
The following prerequisites apply:
-
A Distributed Cloud Services Account. If you do not have an account, see Getting Started with Console.
-
A Distributed Cloud Services Site. If you do not have a site, see Site Management.
-
OCP K8s cluster. For more information, see OCP Documentation. OCP version 4.7 is supported.
-
Minimum 4 vCPUs and 8 GB of memory per node.
-
Kubernetes StorageClass with enabled Dynamic Persistent Volume Provisioner (PVC) with a minimum 1 GB space.
Note: Use the
kubectl get storageclasscommand to check if dynamic PVC is enabled for your K8s StorageClass. The output with an entry of(default)in the name indicates that K8s storage class is enabled with dynamic PVC.
Deploy as Ingress/Egress Gateway
Deploy a Mesh node/site on bare metal, a virtual machine (VM), or on a public cloud provider instance. For instructions on how install Mesh, see Site Management guides.
After successful deployment, perform the following steps:
Step 1: Obtain kubeconfig file for your OCP cluster.
When Mesh is deployed outside the OCP cluster, the kubeconfig file is required to be loaded into F5® Distributed Cloud Console (Console) for service discovery to function. The kubeconfig enables Mesh to monitor kube-api, discover OCP services, and discover lifecycle of pods. It is recommenced to create a custom non-expiring kubeconfig with permissions limited to read-only. A kubeconfig file uploaded to Console is secured with Distributed Cloud Services Blindfold.
Note: For simplicity, in this deployment guide, the
system:adminkubeconfig file is used instead of a token-based kubeconfig file.
The kubeconfig can be obtained in one of the following ways:
Root Access: Obtain kubeconfig on the system as a root user.
If you have root access to any control node, obtain the kubeconfig files located at /etc/kubernetes/static- pod-resources/kube-apiserver-certs/secrets/node-kubeconfigs/.
Note: You may need to use this method when OCP OAuth pods are not working, and you are unable to use token-based authentication to log in.
Remote Access: Obtain kubeconfig using remote interaction with the kube-api.
-
Perform remote login and interact with the kube-api.
-
Create a directory to store the kubeconfig file and then change to that directory:
mkdir kubefilecd kubefile- Extract kubeconfig file remotely using the
extractcommand:
oc -n openshift-kube-apiserver extract secret/node-kubeconfigs lb-ext.kubeconfigThe extract command returns the extracted files. The following is sample output:
lb-ext.kubeconfiglb-int.kubeconfiglocalhost-recovery.kubeconfiglocalhost.kubeconfig- Verify the file list with the
ls -alcommand.
Step 2: Use the kubeconfig file and log into OCP.
Depending on your environment setup, use one of the kubeconfig files to log in. This example uses the internal kubeconfig file.
Note: You cannot use the
<localhost>.kubeconfigto log in. Uselb-ext.kubeconfigorlb- int.kubeconfig.
- Set the
KUBECONFIGenvironment variable:
export KUBECONFIG=./lb-int.kubeconfig- Connect to the OCP and verify the node information:
oc get nodeThe following is a sample output of the above commands:

Figure: OCP Node List
Step 3: Deploy web apps to OCP.
Deploy your apps to OCP using the app manifest file. This example deploys an app called Hipster Shop, whose manifest is hosted here.
Note: Ensure that you update the service type to
NodePortfor the service you want Mesh to advertise. This is because the Mesh node is deployed outside the OCP cluster.
- Create a namespace in OCP that is same as your application namespace in Console. This example creates a namespace called
foobang-chan:
oc create ns foobang-chan- Deploy the apps:
oc -n foobang-chan create -f hipster.yamlThe following output is returned:
deployment.apps/emailservice createdservice/emailservice createddeployment.apps/paymentservice createdservice/paymentservice createddeployment.apps/productcatalogservice createdservice/productcatalogservice createddeployment.apps/cartservice createdservice/cartservice createddeployment.apps/currencyservice createdservice/currencyservice createddeployment.apps/shippingservice createdservice/shippingservice createddeployment.apps/recommendationservice createdservice/recommendationservice createddeployment.apps/checkoutservice createdservice/checkoutservice createddeployment.apps/frontend createdservice/frontend createddeployment.apps/redis-cart createdservice/redis-cart created- Verify that the services started:
oc -n foobang-chan get svcThe following output is returned:
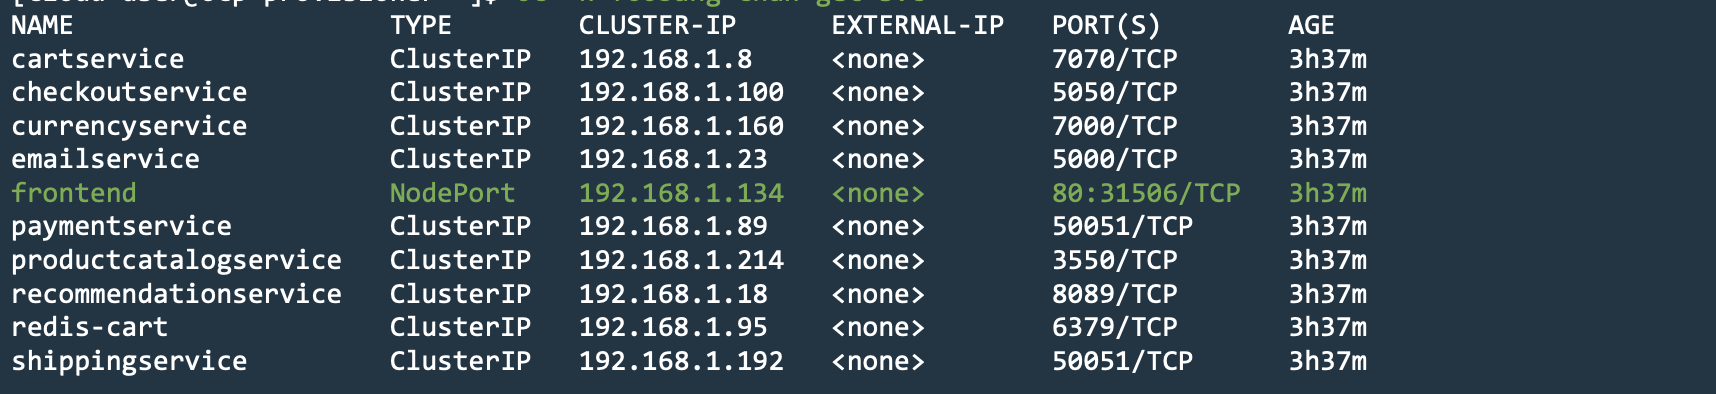
Figure: Deployed Services in OCP
Note: For OCP to send traffic to a pod, the application service type should be
NodePort. In this example, the frontend service is planned to be advertised with Mesh, so its type isNodePort.
Step 4: Verify that Mesh can reach the OCP kube-api.
Ensure that Mesh is able to reach the OCP kube-api using the server URL present in the kubeconfig. The server URL can be obtained by viewing the contents of the kubeconfig file.
- Use a file reading command such as
cat <kubeconfig-file>to view the kubeconfig contents.
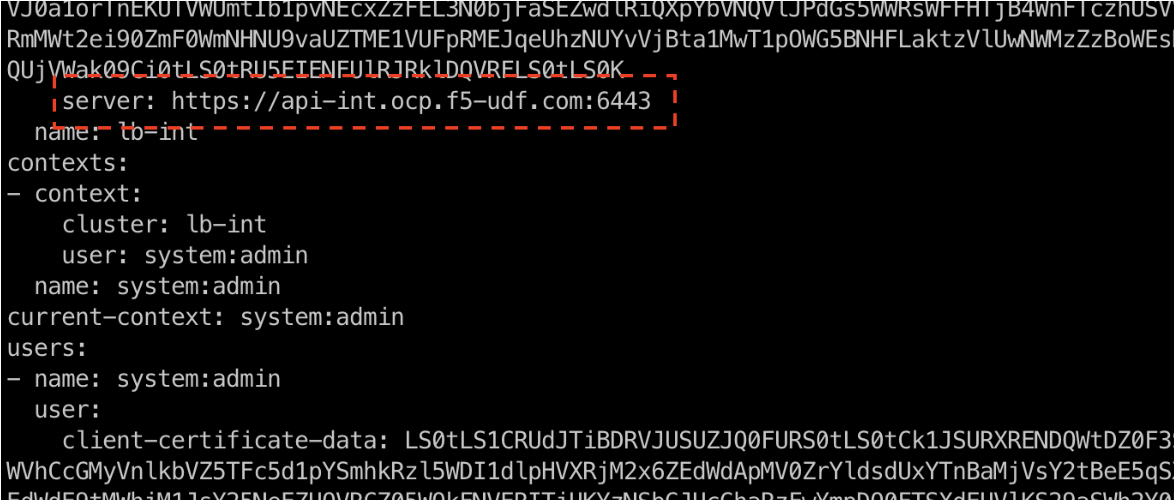
Figure: API URL in Kubeconfig
-
Log into Console.
-
Click
Multi-Cloud Network Connect.

Figure: Console Homepage
- Click
Sites>Site List.

Figure: Site List
-
Click on your Mesh site to open its
Dashboard. -
Click the
Toolstab. -
Select
Pingfrom the options of theSelect Tooldrop-down menu. -
Enter the API URL in the
Destinationfield and then clickCall ping.
Note: You can also execute ping using the site local UI. See Site Local UI for more information.
Step 5: Create service discovery.
-
Click
Manage>Service Discoveries. -
Click
Add Discovery. -
Set the metadata in the
Metadatasection. -
In the
Wheresection, selectSitefrom theVirtual-Site or Site or Networkmenu. -
Select your site from the
Referencemenu. -
Ensure that you select
Site Local Networkfrom theNetwork Typemenu. -
Select
K8s Discovery Configurationfrom theSelect Discovery Methodmenu, and then clickConfigure. -
In the
Access Credentialssection, selectKubeconfigfrom theSelect Kubernetes Credentialsmenu, and then clickConfigure. -
In the
Secretsection, ensure that theTextoption is selected for theTypeand enter the contents of the kubeconfig file in the form available beneath theTypefield. -
Click
Blindfold. -
Wait until the secret is encrypted and then click
Apply.
Note: Use a terminal file reading utility, such as
cat, to obtain the contents of the kubeconfig file. Use the kubeconfig file obtained in the previous steps.
- Click
Applyand then clickSave and Exitto complete creating the discovery object.
Note: For a full set of instructions on Kubernetes-based service discovery, see Service Discovery - K8s.
Step 6: Verify that the services were discovered.
-
Go to
Manage>Service Discoveriesand confirm that the service discovery object was created and that it lists discovered services under theServicescolumn. -
Click the value displayed in the
Servicescolumn to view the details of the services discovered. -
Search for the
frontendservice and note down the service name. -
Ensure that the
Service Typevalue is displayed asNodePort.
Deploy as OCP Pods
Perform the following to deploy a Mesh node as OCP pods:
Step 1: Ensure that a working OCP environment is available.
- Check the nodes and node states in the OCP cluster:
oc get nodeoc get node -o wide- Confirm that no node has state
Not RunningorNot Completed:
oc get pod -A | egrep -vi 'Running|Completed'Step 2: Optionally, approve a pending certificate signing request.
Enter the following command to approve a pending certificate signing request:
oc adm certificate approve `oc get csr |grep Pending |awk '{print $1}' `Step 3: Configure HugePages.
Label node or assigned role for which HugePages is to be configured. Alternatively, you can also configure or label HugePages for all nodes.
These examples show labeling for three worker nodes:
oc label node worker-1.ocp.f5-udf.com node-role.kubernetes.io/worker-hp=oc label node worker-2.ocp.f5-udf.com node-role.kubernetes.io/worker-hp=oc label node worker-3.ocp.f5-udf.com node-role.kubernetes.io/worker-hp=- Verify that the labels created are using the
oc get nodecommand.
Note: The worker-1, worker-2, and worker-3 nodes are labelled as
worker-hp- which is an arbitrary tag/label/name of choice.
- Create two files named
hugepages-tuned-boottime.yamlandhugepages-mcp.yaml.
The following are sample YAML contents for both files:
hugepages-tuned-boottime.yaml
apiVersion: tuned.openshift.io/v1kind: Tunedmetadata:  name: hugepages  namespace: openshift-cluster-node-tuning-operatorspec:  profile:  - data: |      [main]      summary=Boot time configuration for hugepages      include=openshift-node      [bootloader]      cmdline_openshift_node_hugepages=hugepagesz=2M hugepages=1792    name: openshift-node-hugepages
  recommend:  - machineConfigLabels:      machineconfiguration.openshift.io/role: "worker-hp"    priority: 30    profile: openshift-node-hugepages
hugepages-mcp.yaml
apiVersion: machineconfiguration.openshift.io/v1kind: MachineConfigPoolmetadata: name: worker-hp labels: worker-hp: ""spec: machineConfigSelector: matchExpressions: - {key: machineconfiguration.openshift.io/role, operator: In, values: [worker,worker-hp]} nodeSelector: matchLabels: node-role.kubernetes.io/worker-hp: ""- Enable HugePages using the newly created YAML files:
oc create -f hugepages-tuned-boottime.yamlThe following output is returned:
tuned.tuned.openshift.io/hugepages createdoc create -f hugepages-mcp.yamlThe following output is returned:
machineconfigpool.machineconfiguration.openshift.io/worker-hp createdNote: See Official OCP Documentation for more information on HugePages configuration.
-
Wait for all worker nodes to have
Readystatus. -
Use the
oc get nodecommand to verify the state of nodes.
Step 4: Verify that HugePages and storage class or dynamic PV is enabled.
- Verify that HugePages is enabled. Repeat this command for all the worker nodes.
This example shows the verification command for the worker-1 node:
oc get node worker-1.ocp.f5-udf.com -o jsonpath="{.status.allocatable.hugepages-2Mi}"Note: Output for the above command must be a non-zero value and should match the HugePages you specified in the
hugepages-tuned-boottime.yamlfile.
- Verify that the storage class or dynamic Persistent Volume (PV) is configured. This example shows verification for the storage class:
oc get scThe following output confirms that storage class is configured:
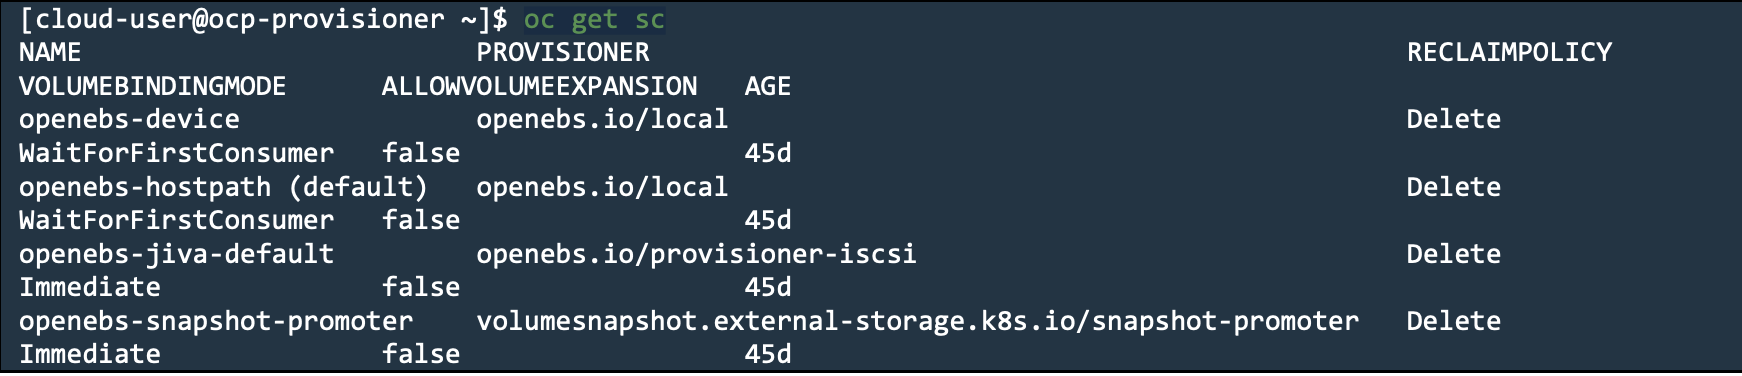
Figure: Storage Class Validation
Step 5: Log into Console and create site tokens.
-
Click
Multi-Cloud Network Connect. -
Select
Manage>Site Management>Site Tokens. -
Click
Add site token. -
In the
Namefield, enter the token name. -
Click
Add site token. -
Click
>to expand the token details in JSON format and note down the value of theuidfield.
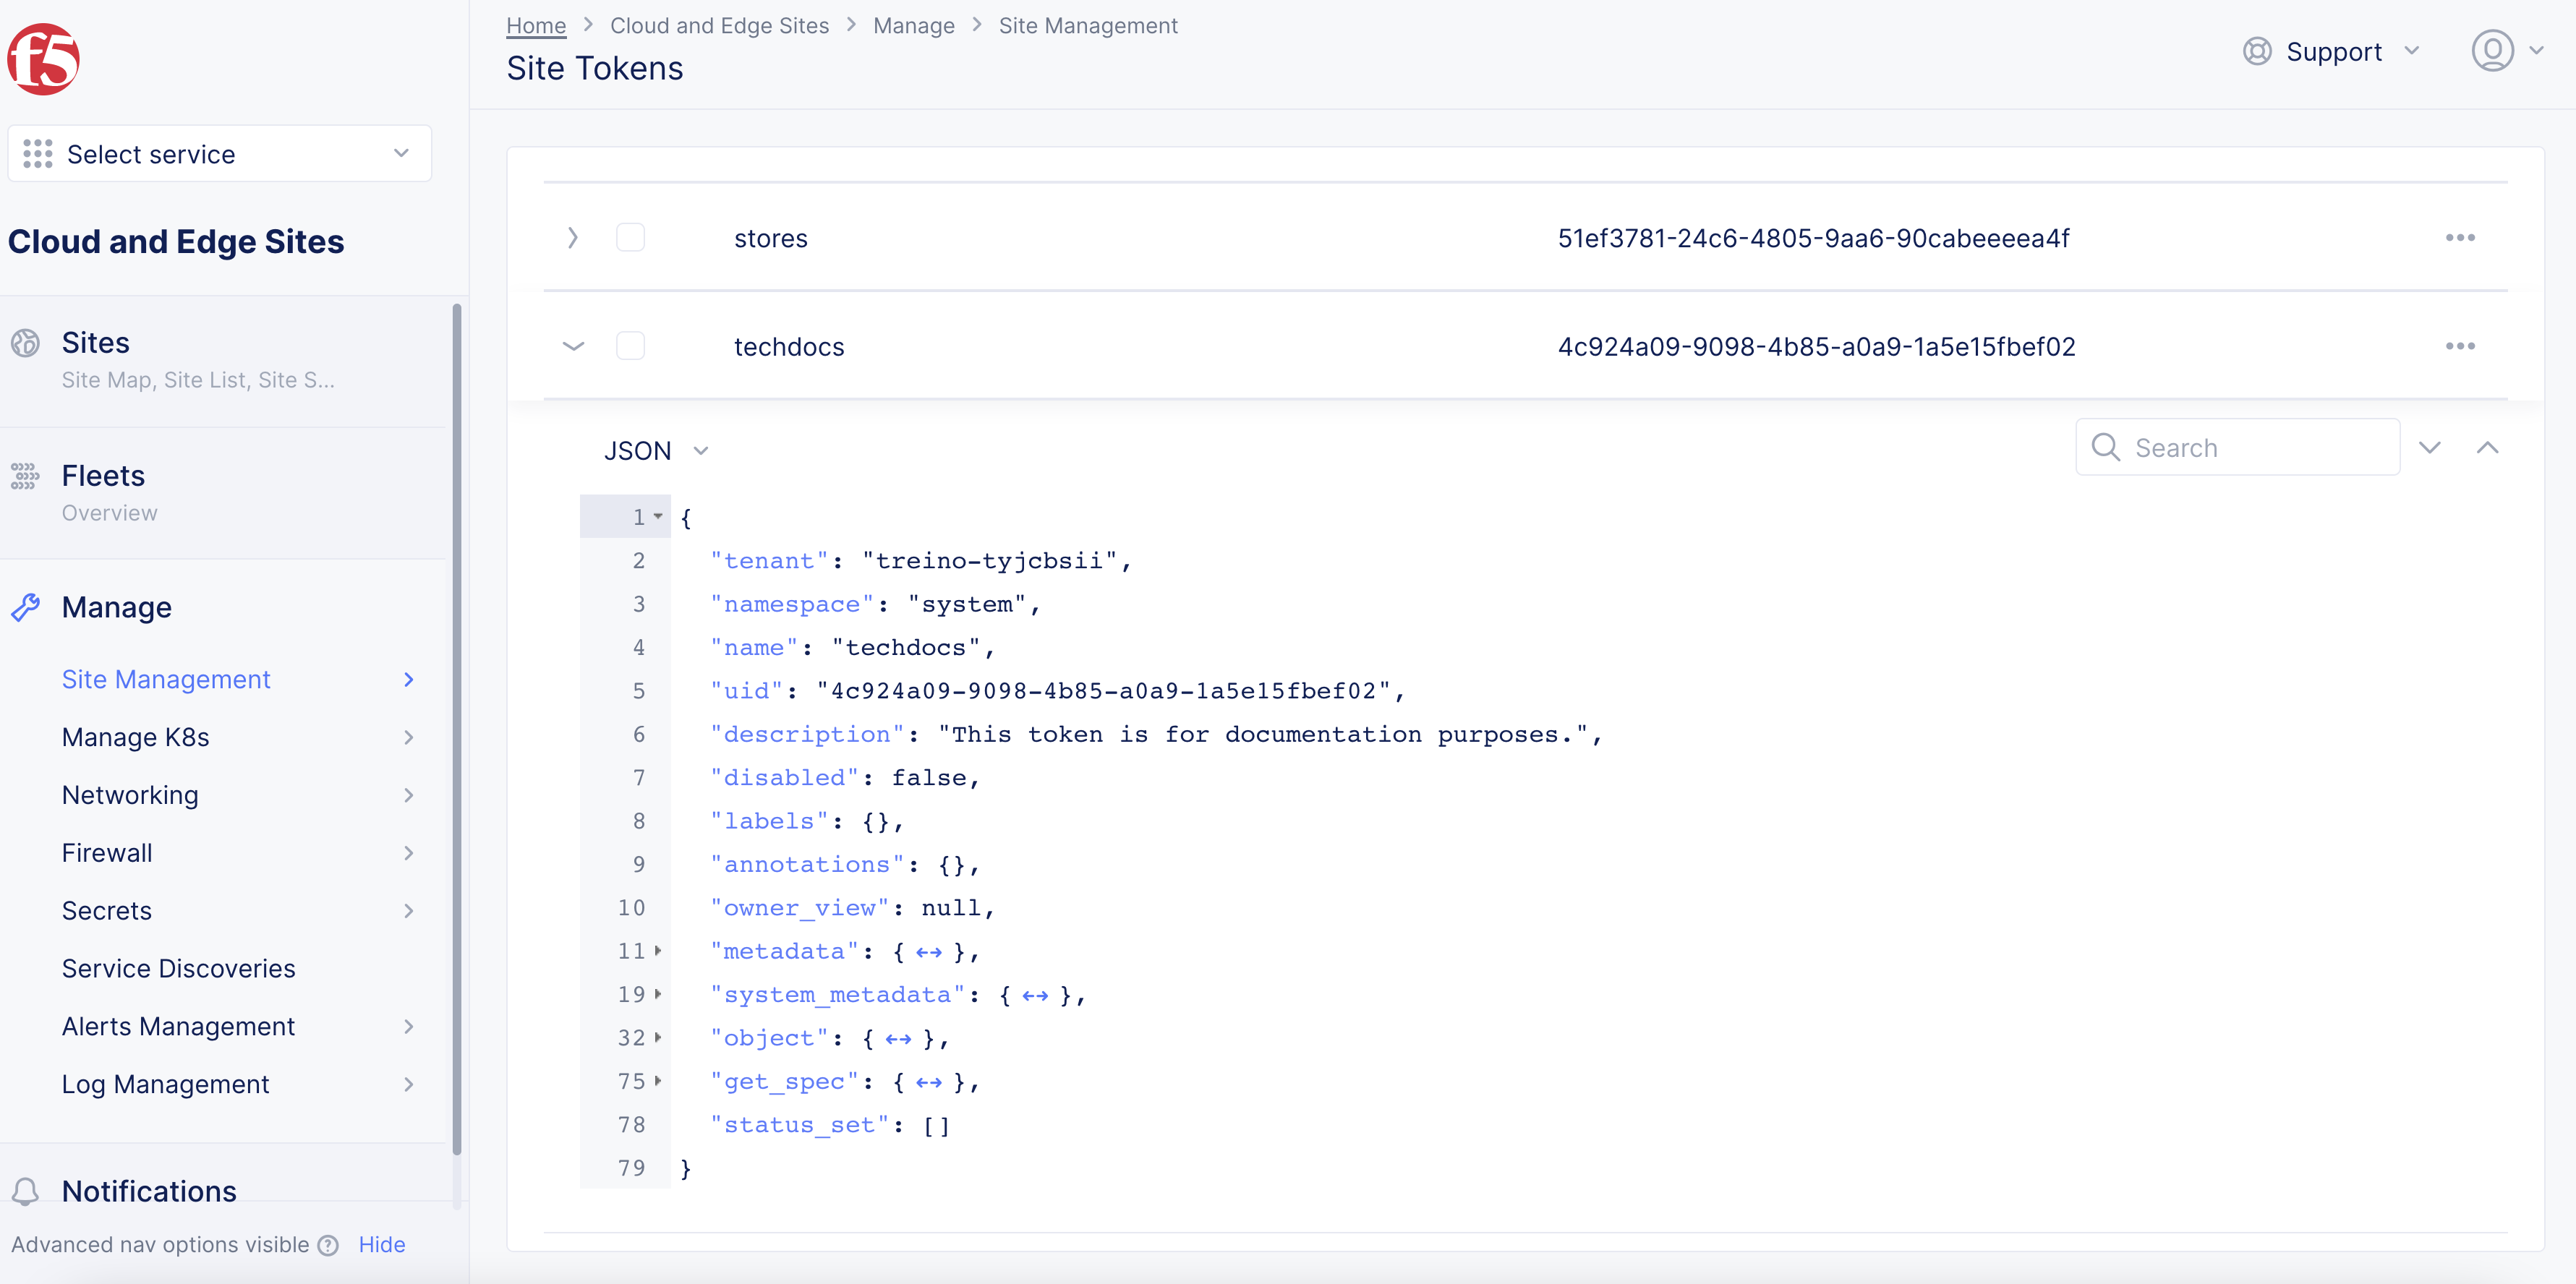
Figure: Site Token
Step 6: Create a site deployment manifest file.
-
Download the sample manifest template file.
-
Edit the configuration in the
Vpmsection of the manifest file per the following guidelines:-
In the
ClusterNamefield, type your cluster name. -
In the
LatitudeandLongitudefields, type the latitude and longitude values. -
In the
Tokenfield, type the site token.
-
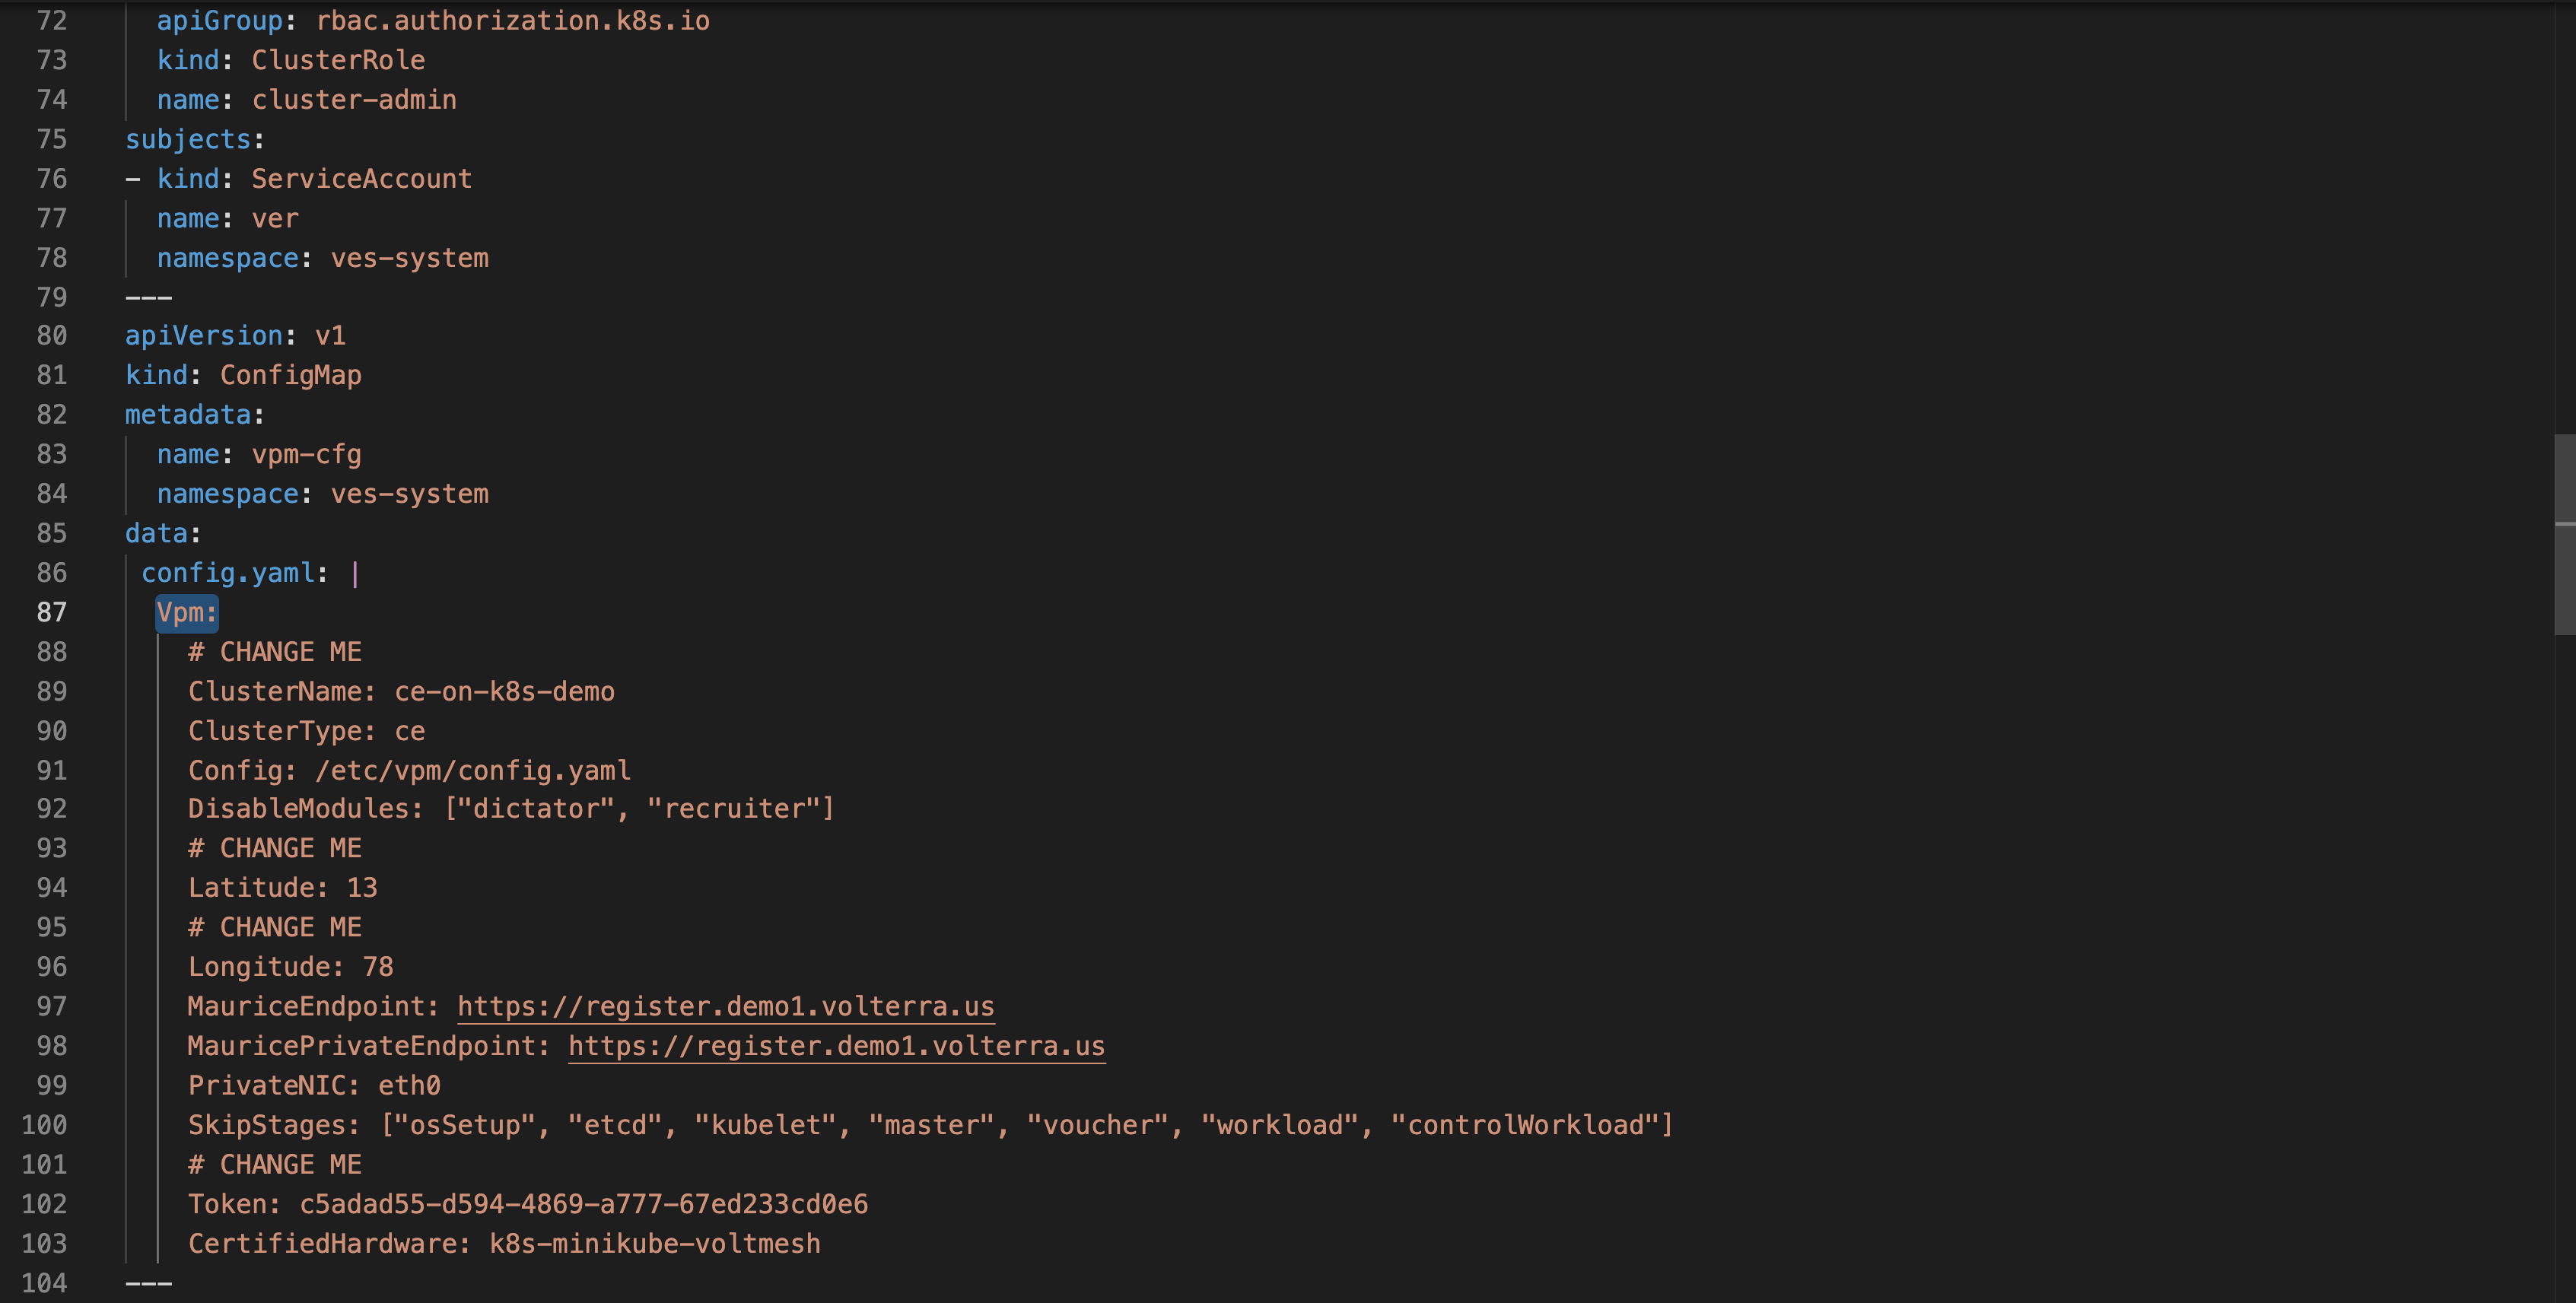
Figure: Manifest Template
- Save your changes.
Step 7: Deploy the site.
- Deploy the Distributed Cloud Services site using the site manifest file.
This example uses the ves-ocp.yaml site manifest file:
oc create -f ves-ocp.yamlThe following is sample output of the above command:
namespace/ves-system createddaemonset.apps/volterra-ce-init createdserviceaccount/vpm-sa createdrole.rbac.authorization.k8s.io/vpm-role createdrolebinding.rbac.authorization.k8s.io/vpm-role-binding createdclusterrolebinding.rbac.authorization.k8s.io/ver createdconfigmap/vpm-cfg createdstatefulset.apps/vp-manager createdStep 8: Perform registration.
- Run the following command to watch the progress of the site creation:
watch 'oc -n ves-system get pod -o wide'- Check the PV and PVC information:
oc -n ves-system get pvoc -n ves-system get pvcNote: Log into Console to accept the site registrations. Only
vp-manager-0pod will be displayed as running until registration of the site is approved.
-
Log into Console.
-
Click
Multi-Cloud Network Connect. -
Click
Manage>Site Management>Registrations. -
Click the
Pending Registrationstab. -
Find your node name and then click the blue checkmark.
-
In the form that appears, fill in all required fields with the asterisk symbol (
*). -
Click
Save and Exit.
The watch command you set earlier will start showing the ver-0 pod as well. This indicates that the site is registered and getting provisioned. Upon successful provision, the status of all pods changes to Running.
Step 9: Check site status and health.
It may take a few minutes for the site health and connectivity score information to update.
-
Click
Sites>Site List. -
Click on your Site name. The
Dashboardtab appears, along with many other tabs to inspect your Site. -
Click the
Site Statustab to verify the following:-
The
Update Statusfield has aSuccessfulvalue for theF5 OS Statussection. -
The
Update Statusfield has aSuccessfulvalue for theF5 Software Statussection. -
The
Tunnel statusandControl Planefields under theRE Connectivitysection haveupvalues.
-
Note: At this point, the site is ready to provide service to apps deployed on OCP. Due to the site pods being inside OCP, you do not need to create service discovery from Console. The pods can query
kube-apifor services and lifecycle of pods.
Step 10: Deploy apps.
Deploy the Hipster shop app using the app manifest. Download the manifest from here.
- Create a namespace with the same name as that of your app namespace in Console:
oc create ns foobang-chan- Deploy the apps:
oc -n foobang-chan create -f hipster.yamlNote: When Mesh deploys as pods inside OCP, the
frontendservice can be of typeClusterIP.
Advertise Services
Step 1: Create origin pool.
-
In Console, click
Multi-Cloud App Connect. -
Select your namespace from the drop-down menu. Ensure that you have the namespace with the same name as the namespace for the OCP cluster.
-
Click
Manage>Load Balancers>Origin Pools. -
Click
Add Origin Pool. -
Enter a name in the
Metadatasection. -
In the
Basic Configurationsection, clickAdd Item. -
From the
Select Type of Origin Servermenu, selectK8s Service Name of Origin Server on given Sites. -
Enter a service name in the
<servicename>.<namespace>format in theService Namefield. -
Select
Sitefrom theSite or Virtual Sitemenu. -
Select your Mesh site from the
Sitedrop-down menu. -
From the
Select Network on the sitemenu, selectOutside Network.
-
Click
Add item. -
Click
Save and Exit.
Note: See the Origin Pools guide for more information.
Step 2: Create HTTP load balancer.
-
Click
Manage>Load Balancers>HTTP Load Balancersin your app namespace. -
Click
Add HTTP Load Balancer. -
Enter a name in the
Metadatasection. -
In the
Basic Configurationsection, enter a domain name in theList of Domainfield. -
Enable the
Automatically Manage DNS Recordsoption. -
In the
Default Origin Serverssection, clickAdd Item. -
From the
Select Origin Pool Methoddrop-down menu, select the origin pool created in the previous step. -
Click
Add Item. -
Scroll down and click
Save and Exit.
Step 3: Verify that the origin servers are displayed in load balancer monitoring.
-
Click
Virtual Hosts>HTTP Load Balancersin your app namespace. -
Click on the load balancer you created in the previous step. The
General Monitoringview with theDashboardtab loads by default. -
Click the
Origin Serverstab. -
Verify that the page shows the pod running your apps as the origin server.
Note: When Mesh is deployed as the ingress/egress Gateway outside the OCP, it discovers services using the service discovery created. When deployed as pods inside the OCP, it auto-discovers the services using the service name and namespace name as specified in the origin pool.
Step 4: Verify that the application is accessible from the Internet.
Send a request to your domain using a web browser or a utility, such as cURL, and confirm that the request is successful and your web page is loaded or an HTTP response has data with a 200 code.