Deploy and Manage BIG-IP Access Policy Manager
Objective
F5 Distributed Cloud BIG-IP Access Policy Manager (APM) is a secure, flexible, and high-performance access management proxy solution. The APM provides unified global access controls for users, devices, applications, and APIs.
Using the instructions provided in this guide, you can deploy a BIG-IP APM instance on your AWS VPC (associated with your AWS TGW Site) or Bare Metal instance to apply policies for your application.
Prerequisites
Note: BIG-IP APM is a limited availabilty (LA) feature available to MSP's with service subscription request.
BIG-IP APM AWS Deployment Site Prerequisites:
-
A Distributed Cloud Services Account. If you do not have an account, see Create an Account.
-
F5 BIG-IP subscription.
-
An Amazon Web Services (AWS) TGW Site. See AWS VPC Site Access Policies and AWS TGW Access Policies for required permissions.
-
A delegated domain. See Domain Delegation for more information.
-
A valid AWS image subscription for F5 BIG-IP AWS images: F5 BIG-IP PAYG Best Plus (200Mbps), or F5 BIG-IP PAYG Best Plus (1Gbps).
-
AWS TGW site must have hellas pod enabled.
BIG-IP APM Bare Metal Deployment Site Prerequisites:
-
A Distributed Cloud Services Account. If you do not have an account, see Create an Account.
-
F5 BIG-IP subscription.
-
Bare Metal site must be deployed on following hardware: Dell PowerEdge R640/R650.
-
Bare Metal site must have hellas pod enabled in the cluster.
Note: If you are deploying Bare Metal site with this version of release, Hellas pod must be deployed automatically.
- Bare Metal site must be deployed with VM support enabled.
Note: Two subnets that are connected to underlay VLAN must be created.
- Connect to Underlay VLAN.
Note: Reference
Steps to Configure VLAN.
- BIG-IP Image version is BIG-IP 16.1.3.3 Build 0.0.3 Point Release 3.
Note: Testing is validated with above image. Other versions of BIG-IP are expected to work, but not validated.
- A BIG-IQ license Server, license configured so BIG-IP activates proper license during instantiation.
Design of BIG-IP Deployment on Bare Metal App Stack Site
BIG-IP APM Virtual Edition (VE) edition is deployed as a Virtual Machine (VM) on physical Kubernetes cluster formed on a Bare Metal site. The external interface and internal interface of BIG-IP are connected to underlay VLAN using linux bridge in the host kernel.
The instructions below help you to configure deployment of BIG-IP APM on Bare Metal.
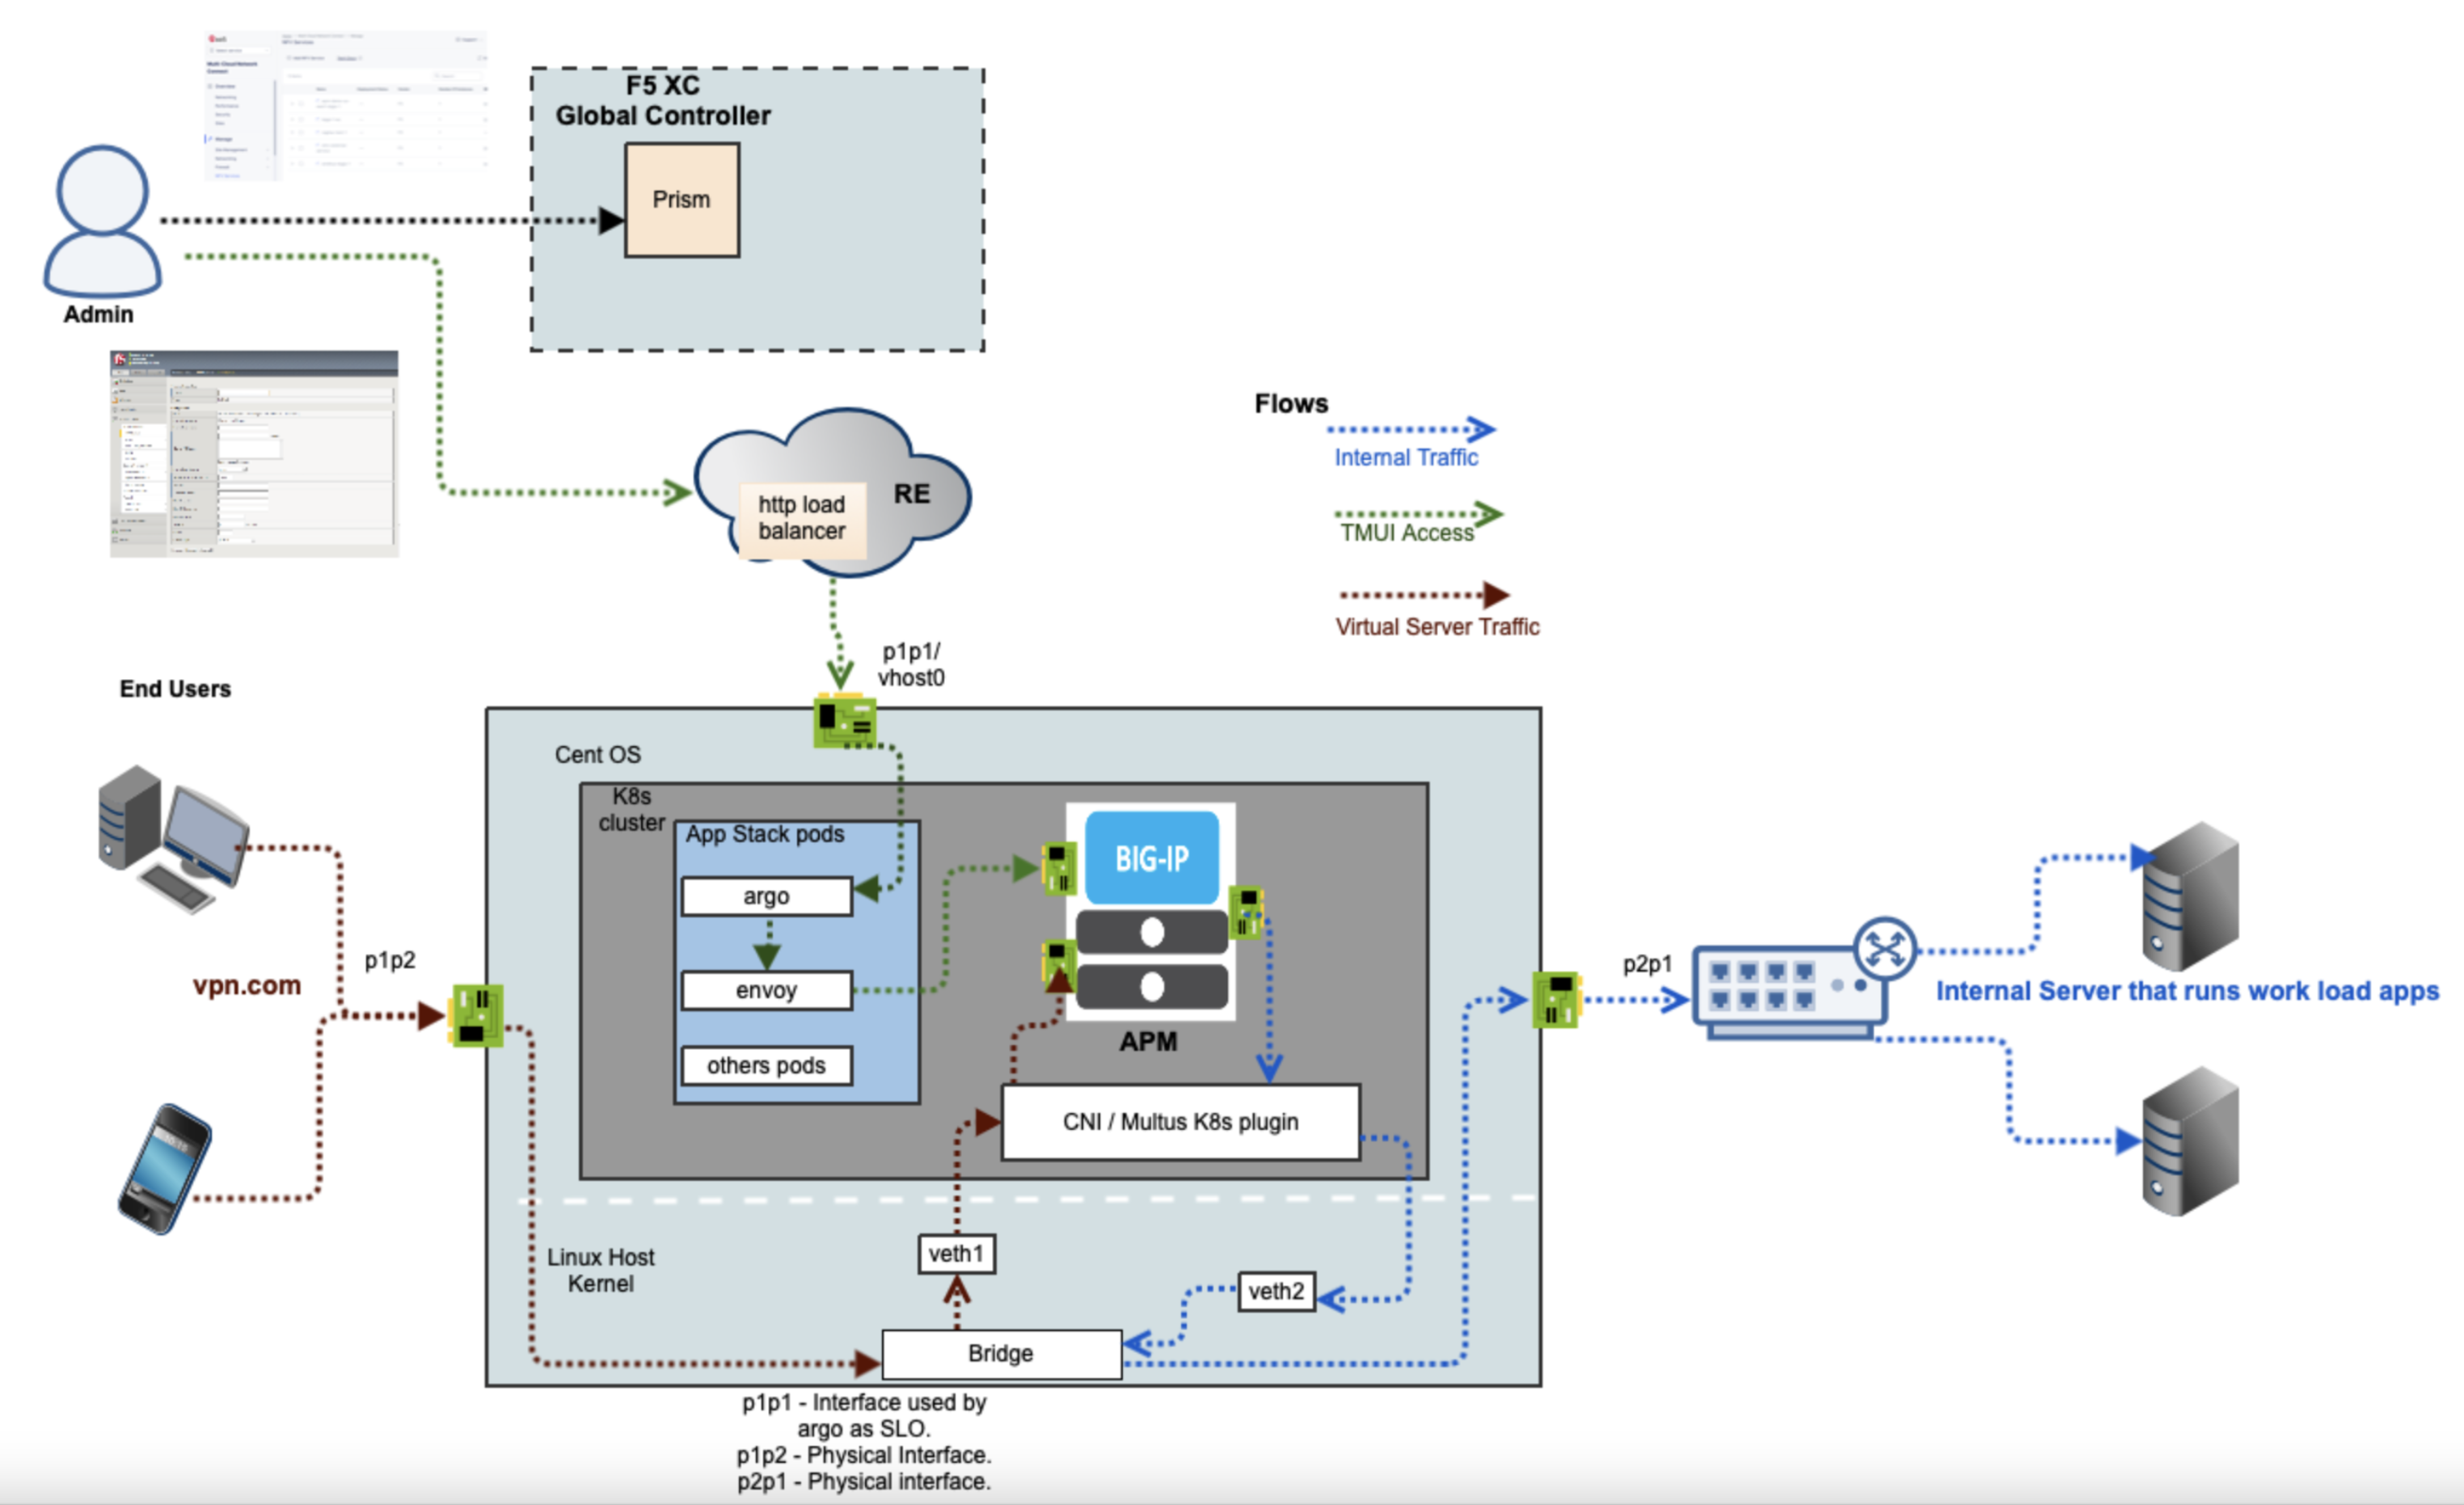
Figure: VLAN Diagram
Steps to Configure VLAN
Step 1: Setup Network Interface to connect to underlay VLAN.
- In F5 Distributed Cloud Console > select
Multi-Cloud Network Connect>Manage.
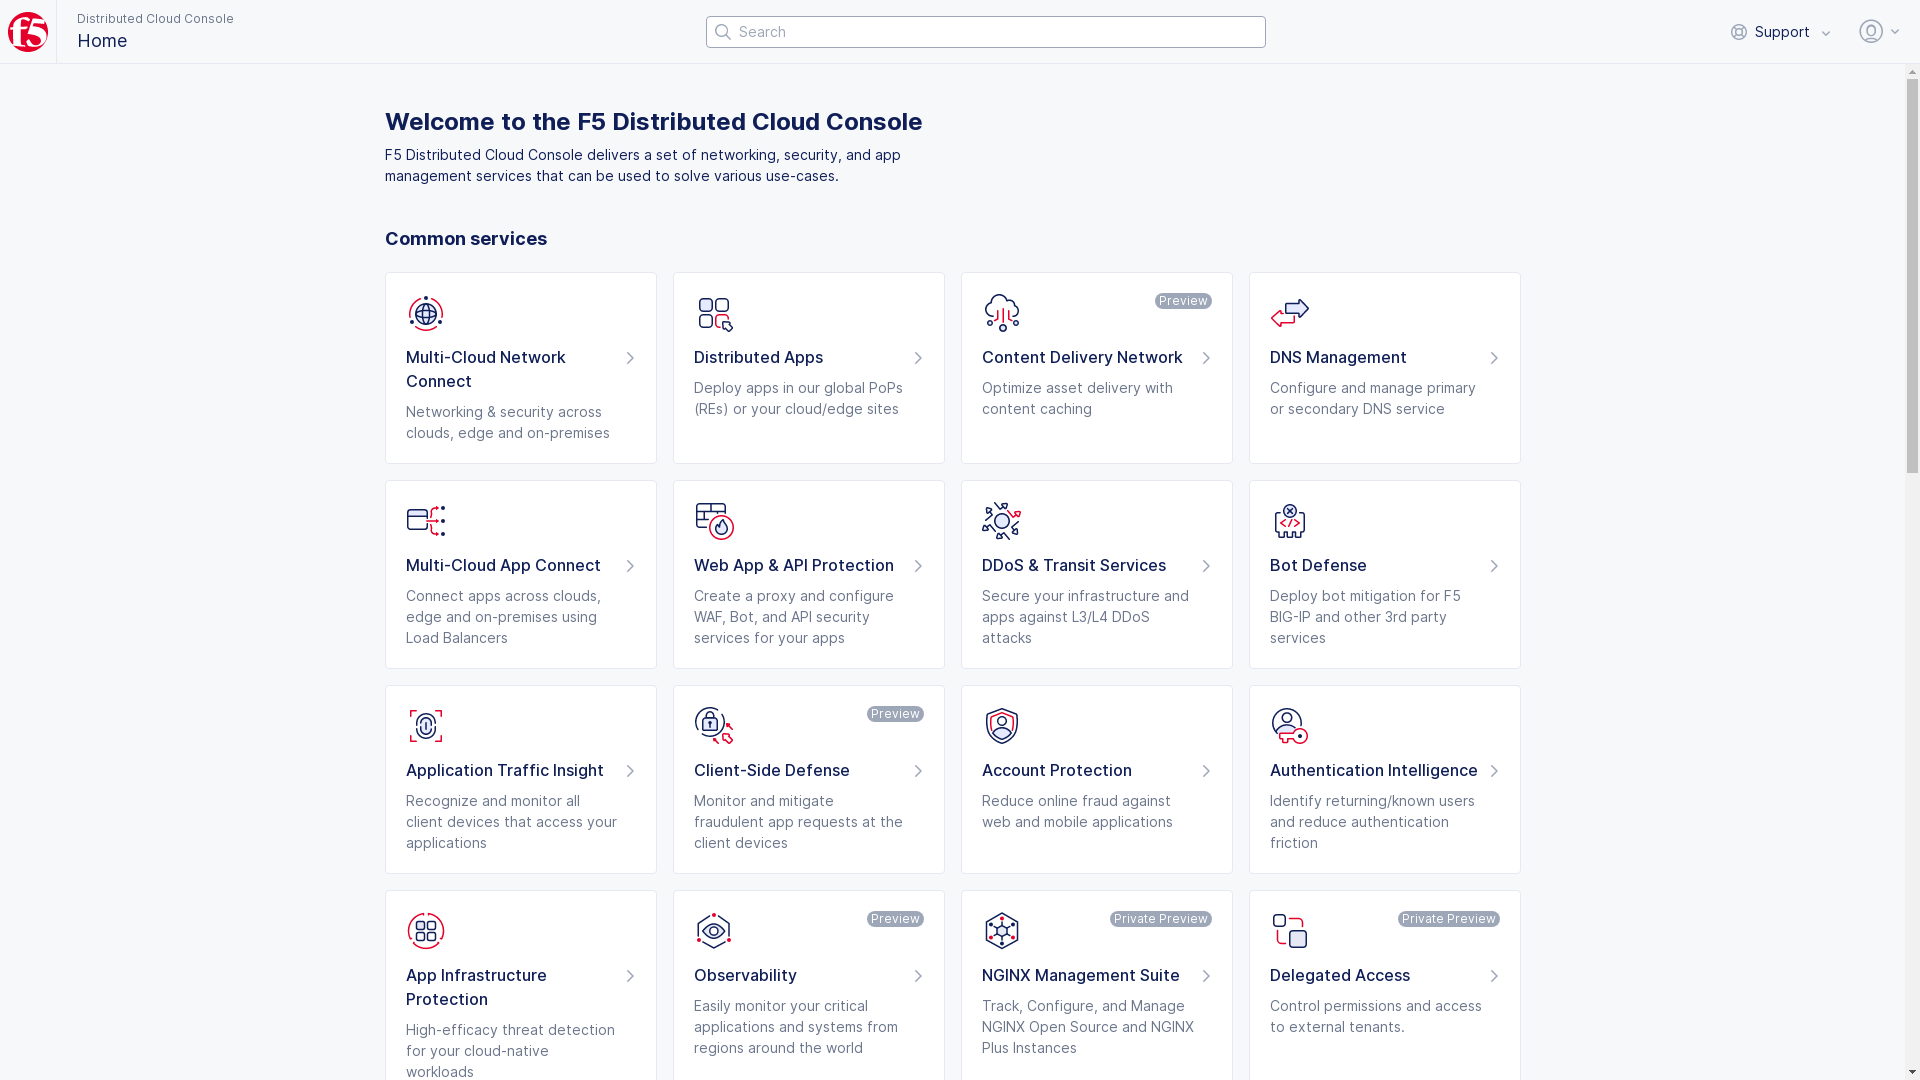
Figure: F5 Distributed Cloud Homepage
-
Select
Networking>Network Interfacing. -
Select
+ Add Network Interface.
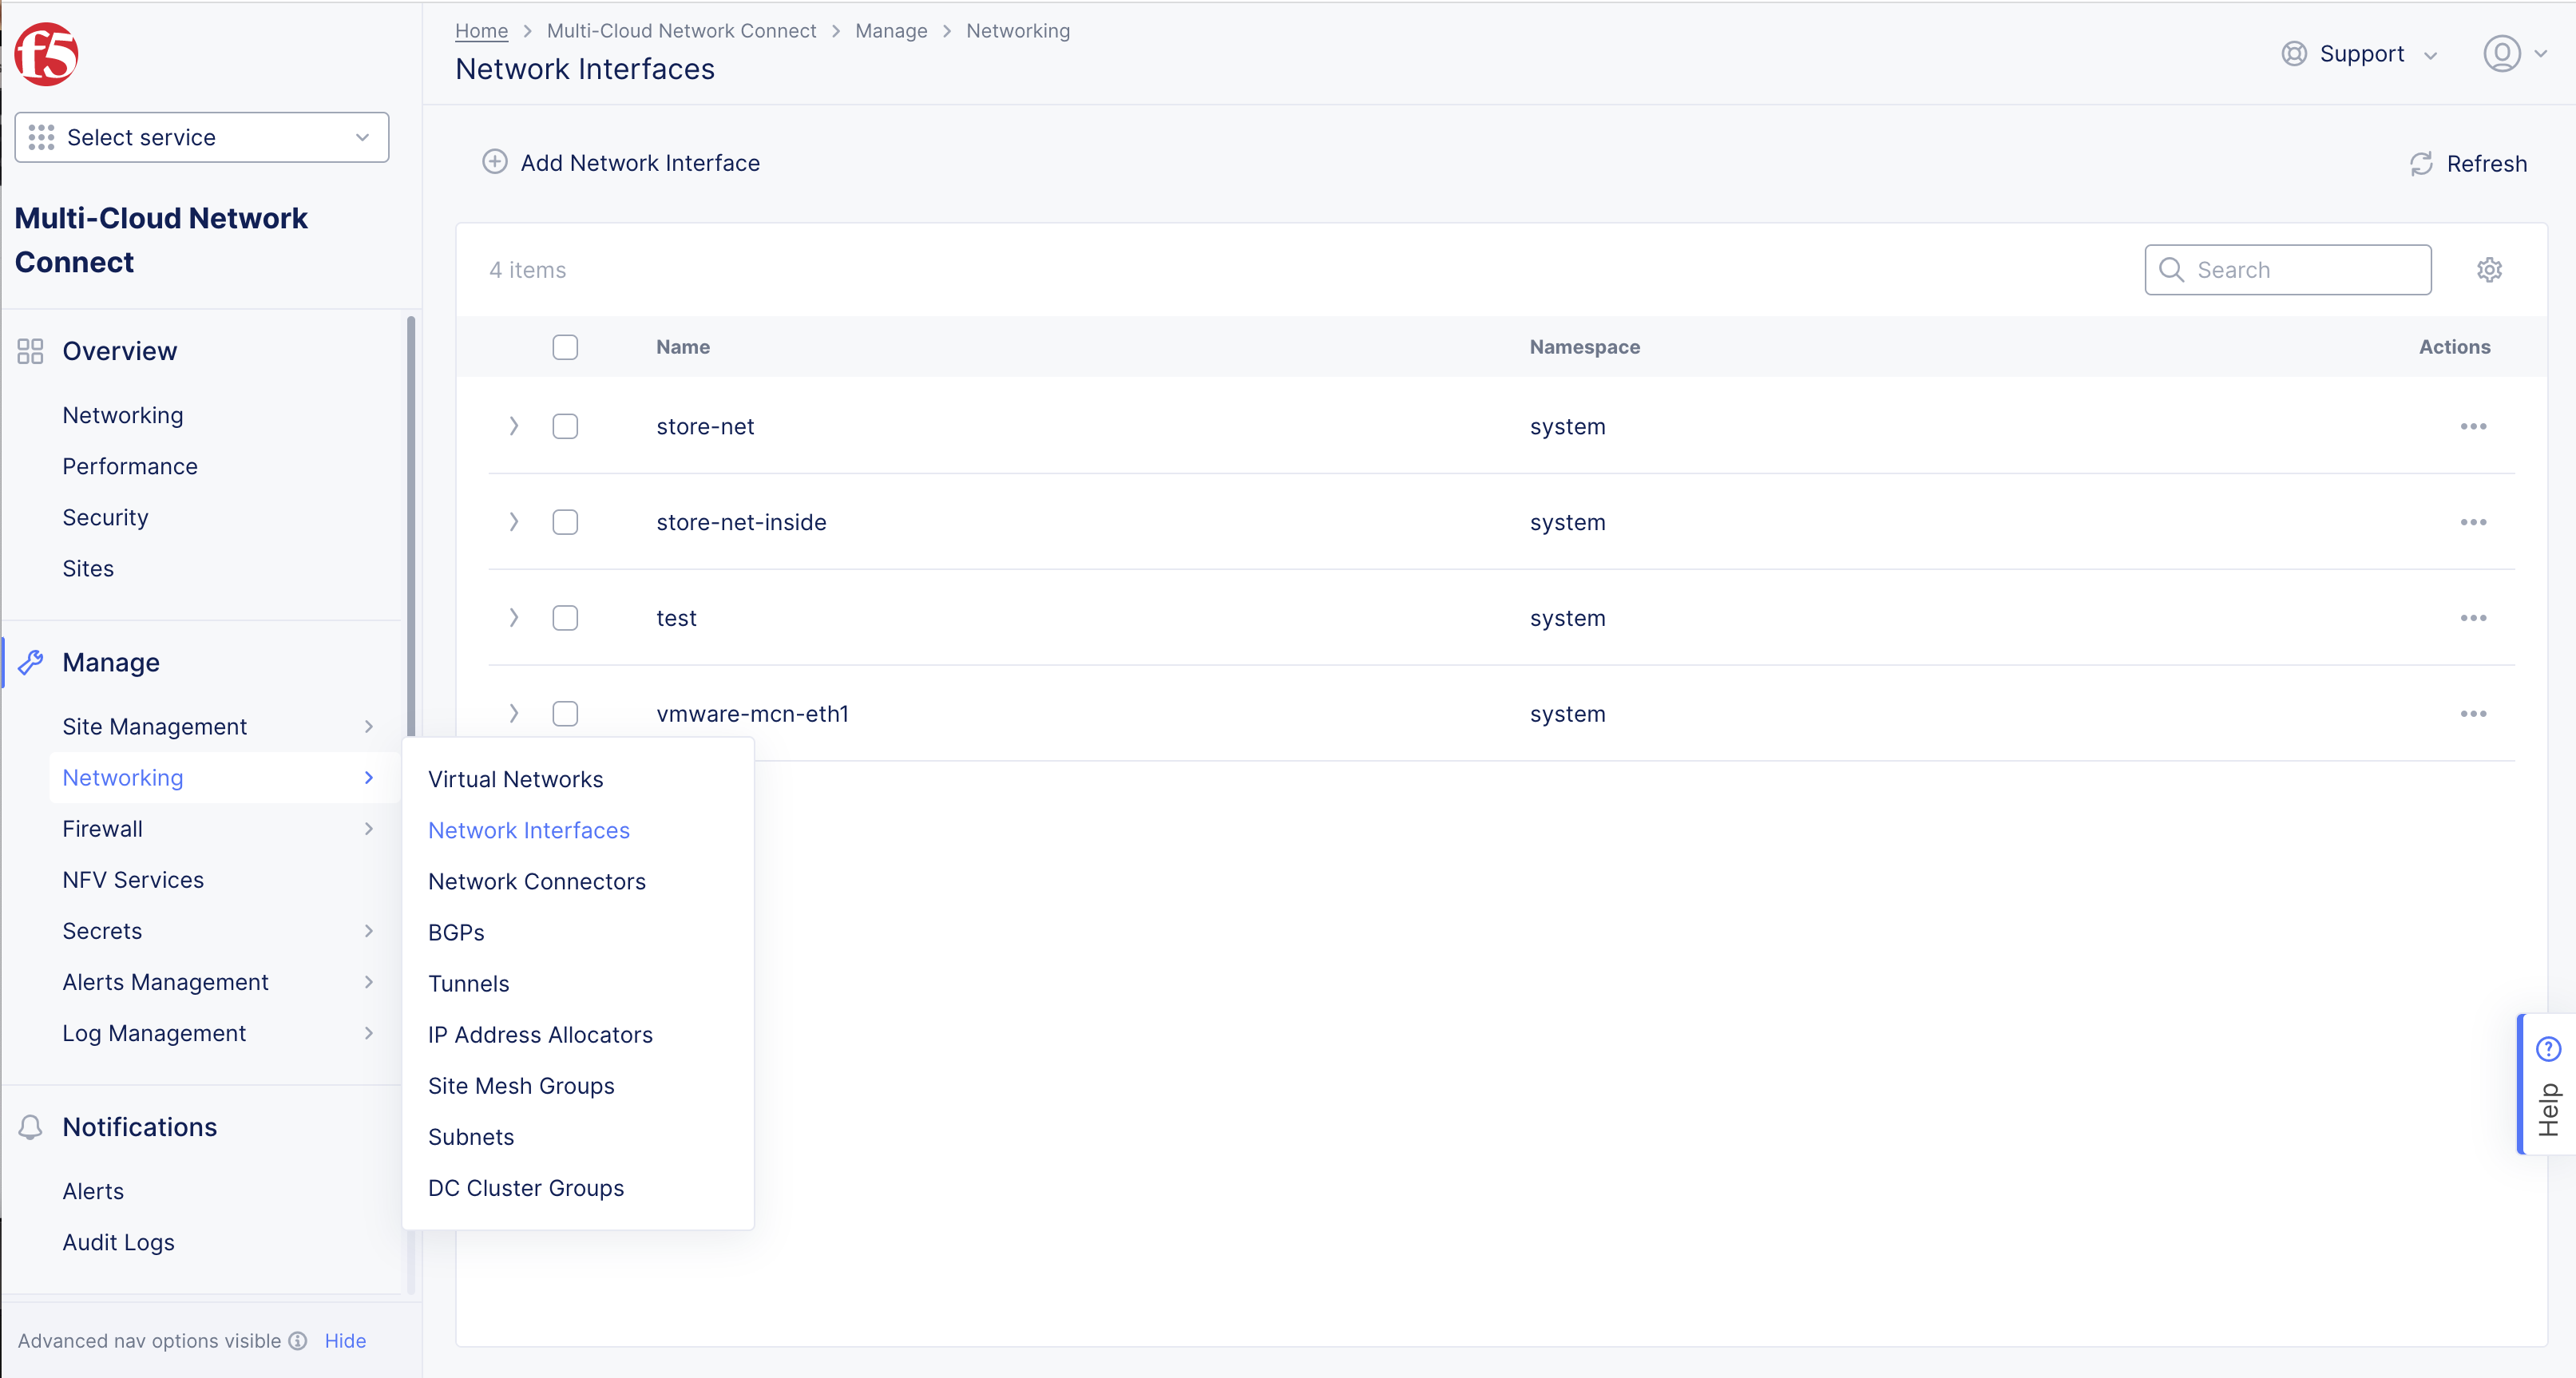
Figure: VLAN
-
Enter
Name. -
Enter
LabelsandDescriptionas needed.
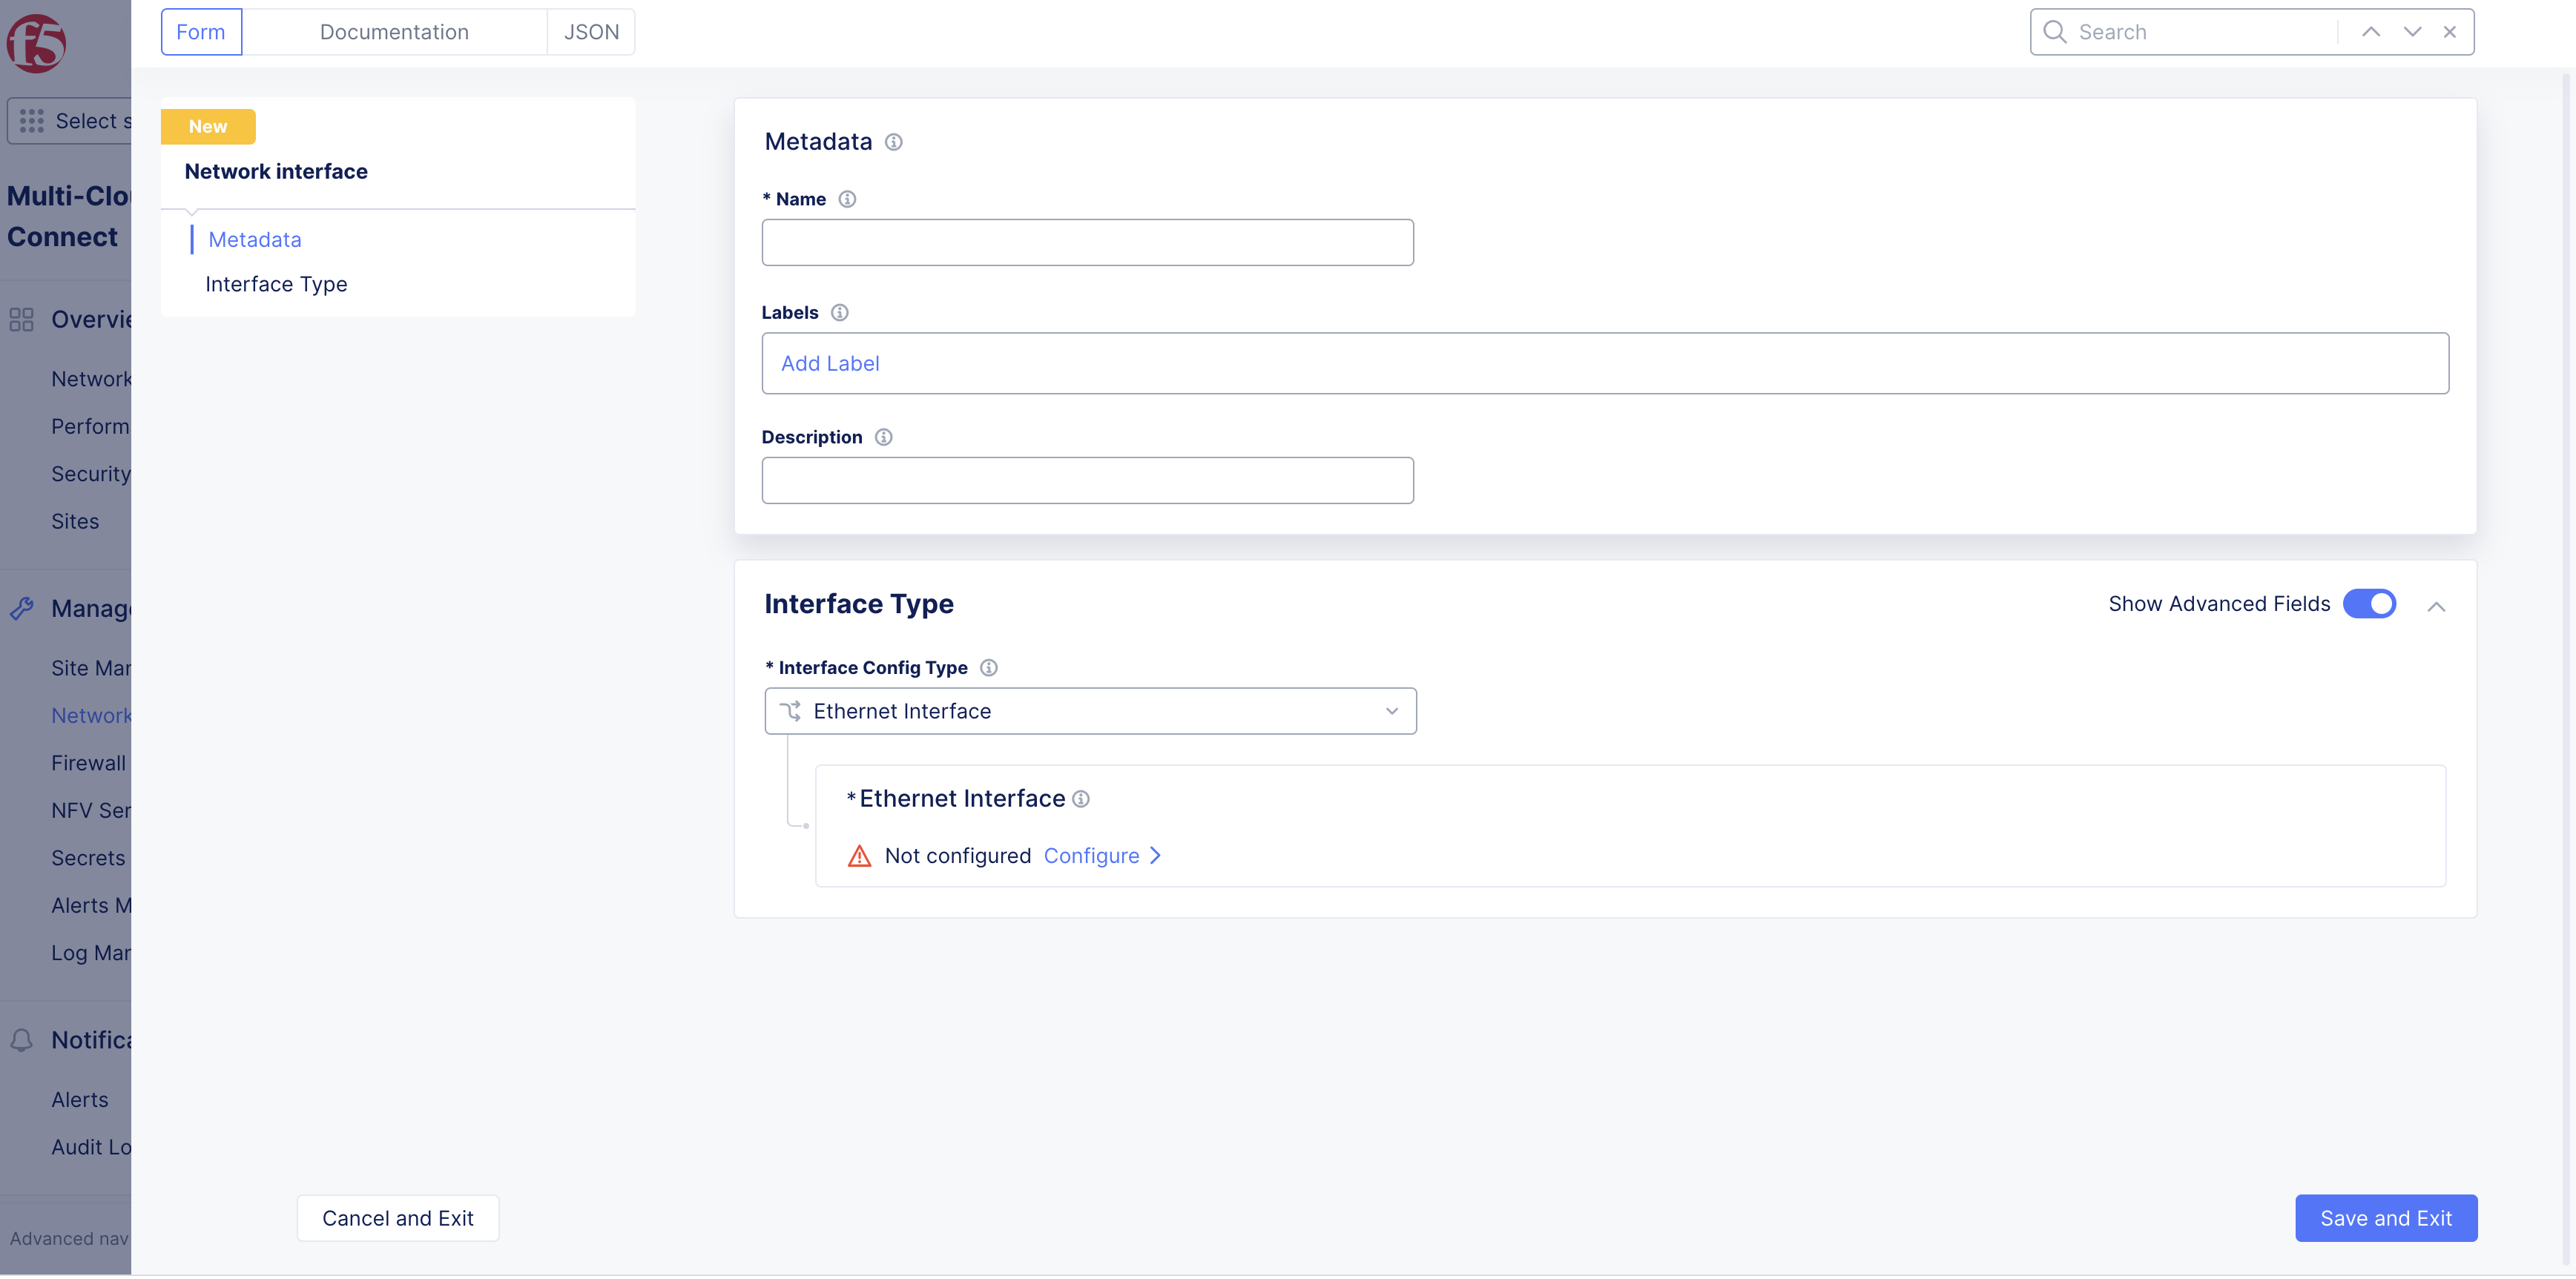
Figure: VLAN
-
Select
Interface Config Typedrop-down menu option: -
Select
Layer2 Interface.
Note: Toggle
Show Advanced Fieldsto showTunnel Interfaceif needed.
-
Select
Layer2 Interface Typedrop-down menu. -
Select
VLAN InterfaceinLayer2 Interface Typedrop-down menu. -
Enter
Ethernet Device. -
Enter
VLAN Id. -
Select
Save and Exitbutton.
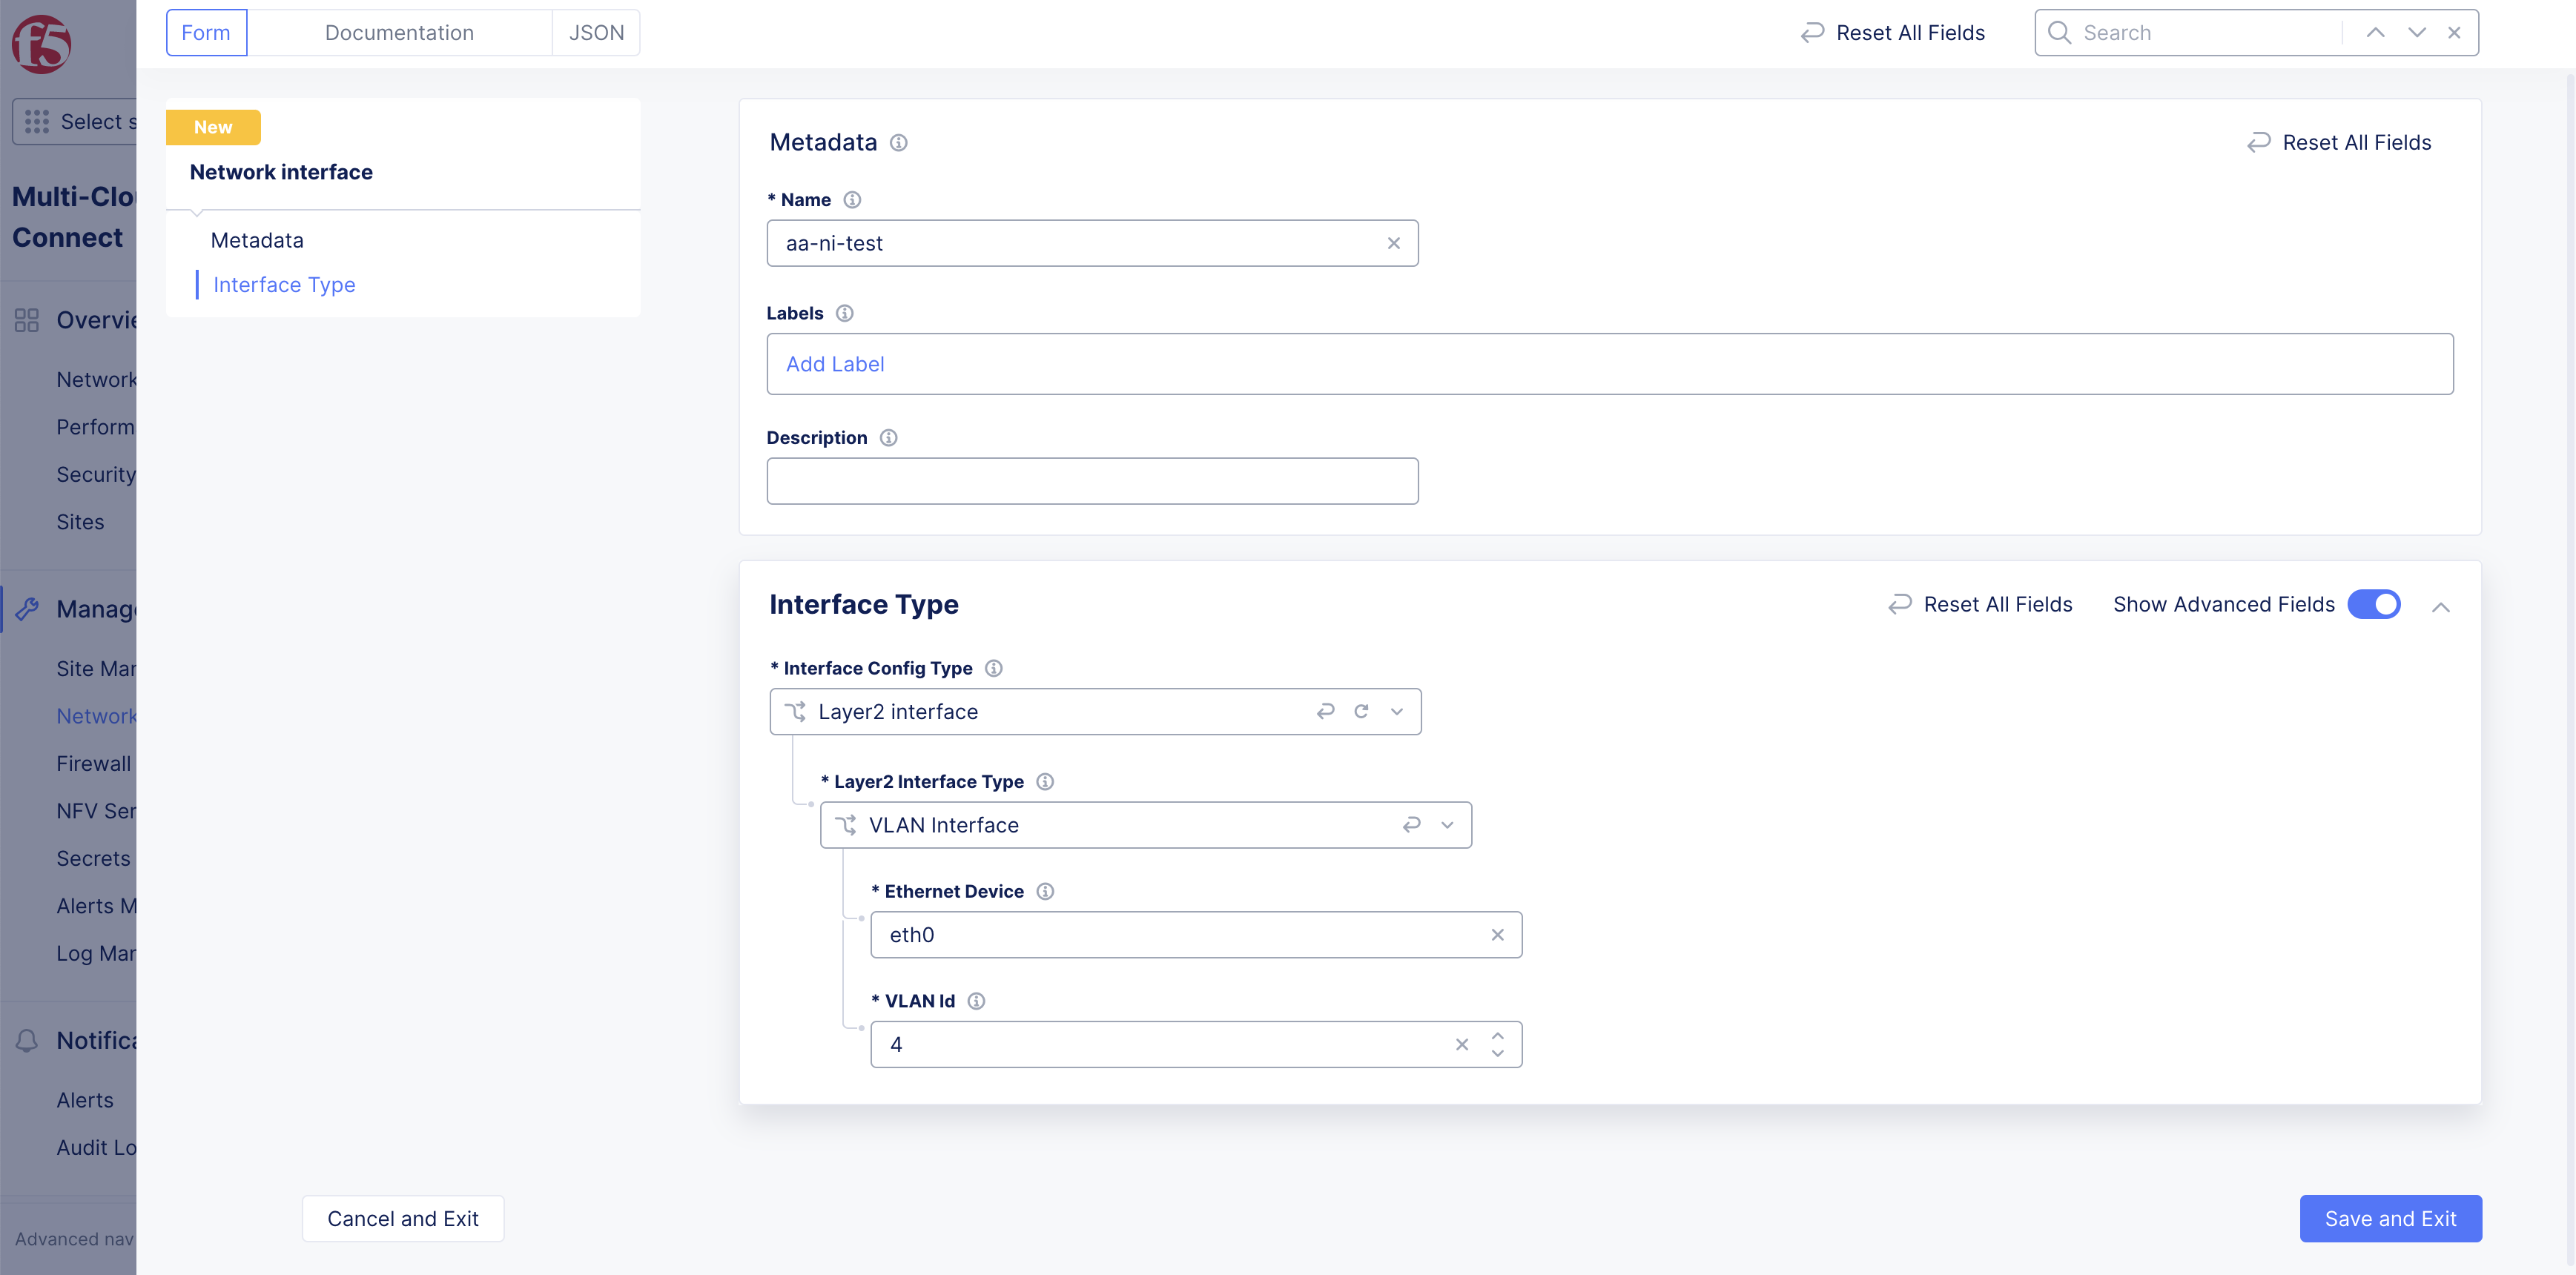
Figure: VLAN
Step 2: Setup Subnet to connect to underlay VLAN.
Note: Associate this Network interface with subnet object, so necessary Network attachment definition is created.
-
Update interface created above inside subnet object as specified in the screenshot.
-
In
Multi-Cloud Network Connect>Manage.
Figure: F5 Distributed Cloud Homepage
-
Select
Networking>Subnets. -
Select
+ Add Subnet.

Figure: VLAN
-
Enter
Name. -
Enter
LabelsandDescriptionas needed. -
Select
Network Connection Typedrop-down menu. -
Select
Connect to Layer2 Interfacedrop-down menu. -
Select
Layer2 Interface.
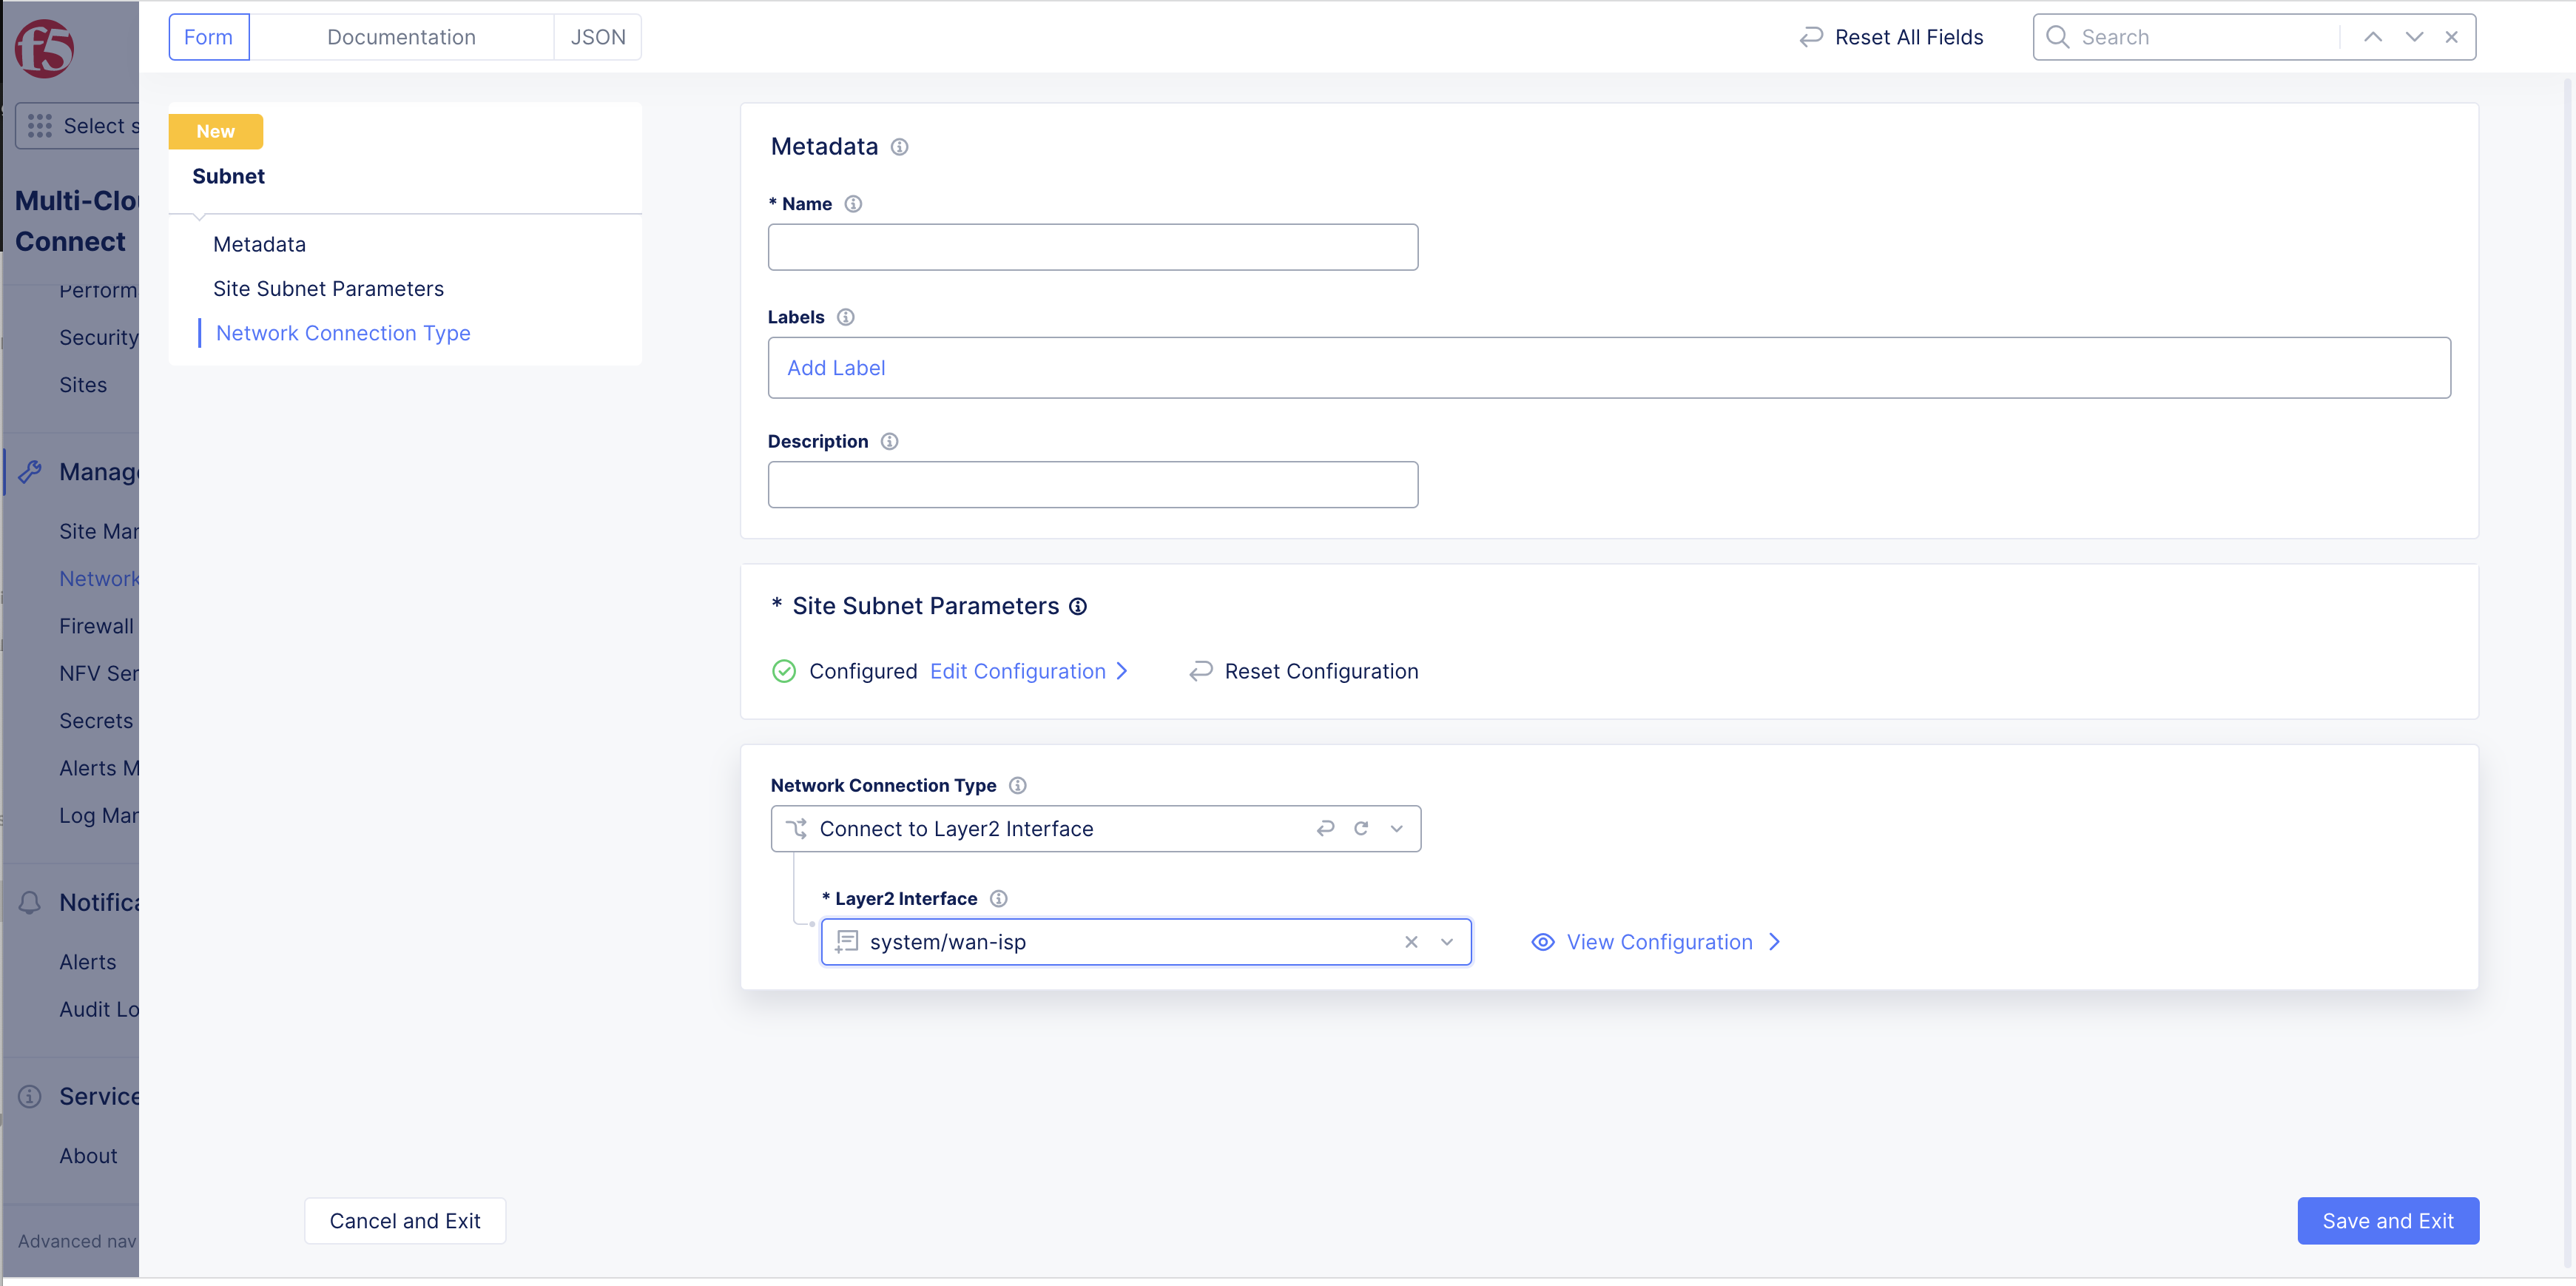
Figure: VLAN
Step 3: Attach Subject Object to a site.
Note: This step creates a network attachment definition that can be attached to VM in your Kubernetes cluster.
-
Select
Configurelink inSite Subnet Parametersbox. -
Select
Sitedrop-down menu. -
Select
Applybutton. -
Select
Save and Exitbutton.
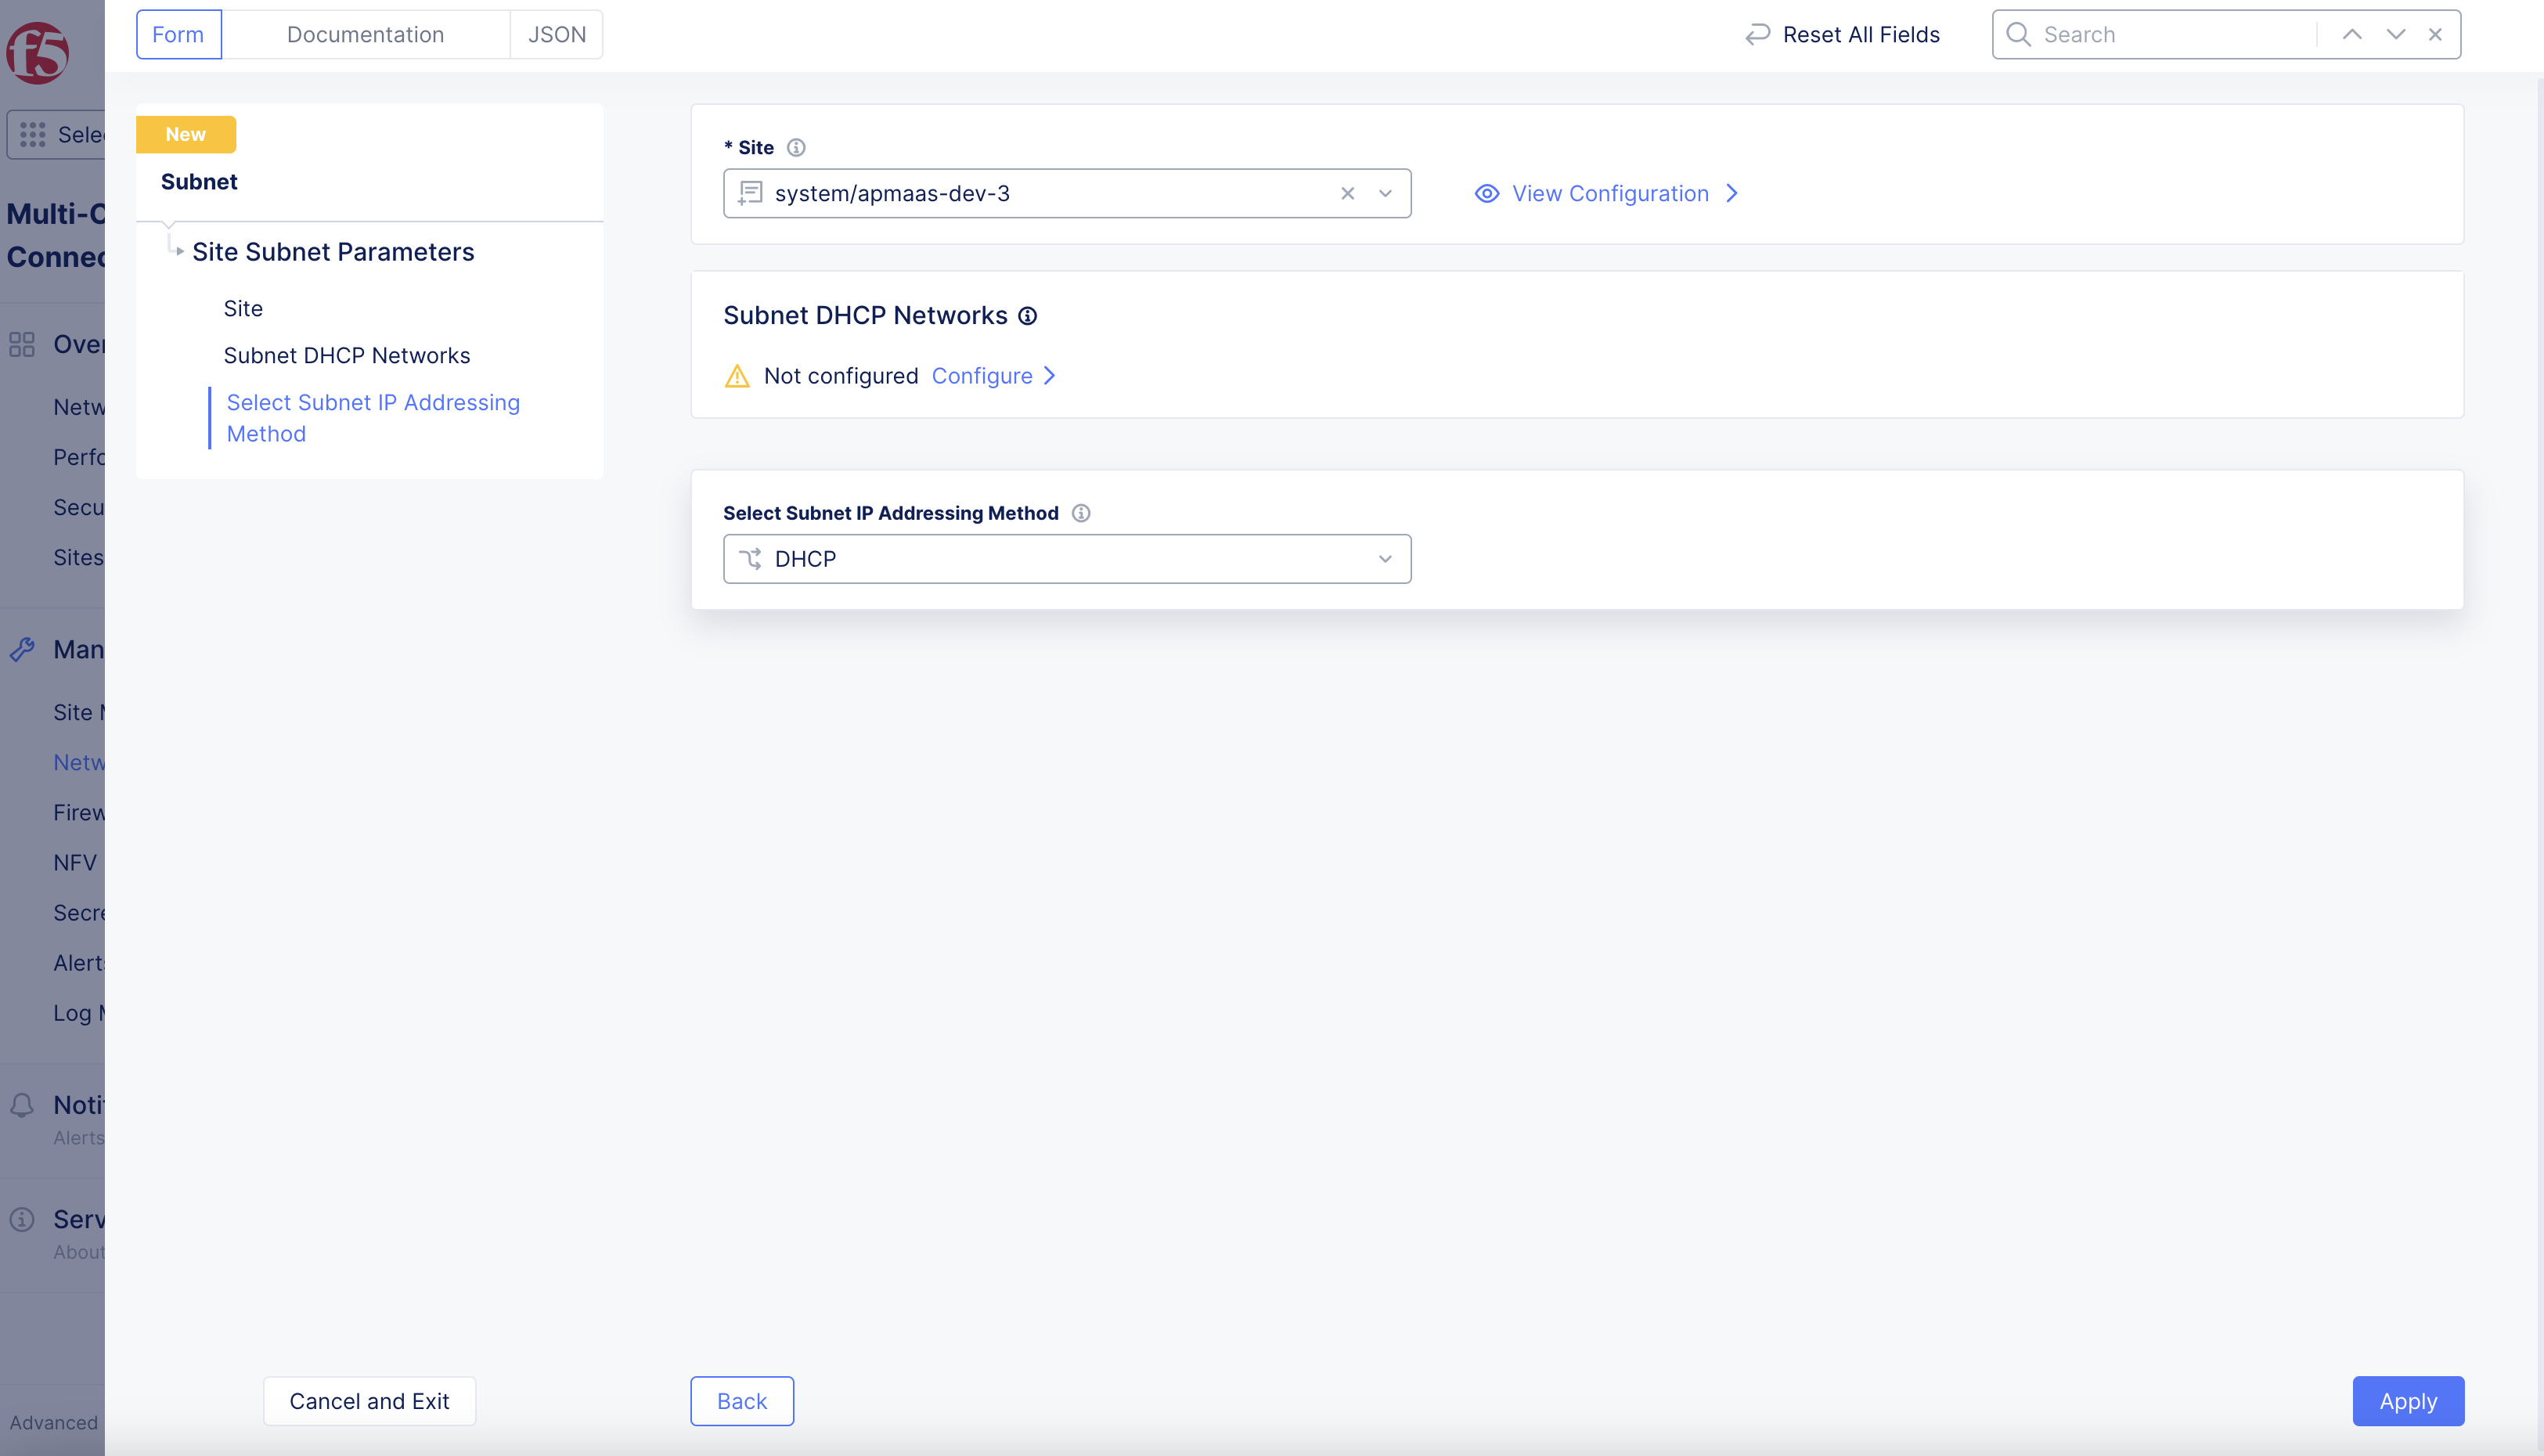
Figure: VLAN
Configuration
Perform the instructions presented in the following chapters to deploy and manage the BIG-IP APM service instances.
Setup BIG-IP AWS
Step 1: Obtain F5 Distributed Cloud BIG-IP APM subscription.
-
Open
F5 Distributed Cloud Console. -
Select
All Workspacesdrop-down menu under service boxes.
Note: Homepage is role based, and your homepage may look different due to your role customization. Select
All Workspacesdrop-down menu to discover all options. Customize Settings:Administration>Personal Management>My Account>Edit work domain & skillsbutton >Advancedbox > checkWork Domainboxes >Save changesbutton.
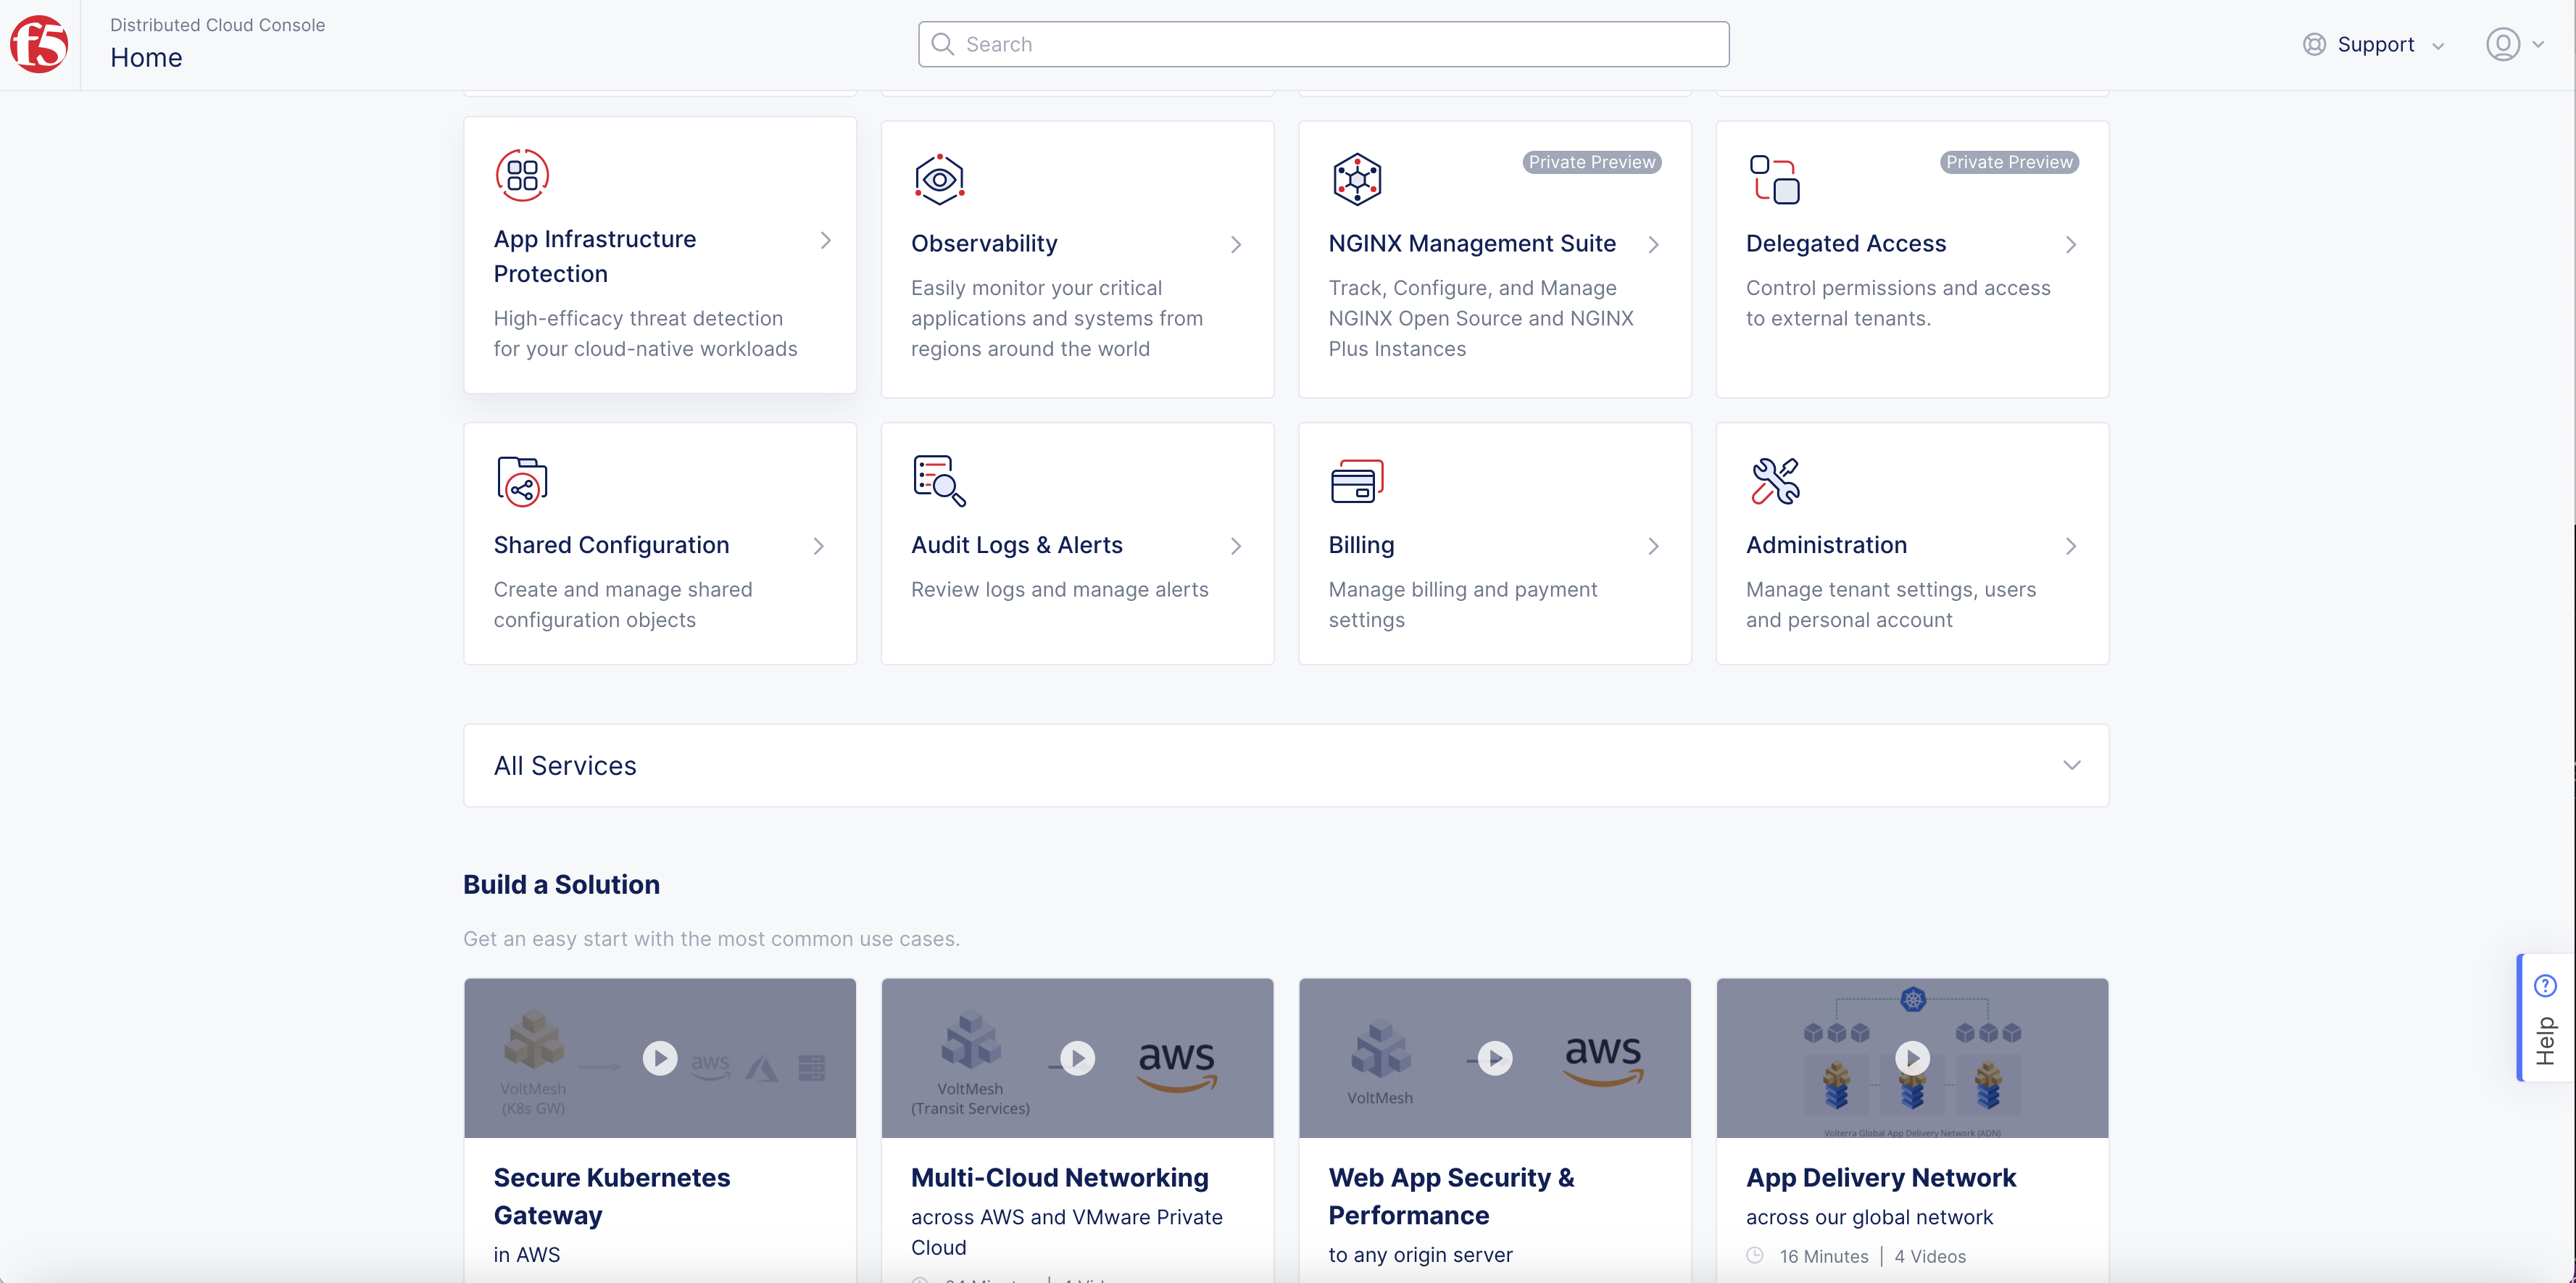
Figure: F5 Console All Services
- Select
BIG-IP APM.

Figure: F5 Console All Services BIG-IP APM
-
Select
Service Info>Aboutto learn more about BIG-IP APM service, and enable service. -
Request subscription via email provided on BIG-IP APM page.
-
You will get license keys required, and subscription will be enabled by F5.
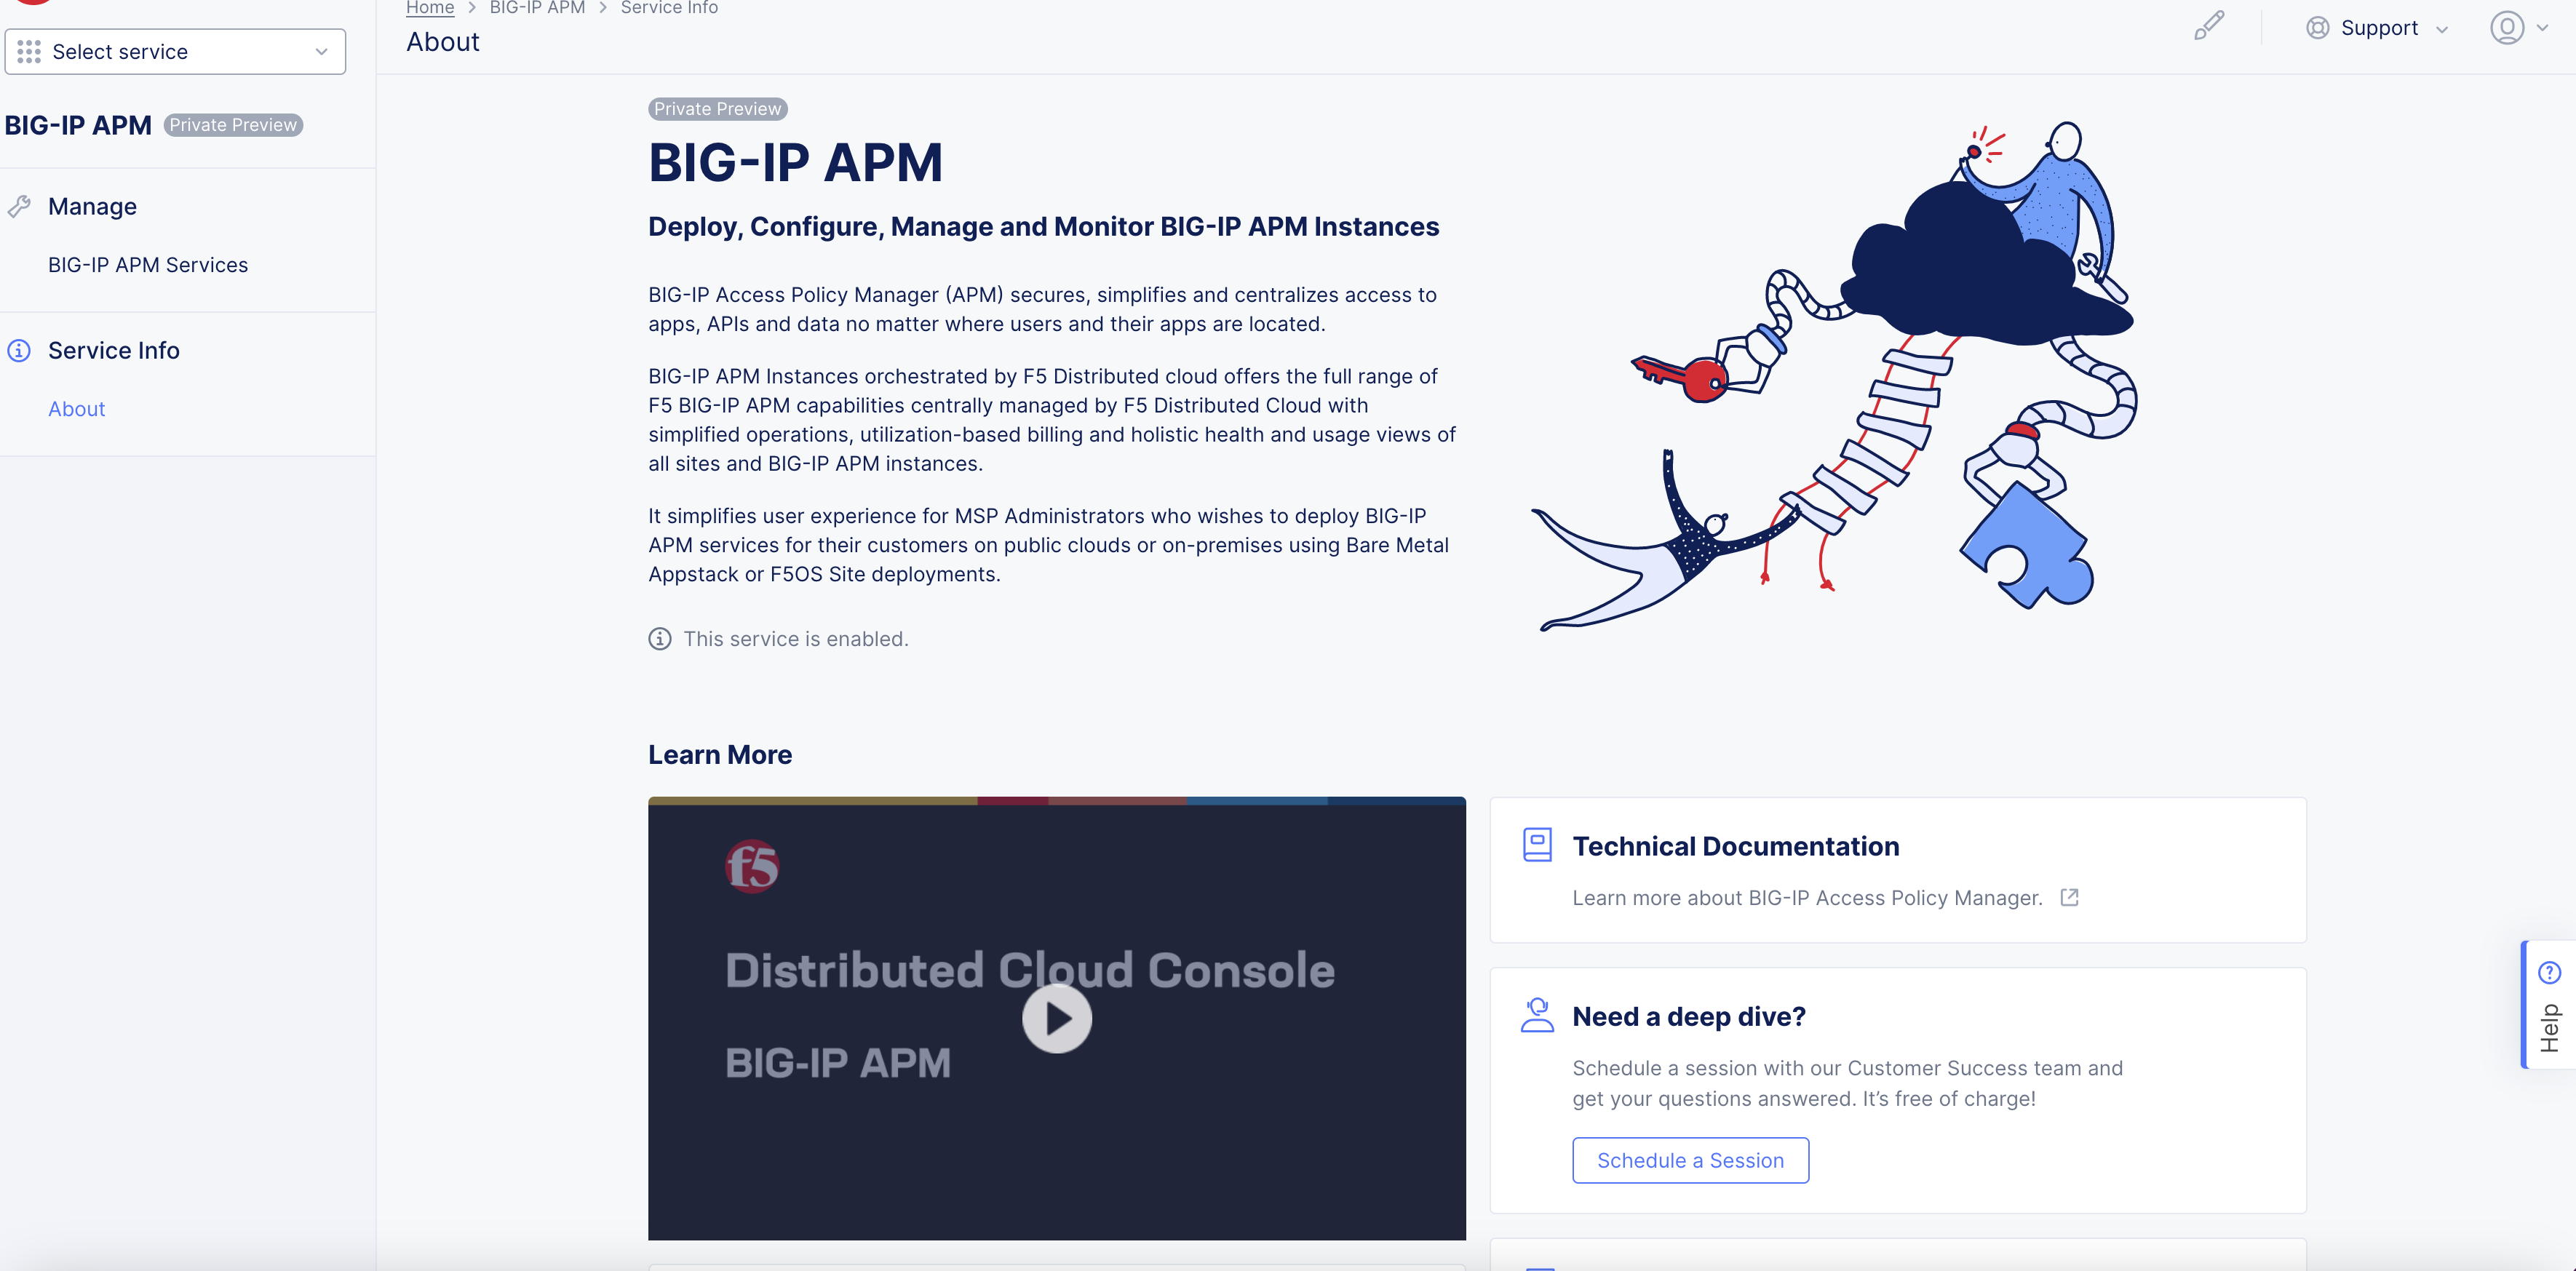
Figure: F5 Console BIG-IP APM
Step 2: Create APM Service.
Note: For full instructions refer to BIG-IP documentation, see BIG-IP APM Instance Configuration
-
In
BIG-IP APM> selectManage> selectBIG-IP APM Services. -
Select
+ Add BIG-IP APM Servicebutton.
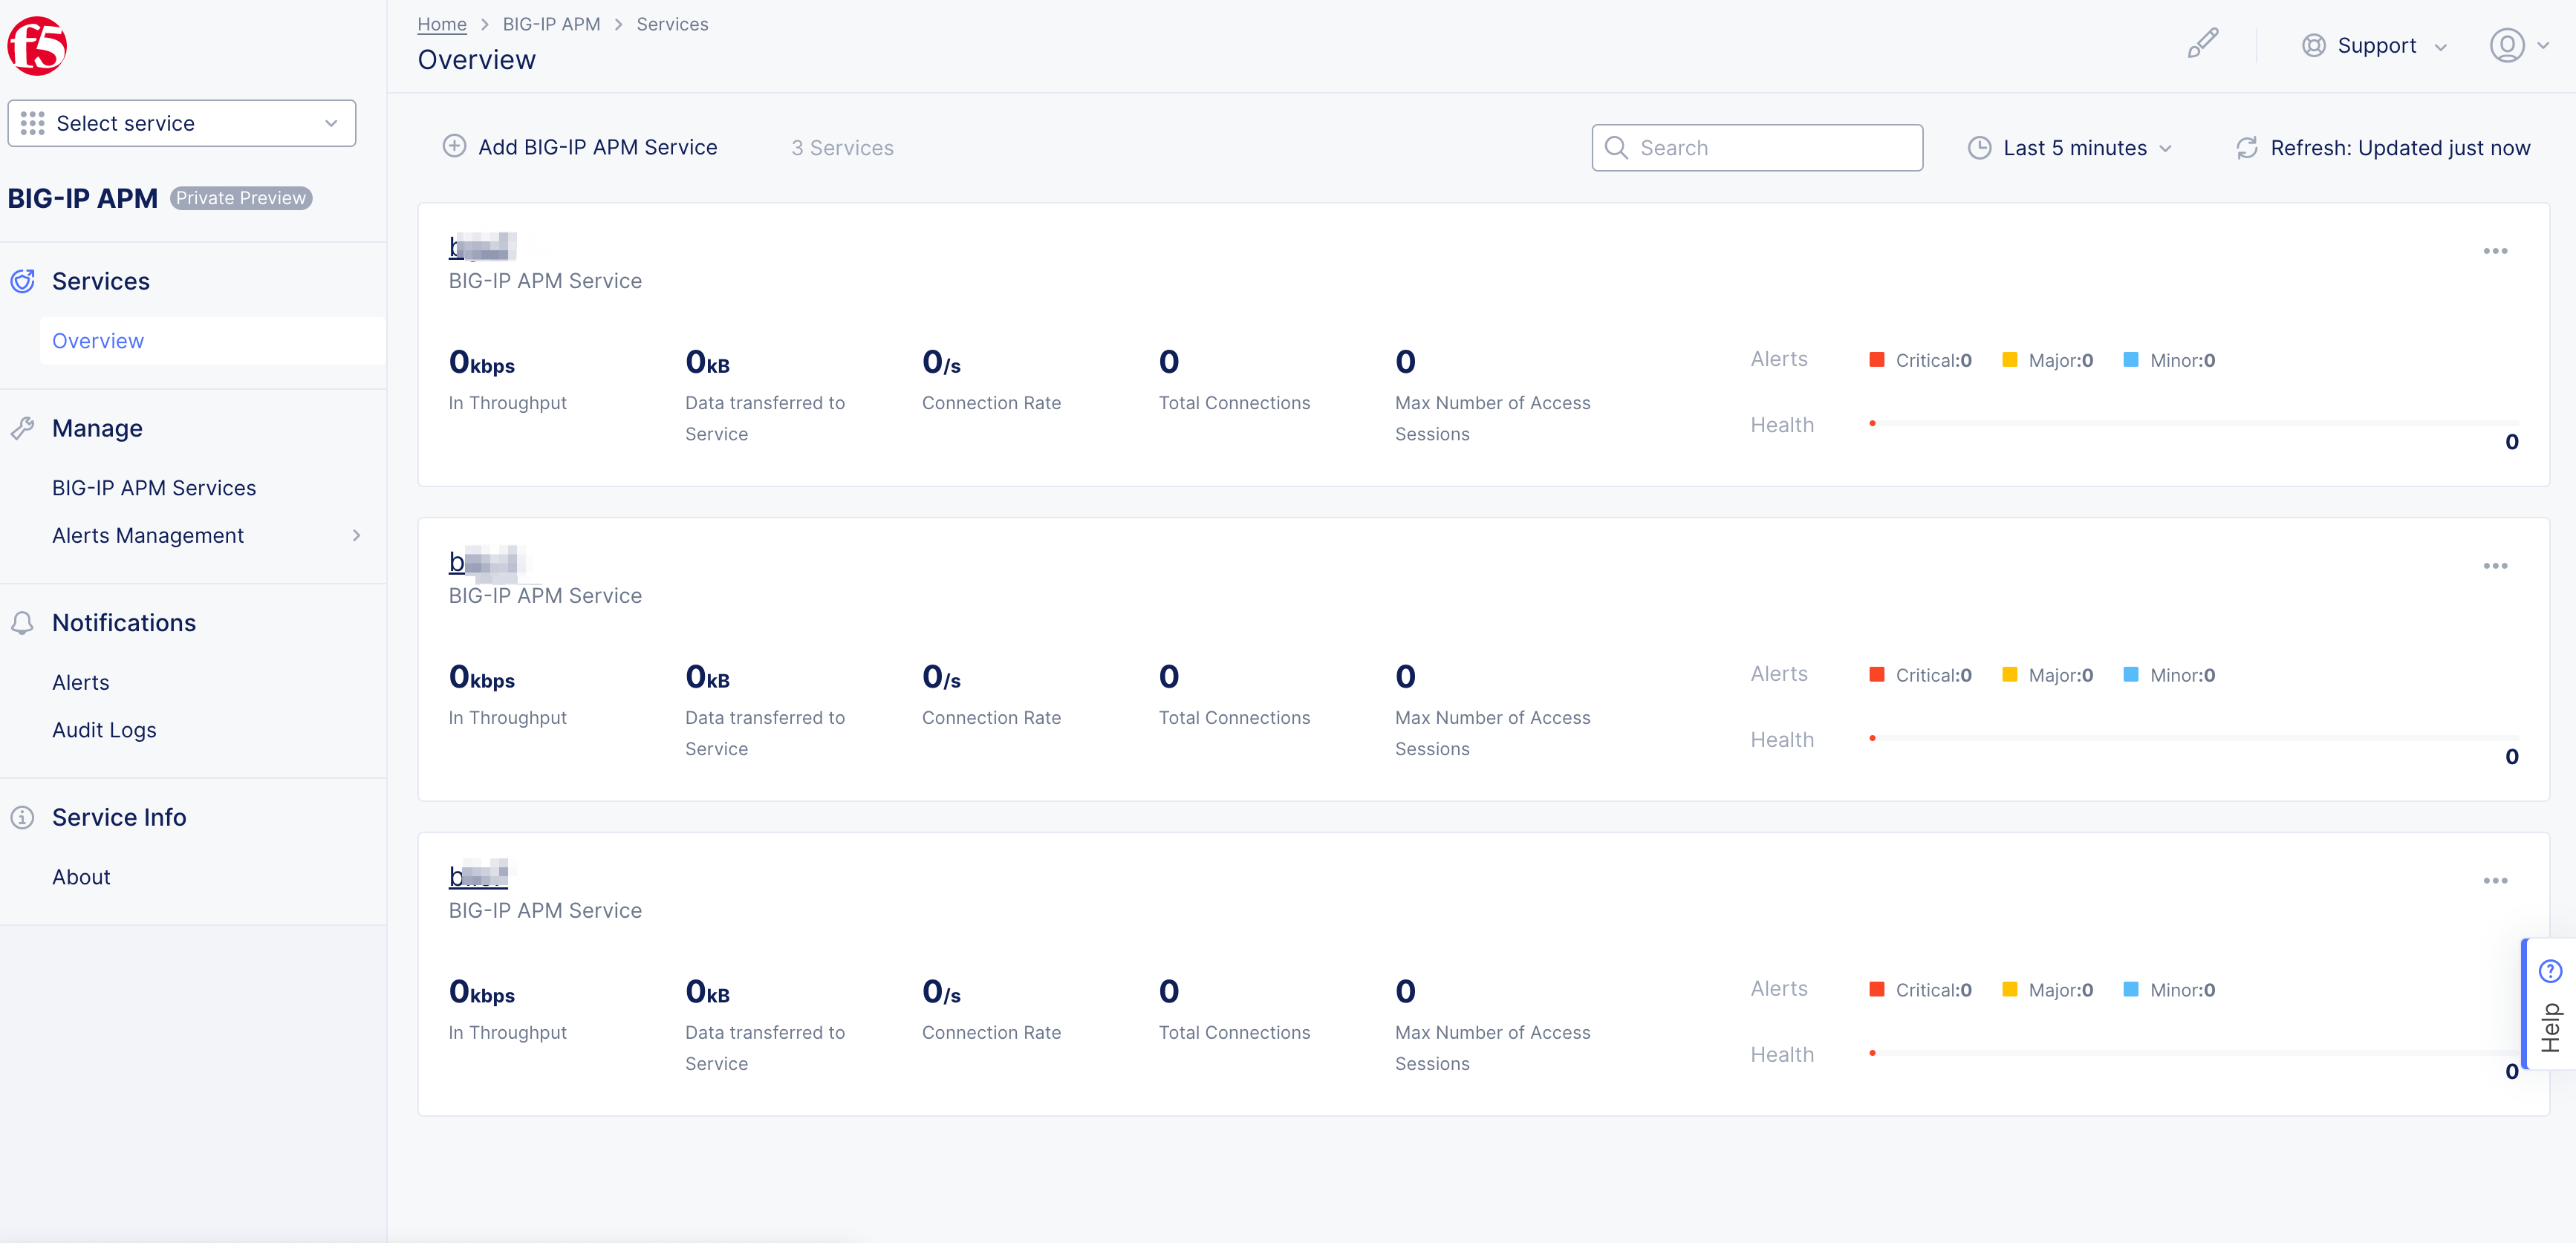
Figure: BIG-IP APM Service
-
Enter
Name. -
Enter
LabelsandDescriptionas needed.
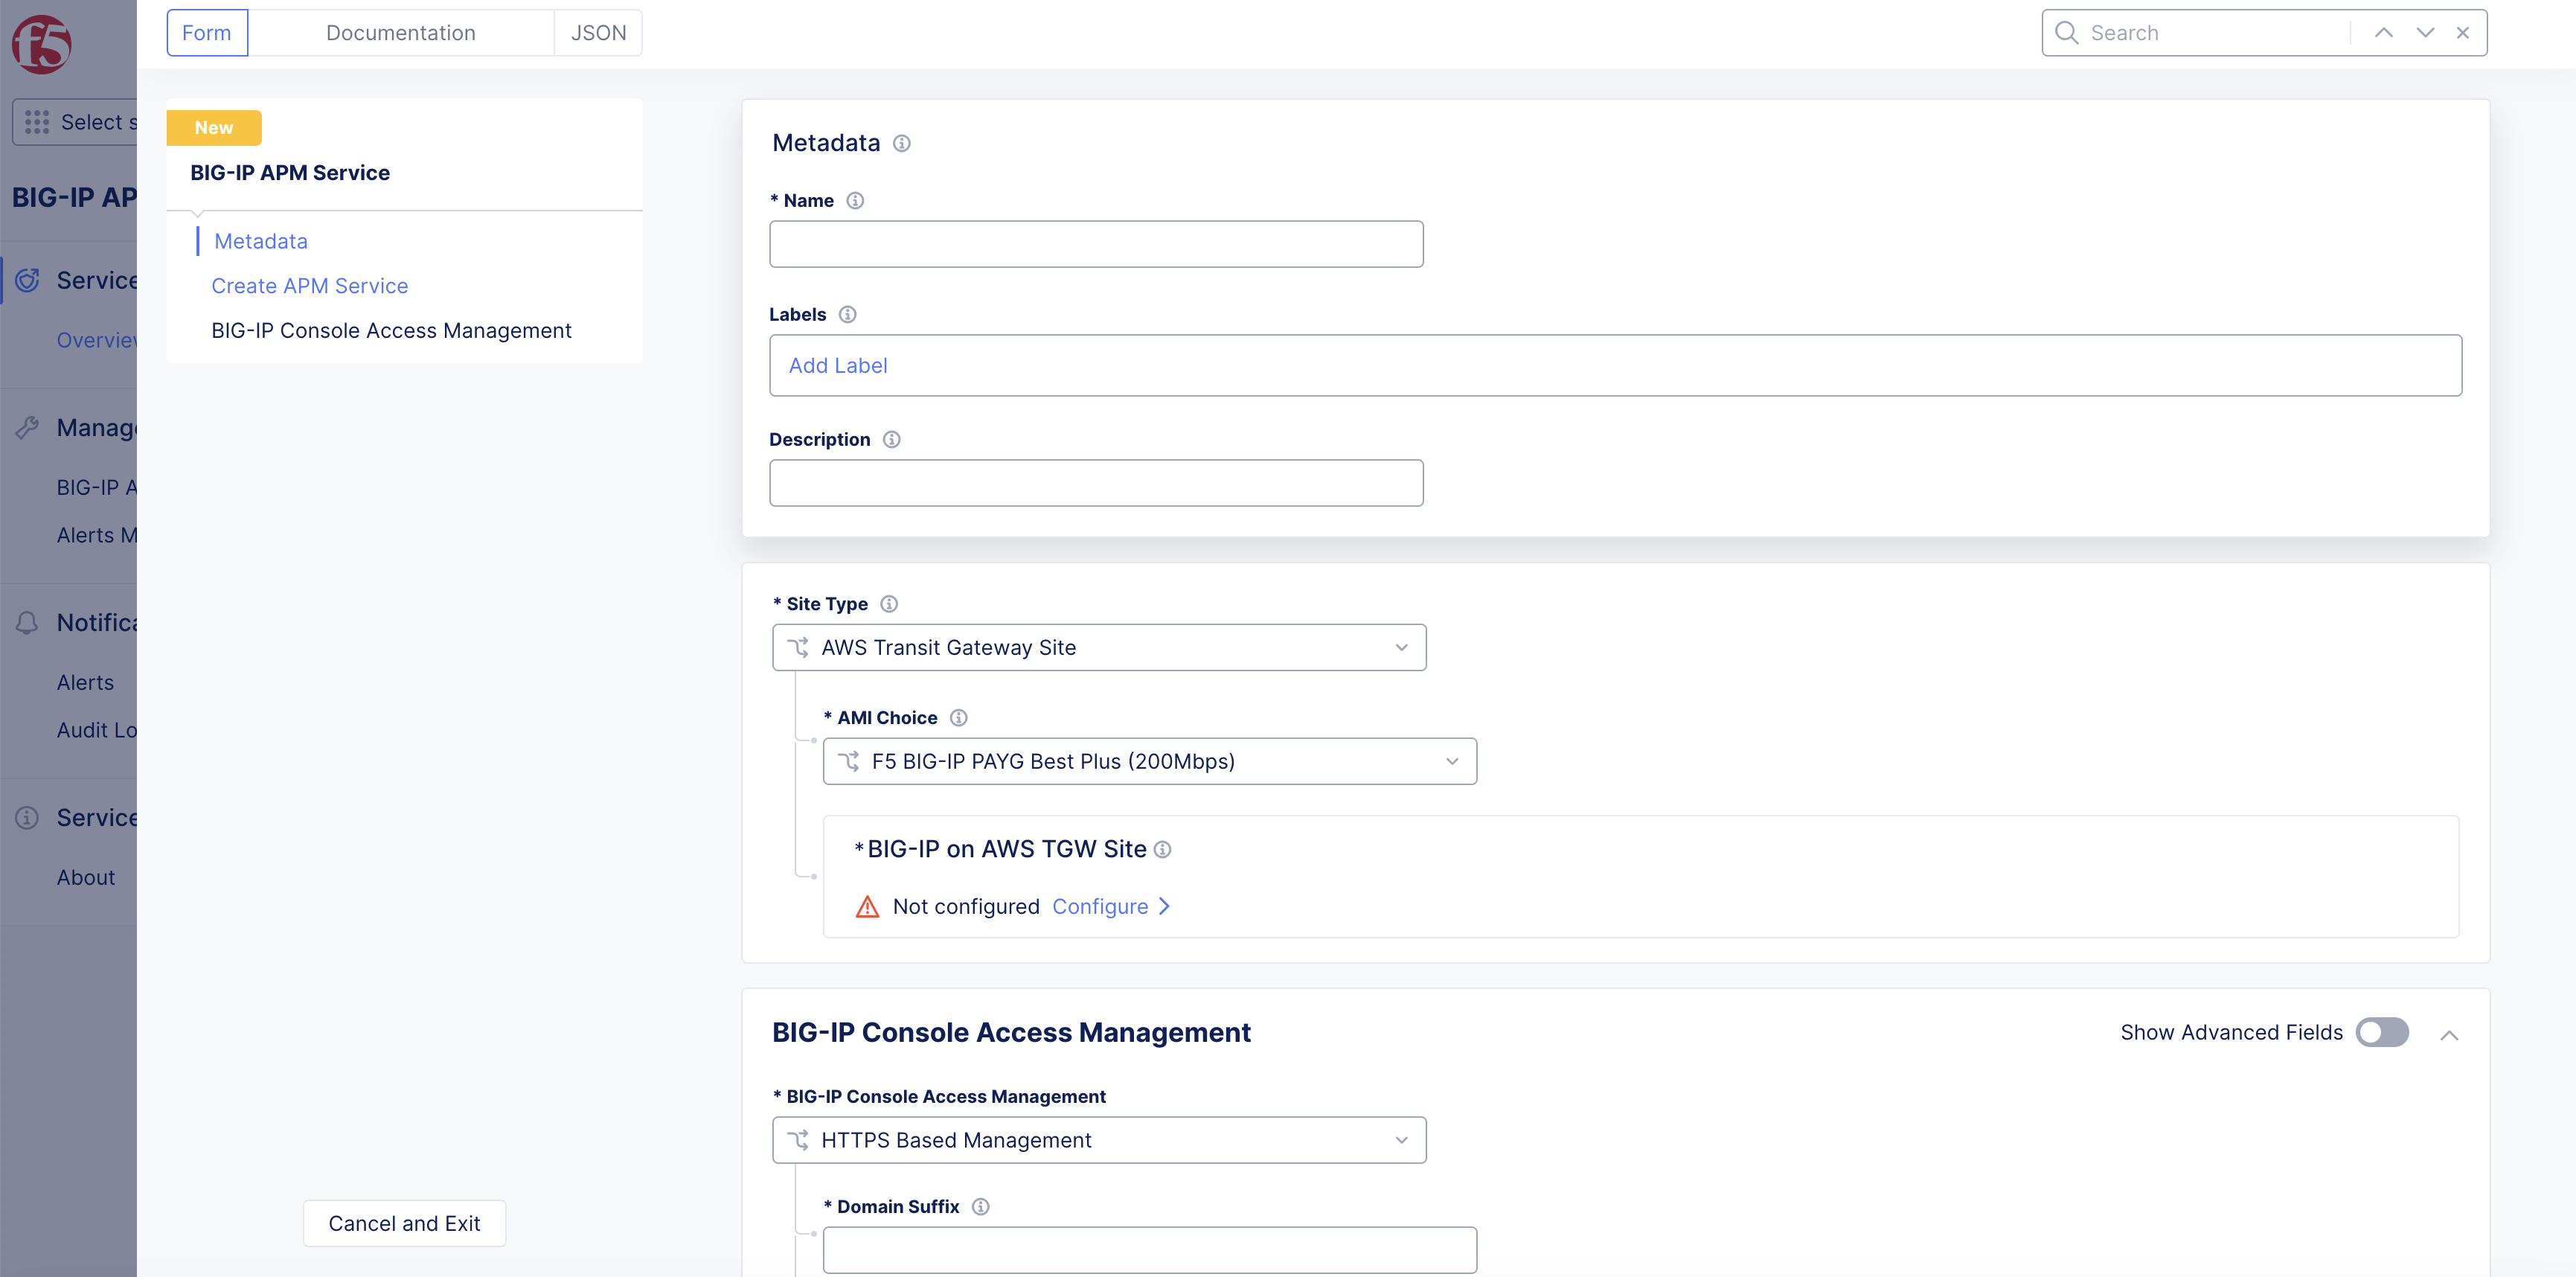
Figure: BIG-IP APM
Step 3: Setup Virtual F5 BIG-IP AWS.
-
Select
Site Typedrop-down menu. -
Select
AWS Transit Gateway Siteoption.

Figure: BIG-IP APM
-
Select
AMI Choicedrop-down menu. -
Select
Configurelink inBIG-IP on AWS TGW Sitebox.
Figure: BIG-IP APM
-
Select
AWS Transit Gateway Sitedrop-down menu. -
Enter
Admin Username. -
Enter your SSH key in
Public SSH Keybox. -
Select
Configurelink inAdmin Passwordbox.
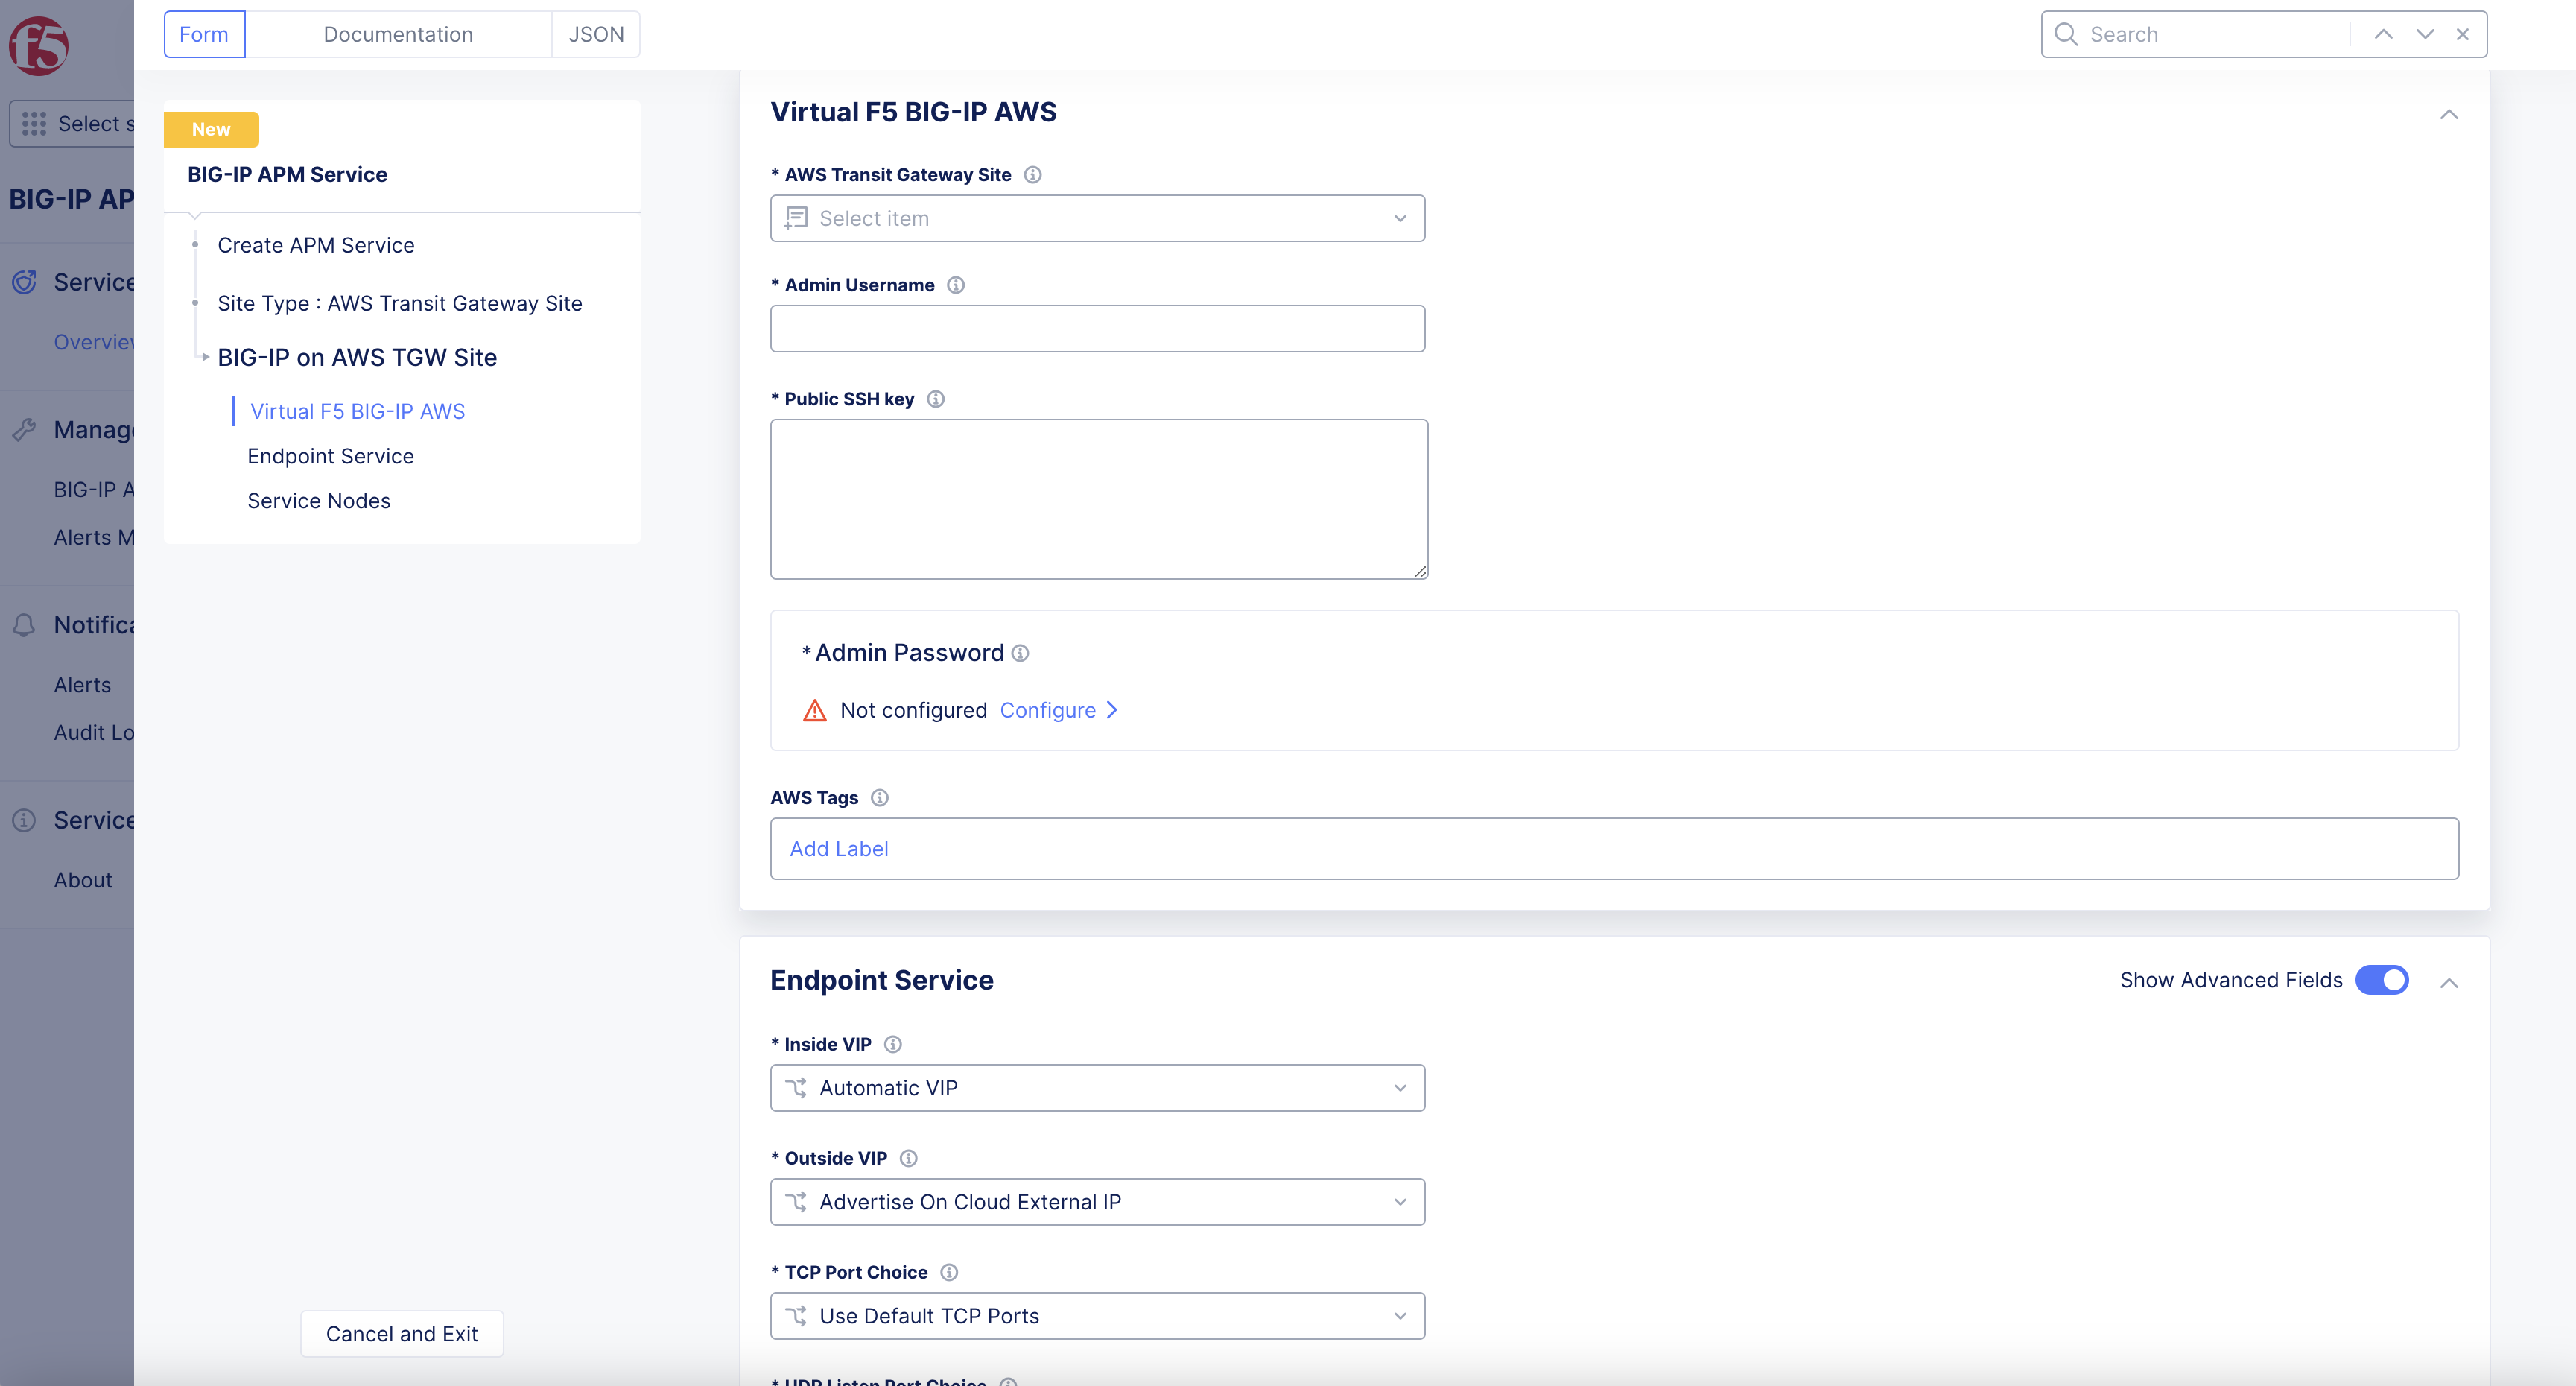
Figure: BIG-IP APM
-
Setup
Secret Type: -
Select
Secret Typedrop-down menu. -
Select
Actiondrop-down menu if needed. -
Select
Policy Typedrop-down menu if needed. -
Enter
Secret to BlindfoldorSecret. -
Select
Applybutton, and wait for the encryption to complete.
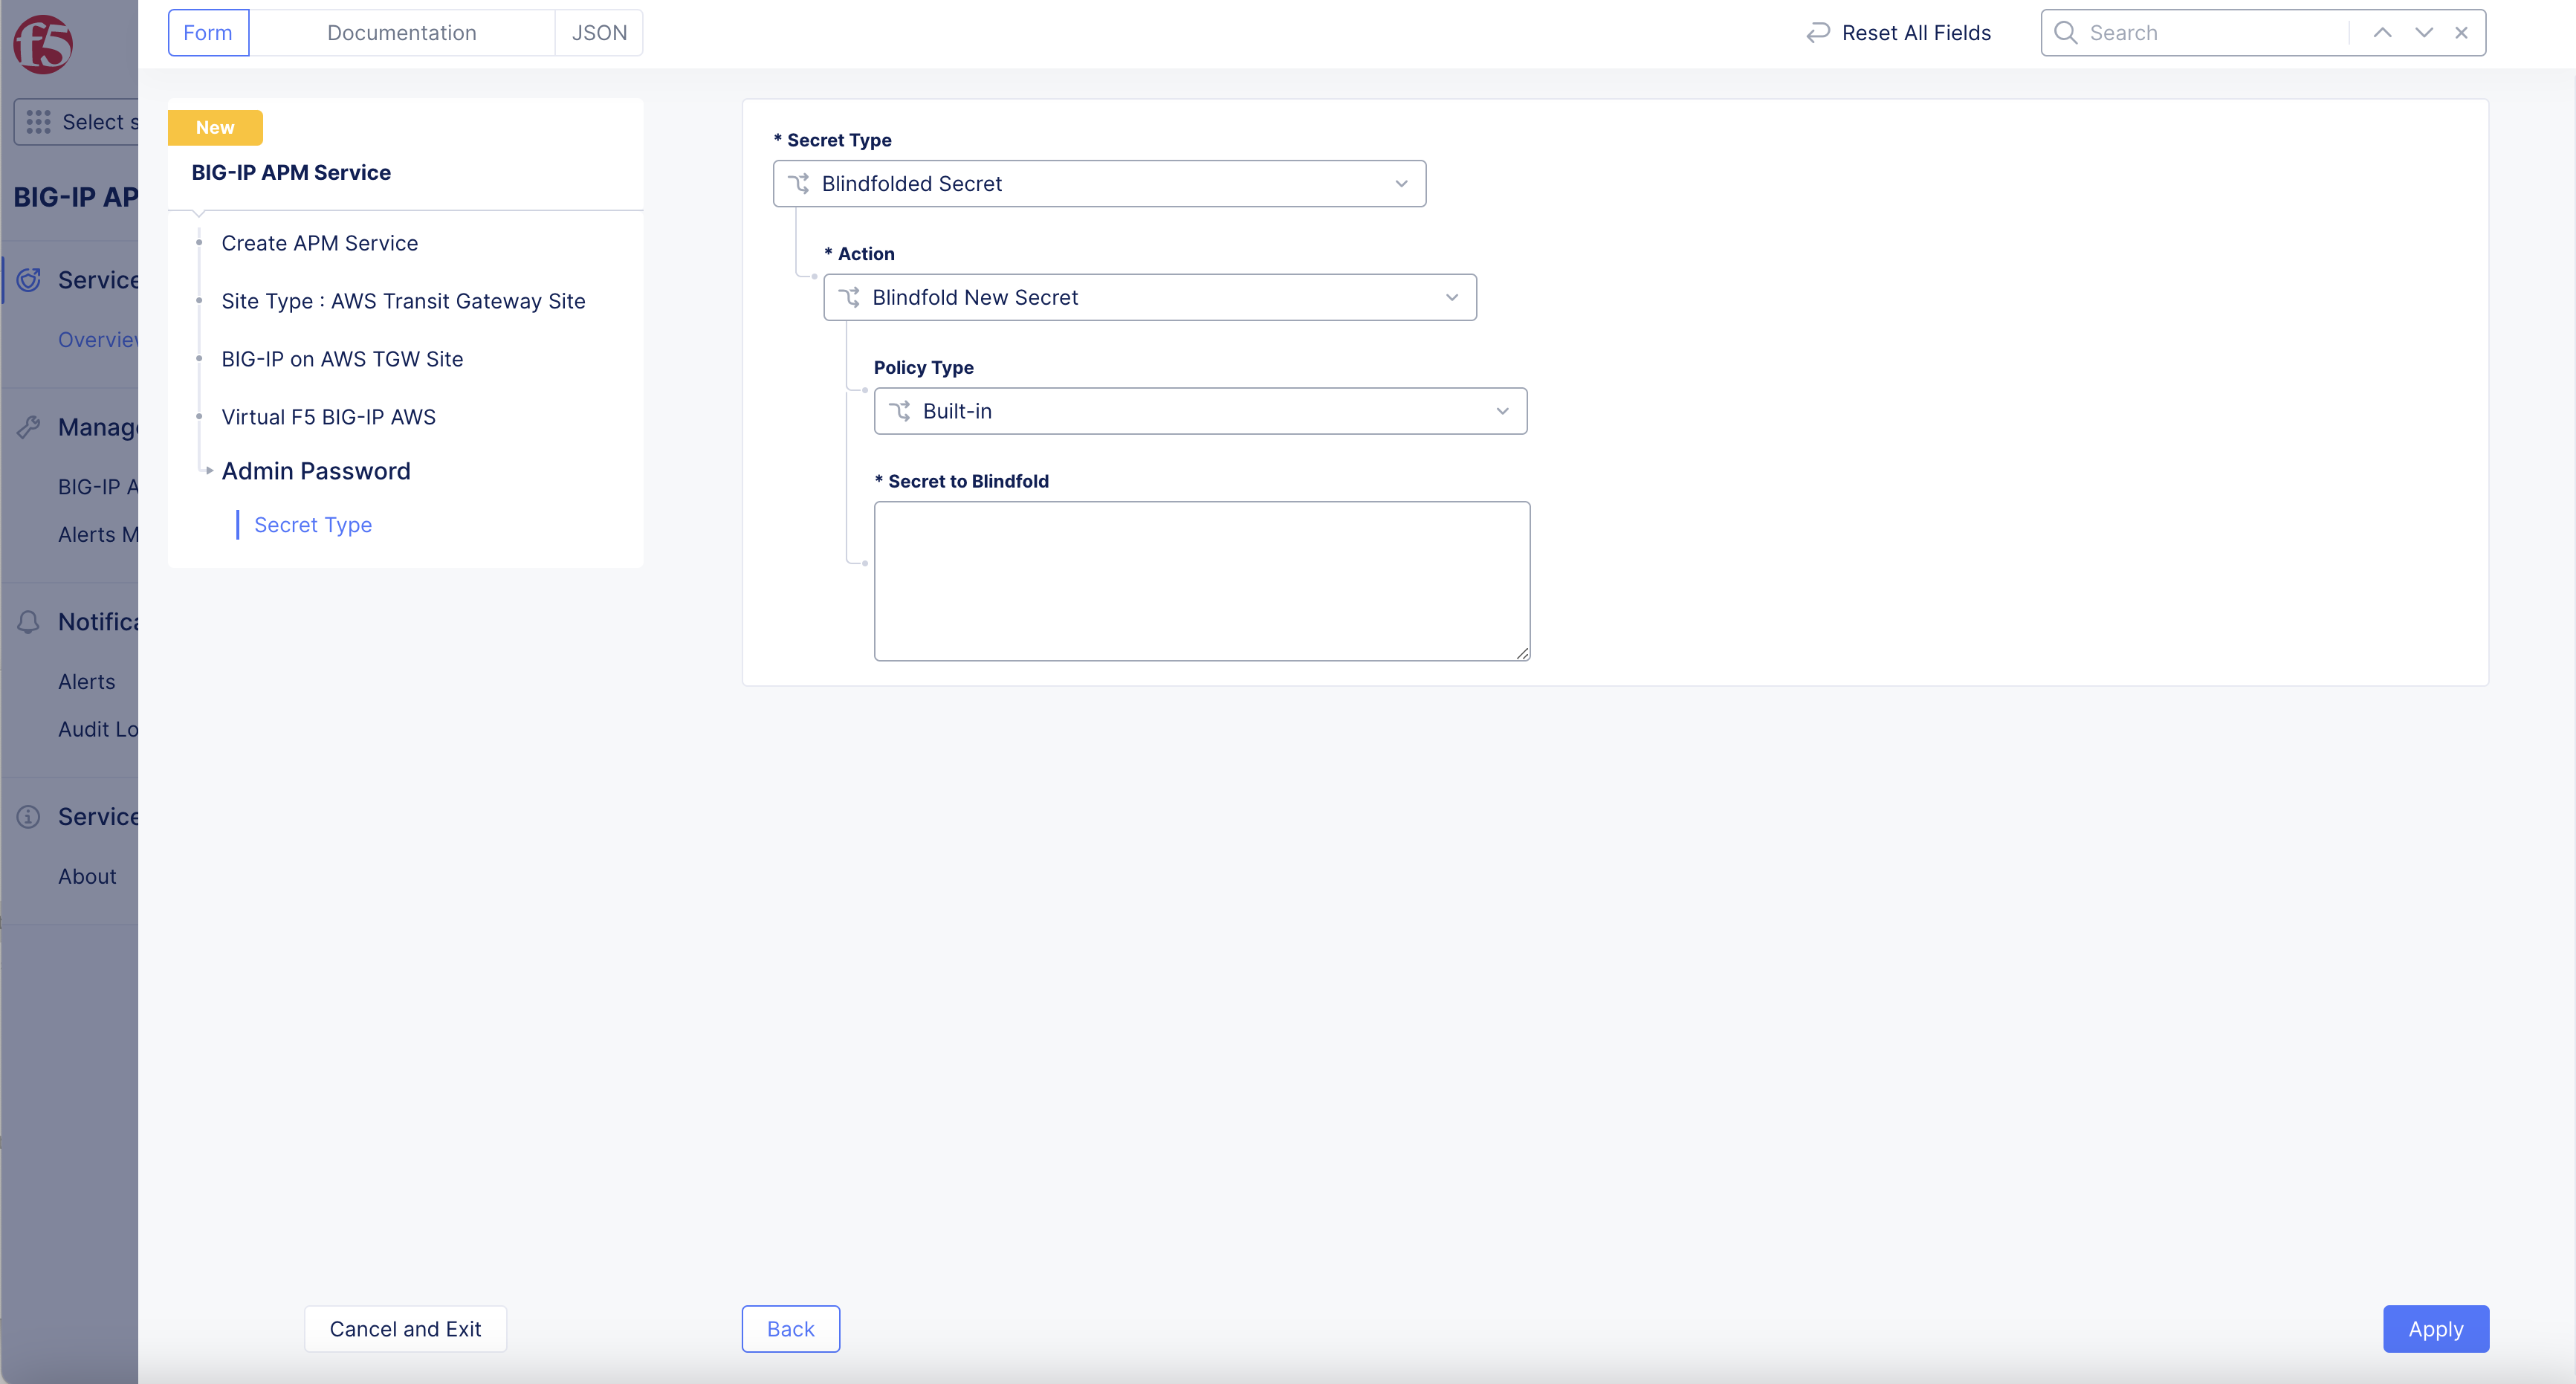
Figure: Encrypted Admin Password
Step 4: Setup Service Type.
-
Select
Inside VIPdrop-down menu inEndpoint Servicebox option:-
Automatic VIP: System automatically selects a VIP as inside VIP. This is also populated by default. -
Configured VIP: Enter an IP address for the default VIP in theConfigured VIPbox.
-
-
Select
Outside VIPdrop-down menu inEndpoint Servicebox option:-
Advertise On Cloud External IP: The cloud provider external IP is set as the VIP. This is default option. -
Disable outside VIP: No outside VIP is set. -
Advertise On Outside Network: Site local outside network address is set as VIP.
-
-
Toggle
Show Advanced Fieldsto showTCP Port ChoiceandUDP Listen Port Choiceoptions.
Note: For enabling both the East-West and North-South traffic, configure both inside VIP and outside VIP. See the Design section to understand the traffic paths.
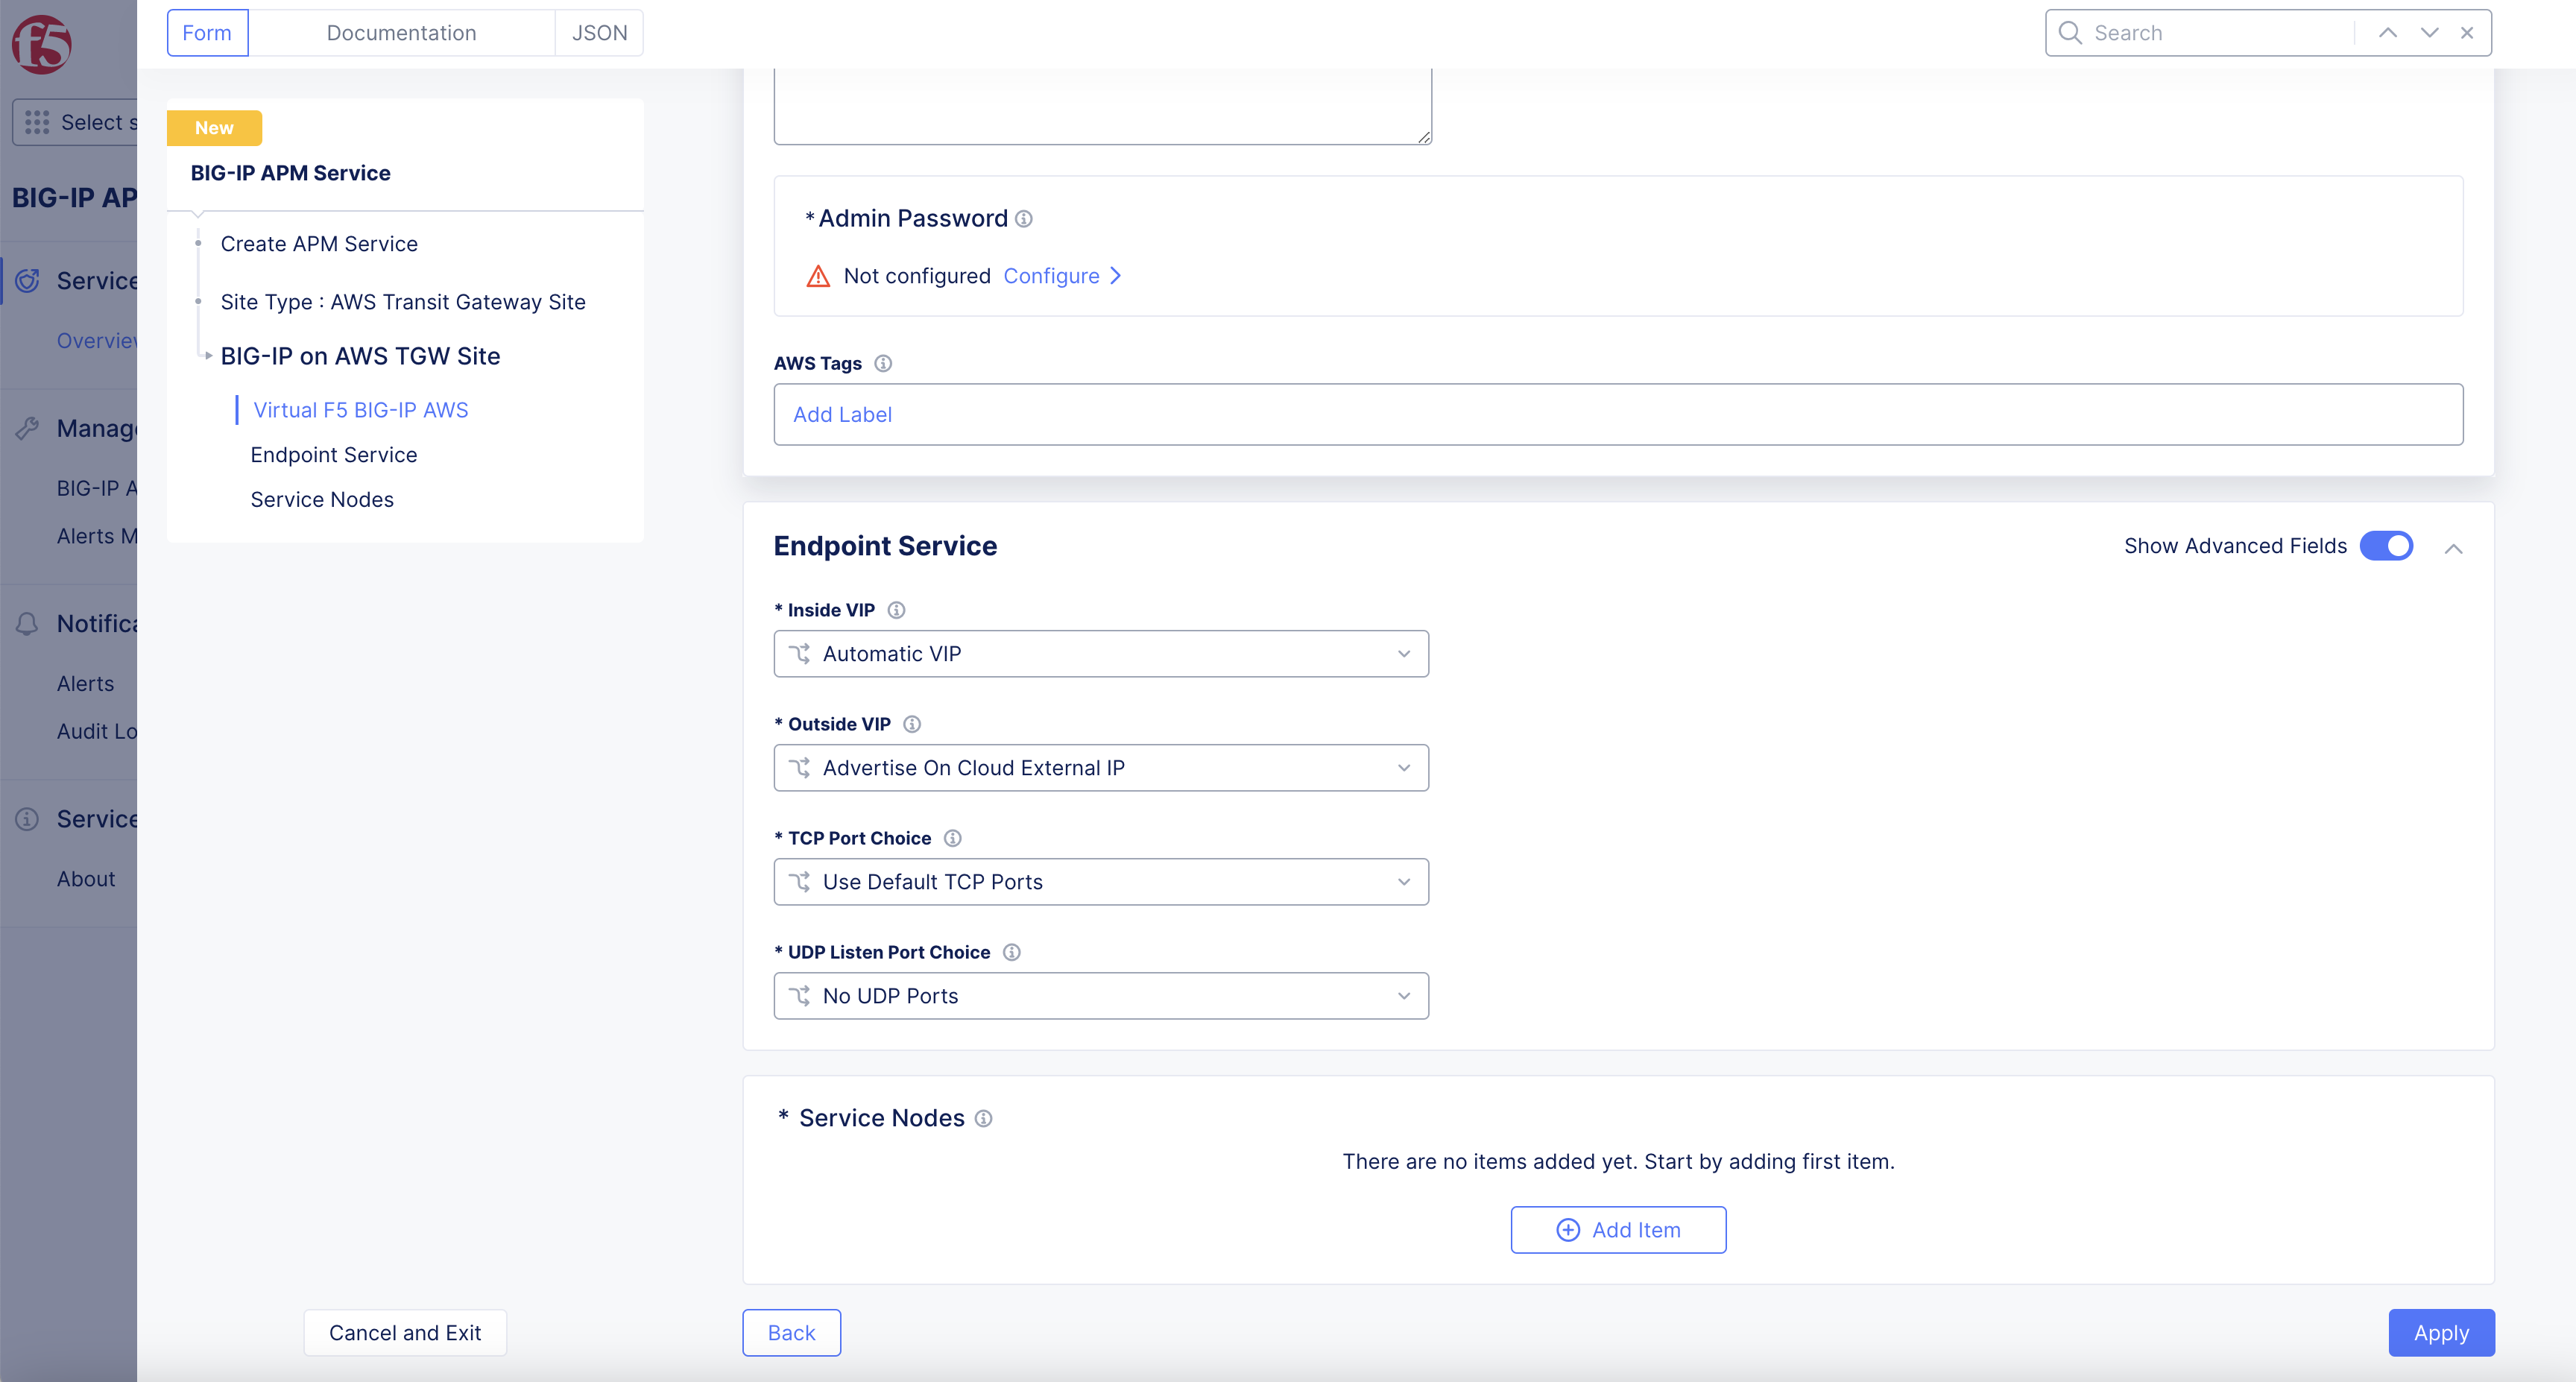
Figure: BIG-IP APM Endpoint
Step 5: Setup Service Nodes.
- Select
+ Add Itembutton inService Nodes.
Figure: BIG-IP APM
-
Setup
Service Nodes:-
Enter
Node Name. This name will be used to form the hostname for the service. -
Select on
AWS AZ Namefield, and select an AWS availability zone from the drop-down list. Ensure that you pick the same availability zone as that of the TGW Site. -
Toggle
Show Advanced Fieldsto showIP Prefix for Tunneloption. -
Select
IP Prefix for Tunneldrop-down menu.Automaticoption is default. -
Select
Subnet for BIG-IP Management Interfacedrop-down menu.Autogenerate Subnetis default. -
Select
Applyto add the service node.
Note: Use
+ Add itembutton inService Nodessection, and repeat above steps to add more service nodes as needed. -
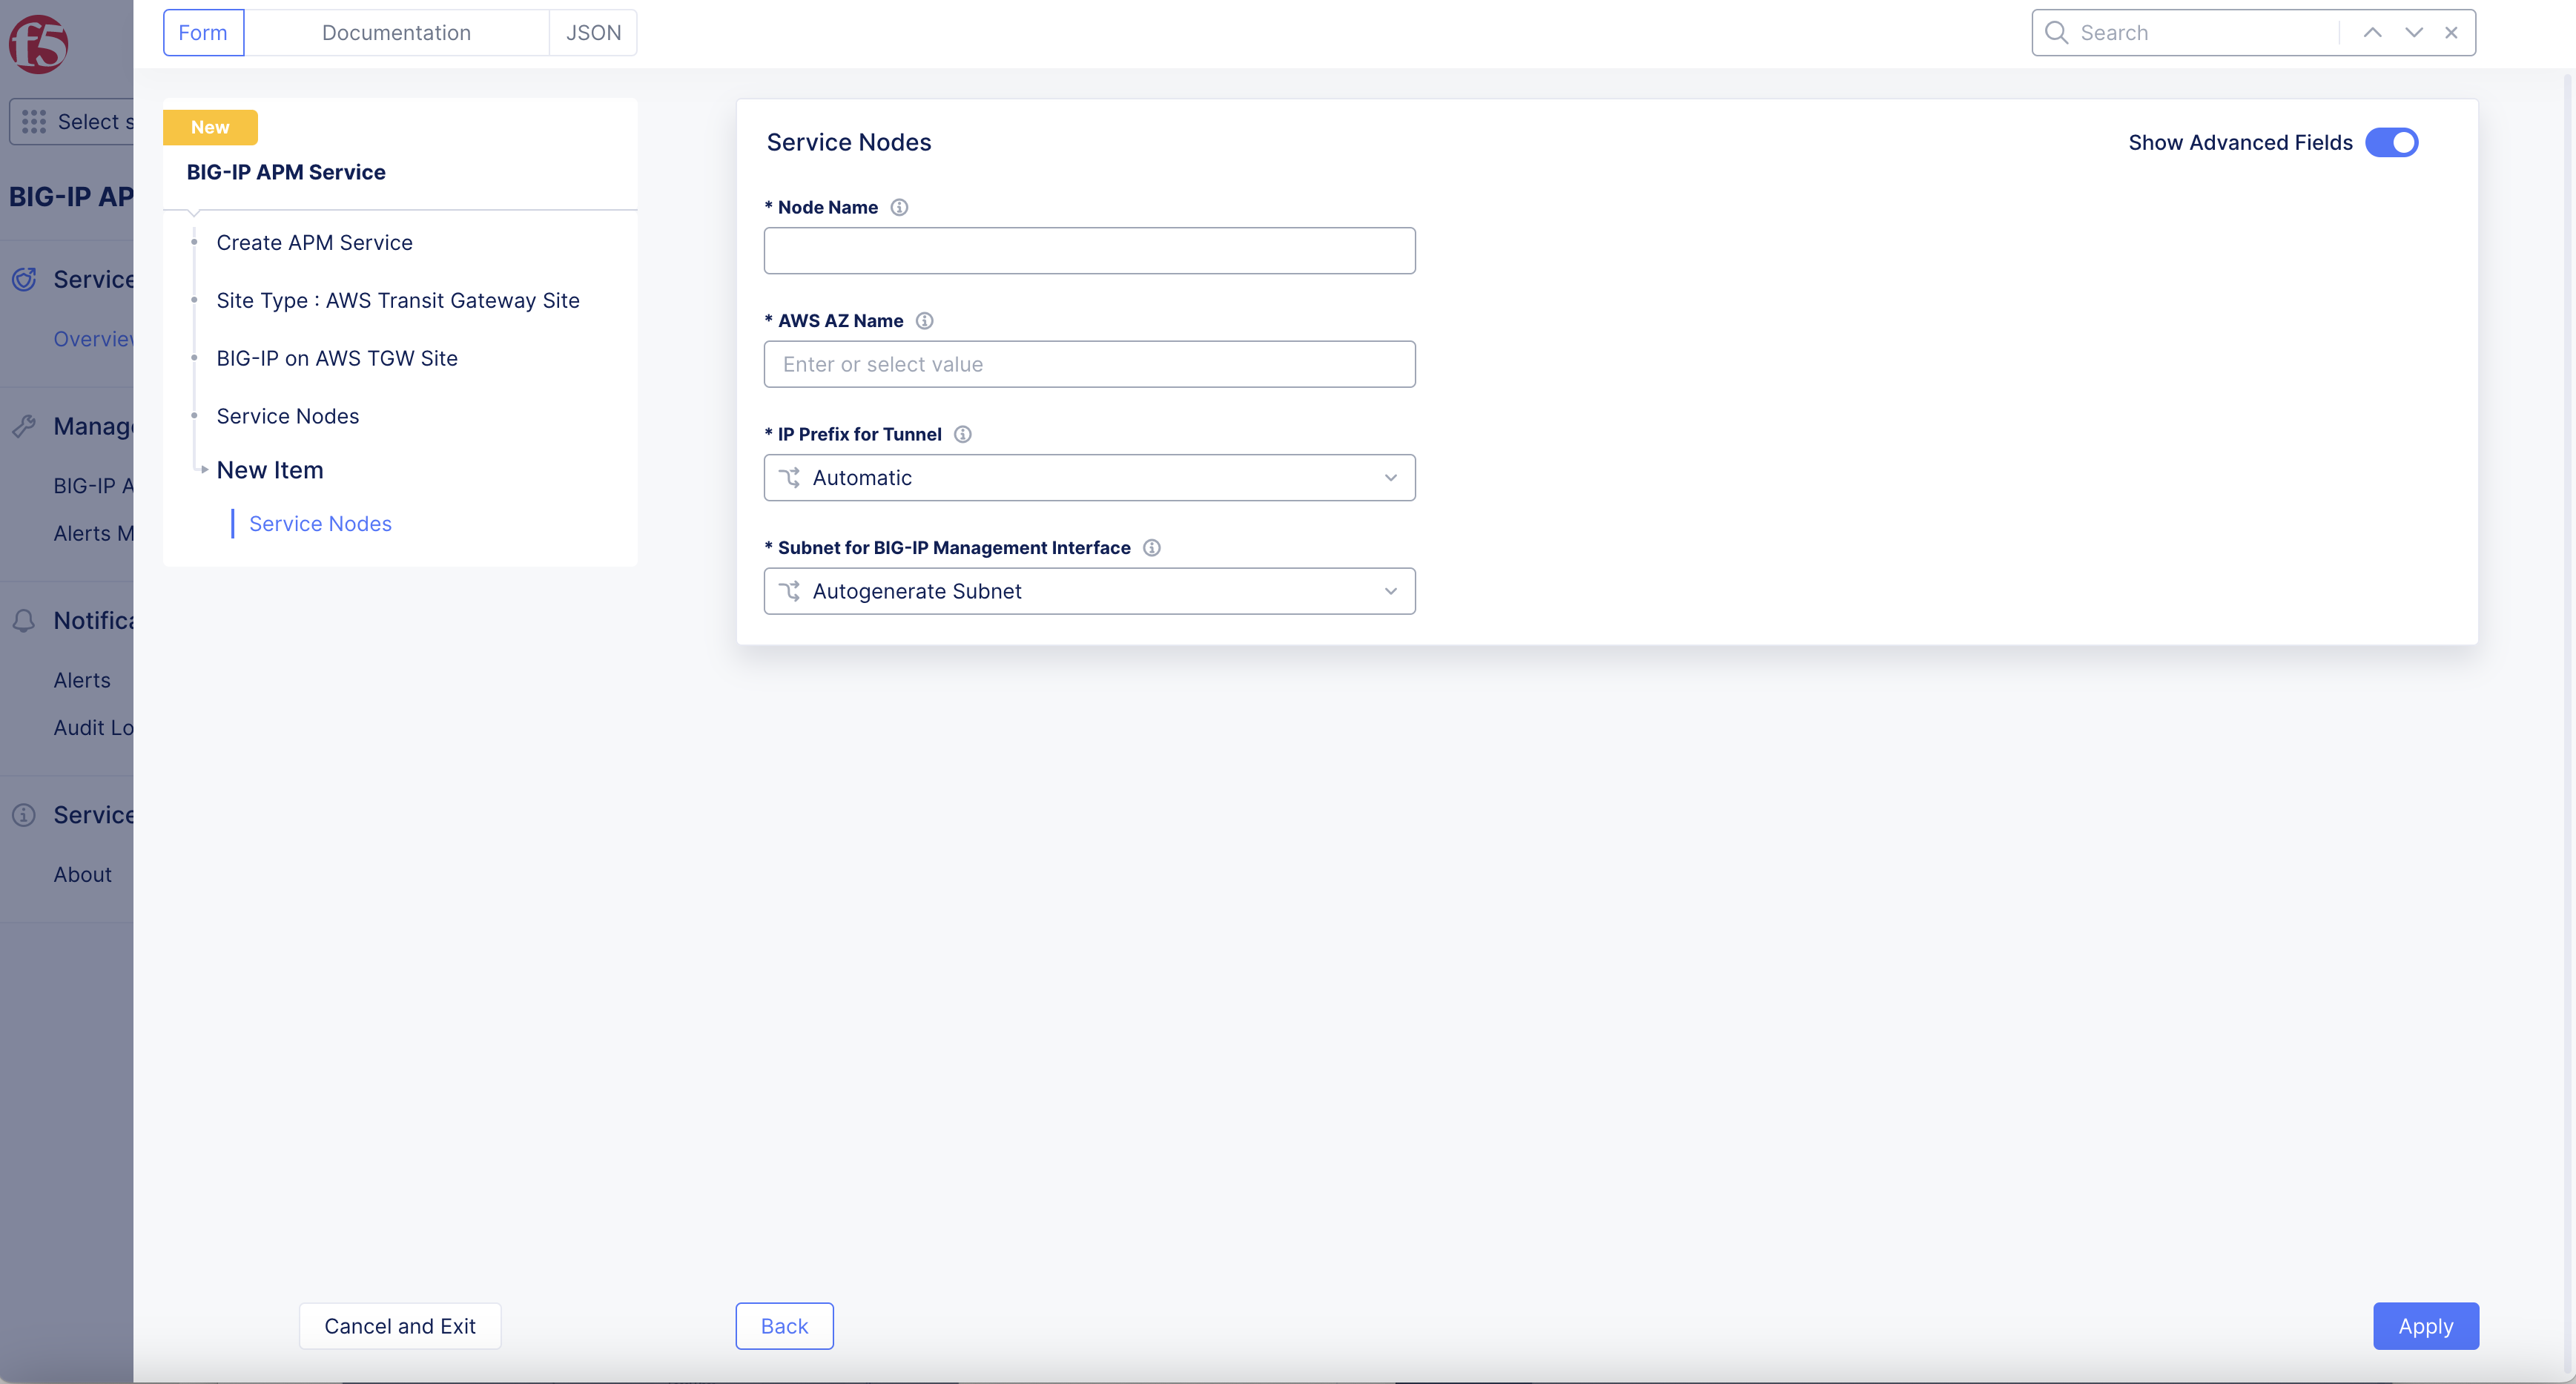
Figure: Service Nodes
Step 6: BIG-IP Access Management Setup.
-
Select
BIG-IP Console Access Managementdrop-down menu. -
Enter
Domain Suffix. -
Toggle
Show Advanced Fieldsto showHTTPS Port Choicedrop-down option, addHTTPS Portas needed. -
Select
Access on Site Local Networksdrop-down menu. -
Select
Save and Exitbutton.
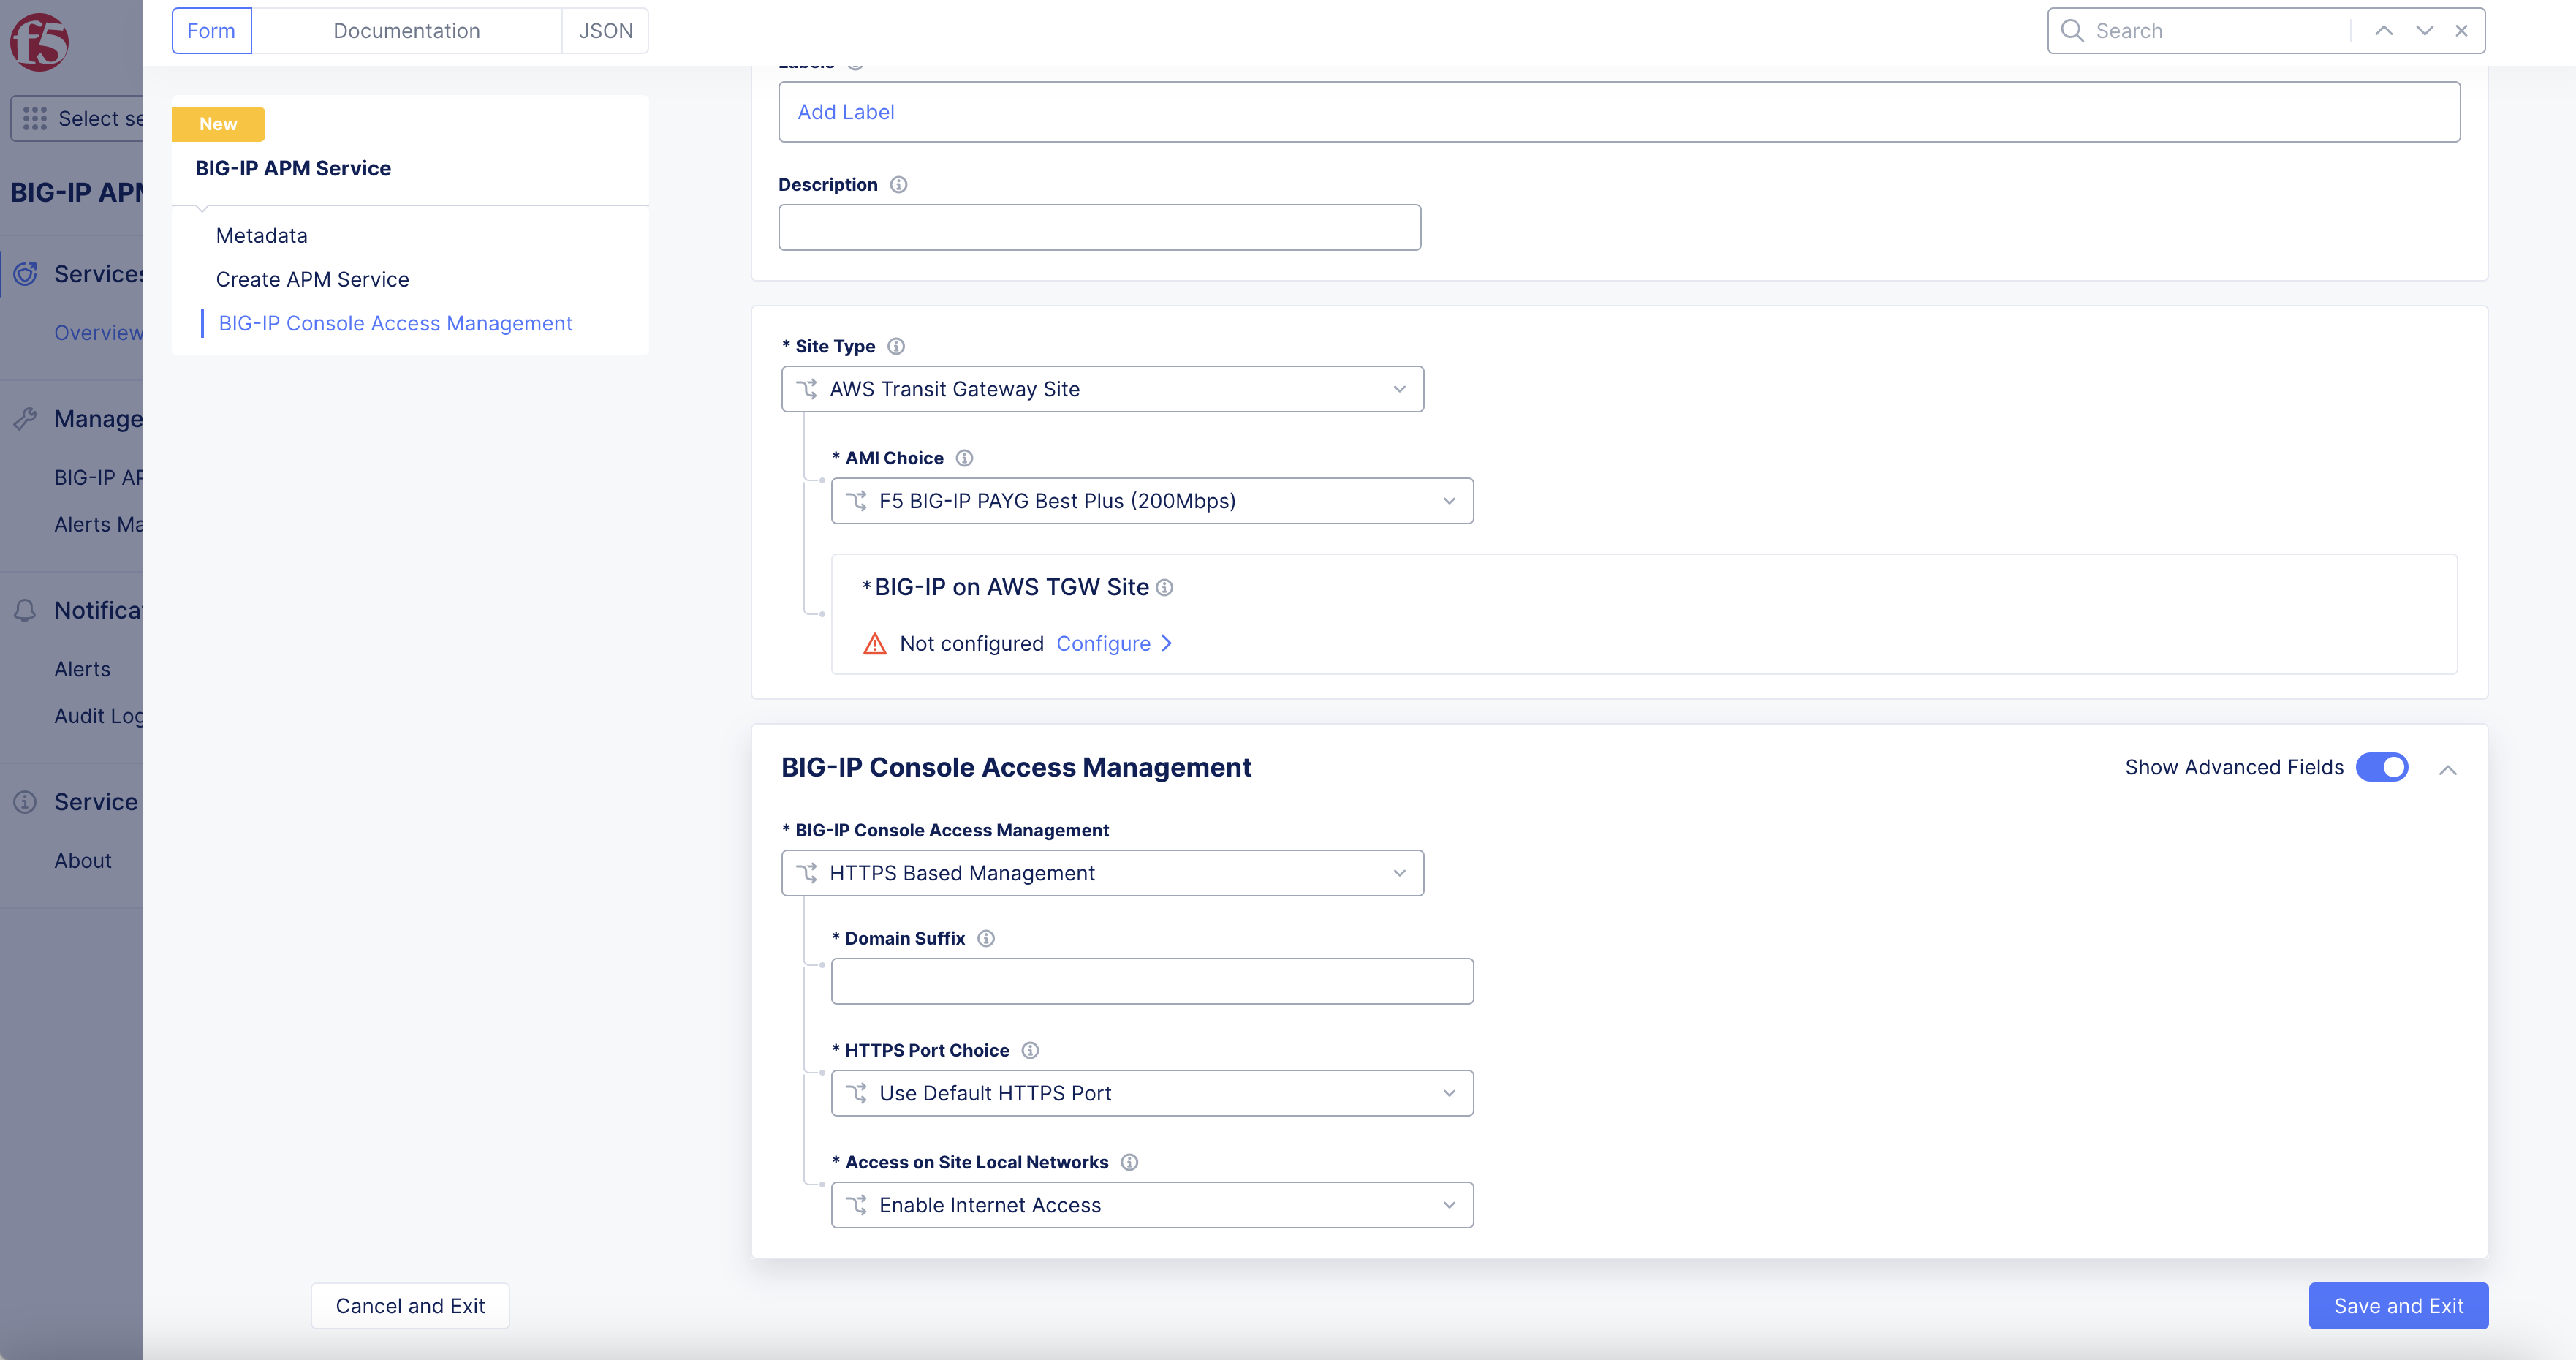
Figure: BIG-IP APM
Note: For full instructions refer to BIG-IP documentation, see BIG-IP APM
Setup BIG-IP Bare Metal
Step 1: Obtain F5 Distributed Cloud BIG-IP APM subscription.
-
Open
F5 Distributed Cloud Console. -
Select
All Workspacesdrop down menu under service boxes.
Note: Homepage is role based, and your homepage may look different due to your role customization. Select
All Workspacesdrop-down menu to discover all options. Customize Settings:Administration>Personal Management>My Account>Edit work domain & skillsbutton >Advancedbox > checkWork Domainboxes >Save changesbutton.
Figure: F5 Console All Services
- Select
BIG-IP APM.
Figure: F5 Console All Services BIG-IP APM
-
Select
Service Info>Aboutto learn more about BIG-IP APM service, and enable service. -
Request subscription via email provided on BIG-IP APM page.
-
You will get license keys required, and subscription will be enabled by F5.
Figure: F5 Console BIG-IP APM
Step 2: Create APM Service.
Note: For full instructions refer to BIG-IP documentation, see BIG-IP APM Instance Configuration
-
In
BIG-IP APM> selectManage> selectBIG-IP APM Services. -
Select
+ Add BIG-IP APM Servicebutton.
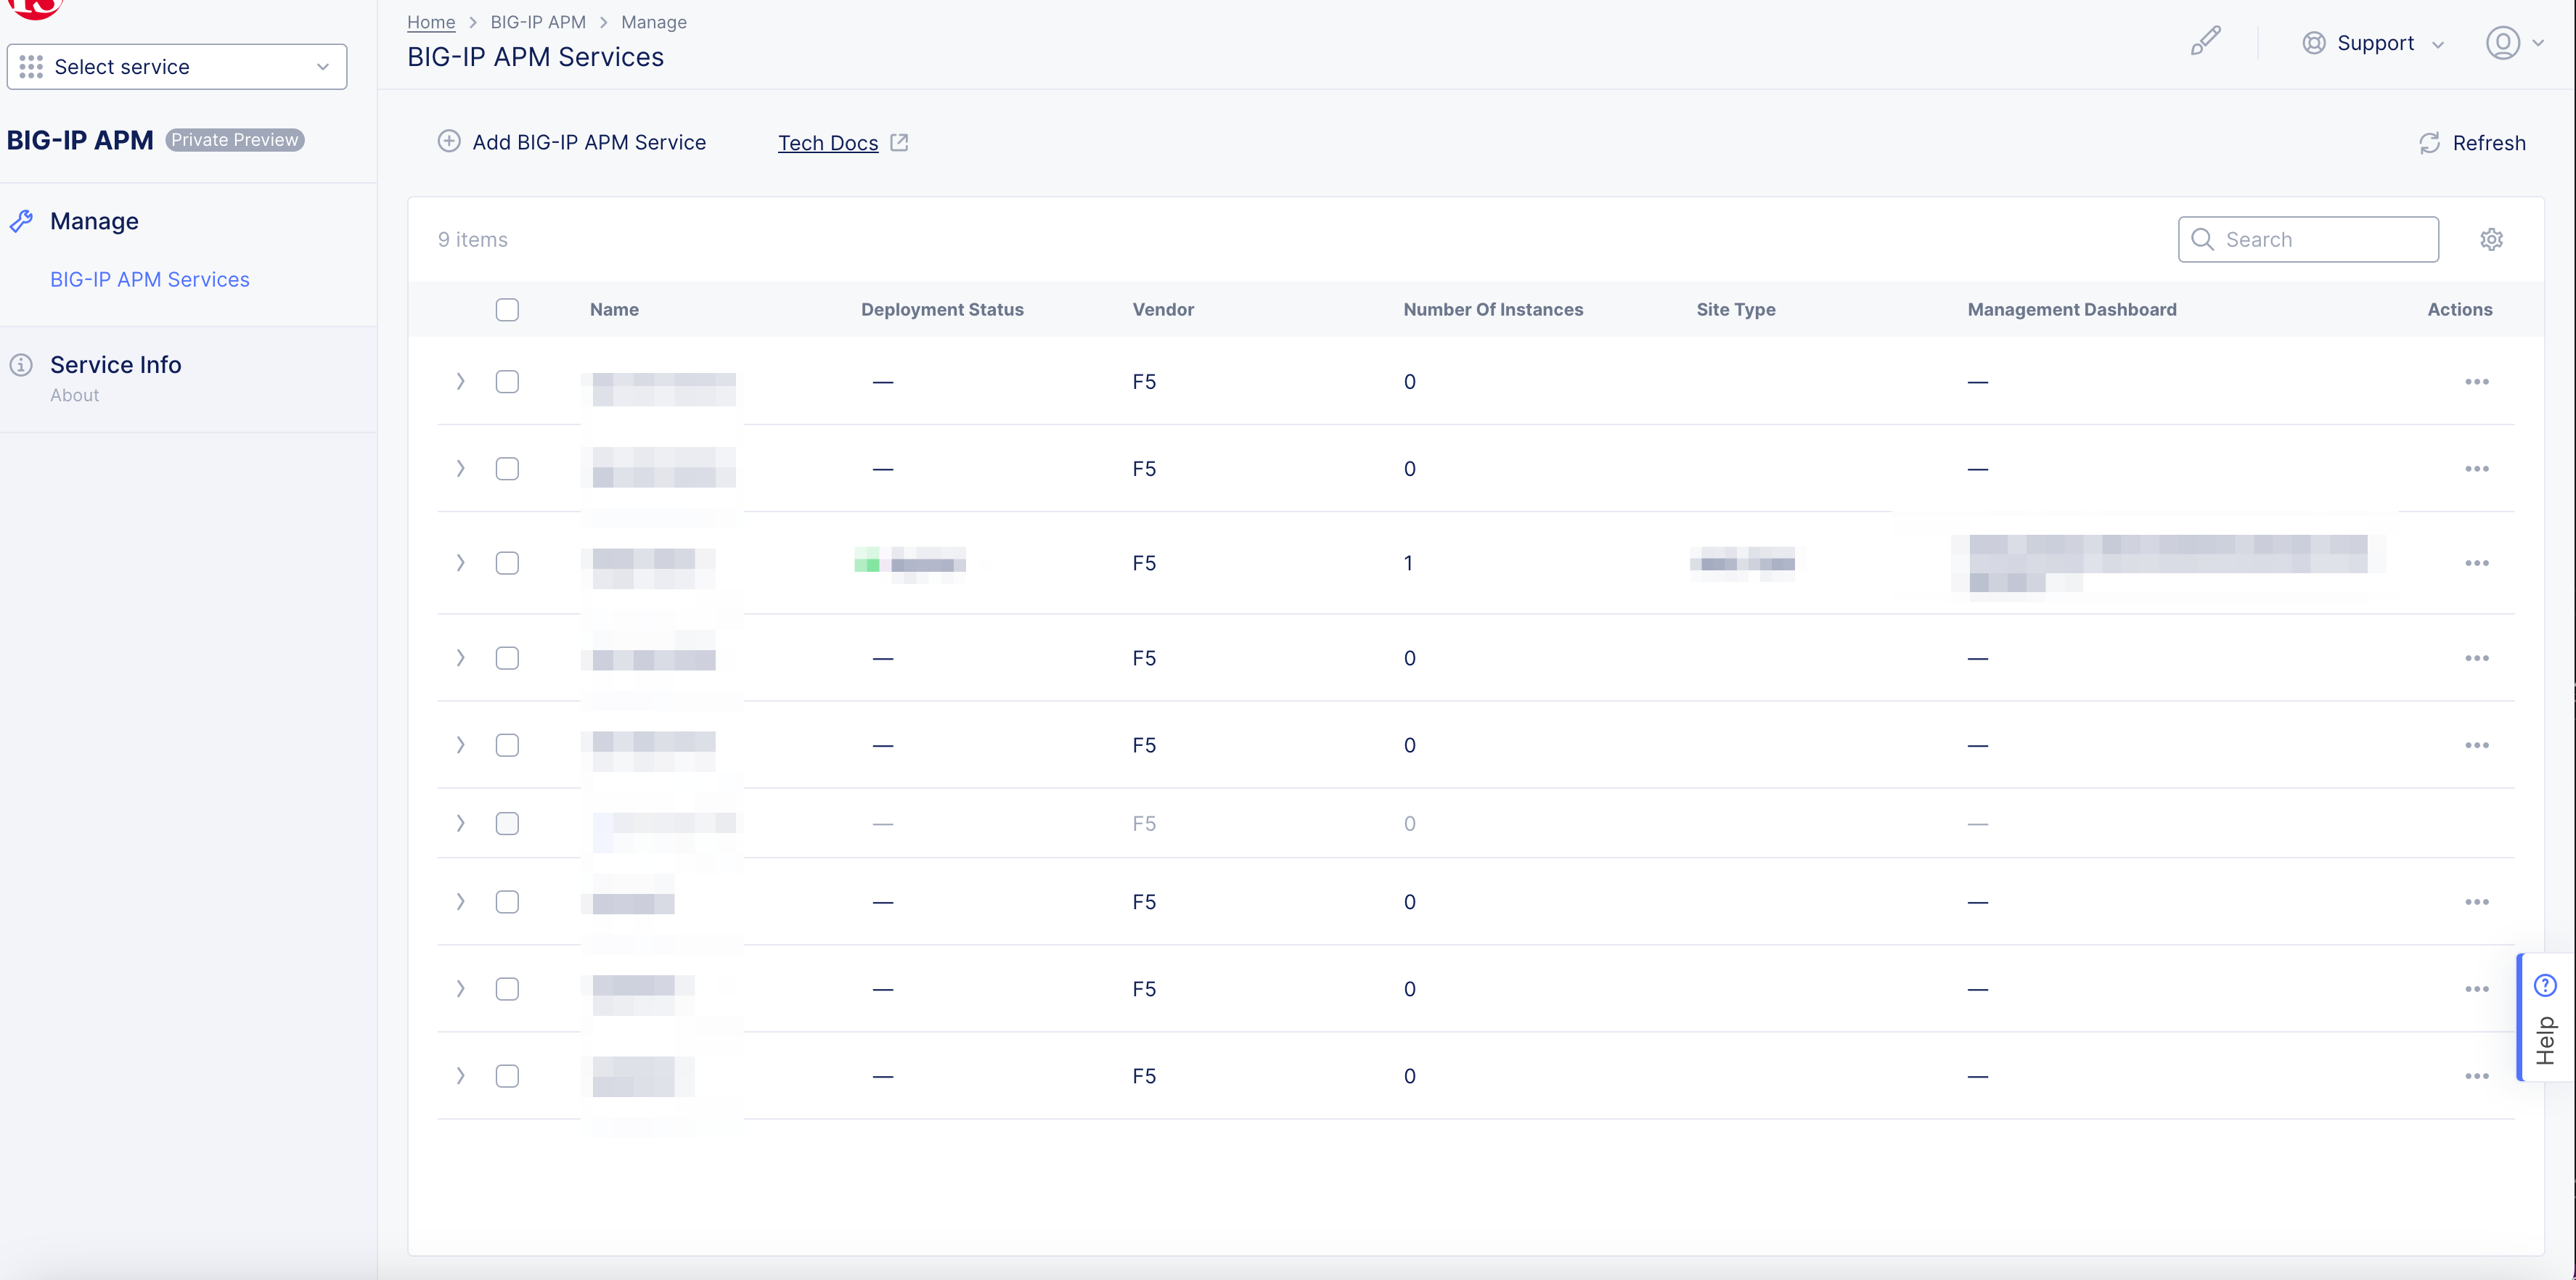
Figure: BIG-IP APM Service
-
Enter
Name. -
Enter
LabelsandDescriptionas needed.
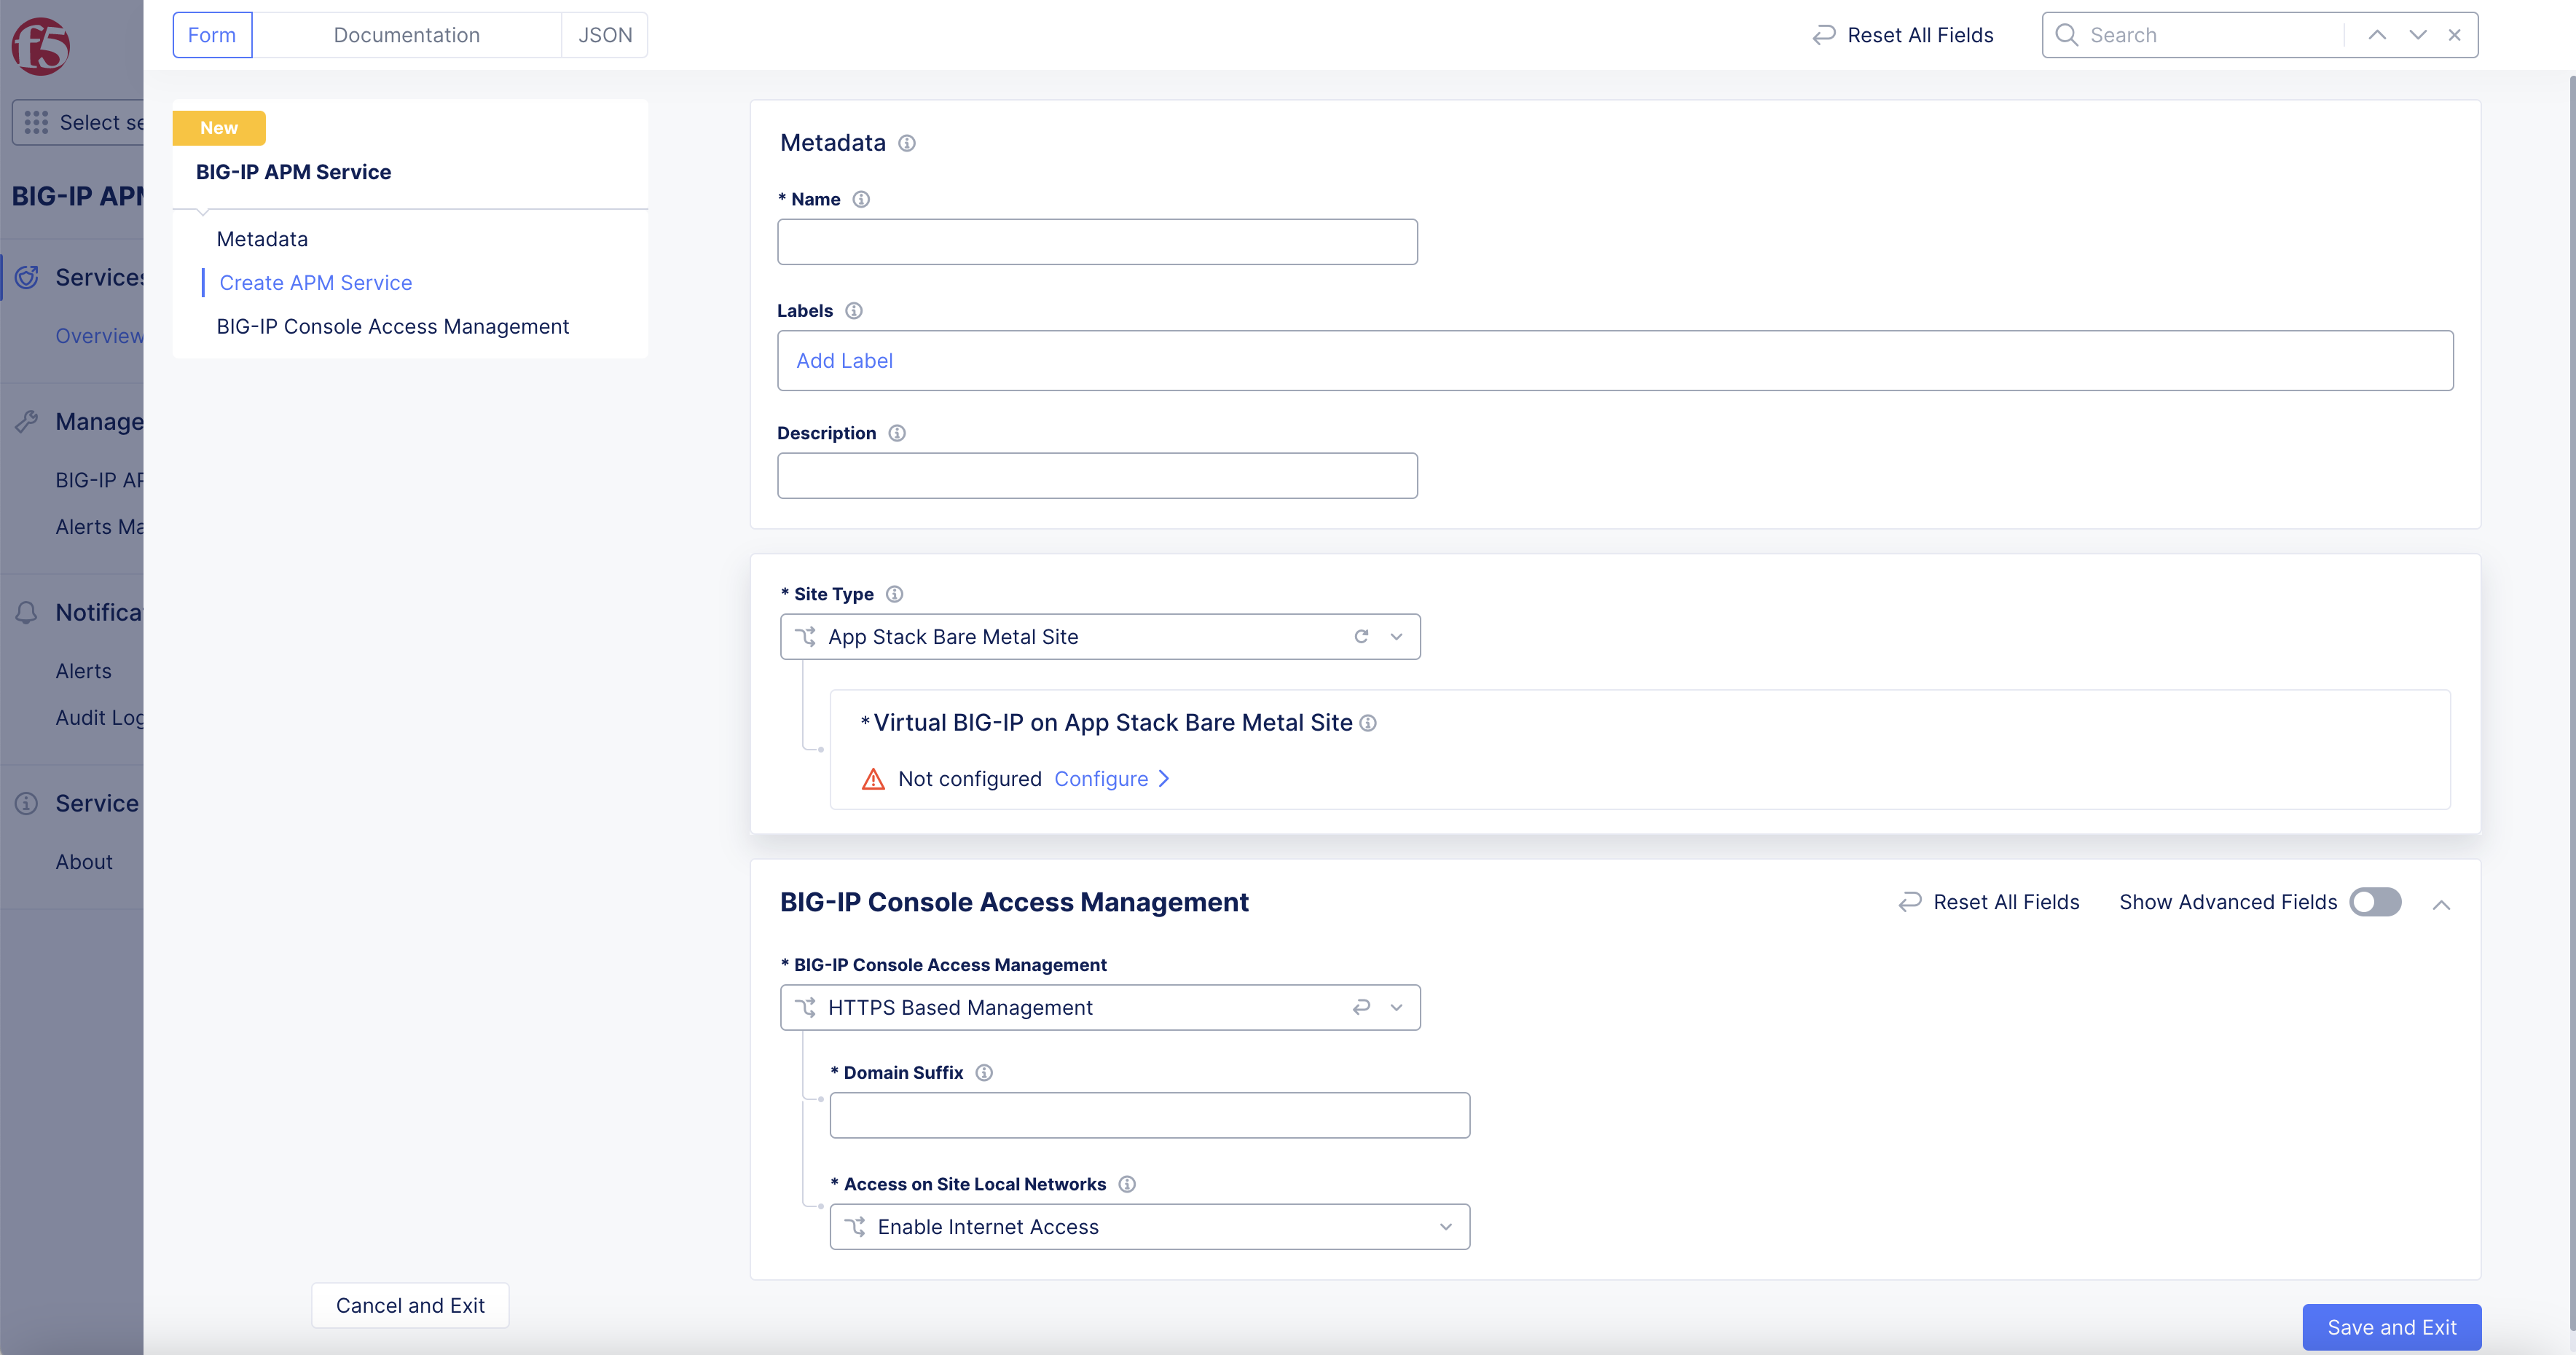
Figure: BIG-IP APM
Step 3: Setup Virtual F5 BIG-IP Bare Metal.
Setup Virtual F5 BIG-IP Bare Metal:
-
Select
Site Typedrop-down menu. -
Select
App Stack Bare Metal Site.
Figure: BIG-IP APM
- Select
Configurelink inVirtual BIG-IP on App Stack Bare Metal Sitebox.
Figure: BIG-IP APM
Step 4: Setup Admin Password.
- Enter
Admin Username.
Note Admin username for BIG-IP.
- Select
Configurelink inAdmin Passwordbox.

Figure: BIG-IP APM
-
Setup
Secret Type: -
Select
Secret Typedrop-down menu optionsBlindfolded SecretorClear Secret.
Blindfolded Secret.
-
Blindfolded Secret:-
Select
Actiondrop-down menu if needed. -
Select
Policy Typedrop-down menu if needed. -
Enter
Secret to Blindfold.- Select
Applybutton, and wait for the encryption to complete.
- Select
-
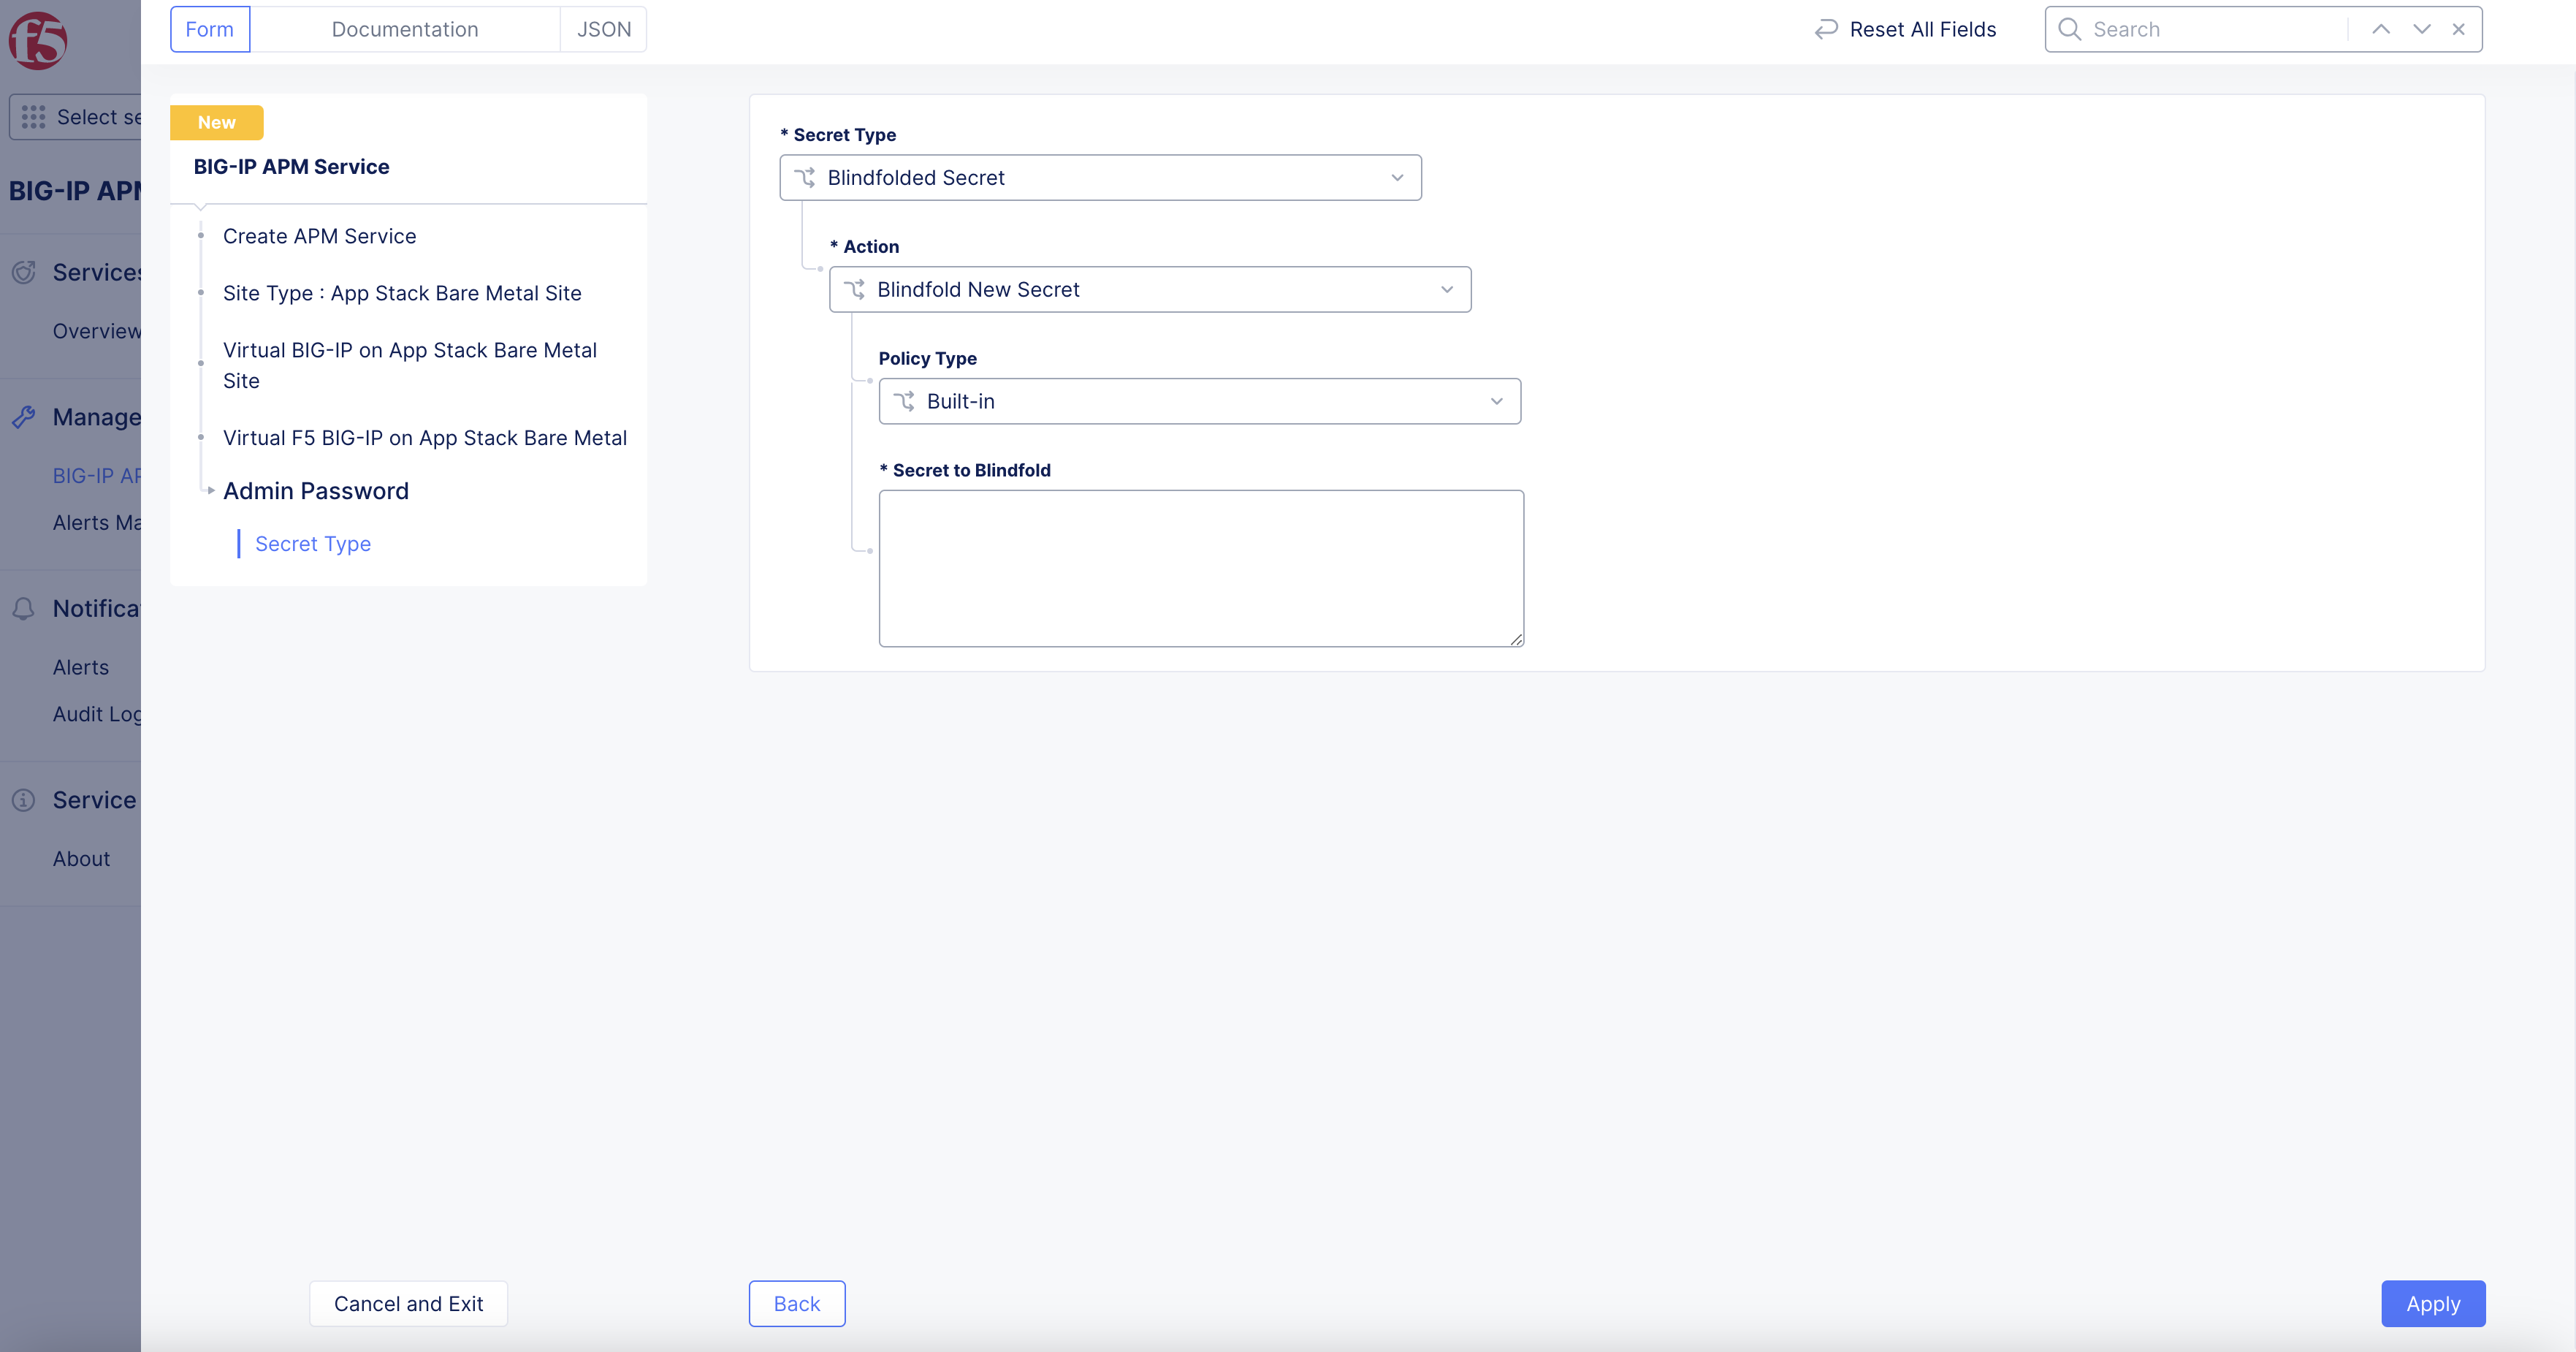
Figure: Encrypted Admin Password
Clear Secret.
-
Clear Secret:-
Select
TextorBase64. -
Enter
Secrettype in box. -
Select
Applybutton, and wait for the encryption to complete.
-
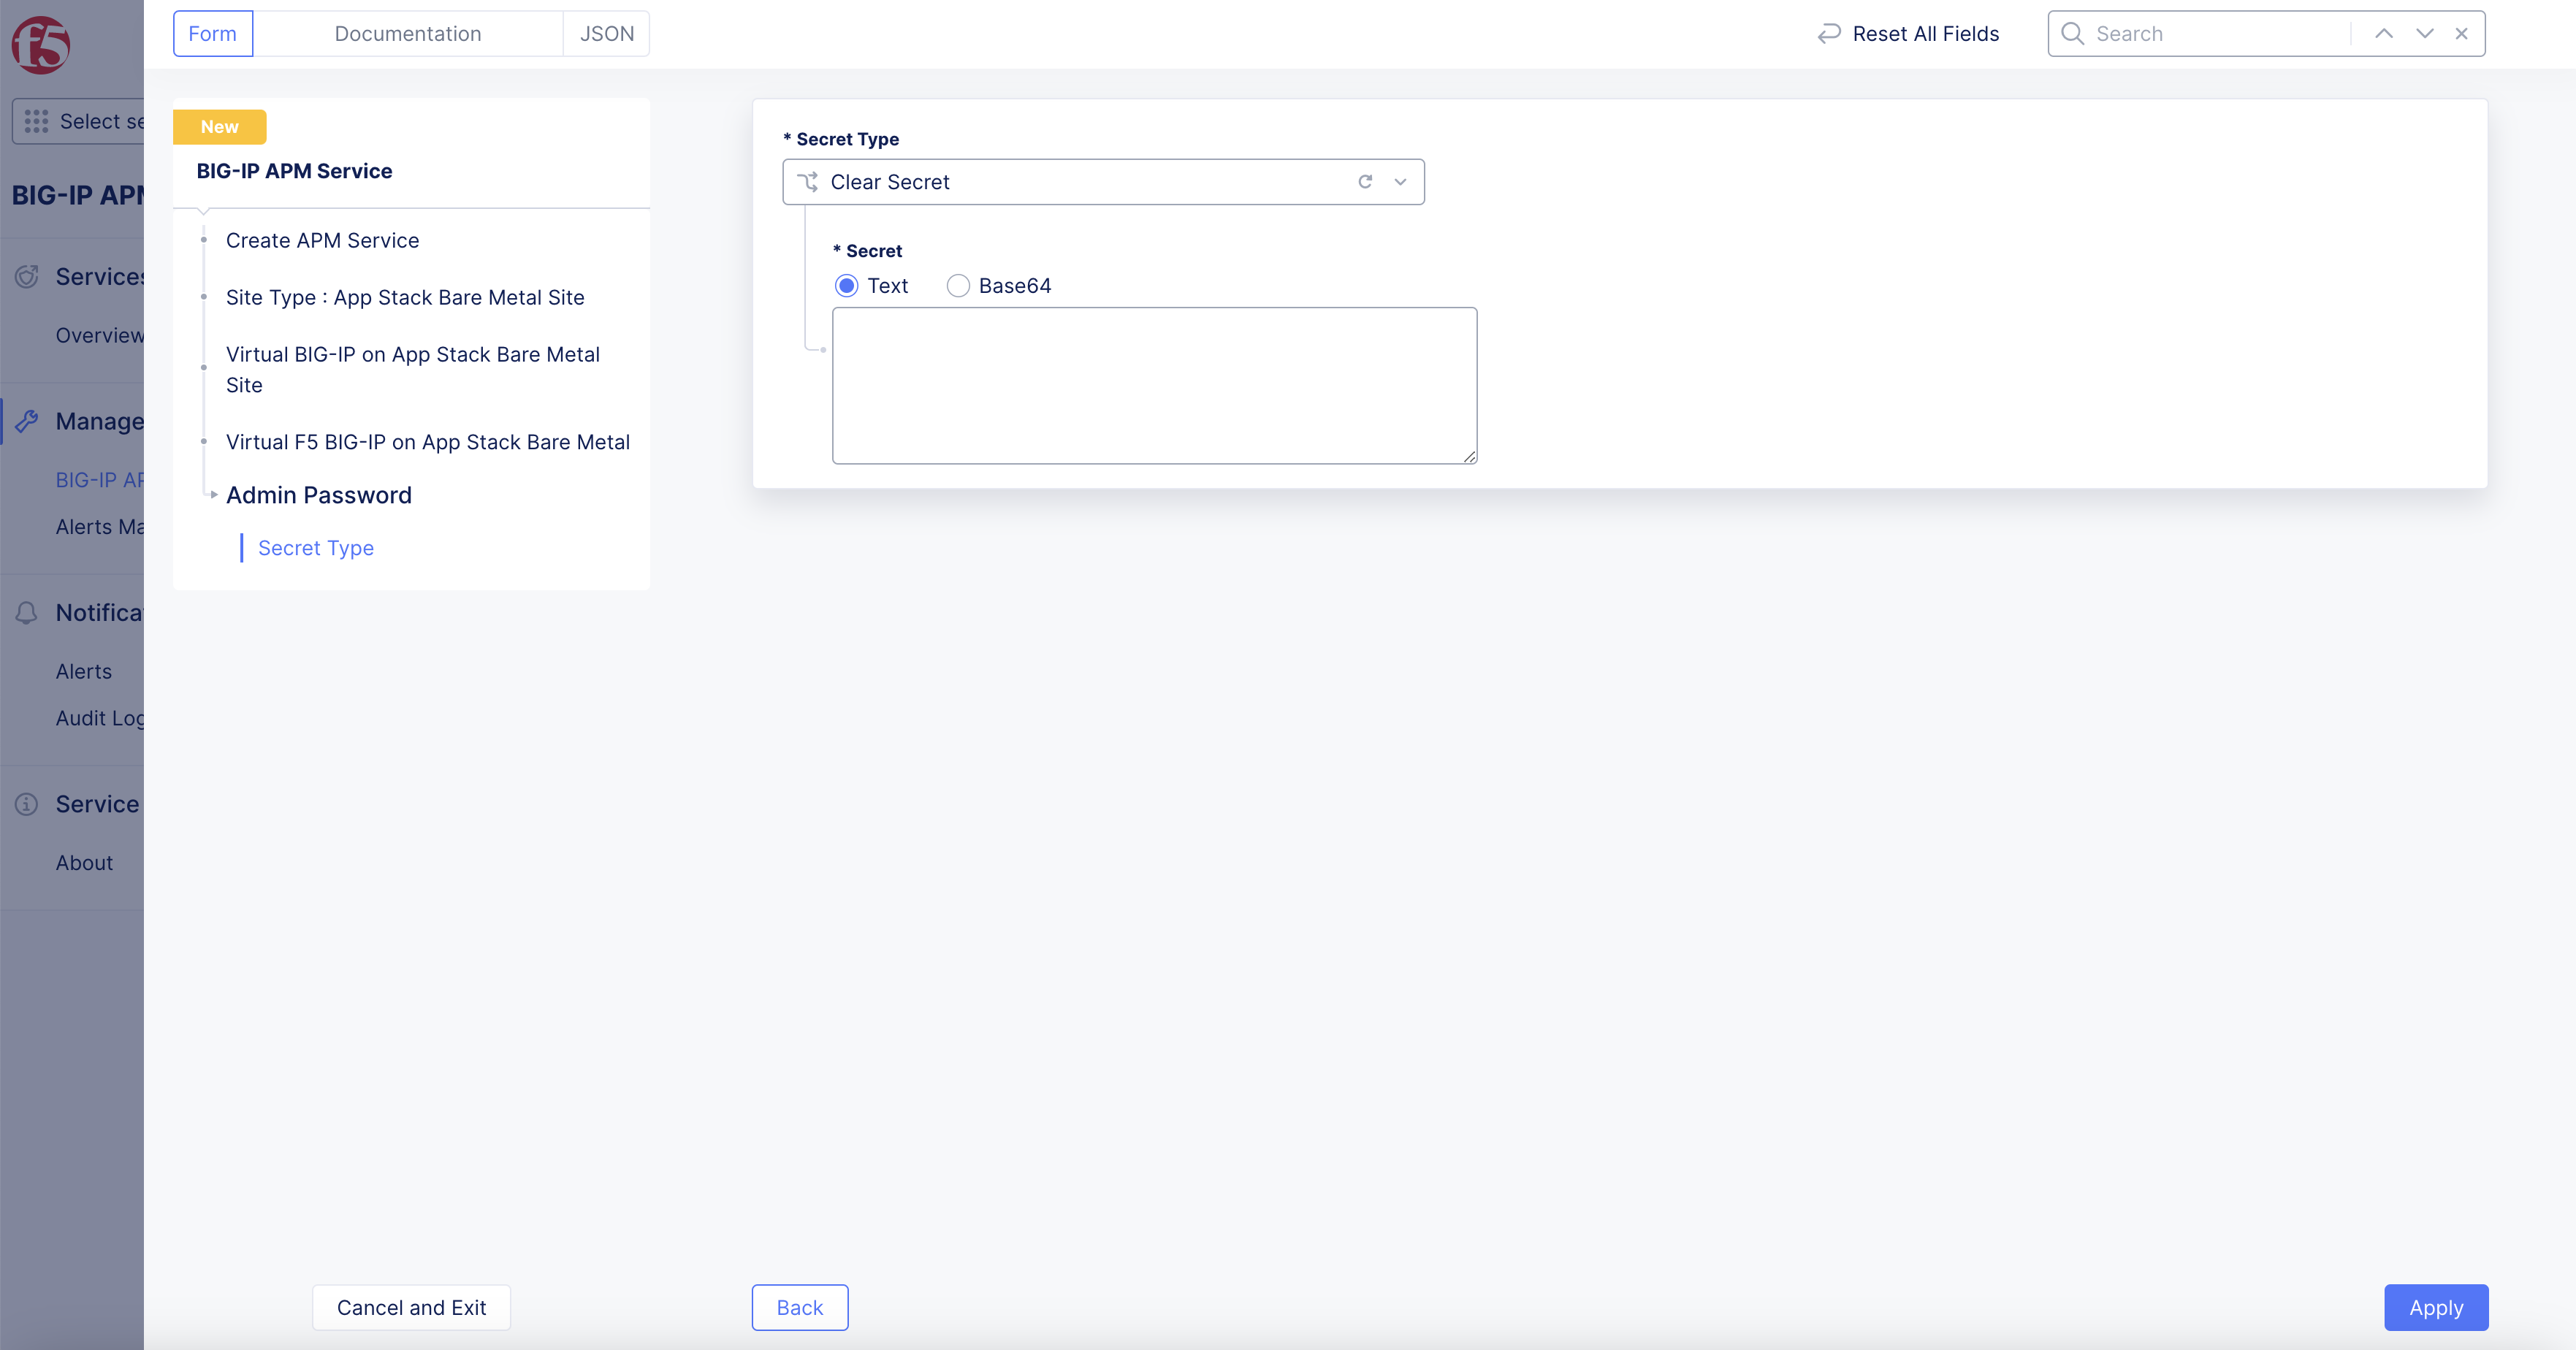
Figure: Encrypted Admin Password
Step 5: Setup Bare Metal site.
- Enter your SSH key in
Public SSH Keybox.
Note Public SSH Key for accessing the BIG-IP nodes.
- Enter
Image URL.
Note: Public URL where BIG-IP VE image (qcow2) is hosted.
- Select
App Stack Bare Metal Sitedrop-down menu.
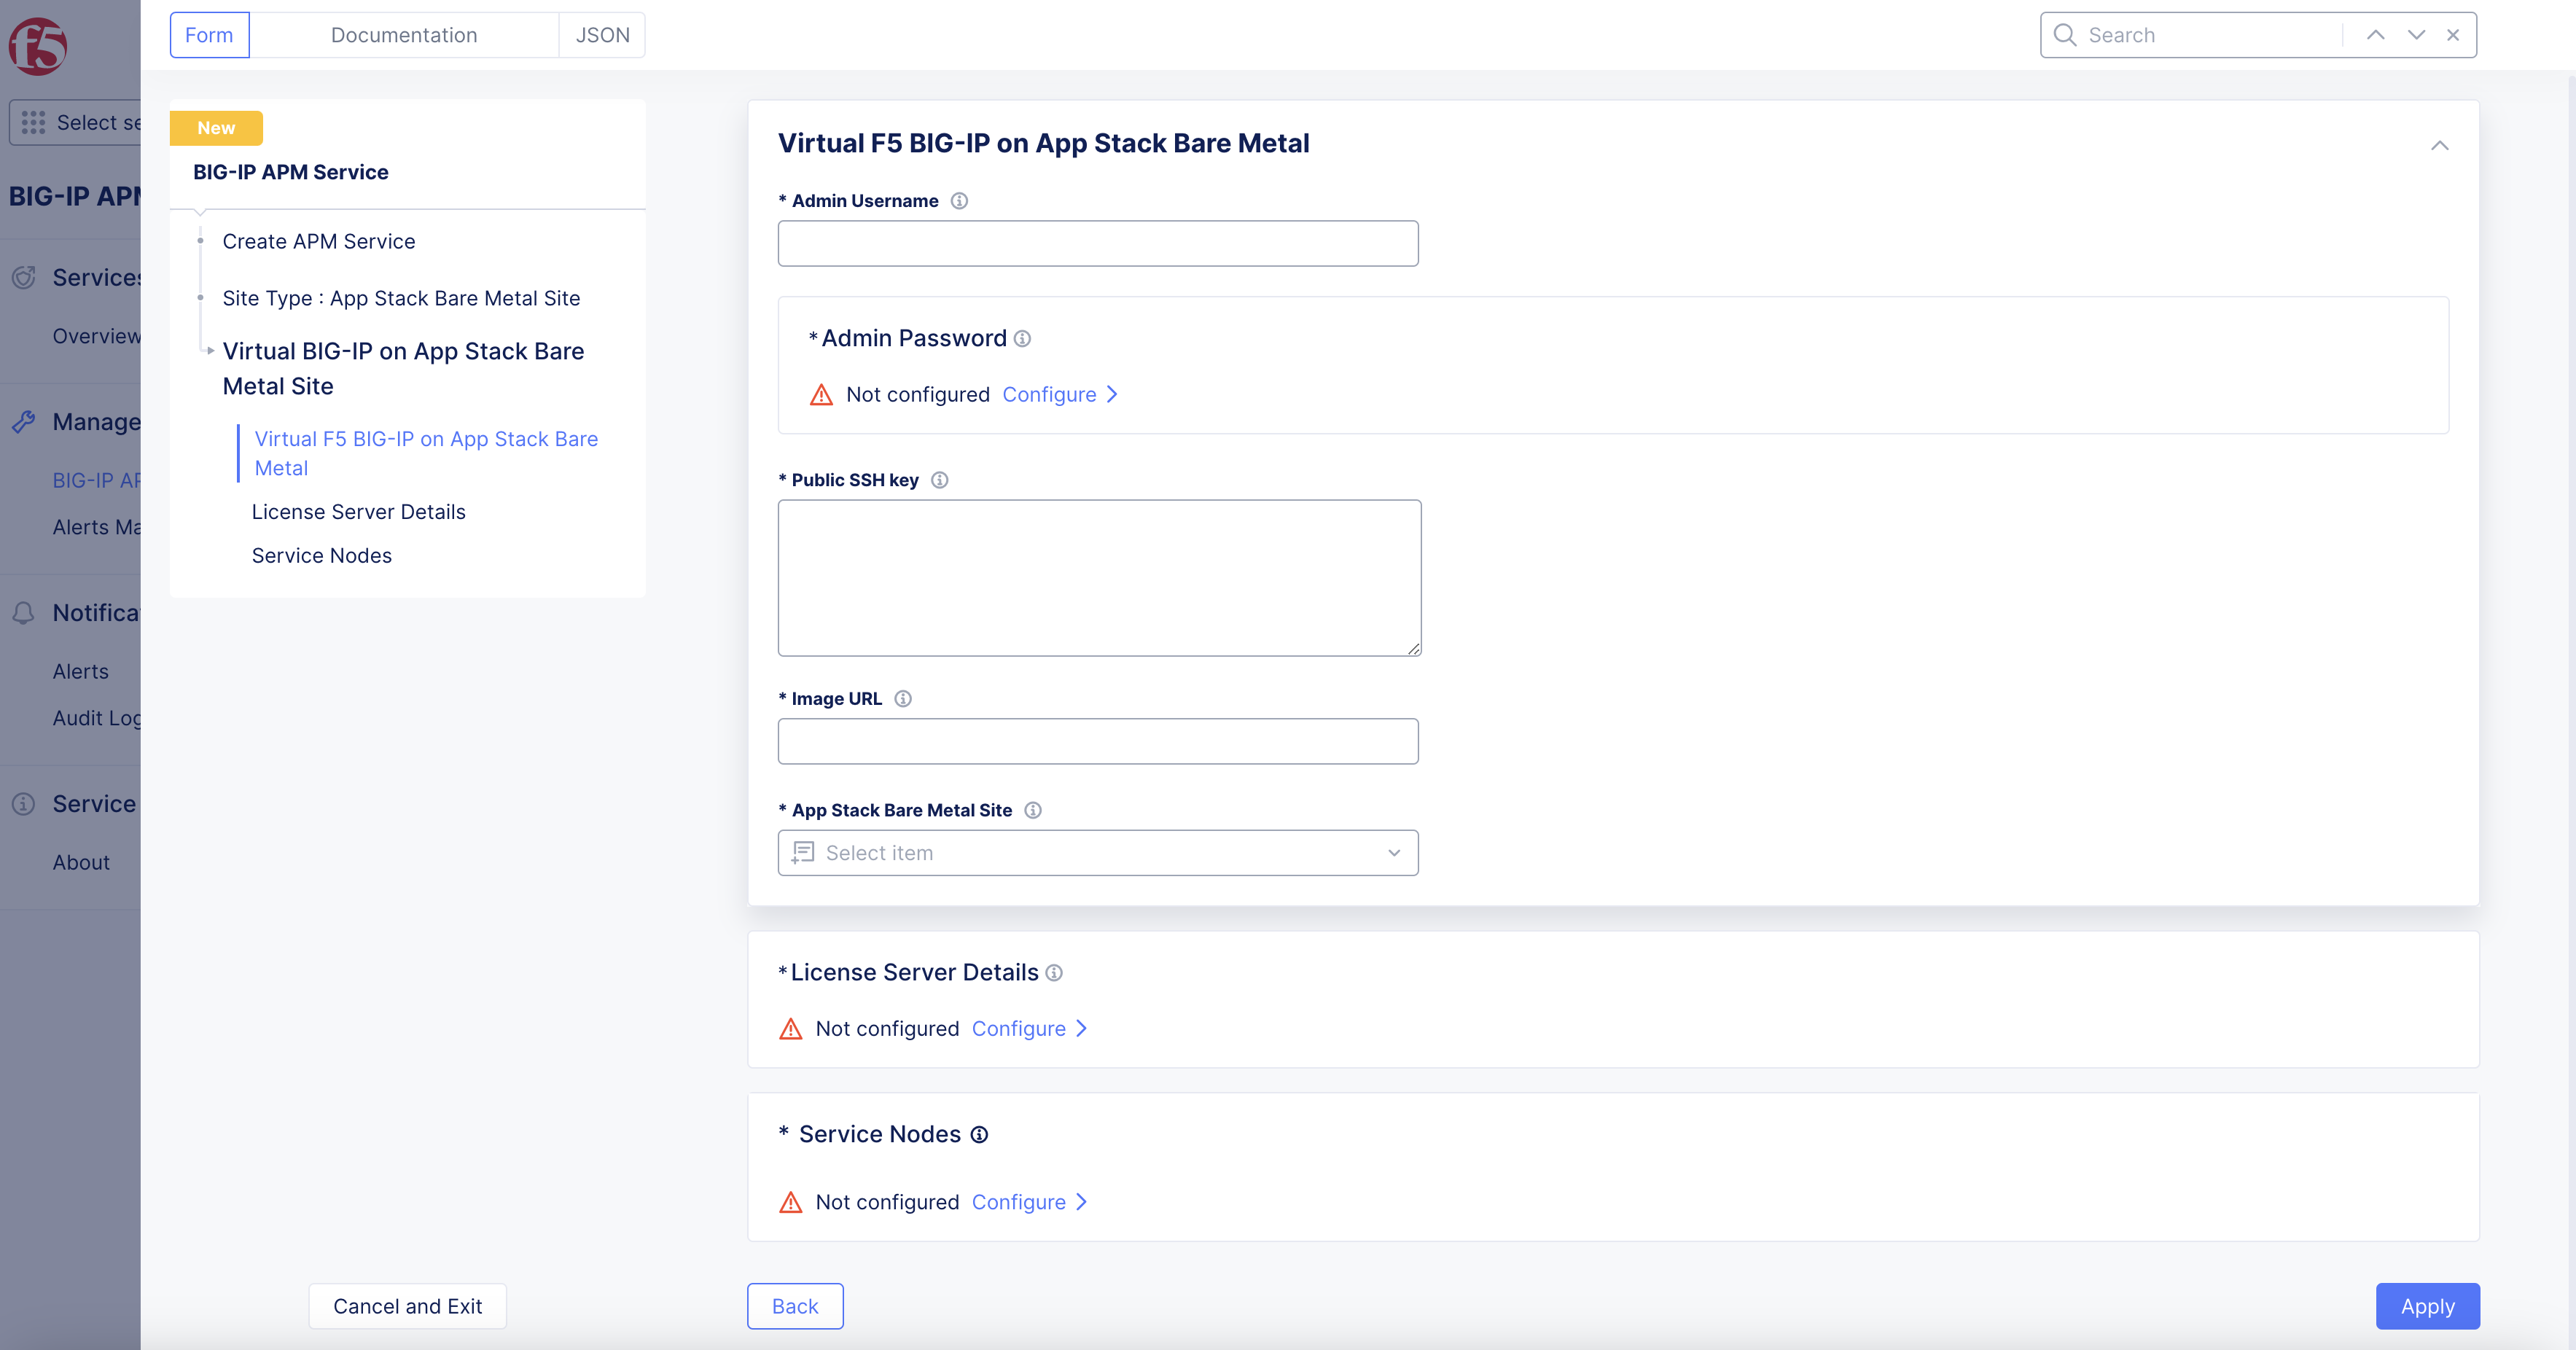
Figure: BIG-IP APM
Step 6: Setup License Server.
- Select
ConfigureinLicense Server Details.
Figure: BIG-IP APM License Server
-
Enter
License Serve IP. -
Enter
User Name. -
ConfigurePassword. -
Enter
License Pool Name. -
Enter
Offering Name. -
Select
Applybutton.
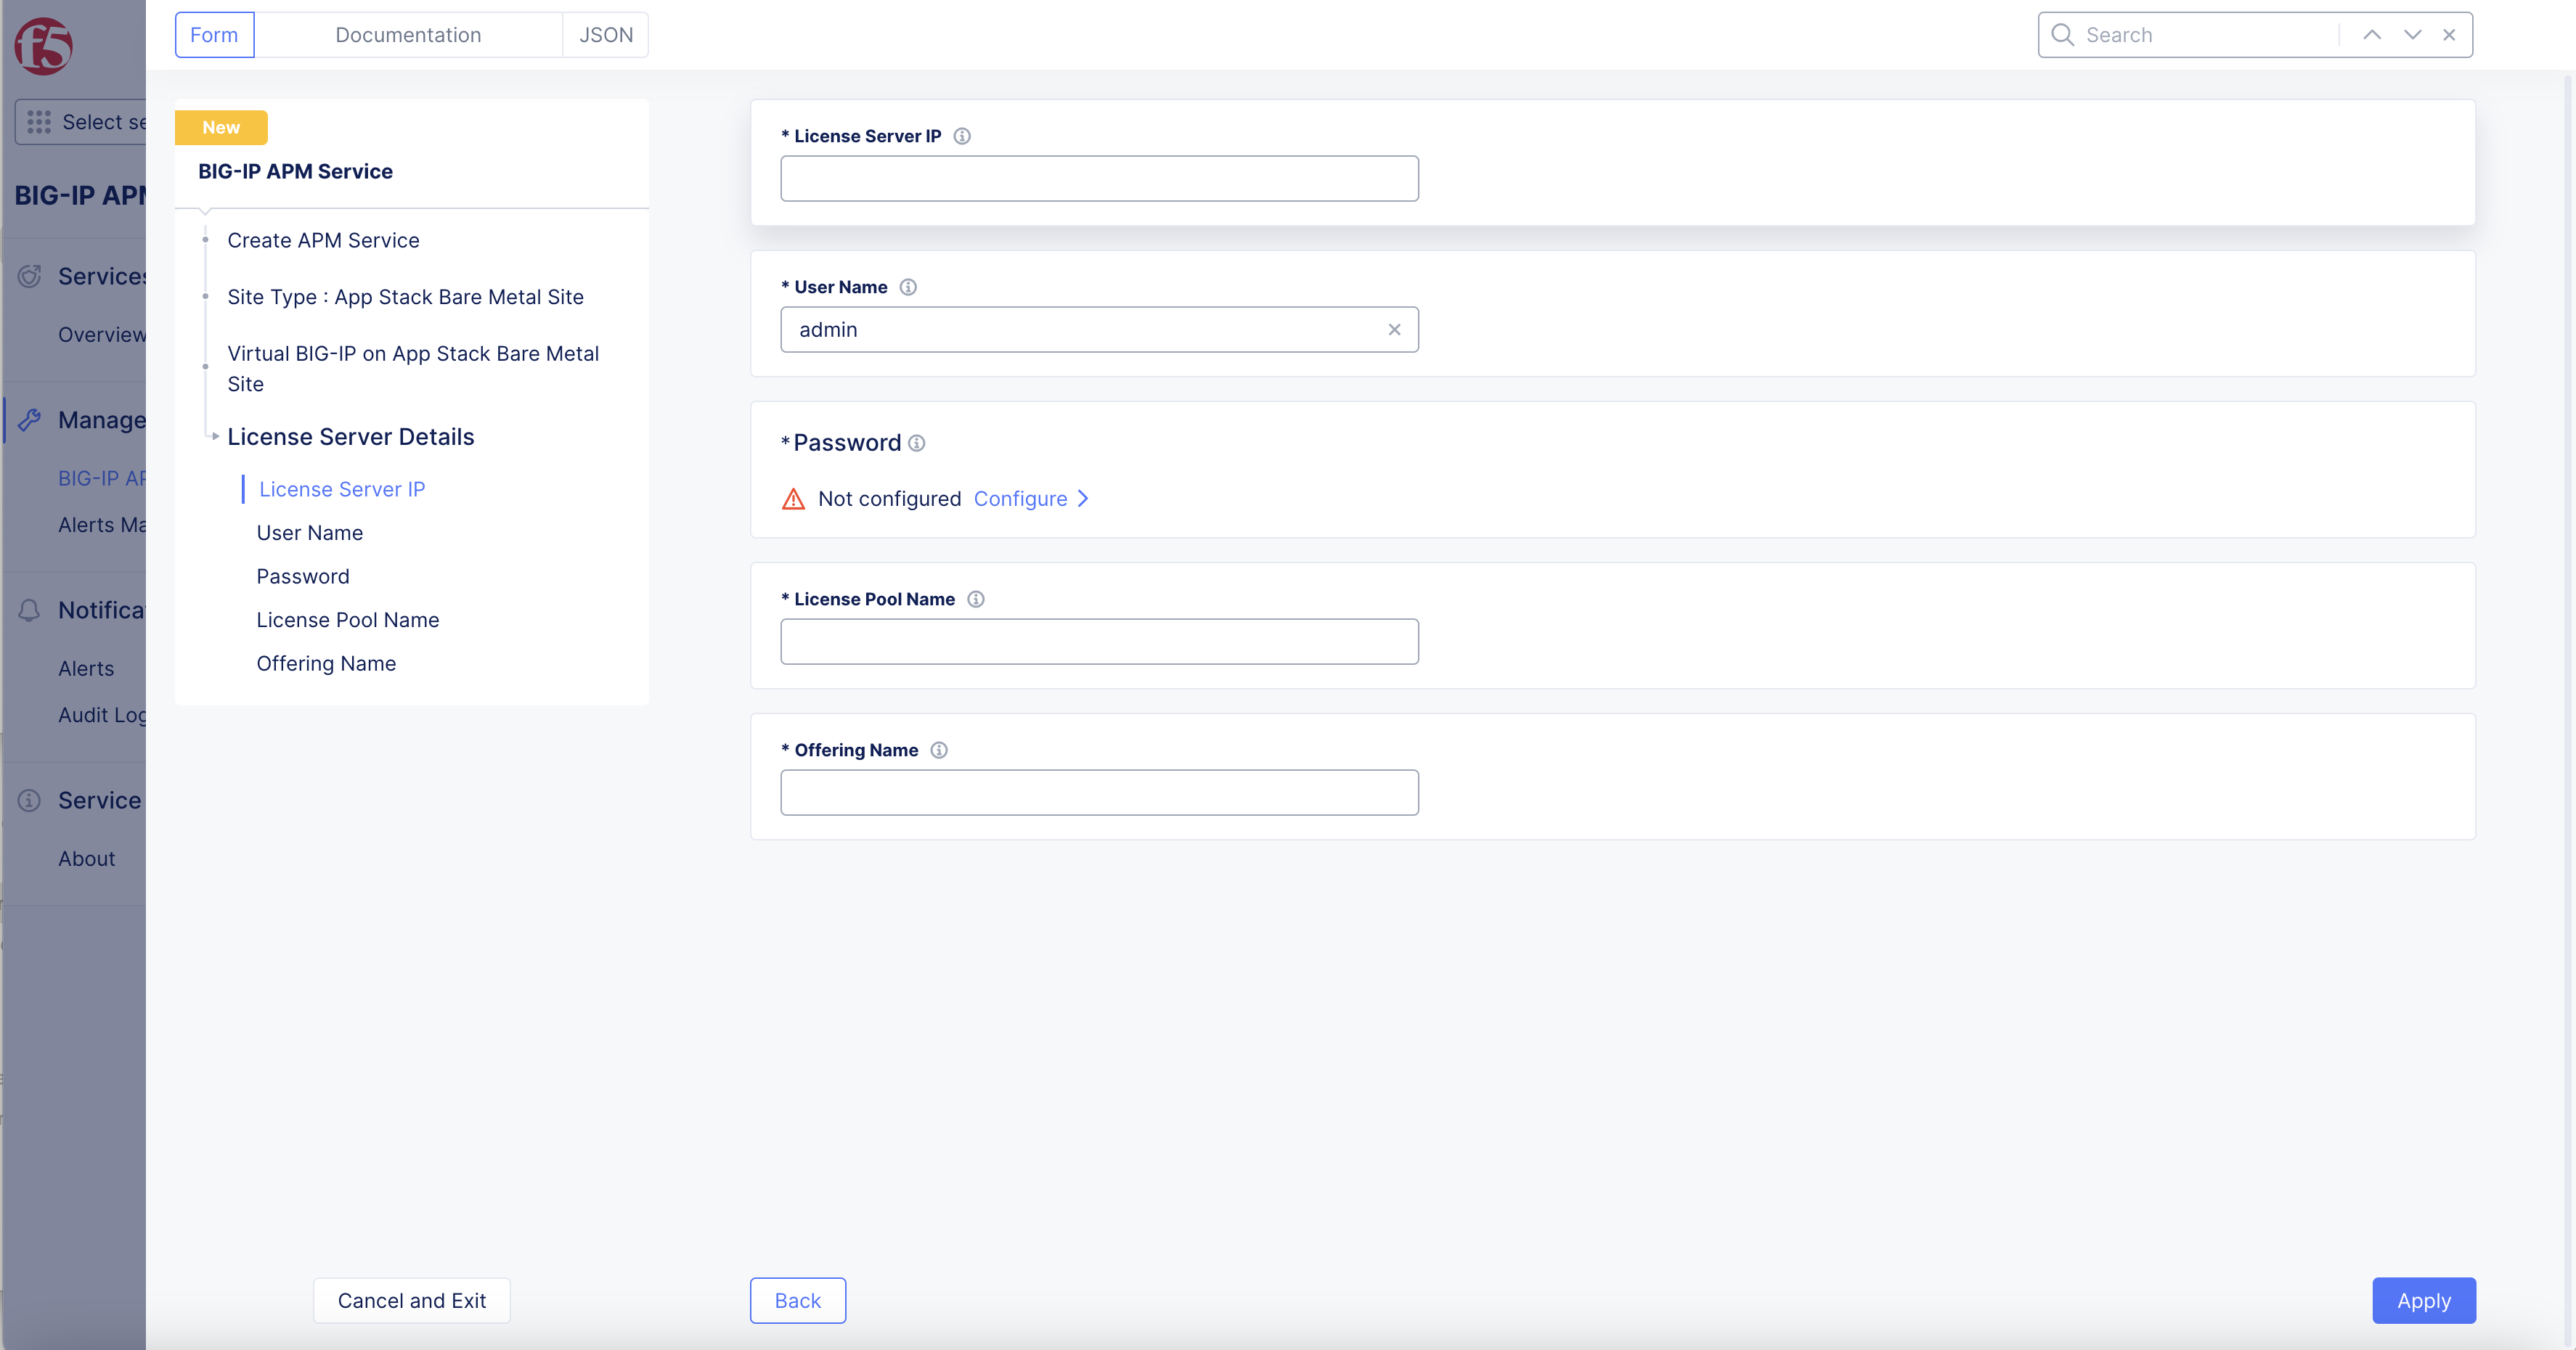
Figure: BIG-IP APM License Server
Step 7: Setup Service Nodes.
- Select
+ Add Itembutton inService Nodesbox.
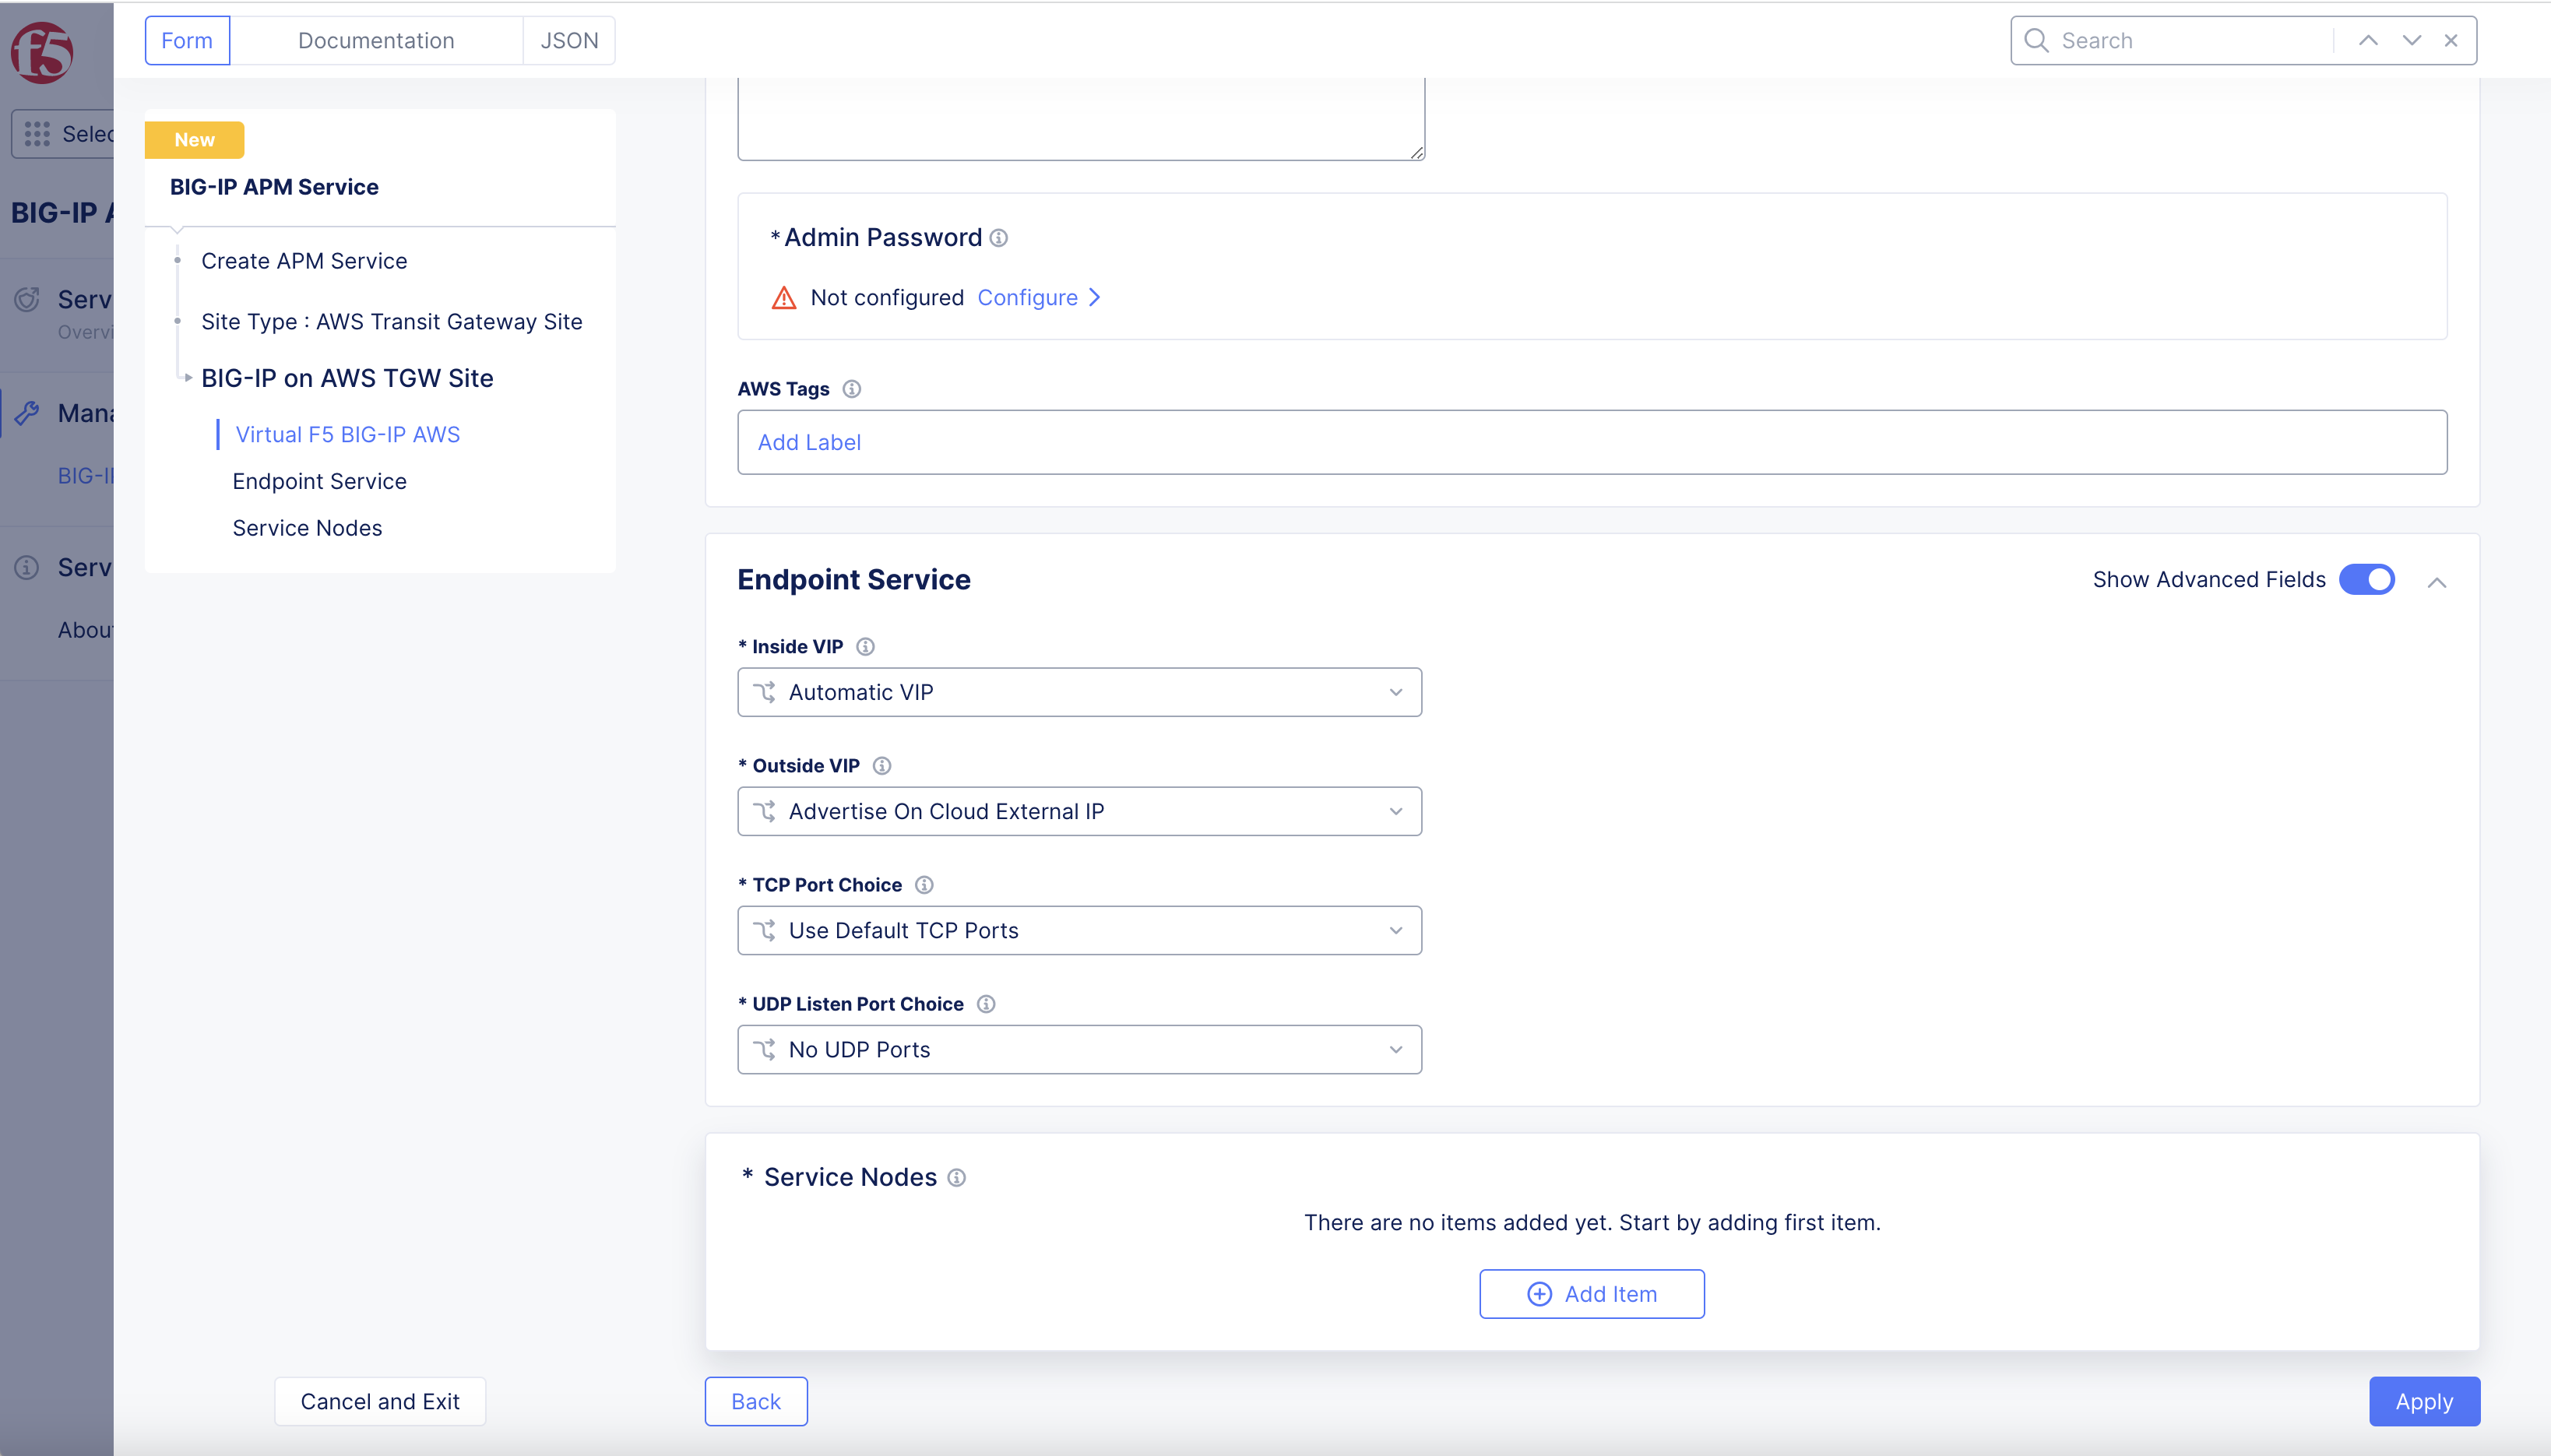
Figure: BIG-IP APM Service Node
- Enter
Node Name.
Note: Toggle
Show Advanced Fieldsto show all options.
Step 8: Setup Internal Interface.
- In
Internal Interfacesection:
Note: L2 interface on Site to be connected as interface on BIG-IP.
-
Select
L2 Interfacedrop-down menu option. -
Enter
Self IP. -
Enter
Default Gatewayas needed.
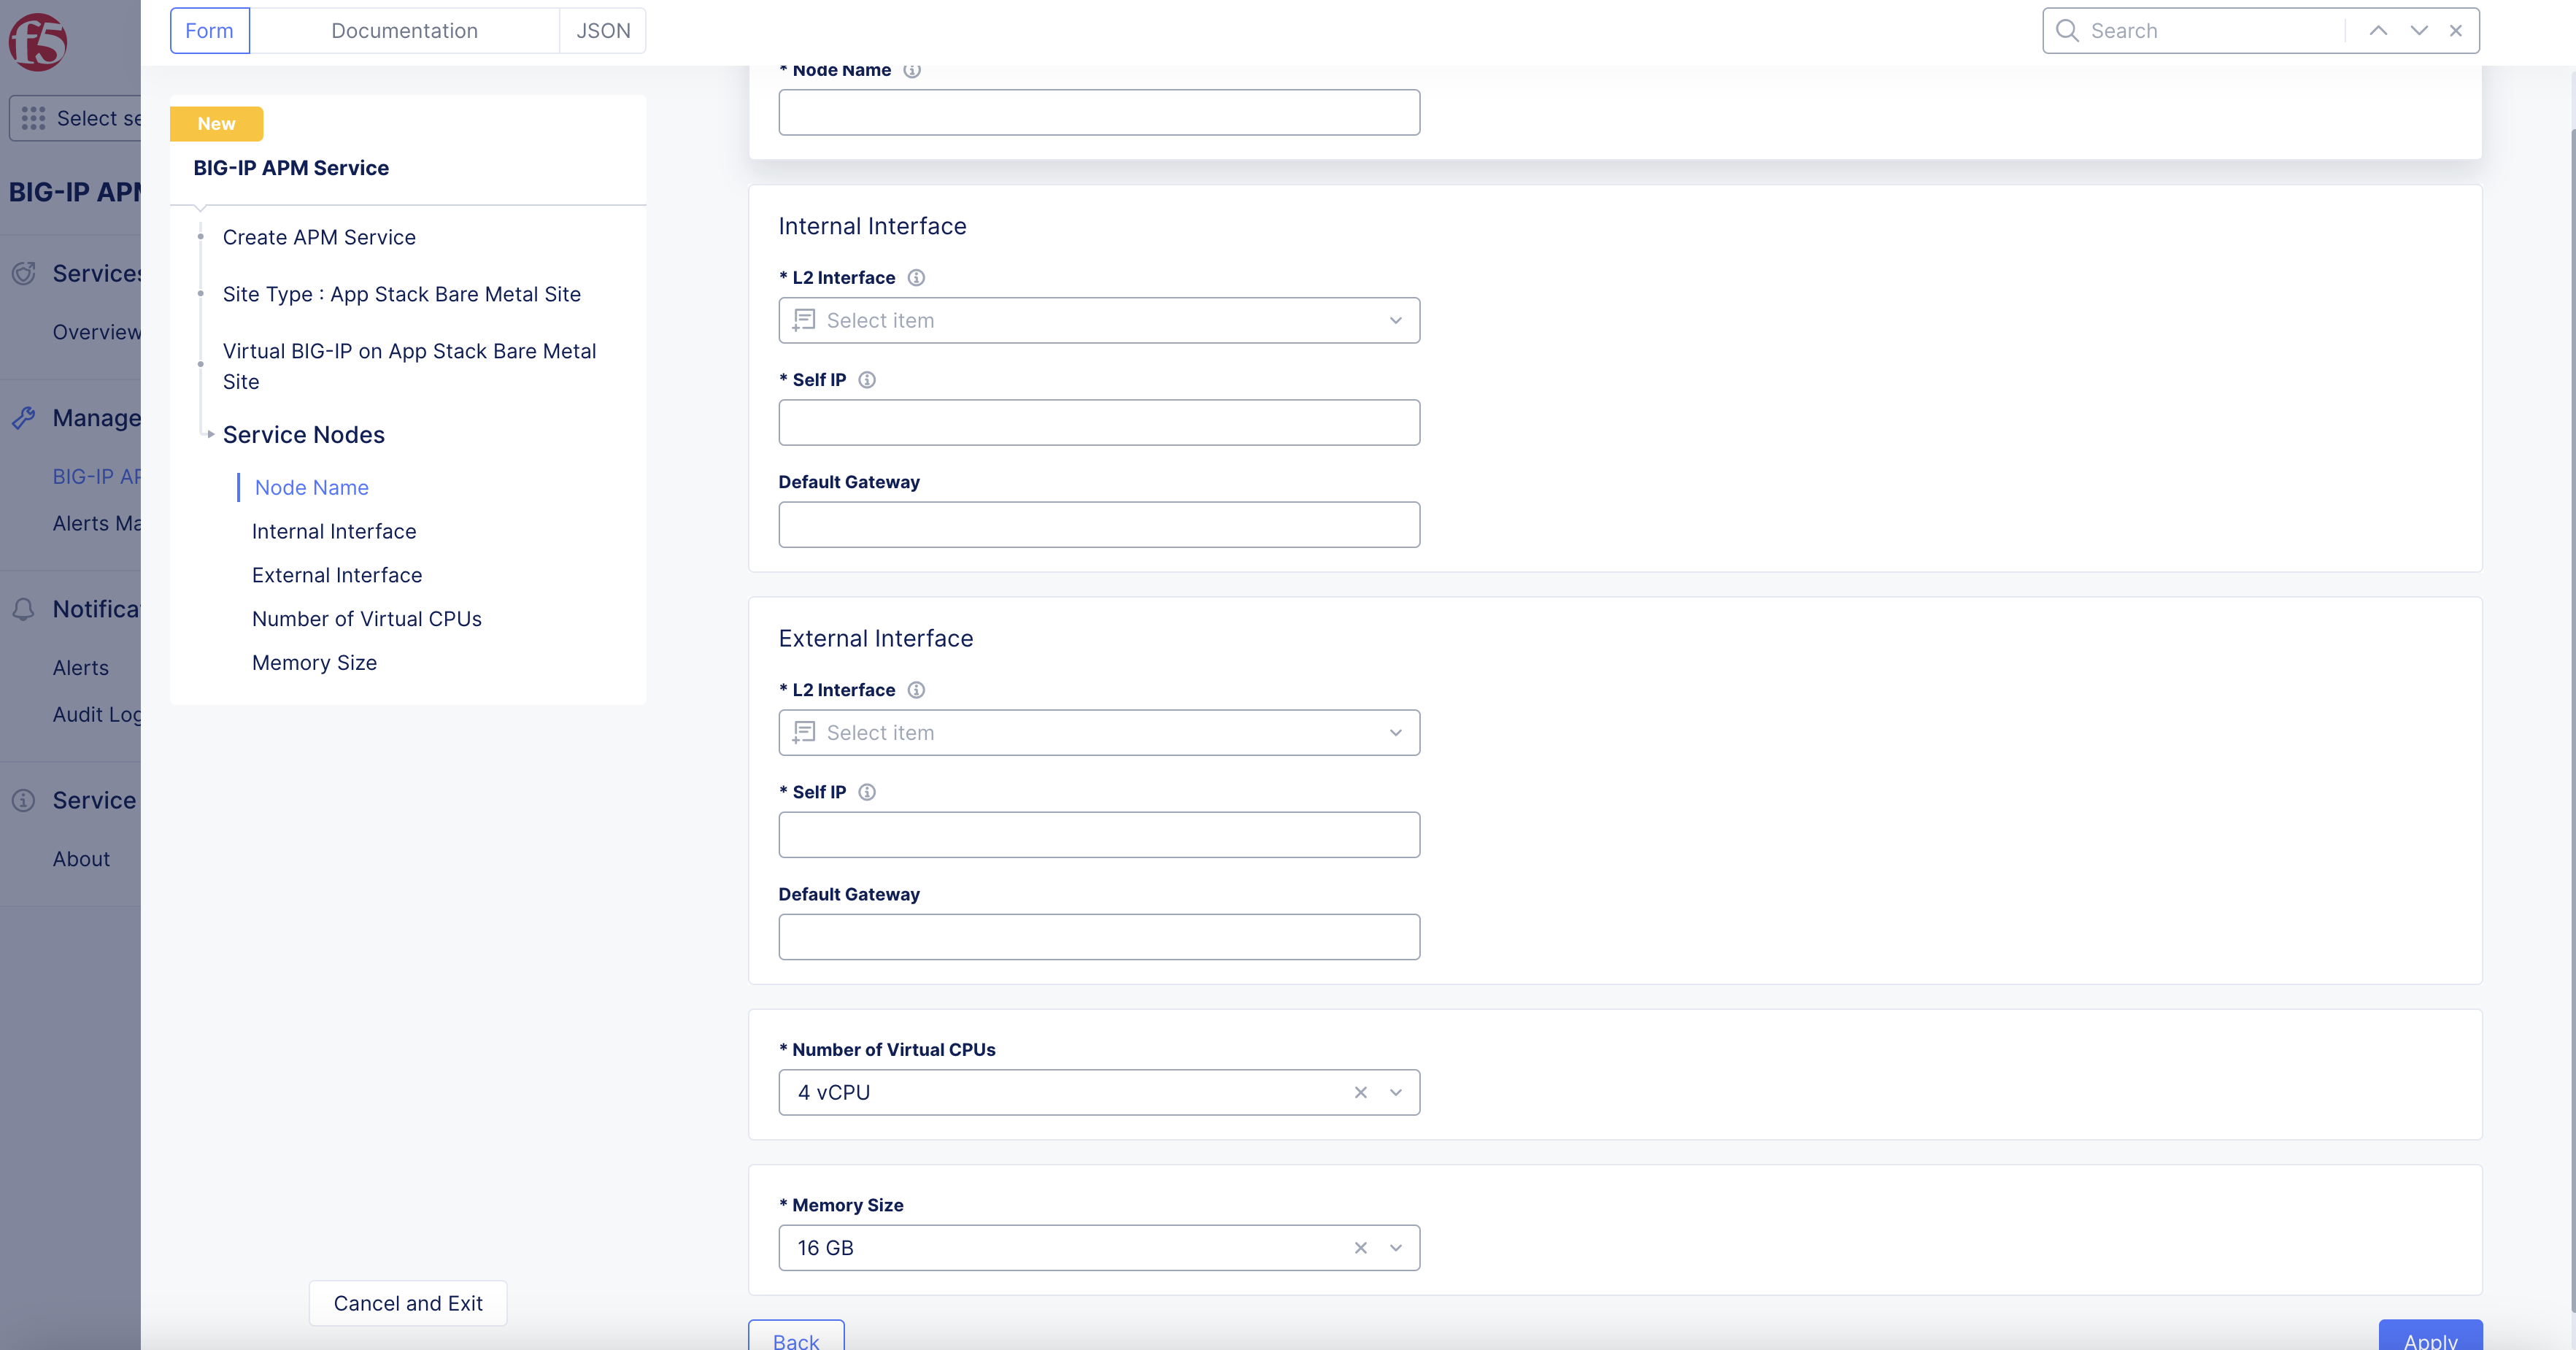
Figure: BIG-IP APM Service Node
Step 9: Setup External Interface.
-
In
External Interfacesection:Note: L2 interface on Site to be connected as interface on BIG-IP.
-
Select
L2 Interfacedrop-down menu option: -
Enter
Self IP. -
Enter
Default Gatewayas needed. -
Select
Applybutton.
-
-
Select
Applybutton.
Figure: BIG-IP APM Service Node
Step 10: BIG-IP Access Management Setup.
-
Select
BIG-IP Console Access Managementdrop-down menu. -
Enter
Domain Suffix. -
Select
Access on Site Local Networksdrop-down menu. -
Select
Save and Exitbutton.
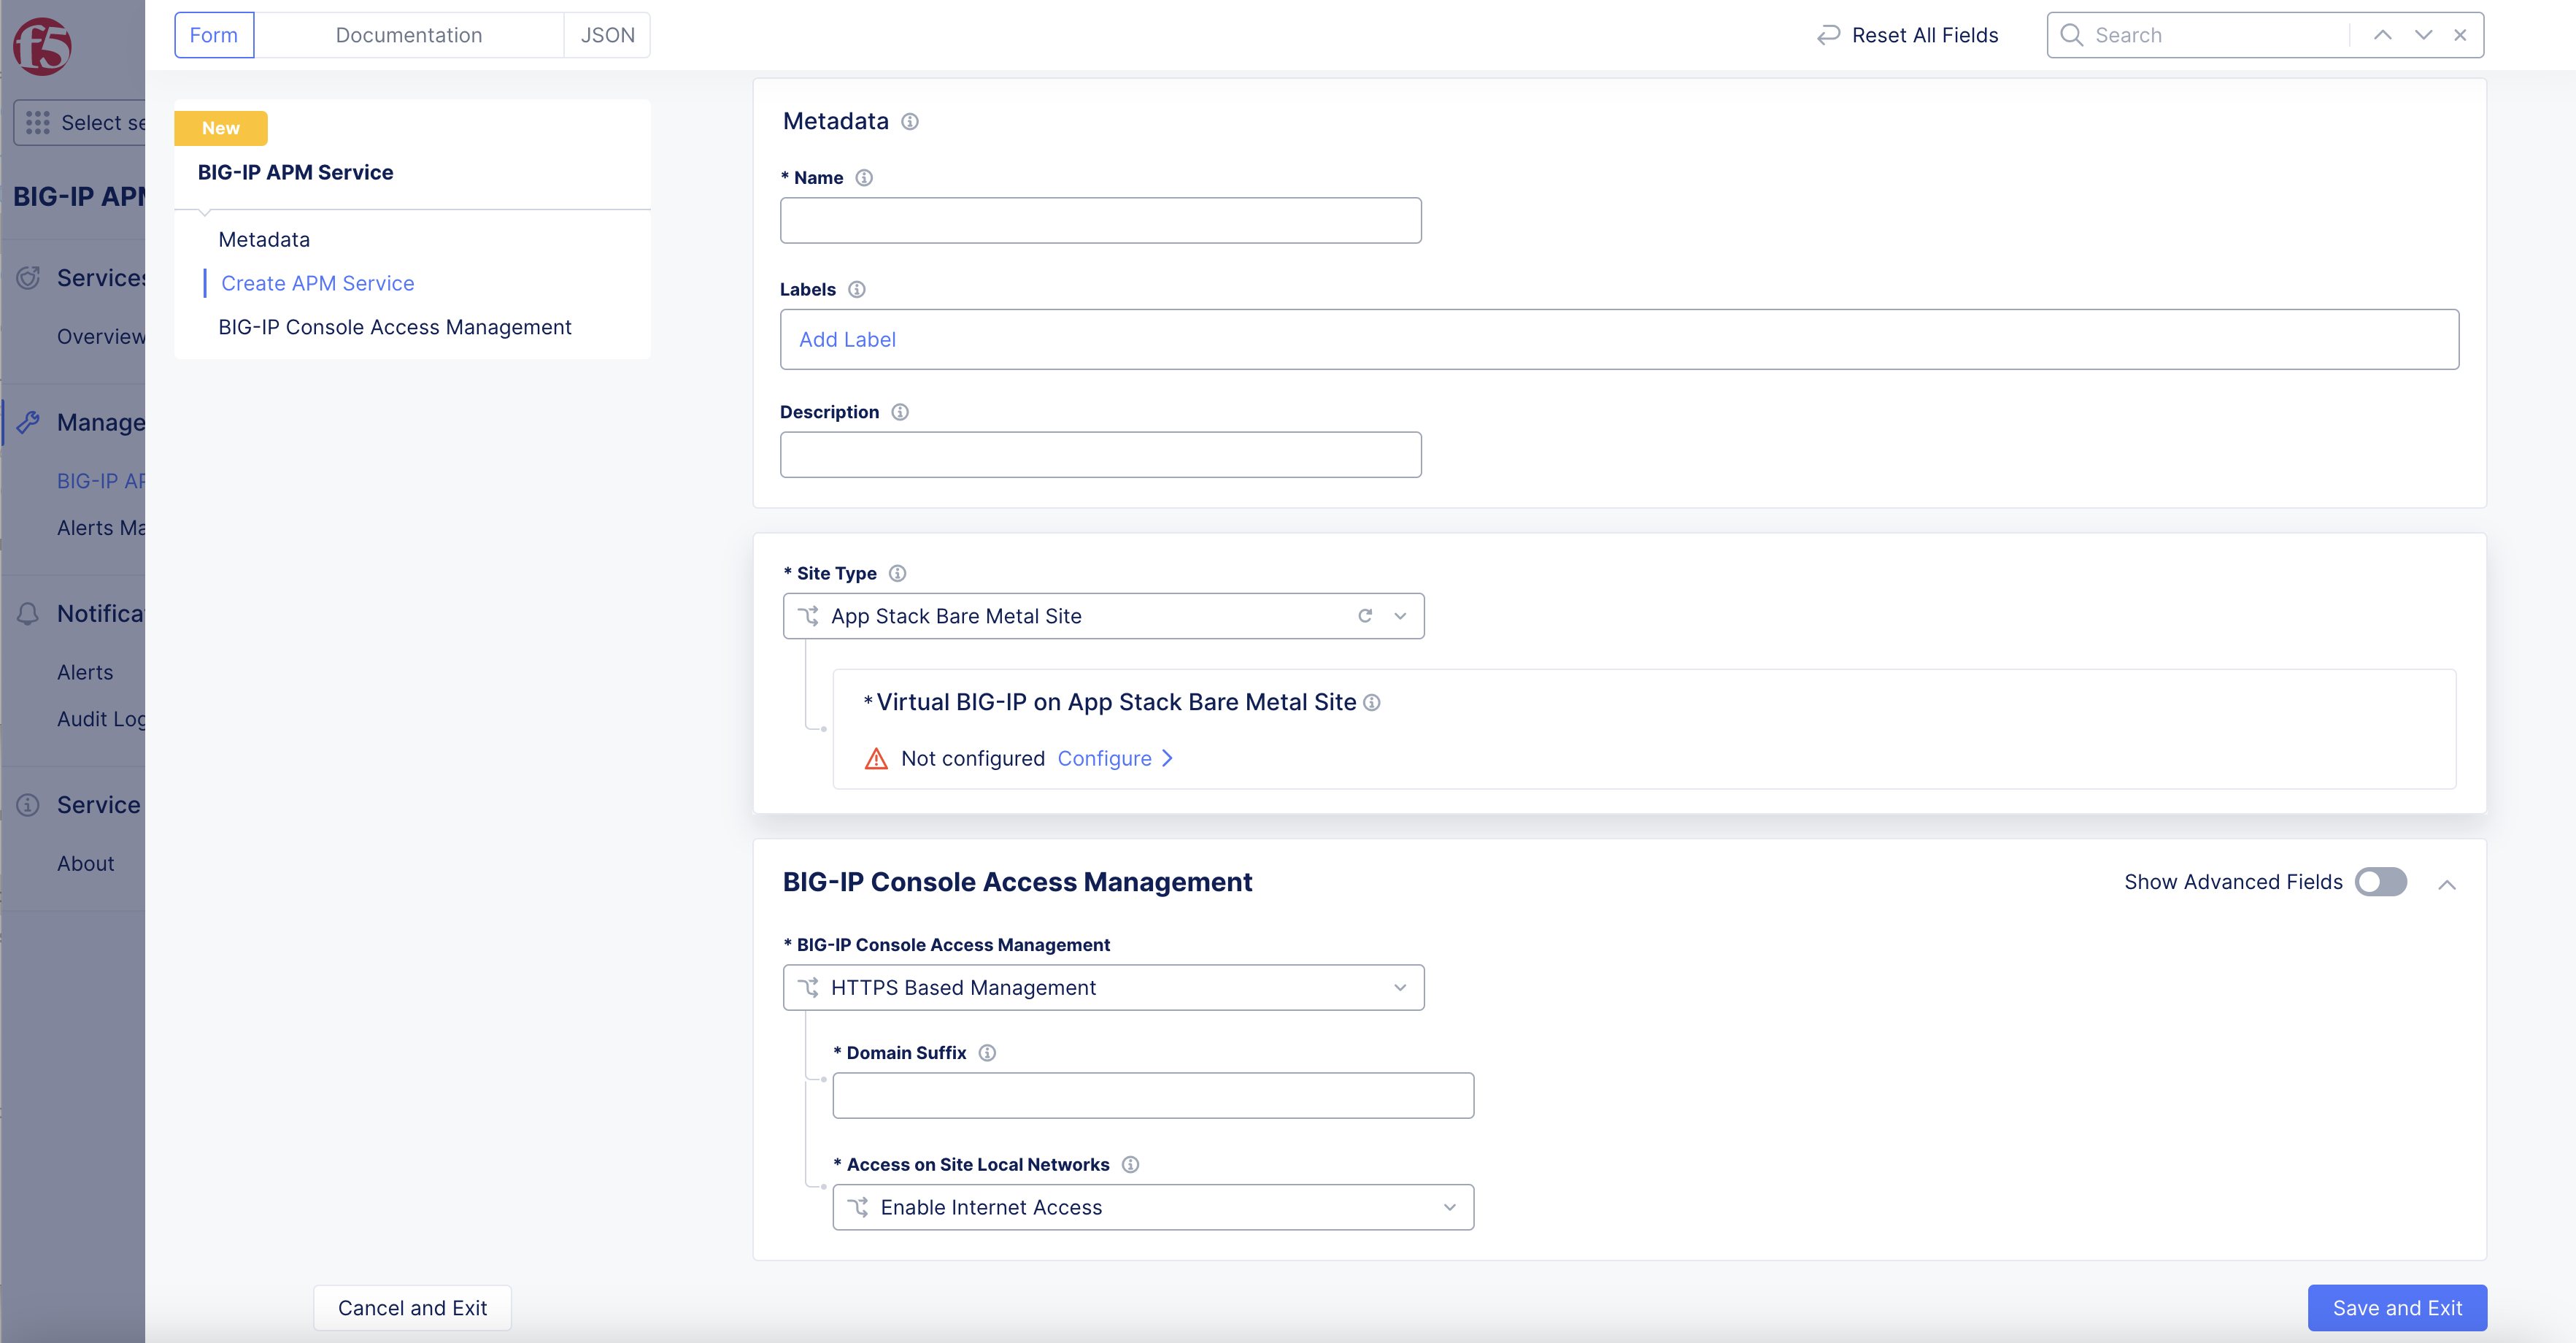
Figure: BIG-IP APM
Confirm BIG-IP APM Setup
Step 1: Confirm BIG-IP APM AWS Setup.
Note: AWS BIG-IP
Deployment StatusisApplied.
- URL populates in
Management DashboardwhenDeployment StatusshowsAppliedfor BIG-IP instance management.
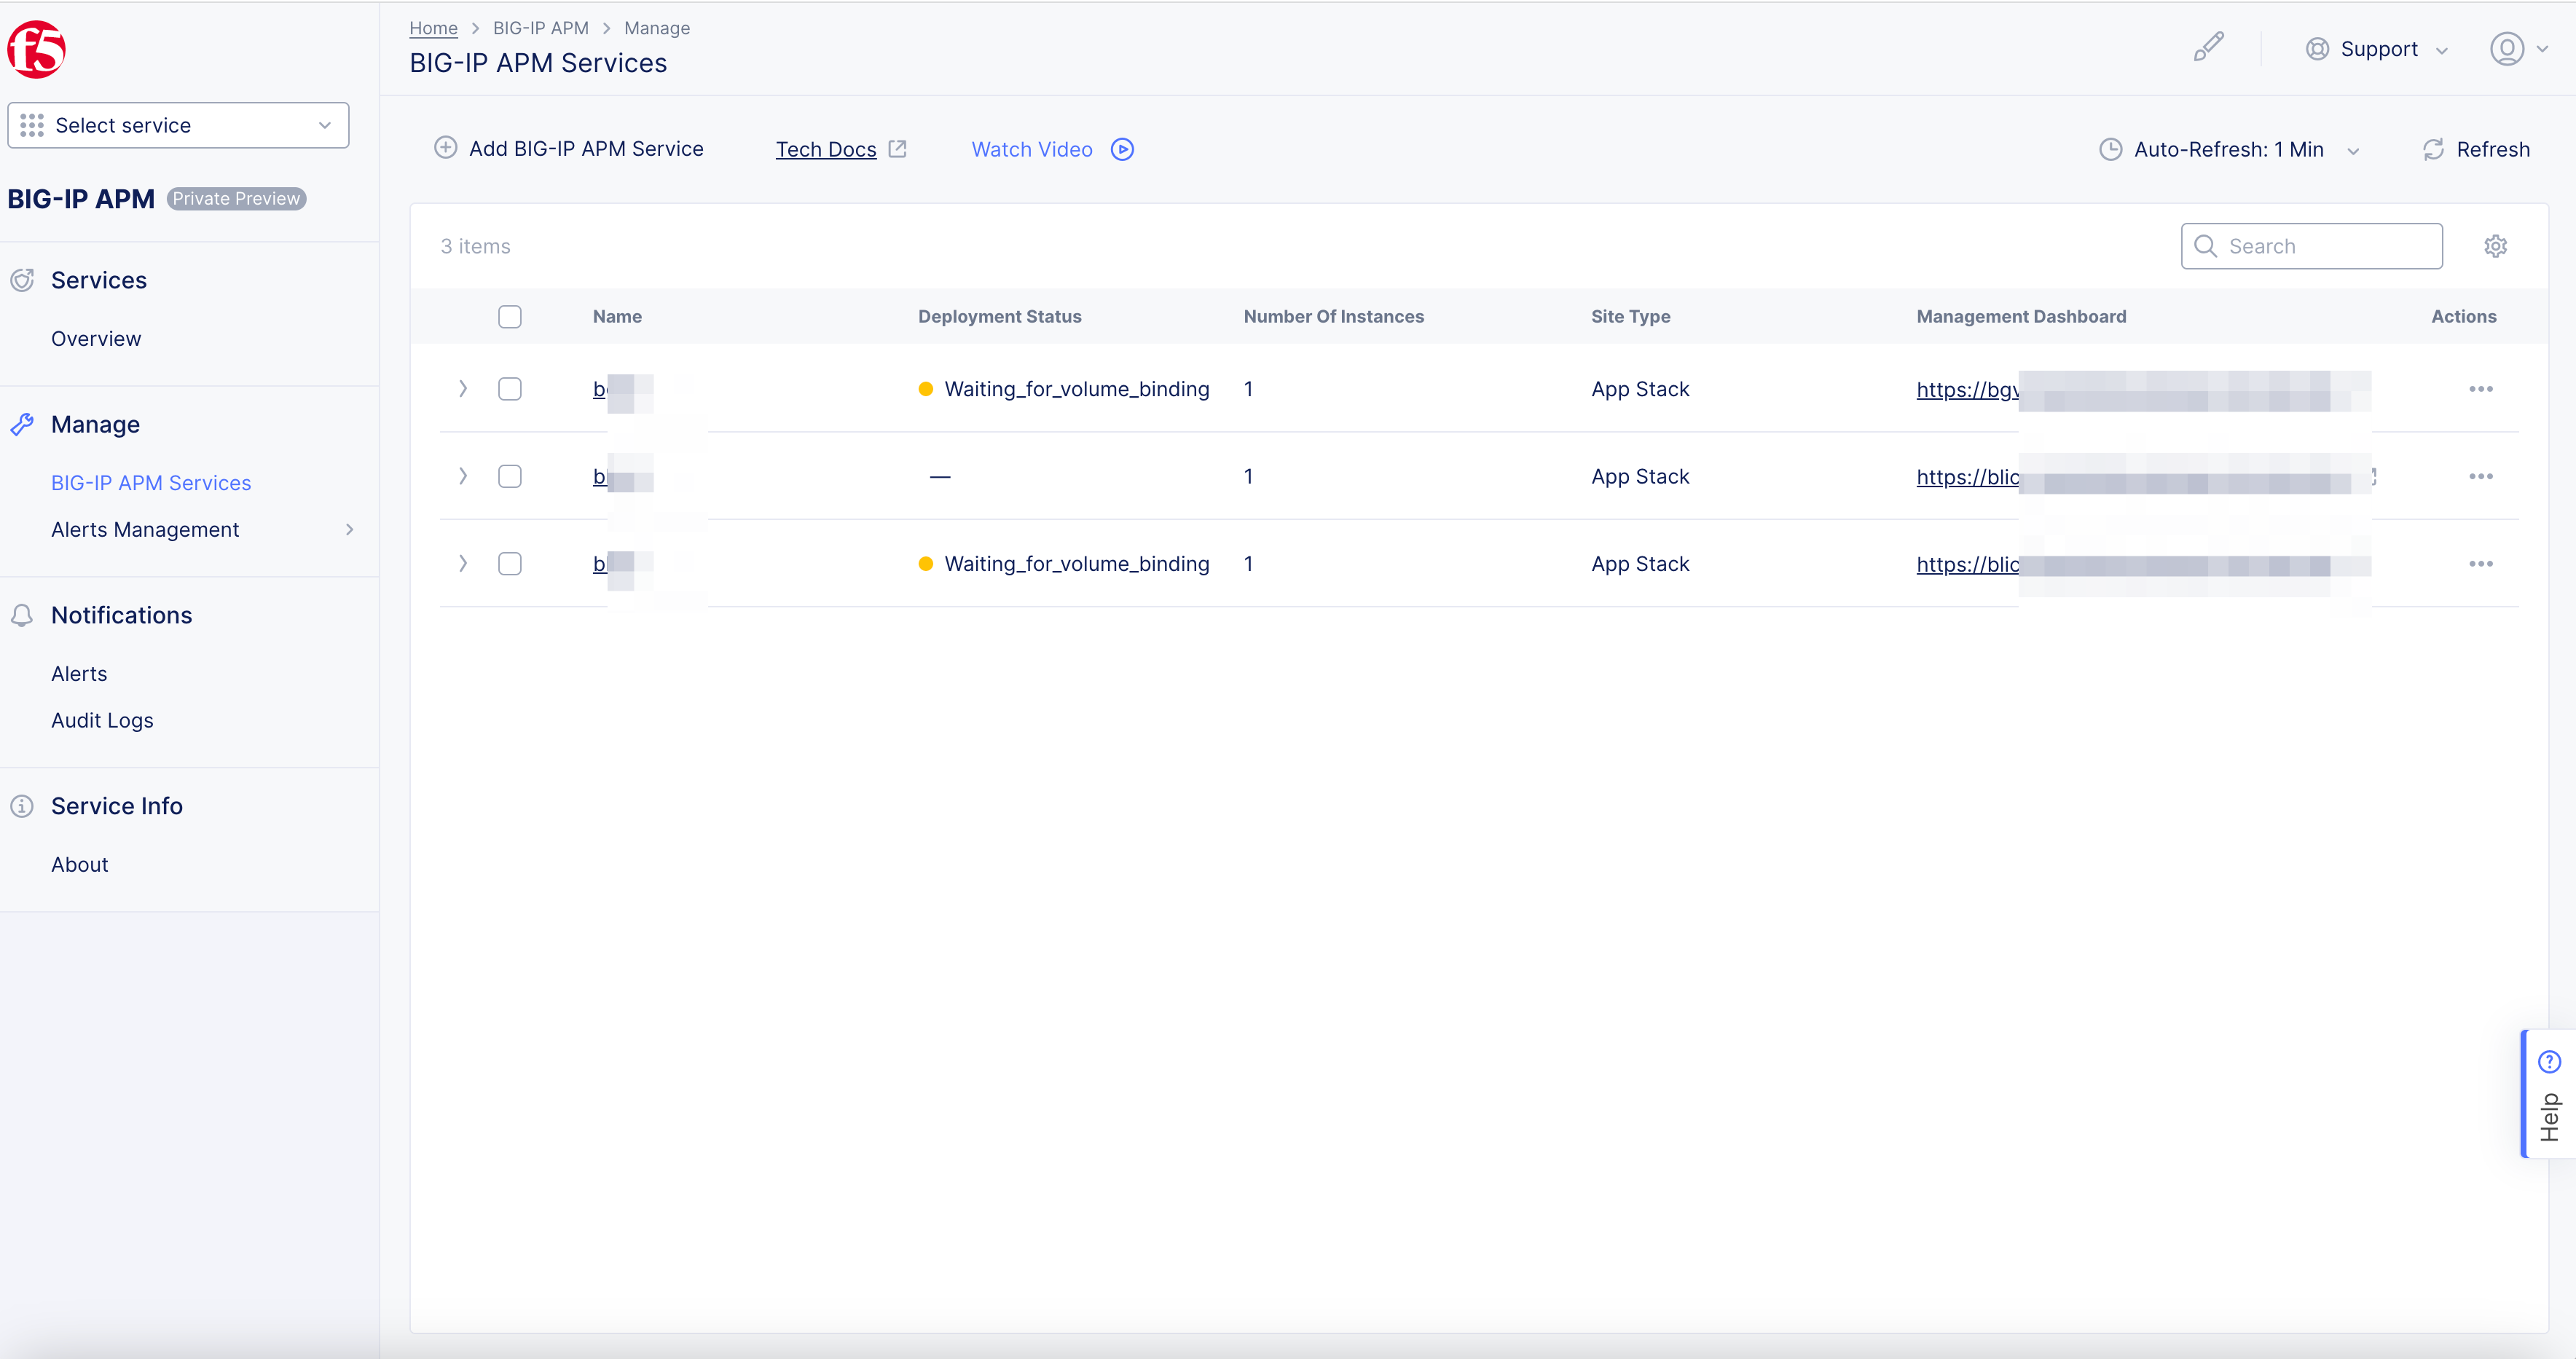
Figure: BIG-IP APM Service
Step 2: Confirm BIG-IP APM Bare Metal Setup.
Note: Bare Metal BIG-IP
Deployment StatusisRunning.
- URL populates in
Management DashboardwhenDeployment StatusshowsRunningfor BIG-IP instance management.
Figure: BIG-IP APM Service
Note: For BIG-IP APM service related issues select
Other>Contact Support>Serviceto contact support.
BIG-IP APM Metrics Setup
Bare Metal App Stack deployments use BIG-IP CLP (cloud licensing program). Managed service providers (MSP) use annual true-up billing in BIG-IQ license manager reporting.
AWS TGW BIG-IPs billed as AWS storefront items. Enabled on AWS account used to establish TGW site and BIG-IP VEs.
BIG-IP APM Alerts
-
APMServiceInstanceUnavailable -
CPU Usage-
APMCPUThresholdCritical -
APMCPUThresholdMajor -
APMCPUThresholdMinor
-
Step 1: Setup BIG-IP APM Alerts Management.
- In
F5 Distributed Cloud Consolehomepage > selectAll Workspacesdrop down menu under service boxes.
Figure: F5 Console All Services
- Select
BIG-IP APM.
Figure: F5 Console All Services BIG-IP APM
- In
BIG-IP APM>Manage> selectAlerts Management.
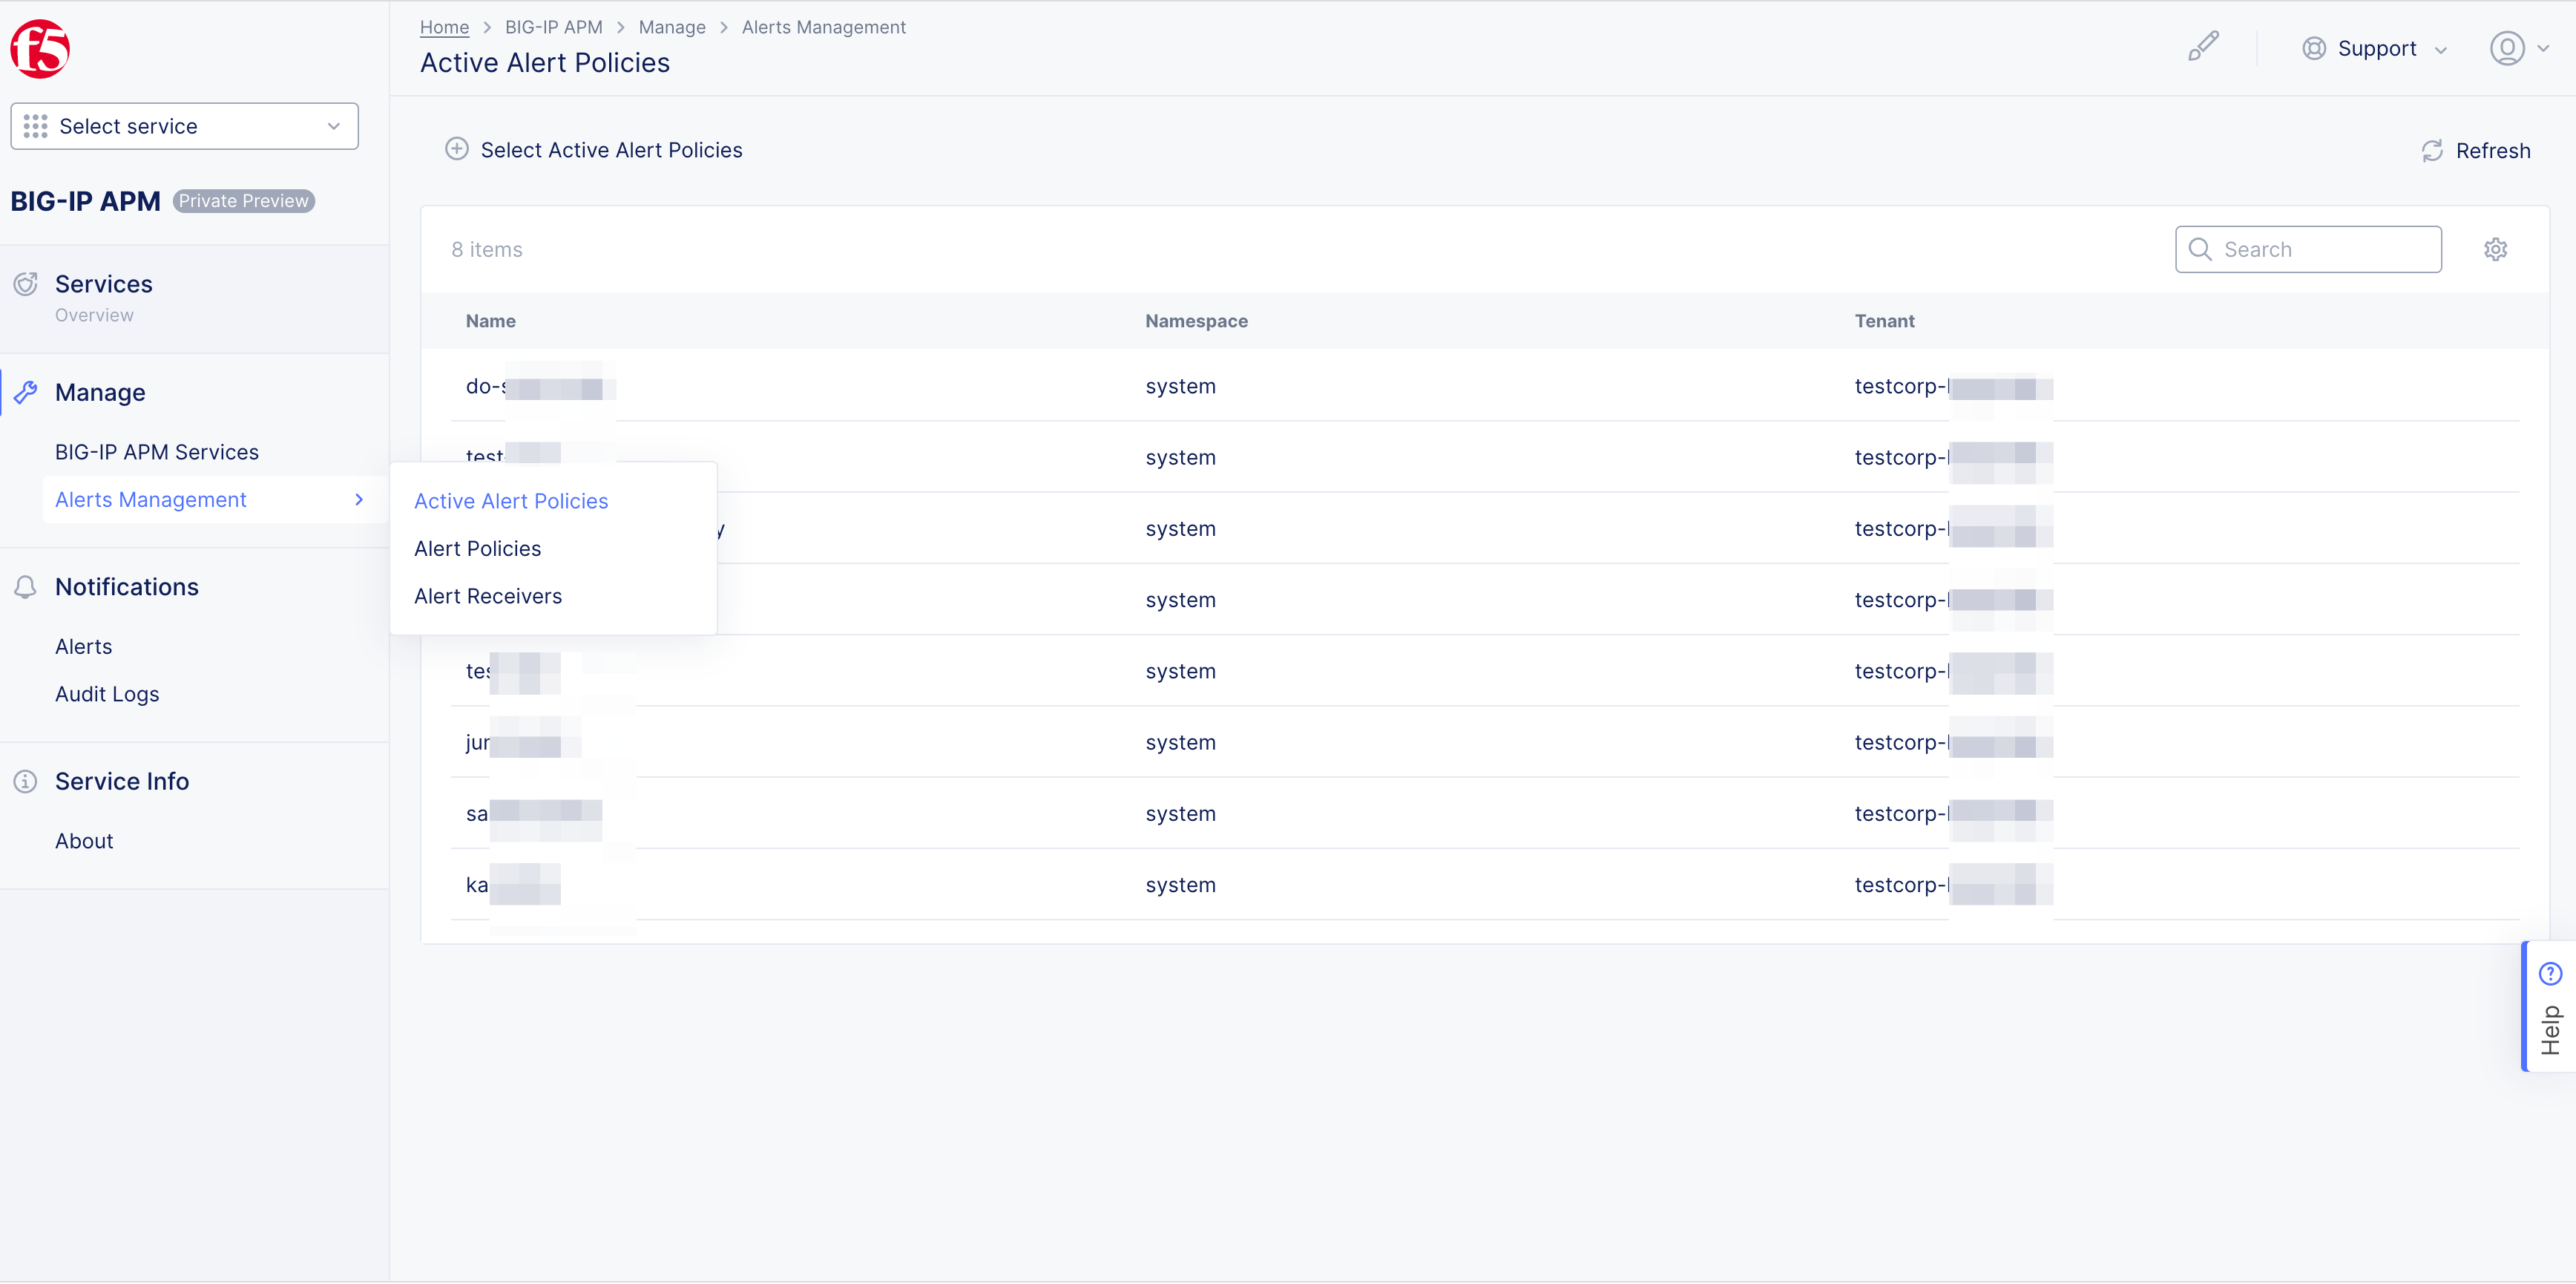
Figure: BIG-IP APM Alerts Management
Step 2: Setup BIG-IP APM Active Alerts Policies.
- Select
Active Alert Policies>+ Select Active Alert Policiesbutton.
Figure: BIG-IP APM
-
Select
+ Add Itembutton. -
Select
Alert Policiesdrop-down option.
Note: Select
+ Add Itembutton to add additionalAlert Policiesas needed. Select dots inOrdercolumn to move order of policies.
Note: Select dots in
Actionscolumn toEditorDeleteas needed.
- Select
Save and Exitbutton.
Step 3: Setup BIG-IP APM Alerts Policies.
- Select
Alert Policies.
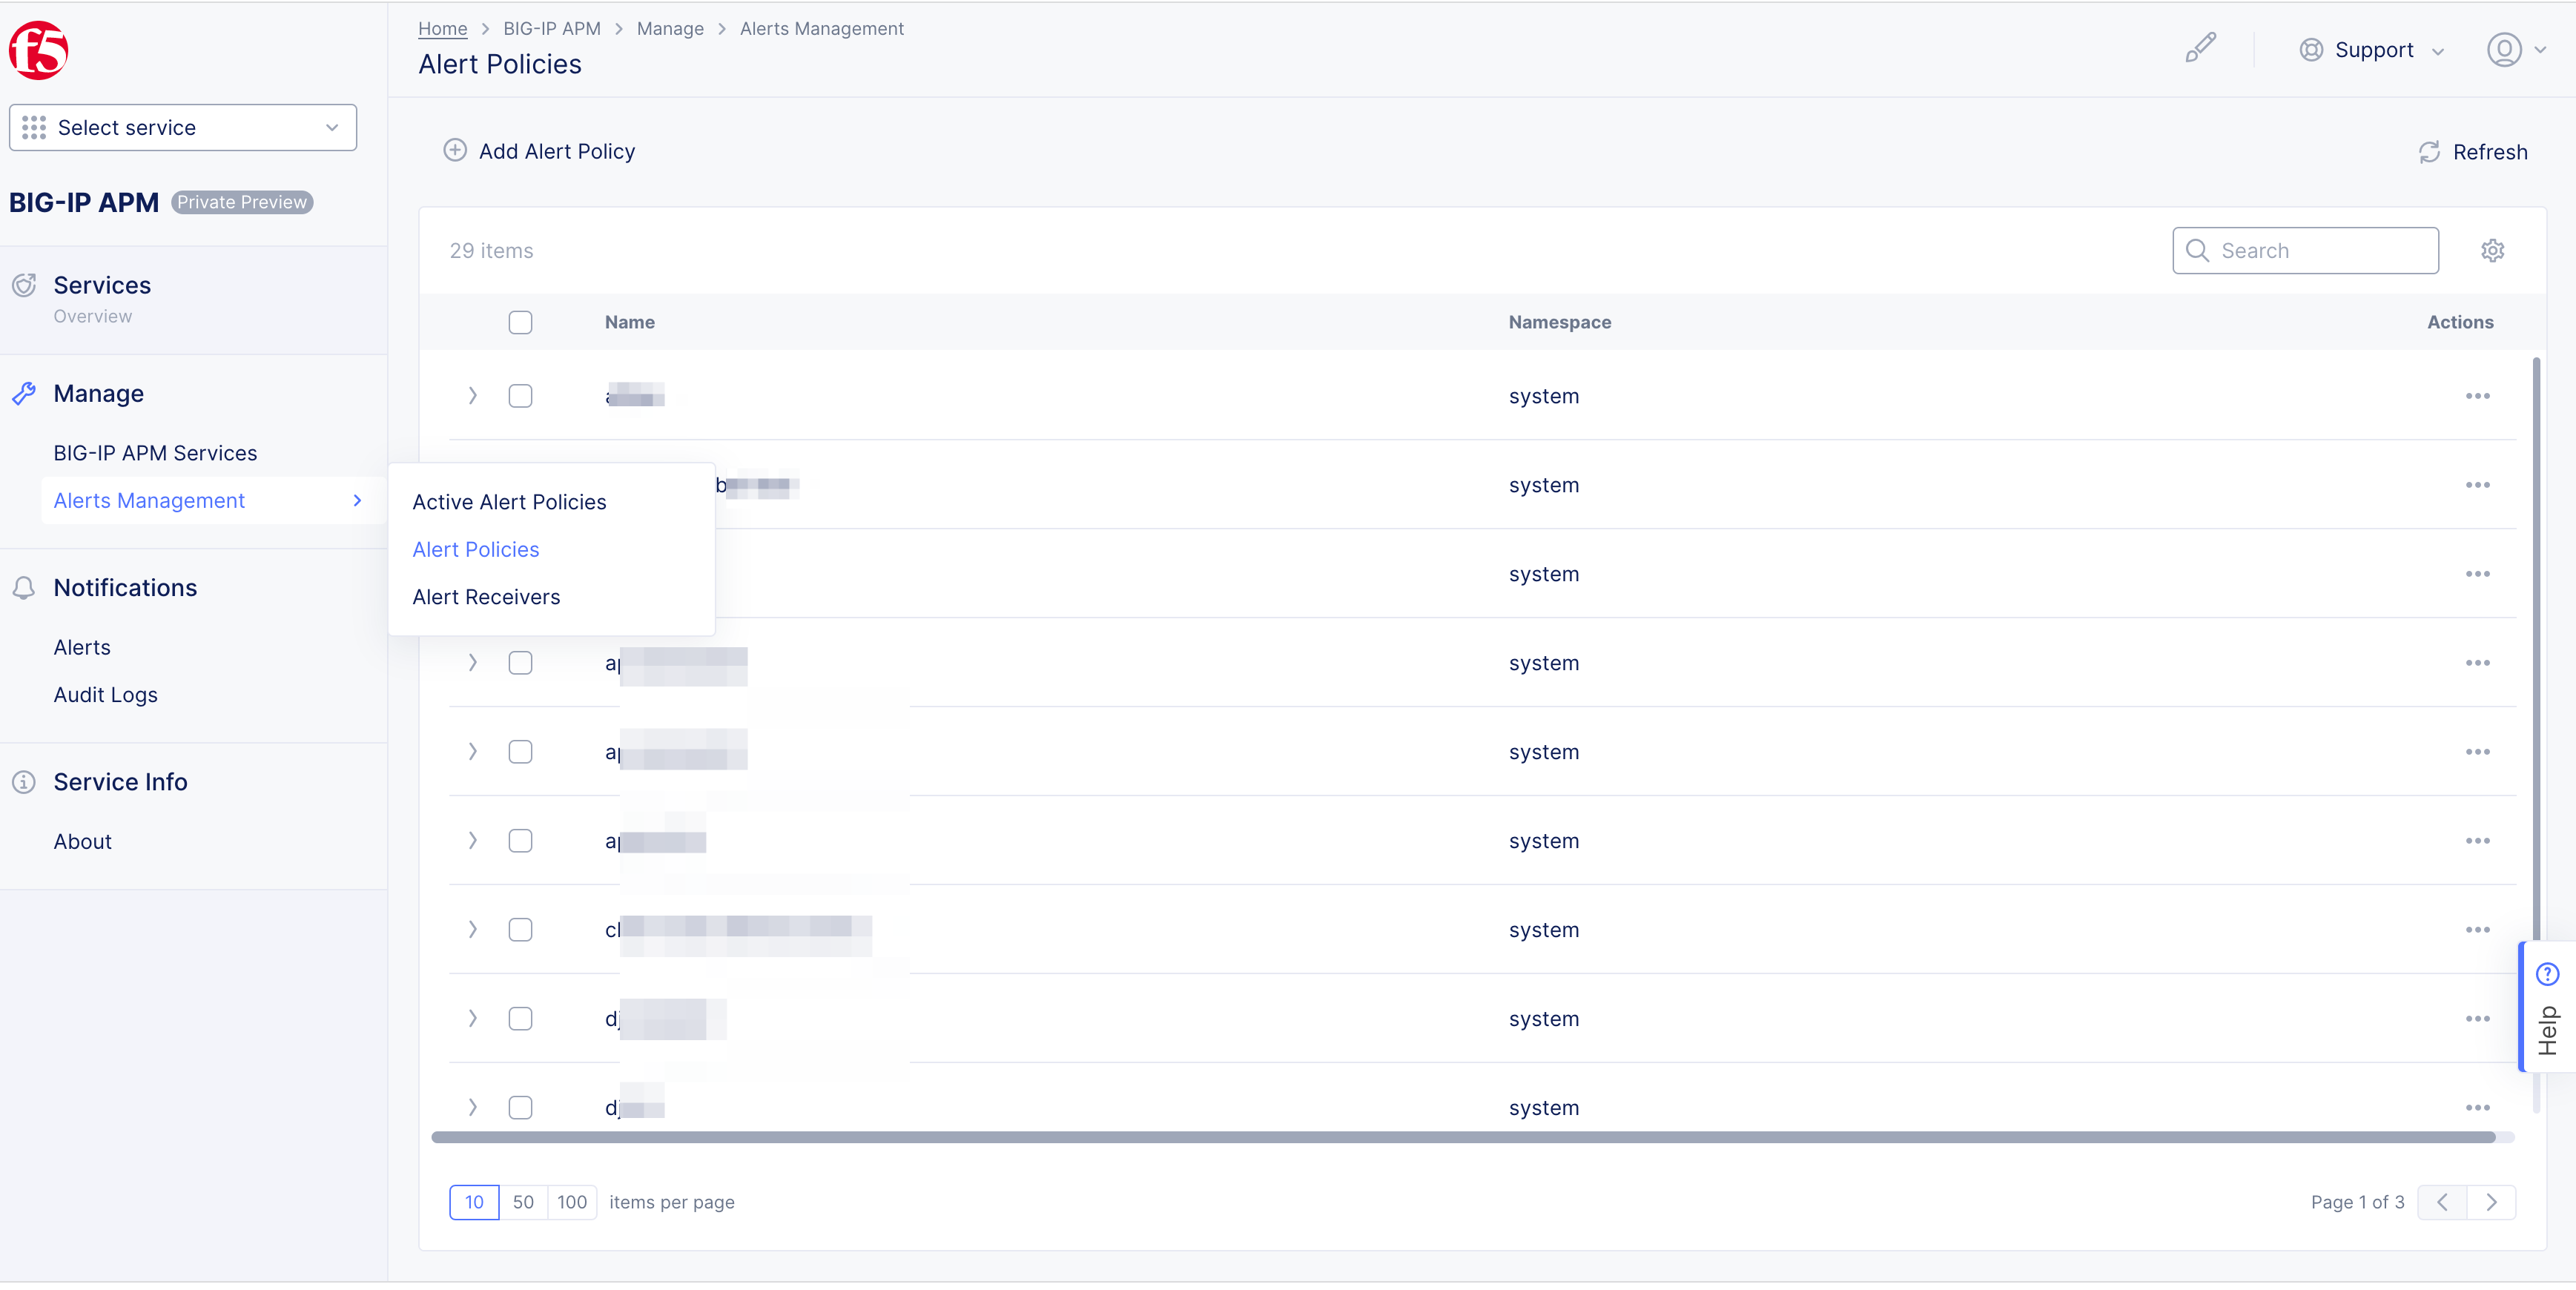
Figure: BIG-IP APM
-
Enter
Name. -
Add
LabelsandDescriptionas needed. -
See, Alerts Setup.
-
Select
Save and Exitbutton.
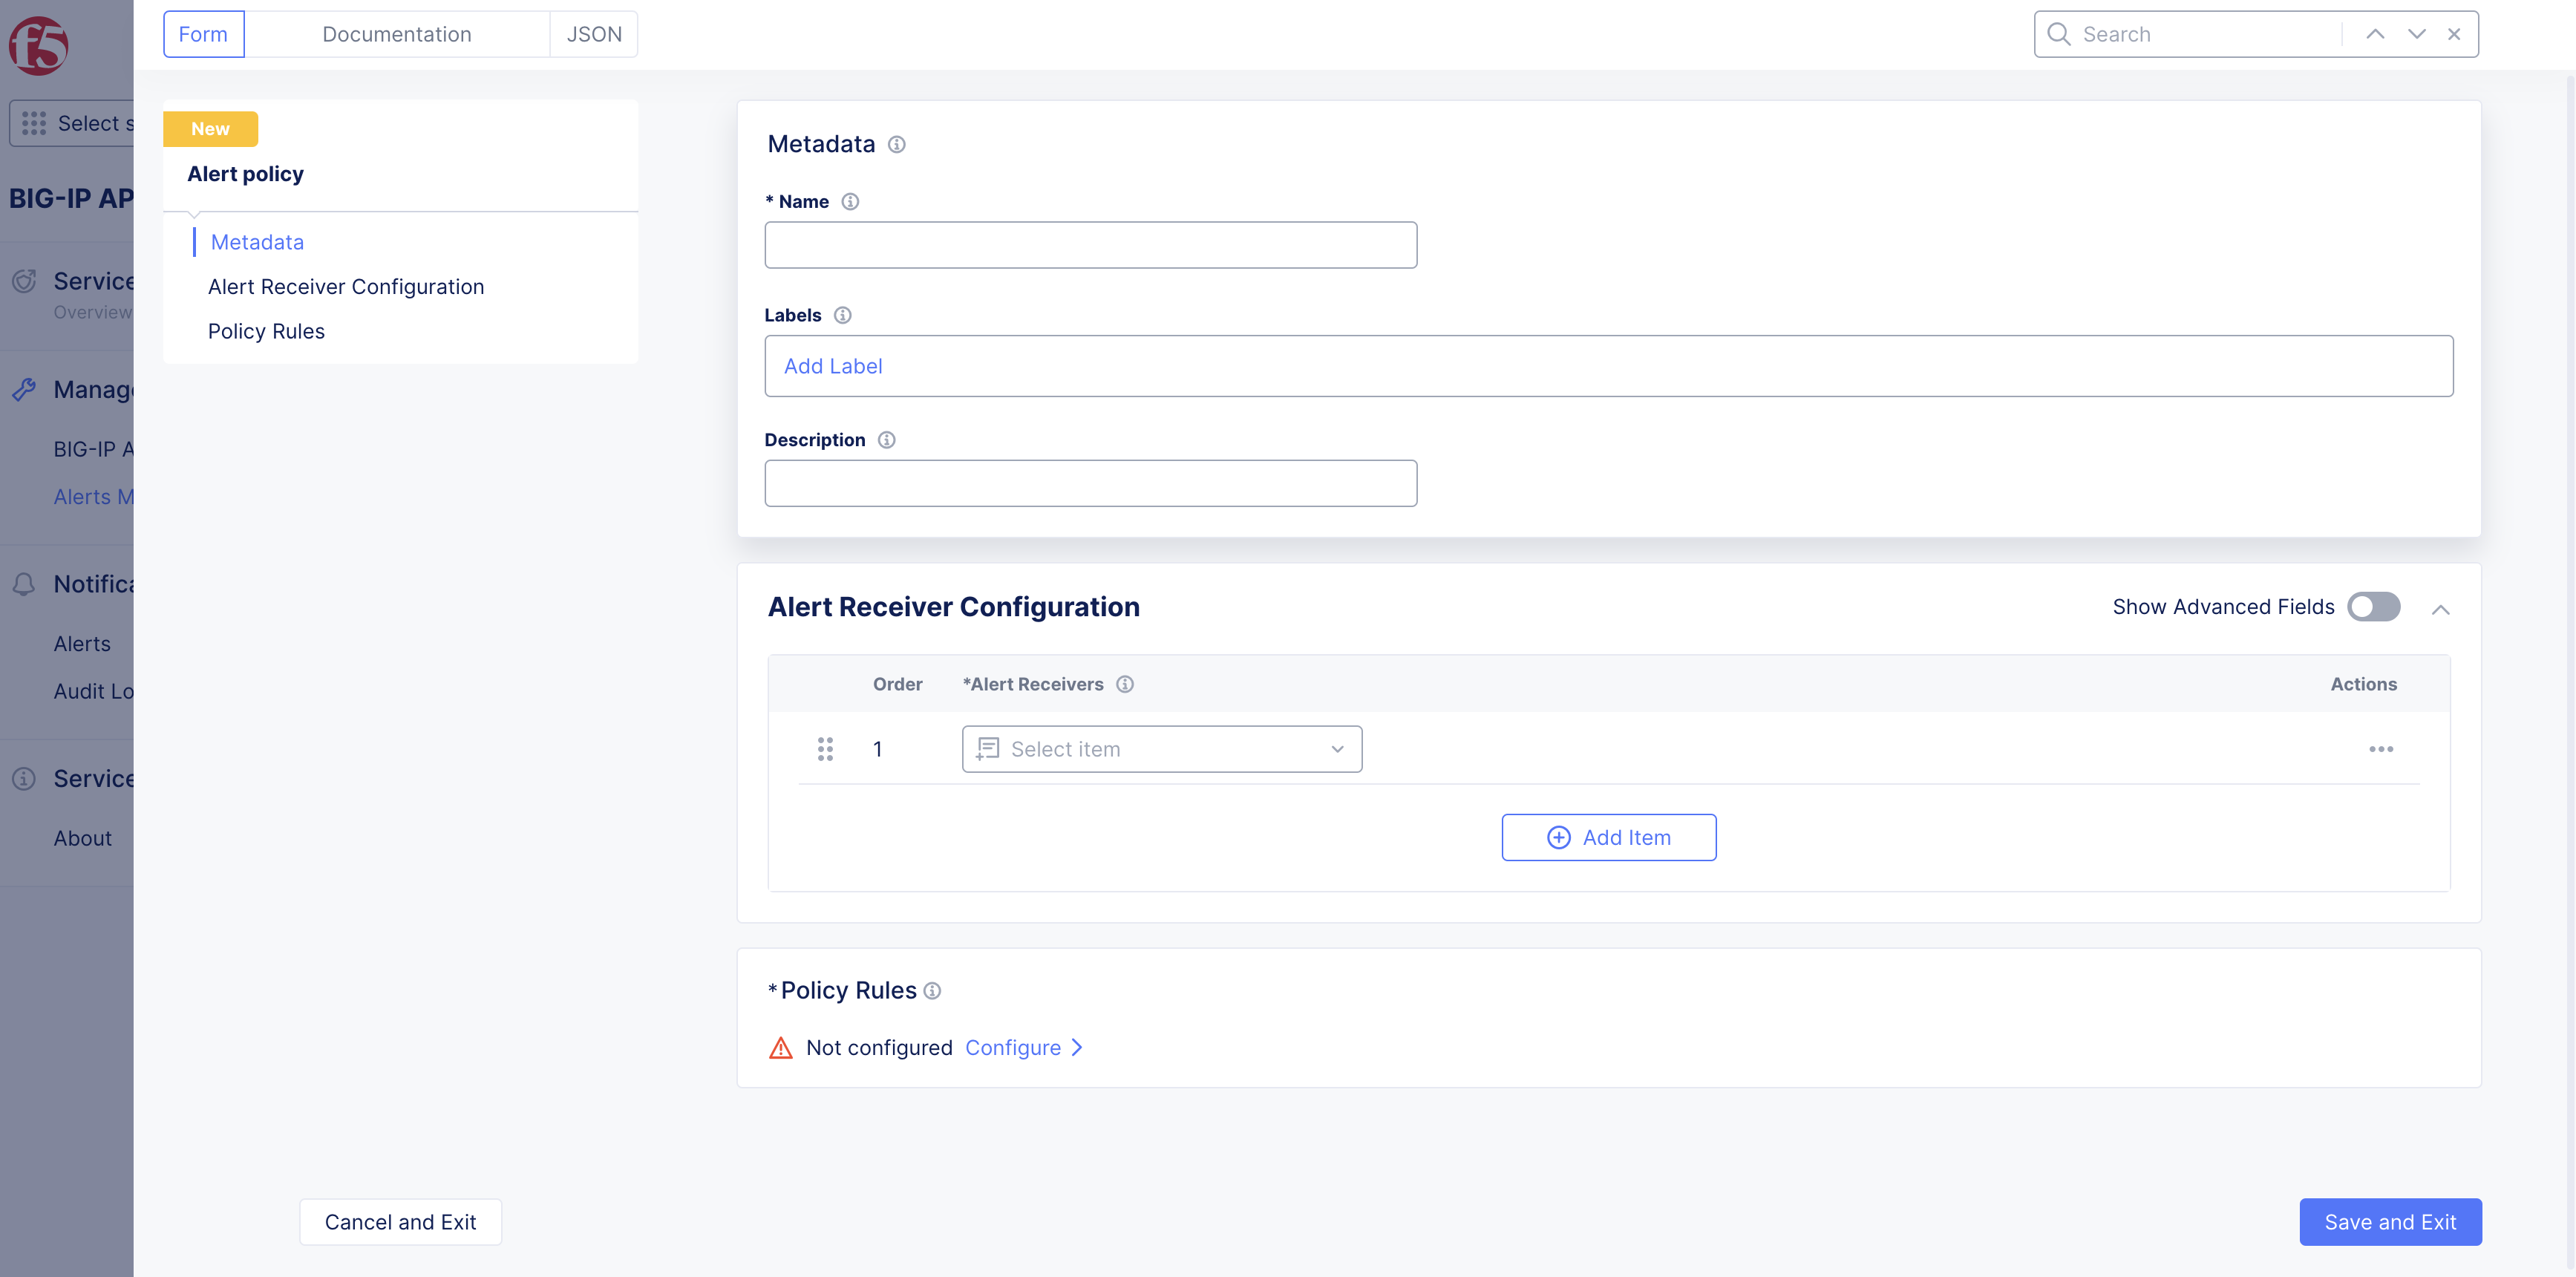
Figure: BIG-IP APM
Step 4: Setup BIG-IP APM Alerts Receivers.
- Select
Alert Receivers.
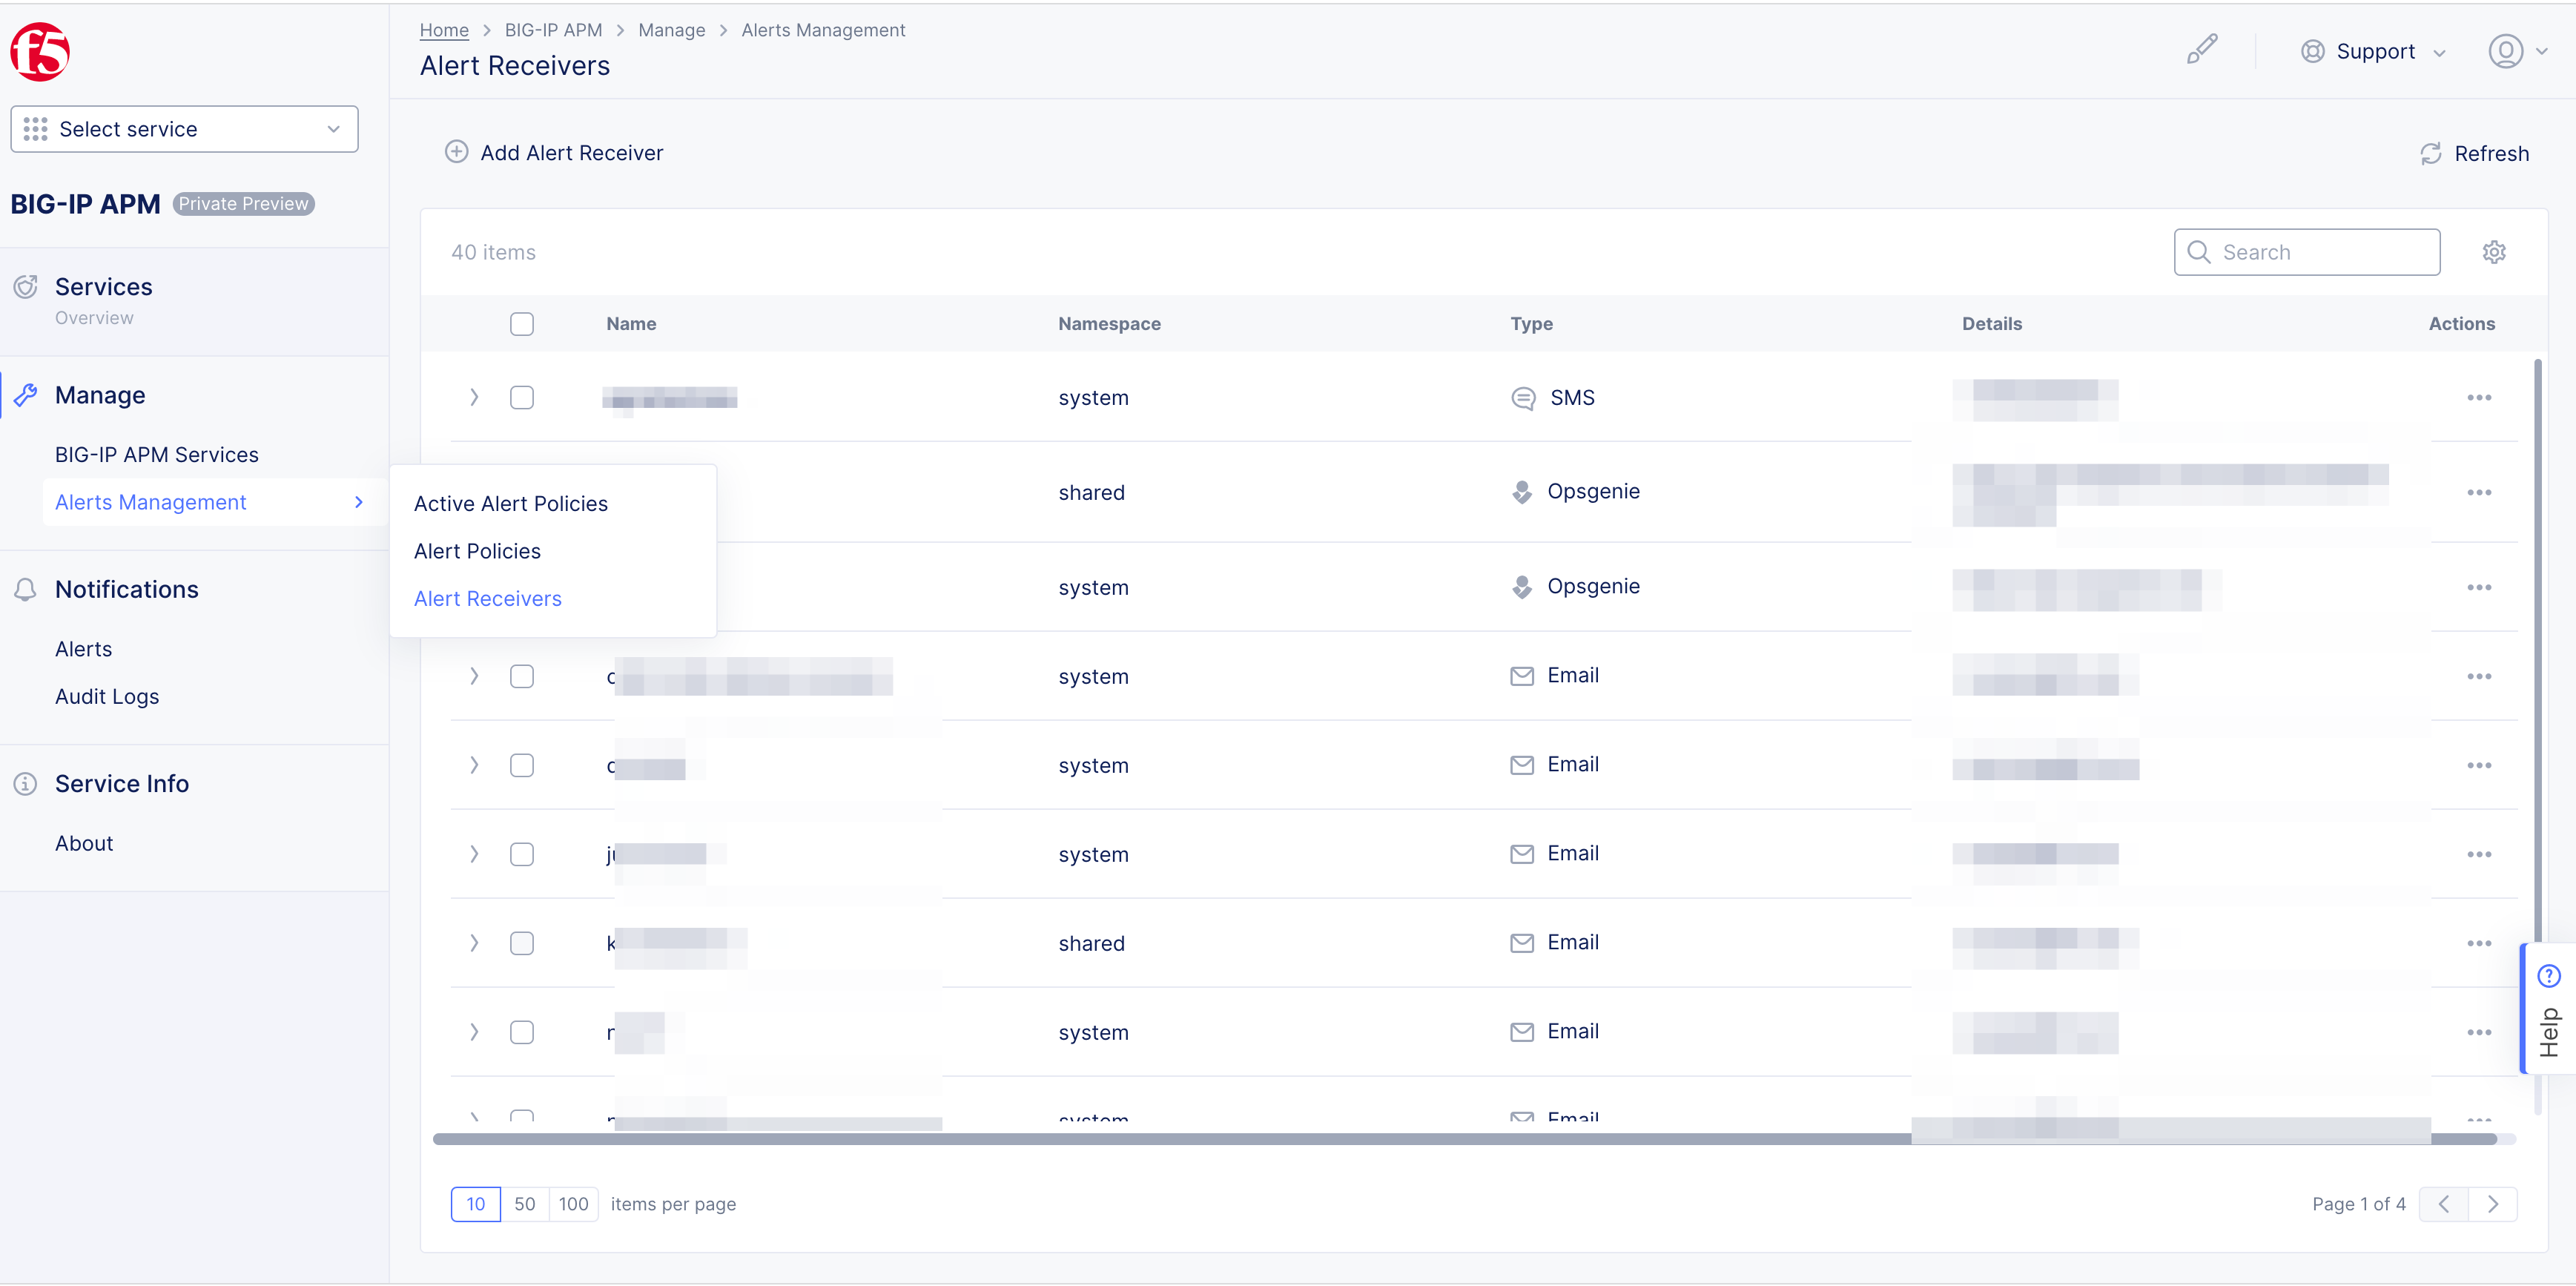
Figure: BIG-IP APM
-
Enter
Name. -
Add
LabelsandDescriptionas needed. -
See, Alerts Setup.
-
Select
Save and Exitbutton.
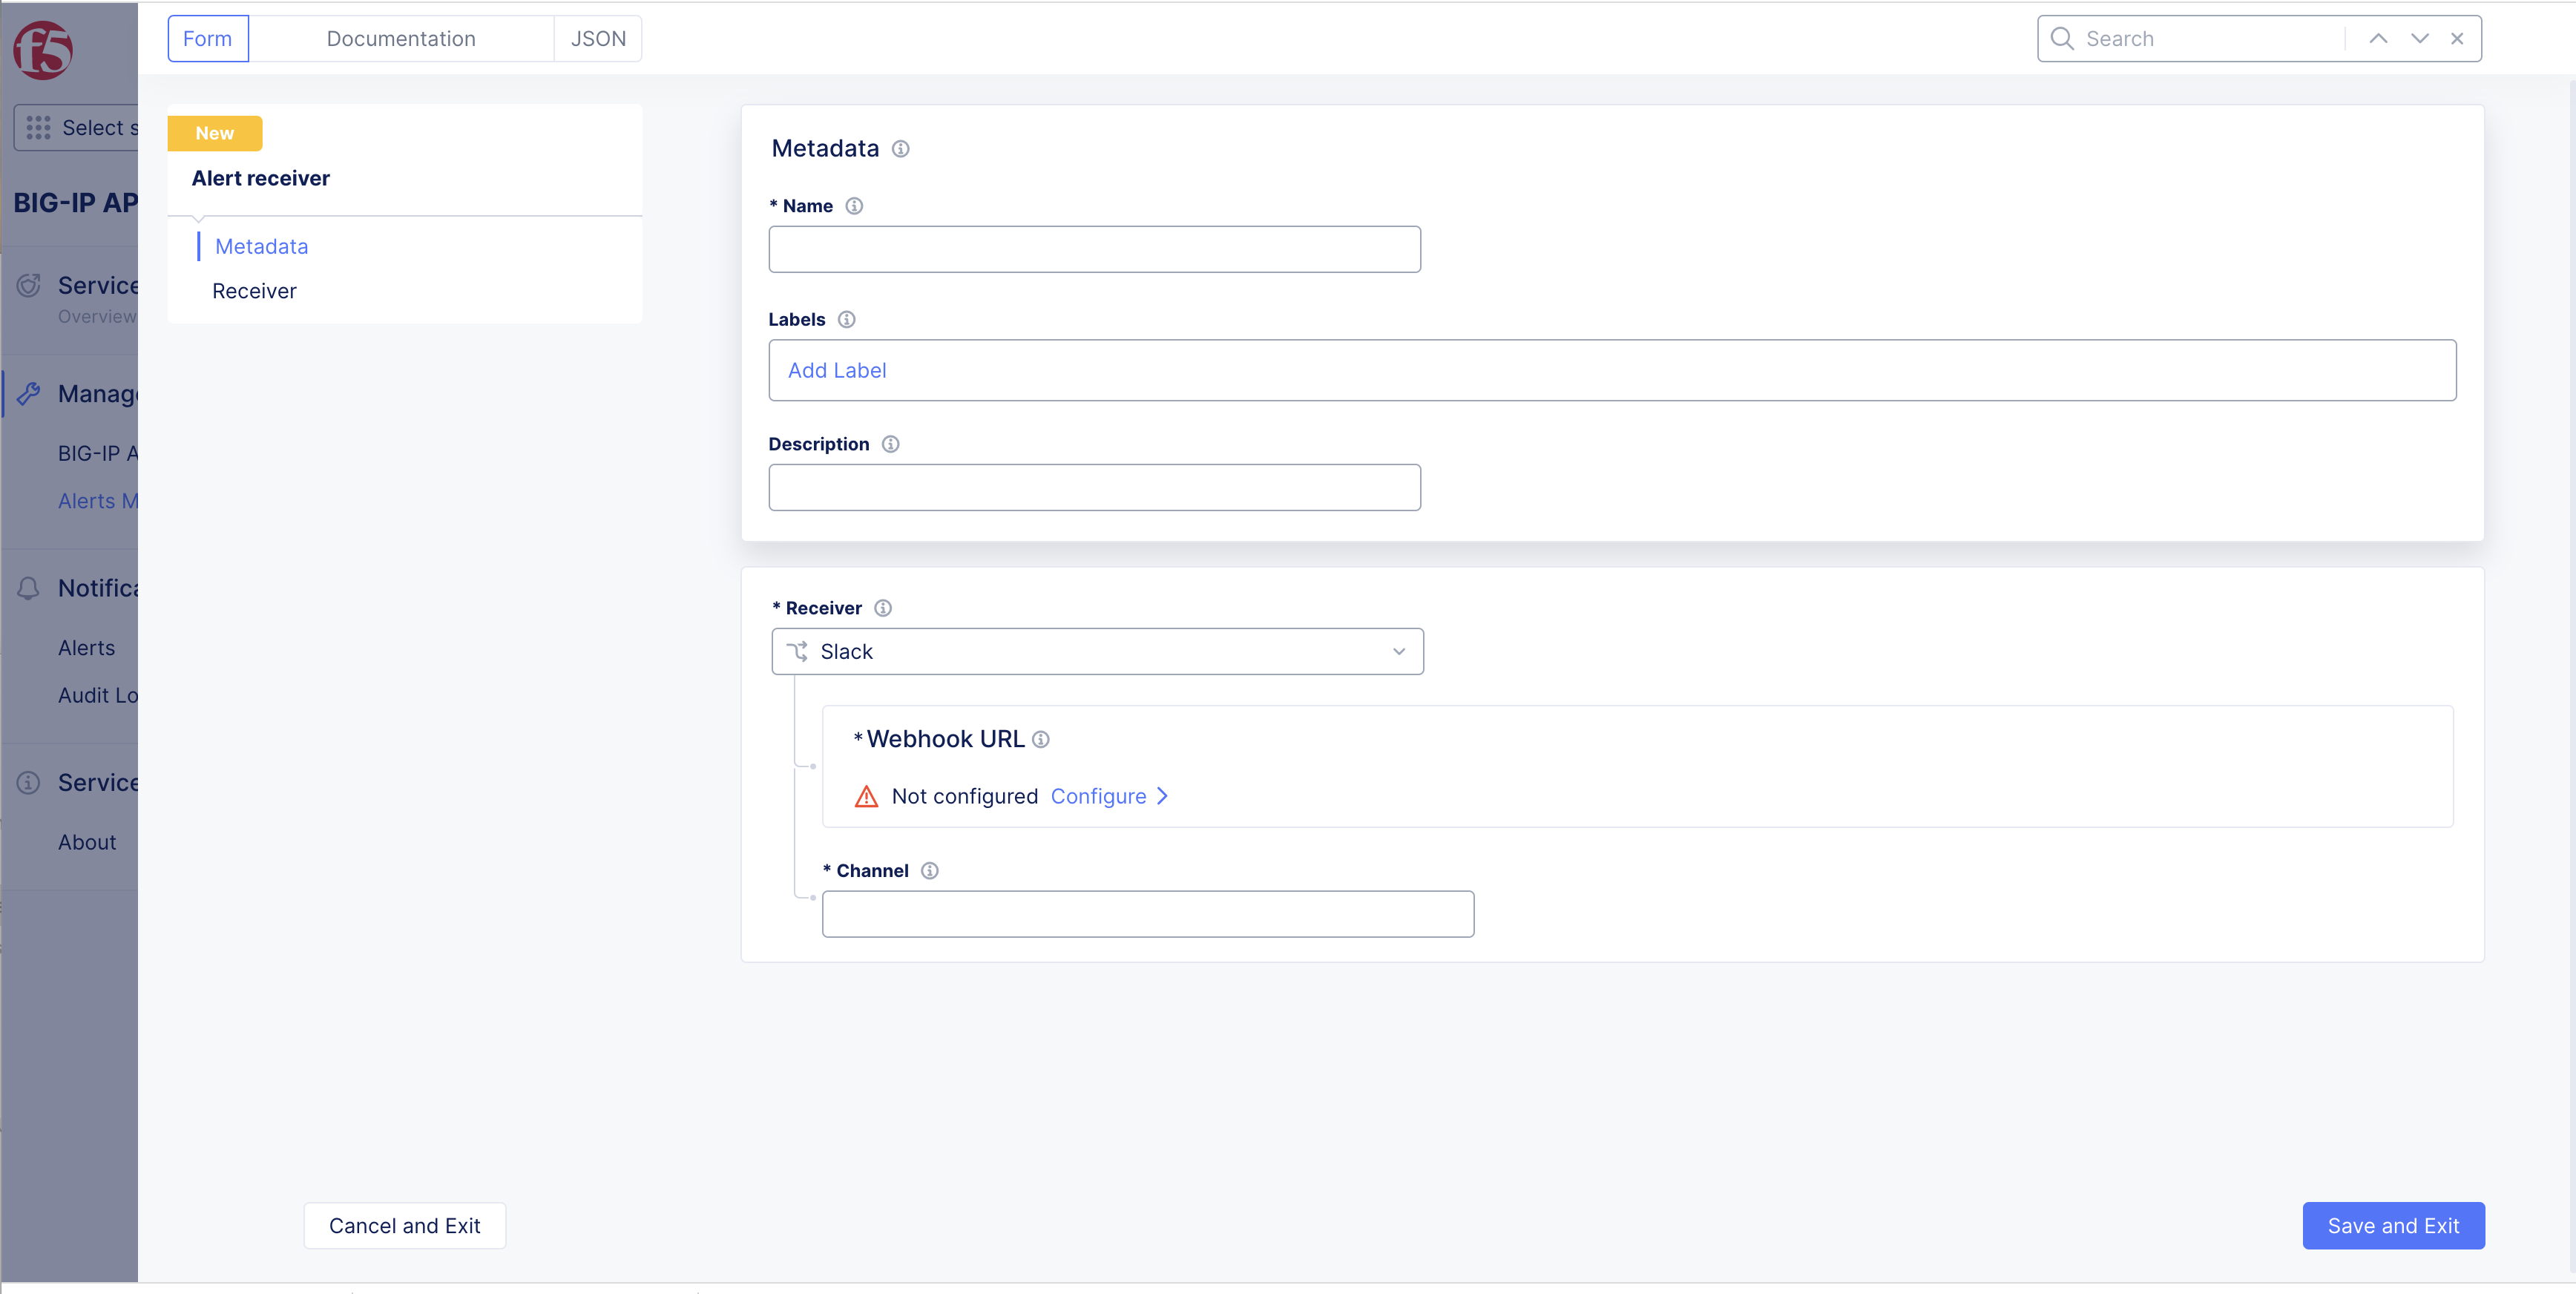
Figure: BIG-IP APM
Step 5: Confirm BIG-IP APM Alerts Setup.
Figure: BIG-IP APM
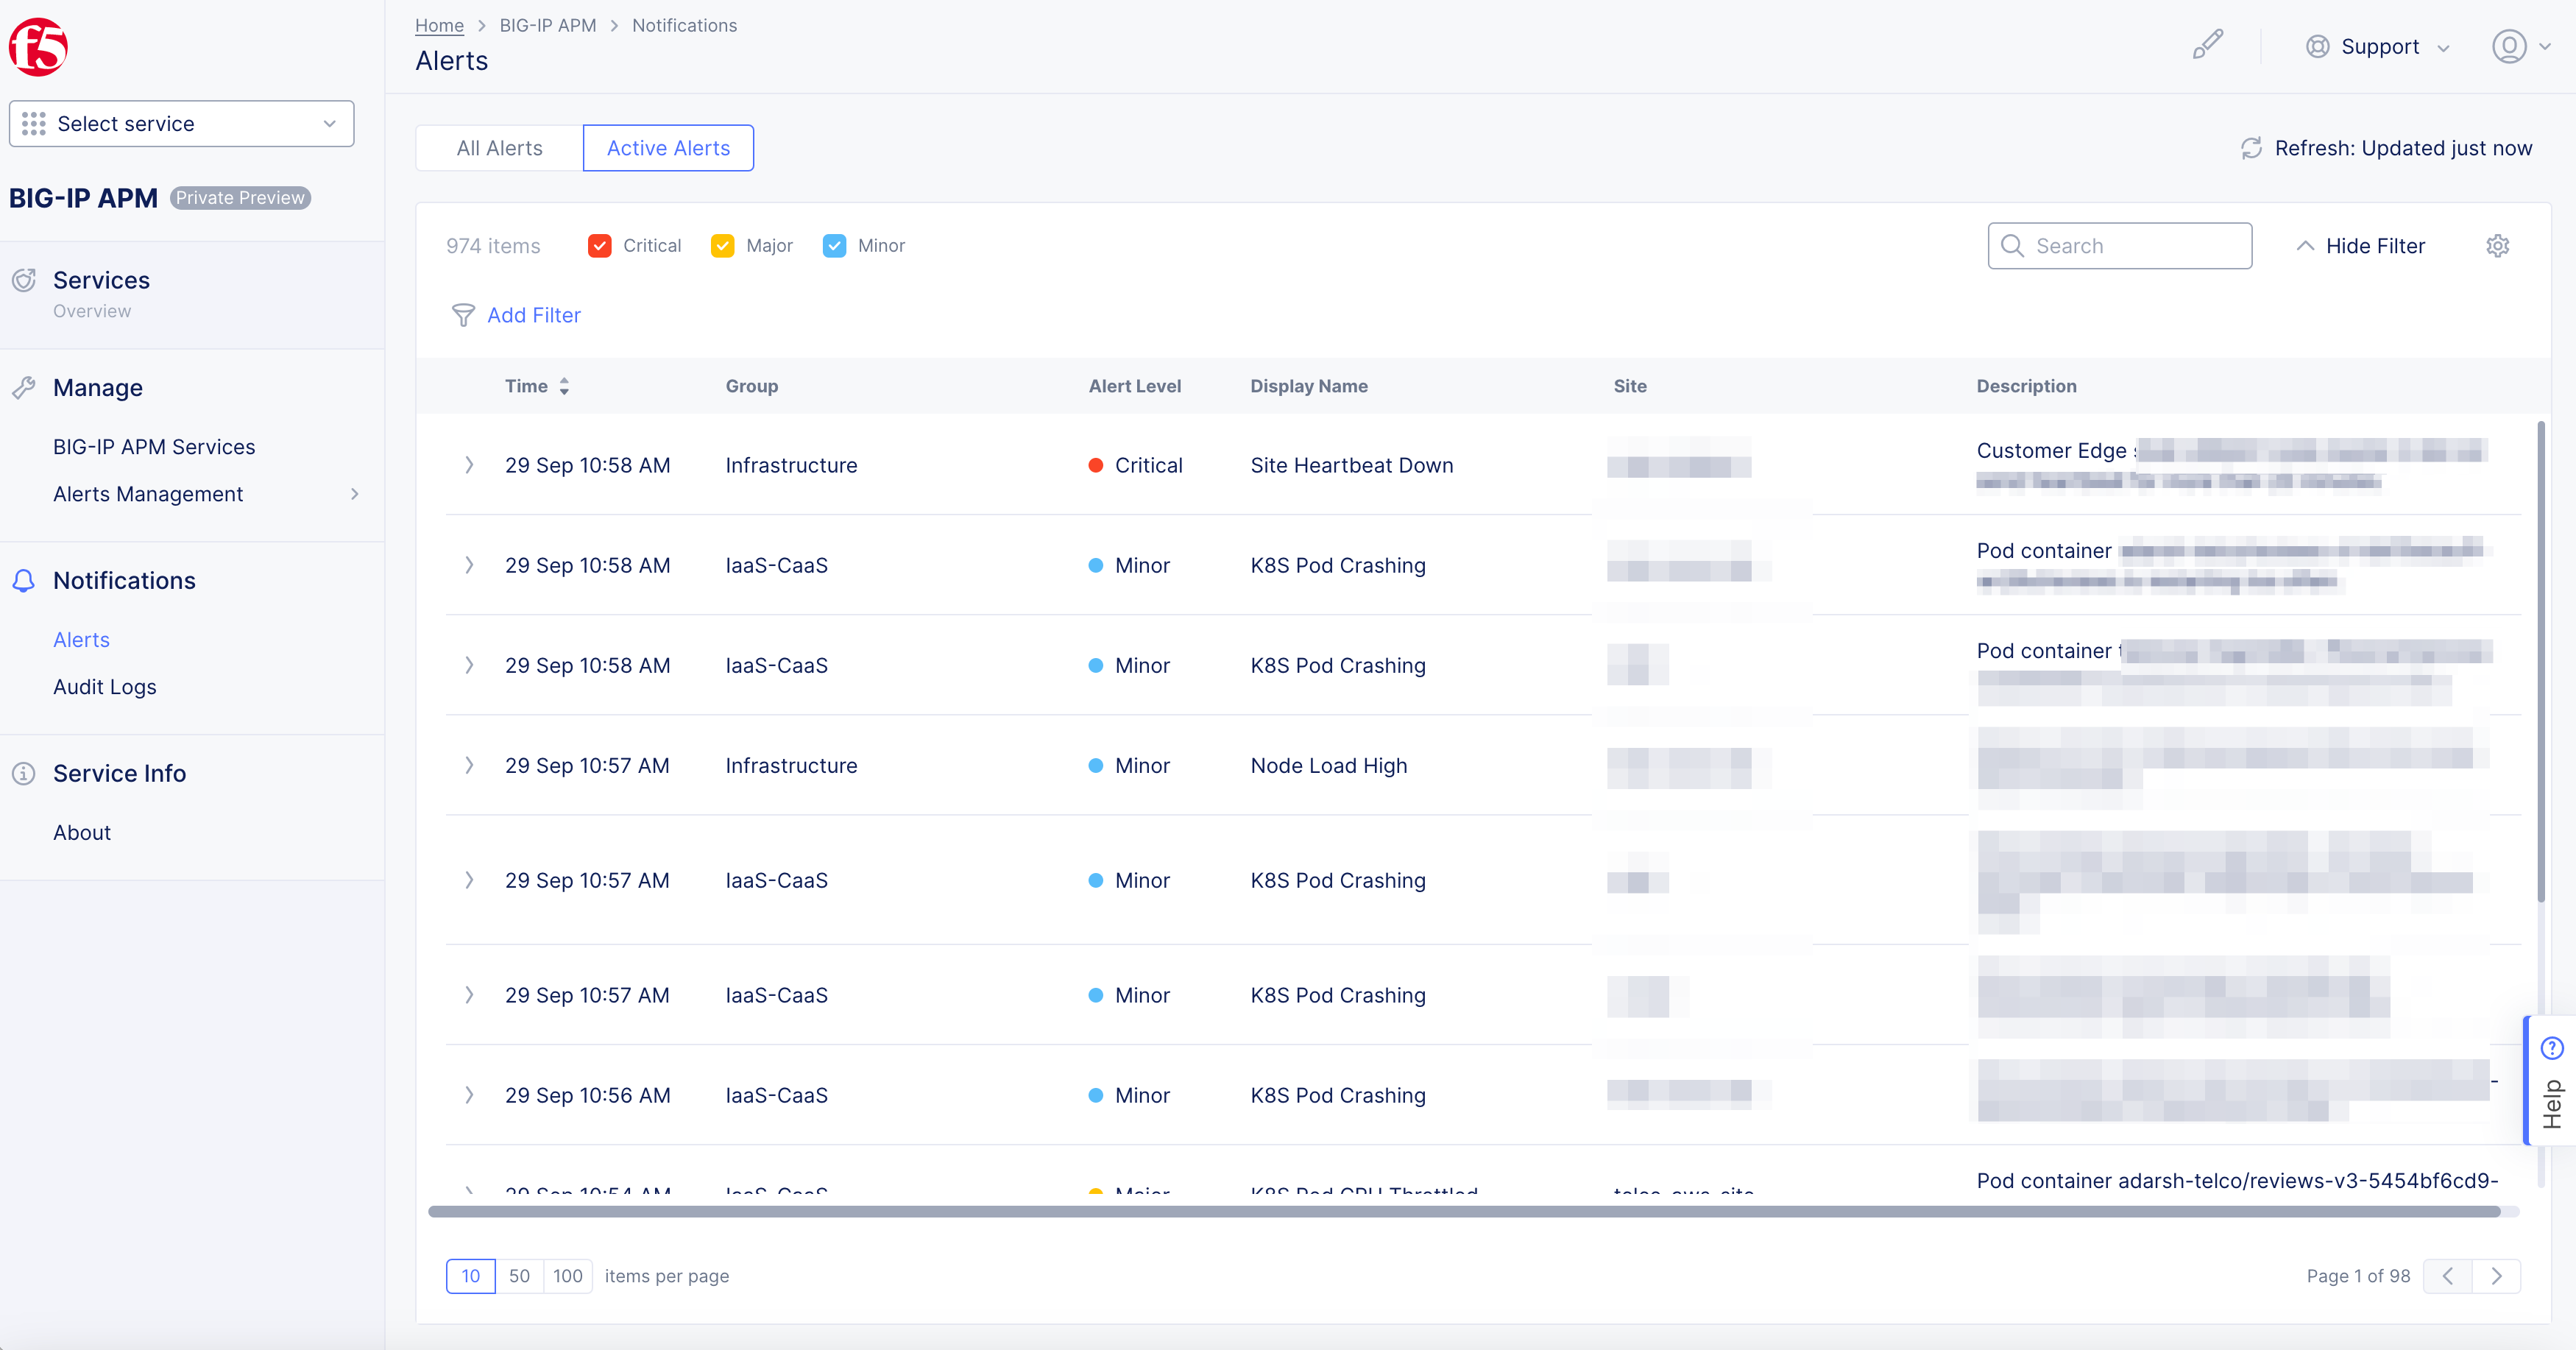
Figure: BIG-IP APM
Figure: BIG-IP APM
Concepts
BIG-IP References
- BIG-IP Overview
- BIG-IP Detailed Operation Guide
- BIG-IP APM
- BIG-IP APM Instance Configuration
- Configuring a BIG-IP Virtual Server to Listen on a Port Range
- Configuring BIG-IP to Load Balance UDP Packets Individually
API References
On this page:
- Objective
- Prerequisites
- BIG-IP APM AWS Deployment Site Prerequisites:
- BIG-IP APM Bare Metal Deployment Site Prerequisites:
- Design of BIG-IP Deployment on Bare Metal App Stack Site
- Steps to Configure VLAN
- Configuration
- Setup BIG-IP AWS
- Setup BIG-IP Bare Metal
- Confirm BIG-IP APM Setup
- BIG-IP APM Metrics Setup
- Concepts
- BIG-IP References
- API References