Set Up DNS Load Balancer
Objective
This guide provides instructions on how to set up DNS load balancers and apply them to your DNS zones using F5® Distributed Cloud Services. A DNS load balancer is an ingress controller for the DNS queries made to your DNS servers. The DNS load balancer receives the requests and answers with an IP address from a pool of members based on the configured load balancing rules.
Using this service, you can set up DNS load balancer, add load balancer record, load balancing rule, and pools for your DNS zones.
Overview
A DNS load balancer is composed of load balancing rules that specify what should be returned to requesting DNS clients. You can set these rules to take into account the Geo-Location of the request and send an answer pointing to an IP endpoint member of a pool.
Rules are ordered using a score. If a request matches 2 (or more) rules, the rule with the higher score has precedence. The rule with the lower score is considered as “catch all” for DNS requests that do not match any rule (for example, client belongs to a country not matched in any rule).
The DNS load balancer pools can have one or more members (IP endpoints). Healthchecks can be performed against the endpoints, to exclude members who are down or unreachable. Multiple load balancing algorithms are available for the load balancer pools.
A DNS load balancer must be attached to a zone to activate the load balancer. This is achieved by creating a DNS Load Balancer record inside a zone, and attaching the DNS load balancer to that record.
Prerequisites
The following prerequisites apply:
-
A Distributed Cloud Services Account. If you do not have an account, see Create an Account.
-
A DNS domain for your web application. Obtain a domain from the Internet domain registrar.
-
Name servers for managing your DNS records.
-
Add the IP addresses mentioned here to your firewall or ACL
allowlist:
Configuration
Creating DNS load balancer includes configuring or creating Geo-Location sets, creating load balancer pools, and optionally configuring health checks.
You can create DNS load balancer as part of DNS zone creation or separately create and apply it to an existing DNS zone configuration. This example shows creating DNS load balancer separately and applying to an existing DNS zone. Log into the F5 Distributed Cloud Console and perform the instructions shown in the following chapters.
Create Geo-Location Sets
A Geo-Location Set is a grouping of geographical locations identified using either a selector expression or a predefined global Geolocations. Do the following to create a Geo-Location Set:
Step 1: Navigate to DNS Management, and start adding a Geo-Location Set.
- Click
DNS Managementworkspace on the Console home page.
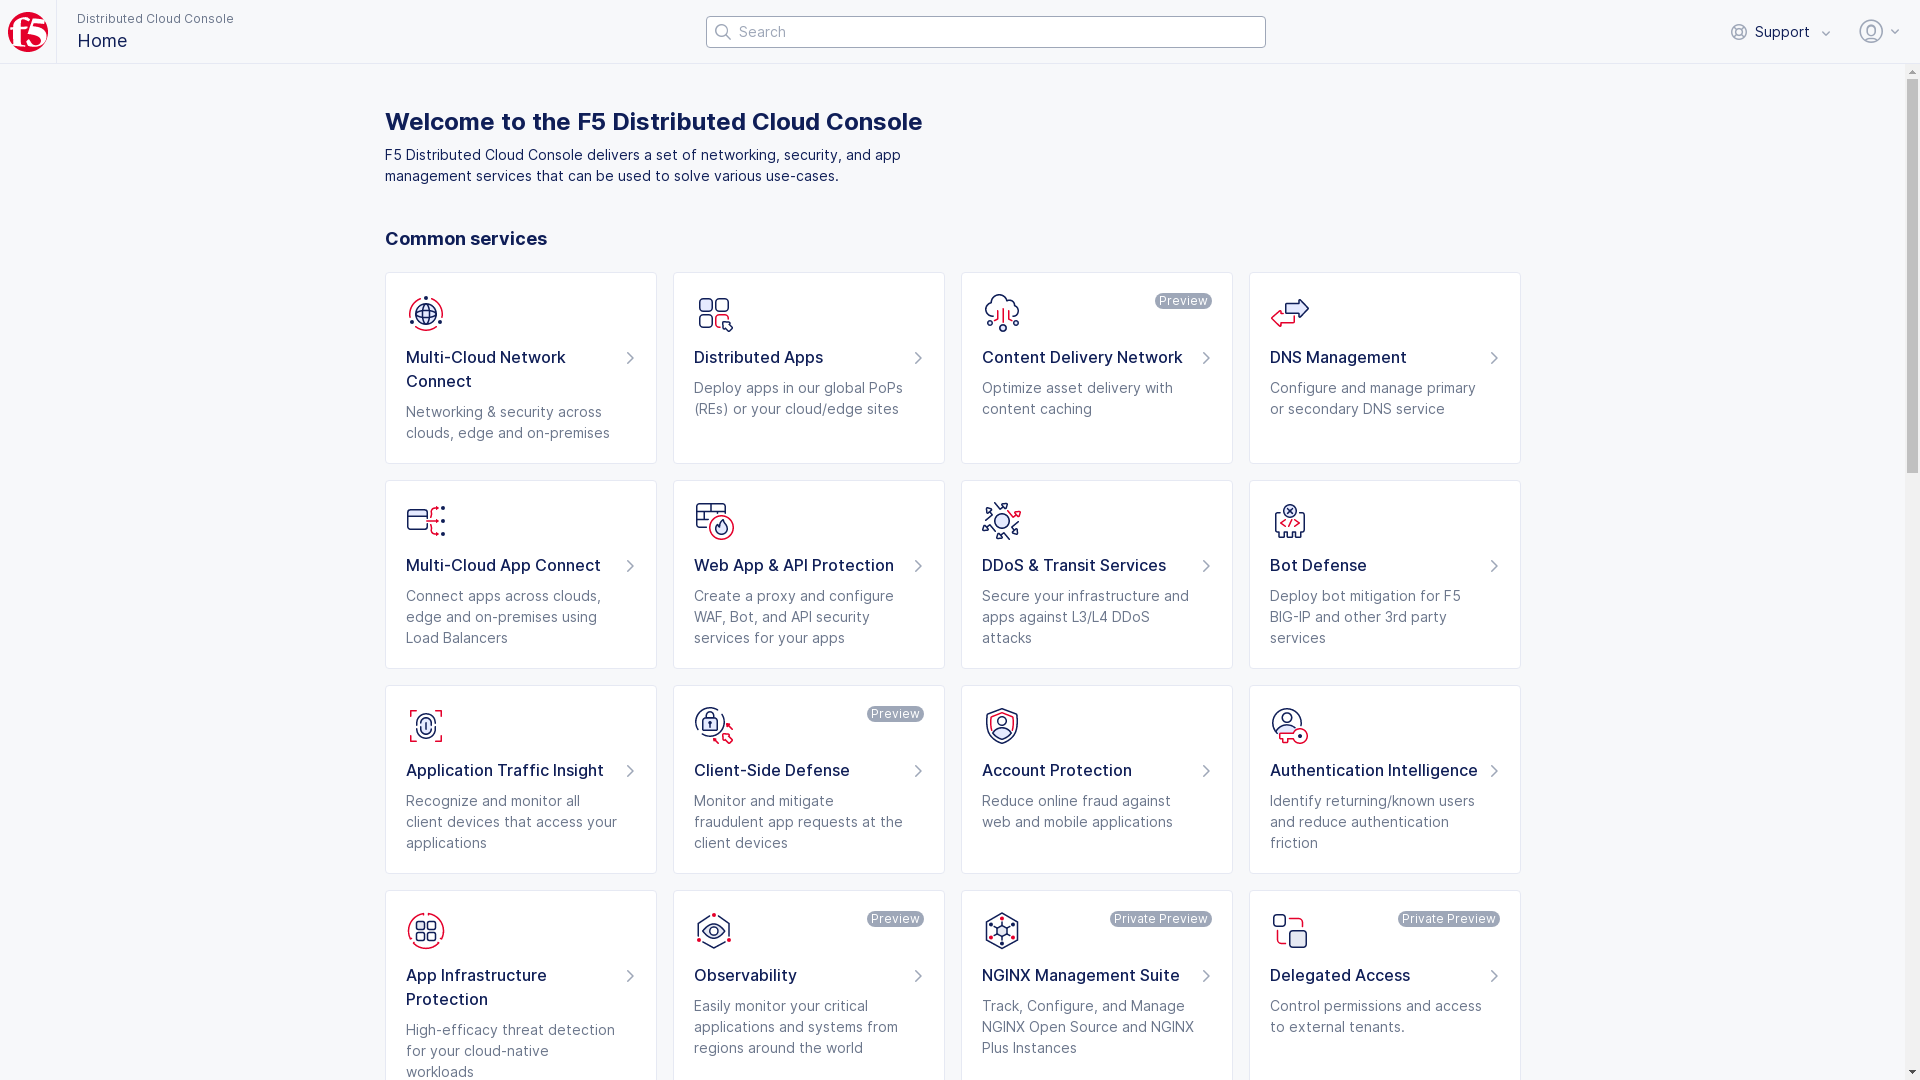
Figure: Navigate to DNS Management
-
Select
Manage>DNS Load Balancer Management>Geo-Location Setsin the primary navigation menu located on the left side of the page. -
Select
Add Geo-Location Set. Enter a name in theNamefield in the metadata section. Optionally, set labels and add a description.
Step 2: Configure Geolocation properties.
Configure the Geolocation Label Selector as per the following guidelines:
-
Select
Global Geolocationto include all predefined Geolocations. This is also populated by default and will include any location. -
Select
Geolocation Selectorto group locations using a selector expression. SelectAdd Labelin theSelector Expressionfield and do the following:- Select a key from the drop-down for the
Select Keyfield. - Choose an expression from the drop-down for the
Selector Operatorfield. - Start typing a value in the
Assign Valuesbox. Select a value from the drop-down.
- Select a key from the drop-down for the
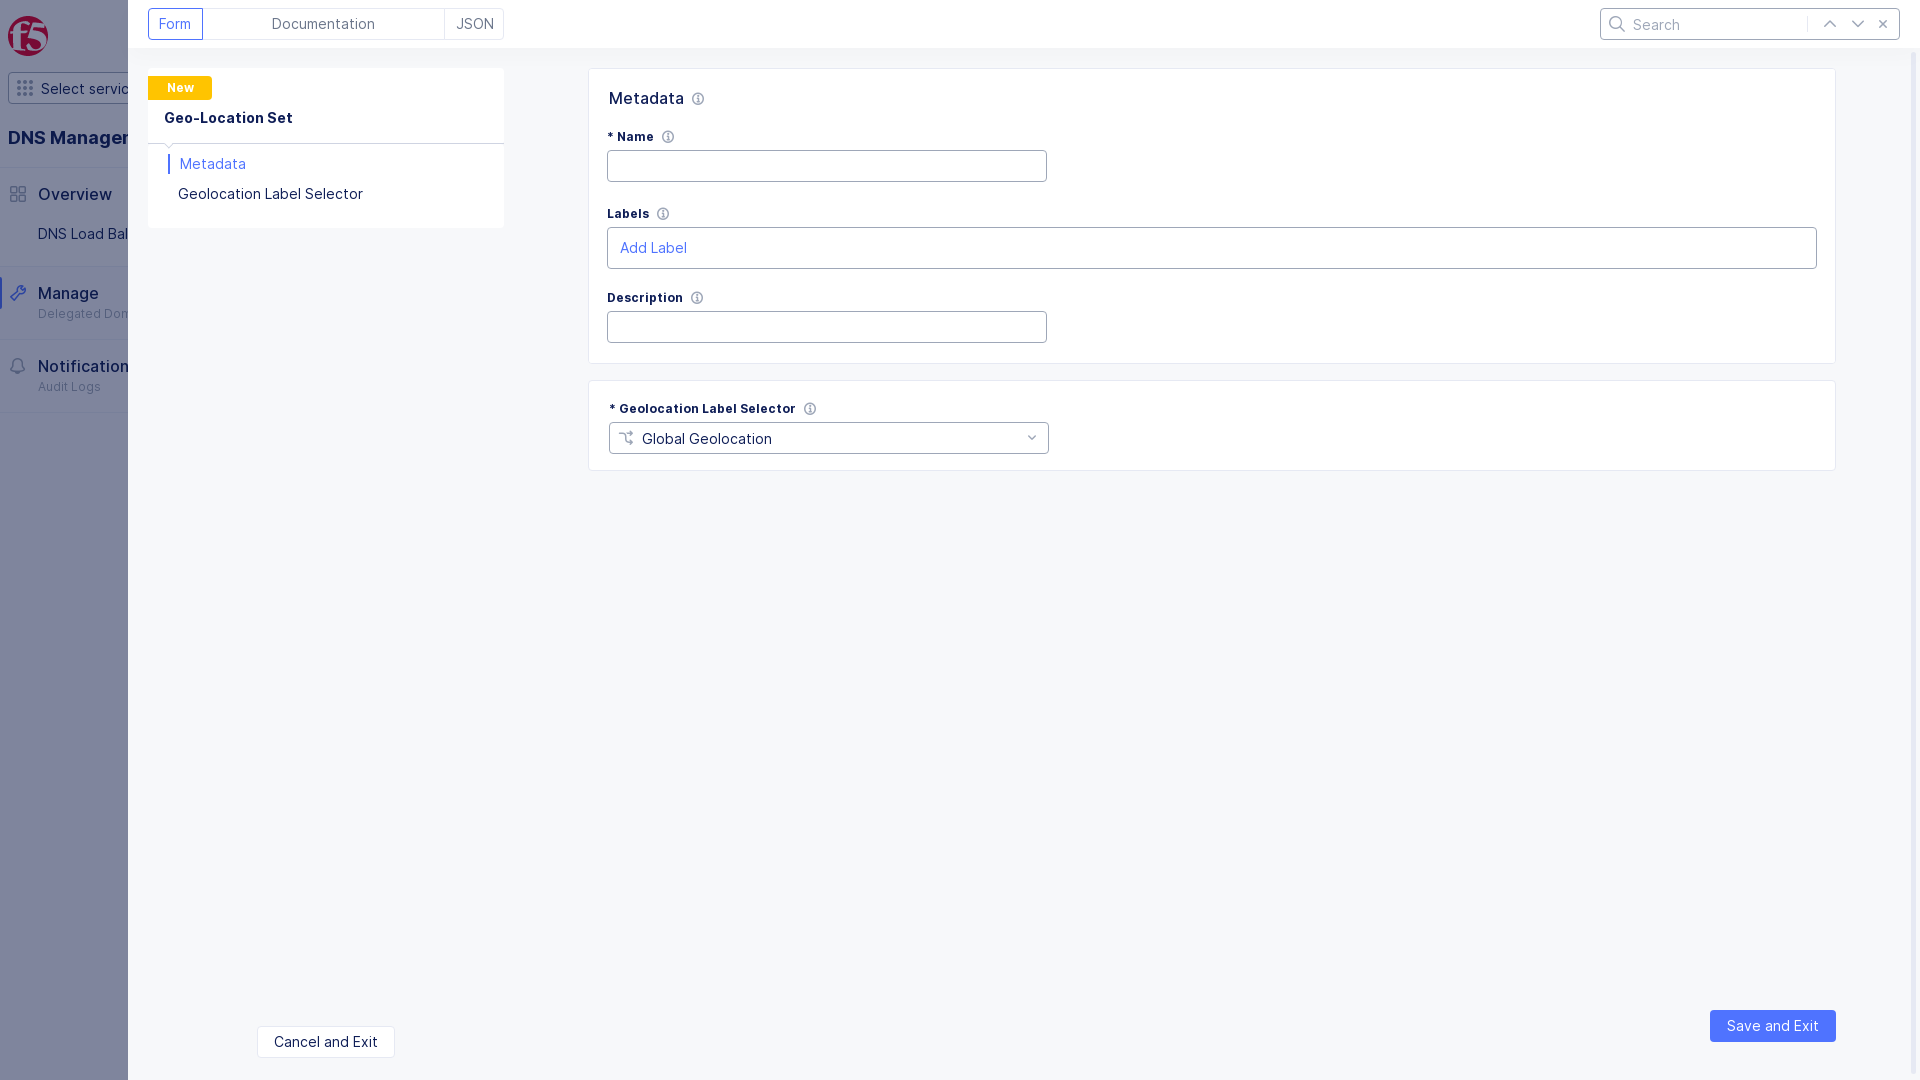
Figure: Set GeoLocation Selector
Note: To match several countries or cities, do the following:
- Select the
INoperator.- Select the first country or city of your choice and clear the search.
- Find the second country or city of your choice and select it.
- Repeat for the other countries or cities.
- Select
Apply.
- Click
Add Geo-Location Set.
Create Health Check
Health check performs periodic inspection of health for each pool member. Do the following to create health check:
Step 1: Start creating a health check object.
-
Select
Manage>DNS Load Balancer Management>DNS Load Balancer Health Checksin the DNS Management workspace. -
Select
Add DNS Load Balancer Health Check. -
Enter a name in the
Namefield in the metadata section. -
Optionally, set labels and add a description for the health check.
Step 2: Configure health check and complete creating the health check.
Select an option from the drop-down for Health Check Type and configure as per the following guidelines:
-
In case of HTTP or HTTPS or TCP or UDP health check choice, do the following:
-
Enter a value for the
Send Stringfield to send this string in the request to the target. -
Enter a value for the
Receive Stringfield to receive this string in the response from the target. This response indicates that the member is healthy. -
Enter a value for the
Health Check Portto set the port for performing health checks. You can also use theCommon Valuesoption and select from a predefined list of ports. -
Select
Add DNS Load Balancer Health Check.
-
-
In case of ICMP health check choice, select the ICMP health check and select
Add DNS Load Balancer Health Check.
This example creates HTTP health check.
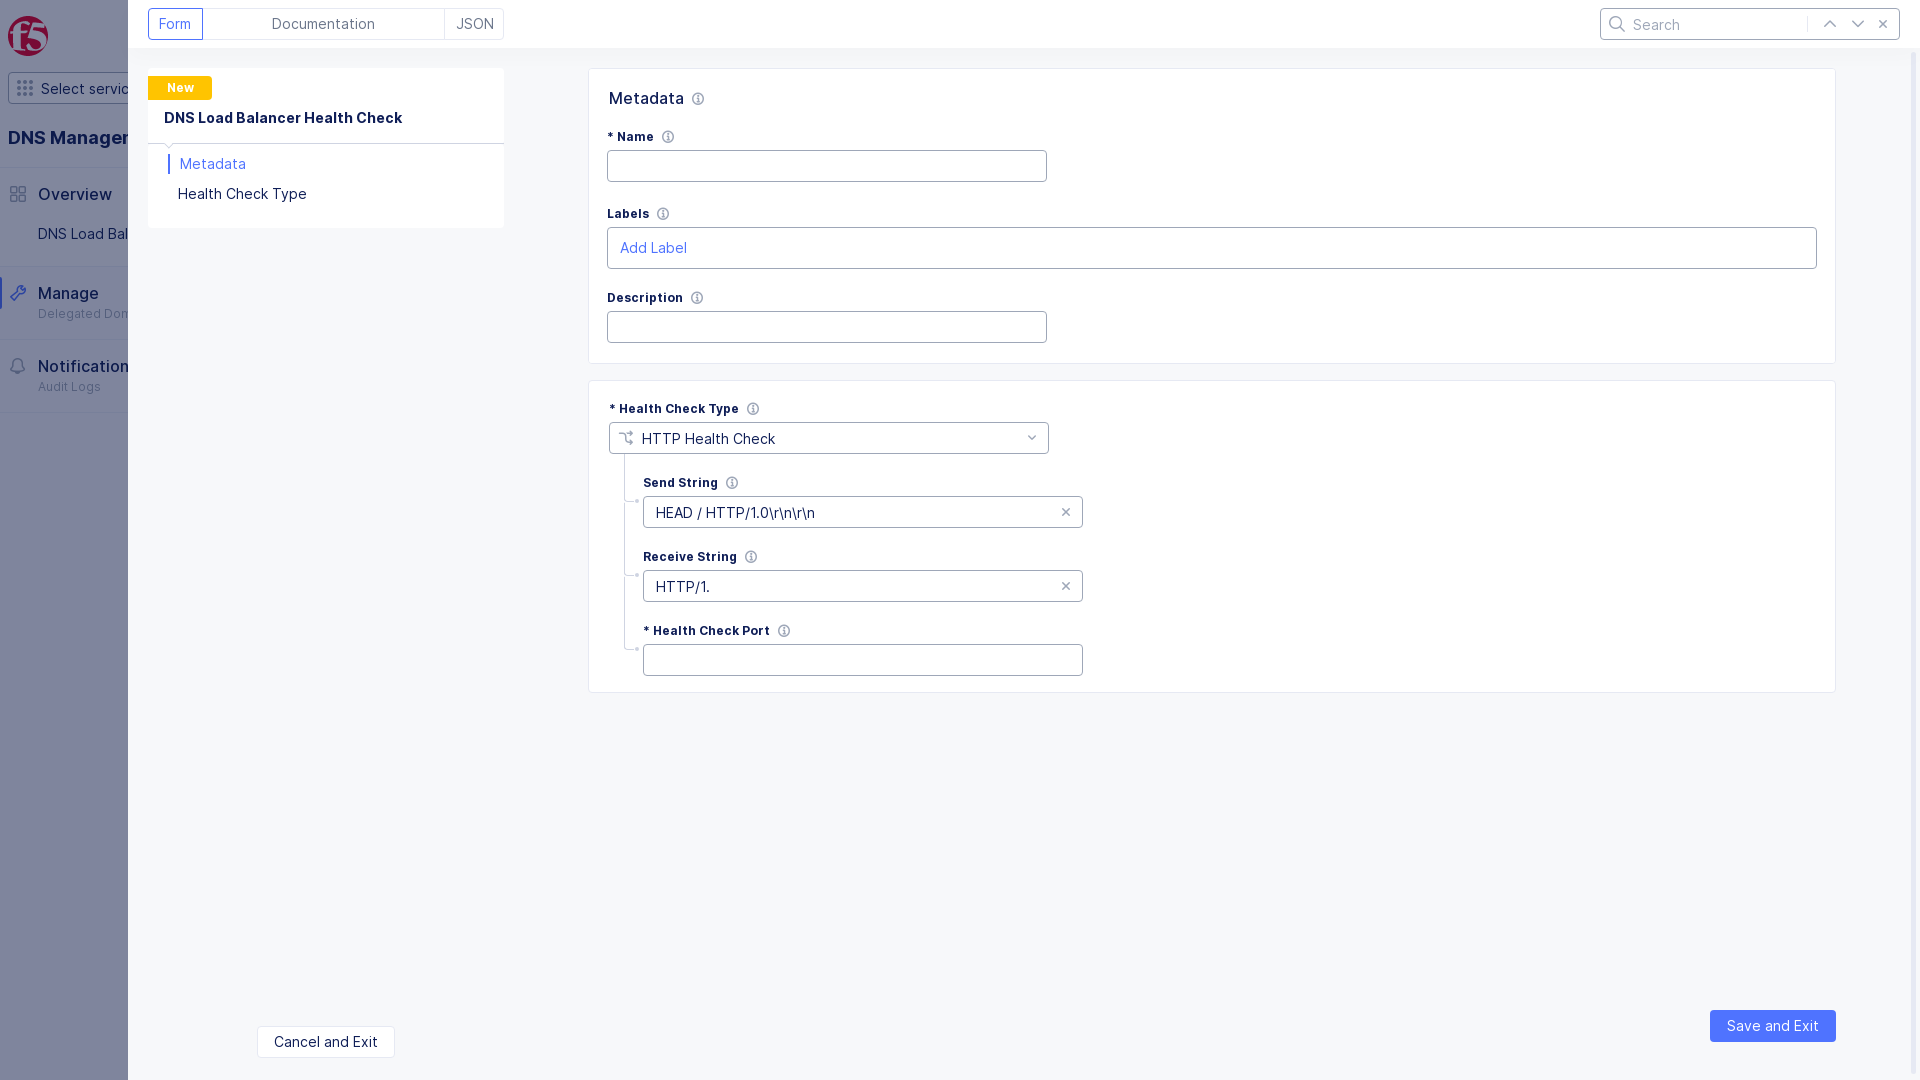
Figure: HTTP Health Check
Note: The health monitor interval is 30 seconds and the timeout value is 90 seconds (i.e. 3x30 seconds). If an endpoint is identified as down, it will be marked as up as soon as it starts to respond correctly again. Configuring health monitor interval and timeout values is currently not supported.
Create DNS Load Balancer Pool
Do the following to create a group of members:
Step 1: Start creating a pool.
-
Select
Manage>DNS Load Balancer Management>DNS Load Balancer Poolsin the DNS Management workspace. -
Select
Add DNS Load Balancer Pool. -
Enter a name in the
Namefield in the metadata section. -
Optionally, set labels and add a description for your pool.
Step 2: Configure pool members.
-
Select an option for the
Pool Typefield and useAdd Itembutton to open pool member configuration page. -
Enter an IP address in the
Public IPfield. -
Enter a name for this pool.
-
Enter values for the
Load Balancing RatioandLoad Balancing Priorityfields. The values 1 and 10 are populated by default for these fields respectively.
Note: The ratio and priority determine how the load balancing happens when the load balancing mode is based on the ratio and priority. The mode is set in subsequent steps.
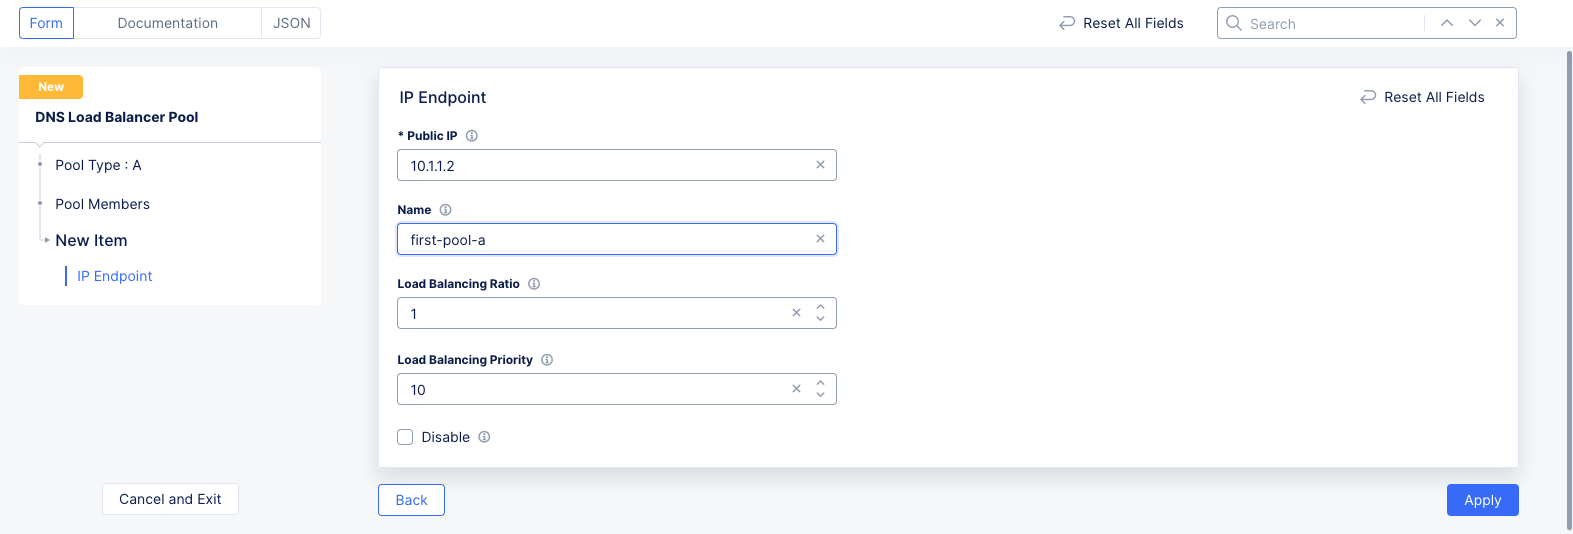
Figure: DNS LB Pool Endpoint
- Select
Apply.
Note: You can use
Add Itembutton to add more than one member.
Step 3: Configure health check.
-
Select
Enable Health Checkfor theDNS Load Balancer Health Checkfield. -
Select a health check object from the drop-down of the
Enable Health Checkfield. You can also use theAdd Itemoption in the drop-down to create a new health check object and apply to pool type settings.
Note: The healcheck is disabled by default and in this mode, all pool members are assumed to be healthy.
- Optionally, enter a value for the
Maximum Answersfield to set the maximum number of resource records included in the responses.
Step 4: Configure load balancing mode and TTL.
The Static Persist load balancing method uses the persist mask, with the source IP address of the Local Domain Name Sever (LDNS), in a deterministic algorithm to send requests to a specific pool member. If the DNS resolver passes ECS (EDNS-Client-Subnet) information, then a hash of it will be used, to send the client to the same pool member.
-
Select a choice from the drop-down for the
Load Balancing Modefield using the following guidelines:- Select
Round-Robinto enable equal distribution of load among the pool members. - Select
Ratio-Memberto distribute requests based on the ratio set to pool members. - Select
Statc-Persistto distribute requests persistently to specific members. Using this, when a request is answered by a member, subsequent such requests are persistently forwarded to that member. - Select
Priorityto distribute requests based on the priority assigned to pool members. Lower number for the priority field for a member means higher priority for that member.
- Select
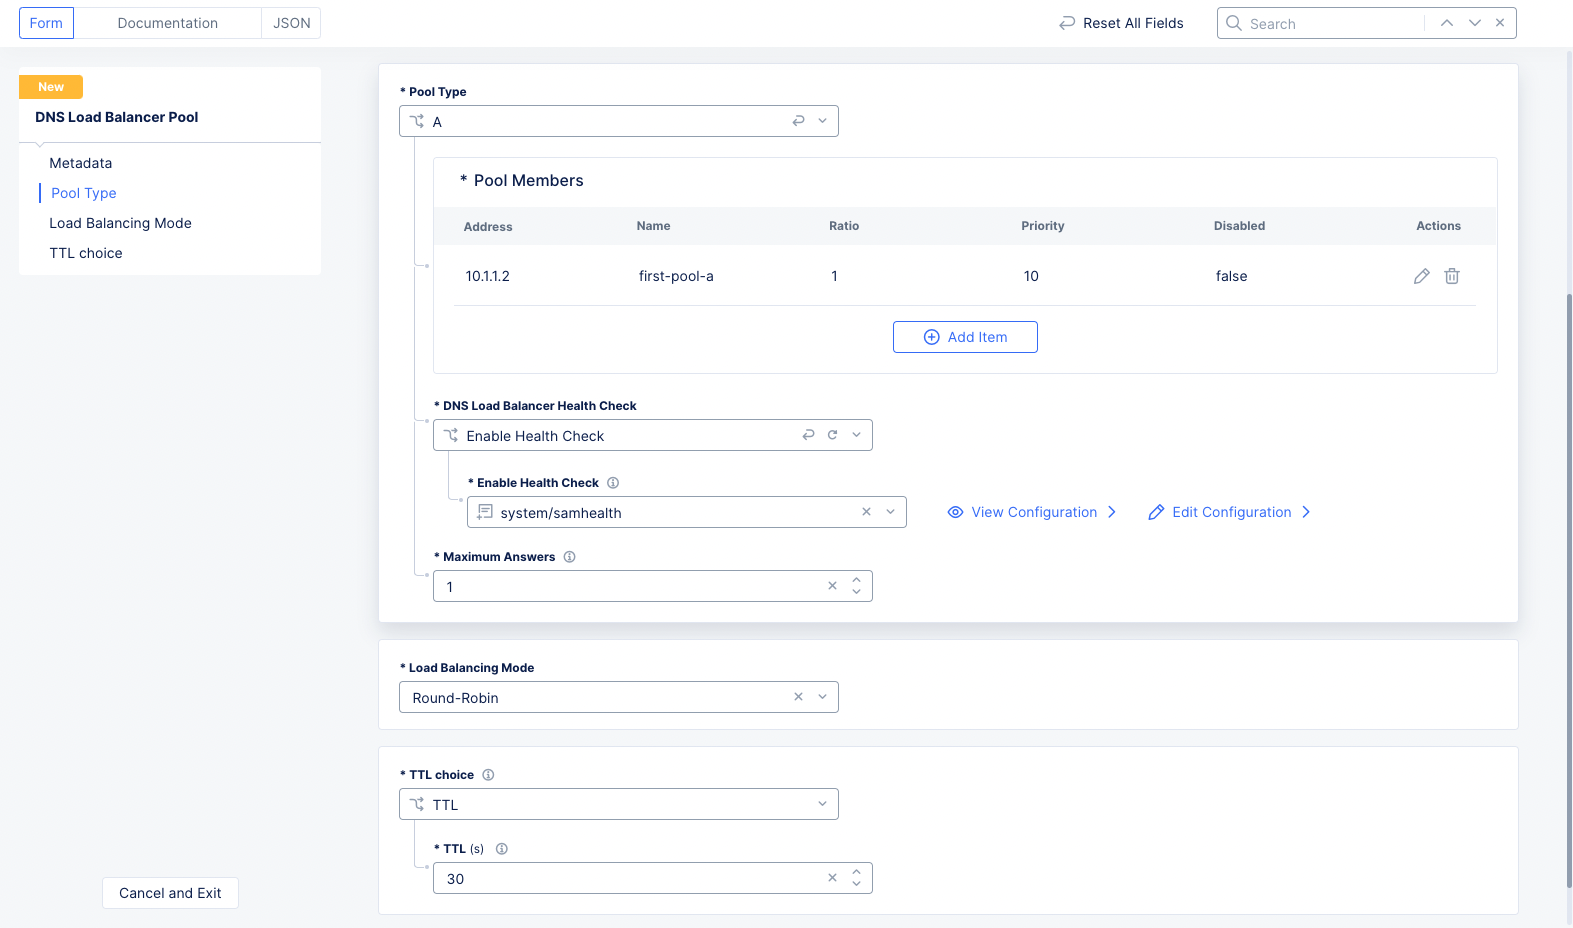
Figure: DNS Load Balancer Pool Settings
-
Select a Time-To-Live (TTL) choice for the
TTLfield using the following guidelines:-
Select
Use RRSet TTLto use the TTL value set in the load balancer record associated with this pool. -
Select
TTLto enforce a custom TTL and enter a value in seconds in theTTL(s)field. It is recommended you use a lower value for this setting.
Note: The internal DNS refresh time used by Distributed Cloud DNS for Origin Endpoint resolution is set to 15 minutes. If the DNS refresh values for the origin server are configured to less than 900 seconds, they will be overridden, resulting in a DNS refresh interval of 15 minutes or more.
-
Step 5: Complete creating the load balancer pool.
Select Add DNS Load Balancer Pool to complete creating the pool.
Create DNS Load Balancer
Do the following to create DNS load balancer:
Step 1: Start creating a DNS load balancer.
-
Select
Manage>DNS Load Balancer Management>DNS Load Balancersin the DNS Management Workspace. -
Select
Add DNS Load Balancer. -
Enter a name in the
Namefield in the metadata section. -
Optionally, set labels and add a description for your load balancer.
Step 2: Configure record type and load balancing rules.
-
Select an option for the
Record Typefield. -
Select
Configurefor theLoad Balancing Rulesfield to open the load balancing rules page and use the+ Add Itembutton on the page to start adding a rule. -
Select
Client Selectiondrop-down option for theGeo Location Selection, and configure as per the following guidelines:- Select
Geo Locations by label selectorand SelectAdd Labelin theSelector Expressionfield. Select a key from the drop-down for theSelect Keyfield, choose an expression from the drop-down for theSelector Operatorfield. Start typing a value in theAssign Valuesbox and select a value from the drop-down. - Select
Geo Location Set selectorand select a Geo-Location set from the drop-down of the selector field. You can also use theAdd Itembutton to create a new Geo-Location set and apply it to the rule. - Select
ASN Listand enter an ASN value in theAS Numbersfield. You can add more than one ASN usingAdd Itemoption and also drag and drop the row entries to change the ASN match order. - Select
BGP ASN Setsand select or create new BGP ASN sets from the drop-down. You can add more than one BGP ASN set using theAdd Itemoption and also drag and drop the row entries to change the ASN match order. - Select
IP Prefix Listand select+ Add Item buttonforIPv4 Prefix ListandIPv6 Prefix Listsections to enter prefixes. - Select
IP Prefix Setsand select or create new IP Prefix sets from the drop-down. You can add more than one IP Prefix set using theAdd Itemoption and also drag and drop the row entries to change the IP Prefix match order.
- Select
-
Select
Use DNS Load Balancer poolfor theActionfield and select a pool from the drop-down. -
Select
Use DNS Load Balancer pooldrop-down menu. You can also use theAdd Itembutton to create a new pool and apply it to the rule. -
Optionally, enter a
Scorefor this rule. When a number of rules match a specific query, rule with the highest score is used to process the query. -
Select
Applyto add the rule to the list of rules.
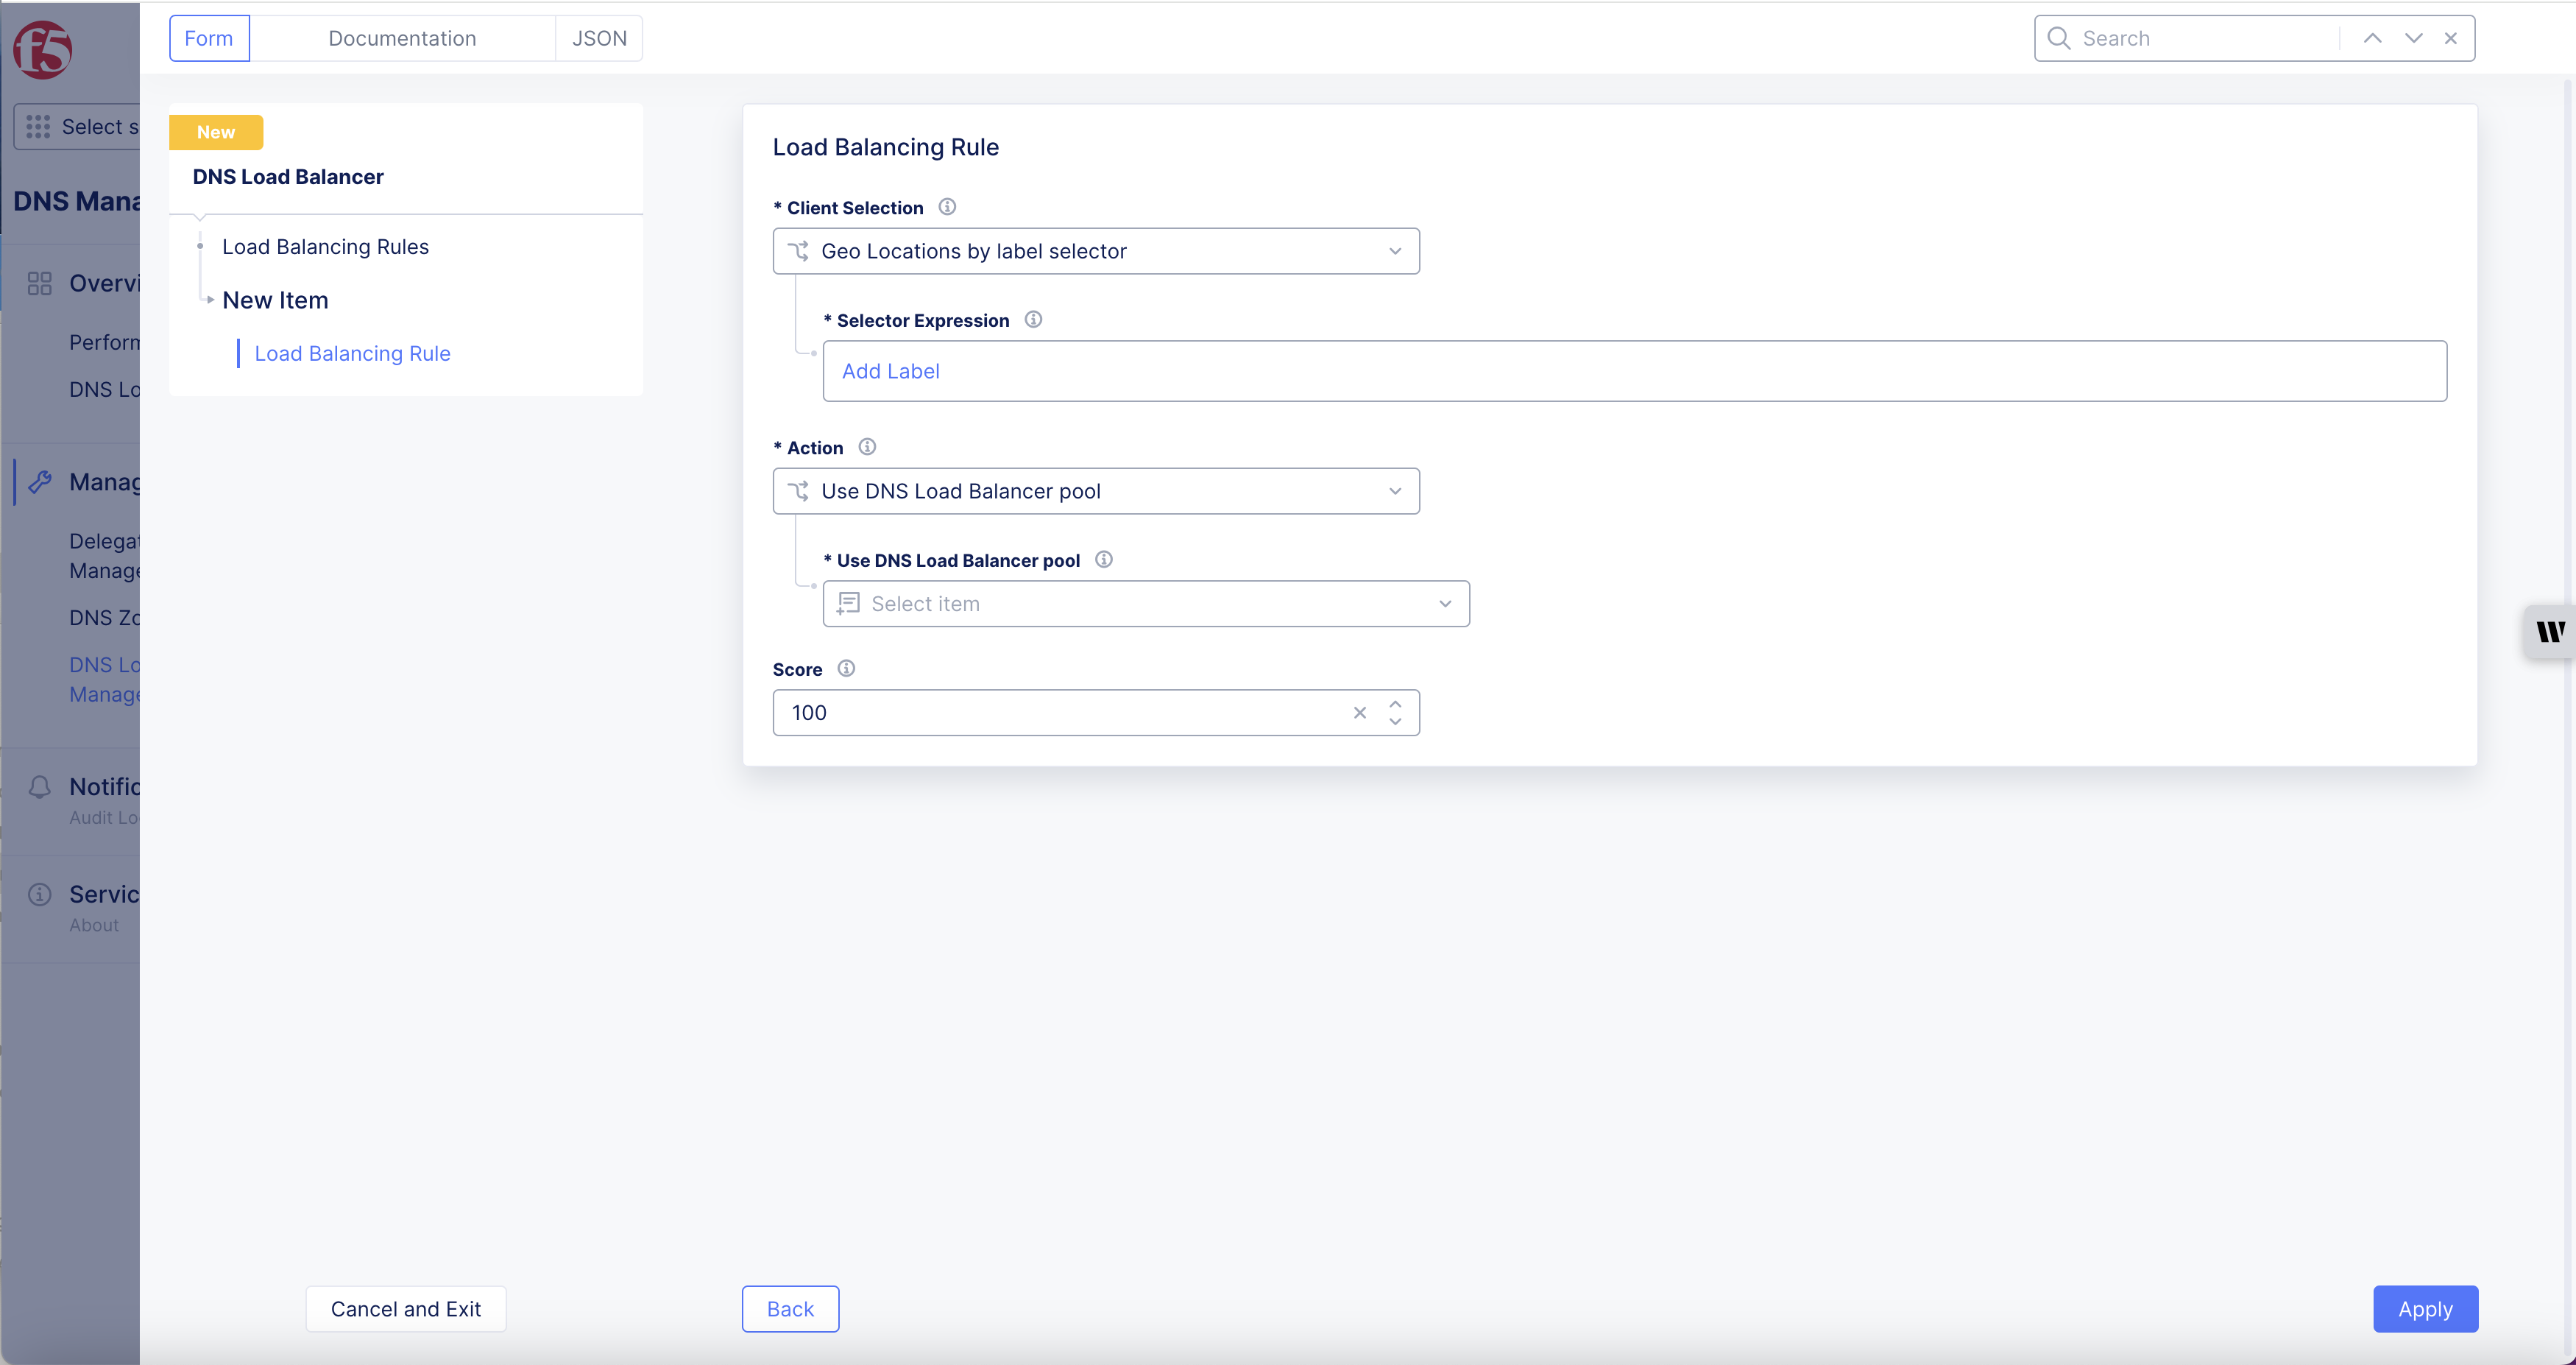
Figure: DNS Load Balancer Rule Settings
Note: You can use
Add Itembutton to add more than one rule.
- Select
Applybutton to add rules to the load balancer configuration.
Step 3: Configure response cache settings.
Select an option for the Response Cache Parameters Choice and configure as per the following guidelines:
-
Select
Disable Response Cacheto disable caching of response. -
Select
Default Response Cache Parametersto apply default settings for response caching. -
Select
Response Cache Parametersto apply custom caching and do the following:- Enter a value for
Length of IPv4 CIDR masksto group IPv4 clients into subnets. - Enter a value for
Length of IPv6 CIDR masksto group IPv6 clients into subnets. - Enter a value for
TTL(s)to set TTL value for response cache. The cache gets cleared and responses are recomputed after the expiry of TTL.
- Enter a value for
Note: Exercise caution when using IP prefix load balancing rules in conjunction with the Response Cache. For example, if prefix list has CIDR with /28 subnet mask and response cache parameters has subnet mask as /24 then the response cache would be used even if the src prefix doesn't match the rule.
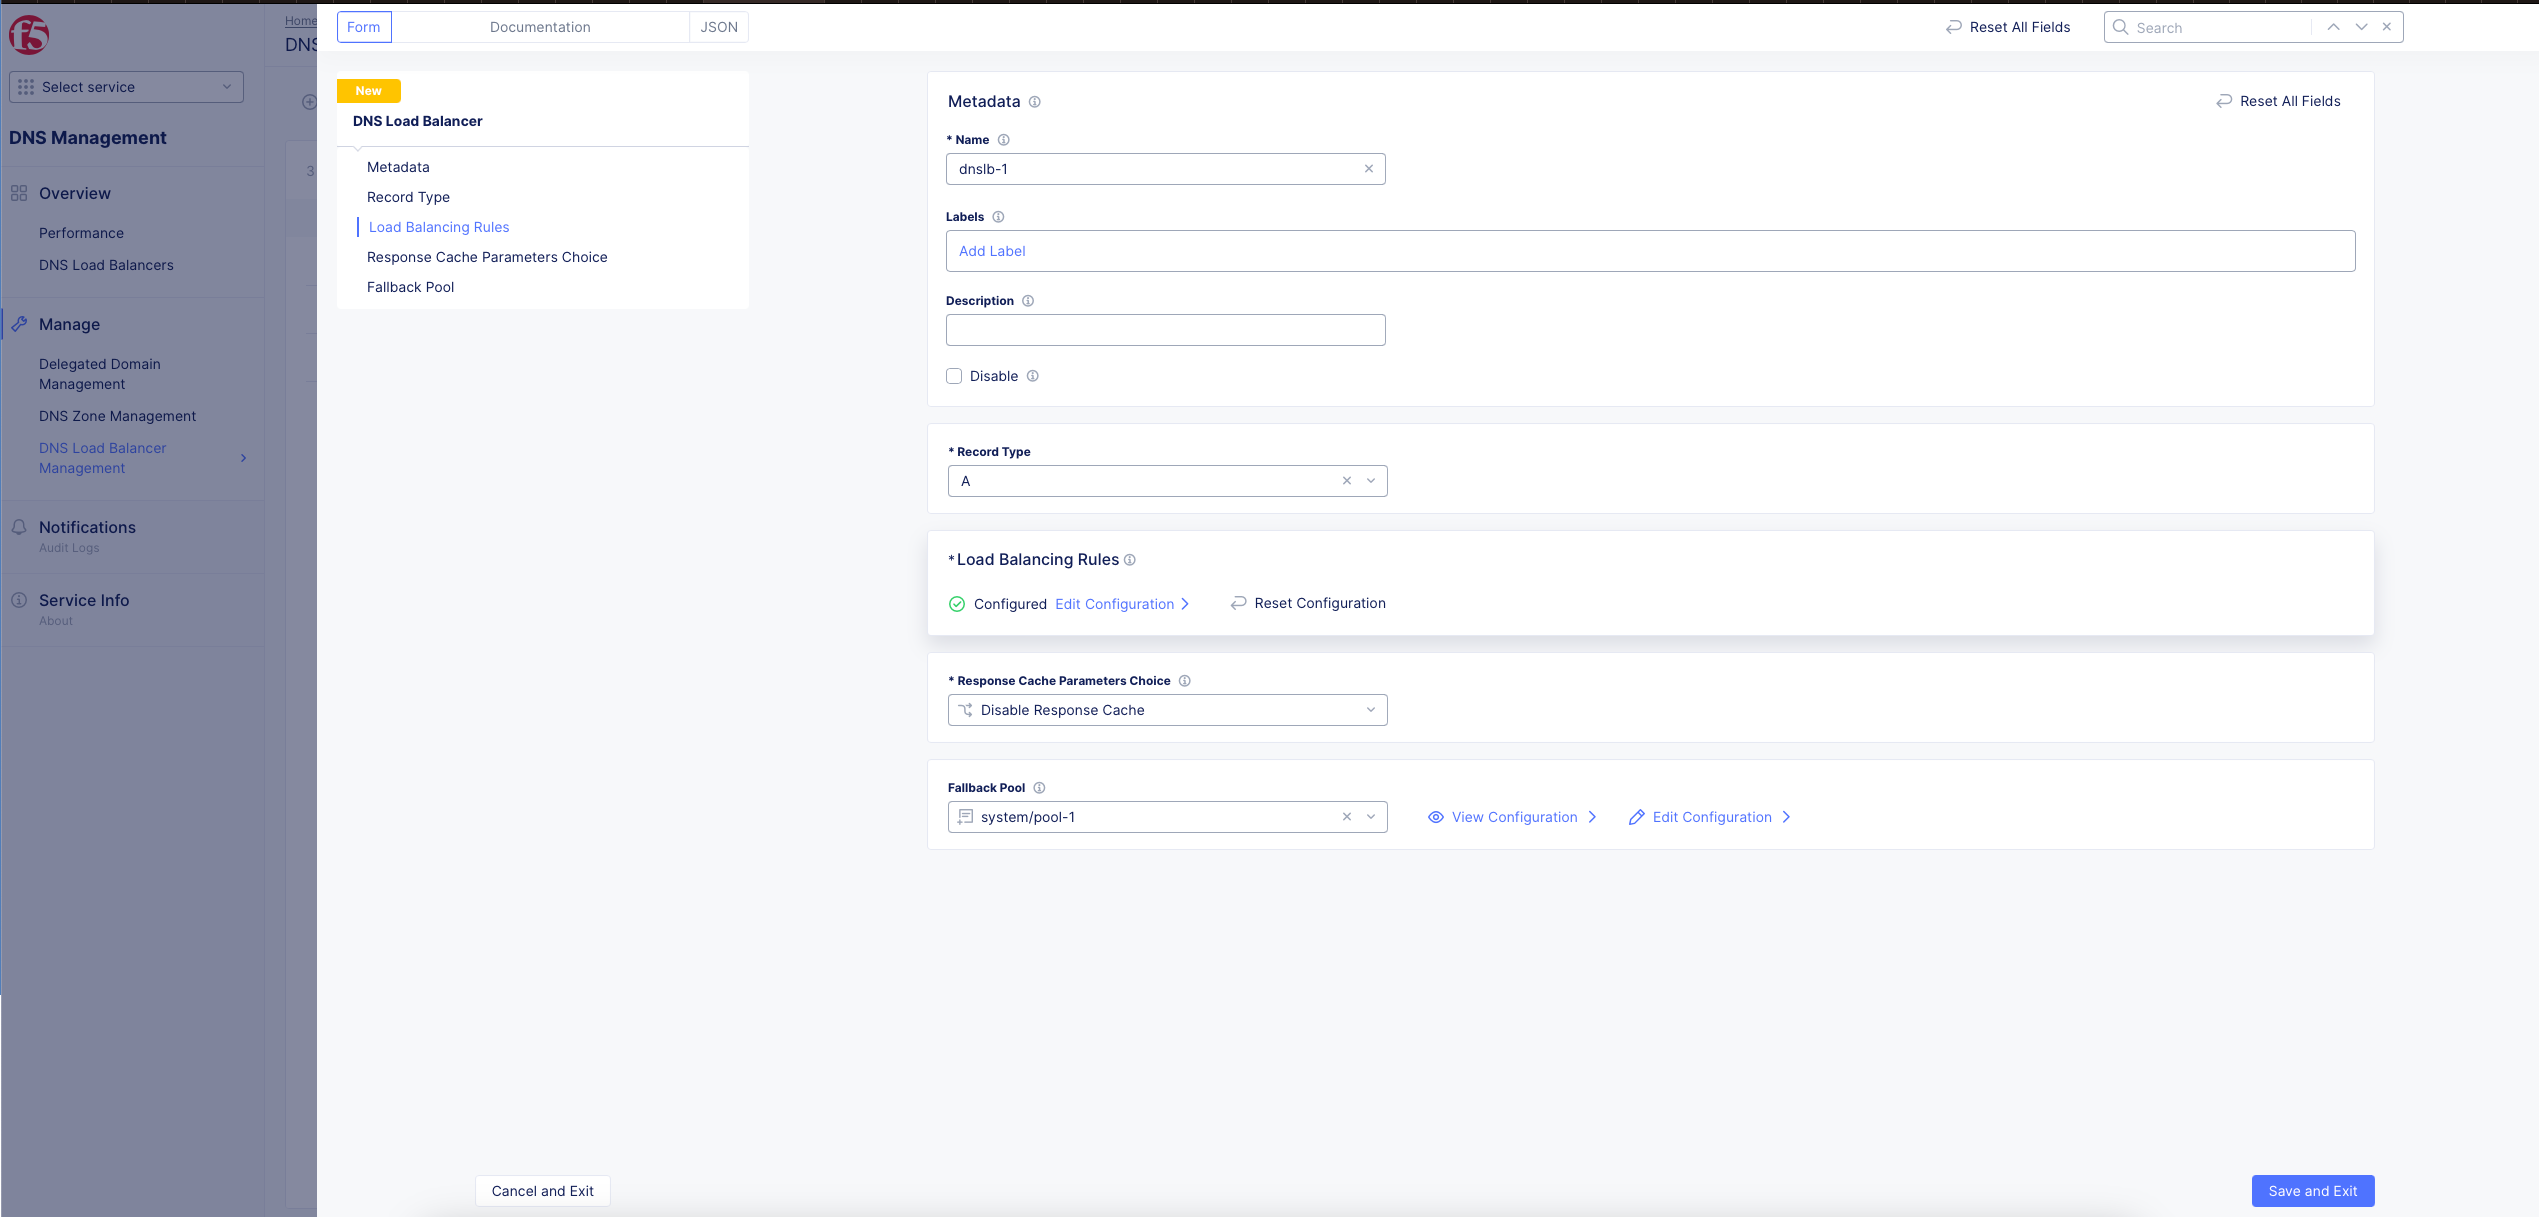
Figure: DNS Load Balancer Settings
- Optionally. add a fallback pool by selecting a pool from the
Fallback Poolfield. If no pool matches, then this pool will be the fallback pool.
Step 4: Complete creating the load balancer.
Select Add DNS Load Balancer to complete the process.
Add DNS Load Balancer to DNS Zone
After creating a DNS load balancer, it is required that you add the load balancer record to a DNS zone.
Note: Subdomains are not supported for DNS load balancer record names. In case you want to use a subdomain, create another DNS zone with the subdomain included in the zone name and add the load balancer record to that zone.
Step 1: Navigate to zone management and start adding a zone.
-
Select
DNS Zone Managementoption in the primary navigation menu located on the left side of the page. -
Select
...>Manage Configurationfor your zone object among the list of displayed zones. -
Select
Edit Configurationlocated on the top right in the manage configuration page.
Step 2: Add load balancer record for the resource records.
-
Go to
Resource Record Setssection and clickAdd Item. The resource record sets configuration form opens. -
Enter a value for the
Time to livefield. -
Select
DNS Load Balancerfor theRecord Setfield, enter your record name in theRecord Namefield, and set the fields as per your record type selection. -
Select a DNS load balancer from the drop-down for the
DNS Load Balancer Recordfield. You can also use theAdd Itembutton to create a new load balancer and apply. -
Select
Applyto add the load balancer record to the zone configuration. -
Select
Save DNS Zonein the main zone configuration form to save changes to the zone configuration.
Note: You can inspect DNS load balancer status in the
Overview>DNS Load Balancerspage. However, at any given time, the health status value displayed is valid only for pools currently associated with an active DNS load balancer applied to a DNS zone.You can use the
...>Disable Objectin theActionscolumn of any DNS load balancer, pool, and healthcheck objects to disable them in case you want to perform troubleshooting activities. Also, a disabled object can be enabled using the...>Enable Objectoption.
Monitor DNS Load Balancer
To monitor your overall DNS system, DNS Performance, DNS zones, and DNS load balancers, see Monitor DNS.