Discover Service Endpoints Using HashiCorp Consul
Objective
This document provides instructions on how to discover service endpoints using HashiCorp Consul. Service discovery enables you to find the endpoints where a given service is available. To learn more about service discovery, see Service Discovery.
Using the instructions provided in this guide, you can create a discovery object and endpoint for a service using the service name and the location where the service is available.
Note: The service name is obtained from HashiCorp Consul.
Prerequisites
-
An F5® Distributed Cloud Services Account. If you do not have an account, see Create an Account.
-
Consul with a service or application reachable from a Distributed Cloud Services Site. Install the Node or Cluster Image in your cloud or edge location.
Configuration
Distributed Cloud Services enable you to discover existing service endpoints using multiple methods, including the HashiCorp Consul. This document covers service discovery on sites, virtual sites, or virtual networks using Consul.
The following figure shows the configuration workflow for service discovery with Consul:
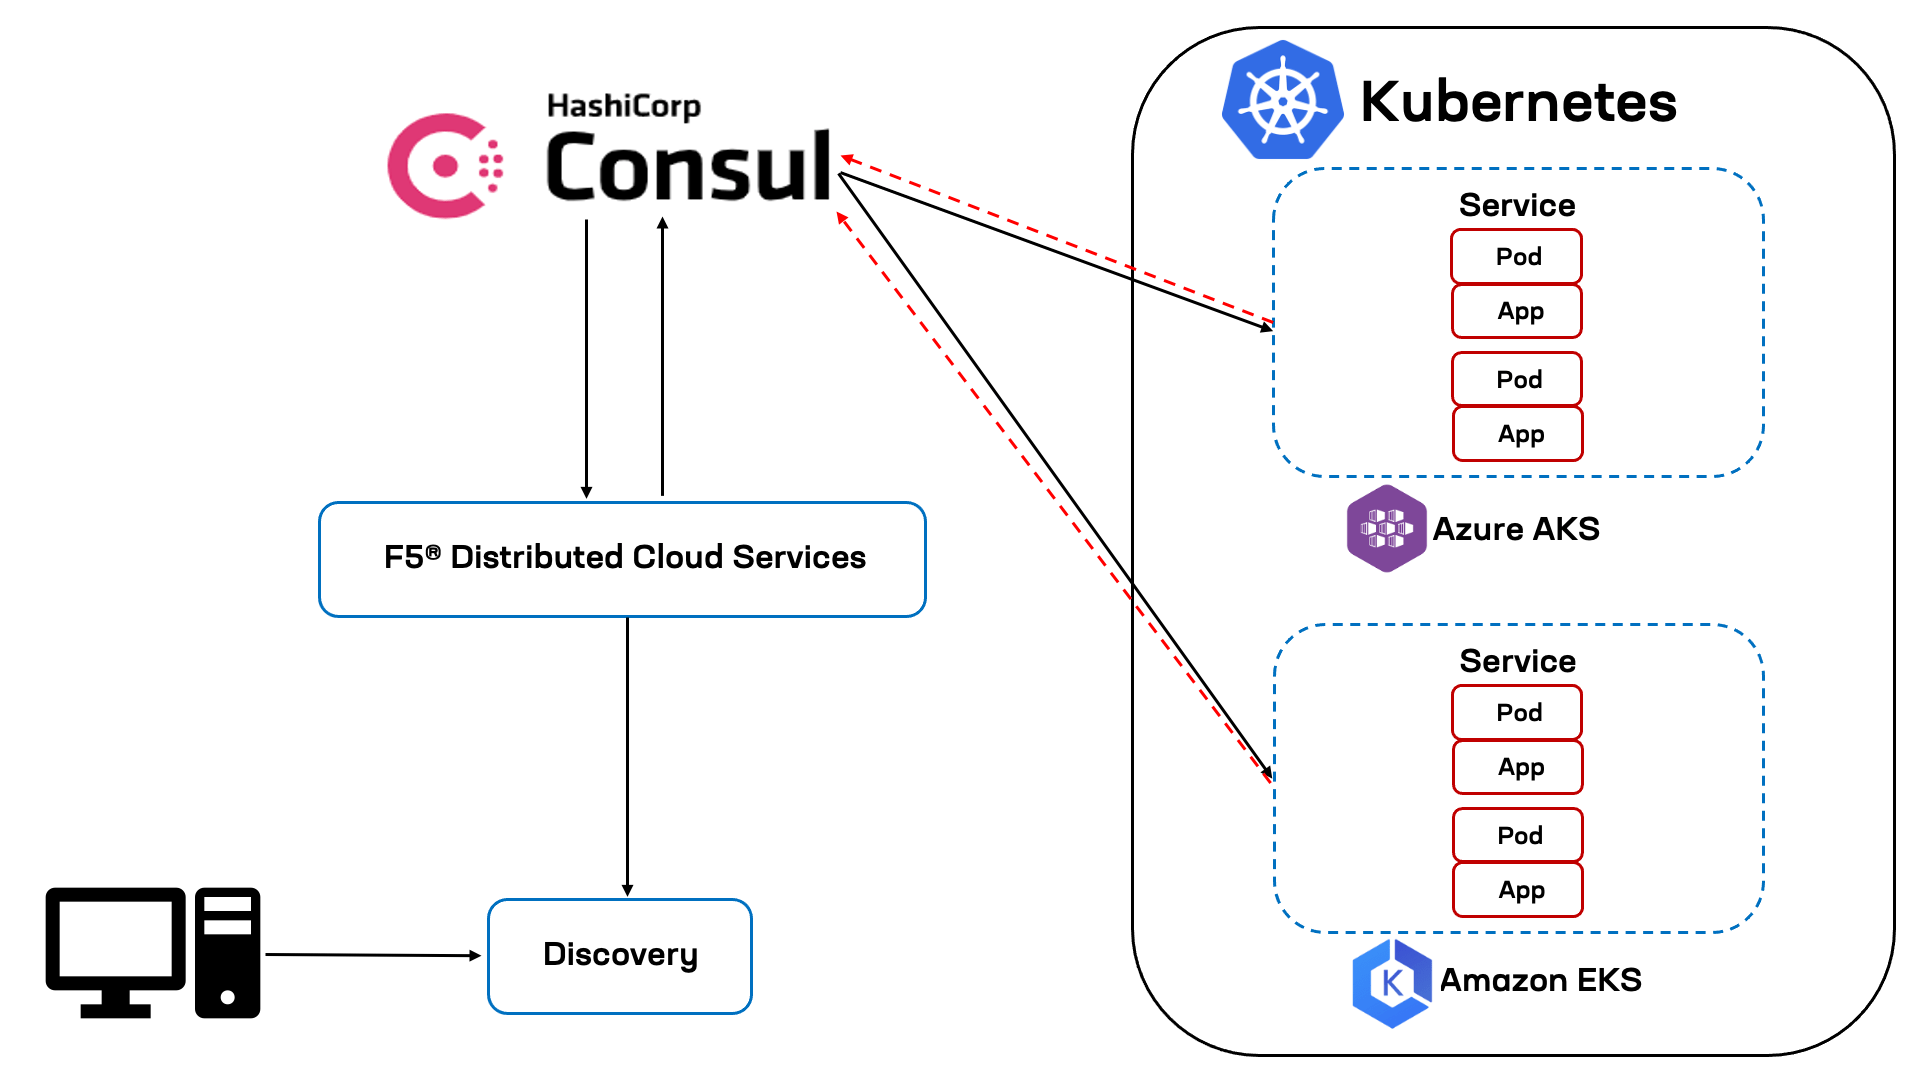
Figure: Setting Up Service Discovery with Consul
Configuration Sequence
Discovering services using the Consul service information requires performing the following sequence of actions:
| Phase | Description |
|---|---|
| Create Discovery for Consul Cluster | Create a service discovery object of type Consul. |
| Verify Discovered Services | Verify that the service discovery object was created and successfully discovered services. |
| Use Discovered Services | Configure an endpoint with K8s as the discovery type and associate sites with it. |
Note: The site of the discovery object and the endpoint must be the same.
Create Discovery for Consul Cluster
Step 1: Start discovery object creation.
-
Log into F5® Distributed Cloud Console (Console).
-
Click
Multi-Cloud App Connect.

Figure: Console Homepage
-
Click
Manage>Service Discoveries. -
Select the
K8s & Consultab. -
Click
Add Discovery.
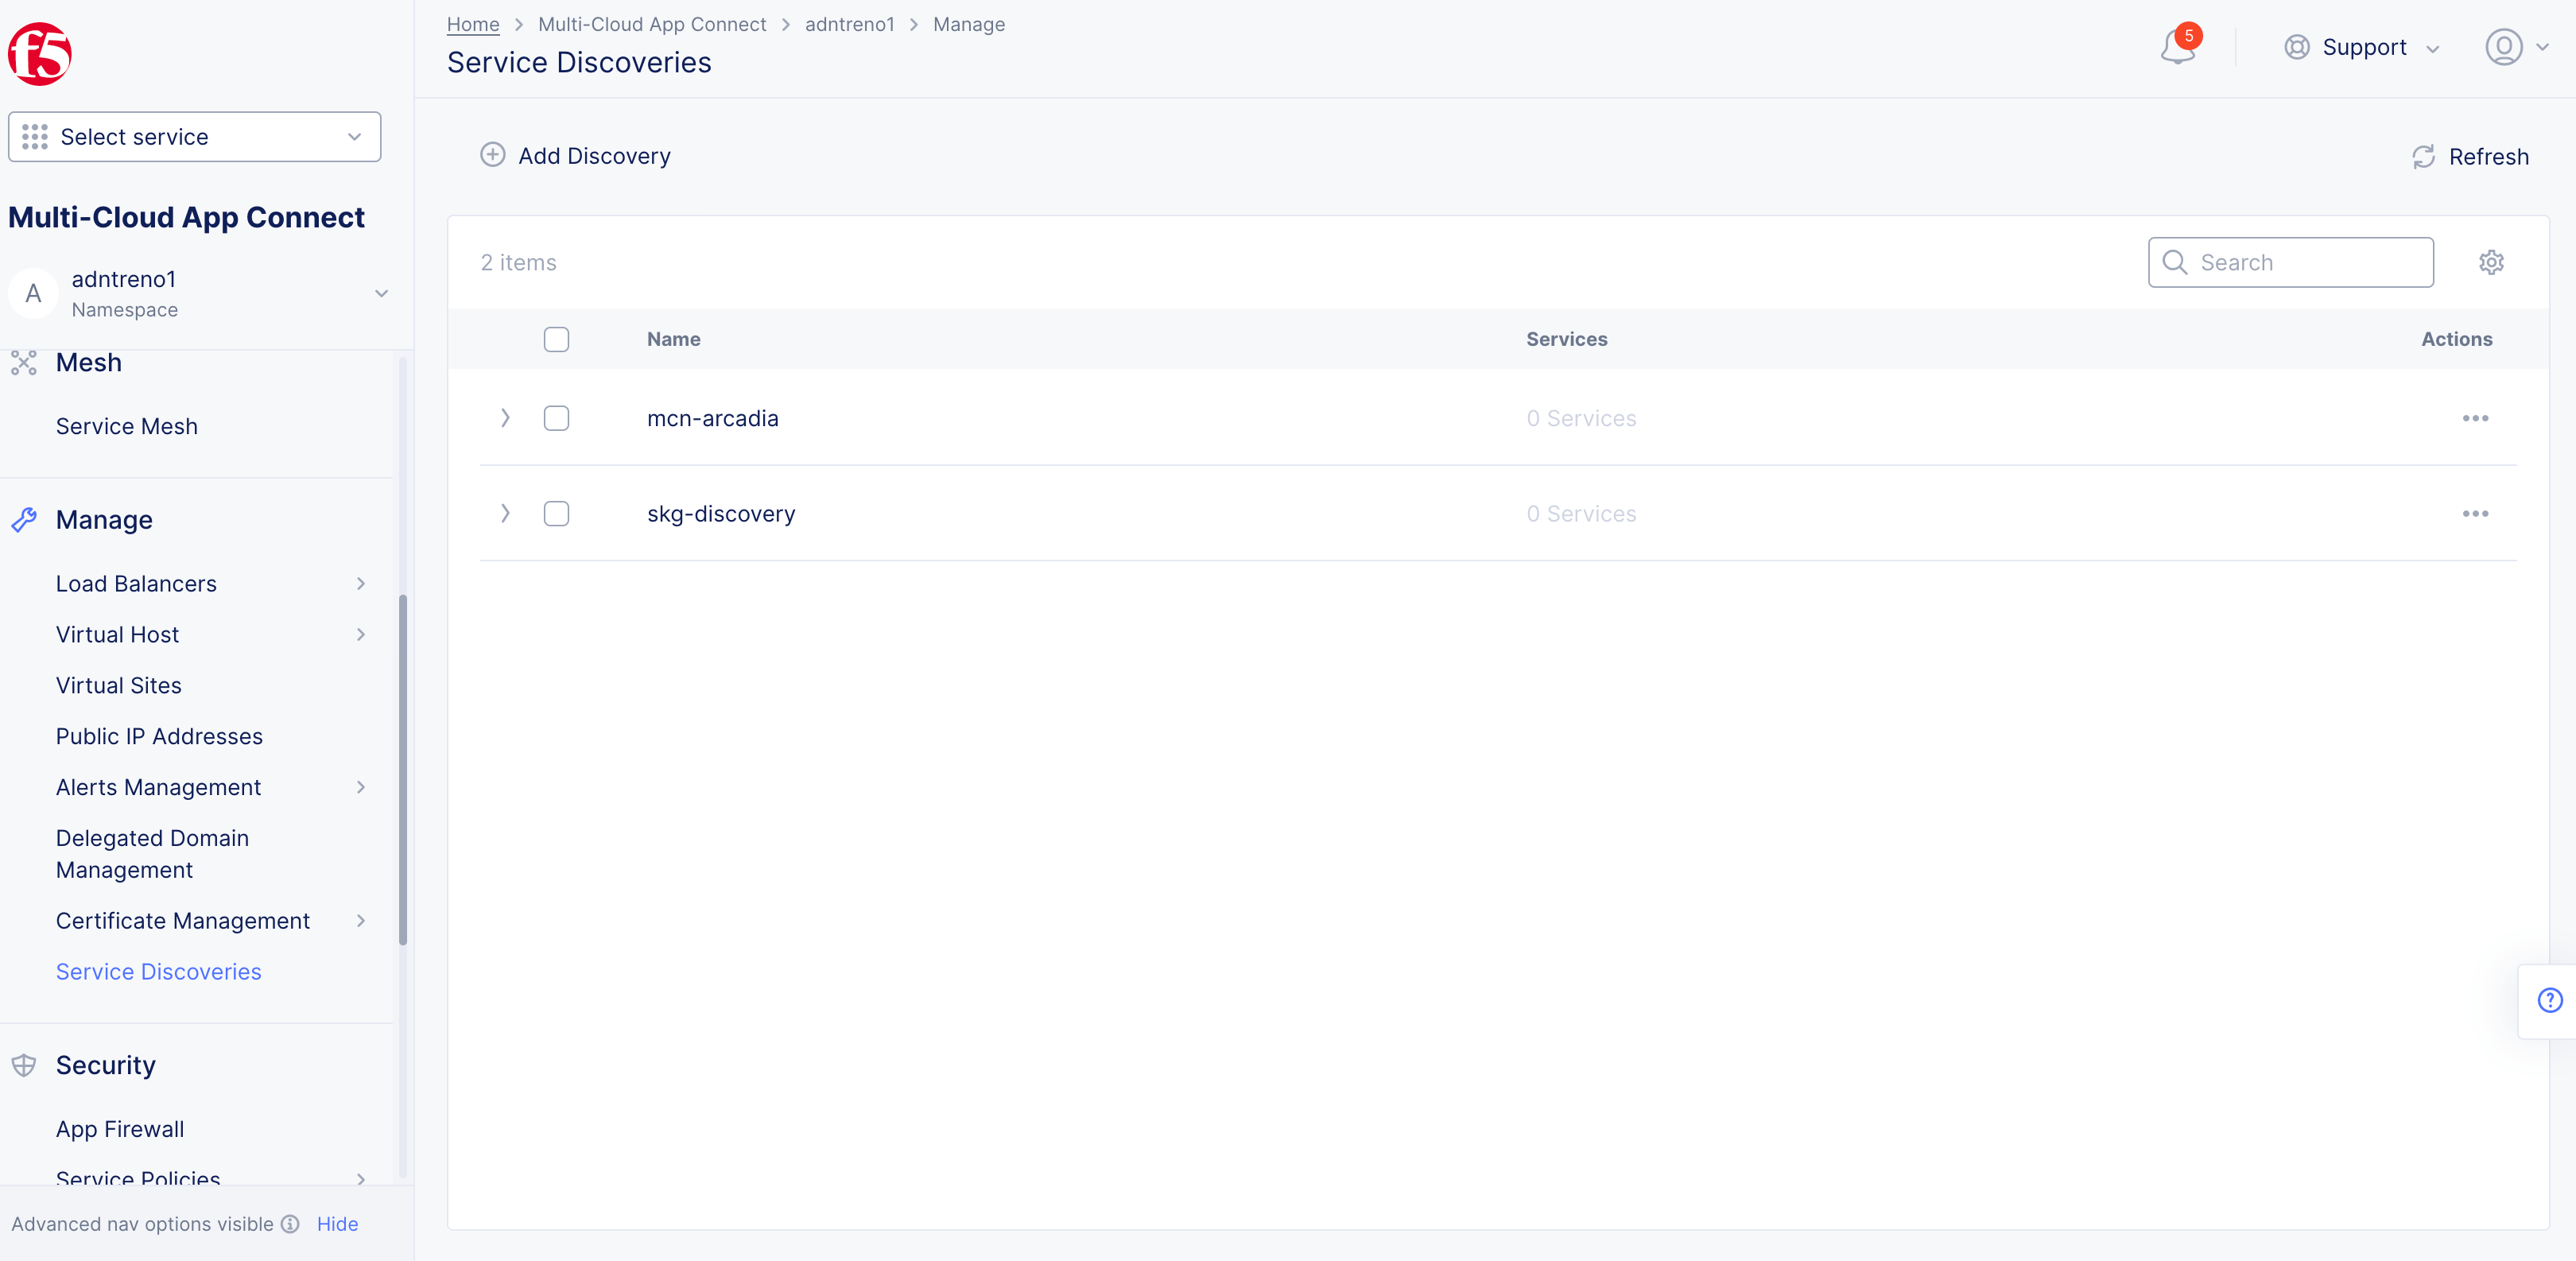
Figure: Navigate to Service Discovery
Step 2: Enter metadata.
-
In the
Namefield, enter a name for the service discovery object. -
Optionally, add labels and a description.
Step 3: Set discovery location.
-
In the
Wheresection, perform the following:-
From the
Virtual-Site or Site or Networkmenu, selectSiteorVirtual Site. -
Accordingly, select an appropriate object from the
Referencemenu. -
From the
Network Typemenu, select the network type for the object.
-
Step 4: Configure Consul settings for discovery.
-
In the
Discovery Methodsection, perform the following:-
From the
Select Discovery Methodmenu, selectConsul Discovery Configuration. -
Click
Configure. -
Enter the API server IP address and port number for your Consul server.
-
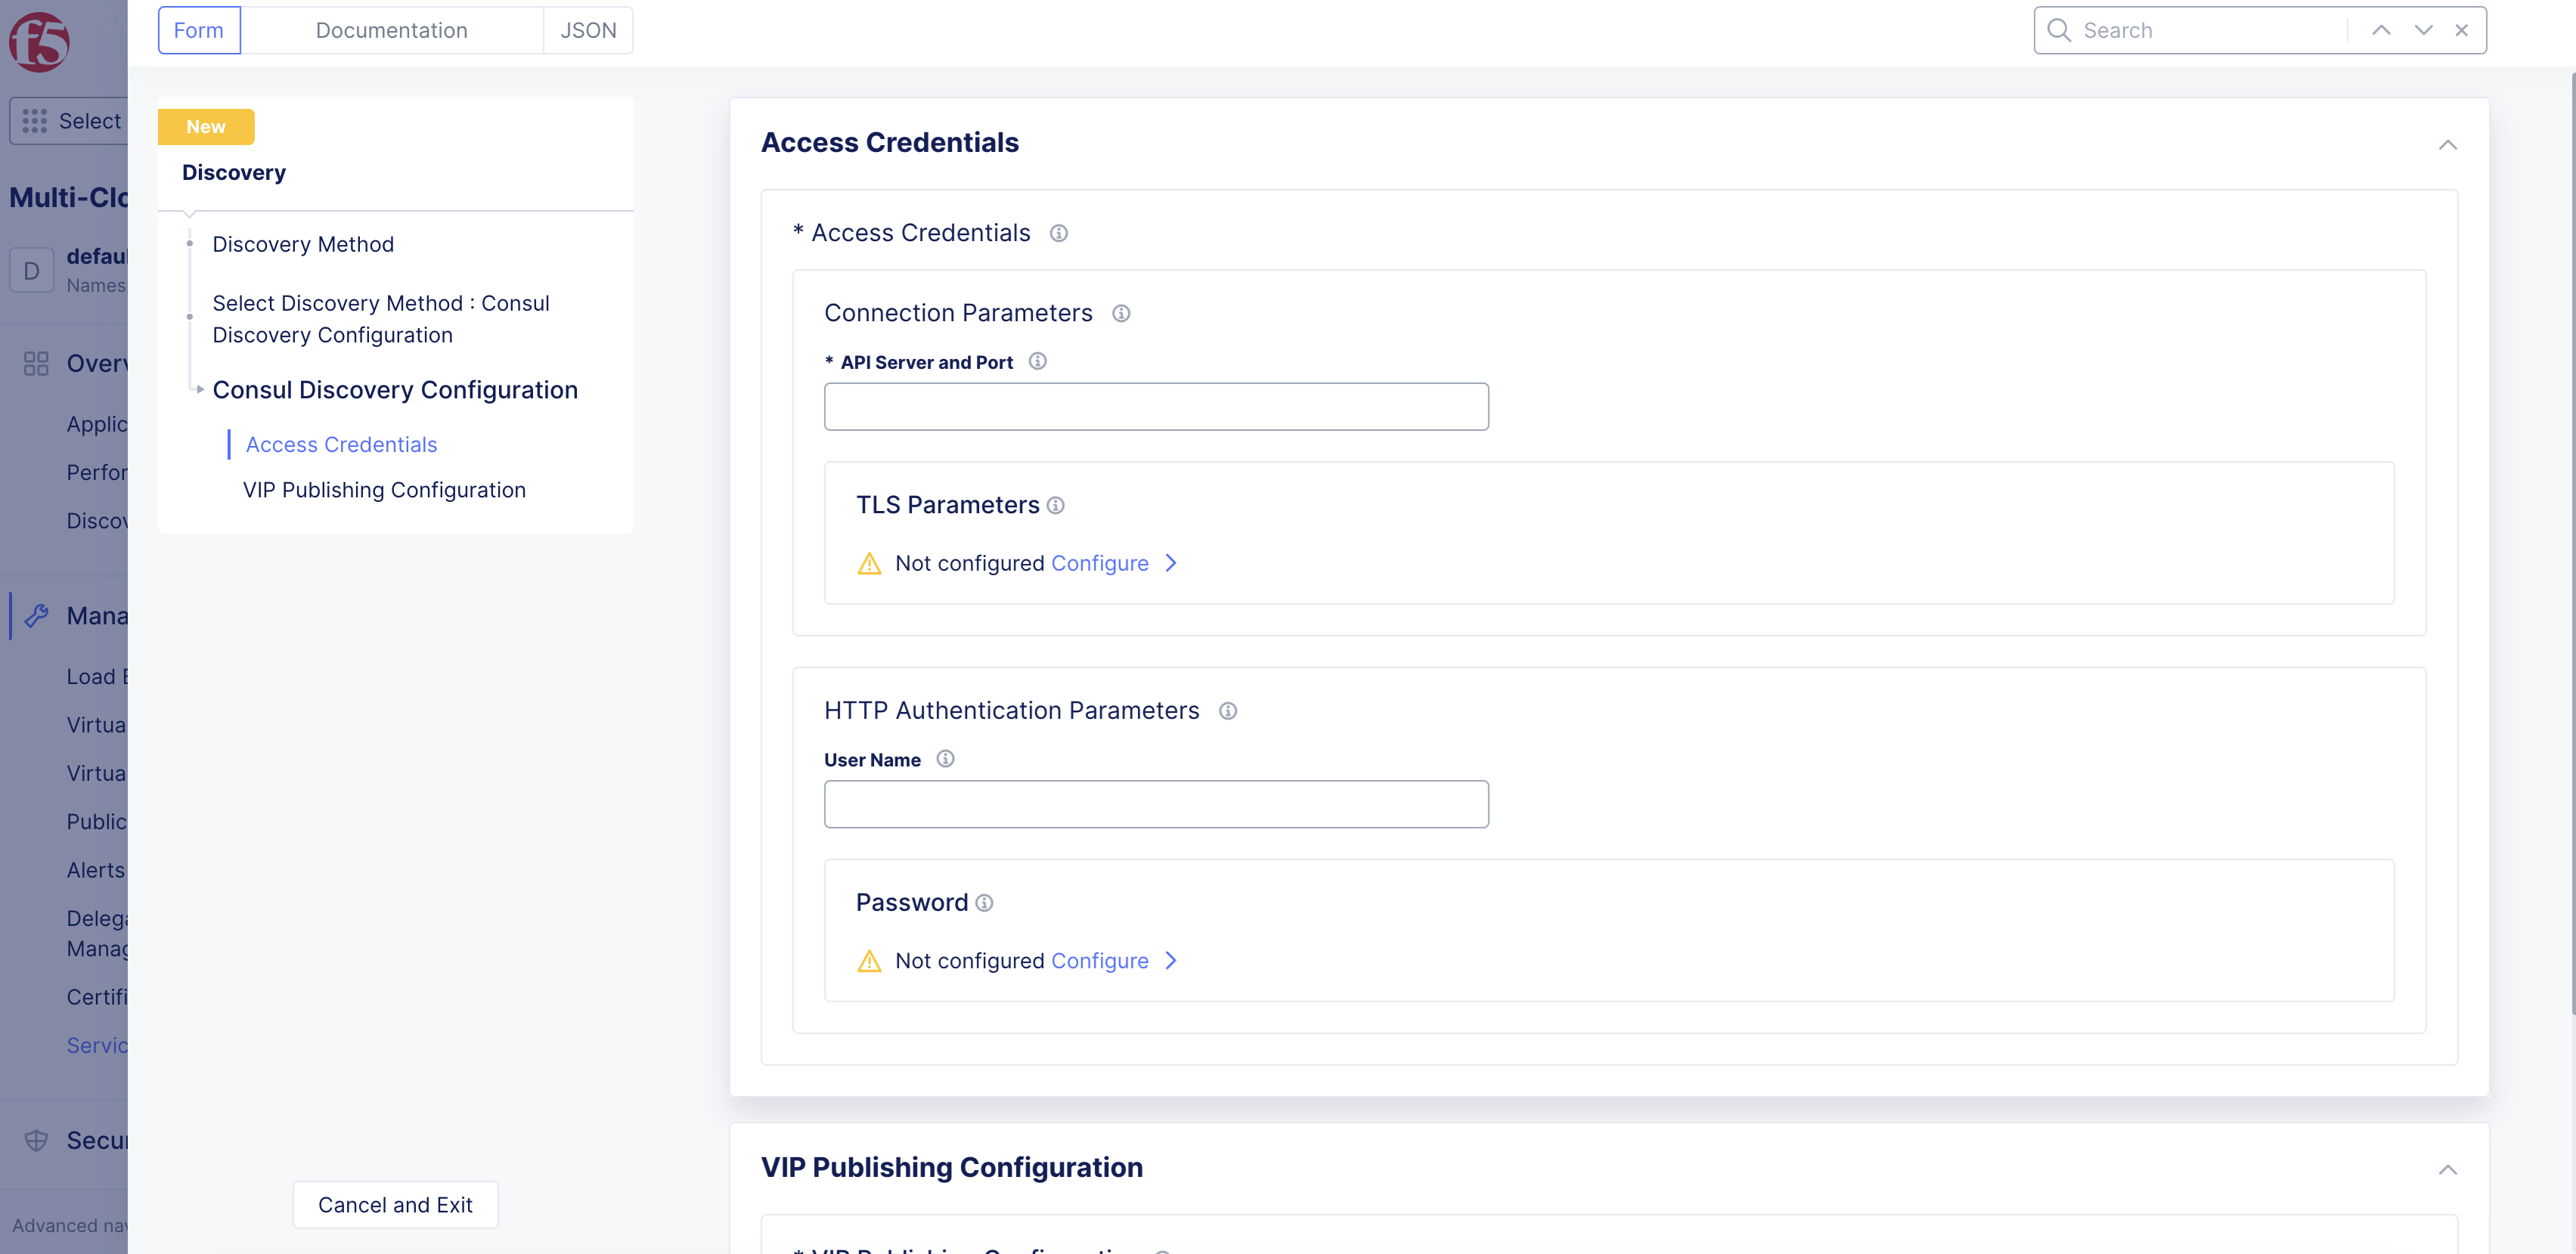
Figure: API Host and Port
Note: If authentication is HTTP-based, skip Step 5 and proceed to Step 6.
Step 5: Configure TLS parameters.
-
If the authentication method for Consul is TLS-based, click
Configure. -
In the
Server Parameterssection, enter the Server Name Indication (SNI) name and enter the server's CA certificate in PEM format.
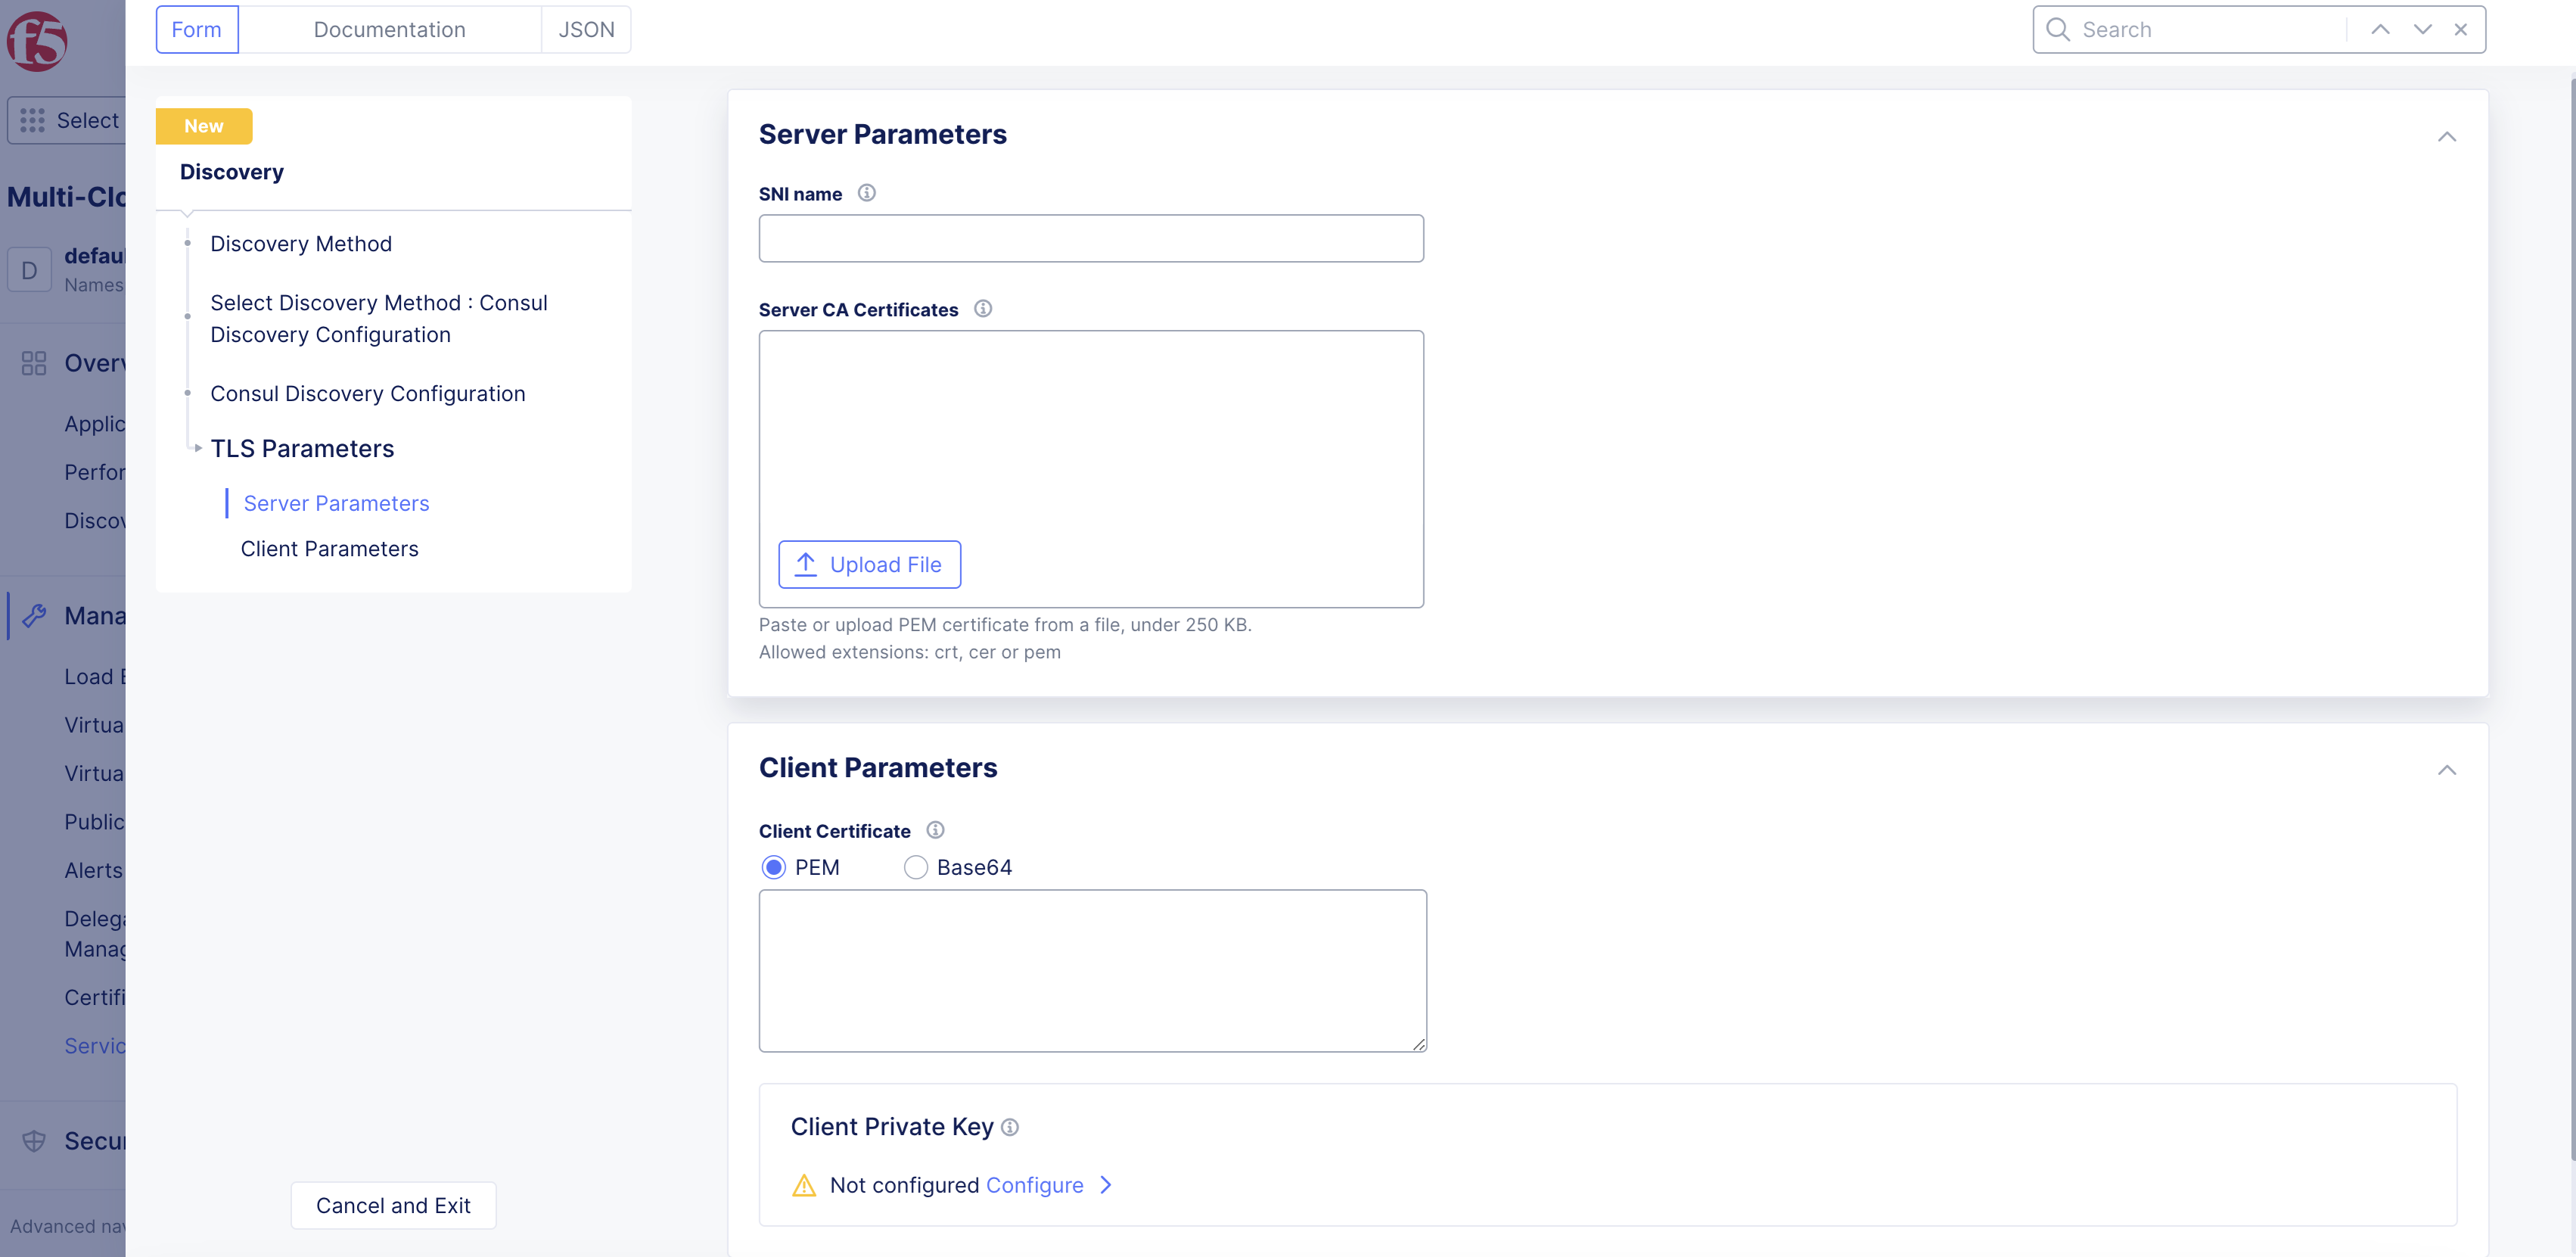
Figure: Consul Server Parameters
-
In the
Client Parameterssection, enter the client certificate inASCIIorbase64(binary)formats. -
Under
Client Private Key, clickConfigure. -
Choose
Blindfold SecretorClear Secretfrom theSecret Infomenu. -
Provide the key in one of the formats available. If you have ASCII text and must blindfold, click
Blindfold. -
Click
Apply.
Step 6: Configure HTTP authentication.
If authentication is HTTP parameters-based for the Consul server, configure the settings in the HTTP Authentication Parameters field.
-
In the
User Namefield, enter the username for the Consul server. -
Click
Configure. -
Choose
Blindfold SecretorClear Secretfrom theSecret Infomenu. -
Provide the key in one of the formats available. If you have ASCII text and must blindfold, click
Blindfold. -
Click
Apply.
Step 7: Set VIP publishing.
-
In the
VIP Publishing Configurationsection, perform the following:-
From the
Enable/Disable VIP Publishingmenu, selectPublish domain to VIP mapping. -
Click
Apply. -
Click
Save and Exit.
-
Verify Discovered Services
Verify that the service discovery object was created and discovering services.
Step 1: Navigate to service discovery in Console.
-
Click
Manage>Service Discoveries. -
Verify that the service discovery object is present and that the
Servicesfield displays the number of services discovered.
Step 2: Verify the discovered services.
-
Click on the value displayed in the
Servicesfield. This displays the list of discovered services. -
Note down the service to use from the
Service Namefield.
Use Discovered Services
After the service discovery object is created and the services are discovered, you can use them in configuration, such as the following:
-
Origin Pools: The origin pools are a way to declare the origin servers for your service in the load balancer configuration. You can create origin pools as part of HTTP load balancer creation or individually create and apply to an HTTP load balancer later.
-
Endpoints: The endpoint objects are for advanced configuration for use in the virtual host configuration.
Configure Origin Pool with Consul Service Information
This chapter shows the origin pool creation with Consul service name for the origin server specification.
Step 1: Start creating origin pool.
-
In Console, click
Multi-Cloud App Connect. -
Change to your application namespace.
-
Click
Manage>Load Balancers>Origin Pools. -
Click
Add Origin Pool.
Step 2: Set Consul as the type of origin.
-
Enter a name in the
Metadatasection. -
In the
Basic Configurationsection, clickAdd Item. -
From the
Select Type of Origin Servermenu, selectConsul Service Name of Origin Server on given Sites.
Step 3: Set the service name.
-
Obtain the service name using the instructions in the Verify Discovered Services chapter.
-
Enter the service name in the
Service Namefield.
Step 4: Specify the location for the origin pool.
-
Select
SiteorVirtual Sitefrom theSelect Site or Virtual Sitemenu. -
Select a site or virtual site accordingly.
-
Select a network from the
Select Network on the sitemenu. -
Click
Apply.
Step 5: Set port.
- From the
Portmenu, enter a port number.
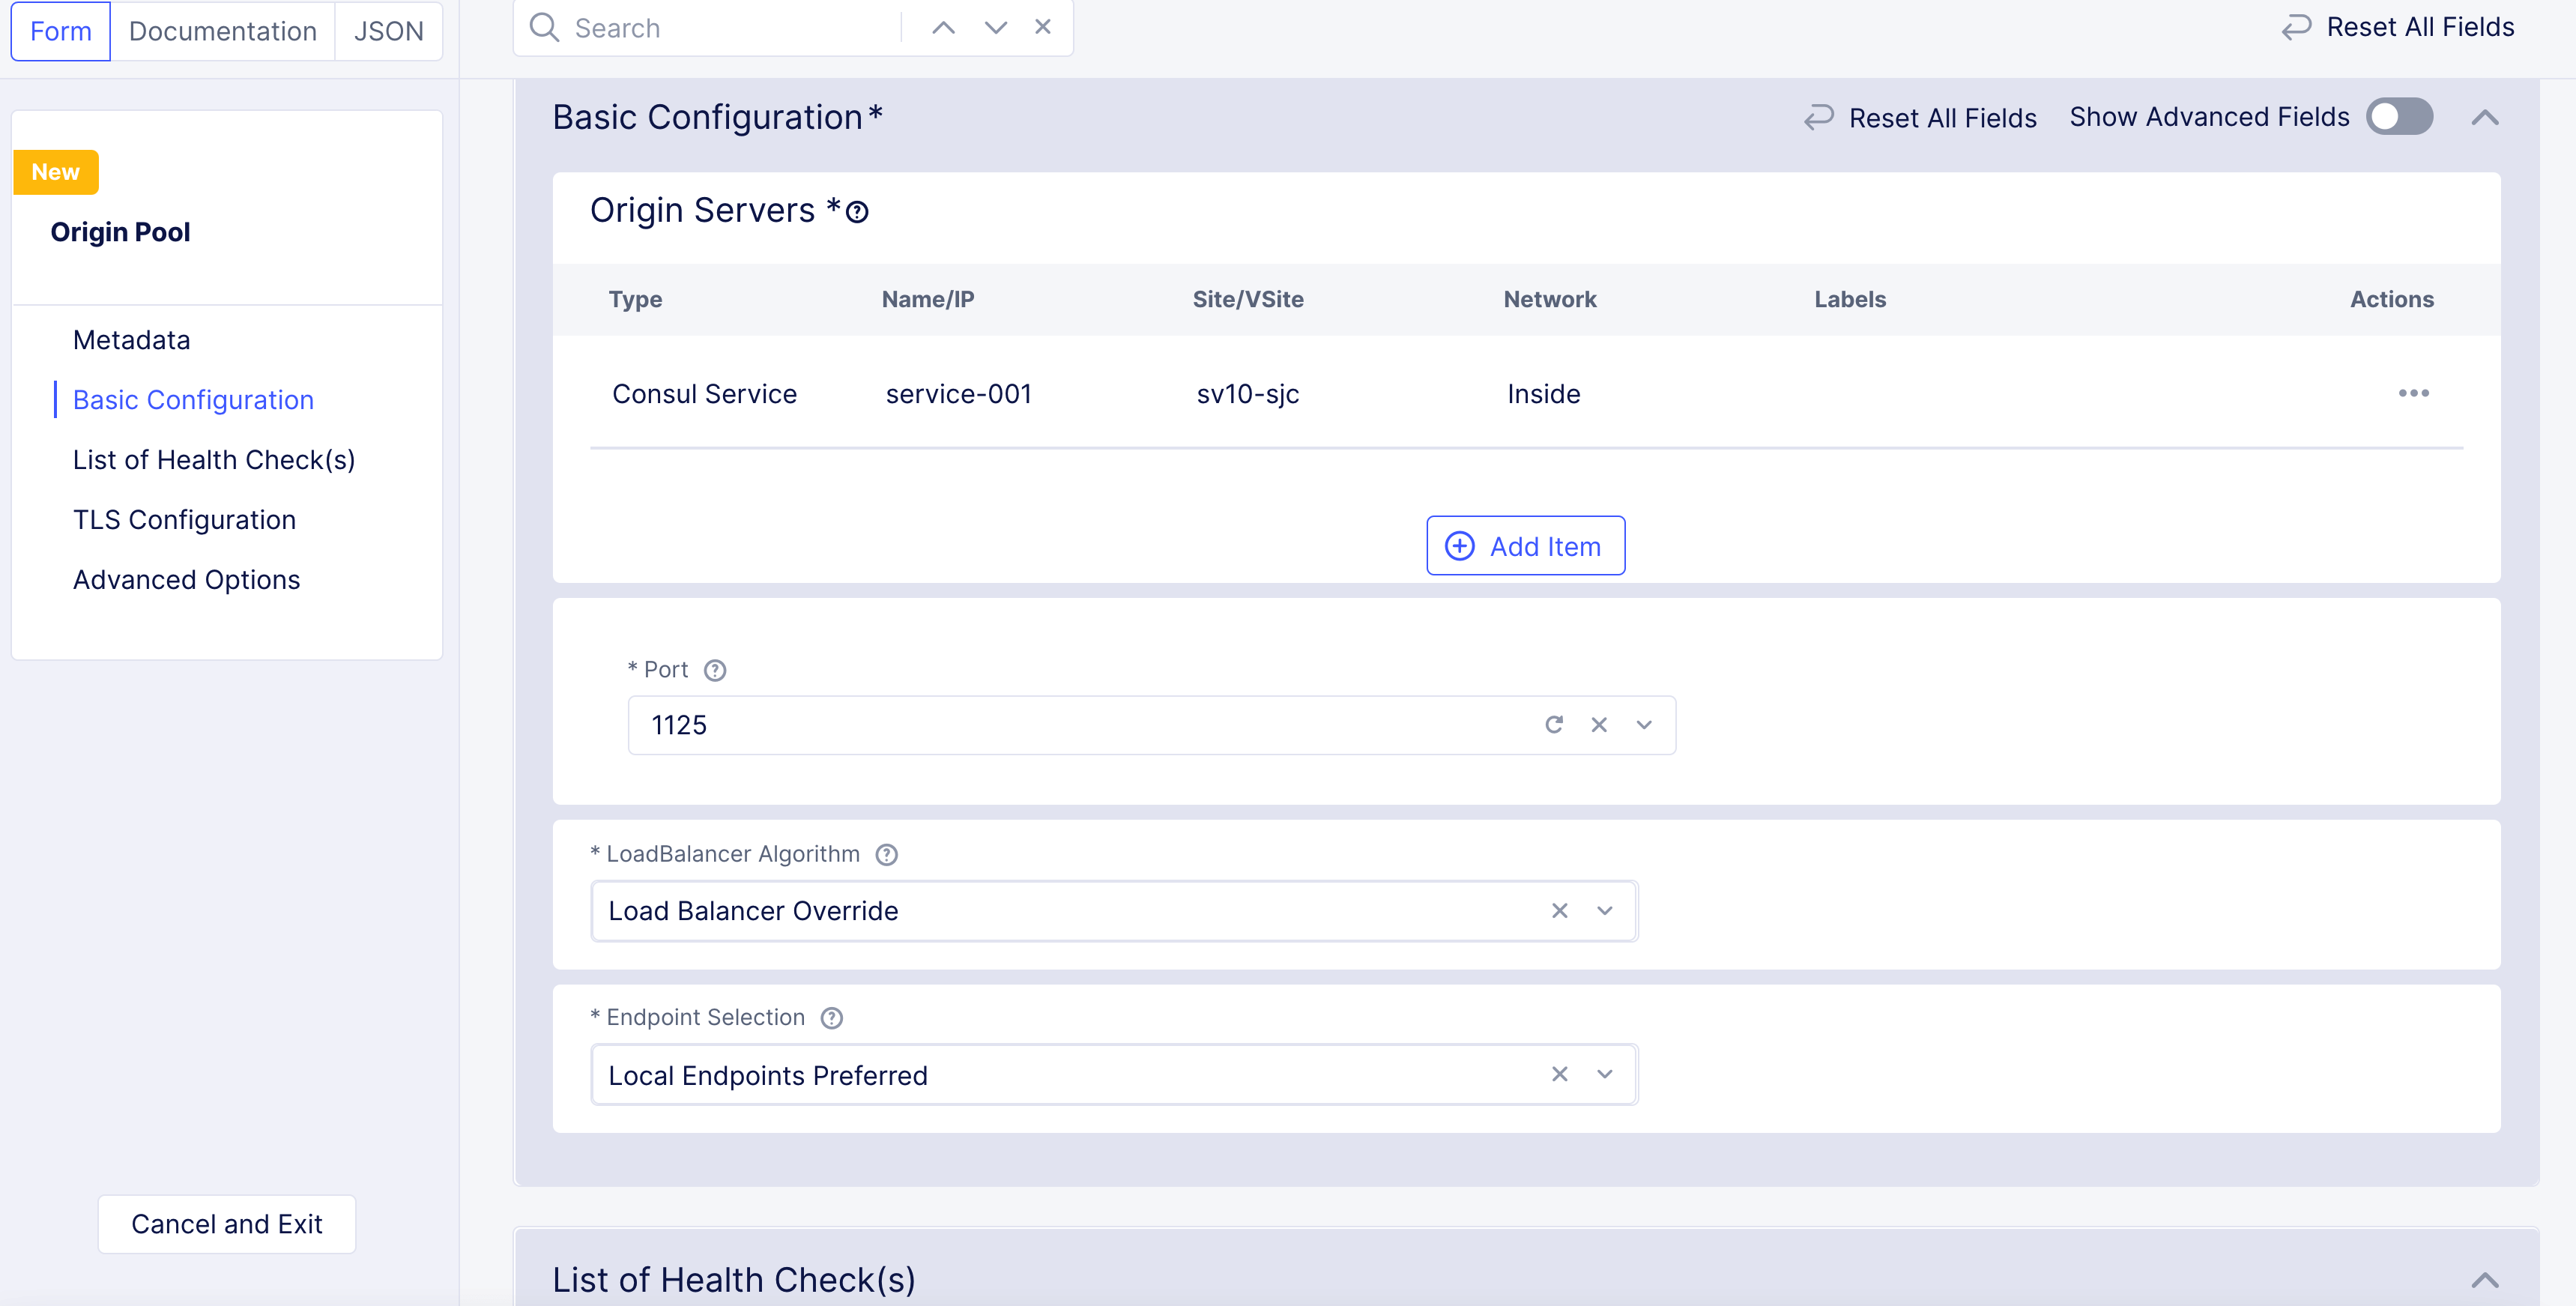
Figure: Set Port
-
To complete the configuration, see the Origin Pools guide.
-
Click
Save and Exit.
Create Endpoint with K8s Service Information
Step 1: Navigate to your application namespace in Console.
Select the namespace from the namespace selector or create a new namespace.
Step 2: Start creating endpoint.
-
Select
Manage>Virtual Host>Endpoints. -
Click
Add endpoint. -
In the
Metadatasection, perform the following:-
Add a name.
-
Optionally, add labels and a description.
-
Step 3: Obtain Consul service information.
Obtain the Consul service information using the instructions in the Verify Discovered Services chapter.
Step 4: Configure the endpoint address.
Configure where the endpoint should be discovered.
-
From the
Endpoint Specifiermenu, selectService Selector Info. This option requires you to use a service name or label selector to reach the endpoint. -
From the
Discoverymenu, selectHashiCorp Consul. -
From the
Servicemenu, selectService Name. -
Enter your service name in the
Service Namefield. Use the<servicename>format.
Note: Obtain the service name from Step 3.
Step 5: Configure the network.
-
From the
Virtual-Site or Site or Networkmenu, select an option. This site or virtual site must be the same as that of the discovery object created. -
From the
Referencemenu, select the object.
Note: Any reference object (site, virtual site, and virtual network) needs to be created and listed before configuring this field. The available object list is displayed on a cascading menu, where you can select one or more objects.
- From the
Network Typemenu, select an option.
Step 6: Set port and protocol.
Enter a port number and a protocol value for the Port and Protocol fields, respectively.
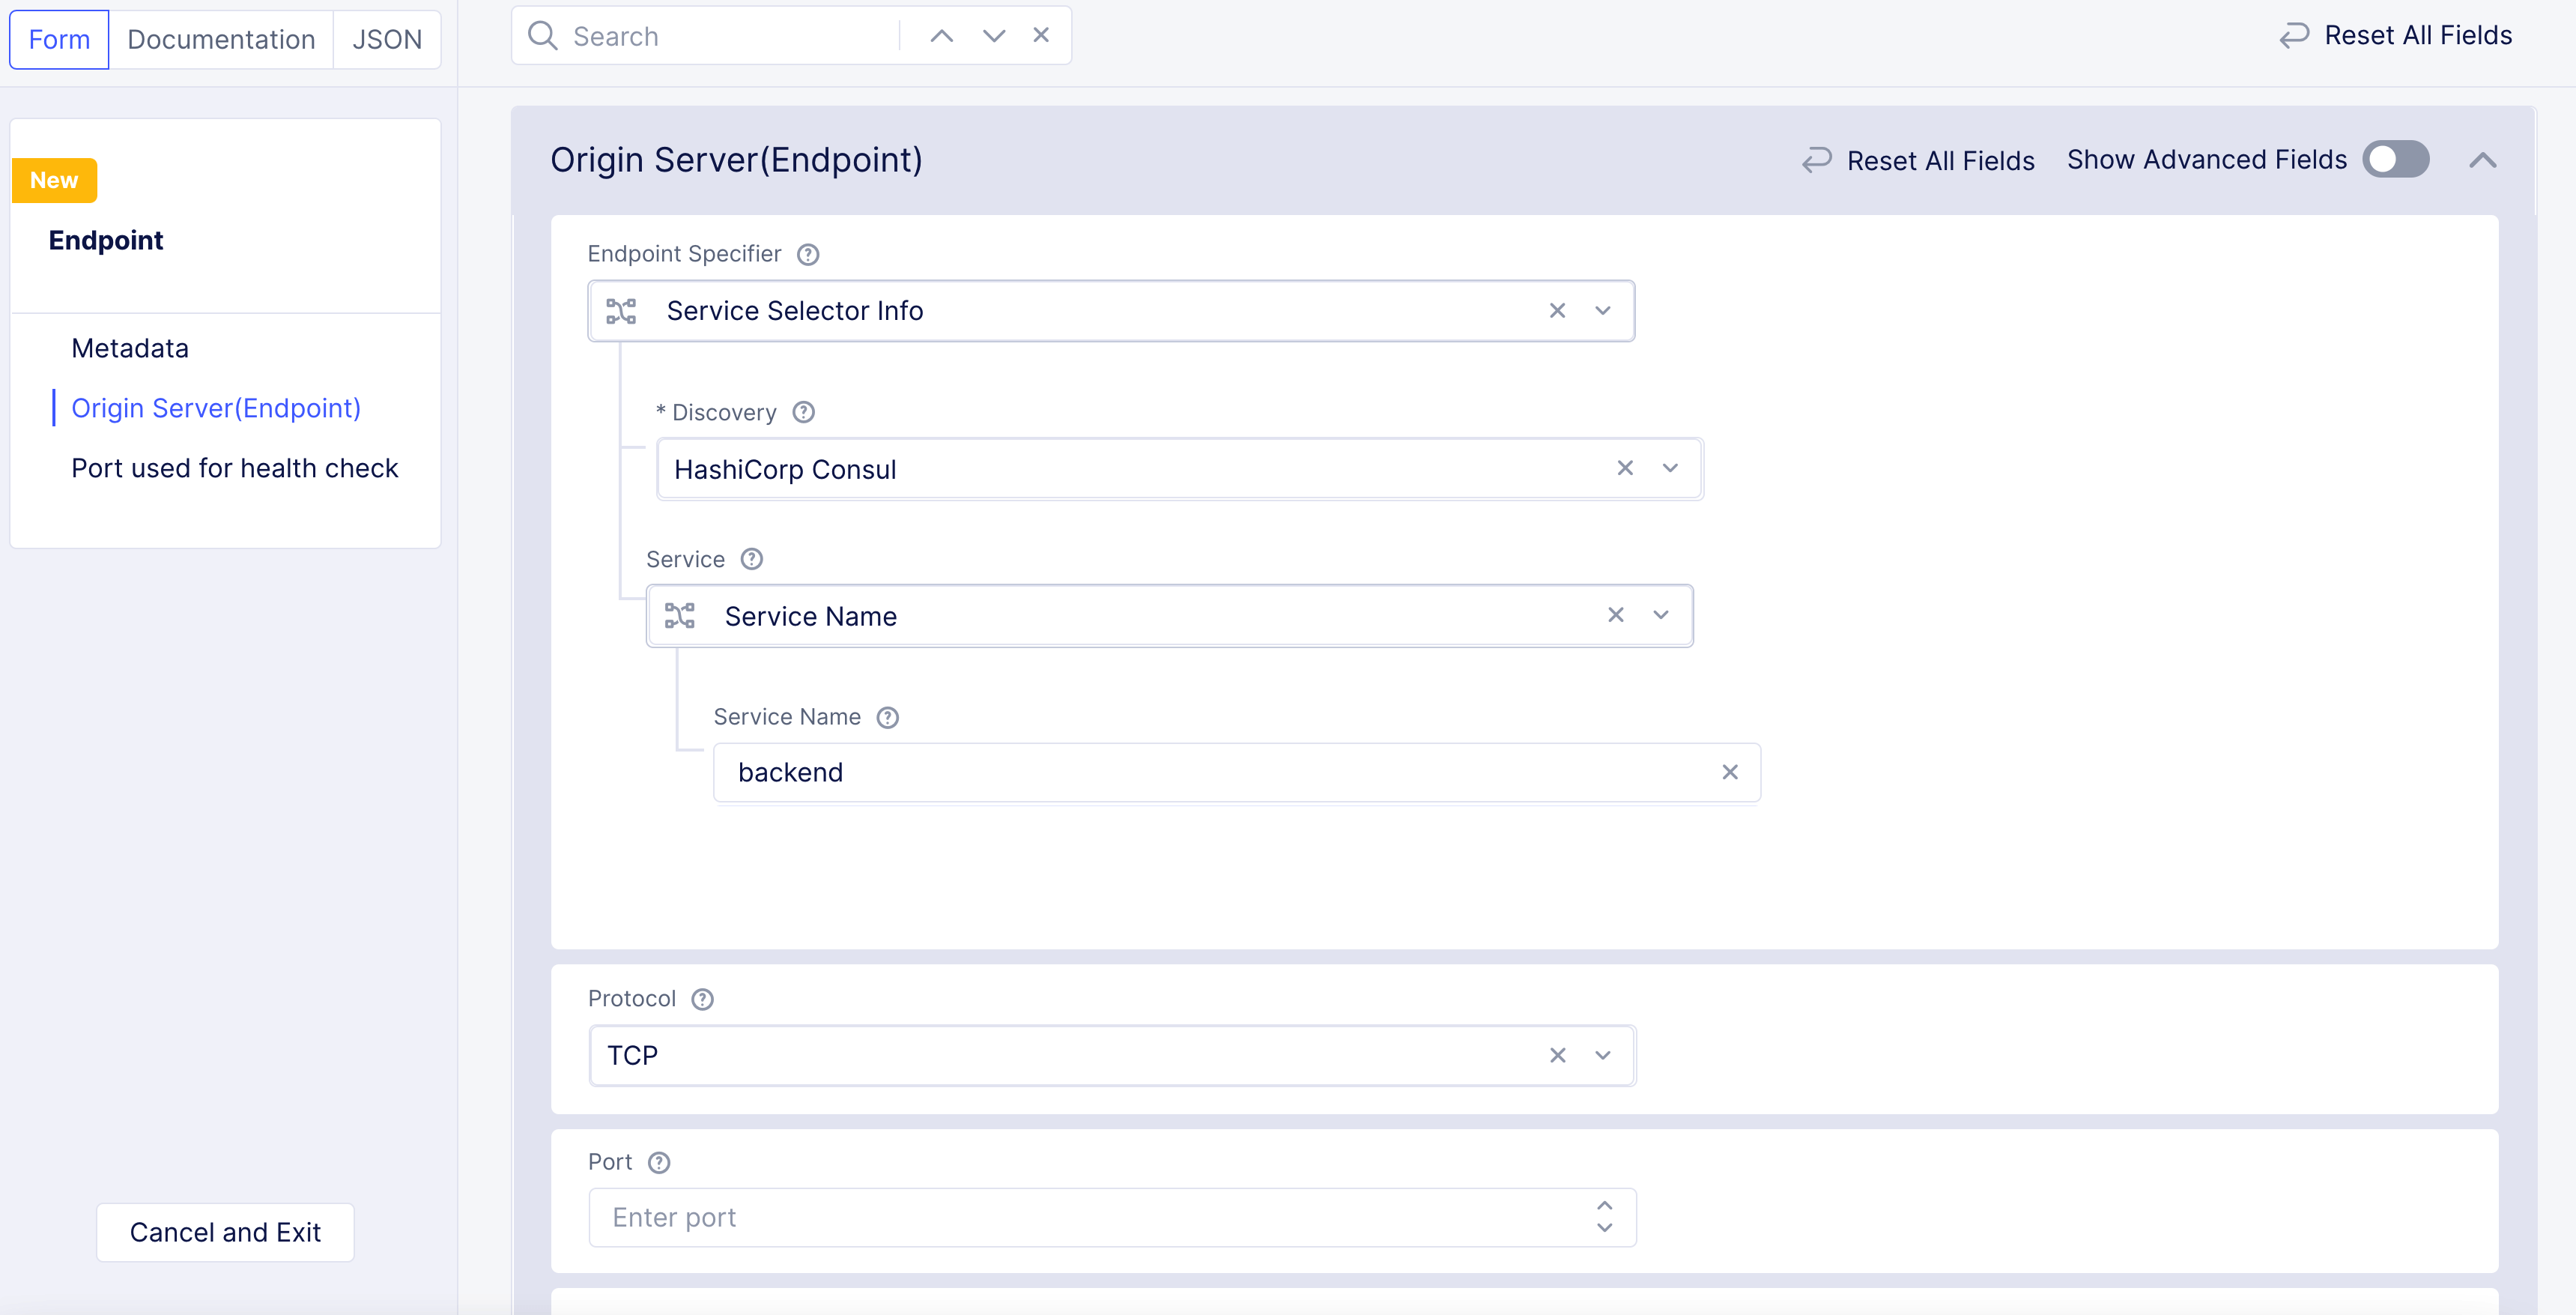
Figure: Set Port and Protocol
Note: The port must be the service port of the Consul service and not the node port.
Step 7: Optionally, set a health check port.
In the Port used for health check, enter a port number to use as an alternative port number for a health check on the endpoint.
Step 8: Complete creating an endpoint.
Click Save and Exit.
With the steps above, you can discover a service endpoint from Consul using Service Info on a location specified using the selector. Once the service is discovered, the object can be used with other configuration objects on the Distributed Cloud Services platform. For example, you can advertise it across sites in the cloud or edge.