Configure Global Log Receiver
Objective
This guide provides instructions on how to enable sending of your tenant logs from F5® Distributed Cloud Regional Edge (RE) Sites to an external log collection system. The sent logs include all system and application logs of your tenant. This also includes logs of all Customer Edge (CE) Sites of that tenant. For conceptual information about logging, see Logs.
In your log collection system, a folder is created for each day and within that daily folder, a subfolder is created for each hour. Every five minutes, new logs are written to the relevant hourly subfolder as compressed gzip files. The supported log format is NDJSON (newline-delimited JSON), where each line representing a separate JSON object.
Global log receiver supports sending the logs for the following log collection systems:
- AWS Cloudwatch
- AWS S3
- Azure Blob Storage
- Azure Event Hubs
- Datadog
- GCP Bucket
- Generic HTTP or HTTPs server
- IBM QRadar
- Kafka
- NewRelic
- Splunk
- SumoLogic
Note: Currently, global log receiver supports only sending the request (access) logs, security events, and audit logs for all HTTP load balancers and sites.
Using the instructions provided in this guide, you can configure a Global Log Receiver in the F5® Distributed Cloud Console (Console) to enable sending of logs to an external log collection system.
Prerequisites
-
An F5 Distributed Cloud Account. If you do not have an account, see Getting Started with Console.
-
An external log collection system reachable publicly.
-
The following IP address ranges are required to be added to your firewall's allowlist:
- 193.16.236.64/29
- 185.160.8.152/29
Enable Global Receiver of Logs
You can configure global log receiver in either system namespace (Multi-Cloud Network Connect service) or in shared namespace (Shared Configuration service). In case of configuring in shared namespace, you can configure to send from either shared namespace or all namespaces or specific list of namespaces. If you are configuring in system namespace, you can only send logs from system namespace.
The example shown in this guide creates a global log receiver object in the Console in system namespace for sending the logs to the external log collection system.
Step 1: Start creating a global log receiver.
-
In the Console home page, select the
Multi-Cloud Network Connectservice or theShared Configurationservice.Multi-Cloud Network Connectservice: SelectManage>Log Management>Global Log Receiver.Shared Configurationservice: SelectManage>Global Log Receiver.
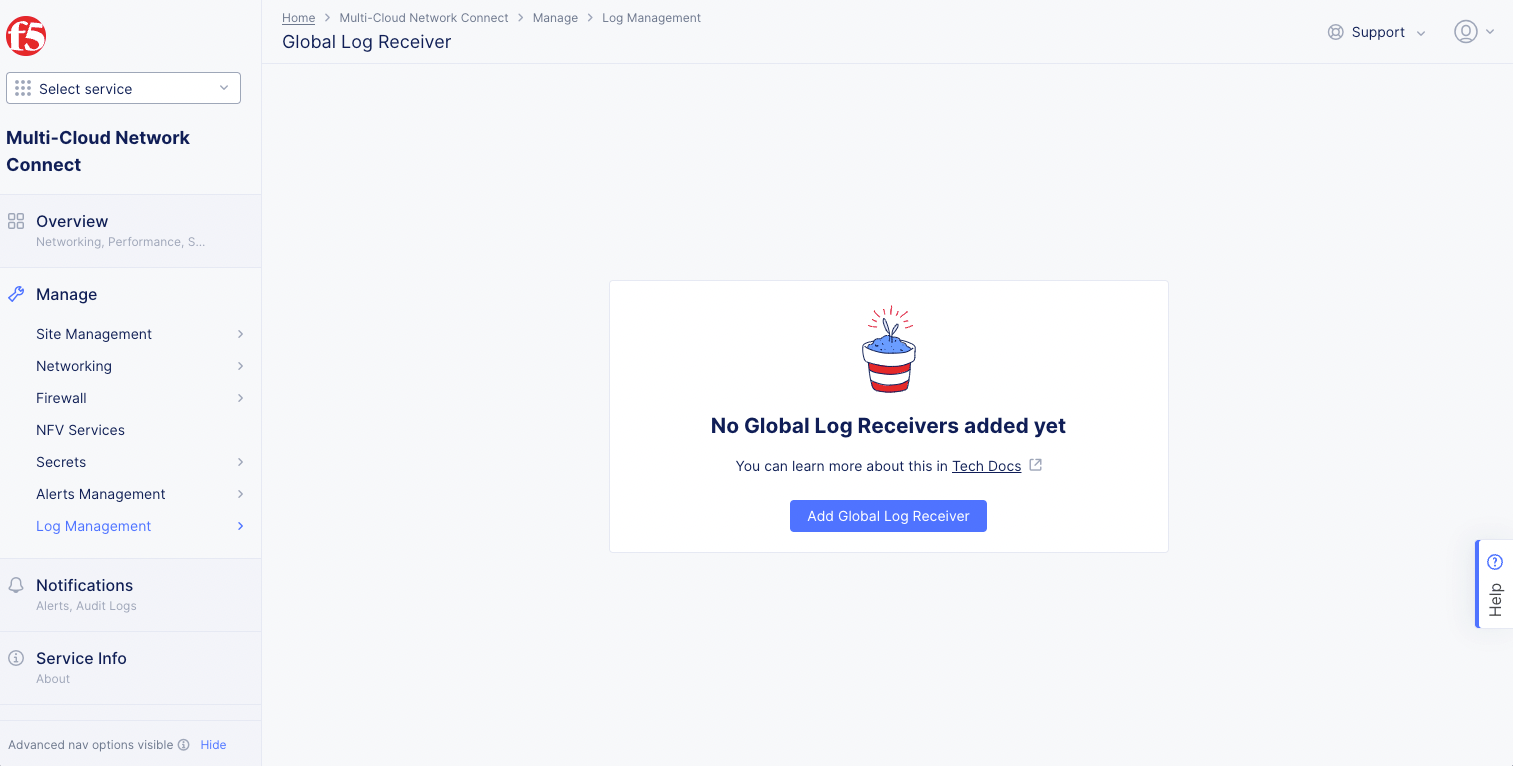
Figure: Navigate to Global Log Receiver Page
- Select
Add Global Log Receiver.
Step 2: Configure global log receiver properties.
-
Enter a name in the
Metadatasection. Optionally, set labels and add a description. -
From the
Log Typemenu, selectRequest Logs,Security Events,Audit Logs, orDNS Request Logs. The request logs are set by default. -
In case of
Multi-Cloud Network Connectservice, select logs from current namespace from theLog Message Selectionmenu. This is also the default option. -
In case of
Shared Configurationservice, you can select one of the following options:Select logs from current namespace: This option sends logs from the shared namespace. In case ofDNS Request Logs, sending logs from the current namespace is not supported. Either select logs from all namespaces or select logs from specific namespaces, and select the system namespace to send logs from.Select logs from all namespaces: This option sends logs from all namespaces.Select logs in specific namespaces: This option sends logs from specified namespaces. Enter the namespace name in the displayed namespaces list. UseAdd itemto add more than one namespace.
-
From the
Receiver Configurationdrop-down menu, select a receiver and follow the corresponding instructions below.
AWS Cloudwatch Receiver
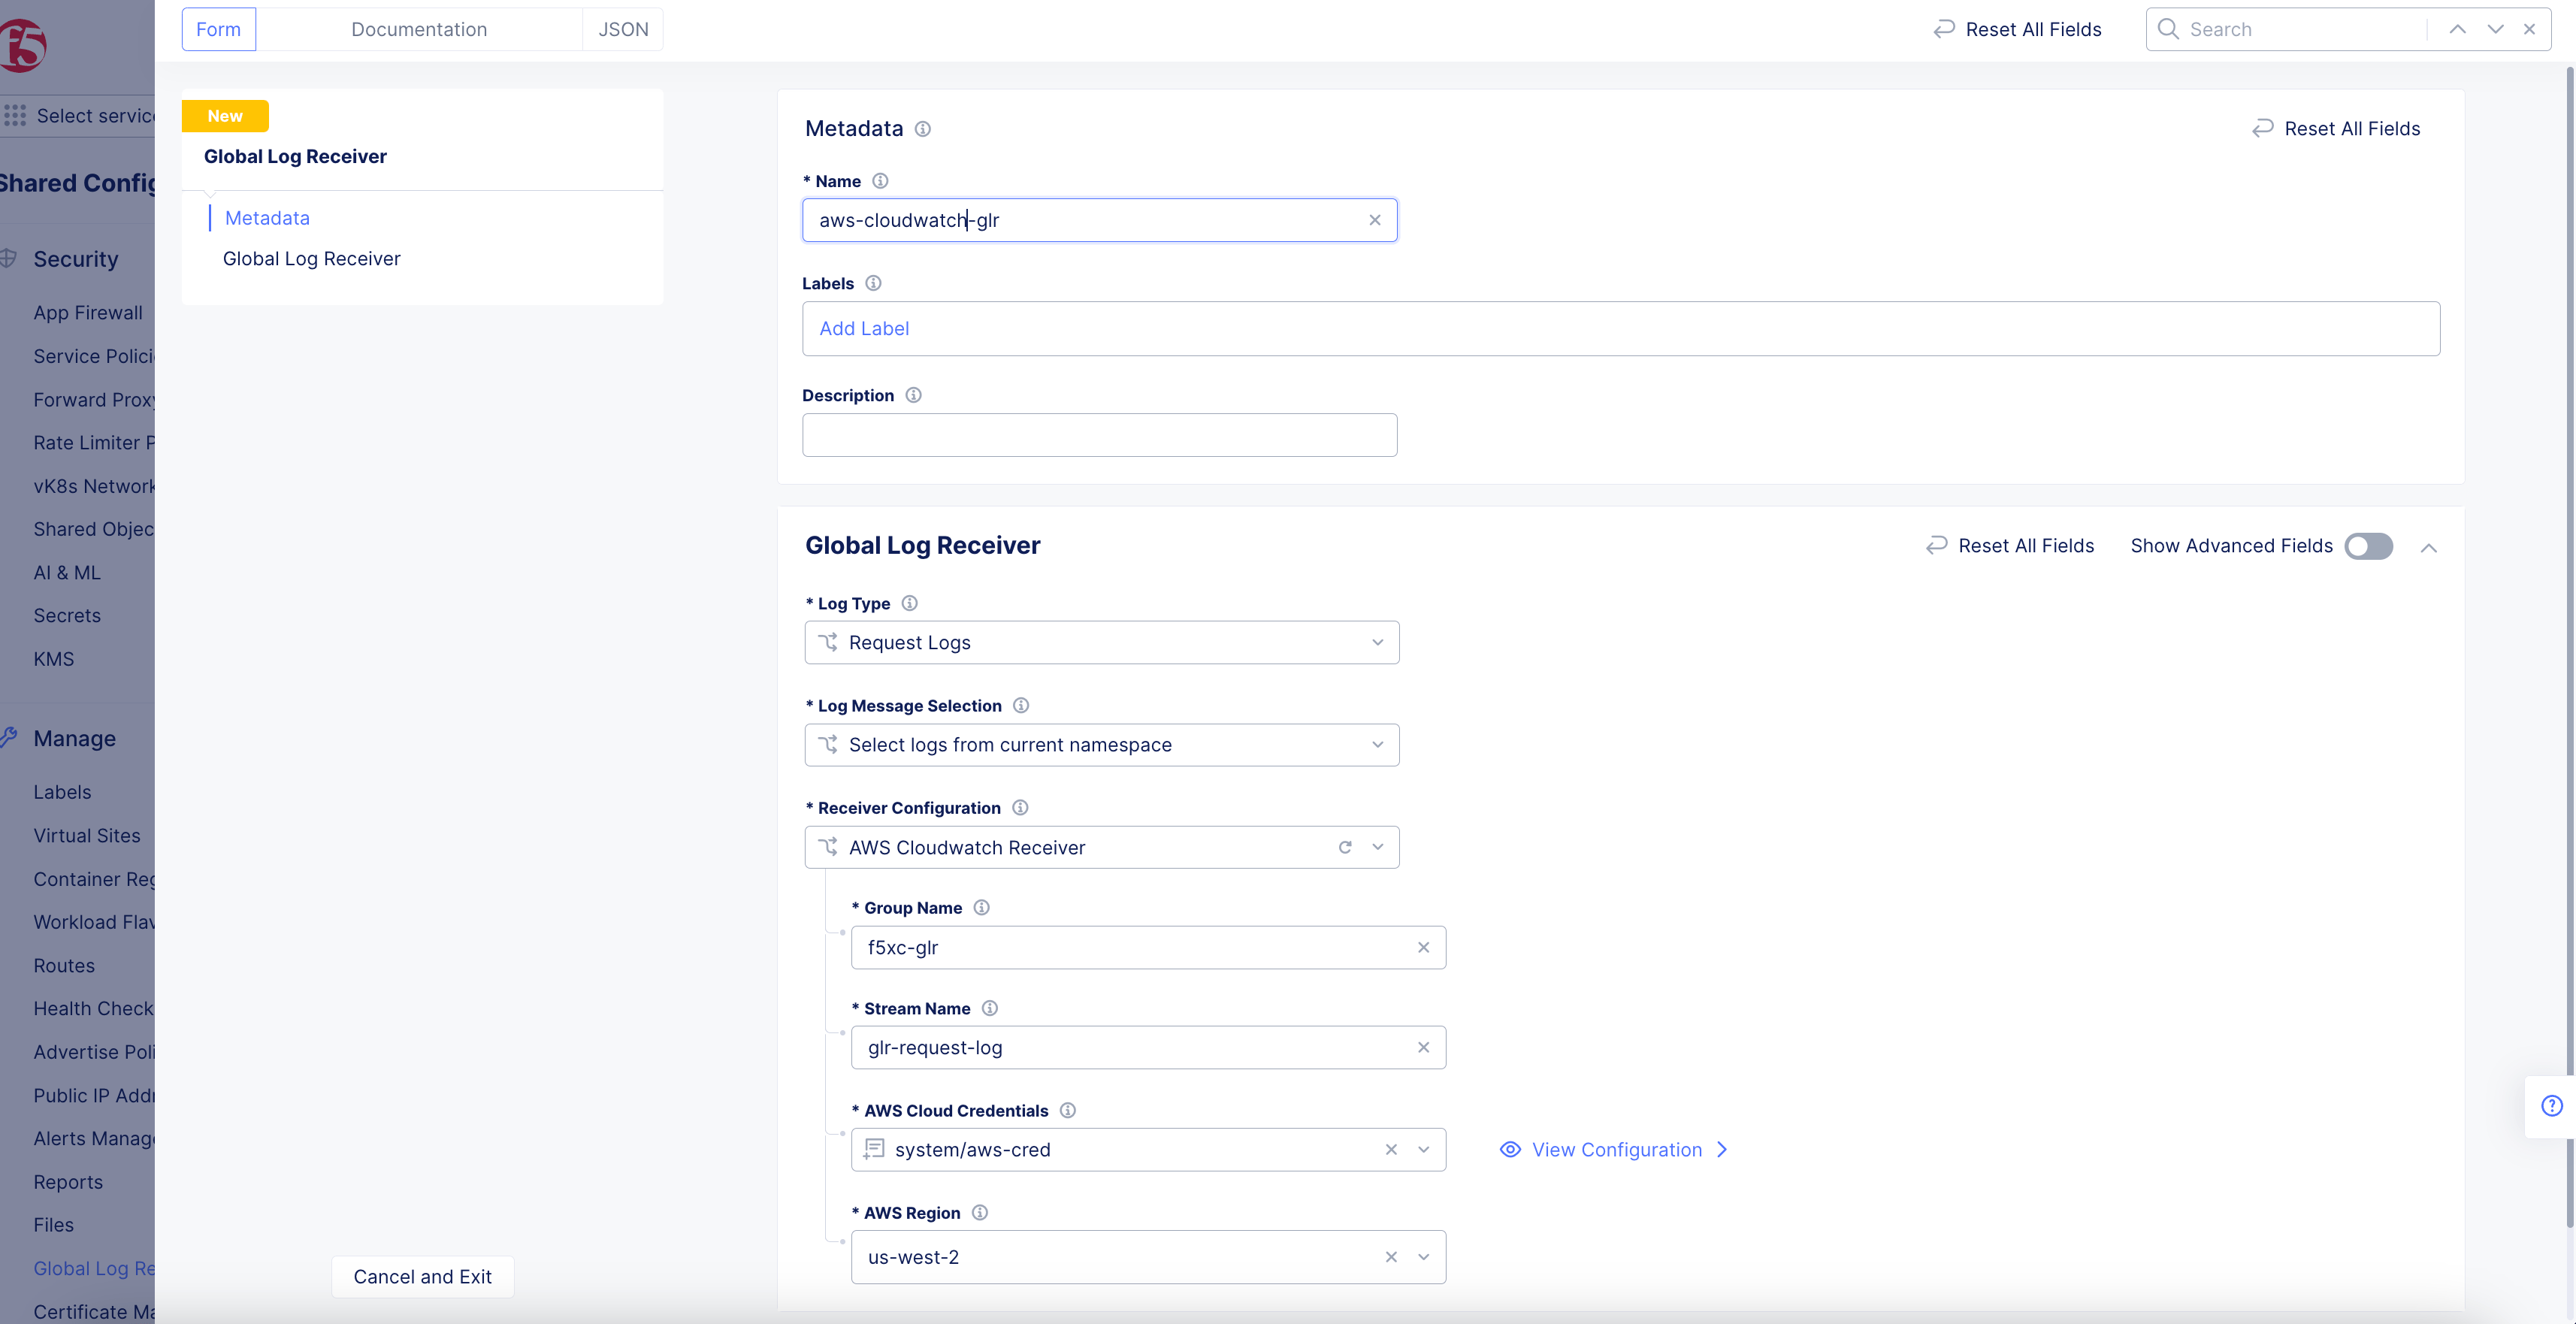
Figure: AWS Cloudwatch Global Log Receiver Configuration
-
Enter the group name for the target CloudWatch logs stream in the
Group Namefield. -
Enter the stream name for the target CloudWatch logs stream in the
Stream Namefield. -
From the
AWS Cloud Credentialsmenu, select a cloud credentials object. Alternatively, you can also useAdd Itemto create a new object. For instructions on creating cloud credentials, see Cloud Credentials. -
Select a region from the
AWS Regiondrop-down menu. Ensure that you select the same region in which the S3 storage is configured.
AWS S3 Receiver
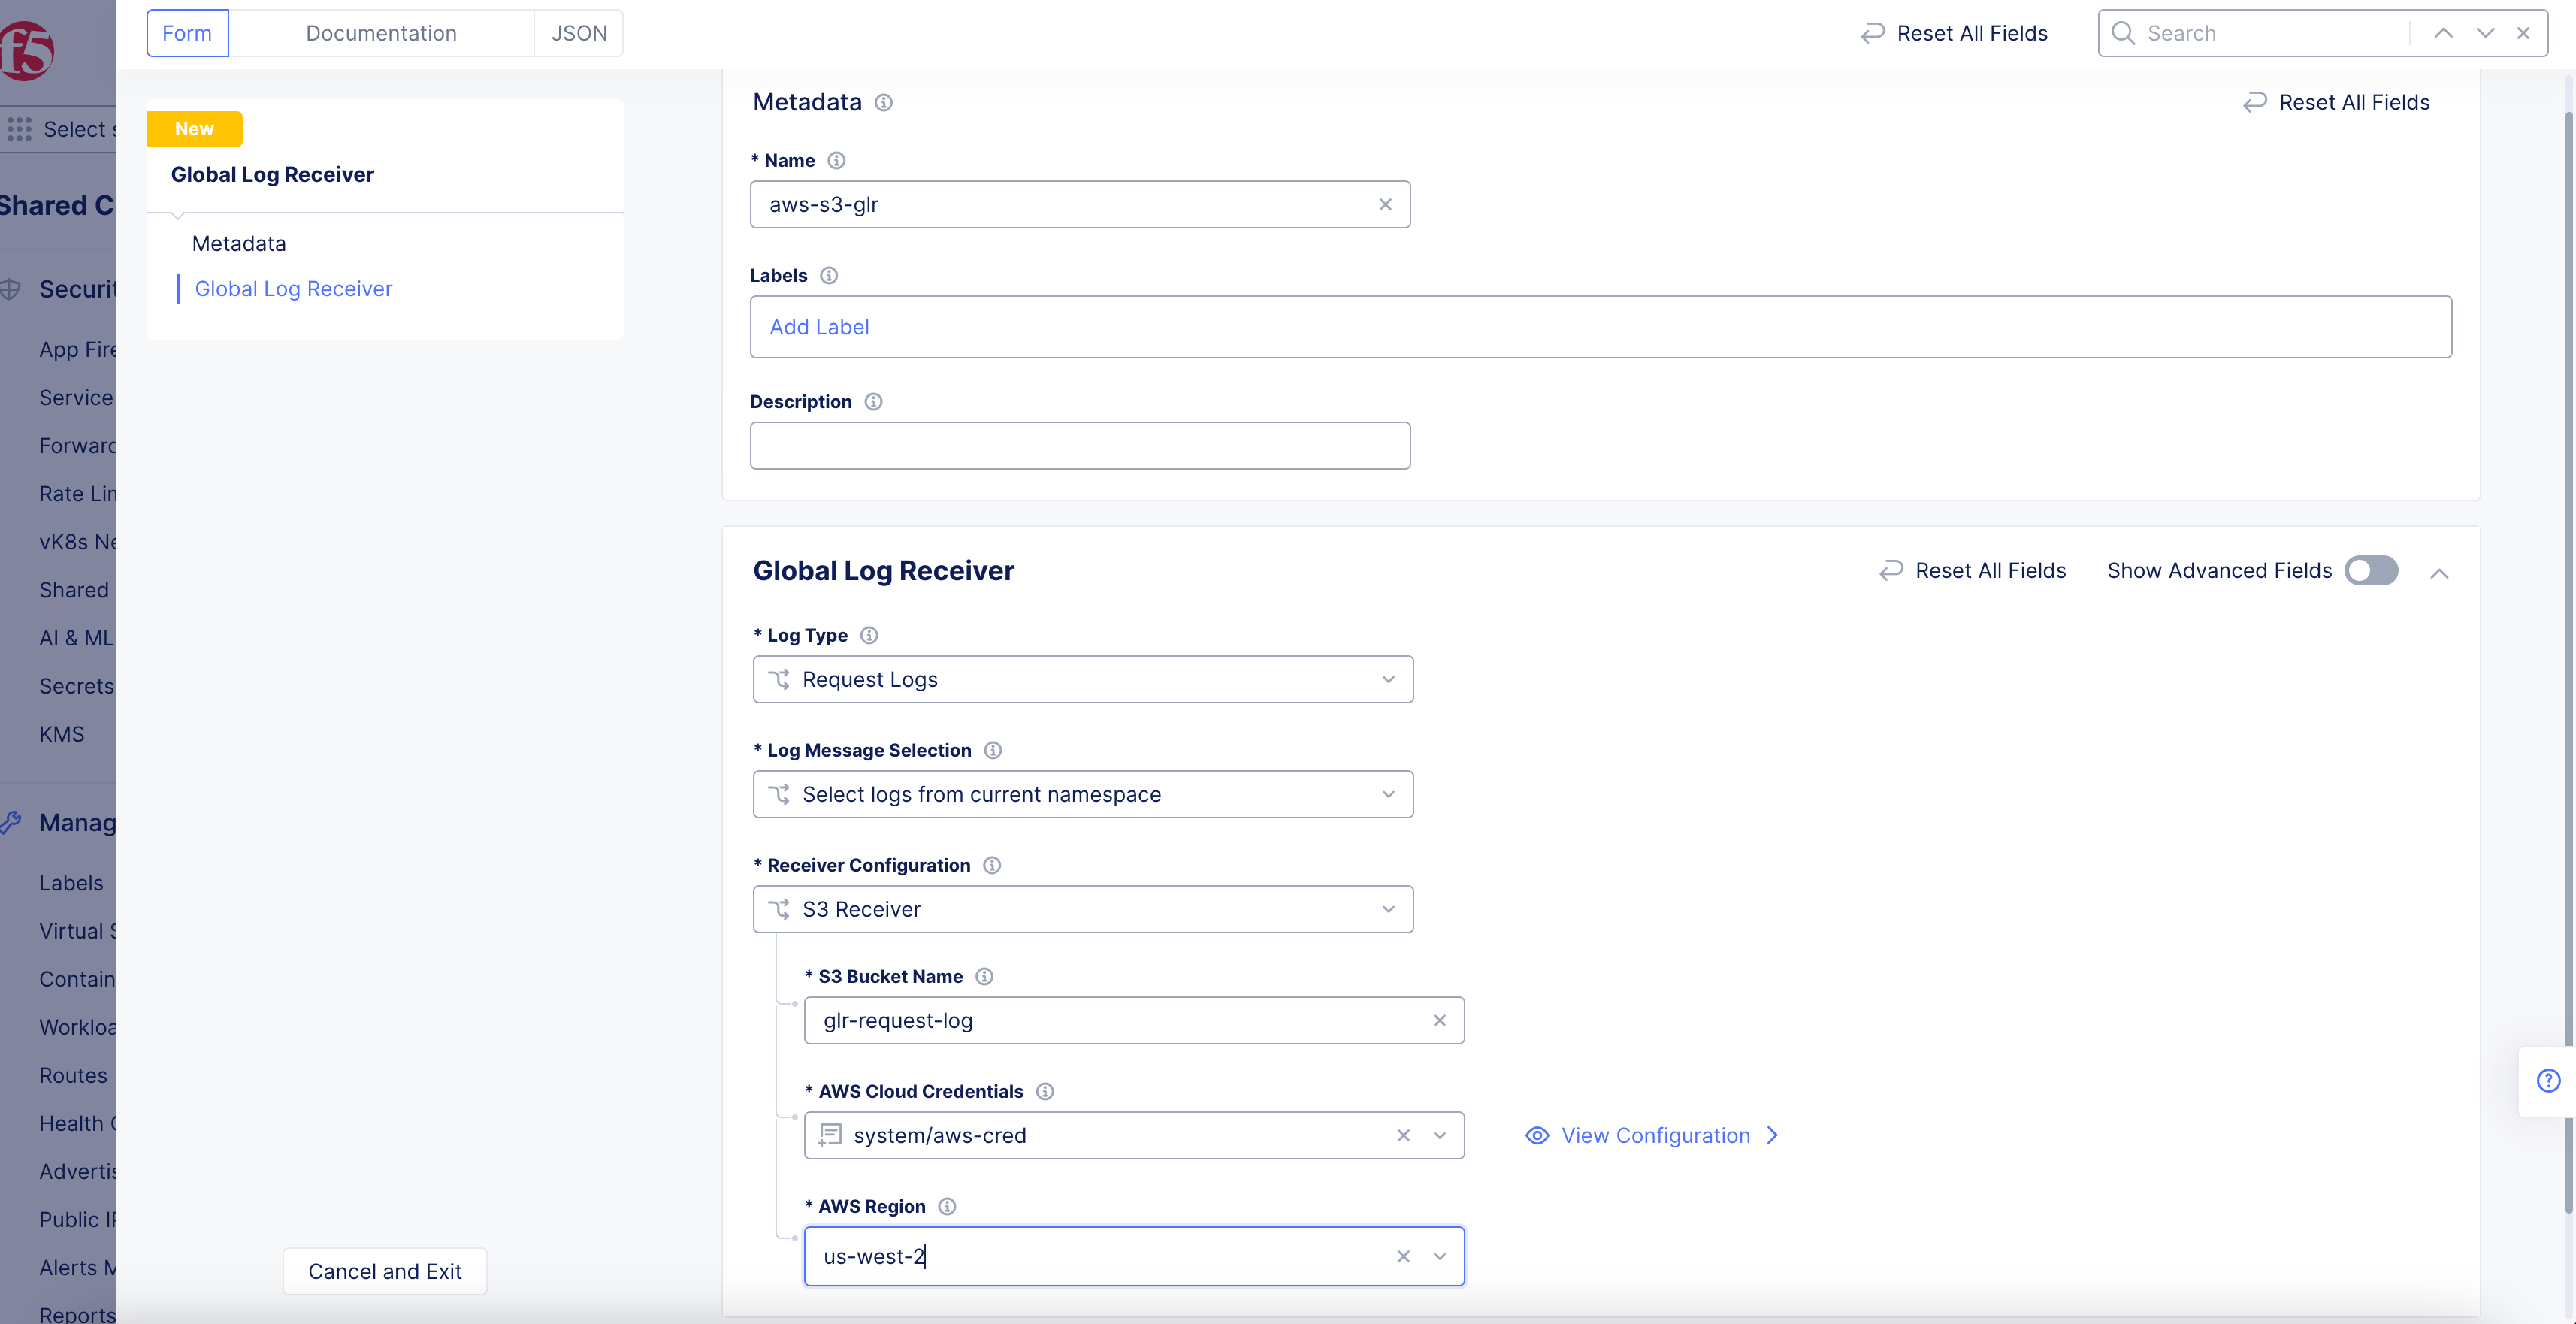
Figure: AWS S3 Global Log Receiver Configuration
-
Enter your AWS S3 bucket name in the
S3 Bucket Namefield. -
From the
AWS Cloud Credentialsmenu, select a cloud credentials object. Alternatively, you can also useAdd Itemto create a new object. For instructions on creating cloud credentials, see Cloud Credentials. -
Select a region from the
AWS Regiondrop-down menu. Ensure that you select the same region in which the S3 storage is configured.
Azure Blob Storage
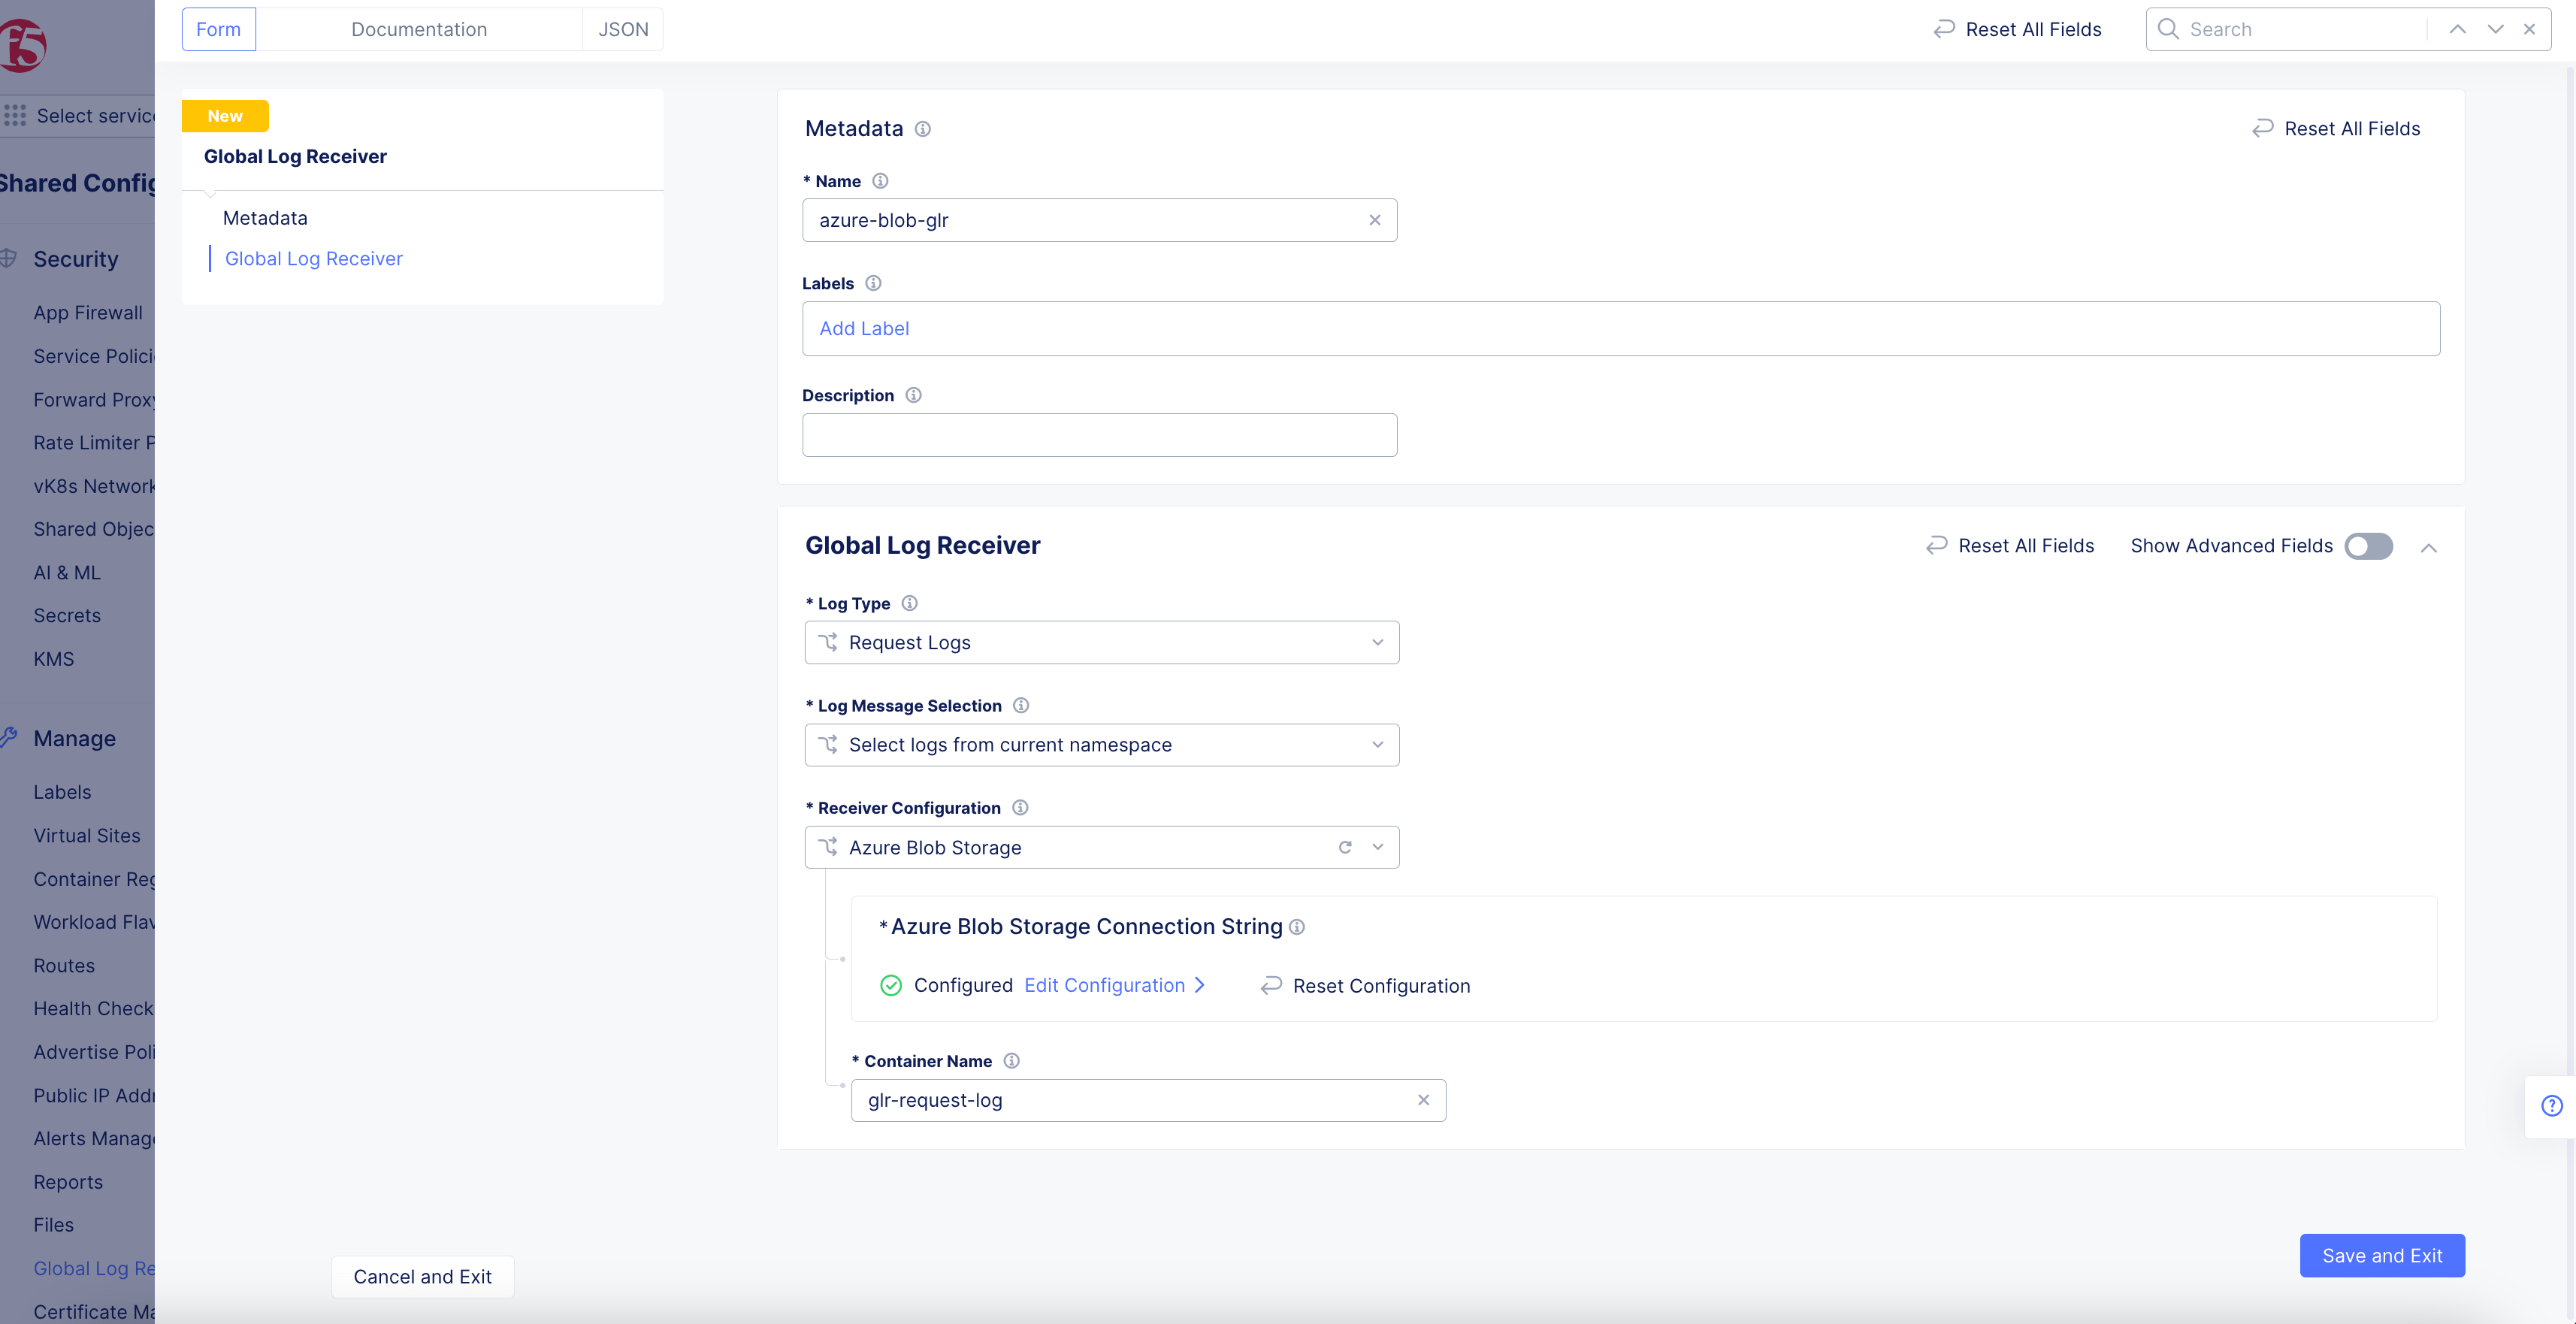
Figure: Azure Blob Global Log Receiver Configuration
- Click
Configureto set up the Azure Blob storage connection string.
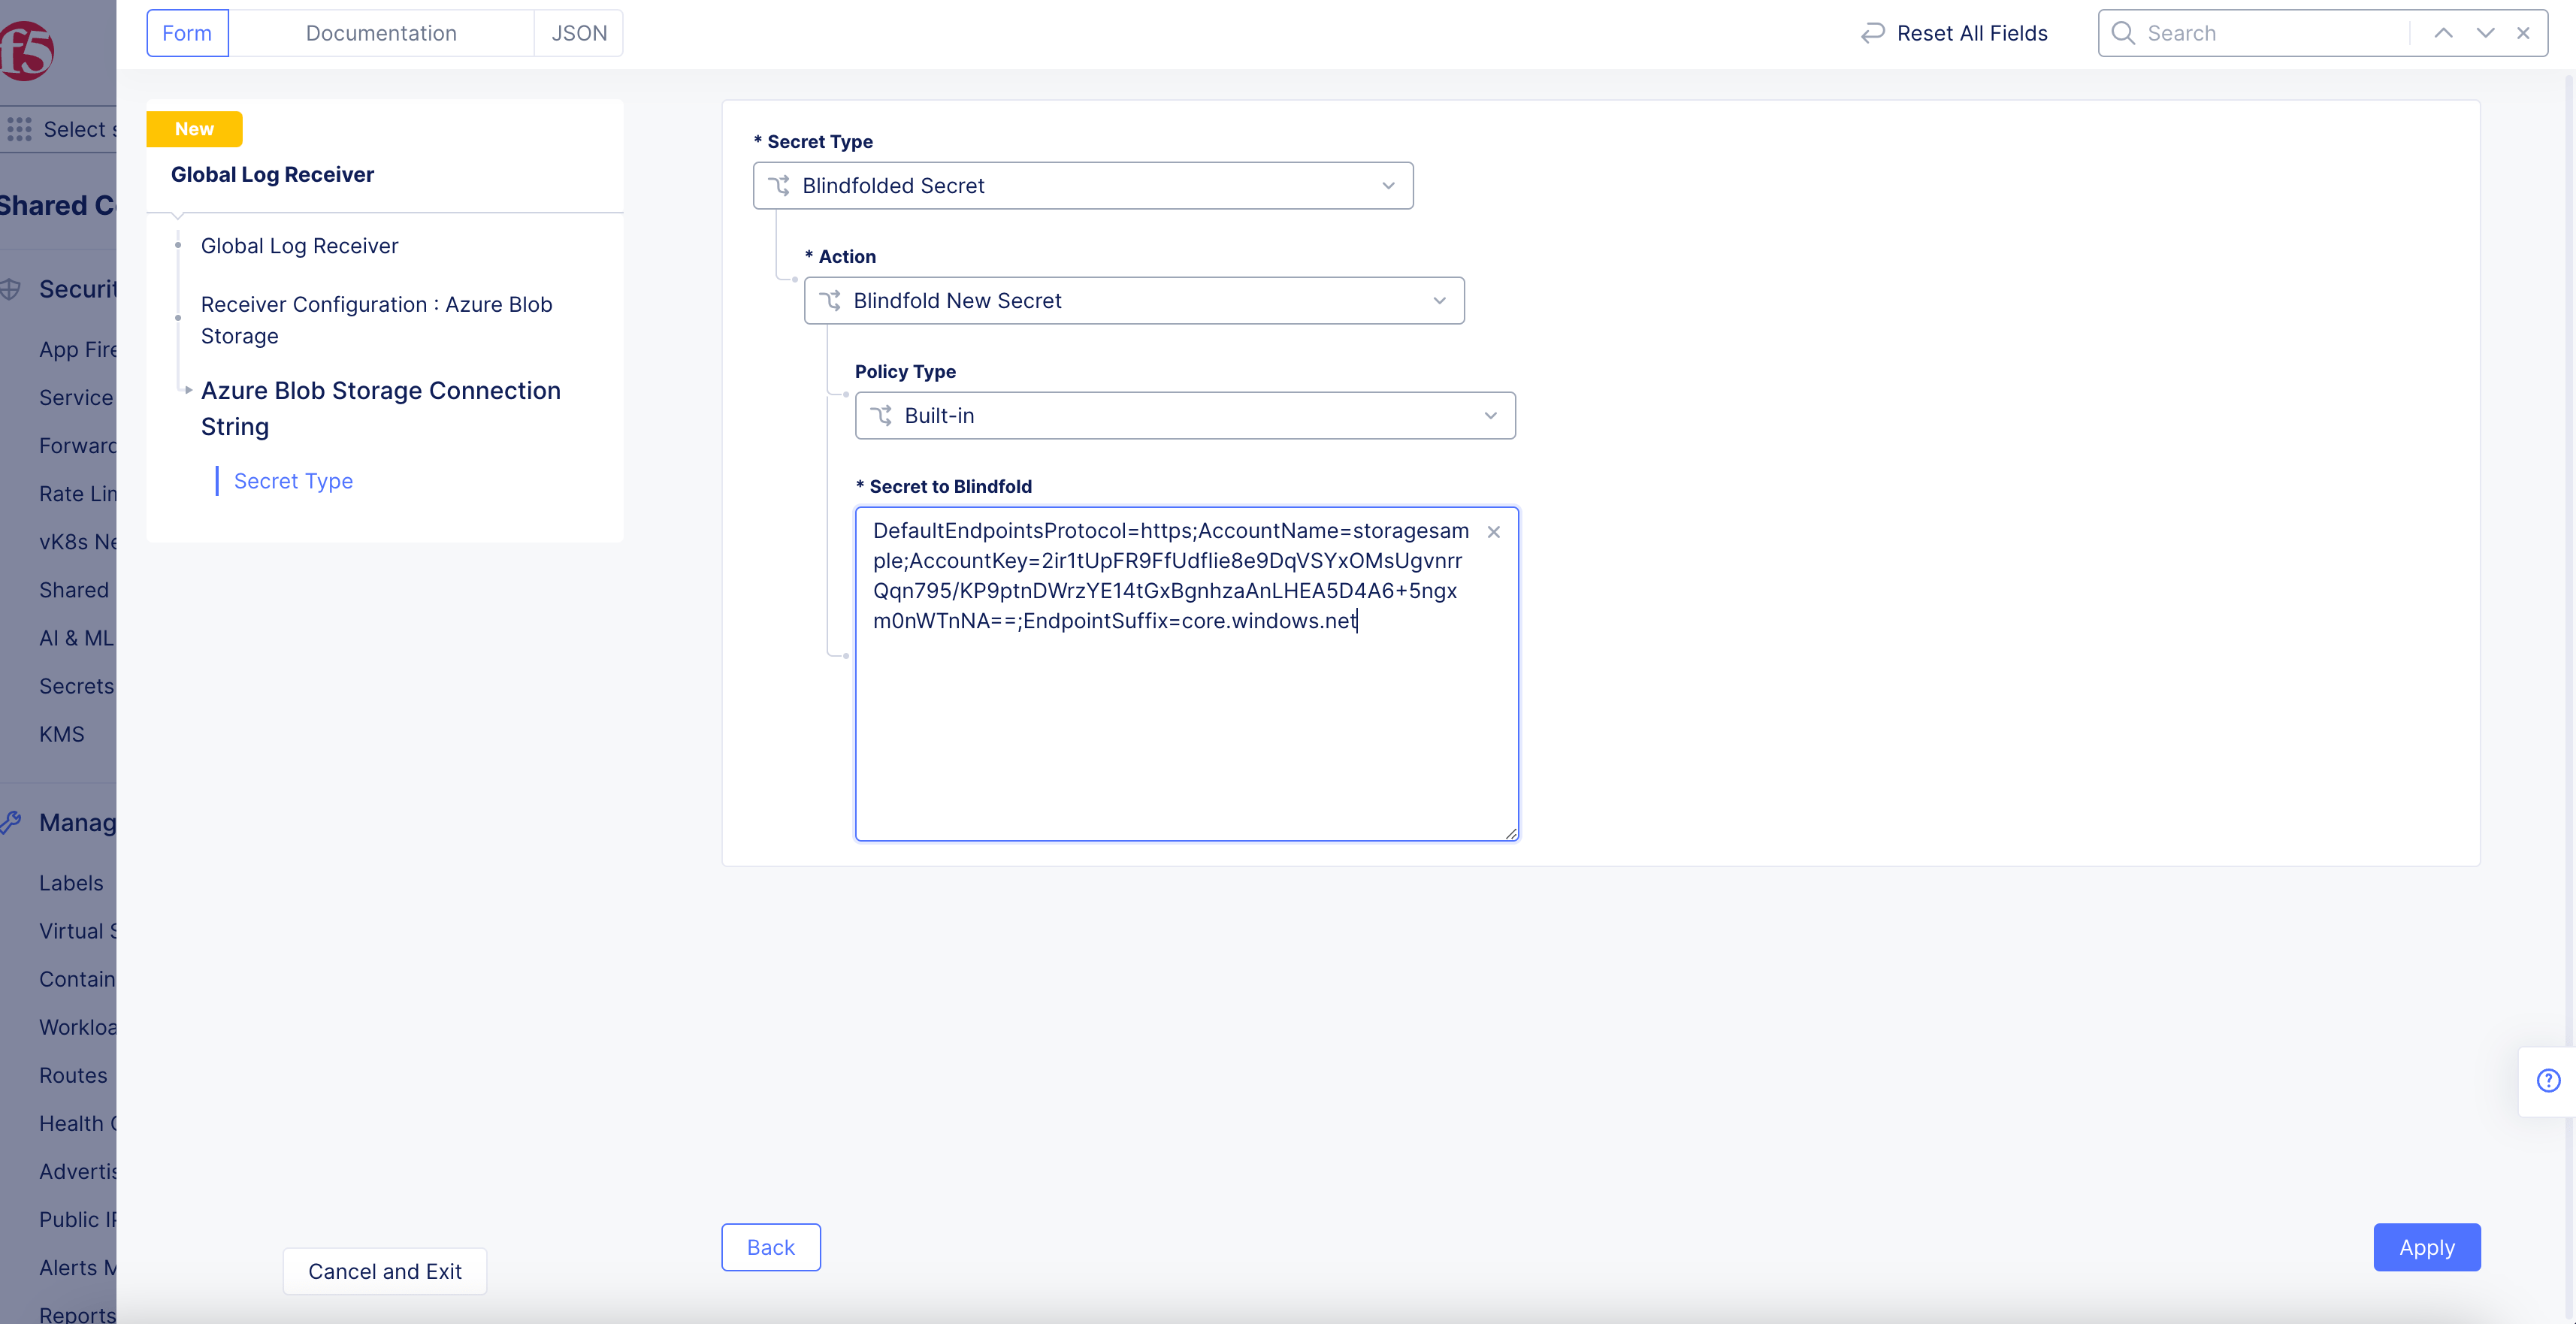
Figure: Azure Blob Connection String
-
Select
Blindfolded Secretfrom theSecret Typedrop-down menu. -
Use the
Actiondrop-down menu to select:-
Use Blindfold Blindfolded Secret: Enter your connection string into theBlindfolded Secretfield. -
Blindfold New Secret: SelectBuilt-infrom thePolicy Typedrop-down menu and enter your connection string into theSecret to Blindfoldfield, or selectCustomfor the policy type and then choose a custom policy and enter your connection string.
-
-
Where to get the Azure BLOB connection string:
- Go to
All Services>Storage accounts>(name of account). - Select
Access Keyson the navigation menu for the storage account you have selected. - In the
Access Keyspane, choose one of the access keys and click Show for the Connection String. ClickCopy to Clipboardon the left side of the shown field.
- Go to
-
Click
Apply.
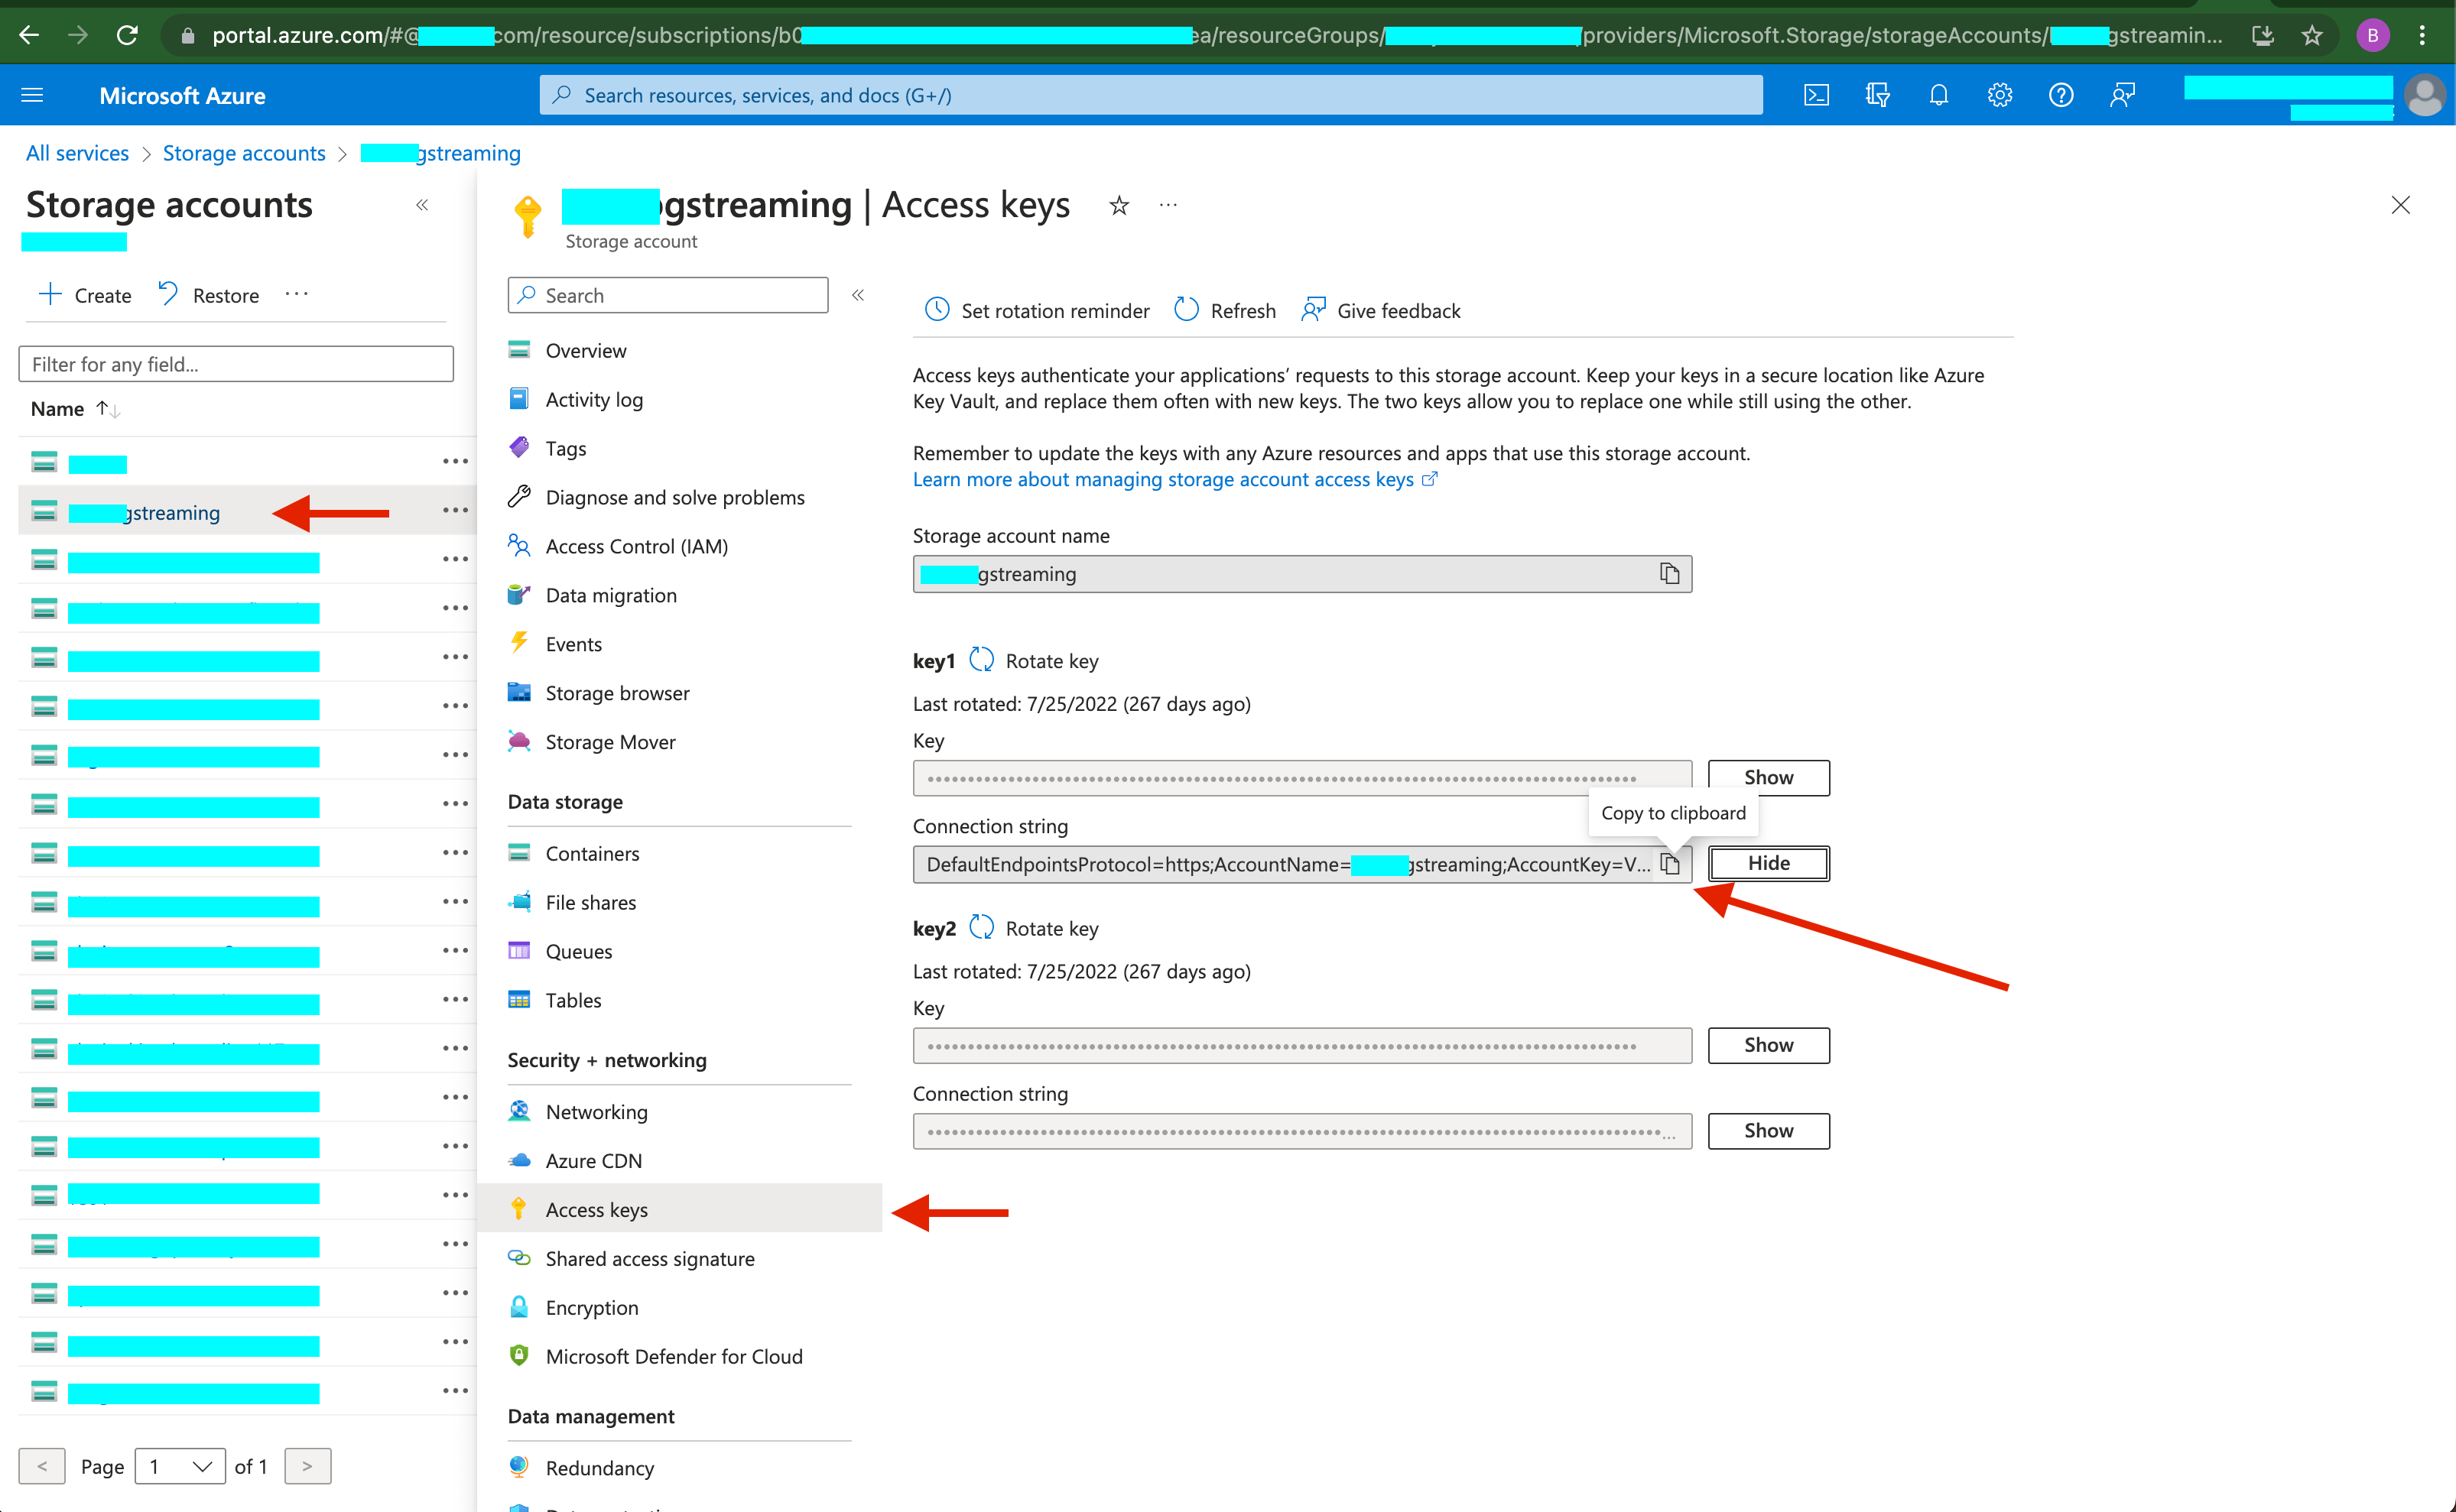
Figure: Azure Blob Connection String Location
- In the
Container Namefield, enter the name of the Azure container into which the logs should be sent.
Azure Event Hubs
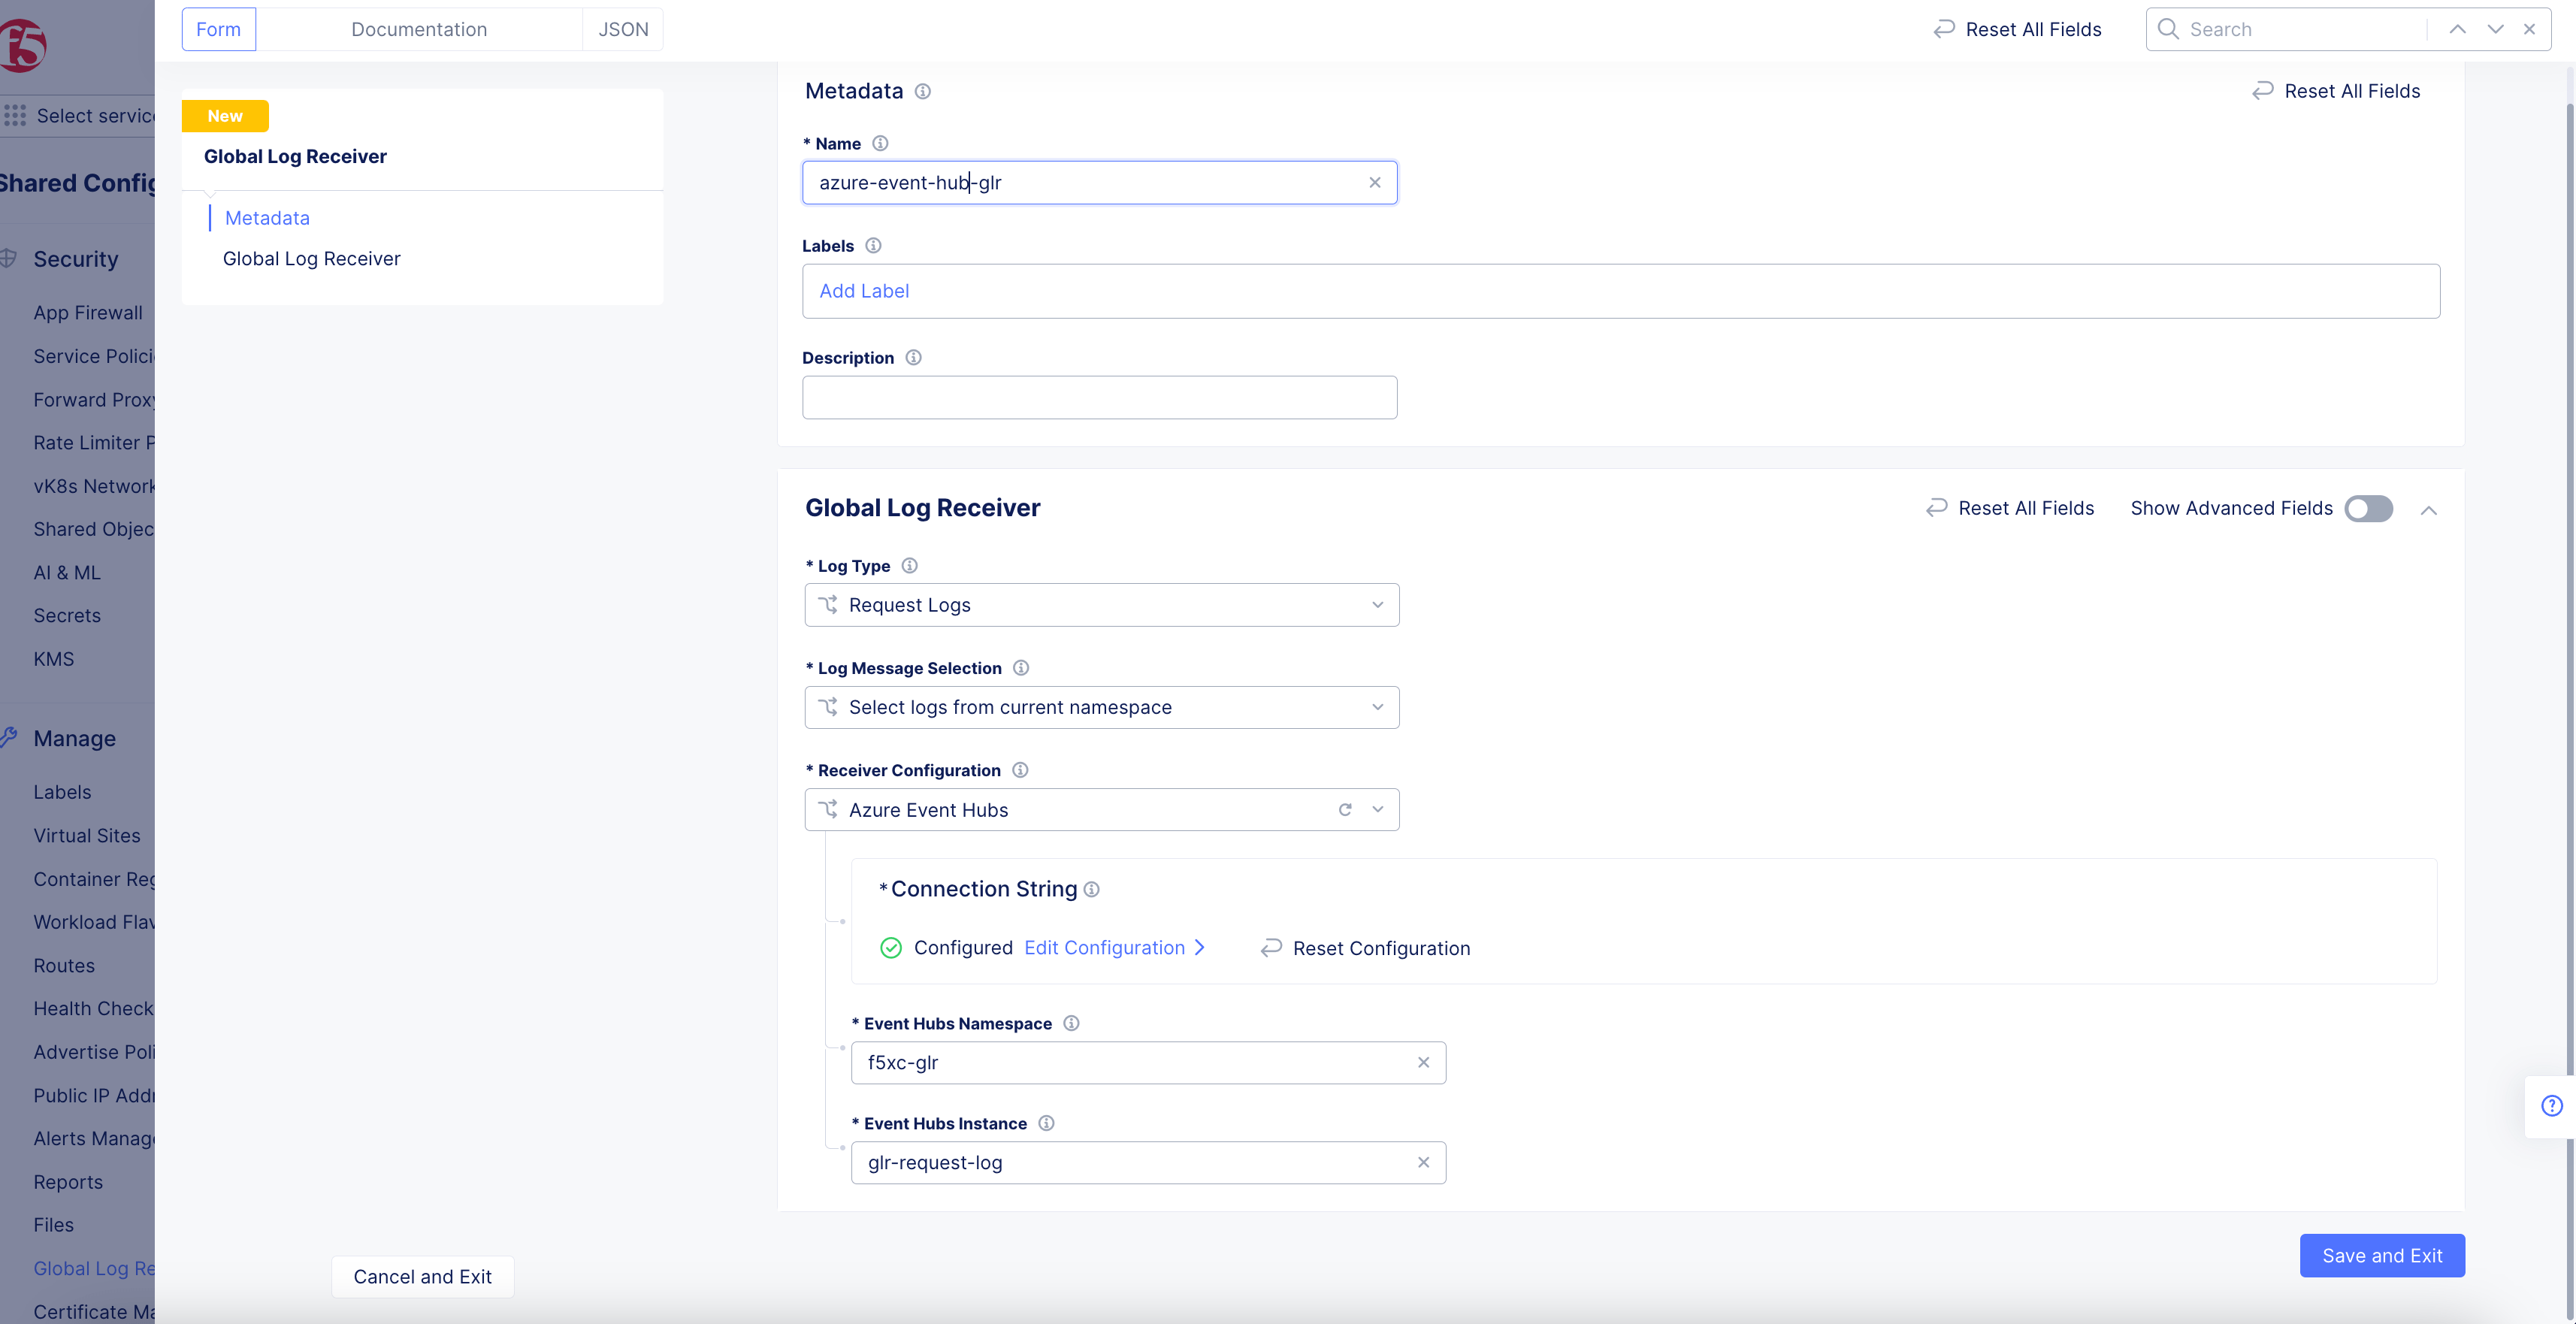
Figure: Azure Event Hubs Global Log Receiver Configuration
- Click
Configureto set up the Azure Event Hubs storage connection string.
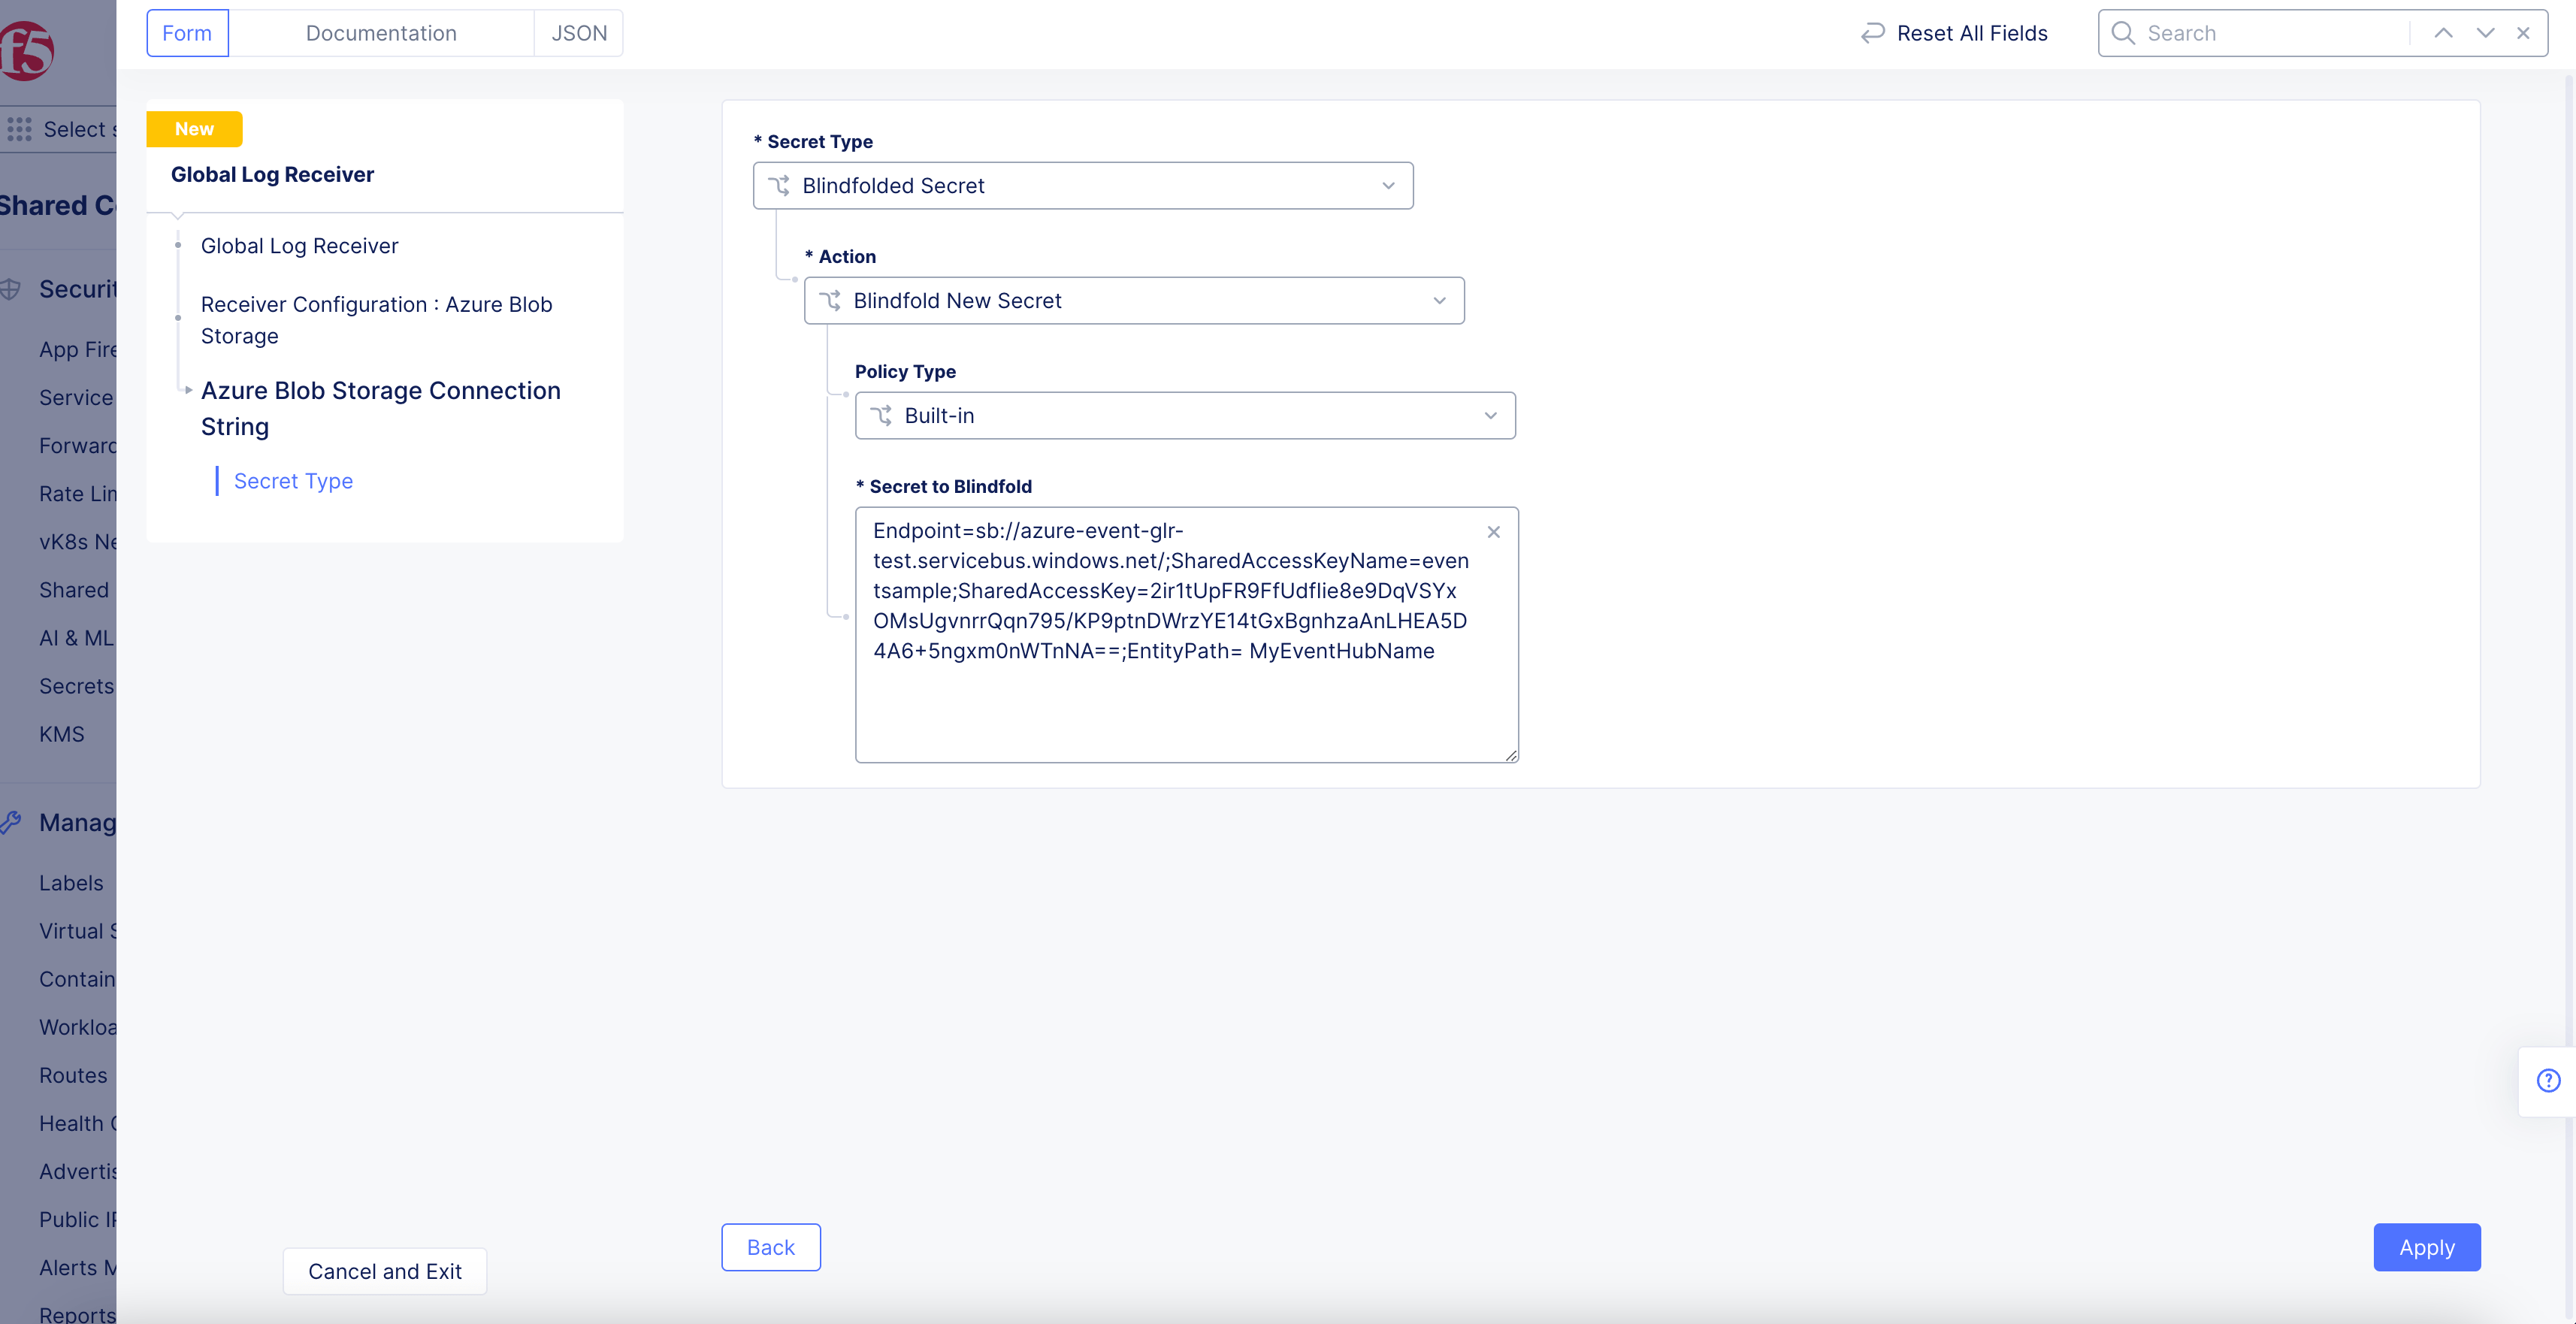
Figure: Azure Blob Connection String
-
Select
Blindfolded Secretfrom theSecret Typedrop-down menu. -
Use the
Actiondrop-down menu to select:-
Use Blindfold Blindfolded Secret: Enter your connection string into theBlindfolded Secretfield. -
Blindfold New Secret: SelectBuilt-infrom thePolicy Typedrop-down menu and enter your connection string into theSecret to Blindfoldfield, or selectCustomfor the policy type and then choose a custom policy and enter your connection string.
-
Note: Your connection string should look like
EntityPath=<EventHubName>.
-
To retrieve the Azure Event Hubs connection string, refer to the following Microsoft article.
-
Click
Apply. -
In the
Container Namefield, enter the name of the Azure container into which the logs should be stored.
Datadog Receiver
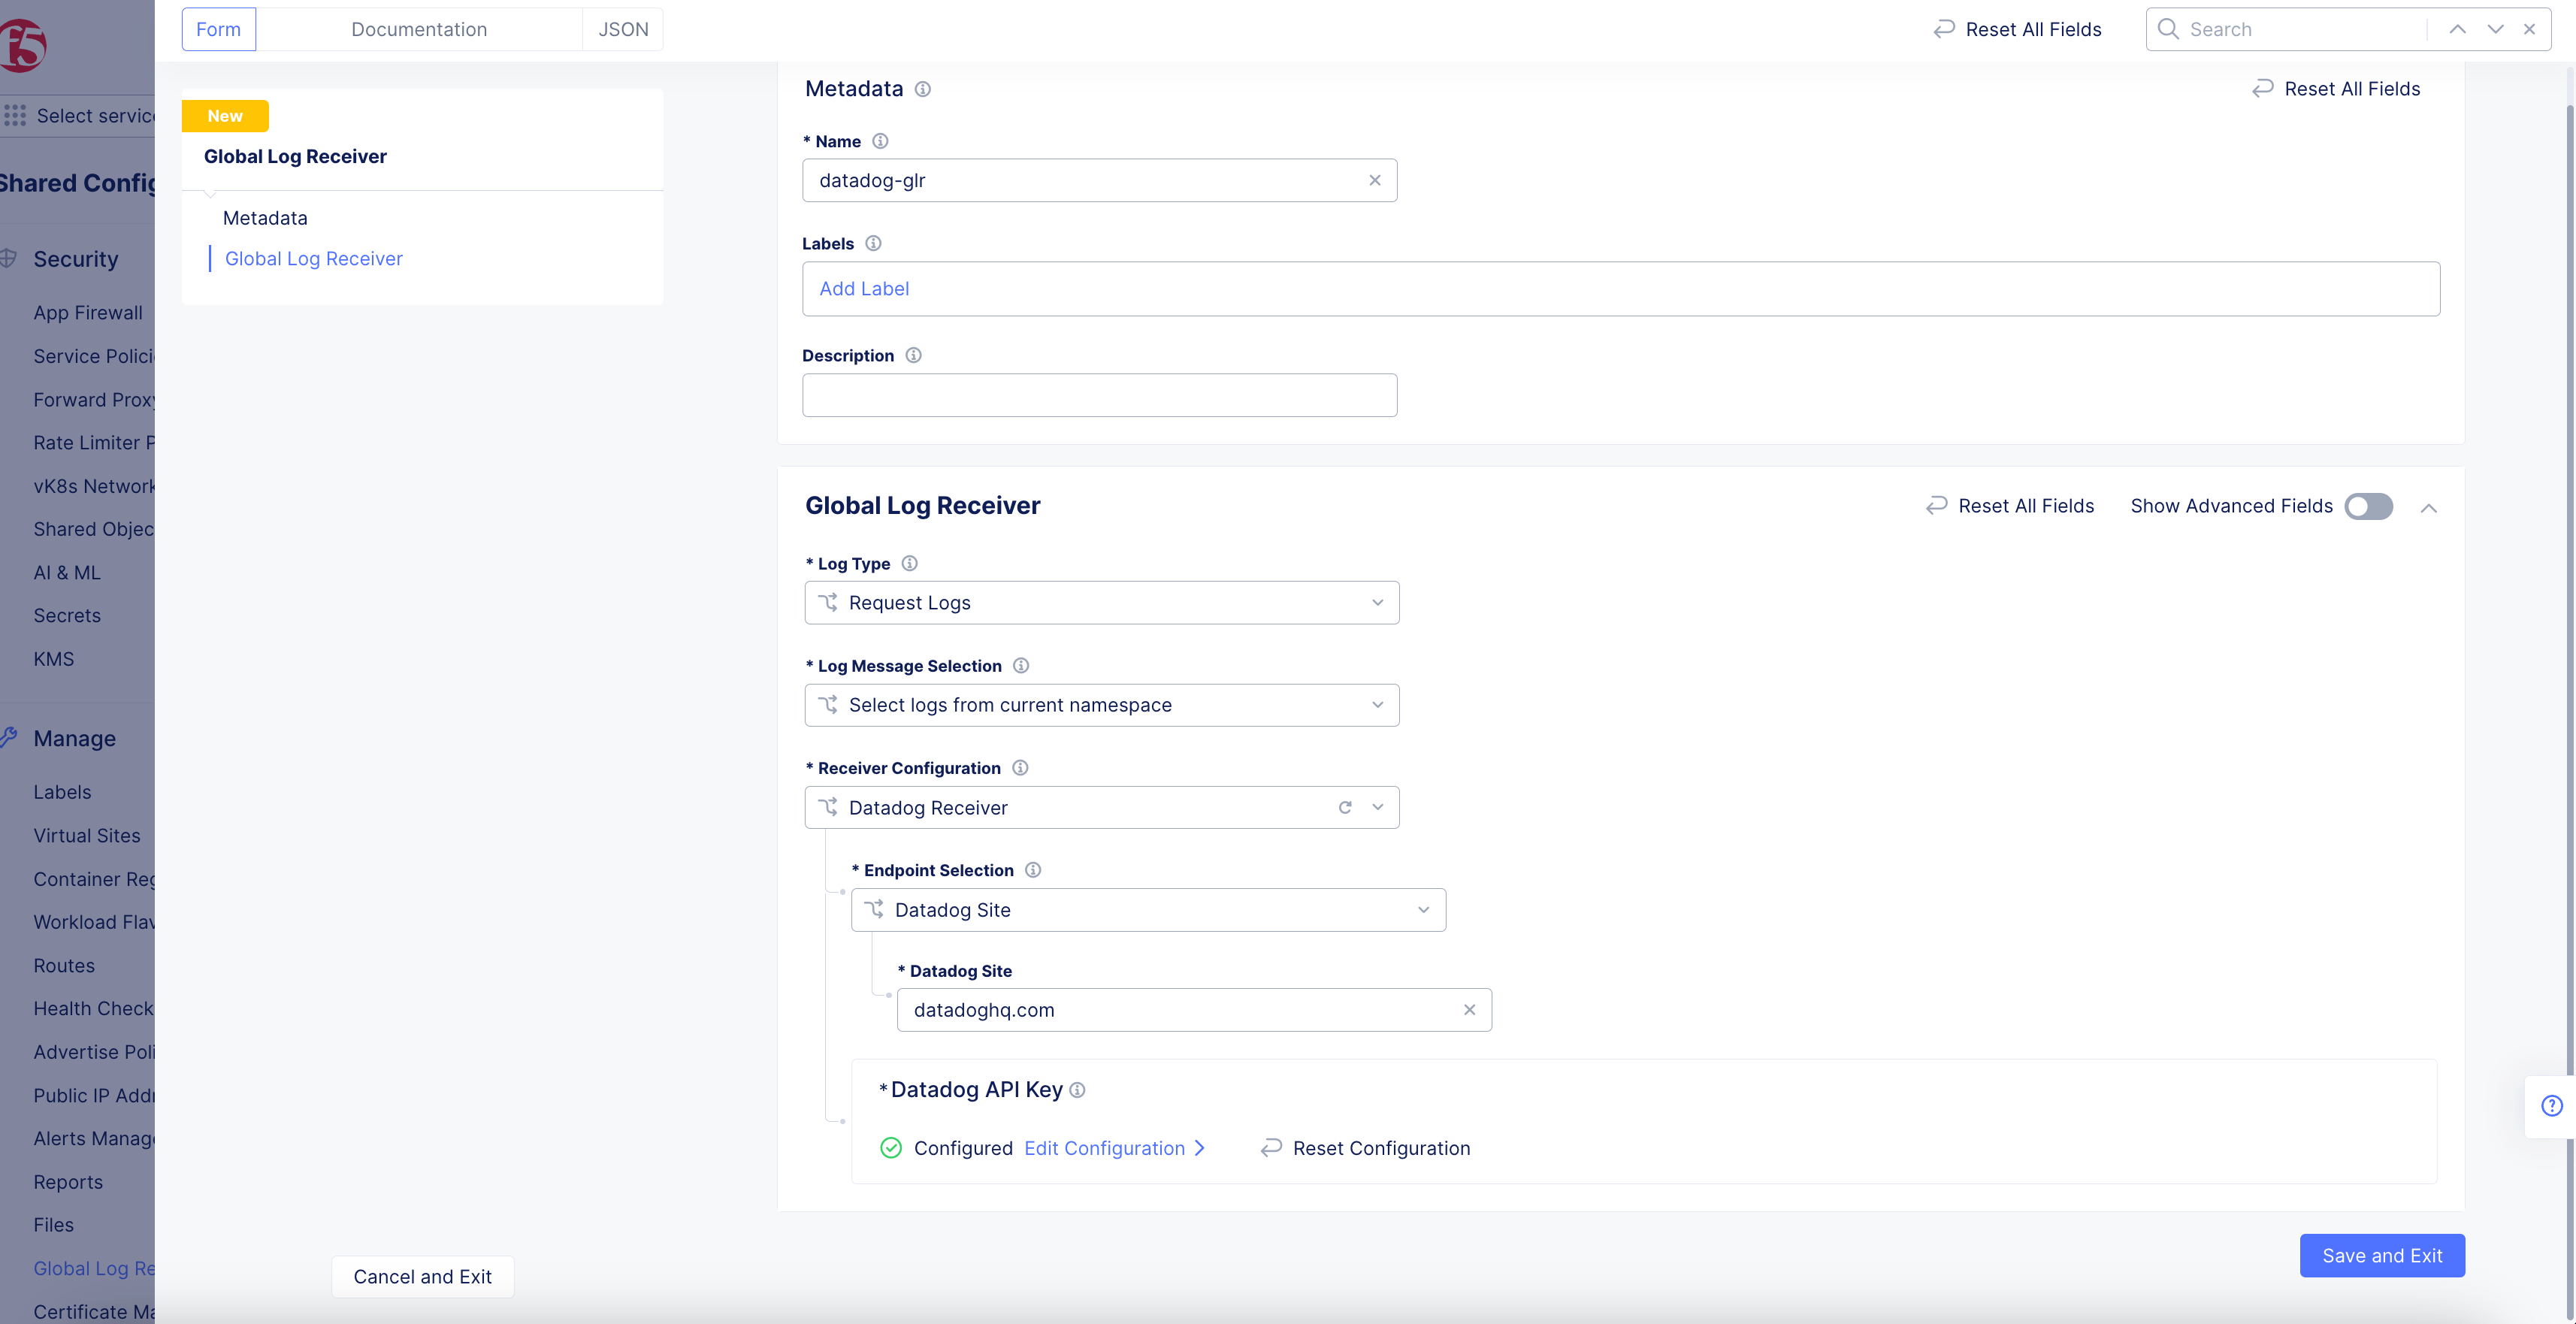
Figure: Datadog Global Log Receiver Configuration
-
Enter the URL for Datadog into the
Datadog Sitefield (datadoghq.com) -
Click
Configureto set up the Datadog API Key.

Figure: Azure Blob Connection String
-
Select
Blindfolded Secretfrom theSecret Typedrop-down menu. -
Use the
Actiondrop-down menu to select:Use Blindfold Blindfolded Secret: Enter your Datadog API Key into theBlindfolded Secretfield.Blindfold New Secret: SelectBuilt-infrom thePolicy Typedrop-down menu and enter your Datadog API Key into theSecret to Blindfoldfield, or selectCustomfor the policy type and then choose a custom policy and enter your Datadog API Key.
-
Where to get the Datadog API Key:
- Go to API Keys.
- Create API key or select existing one.
- A dialog will pop up. Click
Copyfrom the dialog and paste this value into the global log receiver configuration for API Key.
-
For Datadog documentation, see API App Keys.
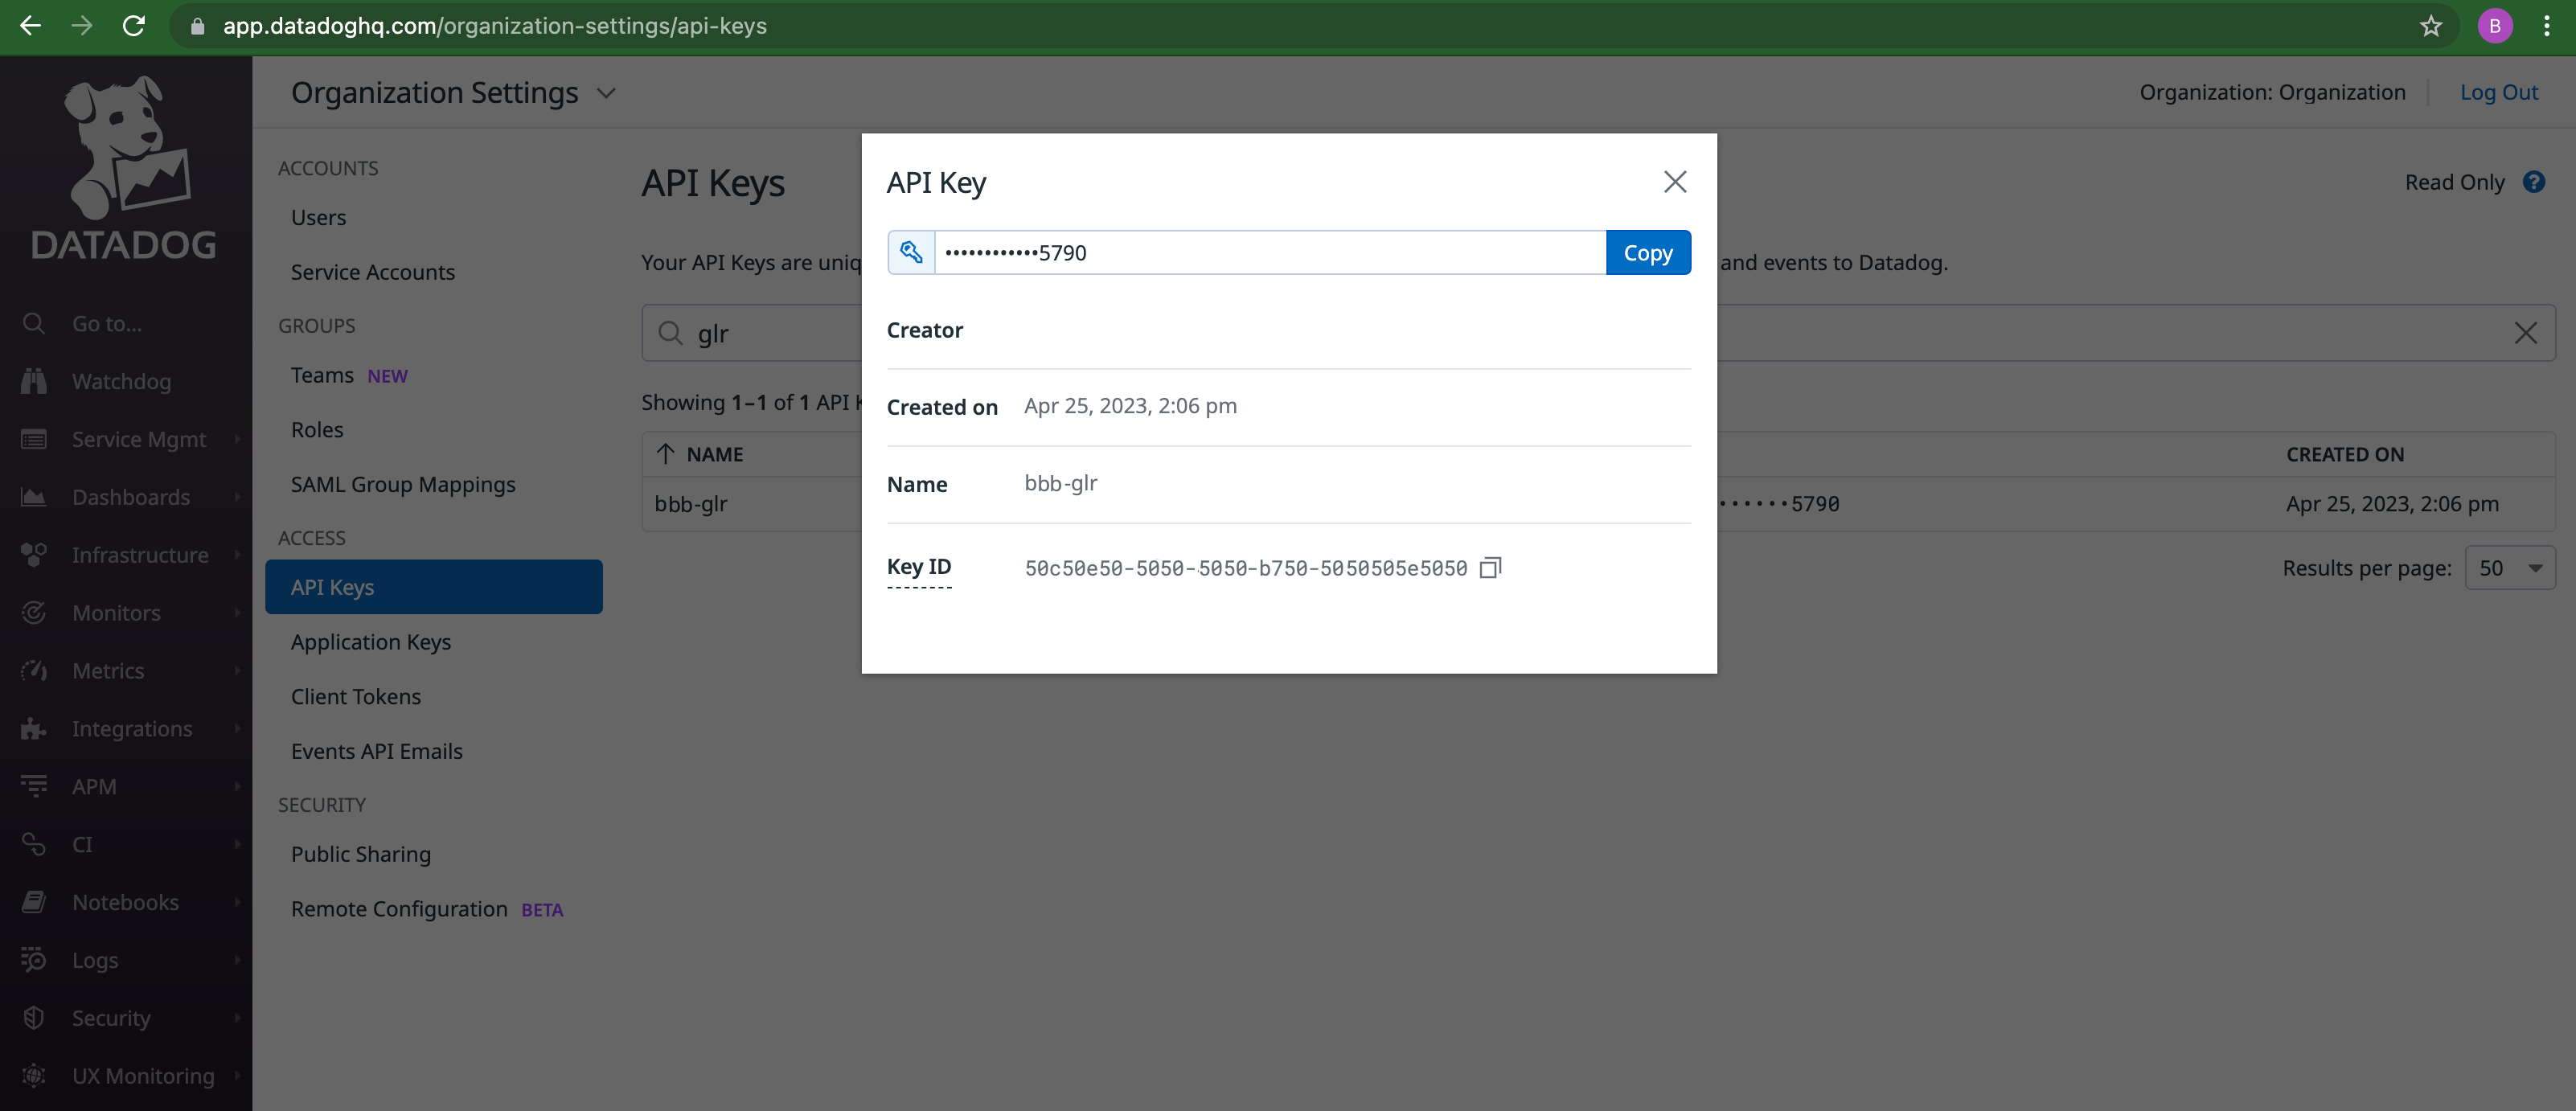
Figure: Datadog API Key Location
- Click
Apply.
GCP Bucket Receiver
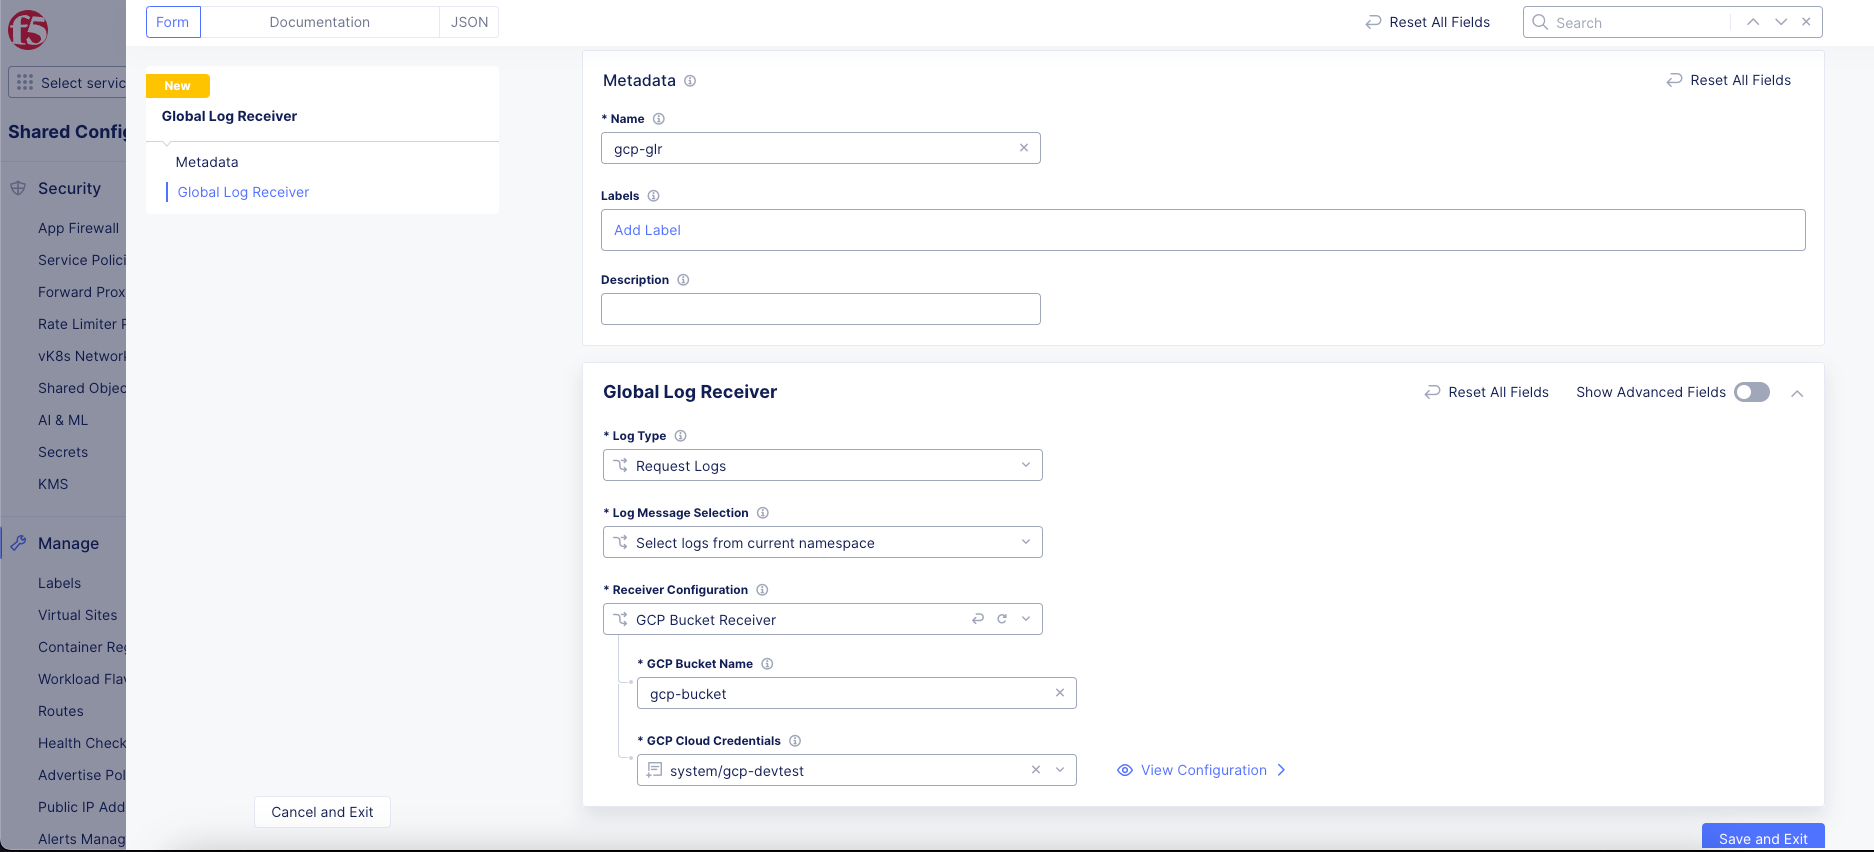
Figure: GCP Global Log Receiver Configuration
-
In the
GCP Bucket Namefield, enter the name of the bucket into which the logs should be sent. -
Use the
GCP Cloud Credentialsdrop-down menu to select an existing set of credentials. Alternatively, selectAdd Itemto create new credentials. For help creating new credentials, see Cloud Credentials.
HTTP Receiver
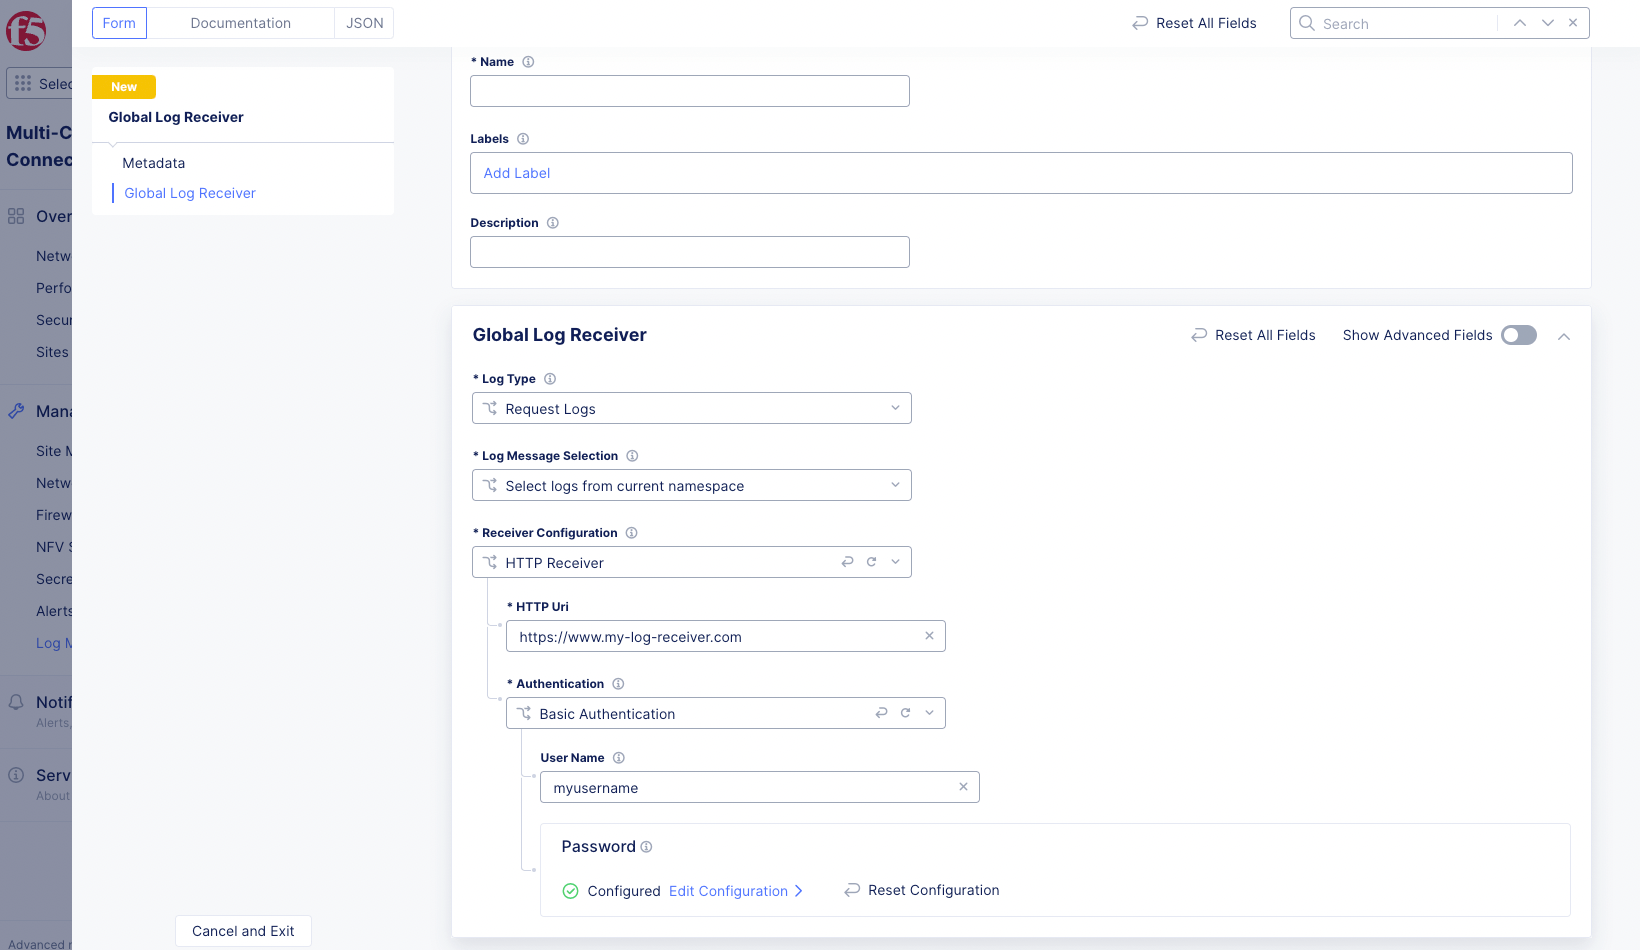
Figure: HTTP Global Log Receiver Configuration
-
Enter the URI for your HTTP receiver in the
HTTP Urifield. -
Choose an authentication type from the
Authenticationdrop-down menu:None: No authentication will be performed.Basic Authentication: Enter your login in theUser Namefield and clickConfigureto enter your password.Token Authentication: ClickConfigureto enter your authentication token.
IBM QRadar Receiver
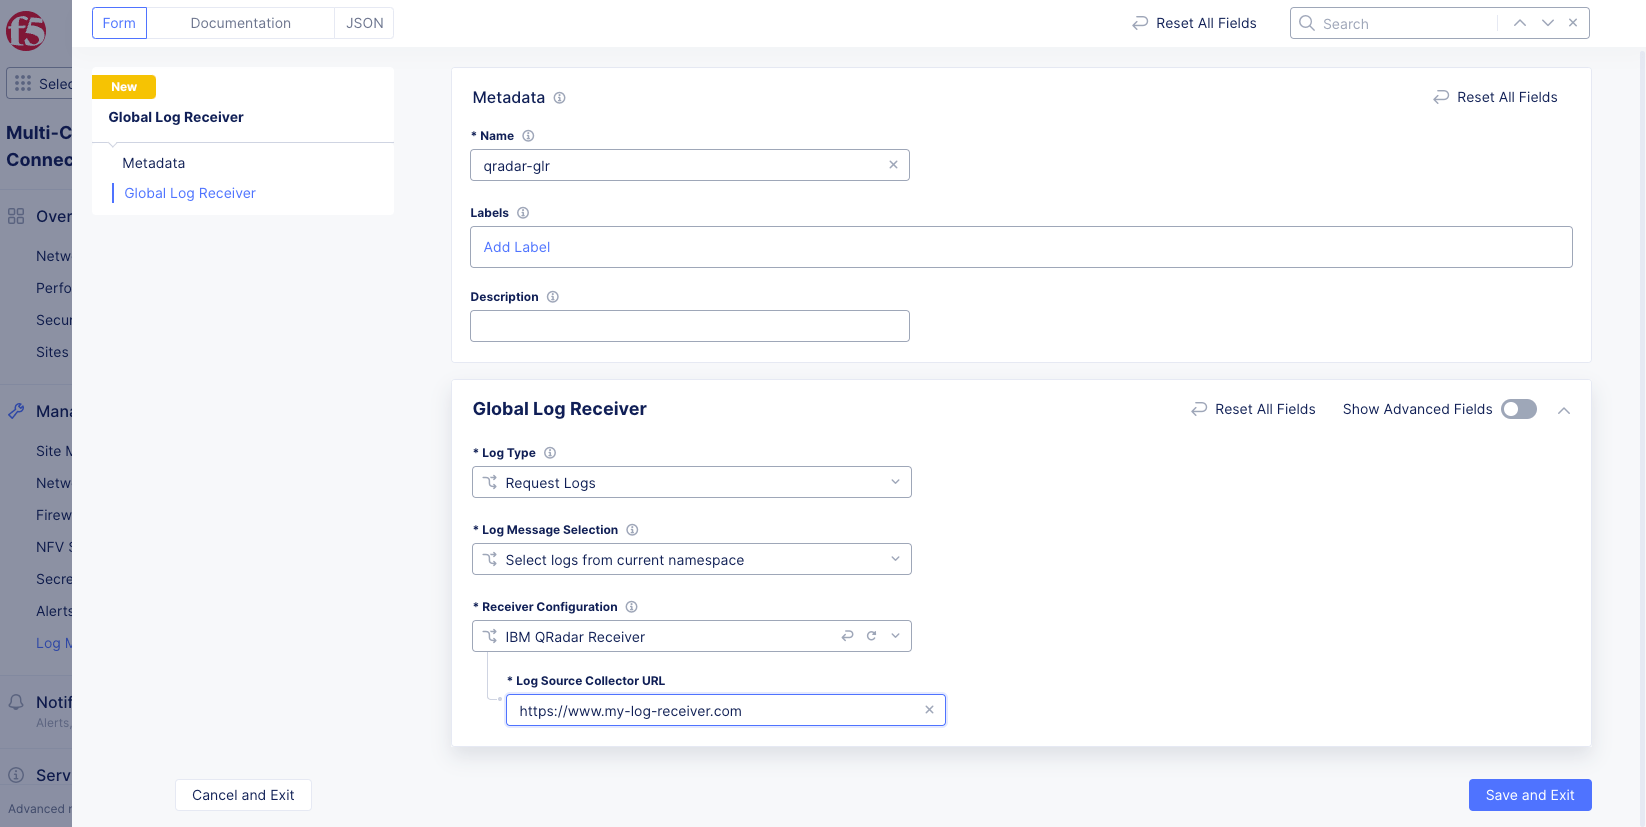
Figure: QRadar Global Log Receiver Configuration
Enter the URI for your QRadar receiver in the Log Source Collector URL field. For more information, refer to the following IBM document.
Note: In some cases, multiple events will be sent to the global log receiver at once. The QRadar receiver needs to be told to split the events into multiple records. To do this, configure the
Message Patternfield as follows:
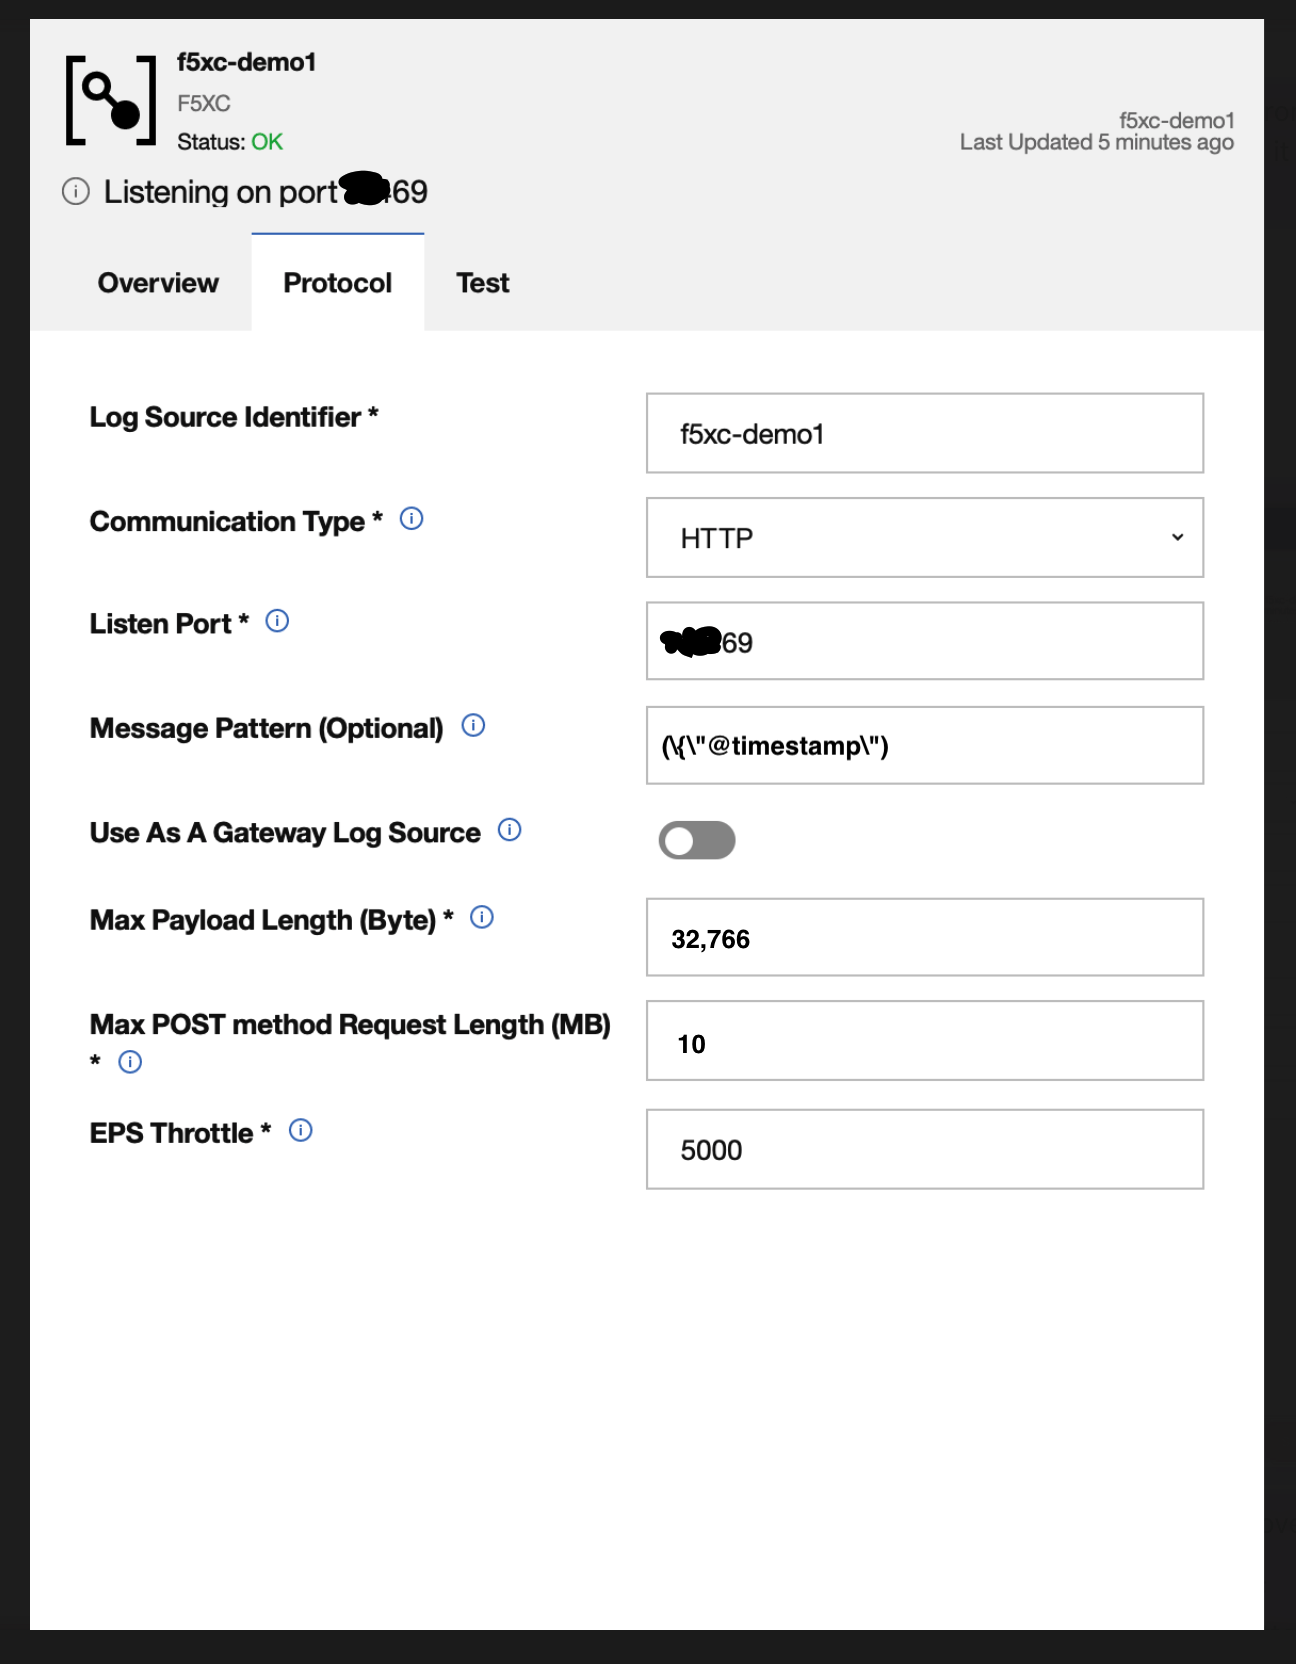
Figure: QRadar Message Pattern Configuration
Kafka Receiver
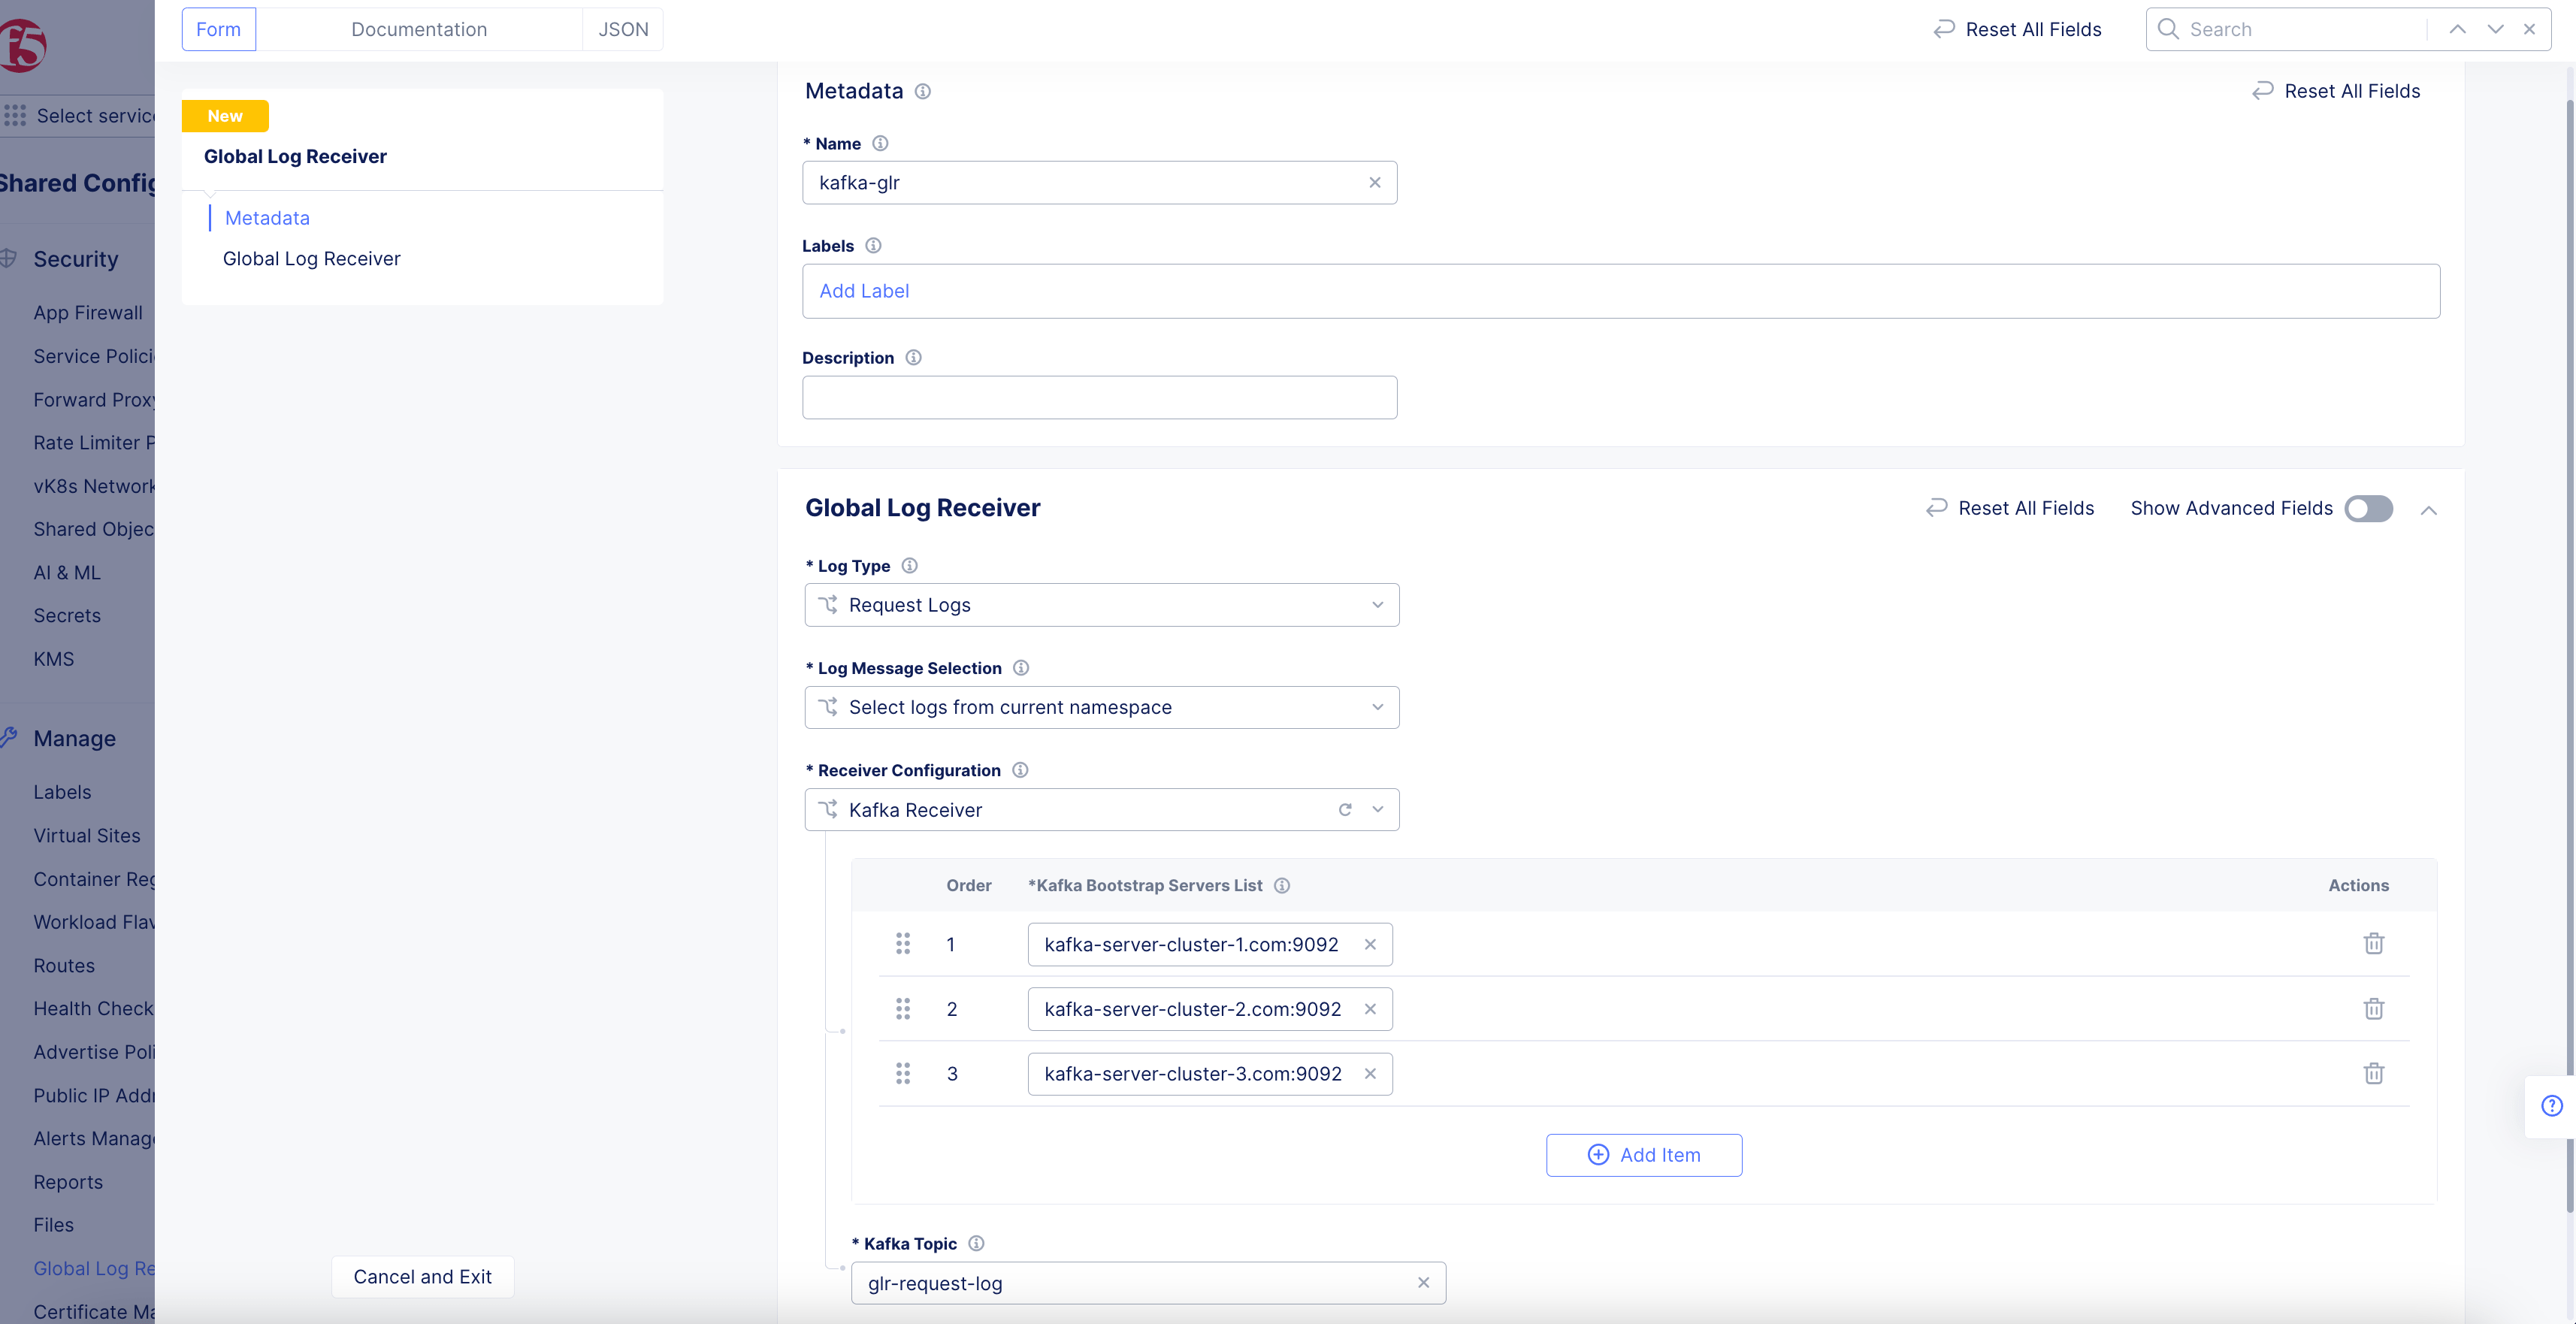
Figure: Kafka Global Log Receiver Configuration
-
Enter a Kafka bootstrap server in the form of host:port into the
Kafka Bootstrap Server List. UseAdd Itemto add additional pairs. -
Enter the
Kafka Topicname for the reported events.
NewRelic Receiver
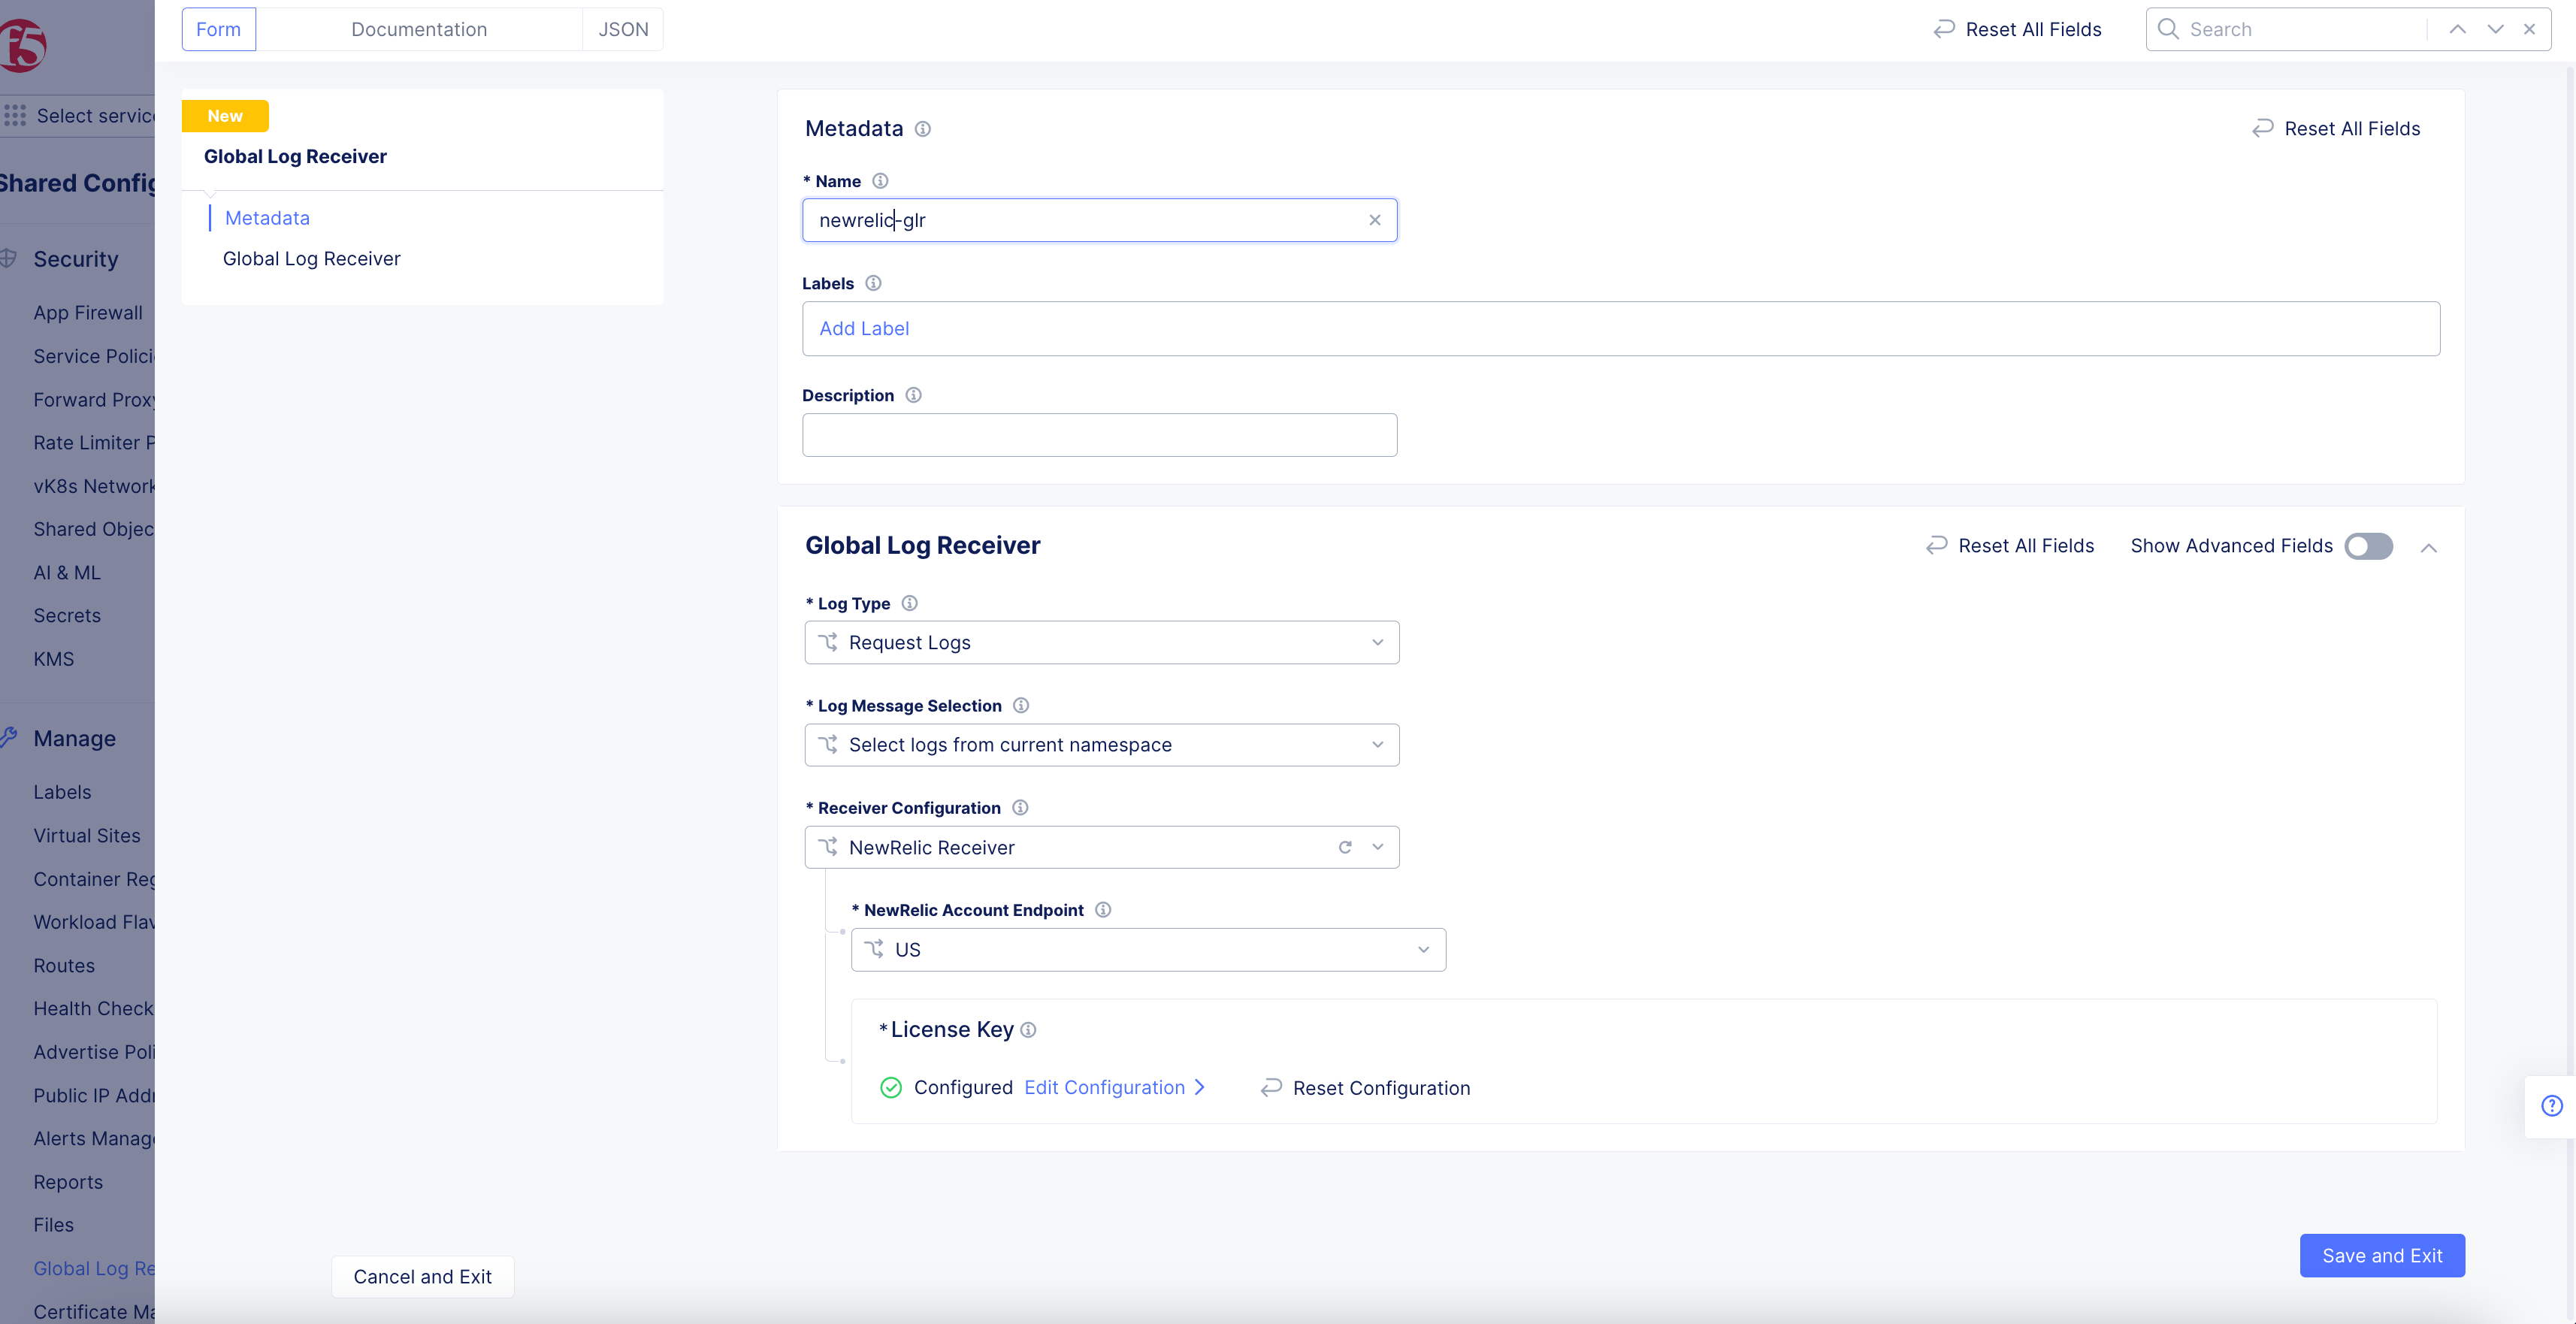
Figure: NewRelic Log Receiver Configuration
-
Select the endpoint that is applicable to your NewRelic account from the
NewRelic Account Endpointdrop-down menu. -
Click
Configureto set up the NewRelic license key.
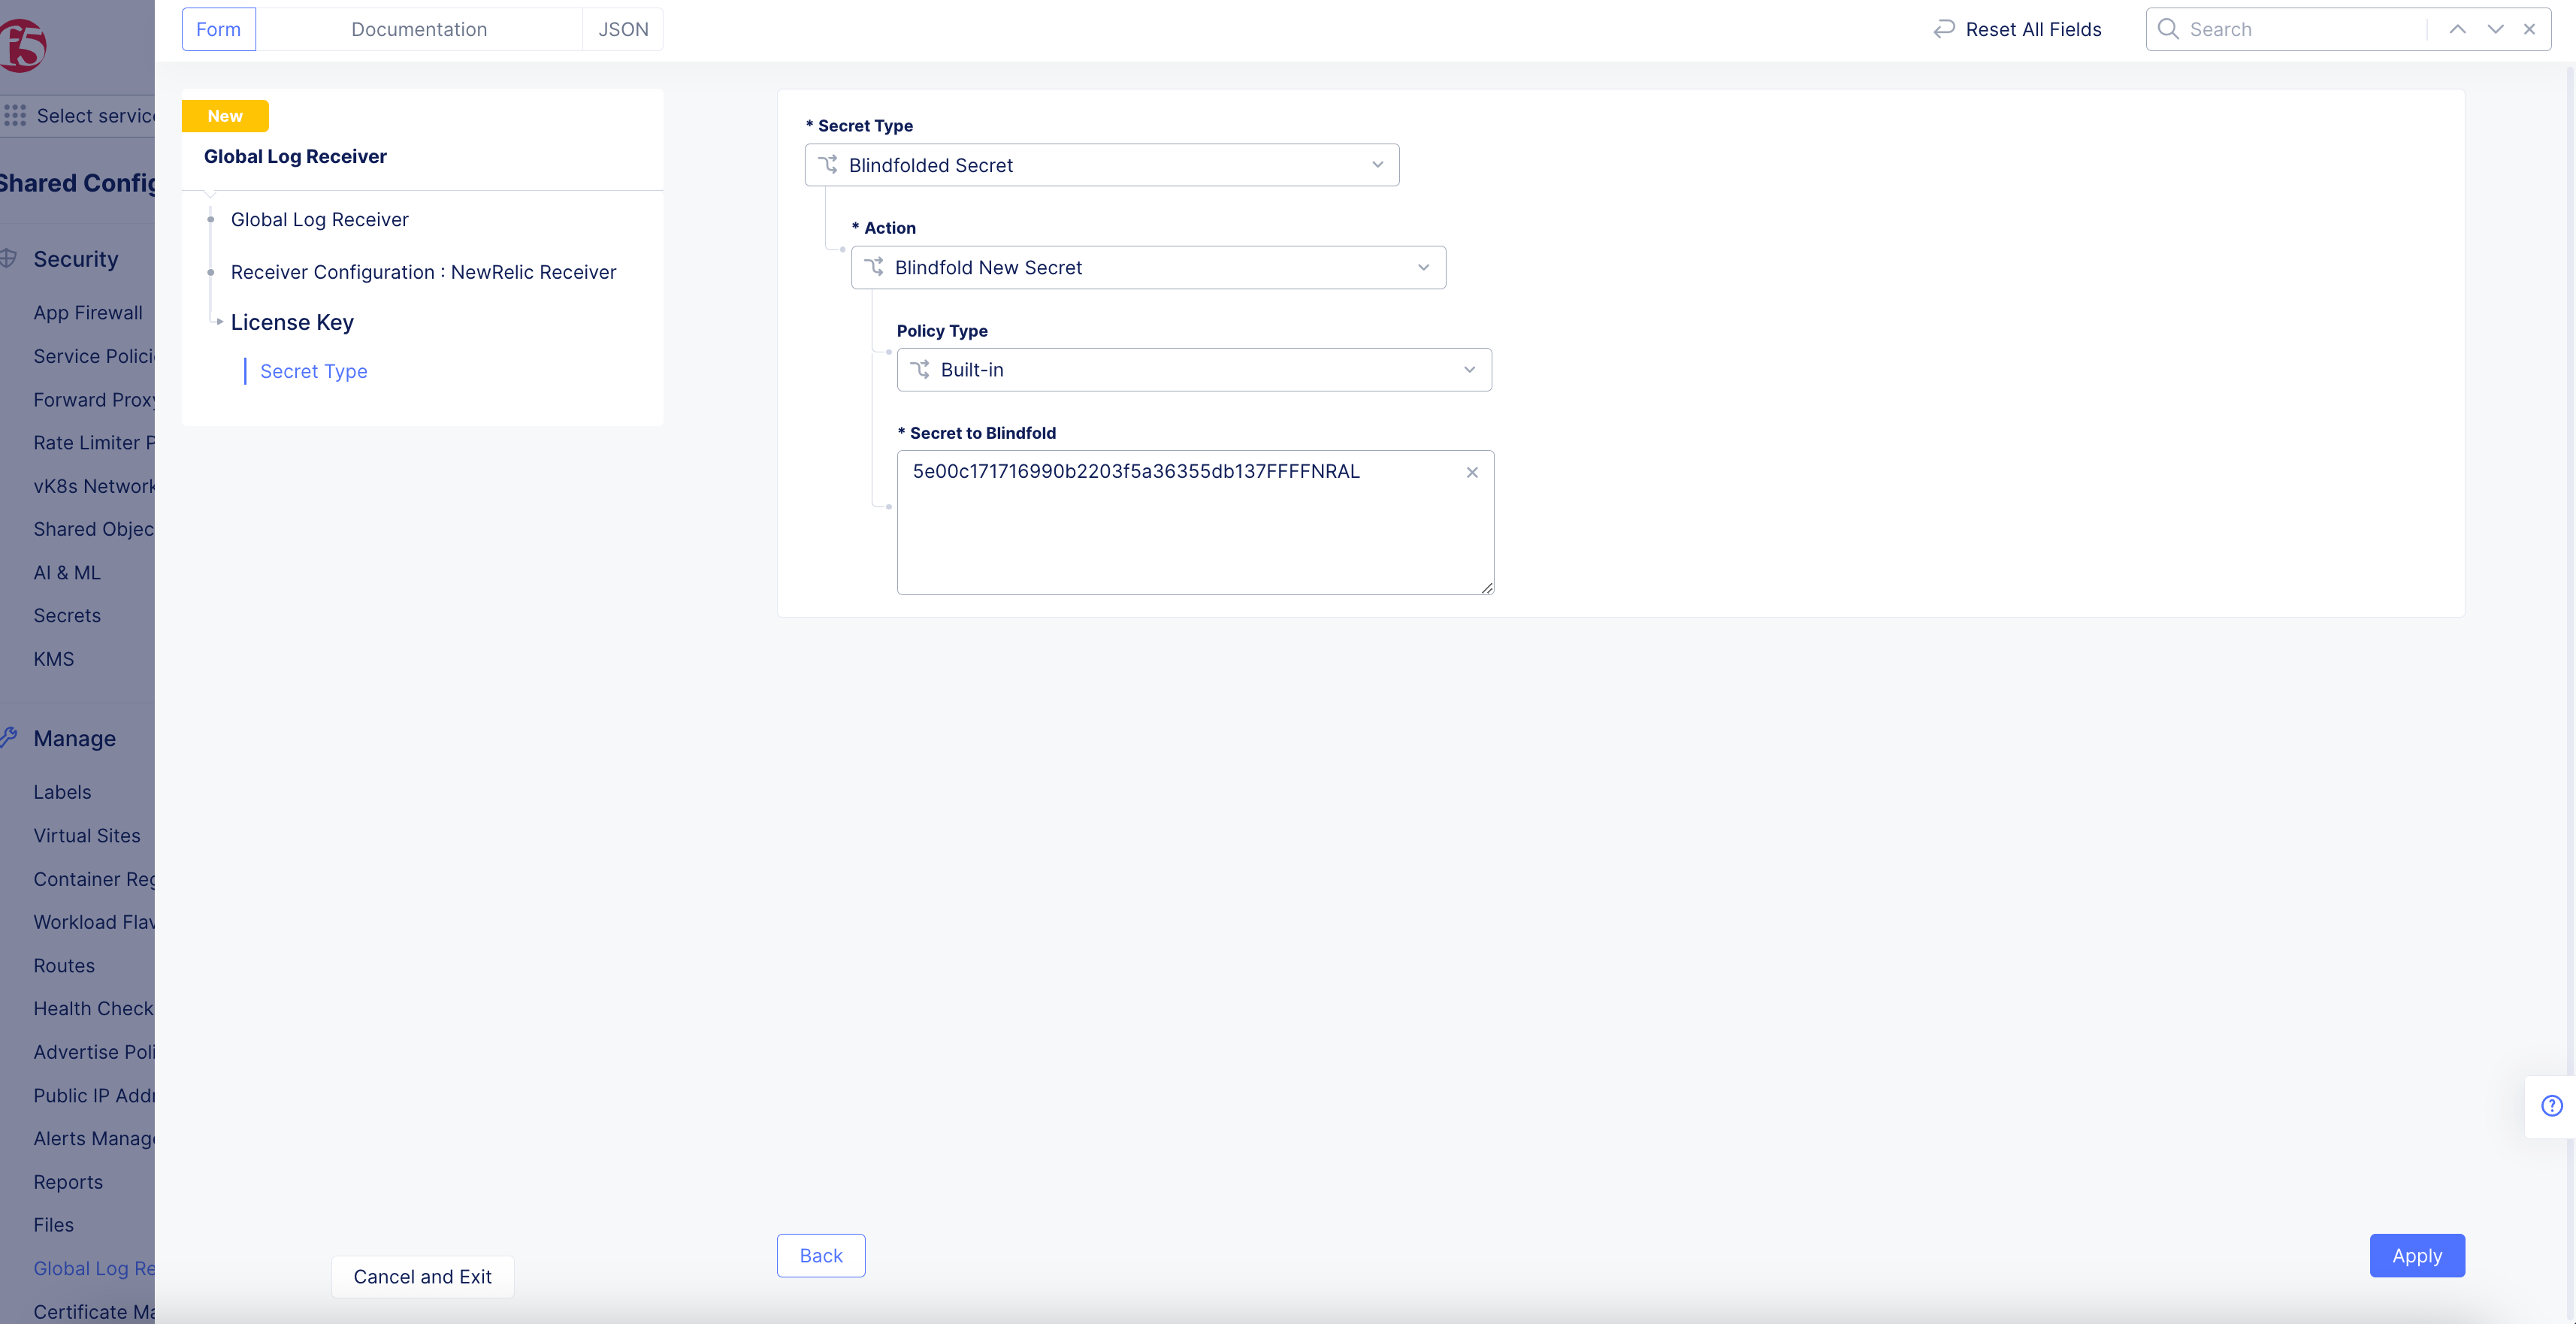
Figure: NewRelic License Key
-
Select
Blindfolded Secretfrom theSecret Typedrop-down menu. -
Use the
Actiondrop-down menu to select:-
Use Blindfold Blindfolded Secret: Enter your NewRelic license key into theBlindfolded Secretfield. -
Blindfold New Secret: SelectBuilt-infrom thePolicy Typedrop-down menu and enter your NewRelic license key into theSecret to Blindfoldfield, or selectCustomfor the policy type and then choose a custom policy and enter your NewRelic license key.
-
-
Click
Apply.
Splunk Receiver
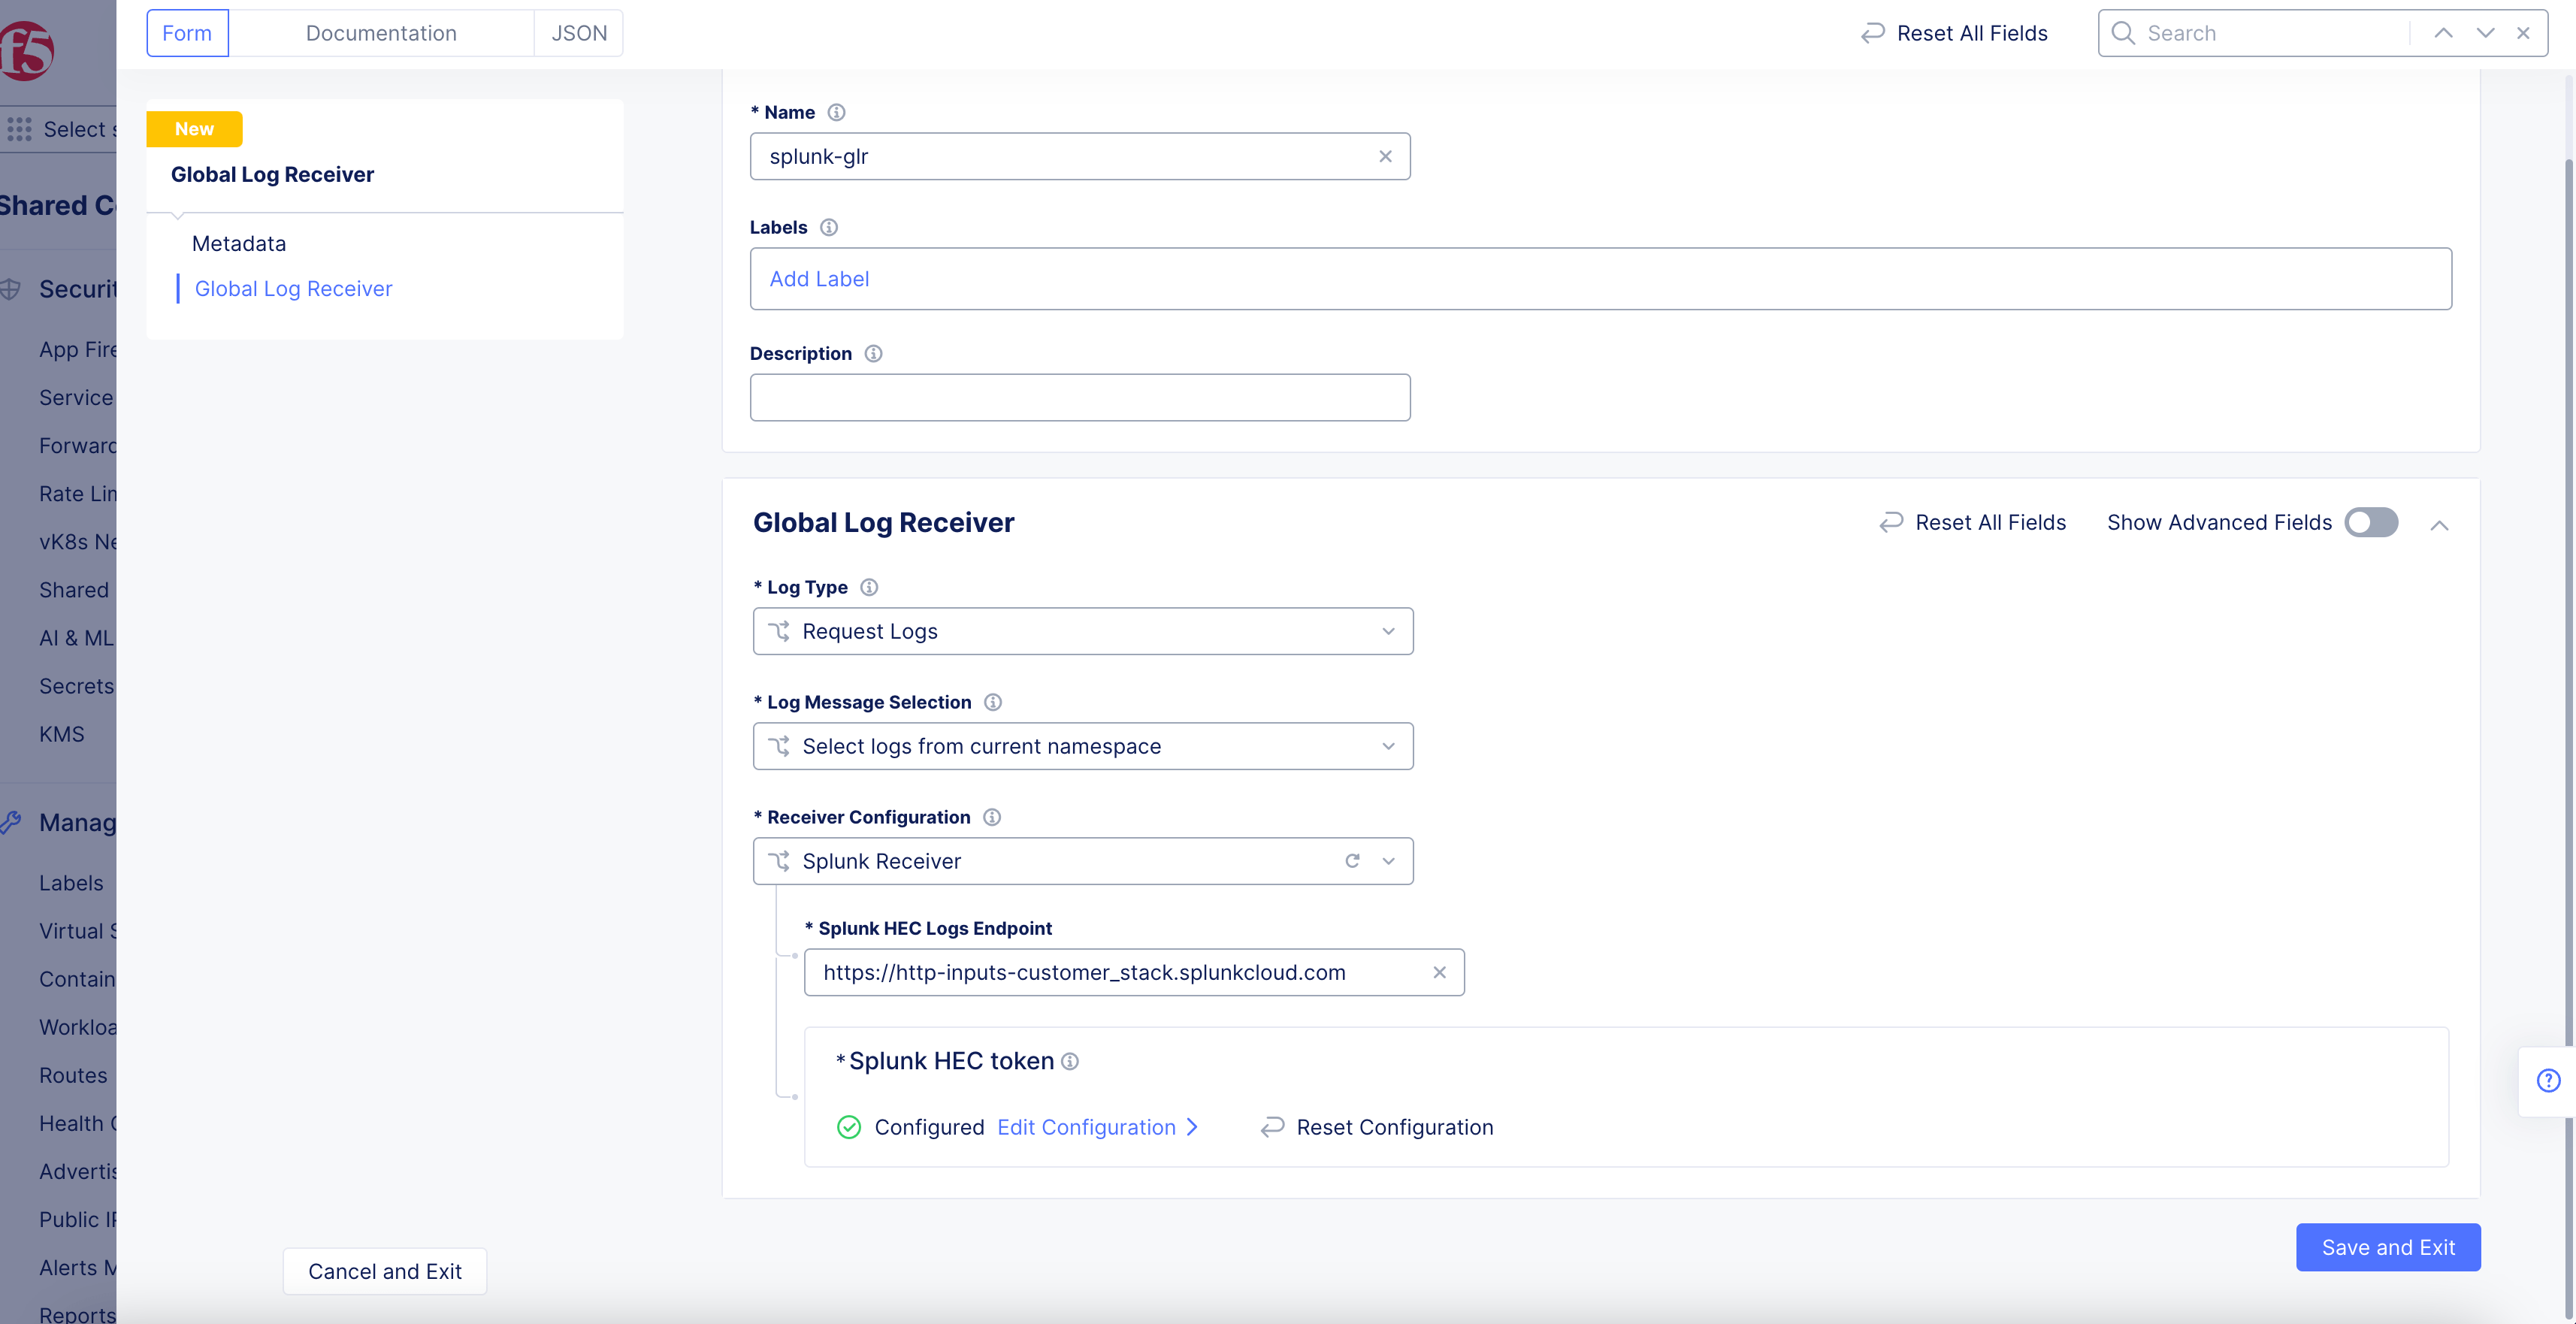
Figure: Splunk Log Receiver Configuration
-
Enter the
Splunk HEC Logs Endpoint. -
Click
Configureto set up the Splunk HEC token.
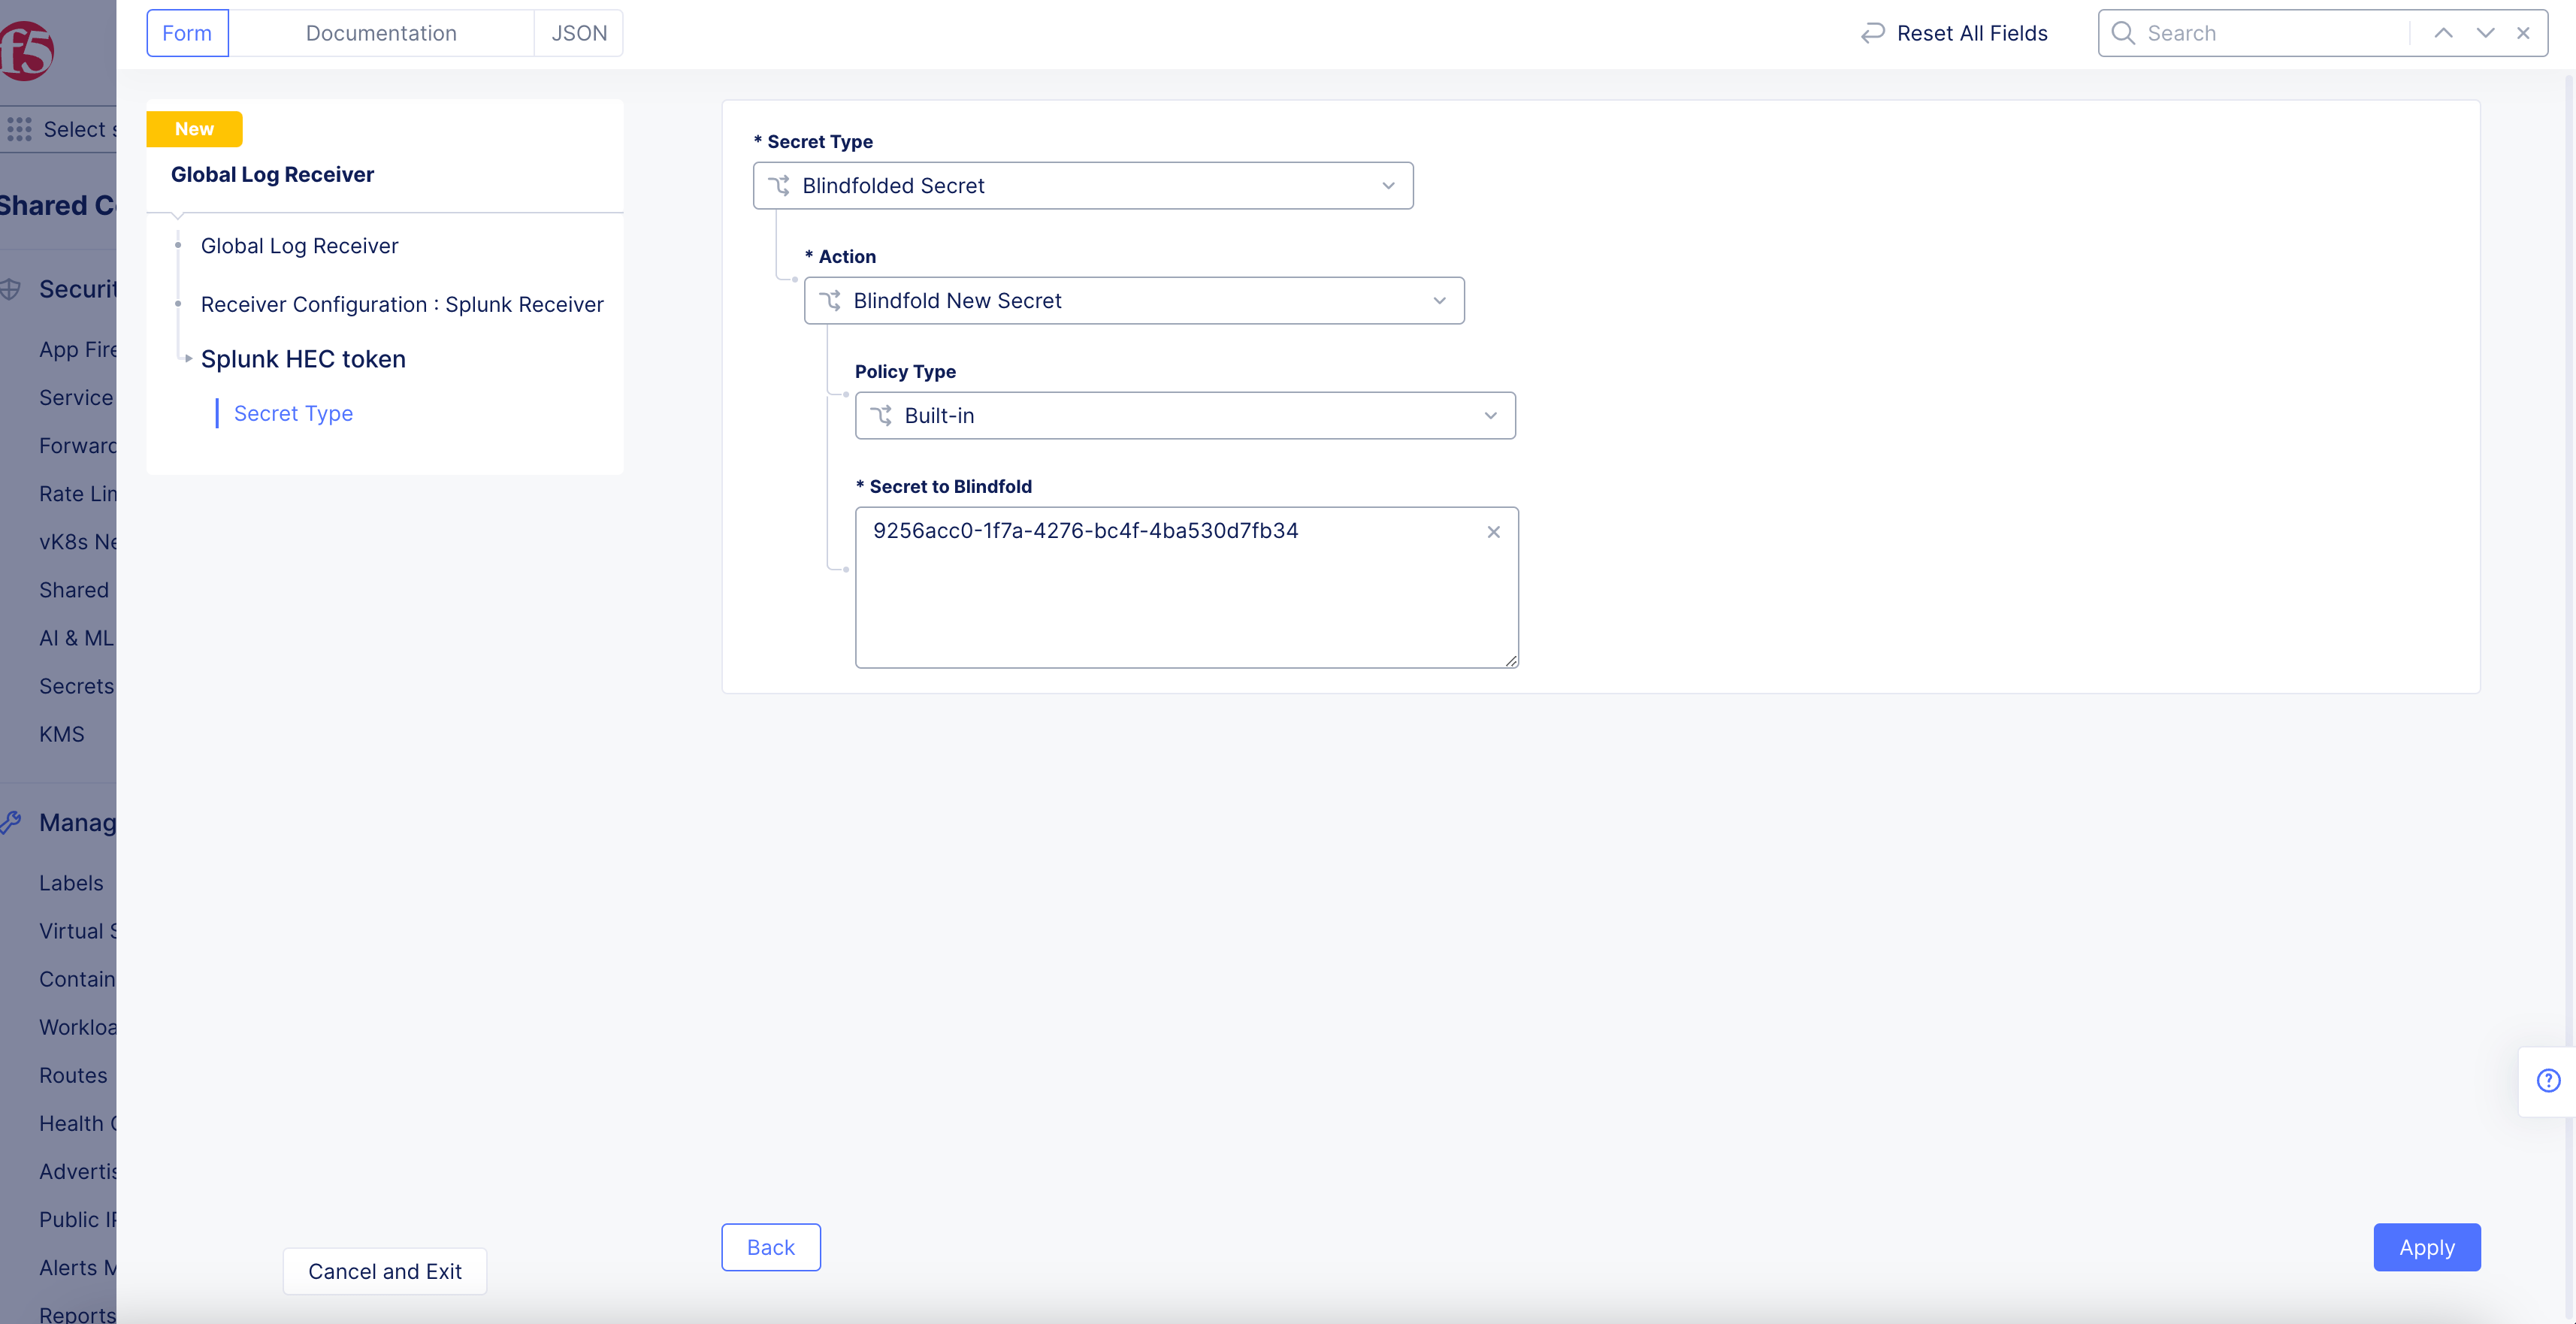
Figure: Splunk License Key
-
Select
Blindfolded Secretfrom theSecret Typedrop-down menu. -
Use the
Actiondrop-down menu to select:-
Use Blindfold Blindfolded Secret: Enter your Splunk HEC token into theBlindfolded Secretfield. -
Blindfold New Secret: SelectBuilt-infrom thePolicy Typedrop-down menu and enter your Splunk HEC token into theSecret to Blindfoldfield, or selectCustomfor the policy type and then choose a custom policy and enter your Splunk HEC token.
-
-
Click
Apply.
Splunk Configuration Details
According to a Splunk article, there are two different Splunk HEC URIs:
-
For Splunk Cloud customers, the standard HEC URI is https://http-inputs-customer_stack.splunkcloud.com. Splunk Cloud customers do not need to specify port 8088. All HEC traffic goes over port 443.
-
For customers using AWS Firehose, you will have a second HEC URL: https://http-inputs-firehose-customer_stack.splunkcloud.com.
-
For customers running HEC on their own deployments or using the Splunk test drive instance, port 8088 will need to be specified: https://input-prd-uniqueid.cloud.splunk.com:8088.
In either of the scenarios, you can use the following commands to validate the URLs:
-
In case of Splunk Cloud, enter
%>nslookup http-inputs-<customer_stack>.splunkcloud.com -
In case of Splunk Test Drive, enter
$ nslookup input-prd-uniqueid.cloud.splunk.com
See Splunk documentation.
SumoLogic Receiver
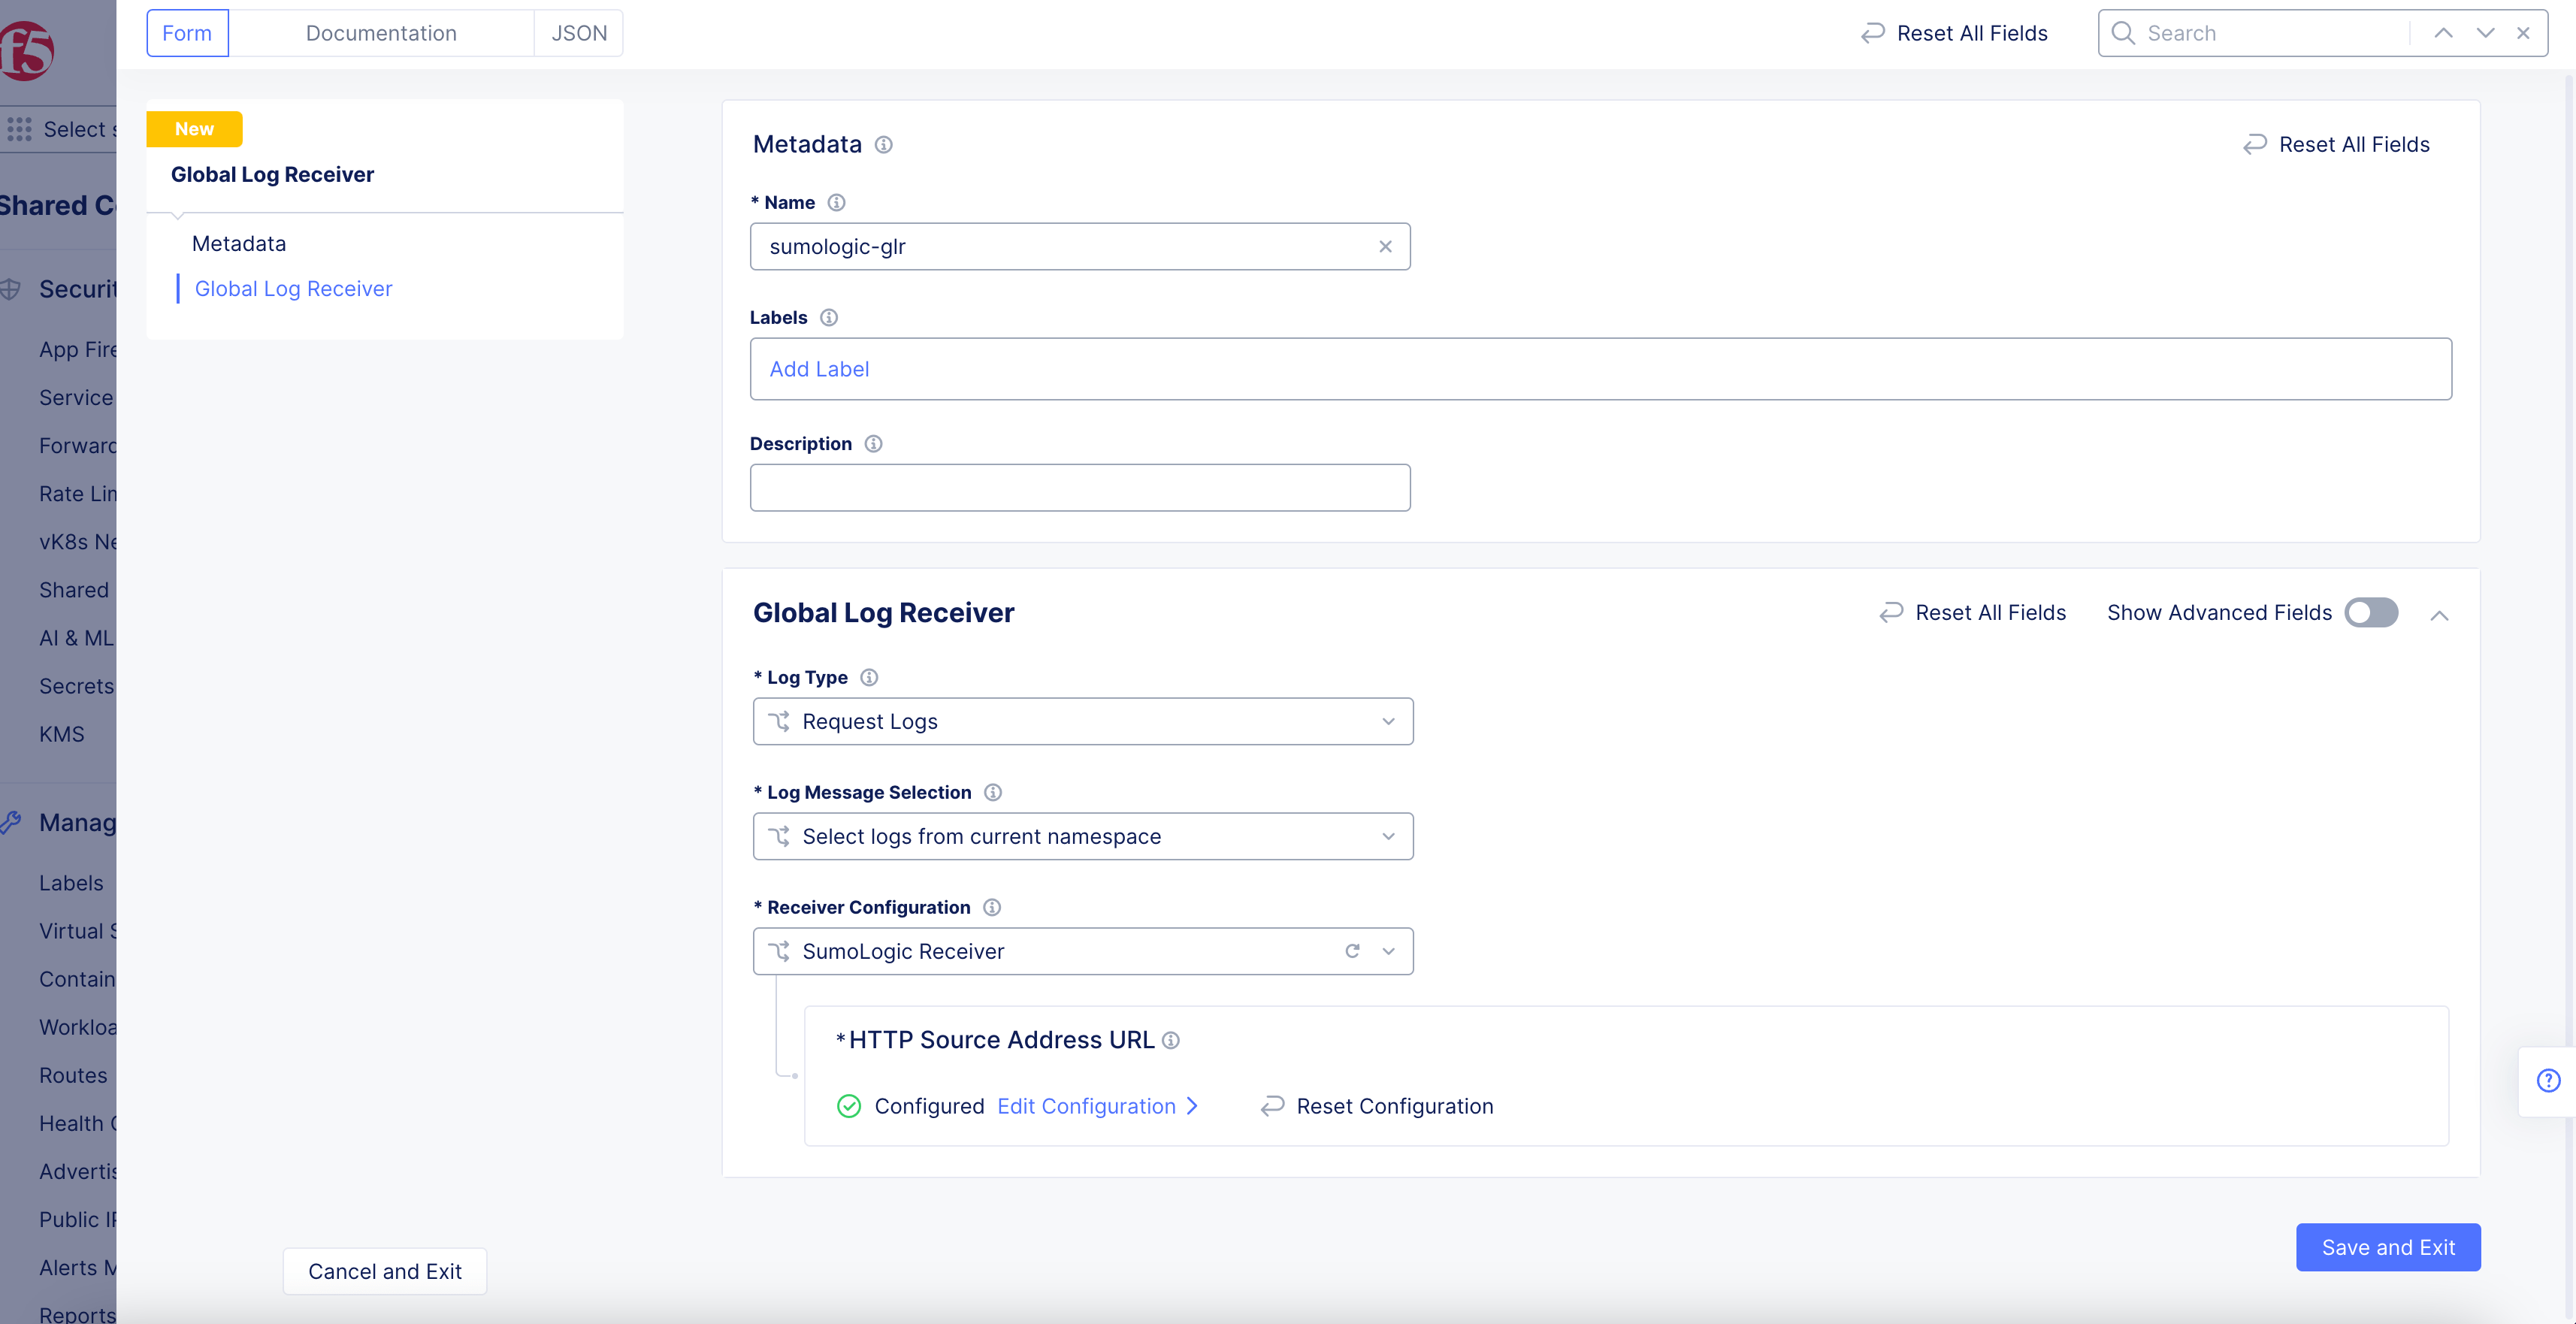
Figure: SumoLogic Log Receiver Configuration
- Click
Configureto set up the SumoLogic Source Address URL.
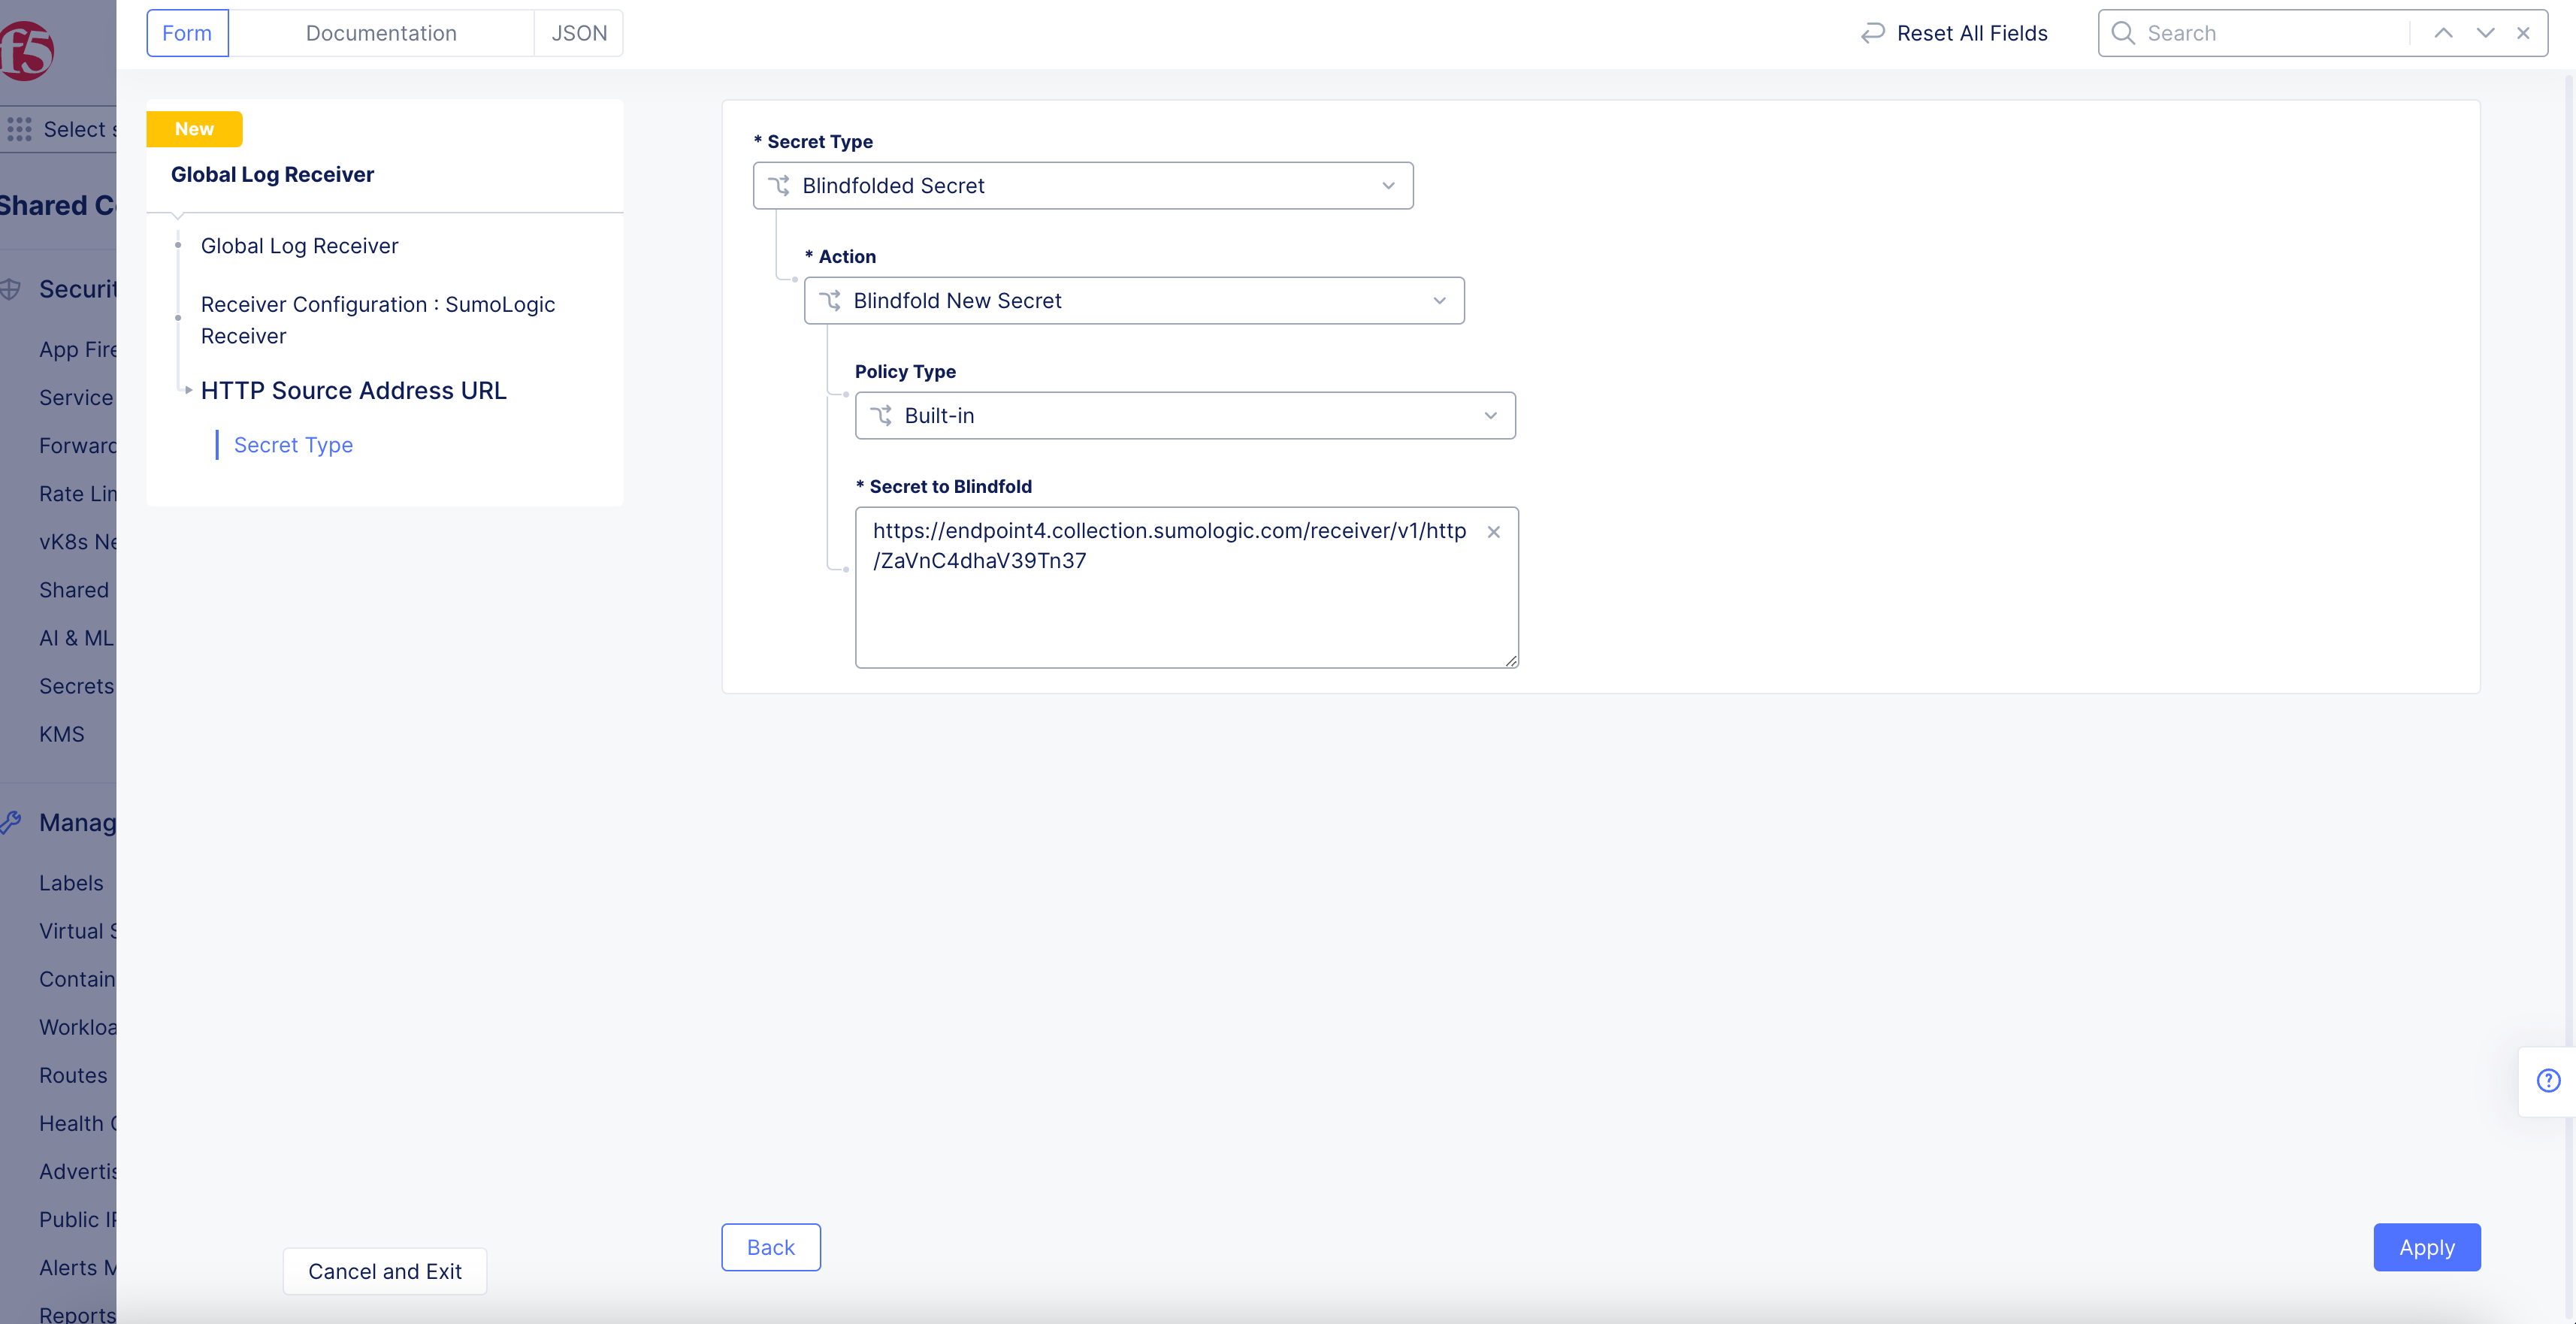
Figure: SumoLogic Source Address URL
-
Select
Blindfolded Secretfrom theSecret Typedrop-down menu. -
Use the
Actiondrop-down menu to select:-
Use Blindfold Blindfolded Secret: Enter your SumoLogic HTTP collector URL into theBlindfolded Secretfield. -
Blindfold New Secret: SelectBuilt-infrom thePolicy Typedrop-down menu and enter your SumoLogic HTTP collector URL into theSecret to Blindfoldfield, or selectCustomfor the policy type and then choose a custom policy and enter your SumoLogic HTTP collector URL.
-
-
Click
Apply.
Step 3: Optionally, configure advanced settings.
Advanced settings include configuring batch options and TLS. Using batch options, you can apply limits such as maximum number of messages bytes or timeout for a batch of logs to be sent to the receiver.
The default configuration for Batch Options are:
Timeout Seconds: 300s (5 minutes)Max Events: (no limit / unset)Max Bytes: 10MB
To modify the default configurations, select the Show Advanced Fields toggle and do the following in the Batch Options section:
- Select
Timeout Secondsfrom theBatch Timeout Optionsmenu and enter a timeout value in theTimeout Secondsbox. - Select
Max Eventsfrom theBatch Max Eventsmenu and enter a value between 32 and 2000 in theMax Eventsbox. - Select
Max Bytesfrom theBatch Bytesmenu and enter a value between 4096 and 1048576 in theBatch Bytesbox. Logs will be sent after the batch is size is equal to or more than the specified byte size.
Perform the following for the TLS drop-down menu:
- Select
Use TLSfor theTLSfield. - Select
Server CA Certificatesfor theTrusted CAfield. Enter the certificates in PEM or Base64 format in theServer CA Certificatesbox. - Select
Enable mTLSfrom themTLS configmenu and enter client certificate in PEM or Base64 format in theClient Certificatebox.- Select
Configurein theClient Private Keyfield, enter the secret in the box with type selected asText. - Select
Blindfold, wait for the operation to complete, and clickApply.
- Select
Step 4: Complete log receiver creation.
Select Save and Exit to complete creating the global log receiver.
Step 5: Inspect your connection and verify that logs are collected in the receiver.
- Select
...>Test Connectionin theActionscolumn for your global log receiver object. Wait for the test to complete and return message indicating successful connection.
Note: The F5 Distributed Cloud performs up to 20 retries in case of connection failure. The retries are performed only in case of the following HTTP response codes are returned:
- 429
- 500 and above, but not 501
- Verify that logs are collected into your receiver (such as S3 bucket in AWS).