Discover Service Endpoints Using Classic BIG-IP
Objective
This document provides instructions on how to configure Service Discovery of type Classic BIG-IP. Service discovery enables you to discover endpoints available on a given platform. This enables you to use F5 Distributed Cloud as the DMZ for public-facing applications, facilitates easy app migrations across diverse infrastructures, and enhances the visibility of APIs being used for these apps, empowering BIG-IP users to optimize their multi-cloud strategy effectively.
This service discovery feature enables the F5 Distributed Cloud platform to discover virtual servers configured on your classic BIG-IP devices and provides quick actions to enable various Distributed Cloud Services for the discovered applications.
Prerequisites
-
A valid F5 Distributed Cloud Account is required. If you do not have an account, see Getting Started with Console.
-
A Secure Mesh Site deployed with reachability to the BIG-IP instances. Refer to Infrastructure Requirements section for more details.
-
BIG-IP admin credentials (required) and certificate (optional).
Infrastructure Requirements
The management and data interfaces of BIG-IP devices must be routable from the Site Local Inside (SLI) interfaces of the CE. F5 recommends you deploy the CE with two SLI interfaces: one to reach the BIG-IP Management interface and the other to reach the data interface. This keeps the config and data path separate and the data path performance is not affected by config traffic.
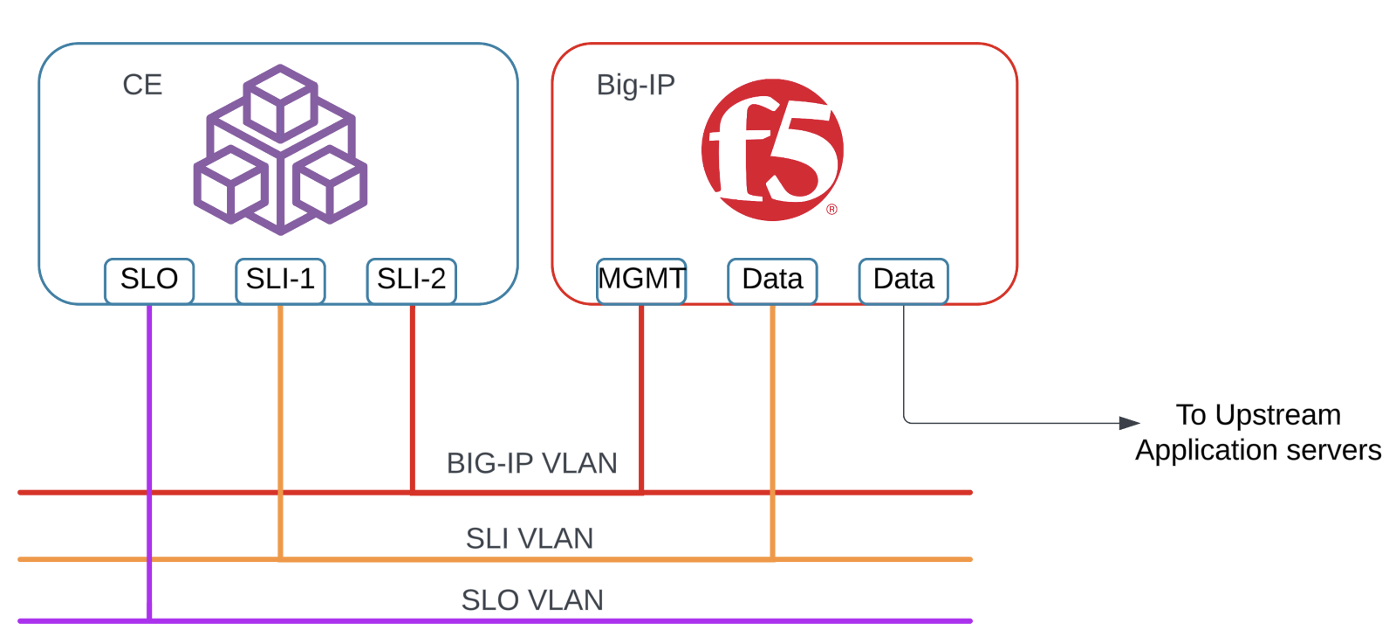
Figure: Infrastructure Requirements
The feature also works with one SLI interface on the CE with reachability to both BIG-IP interfaces.
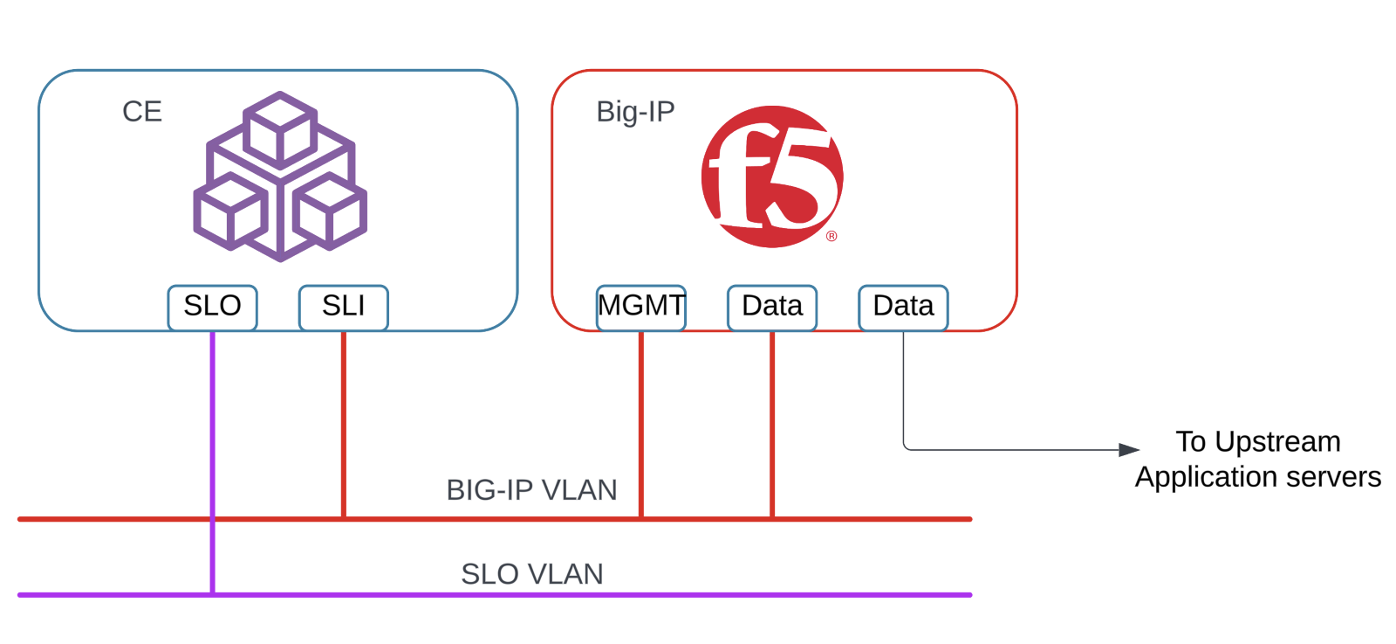
Figure: Infrastructure Requirements
Note: The same service discovery configuration can discover from multiple BIG-IP clusters that are reachable from the CE Site's SLI interface.
Configuration Sequence
Discovering BIG-IP applications and enabling Distributed Cloud services for them requires performing the following actions:
-
Configure service discovery:
-
Add BIG-IP instances or HA clusters.
-
Configure Virtual Server Filters to selectively discover required applications.
-
Configure Namespace Mapping to select BIG-IP partitions to discover from.
-
-
Verify the discovered applications.
-
Create an HTTP load balancer to advertise the app, or enable Visibility to make it available in the
Web App & API Protectionworkspace where you can enable and monitor API discovery.
Configuring Discovery for Shared vs Dedicated BIG-IP Resources
The service discovery tool discovers the BIG-IP apps into Distributed Cloud App Connect Namespaces. The feature provides an option to discover apps from different BIG-IP partitions into single or multiple Distributed Cloud App Connect Namespaces.
If the requirement is to discover all BIG-IP Apps into the same App Connect Namespace, for example: when the BIG-IP is a dedicated resource and all partitions on it are owned by a single team, the Service Discovery object can be configured in the App Connect namespace to which the team has access.
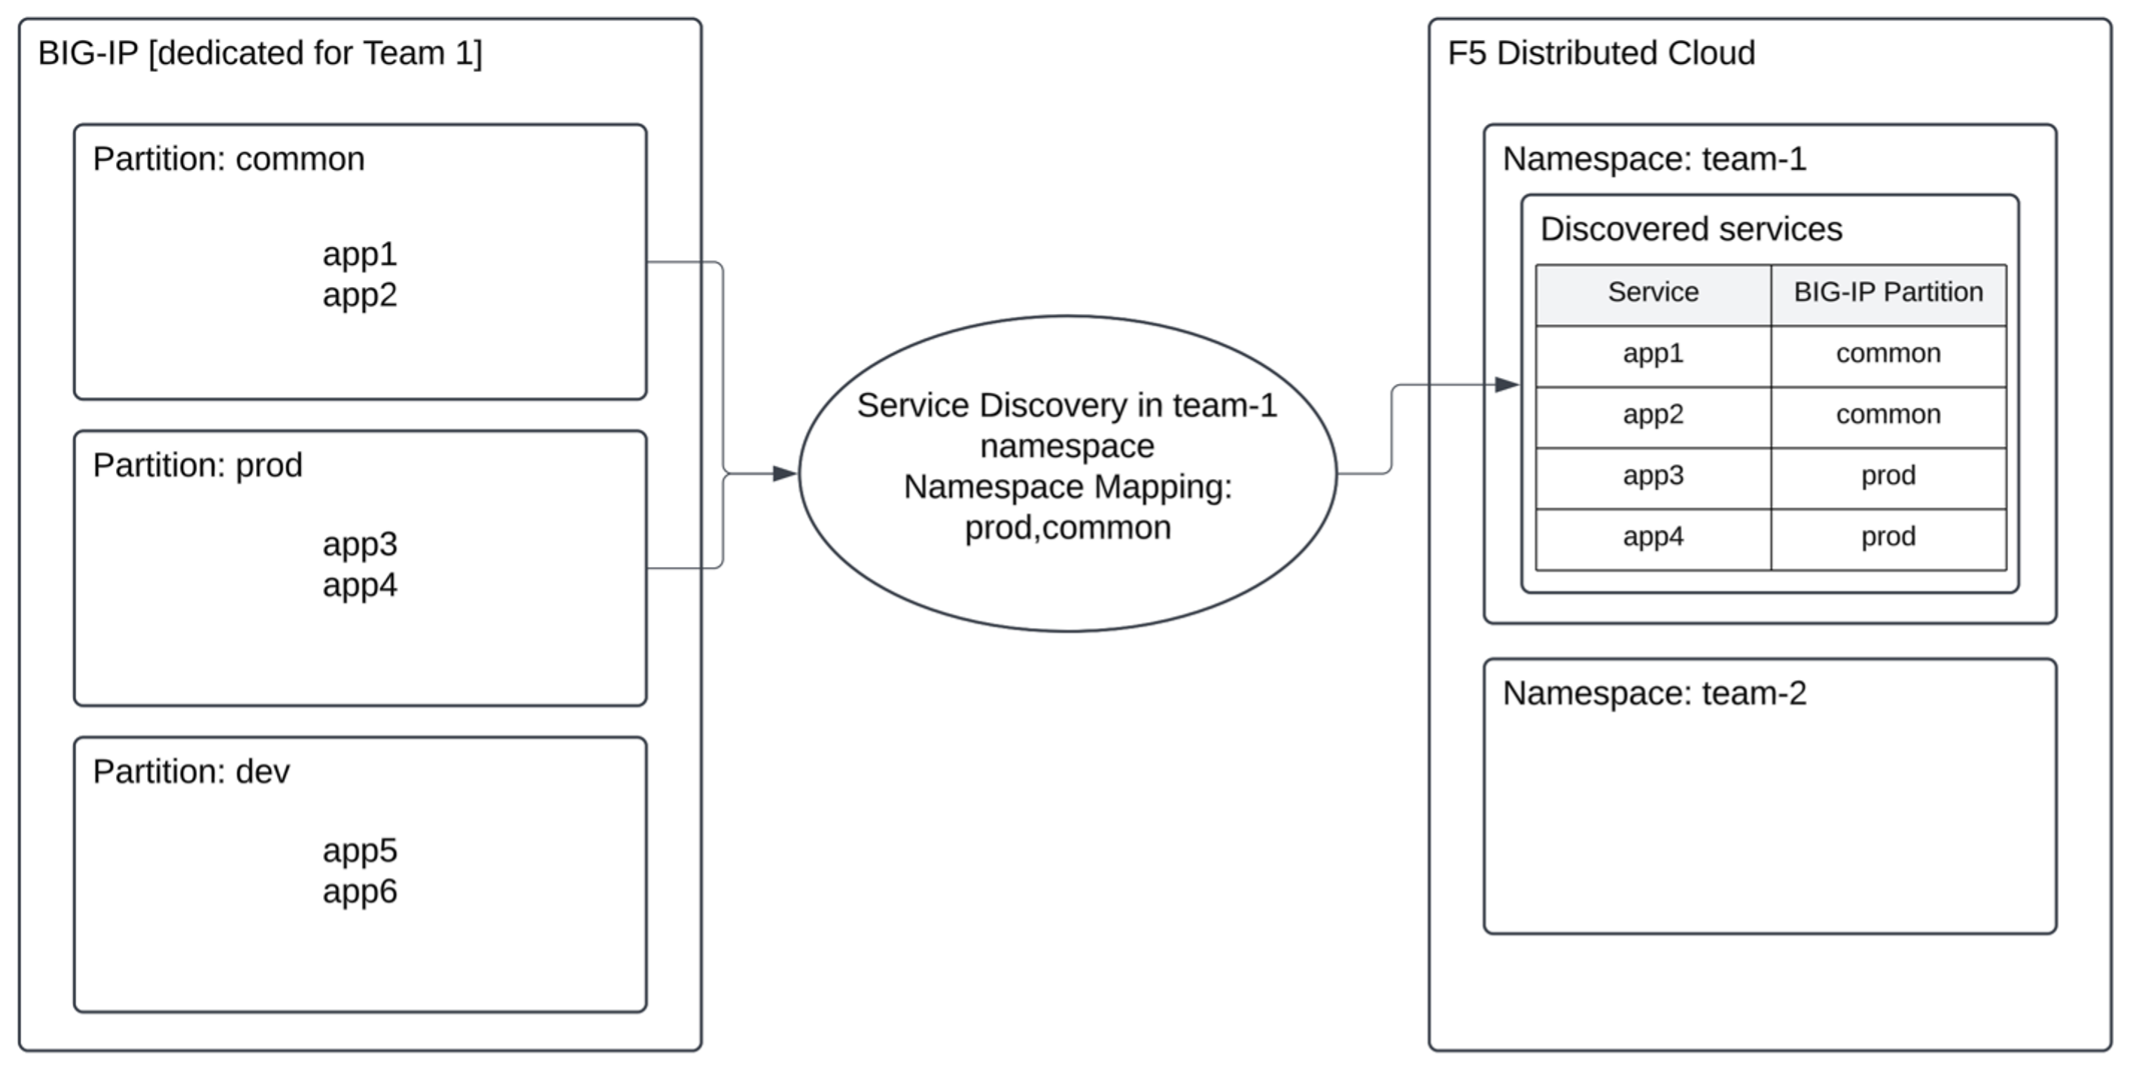
Figure: Service discovery created in application namespace (example: team-1)
If the requirement is to discover apps from certain BIG-IP partitions to corresponding App Connect Namespace (for example: when different BIG-IP partitions are owned by different teams), the Service Discovery object must be configured in the Shared Configurations workspace. The namespace mapping configuration can be used to map the required BIG-IP partitions to the corresponding App Connect Namespace. The applications from the BIG-IP partitions will be discovered only to the mapped App Connect Namespace, maintaining the management isolation.
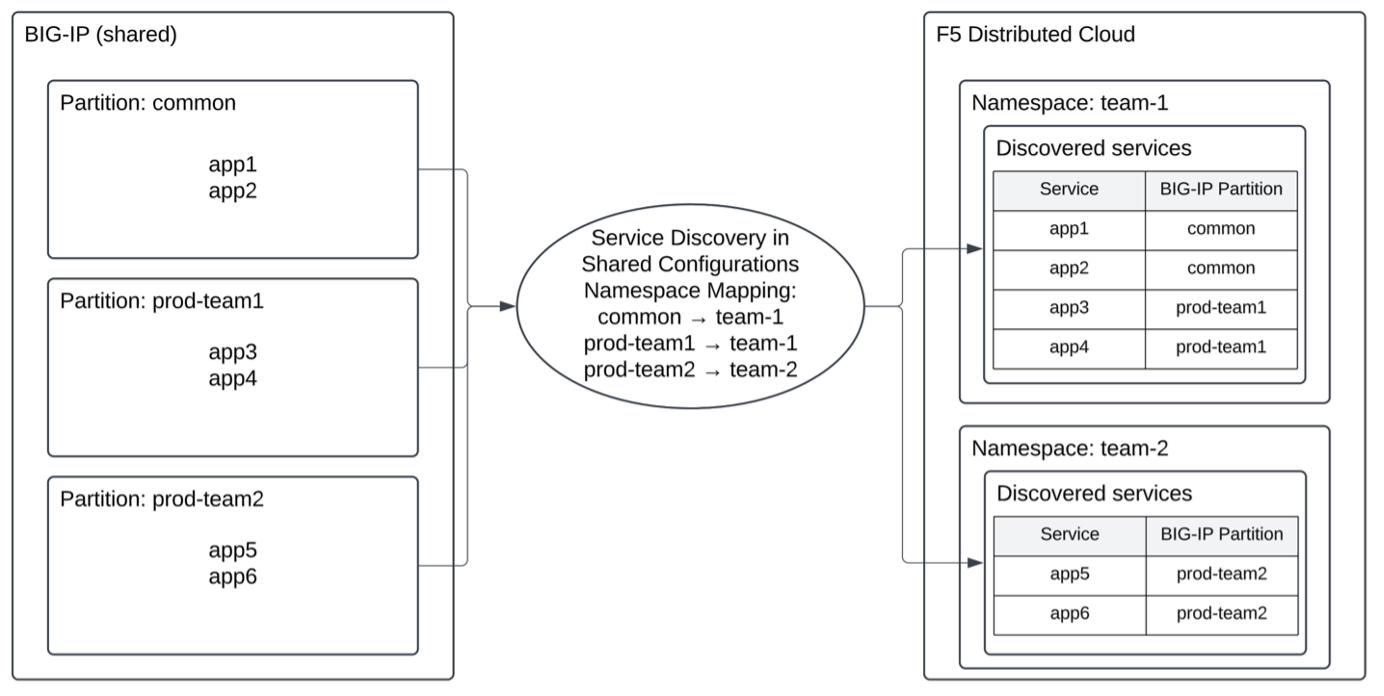
Figure: Service discovery created in shared namespace
Configure Service Discovery for Classic BIG-IP
The steps to configure Classic BIG-IP service discovery are the same for the App namespace and Shared Configuration, except for the namespace mapping step. Follow the steps below to configure the Service Discovery object in the App Connect namespace:
Step 1: Create a new service discovery object.
-
Open
F5 Distributed Cloud Console. -
Select
Multi-Cloud App Connect>Manage>Service Discoveries. -
In
BIG-IPtab, selectAdd Service Discoverybutton.
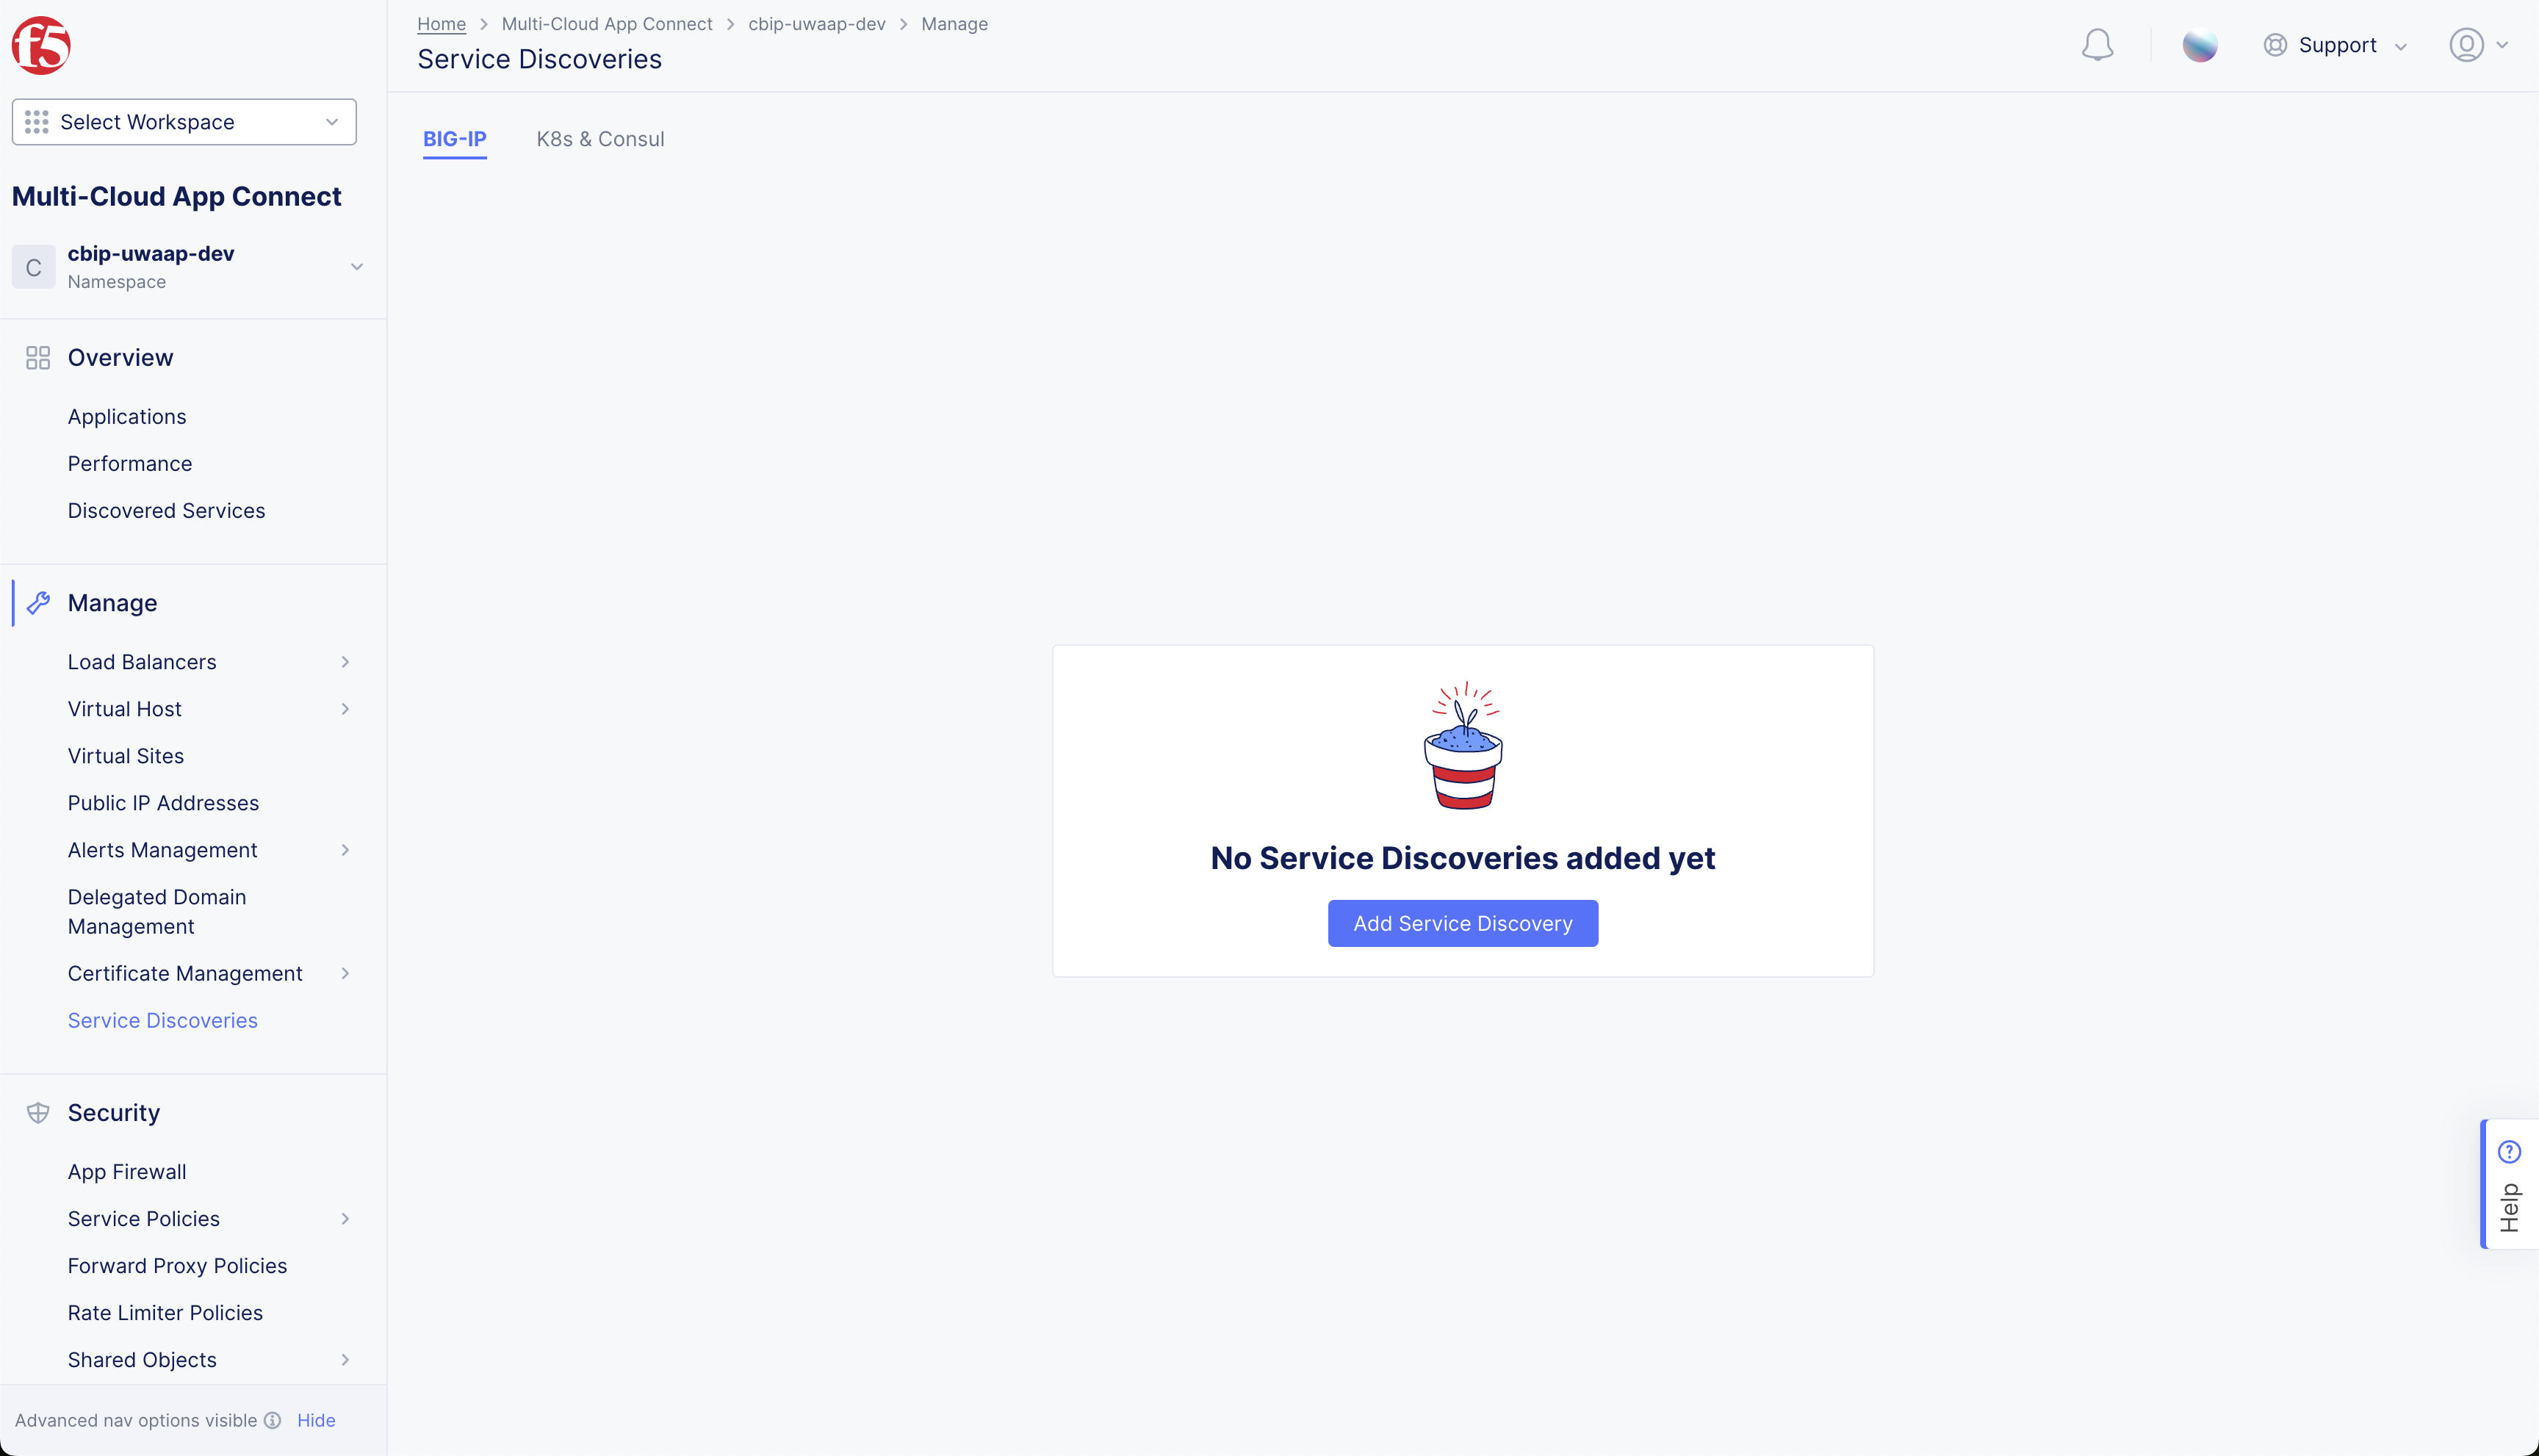
Figure: Add Service Discovery
Step 2: Enter the metadata.
-
Enter
Name. -
Optionally, enter
LabelsandDescription.
Step 3: Select where the discovery is applicable.
-
In
Virtual-Site or Site or Networkdrop-down menu, selectSite. -
From the
Referencedrop-down menu, select the CE Site deployed with reachability to the BIG-IP. -
From the
Network typedrop-down menu, selectSite Local Inside Network.
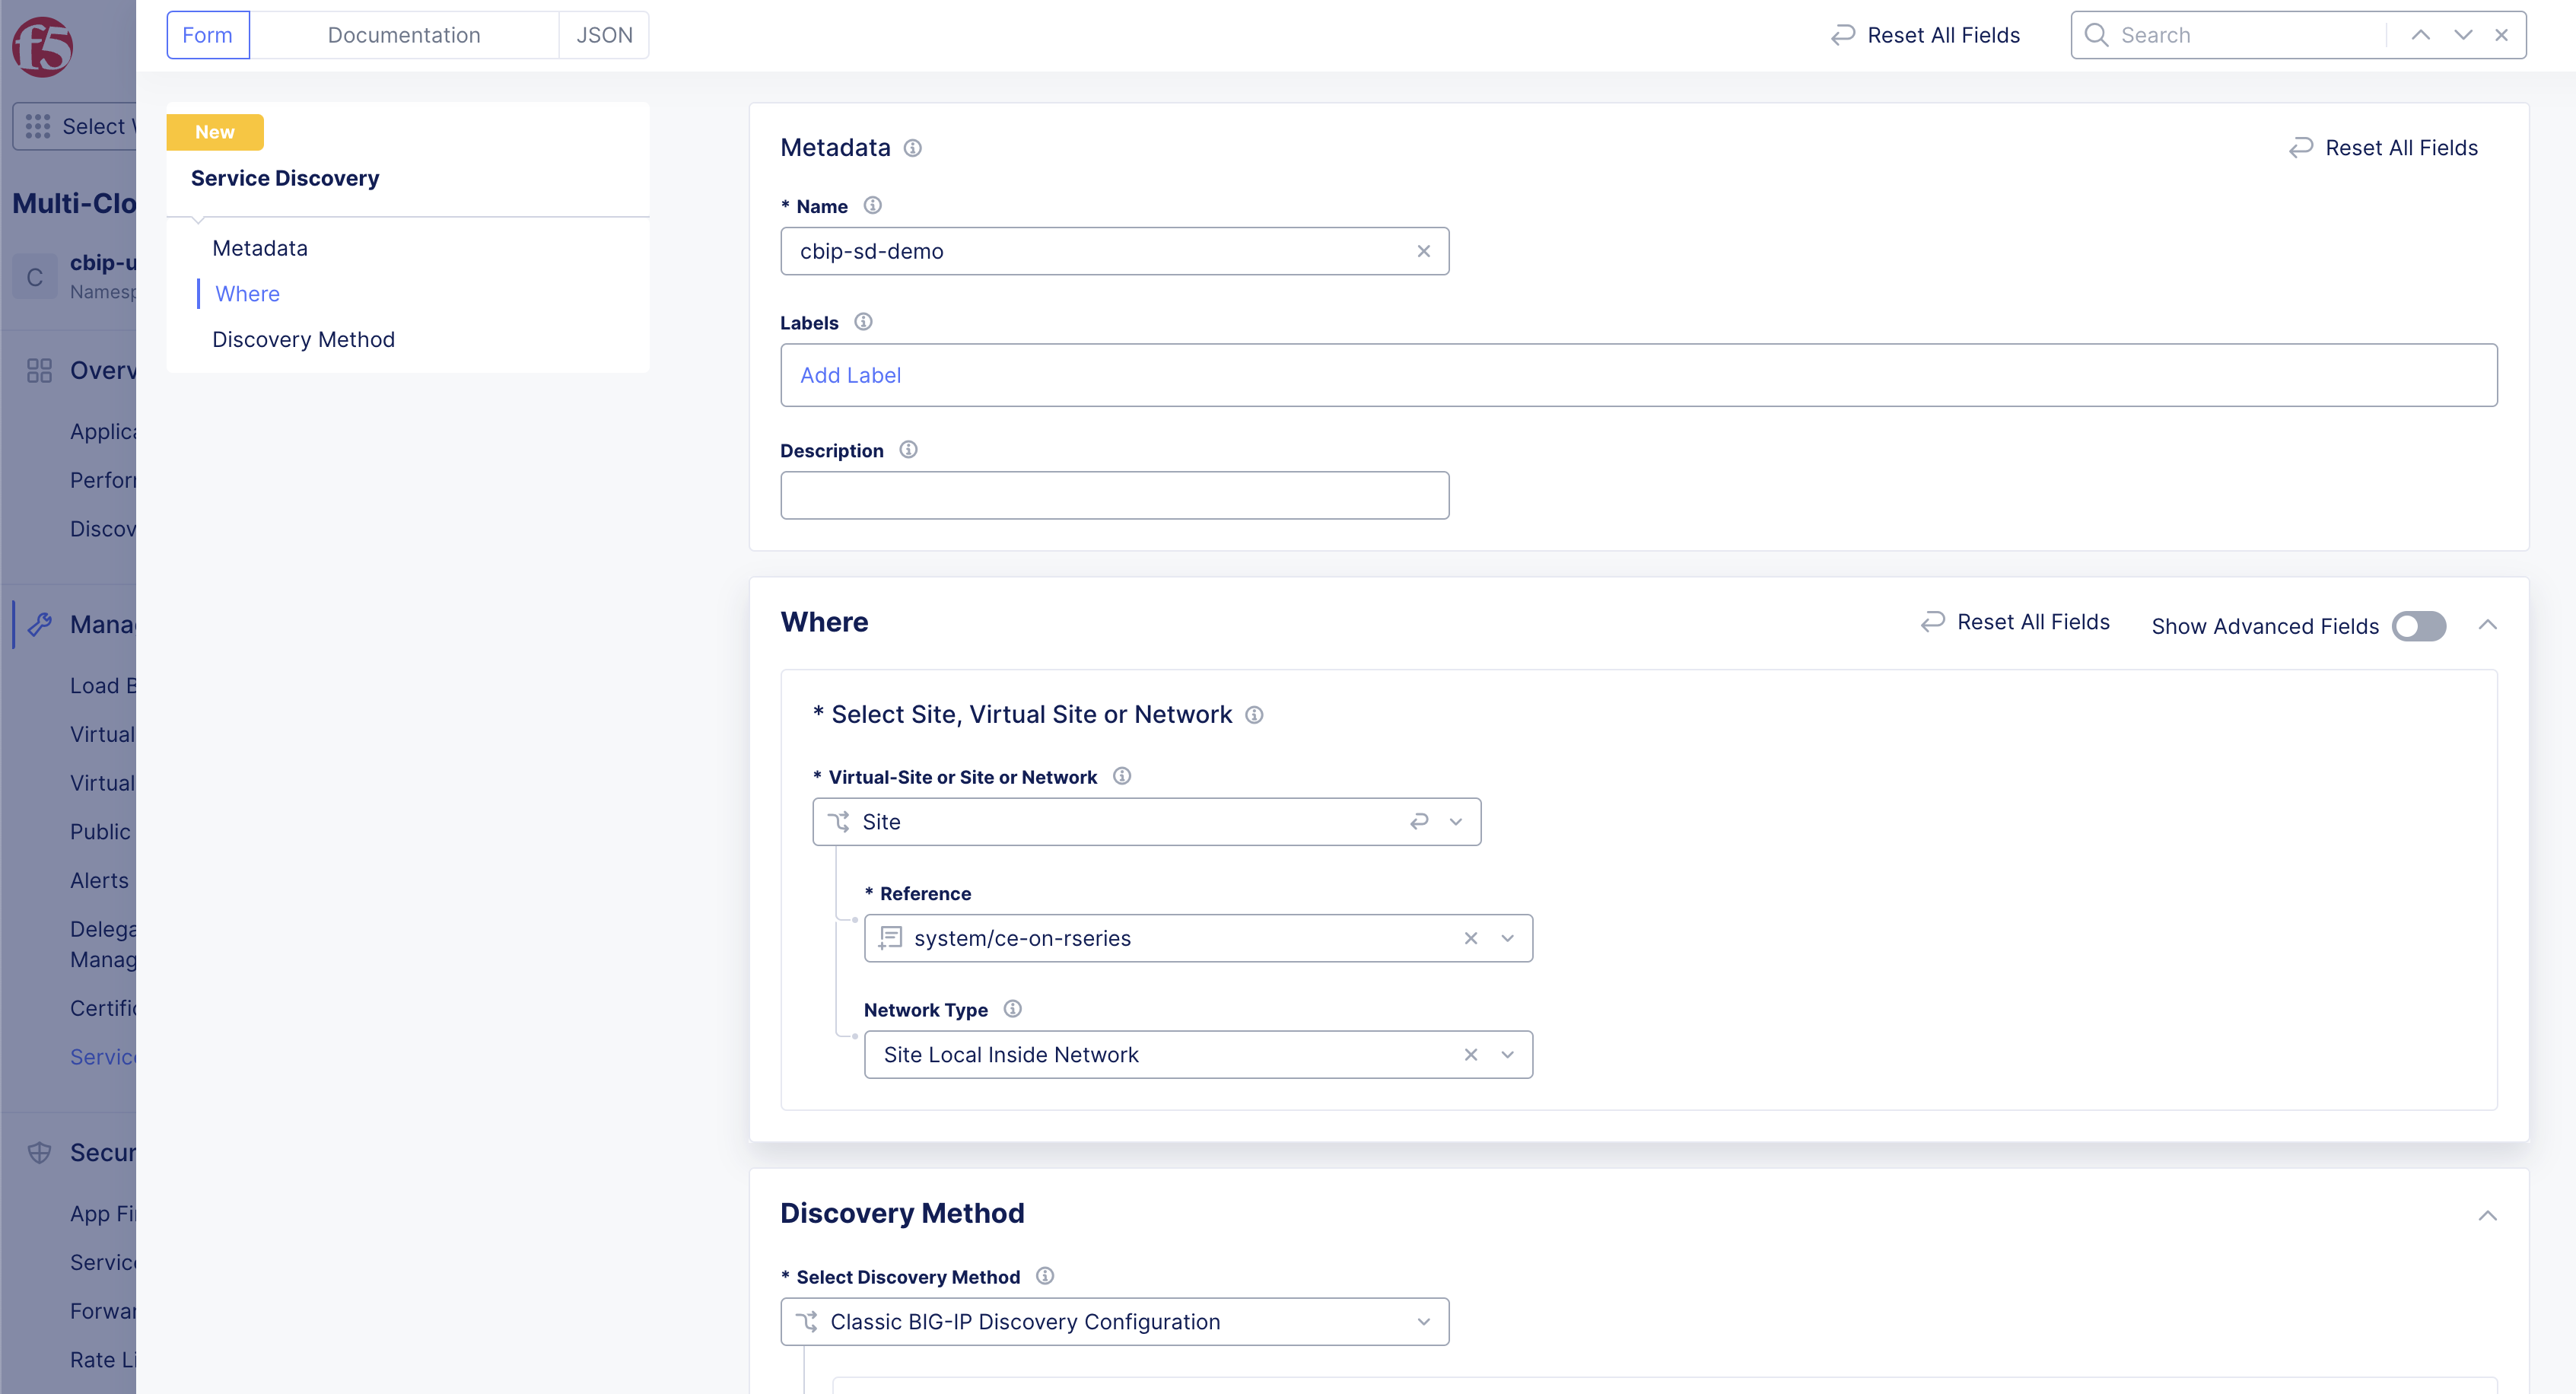
Figure: Site Local Inside Network
Step 4: Select the discovery method.
In the Discovery Method drop-down menu, select Classic BIG-IP Discovery Configuration.
Step 5: Add BIG-IP clusters.
- Under
Classic BIG-IP Clusters, click+ Add Itembutton to add one cluster at a time.
Note: If you do not have a cluster and have an individual BIG-IP device, you can add it as a cluster of one device.
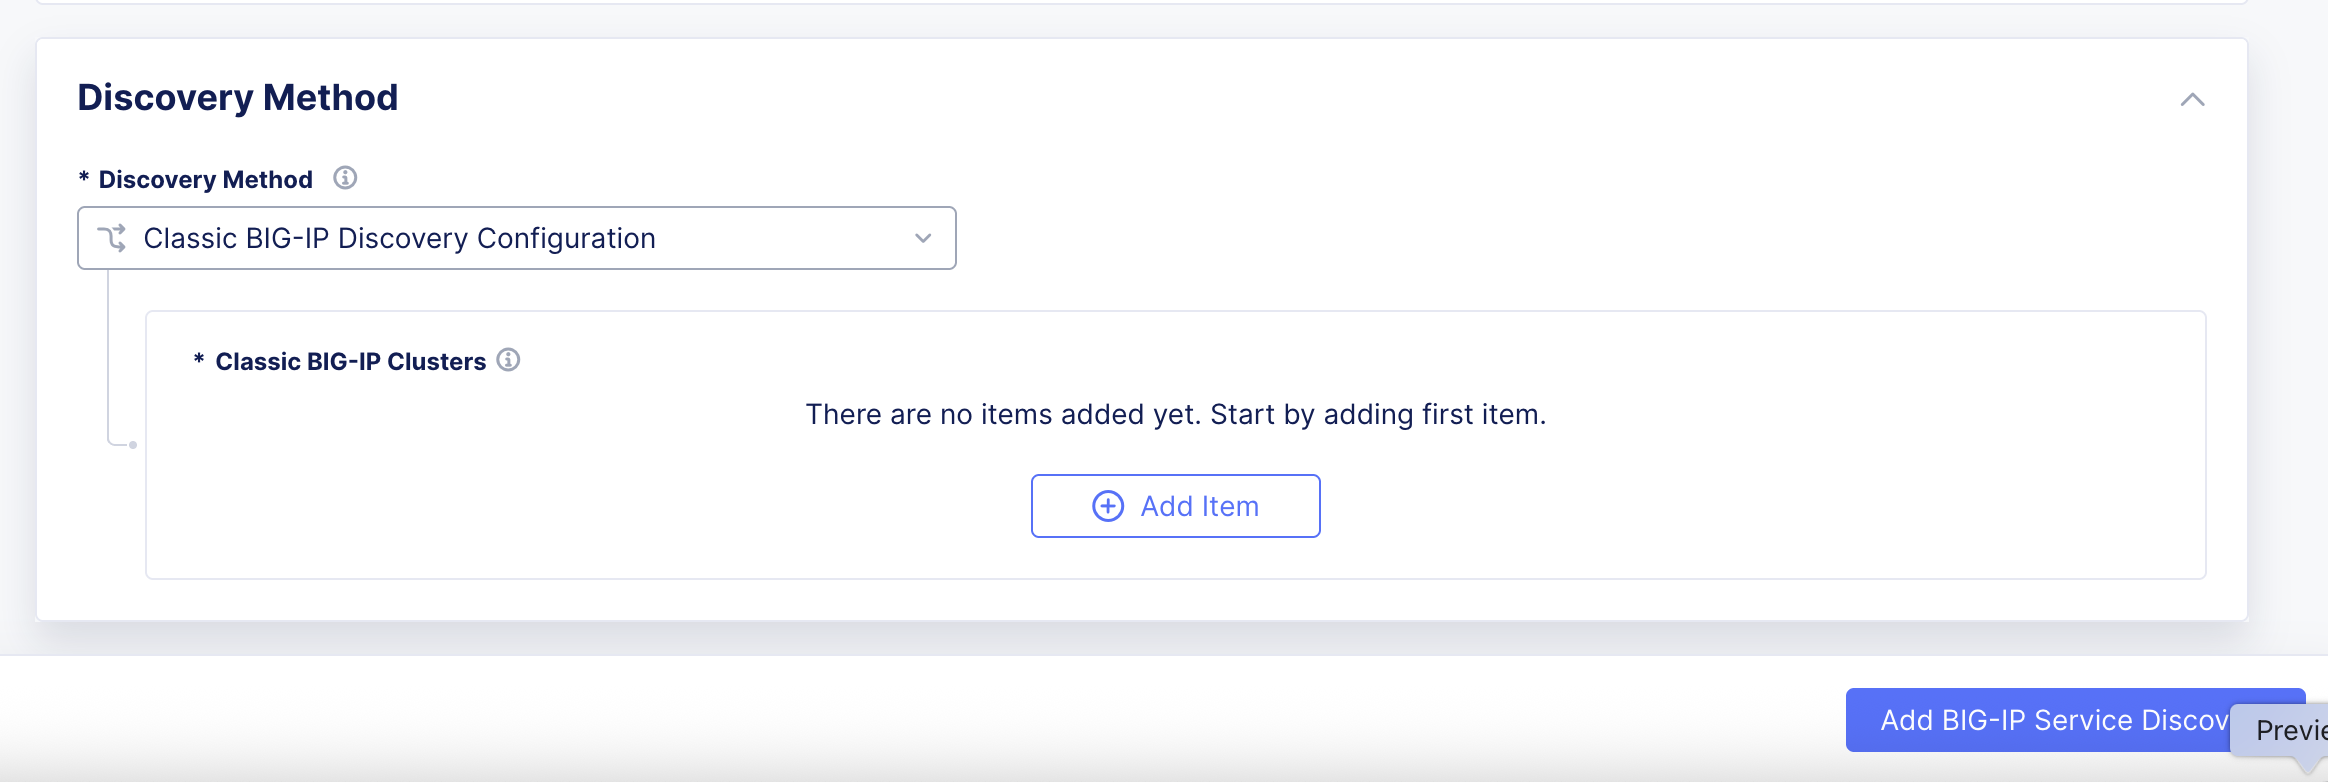
Figure: Add BIG-IP Clusters
- Enter the name and description of the BIG-IP cluster.
Step 6: Add BIG-IP device.
-
In
Classic BIG-IP Clusters, select+ Add Itembutton. -
Enter
NameandDescriptionas needed. s -
Provide the device's
Management IP. -
Select
+ Add Itembutton to add additional Management IP's. -
Select
Management Port.
Note: 443 is
Management Portdefault value. Port numbers must be in the range of 1-65535.
-
Edit
Management Portas needed, or reset to default value with circle arrow icon. -
Provide the device's
Admin Credentials. -
Enter
Admin Usernamein box -
In
Admin Passwordbox selectConfigurelink.- Select
Secret Type>Action>Policy Type>Secret to Blindfold>Applybutton.
- Select
-
Under
Root CA Certificate, selectSkip Verificationif no certificate is configured on BIG-IP for authentication, or selectRoot CA Certificateand add the required certificate.
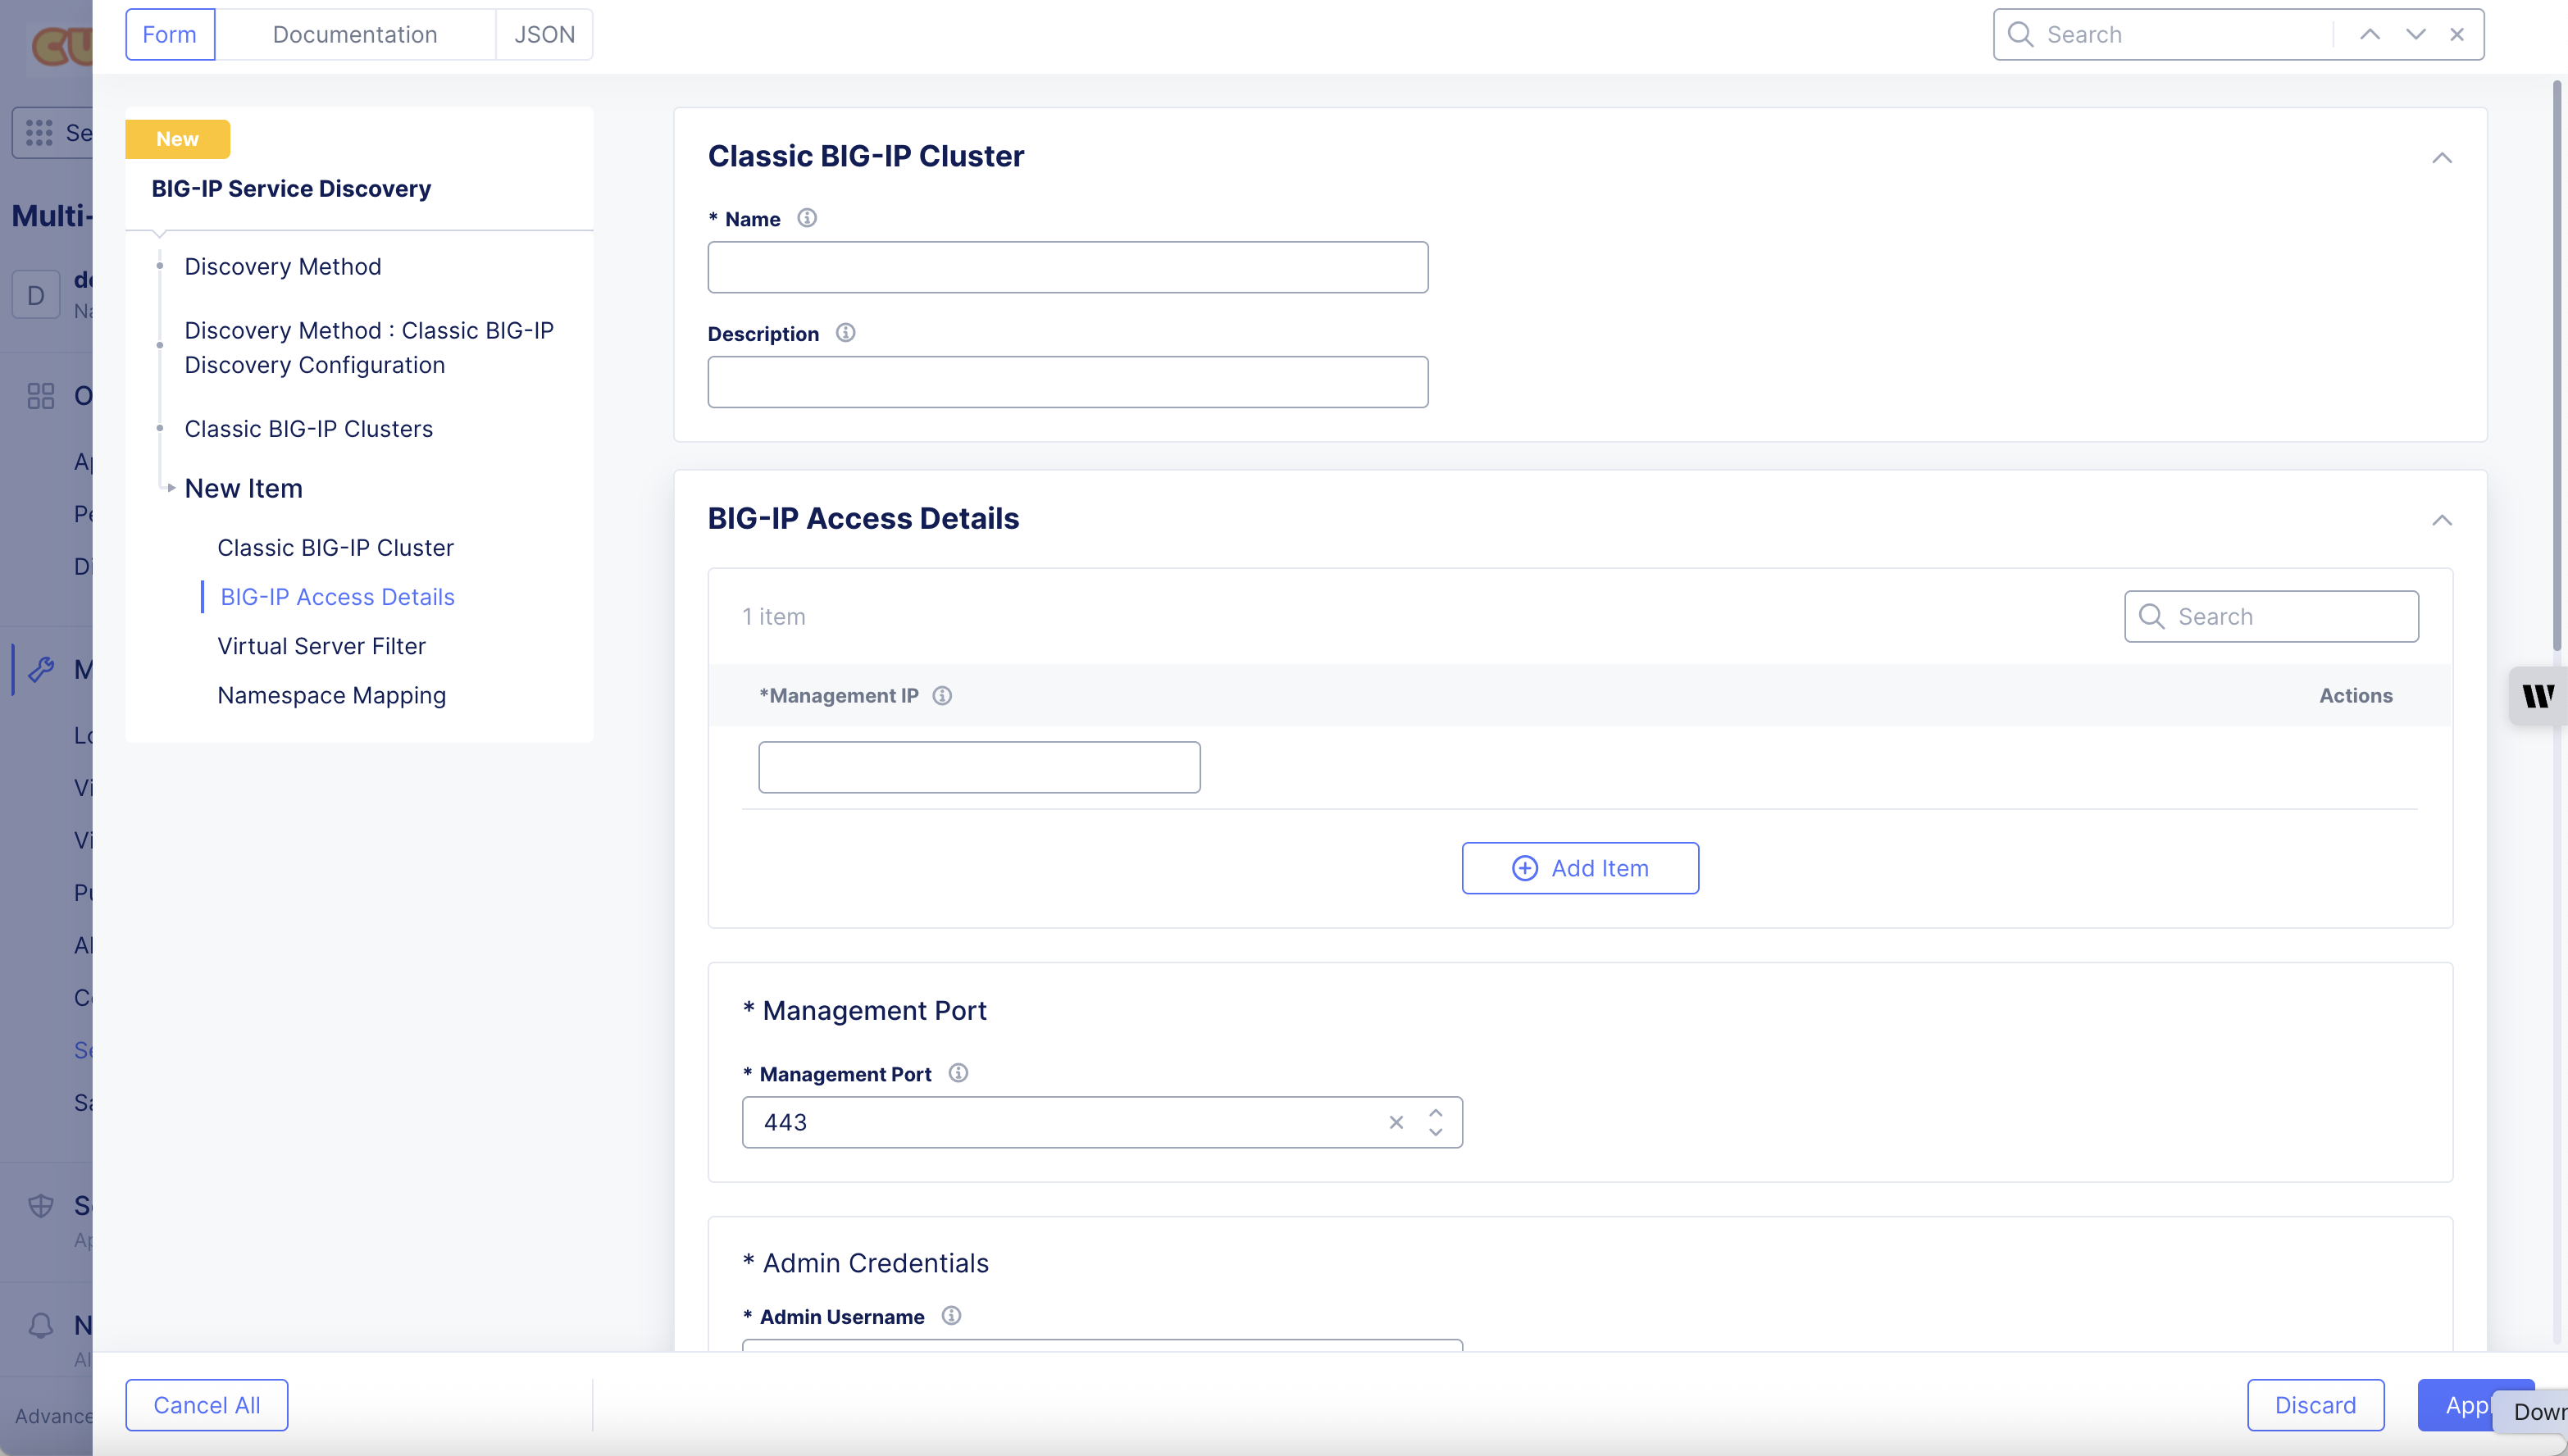
Figure: Add BIG-IP Access Details
Step 7: Optionally, configure virtual server filter.
The virtual server filter can be optionally used to select only the required BIG-IP virtual servers that need to be onboarded to Distributed Cloud App Connect and exclude others.
Virtual servers that are disabled on BIG-IP are not discovered by default.
-
Check the
Discover Disabled Virtual Serverscheckbox to allow discovering these servers if required. -
In
Regex To Match Virtual Server Namebox, provide a regex string to match the required virtual server names. For example, if non-production virtual servers are named with the prefix “dev-”, you can enter “^dev-*” as the regex. -
In
Regex To Match Virtual Server Descriptionbox, provide a regex string to match the required virtual server description.
Note: You can add labels in the virtual server description on BIG-IP and use this to discover these virtual servers.
- In
Port Rangesbox, enter comma-separated ports/port ranges to match the required virtual server (for example: 80,8080,5000-5050).

Figure: Configure Virtual Server Filter
Note:
If any field is left blank, it is treated as
select any.The virtual server will be discovered if it matches any of the configured criteria (logical OR between the configured criteria).
Step 8: Configure namespace mapping.
-
Under the
Namespace Mapping Choicedrop-down menu, select one of the following:-
Automatic: if you want to discover virtual servers from all BIG-IP partitions. -
Custom: if you want to select the BIG-IP partitions to discover from.- Click
Add Itembutton to add regex to match the partition name.
- Click
-
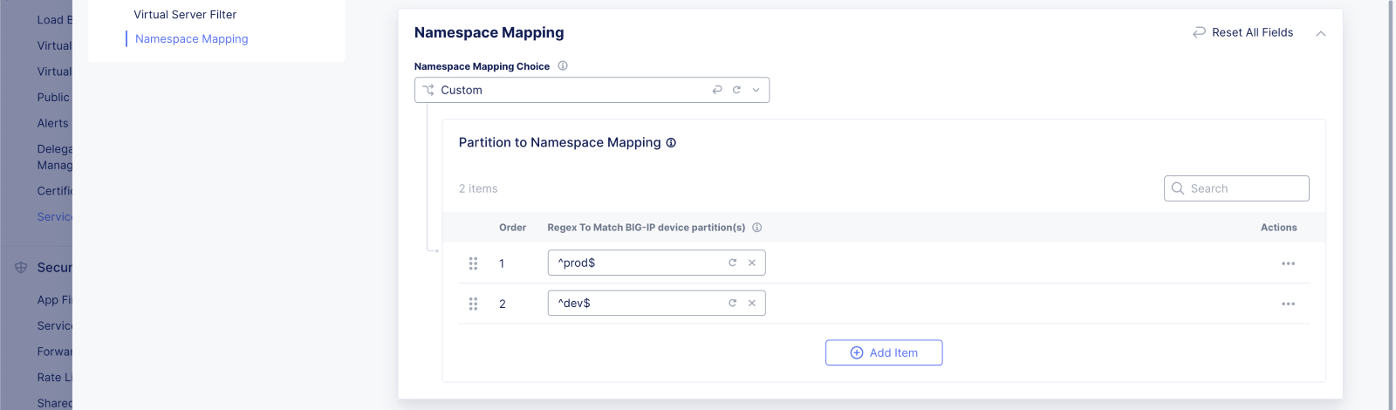
Figure: Namespace Mapping
Note: If you are configuring the Service Discovery object in the
Shared Configurationsworkspace, you must also select theApp Connect Namespaceto which the discovered virtual servers will be deposited.
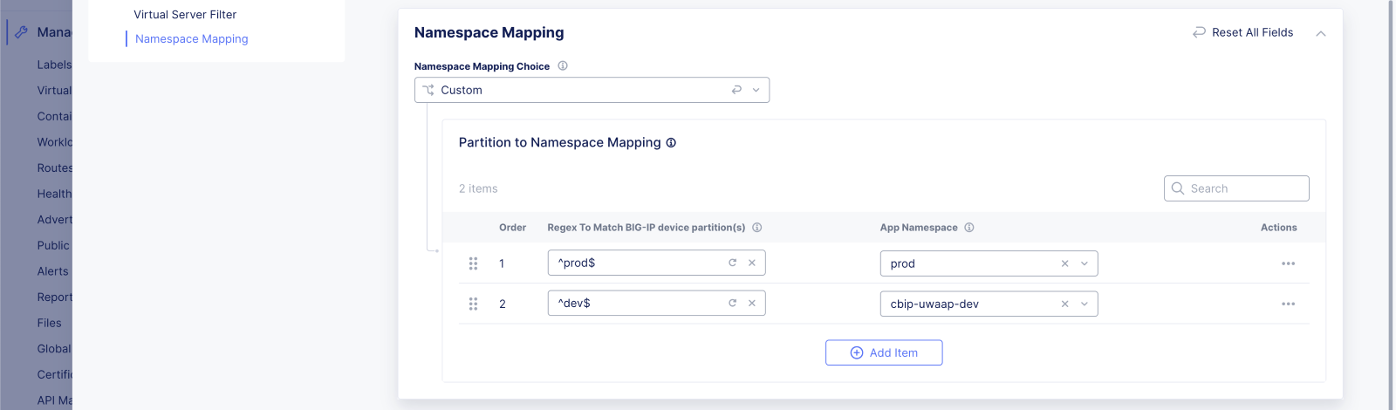
Figure: Namespace Mapping Virtual Server
Step 9: Save the instance configuration.
-
Click
Applyto save the BIG-IP instance. -
Go back to Step 6 to add more BIG-IP instances to the cluster.
Step 10: Save the cluster configuration.
-
Click
Applyto save the BIG-IP cluster. -
Go back to Step 5 to add more BIG-IP clusters to discover from.
Step 11: Save the service discovery configuration.
Select Add BIG-IP Service Discovery button to save the configuration.
Note: Editing the cBIP management IP in an existing Service Discovery object is not supported as it may cause an incomplete cleanup of related configurations. If you need to update the members of the management IP or HA cluster, you must create a new Service Discovery object with the updated information, validate it, and then delete the old one after successful validation.
Monitor BIG-IP Service Discovery Connection Status
After creating a BIG-IP Service Discovery object, you can monitor its Connection Status before proceeding to Discover Services. The Connection Status displays the real-time connectivity and operational state between the Customer Edge (CE), F5 Distributed Cloud, and BIG-IP (including HA clusters).
The Connection Status only applies to the BIG-IP Service Discovery and indicates whether the system is able to successfully connect to BIG-IP devices, identify the active node, and fetch configuration data.
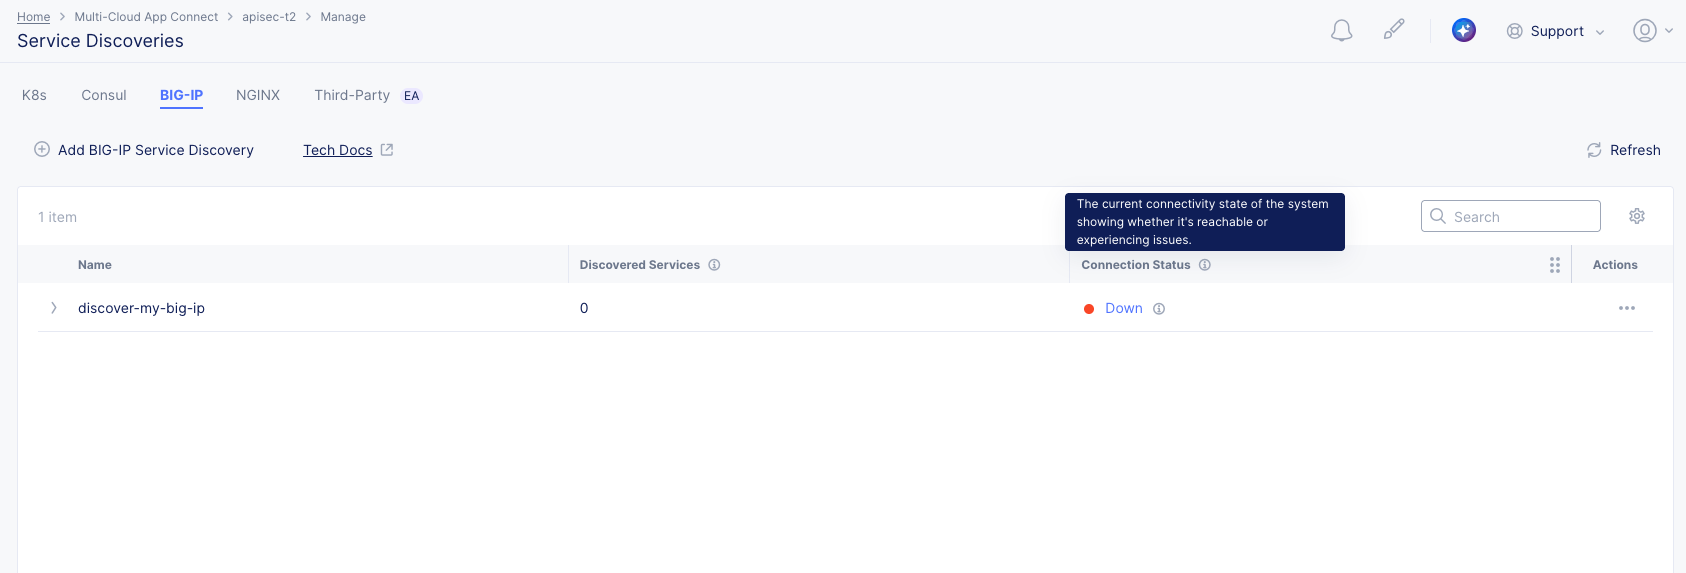
Figure: BIG-IP Service Connection Details
The Connection Status column displays one of the following states:
-
Up (Green): All BIG-IP clusters are accessible, and the configuration is successfully fetched from the active nodes.
-
Retrying (Yellow): The system is either applying or retrying the configuration. For example, during the initial setup, configuration updates, or failover handling.
-
Down (Red): The configuration cannot be fetched due to connectivity, authentication, RPM installation, or active node availability issues.
Click on the Connection Status to open a detailed view that displays the following information:
- Overall Service Discovery status
- Per-cluster status
- Per-instance (active/standby) status
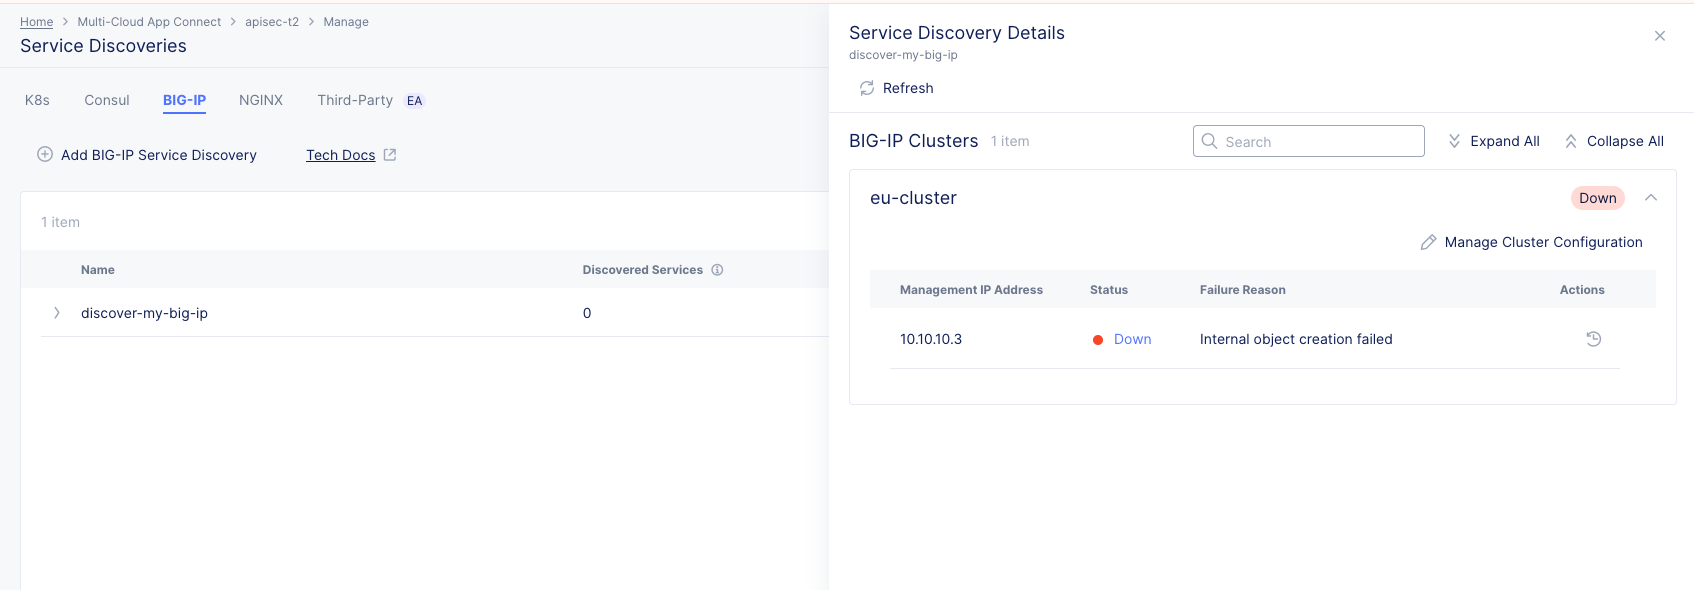
Figure: BIG-IP Service Discovery Details
This hierarchical view helps identify where the Service Discovery process is blocked before moving to Discover Services. The discovered applications only appear in the Discover Services view after the Connection Status moves to Up.
Verify the Discovered Applications
Once the service discovery configuration is saved, the number of discovered BIG-IP virtual servers is shown in the Services column next to each discovery object.
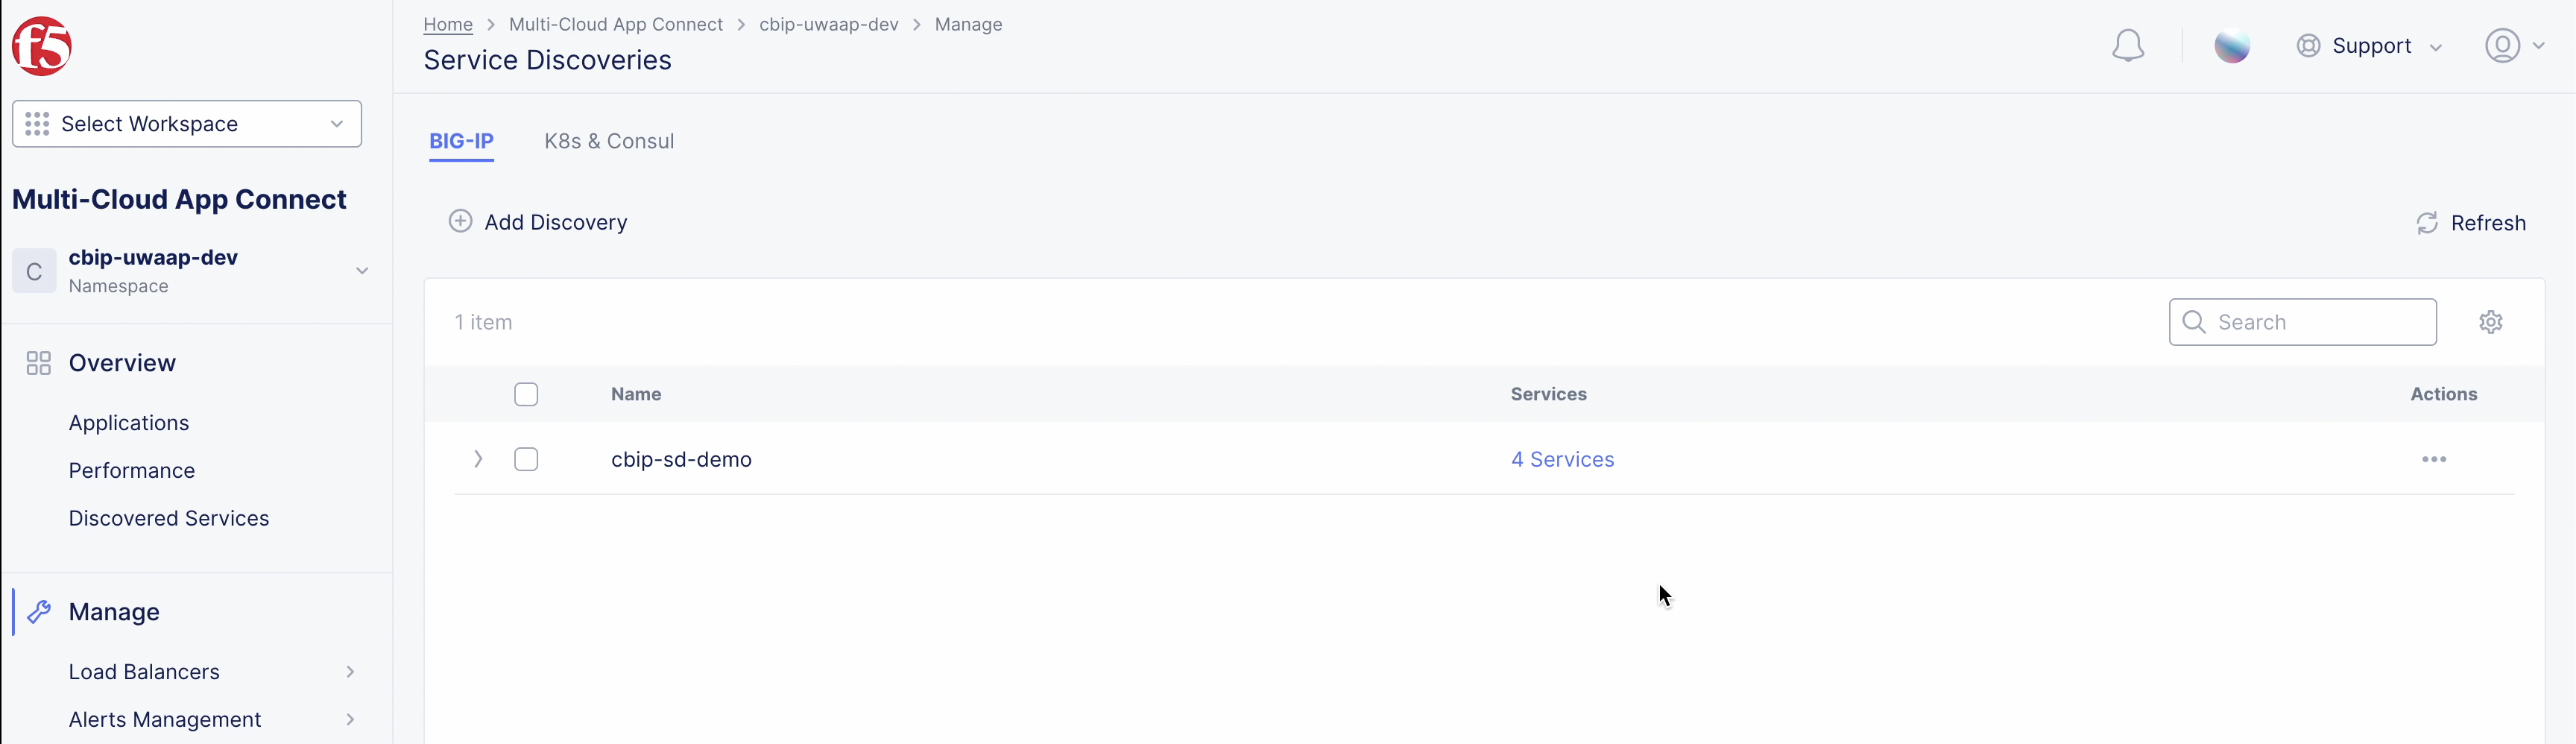
Figure: SD Object Configured
Note: This is not shown when the service discovery is configured in the
Shared Configurationworkspace. To view this, navigate toMulti Cloud App Connect>Manage>Service Discoverieson one of the namespaces to which the partitions are mapped.
You can click on the number to navigate to the Multi Cloud App Connect > Discovered Services dashboard to view the list of discovered applications for that Service Discovery object.
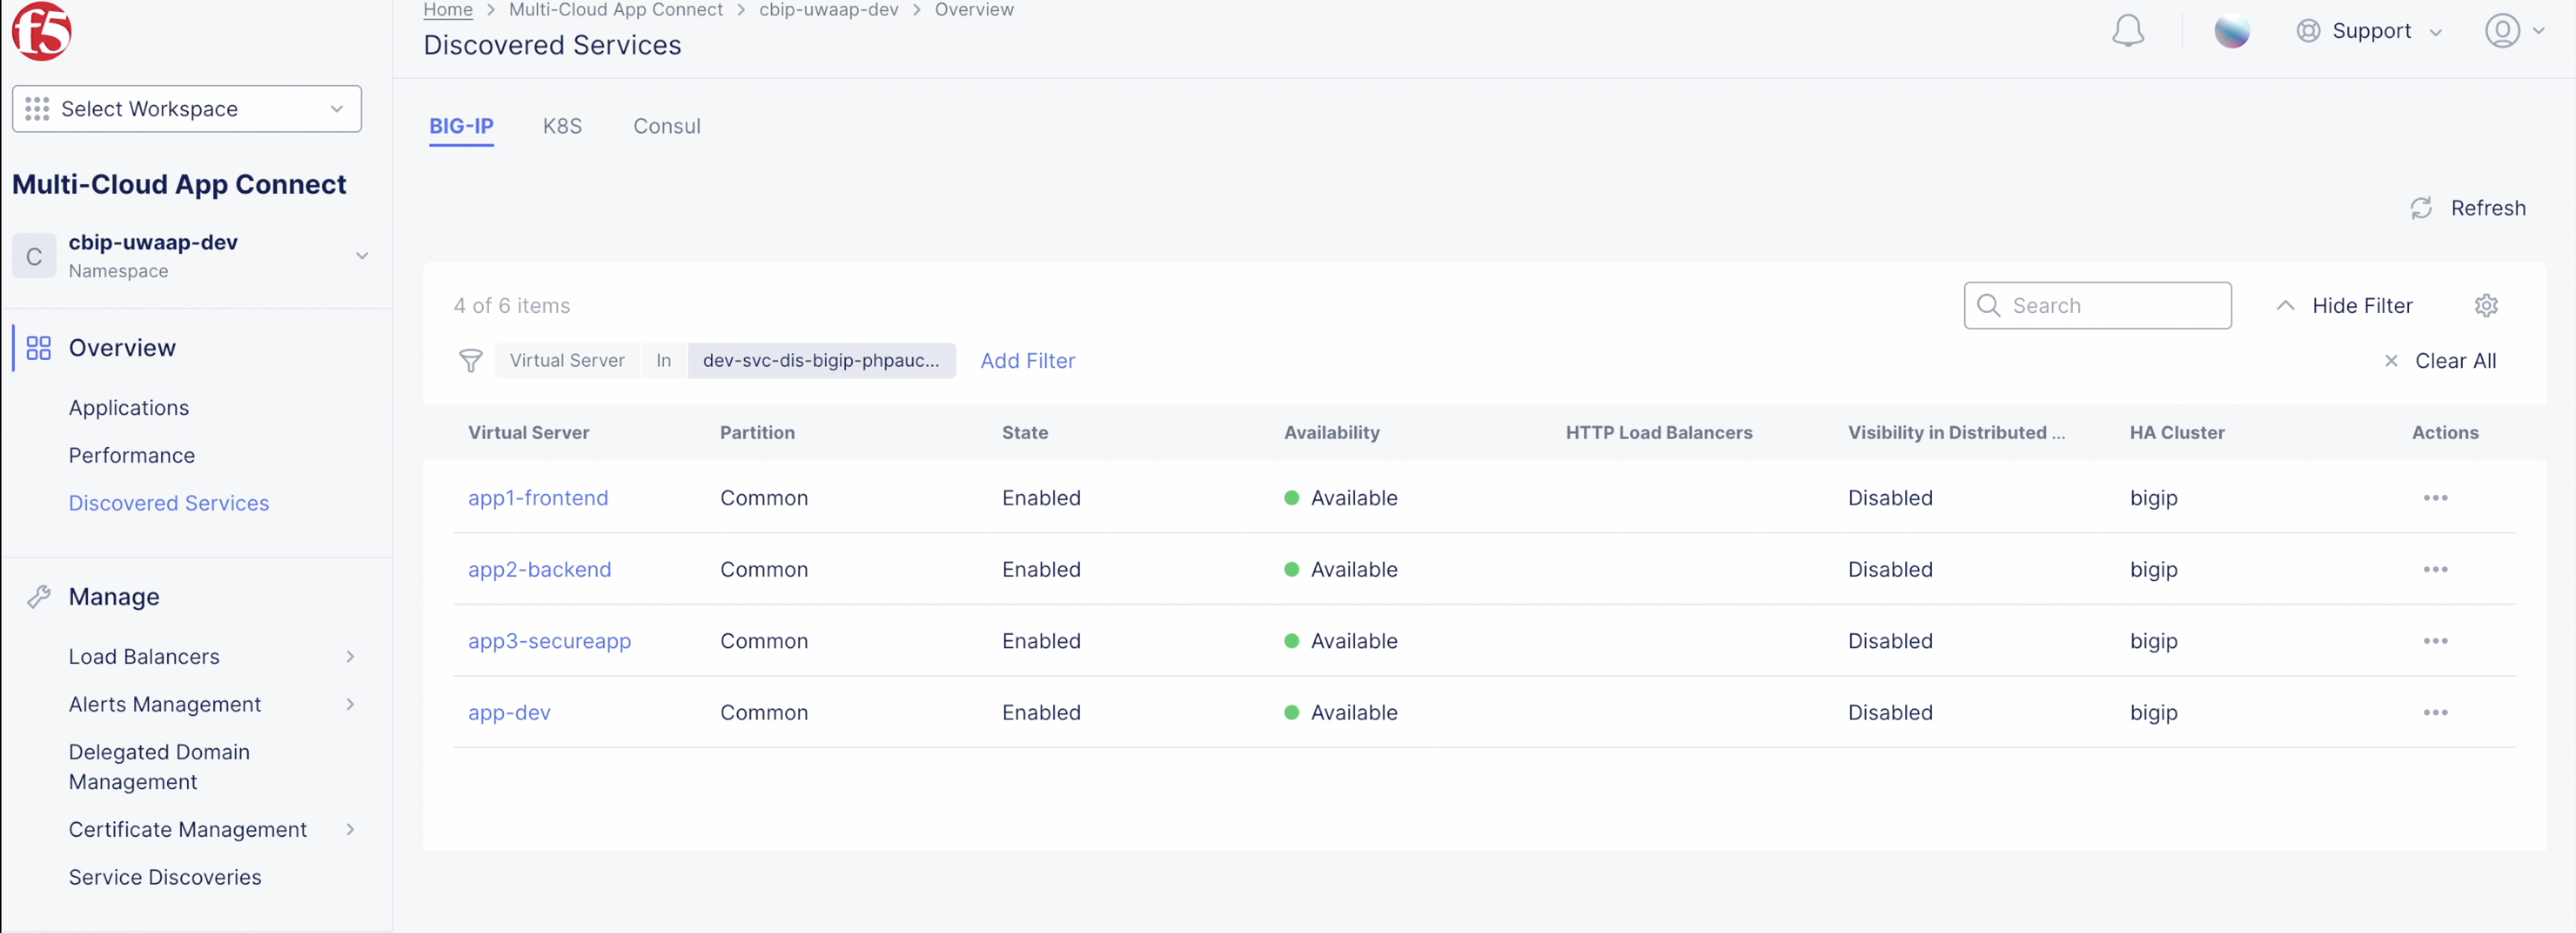
Figure: Discovered Services
Advertise the Discovered Applications
The Console provides a quick wizard to easily advertise the discovered application to the Internet or other sites using the F5 Distributed Cloud Multi-Cloud App Connect workspace by creating an HTTP load balancer.
The below example shows the steps to advertise the discovered HTTP application to the Internet:
-
Navigate to
Multi Cloud App Connect>Discovered Services. -
Click on
...(ellipsis) icon in theActionscolumn of the discovered service you want to advertise. -
Select
Add HTTP Load Balancer.
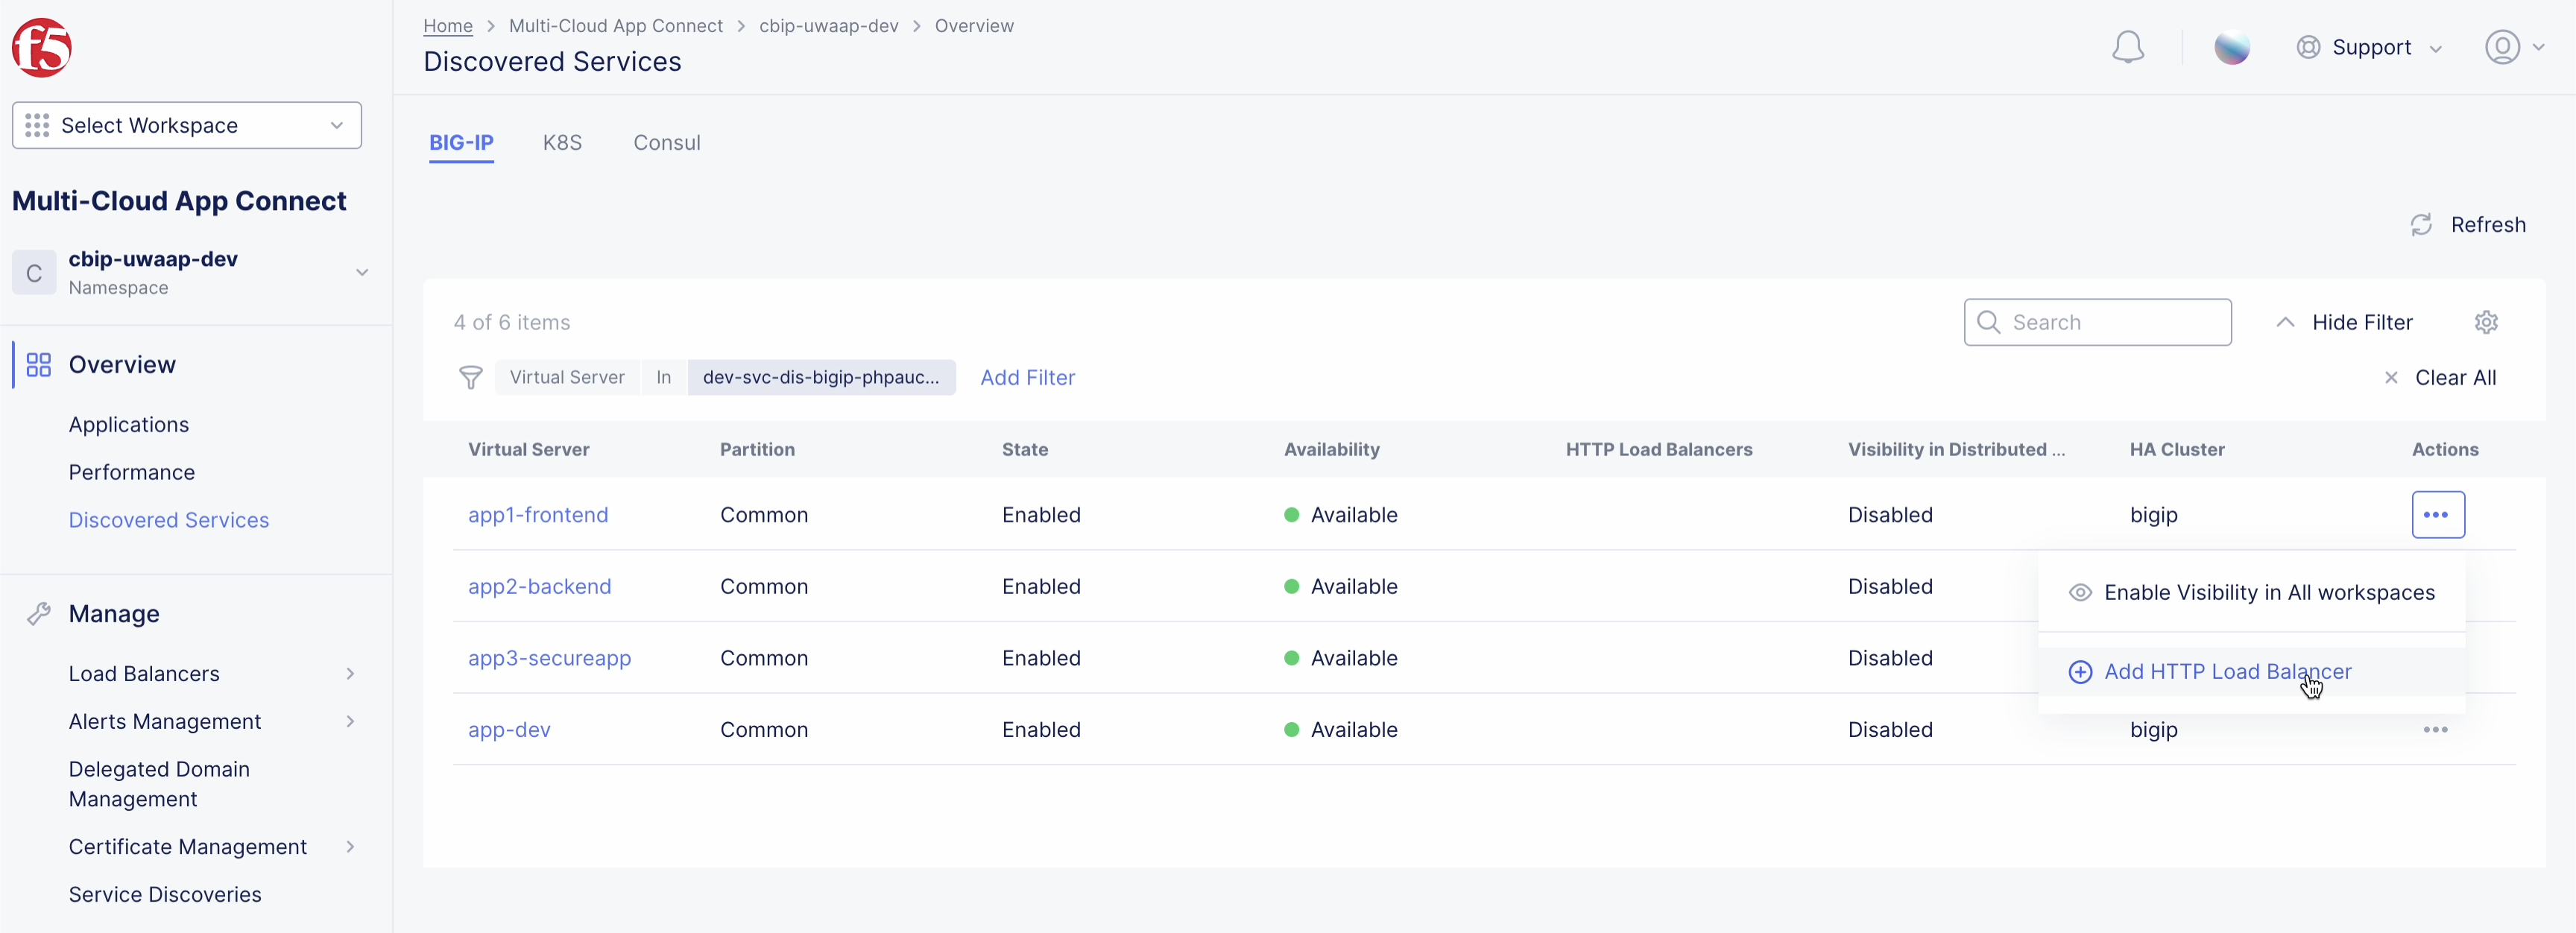
Figure: Add HTTP LB
-
Enter a name for the load balancer.
-
Enter a domain name.
-
In the
Load balancer Typedrop-down menu, selectHTTPS with Automatic Certificate. -
In the
Root CA Certificate of Origin Serverdrop-down menu, selectSkip Verification. -
Click
Save and Exit.
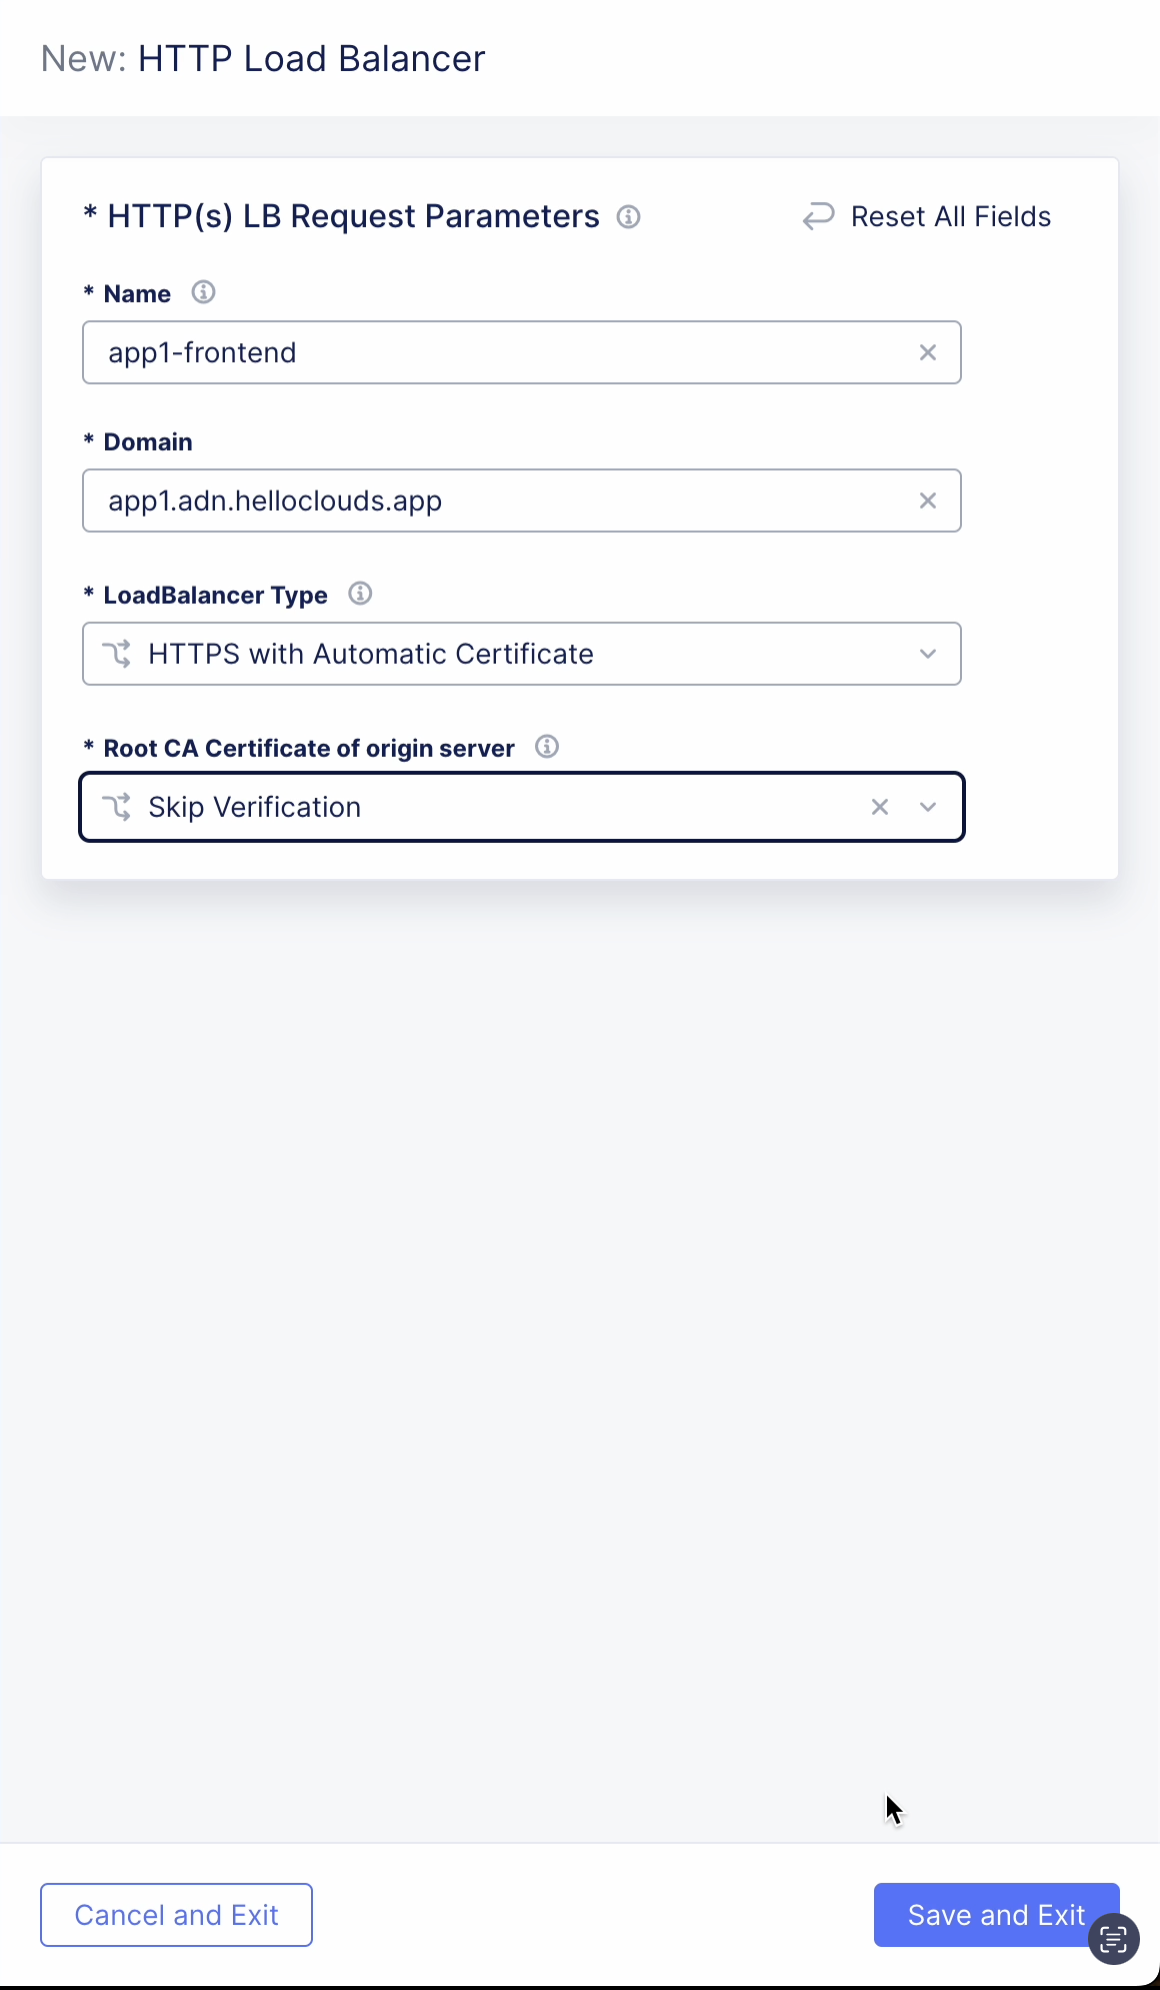
Figure: Advertise the Discovered Applications
Note: This gives a quick way to advertise the discovered objects. The Load balancer and Origin pool objects for the service are automatically created and can be managed directly by navigating to
Multi Cloud App Connect>Manage>Load Balancers>HTTP Load Balancers.
Enable Visibility in All Workspaces
The “Enable Visibility in All Workspace” action promotes the discovered app as a BIG-IP Virtual Server object in all Distributed cloud workspaces. This object provides a security dashboard similar to existing Distributed Cloud load balancer dashboards to enhance visibility into the security of the discovered app. In the current release, it supports enabling API visibility in the Web App & API Protection workspace.
Note: This option can be used for the use case where the client directly connects to the app on BIG-IP (CE is not inline on the data path) and the access logs for the visibility-enabled virtual server are streamed to the Global Controller via the CE.
Follow the below steps to enable visibility for a discovered app:
-
Navigate to
Multi Cloud App Connect>Discovered Services. -
Click
...(ellipsis) icon in theActionscolumn of the discovered service and then clickEnable Visibility in All Workspace.
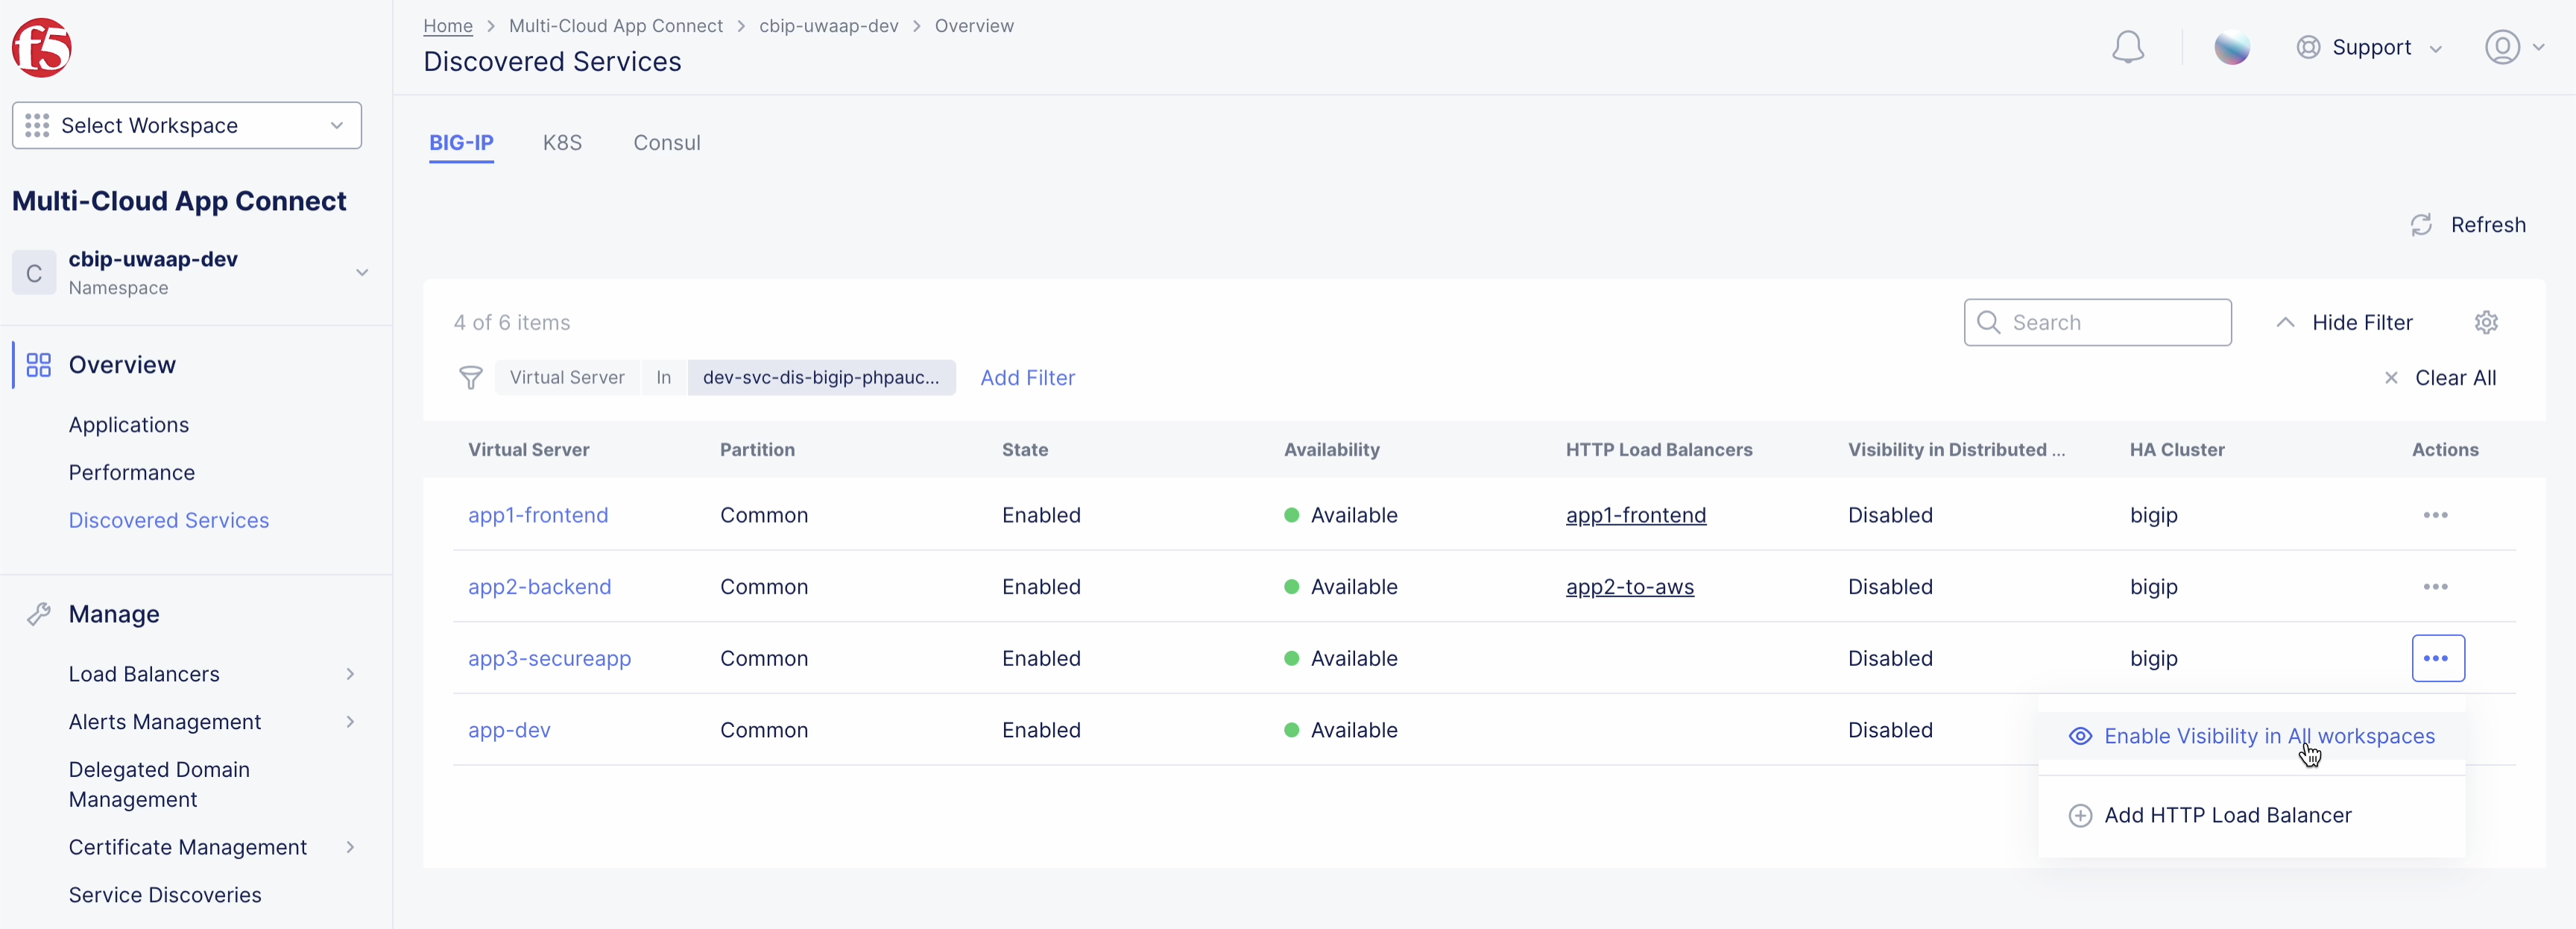
Figure: Enable Visibility
- Click
Enable Visibilityin the popup to confirm your action. A popup at the bottom of the screen shows if the action was successfully performed and the status in theVisibility in Distributed Cloudcolumn changes toManage in WAAP. You can click this status to redirect to theWeb App & API Protectionworkspace and enable API discovery for the corresponding BIG-IP virtual server.
Behavior in BIG-IP HA environments
In BIG-IP High Availability (HA) setups, the visibility configuration is applied to all the devices available in the HA cluster. Network-related configurations (such as VLANs) are not automatically synchronized across devices, and therefore require the following special considerations:
- All HA devices must be reachable while enabling or disabling visibility.
If any device is unreachable during this process, configuration changes are automatically rolled back to maintain consistency across the cluster. - While using manual sync mode, network configurations on the standby device may not be automatically removed after disabling visibility.
You must perform a manual sync from the active device to the standby device. If required, delete the remaining network configurations manually to maintain a clean state. This does not affect any future enable/disable visibility actions.
Therefore, it is recommended that you follow these steps before you enable or disable visibility:
- Ensure that all the BIG-IP HA devices are online and reachable.
- Ensure that the HA synchronization (either manual or auto-sync) is up to date.
- For manual sync setups, ensure that you perform a manual sync after disabling visibility.
Notes:
- In the auto-sync mode, cleanup and synchronization occur automatically.
- Any existing configurations that are detected by the system are reused during subsequent enable/disable actions.
- These behaviors are applicable while performing the Enable/Disable Visibility in All Workspaces actions from the Discovered Services screen.
Concepts
API References
On this page:
- Objective
- Prerequisites
- Infrastructure Requirements
- Configuration Sequence
- Configuring Discovery for Shared vs Dedicated BIG-IP Resources
- Configure Service Discovery for Classic BIG-IP
- Monitor BIG-IP Service Discovery Connection Status
- Verify the Discovered Applications
- Advertise the Discovered Applications
- Enable Visibility in All Workspaces
- Behavior in BIG-IP HA environments
- Concepts
- API References