
Configure Rate Limiting
Overview
This guide provides instructions on how to configure rate limiting per user based on the user identification in the F5® Distributed Cloud Console. This limits the number of API requests from a user per a time period set by your configuration. The rate limiting per user is applied on your Distributed Cloud load balancer.
Prerequisites
The following prerequisites apply:
-
An F5 Distributed Cloud Account. If you do not have an account, see Getting Started with Console.
-
F5 Distributed Cloud Services load balancer providing for your application. See the Create HTTP Load Balancer guide for instructions.
Configuration
Enabling rate limiting for your load balancer requires you to create rate limiting with optional user identification rules and applying to the load balancer. The following image illustrates the sequence of enabling rate user identification:
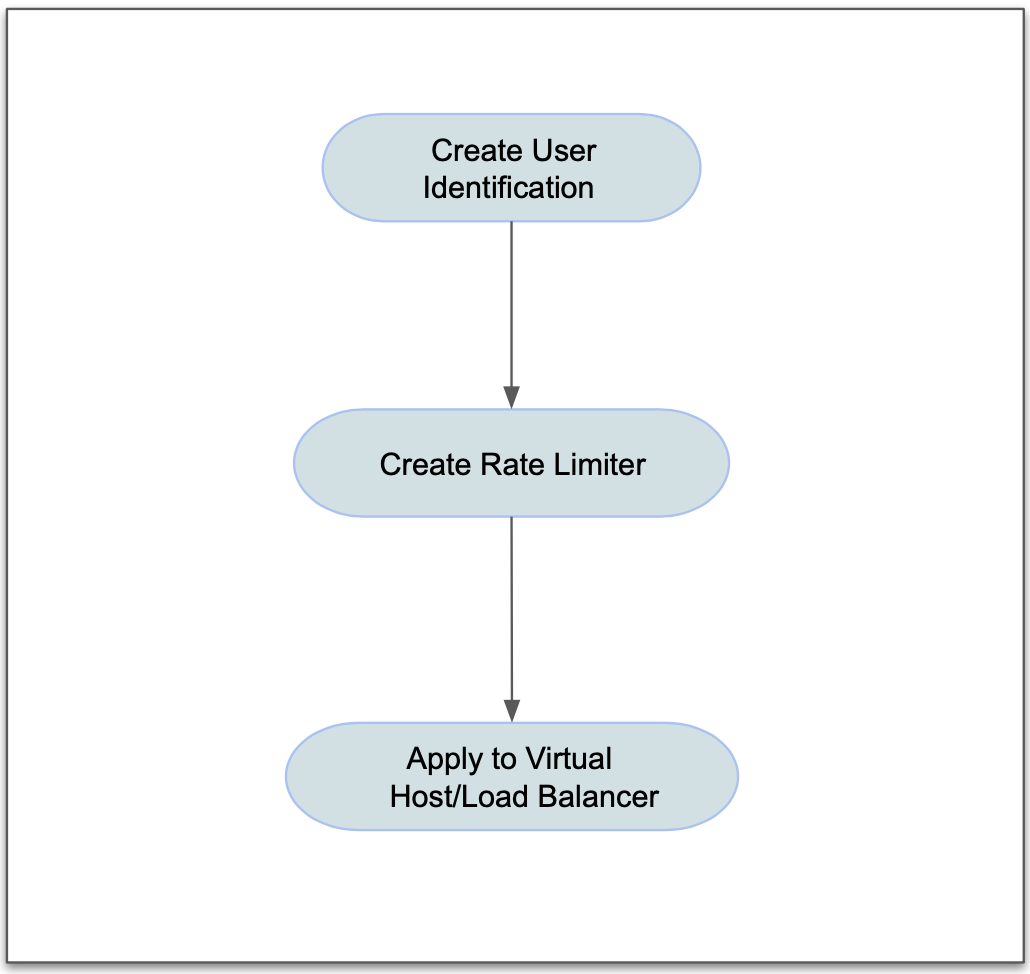
Figure: Sequence Diagram
Configuration sequence
You can enable rate limiting based on user identification in the following two ways:
- Using the HTTP load balancer wizard.
- Using the individual wizards for the user identification, rate limiter, and load balancer.
Enabling rate limiting based on user identification requires you to perform the following sequence of actions:
| Phase | Description |
|---|---|
| Create User Identification | Create user identification with rules defining what are evaluated for identification. |
| Create Rate Limiter | Create rate limiter and optionally apply user identifier. |
| Apply Rate Limiter to load balancer | Create a fast ACL set |
Note: When using the HTTP load balancer wizard, creation of user identification and rate limiter are part of the wizard itself.
Enable rate limit
Step 1: Navigate to the HTTP load balancers page.
Note the following information:
-
The rate limit is always evaluated before any configured network security policy sets.
-
Evaluation of the configured network policy set is done only if the request is under limit set by the rate limit.
-
A service policy rule is automatically created for each HTTP load balancer that has rate limiting enabled and a rate limiter object is also automatically created.
-
An IP prefix set is automatically created if the rate limiting configuration has an allowed IP list.
-
Policy rule uses load balancer and IP matcher as match predicates.
-
The rate limiter is applied as an action in the service policy rule.
-
On the homepage, select the Multi-Cloud App Connect workspace.
-
Select the namespace from the Namespace drop-down menu.
-
Navigate to Manage > Load Balancers > HTTP Load Balancers.
Step 2: Select a user identifier for rate limiting.
-
For your load balancer, select ... > Manage Configuration and then select Edit Configuration in the upper-right corner to open to the configuration form.
-
Scroll down to the Common Security Controls section.
-
From the User Identifier menu, select User Identification Policy.
-
From the User Identification Policy menu, select an existing user policy or select Add Item to create a new one.
Step 2.1: Create new user identification rule.
This example shows creating a new user identification rule.
-
Enter a name for the user identification rule in the Metadata section.
-
In the User Identification Rules section, select Configure to build a list of user identification rules.
-
Select Add Item to create a rule.
-
From the Identifier Type menu, select an identifier type and enter a value for that identifier in the field enabled as appropriate for your identifier type selection. For example, select Cookie Name as the identifier type and set Userid as the identifier.
-
Select Apply to add the new rule to your rules list.
-
Optionally, select Add Item to add more rules to your list.
-
Select Apply to complete your list.
-
Select Add User Identification to save your rule list into your load balancer configuration.
Step 3: Enable rate limiting and set the limiter values.
-
From the Rate Limiting menu, select Custom Rate Limiting Parameters. Alternatively, you can select API Rate Limit to configure rules for specific API endpoints.
-
Select View Configuration.
-
Enter the maximum number of requests per unit in the Number Of Requests field.
-
Enter a unit of time in the Per Period field. Supported units are Seconds, Minutes, and Hours.
-
Enter the number of periods to apply the rate. For example: If you enter [1, Seconds, 60] or [1, Minutes, 1] for [Number of Requests, Per Period, Periods], both would be the same as 1 request per minute.
-
Optionally, enter a value for the Burst Multiplier field, which indicates how many times a user can hit the requests/unit limit.
Step 4: Optionally, create a mitigation rule.
-
From the Mitigation Action drop-down menu, select Block if you want a user to be blocked for all requests for some time after exceeding the rate limit.
-
From the Duration menu, select a duration unit.
-
Enter a duration value. The maximum blocking time is 48 hours.
Step 5: Optionally, specify IP addresses for exempting from rate limiting.
By default, rate limiting applies to all client endpoint IP addresses. Performing this step enables the system to exempt rate limiting for client requests from specified IP addresses.
-
From the IP(s) Allowed without Rate Limiting menu, select from the options available:
-
No IP Allowed: Default option.
-
IP Allowed List: This option allows you to list prefixes to exempt.
-
IP Allowed List using IP Prefix Set(s): This option uses existing prefix sets. If no IP prefix sets are available, select Add Item in the drop-down menu to create a new prefix set.
-
Step 6: Specify rate limiter policies.
By default, there are no rate limiting policies. You have the option to create an ordered list of policies. If an IP allowed list was specified in the previous step, it is effectively the first ordered policy.
-
From the Rate Limiter Policies menu, select Rate Limiter Policies.
-
Select an existing policy or select Add Item from that list.
Step 6.1: Add a new policy.
-
Enter the policy name.
-
Select Configure in the Rules section to view the rule list.
-
Select Add Item to add a rule.
-
Enter a name for the rule.
-
From the Action menu, specify an action for this new rule:
- Bypass Rate Limiter: This option bypasses the rate limiter for the load balancer.
- Apply Rate Limiter: This option applies the rate limiter for the load balancer.
- Apply Custom Rate Limiter: This option applies a custom rate limiter to the load balancer, which you select from the drop-down menu.
-
In the Clients section, toggle the Show Advanced Fields option.
-
Optionally, use the Source IP Match, Source ASN Match, Country Match, and Source Segments menus to configure additional parameters for client requests.
-
Configure one or more Request Match parameters:
- HTTP Method: Matches against the HTTP method(s) you specify (for example, GET, PUT, and HEAD).
- Domain Matcher: Matches against the domain(s) you specify, either by exact match or by regex.
- HTTP Path: Matches against the path portion of the request, either by prefix value, exact value, or regex value.
- HTTP Headers: Matches against a list of header names that are either present, not present, or contain specified values.
-
Select Apply to save the rate limiter rule specification.
-
Select Apply to save the rate limiter rule.
-
Select Add Rate limiter policy to save the rate limiter rules list.
-
Select Apply to save the rate limiter policy.
Step 7: Complete enabling the rate limiting for the load balancer.
Select Save HTTP Load Balancer.
Enable rate limit using constituent component wizards
The constituent components of rate limiting functionality are user identification, rate limiter, and load balancer.
Create user identification
A user identification specifies the list of rules defining the identifier types and their values. The system determines the user identity based on these rules and uses the rate limiter to limit the requests accordingly.
Configuring the user identifier is optional as the system treats the client IP address as the default user identifier.
Step 1: Navigate to user identity creation.
-
Select the Multi-Cloud App Connect workspace.
-
Select the namespace from the Namespace drop-down menu.
-
Navigate to Security > Shared Objects > User Identifications.
Step 2: Configure identification rules.
-
Select Add User Identification.
-
Enter a name for this user identification.
-
In the User Identification Rules section, select Configure to create a rule list.
-
Select Add Item to create the first rule in the list.
-
From the Identifier Type menu, select a type of identifier to use in the rule.
-
Select Apply to save the rule to the rule list.
-
Use Add Item to add more rules, if necessary.
-
When finished adding rules, select Apply to save the rule list.
Step 3: Complete creating user identification
Select Add User Identification to create the user identification object.
Create rate limiter
A rate limiter specifies the limit for an API request per second or minute and, optionally, specifies the user identification rules to determine to which API request the limit is applied.
Step 1: Navigate to rate limiters section.
-
Select the Shared Configuration workspace.
-
Select the namespace from the Namespace drop-down menu.
-
Navigate to Security > Shared Objects > Rate Limiters.
-
Select Add Rate Limiter.
Step 2: Set rate limit configuration.
-
Enter a name.
-
Select View Configuration in the Rate Limit Values section.
-
Enter the maximum number of requests per unit in the Number Of Requests field. The maximum allowed number is 8192.
-
Enter a unit of time in the Per Period field. Supported units are Seconds, Minutes, and Hours.
-
Enter the number of Periods to apply the rate. For example: If you enter [1, Seconds, 60] or [1, Minutes, 1] for [Number of Requests, Per Period, Periods], both would be the same as 1 request per minute.
-
Enter a multiplier value in the Burst Multiplier field. The burst multiplier is the maximum burst of requests allowed and is expressed as a multiple of the rate.
-
Optionally, select Block from the Mitigation Action drop-down menu if you want a user to be blocked for all requests for some time after exceeding the rate limit:
- Select a duration unit.
- Enter a duration value.
-
Select Apply to save the rate limit values.
-
From the User Identification Policy menu, select the policy to use with this new rate limiter.
Step 3: Complete rate limiter creation.
Select Add Rate limiter to create the rate limiter object.
Add rate limiter to load balancer
Perform the following steps to apply a rate limiter to a load balancer:
Step 1: Navigate to load balancer configuration.
-
Select the Multi-Cloud App Connect workspace.
-
Select the namespace from the Namespace drop-down menu.
-
Navigate to Manage > Load Balancers > HTTP Load Balancers.
-
For your load balancer, select ... > Manage Configuration and then select Edit Configuration in the upper-right corner.
Step 2: Apply rate limiters to the load balancer.
-
Scroll down to the Common Security Controls section.
-
From the Rate Limiting menu, select Custom Rate Limiting Parameters. Alternatively, you can select API Rate Limit to configure rules for specific API endpoints.
-
In the Custom Rate Limiting Parameters section, select View Configuration.
-
Enter the maximum number of requests per unit in the Number Of Requests field.
-
From the Per Period menu, select a unit.
-
Optionally, enter a value for the Burst Multiplier field, which indicates how many times a user can hit the requests/unit limit.
-
Optionally, allow some IP addresses to bypass rate limits:
-
From the IP(s) Allowed without Rate Limiting menu, select IP Allowed List.
-
Enter a prefix that will not be rate limited. Use Add Item to add more IP prefixes.
-
-
Select Apply.
Step 3: Complete enabling the rate limiter.
Select Save HTTP Load Balancer.
References
For more information, see: