Configure DNS Services
Objective
This guide provides instructions on how to set up primary and secondary Domain Name System (DNS) zones in various configurations for specific purposes using F5® Distributed Cloud Services. A DNS zone is a distinct division or subdivision of domain namespace that is managed by an entity such as an organization. A DNS zone allows you to exercise granular control on the components such as name servers which hold the DNS records for the domain namespace represented by the zone.
DNS can be configured in a various was to satisfy different needs or solve different problems. Below are a list of quick-start sections that are commonly used.
-
Primary DNS This configuration maximizes app performance and improves response times by leveraging F5's geo-distributed anycast network to resolve DNS queries to the closest healthy resource. It also provides a level of built-in DDoS protection.
-
Dual-Primary DNS Builds in diversity to your environment by standing up two primary DNS services. Teams manage DNS set up in-house, send configurations to the two primary DNS services via API calls, and can leverage either DNS service if one fails.
-
Secondary DNS Positions the Distributed Cloud DNS service as a secondary DNS service to an existing primary DNS service. This reduces the load on the primary DNS service, provides redundancy in the event of an outage, improves response times, and helps mitigate DDoS attacks.
-
Secondary DNS (with hidden primary) Positions the Distributed Cloud DNS service as a secondary DNS, but keeps the primary DNS hidden from the internet. This provides enhanced performance via F5's geo-distributed cloud network, enhanced failover, and DDoS protection.
Prerequisites
The following prerequisites apply:
-
A Distributed Cloud Services Account. If you do not have an account, see Getting Started with Console.
-
A DNS domain for your web application. Obtain a domain from the Internet domain registrar.
-
Name servers for managing your DNS records.
-
To ensure that zone transfers are successful, add the following IP addresses to your firewall or ACL
allowlist:52.14.213.2083.140.118.214
Configuration
Creating and managing zones involve creating a primary DNS zone and a secondary zone, configuring settings such as records, encryption mechanism, etc.
Create Primary DNS
This procedure will show you how to replace your current DNS server(s) with Distributed Cloud DNS servers. Log into Console and perform the following:
Step 1: Navigate to DNS management and create a primary zone.
- Click
DNS Managementservice on the Console home page.

Figure: Navigate to DNS Management
-
Click
Manage>DNS Zone Managementin the primary navigation menu located on the left side of the page. -
Click
Add Zone.
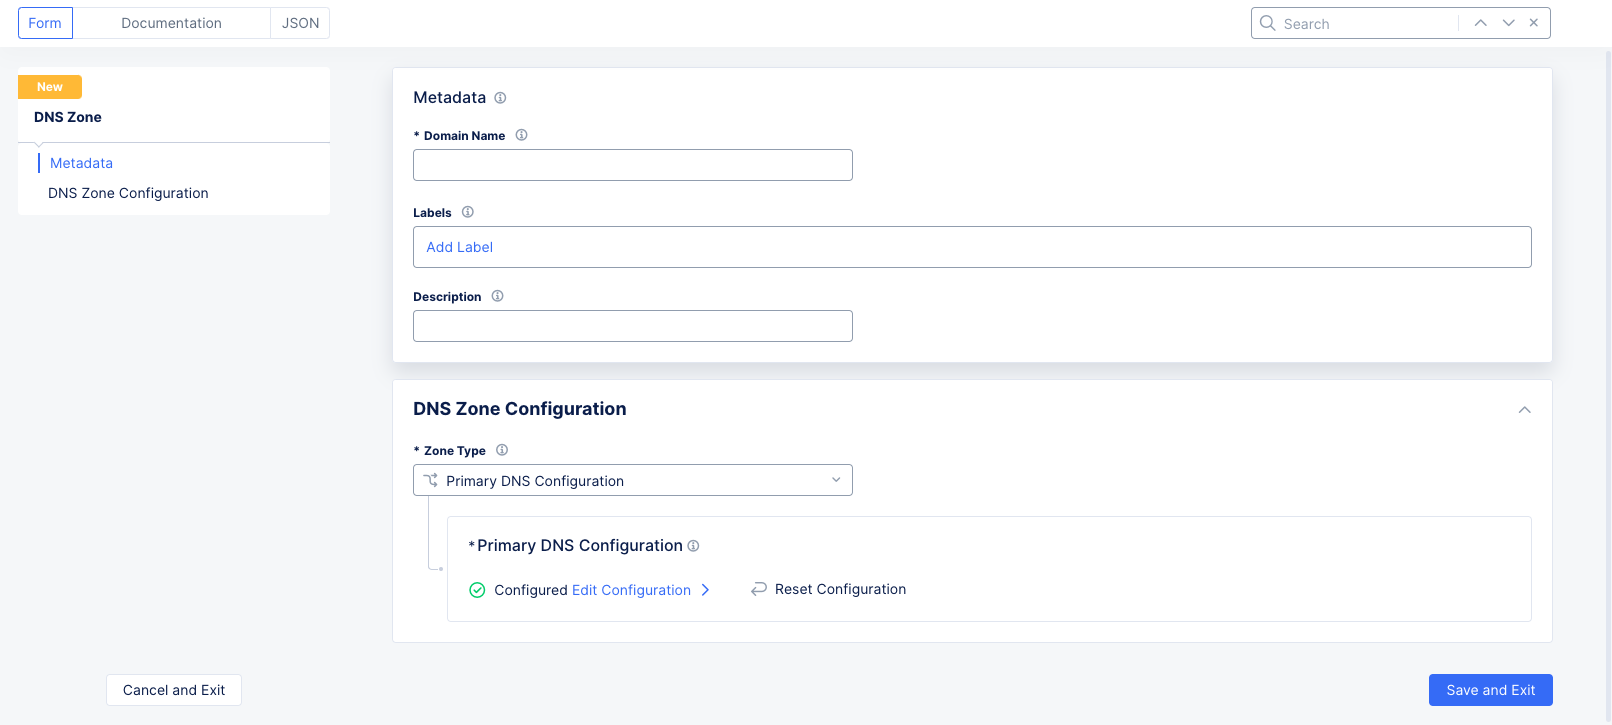
Figure: Add Zone
-
Enter domain or subdomain name in the
Domain Namefield in the metadata section. -
Optionally, set labels and add a description for your zone.
-
Select
Primary DNS Configurationfrom theZone Typedrop-down menu in theDNS Zone Configurationsection. -
Click
Edit Configurationunder thePrimary DNS Configurationfield to display thePrimary DNS Configurationform.

Figure: DNS Primary Configuration
Step 2: Configure the SOA Parameters.
- Select
Use Default Parametersfrom theSOA Record Parametersdrop-down menu.- Optionally, you can customize these parameters by selecting the
SOA Record Parametersoption and clickingView Configuration. From there you can set the SOA parameters such as refresh interval, retry interval, TTL, etc.
- Optionally, you can customize these parameters by selecting the
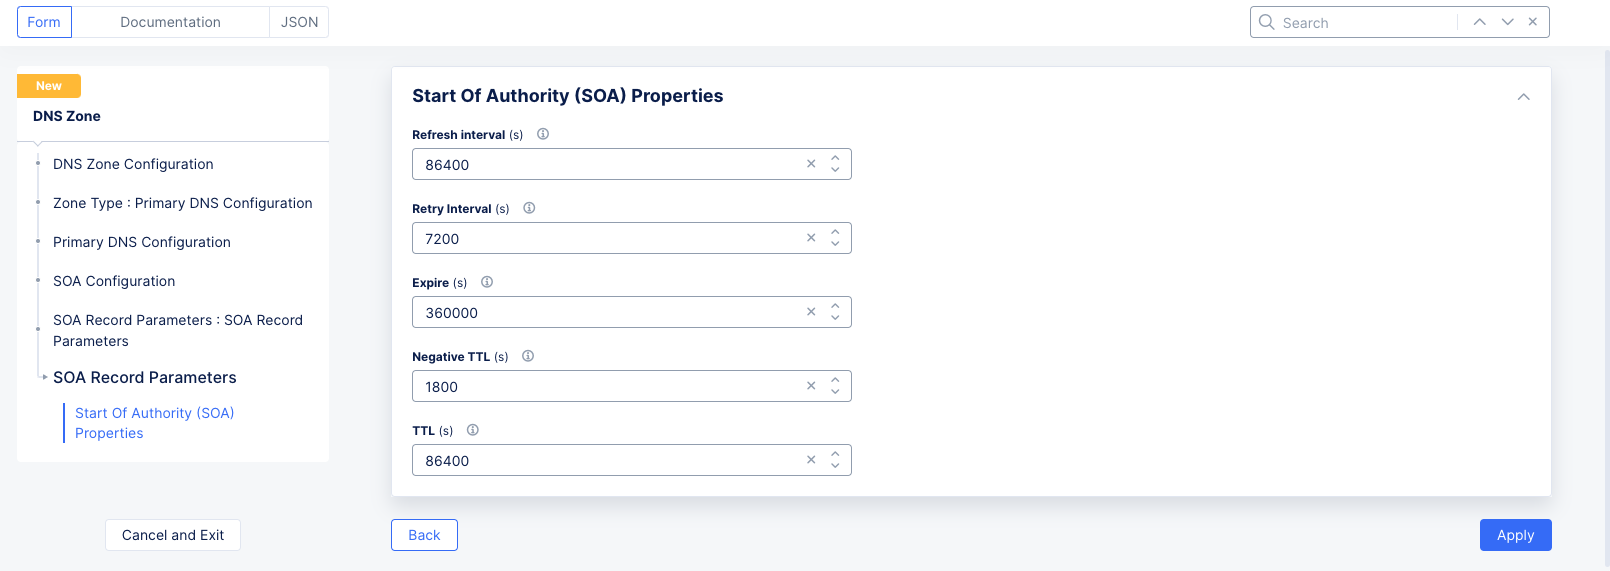
Figure: SOA Custom Configuration
Step 3: Configure resource record set for the default group.
In this step, you will build a list of resource records that will be stored in your zone file.
- For each resource record you want to create, click
Add Itemin theResource Record Setssection and configure the record in theResource Record Setconfiguration form.

Figure: Resource Record Configuration
-
Enter a value for the
Time to livefield. -
Select a record type from the
Record Setdrop-down menu. -
Enter a name for your record in the
Record Namefield. -
The rest of the form in dependent on the record type you selected. Use the following table for help with each record type.
| Record Type | Fields | Notes |
|---|---|---|
| A | List of IPv4 Addresses | Enter IPv4 addresses. |
| AAAA | List of IPv6 Addresses | Enter IPv6 addresses. |
| ALIAS | Domain | Enter alias domain name. |
| CAA | Tags and Value | Enter a tag and its value. |
| CNAME | Domain | Enter domain name. |
| MX | Domain and Priority | Enter domain and priority in the MX Record Value section. |
| NS | List of Name servers | Enter the FQDN for the name servers. |
| PTR | List of Name servers | Enter the FQDN for the name servers. |
| SRV | Priority, Weight, Port, Target | Click Add Item in the SRV Value section and set the parameters. |
| TXT | List of Text | Add the TXT record. |
| DNS Load Balancer | DNS Load Balancer Records | Add the DNS Load Balancer record. |
| NAPTR | Naming Authority Pointer | Enter regex based domain names used in URIs. |
| DS | Delegation signer | Enter the signer to identify DNSSEC signing key of a delegated zone. |
| CDS | Child DS | Enter Child copy of DS record, for transfer to parent. |
| EUI48 | MAC address (EUI-48) | Add uniquely identified MAC address as per the EUI-48 specification. |
| EUI64 | MAC address (EUI-64) | Add uniquely identified MAC address as per the EUI-48 specification. |
| AFS | AFS record | Enter the AFS record. |
| DNSKEY | DNS Key | Enter the type, protocol, algorithm, and public key. |
| CDNSKEY | Child DNS Key | Enter the type, protocol, algorithm, and public key. |
| LOC | Location information | Enter geographical details such as latitude, longitude, hemispheres, etc. |
| SSHFP | SSH Key Fingerprint | Enter the fingerprint algorithm, type, and hexadecimal hash result of the ssh key. |
| TLSA | TLS Certificate Association | Enter the usage, selector, matching type, and association data. |
| CERT | Public Key Certificate | Enter the type, key tag, algorithm, and certificate. |
- Use the
Add itembutton available in some record type configurations to add more than one item for that record.
Note: See DNS Load Balancer for instructions on how to configure DNS load balancer for your zone.
- Click
Applyto save the resource record.
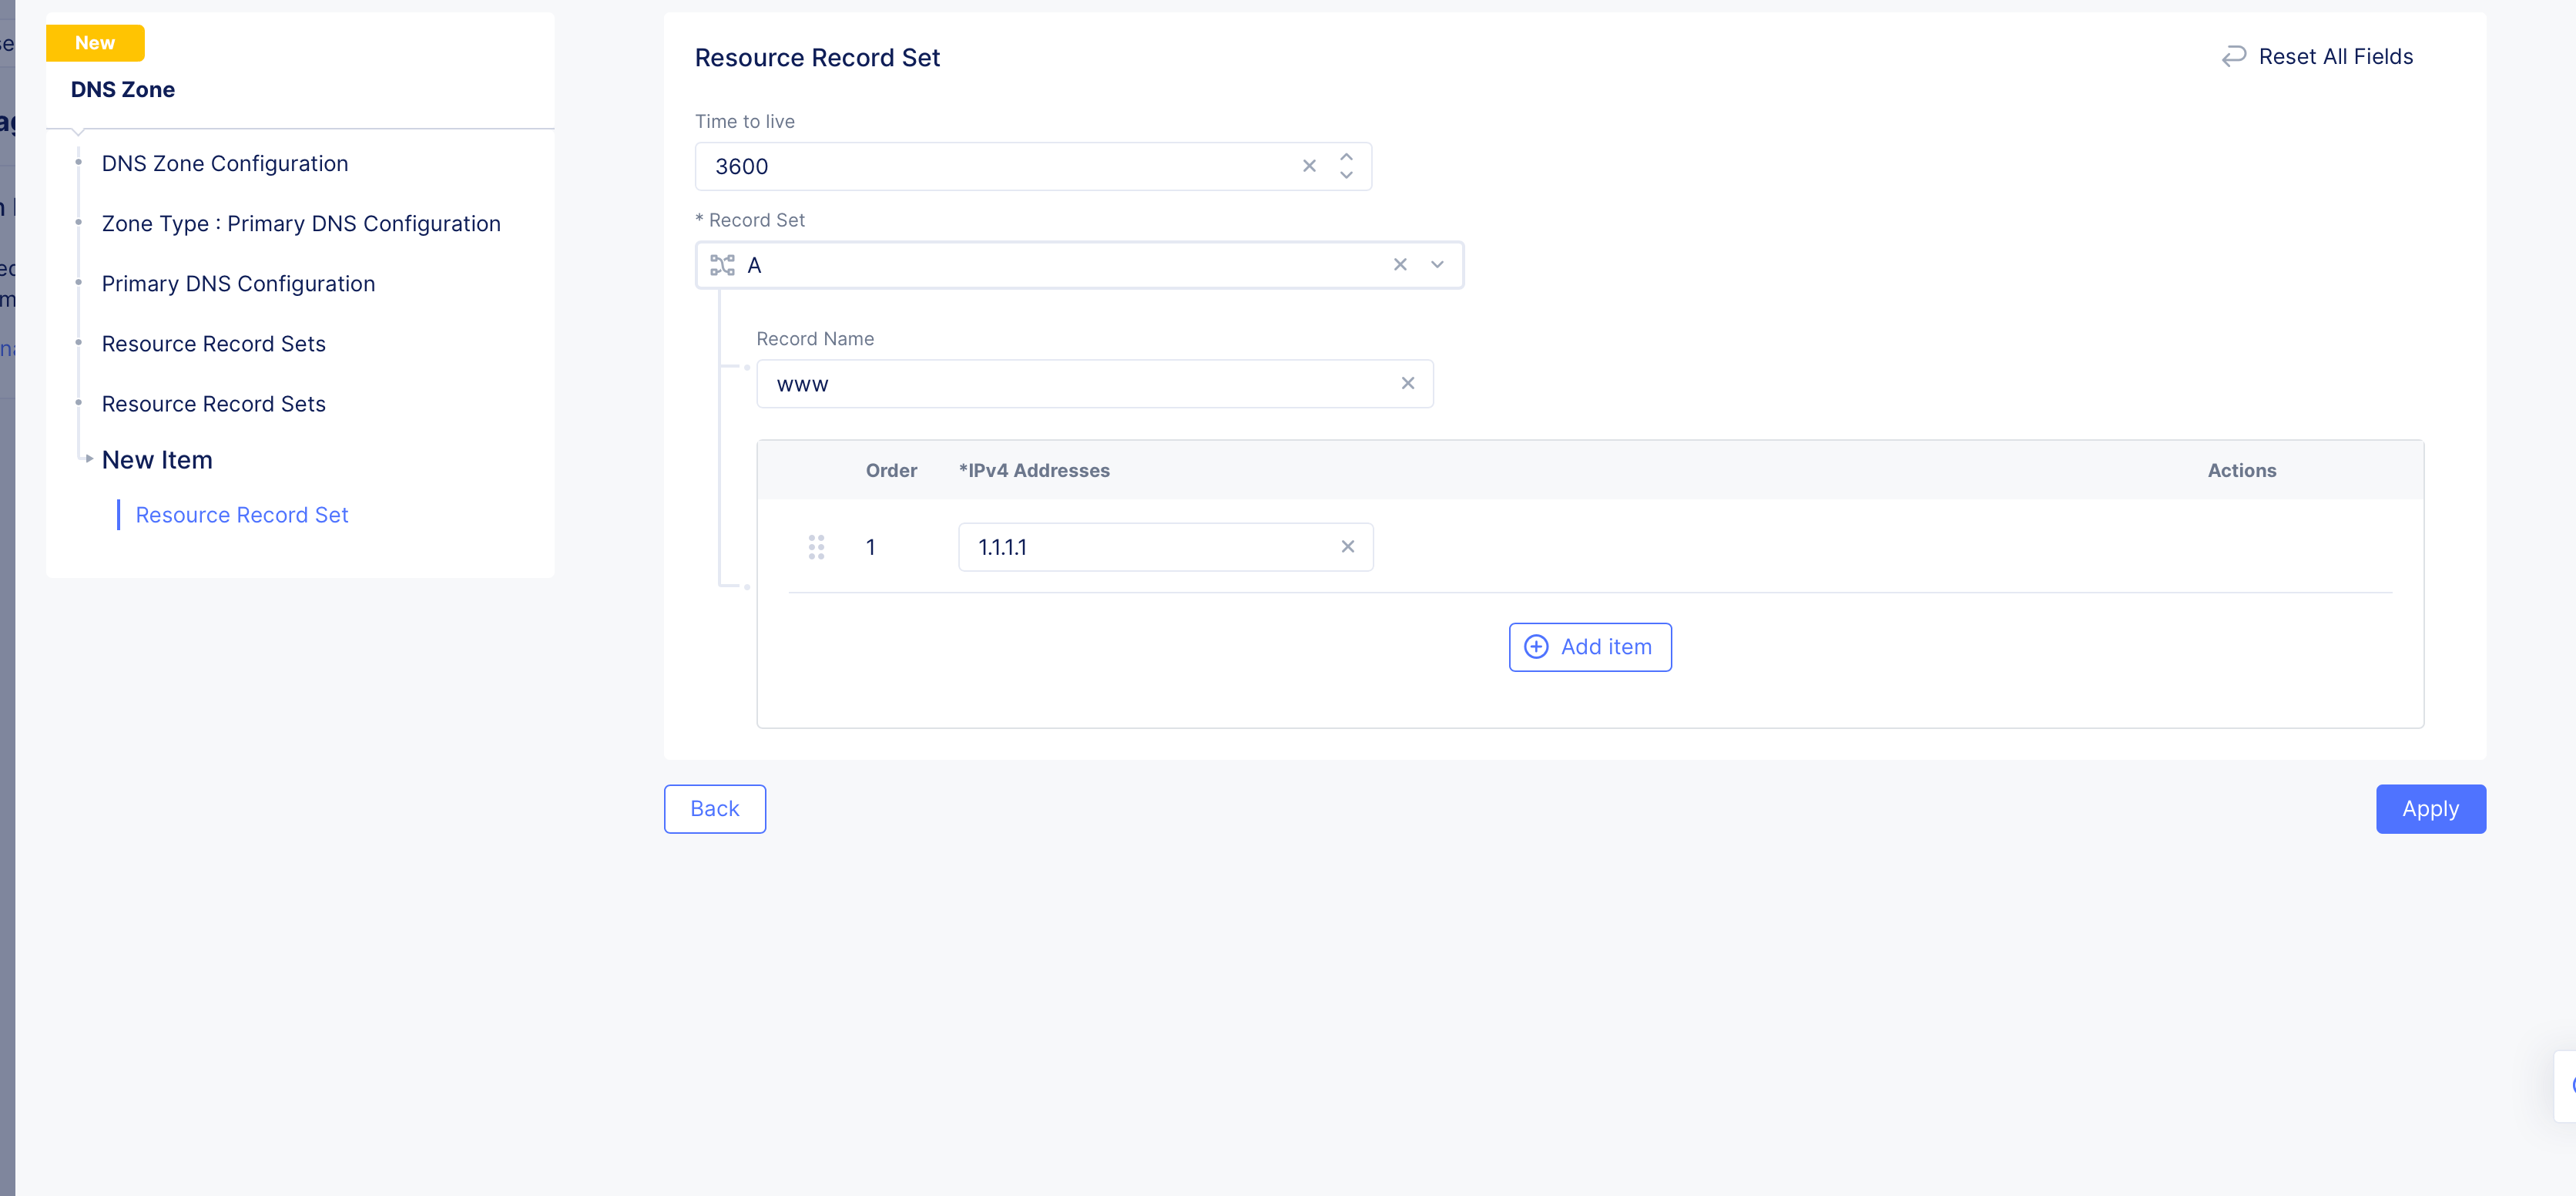
Figure: Resource Record Set
Step 4: Optionally, enable DNSSEC and load balancer management.
- In the
DNSSEC Modesection, selectEnablefor theDNSSEC Modefield if you want to use DNS security extensions (DNSSEC) to authenticate DNS response data.
Note:
DNSSEC Modeis disabled by default.
- Check the
Allow HTTP Load Balancer Managed Records. This is only optional for a legacy delegated domain.
Note:
Allow HTTP Load Balancer Managed Recordsis unchecked by default, which might have made sense for a delegated domain. However, Distributed Cloud Services has deprecated the Delegated Domain capability, which means that new domains will need to be setup as a primary DNS zone corresponding to your HTTP Load Balancer (which is what you created in these steps), and you must check theAllow HTTP Load Balancer Managed Recordscheckbox for the HTTP Load Balancer to work properly.
Step 5: Complete creating the primary zone.
- Click
Applyin the primary zone configuration form.

Figure: Primary Zone Configuration
- Click
Save and Exitin the main zone configuration form to complete creating the primary zone.
Step 6: Update your registrar (or parent zones) to replace your current nameservers.
-
In your domain registrar or parent zone, remove your existing nameservers.
-
Add two nameservers,
ns1.f5clouddns.comandns2.f5clouddns.com.
Note: This may take a day or two to propagate across the Internet.
- Validate that your nameserver change has occurred with the following command (be sure to replace
<domain>with your domain):dig <domain> ns +short- This should show your two newly added nameservers.
Note: If you enabled DNSSEC, the system generates a DS record and displays it in the
DNSSEC DS Recordcolumn. Click on the displayed value, clickCopy DS Recordon the displayed window, add the DS record to your parent zone. After the primary zone is created, you can use thedig ds <domain name>command to verify that the DS record digest is displayed in the output. This indicates that DNSSEC is functional.
Create Dual-Primary DNS
**Note: This is an advanced DNS setup. You should have a good understanding of how DNS works prior to using this setup.
The process of creating a dual-primary DNS is almost the same as creating a primary DNS. The only difference is that you will add the Distributed Cloud DNS nameservers to your nameserver list along with your existing primary DNS nameservers.
Once done, you will have two primary DNS servers, both of which are authoritative. This can cause data synchronization problems and conflicts. To avoid these problems, this setup is typically done by organizations that are managing their DNS setups programmatically such that they can update all primary DNS servers at the same time.
There are no steps for creating this setup, because this will typically be done programmatically using the Distributed Cloud API to both create and update the setup.
Create Secondary DNS
Prior to creating secondary zone, ensure that you allow queries from F5 Distributed Cloud IP ranges to your DNS servers.
Log into Console and perform the following:
Step 1: Navigate to zone management and start adding a zone.
- Click
DNS Managementservice on the Console home page.
Figure: Navigate to DNS Management
-
Click
Manage>DNS Zone Managementin the primary navigation menu located on the left side of the page. -
Click
Add Zone. -
Enter domain or subdomain name in the
Domain Namefield in the metadata section. Ensure that you enter the same domain name used in primary zone configuration. -
Optionally, set labels and add a description.
Step 2: Start configuring secondary zone.
Select Secondary DNS Configuration for the Zone Type field in the DNS Zone Configuration section. Click Configure under the Secondary DNS Configuration field. Do the following in the zone configuration form:
-
Enter the IP address for your primary zone server in the
DNS Primary Server IPfield. Use theAdd itembutton to add more than one primary server. -
Enter the Transaction Signature (TSIG) key name in the
TSIG Key Namefield. -
Select an algorithm from the
TSIG Key Algorithmdrop-down menu. Ensure that the key value for the key specified is compatible with the algorithm being selected.
Note: Configuring TSIG key and algorithm is optional. However, it is recommended that you use at least the
HMAC-SHA256algorithm in case you configure TSIG.
-
Click
Configurein theTSIG key value in base 64 formatsection to encrypt your secret, and do one of the following:- Paste your secret in the
Secret to Blindfoldfield, and clickApply. The secret typeBlindfolded Secretand actionBlindfold New Secretare set by default, and your secret is encrypted using Blindfold. You can optionally change the action toUse Existing Blindfolded Secretto add an existing encrypted secret, or use a custom policy instead of a built-in policy using thePolicy Typefield. - In case you want to use a clear secret, select
Clear Secretfor theSecret Typefield, and paste your secret in theSecretfield. The optiontextis selected by default, but you can selectBase64and then paste your secret in Base64 format. - Click
Apply
- Paste your secret in the
Note: Ensure you obtain the base64 encoded secret if you choose
Base64option for clear secret. You can useecho -n <TSIG KEY> | base64to convert your secret to Base64 encoded format.
- Click
Apply.
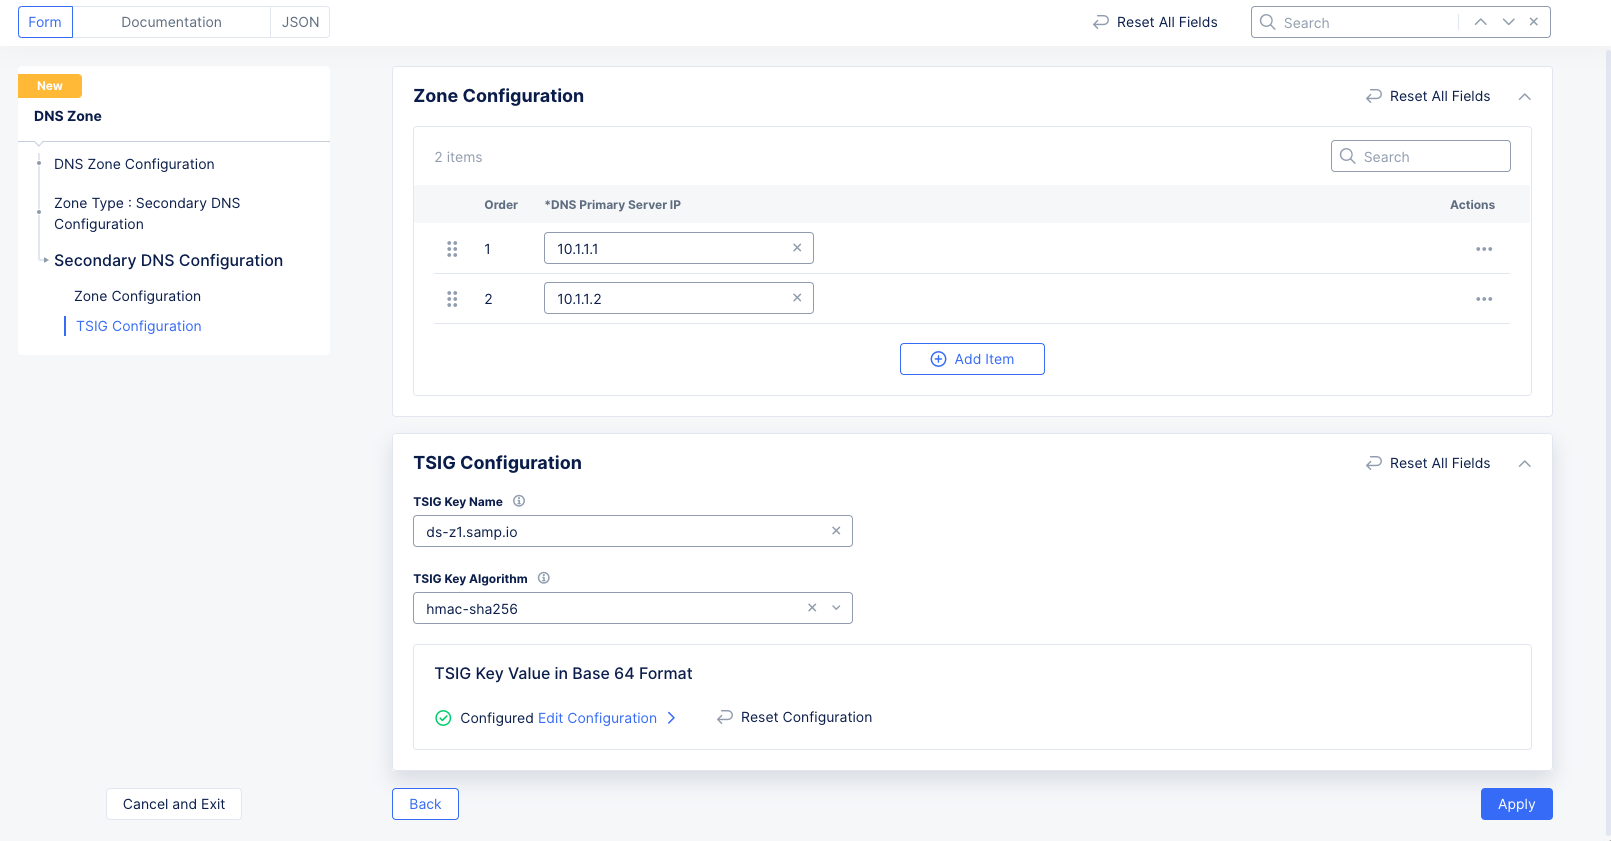
Figure: Secondary Zone Configuration
Step 3: Complete configuring secondary zone.
Click Save and Exit in the main zone configuration form to create secondary zone.
Step 4: Inspect the secondary zone file.
-
Select
...>View Zone Filein theActionscolumn for your secondary zone object. This opens the secondary zone file in a read-only window and displays the record name, TTL, record type, and record values. -
Click on any record name to open detailed information of that record.
Step 5: Update your registrar (or parent zones) to add XC nameservers.
- In your domain registrar or parent zone, add two nameservers,
ns1.f5clouddns.comandns2.f5clouddns.com.
Note: This may take a day or two to propagate across the internet.
- Validate that your nameserver change has occurred with the following command (be sure to replace
<domain>with your domain):dig <domain> ns +shortThis should show your nameservers including your two newly added nameservers.dig @ns1.f5clouddns.com <domain>This should return a header status ofNOERRORand a list of your nameservers plus other information. If the header status isREFUSED, then your secondary DNS nameservers are not propagated yet.
Create Secondary DNS (with Hidden Primary DNS)
Note: This is an advanced DNS setup. You should have a good understanding of how DNS works prior to using this setup.
The process of creating a secondary DNS with a hidden primary is almost the same as creating a secondary DNS. The only difference is that you will replace the primary DNS nameservers with the secondary DNS nameservers rather than adding the secondary DNS nameservers to your nameserver list.
Once done, your secondary DNS nameservers will handle all DNS services. If you need to change your DNS setup, you will need to change your primary DNS setup, and then it will update your secondary DNS servers with a DNS change notification followed by a DNS zone transfer.
Step 1: Create Secondary DNS.
Follow steps 1 through 4 in Create Secondary DNS. In other words, follow all but the last step of updating your registrar (that procedure will change slightly).
Step 2: Update your registrar (or parent zones) to replace your current nameservers.
-
In your domain registrar or parent zone, remove your existing nameservers.
-
Add two nameservers,
ns1.f5clouddns.comandns2.f5clouddns.com.
Note: This may take a day or two to propagate across the internet.
- Validate that your nameserver change has occurred with the following command (be sure to replace
<domain>with your domain):dig <domain> ns +short- This should show your two newly added nameservers.