Configure Data Intelligence
Distributed Cloud Data Intelligence processes log data collected by F5 Distributed Cloud Services and uses it to equip security and fraud prevention teams with comprehensive insights into user behavior, device identification, and network data. This enables the early detection of anomalies indicative of potential security threats and fraudulent activities.
Integrate Data Intelligence with your SIEM solution or Fraud Orchestration tools and use the log data processed by Data Intelligence along with additional context and signals from your other data sources to build better rules and models and to improve the quality of data and decisions.
Data Intelligence can send log information to the following data collection systems:
- AWS S3
- Splunk
- Datadog
- Azure Blob Storage
- GCP Buckets
- HTTPS
Configure Data Intelligence Data Delivery
Depending on the version of Bot Defense that you have, there are two ways to configure Data Intelligence Data Delivery:
-
If you have Bot Defense Standard, follow the instructions in the sections below to enable and configure Data Intelligence Data Delivery. To get started, see the prerequisites.
-
If you have Bot Defense Advanced, you can contact your assigned Technical Account Manager for assistance enabling and configuring Data Intelligence Data Delivery. Your Technical Account Manager can perform most of the configuration process for you and guide you on how to get started with Data Intelligence Data Delivery.
You can also optionally decide to configure Data Intelligence Data Delivery yourself. To get started yourself, see the prerequisites.
Prerequisites
- An F5 Distributed Cloud Account. If you do not have an account, see Getting Started with Distributed Cloud Console.
- You must have an Organization plan. To see plan information, from the Distributed Cloud Console Home page, select Usage & Billing.
- You must have an externally available data collection system.
- To enable Data Intelligence in the US region, you must add the following IP addresses to your firewall allow list:
- 35.247.100.206
- 34.168.102.111
- 34.168.48.1
- 34.82.248.13
- 35.230.48.185
- 35.203.143.95
- To enable Data Intelligence in the EU region, you must add the following IP addresses to your firewall allow list:
- 35.205.7.217/32
- 34.76.251.175/32
- 34.77.214.28/32
- 104.199.23.243/32
- 34.77.3.25/32
- 104.155.7.183/32
Enable Data Intelligence
To use Data Intelligence, you must first enable it in the Distributed Cloud Console.
- On the Distributed Cloud Console Home page, select Usage & Billing.
- Select Manage > Billing Plan and scroll to the Organization Plan.
- Under the Organization Plan, select Data Intelligence. The Data Intelligence landing page appears.
Note: If Data Intelligence is already enabled, the Data Receivers page appears, and you can begin using Data Intelligence.
- From the Data Intelligence landing page, select Request Service.
Next steps
After you enable Data Intelligence in the Distributed Cloud Console, configure one or more of the following data receivers to connect Data Intelligence to your externally accessible data collection system.
- Configure an AWS S3 Receiver
- Configure a Splunk Receiver
- Configure a Datadog Receiver
- Configure an Azure Blob Storage Receiver
- Configure a GCP Bucket Receiver
- Configure an HTTPS Receiver
Important: When you configure your data receiver, for better security, F5 recommends that you select Blindfolded Secret instead of Clear Secret so that Data Intelligence does not have access to your password.
Configure an AWS S3 Receiver
-
In the Distributed Cloud Console, go to Data Intelligence.
-
Select Manage > Data Delivery and then select Add Receiver.
-
Add a Name to identify the new data receiver and optionally add a Description.
-
From the Data Set drop-down menu, select the data set you want to send to your data collection system.
-
From the Receiver Configuration drop-down menu, select S3 Receiver.
-
In the Data Delivery section, in the S3 Bucket Name field, enter the exact name of the AWS S3 bucket where you want to send log data.
-
From the AWS Cloud Credentials drop-down menu, select the cloud credentials you want Distributed Cloud Services to use to access the AWS S3 bucket.
If you need to add new credentials, from the AWS Cloud Credentials drop-down menu, select Add Item. To add an AWS Assume Role credential, see "Configure AWS Assume Role Authentication."
Note: You must select credentials that are the AWS Programmatic Access Credentials type.
-
In the AWS Region drop-down menu, select the region where you configured your S3 storage bucket.
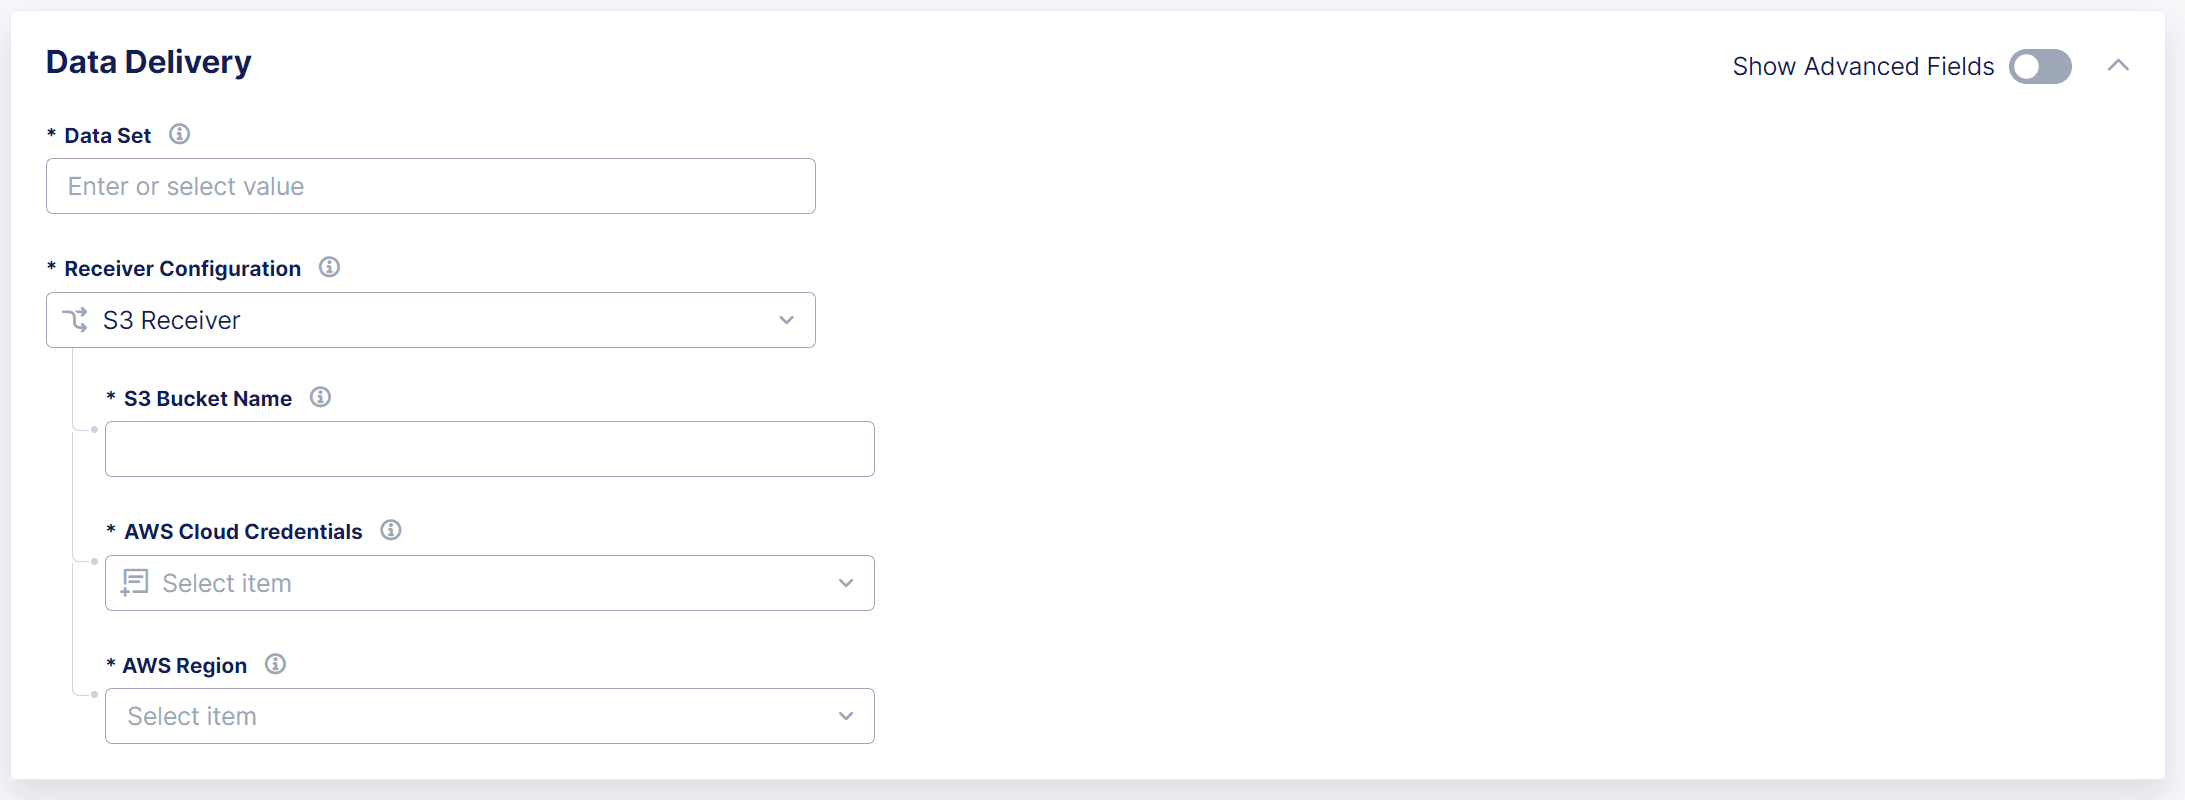
Figure: Configure an AWS S3 Receiver
-
Optionally, configure Advanced Options.
-
To save your AWS S3 receiver, select Add Receiver.

Configure AWS AssumeRole Authentication
To help facilitate secure data delivery, you can add permissions to allow a specific IAM user in the F5 Distributed Cloud AWS account to assume a role in your AWS account.
To configure AWS AssumeRole Authentication, you must create a role and attach a trust policy in the IAM section of the AWS Console and then delegate it to the F5 Distributed Cloud AWS account.
-
Obtain the following service account and keys required for the Assume Role:
-
F5 Distributed Cloud AWS account number
-
Your F5 Distributed Cloud tenant ID
Note: To request the F5 AWS account number, contact F5 Support.
-
-
Create AWS AssumeRole with the custom trust policy.
-
In the AWS Console, select IAM > Roles.
-
Select Create Role.
-
Select Custom trust policy and add the following JSON:
{"Version": "2012-10-17","Statement": [{"Effect": "Allow","Principal": {"AWS": "arn:aws:iam::<account-number>:user/svc-acct-f5xc-bot-and-risk-anagement"},"Action": "sts:AssumeRole",},{"Effect": "Allow","Principal": {"AWS": "arn:aws:iam::<account-number>:user/svc-acct-f5xc-bot-and-risk-anagement"},"Action": "sts:TagSession"}]}Note: Replace
<account-number>with the F5 Distributed Cloud AWS account number. -
Create an inline role with the following permissions to push data to your AWS S3 bucket.
{"Version": "2012-10-17","Statement": [{"Sid": "Statement1","Effect": "Allow","Action": ["s3:ListAllMyBuckets","s3:ListBucket","s3:GetObject","s3:PutObject","s3:PutObjectTagging","s3:TagResource"],"Resource": ["arn:aws:s3:::<<bucket name>>"]}]} -
Finish creating the role in the AWS Console and record the ARN value (role_arn) that you created. You need the role_arn when you add the AssumeRole credential in the Distributed Cloud Console.
-
-
Log in to the Distributed Cloud Console and add an AssumeRole credential.
- When you add a AWS S3 data receiver, from the AWS Cloud Credentials drop-down menu, select Add Item.
- From the Select Cloud Credential Type drop-down menu, select AWS Assume Role.
- In the IAM Role ARN field, enter the same ARN value that you created in the AWS Console.
- In the Role Session Name field, enter a name for the role.
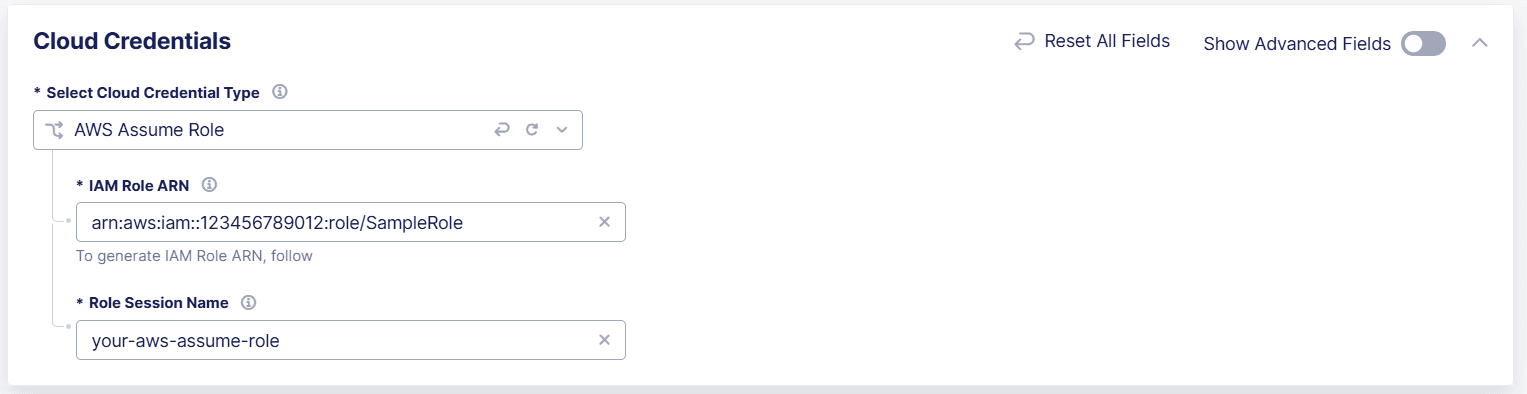
Figure: Configure AWS Assume Role
- Select Add Cloud Credentials to save the credential.
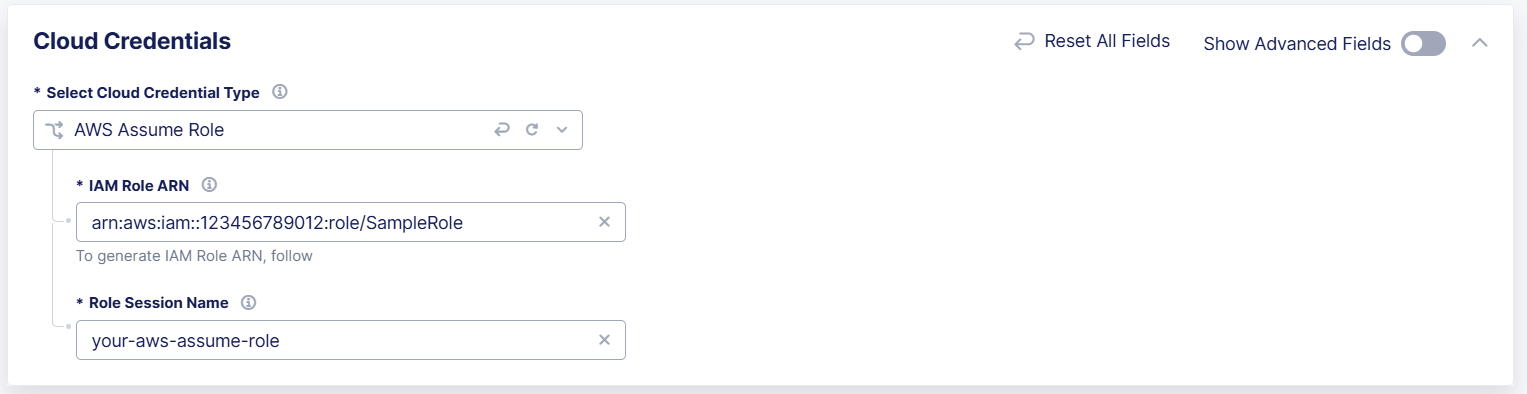
Configure a Splunk Receiver
-
In the Distributed Cloud Console, go to Data Intelligence.
-
Select Manage > Data Delivery and then select Add Receiver.
-
Add a Name to identify the new data receiver and optionally add a Description.
-
From the Data Set drop-down menu, select the data set you want to send to your data collection system.
-
From the Receiver Configuration drop-down menu, select Splunk Receiver.
-
In the Data Delivery section, in the Splunk HEC Logs Endpoint field, enter the name of the Splunk HTTP Event Collector (HEC) that you want use to send log data to your Splunk deployment.
Figure: Configure a Splunk Receiver
-
In the Splunk HEC token section, select Configure. Distributed Cloud Services uses an HEC token to authenticate with the HEC.
-
From the Secret Type drop-down menu, select one of the following options:
-
Clear Secret: Enter the password you want to use. If you select Clear Secret, F5 strongly recommends that you use Base64 format.
-
Blindfolded Secret (recommended): From the Action drop-down menu, select one of the following options:
- Use Existing Blindfolded Secret: Enter the Blindfolded Secret.
- Blindfold New Secret:
- From the Policy Type drop-down menu, select Built-in.
- In the Secret to Blindfold field, enter your Splunk HEC token.

Figure: Configure a Splunk HEC Token
-
-
Select Apply.
-
Optionally, configure Advanced Options.
-
To save your Splunk receiver, select Add Receiver.

Configure a Datadog Receiver
-
In the Distributed Cloud Console, go to Data Intelligence.
-
Select Manage > Data Delivery and then select Add Receiver.
-
Add a Name to identify the new data receiver and optionally add a Description.
-
From the Data Set drop-down menu, select the data set you want to send to your data collection system.
-
From the Receiver Configuration drop-down menu, select Datadog Receiver.
-
In the Data Delivery section, from the Endpoint Selection drop-down menu, select Datadog Site.
-
In the Datadog Site field, enter the URL for DataDog,
datadoghq.com.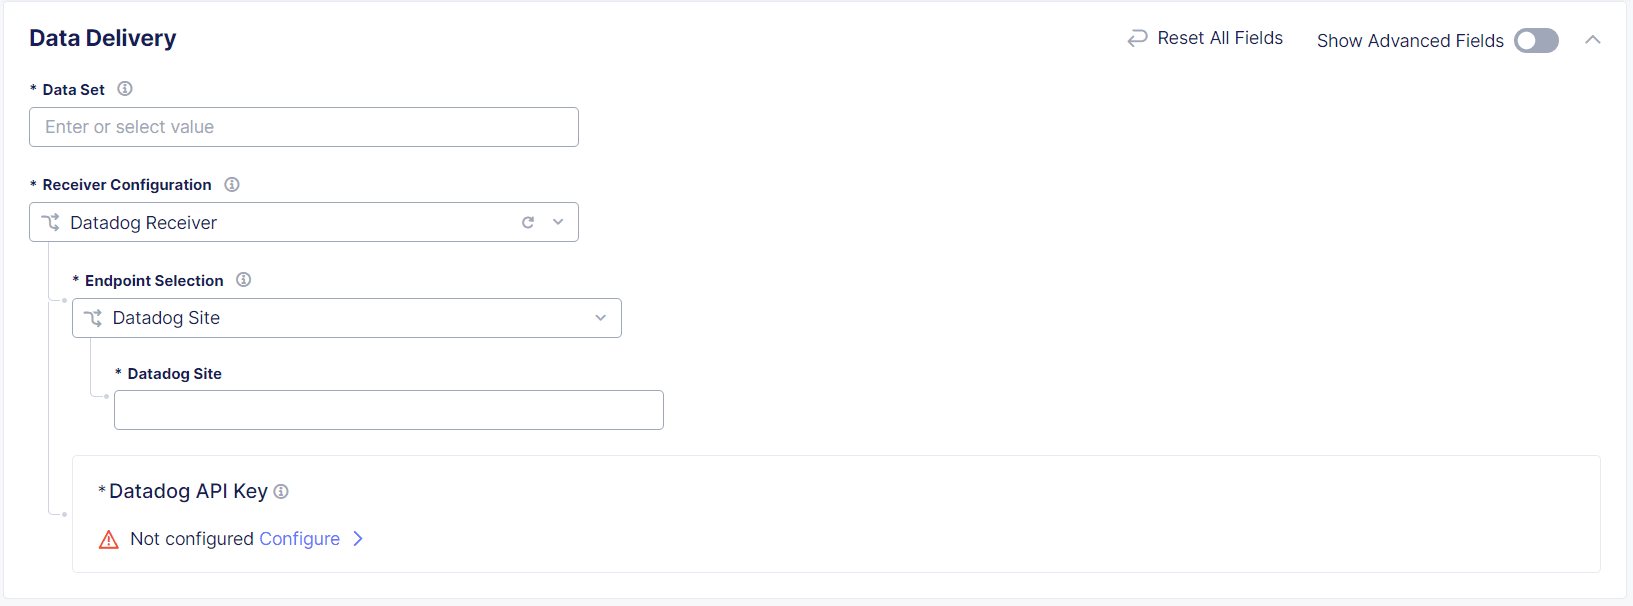
Figure: Datadog Image
-
To configure the Datadog API key, select Configure.
-
From the Secret Type drop-down menu, select one of the following options:
- Clear Secret: Enter the password you want to use. If you select Clear Secret, F5 strongly recommends that you use Base64 format.
- Blindfolded Secret (recommended): From the Action drop-down menu, select one of the following options:
-
Use Existing Blindfolded Secret: Enter the Blindfolded Secret.
-
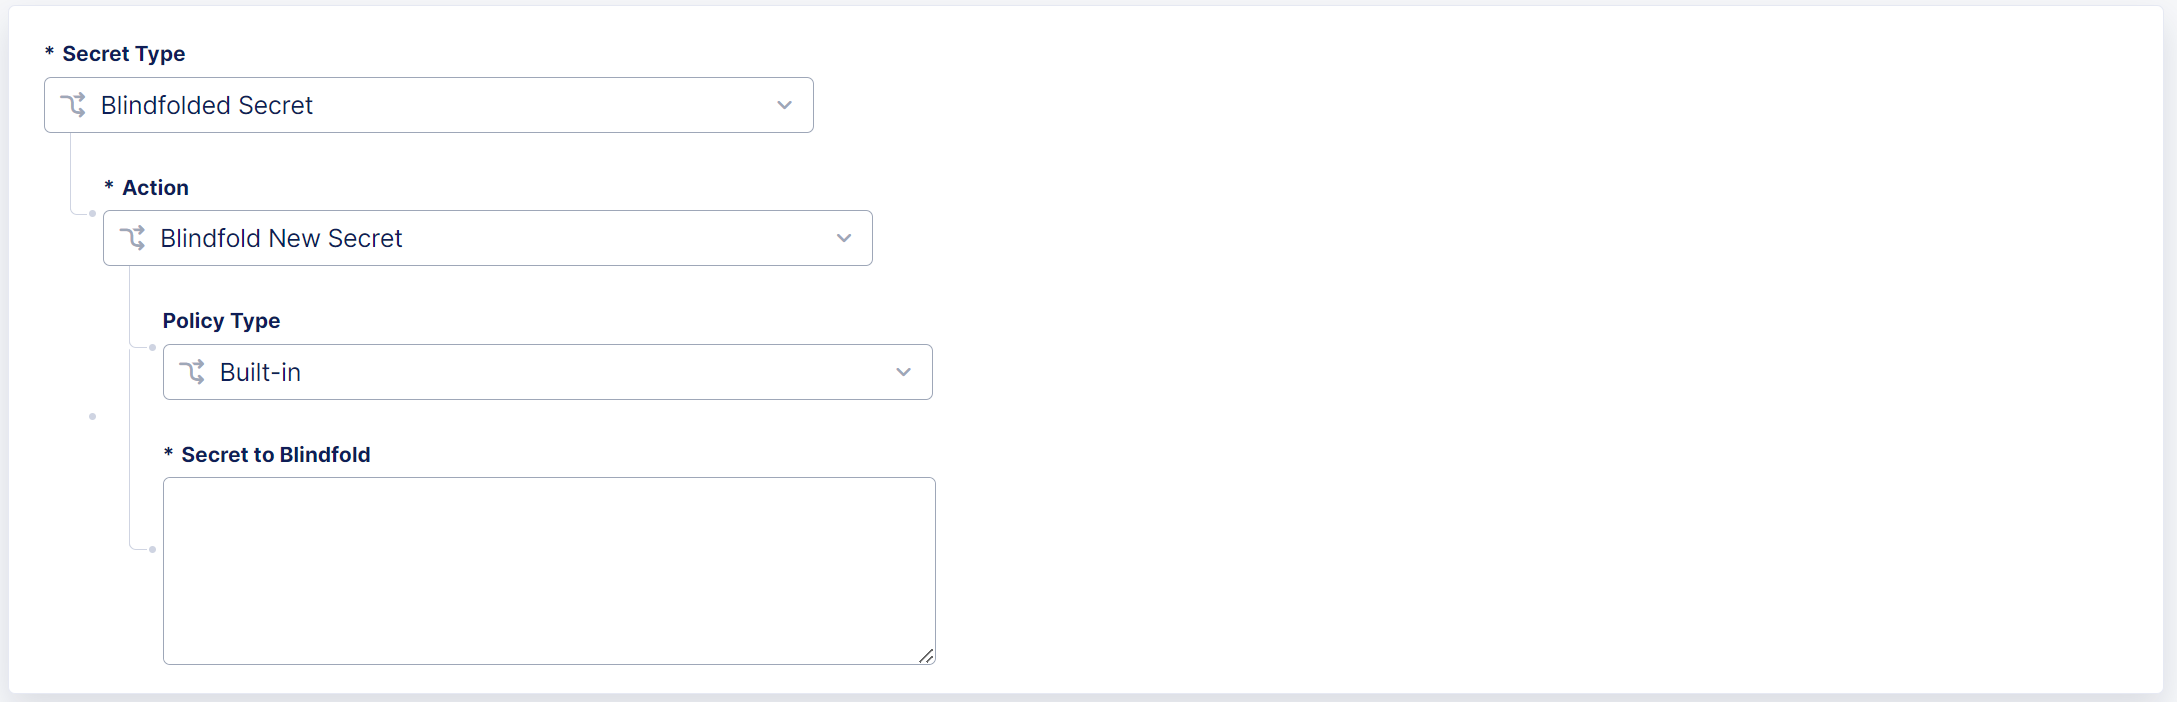
Blindfold New Secret:
- From the Policy Type drop-down menu, select Built-in.
- In the Secret to Blindfold field, enter your Datadog API Key.
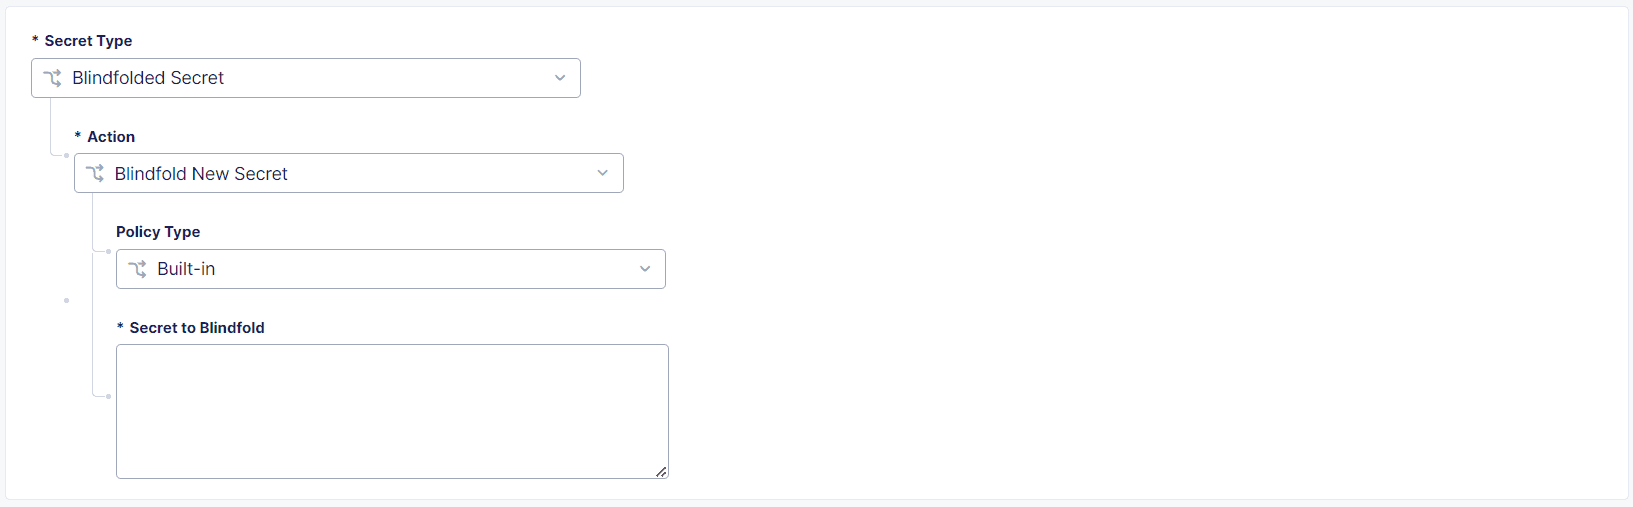
Figure: Datadog Image
-
Note: To obtain your Datadog API key, go to https://app.datadoghq.com/organization-settings/api-keys. For more information, see Datadog documentation: https://docs.datadoghq.com/account_management/api-app-keys/#add-an-api-key-or-client-token.
-
Select Apply.
-
Optionally, configure Advanced Options.
-
To save your Datadog receiver, select Add Receiver.


Configure an Azure Blob Storage Receiver
Important: Before you begin, make sure you have access to your Azure Blob connection string. You need the connection string during the receiver configuration process. See your Azure documentation for information about how to obtain the Azure Blob connection string.
-
In the Distributed Cloud Console, go to Data Intelligence.
-
Select Manage > Data Delivery and then select Add Receiver.
-
Add a Name to identify the new data receiver and optionally add a Description.
-
From the Data Set drop-down menu, select the data set you want to send to your data collection system.
-
From the Receiver Configuration drop-down menu, select Azure Blob Storage.
-
In the Azure Blob Connection String section, select Configure.

Figure: Configure an Azure Blob Receiver
-
From the Secret Type drop-down menu, select one of the following options:
- Clear Secret: Enter the password you want to use. If you select Clear Secret, F5 strongly recommends that you use Base64 format.
- Blindfolded Secret (recommended): From the Action drop-down menu, select one of the following options:
- Use Existing Blindfolded Secret: Enter the Blindfolded Secret.
- Blindfold New Secret:
- From the Policy Type drop-down menu, select Built-in.
- In the Secret to Blindfold field, enter your Azure Blob connection string and then select Apply.
-
In the Container Name field, enter the name of the Azure container where the logs should be stored.
-
Optionally, configure Advanced Options.
-
To save your Azure Blob storage receiver, select Add Receiver.

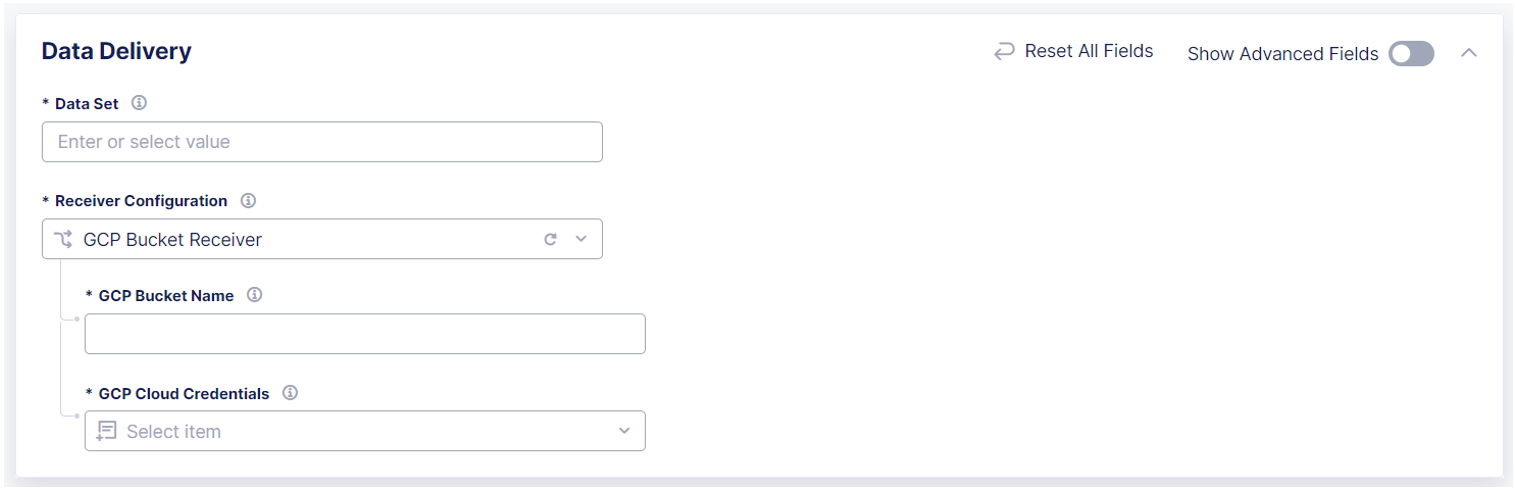
Configure a GCP Bucket Receiver
-
In the Distributed Cloud Console, go to Data Intelligence.
-
Select Manage > Data Delivery and then select Add Receiver.
-
Add a Name to identify the new data receiver and optionally add a Description.
-
From the Data Set drop-down menu, select the data set you want to send to your data collection system.
-
From the Receiver Configuration drop-down menu, select GCP Bucket Receiver.
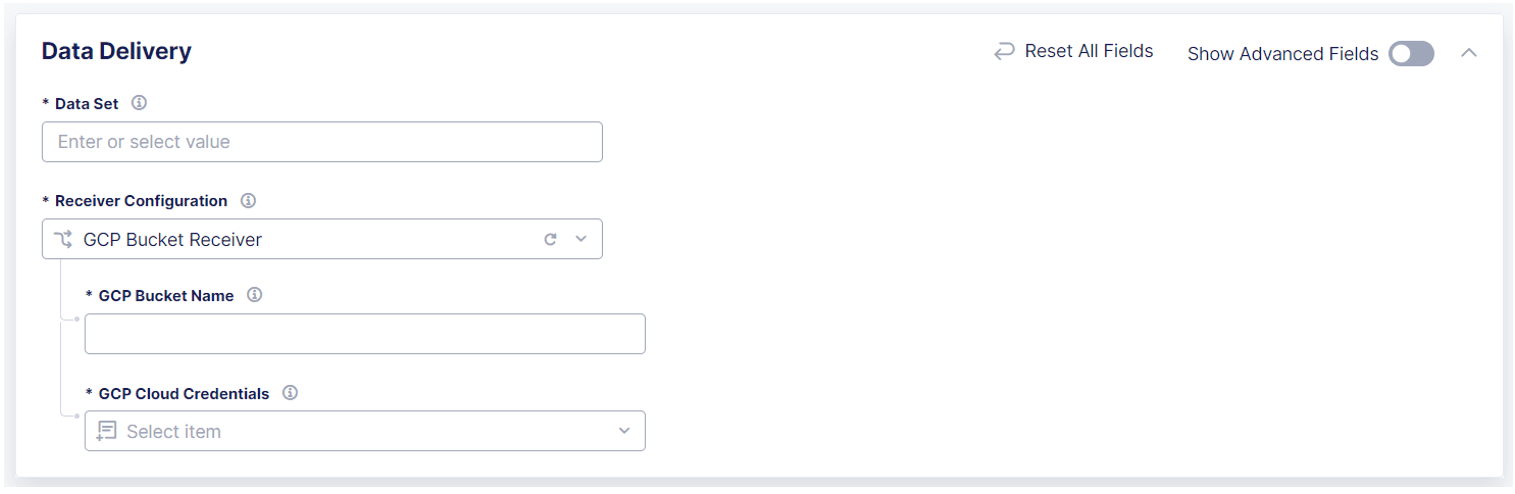
Figure: Configure a GCP Bucket Receiver
-
In the Data Delivery section, in the GCP Bucket Name field, enter the name of the GCP bucket where you want to send log data.
-
From the GCP Cloud Credentials drop-down menu, select an existing set of credentials that Data Intelligence can use to access the GCP bucket.
To add new cloud credential, select Add Item. For information, see GCP Credentials.
-
Optionally, configure Advanced Options.
-
To save your GCP bucket receiver, select Add Receiver.
Configure an HTTPS Receiver
- In the Distributed Cloud Console, go to Data Intelligence.
- Select Manage > Data Delivery and then select Add Receiver.
- Add a Name to identify the new data receiver and optionally add a Description.
- From the Data Set drop-down menu, select the data set you want to send to your data collection system.
- From the Receiver Configuration drop-down menu, select HTTPS Receiver.
- In the Data Delivery section, in the HTTP URI field, enter the URI for the HTTPS receiver. For example, enter,
https://your_receiver_uri.com. - From the Authentication drop-down menu, select how you want to authenticate to the HTTPS endpoint. Select one of the following options:
- None: Select this if no authentication is required.
- Basic Authentication:
- In the User Name field, enter the user name you use to connect to the HTTPS endpoint.
- In the Password section, select Configure.
- From the Secret Type menu, select one of the following options:
- Clear Secret: Enter the password for the HTTPS endpoint. If you select Clear Secret, F5 strongly recommends that you use Base64 format.
- Blindfolded Secret (recommended): From the Action drop-down menu, select one of the following options:
- Use Existing Blindfolded Secret: Enter the Blindfolded Secret.
- Blindfold New Secret:
- From the Policy Type drop-down menu, select Built-in.
- In the Secret to Blindfold field, enter the password for the HTTP endpoint.
- Token Authentication:
- In the Token section, select Configure.
- From the Secret Type menu, select one of the following options:
- Clear Secret: Enter the password for the HTTPS endpoint. If you select Clear Secret, F5 strongly recommends that you use Base64 format.
- Blindfolded Secret (recommended): From the Action drop-down menu, select one of the following options:
- Use Existing Blindfolded Secret: Enter the Blindfolded Secret.
- Blindfold New Secret:
- From the Policy Type drop-down menu, select Built-in.
- In the Secret to Blindfold field, enter your authentication token.
- Select Apply.
- Optionally, configure Advanced Options.
- To save your HTTPS receiver, select Add Receiver.
Configure Advanced Options
Advanced settings include optional settings to enable compression and to configure batch options. Not all options are available with all data receivers.
Enable Compression
Enabling compression reduces the size of the log data files delivered from Data Intelligence and can help reduce your data storage costs.
- Select Manage > Data Delivery > Add Receiver.
- In the Data Delivery section, enable Show Advanced Fields.
- To enable compression, from the Compression Type drop-down menu, select gzip.
- When finished, select Add Receiver.
Configure Batch Options
Batch options allow you to apply limits such as maximum number of messages, bytes or timeout. When you configure a limit, Data Intelligence sends log data to the receiver only when the system detects that a configured limit has been reached.
- Select Manage > Data Delivery > Add Receiver.
- In the Data Delivery section, enable Show Advanced Fields.
- To configure the maximum age of a batch before it is sent to a data receiver, from the Batch Timeout Options drop-down menu, select Timeout Seconds and then enter the number of Timeout Seconds.
- To configure the maximum number of log messages that can be added to a batch before it is sent to a data receiver, from the Batch Max Events drop-down menu, select Max Events and then enter a Max Events value between
32and100000. - To configure the maximum byte size of a batch before it is sent to a data receiver, from the Batch Bytes drop-down menu, select Max Bytes and then enter a value between
4096and104857600. Logs are sent after the batch is size is equal to or more than the specified byte size. - When finished, select Add Receiver.
Configure TLS
To encrypt the data sent from Data Intelligence to your Splunk, Datadog or HTTPS data receiver, you can enable TLS.
- Select Manage > Data Delivery > Add Receiver.
- In the Data Delivery section for your data receiver, enable Show Advanced Fields.
- To enable TLS, from the TLS drop-down menu, select Use TLS.
- The following options are enabled by default. You can disable them as necessary.
- Perform Server Certificate Verification
- Enable Server Hostname Verification
- To upload a server CA certificate, select Server CA Certificates and then paste or upload the certificate (
.pem,.cer, or.crt). - To optionally Enable mTLS, perform the following steps:
- From the mTLS drop-down menu, select Enable mTLS.
- Paste the contents of your Client Certificate (PEM or Base64).
- In the Client Private Key section, select one of the following options:
- Clear Secret: Paste the Secret you want to use. If you select Clear Secret, F5 strongly recommends that you use Base64 format.
- Blindfolded Secret (recommended): Select one of the following options:
- Use Existing Blindfolded Secret: Enter the Blindfolded Secret.
- Blindfold New Secret: From the Policy Type drop-down menu, select Built-in and then paste the Secret to Blindfold.
- When finished, select Add Receiver.
Manage Data Receivers
Perform the following steps to manage, enable or disable, or delete existing data receivers.
Note: To add a new data receiver, see Add a Data Receiver.
- From the Data Intelligence navigation menu, select Manage > Data Delivery.
- From the list of configured data receivers, in the Actions column, select the Action menu (…) next to the data receiver you want to manage and then select one of the following options:
- Manage: Update data receiver configuration settings. For information about specific settings, see the following sections:
- Disable: Temporarily disable the data receiver that connects the Distributed Cloud Service to your data collection system. This prevents the Distributed Cloud Service from sending log data to your data collection system.
- Enable: Re-enable a data receiver that you previously disabled. This allows the Distributed Cloud Service to resume sending log data to your data collection system
- Delete: Permanently disable and remove a configured data receiver. This cannot be undone.
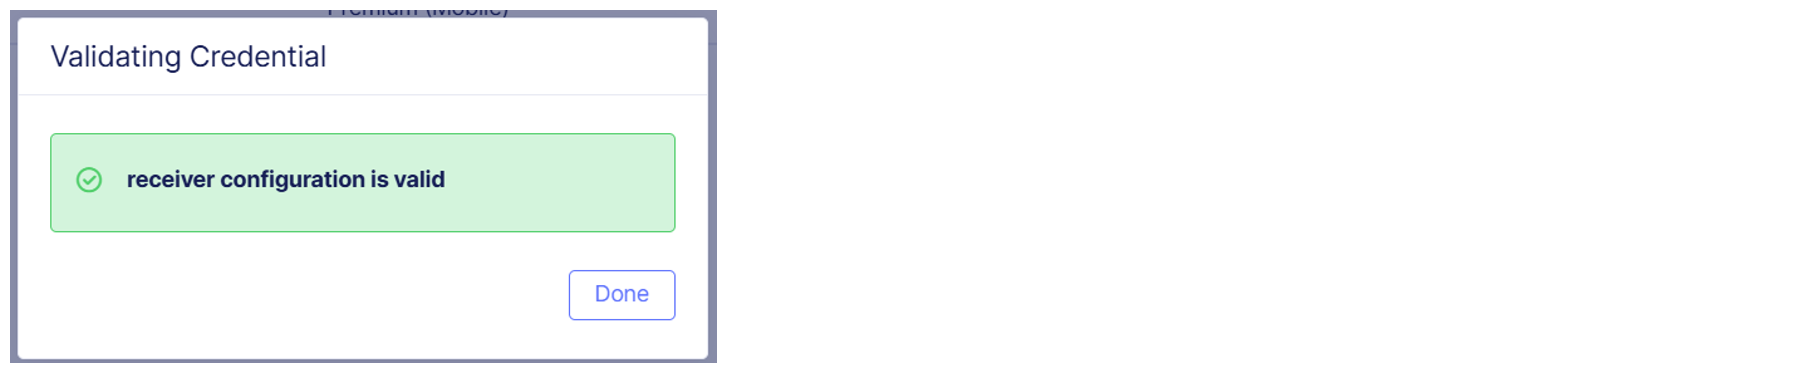
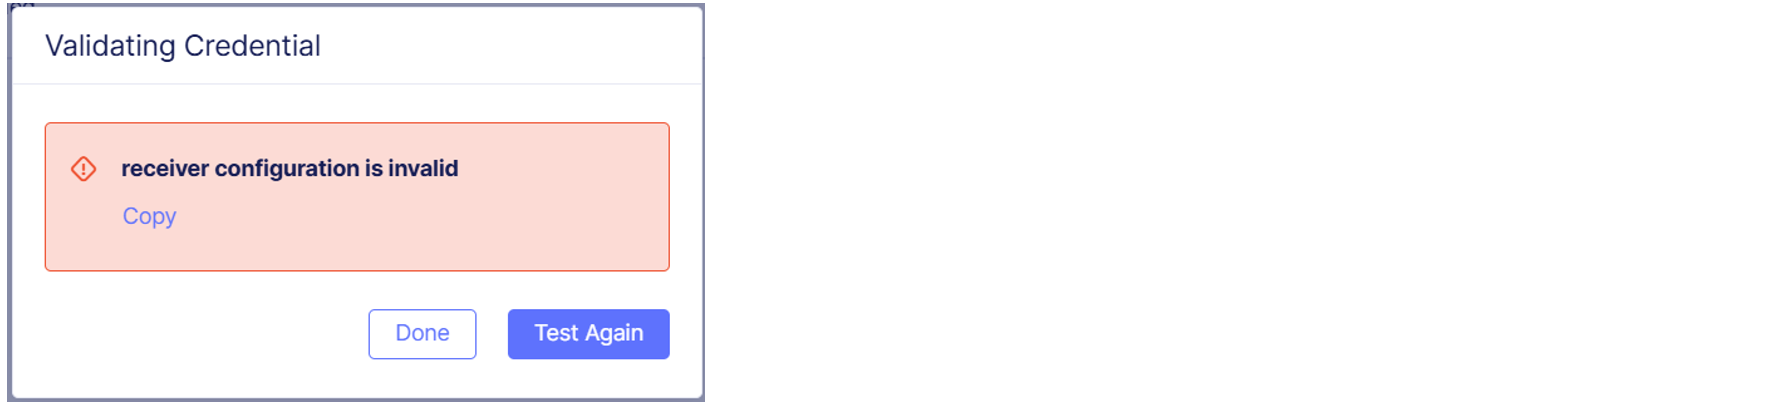
Validate Credentials
Use the Validate Credential option to confirm if your data receiver credentials and configuration are valid.
For most data receivers, Data Intelligence creates a new folder on your data collection system where it stores a file that contains the echo message. For Splunk receivers, Data Intelligence publishes the echo message to the hec/http event collector.
To validate a credential and configuration for a data receiver:
-
From the Actions column, select the Action menu (...) for a data receiver.
-
Select Validate Credential.
The system displays a message that the receiver configuration is valid or invalid.
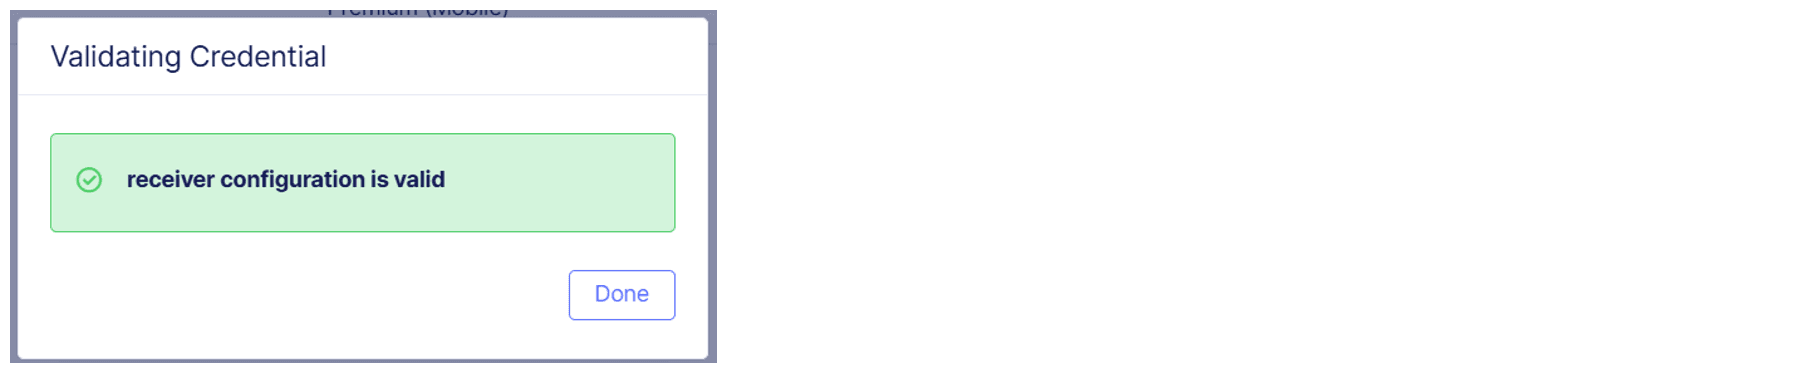
Figure: Valid Configuration
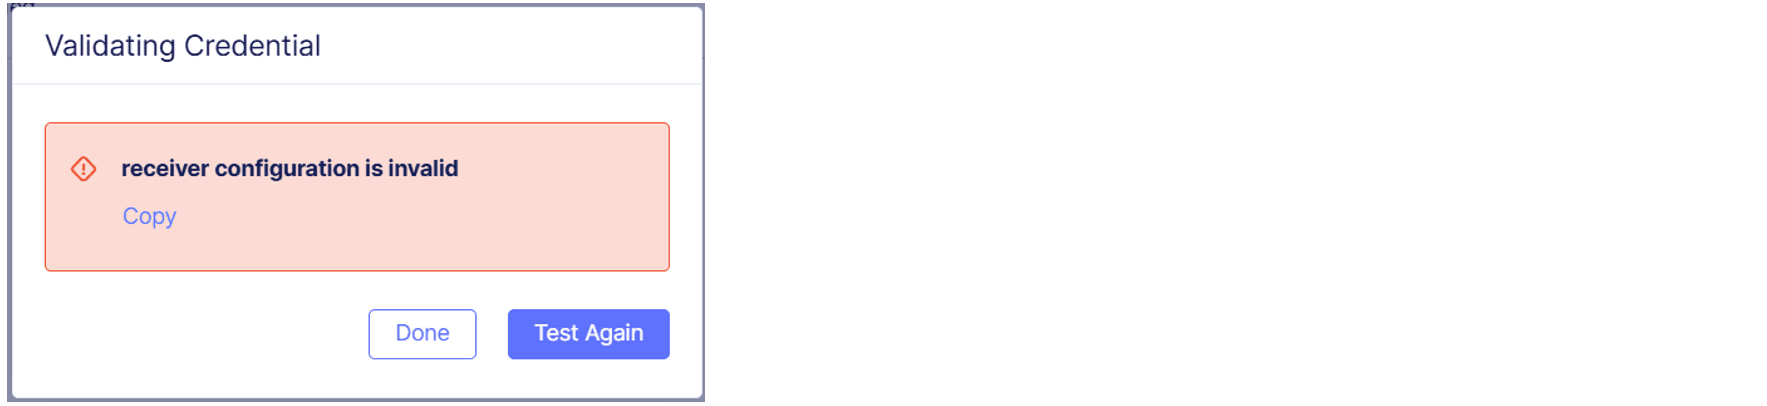
Figure: Invalid Configuration
On this page:
- Configure Data Intelligence Data Delivery
- Prerequisites
- Enable Data Intelligence
- Configure an AWS S3 Receiver
- Configure a Splunk Receiver
- Configure a Datadog Receiver
- Configure an Azure Blob Storage Receiver
- Configure a GCP Bucket Receiver
- Configure an HTTPS Receiver
- Configure Advanced Options
- Manage Data Receivers
- Validate Credentials