Deploy a Secure Application and Monitor Performance
Objective
This guide provides instructions on how to secure your web application and enhance its performance using F5® Distributed Cloud Console and F5 Distributed Cloud Mesh.
The steps to secure your web application and enhance its performance are:
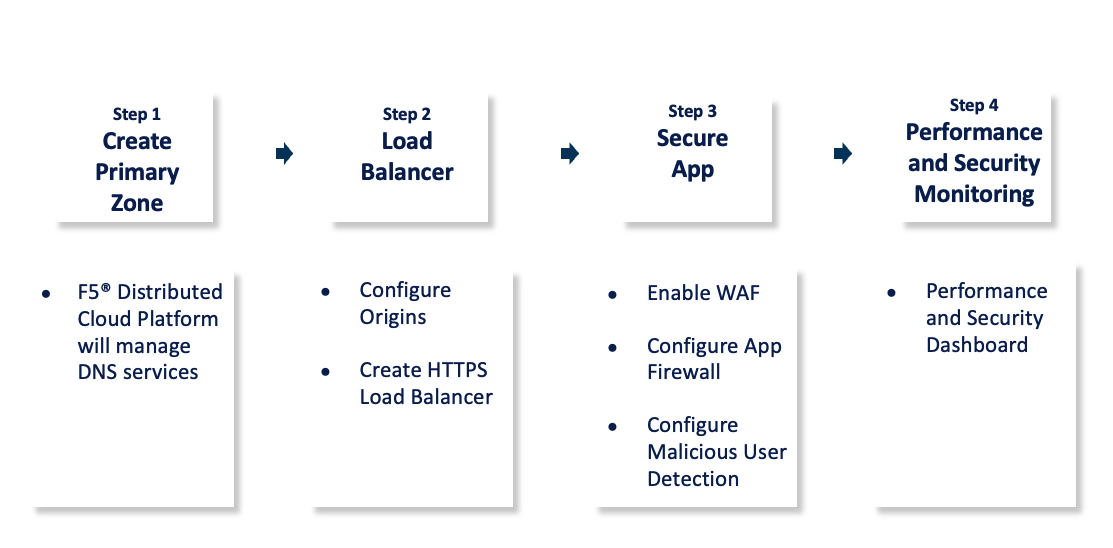
Figure: Web Application Security and Performance Steps
The following image shows the topology of the example for the use case provided in this document:
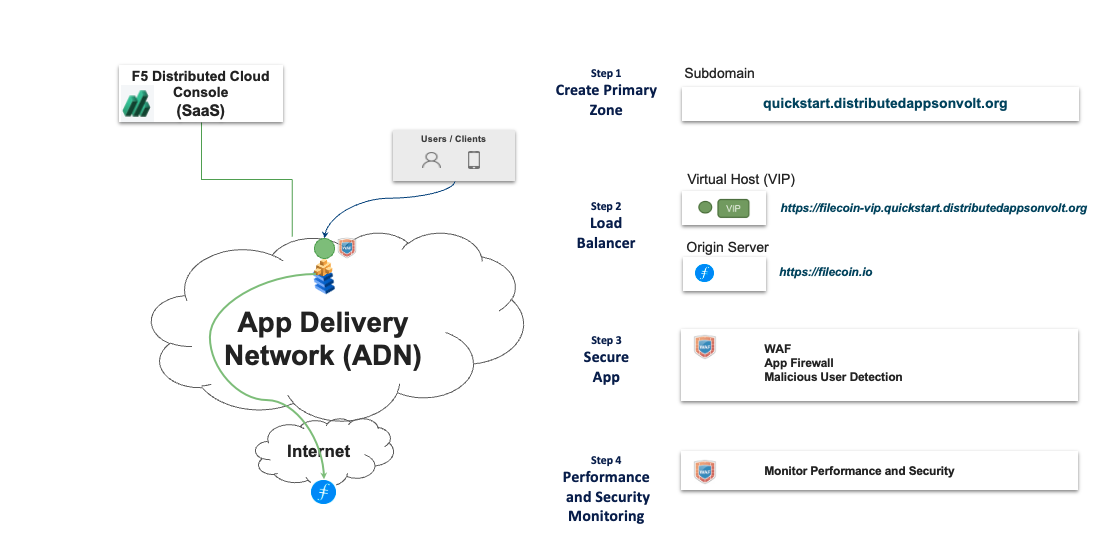
Figure: Web Application Security Sample Topology
Using the instructions provided in this guide, you can configure F5 Distributed Cloud Services to handle the domain ownership (which includes the creation of needed DNS resource records) of a new subdomain, create an HTTPS Load Balancer with automatic SSL certificate for the VIP, secure the domain with features such as JavaScript challenge and a web application firewall (WAF), and monitor the security and performance of your new subdomain. This example use case presents securing an application hosted on a public website. The HTTPS Load Balancer creates a Virtual IP (VIP) across your Application Delivery Network (ADN). All the VIPs instantiated on the ADN are automatically enabled with the DDoS protection.
Note: Additional performance and origin access via private tunnels or native K8s/Consul integration can be achieved by installing a Mesh node closest to the origin server. For more information, see the Secure Kubernetes Gateway quick start guide.
Prerequisites
-
F5 Distributed Cloud Console SaaS account. If you do not have an account, see Getting Started with Console.
-
Amazon Web Services (AWS) account. This is required to deploy a Distributed Cloud site.
-
F5 Distributed Cloud vesctl utility. See vesctl for more information.
-
Docker.
Configuration
The use case provided in this guide demonstrates enabling a domain for an application hosted on a public website and secures it using a Distributed Cloud JavaScript challenge and WAF. The following actions outline the activities in domain setup and securing the web app:
-
The domain for the application is delegated to F5 Distributed Cloud Services for handling the queries towards the subdomain for the application and management of the SSL certificates for the subdomain.
-
An HTTP load balancer is created for the subdomain with automatic certificate management. As part of this step, an origin pool is created with the origin server as the public website. This use case demonstrates securing the
cloud.f5.comwebsite. -
The load balancer is secured with the JavaScript challenge and WAF for its ingress traffic.
Step 1: Create Primary Zone
Note: Previous versions of this quick start instructed you to delegate your domain to the F5 Distributed Cloud Platform. The Delegate Domain capability has since been deprecated. Now you will configure your domain to use F5 Distributed Cloud DNS instead.
Log into Console and perform the following:
Step 1.1: Navigate to zone management and start adding a zone.
- Click
DNS Managementservice on the Console home page.
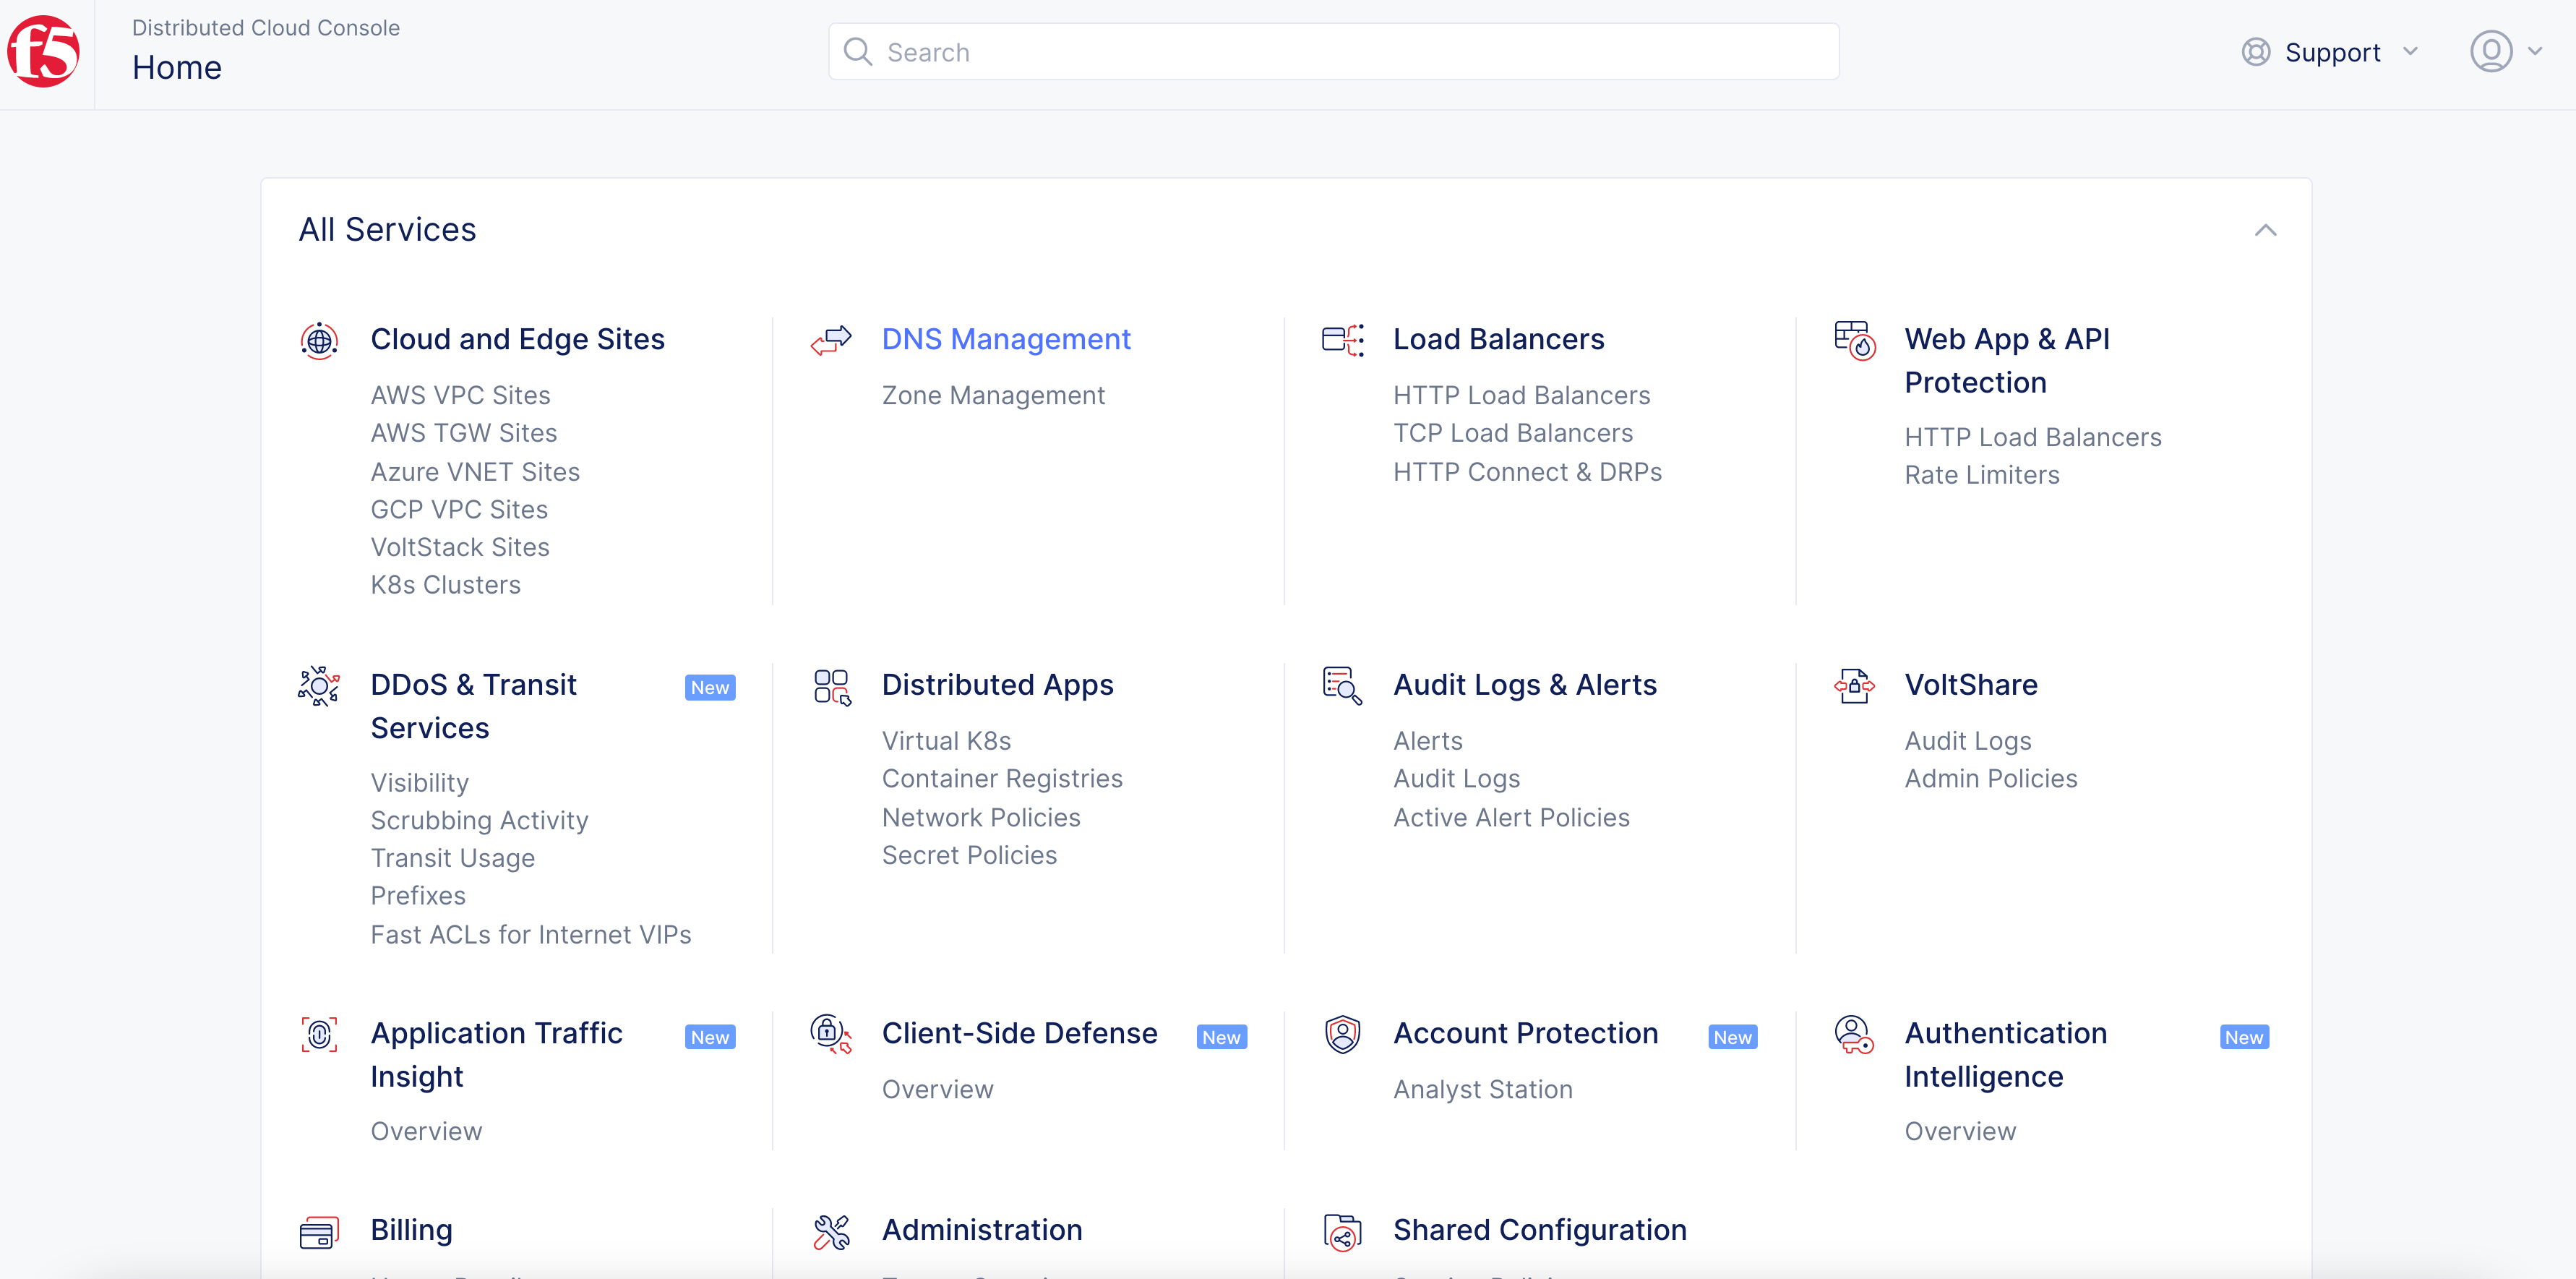
Figure: Navigate to DNS Management
-
Select
DNS Managementoption in the primary navigation menu located on the left side of the page. -
Click
Add Zone.
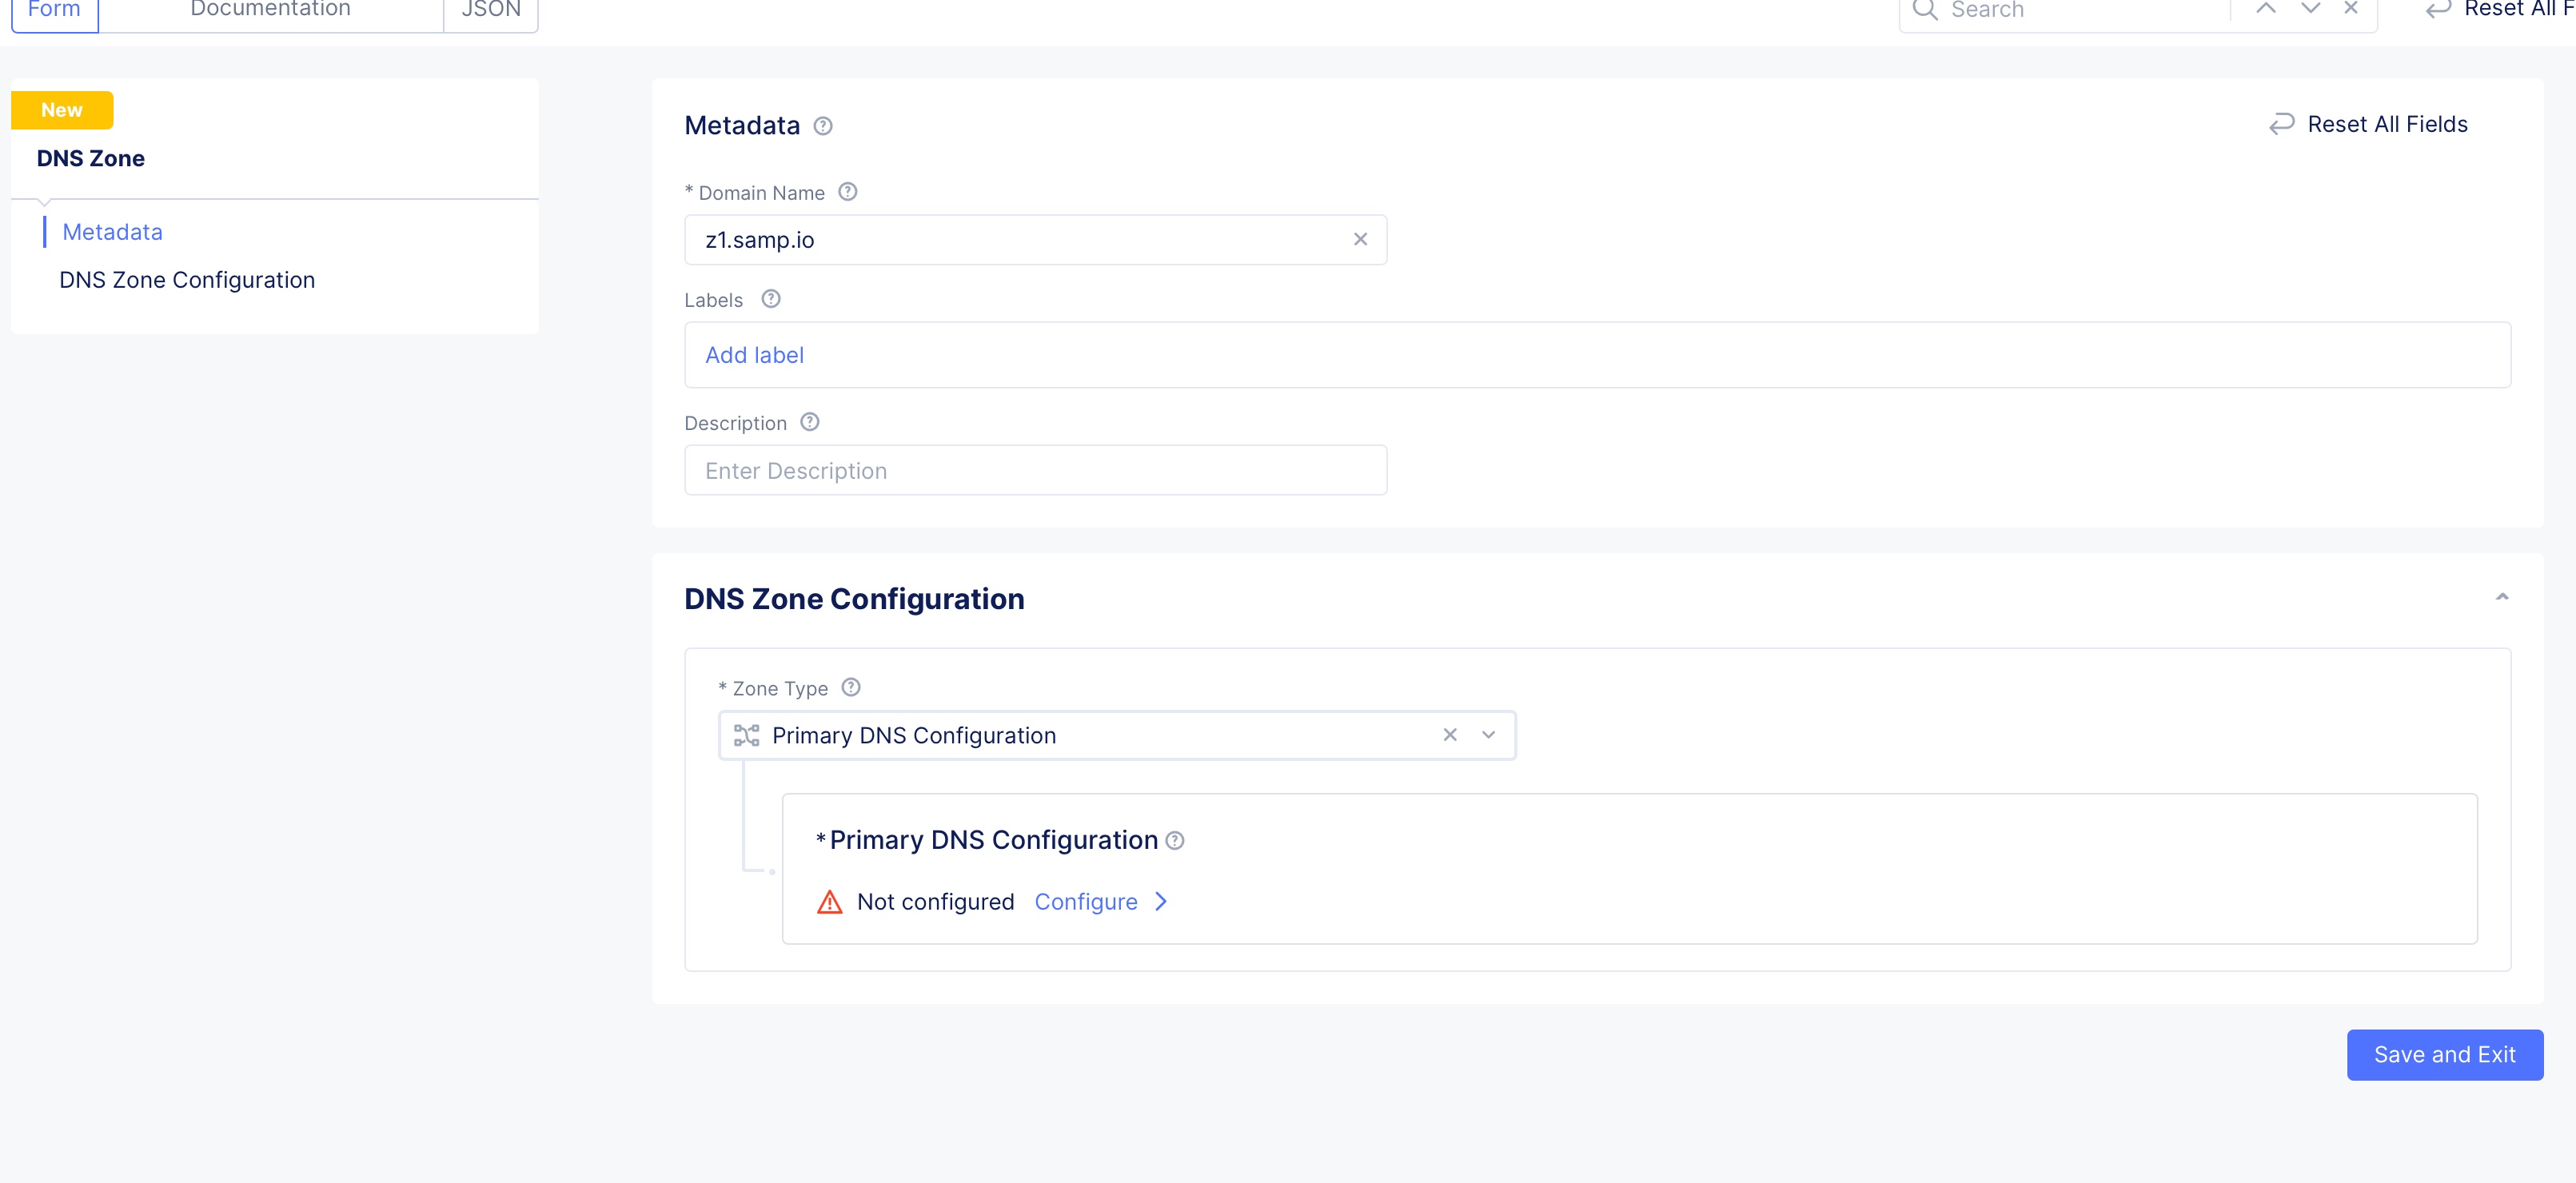
Figure: Add Zone
-
Enter domain or subdomain name in the
Domain Namefield in the metadata section. -
Optionally, set labels and add a description for your zone.
Step 1.2: Start configuring primary zone.
Select Primary DNS Configuration for the Zone Type field in the DNS Zone Configuration section. Click Edit Configuration under the Primary DNS Configuration field. Do the following in the zone configuration form:
- In the
SOA Record Parameterssection, theUse Default Parametersis populated by default. To customize this, selectSOA Record Parametersoption, clickView Configuration, and set the SOA parameters such as refresh interval, retry interval, TTL, etc.
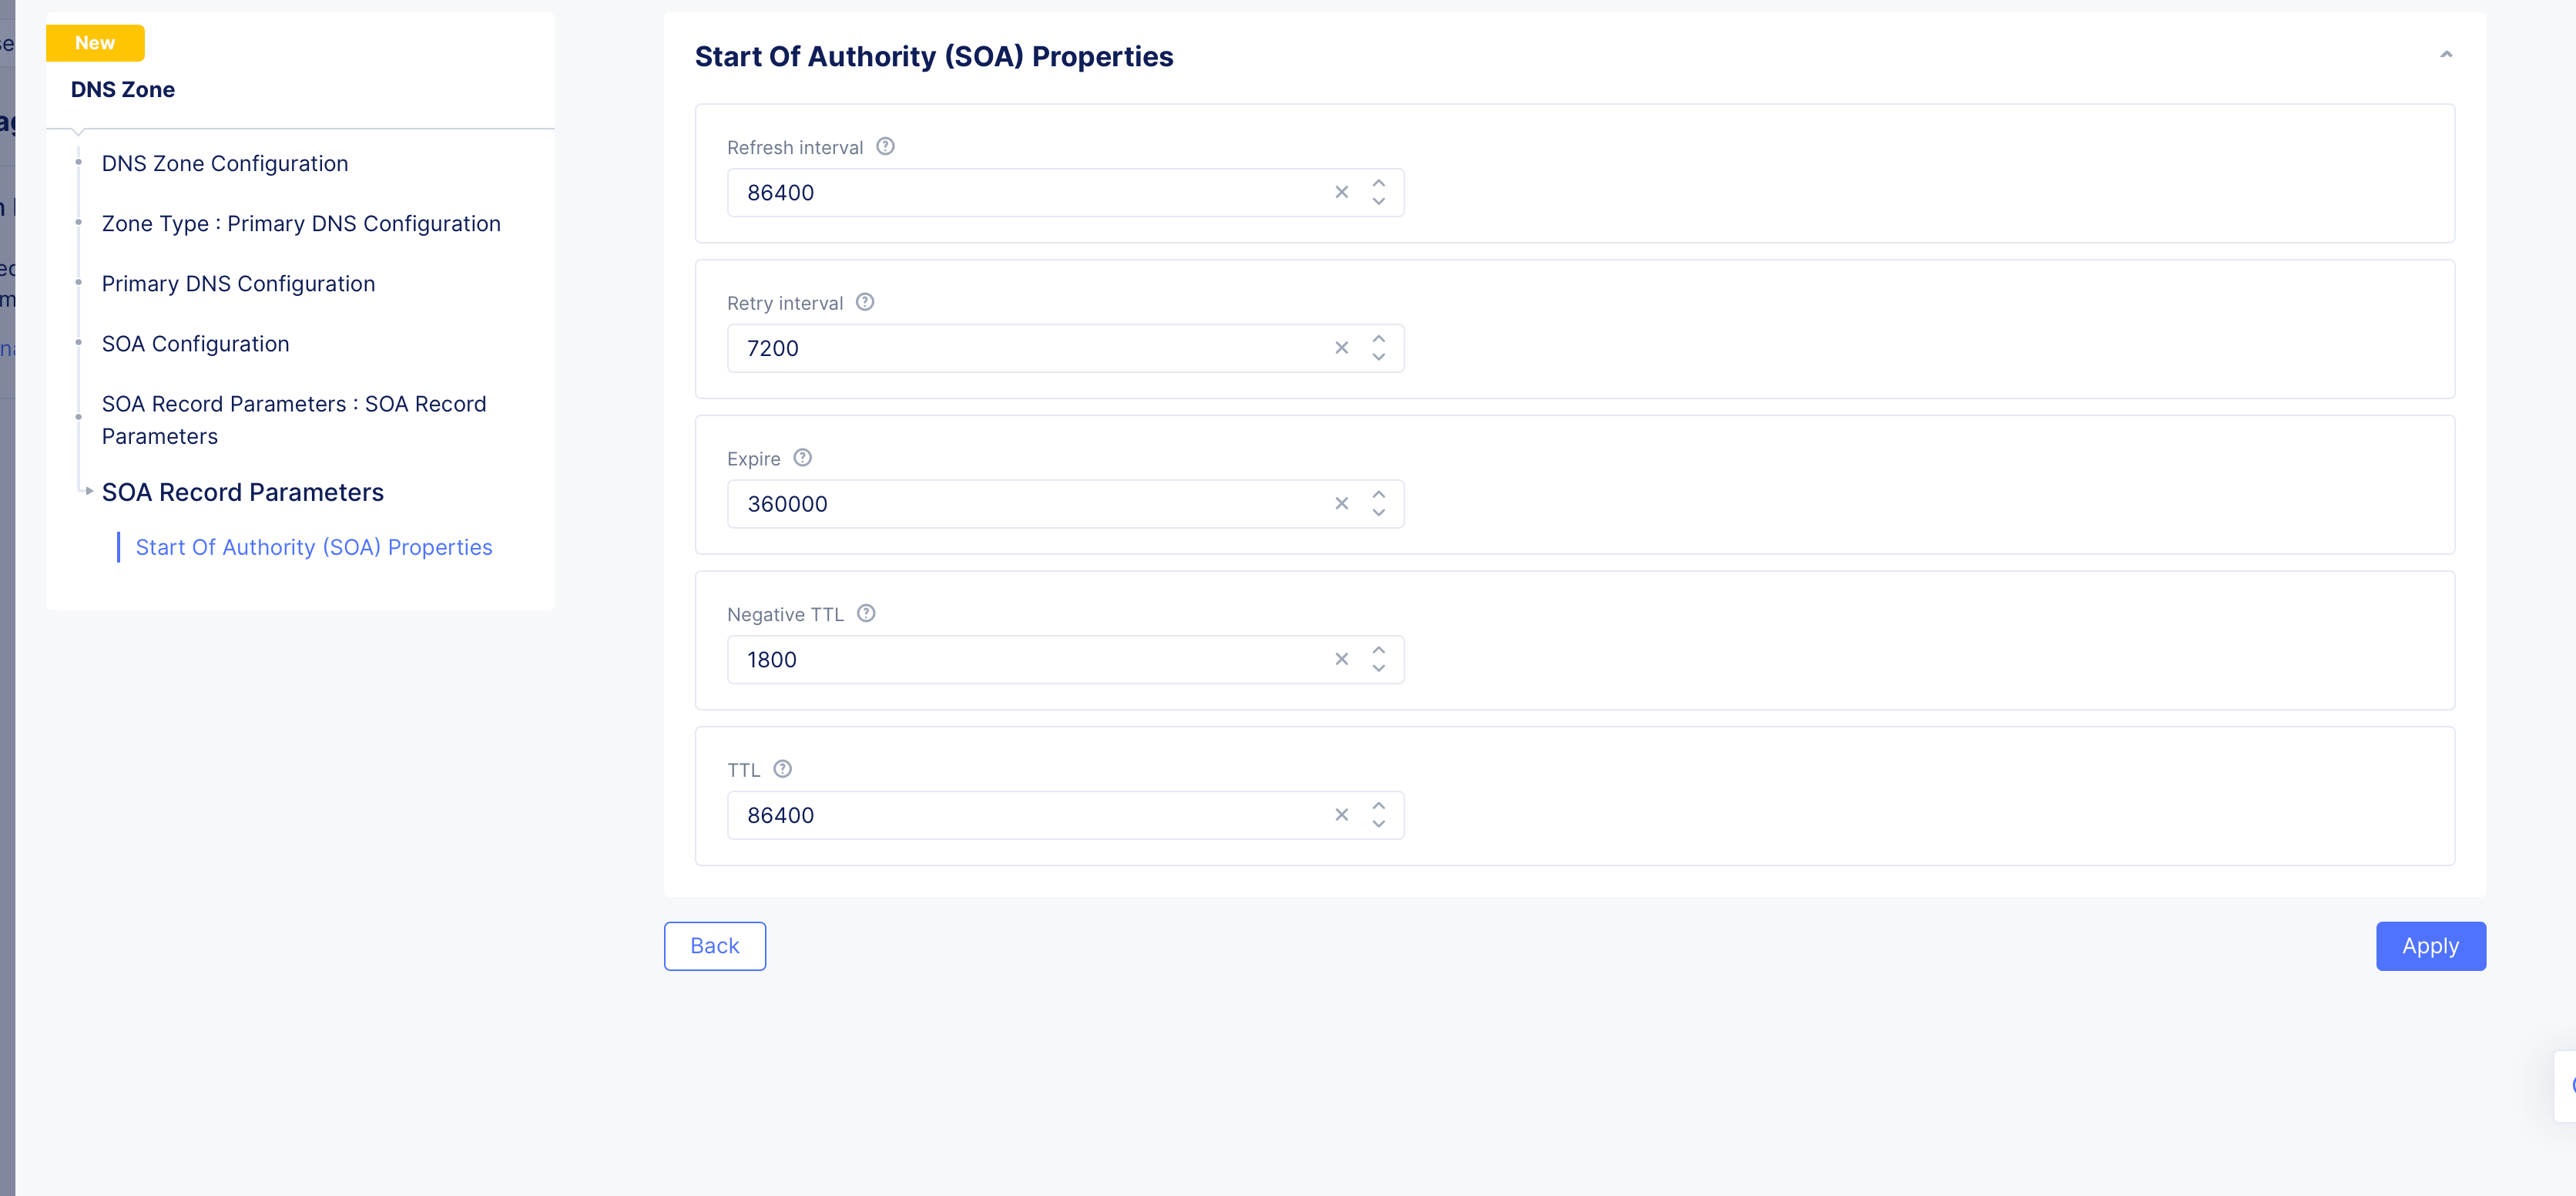
Figure: SOA Custom Configuration
Step 1.3: Configure resource record sets for the default group.
-
Go to
Resource Record Setssection and clickAdd Item. The resource record sets configuration form opens. -
Enter a value for the
Time to livefield. -
Select a record type for the
Record Setfield, enter a name for your record name in theRecord Namefield, and set the fields as per your record type selection. Refer to the following table for the record type and field mapping:
| Record Type | Fields | Notes |
|---|---|---|
| A | List of IPv4 Addresses | Enter IPv4 addresses. |
| AAAA | List of IPv6 Addresses | Enter IPv6 addresses. |
| ALIAS | Domain | Enter alias domain name. |
| CAA | Tags and Value | Enter a tag and its value. |
| CNAME | Domain | Enter domain name. |
| MX | Domain and Priority | Enter domain and priority in the MX Record Value section. |
| NS | List of Name servers | Enter the FQDN for the name servers. |
| PTR | List of Name servers | Enter the FQDN for the name servers. |
| SRV | Priority, Weight, Port, Target | Click Add Item in the SRV Value section and set the parameters. |
| TXT | List of Text | Add the TXT record. |
| DNS Load Balancer | DNS Load Balancer Records | Add the DNS Load Balancer record. |
| NAPTR | Naming Authority Pointer | Enter regex based domain names used in URIs. |
| DS | Delegation signer | Enter the signer to identify DNSSEC signing key of a delegated zone. |
| CDS | Child DS | Enter Child copy of DS record, for transfer to parent. |
| EUI48 | MAC address (EUI-48) | Add uniquely identified MAC address as per the EUI-48 specification. |
| EUI64 | MAC address (EUI-64) | Add uniquely identified MAC address as per the EUI-48 specification. |
| AFS | AFS record | Enter the AFS record. |
| DNSKEY | DNS Key | Enter the type, protocol, algorithm, and public key. |
| CDNSKEY | Child DNS Key | Enter the type, protocol, algorithm, and public key. |
| LOC | Location information | Enter geographical details such as latitude, longitude, hemispheres, etc. |
| SSHFP | SSH Key Fingerprint | Enter the fingerprint algorithm, type, and hexadecimal hash result of the ssh key. |
| TLSA | TLS Certificate Association | Enter the usage, selector, matching type, and association data. |
| CERT | Public Key Certificate | Enter the type, key tag, algorithm, and certificate. |
Note: Use the
Add itembutton available in each record type configuration to add more than one record for that record. See DNS Load Balancer for instructions on how to configure DNS load balancer for your zone.
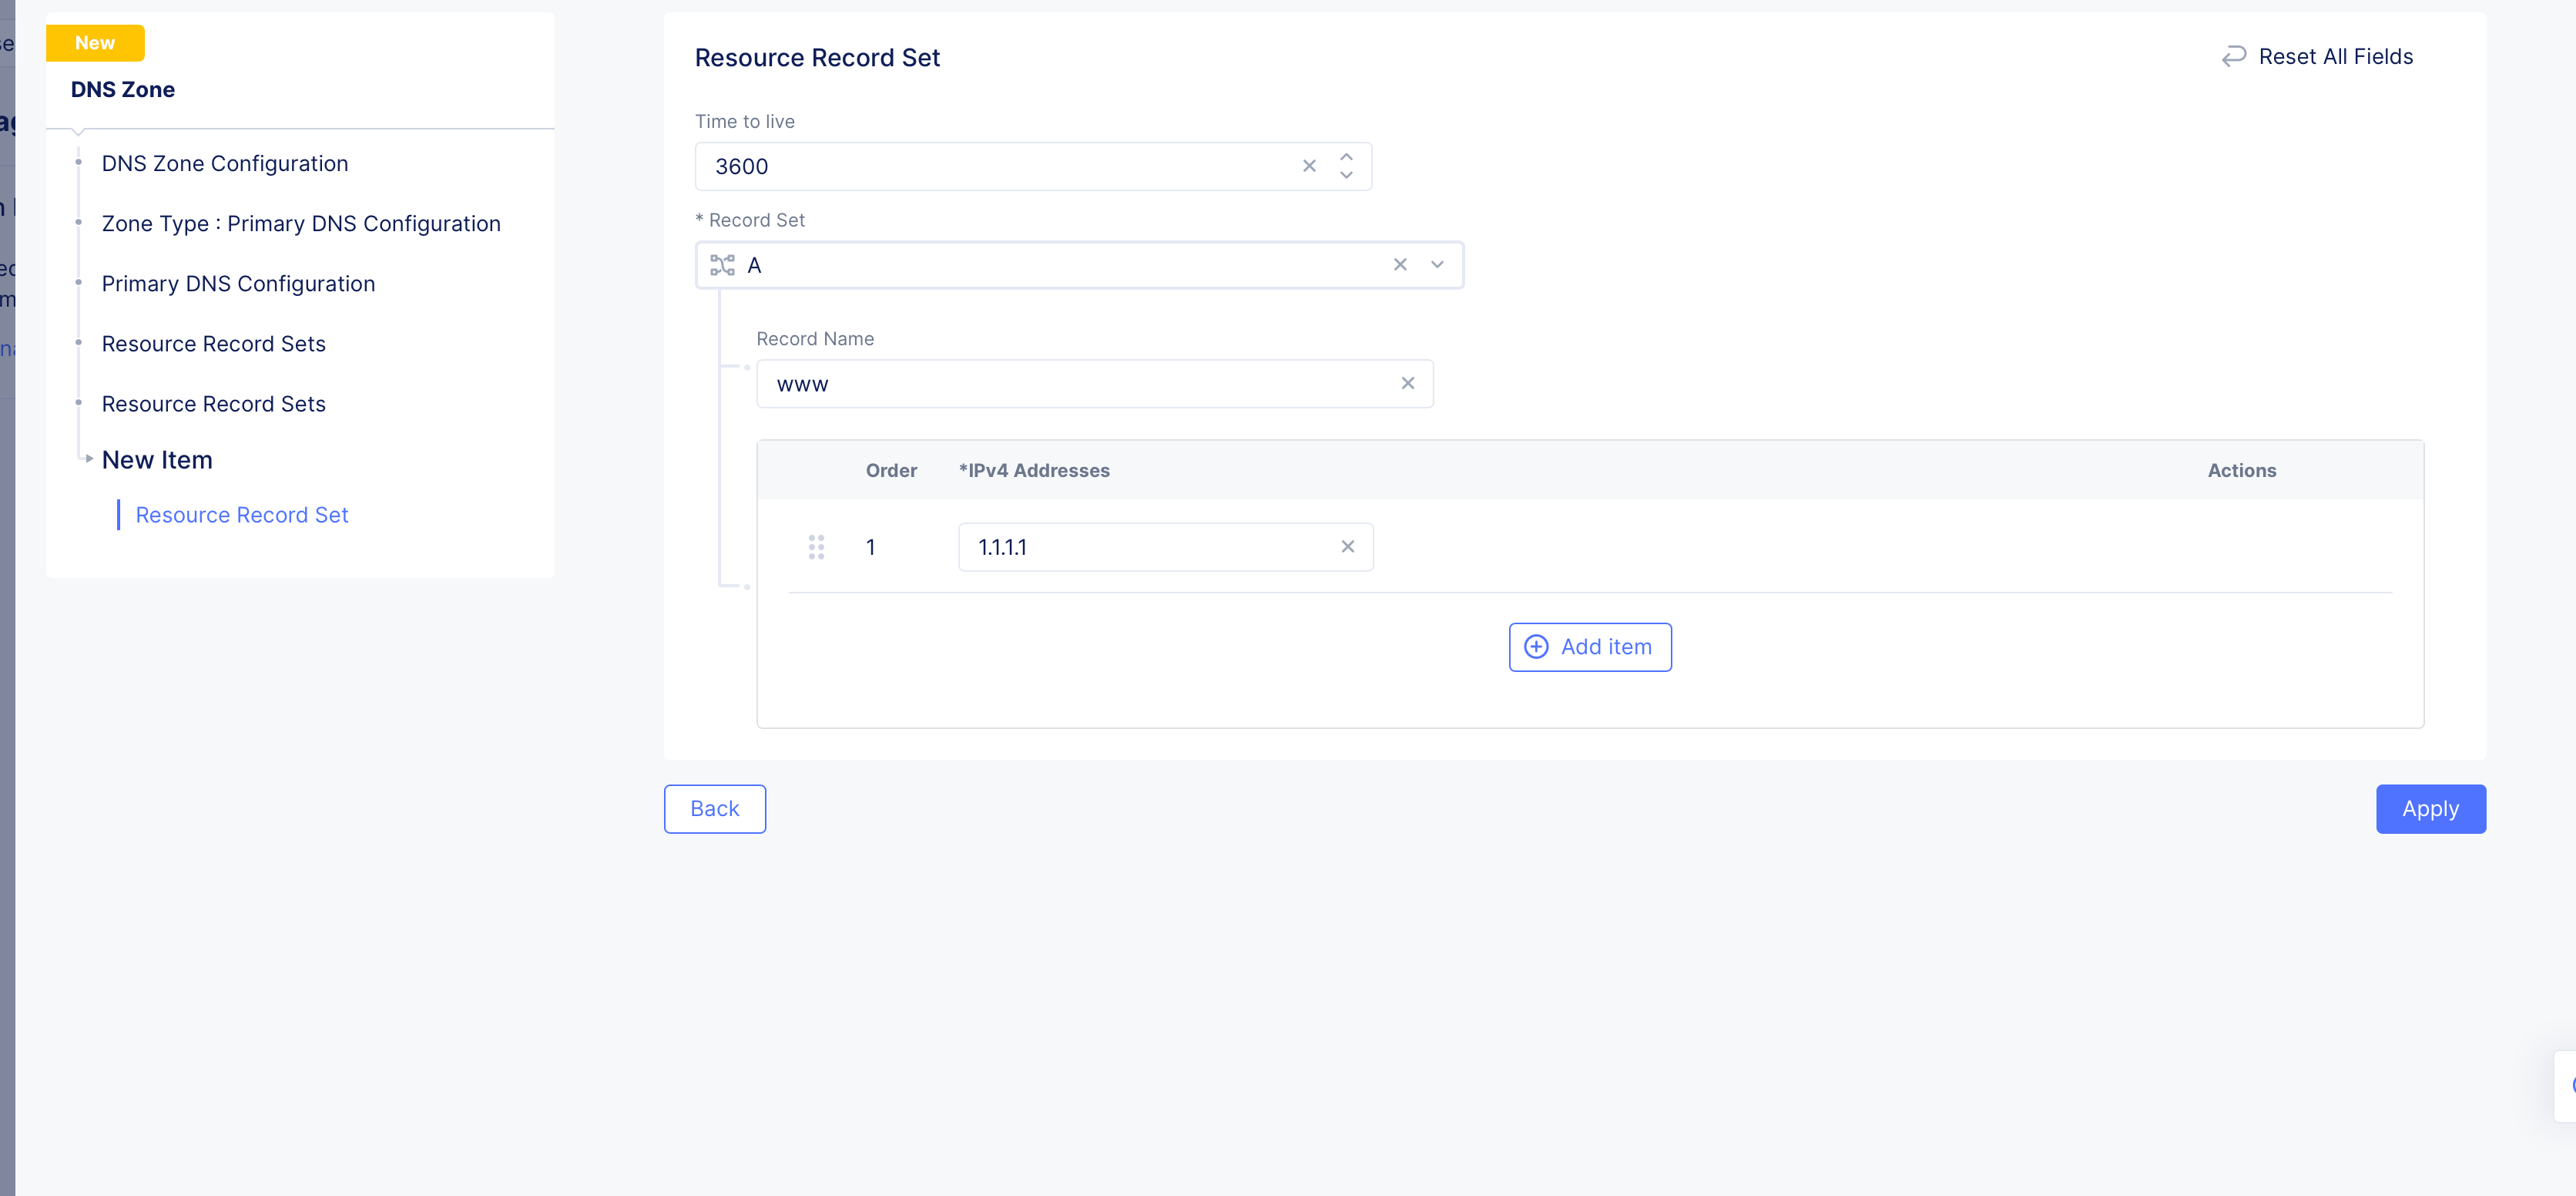
Figure: Resource Record Set
- Click
Add Itemto add the resource record set to the list of resource record sets. Use theAdd Itembutton to add more than one resource record step.
Step 1.4: Configure specific resource record sets group.
This step configures specific groups for resource record sets. A resource record sets group allows grouping of DNS records to make it easier to manage them. For example, you can group DNS records that belong to the same application.
-
Enable
Show Advanced Fieldsin theResource Record Setssection. -
Click
Add Itemin the appearedAdditional Resource Record Setssection. This opens new resource record sets form. -
Enter a
Namein the metadata section. -
Click
Add Itemin theResource Record Setssection. This opens the resource record sets configuration form. -
Configure the records in the same way as mentioned in previous step.
-
Click
Add Itemto add the resource record set to the group. Use theAdd Itembutton to add more than one resource record set. -
Click
Add Itemin theResource Record Setsform to add the group to theAdditional Resource Record Setssection. Use theAdd Itembutton to add more than one group.
Step 1.5: Optionally, enable DNSSEC and load balancer management.
- In the
DNSSEC Modesection, selectEnablefor theDNSSEC Modefield if you want to use DNS security extensions (DNSSEC) to authenticate DNS response data.
Note:
DNSSEC Modeis disabled by default.
- Check the
Allow HTTP Load Balancer Managed Records. This is only optional for a legacy delegated domain.
Note:
Allow HTTP Load Balancer Managed Recordsis unchecked by default, which might have made sense for a delegated domain. However, Distributed Cloud Services has deprecated the Delegated Domain capability, which means that new domains will need to be setup as a Primary DNS zone corresponding to your HTTP Load Balancer (which is what you created in these steps), and you must check theAllow HTTP Load Balancer Managed Recordscheckbox for the HTTP Load Balancer to work properly.
Step 1.6: Complete creating the primary zone.
- Click
Applyin the primary zone configuration form.
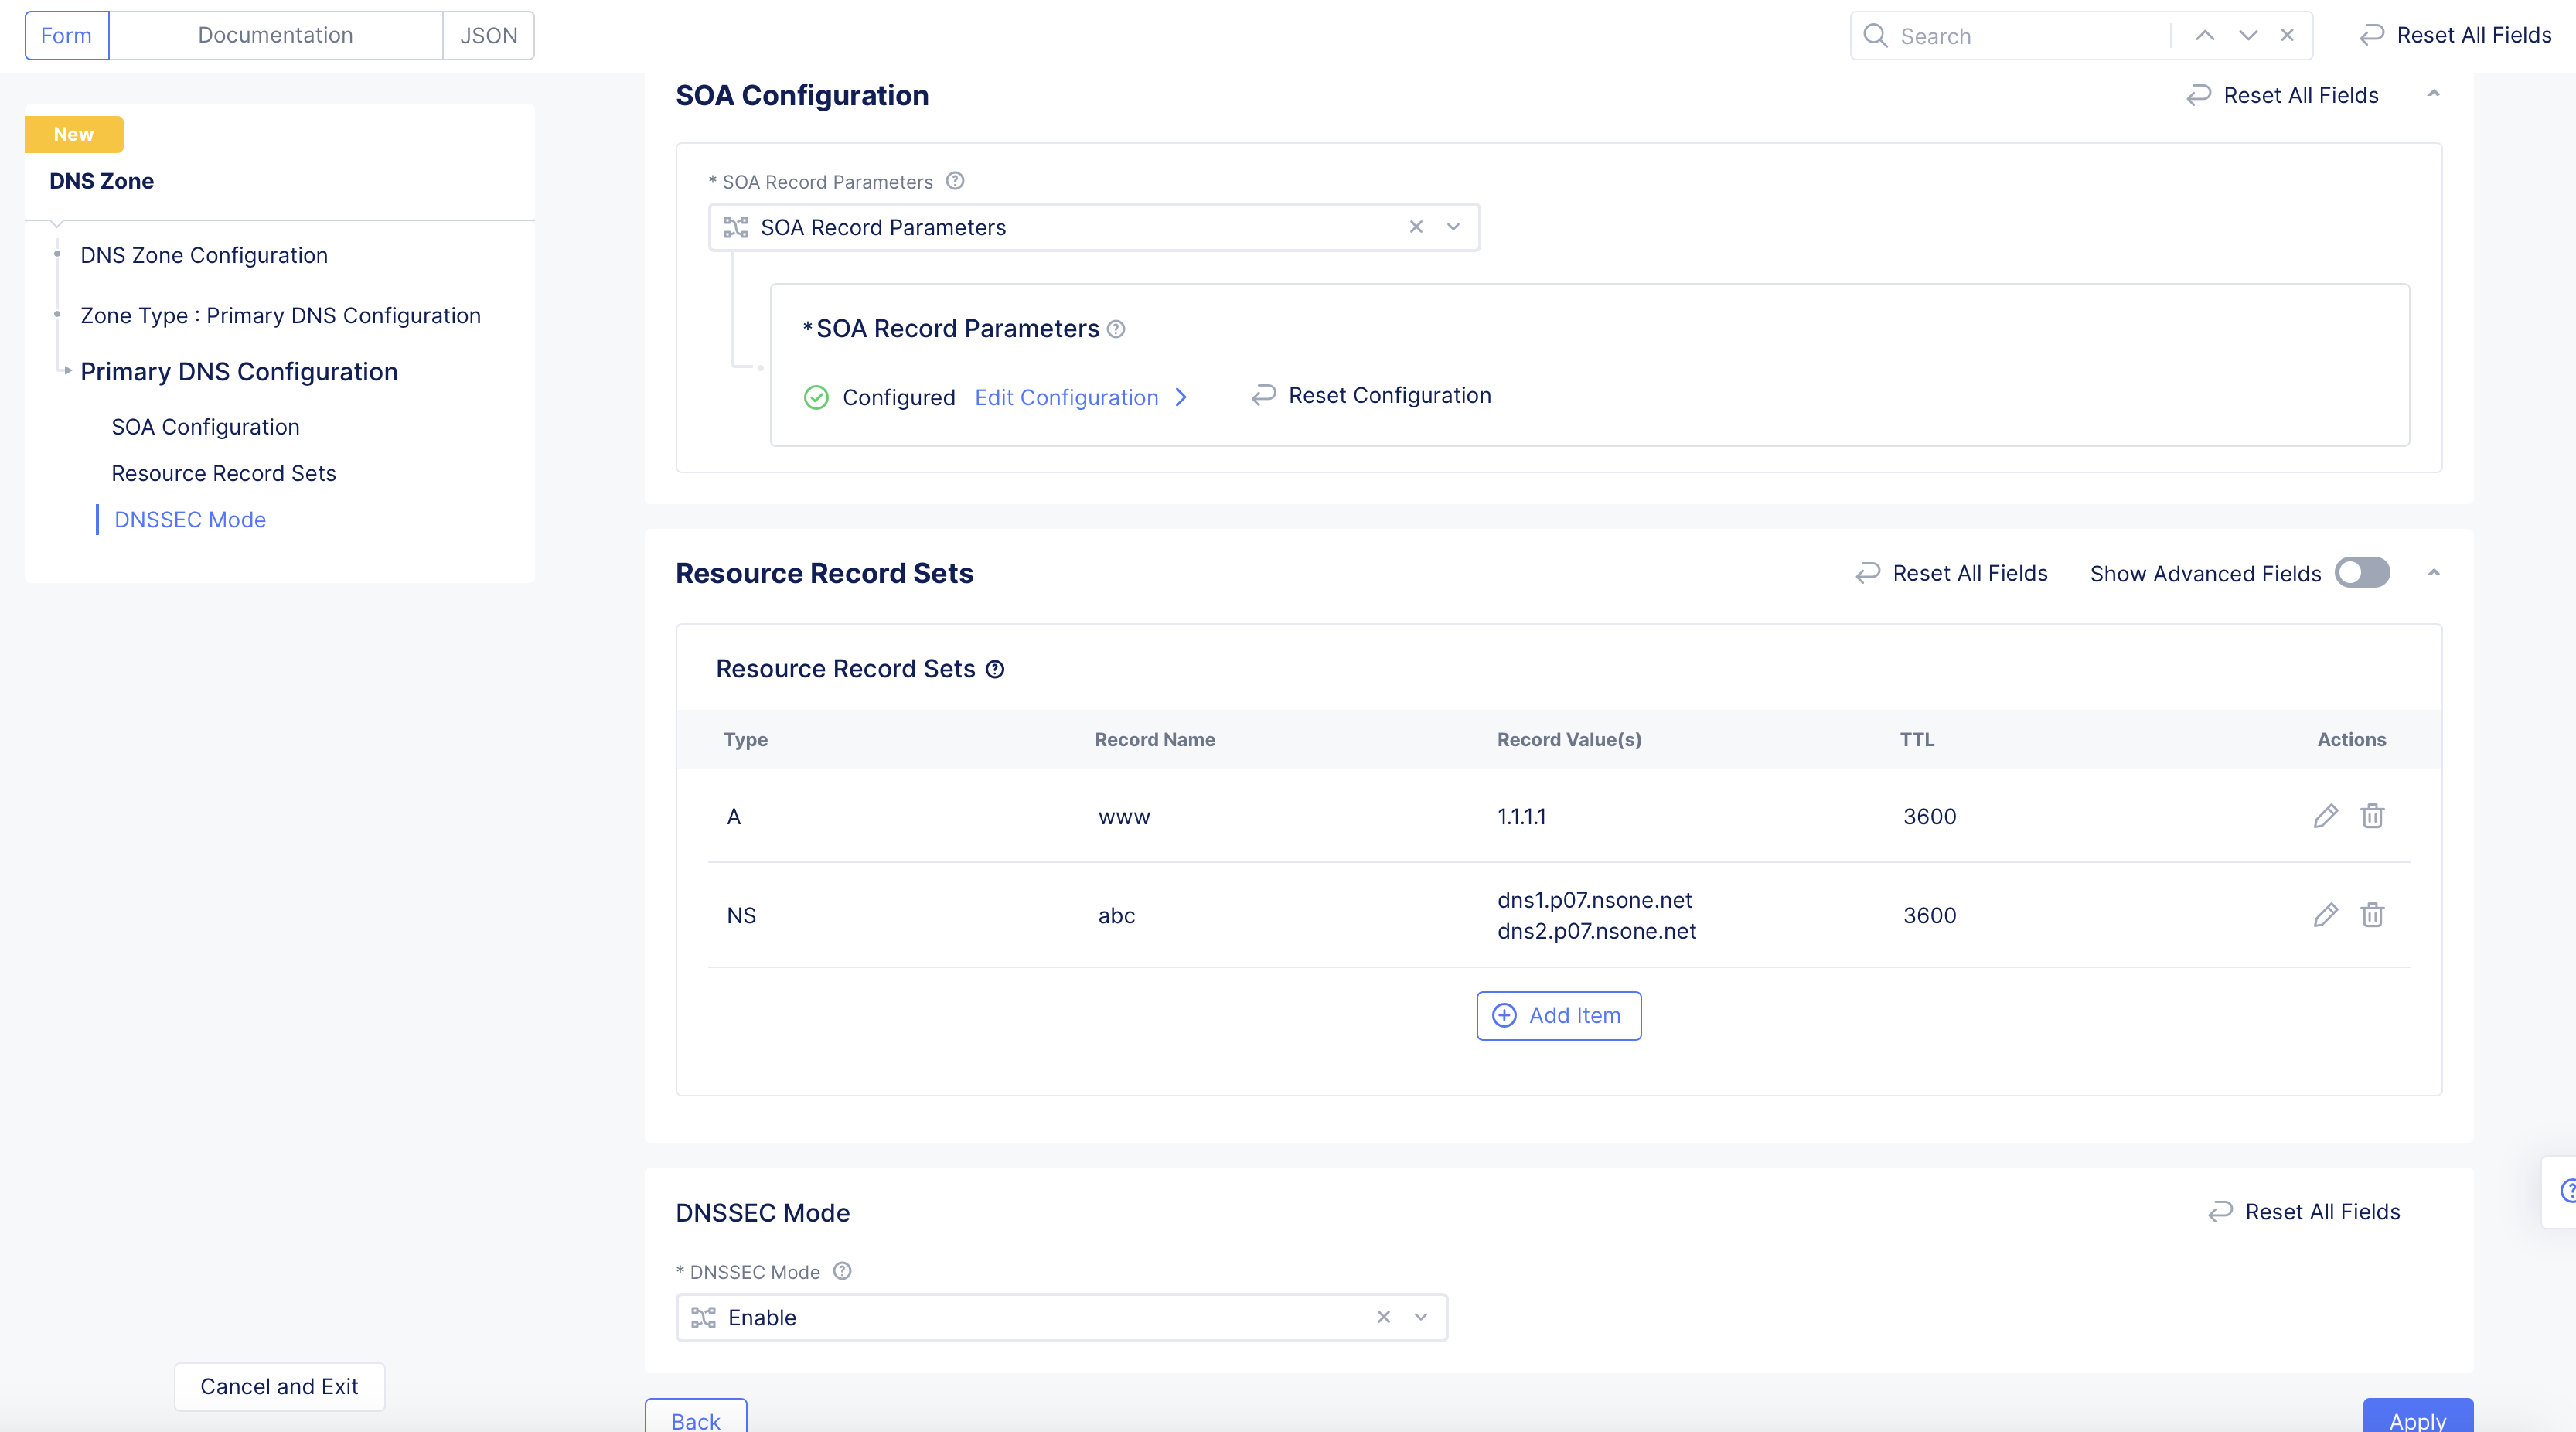
Figure: Primary Zone Configuration
- Click
Save and Exitin the main zone configuration form to complete creating the primary zone.
Note: In case you enabled the DNSSEC, the system generates a DS record and displays it in the
DNSSEC DS Recordcolumn. Click on the displayed value, clickCopy DS Recordon the displayed window, add the DS record to your parent zone. After primary zone is created, you can use thedig ds <domain name>command to verify that the DS record digest is displayed in the output. This indicates that DNSSEC is functional.
Step 2: Load Balancer
The HTTP load balancer is created with the domain name for which, the DNS and certificate management is delegated to Distributed Cloud Services. As part of load balancer creation, an origin pool is created with the origin server as the public website.
Perform the following steps for creating load balancers to enhance the application performance:
Step 2.1: Obtain the public certificate for the origin server.
This example demonstrates securing the public website cloud.f5.com. You can obtain the public certificate using more than one method. This example shows how to obtain using Firefox browser.
- Open https://cloud.f5.com website in browser.
- Select the padlock symbol on the URL bar and then select the arrow button next to the
Connection Secureoption.
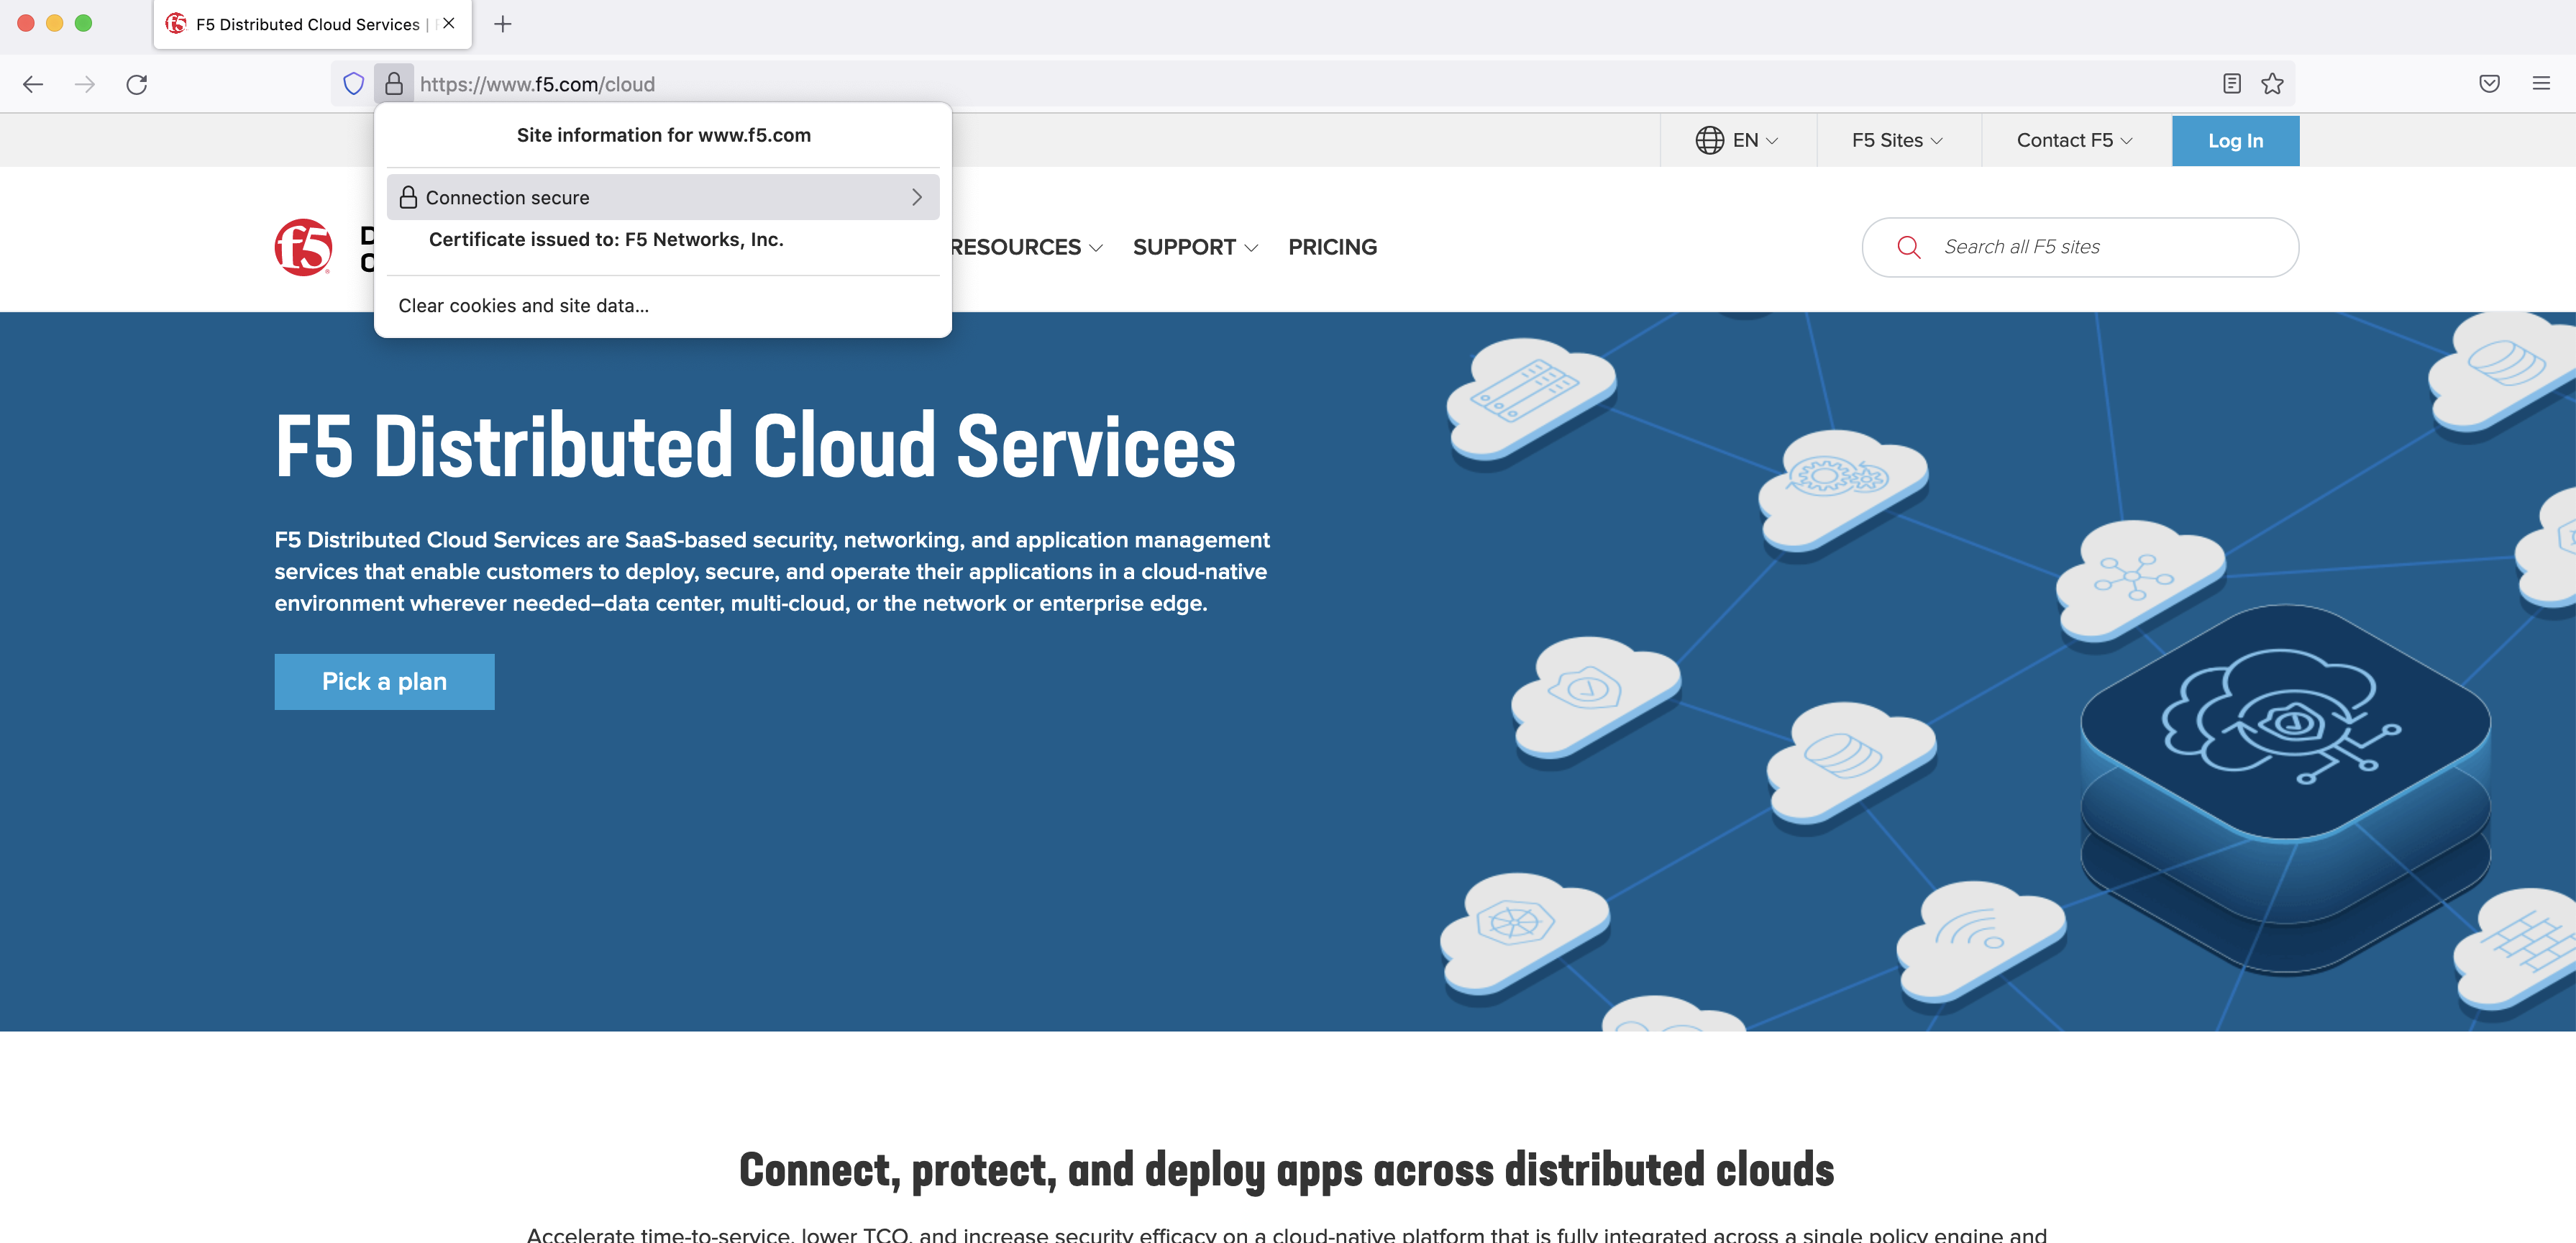
Figure: View Connection Information of Public Site
- Select
More Informationto display the security options.
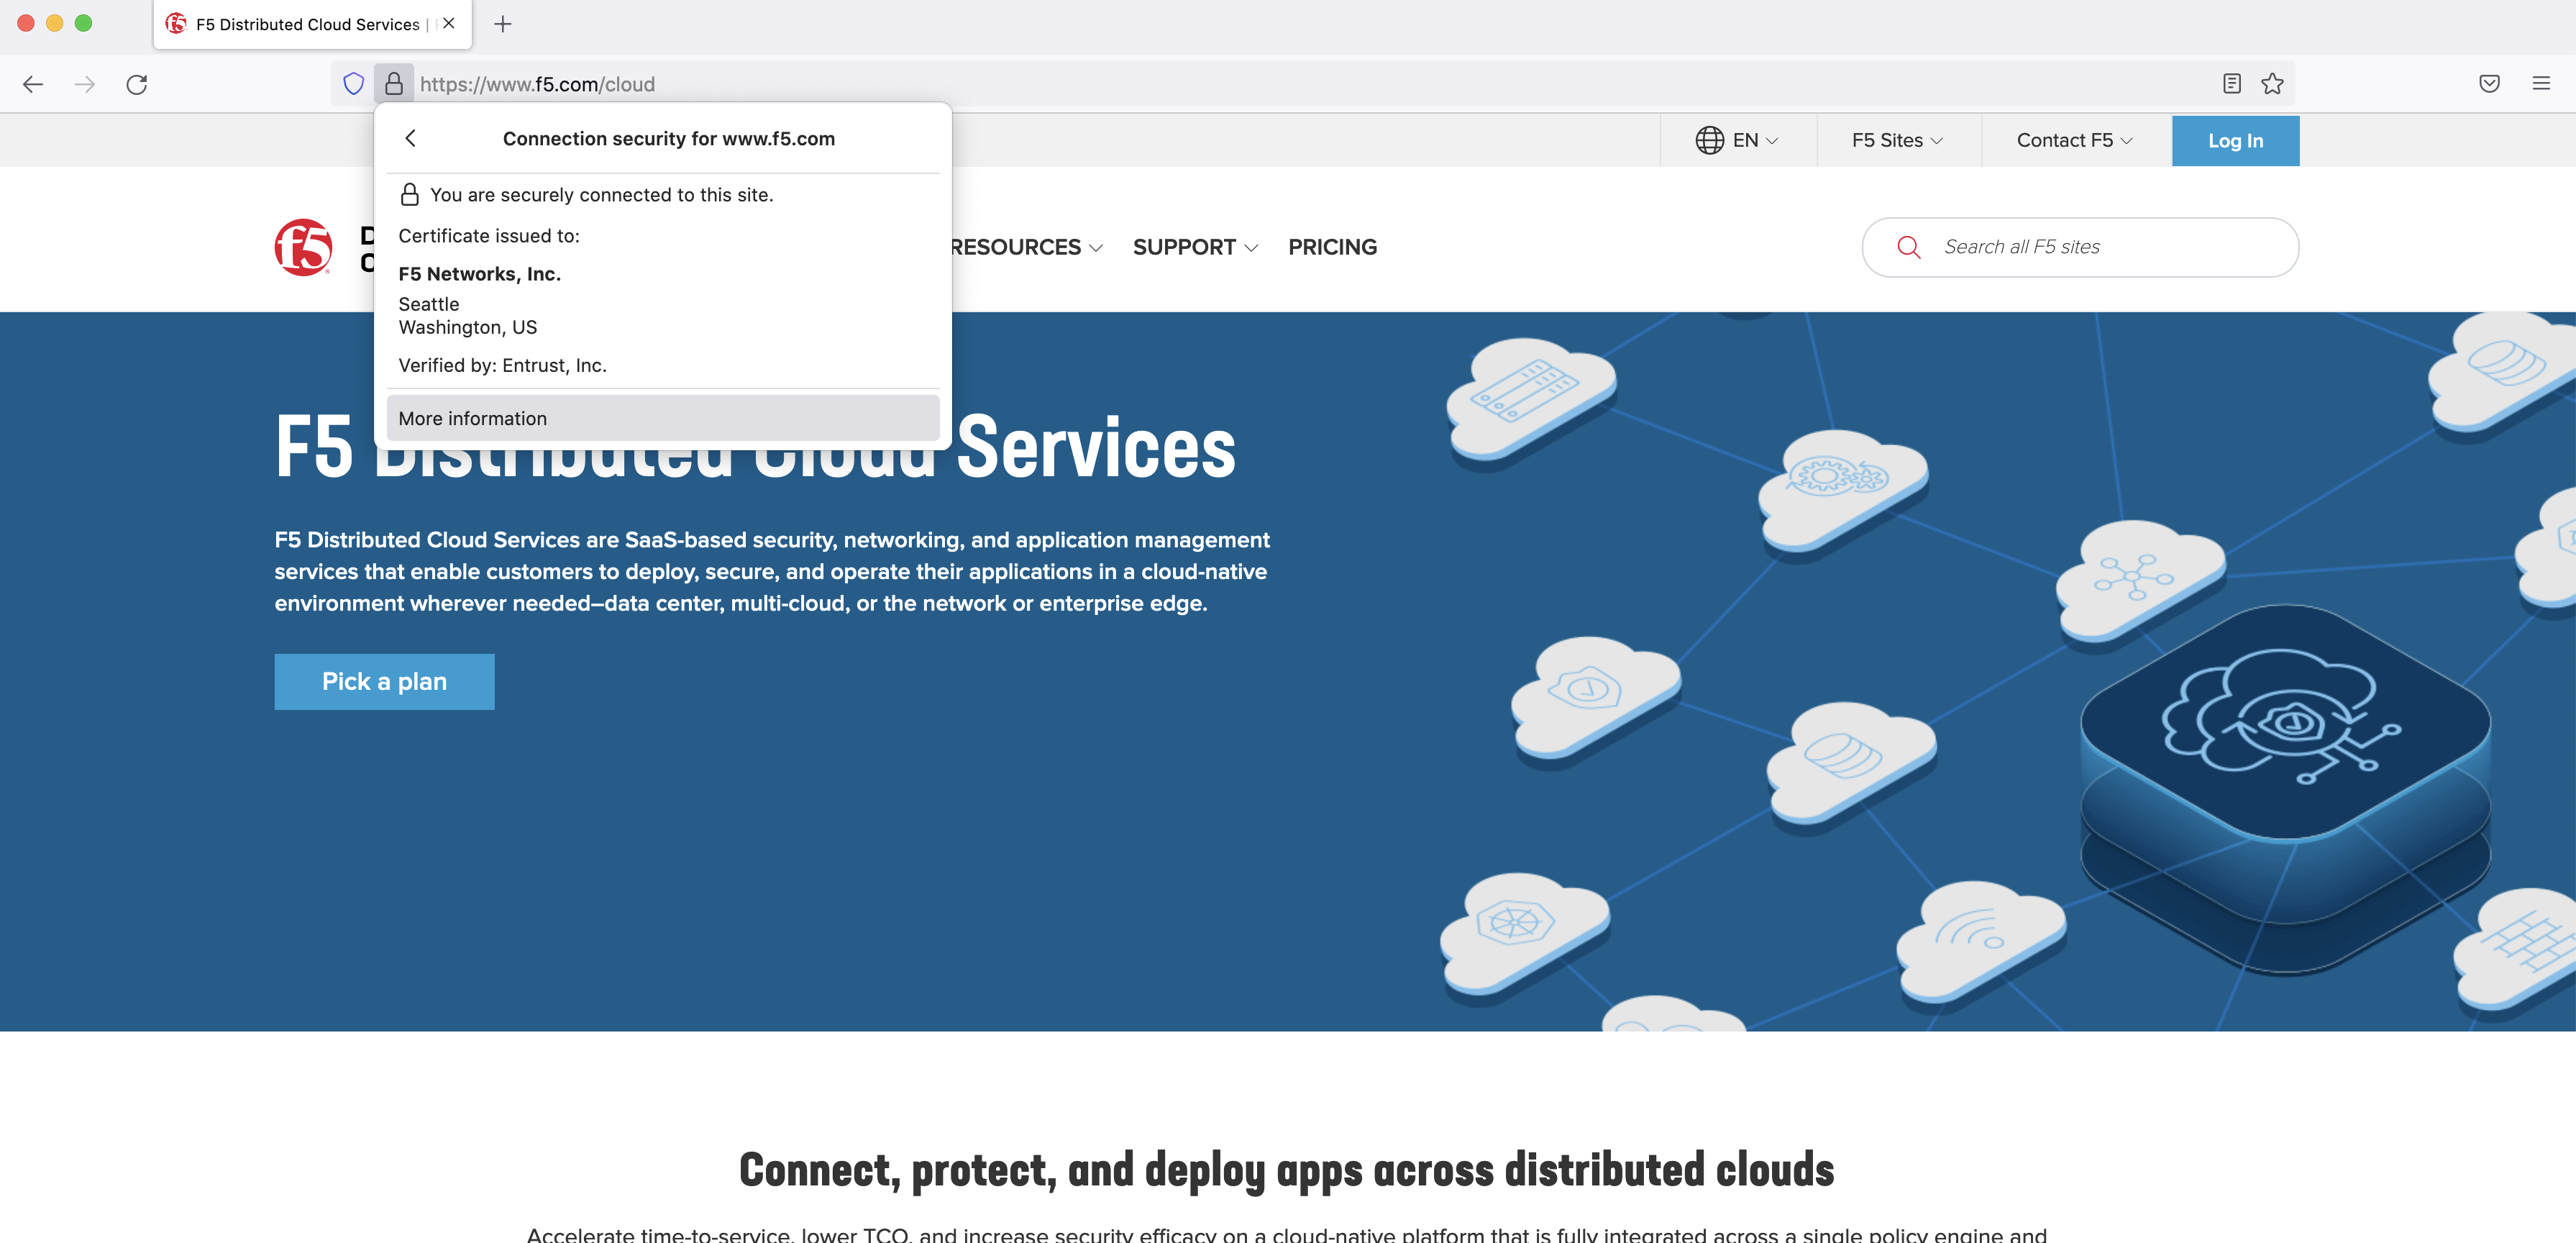
Figure: View Security Information of Public Site
- Select the
View Certificatebutton in the displayed security options.
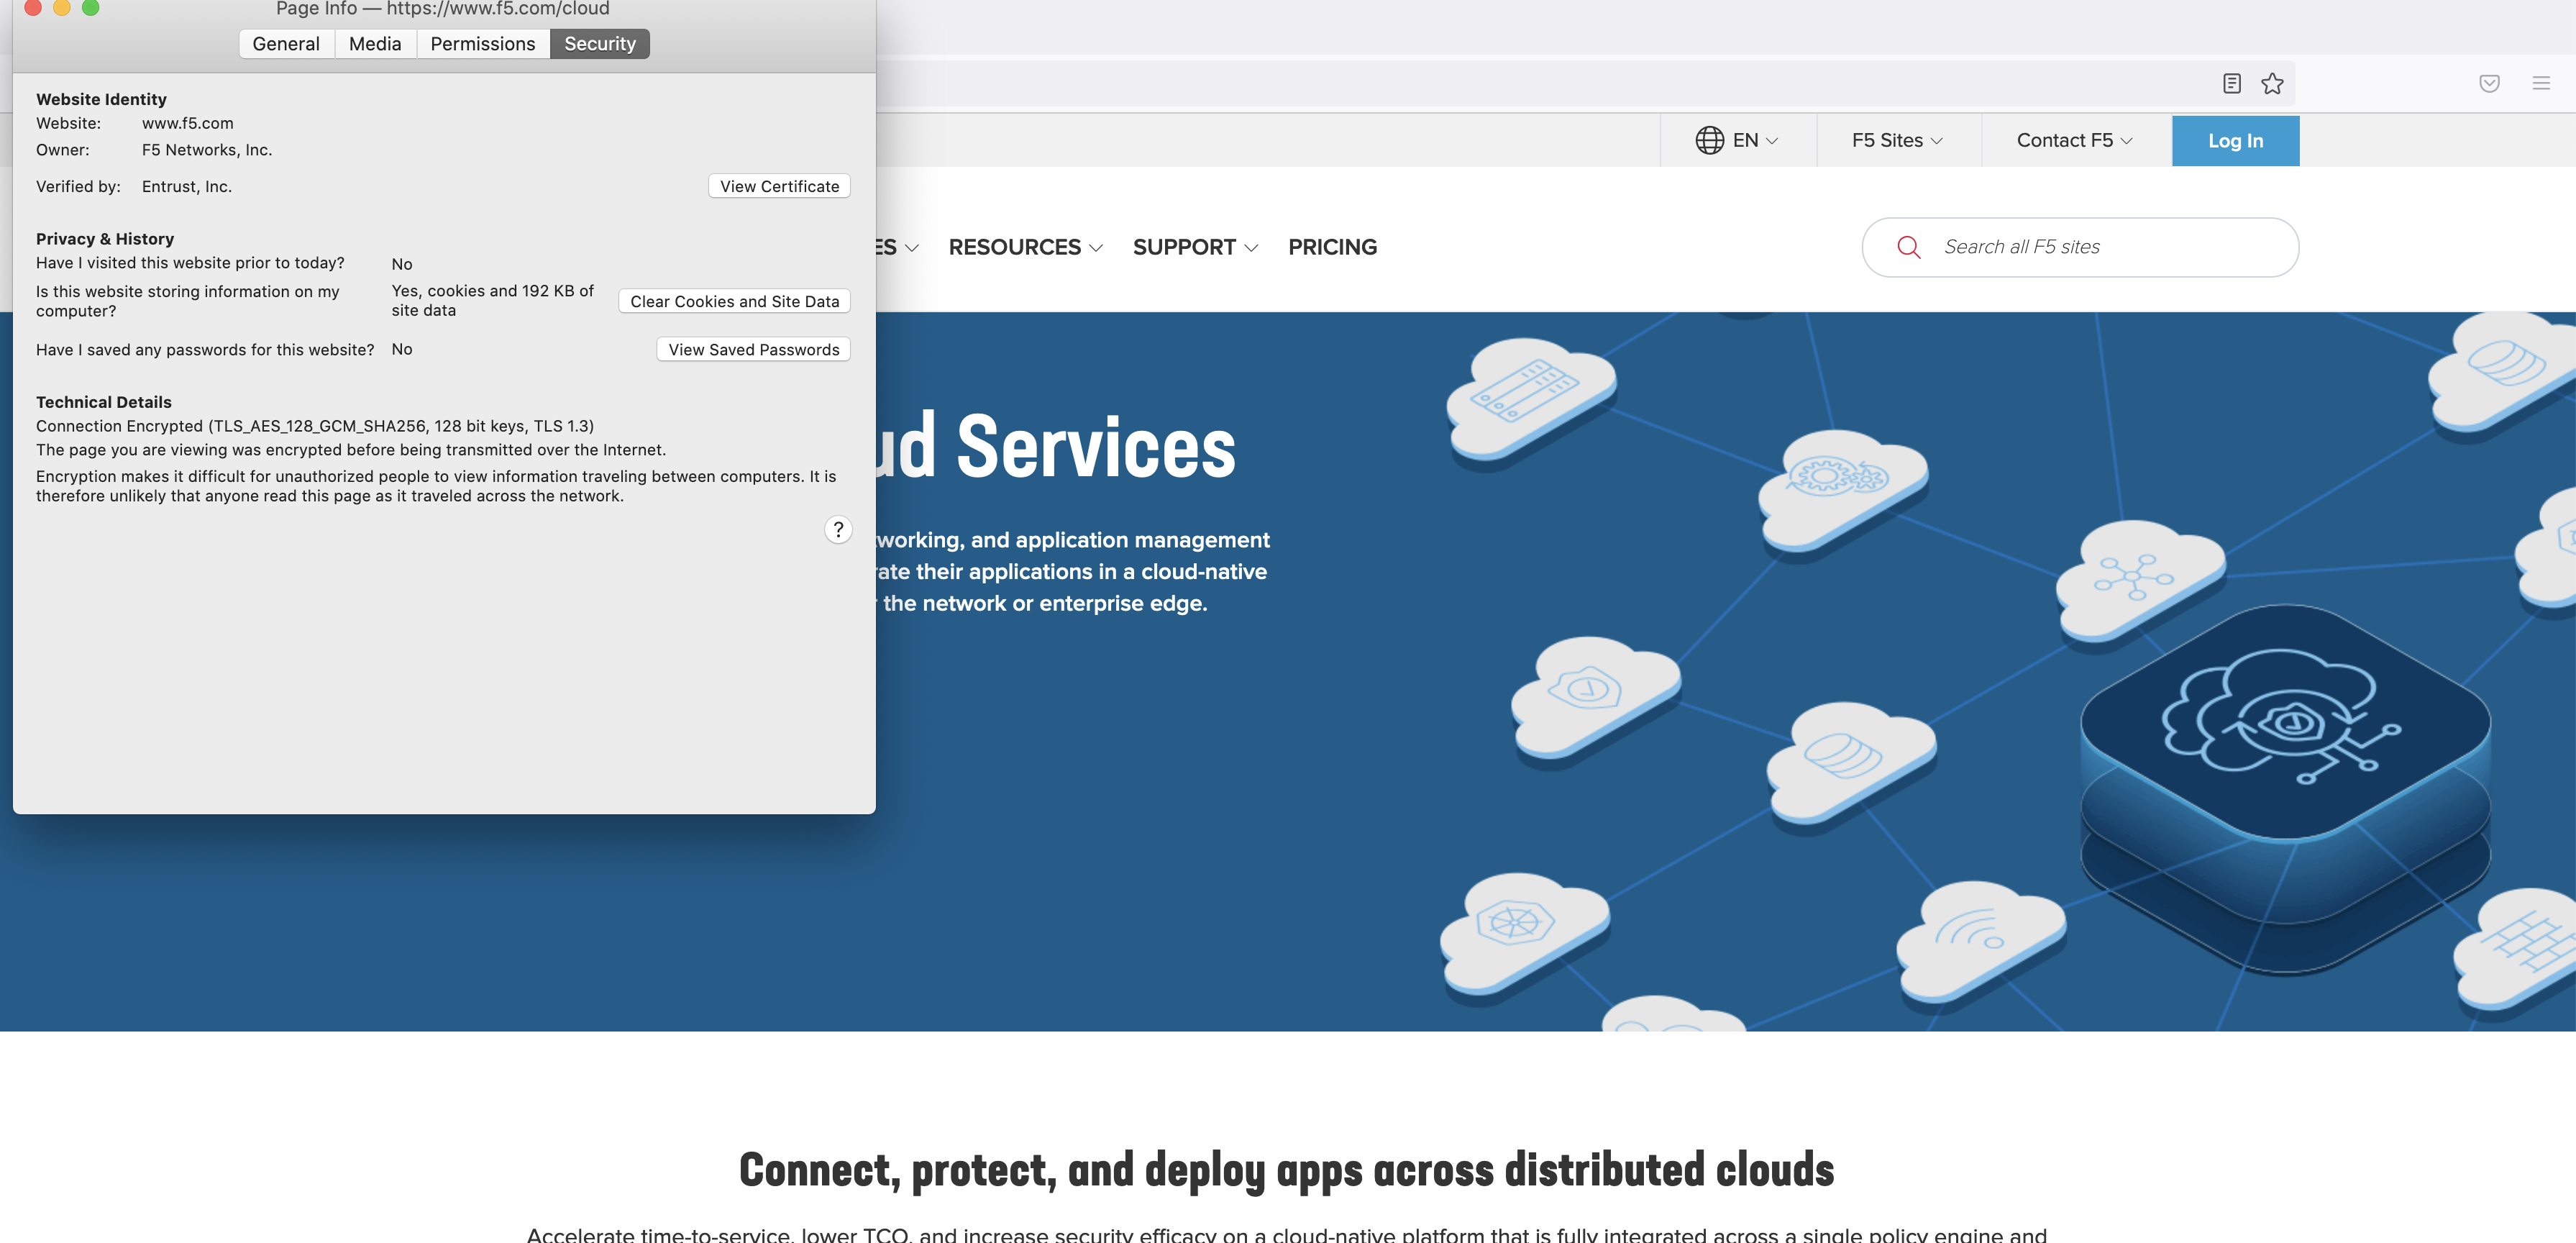
Figure: View Certificate Information of Public Site
- Switch to the
Entrust Root Certification Authority - G2tab and scroll down to theMiscellaneoussection. SelectPEM (Cert)andOkin the confirmation box to download the certificate.
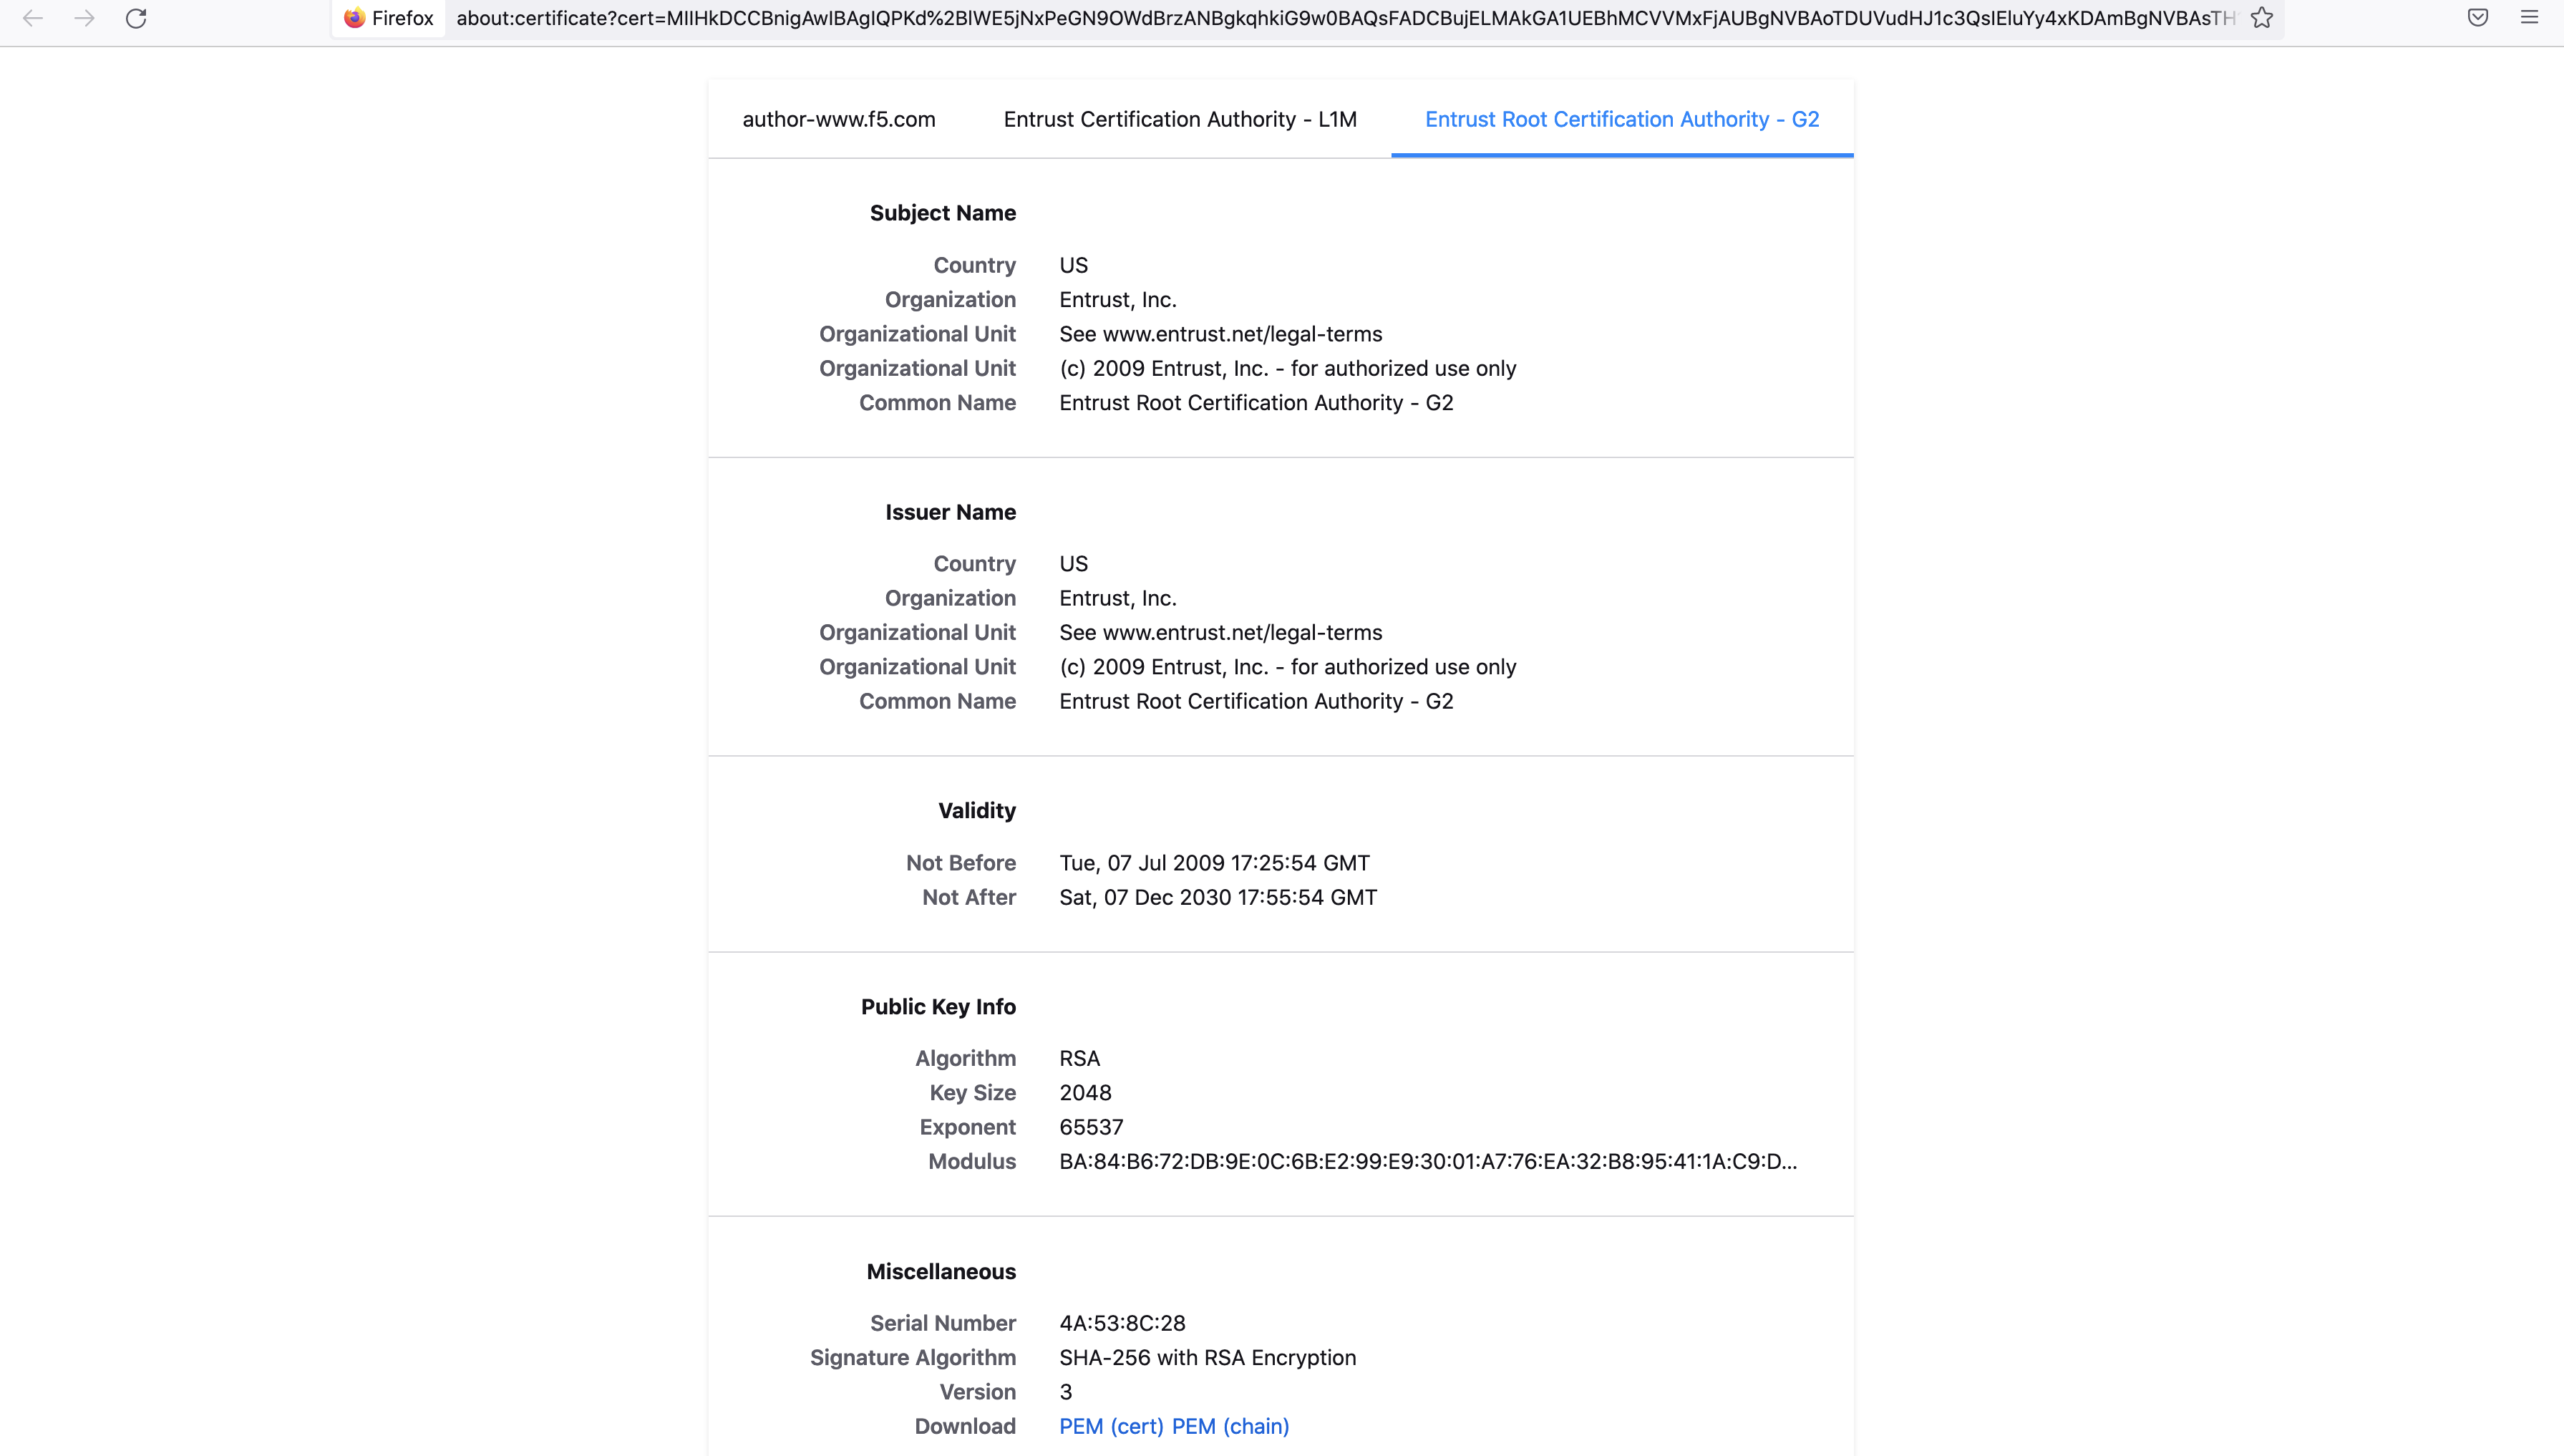
Figure: Download Certificate of Public Site
Step 2.2: Create a namespace.
- Log into the Console and select the
Administrationservice. - Navigate to
Personal Managementand selectMy Namespaces. SelectAdd namespace.
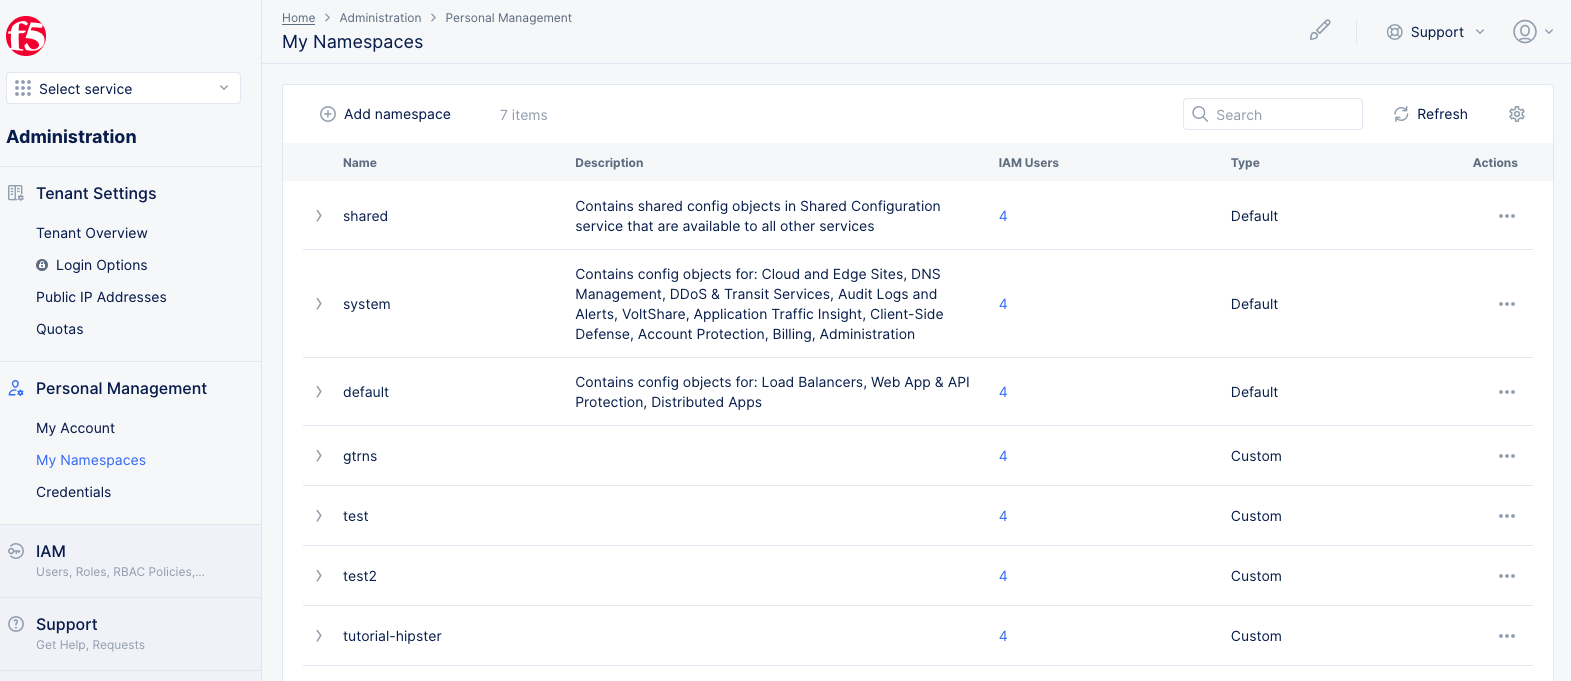
Figure: Manage Namespaces
- Set a name, optionally add users, and select
Save. This example createswaapnamespace.
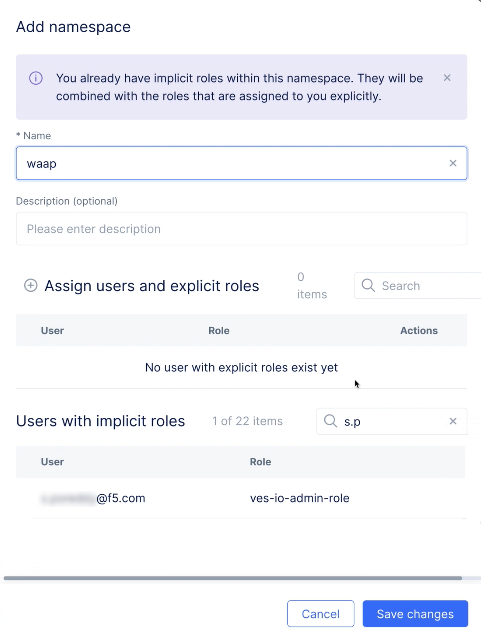
Figure: Create Namespace
Step 2.3: Create origin pool.
- Select the
Web App & API Protectionservice. - Change to your new application namespace and navigate to
Manage>Load Balancers>Origin Pools. - Select
Add Origin Pool. - Enter a name for your origin pool in the metadata section.
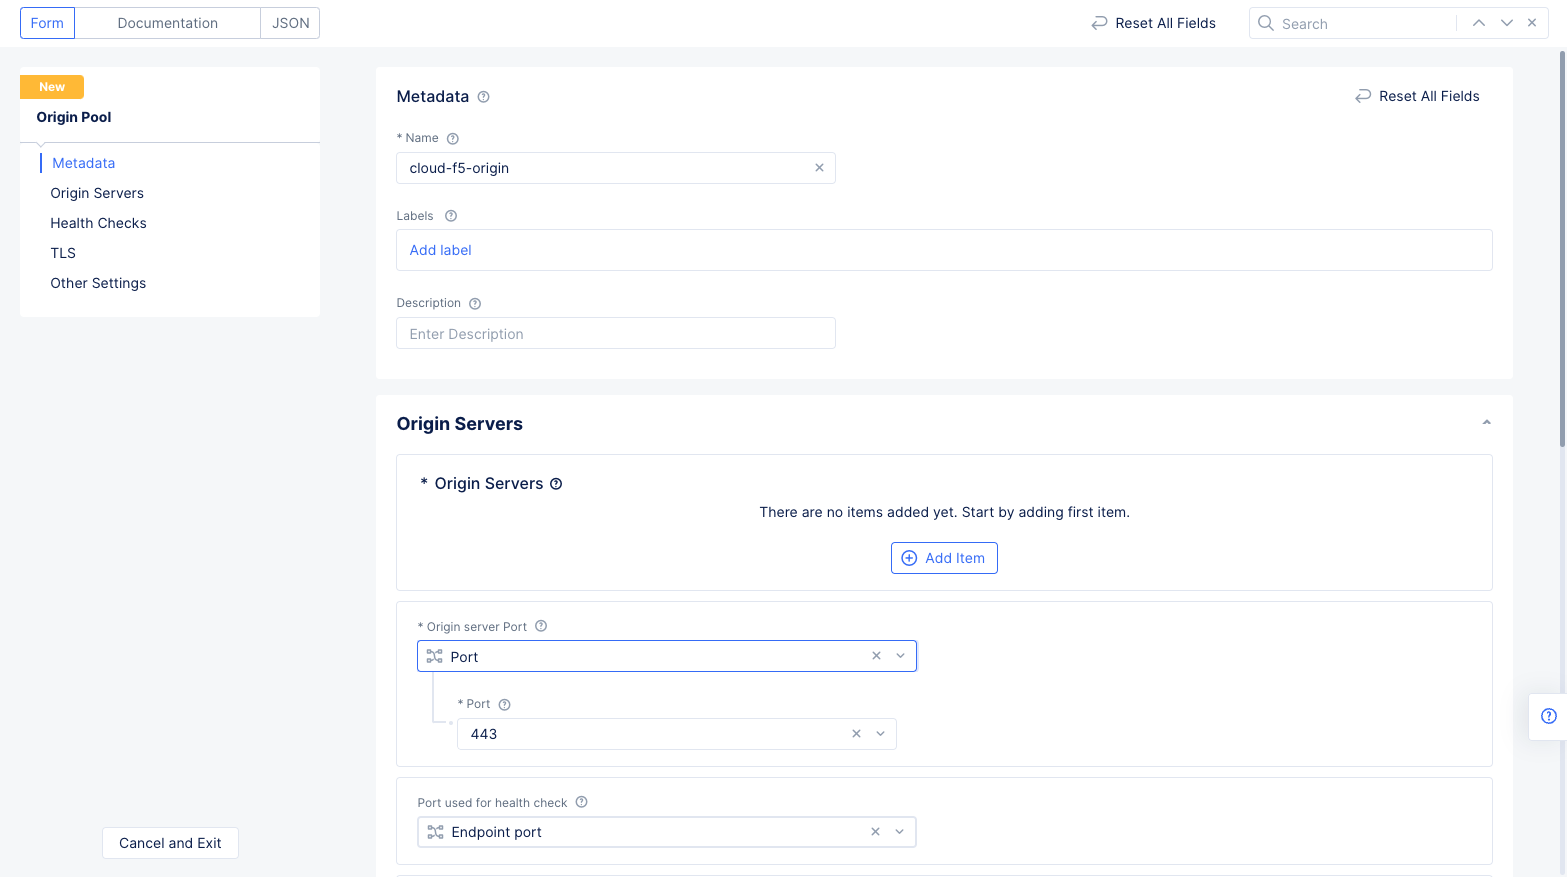
Figure: New Origin Pool
- In the
Origin Serverssection, selectAdd Item.- Select
Public DNS Name of Origin Serverfor theType of Origin Serverfield. - Enter the public DNS name of your origin server in the
DNS Namefield. This example configurescloud.f5.comas the DNS name. - Select
Applyto save the origin server selection.
- Select
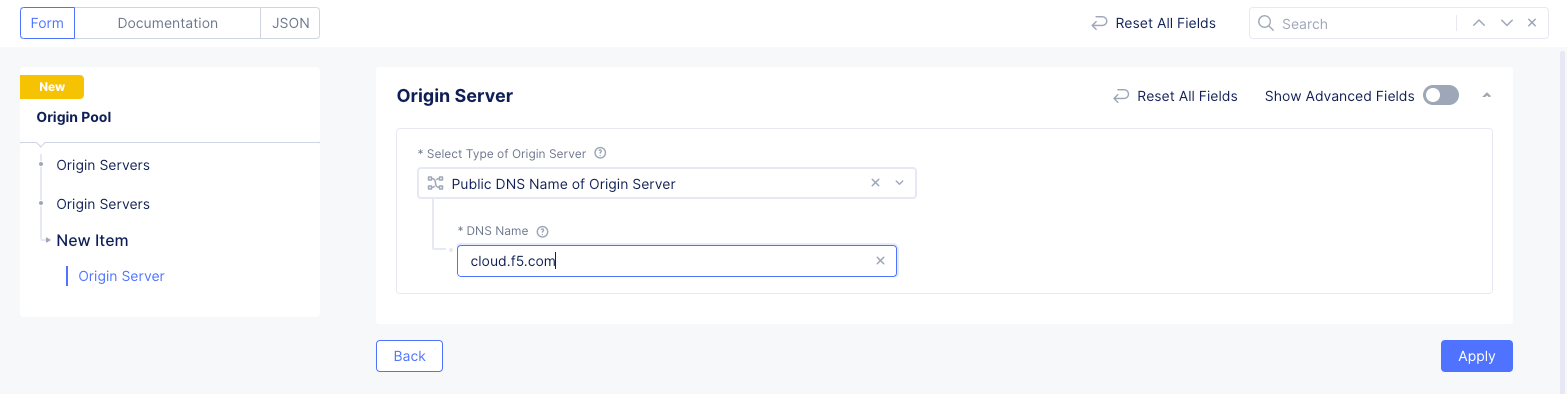
Figure: Origin Pool Basic Configuration
- In the
Origin server Portsection, enter443for thePortfield. - Scroll down to the
TLSsection, and selectEnable. - Select
SNI Valuein theSNI Selectionfield and enter the SNI. This example setscloud.f5.comas theSNI Value. - Select
Highfor theTLS Security Levelfield. - Select
Use Custom CA Listfor theOrigin Server Verificationfield. - Select
Base64(binary)option for theTrusted CAsfield. - Switch to command terminal and encrypt the downloaded public certificate of the website using Base64. Copy the output.
cat author-www-f5-com.pem | base64- Go back to Console and enter the copied Base64 string in the
Trusted CAsfield.
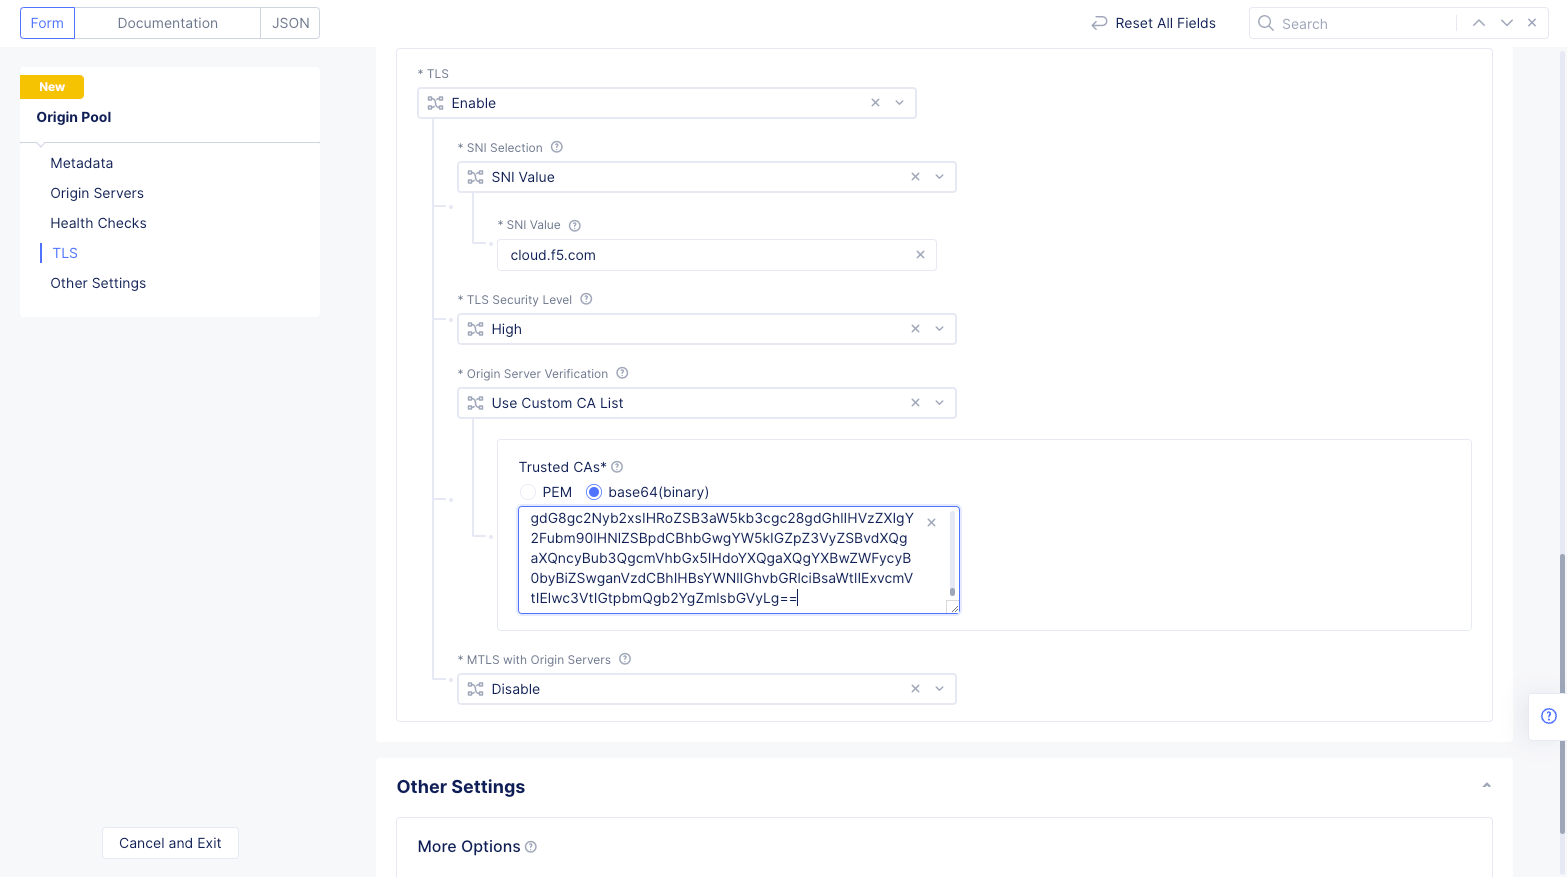
Figure: Origin Pool TLS Configuration
Note: Configuring the public certificate enables Distributed Cloud Services to establish connection to the origin server.
- Select
Save and Exit.
Step 2.4: Create HTTP load balancer.
-
Navigate to
Manage>Load Balancers>HTTP Load Balancers. SelectAdd HTTP Load Balancer. -
Enter a name and your domain in the
NameandDomainsfields respectively. This will create an A name entry, cloudf5-vip, which will resolve to an IP address that is pointed to a VIP that is hosted on F5 ADN. -
Select
HTTPS with Automatic Certificatein theLoad Balancer Typefield. This will create an SSL certificate for this domain and sign it with a public Certificate Authority (CA).
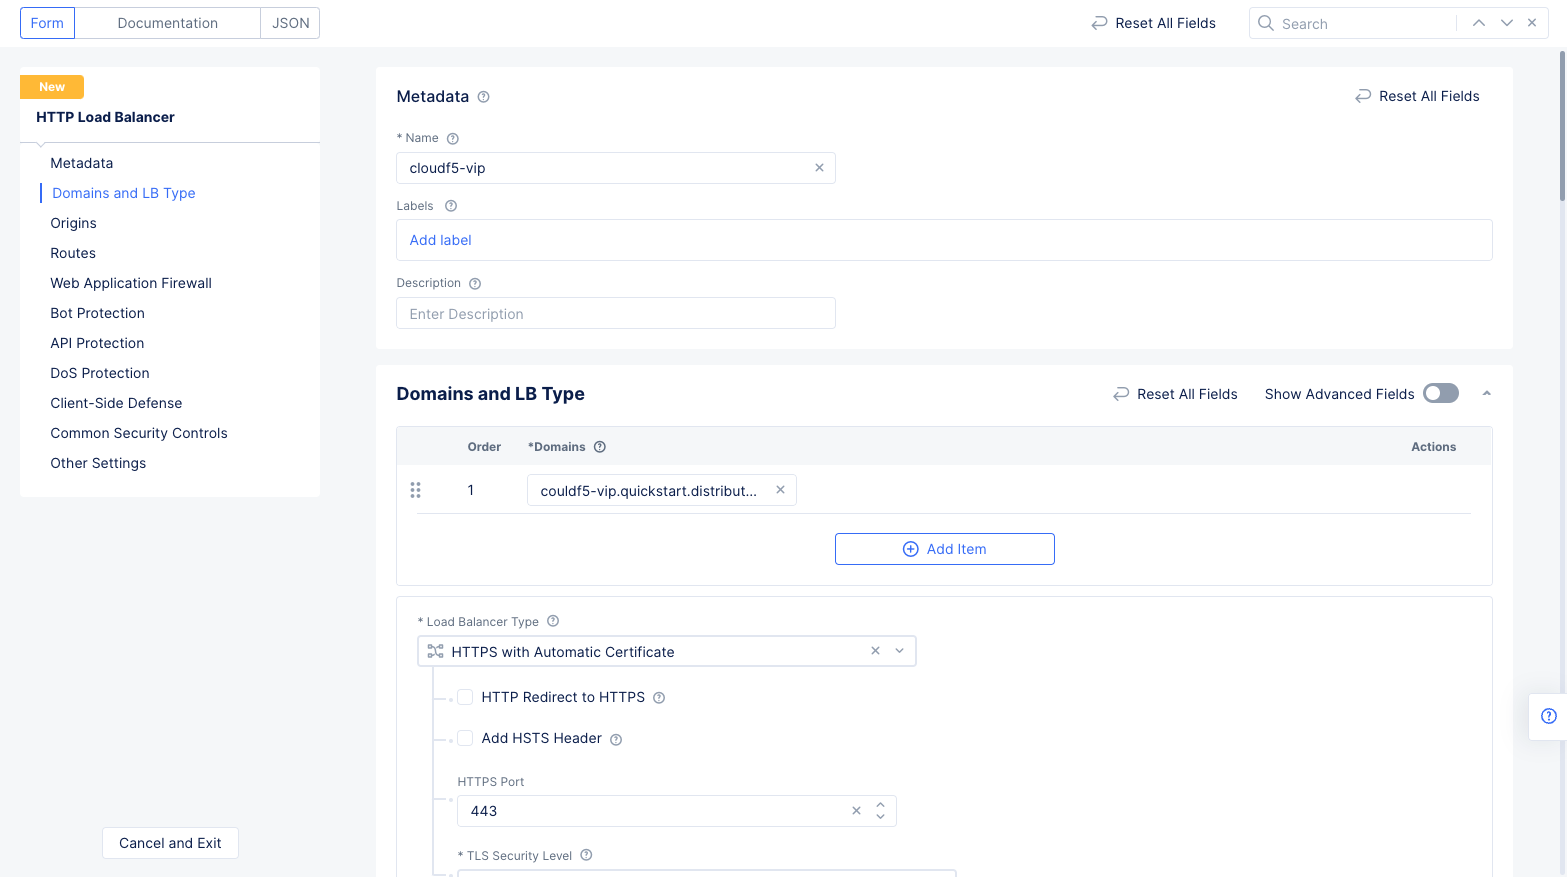
Figure: HTTP Load balancer creation
- Since this use case attempts to provide a proxy to an existing public site, it is required to enable automatic host-rewriting. Therefore, route configuration is required. Scroll down to the
Routessection and selectConfigure.
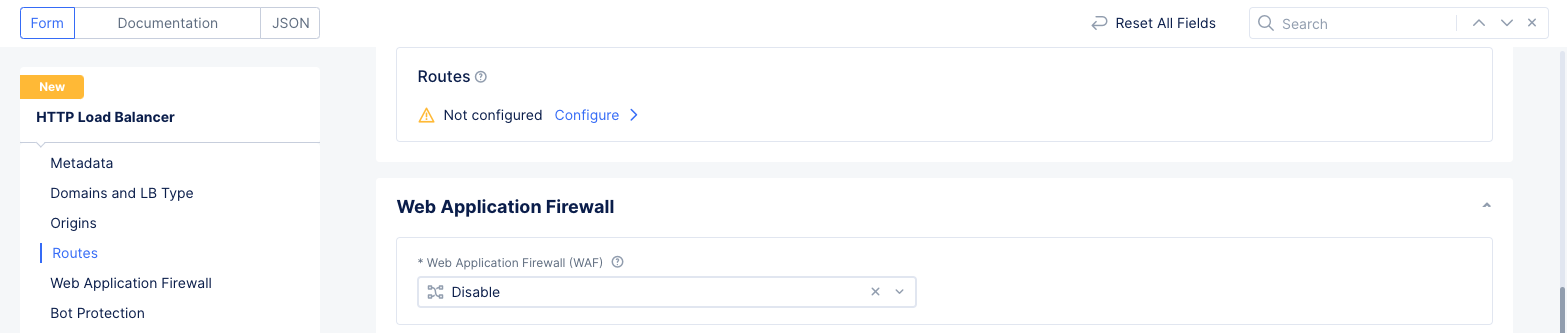
Figure: Route Configuration Section
- Select
Add Item, selectANYfor theHTTP Method, selectRegexfor thePath Matchfield, and enter(.*?)(all routes) in theRegexfield.
Note: The option
Simple Routeis applied by default for theSelect Type of Routefield.
- Select
Add Itemfor theOrigin Poolssection. Select the origin pool created in the previous step for theOrigin Poolfield and selectApply.
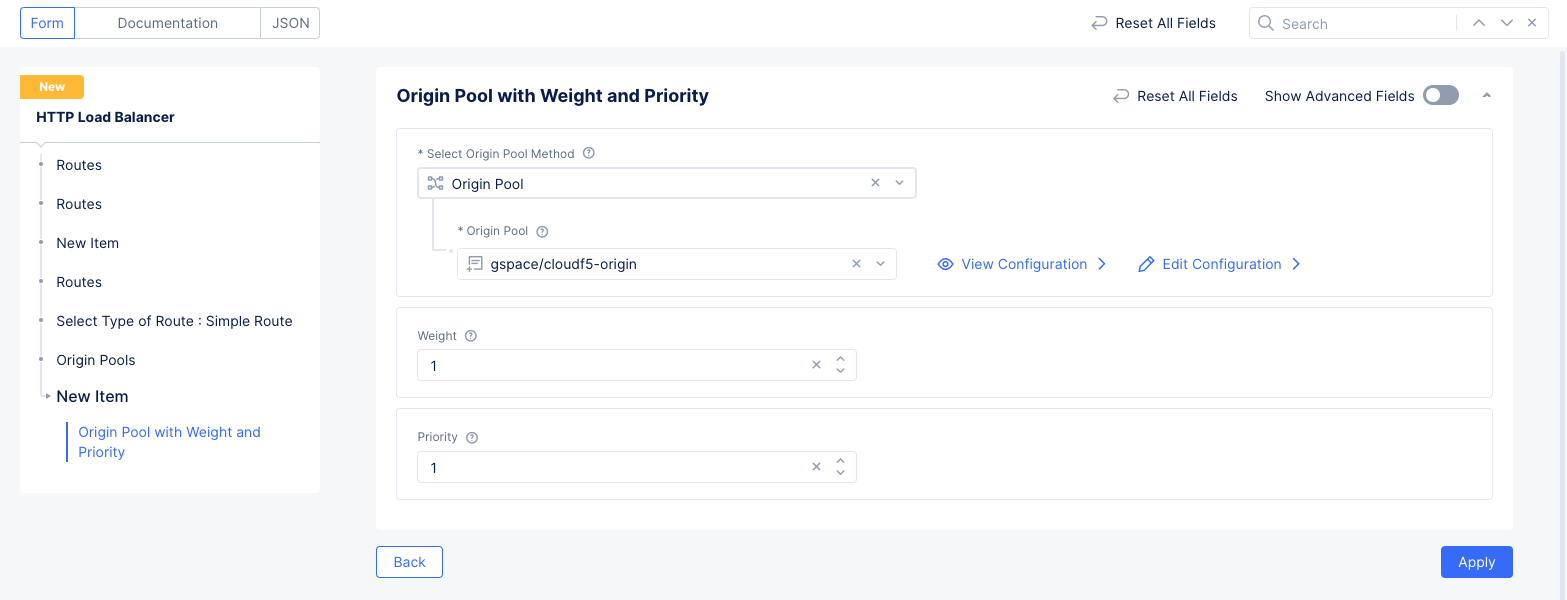
Figure: Route Origin Pool Configuration
- Select
Applyat the bottom of theRoutesconfiguration form to add the route to the load balancer configuration and return to the load balancer configuration form.
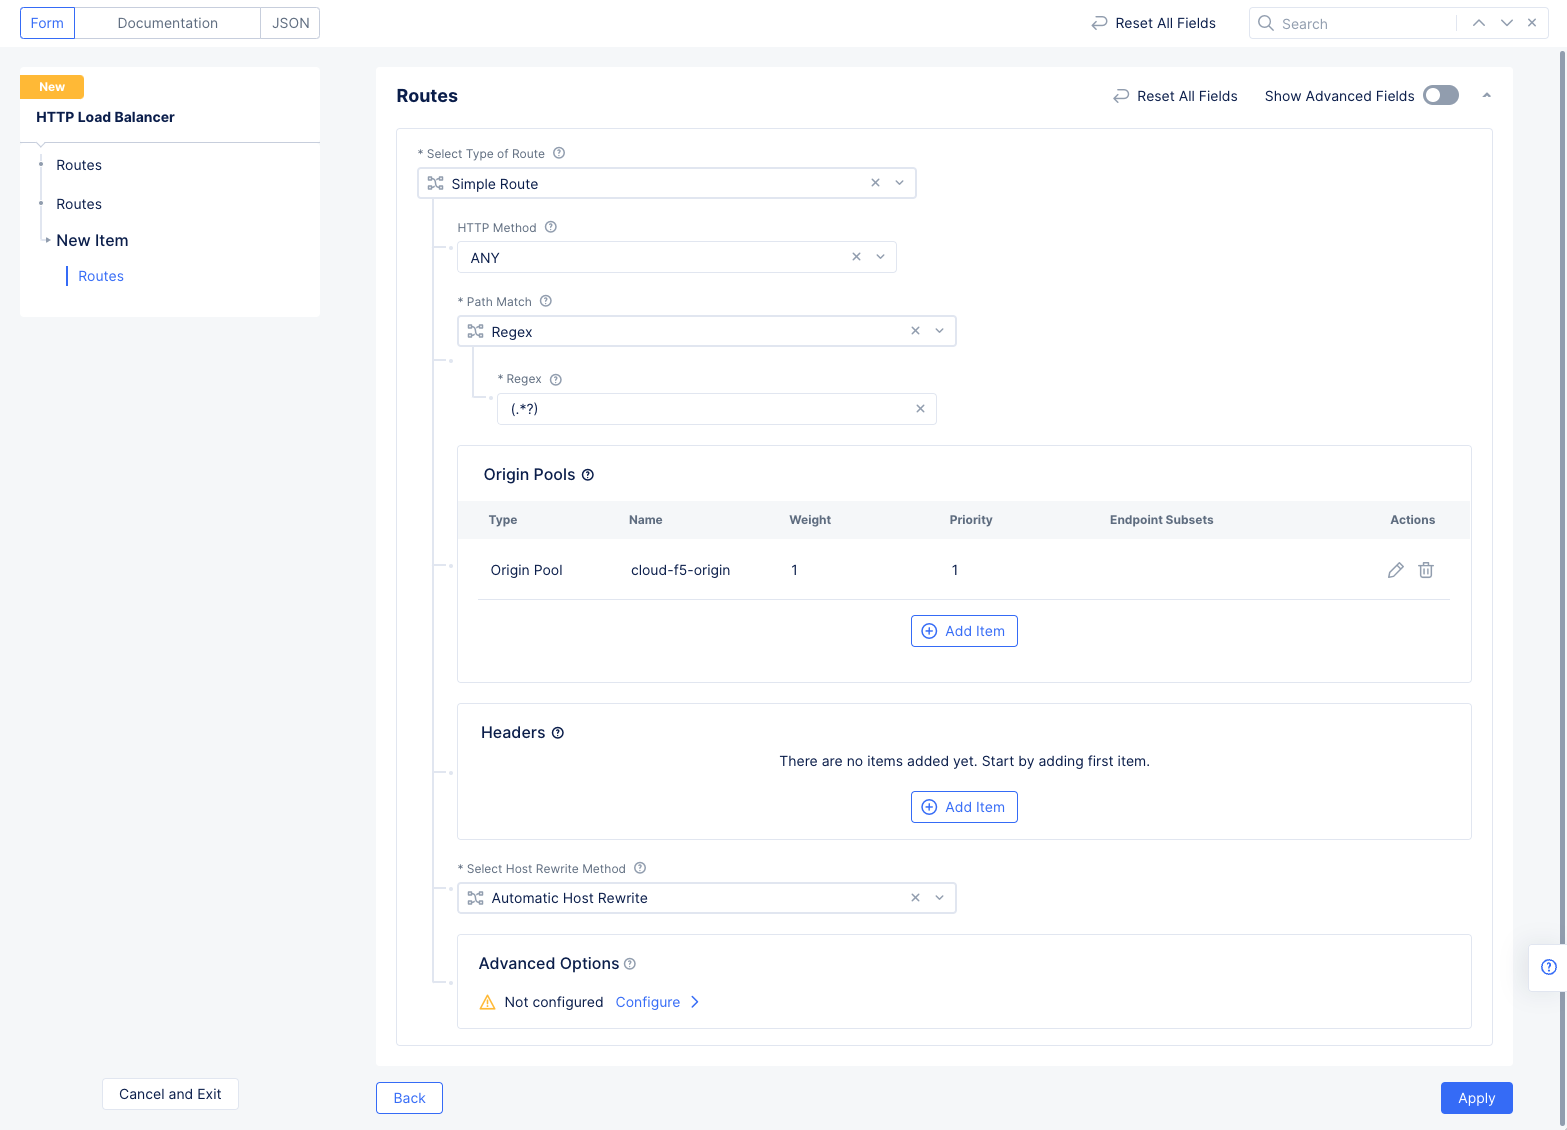
Figure: Route Origin Pool Configuration
Note: Ensure that the
Automatic Host Rewriteoption is selected by default for theHost Rewritefield. This ensures that the requests coming to the domain you configured are redirected to the public DNS name of the origin server.
- Select
Applyto apply this list to the load balancer. - Scroll to the bottom and select
Save and Exitto complete the load balancer.
The load balancer object gets displayed on the screen. The fields DNS Info and TLS Info with values VIRTUAL_HOST_READY and Certificate Valid indicate that the virtual host certificate is successfully validated and ready for use. You can verify this by entering the load balancer domain into a browser.
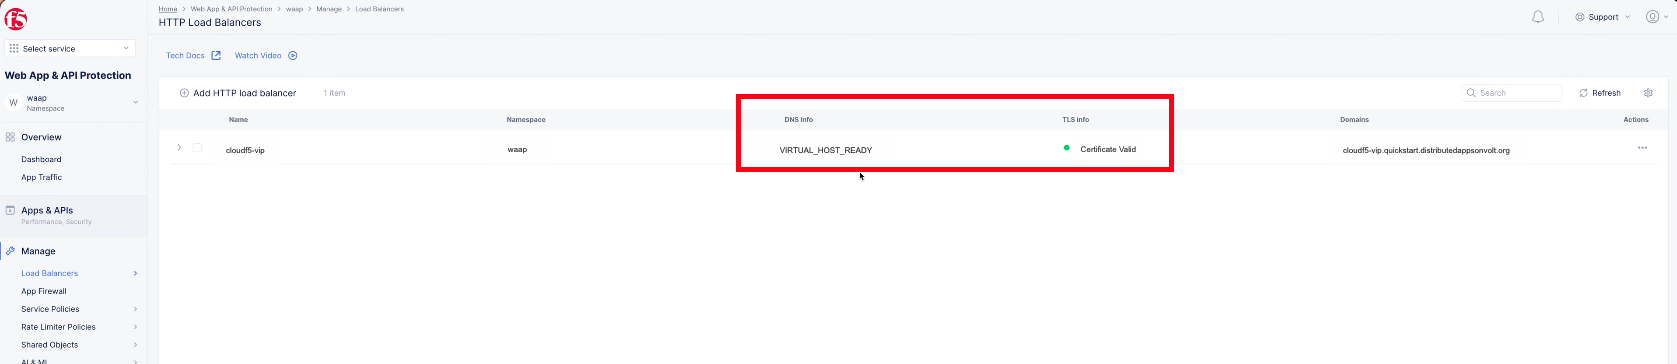
Figure: HTTP Load Balancer Created
Note: Select
Refreshon the load balancers display list screen to display the latest status.
Step 3: Secure App
Securing the application includes applying JavaScript challenge for the requests towards the load balancer domain and configuring a WAF for the load balancer.
Note: JavaScript challenge enforces the users to send requests through the browser preventing automated attacks.
Perform the following enable a JavaScript challenge and apply a WAF to the load balancer:
Step 3.1: Enable WAF.
- In the
Web App & API Protectionservice, select the same namespace as your load balancer. - Navigate to
Manage>Load Balancers>HTTP Load Balancers. - Select
...>Manage Configurationfor your load balancer to view its configuration. Next selectEdit Configurationin the upper right corner to edit its configuration. - Scroll down to the
Web Application Firewallsection. - Select
Enablefor theWeb Application Firewall (WAF)field, and then use theEnablepull-down menu to select theAdd Itembutton.

Figure: HTTP Load Balancer Security Configuration
Step 3.2: Configure App Firewall.
- Enter a name for the firewall.
- Select
Blockingfor theEnforcement Modefield. - Leave the
Protection Settingsat their defaults and selectContinueto save the WAF and return to the HTTP Load Balancer form.
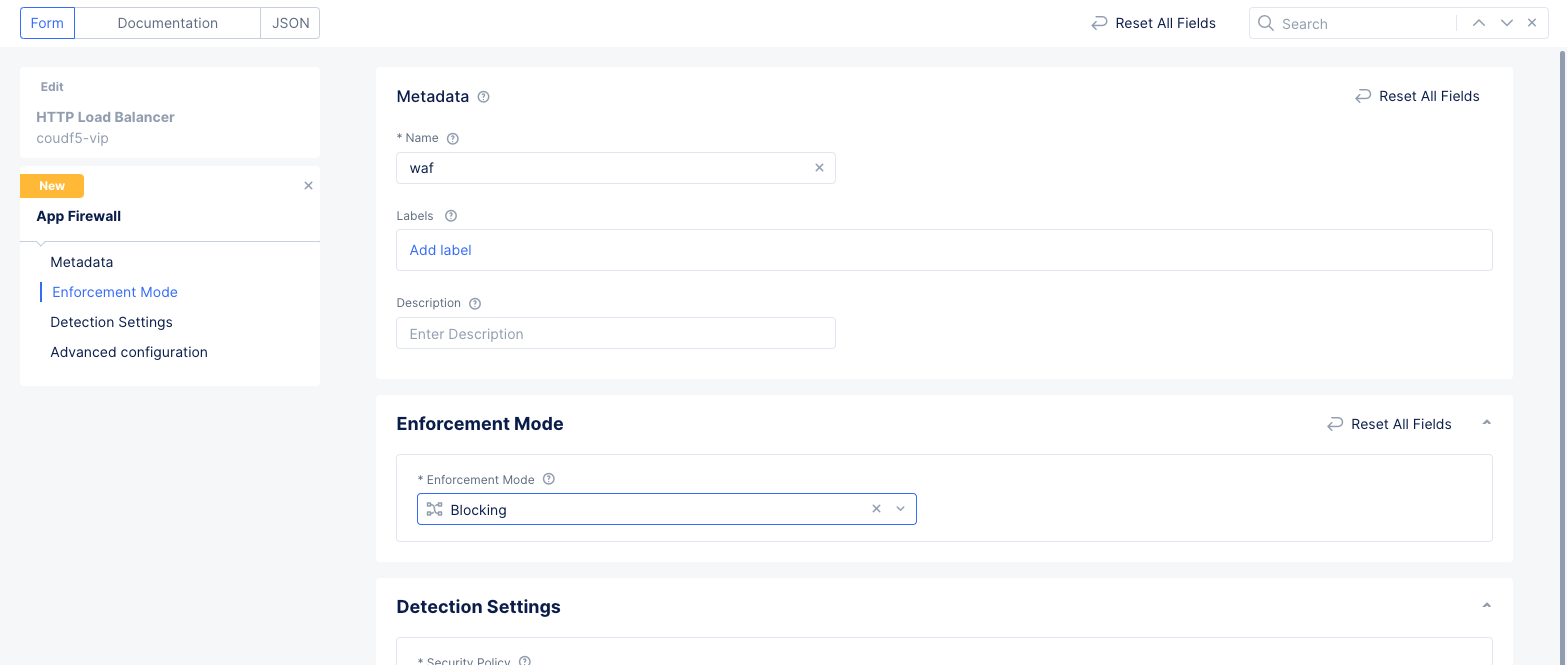
Figure: WAF for HTTP Load Balancer
Step 3.3: Configure API Discovery, DDoS Detection, and Malicious User Detection.
- Optionally select
Enablein theAPI Discoverydrop-down menu of theAPI Protectionsection. - In the
DoS Protectionsection, selectDefaultfor theL7 DDoS Auto Mitigationfield, and thenDefaultfor theSlow DDos Mitigationfield.
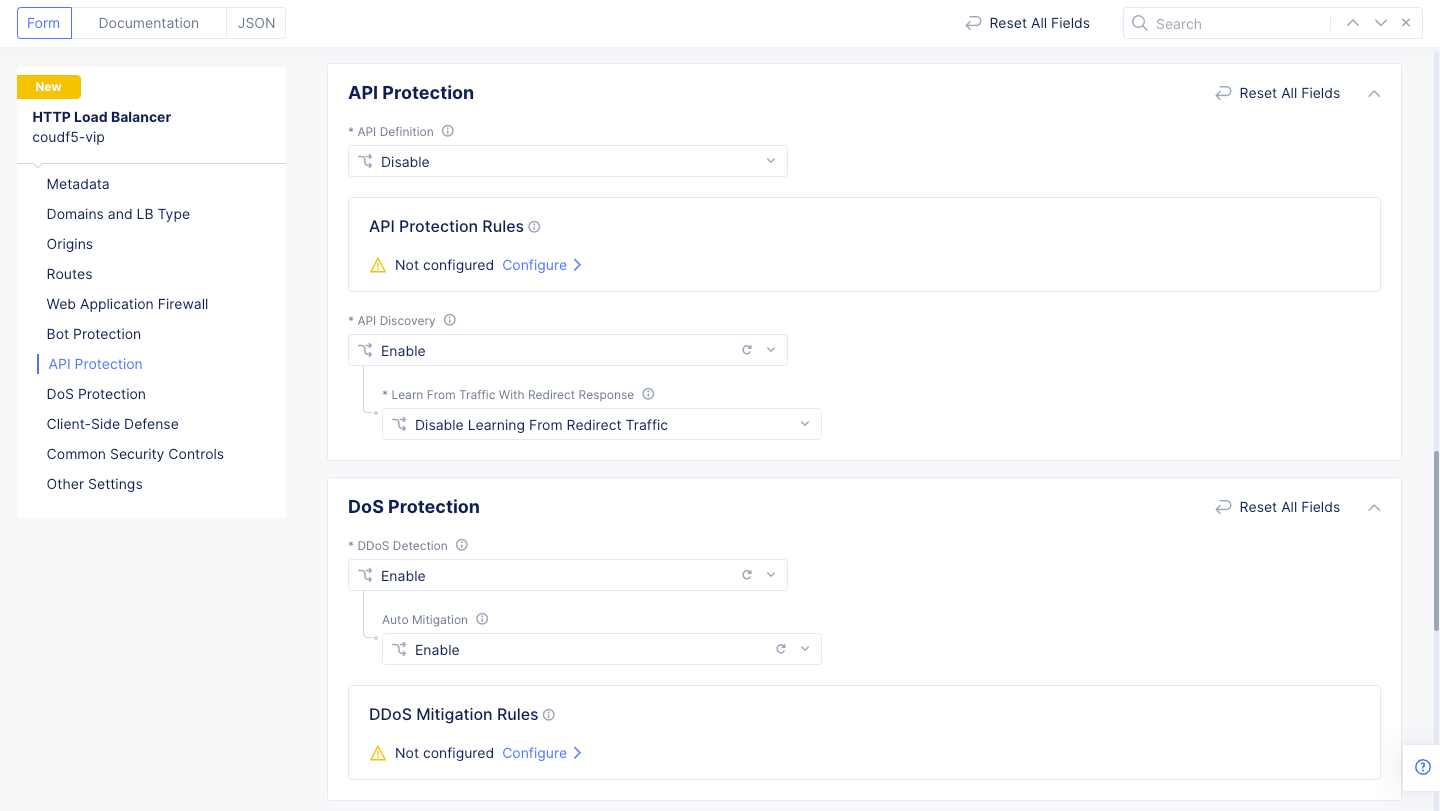
Figure: DDoS Detection for HTTP Load Balancer Security
- Scroll down to the
Common Security Controlssection and selectEnablefor theMalicious User Detection and Challengesfield and thenDefaultfor theMalicious User Mitigation Settingsfield.
Note: This quickstart guide uses default malicious user detection settings. You can customize those settings by creating an app type and applying it to this load balancer with a label (in the metadata section). For more information, see Malicious Users.
- Scroll down and select
Save and Exitto save these security settings.
Step 4: Performance and Security Monitoring
This step shows how to see the performance and security monitoring available.
Note: Monitoring is based on site traffic, so in order to have meaningful information, either wait for some user traffic or create traffic by visiting the website and interacting with it in a browser.
Step 4.1: View the overall performance.
- In the
Web App & API Protectionservice, select the same namespace as your load balancer. - Select
Overview>Dashboards>Performance Dashboard. This provides an overall performance view of the entire namespace, includingHealth,Active Alerts,Active Configuration,Traffic Overview, andThroughputgraphs. Below is a list ofLoad Balancers.
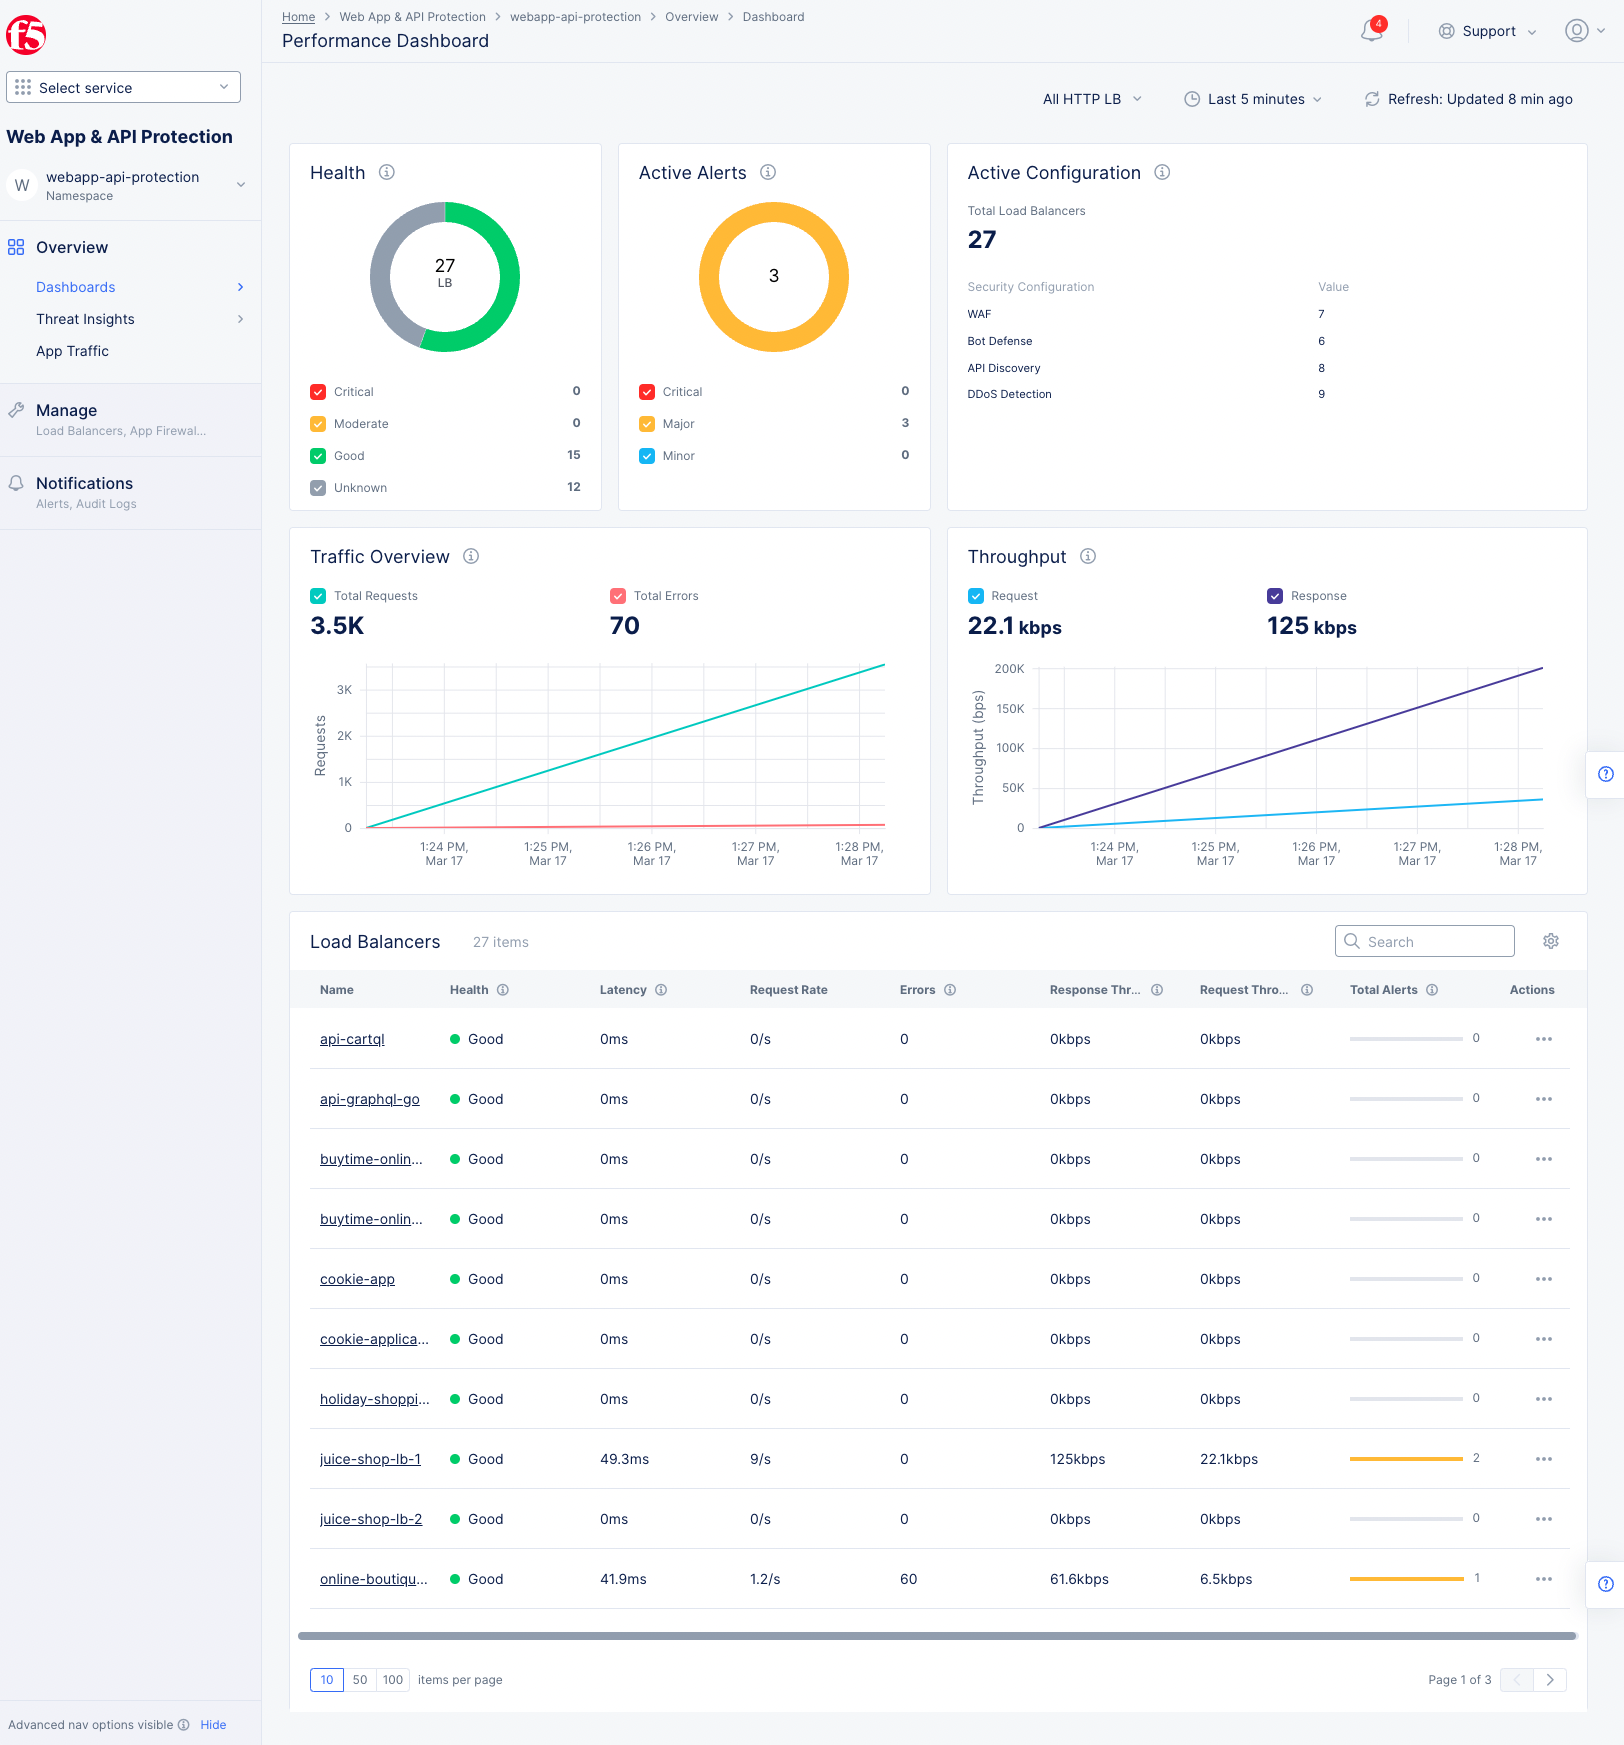
Figure: HTTP Load Balancer WAF Monitoring
Step 4.2: View the performance dashboard for your load balancer.
- Select the name of the load balancer you want to monitor in load balancers list. This will show the performance dashboard for that specific load balancer.
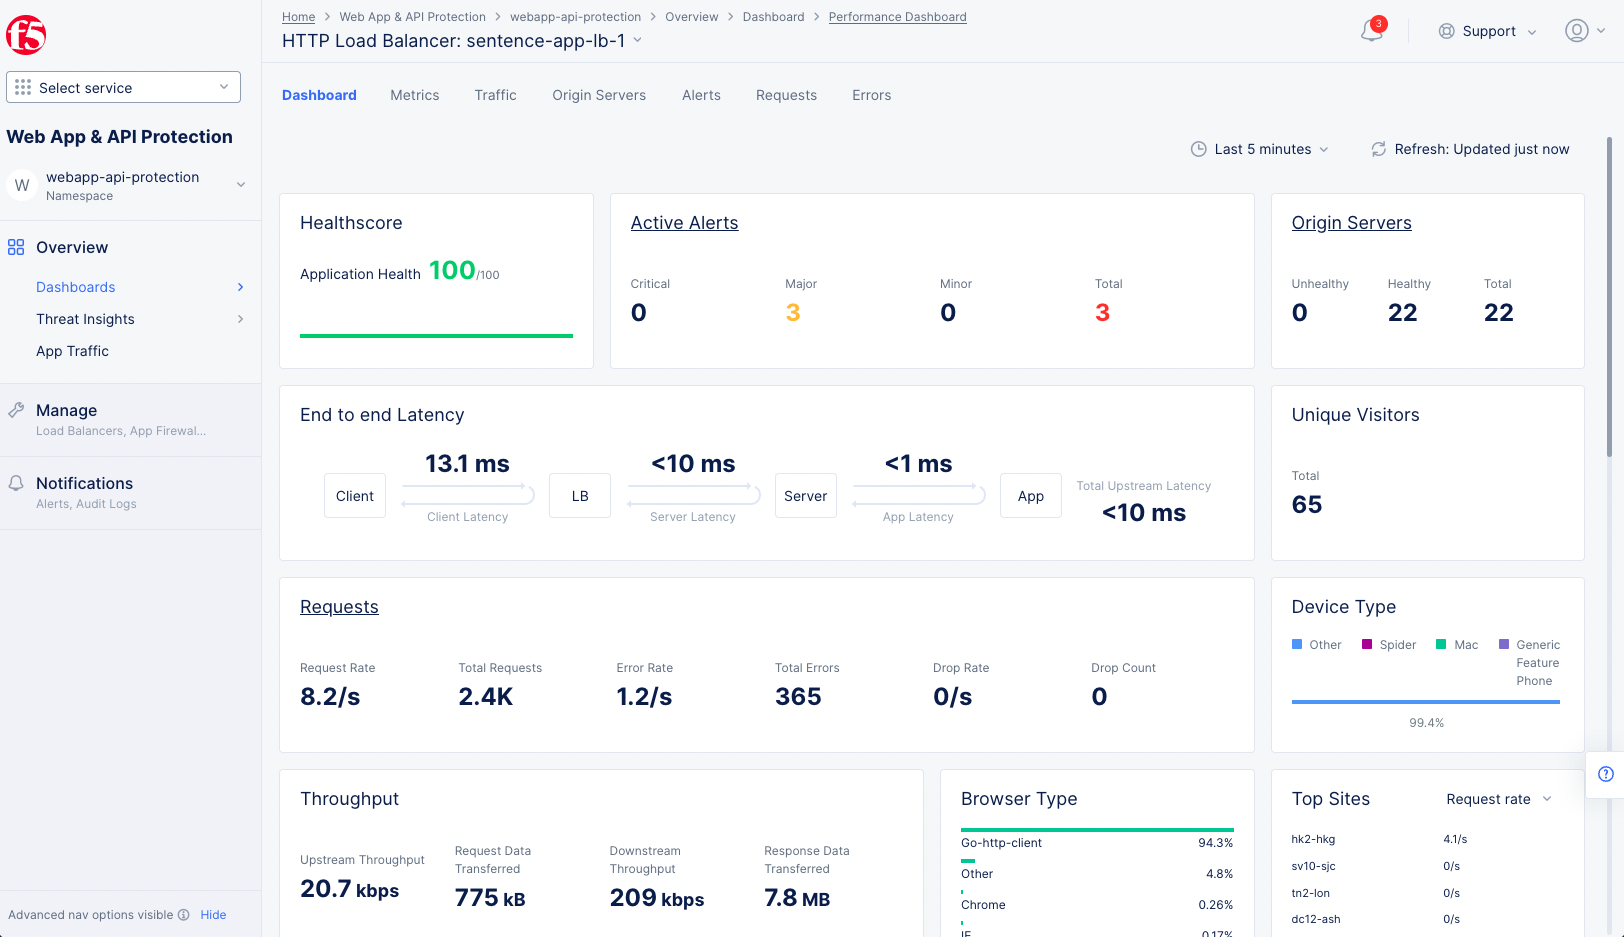
Figure: HTTP Load Balancer Performance Dashboard
Step 4.3: View the app's requests.
- Select the
Requeststab. Each request shown represents a call to our website. - Select a request to get more information specific to that request.
- Select
Forensicsto see theForensicspanel allowing you to filter the requests chart by various metrics, like country and source IP address.
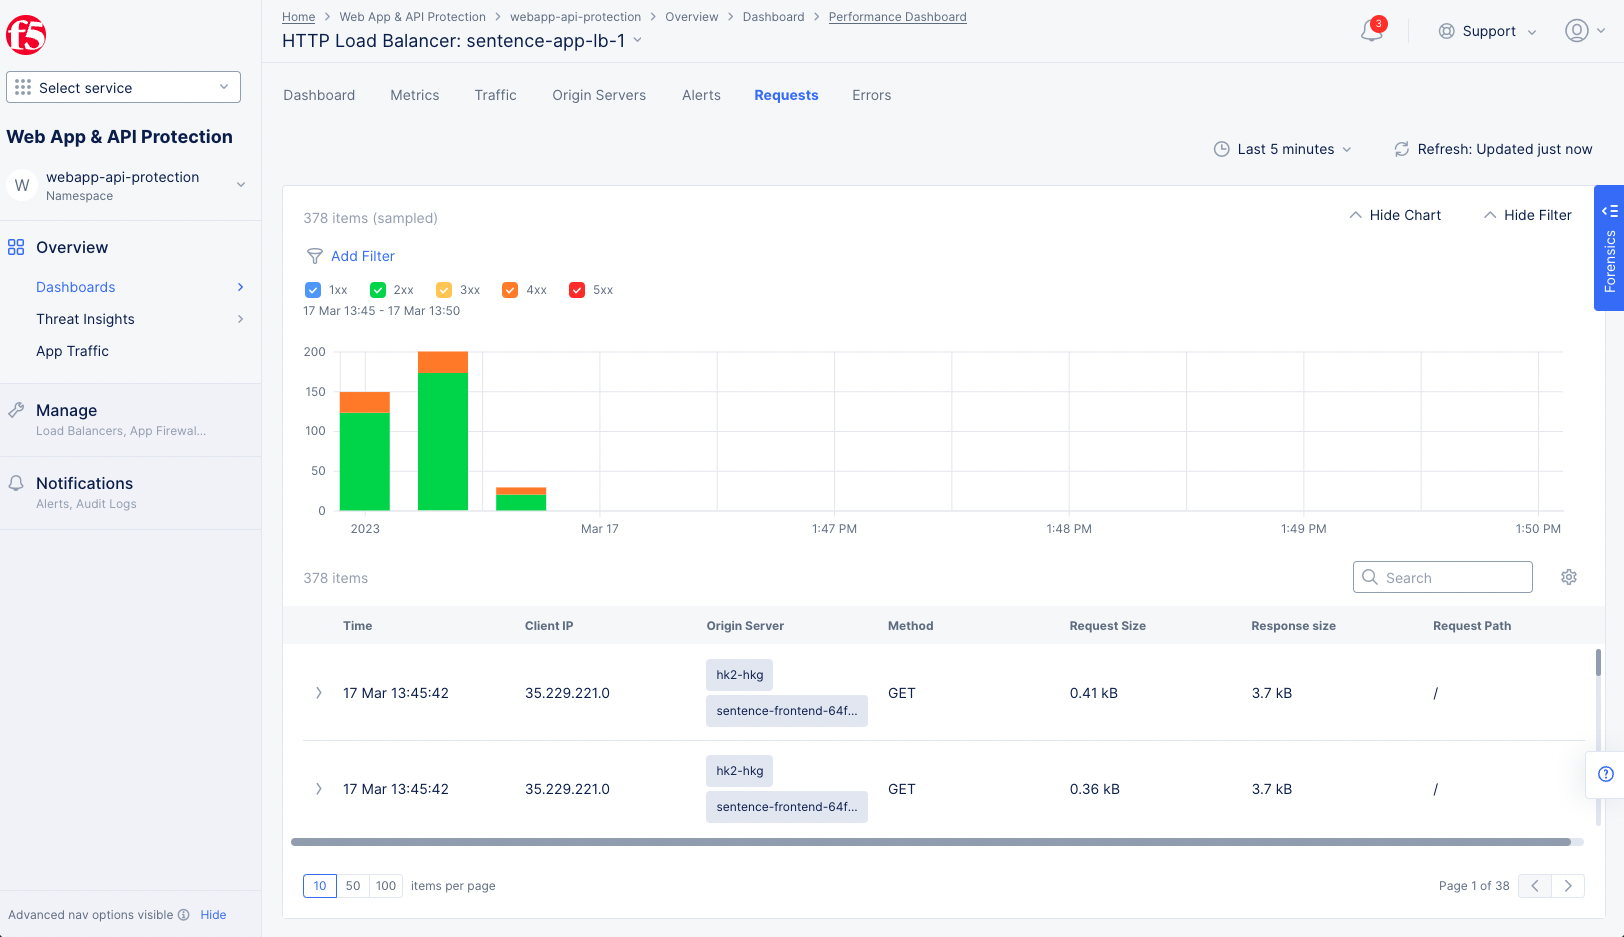
Figure: HTTP Load Balancer Performance Requests
Step 4.4: View the overall security.
- Select
Overview>Dashboards>Security Dashboard. This provides an overall security view of the entire namespace, includingThreat intelligence,Bot Traffics,API Classification,DDoS Attack Activity,Security Events,Top Attack Sources,Top Attacked Paths,Events by Country, andActive Configuration. Below is a list ofLoad Balancers.
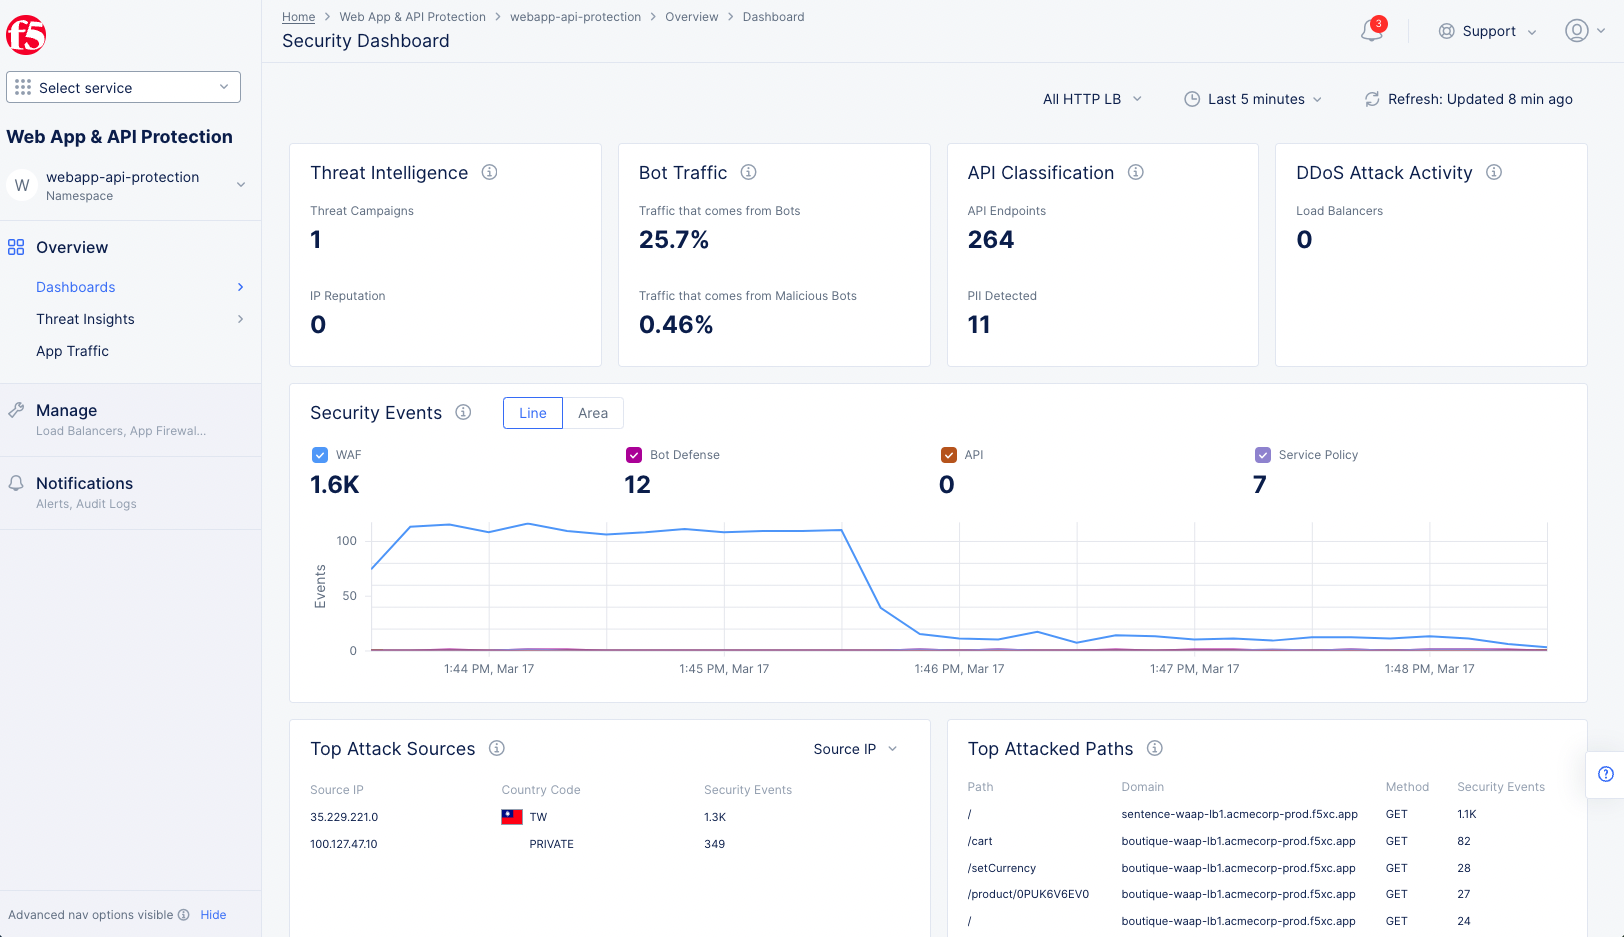
Figure: HTTP Load Balancer Security Dashboard
Step 4.5: View security dashboard for your load balancer.
- Select the name of the load balancer you want to monitor in the load balancers list. This will show the security dashboard for that specific load balancer.
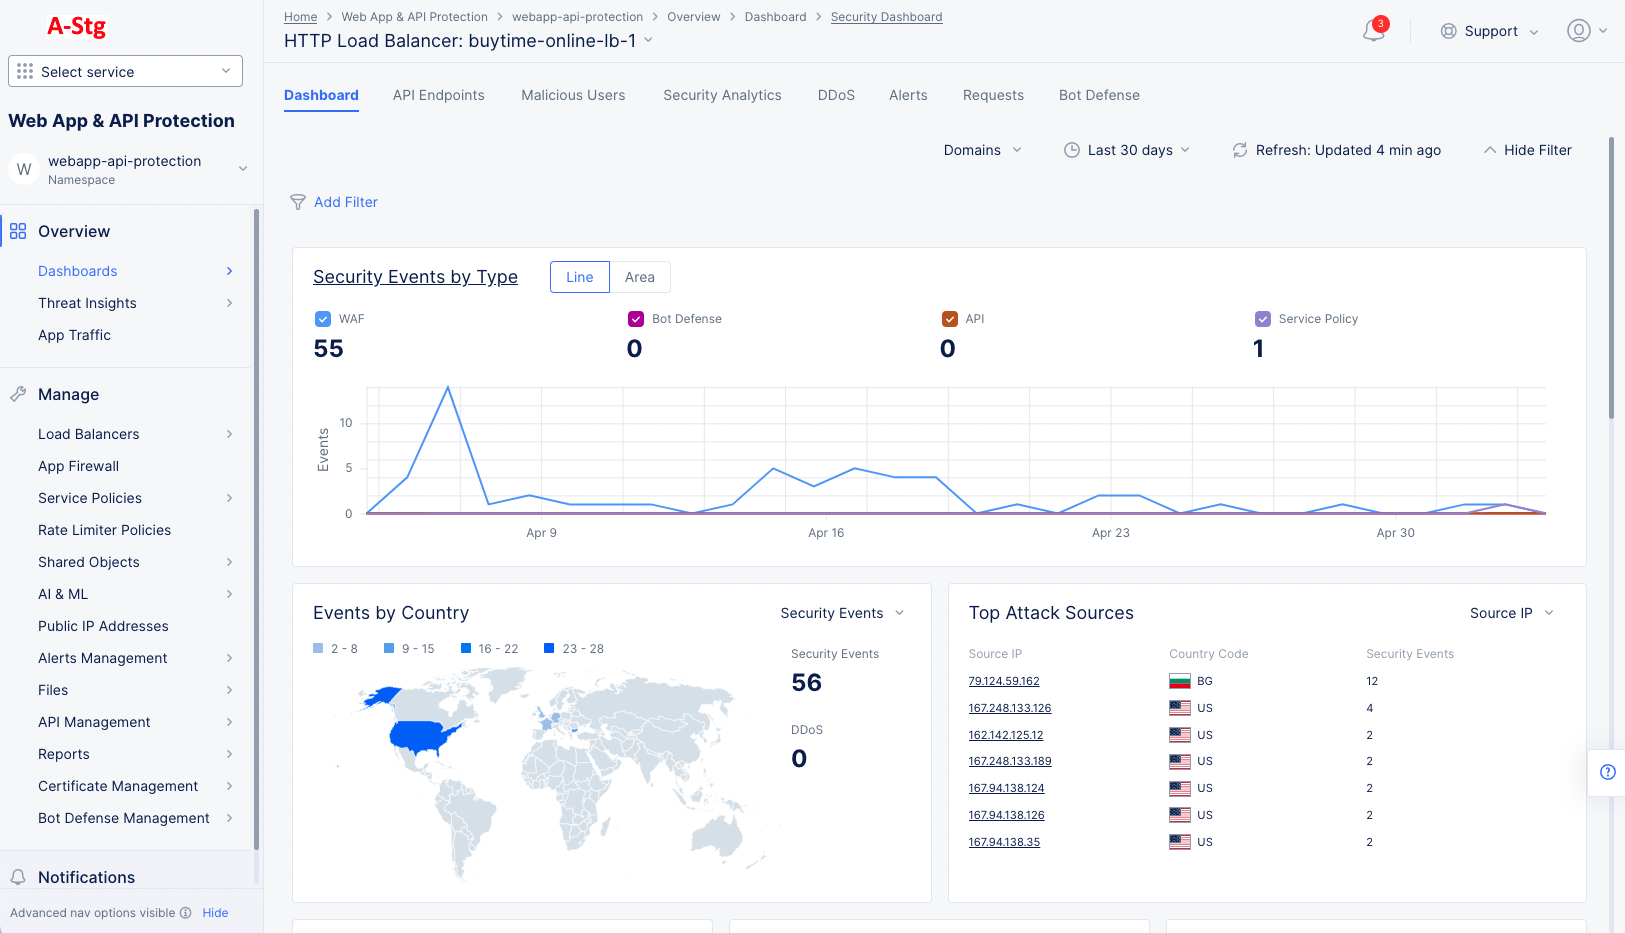
Figure: Security Dashboard for specific HTTP Load Balancer
Step 4.6: View the app's blocked requests.
- Select the
Security Analyticstab to see all security events, shown in a bar chart and below in a table. The chart shows time-based counts for the different types of events. The table shows event summary information across the columns. - The
Actionscolumn provides options to either block the requesting client and/or add the client to the list of trusted clients (depending on the type of event). - Select
>on the left side of a row to see the specifics of the request and the violations that were triggered by the attack. - To see only blocked requests, use the
Add Filteroption and selectAction,In, SelectBlock, followed byApply.
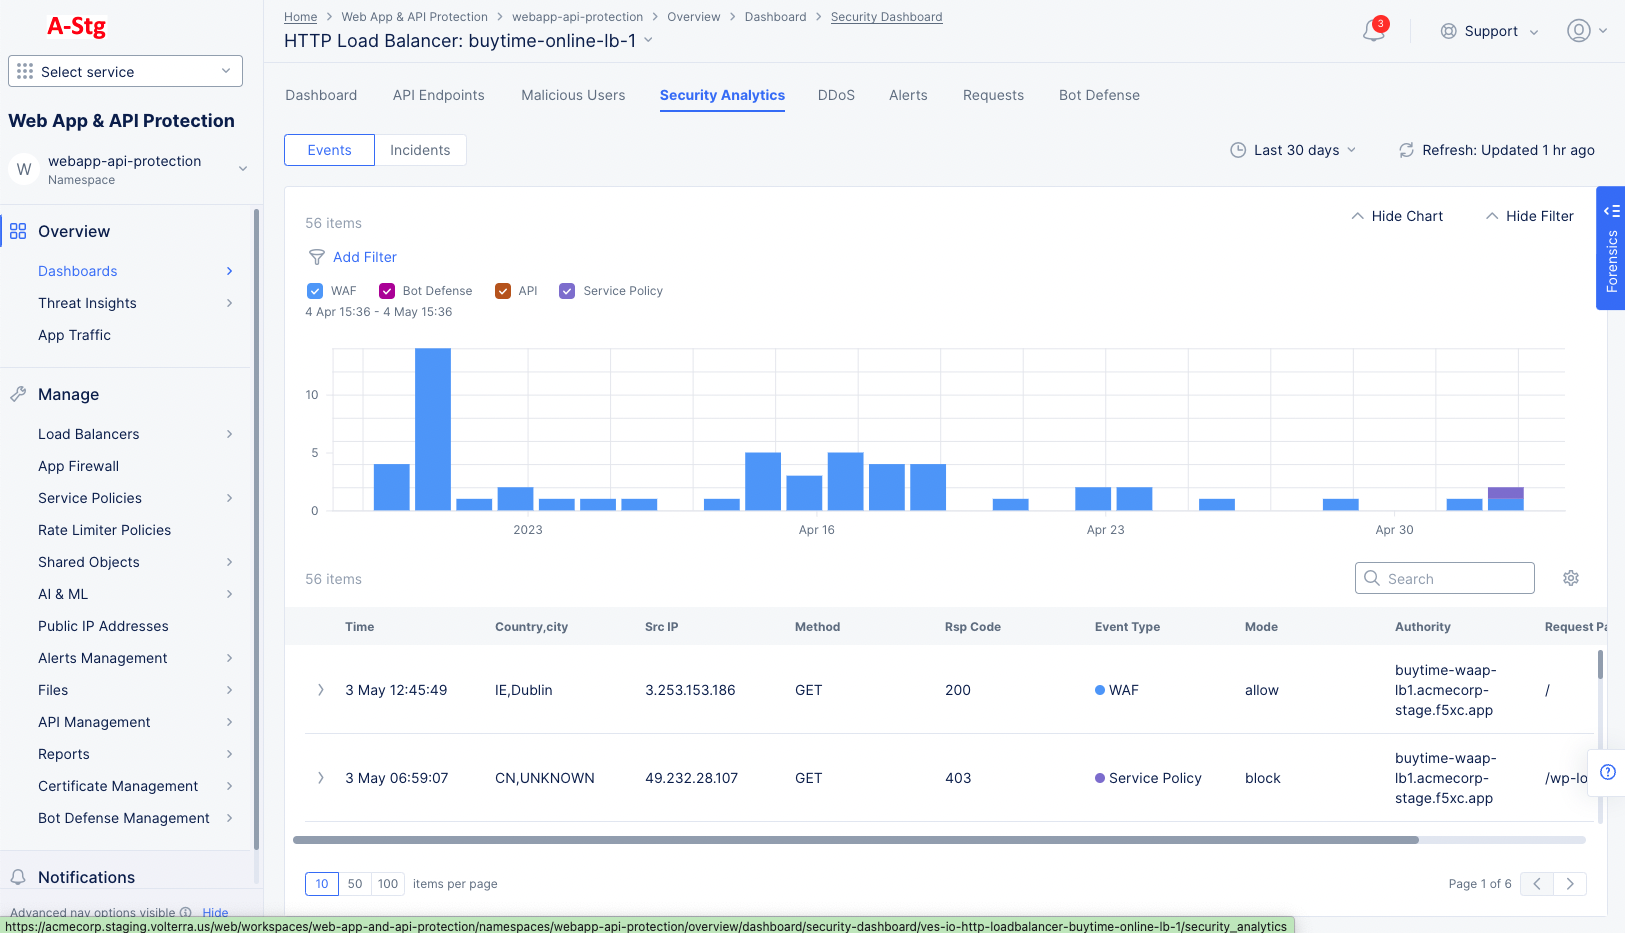
Figure: HTTP Load Balancer Blocked Requests
Note: For more information on analyzing security, see the security section of the Monitor HTTP Load Balancer document.