Hello, WebApp!
This “Hello, WebApp!” is the first quickstart in Volterra’s “Hello, World!” series. This is a basic use-case to get you started, additional use-cases can be enabled by reading appropriate how-to guides. It will start by securing your existing WebApp (running in any cloud location) from the clients on the Internet. All you need to bring is your service endpoint and Volterra will securely proxy the connection across Volterra’s global network using the VoltMesh offering. You’ll be able to visualize web application connectivity and security metrics using VoltConsole.
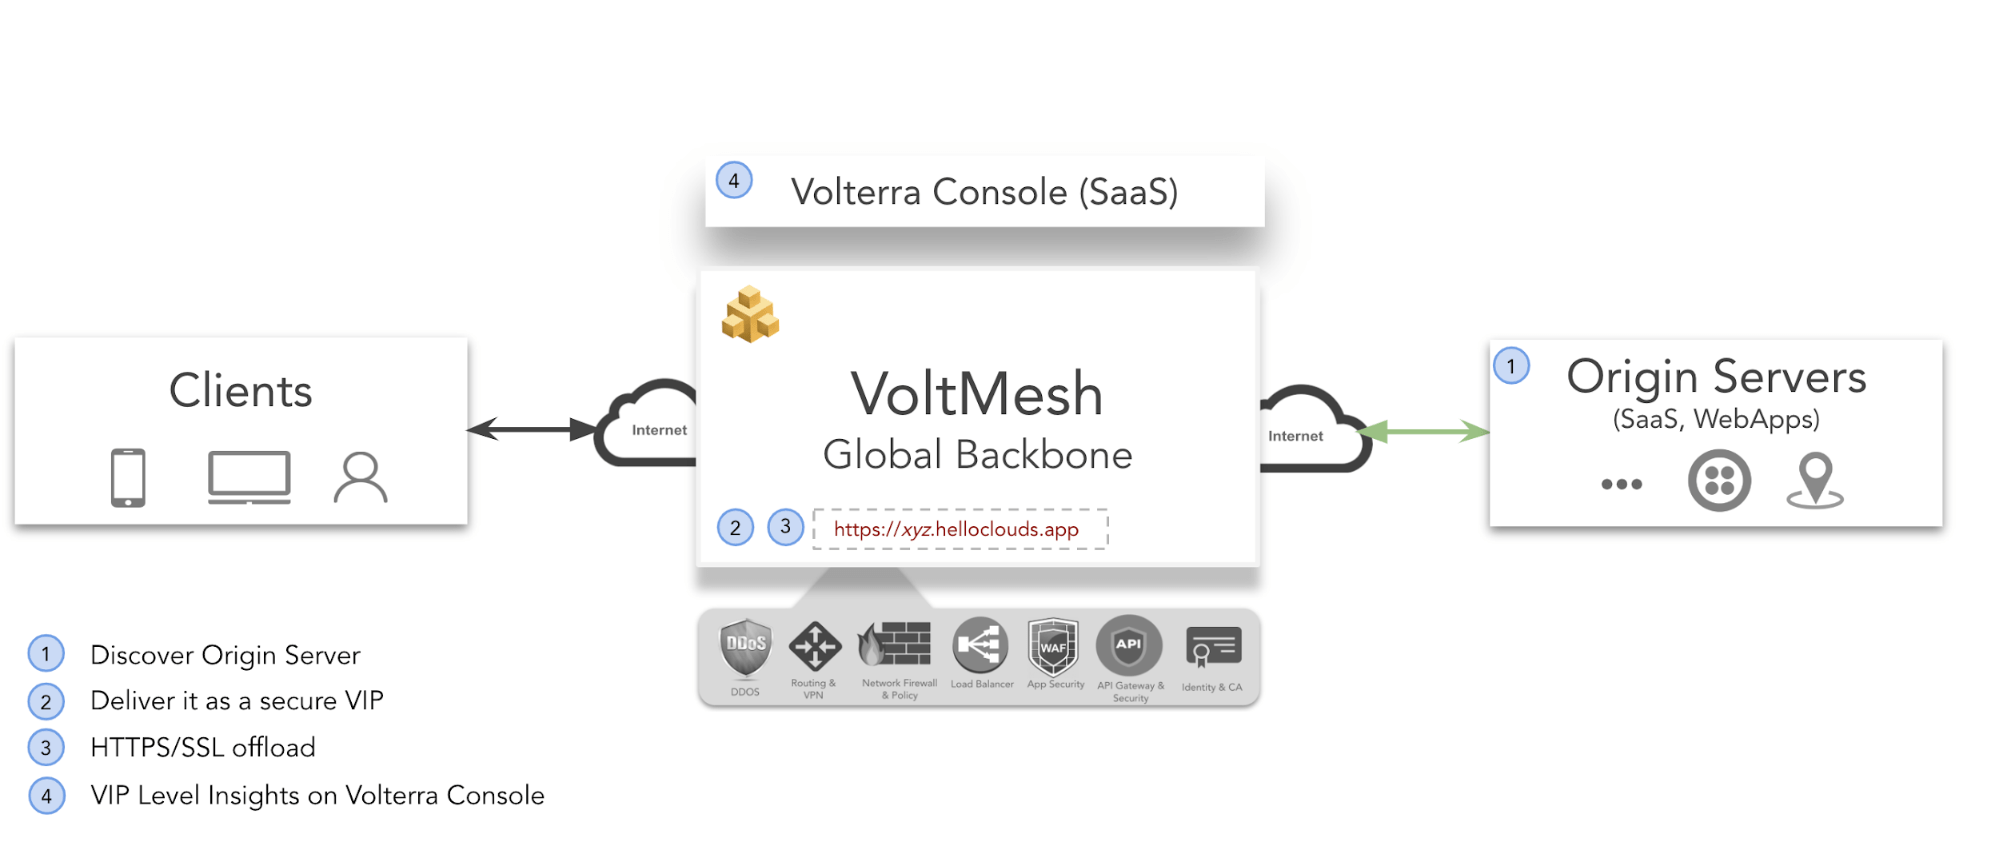
Figure: Secure Deployment of Webapp Using VoltMesh
In summary, you will:
- Discover a web application using Volterra’s Load Balancing.
- Securely deliver it across the Internet using Volterra’s Secure Backbone.
- Protect against application attacks using Volterra’s Application Security.
- Get host-level insights via VoltConsole.
Prerequsites
Minimum
-
Note: If you don’t have an account please go to Create a Volterra Account.
-
Any HTTP/HTTPS web application endpoint running in your cloud.
Steps
The following steps are designed for those who’d like to cut & paste into their terminal.
Deploy
P12 file can be created and downloaded from API credentials section of your Volterra tenant. P12 file can only be downloaded (auto-downloaded) while creation
-
Download and save your PCKS file (.p12) with your API credentials from your Volterra tenant. Remeber the password which you have entered, it will be used in later steps
Login to VoltConsole and create API credentials [navigate to "system" namspace */} IAM */} API Credentials]
-
Create a terraform variable file. Below is a sample file.
  # DEFINITIONS
  #
  # api_p12_file: $PATH/to_your_api_creds.p12
  # api_url: your tenant's apu url (e.g. https://volt-demos.console.ves.volterra.io/api)
  # webapp: Resolvable DNS name to webapp (e.g. apache.org)
  # name: name for this example your are creating
  # this will create URL - name.tenant_name.helloclouds.app

  {
      "api_p12_file": "/home/user1/Api_Credentials.p12",
    "api_url": "<your tenant's api url>",
     "webapp": "apache.org",
     "name": "example1"
  }
- Download volt-terraform deployment script to the local machine. This will download the Volterra Quickstart Script.
docker run --rm -v $(pwd):/opt/bin:rw docker.io/volterraio/volt-terraform:latest cp /deploy-terraform.sh /opt/bin
- Run the deploy-terraform.sh to connect and secure your webapp through VoltMesh.
#Set the VES_P12_PASSWORD env variable.
#This should be the same password which you entered while creating API Credentials in step 1

export VES_P12_PASSWORD=<password>
./deploy-terraform.sh apply -p volterra -i <absolute_path_to_variable_file> -tn quickstart-webapp --force
- Open VoltConsole for your WebApp statistics.
Note: It will take a few minutes for statistics to show up.
open $(./deploy-terraform.sh output -n <name you have provide in variable file> virtual_host_dashboard_url)
Destroy
- To destroy all Volterra service objects created then run the following:
./deploy-terraform.sh destroy -p volterra -i <absolute_path_to_variable_file> -tn quickstart-webapp --force