Hello, Clouds!
The Hello, Cloud! is the second QuickStart in Volterra’s Hello, World! series. This guide provides instructions to deploy a secure mesh for your application spanning across multiple cloud locations. Using these instructions, you can also visualize web application connectivity and security metrics using the VoltConsole.
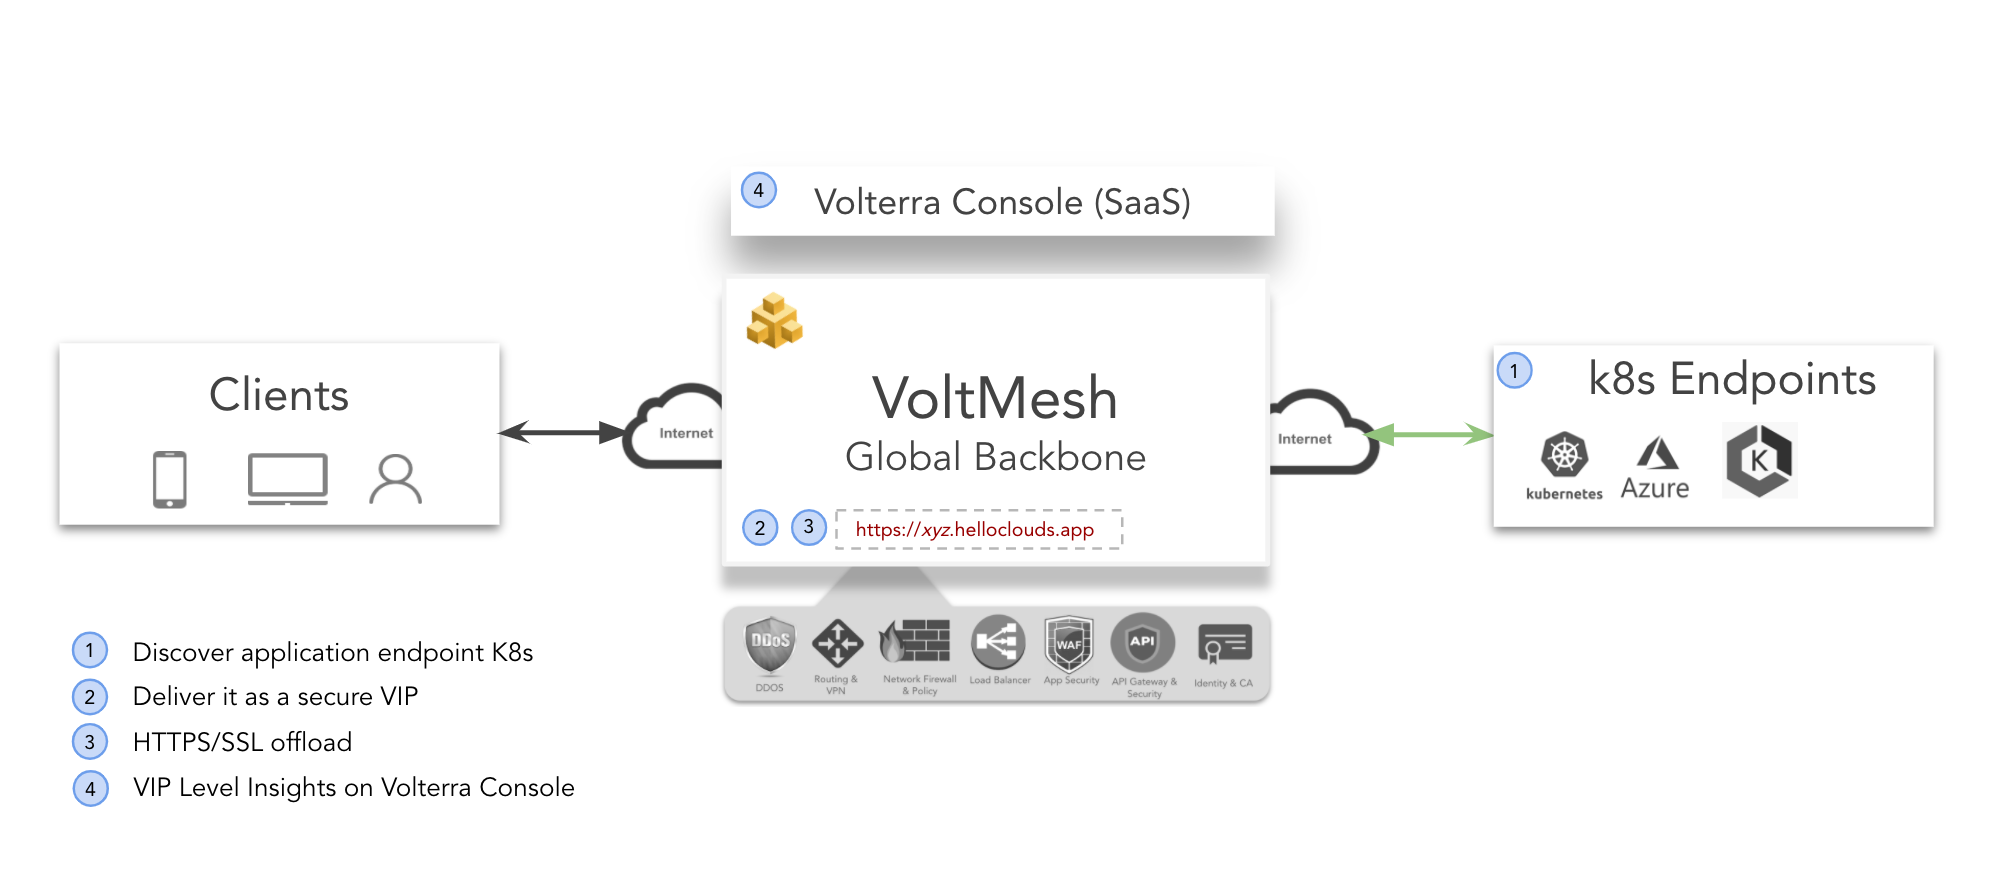
Figure: Multi-Cloud Deployment of Webapp
Prerequisites
-
Note: If you do not have an account, see Getting Started with Console.
-
Volterra Node installed on Azure with Azure Kubernetes Service (AKS).
Note: The
aks_clustermust be set totruein the terraform variables file when deploying the Azure site. Also, theaks_vm_countvariable must be set. See Azure Installation for Azure site installation. -
Volterra Node installed on Amazon Web Services (AWS).
Note: See AWS Installation for AWS site installation.
Deploy Using Volterra Quickstart
Using Volterra Quickstart tool creates the mesh in a quick manner. Perform the following steps to deploy the secure mesh for your application.
Step 1: Create an input variables file. This example show sample variables file.
{
    "api_p12_file": "<api p12 file path>",
    "api_url": "<api_url>",
    "name": "<prefix name for all the resource that will be created>",
    "aws_vsite_name": "<prefix name for the virtual site that will be created>",
    "aws_site_name": "<aws-site-name>",
    "azure_site_name": "<az-site-name>",
    "sli_network_prefix": "192.168.0.0",
    "slo_network_prefix": "192.168.1.0",
    "stage_one": true,
    "stage_two": true,
    "stage_three": true,
    "stage_four": true,
    "stage_five": false,
    "aks_kubeconfig_base64": "<this needs to be given>",
  }
Note: The
aks_kubeconfig_base64value is obtained from applying Base64 encoding to the AKS kubeconfig file. Use theopenssl base64 -in <aks_kubeconfig.yml>command to obtain the Base64 encoded string from your kubeconfig file.
Step 2: Download the Volterra Quickstart tool.
docker run --rm -v $(pwd):/opt/bin:rw docker.io/volterraio/volt-terraform:latest cp /deploy-terraform.sh /opt/bin
Step 3: Create the VES_P12_PASSWORD environment variable. Enter your API credentials password as the value for this variable.
export VES_P12_PASSWORD=<your_password>
Note: This step requires you to create API credentials in the VoltConsole by navigating to
IAM->API Credentialsoption.
Step 4: Deploy the application in your cloud locations using the created variables file.
./deploy-terraform.sh apply -p volterra -i <absolute_path_to_vars_file> -tn hello-cloud --force
Step 5: Monitor your application for statistics using the output option of the Quickstart tool.
./deploy-terraform.sh output -n <name you have provide in variable file> curl_cmd_to_test_app_url
Note: The
outputoption of terraform returns the IP address or URL to your application so that you can use the same with the curl to obtain statistics.
This quickstart creates the following objects in the Volterra platform:
- Sites (Including Cluster)
- Namespace
- Virtual Site
- Fleet
- Network Objects (Connector and Interface)
- Endpoint
- Discovery Object
- Route
- Advertise Policy
- Service Policy
- Virtual Host
- vK8s
You can delete the created secure mesh in two ways:
- Using
curlor an equivalent API client, perform a cascade delete post API call to delete the namespace.
Note: Performing API call requires API credentials. Download the credentials from the
IAM->API Credentialsoption under thesystemnamespace from the VoltConsole.
- Using the vesctl configuration utility.