Deploy App Delivery Network
Objective
This guide provides instructions on how to deploy and secure network edge applications using F5® Distributed Cloud Console and F5 Distributed Cloud Mesh.
The following image shows the steps to deploy network edge applications:
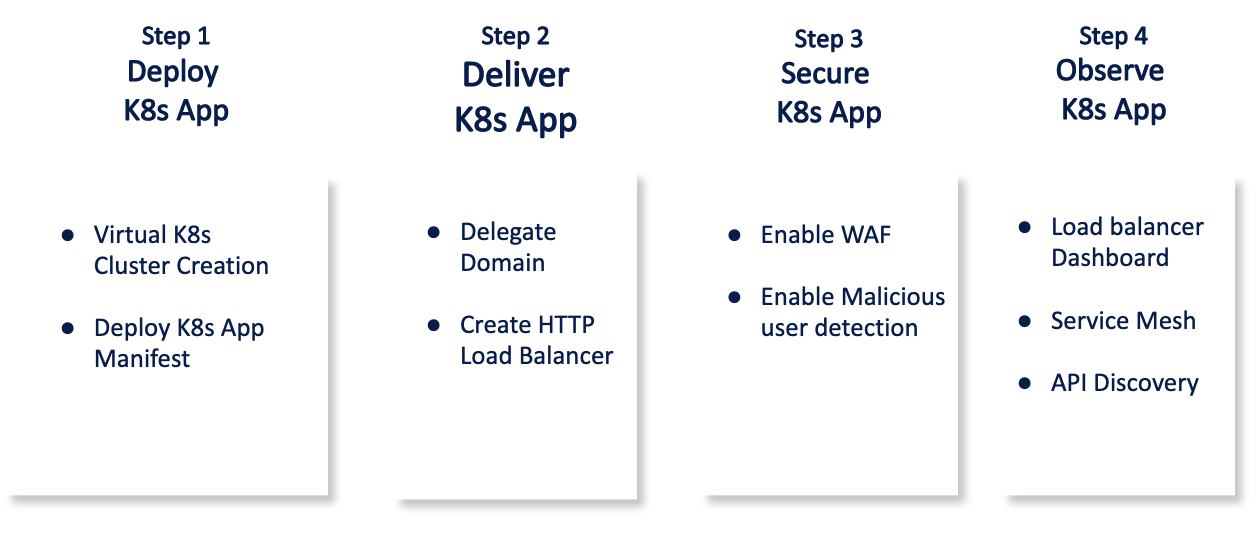
Figure: Steps to Deploy and Secure Network Edge Applications
The following images shows the topology of the example for the use case provided in this document:
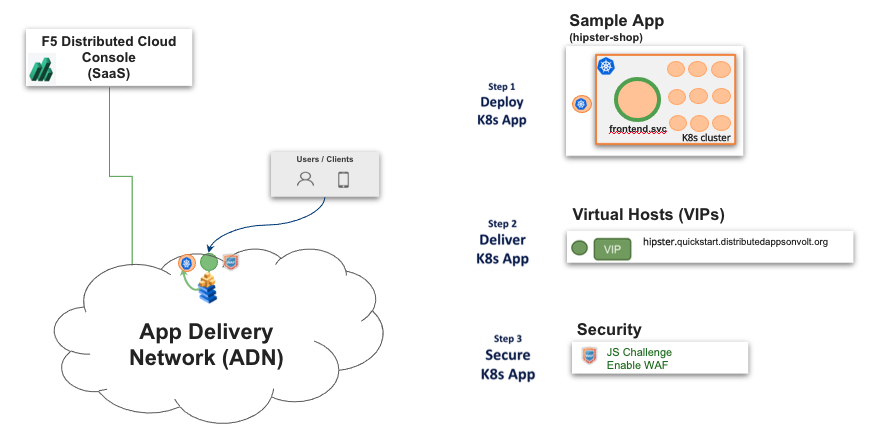
Figure: Network Edge Applications Sample Topology
Using the instructions provided in this guide, you can deploy your web application in the Distributed Cloud virtual K8s (vK8s) clusters, deliver the application using load balancer, advertise the application services on the Distributed Cloud global network (exposing to internet), protect the application using Distributed Cloud security features, and monitor the application using Console monitoring features.
The example shown in this guide deploys a microservices application called hipster-shop across the Distributed Cloud global network using Distributed Cloud vK8s. The application consists of the following services:
- frontend
- cartservice
- productcatalogservice
- currencyservice
- paymentservice
- shippingservice
- emailservice
- checkoutservice
- recommendationservice
- adservice
- cache
Prerequisites
-
F5 Distributed Cloud Console SaaS account. If you do not have an account, see Getting Started with Console.
-
Distributed Cloud vesctl utility. See vesctl for more information.
-
Docker.
-
Self-signed or CA-signed certificate for your application domain.
Configuration
The use case provided in this guide deploys the web application across all the Distributed Cloud Regional Edge (RE) sites in the vK8s clusters. It then exposes the application to the Distributed Cloud global network using Distributed Cloud load balancer and secures it using the Distributed Cloud security features. The following actions outline the activities in deploying the web app and securely expose it to the internet.
-
A Distributed Cloud vK8s cluster is created and using its kubeconfig and K8s manifest, the web application is deployed in the vK8s clusters in all RE sites.
-
The frontend service of the application needs to be externally available. Therefore, an HTTPS load balancer is created for each cluster with the required origin pools such as endpoint, health check, and cluster. The appropriate route and advertise policy are enabled for exposing to internet. Also, the subdomain is delegated to Distributed Cloud Services to manage the DNS and certificates.
-
A WAF configuration is applied to secure the externally available load balancer VIPs.
-
The deployed services of the K8s application are monitored using the observability features such as load balancer and service mesh monitoring.
Step 1: Deploy K8s App
Perform the following steps to deploy the web application in vK8s clusters:
Step 1.1: Log into the Console and create a namespace.
This example creates a sample namespace called tutorial-hipster namespace.
- Select the
Administrationworkspace. - Select
Personal Management>My namespaces.
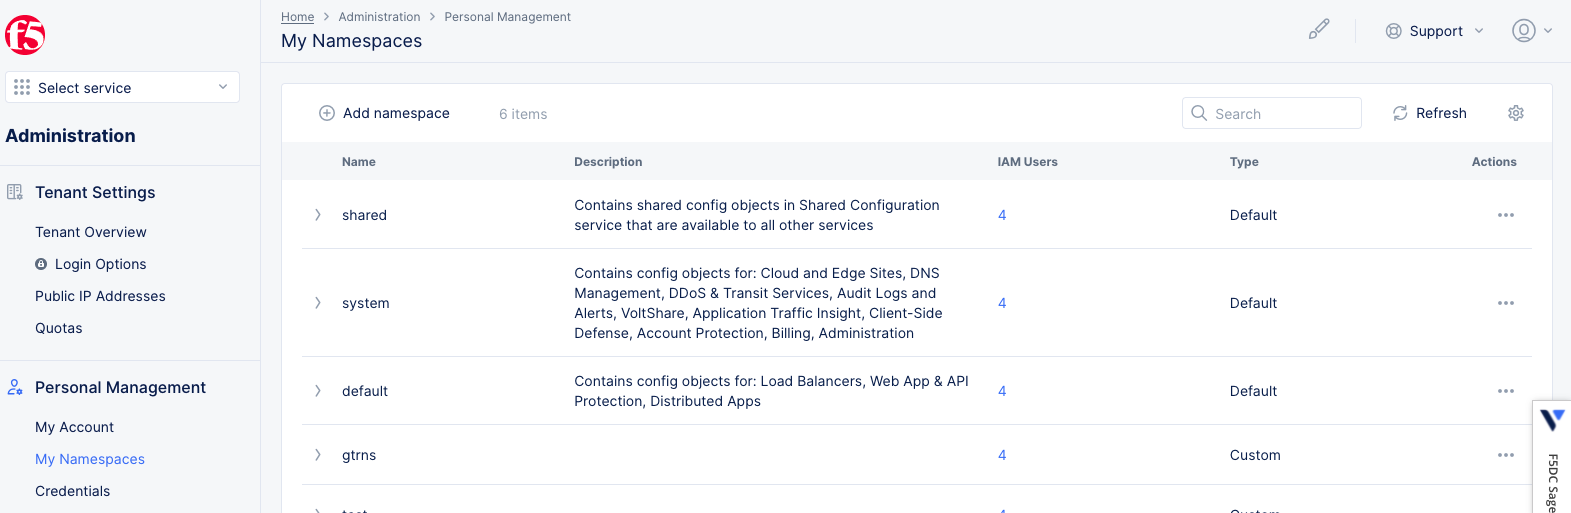
Figure: Navigate to Manage Namespaces
- Click
Add namespaceand enter a name for your namespace. ClickSave changesto complete creating the namespace.

Figure: Create Namespace
Step 1.2: Create vK8s cluster and download its kubeconfig.
-
Change to the
Distributed Appsworkspace. -
Click on the application namespace option on the namespace selector. Select the namespace created in previous step from the namespace dropdown list to change to that namespace.
-
Select
Applicationsin the configuration menu andVirtual K8sin the options pane.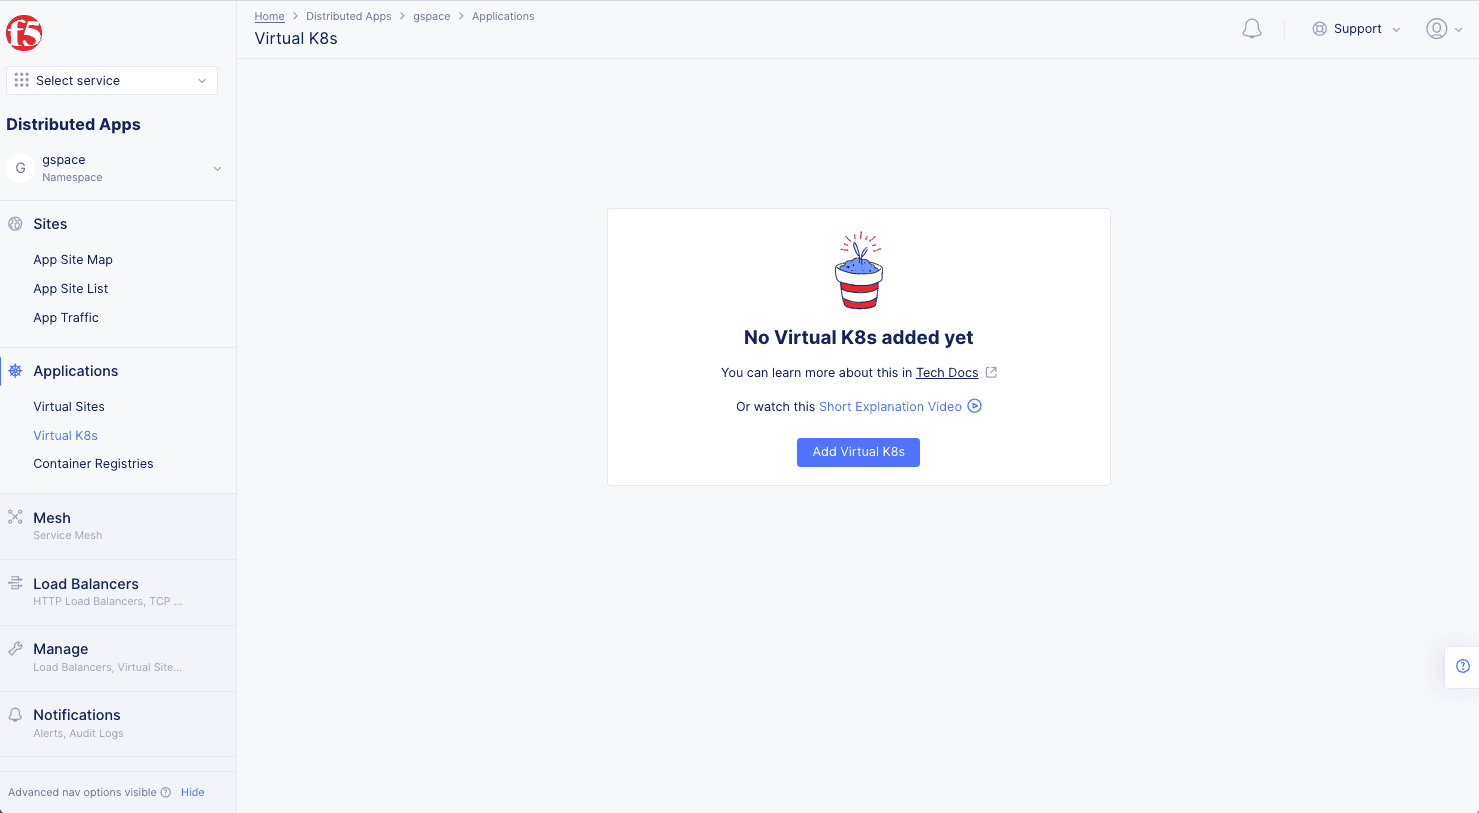
Figure: Navigate to vK8s Creation
-
Click
Add Virtual K8sand enter a name for your vK8s cluster.
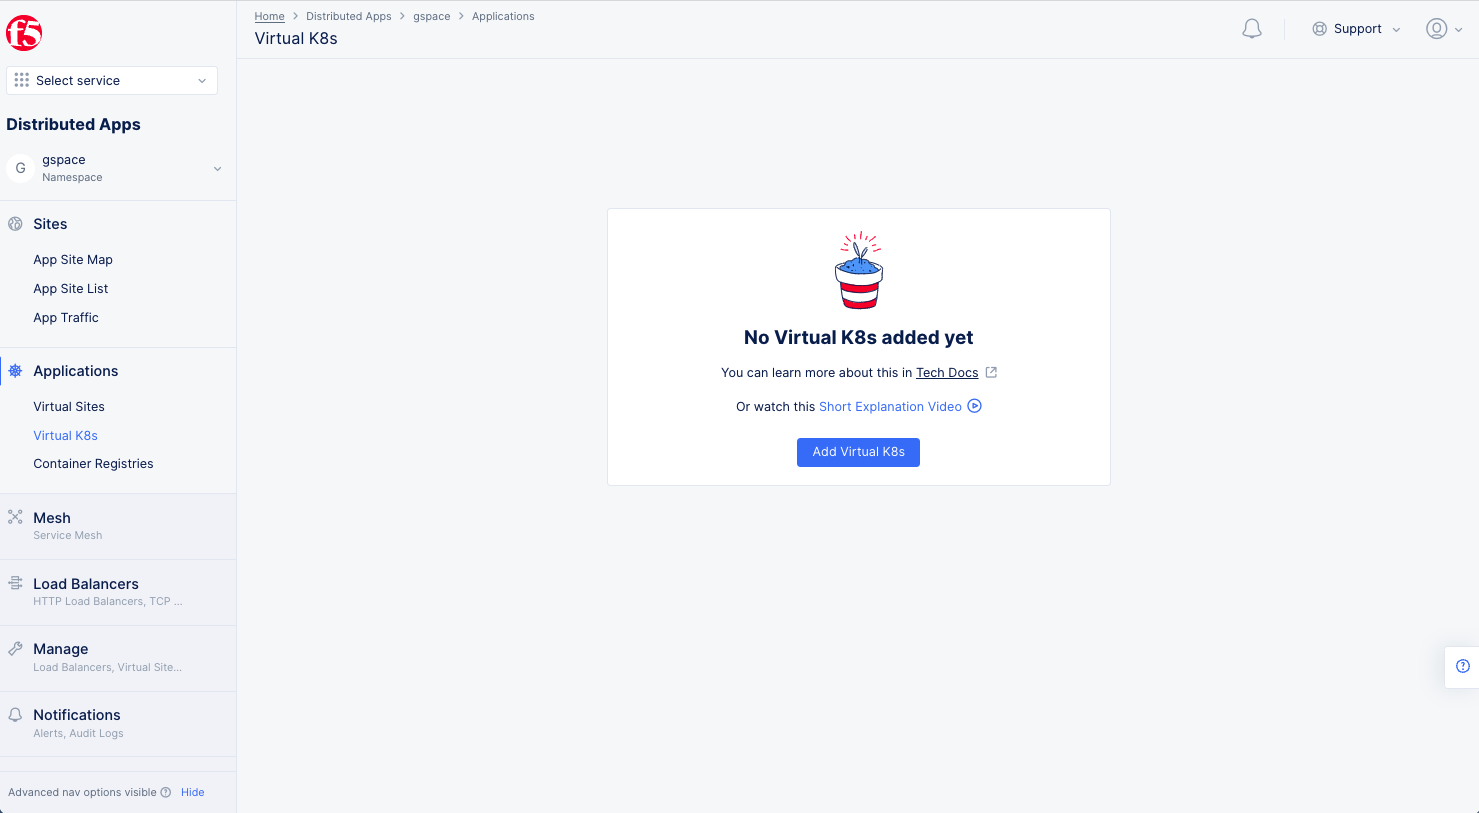
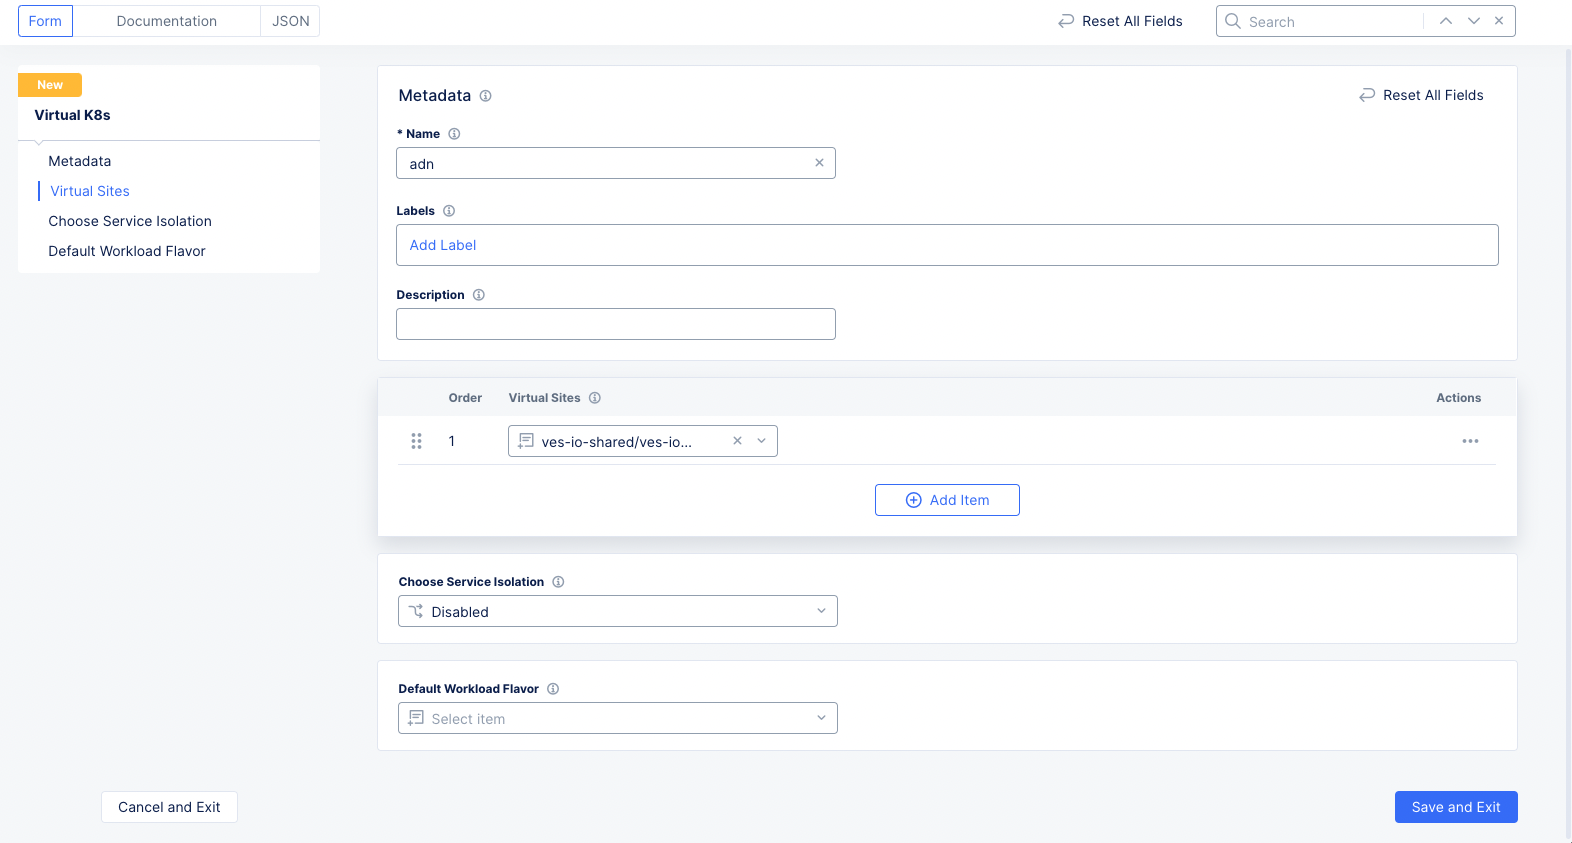
Figure: Select Virtual Site for vK8s
-
Click the
Select vsite refbutton and selectves-io-all-res. Click theSelect Vsite Refbutton at the bottom to apply the virtual site to the vK8s configuration. -
Click
Save and Exitto start creating the vK8s clusters in all RE sites. -
Once the vK8s object is created, click
...>Kubeconfigfor it and enter an expiration date to download its kubeconfig file.
Step 1.3: Deploy the web application in all Distributed Cloud RE sites.
To deploy the web application in a K8s cluster, the following are required:
- Kubeconfig of the K8s cluster. For this, use the vK8s kubeconfig downloaded in previous step.
- Manifest file of your web application. Download the sample this example uses and edit its fields as per your application.
Enter the following command to deploy the application:
kubectl --kubeconfig ves_adn_adn.yaml --namespace adn apply -f kubernetes-manifests.yamlNote: You can download the kubectl application here: kubeclt.
This completes deployment of application across all RE sites.
Step 2: Deliver K8s App
Delivering the application requires creating load balancer and origin pool for the services. Origin pools consist of endpoints and clusters. Also routes and advertise policies are required to make the application available to the internet. In addition, this example shows creation of app type object and associate it with the load balancer for API discovery. This use case also shows how to delegate your subdomain to Distributed Cloud Services to manage the DNS and certificates for your domain.
Perform the following steps for creating origin pool and load balancer for your application:
Create HTTP Load Balancer.
- Select the
Multi-Cloud App Connectworkspace. - Select the namespace created in step 1.1 where we previously deployed our application onto our vk8.
- Navigate to
Managein the left menu. SelectLoad Balancers>HTTP Load Balancersfrom the options. ClickAdd HTTP Load Balancerto start load balancer creation.
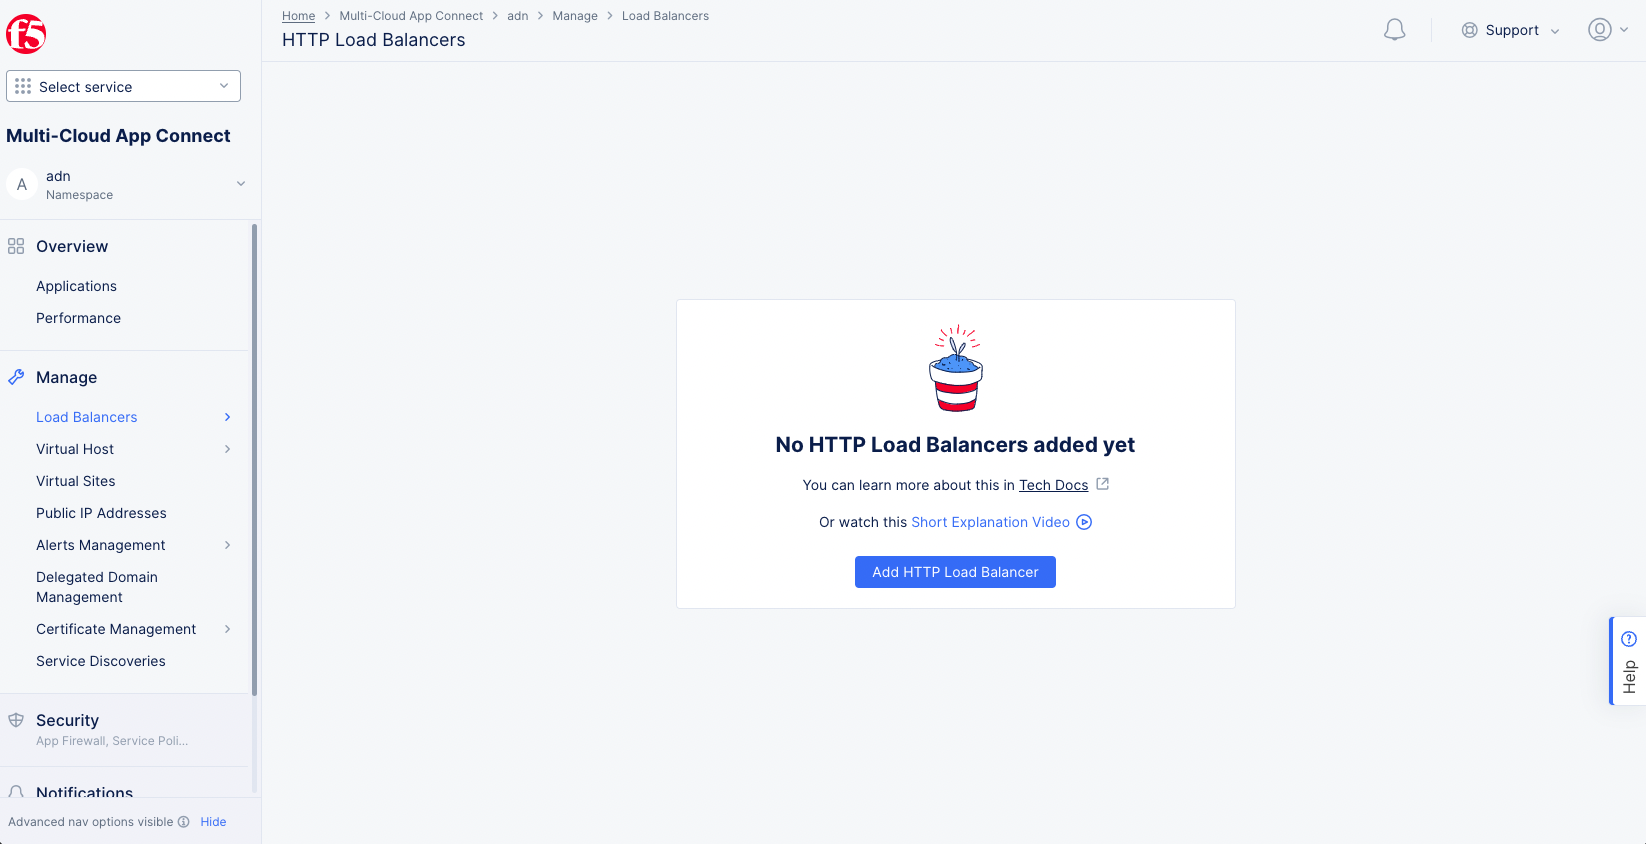
Figure: Add HTTP Load Balancer
- Enter a name for the load balancer.
- Under
Domains and LB Typein theList of Domainsfield, enter the domain(s) that will be matched to this load balancer. - Select the
Load Balancer Type. For this quick start, we will selectHTTPS with Automatic Certificate.
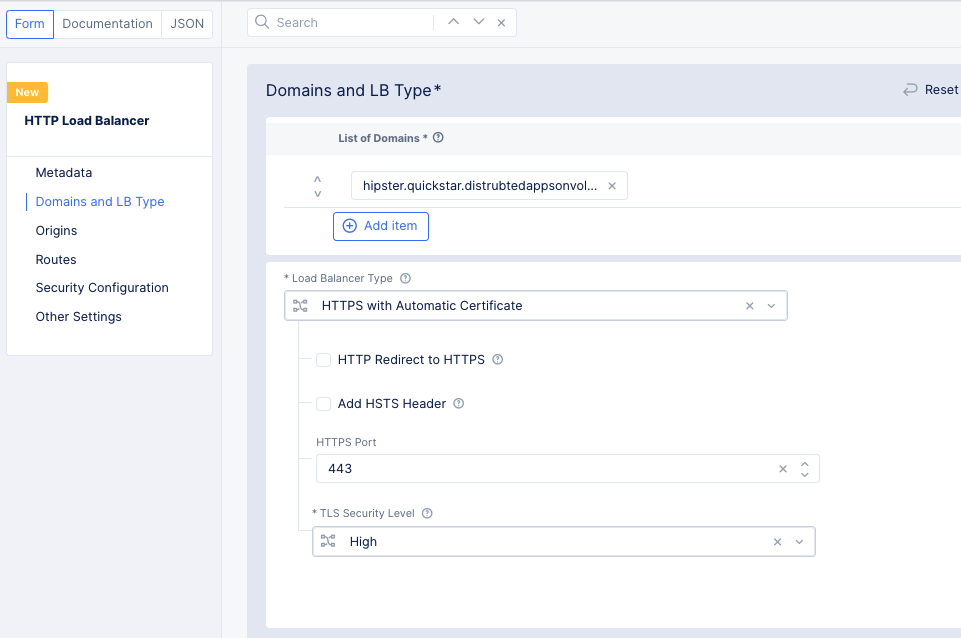
Figure: HTTP Load Balancer Basic Configuration
-
Scroll down to the
Originssection and clickAdd Itemto set up an origin pool. -
Use the
Origin Poolpull-down menu to find and click theCreate new origin poolbutton. -
Enter a name for the new origin pool.
-
In the
Origin Serverssection, clickAdd Item.- In the
Select Type of Origin Serverfield, selectK8s Service Name of Origin Server on given Sites. - Enter a name in the
Service Namefield in the form <unique-name>.<namespace>. For the quick start example, we'll enterfrontend.adn. - Set this as a
Virtual Sitein theSite or Virtual Sitefield. - Set the virtual site to the same site used when you created your virtual kubernetes cluster. In this example, we used
ves-io-all-res. - For the
Select Network on the sitefield, selectvK8s Networks on Site. - Click
Add Itemto save the origin server.
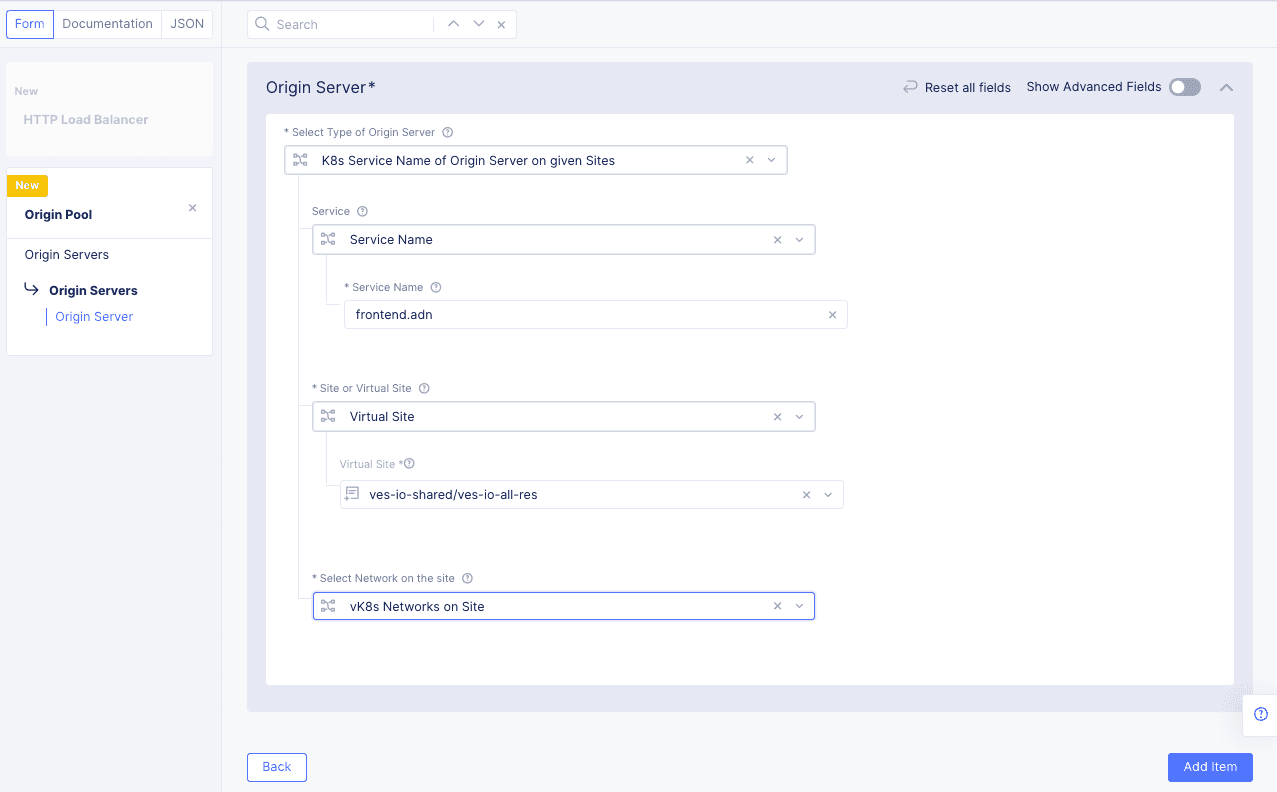
Figure: Load Balancer Origin Server
- In the
-
Enter the port number that the origin server is using.
-
Click
Continueat the bottom of the page to create the origin pool.
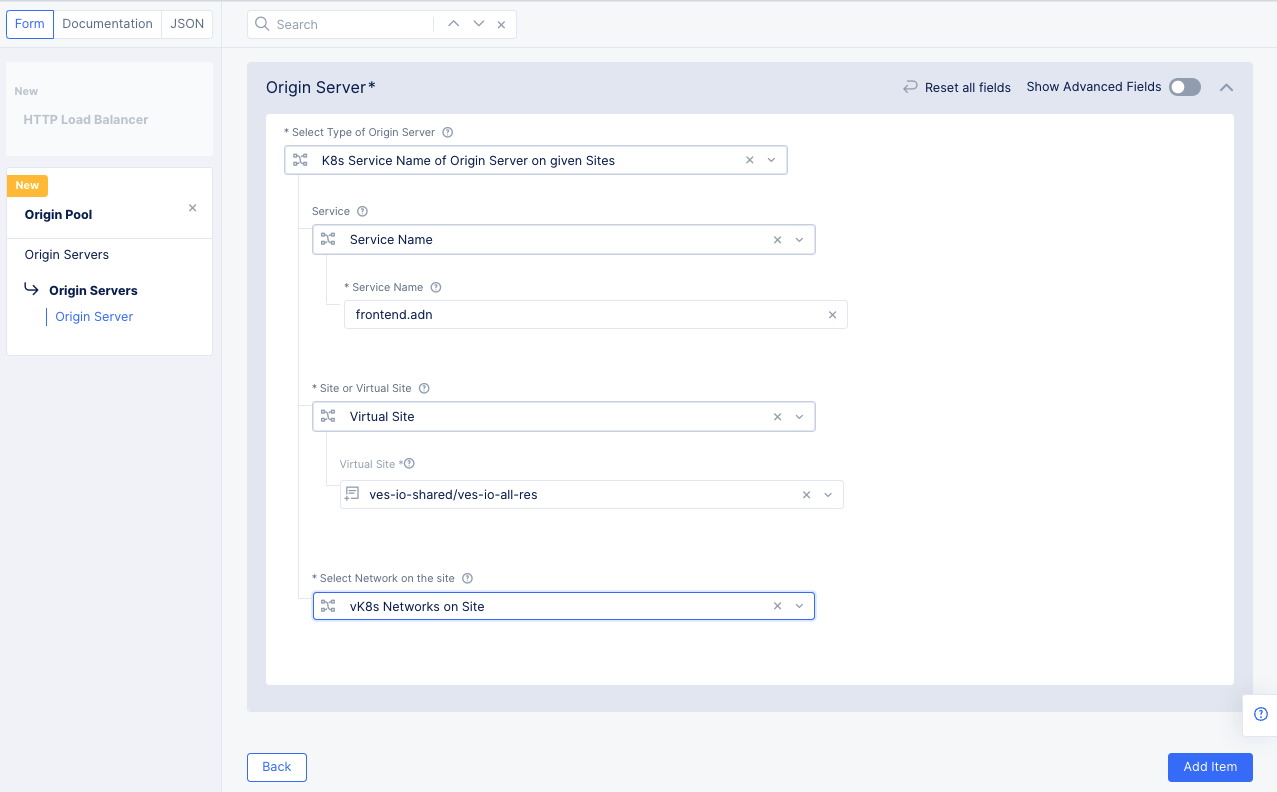
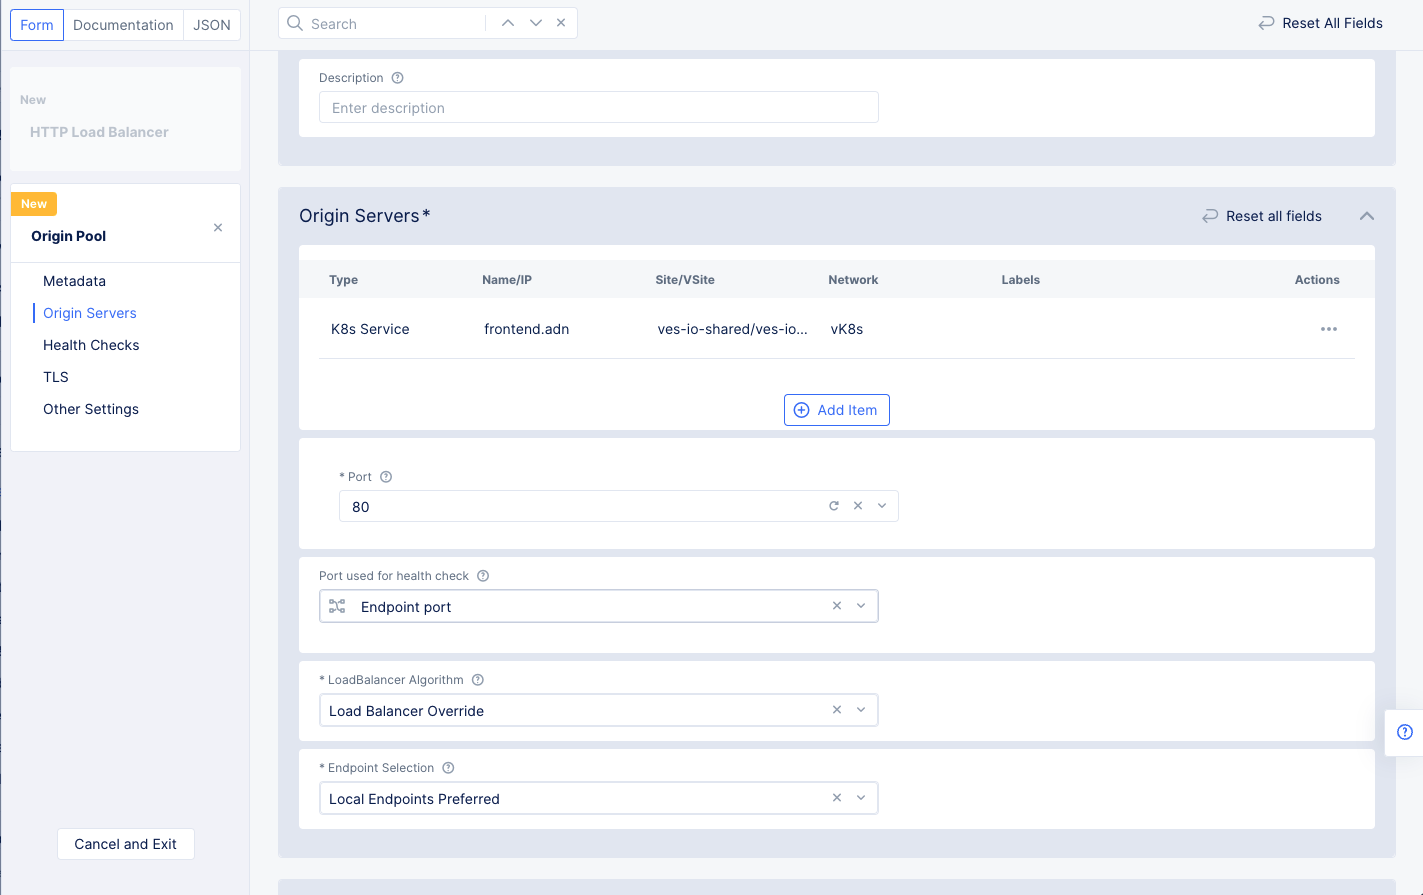
Figure: Origin Pool Basic Configuration
- Click
Add Itemto add this pool to the HTTP load balancer. - Click
Save and Exitto complete the HTTP load balancer. - Press the
Refreshbutton to update theTLS infocolumn in the load balancer table. After a few minutes, the TLS info will be certified, and we'll be able to access our application through the domain we specified.

Figure: Load Balancer Created
Step 3: Secure K8s App
Securing the web application requires you to set up ingress filtering using BGP ASN sets, JavaScript challenge, DDoS protection using rate limiting, and WAF.
The examples in this chapter demonstrate how to set up the JavaScript challenge and WAF to the load balancer to complete securing the application.
Note: JavaScript challenge enforces the users to send requests through the browser preventing automated attacks.
Create a Web Application Firewall (WAF) and apply to the load balancer.
-
Select the
Web App & API Protectionworkspace. -
Select the namespace used to create the HTTP load balancer previously.
-
Navigate to
Manage>Load Balancers>HTTP Load Balancers. -
Click
...>Manage Configurationfor your load balancer, and then clickEdit Configurationin the top right to edit the load balancer's configuration. -
Scroll down or click on
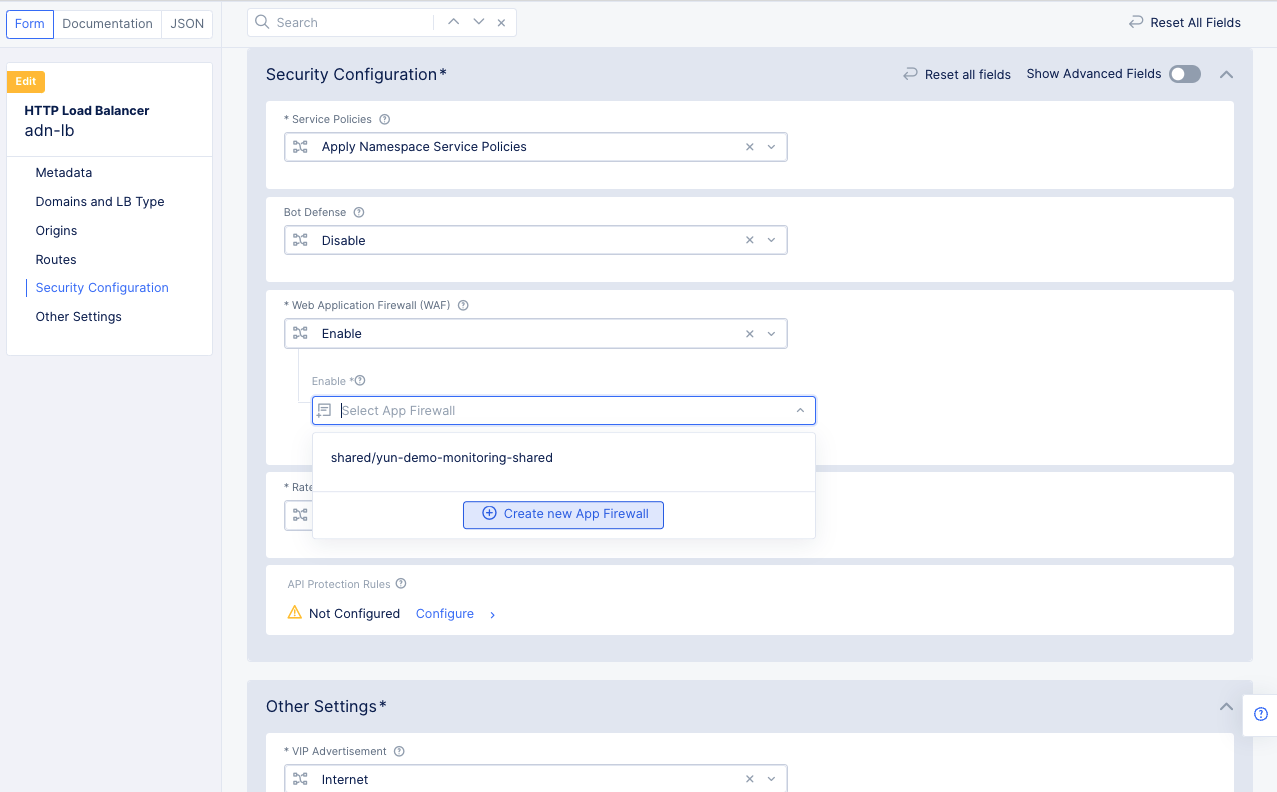
Security Configurationin the left menu to go to the security configuration section. -
Select
Enablein theWeb Application Firewall (WAF)field. -
In the
Enablefield, click theCreate new App Firewallbutton.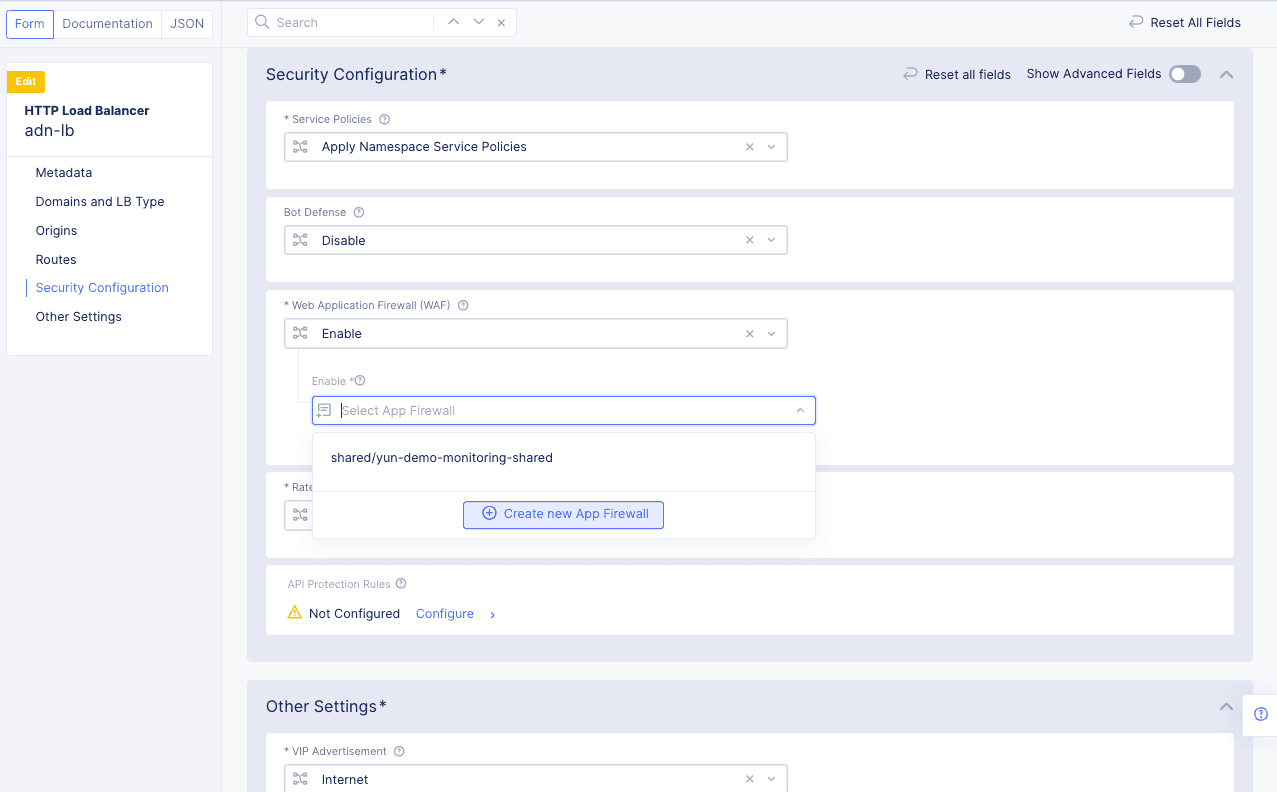
Figure: Create New Web Application Firewall
Perform the configuration using the following guidelines:
- Enter a name for the Distributed Cloud WAF in the
Metadatasection. - Set the
Enforcement ModetoBlockingto protect the website. The other default option isMonitoring, which will log malicious activity, but it will not block any traffic. - Leave the
Detection Settingsat their defaults. - Click
Continueto complete creating the WAF.
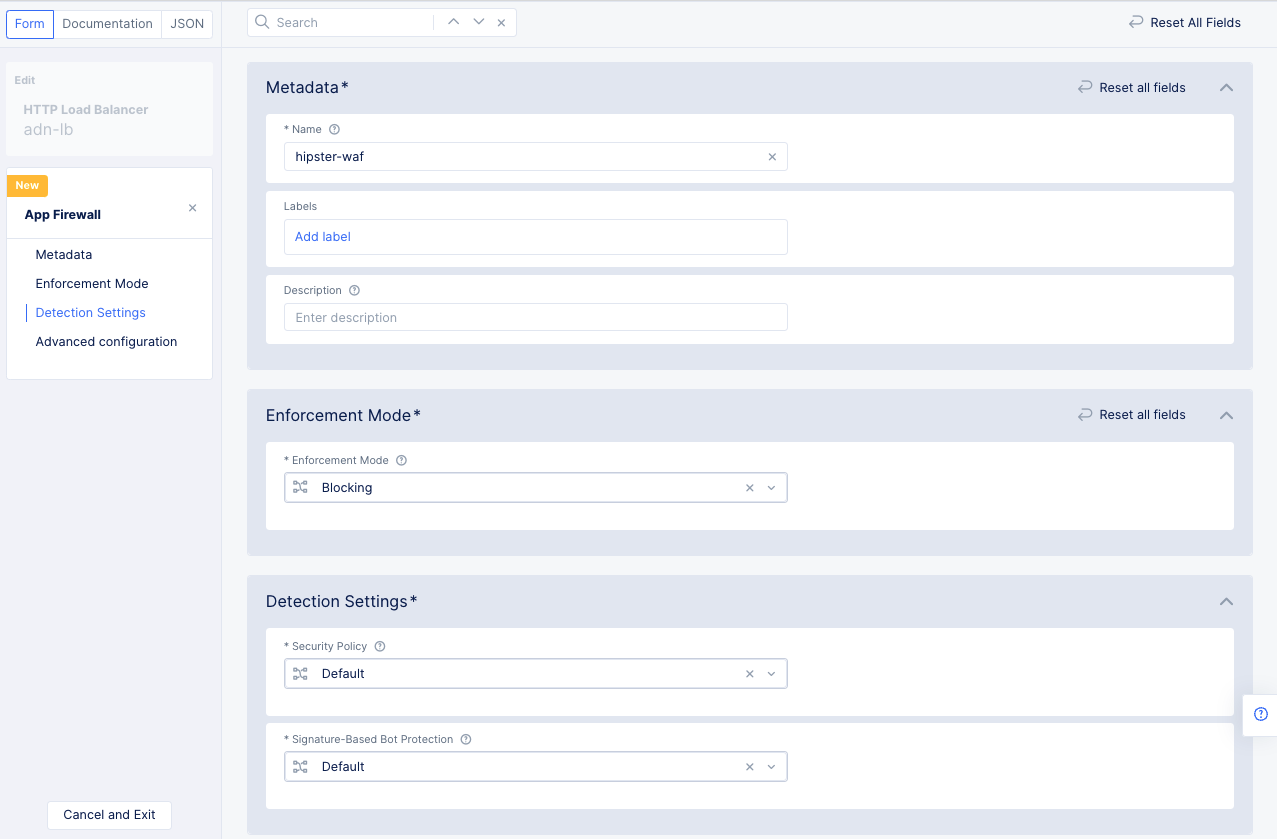
Figure: Web Application Firewall Creation
- Click
Save and Exitto add the WAF to the load balancer configuration.
Step 4: Observe K8s App
You can monitor the deployed K8s application using the Console monitoring.
Step 4.1: Open the application site map.
- Log into the Console and select the
Distributed Appsworkspace. - Change to your namespace.
- Click
App Site Mapin theSitessection to get a global view of all your apps.
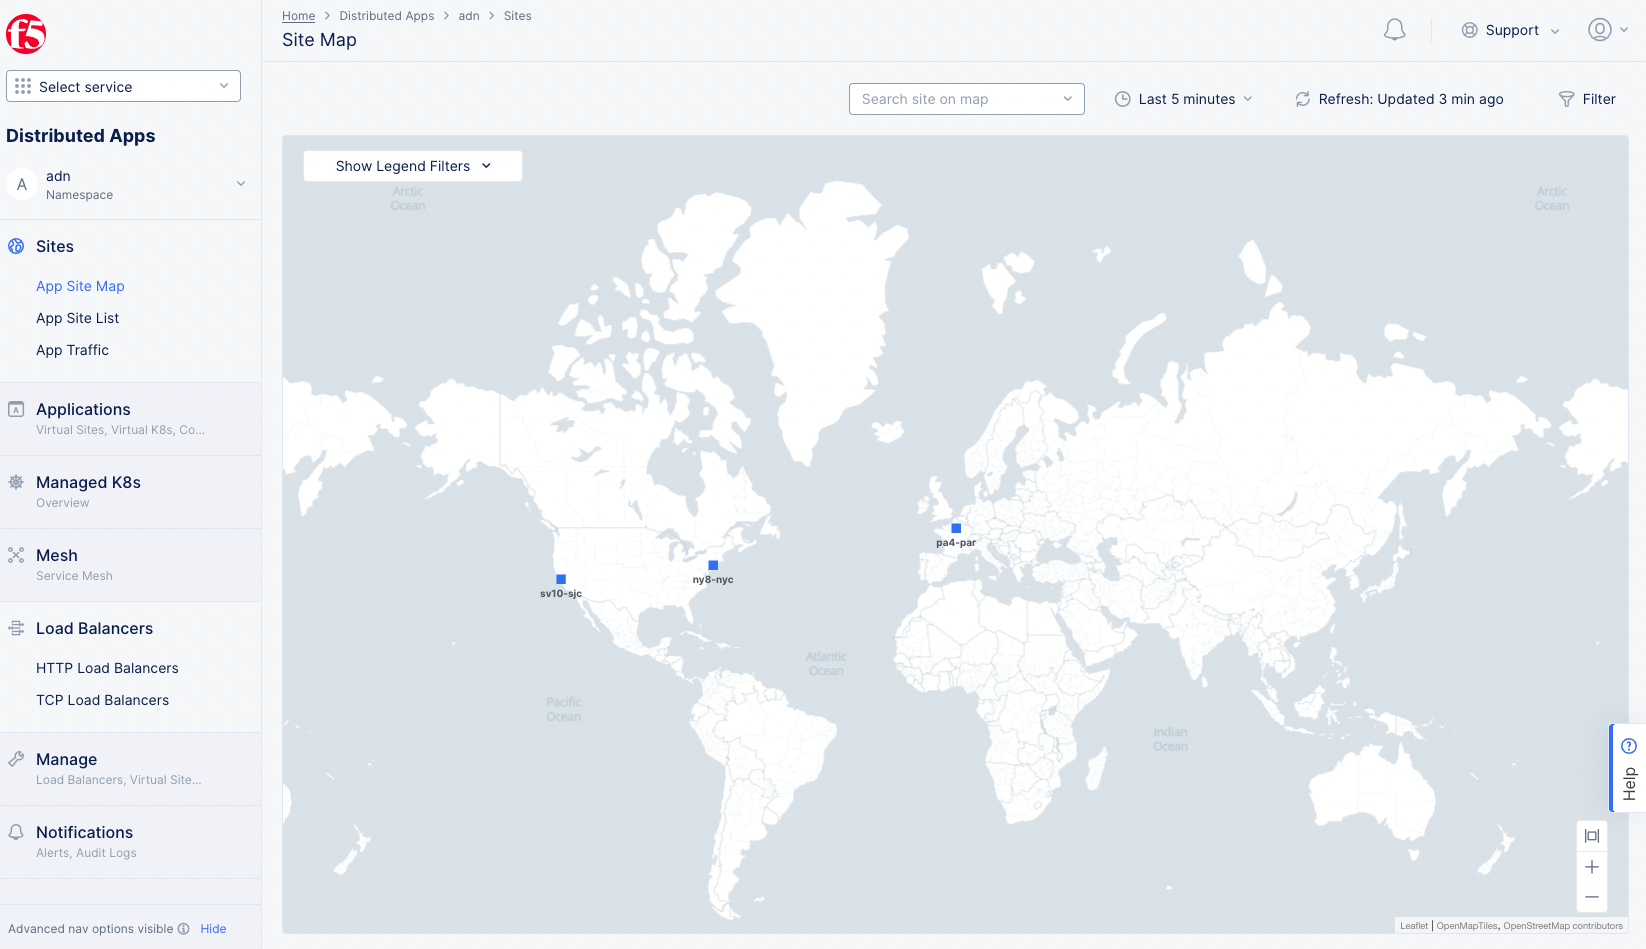
Figure: App Site Map Global View
- Click on a site in the map to get details for that site. You can see the application's health overview along with a summary of requests and errors.
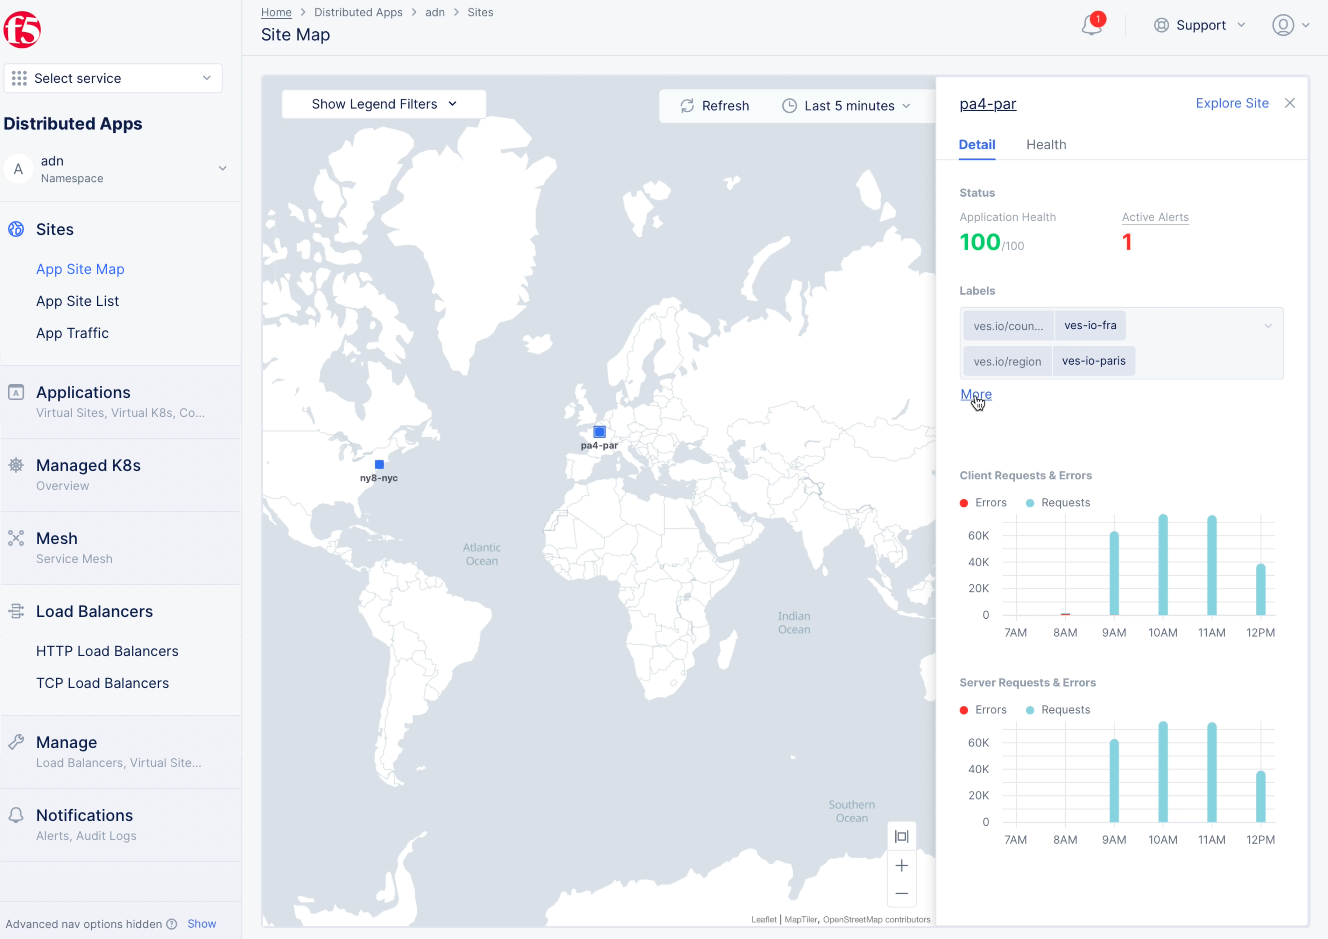
Figure: App Site Detail
Step 4.2: Open the load balancer dashboard.
- In the sidebar menu, select
Load Balancers>HTTP Load Balancersto see a list of HTTP load balancers. - Find your load balancer in the list and select
Performance Monitoring. This shows the performance dashboard showing the overall status such as a health score, the number of origin servers, end-to-end latency, requests per second, and throughput information.
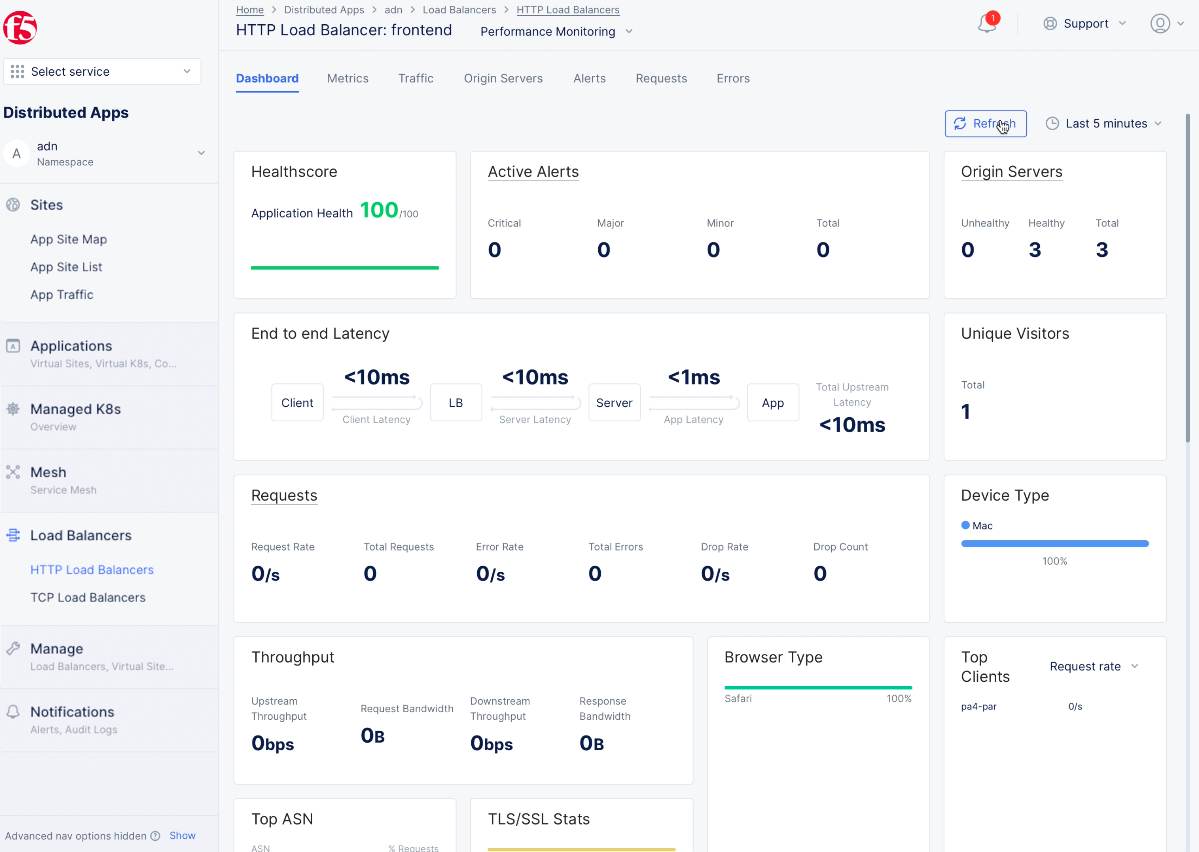
Figure: Load balancer Dashboard View
- Click
Metricstab check the metrics such as request rate, error rate, latency, and throughput.
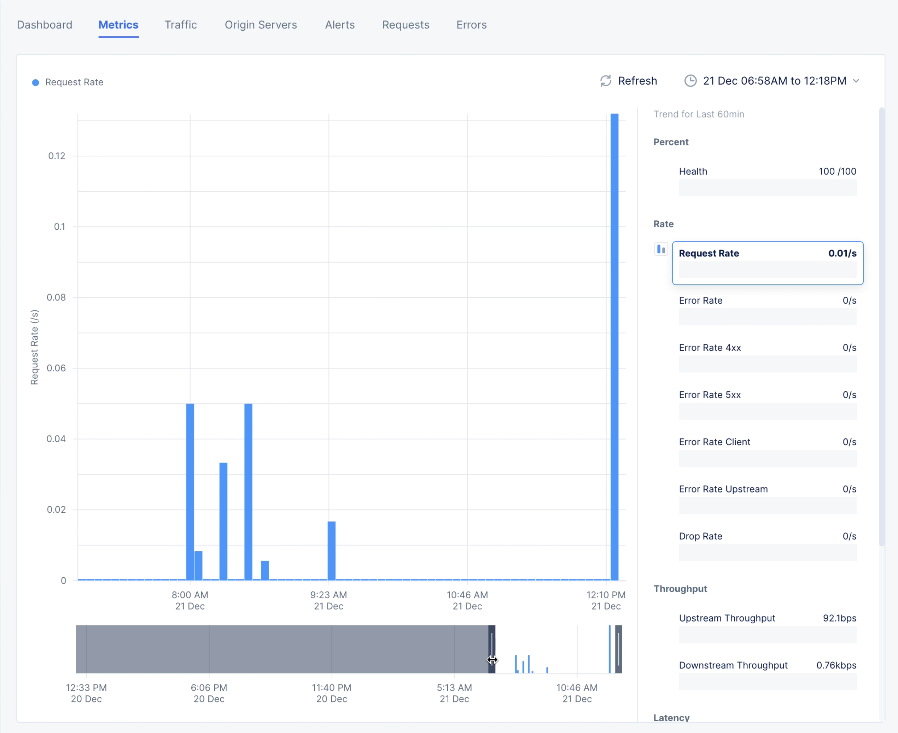
Figure: Load balancer Metrics View
- Click
Traffictab to see the request rate and overall throughput between source, load balancer, and origin server.
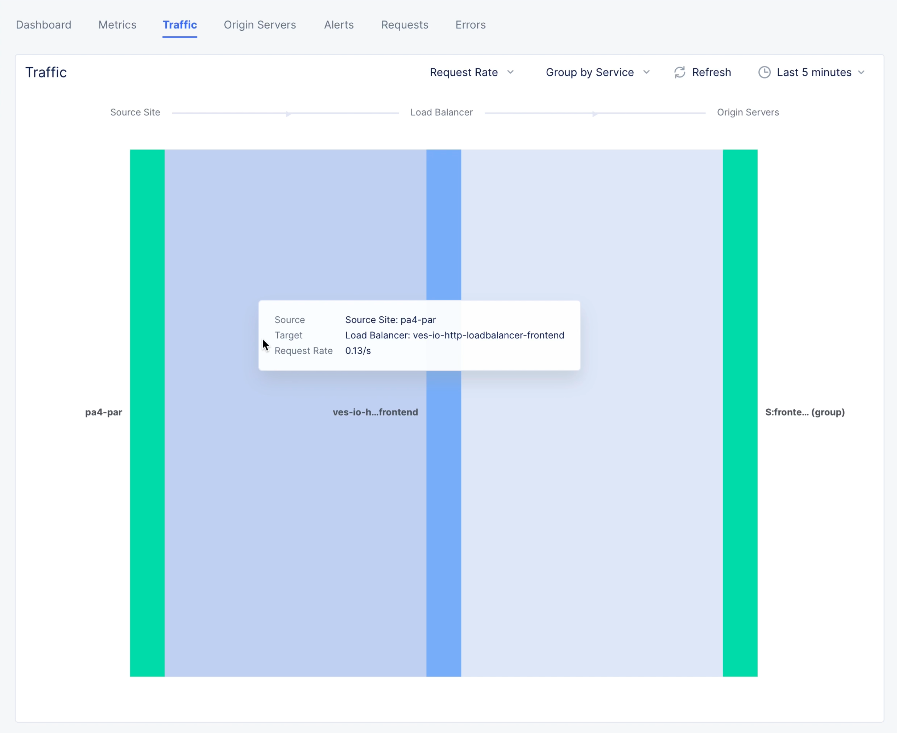
Figure: Load balancer Traffic View
- Click
Origin Serverstab check the origin servers and the associated details, like requests, errors, latency, RTT, and more.
Step 4.3: Open the application service mesh.
- In the sidebar menu, select
Service Meshto see a list of service meshes. - Click on the
Morebutton associated with the service mesh object for your application to open its service graph. The service graph shows the service mesh graph for your application services.
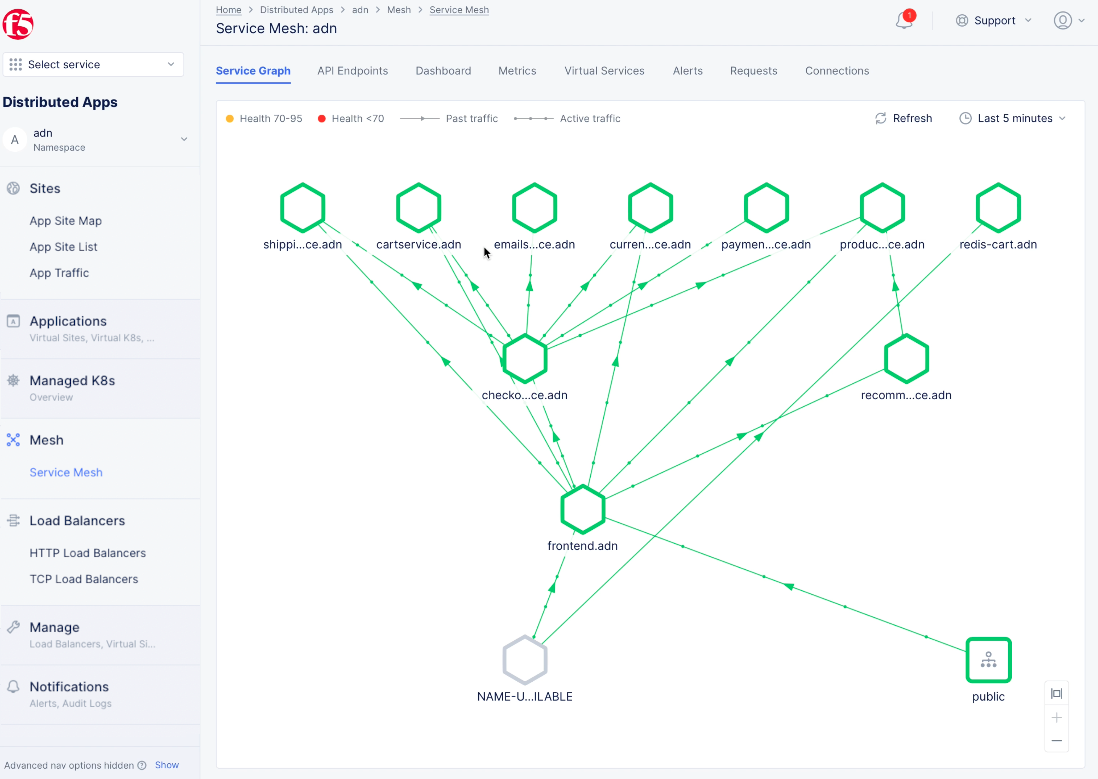
Figure: Service Mesh Service Graph View
- Click on an endpoint to see more details and health information.
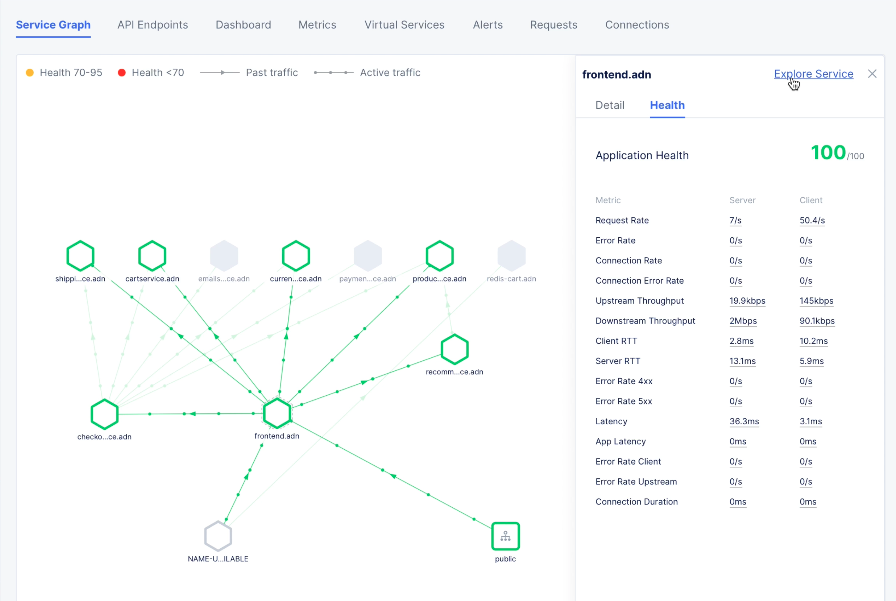
Figure: Service Mesh Service Endpoint Details
-
Click
Explore Serviceto see more details -
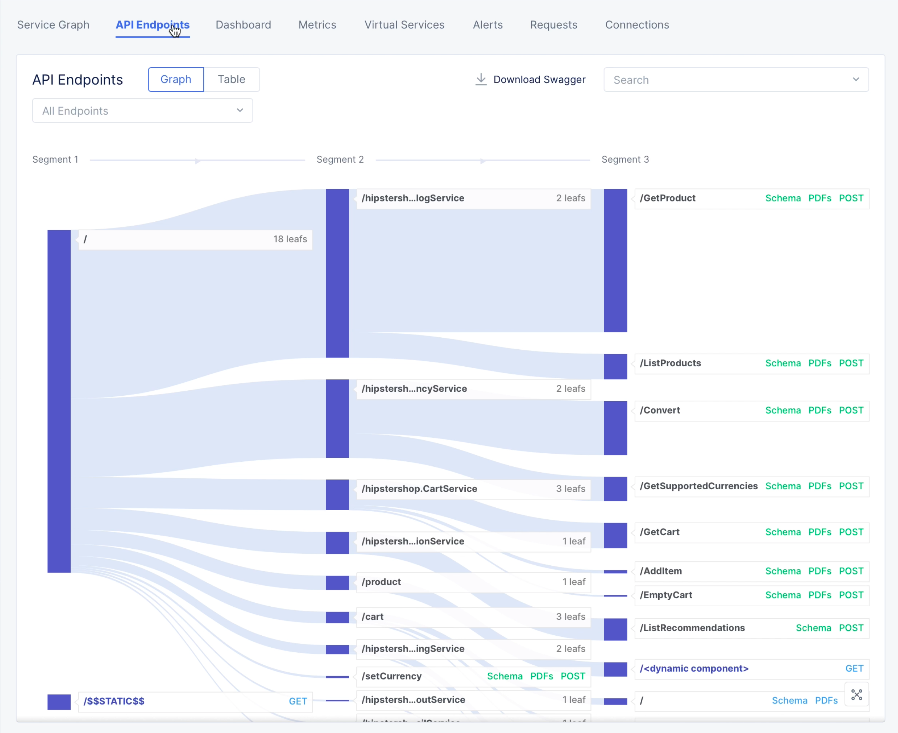
Click the
API Endpointstab to display the distribution map of all requests hitting the app via local answer and shows the percentage split of each path per segment.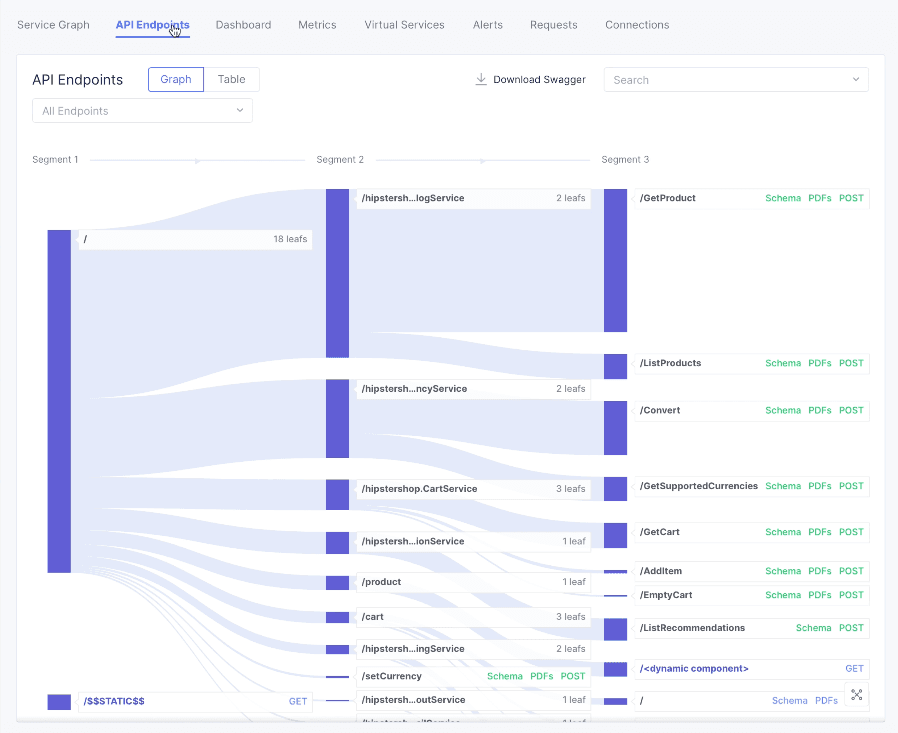
Figure: Service Mesh Endpoints View for all Endpoints
-
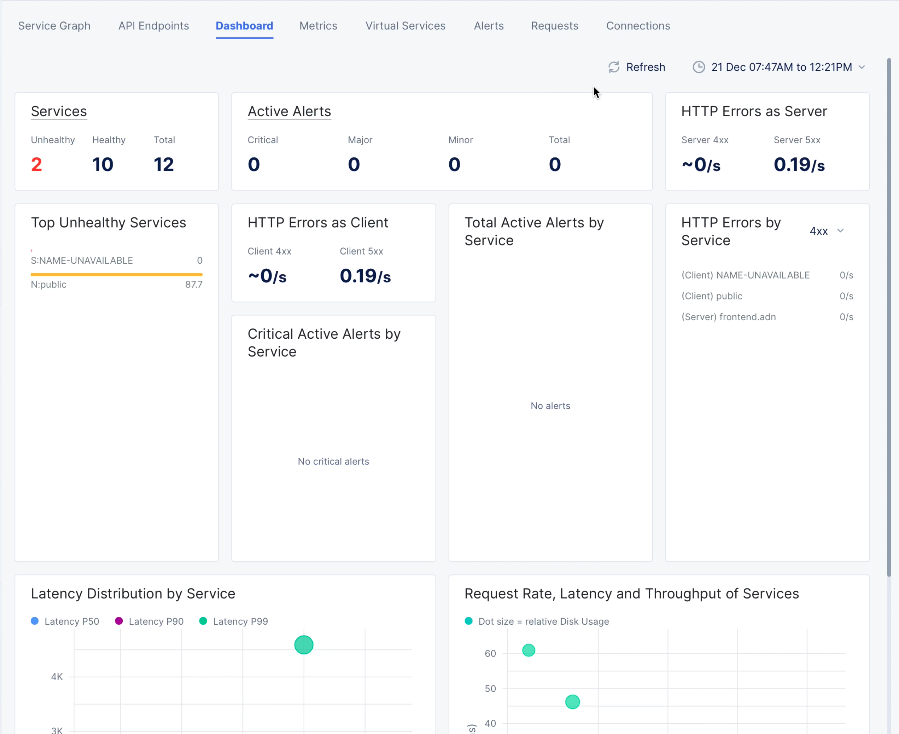
Click the
Dashboardtab to see latency distribution per service as well as request rate, latency, and throughput of services.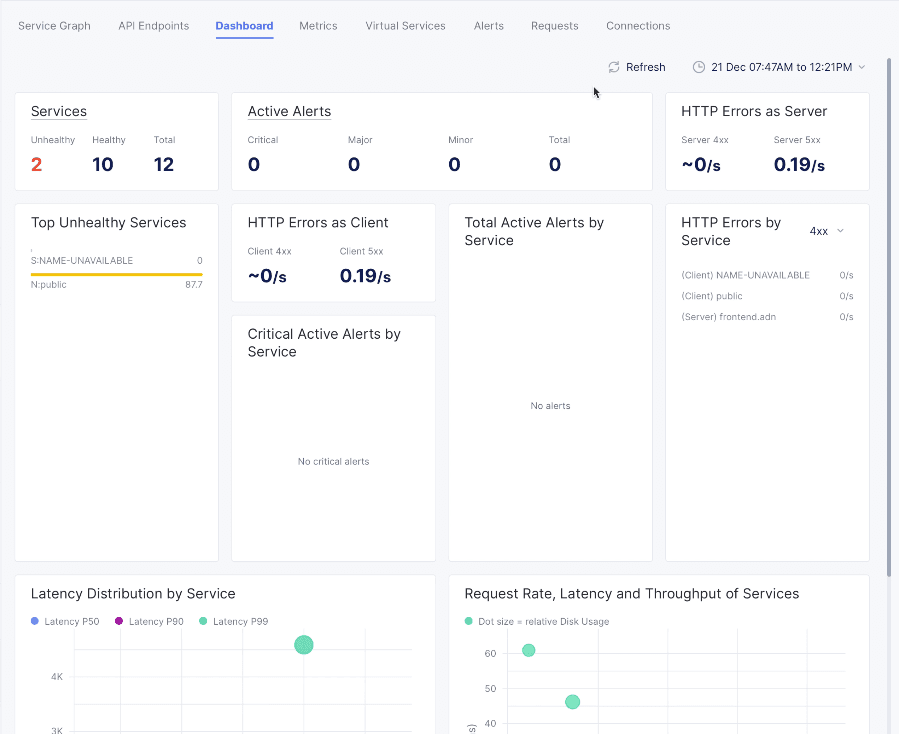
Figure: Service Mesh Dashboard View