Create CloudLink
Objective
This guide provides instructions on how to create and use a CloudLink using a guided wizard in F5® Distributed Cloud Console (Console). A CloudLink allows Distributed Cloud Services to orchestrate an already provisioned direct connection, establish a multi-cloud networking fabric, and then connect, deliver, secure, and operate networks and apps across hybrid environments. CloudLink is currently available for Amazon Web Services (AWS) and Google Cloud Platform (GCP).
Prerequisites
F5 Distributed Cloud Services account. If you do not have an account, see Getting Started with Console.
AWS-Specific Prerequisites
Order a connection into AWS using Equinix (or other providers) and have a Direct Connect Connection available.
GCP-Specific Prerequisites
-
Use an existing GCP interconnect or order through Equinix (or other providers).
-
Use an existing VPC or create a new VPC. This VPC will be the same VPC used to provision the Site (Brownfield deployment support only).
-
Ensure that the Cloud router and the Interconnect are provisioned using the above VPC.
Configuration
Configuration Sequence
The following table presents the sequence of activities in enabling the TSA detection:
| Activity | Description |
|---|---|
| Create CloudLink | Provide cloud credentials and specify connection details |
| Configure Distributed Cloud Customer Edge (CE) Sites | Deploy CE cloud sites, establish private connectivity, and attach workload |
| Apply Networking and Security Services | Select and configure networking and security services |
Create AWS CloudLink
Perform the following steps to create a CloudLink:
Step 1: Navigate to the CloudLink page.
-
Log into Console.
-
Click
Multi-Cloud Network Connect.
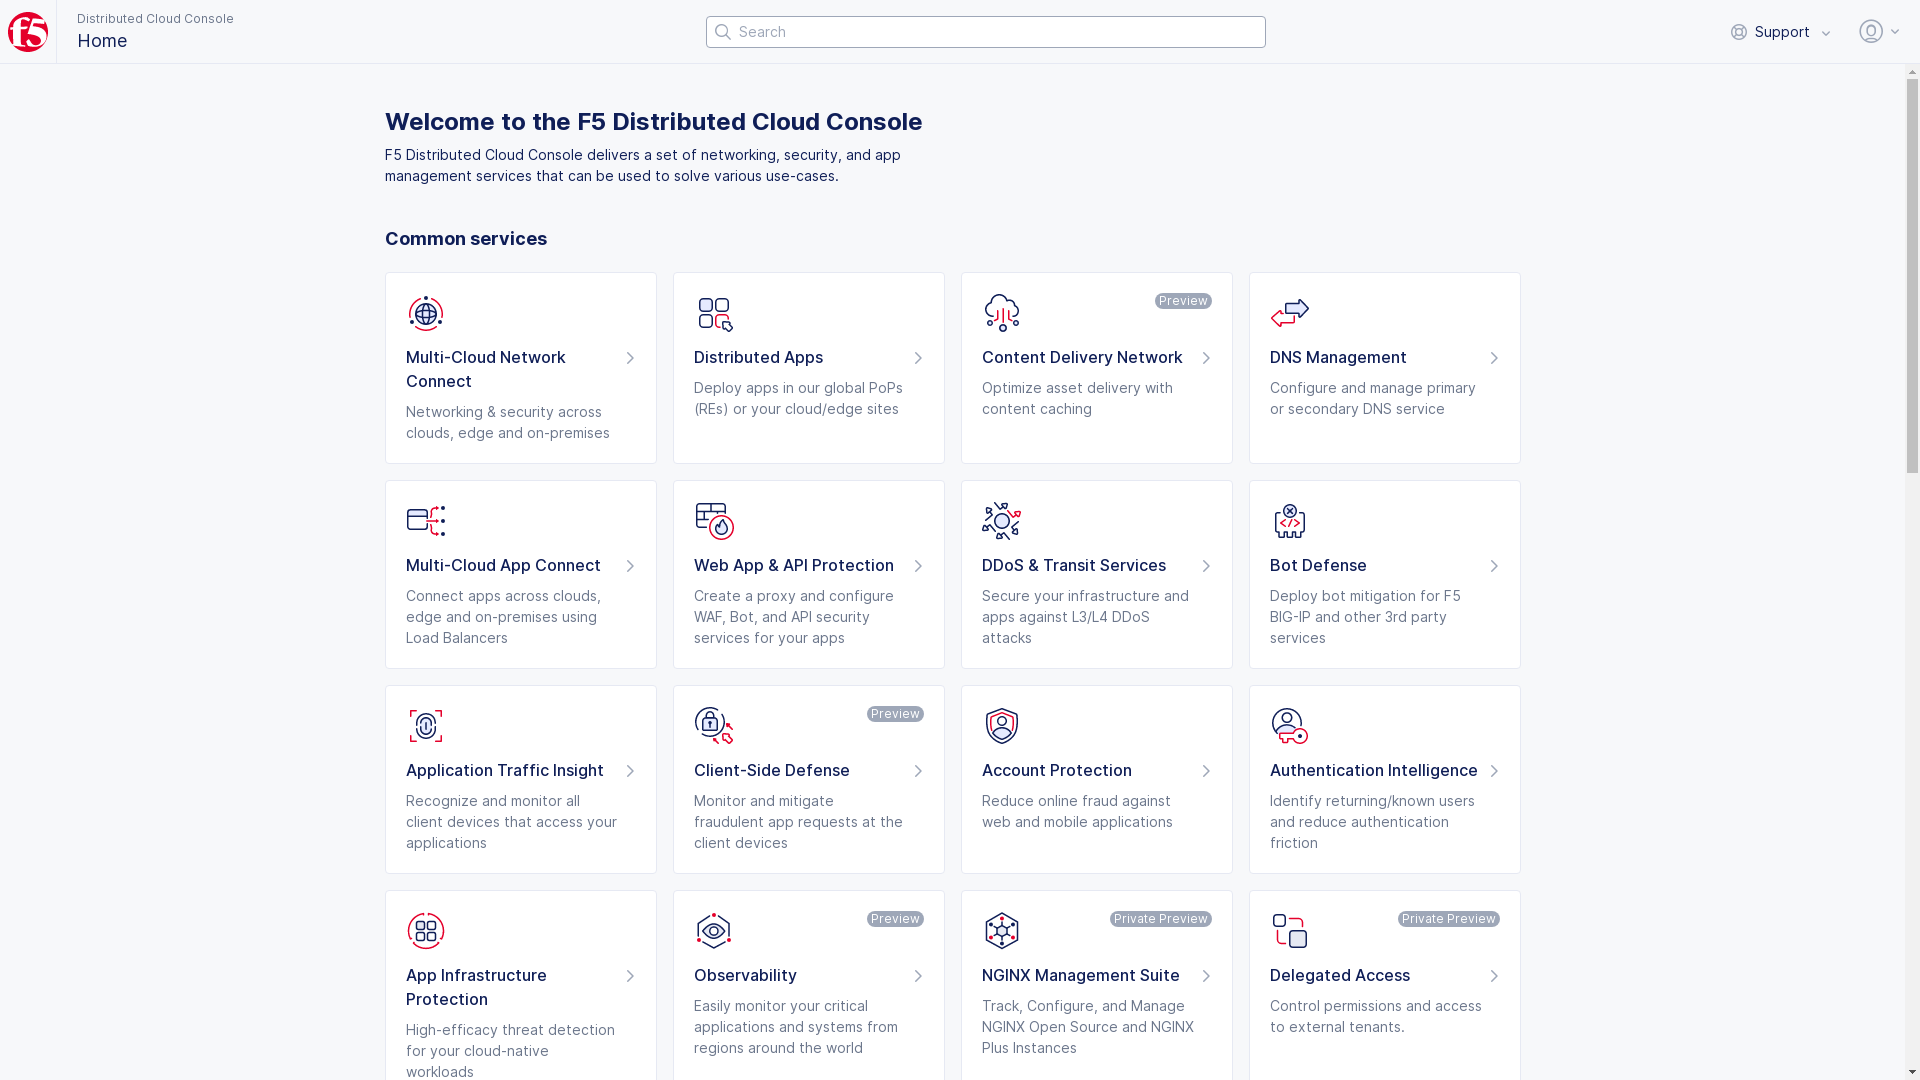
Figure: Console Homepage
- Select
Manage>Networking>CloudLinks.

Figure: CloudLinks
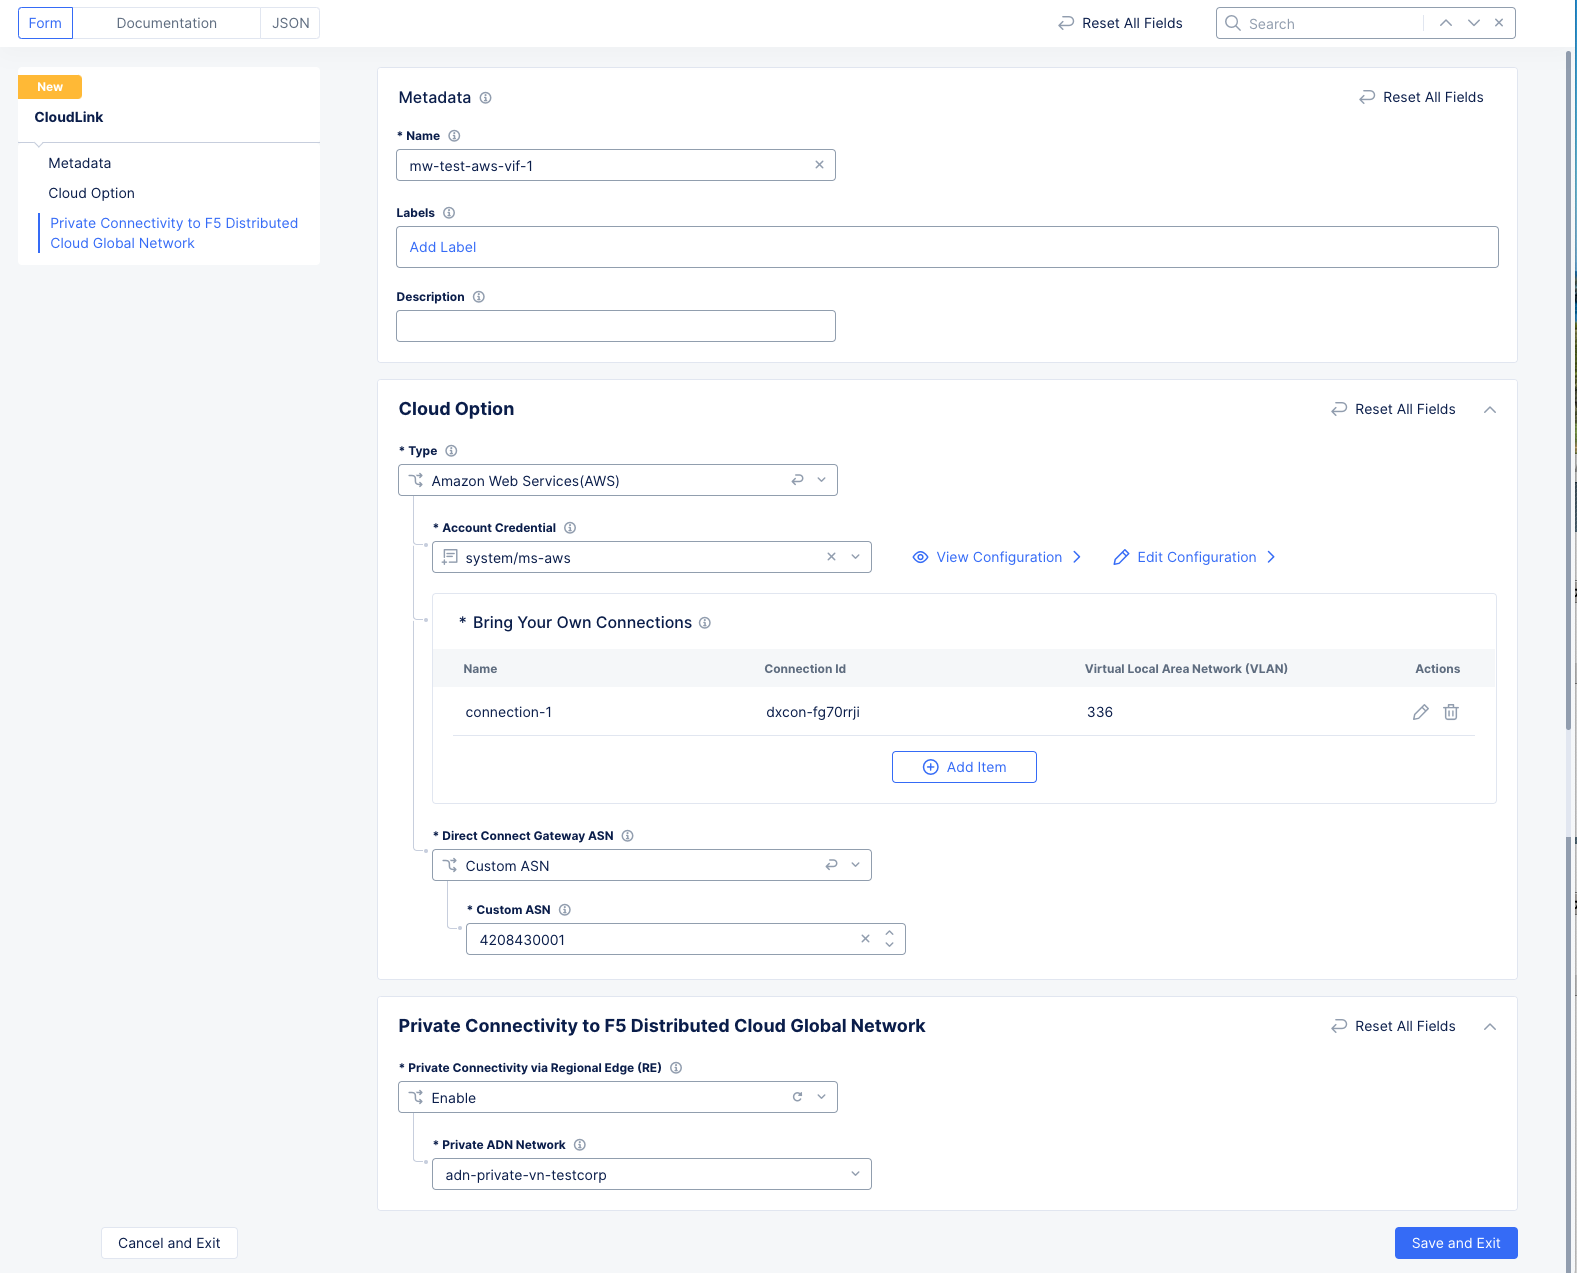
Step 2: Create an AWS CloudLink.
-
Click
Add CloudLink. -
In the
Namefield, enter the name for the CloudLink. -
Select
Amazon Web Services(AWS)from theTypedrop-down menu in theCloud Optionsection. -
Use the
Account Credentialdrop-down menu to select your cloud credentials. Optionally you can selectAdd Itemto create new cloud credentials. -
Click
Add itemin theBring Your Own Connectionssection to configure a connection.- Enter a name for this connection.
- Select the region where the AWS site is located.
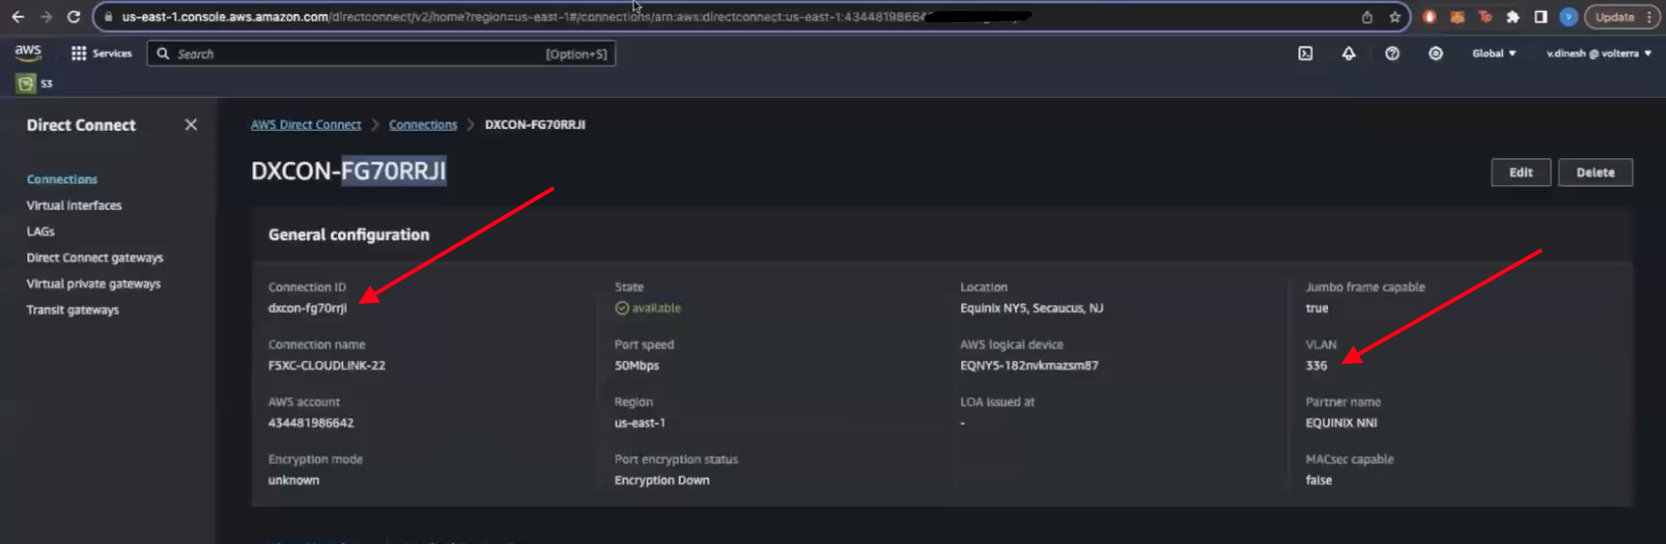
- Enter the connection ID in the
Direct Connect Connection Idfield. ClickSee Suggestionsin the drop-down menu to see suggested values for Direct Connect Connection ID. Also, enter the VLAN in theVirtual Local Area Network (VLAN)field. You can get these values from your AWS console on theDirect Connectpage.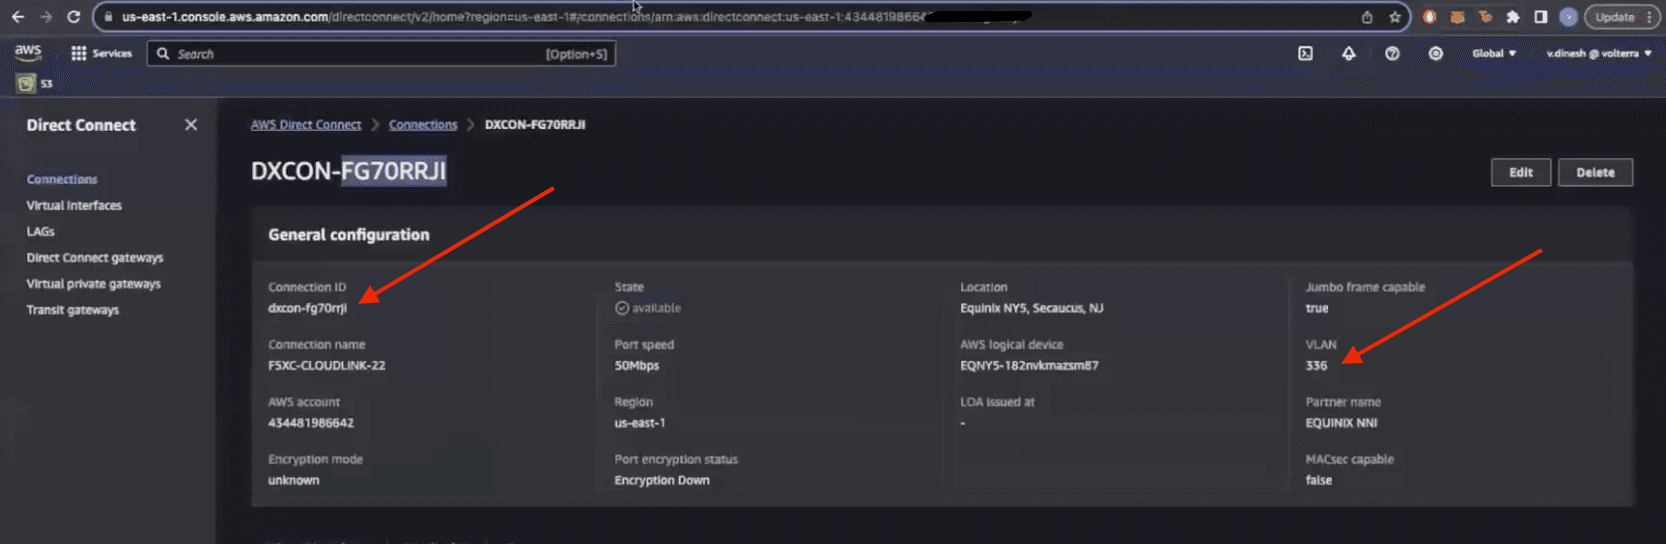
Figure: AWS Console
- Enter your BGP in the
BGP ASNfield. - Click
Configureto enter your BGP Authorization key. - Enter the router IP addresses for both the customer side and the AWS side in the
Peer IP Addressessection. - Click
Applyto save the connection.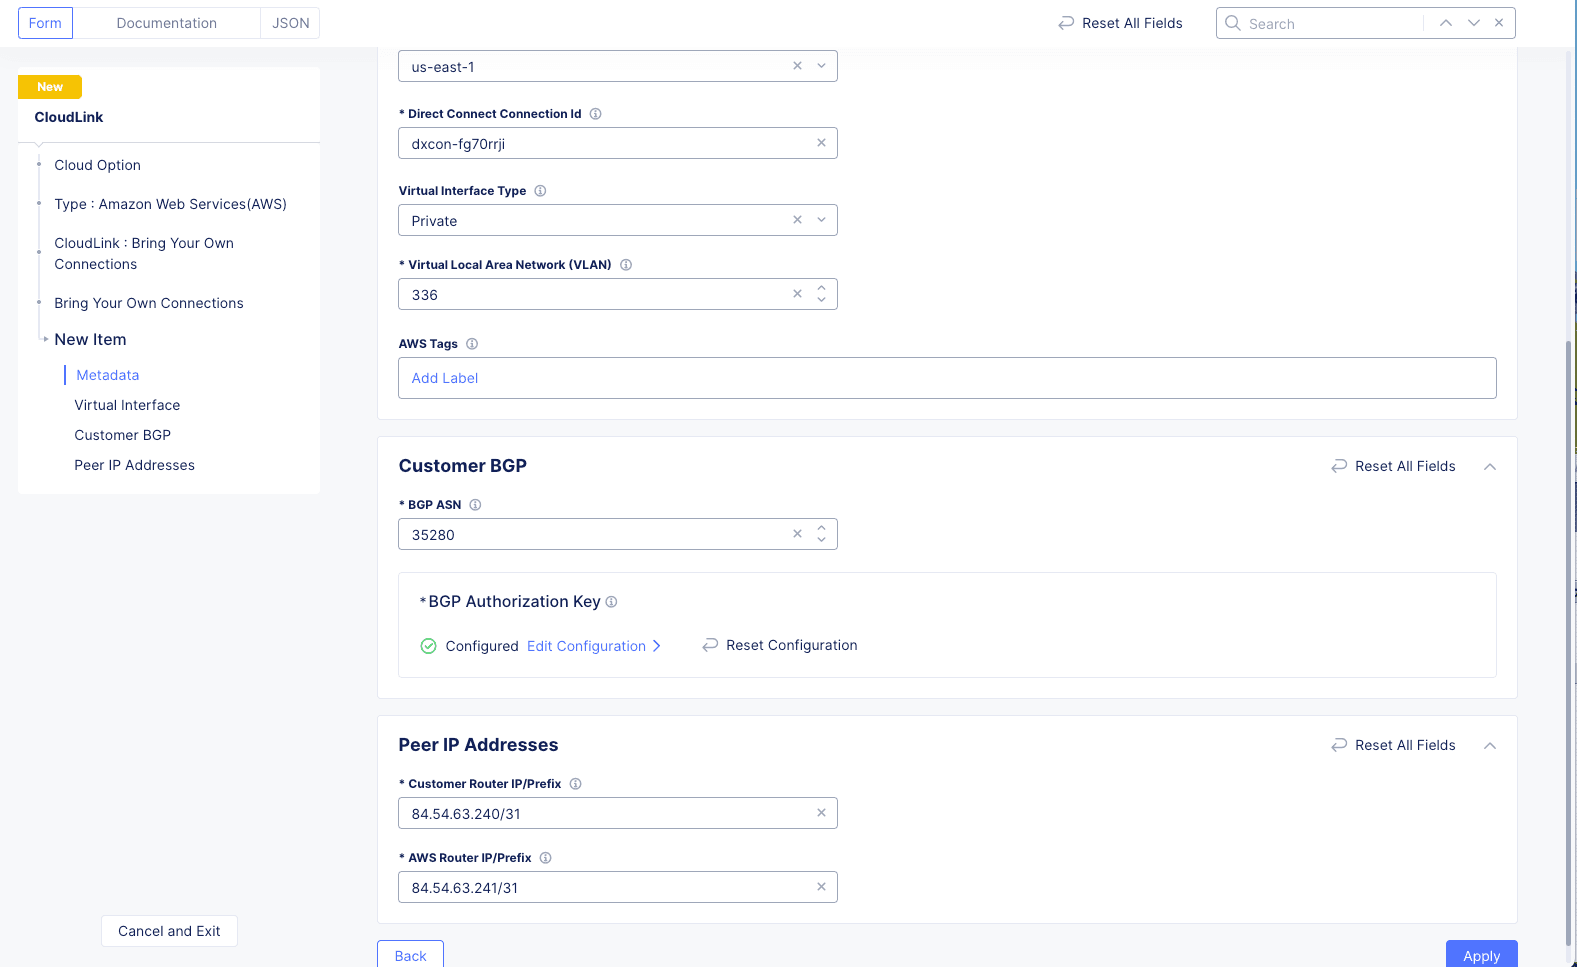
Figure: CloudLink Connection

Note: You can add multiple Direct Connect connections to a single CloudLink by using the
Add Itembutton. Up to 10 connections are supported per CloudLink.
-
Select
Custom ASNfrom theDirect Connect Gateway ASNdrop-down menu in theCloud Optionsection. -
Enter Direct Connect Gateway ASN in the
Custom ASNfield. -
Optionally you can enable private connectivity to the regional edge by selecting
Enablefrom theConnection to REdrop-down menu. -
Select a network name from the
CloudLink ADN Network Namedrop-down menu.
Figure: AWS CloudLink Form
-
Click
Save and Exit.
Step 3: Verify CloudLink.
-
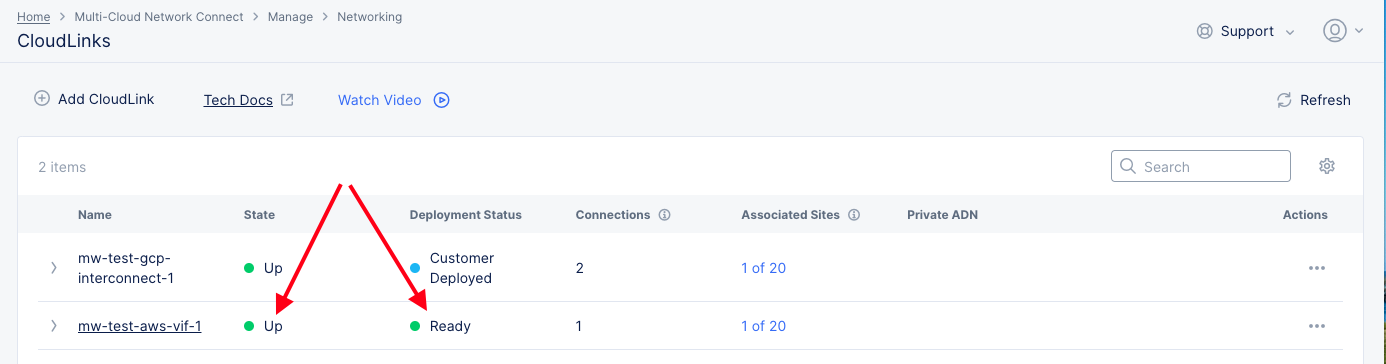
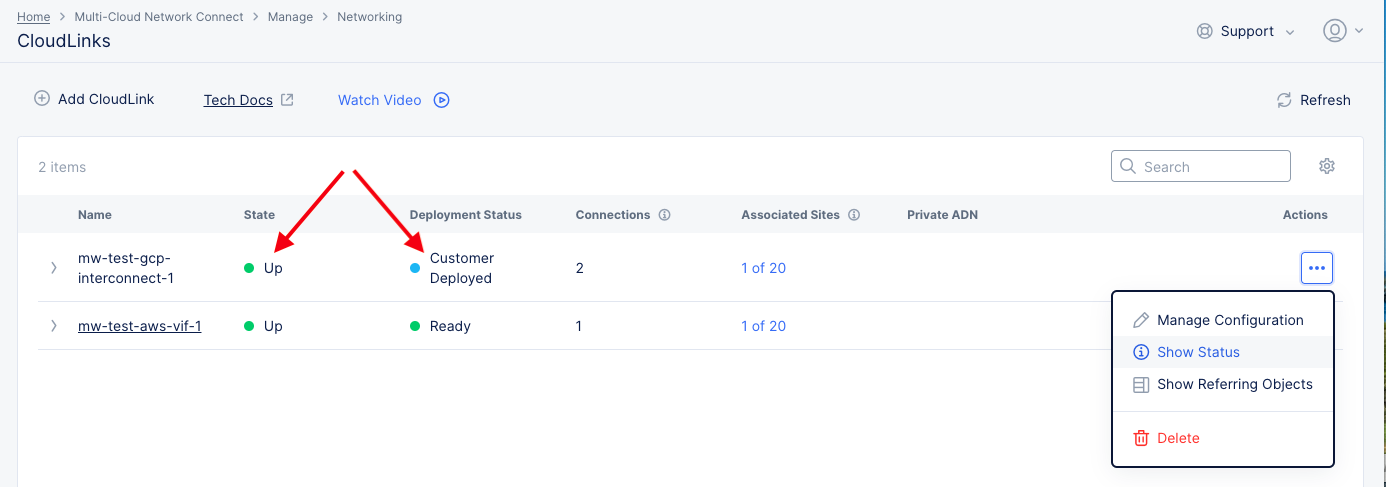
On the CloudLinks page, verify that the
Statecolumn showsUpand theDeployment Statuscolumn showsReady.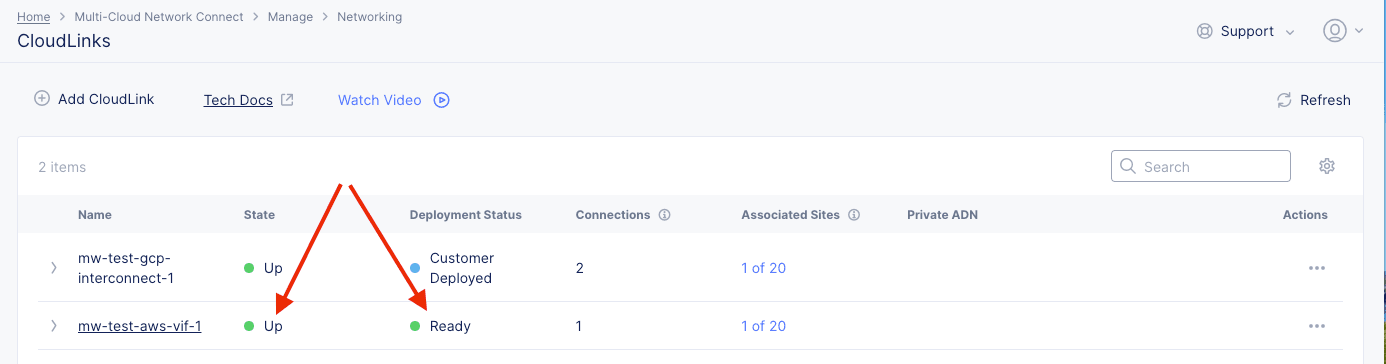
Figure: AWS CloudLink Created
-
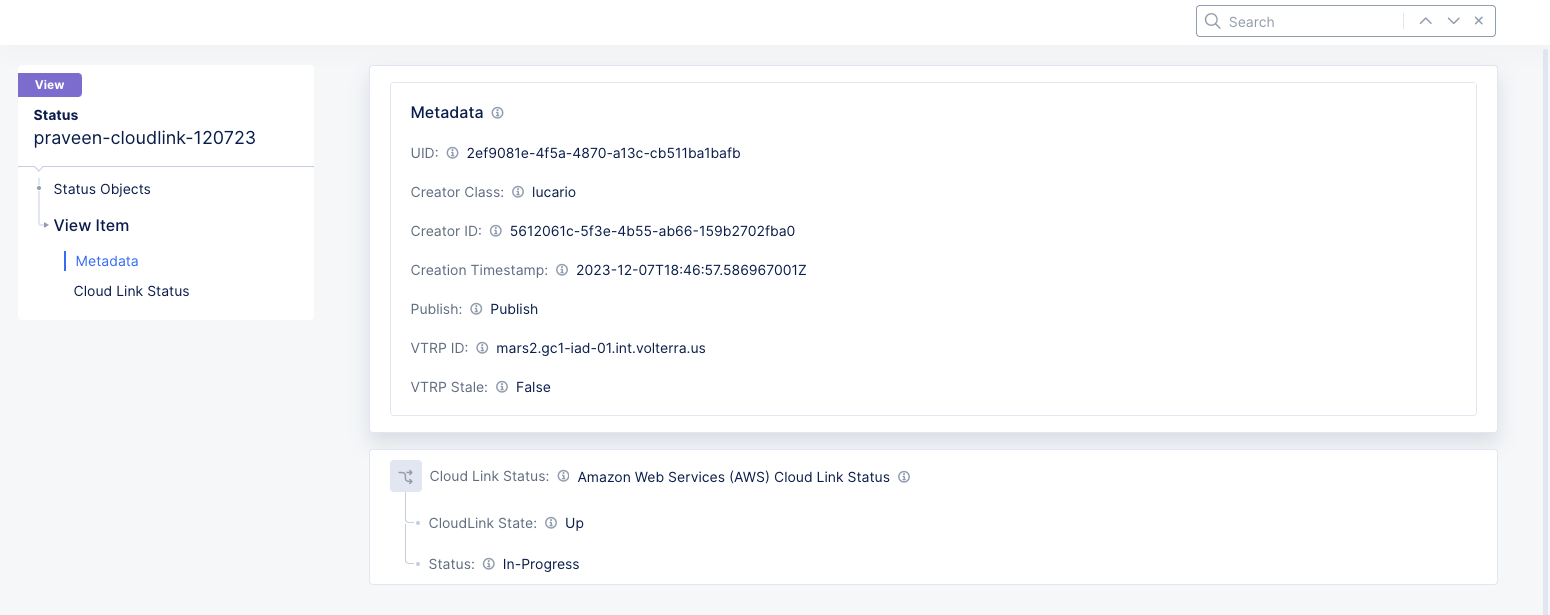
Click
...>Show Statusfor the CloudLink you just created. The example below shows two status objects: one that has failed and one that was successful.
Figure: GCP CloudLink Object Status
-
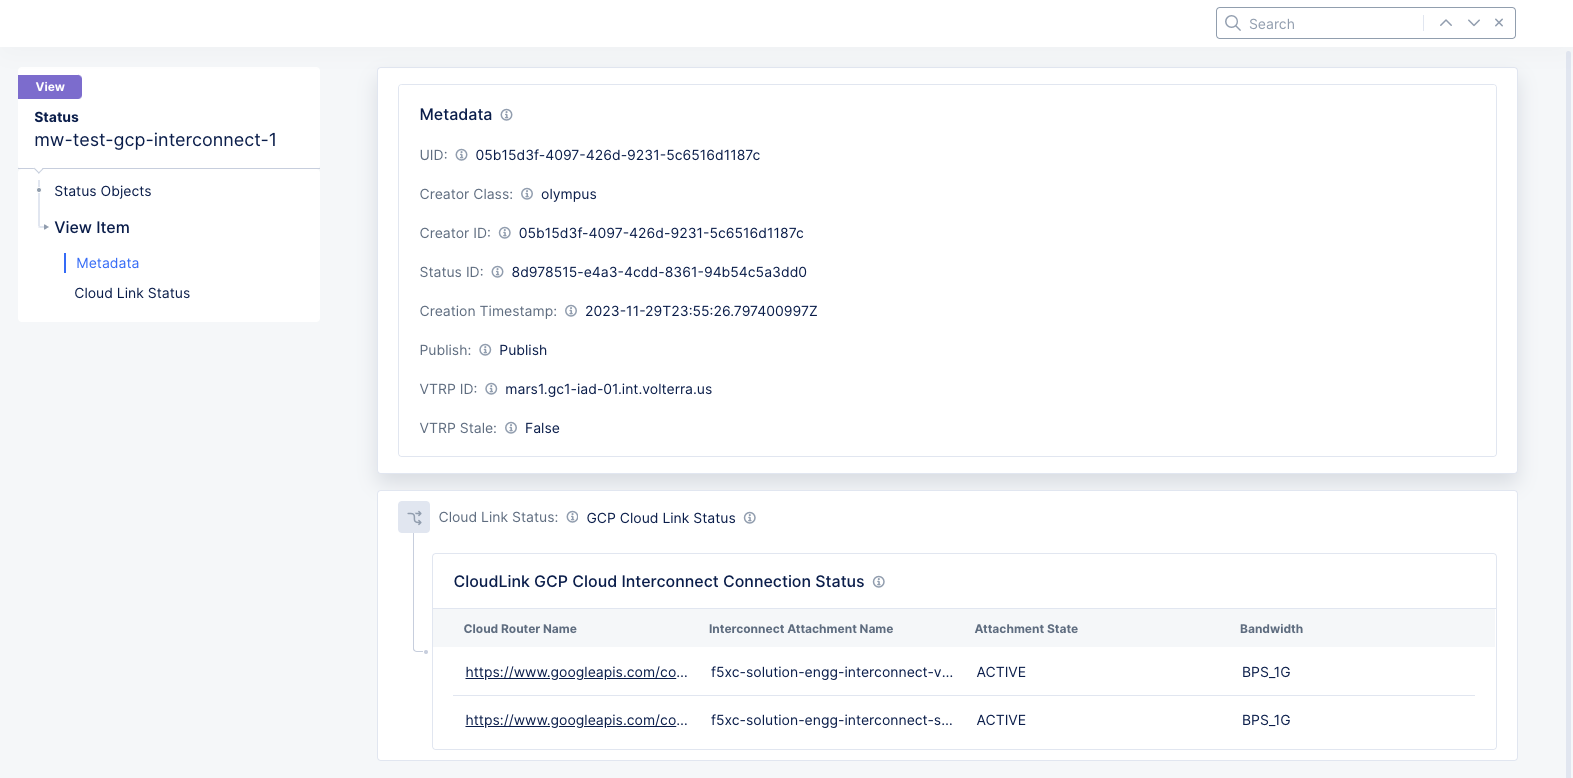
Click a UID link and verify that the interconnect name(s) is shown in the CloudLink Status section. The example below shows a successful CloudLink creation.
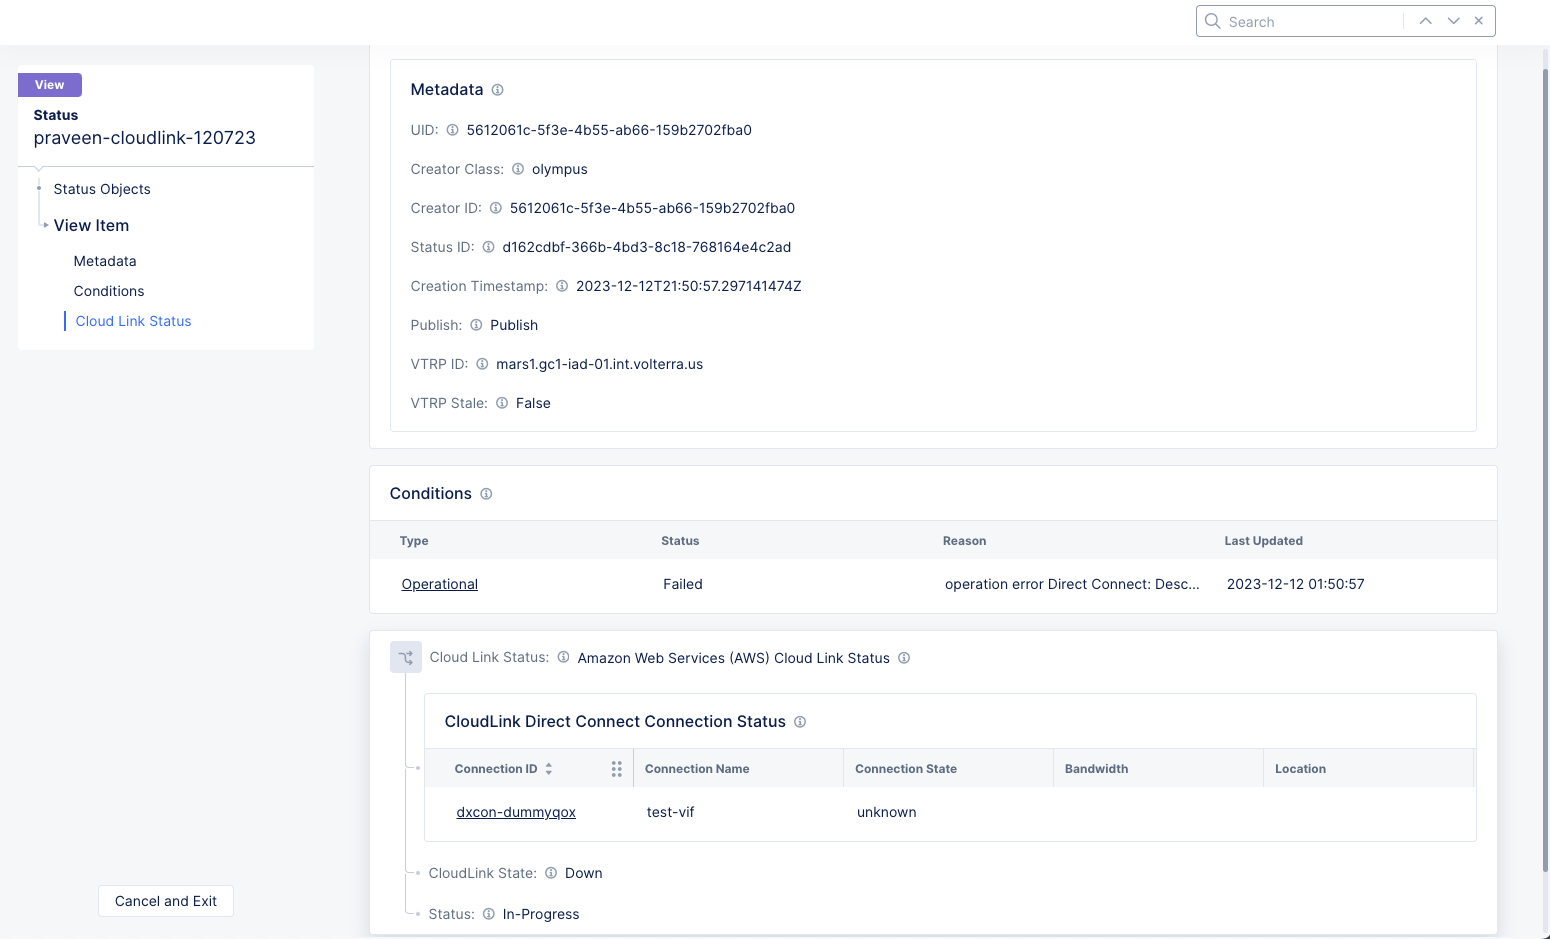
However, in the example below, the CloudLink creation failed. Click the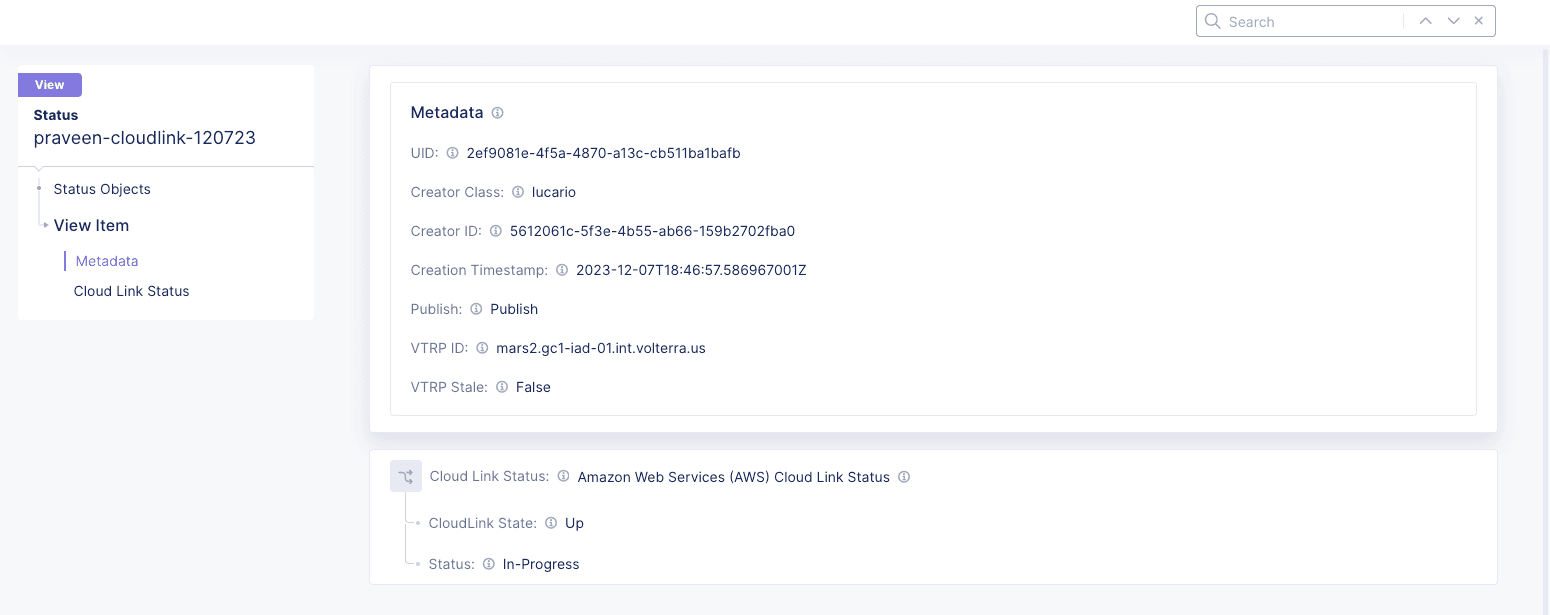
Figure: GCP CloudLink Status Successful
Conditions Typeentry and/or theConnection IDentry for more details.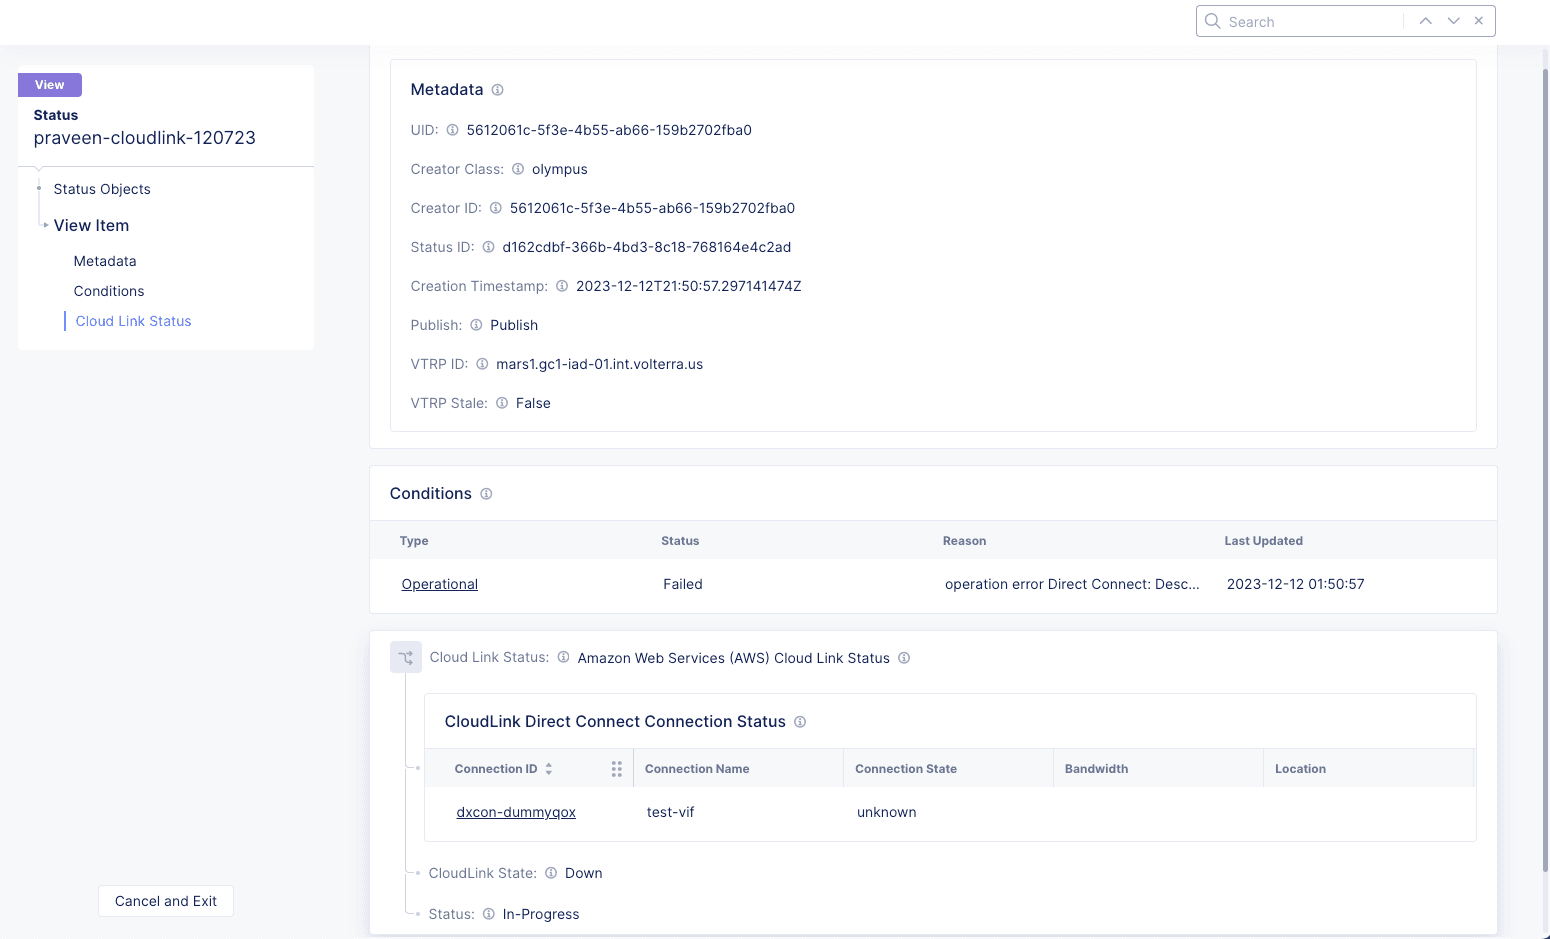
Figure: GCP CloudLink Status Failed
-
On the AWS Console, verify that a virtual interface (VIF) has been created with the name we specified and that it's status is
pending.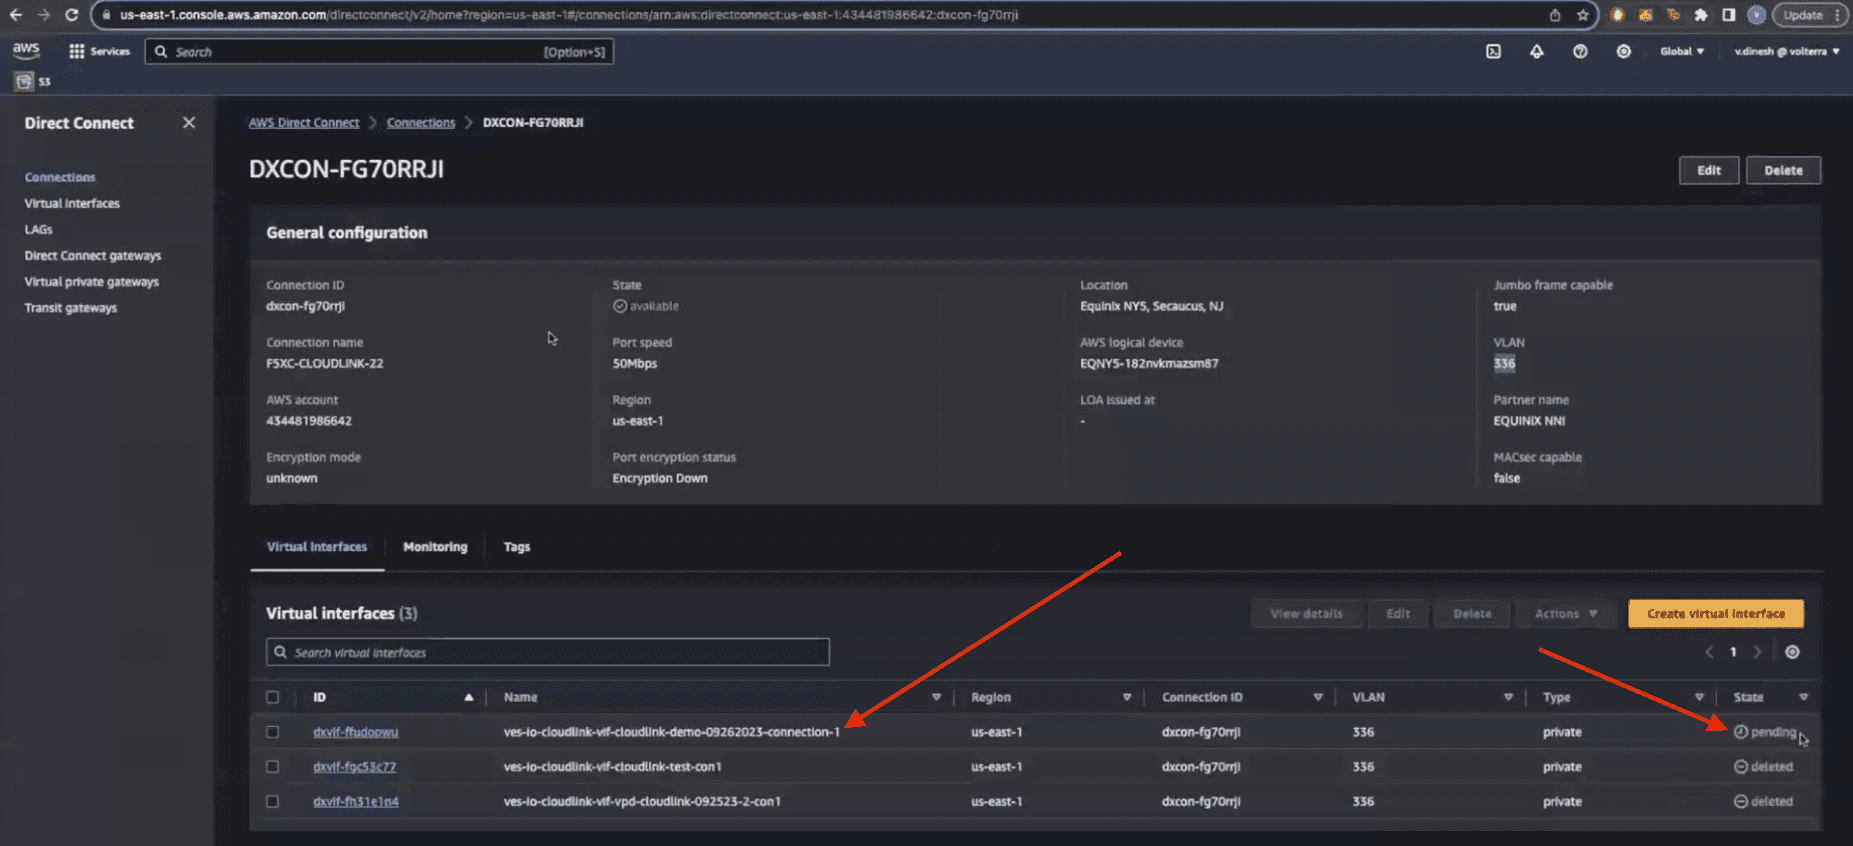
Figure: AWS CloudLink VIF Created


At this point, a CloudLink has been created and verified. Next you will associate the CloudLink to one or more sites (up to 20 sites).
Step 4: Create a Site in Console.
-
Navigate to
Manage>Site Management>AWS TGW Sitesand clickAdd AWS TGW Site. -
Enter a site name in the
Metadatasection. -
Click
Configurein theAWS Resourcessection to enter AWS credentials and resources.-
Select your AWS credentials from the
Credential Referencedrop-down menu. Alternatively use the drop-down menu to selectAdd Itemand create new credentials. -
Select your site's region using the
AWS Regiondrop-down menu in theRegion & Services VPCsection. -
Select
New VPCfor theNew/Existing Services VPCdrop-down menu. Then selectAutogenerate VPC Nameand enter the IP in the new VPC fields. -
Scroll down to the
Site Node Parameterssection and clickAdd Itemto create an ingress/egress gateway.- Enter the availability zone name in the
AWS AZ Namefield. - Select
New Subnetin theWorkload Subnetdrop-down menu and then enter the IPv4 value for the subnet. - Select
New Subnetin theSubnet for Outside Interfacedrop-down menu and then enter the IPv4 value for the subnet. - Select
Autogenerate Subnetfor theSubnet for Inside Interfacedrop-down menu. - Click
Applyto save the AZ parameters.
- Enter the availability zone name in the
-
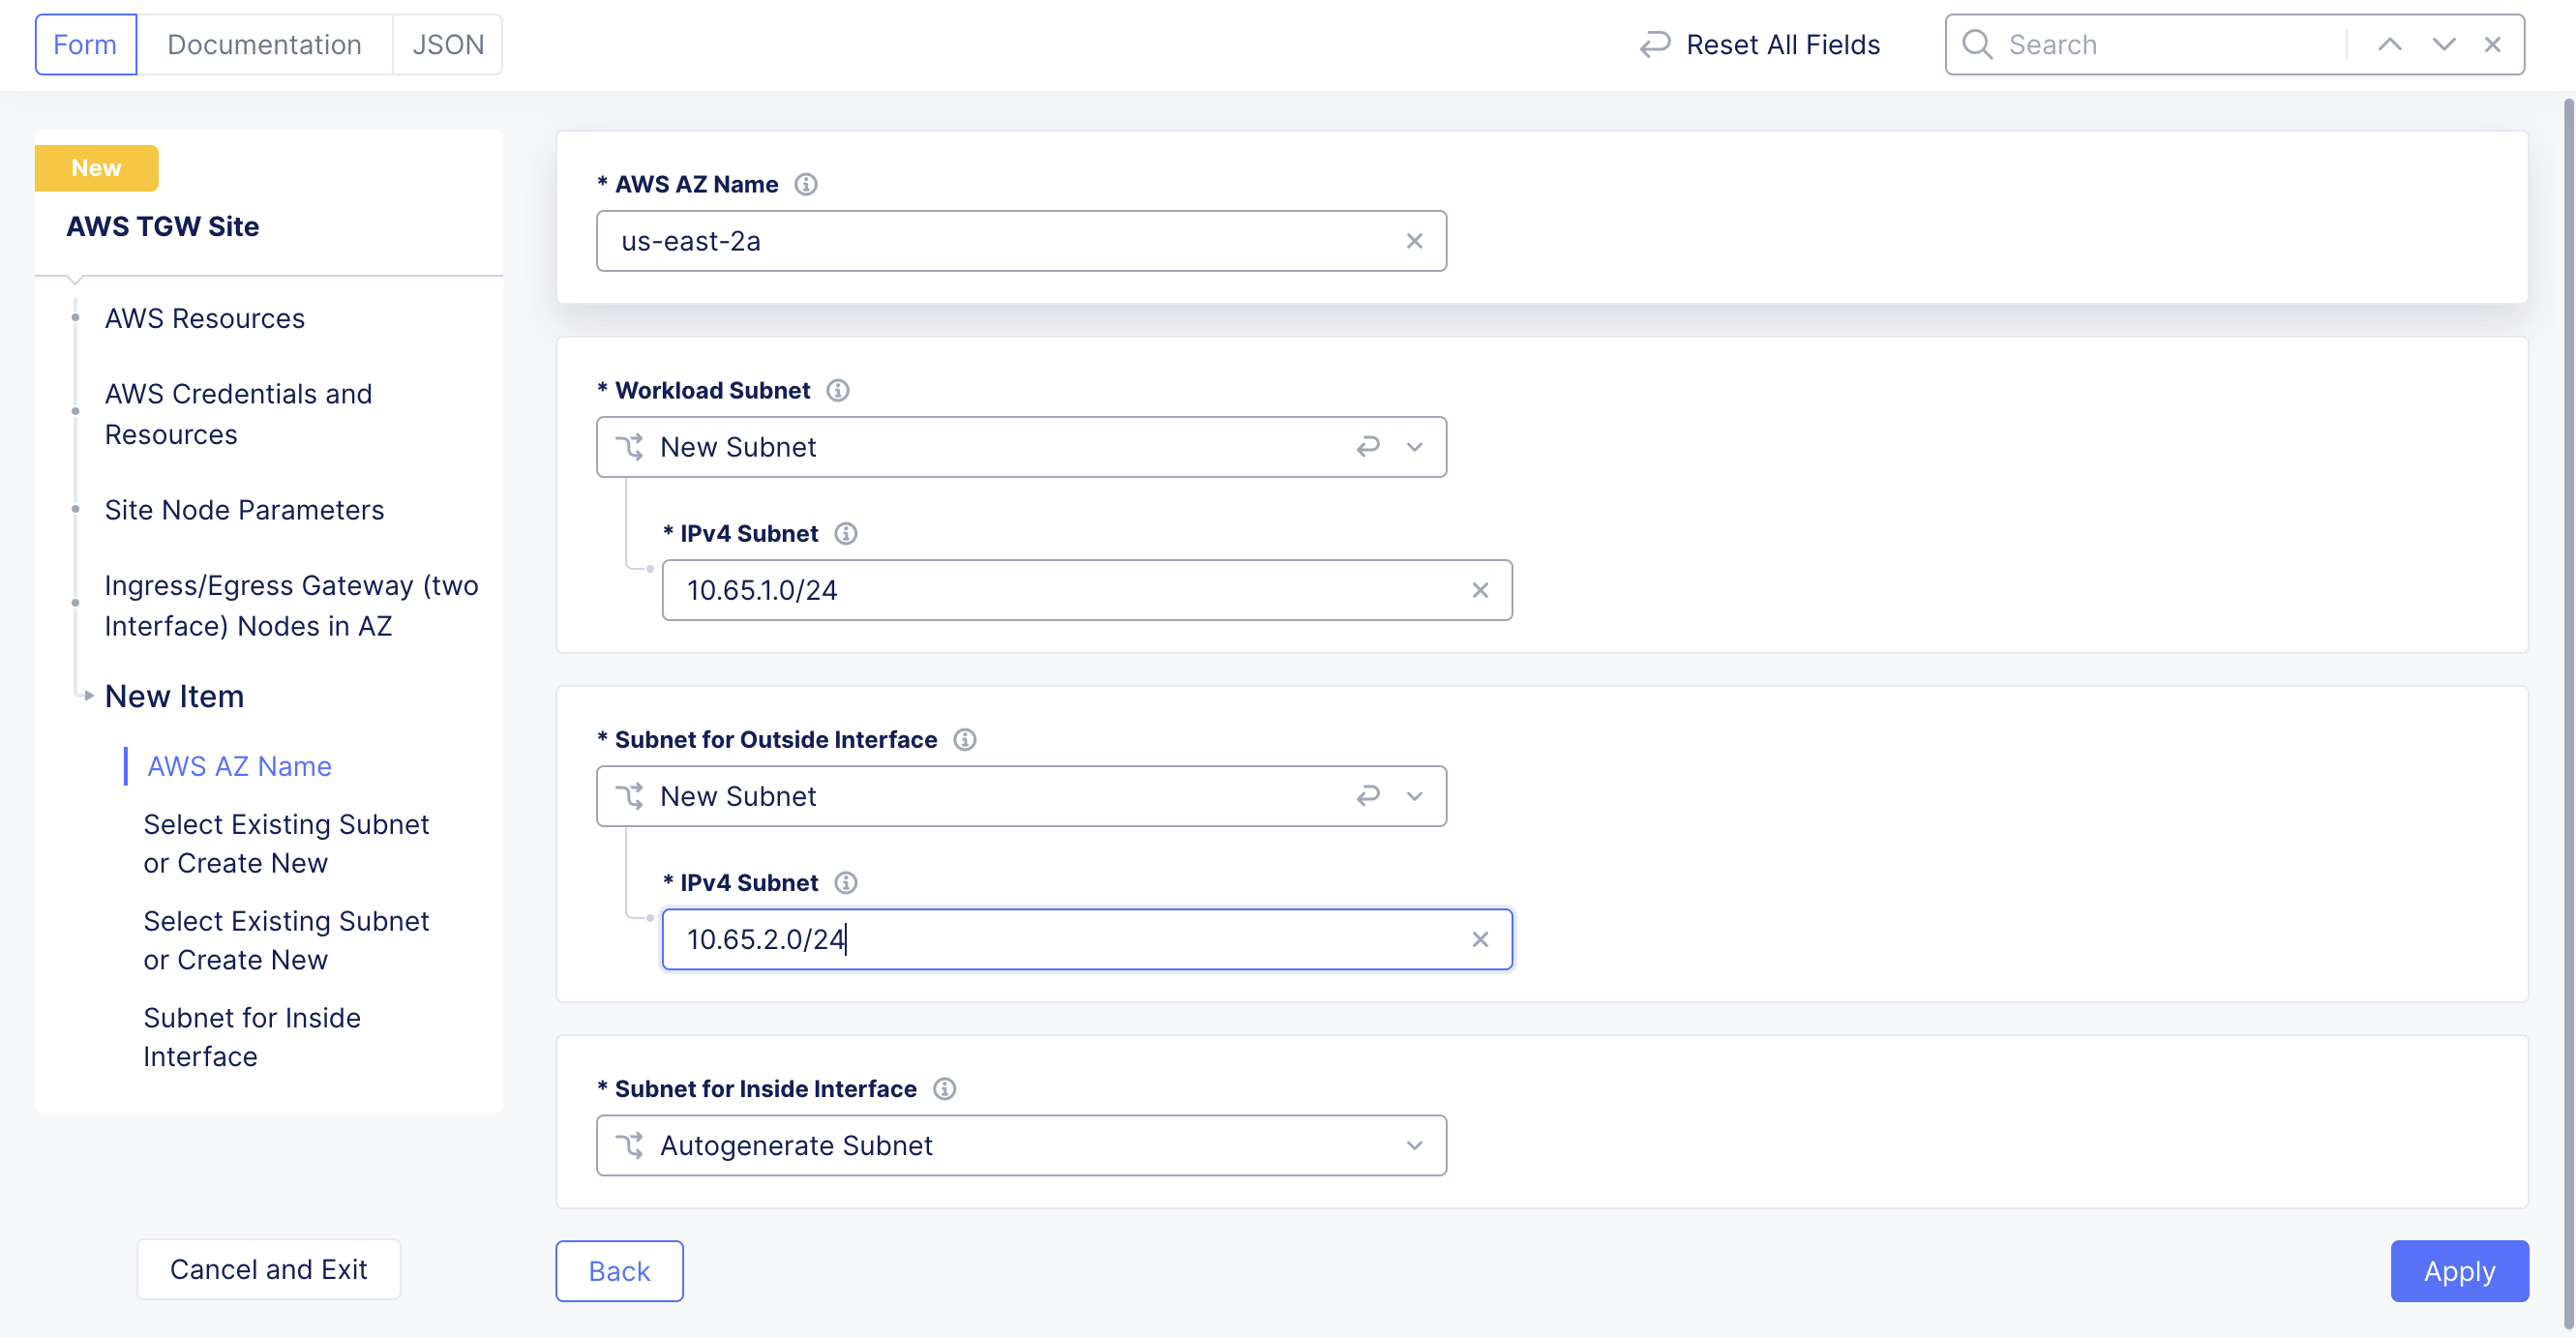
Figure: AWS AZ Setup
- In the
Public SSH keyfield, enter the key that will allow access to the nodes of the site. - Scroll to the bottom and click
Applyto save your AWS credentials and resources.
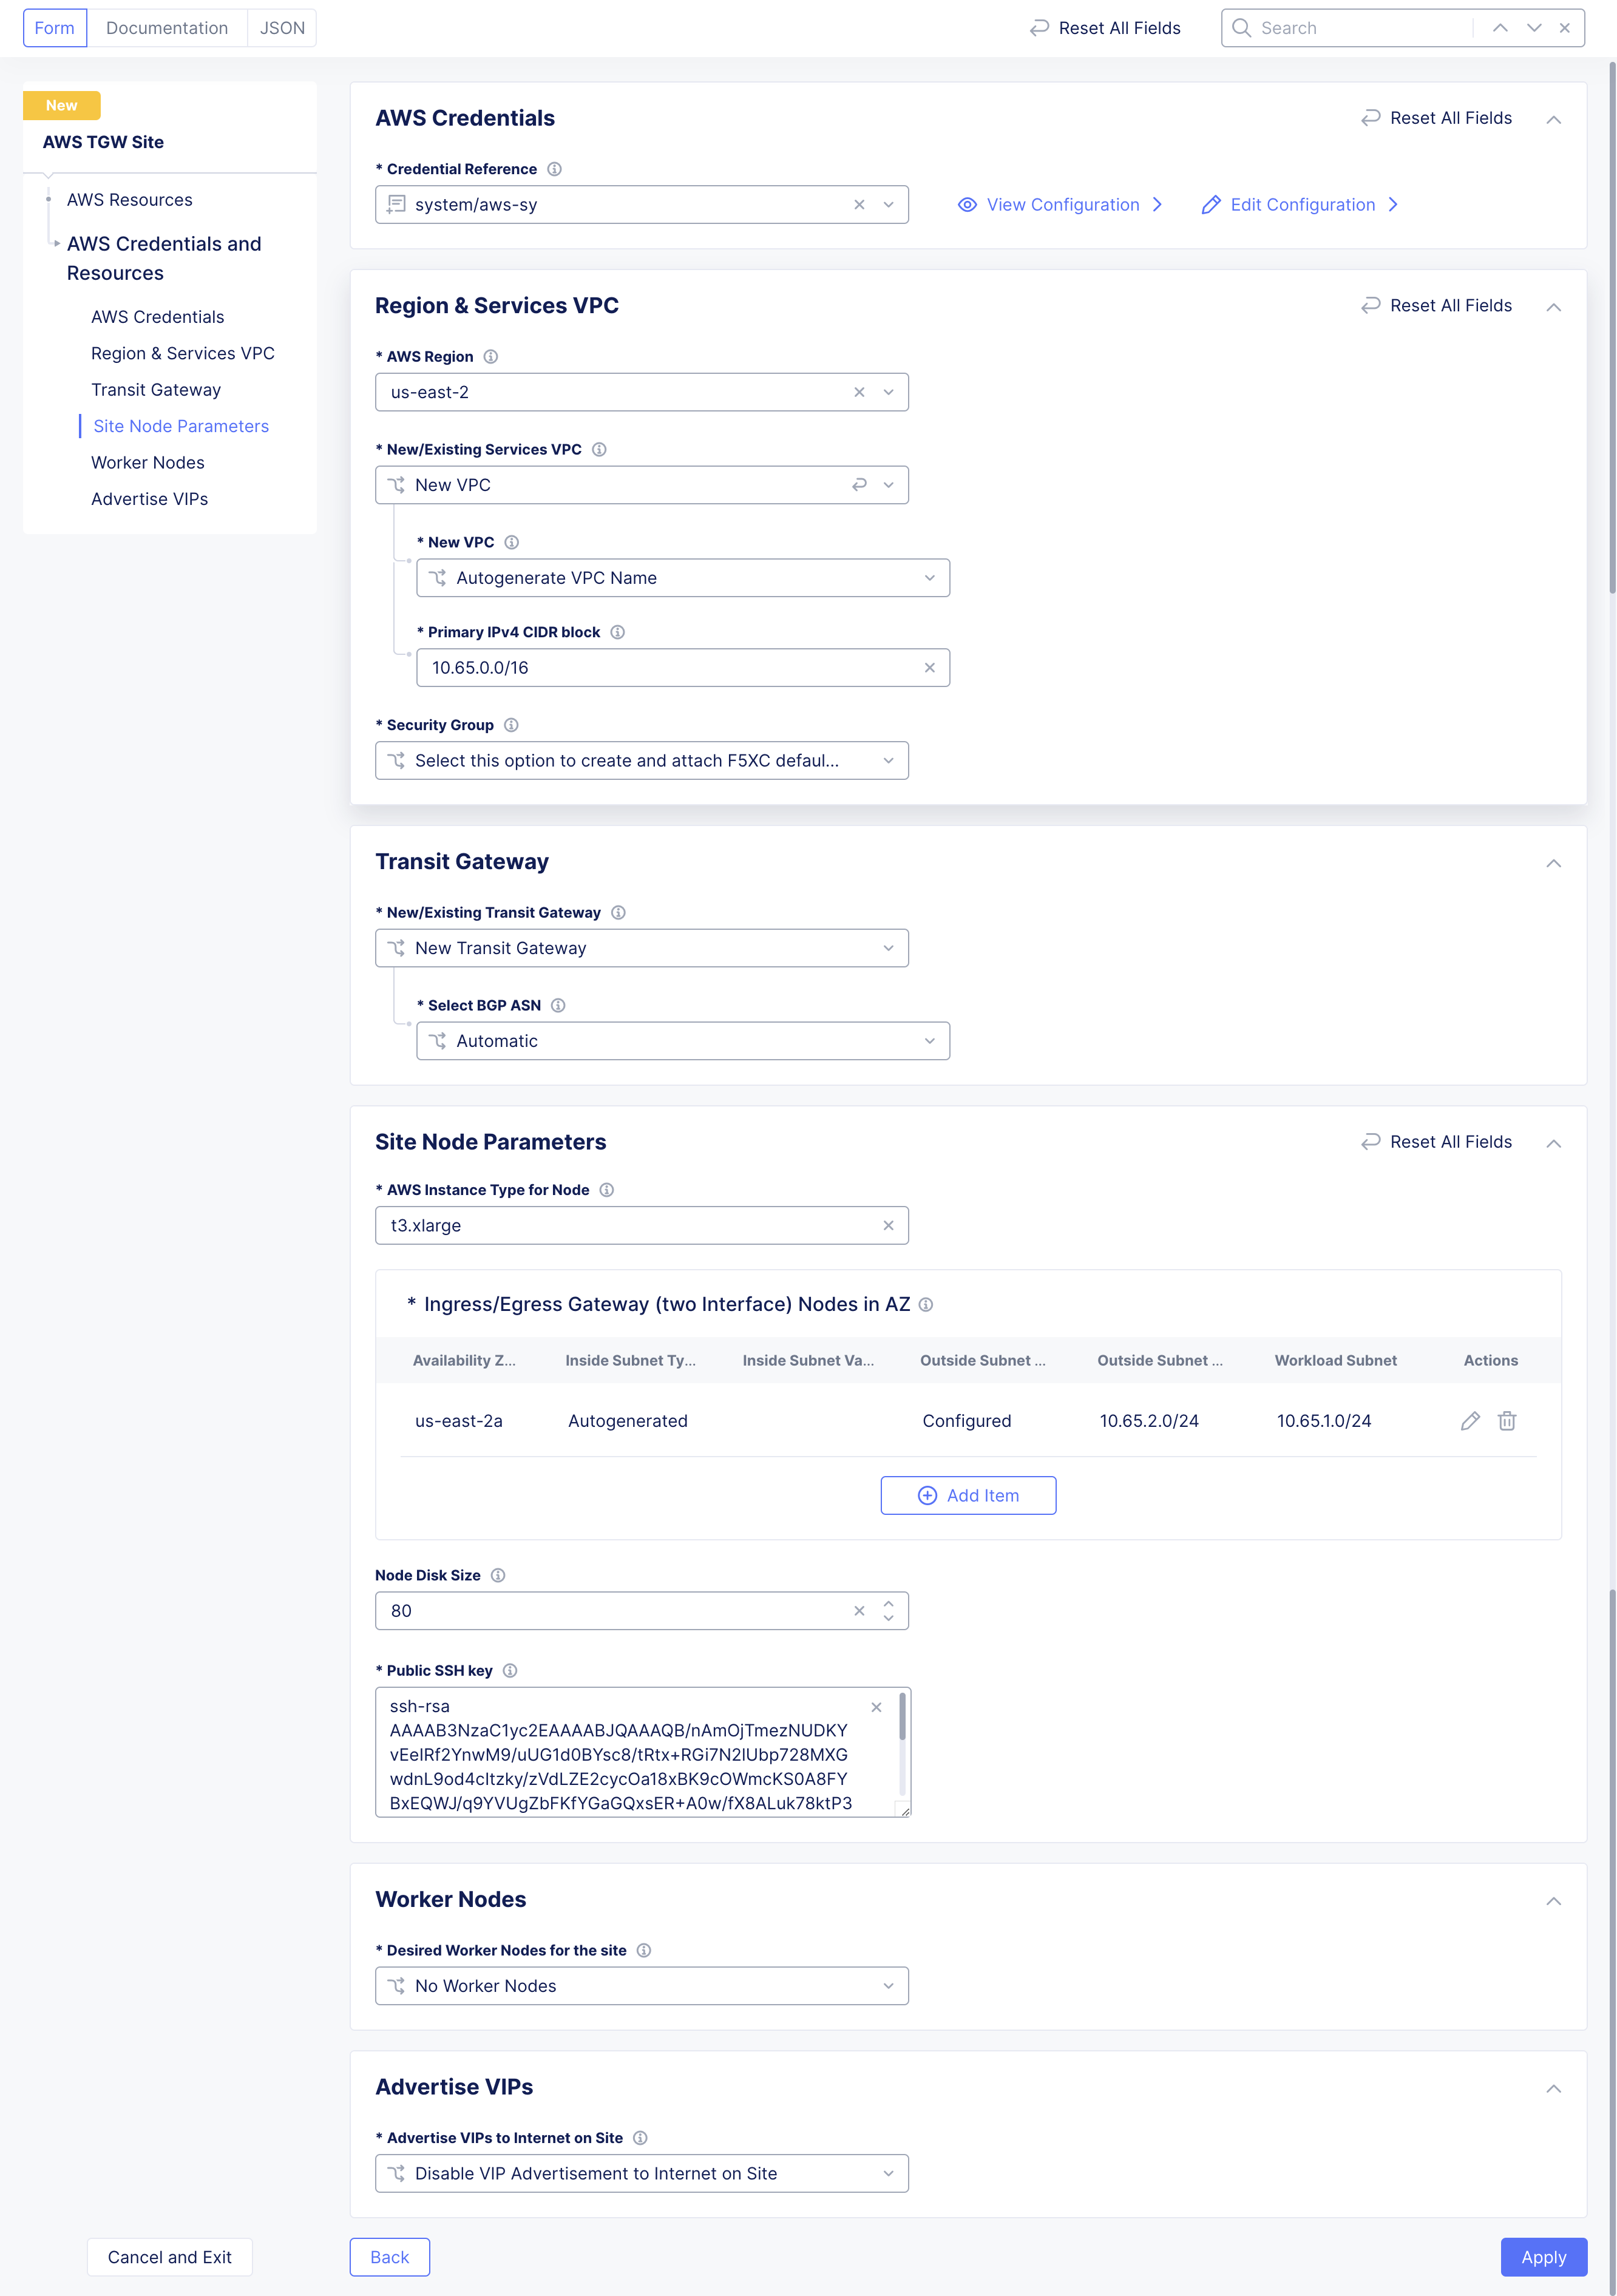
Figure: AWS Credentials and Resources
-
Scroll down to the
Private Connectivitysection, selectEnable Private Connectivityfrom the drop-down menu, and clickConfigure.- Select the CloudLink you created previously using the
Associate CloudLinkdrop-down menu. - Click
Applyto save the private connection.
- Select the CloudLink you created previously using the
Note: if you already have a site created, you can associate it with a CloudLink by editing the site and enabling private connectivity as outlined above.
- Click
Save and Exitto create the site.
Step 5: Apply the Terraform.
- In the
Multi-Cloud Network Connectservice on theAWS TGW Sitespage, click theApplybutton associated with the site you just created. This will start the process of creating the site in AWS, which will take some time (approximately 15 to 50 minutes). Once the process is complete, the status will change toApplied.
Create GCP CloudLink
A GCP CLoudLink allows you to use a private connection for your site registration and communications with your regional edge (RE).
Creating a GCP CloudLink requires an existing and configured router and interconnect in the Google Cloud Platform. Distributed Cloud Console will not do any orchestration. You simply provide the interconnect attachment name, and the Console will pull all information required to create the CloudLink.
Step 1: Navigate to the CloudLink page.
-
Log into Console.
-
Click
Multi-Cloud Network Connect.
Figure: Console Homepage
- Select
Manage>Networking>CloudLinks.
Figure: CloudLinks
Step 2: Create a GCP CloudLink.
-
Click
Add CloudLink. -
In the
Namefield, enter the name for the CloudLink. -
Select
Google Cloud Platformfrom theTypedrop-down menu in theCloud Optionsection. -
Use the
Account Credentialdrop-down menu to select your cloud credentials. Optionally you can selectAdd Itemto create new cloud credentials. -
Click
Add itemin theBring Your Own Connectionssection to configure a connection.- Enter a name for this connection.
- Select the region where the GCP site is located.
- Use the
Projectdrop-down menu to selectSame as Credential(the project for the interconnect and the credential are the same) orSpecified Projectand enter the project for the interconnect.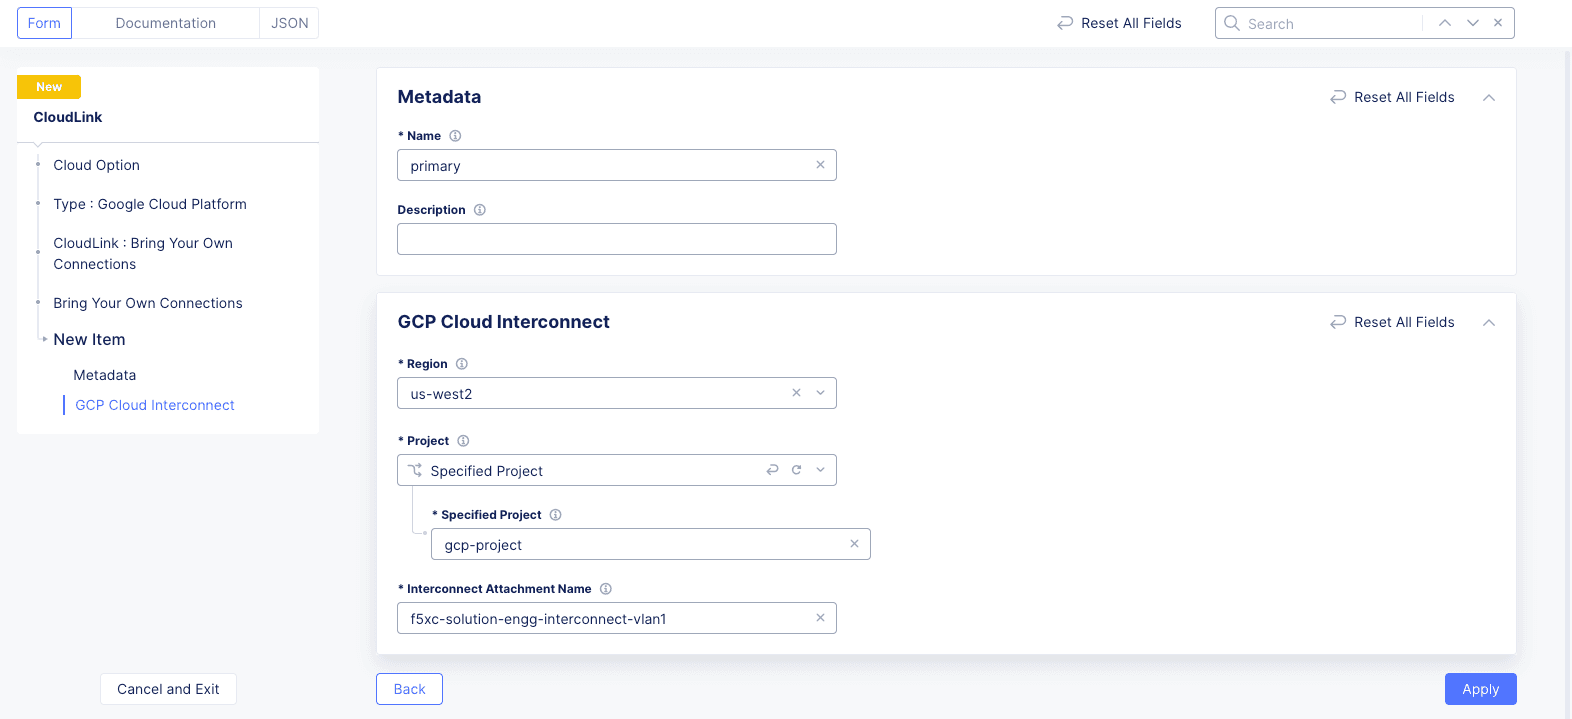
Figure: CloudLink Connection
- Click
Applyto save the connection.
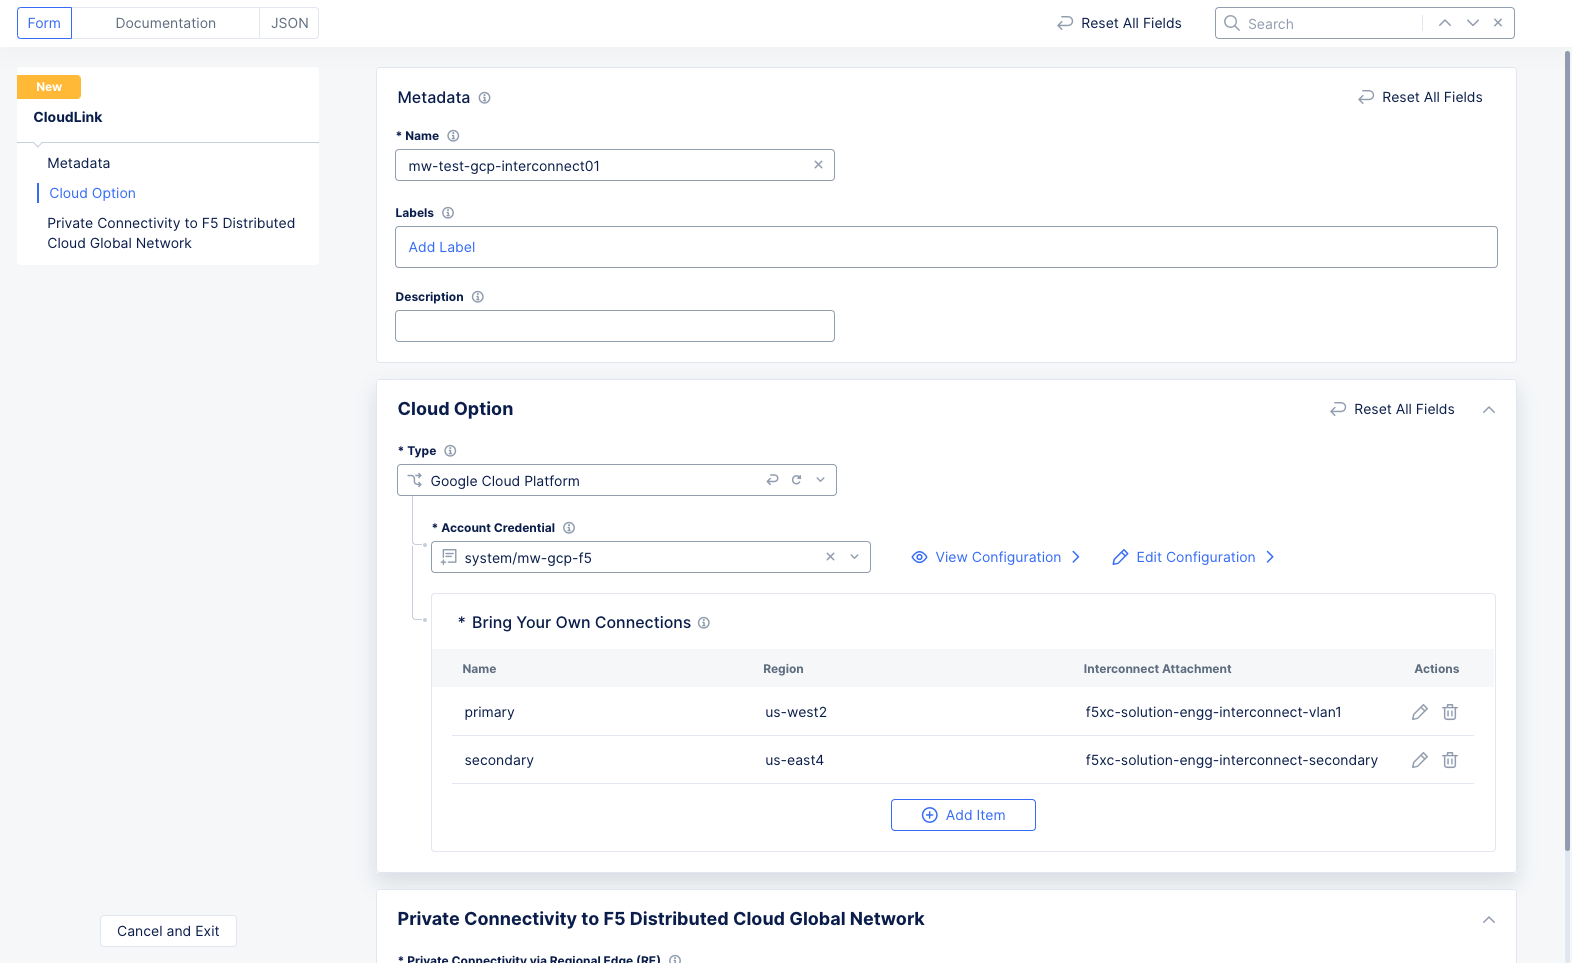
Figure: GCP CloudLink Form
Note: You can add multiple Direct Connect connections to a single CloudLink by using the
Add Itembutton. Up to 10 connections are supported per CloudLink.
- Click
Save and Exitto create your CloudLink.
Step 3: Verify CloudLink.
-
On the CloudLinks page, verify that the
Statecolumn showsUpand theDeployment Statuscolumn showsCustomer Deployed.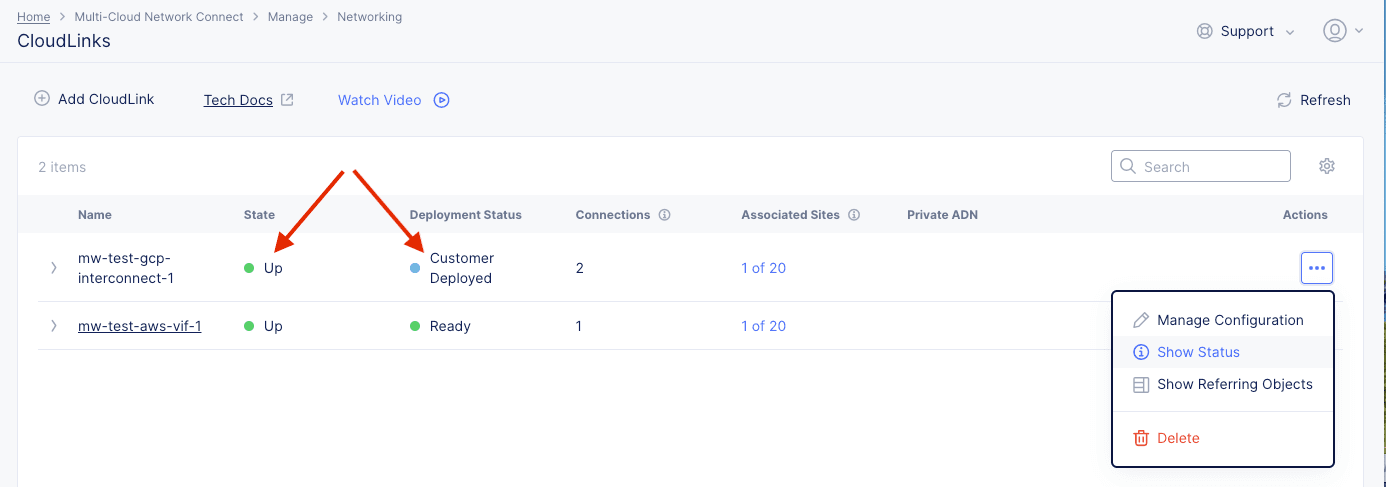
Figure: GCP CloudLink Created
-
Click
...>Show Statusfor the CloudLink you just created.
Figure: GCP CloudLink Object Status
-
Click the UID link and verify that the interconnect name(s) is shown in the CloudLink Status section.
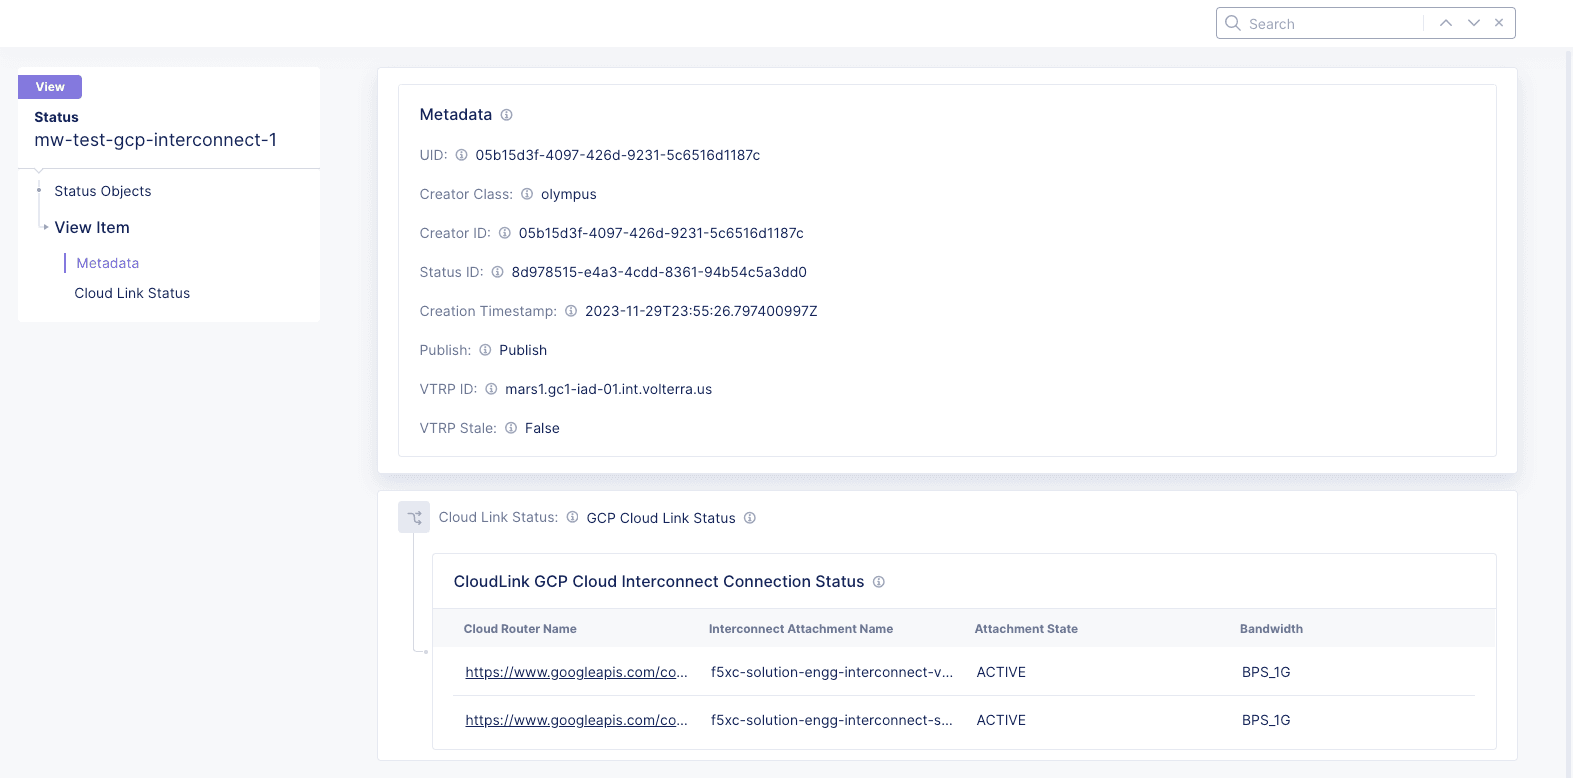
Figure: GCP CloudLink Status
-
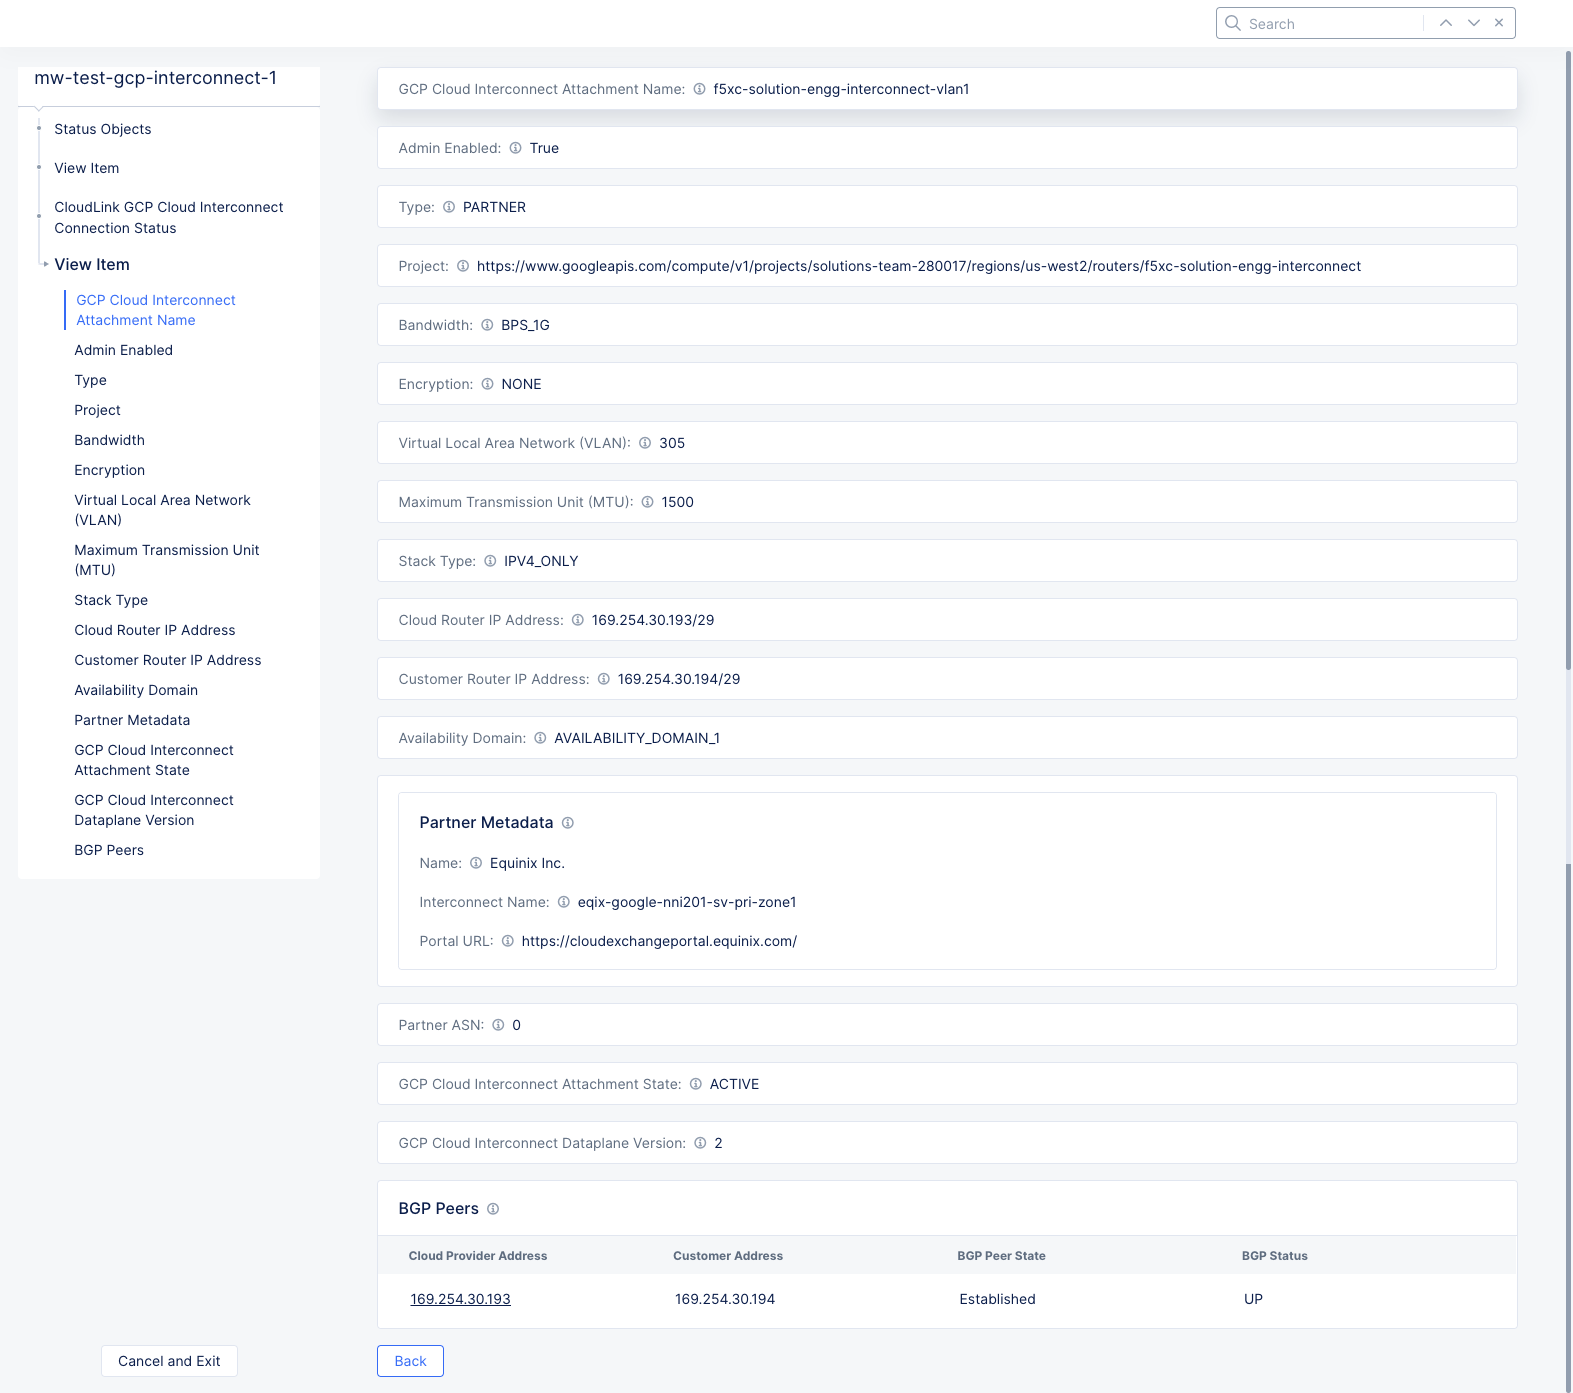
Click on a router in the
Cloud Router Namecolumn to see the router status.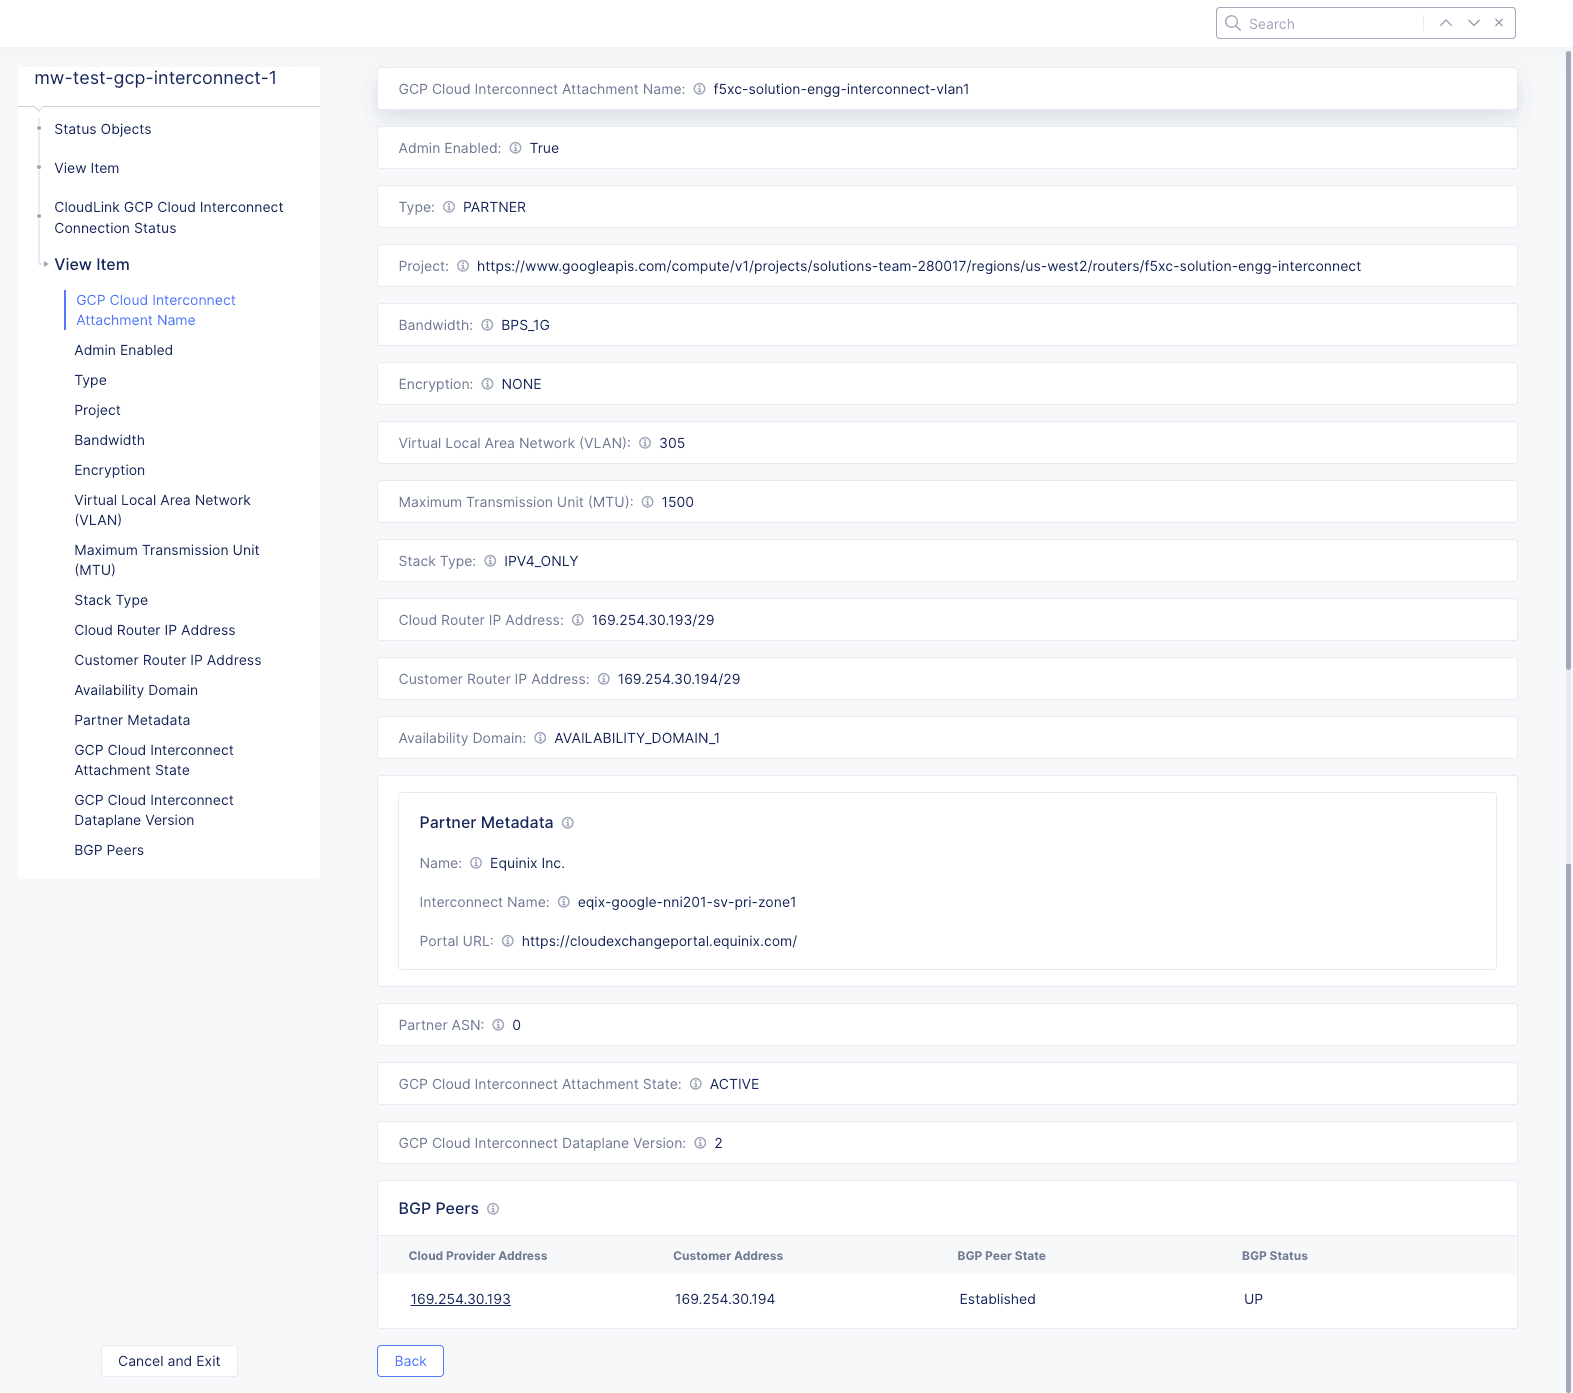
Figure: GCP GCP Router Status
-
The router status shown here comes from Google Cloud Platform. Scroll to the
BGP Peerssection at the bottom to verify that the BGP peer state isEstablishedand the BGP status isUp.

At this point, a CloudLink has been created and verified. Next you will associate the CloudLink to one or more sites (up to 20 sites).
Step 4: Associate CloudLink with a site.
-
Navigate to
Manage>Site Management>GPC VPC Sites. -
Enter a site name in the
Metadatasection. -
Click
...for your site and selectManage Configurationto open the site configuration form. -
Click
Edit Configurationin the top right corner of the form. -
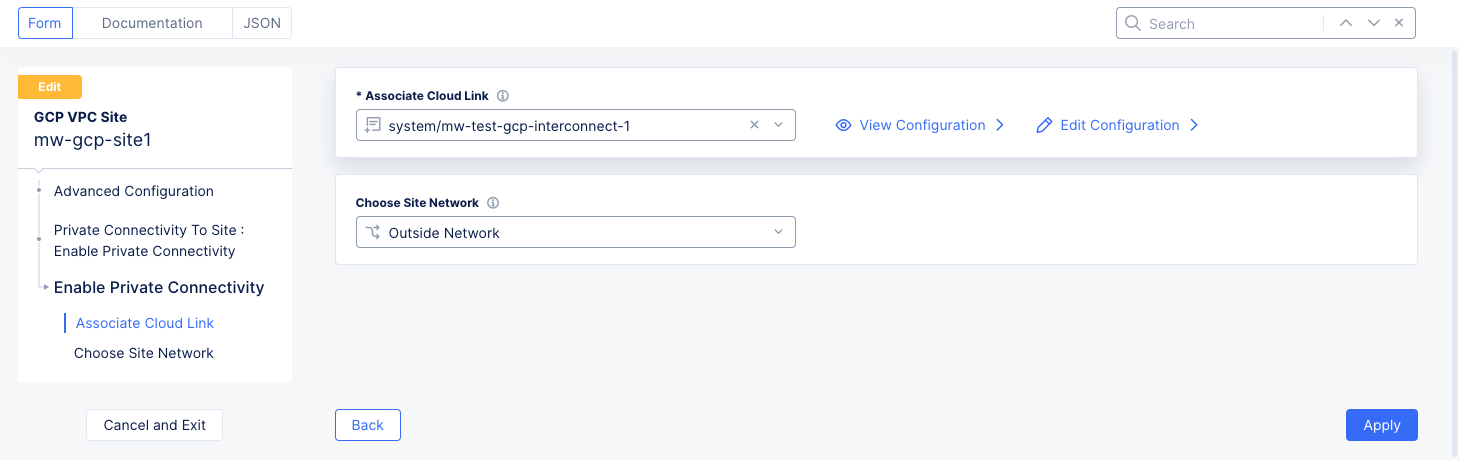
Scroll down to the
Advanced Configurationsection and selectEnable Private Connectivityfrom thePrivate Connectivitydrop-down menu. ClickConfigure.- Select the CloudLink you created previously using the
Associate CloudLinkdrop-down menu. - Select
Outside NetworkorInside Networkfrom theChoose Site Networkdrop-down menu.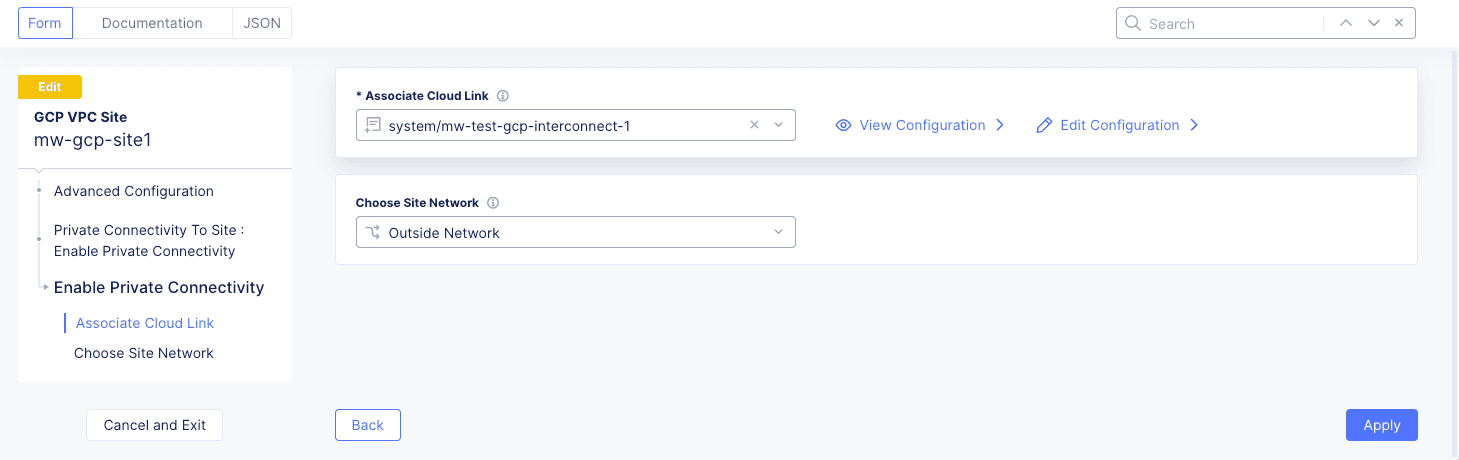
Figure: Private Connectivity
- Click
Applyto save the private connection.
- Select the CloudLink you created previously using the
-
Click
Save and Exit.
Delete a CloudLink
Use the following procedure to delete a CloudLink.
Note: You should delete the CloudLink object only after removing the site association with the CloudLink object and re-applying the site or deleting the site. If you just remove the cloud link association and try to delete the CloudLink, the deletion process will get stuck.
Step 1: Navigate to the CloudLink page.
-
Log into Console.
-
Click
Multi-Cloud Network Connect.
Figure: Console Homepage
- Select
Manage>Networking>CloudLinks.
Figure: CloudLinks
Step 2: Delete a CloudLink.
-
Click
...>Deleteon the in theActioncolumn for the CloudLink you want to delete -
Click
Deletein the confirmation window to delete the CloudLink.
CloudLink Monitoring
You can monitor your CloudLinks as part of monitoring your site networking. See Monitor your Site Networking for more information.

Figure: CloudLink Dashboard