Configure Tenants Using MSP Service
Objective
In a cloud environment, tenants are used to create isolated and secure environments for customers. These tenants can be managed by a Managed Service Provider (MSP), who provides tenant-specific services, such as load balancing, firewalls, and VPNs. In a distributed cloud environment, like F5, the MSP can configure tenants using the MSP service.
This documentation provides the steps required to configure tenants using an MSP service on F5® Distributed Cloud Console.
Tenant Levels
The F5 MSP service consists of a system of tenants that is made up of a root, parent, and child. This is a hierarchical system of tenants where the root tenant is at the top of the hierarchy, the parent tenant is below the root tenant, and the child tenant is below the parent tenant.
Typically, the root tenant has the most permissions and can create and manage a certain number of parent and child tenants. The parent tenant can create and manage any number of child tenants, but it cannot create or manage other parent tenants. The child tenant can only be managed by its parent tenant.
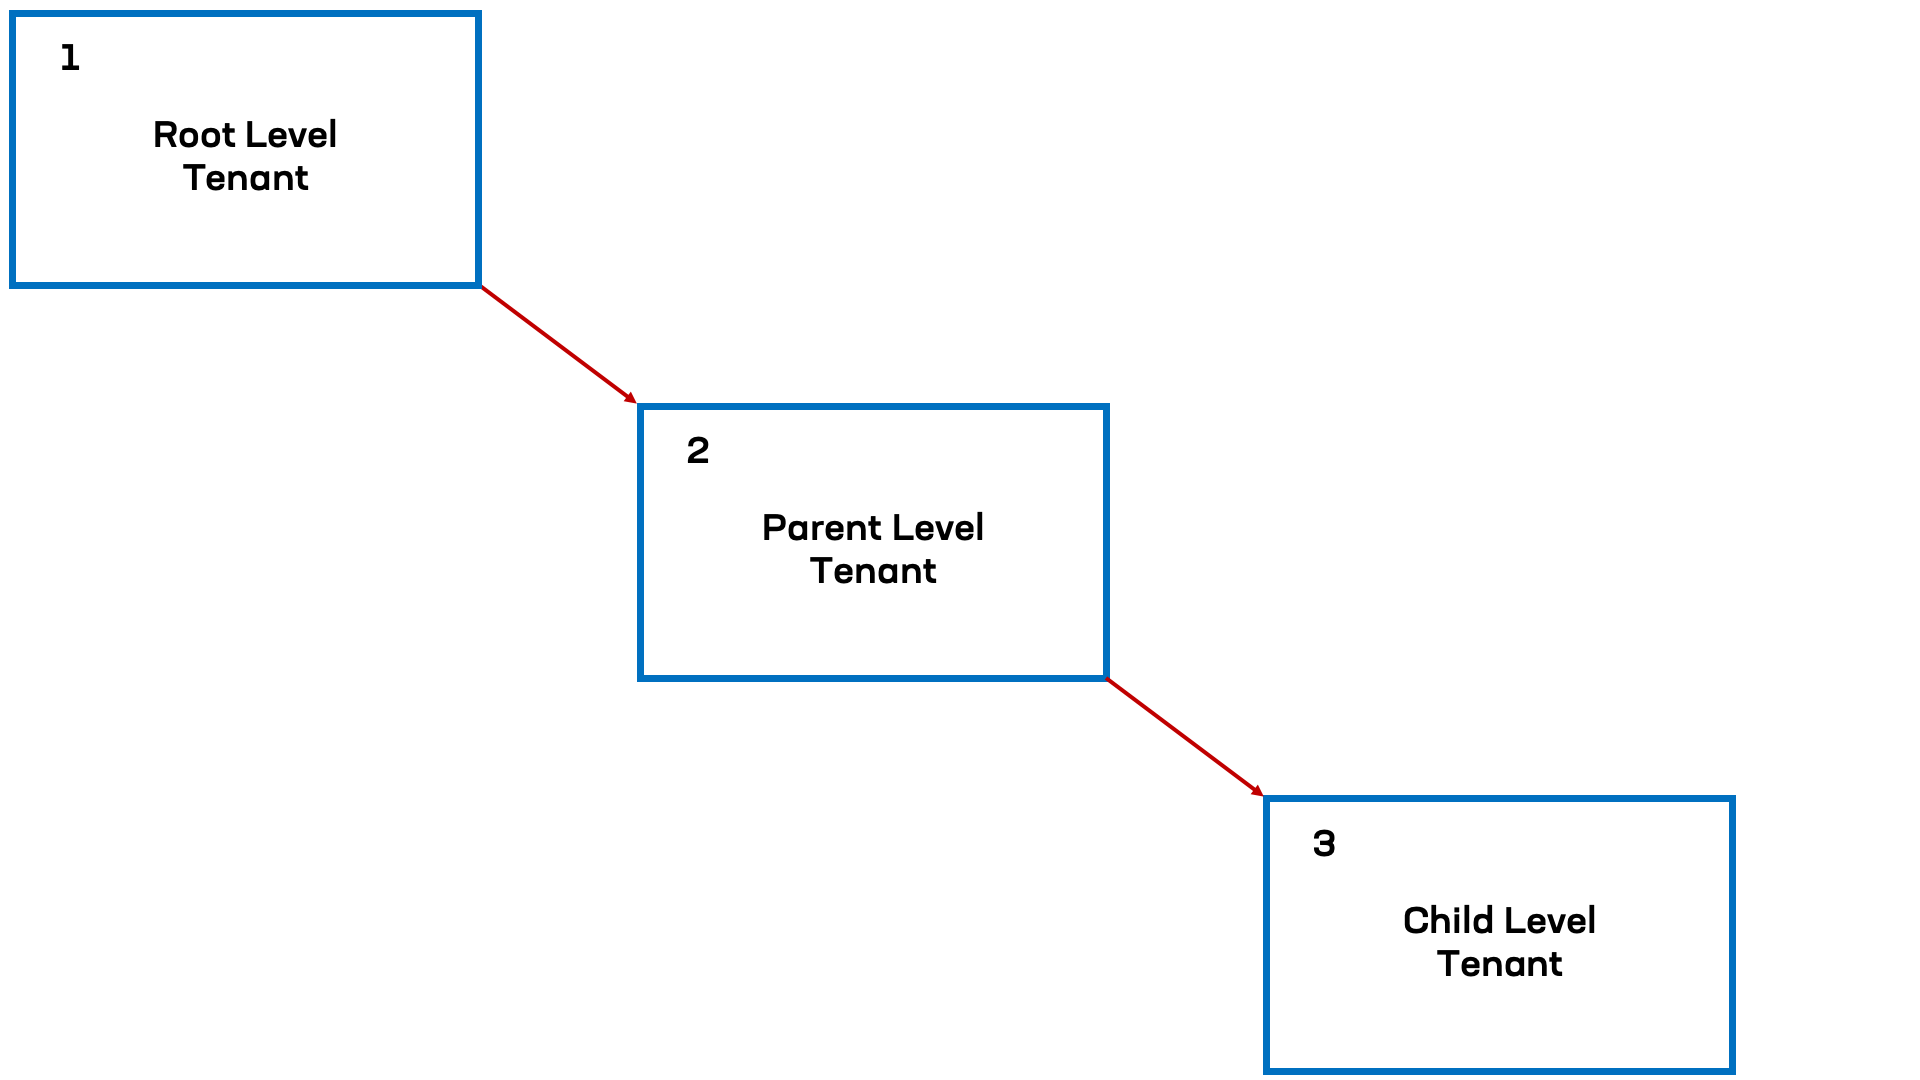
Figure: Tenant Level Diagram
Note: You can use API Token and API Certificate service credentials for managed service providers where one set of credentials is used to authenticate access and permissions in a secondary tenant.
Prerequisites
-
A Distributed Cloud Services Account. If you do not have an account, see Create an Account.
-
An F5 Partner Programs account.
Create Child Tenant Manager
The Child Tenant Manager is a tool that is used when creating a Child Tenant to define the users who will act as tenant owners. This tool also defines the group mapping between the parent and child tenants.
Once Child Tenants are created, the Child Tenant Manager can be utilized to organize them by ownership. The group mapping feature is used to define users and roles, ensuring that each Child Tenant is properly configured and managed.
- From the Console homepage of your root or parent tenant, select the
Managed Service Providerservice.
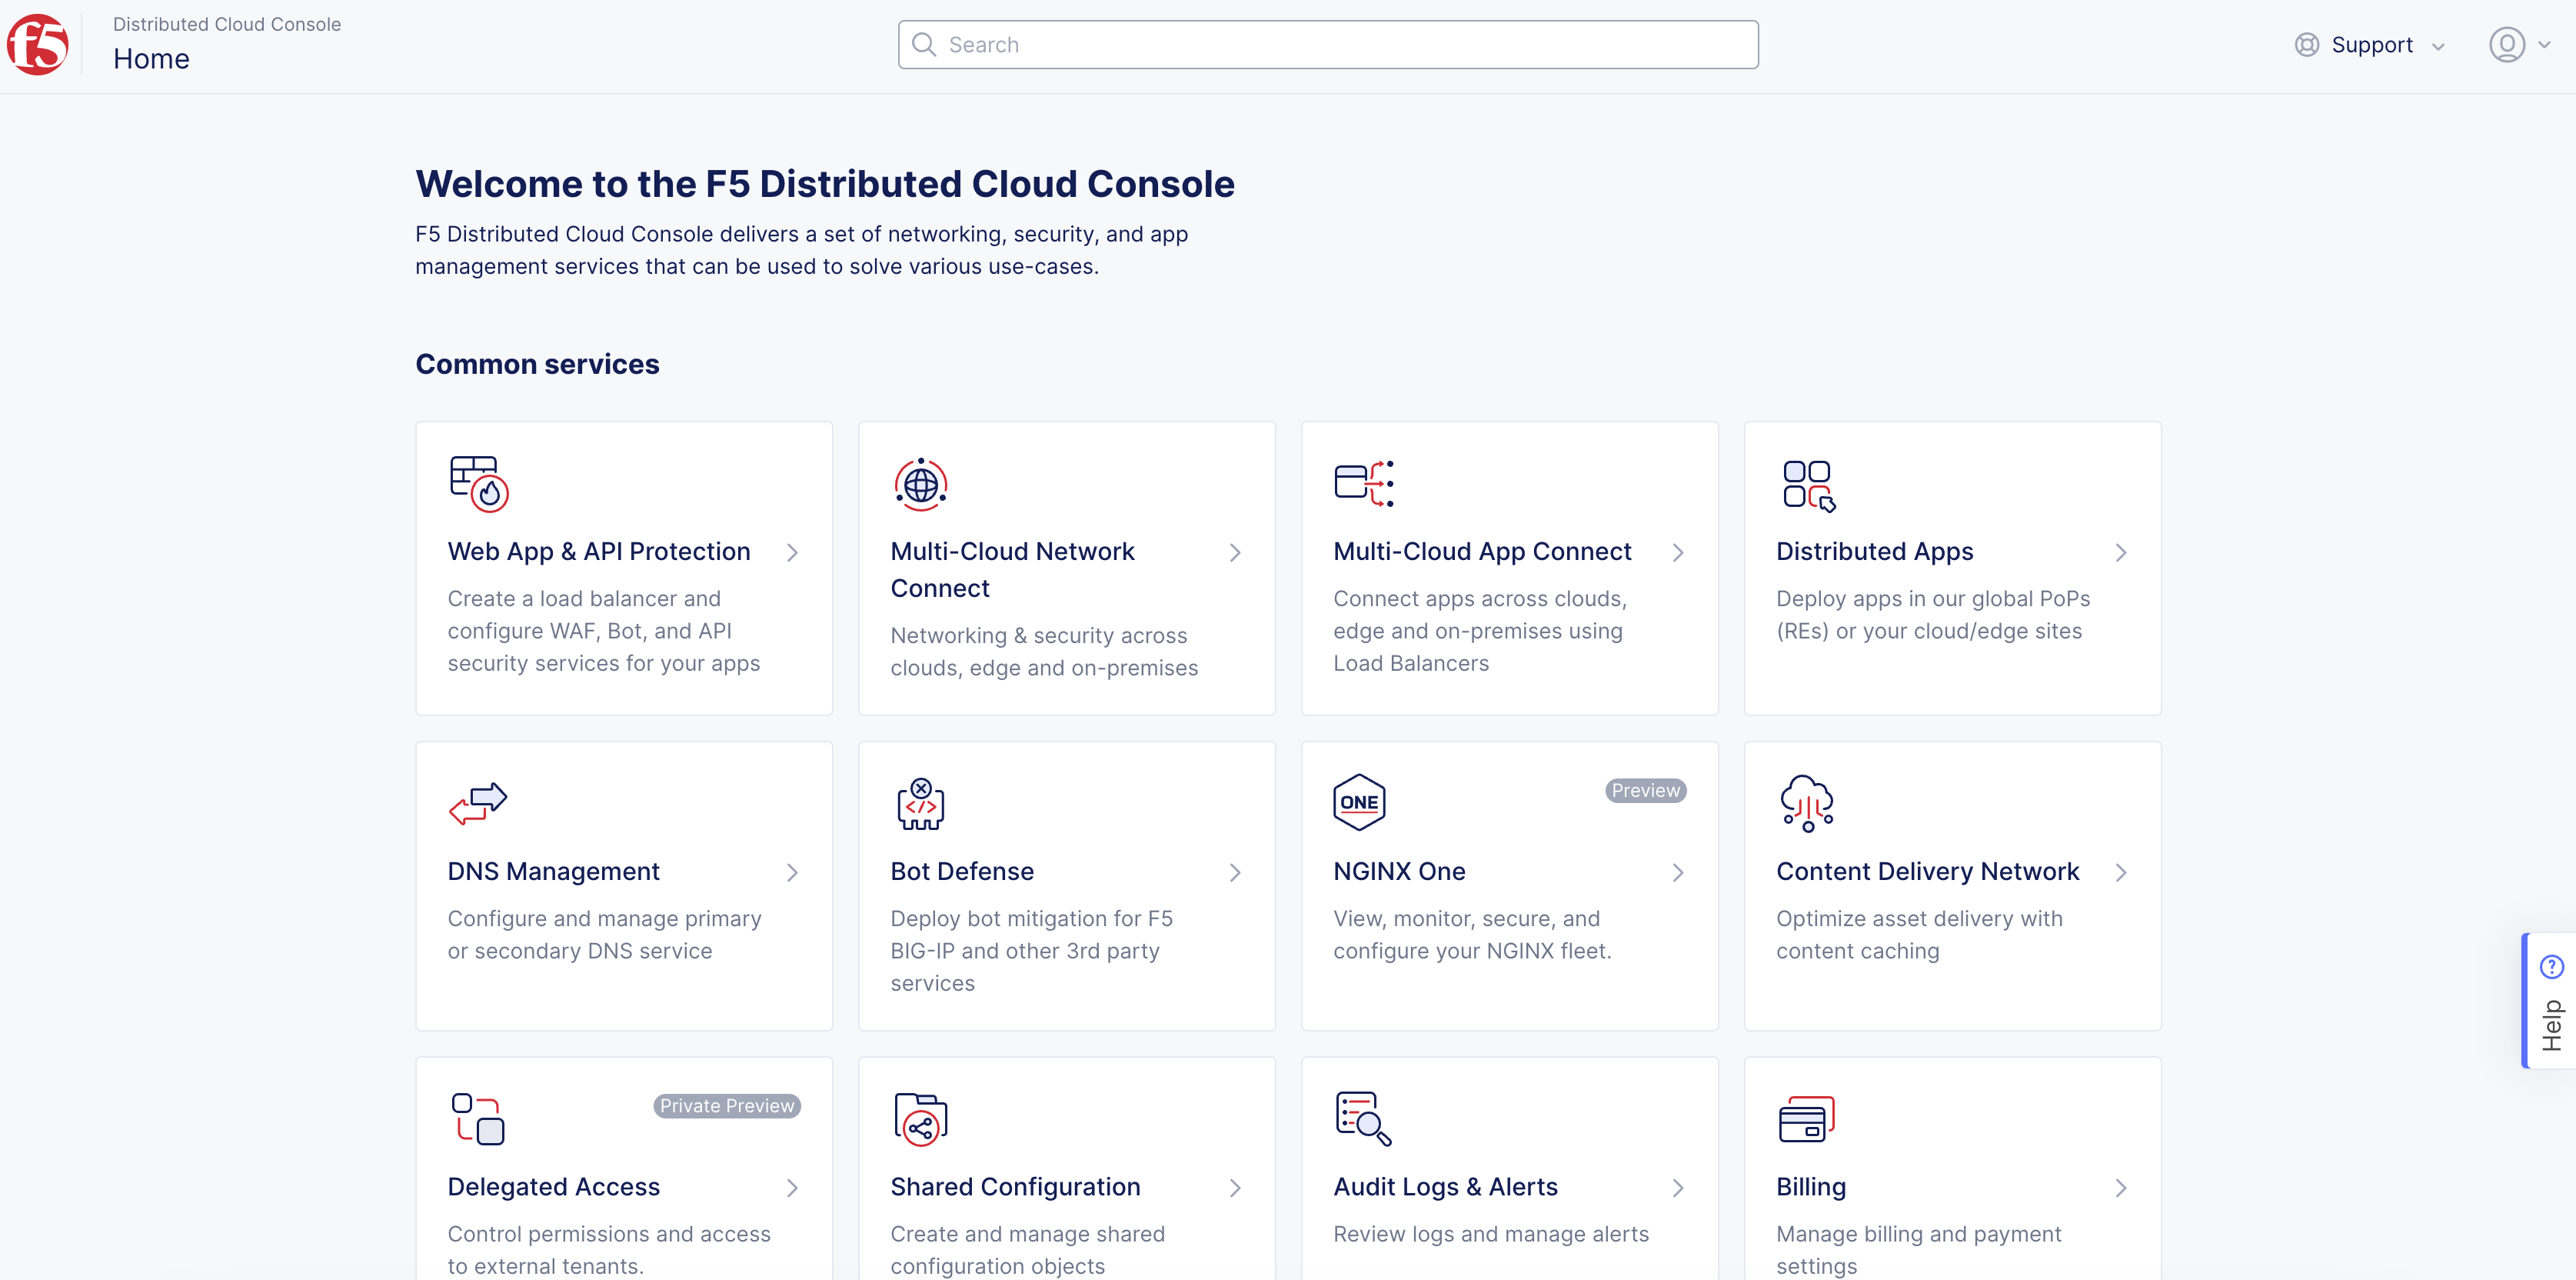
Figure: Console Homepage
-
Select
Manage>Child Tenant Managers. -
Select
Add Child Tenant Manager. -
In the
Namefield, enter a name to identify the newChild Tenant Manager. -
Optionally, add labels and a short description describing this child tenant manager configuration.
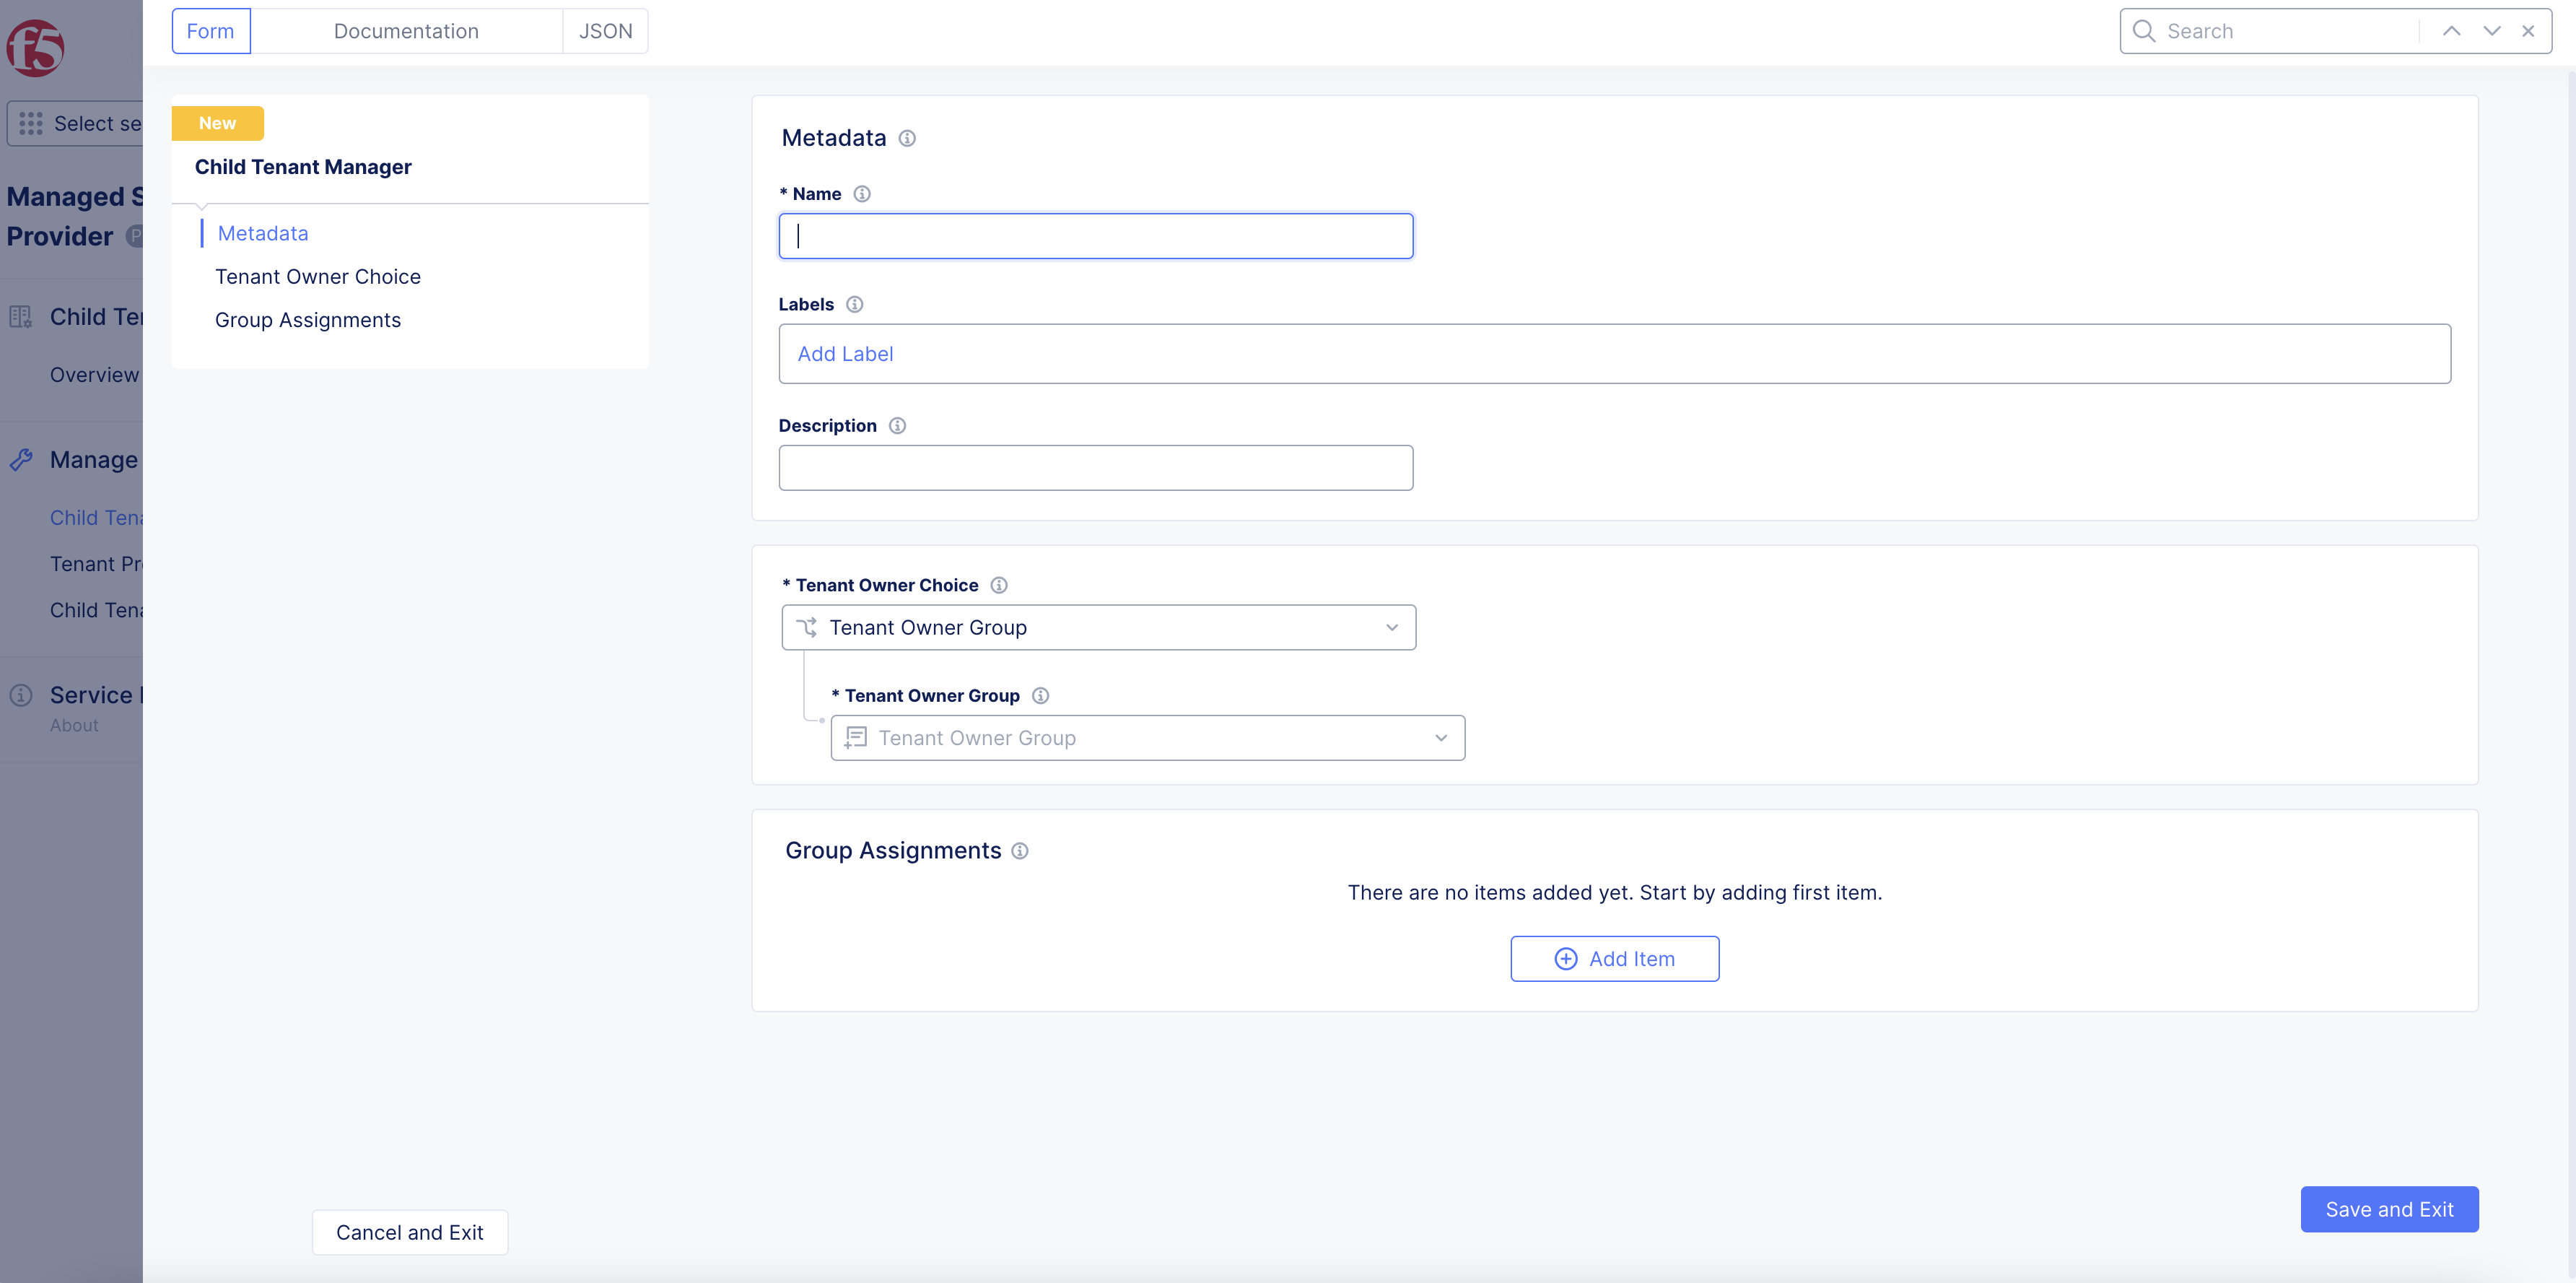
Figure: Metadata
- From the
Tenant Owner Choicedrop-down menu, select a local user group that will inherit tenant ownership roles in the child tenant.

Figure: Tenant Owner Group
-
Under
Group Assignments, selectAdd Itemto add groups that will be created in the new tenant. -
From the
Groupdrop-down menu, select the local group that is to be given access to the child tenant.
Note: Users added to this group in the Parent Tenant will be able to access the child tenant and assume roles and permissions associated with the new Child Tenant group. You can define multiple groups to be created in the new Child Tenant and mapped to the same local tenant.
- After you finish, select
Save and Exit.
Create Tenant Profile Configuration
To expedite the creation of multiple similar tenants, Managed Service Providers (MSPs) can use Tenant Profiles. These profiles contain common values for new Child Tenants and serve as the starting point for their creation. This helps to streamline the process and reduce the likelihood of errors or inconsistencies.
In addition to values, Tenant Profiles can also be used to define namespaces and roles that are to be provisioned in the new tenant. This allows MSPs to easily configure and manage the tenant's environment, ensuring that it meets the needs of the customer. By utilizing Tenant Profiles, MSPs can efficiently create and manage tenants on the F5 Distributed Cloud.
-
From the root or parent tenant, select
Manage>Tenant Profiles. -
Select
Add Tenant Profile. -
In the
Namefield, enter a name to identify the newTenant Profile.
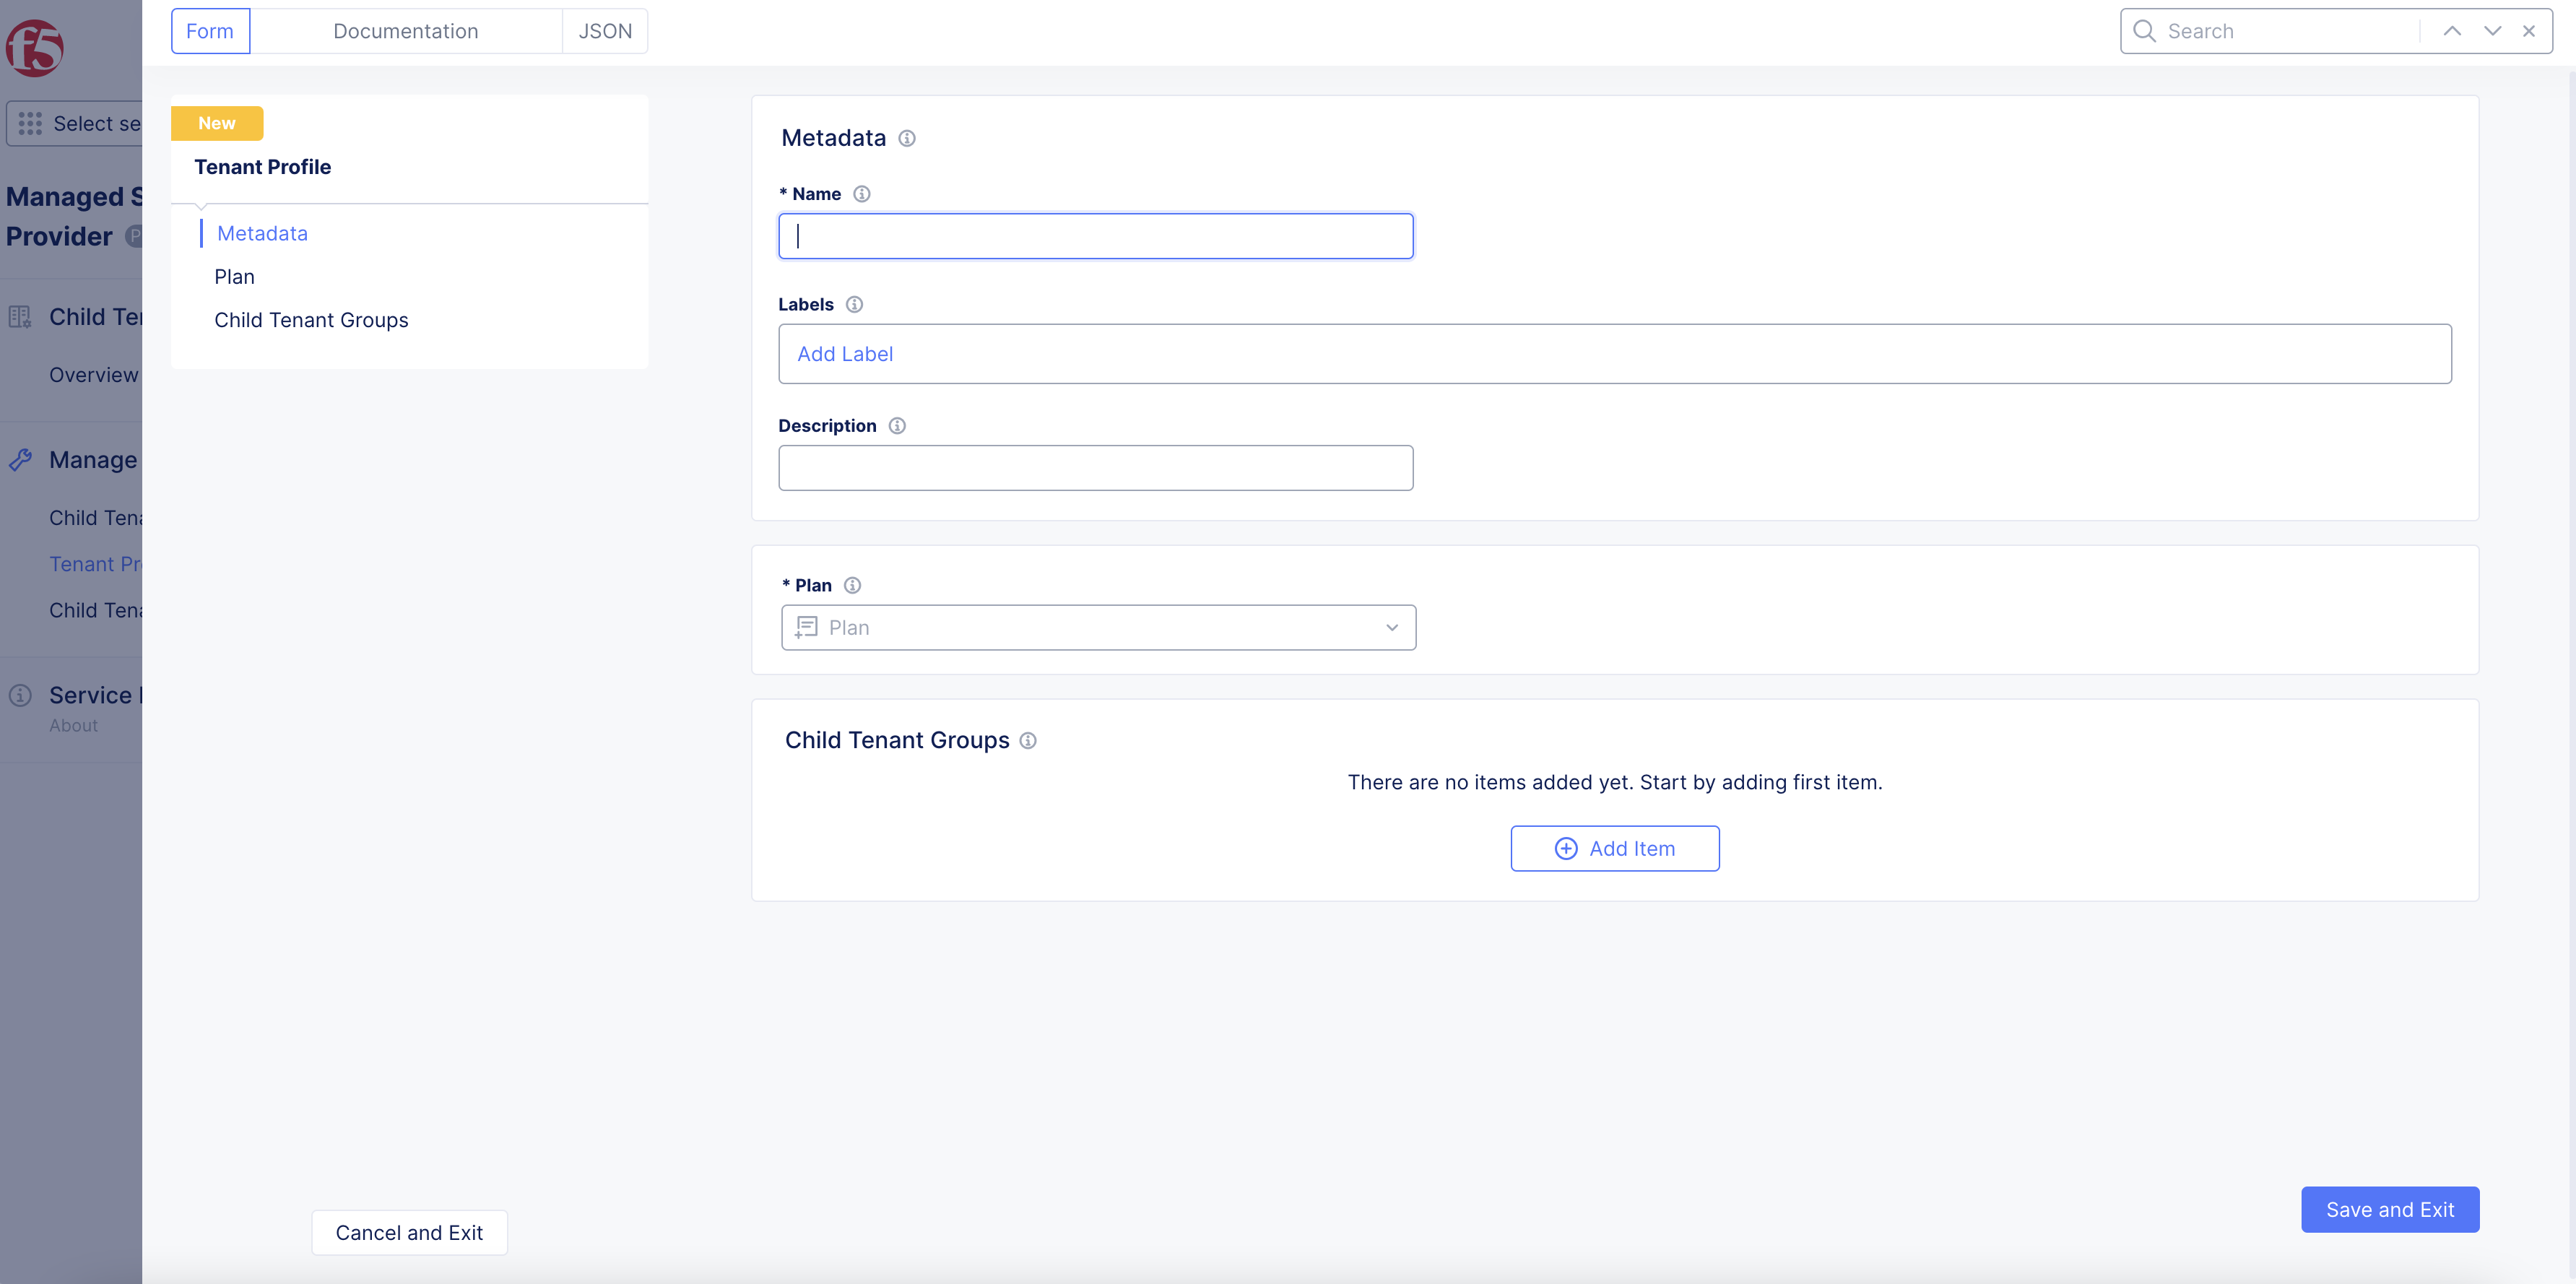
Figure: Metadata
-
Optionally, add labels and a short description describing this tenant configuration.
-
From the
Plandrop-down menu, select an option to be used as the subscription plan for any new tenants created from thisTenant Profile. TheTenant Profileis also used to create child groups for the new tenant and link them back to the higher-level tenant. -
Under
Child Tenant Groups, selectAdd Item. Perform the following:-
In the
Namefield, enter a name for the child tenant group. -
In the
Namespacefield, enter a new namespace that the child tenant group will apply to. -
From the
Rolemenu, select a role for the group in the new tenant. -
After you finish, select
Apply. -
Select
Save and Exitto complete the tenant profile creation.
-
Create Child Tenant
Using the Tenant Profile and Child Tenant Manager, you must create a new child tenant.
-
From the root or parent tenant, select
Manage>Child Tenants. -
Select
Add Child Tenant. -
In the form that appears, configure the options for the child tenant:

Figure: Child Configuration
-
In the
Namefield, enter the name of the child tenant. -
Optionally, add labels and a short description describing this child tenant.
-
From the
Tenant Profiledrop-down menu, select the tenant profile configuration object created previously. -
From the
Child Tenant Managerdrop-down menu, select the child tenant manager configuration object created previously. -
In the
Domainfield, enter the domain to use for the customer child tenant.
Note: This will become the new child tenant's domain name and cannot be changed or reused after creating a new tenant. For example:
AcmeCorpinhttps://acmecorp.console.ves.volterra.io/.
-
Optionally, enter information for the
Company Name,First Name,Last Name, andEmail. You can also enter customer information under theContactsection that further describes the child tenant. -
After you finish, select
Save and Exit.