Deploy vGPU Apps Using vK8s
Objective
This document provides instructions on how to enable Virtual GPU (vGPU) for the F5® Distributed Cloud VMware sites and deploy vGPU apps using Distributed Cloud vK8s. To know more about Distributed Cloud vK8s, see Virtual Kubernetes (vK8s).
The Distributed Cloud Platform supports enabling vGPU capability using fleet configuration. For more information on Distributed Cloud fleet, see Fleet.
After enabling vGPU capability using fleet, the vGPU applications are deployed using the Distributed Cloud vK8s that is associated with the same virtual site as that of the fleet of sites.
Using the instructions provided in this guide, you can enable vGPU capabilities in Distributed Cloud sites using fleet configuration and deploy vGPU apps using Distributed Cloud vK8s.
Note: Only Distributed Cloud VMware site and NVIDIA Tesla T4 vGPU software are supported.
Prerequisites
-
An F5 Distributed Cloud Account. If you do not have an account, see Getting Started with Console.
-
A vGPU application and associated Kubernetes manifest file.
-
Distributed Cloud VMware site with vSphere. In case you do not have a VMware site, see Create VMware Site.
-
NVIDIA vGPU Manager compatible with NVIDIA Tesla T4 vGPU driver version
460.32.03. Refer to the following NVIDIA documentation for more information on the vGPU software: -
Distributed Cloud vK8s. See the Create Virtual K8s Object document for more details.
-
Distributed Cloud fleet of sites. If you do not have a fleet, see Create a Fleet.
Configuration
Deploying vGPU applications using vK8s requires you to perform the following sequence of actions:
- Add the vGPU device to your VM
- Enable the vGPU capability to your site using the fleet in which the site is a member
- Create a K8s deployment or job for vGPU app on your site using Distributed Cloud vK8s
Do the following to deploy vGPU apps on your site:
Step 1: Set your GPU device to vGPU mode.
-
Log onto your vSphere platform using the vSphere client.
-
Select your server under the
Datacenterin the left menu. SelectHardware>Graphicsunder theConfiguretab. -
Select the graphics device under the
Host Graphicstab and clickEdit.

Figure: Graphics Devices
- Select
Shared DirectandSpread VMs Across GPUs (best performance)options and clickOk.
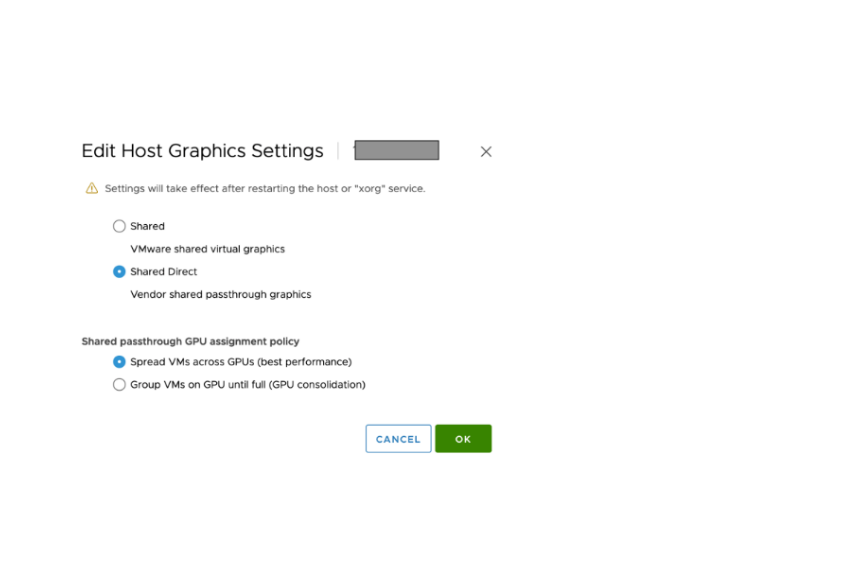
Figure: Set GPU to vGPU
Note: Restart the host or the
xorgservice to enforce these settings.
Step 2: Add vGPU device for your VM.
- Right-click on your VM and select
Edit Settings. - Click
Add NEW DEVICE>New PCI Deviceand select the type asNVIDIA GRID vGPU. - Select a profile for the
NVIDIA GRID vGPU Profilefield as per your requirement. This example selectsgrid_t4-4q.

Figure: Add vGPU to VM
- Click
OKto add the vGPU software.
Step 3: Enable GPU for your site using fleet.
- Select the
Multi-Cloud Network Connectworkspace. - Navigate to
Manage>Site Management>Fleets. - Click
...>Editfor the fleet in which your VMware site is a member. - Go to
Advanced Configurationsection and enableShow Advanced Fieldsoption. - Select
vGPU Enabledfor theEnable/Disable GPUfield. - Enter the license server IP address or FQDN in the
License Server Addressfield. - Enter license server port number in the
License Server Port Numberfield. Port 7070 is populated by default. - Select a type for the
Feature Typefield. This example setsNVIDIA vGPUas the feature type.
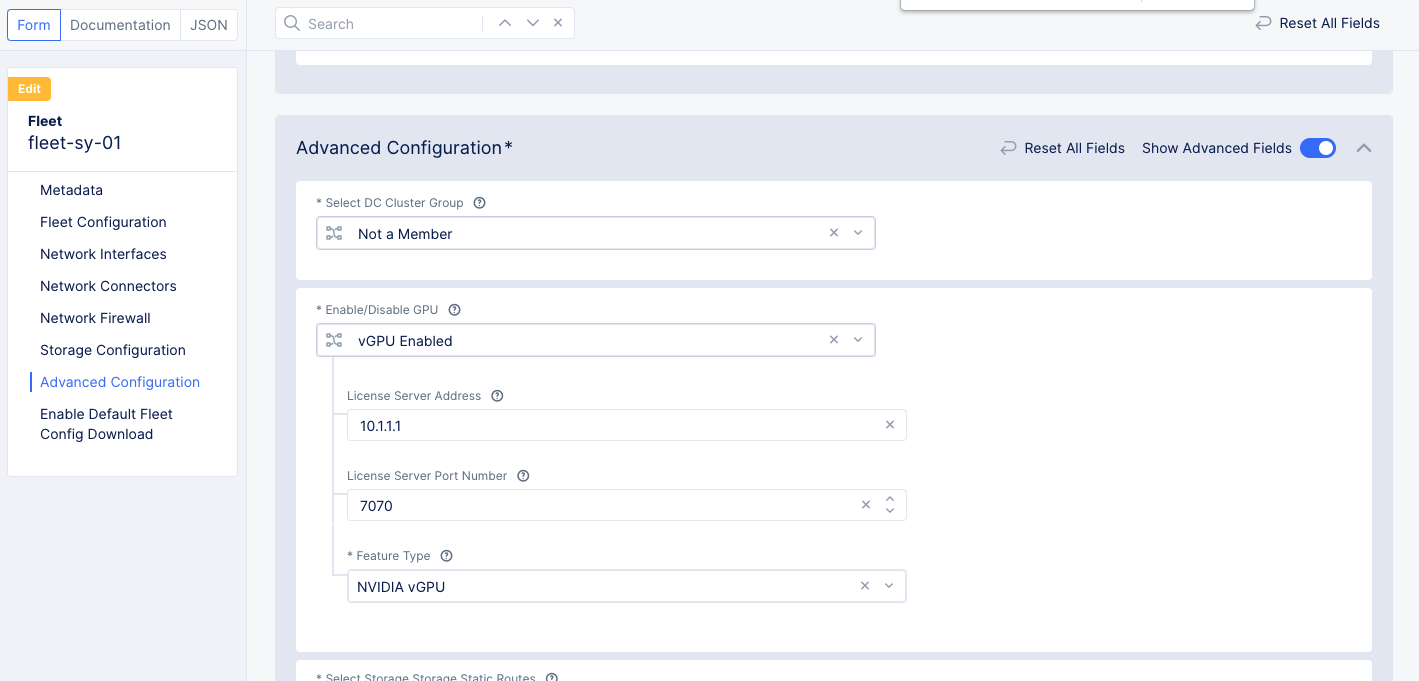
Figure: Enable vGPU in Fleet
Note: You can set
Unlicensedfor the feature type field. However, unlicensed usage of NVIDIA vGPU software results in degraded performance based on time elapsed since the boot time. See Grid Licensing Guide for more information.
-
Go to
Enable Default Fleet Config Downloadsection and enable theShow Advanced Fieldsoption. SelectEnable Default Fleet Config Downloadoption. -
Click
Save and Exit.
Step 4: Prepare vGPU deployment.
You can deploy the vGPU app using the vK8s workloads or jobs. This example shows deploying a vGPU app using the vK8s jobs.
Prepare a vGPU application manifest in JSON or YAML format. Ensure that the manifest resources should specify that a vGPU is required. See the following resources sample for NVIDIA vGPU:
apiVersion: batch/v1
kind: Job
metadata:
  name: vgpu-test1
spec:
  template:
    spec:
      containers:
      - name: cuda-container
        image: nvidia/cuda:11.0-base
        command: ["nvidia-smi"]
        resources:
          limits:
            nvidia.com/gpu: 1
            cpu: 200m
            memory: 600Mi
          requests:
            cpu: 0m
            memory: 100Mi
      restartPolicy: Never
  backoffLimits: 2
The following is a JSON version of the deployment:
{
  "apiVersion": "batch/v1",
  "kind": "Job",
  "metadata": {
    "name": "vgpu-test1"
  },
  "spec": {
    "template": {
      "spec": {
        "containers": [
          {
            "name": "cuda-container",
            "image": "nvidia/cuda:11.0-base",
            "command": [
              "nvidia-smi"
            ],
            "resources": {
              "limits": {
                "nvidia.com/gpu": 1,
                "cpu": "200m",
                "memory": "600Mi"
              },
              "requests": {
                "cpu": "0m",
                "memory": "100Mi"
              }
            }
          }
        ],
        "restartPolicy": "Never"
      }
    },
    "backoffLimits": 2
  }
}
Note: In case of continuous use of vGPU such as video monitoring applications, it is recommended to use Kubernetes deployment and in other cases, it is recommended to use a Kubernetes job so that the vGPU is released after the task is completed.
Step 5: Navigate to your vK8s object and deploy the vGPU app.
Note: Ensure that the vK8s object is associated with virtual site that groups all the VMware sites enabled with vGPU or sites that are part of the fleet created in previous steps.
- Select the
Multi-Cloud Network Connectworkspace. - Select your application namespace from the namespace dropdown list to change to that namespace.
- Navigate to
Applications>Virtual K8s. - Click the name of the virtual K8 object where you want to deploy the vGPU app.
- Click on the
Jobstab and clickAdd Job. - Paste the YAML prepared in previous step and click
Save.
Step 6: Verify that the deployment is utilizing the vGPU.
You can verify that the sites are enabled with vGPU and the application processes are consuming the enabled vGPU resources.
- Log into your node and check the vGPU processes. This example shows command to monitor the vGPU devices of Nvidia.
nvidia-smi
Note: The
nvidia-smicommand displays the information on the GPU devices and the running processes for that GPU.
- Log into F5 Distributed Cloud Console and navigate to the
Sites>App Site Listpage. Click on a site that is part of the fleet you created. This opens the site dashboard. ClickNodestab and click on a node to open its dashboard. Click onMetricsto monitor the GPU usage, GPU temperature, and GPU throughput metrics.