Create Service Token for Managed K8s Cluster
Objective
This document provides instructions on how to create use a service token to access F5® Distributed Cloud Services Managed K8s cluster. To know more about Managed K8s, see Create and Deploy Managed K8s.
The service token is used for applications on the site-local network to access F5 Managed K8s cluster API server. This is useful in scenarios such as CI/CD deployments where, certificates need to be manually renewed periodically but certificates cannot be revoked and have shorter expiry duration.
F5 does not support revoking local Kubeconfig certificates of Managed K8s cluster and these certificates have short expiry duration of 14 days. In case of CI/CD deployments that require renewing certificates every 2 weeks, the using service token prevents impact to the deployments.
Using the instructions provided in this guide, you can create a service account using the local kubeconfig certificate of your Managed K8s cluster. You can then obtain the service token from the service account, apply it to the cluster role binding used in Managed K8s configuration, and access the Managed K8s server using the service token in the HTTP request header.
Note: Service token can be also created for a specific namespace and used for that namespace. The service token is applied using role and role binding. Instructions provided in this guide also cover applying the service account at namespace level.
Prerequisites
-
An F5 Distributed Cloud Account. If you do not have an account, see Getting Started with Console.
-
App Stack site with Managed K8s cluster. See Create and Deployed Managed K8s document for information on creating Managed K8s cluster. See Create App Stack Site for information on creating an App Stack site.
Create and Use Service Token in Managed K8s
Using service token for Managed K8s cluster requires you to first create a service account and obtain the token from it. After that, set the service account in any of the following Managed K8s configuration objects:
-
Role
-
Role Binding
-
Cluster Role
-
Cluster Role Binding
You can create service account and obtain the service token at cluster level or at a namespace level. The following chapters present instructions for both cases.
Use Service Token at Cluster Level
Do the following to create and use the service token at cluster level.
Create Service Account and Obtain Service Token
Do the following to create service account, and get service token:
Features can be viewed, and managed in multiple services.
This example shows Service Token setup in Distributed Apps.
Step 1: Log into F5® Distributed Cloud Console and download local kubeconfig of your Managed K8s.
- Open
F5® Distributed Cloud Consoleand selectDistributed Apps.
Note: Homepage is role based, and your homepage may look different due to your role customization. Select
All Workspacesdrop-down menu to discover all options. Customize Settings:Administration>Personal Management>My Account>Edit work domain & skillsbutton >Advancedbox > checkWork Domainboxes >Save changesbutton.
Figure: Homepage
Note: Confirm
Namespacefeature is in correct namespace, drop-down selector located in upper-left corner. Not available in all services.
- In the left navigation pane, select
Applications>Virtual K8s.
Note: If options are not showing available, select
Showlink inAdvanced nav options visiblein bottom left corner. If needed, selectHideto minimize options from Advanced nav options mode.
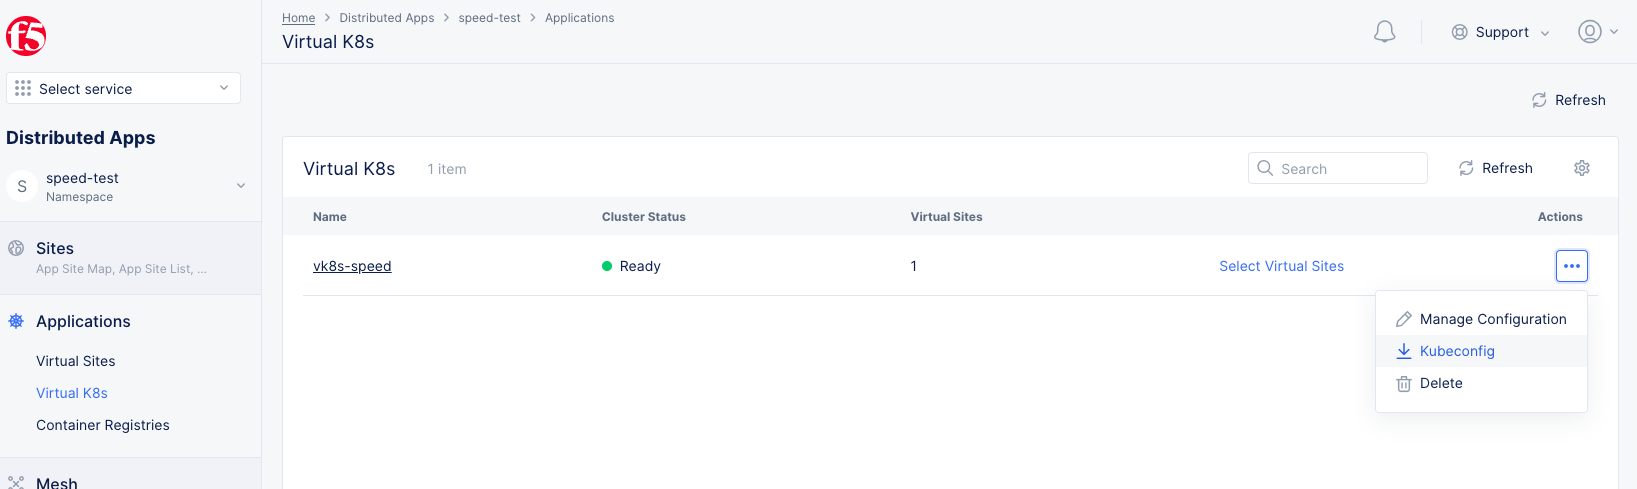
Figure: Virtual K8s Kubeconfig file download
-
Select
...on your App Stack site enabled with managed K8s. -
Select
Kubeconfigto download the kubeconfig file to your computer.
Step 2: Create service account.
- Set
KUBECONFIGenvironment variable.
export KUBECONFIG=<kubeconfig-local>.yml
Note: Replace
<kubeconfig-local>.ymlwith the local kubeconfig file downloaded in Step 1.
- Create service account. The following sample creates a service account with name
my-pk8s-sa.
kubectl create serviceaccount my-pk8s-sa
The above command returns the following output:
serviceaccount/my-pk8s-sa created
Step 3: Obtain service token.
Enter the following command to print the service token for the service account created in previous step.
kubectl describe serviceaccount my-pk8s-sa
The above command returns the following output. Note down the value of the token field.
Name:                my-pk8s-sa
Namespace:           default
Labels:              <none>
Annotations:         <none>
Image pull secrets:  <none>
Mountable secrets:   my-pk8s-sa-token-9426z
Tokens:              my-pk8s-sa-token-9426z
Events:              <none>
❯ kubectl describe secret my-pk8s-sa-token-9426z
Name:         my-pk8s-sa-token-9426z
Namespace:    default
Labels:       <none>
Annotations:  kubernetes.io/service-account.name: my-pk8s-sa
              kubernetes.io/service-account.uid: b087e2c7-c346-4817-aa6d-01c1c8c0bf94

Type:  kubernetes.io/service-account-token

Data
====
ca.crt:     21036 bytes
namespace:  7 bytes
token:      eyJhbGciOiJSUzI1NiIsImtpZCI6IkY5czRoTzlnYjhZSy1KemZmOXd6R2diRXlkY0NfRnVkWUNnZDRnT3U4ZnMifQ.eyJpc3MiOiJrdWJlcm5ldGVzL3NlcnZpY2VhY2NvdW50Iiwia3ViZXJuZXRlcy5pby9zZXJ2aWNlYWNjb3VudC9uYW1lc3BhY2UiOiJkZWZhdWx0Iiwia3ViZXJuZXRlcy5pby9zZXJ2aWNlYWNjb3VudC9zZWNyZXQubmFtZSI6Im15LXBrOHMtc2EtdG9rZW4tOTQyNnoiLCJrdWJlcm5ldGVzLmlvL3NlcnZpY2VhY2NvdW50L3NlcnZpY2UtYWNjb3VudC5uYW1lIjoibXktcGs4cy1zYSIsImt1YmVybmV0ZXMuaW8vc2VydmljZWFjY291bnQvc2VydmljZS1hY2NvdW50LnVpZCI6ImIwODdlMmM3LWMzNDYtNDgxNy1hYTZkLTAxYzFjOGMwYmY5NCIsInN1YiI6InN5c3RlbTpzZXJ2aWNlYWNjb3VudDpkZWZhdWx0Om15LXBrOHMtc2EifQ.g0VEYE7PuvPaiiuAY3UFaTRdhpdQXpx6ShEAEvuQDZU2Tf48igWm7oDAeED5Y1TDPDVsgE7orNNv8Zrrcmd8gDaPAJhBpfsrnC6ZbjsgSNAR6AL_l2IHFLt2tYrahW4NSol4JlFz8O5LnLUTQ1XJ_kaS4vxi2IztCgSCElc4P69l0aABa9G42RX5KH333_EebcK_AgLjhh5N1jxk47KZPee3IAMqK0435apBBnxEeGb9DcSaE-lQp6xcwik3g8pA7yXbBmqcsG2amxZ1_lOoQC1-8l6Ld1BiY0BR-d_1rpcnSCZ7198XoUq11Vf4TKFhaigWoxXQCqX0sF05RzvfZA

❯
Apply Service Account to Cluster Role Binding
You can either edit an existing cluster role binding that is associated with a managed K8s cluster or create a new cluster role binding object and apply it while creating or updating managed K8s cluster configuration. This example shows editing an existing cluster role binding object.
Log into F5® Distributed Cloud Console and perform the following:
Step 1: Start editing the cluster role binding.
- Go to the
Distributed Appsworkspace. - Select
Manage>Manage K8s>K8s Cluster Role Bindings.
Note: To change your skill level and/or work domains,
- Select the
Administrationworkspace- Select
Personal Management>My Account- In the
Work domains and skill levelsection, selectEdit Work Domains & Skills- Select the appropriate skill domains and skill level
- Select
Save Changes
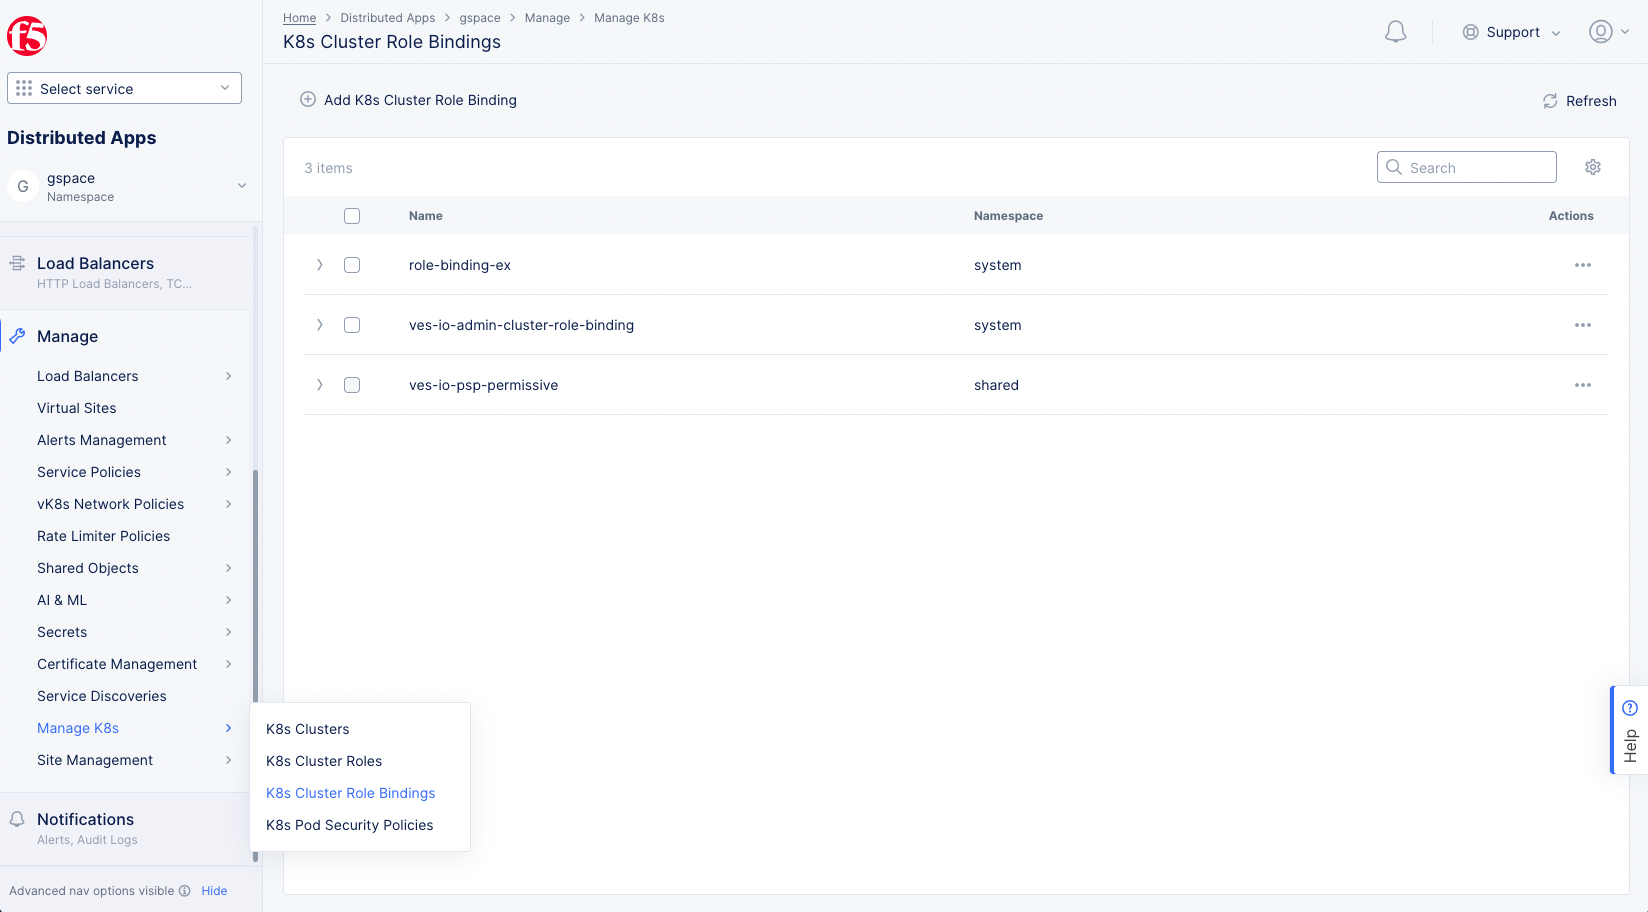
Figure: Local Kubeconfig of Managed K8s
- Select
...>Manage Configurationfor a cluster role binding object from the displayed list. - Select
Edit Configurationin the upper right corner to enable changes.
Step 2: Apply service account to Subjects section.
- Select
Add IteminSubjectssection.
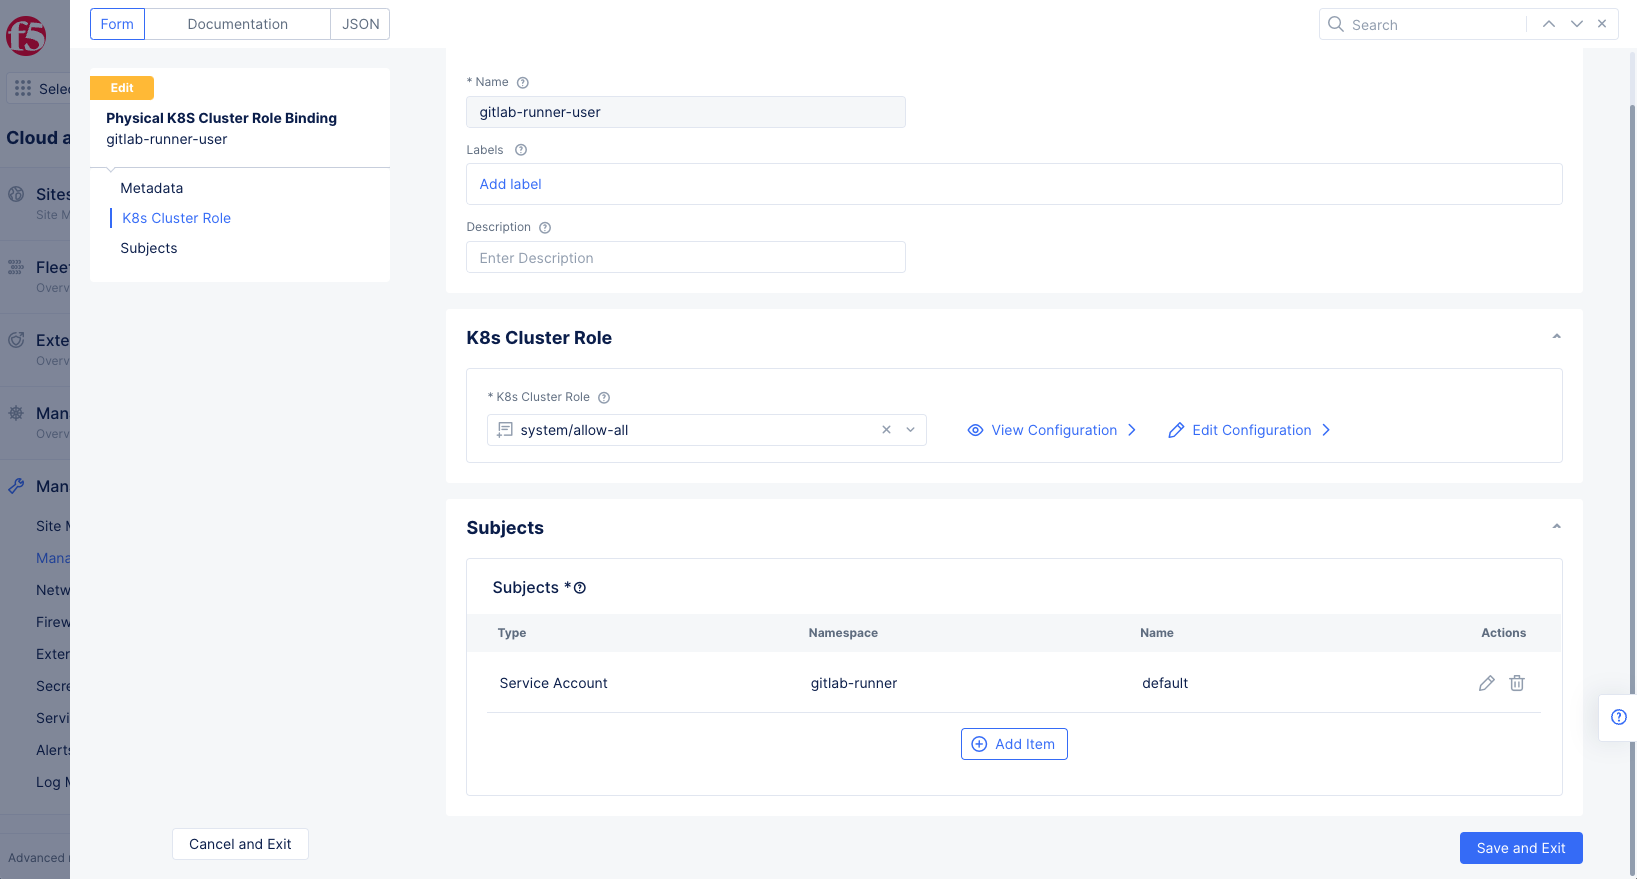
Figure: Local Kubeconfig of Managed K8s
- Select
Service AccountinSelect Subjectdrop-down menu. - Enter
Namespace. - Enter
Nameof the service account. - Select
Applyto save the subject.
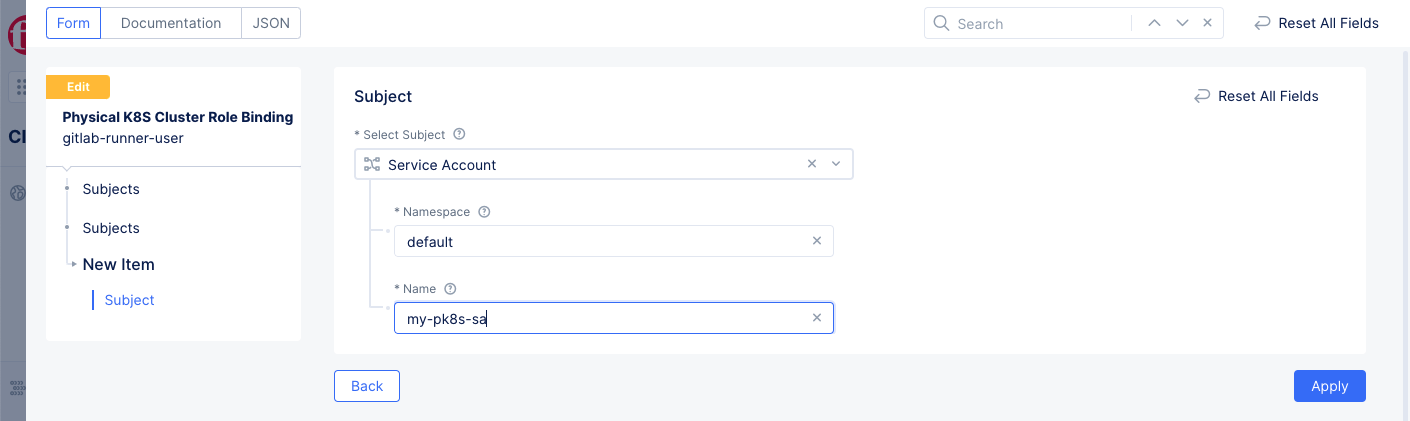
Figure: Cluster Role Binding with Service Account
Step 3: Complete editing the cluster role binding.
Select Save and Exit to save the changes to the cluster role binding.
Verify Cluster Role Binding and Access Using Service Token
You can verify on the managed K8s cluster that the cluster role bindings are created with the service account. Use local kubeconfig downloaded in the Create Service Account and Obtain Service Token chapter and perform the following:
Step 1: Verify cluster role binding.
- Set KUBECONFIG environment variable with the downloaded local kubeconfig file.
export KUBECONFIG=<kubeconfig-local>.yml
- Verify that the cluster role binding is created.
kubectl get clusterrolebinding admin-cluster-role-binding
The following is a sample output for the above command:
NAME                         AGE
admin-cluster-role-binding   87d
- Verify detailed information of the cluster role binding.
kubectl get clusterrolebinding admin-cluster-role-binding -o=yaml
The following is a sample output for the above command:
apiVersion: rbac.authorization.k8s.io/v1
kind: ClusterRoleBinding
metadata:
  annotations:
    app.kubernetes.io/managed-by: vpm
  creationTimestamp: "2021-03-23T09:05:12Z"
  labels:
    managed-by: vpm-fleet
  name: admin-cluster-role-binding
  resourceVersion: "20818602"
  selfLink: /apis/rbac.authorization.k8s.io/v1/clusterrolebindings/admin-cluster-role-binding
  uid: 3c6aaf8c-a661-4a94-b847-5db457f30e6f
roleRef:
  apiGroup: rbac.authorization.k8s.io
  kind: ClusterRole
  name: admin-cluster-role
subjects:
- apiGroup: rbac.authorization.k8s.io
  kind: Group
  name: automation-rllmbbuf
- apiGroup: rbac.authorization.k8s.io
  kind: User
  name: test@example.com
- kind: ServiceAccount
  name: my-pk8s-sa
  namespace: default
Step 2: Obtain the managed K8s local API server address.
- Open
F5® Distributed Cloud Consoleand select theMulti-Cloud Network Connectworkspace.
Figure: Homepage
- Select
Manage>Manage k8s>K8s Clusters. - Select the gear icon ( ⚙ ) located in upper-right.
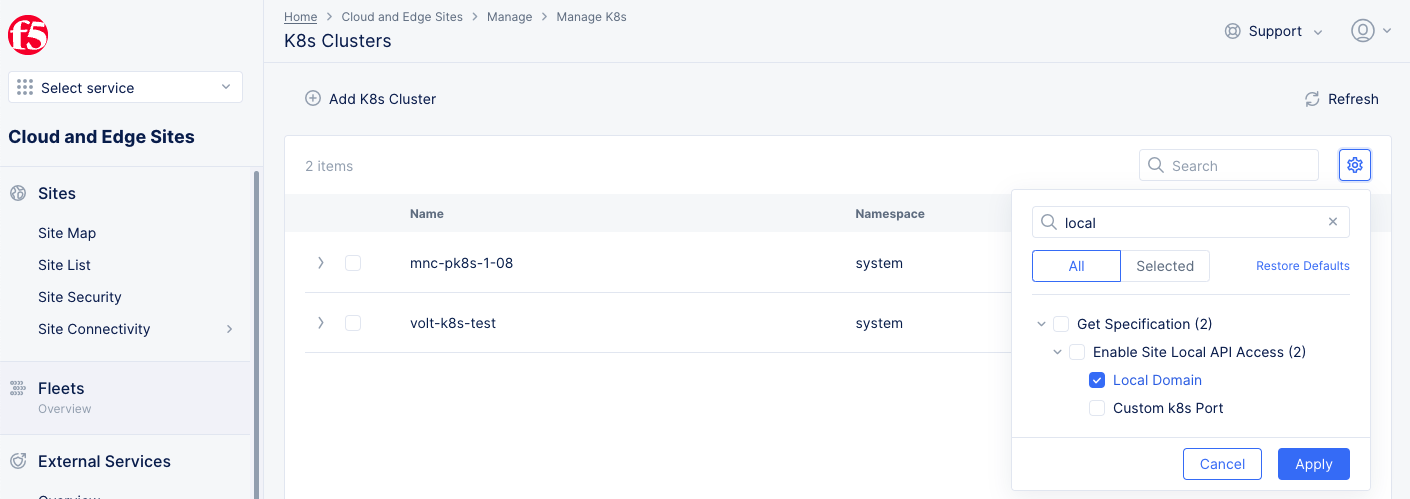
Figure: Show Local Domain
- Select the
Local Domaincheck box in the pop-up window. - Select the
Applybutton. - Note the local domain for your managed K8s cluster from the displayed list of clusters.
Step 3: Verify that access using service token is successful.
The following example shows CURL to send a request with service token in the request header:
curl -k -H "Authorization: Bearer eyJhbGciOiJSUzI1NiIsImtpZCI6IkY5czRoTzlnYjhZSy1KemZmOXd6R2diRXlkY0NfRnVkWUNnZDRnT3U4ZnMifQ.eyJpc3MiOiJrdWJlcm5ldGVzL3NlcnZpY2VhY2NvdW50Iiwia3ViZXJuZXRlcy5pby9zZXJ2aWNlYWNjb3VudC9uYW1lc3BhY2UiOiJkZWZhdWx0Iiwia3ViZXJuZXRlcy5pby9zZXJ2aWNlYWNjb3VudC9zZWNyZXQubmFtZSI6Im15LXBrOHMtc2EtdG9rZW4tOTQyNnoiLCJrdWJlcm5ldGVzLmlvL3NlcnZpY2VhY2NvdW50L3NlcnZpY2UtYWNjb3VudC5uYW1lIjoibXktcGs4cy1zYSIsImt1YmVybmV0ZXMuaW8vc2VydmljZWFjY291bnQvc2VydmljZS1hY2NvdW50LnVpZCI6ImIwODdlMmM3LWMzNDYtNDgxNy1hYTZkLTAxYzFjOGMwYmY5NCIsInN1YiI6InN5c3RlbTpzZXJ2aWNlYWNjb3VudDpkZWZhdWx0Om15LXBrOHMtc2EifQ.g0VEYE7PuvPaiiuAY3UFaTRdhpdQXpx6ShEAEvuQDZU2Tf48igWm7oDAeED5Y1TDPDVsgE7orNNv8Zrrcmd8gDaPAJhBpfsrnC6ZbjsgSNAR6AL_l2IHFLt2tYrahW4NSol4JlFz8O5LnLUTQ1XJ_kaS4vxi2IztCgSCElc4P69l0aABa9G42RX5KH333_EebcK_AgLjhh5N1jxk47KZPee3IAMqK0435apBBnxEeGb9DcSaE-lQp6xcwik3g8pA7yXbBmqcsG2amxZ1_lOoQC1-8l6Ld1BiY0BR-d_1rpcnSCZ7198XoUq11Vf4TKFhaigWoxXQCqX0sF05RzvfZA" https://<local-domain>:65443/api/v1/pods
Note: Replace the
<local-domain>with the local domain value obtained in previous step.
The following output indicates a successful response:
{
  "kind": "PodList",
  "apiVersion": "v1",
  "metadata": {
    "selfLink": "/api/v1/pods",
    "resourceVersion": "20815877"
  },
  "items": [
    {
      "metadata": {
        "name": "details-v1-7b9c5d77f-5vmw5",
        "generateName": "details-v1-7b9c5d77f-",
        "namespace": "cmallam-ns1",
        "selfLink": "/api/v1/namespaces/cmallam-ns1/pods/details-v1-7b9c5d77f-5vmw5",
        "uid": "156a6bfe-eef7-4a2d-8d06-b861cd589ee1",
        "resourceVersion": "20396973",
        "creationTimestamp": "2021-06-11T14:04:45Z",
        "labels": {
          "app": "details",
          "pod-template-hash": "7b9c5d77f",
          "version": "v1"
        },

....

      }
    }
  ]
}
Use Service Token at Namespace Level
Do the following to create and use the service token at the namespace level.
Create and Obtain Service Token for Namespace
Do the following to create service account and get service token:
Step 1: Log into F5® Distributed Cloud Console and download local kubeconfig of your Managed K8s.
- Open
F5® Distributed Cloud Consoleand selectDistributed Apps.
Figure: Homepage
- In the left navigation pane, select
Applications>Virtual K8s. - Select
...for your App Stack site enabled with managed K8s. - Select
Kubeconfigto download the kubeconfig file to your computer.
Step 2: Create service account.
- Set
KUBECONFIGenvironment variable.
export KUBECONFIG=<kubeconfig-local>.yml
Note: Replace
<kubeconfig-local>.ymlwith the local kubeconfig file downloaded in Step 1.
- Create service account. The following sample creates a service account with name
my-pk8s-sa-cmallam-ns1.
kubectl create serviceaccount my-pk8s-sa-cmallam-ns1 -n cmallam-ns1
The above command returns the following output:
serviceaccount/my-pk8s-sa-cmallam-ns1 created
Step 3: Obtain service token.
Enter the following command to print the service token for the service account created in previous step.
kubectl describe serviceaccount my-pk8s-sa-cmallam-ns1 -n cmallam-ns1
The above command returns the following output. Note down the value of the token field.
Name:                my-pk8s-sa-cmallam-ns1
Namespace:           cmallam-ns1
Labels:              <none>
Annotations:         <none>
Image pull secrets:  <none>
Mountable secrets:   my-pk8s-sa-cmallam-ns1-token-clcsl
Tokens:              my-pk8s-sa-cmallam-ns1-token-clcsl
Events:              <none>
❯ k describe secret my-pk8s-sa-cmallam-ns1-token-clcsl -n cmallam-ns1
Name:         my-pk8s-sa-cmallam-ns1-token-clcsl
Namespace:    cmallam-ns1
Labels:       <none>
Annotations:  kubernetes.io/service-account.name: my-pk8s-sa-cmallam-ns1
              kubernetes.io/service-account.uid: 9068e568-9dd7-4e2c-8aab-ec075c588355

Type:  kubernetes.io/service-account-token

Data
====
ca.crt:     21036 bytes
namespace:  11 bytes
token:      eyJhbGciOiJSUzI1NiIsImtpZCI6IkY5czRoTzlnYjhZSy1KemZmOXd6R2diRXlkY0NfRnVkWUNnZDRnT3U4ZnMifQ.eyJpc3MiOiJrdWJlcm5ldGVzL3NlcnZpY2VhY2NvdW50Iiwia3ViZXJuZXRlcy5pby9zZXJ2aWNlYWNjb3VudC9uYW1lc3BhY2UiOiJjbWFsbGFtLW5zMSIsImt1YmVybmV0ZXMuaW8vc2VydmljZWFjY291bnQvc2VjcmV0Lm5hbWUiOiJteS1wazhzLXNhLWNtYWxsYW0tbnMxLXRva2VuLWNsY3NsIiwia3ViZXJuZXRlcy5pby9zZXJ2aWNlYWNjb3VudC9zZXJ2aWNlLWFjY291bnQubmFtZSI6Im15LXBrOHMtc2EtY21hbGxhbS1uczEiLCJrdWJlcm5ldGVzLmlvL3NlcnZpY2VhY2NvdW50L3NlcnZpY2UtYWNjb3VudC51aWQiOiI5MDY4ZTU2OC05ZGQ3LTRlMmMtOGFhYi1lYzA3NWM1ODgzNTUiLCJzdWIiOiJzeXN0ZW06c2VydmljZWFjY291bnQ6Y21hbGxhbS1uczE6bXktcGs4cy1zYS1jbWFsbGFtLW5zMSJ9.m02gbbTjkrxMO8m0uhojsS3niKzhL5xWMTJgZO2XT-88w7g1esgue14FjdXhXulF7_wuavCTnp4wct9z4Gi8AhPmrU0B4voHQ8LODeC-ya74m08mVC2wBpMVrXKZ7V4KTA_CG6CD4CwME4wY_6-Jm6vT5qaTC7tilK4omYUbsUdmu0T_iDFoYM9HD3JuCfIBO_K-NAcV_EKnWhvueMbqsZ2Qs8nbeLLpp3UWx4q8xOT5j7L0uDU_DZy44ptLlryOrHyzLxF5hGw6Lss6pUwgVPKFXHXp9T8Jx6d-bu7RJUCspAGcupcI5YFp0tfjtqKpVNnGUC8cTVFih-Ea6XWxNw
Apply Service Account to Role Binding
Do the following to create and apply the service account to role binding:
Step 1: Create a role configuration file.
Create a file with the role configuration in YAML format. The following is a sample configuration.
apiVersion: rbac.authorization.k8s.io/v1
kind: Role
metadata:
  namespace: cmallam-ns1
  name: pod-reader
rules:
- apiGroups: [""] # "" indicates the core API group
  resources: ["pods", "deployments"]
  verbs: ["get", "watch", "list"]
Note: Use a file editing utility such as
vior a text editor of your choice.
Step 2: Create a role binding configuration file.
Create a file with the role binding configuration in YAML format. The following is a sample configuration.
apiVersion: rbac.authorization.k8s.io/v1
# This role binding allows "jane" to read pods in the "cmallam-ns1" namespace.
# You need to already have a Role named "pod-reader" in that namespace.
kind: RoleBinding
metadata:
  name: read-pods
  namespace: cmallam-ns1
subjects:
# You can specify more than one "subject"
- kind: User
  name: "derek@example.com"#"name" is case sensitive
  apiGroup: rbac.authorization.k8s.io
- kind: User
  name: cmallam #"name" is case sensitive
  apiGroup: rbac.authorization.k8s.io
- kind: ServiceAccount
  name: my-pk8s-sa-cmallam-ns1
  namespace: cmallam-ns1
roleRef:
  # "roleRef" specifies the binding to a Role / ClusterRole
  kind: Role #this must be Role or ClusterRole
  name: pod-reader # this must match the name of the Role or ClusterRole you wish to bind to
  apiGroup: rbac.authorization.k8s.io
Note: Enter the role name created in step 1 in the
namefield under theroleRefsection of the above YAML file.
Step 3: Complete creating the role and role binding.
- Enter the following commands to create role and role binding.
kubectl apply -f <role-yaml>.yml

kubectl apply -f <rolebinding-yaml>.yml
- On the managed K8s cluster, set the role with the role binding:
kubectl apply -f ~/work/features/vk8s/rolebindigs/role-example.yml -o=yaml
apiVersion: rbac.authorization.k8s.io/v1
kind: Role
metadata:
  annotations:
    kubectl.kubernetes.io/last-applied-configuration: |
      {"apiVersion":"rbac.authorization.k8s.io/v1","kind":"Role","metadata":{"annotations":{},"name":"pod-reader","namespace":"cmallam-ns1"},"rules":[{"apiGroups":[""],"resources":["pods","deployments"],"verbs":["get","watch","list"]}]}
  creationTimestamp: "2021-06-23T08:47:29Z"
  name: pod-reader
  namespace: cmallam-ns1
  resourceVersion: "21794434"
  selfLink: /apis/rbac.authorization.k8s.io/v1/namespaces/cmallam-ns1/roles/pod-reader
  uid: eb5cb4f4-84b7-46ea-a6d1-b03605523388
rules:
- apiGroups:
  - ""
  resources:
  - pods
  - deployments
  verbs:
  - get
  - watch
  - list
Verify Role Binding and Access Using Service Token
You can verify on the managed K8s cluster that the cluster role bindings are created with the service account. Use local kubeconfig downloaded in the Create and Obtain Service Token for Namespace chapter and perform the following:
Step 1: Verify cluster role binding.
- Set KUBECONFIG environment variable with the downloaded local kubeconfig file.
export KUBECONFIG=<kubeconfig-local>.yml
- Verify that the cluster role binding is created.
kubectl get role -n cmallam-ns1

NAME         AGE
pod-reader   25m
- Verify information of the role binding.
kubectl get rolebinding -n cmallam-ns1

NAME        AGE
read-pods   24m
- Verify detailed information on the role:
kubectl get role -n cmallam-ns1 -o=yaml
apiVersion: v1
items:
- apiVersion: rbac.authorization.k8s.io/v1
  kind: Role
  metadata:
    annotations:
      kubectl.kubernetes.io/last-applied-configuration: |
        {"apiVersion":"rbac.authorization.k8s.io/v1","kind":"Role","metadata":{"annotations":{},"name":"pod-reader","namespace":"cmallam-ns1"},"rules":[{"apiGroups":[""],"resources":["pods","deployments"],"verbs":["get","watch","list"]}]}
    creationTimestamp: "2021-06-23T08:47:29Z"
    name: pod-reader
    namespace: cmallam-ns1
    resourceVersion: "21794434"
    selfLink: /apis/rbac.authorization.k8s.io/v1/namespaces/cmallam-ns1/roles/pod-reader
    uid: eb5cb4f4-84b7-46ea-a6d1-b03605523388
  rules:
  - apiGroups:
    - ""
    resources:
    - pods
    - deployments
    verbs:
    - get
    - watch
    - list
kind: List
metadata:
  resourceVersion: ""
  selfLink: ""
Step 2: Obtain the managed K8s local API server address.
- Open
F5® Distributed Cloud Consoleand select theMulti-Cloud Network Connectworkspace.
Figure: Homepage
- Select
Manage>Manage k8s>K8s Clusters. - Select the gear icon ( ⚙ ) located in upper-right.
Figure: Show Local Domain
- Select the
Local Domaincheck box in the pop-up window. - Select the
Applybutton. - Note the local domain for your managed K8s cluster from the displayed list of clusters.
Step 3: Verify that access using service token is successful.
The following example shows CURL to send a request with service token in the request header:
curl -k -H "Authorization: Bearer eyJhbGciOiJSUzI1NiIsImtpZCI6IkY5czRoTzlnYjhZSy1KemZmOXd6R2diRXlkY0NfRnVkWUNnZDRnT3U4ZnMifQ.eyJpc3MiOiJrdWJlcm5ldGVzL3NlcnZpY2VhY2NvdW50Iiwia3ViZXJuZXRlcy5pby9zZXJ2aWNlYWNjb3VudC9uYW1lc3BhY2UiOiJjbWFsbGFtLW5zMSIsImt1YmVybmV0ZXMuaW8vc2VydmljZWFjY291bnQvc2VjcmV0Lm5hbWUiOiJteS1wazhzLXNhLWNtYWxsYW0tbnMxLXRva2VuLWNsY3NsIiwia3ViZXJuZXRlcy5pby9zZXJ2aWNlYWNjb3VudC9zZXJ2aWNlLWFjY291bnQubmFtZSI6Im15LXBrOHMtc2EtY21hbGxhbS1uczEiLCJrdWJlcm5ldGVzLmlvL3NlcnZpY2VhY2NvdW50L3NlcnZpY2UtYWNjb3VudC51aWQiOiI5MDY4ZTU2OC05ZGQ3LTRlMmMtOGFhYi1lYzA3NWM1ODgzNTUiLCJzdWIiOiJzeXN0ZW06c2VydmljZWFjY291bnQ6Y21hbGxhbS1uczE6bXktcGs4cy1zYS1jbWFsbGFtLW5zMSJ9.m02gbbTjkrxMO8m0uhojsS3niKzhL5xWMTJgZO2XT-88w7g1esgue14FjdXhXulF7_wuavCTnp4wct9z4Gi8AhPmrU0B4voHQ8LODeC-ya74m08mVC2wBpMVrXKZ7V4KTA_CG6CD4CwME4wY_6-Jm6vT5qaTC7tilK4omYUbsUdmu0T_iDFoYM9HD3JuCfIBO_K-NAcV_EKnWhvueMbqsZ2Qs8nbeLLpp3UWx4q8xOT5j7L0uDU_DZy44ptLlryOrHyzLxF5hGw6Lss6pUwgVPKFXHXp9T8Jx6d-bu7RJUCspAGcupcI5YFp0tfjtqKpVNnGUC8cTVFih-Ea6XWxNw" https://<local-domain>:65443/api/v1/namespaces/cmallam-ns1/pods
Note: Replace the
<local-domain>with the local domain value obtained in previous step.
The following output indicates a successful response:
{
  "kind": "PodList",
  "apiVersion": "v1",
  "metadata": {
    "selfLink": "/api/v1/namespaces/cmallam-ns1/pods",
    "resourceVersion": "21798784"
  },
  "items": [
    {
      "metadata": {
        "name": "details-v1-7b9c5d77f-h74kn",
        "generateName": "details-v1-7b9c5d77f-",
        "namespace": "cmallam-ns1",
        "selfLink": "/api/v1/namespaces/cmallam-ns1/pods/details-v1-7b9c5d77f-h74kn",
        "uid": "3de07e58-ac59-4e71-91be-a90e5b70b1a5",
        "resourceVersion": "20829151",
        "creationTimestamp": "2021-06-19T07:10:22Z",
        "labels": {
          "app": "details",
          "pod-template-hash": "7b9c5d77f",
          "version": "v1"
        },
        "annotations": {
          "kubernetes.io/psp": "permissive",
          "ves.io/pod-id": "f580120a-d0b8-4502-90eb-5749c614603a"
        },

...
            "ready": true,
            "restartCount": 0,
            "image": "sha256:c814e8121ca31a152aca774724d0c3e5a2673ccd47cd1d3e6705e559896f6b8d",
            "imageID": "docker-pullable://gcr.io/volterraio/wingman@sha256:f39ab6d5cb52bf9dc538da45bd8f18cd37dba27e1d922d82f6ecf21c0dfff16a",
            "containerID": "docker://58e0a298bdc4ab76920a76ec424d59d5334dbcc48954af753ce3c918eed2a7df",
            "started": true
          }
        ],
        "qosClass": "Burstable"
      }
    }
  ]
}
Concepts
API References
On this page:
- Objective
- Prerequisites
- Create and Use Service Token in Managed K8s
- Use Service Token at Cluster Level
- Create Service Account and Obtain Service Token
- Apply Service Account to Cluster Role Binding
- Verify Cluster Role Binding and Access Using Service Token
- Use Service Token at Namespace Level
- Create and Obtain Service Token for Namespace
- Apply Service Account to Role Binding
- Verify Role Binding and Access Using Service Token
- Concepts
- API References