Deploy GPU Workload Using vK8s
Objective
This document provides instructions on how to deploy GPU application workloads using F5® Distributed Cloud vK8s. To know more about how Distributed Cloud Platform distributes application deployment, see Distributed Application Management.
The Distributed Cloud Platform supports enabling GPU capability through any of the following ways:
-
Through App Stack Site configuration: The App Stack sites can be enabled with GPU via configuration provided that the site hardware includes a GPU.
-
Through fleet configuration: Distributed Cloud sites that are part of this fleet are applied with the GPU capability provided that the site hardware includes a GPU.
The GPU applications are then deployed using the Distributed Cloud vK8s that are associated with the same virtual site as that of the fleet of sites. The following objectives can be achieved using this functionality:
- GPU with Virtual Machine (VM) where one site utilizing multiple GPUs or multi-site time-slicing with single GPU
- Partition for GPU with Nvidia support and VM on 3rd party commodity hardware such as Dell Edge R640
- GPU with F5 Volterra Industrial server (ISV) in shared mode (multiple container time-slicing single GPU) and passthrough mode (1 container to 1 GPU)
- Training and inferencing at the edge on GPU
Using the instructions provided in this guide, you can enable GPU capabilities in Distributed Cloud sites using App Stack site or Fleet configuration and deploy GPU application workloads with the kubeconfig of the vK8s object.
Prerequisites
-
An F5 Distributed Cloud Account. If you do not have an account, see Getting Started with Console.
-
A GPU application and associated Kubernetes deployment file.
-
A Distributed Cloud App Stack site with hardware that includes a GPU, or a Fleet.
-
A Kubeconfig file of the vK8s object. See the Create Virtual K8s Object guide for more details.
Configuration
Deploying GPU applications using vK8s consists of the following sequence of actions:
-
Enabling GPU capability through Fleet or App Stack site configuration. You can create a new object or edit an existing one.
-
Creating a vK8s object and associating it with virtual site selecting App Stack sites or the sites that are of the created fleet.
-
Deploying the application using the kubeconfig of the vK8s object.
Step 1: Enable GPU capability for sites.
You can enable GPU capability for a new App Stack site or new Fleet, or edit an existing site or Fleet object.
App Stack Site: Enable GPU capability in App Stack Site.
This step shows only how to enable the GPU in App Stack site configuration. For detailed information on App Stack site creation, see Site Management.
-
From the Home screen, select
Multi-Cloud Network Connect. -
Navigate to
Manage>Site Managementand selectApp Stack Sites. SelectAdd App Stack Siteand enter a name and other required fields for your site. To edit an existing site, click...>Manage Configuration>Edit Configuration. -
Go to the
Advanced Configurationsection and enable theShow Advanced Fieldsoption. -
Select
GPU Enabledoption for theEnable/Disable GPUfield.
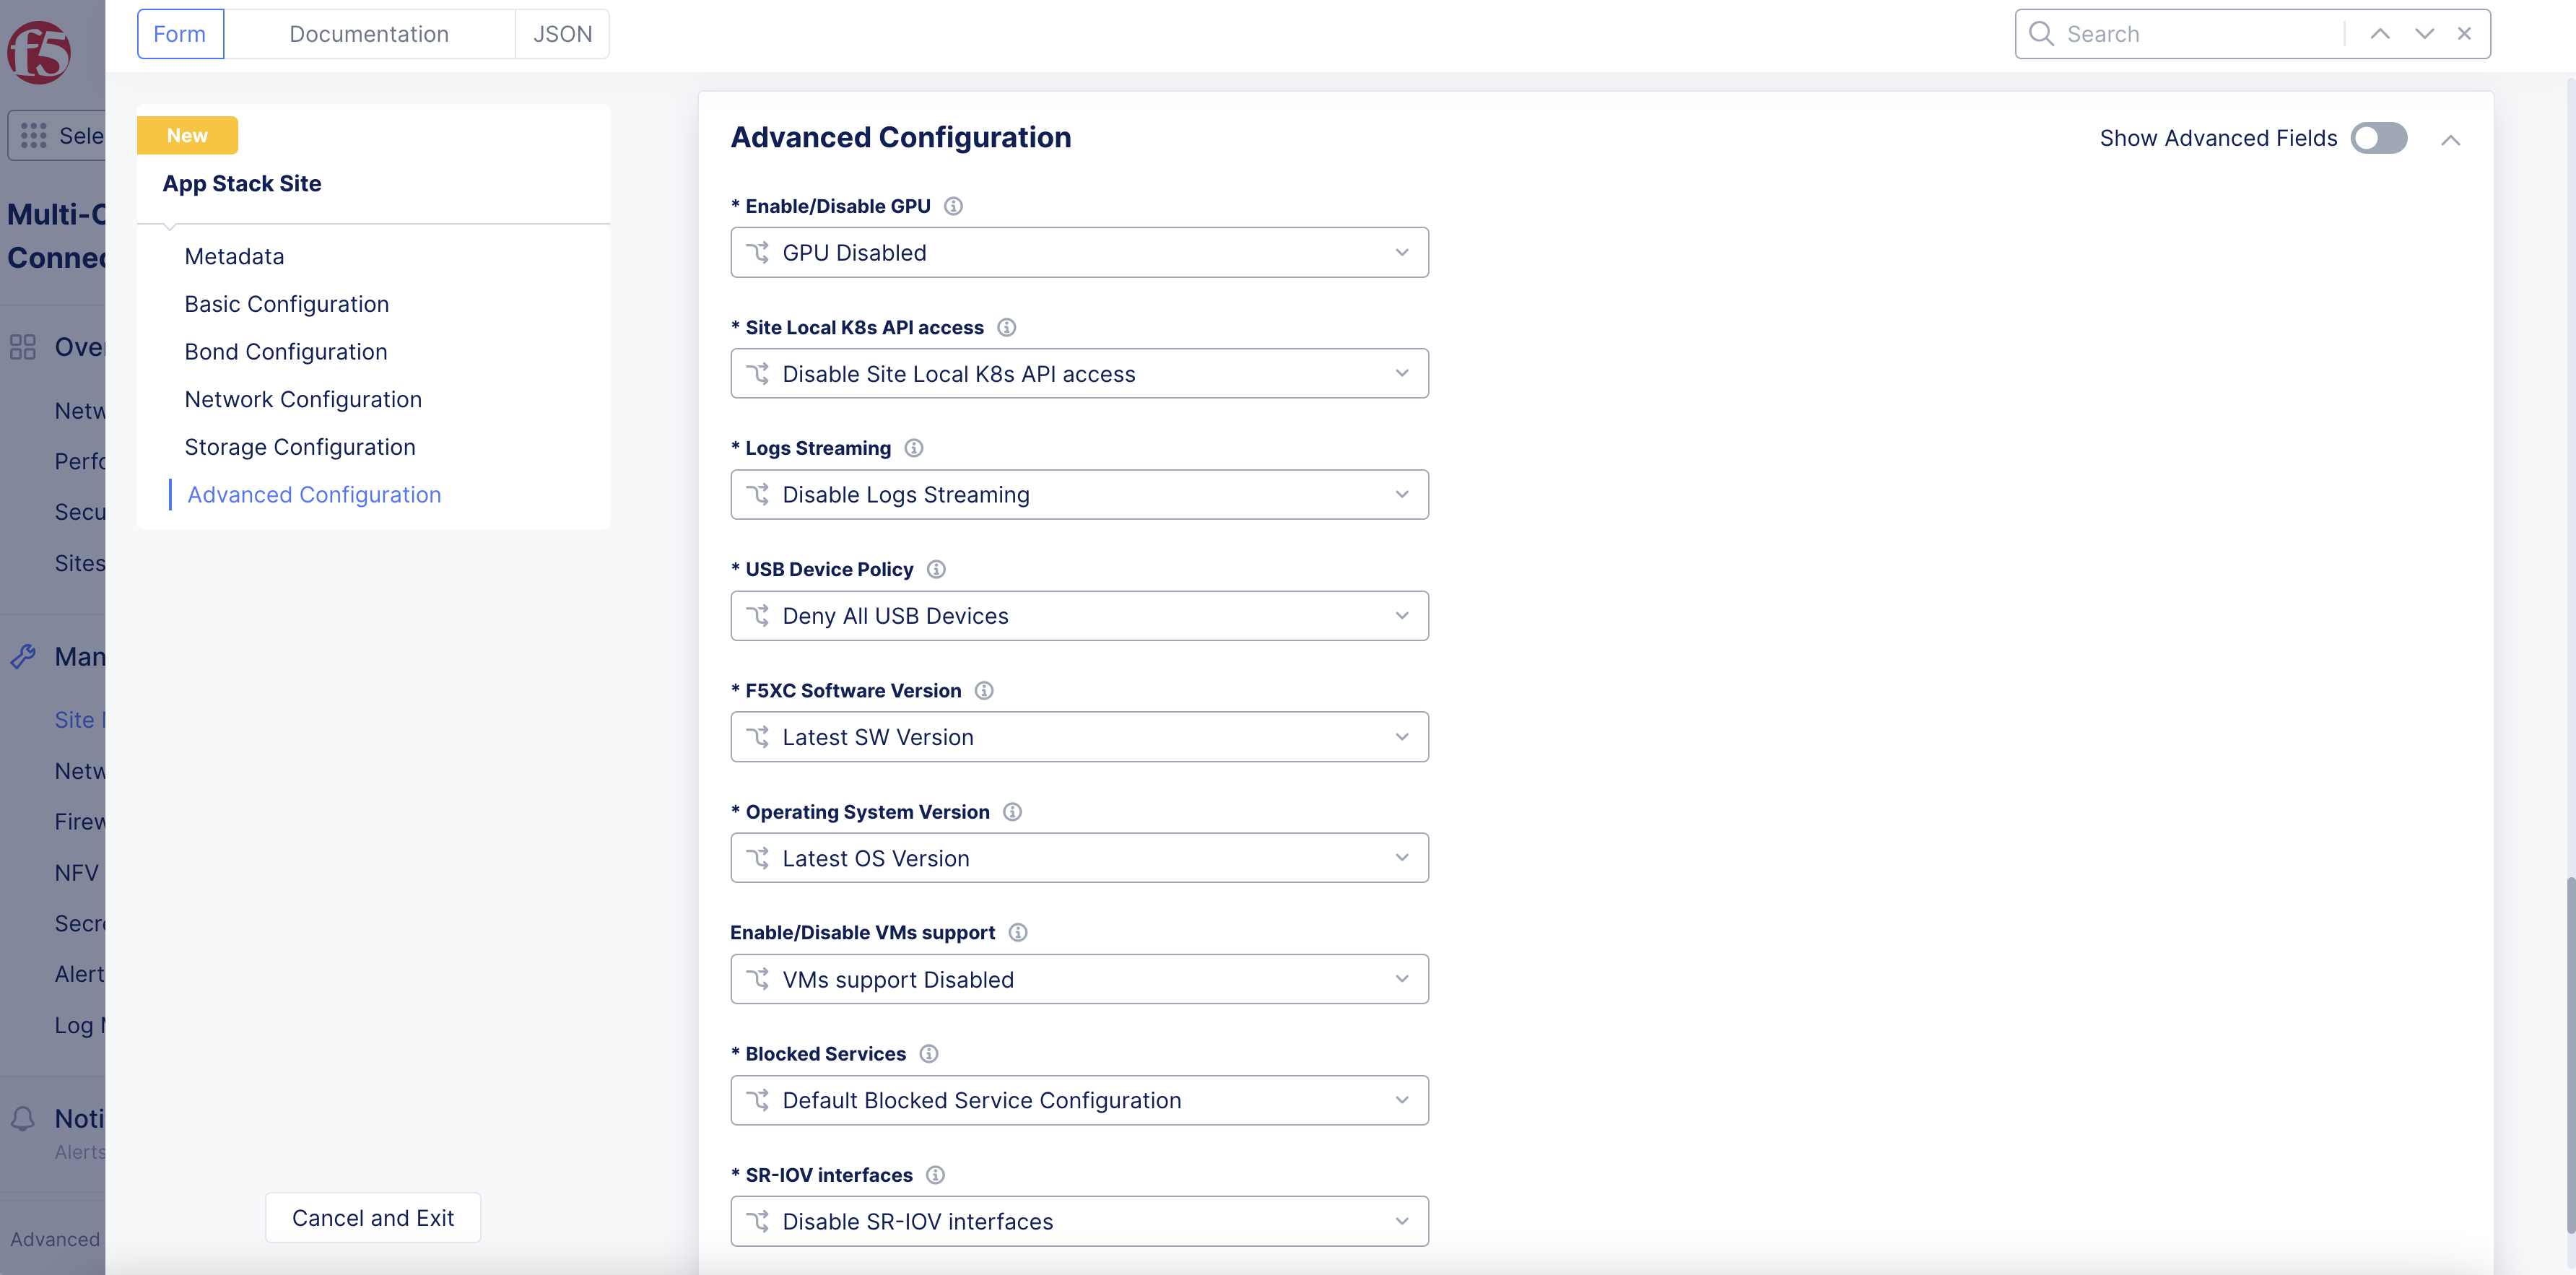
Figure: App Stack Site GPU Setting
- Select
Save and Exit.
Fleet: Enable GPU capability in Fleet.
For detailed information on Fleet configuration and operation, see Fleets and Vsites.
-
From the Home screen, select
Multi-Cloud Network Connect. -
Navigate to
Manage>Site Managementand selectFleetsfrom the options. To edit an existing Fleet, click...>Manage Configuration>Edit Configuration. -
Select
Add Fleetand enter a name for your fleet in the metadata section. -
Enter a label in the
Fleet Label Valuefield in theFleet Configurationsection. -
Go to
Advanced Configurationsection and enable theShow Advanced Fieldsoption. -
Select
GPU Enabledfor theEnable/Disable GPUfield. -
Go to
Enable Default Fleet Config Downloadsection and enable theShow Advanced Fieldsoption. -
Select the
Enable Default Fleet Config Downloadcheckbox.
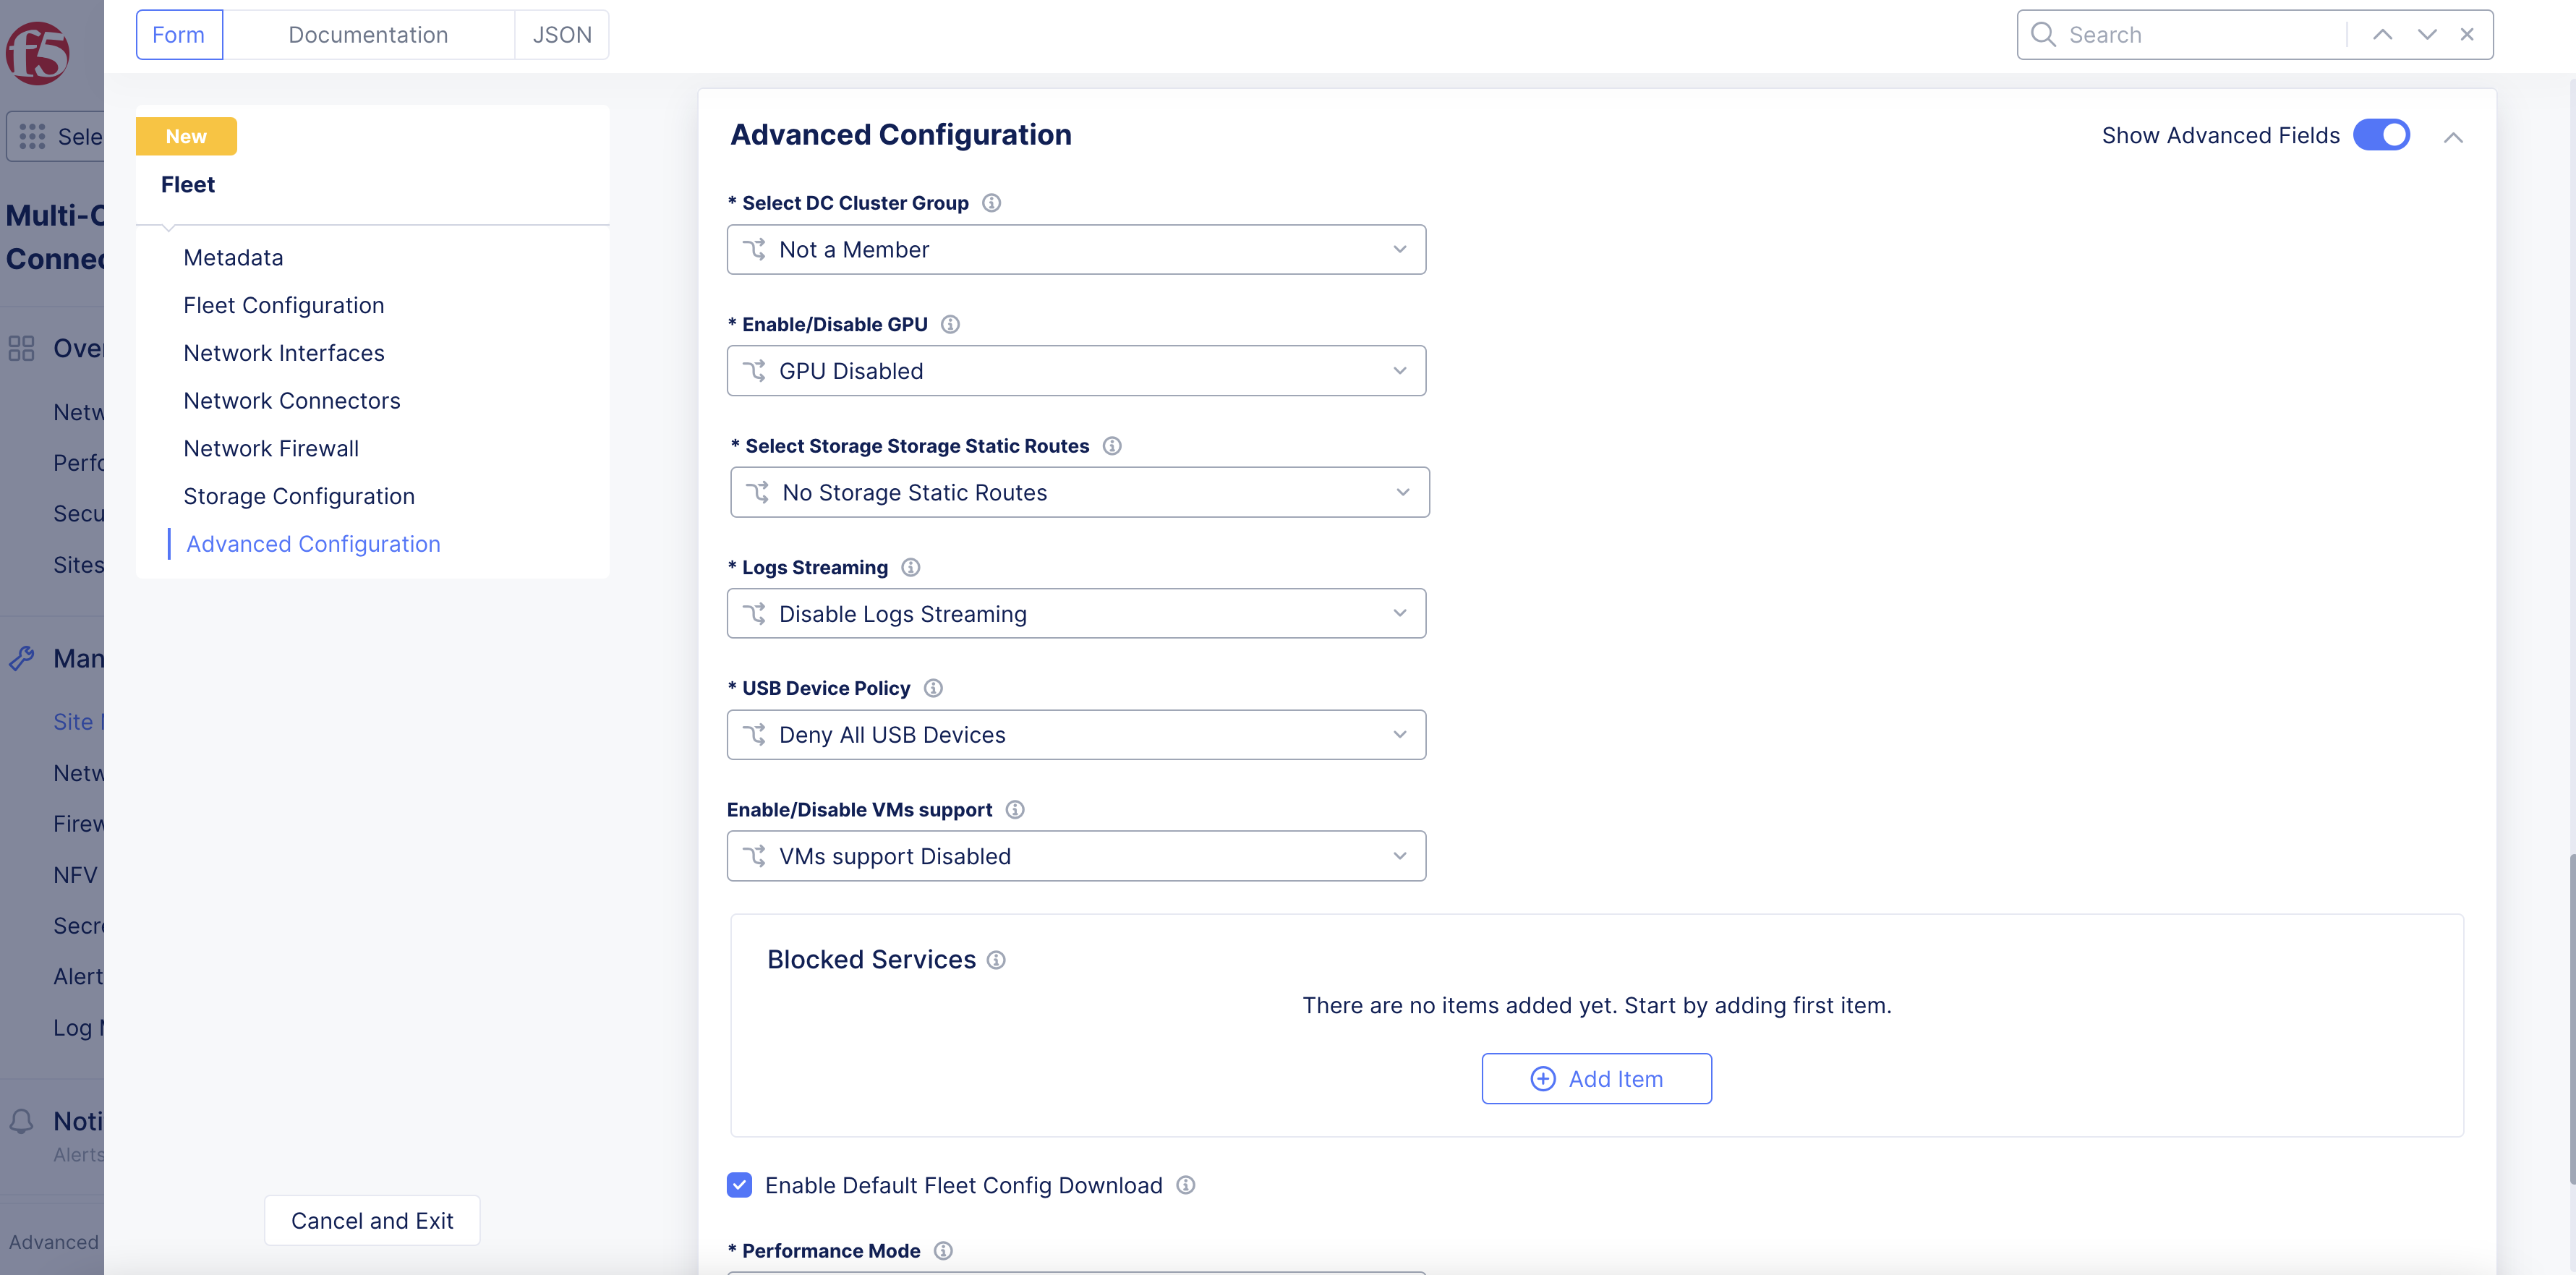
Figure: Fleet Configuration Enabled with GPU
- Select
Save and Exitto create the fleet.
Step 2: Apply fleet label to the sites in case GPU is enabled using fleet.
For detailed instructions on fleets, see Create Fleet document.
-
In the
Multi-Cloud Network Connectworkspace, navigate toManage>Site Managementand select the option (AWS VPC Sites,AWS TGW Sites,GCP VPC Sites, orApp Stack Sites) that applies to the site where you want to deploy the GPU application. -
For that site, select
...>Edit. -
Select the
Labelsfield and then selectves.io/fleetfrom the list of keys and assign the value created in the previous step. -
Select
Save and Exit. -
Repeat the above steps for all the sites of your choice.
Note: In case you apply a fleet label to a site which does not have hardware support for GPU, the GPU applications do not get deployed on that site.
Step 3: Navigate to your vK8s object and download its kubeconfig.
Note: Ensure that the vK8s object is associated with virtual site that groups all the App Stack sites enabled with GPU or sites that are part of the fleet created in previous steps.
-
From the Home screen, select
Distributed AppsunderAll workspaces. -
Select your application namespace from the namespace dropdown list to change to that namespace.
-
Select
Applicationsin the configuration menu andVirtual K8sin the options pane. -
Select
...>Kubeconfigfor the created vK8s object to download its kubeconfig file. -
Enter an expiration date for the credential and select
download Credential. -
Set environment variable for the downloaded kubeconfig in your local machine.
export KUBECONFIG=<vK8s-kubeconfig>
Note: In case of deployment using kubectl, setting
KUBECONFIGvariable deploys the resources to the vK8s.
Step 4: Deploy the workload to the vK8s.
You can deploy the application workload from Console or using Kubectl. This example shows deploying using Kubectl.
- Create a file in your local machine and enter the GPU application manifest in JSON or YAML format. Ensure that the manifest resources should specify that a GPU is required. See the following resources sample for NVIDIA GPU:
spec:
containers:
- name: nvidia-pytorch
image: "nvcr.io/nvidia/pytorch:18.05-py3"
resources:
requests:
nvidia.com/gpu: 1
- Deploy the workload using the application manifest file and the kubeconfig downloaded in previous step. Use the following sample command:
kubectl apply -f k8s-app-manifest.yaml --kubeconfig vk8s-kubecfg.yaml
Note: In case of continuous use of GPU such as video monitoring applications, it is recommended to use Kubernetes deployment. In other cases, it is recommended to use a Kubernetes job so that the GPU is released after the task is completed.
Step 5: Verify that the deployment is utilizing the GPU.
You can verify that the sites are enabled with GPU and the application processes are consuming the enabled GPU resources.
- Log into your node and check the GPU processes. This example shows command to monitor the GPU devices of Nvidia EGX.
nvidia-smi
Note: The
nvidia-smicommand displays the information on the GPU devices and the running processes for that GPU.
- Log into Console and navigate to the
Sites>Site Listpage. Select a site that is part of the fleet you created. This opens the site dashboard. Select theNodestab and then select a node to open its dashboard. SelectMetricsto monitor the GPU usage, GPU temperature, and GPU throughput metrics.