Blindfold TLS Certificates
Objective
This document provides instructions on how to encrypt your TLS certificates using F5® Distributed Cloud Blindfold. This ensures additional security measures for the certificates stored in F5 Distributed Cloud Platform. To know more about Blindfold and secrets management, see Blindfold.
Note: Distributed Cloud Platform supports blindfolding the secrets directly in Console. Use the instructions provided in this document only in the case you want to apply Blindfold to your certificates Offline.
The following image illustrates the sequence of actions performed in securing the certificates.
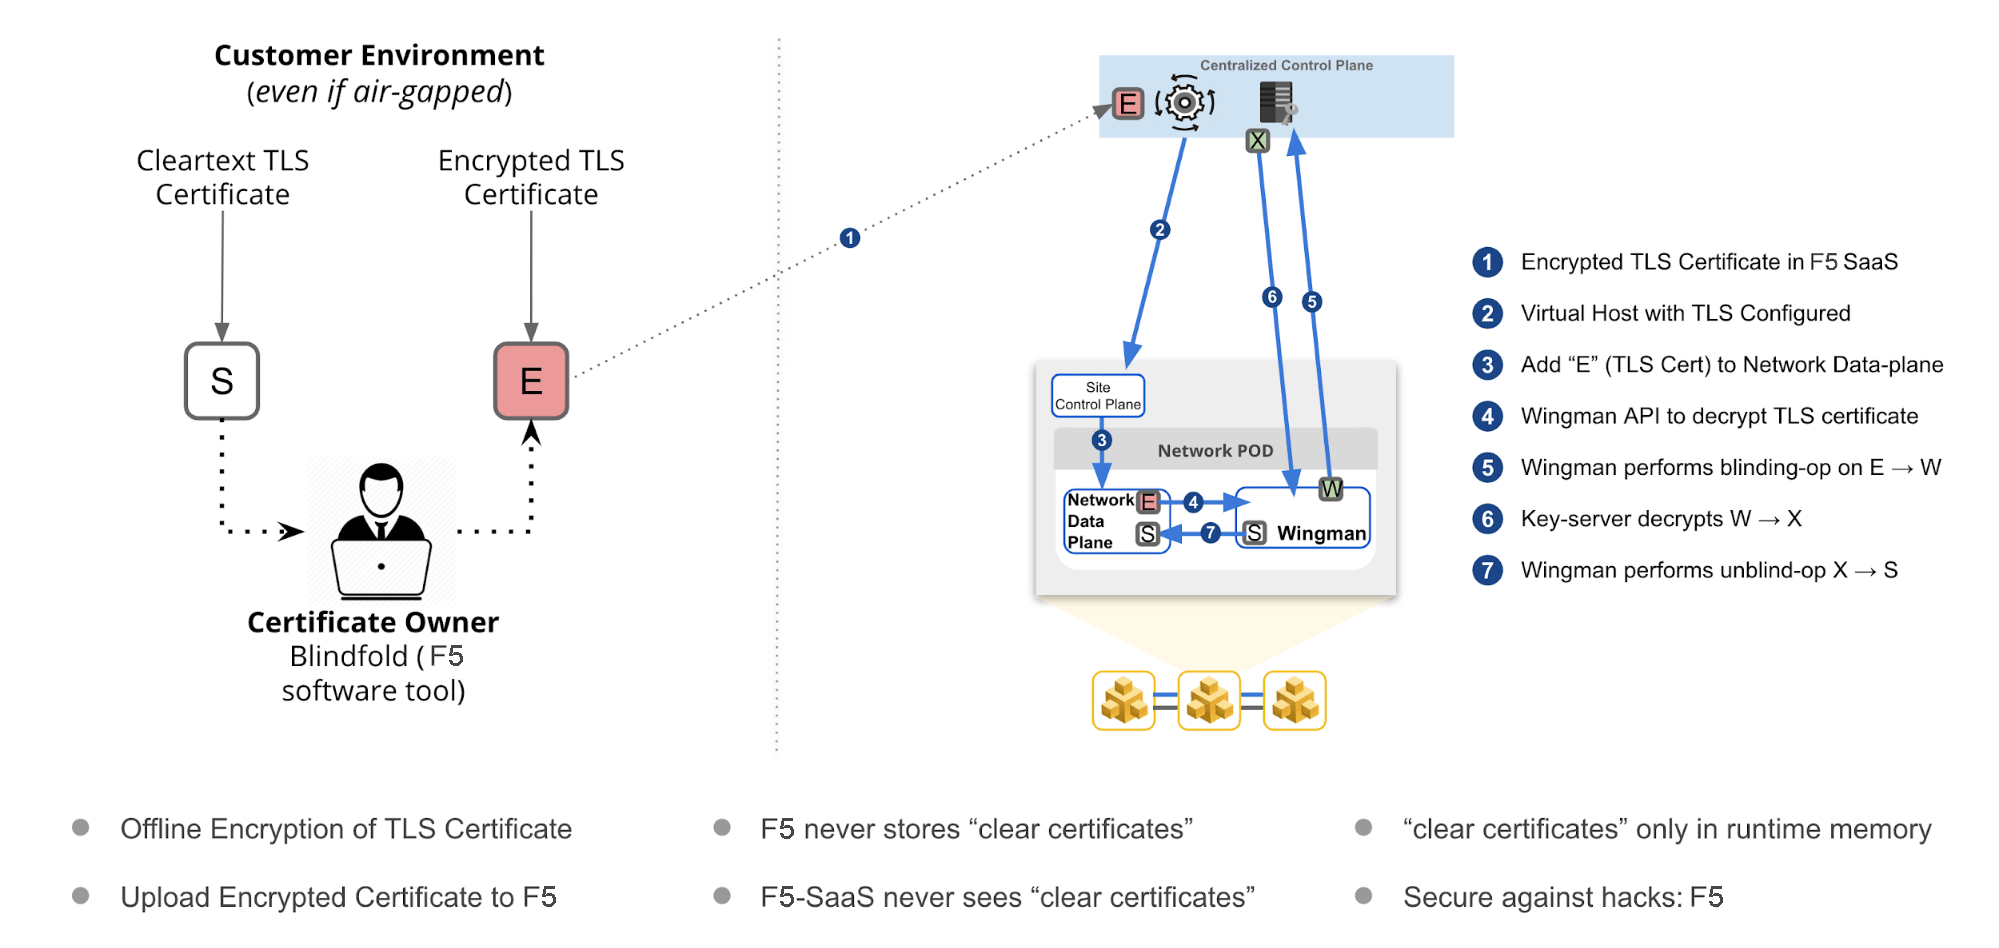
Figure: F5 Distributed Cloud Blindfold
Using the instructions provided in this guide, you can encrypt TLS certificate with Blindfold and apply it to a virtual host.
Prerequisites
The following prerequisites apply:
-
An F5 Distributed Cloud Account. If you do not have an account, see Getting Started with Console.
-
A virtual host with a signed TLS certificate. If you do not have a virtual host, see Create and Advertise Virtual Host.
-
The vesctl tool. Download vesctl on your local machine as it is used to apply Blindfold to the TLS certificate.
-
Optionally, one or more cloud or edge locations with a Distributed Cloud site. Install the Distributed Cloud node or cluster image in your cloud or edge location. See Site Management guides for more information.
-
A minimum of monitor role in the Shared namespace is required.
Configuration
The following image shows the configuration sequence of applying Blindfold encryption to your TLS certificate.
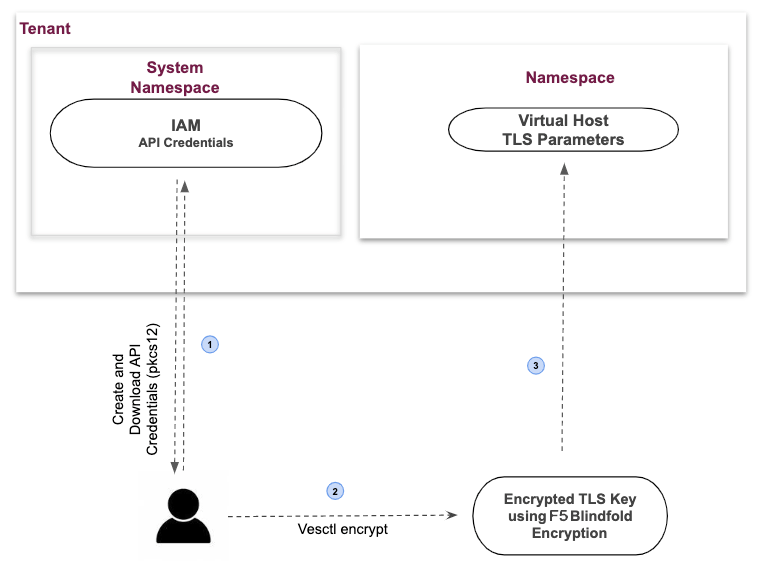
Figure: Encrypting TLS-Key using Blindfold
Configuration Sequence
Applying Blindfold to the certificates of your WebApp includes performing the following sequence of actions:
| Phase | Description |
|---|---|
| Create a Secret Policy | Create a policy to permit F5 Distributed Cloud Wingman and data plane to access the TLS certificate. |
| Prepare Credentials and Policy | Retrieve API credentials from Console, derive certificates, derive keys, and obtain policy. |
| Encrypt TLS Certificate | Perform the encryption on a local computer. F5 recommends you use an air-gapped computer. |
| Enable TLS on a Load Balancer | Update the load balancer configuration with the TLS certificate and key encrypted with Blindfold. |
Note: The API credentials are required to be downloaded in PKCS #12 file format.
Create a Custom Secret Policy
The secret policy allows Wingman and Distributed Cloud data plane access to the TLS certificate. In many cases, you can use the default ves-io-allow-volterra policy. Use the following instructions, if you need to create a custom secret policy.
-
Log into Distributed Cloud Console. From the homepage, select Multi-Cloud Network Connect.
-
From the Multi-Cloud Network Connect navigation menu, select Manage > Secrets > Secret Policies.
-
Select Add Secret Policy to see the new secret policy form.
-
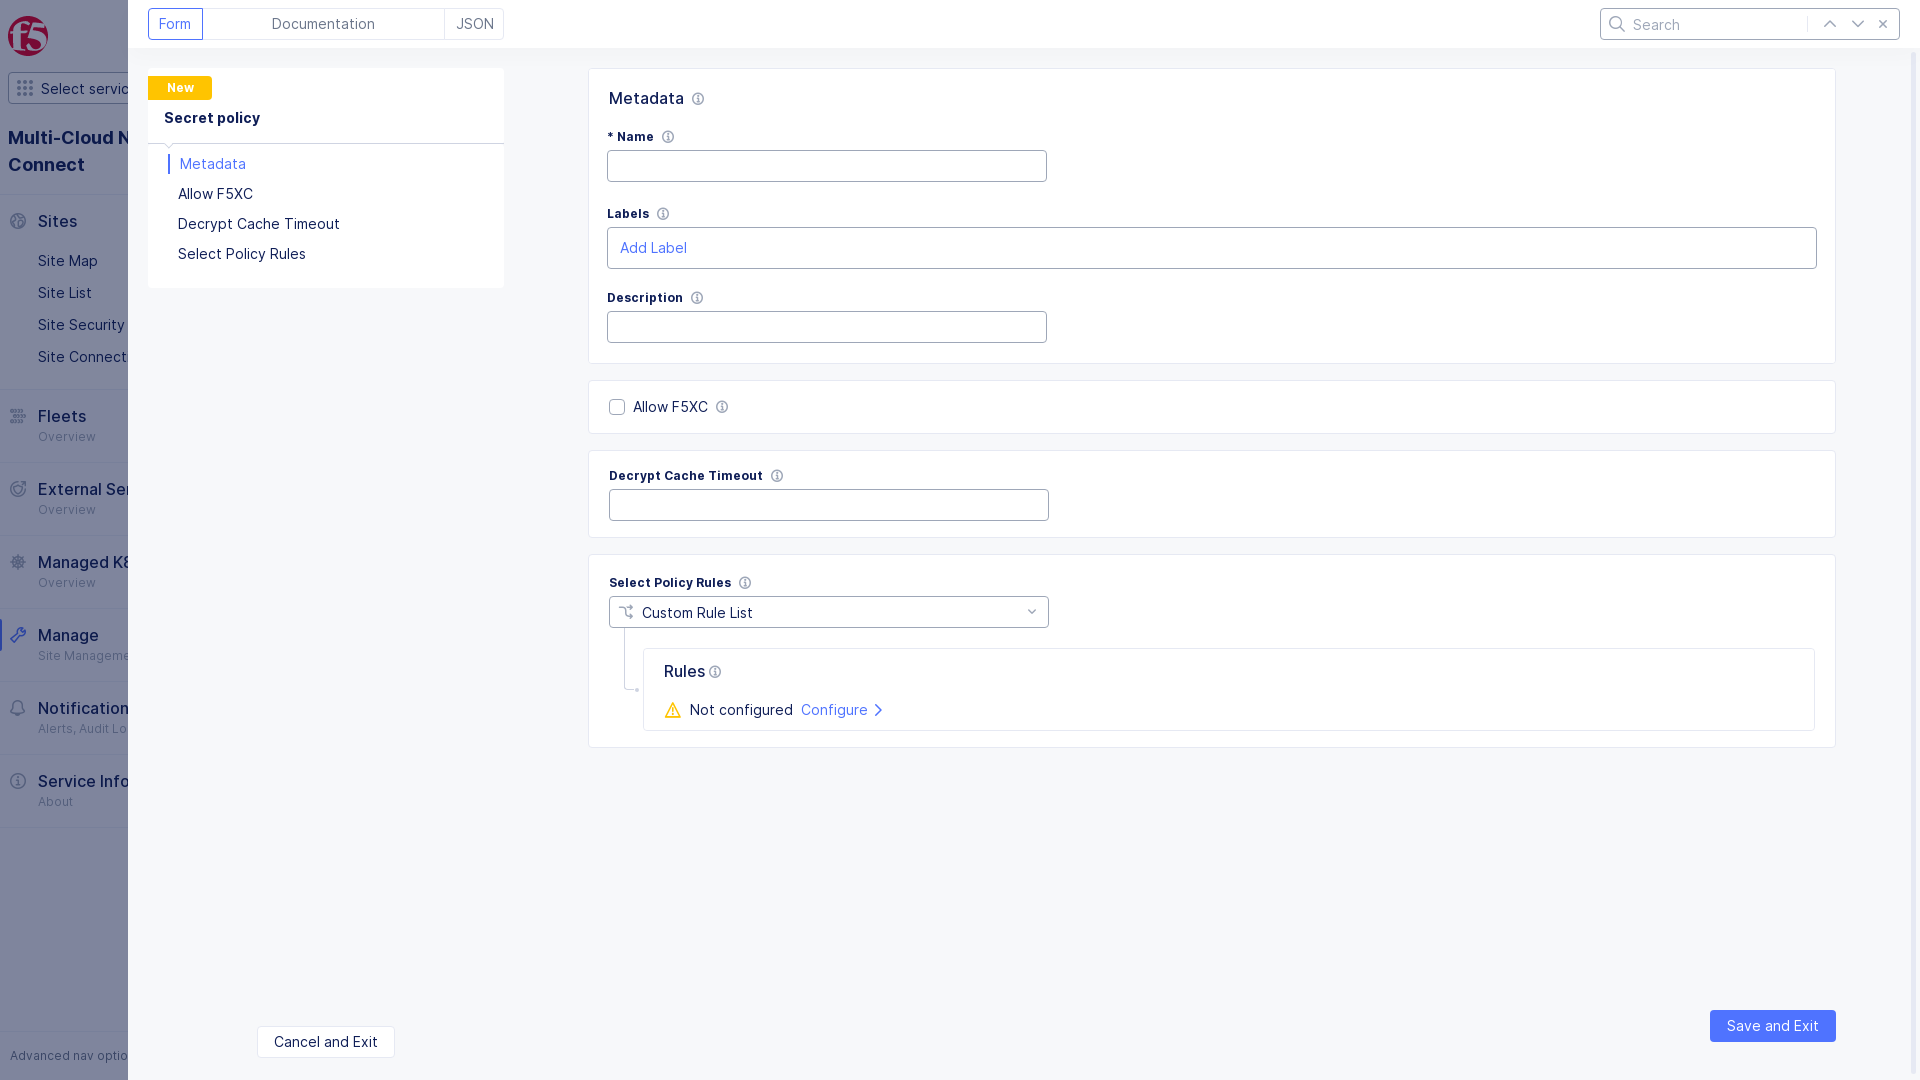
Enter a Name and Description to identify your new secret policy.
-
To allow the data plane to decrypt an encrypted TLS private key, select Allow F5XC.
-
To limit the time a decrypted secret is cached in Wingman, enter Decrypt Cache Timeout. Enter a value in seconds (s), minutes (m) or hours (h). For example, enter 20s, 20m or 20h.

Figure: Secret Policy Metadata
-
From the Select Policy Rules section, select Custom Rule List. Then select Configure and select Add item.
-
Enter a unique Name and Description for the new rule.
-
From the Action drop-down menu, select Allow or Deny determines how to react to a request if all the predicates evaluate to true for clients (requests and users).
-
In the Client Selection section, specify the clients that are affected by this rule:
- Group of Clients by Name: List of client names for which the rule applies. You can specify client names using Exact Values, Regex Values or both. Select Add item and enter client names as exact values or regular expressions (Regex).
- Group of Clients by Label Selector: Specifies the labels associated with the clients to which the rule applies. To add labels:
- In the Selector Expression field, select Add Label.
- Select a key from the displayed options. Or type a custom key name and click Assign a Custom Key.
- Select an operator from the list.
- Select an available value from the list. Or type a custom value and select Assign a Custom Value.
- Select Apply.
-
When you finish, select Apply.
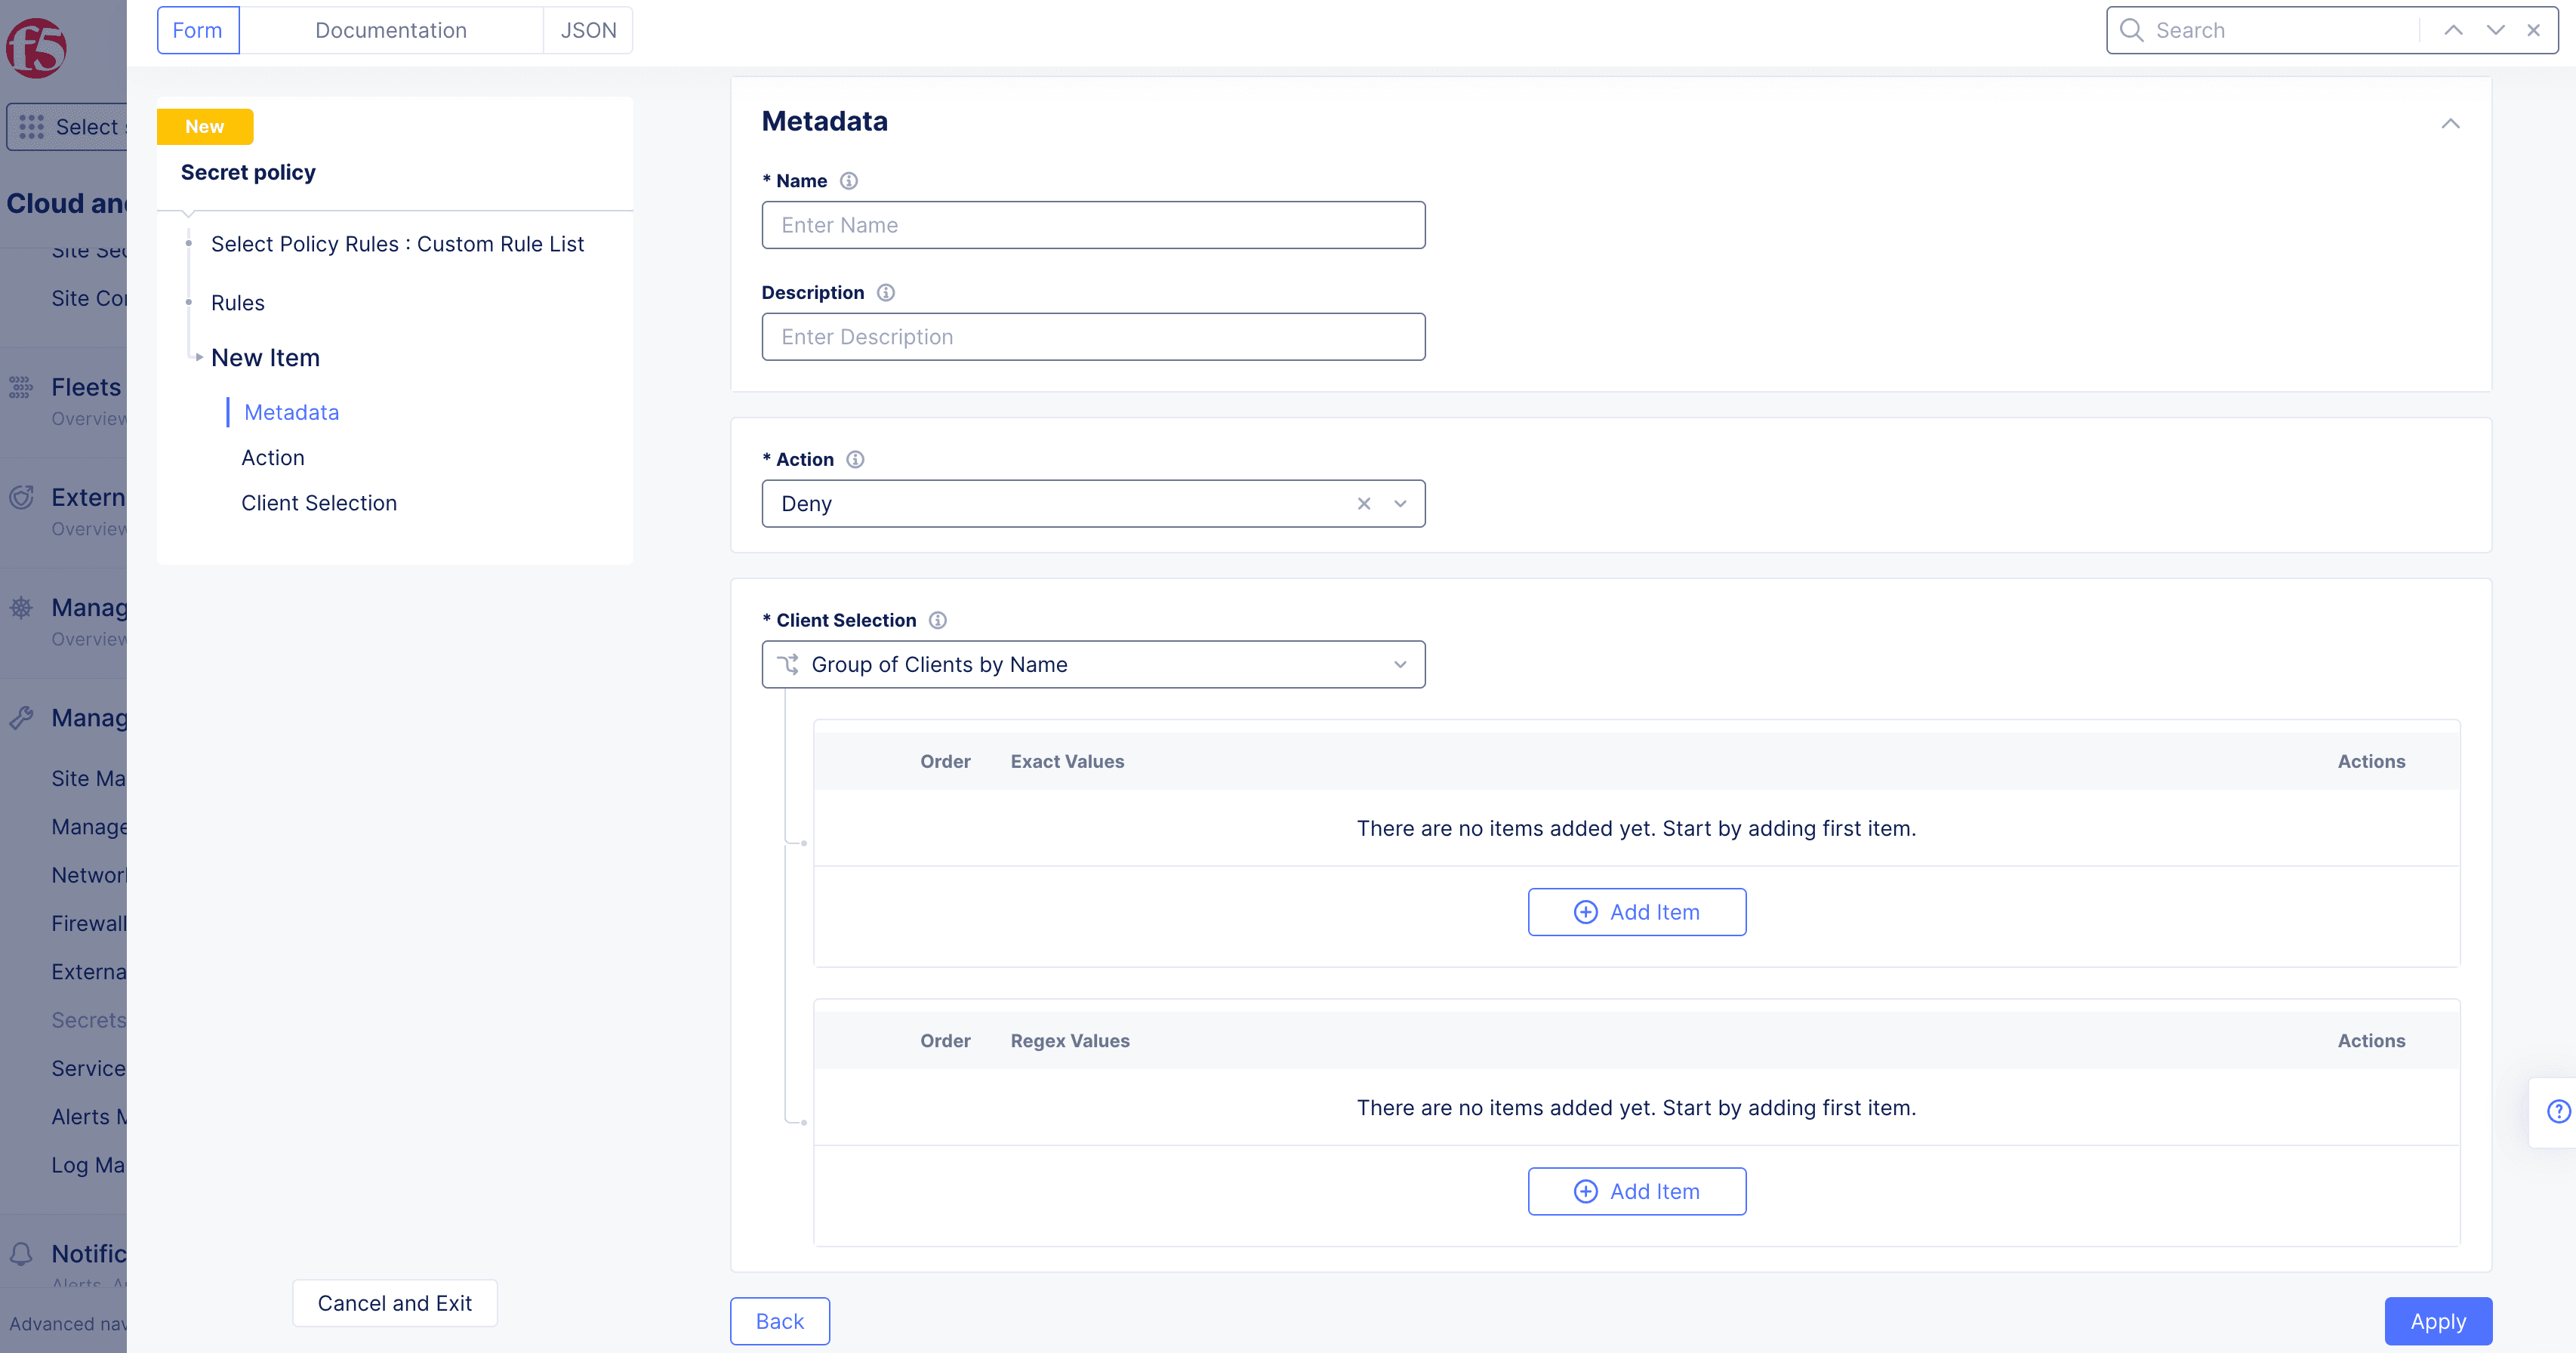
Figure: Secret Policy Action
-
Select Apply to save the custom rule list, and then select Save Secret Policy.

Prepare Credentials and Policy
-
Create an API certificate using the instructions in the Credentials guide.
-
Download the API certificate in PKCS #12 (P12) format.
-
Create a file named .vesconfig and add the P12 certificate bundle and the tenant server URLs to the file.
-
Set the environment for the P12 password. Enter the following command:
export VES_P12_PASSWORD=<p12 password>Note: The password for the P12 file is set during the generation of API certificate.
-
Obtain a public key using vesctl and store the output to a file.
This example stores the output to a file named demo-api-pubkey.
vesctl request secrets get-public-key > demo-api-pubkey -
Obtain a policy-document using vesctl and store the output to a file.
This example stores the output to a file named demo-api-policy. You can use the in-built policy or the policy created in the previous section. This example uses the in-built ves-io-allow-volterra policy.
vesctl request secrets get-policy-document --namespace shared --name ves-io-allow-volterra > demo-api-policy
Enable TLS on a Load Balancer
The following steps explain how to cut and paste a blindfolded (or non-blindfolded) TLS certificate into your load balancer.
-
Use vesctl and Blindfold to encrypt a TLS Key.
This example stores the output to a file named bl-enckey.
vesctl request secrets encrypt --policy-document demo-api-policy --public-key demo-api-pubkey key.pem > bl-enckeyNote: Provide the public key and policy document obtained in the Prepare Credentials and Policy section. The key.pem is the TLS key to be encrypted. Save the encrypted TLS Key for future use. You need the encrypted key when you add your TLS key.
-
Log into the Distributed Cloud Console. From the Homepage, select Web App & API Protection.
-
Select your namespace from the Namespace drop-down menu.
-
Select Manage > Load Balancers > HTTP Load Balancers.
-
From the Actions column, select the Action menu (...) for your load balancer.
-
Select Manage Configuration, and then select Edit Configuration.
-
In the Domains and LB Type section, from the Load Balancer Type drop-down menu, select HTTPS with Custom Certificate.
-
Optionally, select HTTP Redirect to HTTPS and Add HSTS Header checkboxes.
-
From the Listen Port drop-down menu, select between using a single port or a range of ports, and then enter the port numbers. For a range of ports, enter a list of non-overlapping port ranges with a maximum of 64 ports in the list, for example, 443,100-120,8080,9080-9089.
-
From the TLS Configuration drop-down menu, select TLS Certificates, and then select Configure.
-
From the TLS Security Level drop-down menu, select the desired level.
-
From the Certificates drop-down menu, select Add Item.
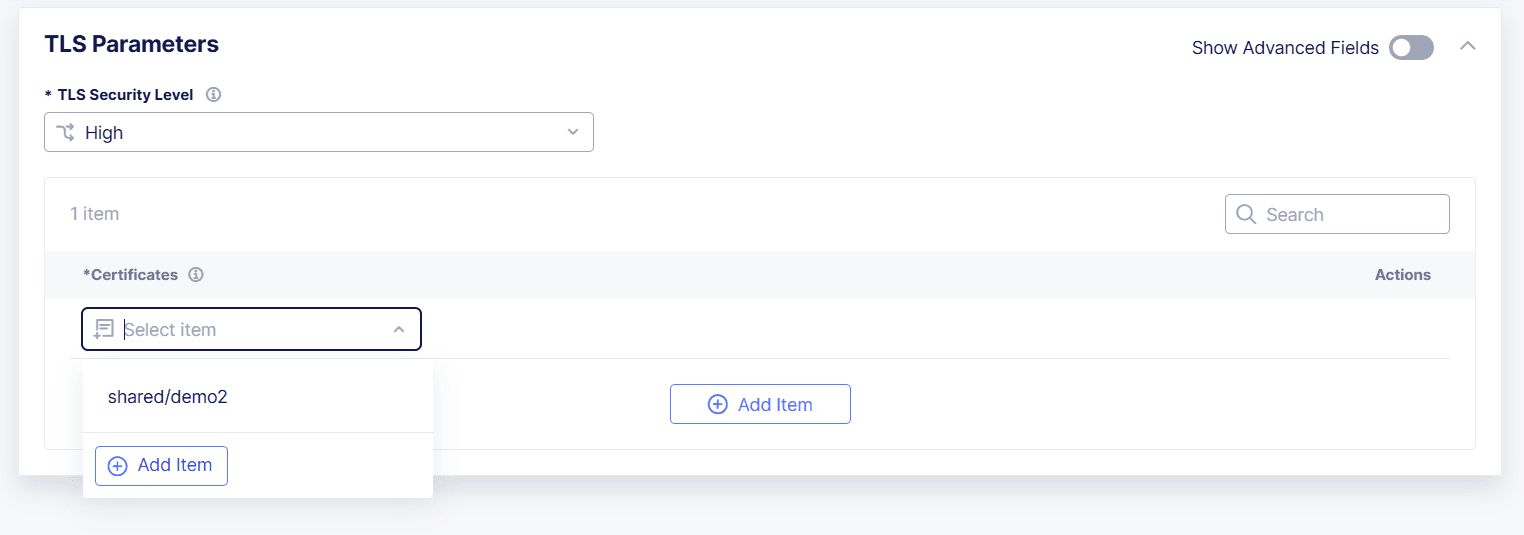
Figure: Add New TLS Certificate
- Enter a Name to identify the new certificate.
- Select the JSON tab above the form. This shows your TLS certificate and associated information in a JSON editor. It is empty, except for any metadata you may have entered in the form.
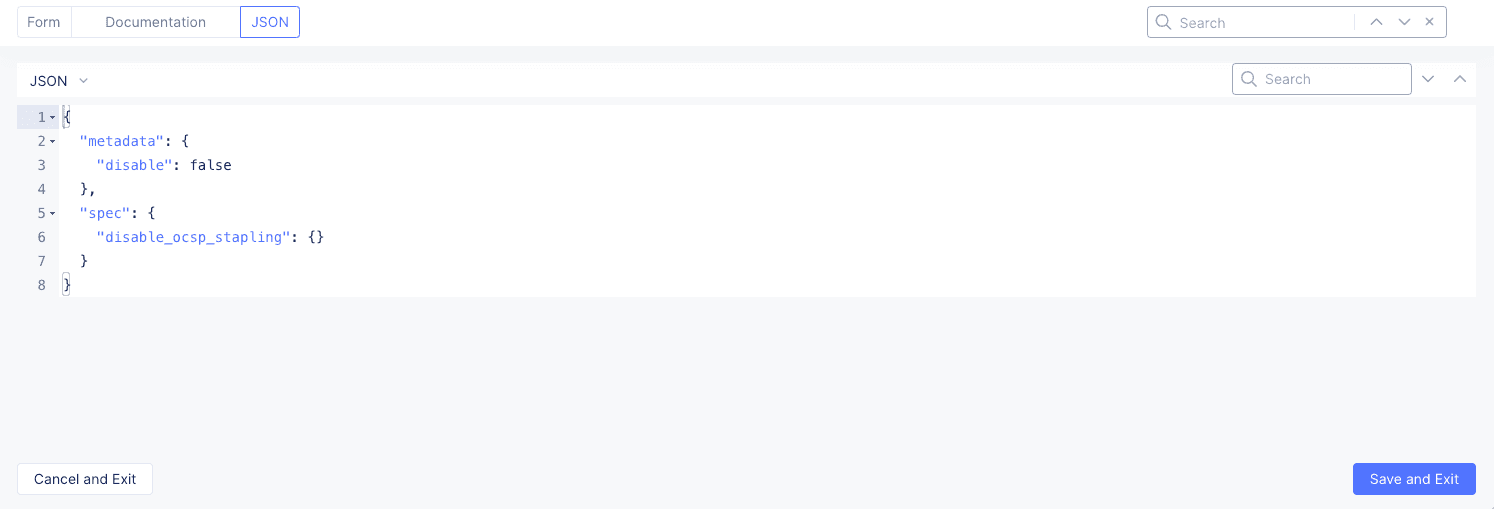
Figure: Empty TLS Certificate JSON
-
Use one of the following methods to add your certificate and private key to the JSON based on the type of certificate/key you want to enter.
- Certificate and non-blindfolded private key
- Certificate and blindfolded private key
Add a certificate and non-blindfolded private key
-
To add a certificate and non-blindfolded private key, paste the following JSON template into the JSON editor.
Important: When you use this method, you paste your private key in the clear. It is not blindfolded (encrypted). Base64 encoding is not encryption.
{"metadata": {"name": "certificate-name","namespace": "my-namespace"},"spec": {"disable_ocsp_stapling": {},"certificate_url": "string:///<base64 encoded certificate>","private_key": {"clear_secret_info": {"url": "string:///<base64 encoded private key>"}}}} -
Use https://www.base64encode.org/ or equivalent method to encode your certificate and private key.
-
Paste your encoded certificate text into the
certificate_urlkey following the three slashes. Replace<base64 encoded certificate>with your encoded certificate text. -
Repeat this process for your private key. For the private key, replace
<base64 encoded private key>with your encoded private key text. -
Select the Form tab to return to the TLS Certificate form.
Add a certificate and blindfolded private key
-
To add a certificate and blindfolded private key, paste the following JSON template into the JSON editor.
{"metadata": {"name": "certificate-name","namespace": "my-namespace"},"spec": {"disable_ocsp_stapling": {},"certificate_url": "string:///<certificate>","private_key": {"blindfold_secret_info": {"location": "string:///<blindfolded private key>"}}}} -
Paste your certificate into the certificate_url key following the three slashes. Replace
<certificate>with your certificate text. -
Repeat the process for the private key. Replace
<blindfolded private key>with your blindfolded private key text. -
Once your certificate and key are in the
specsection, make sure that the name and namespace values are correct in themetadatasection. The namespace value must match your selected namespace. -
Select the Form tab to return to the TLS Certificate form.
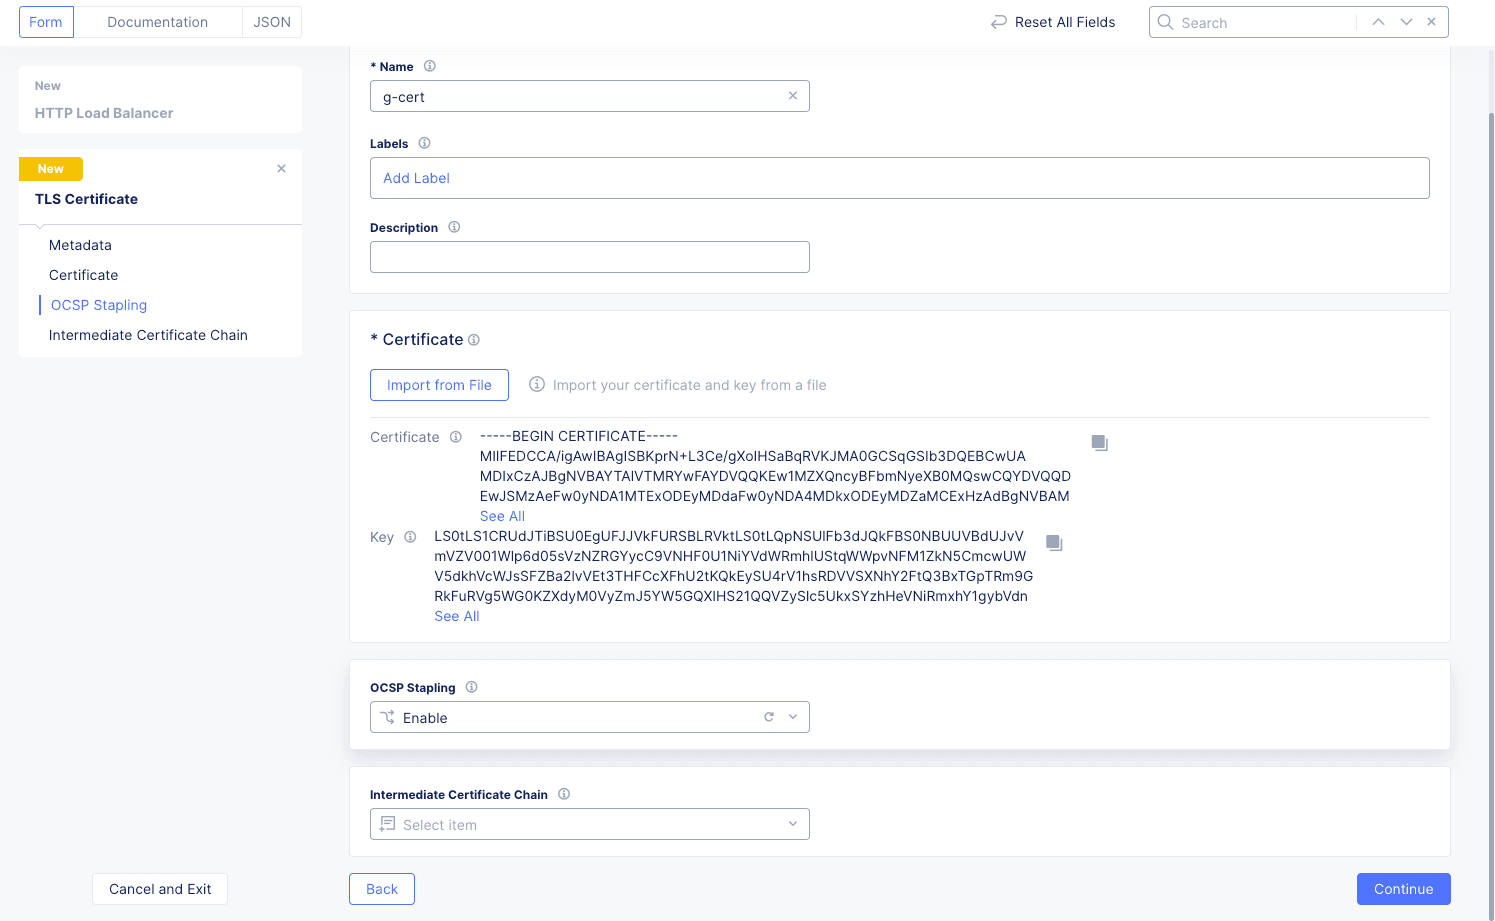
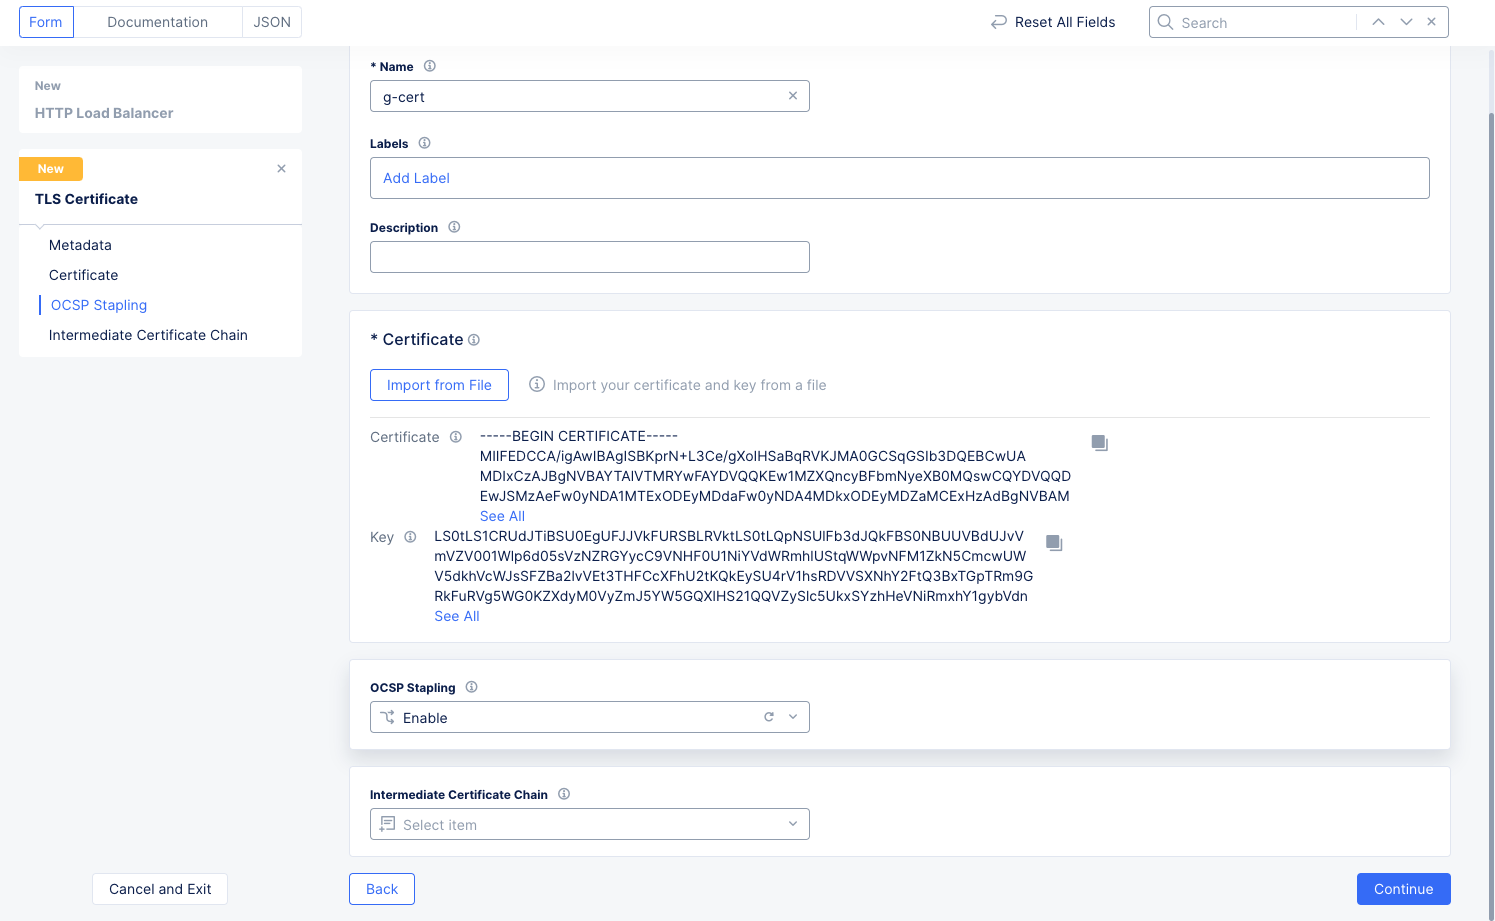
Figure: TLS Certificate Added
-
-
Select an OCSP Stapling option, and then select Add TLS Certifcate to create your certificate.
-
From the Certificates drop-down menu, select your new certificate, and then select Apply. Select Add Item to optionally add additional TLS certificates.
-
Select Save HTTP Load Balancer to save your HTTP load balancer updates.