Account Protection
Objective
This guide provides instructions on how to use F5 Distributed Cloud Account Protection.
Prerequisites
- You must have a valid F5 Distributed Cloud Services Account. If you do not have an account, see Getting Started with Distributed Cloud Console.
- Account Protection should be enabled by an F5 Account Protection Manager.
- Your enterprise must be integrated with F5 Distributed Cloud Account Protection.
Accessing Account Protection
To access Account Protection in F5 Distributed Cloud Console:
Step 1: In the F5 Distributed Cloud Console Home Page, click Account Protection.
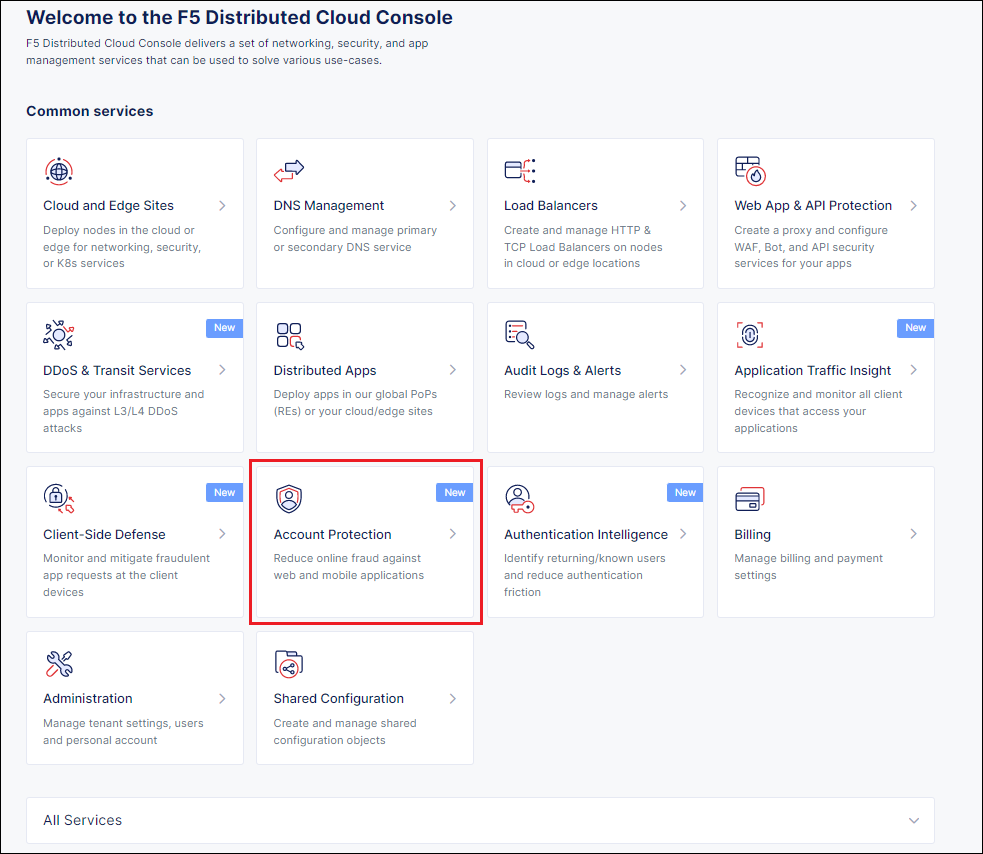
Figure: Select Account Protection
The Analyst Station dashboard is displayed.
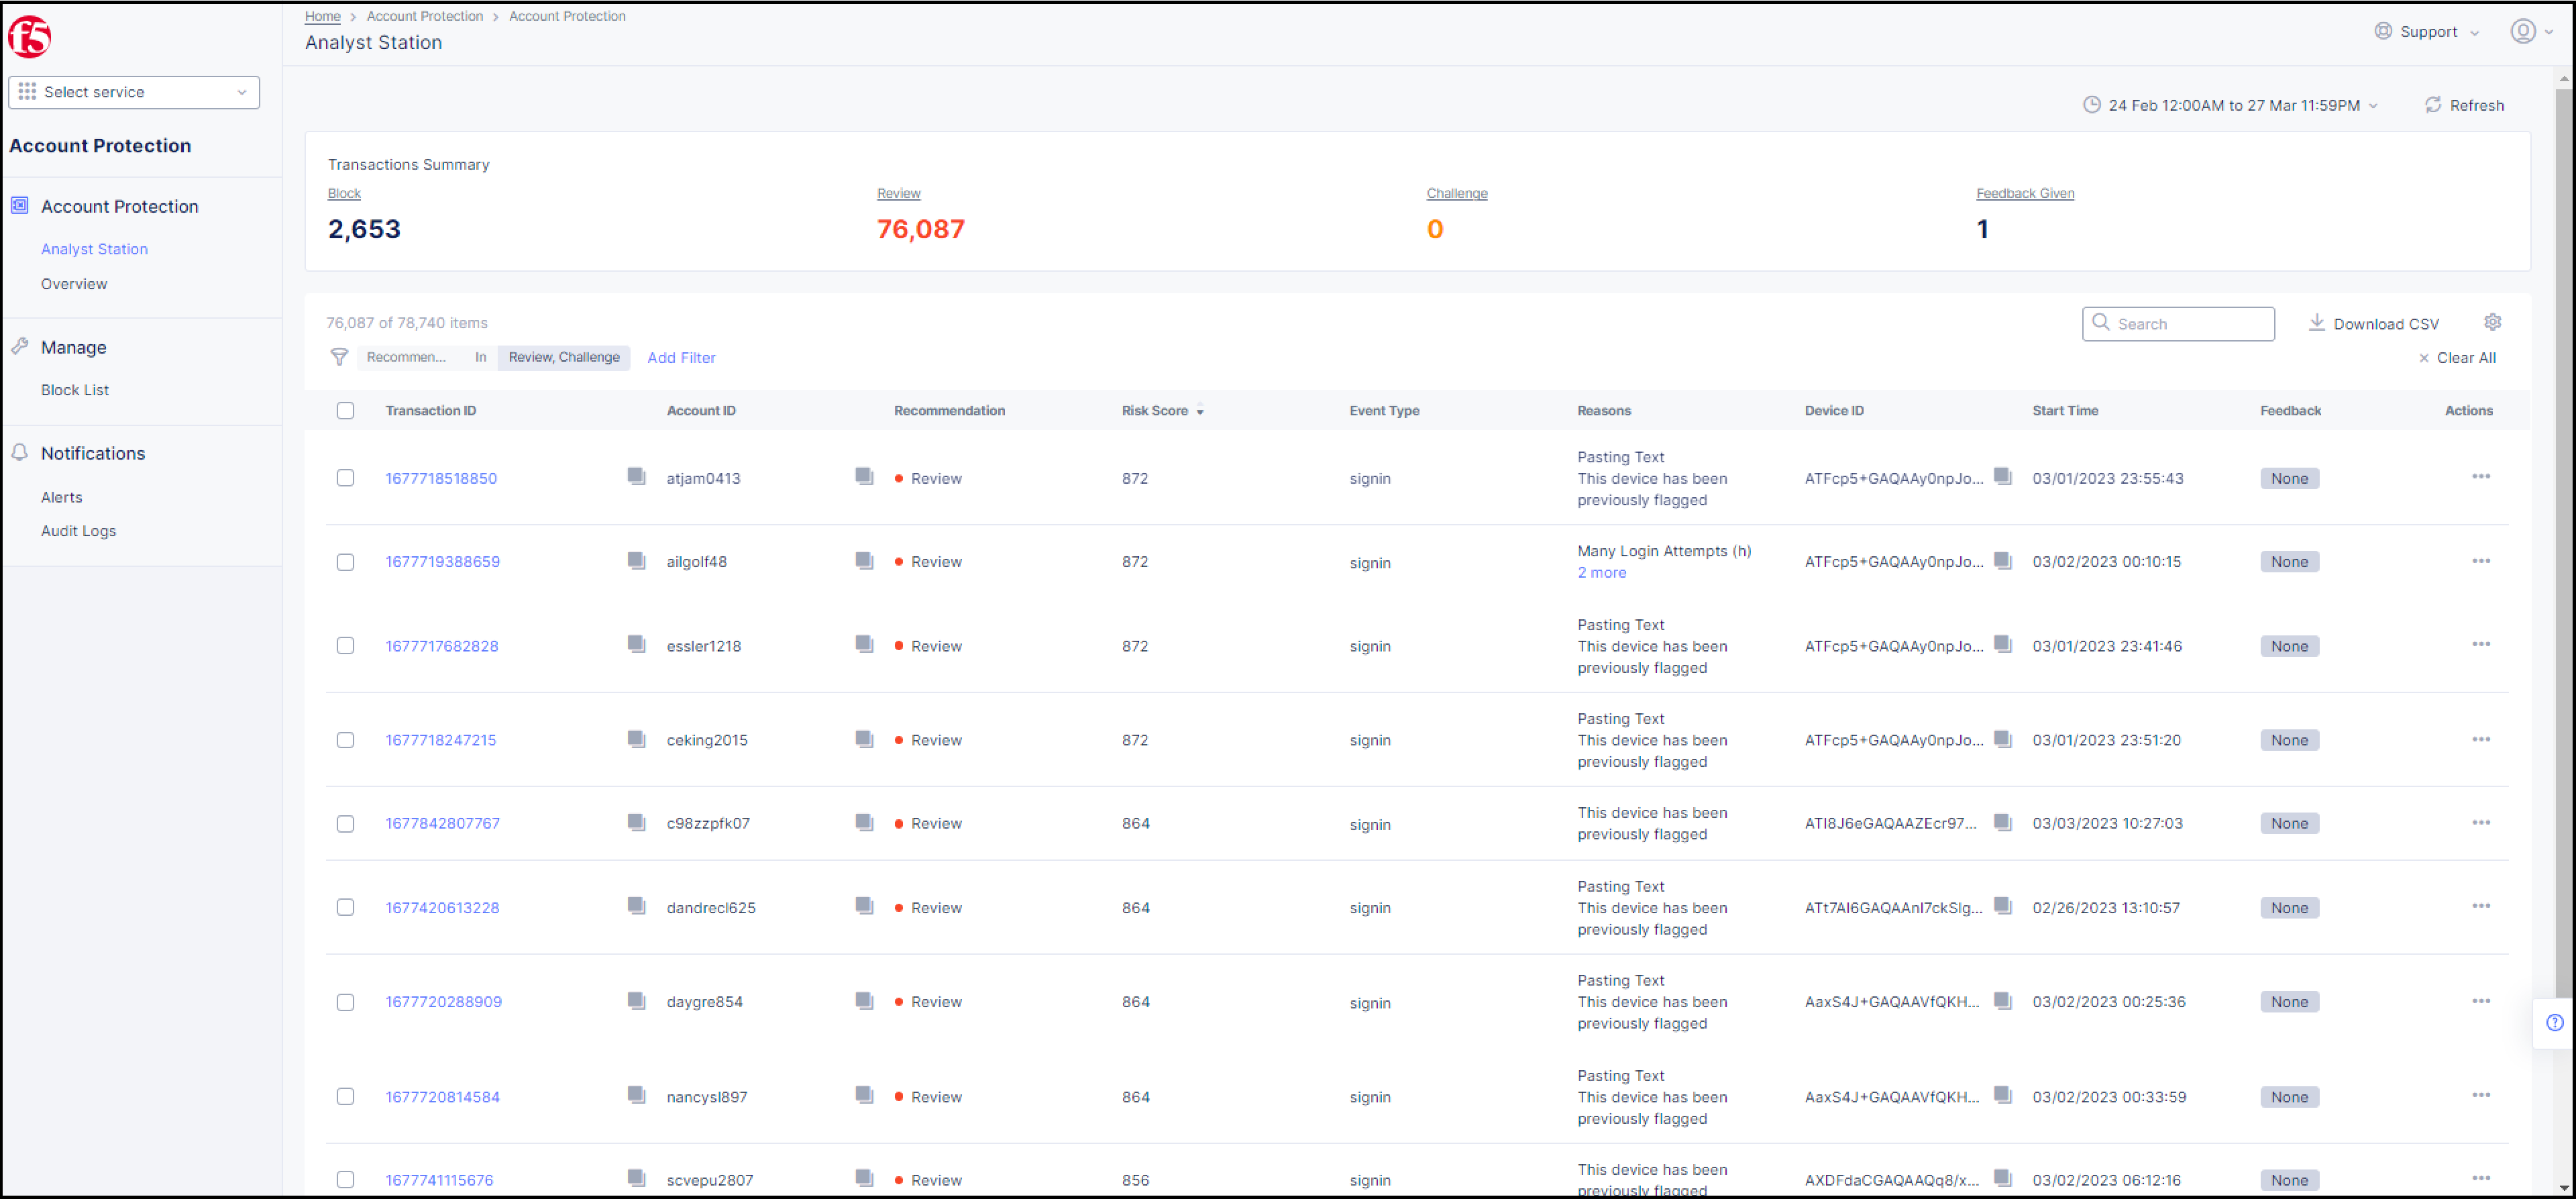
Figure: Analyst Station Dashboard
By default, the Analyst Station dashboard lists transactions that Account Protection has assigned the status of Review or Challenge. However, you can filter the display settings so that transactions with the status Block or Allow are also displayed. For instructions on how to filter the display settings, see Filtering the Transactions List.
Understanding the Recommendations that Account Protection Assigns to Transactions
All transactions that are displayed in the Analyst Station dashboard have a recommendation that has been assigned by Account Protection. These recommendations are extremely useful for the user to determine which transactions should be blocked, which transactions require further investigation to determine if they are malicious, and which transactions are safe and require no intervention. These recommendations cannot be changed by the user.
Account Protection assigns one of the following four recommendations to a transaction:
- Allow: This transaction shows normal behavior and requires no further follow-up.
- Block: Account Protection has identified this transaction as fraudulent with high confidence and recommends that you block it.
- Review: Account Protection has identified this transaction as suspicious and recommends that it be reviewed by your fraud team.
- Challenge: Account Protection has identified this transaction as needing further validation by some type of means such as CAPTCHA or multi-factor authentication.
System Overview
Click Overview in the navigation pane on the left side of the Analyst Station dashboard to see a high level overview on the recommendations that Account Protection has assigned to transactions on your system.

Figure: Select Overview
Information is displayed in the Overview according to the time-period you select, either Last 24 hours, Last 7 days, or Last 15 days.
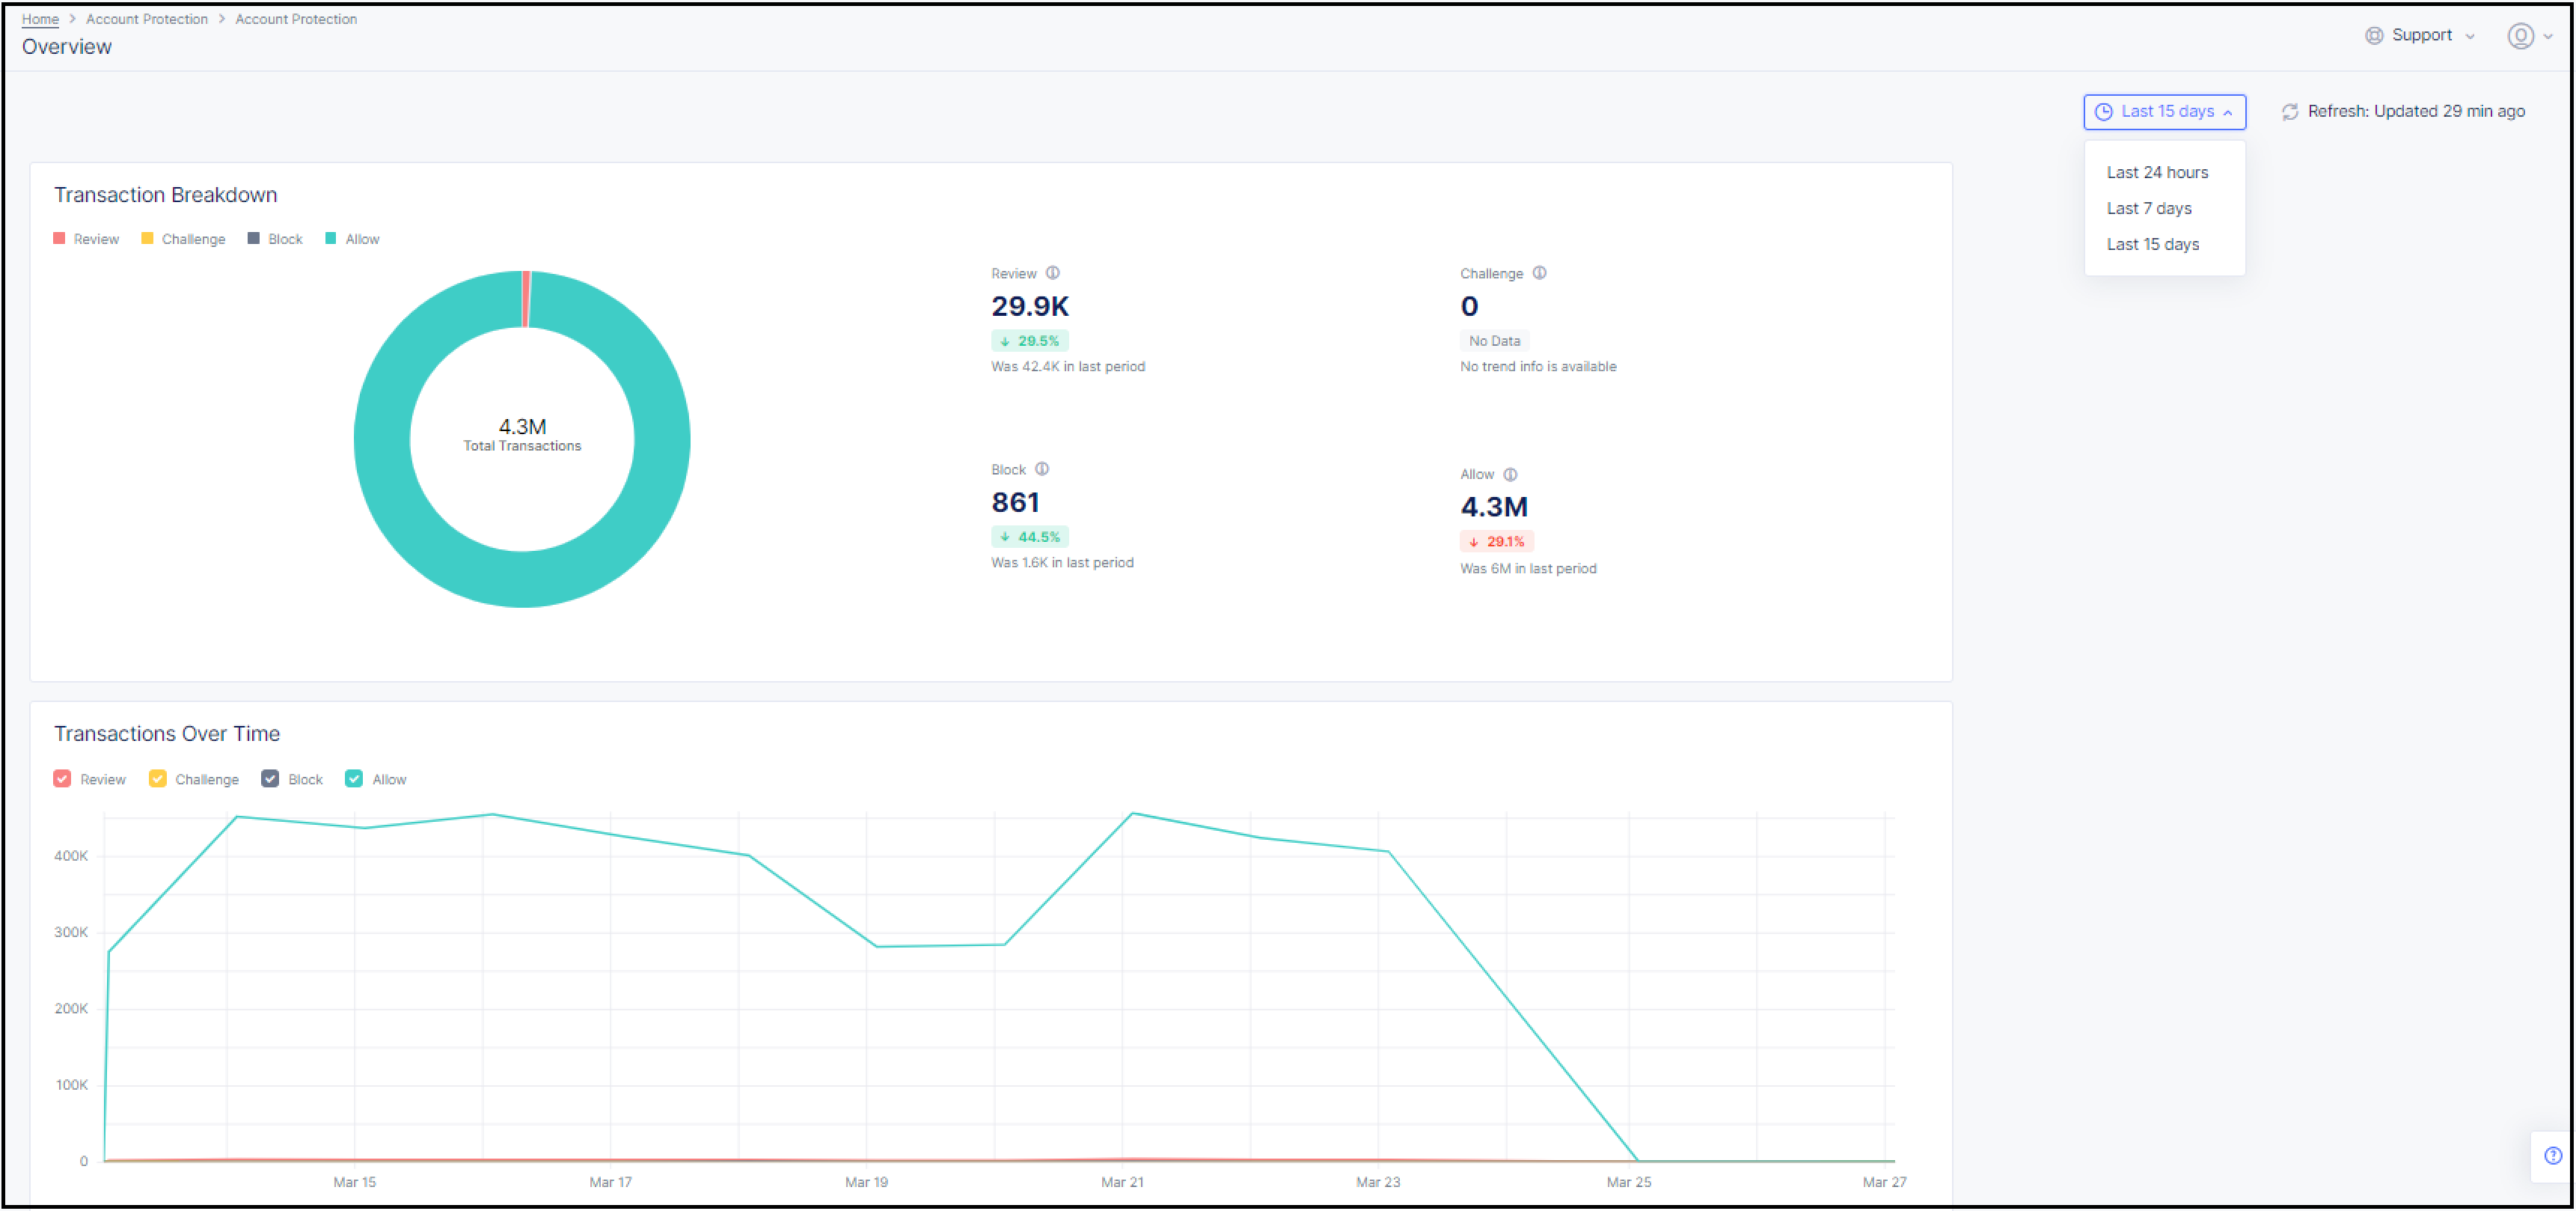
Figure: Overview Screen
For an explanation of the recommendations that Account Protection assigns to transactions, click here.
Viewing Transaction Details
To view a transaction's details:
Step 1: In the list of transactions in the Analyst Station dashboard, click the Transaction ID that you want to view.
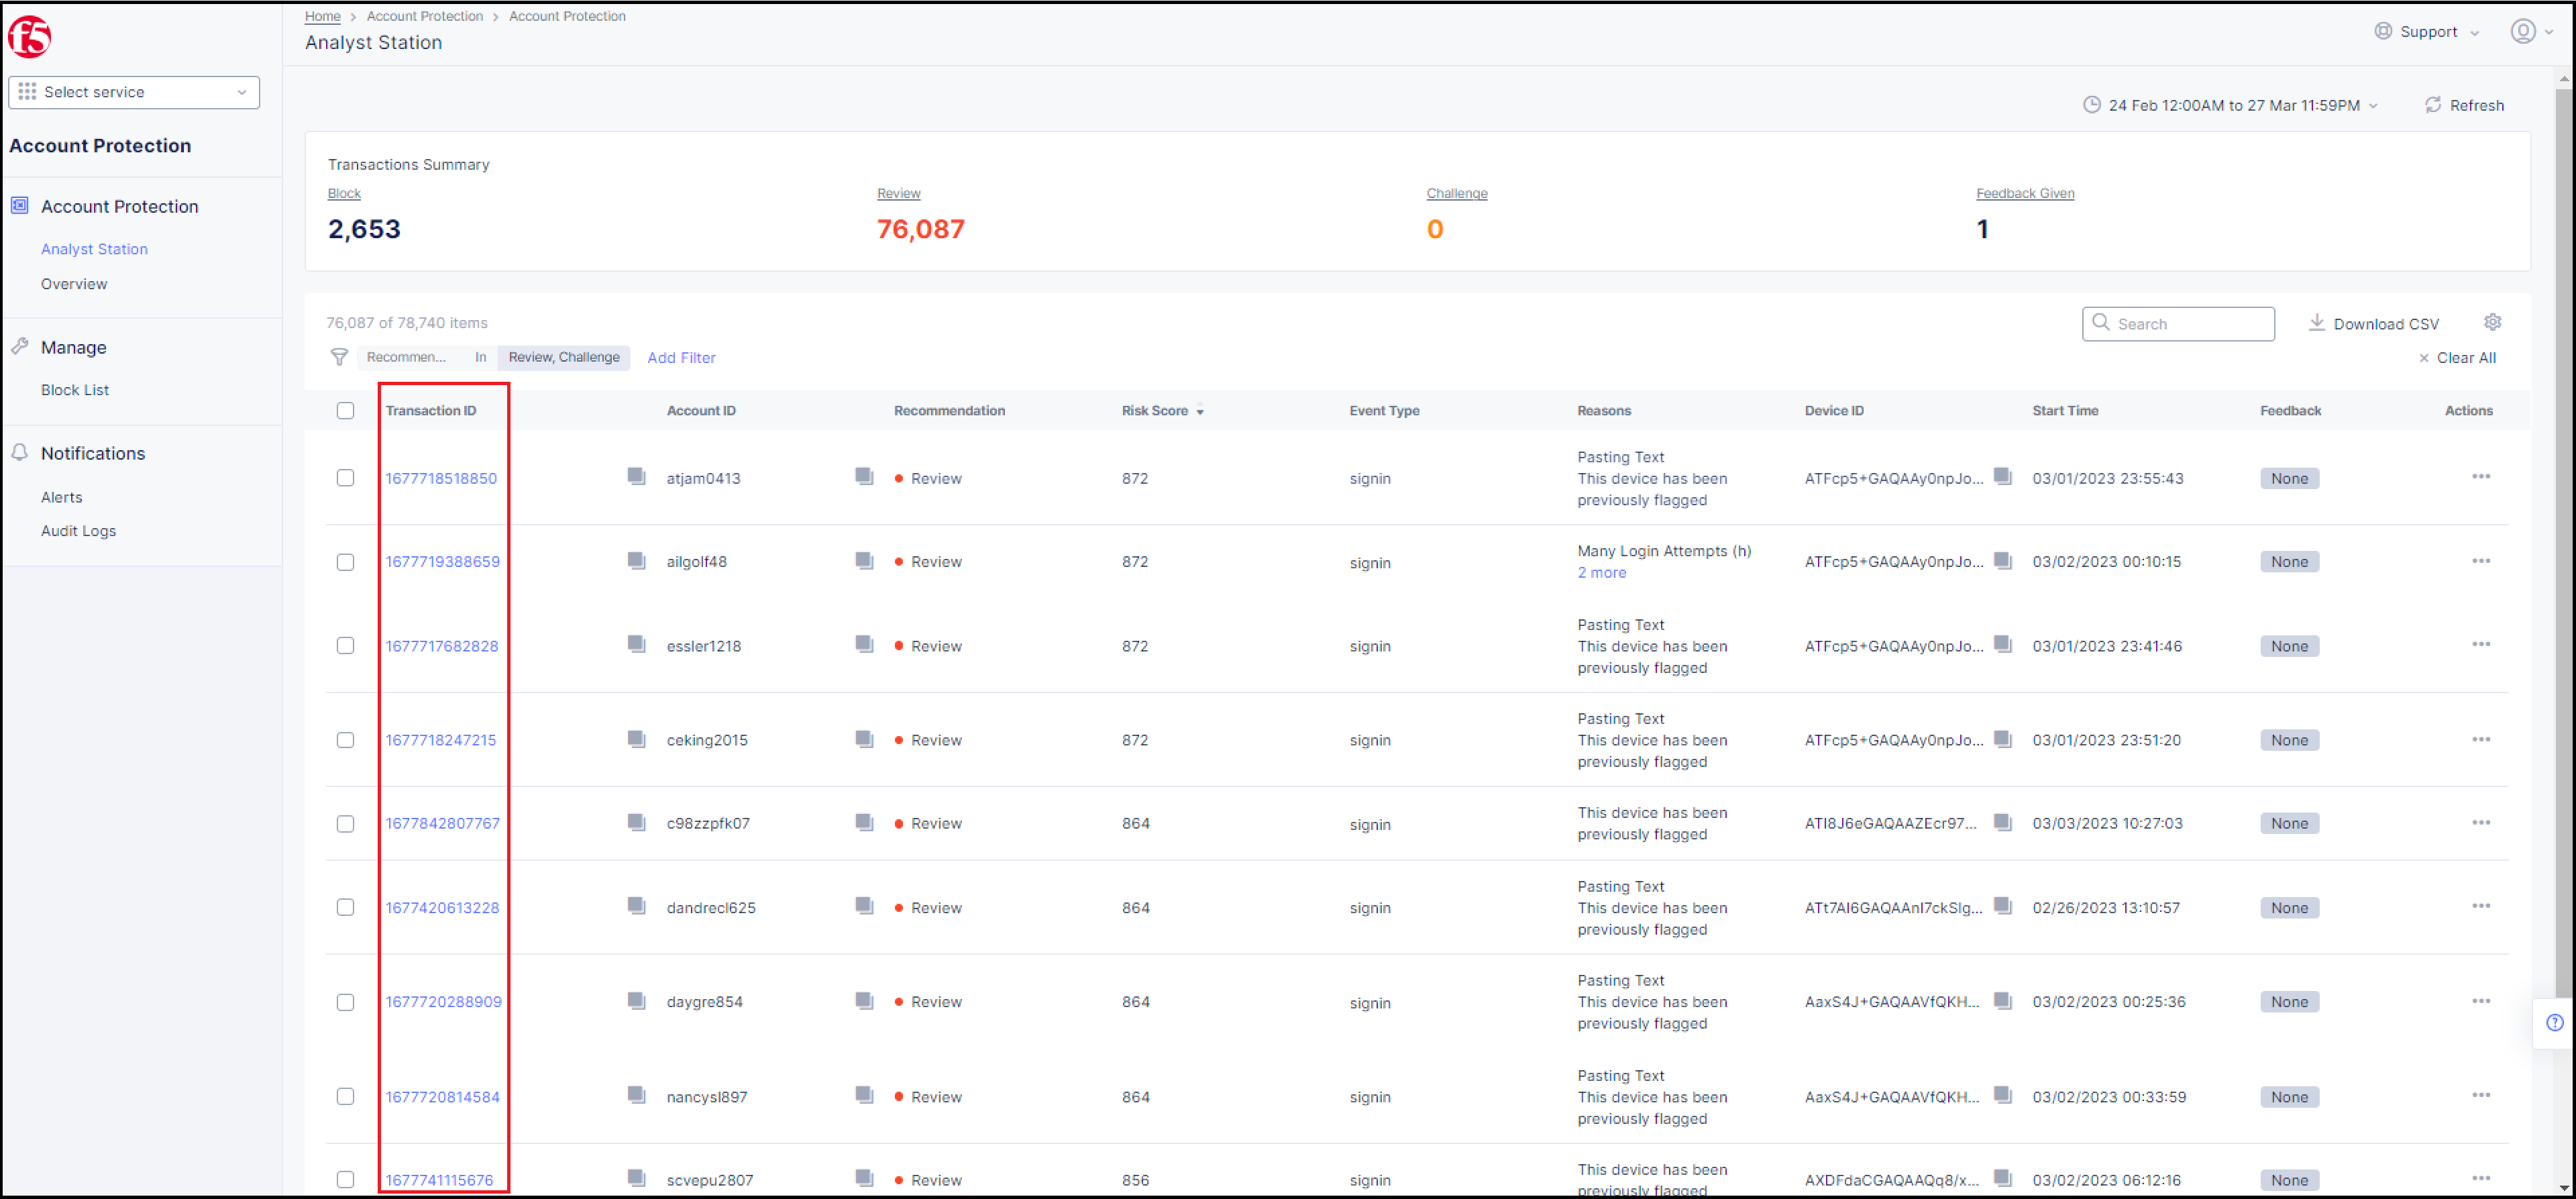
Figure: Select a Transaction ID
Step 2: Review the transaction's details.
- When you click on the Transaction ID, the Transaction Details screen appears.
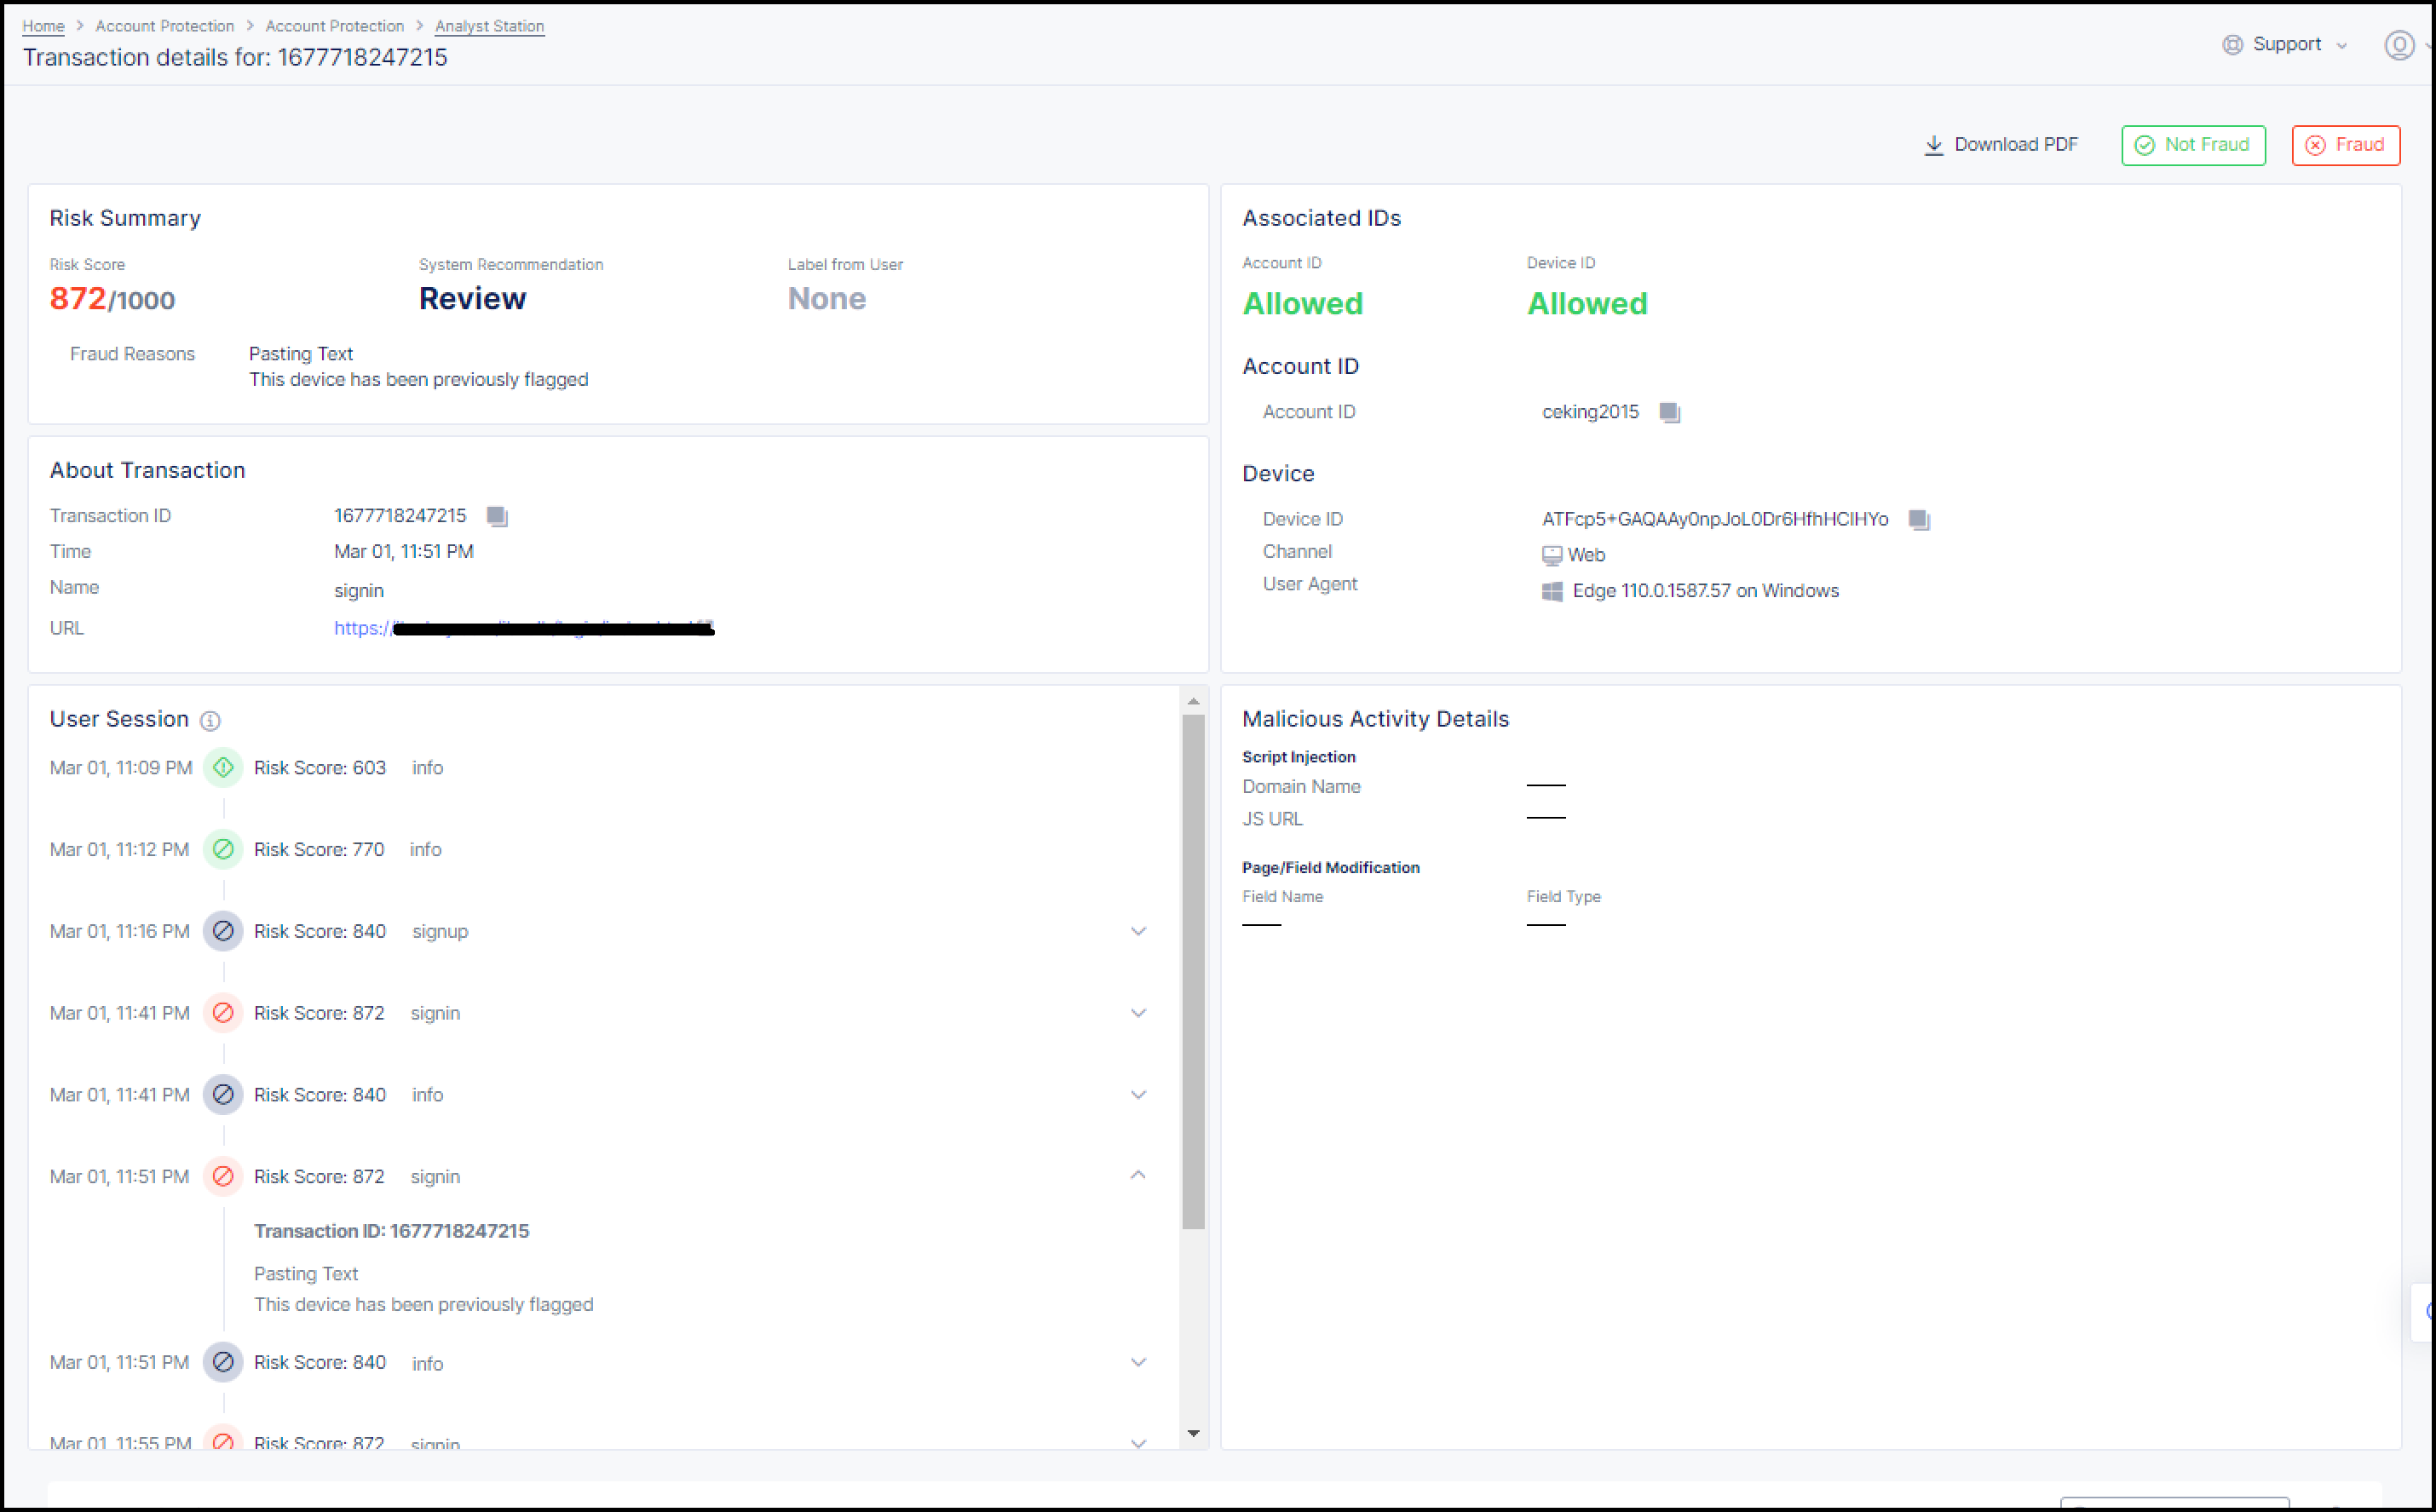
Figure: Transaction Details Screen
In this screen, you can view the following useful information about the transaction:
- Risk Summary: Shows the risk score, the recommendation from Account Protection for this transaction, user feedback (if provided), and the fraud reasons for that recommendation.
- About Transaction: Shows the Transaction ID, the time at which the transaction occurred, the name of the event type that indicates the location in the web application from where the transaction occurred, and the URL of the web page where the transaction occurred.
- User Session: Shows the User Session that the current transaction is a part of. A User Session is a set of transactions that share the same Session ID and Device ID within a 48-hour time period.
- Associated IDs: Shows the Account ID associated with this transaction, the Device ID of the web browser from where the transaction was initiated, the channel of the transaction (either web or mobile), and the type and version of the web browser (User Agent) from where the transaction was initiated
- Malicious Activity Details: Lists malicious activity (such as malicious script injection or violation of page integrity) detected during the transaction and any relevant details.
- Related Sessions: Lists other user sessions related to the current Transaction ID.
- Location and IP Address of the Account ID: Shows the IP of the location from where the transaction was initiated, the Autonomous System Number (ASN) associated with the transaction, and actual physical location where the transaction occurred.
Marking a Transaction as Fraud or Not Fraud
In addition to the recommendations that Account Protection automatically assigns to transactions, Account Protection also offers you the option to mark a transaction as fraud or not fraud and to add an explanation about why you consider the transaction to be either fraud or not fraud.
To mark a transaction as fraud or not fraud:
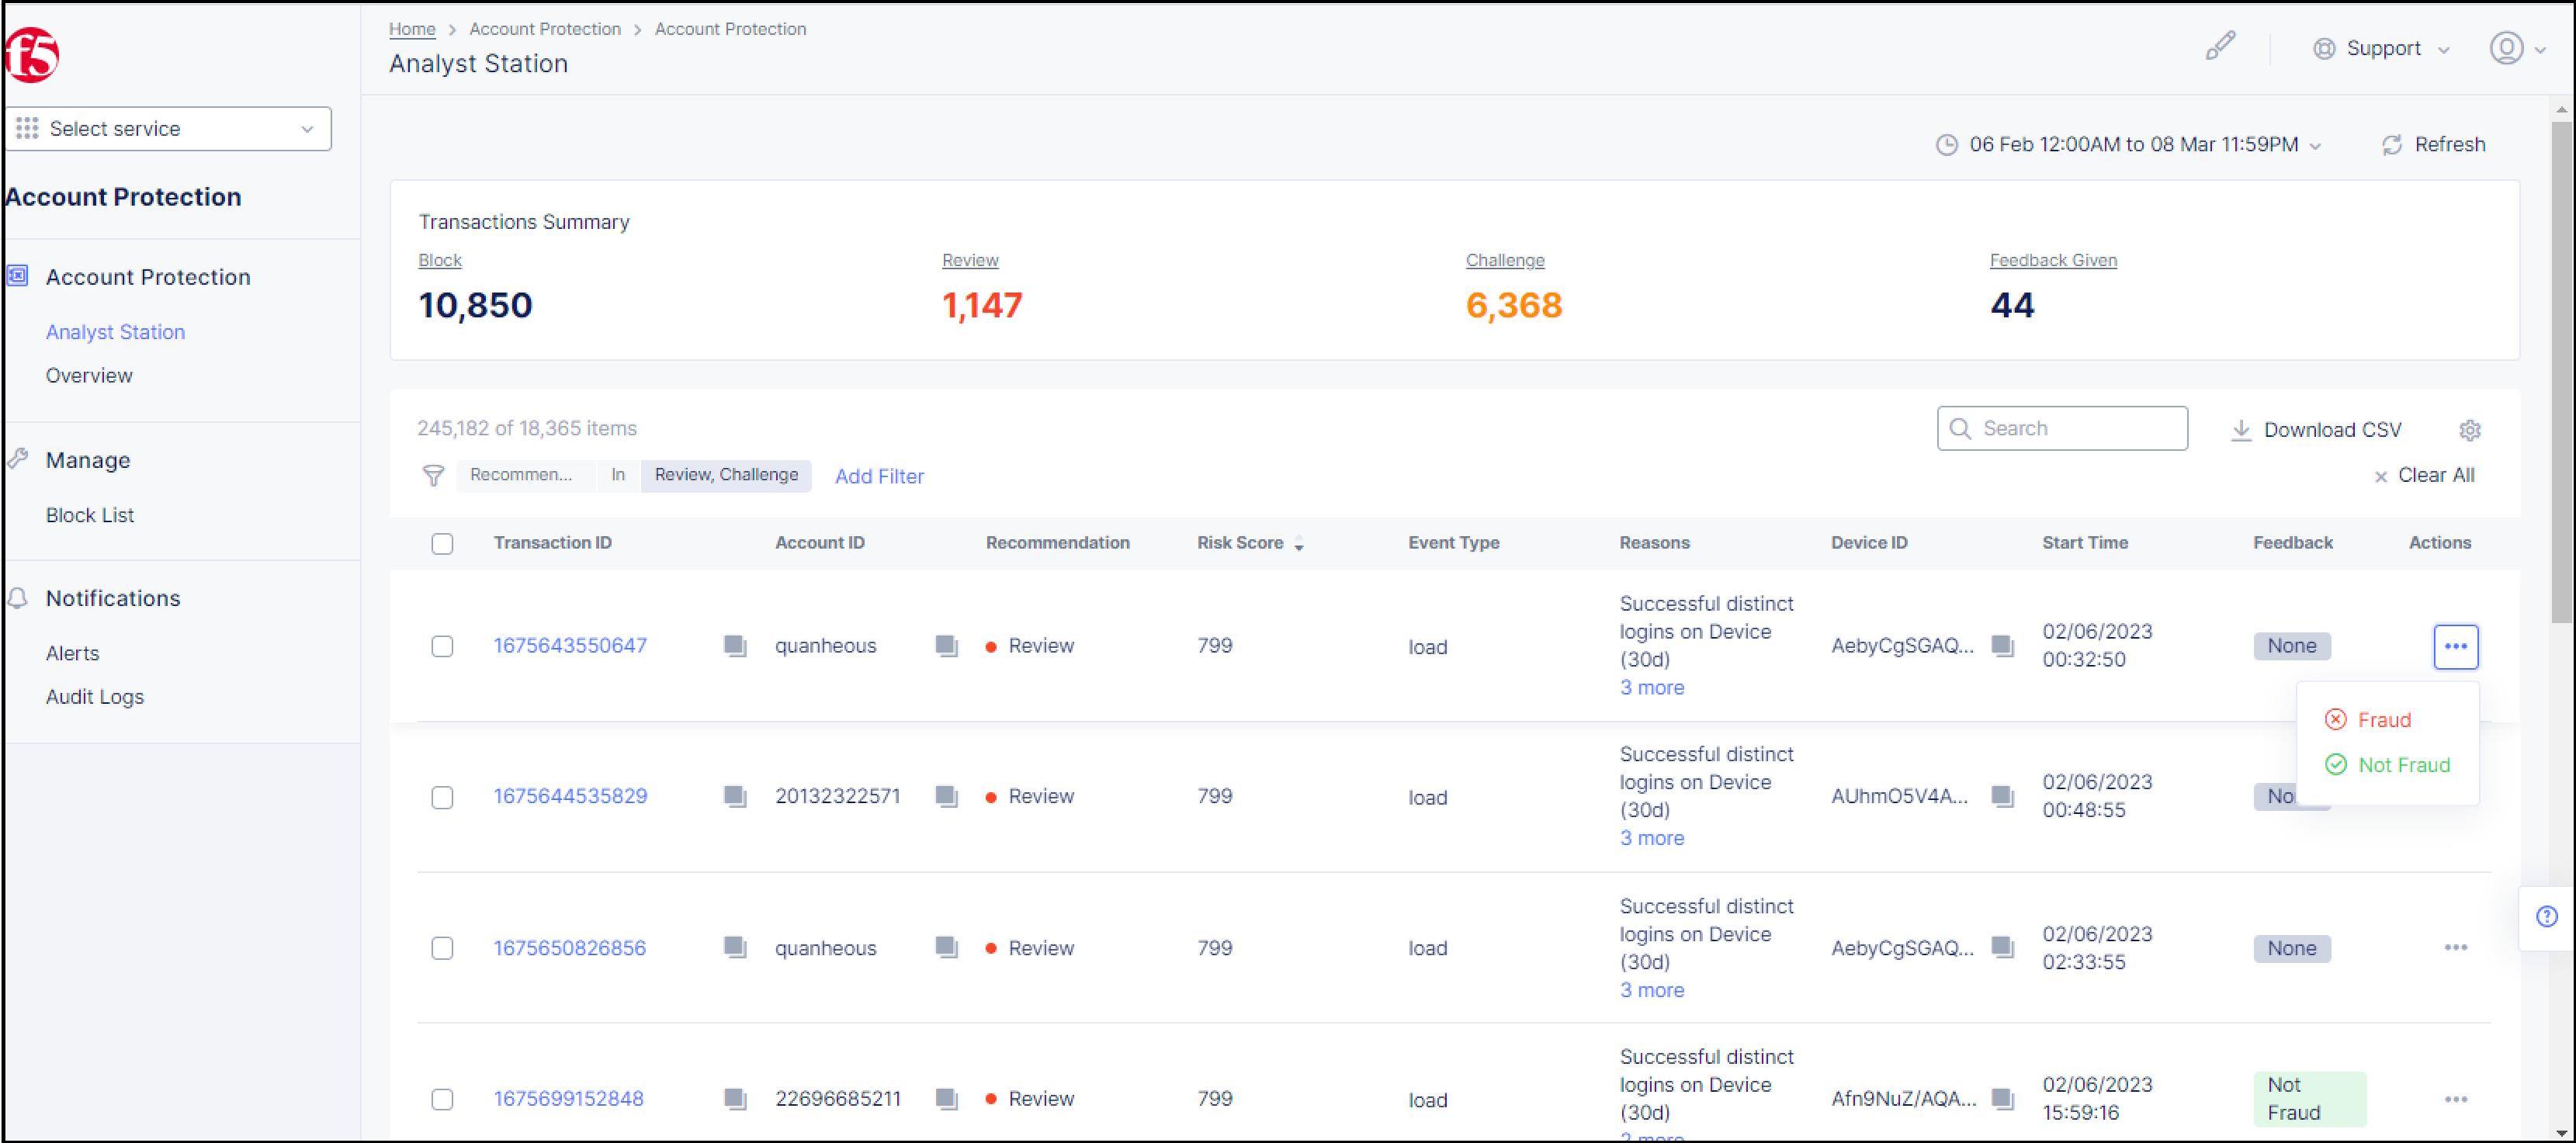
-
In the Transactions List, go to the Actions column on the right and click the 3 dots in the row of the transaction. The Fraud/Not Fraud pop-up appears, as shown below.

Figure: Select Fraud or Not Fraud
-
In the Fraud/Not Fraud pop-up, click Fraud or Not Fraud. The Label Transaction window appears.
Note: It is also possible to mark a transaction as fraud or not fraud by displaying the Transaction Details and clicking the Fraud or Not Fraud button in the upper right section of the details screen.
-
In the comment section, add a comment explaining why you decided to mark this transaction as fraud or not fraud.
Note: If you are marking the transaction as fraud, you may want to also block the associated Account ID and/or Device ID, as explained here.
-
Click Label Fraud or Label Not Fraud.
Marking Multiple Transactions as Fraud or Not Fraud
Account Protection also provides you with an option to mark multiple transactions as fraud or not fraud in one action.
To mark multiple transactions as fraud or not fraud:
-
In the Transactions List, click the check box to the left of the Transaction IDs that you want to mark as fraud or not fraud, as shown below.
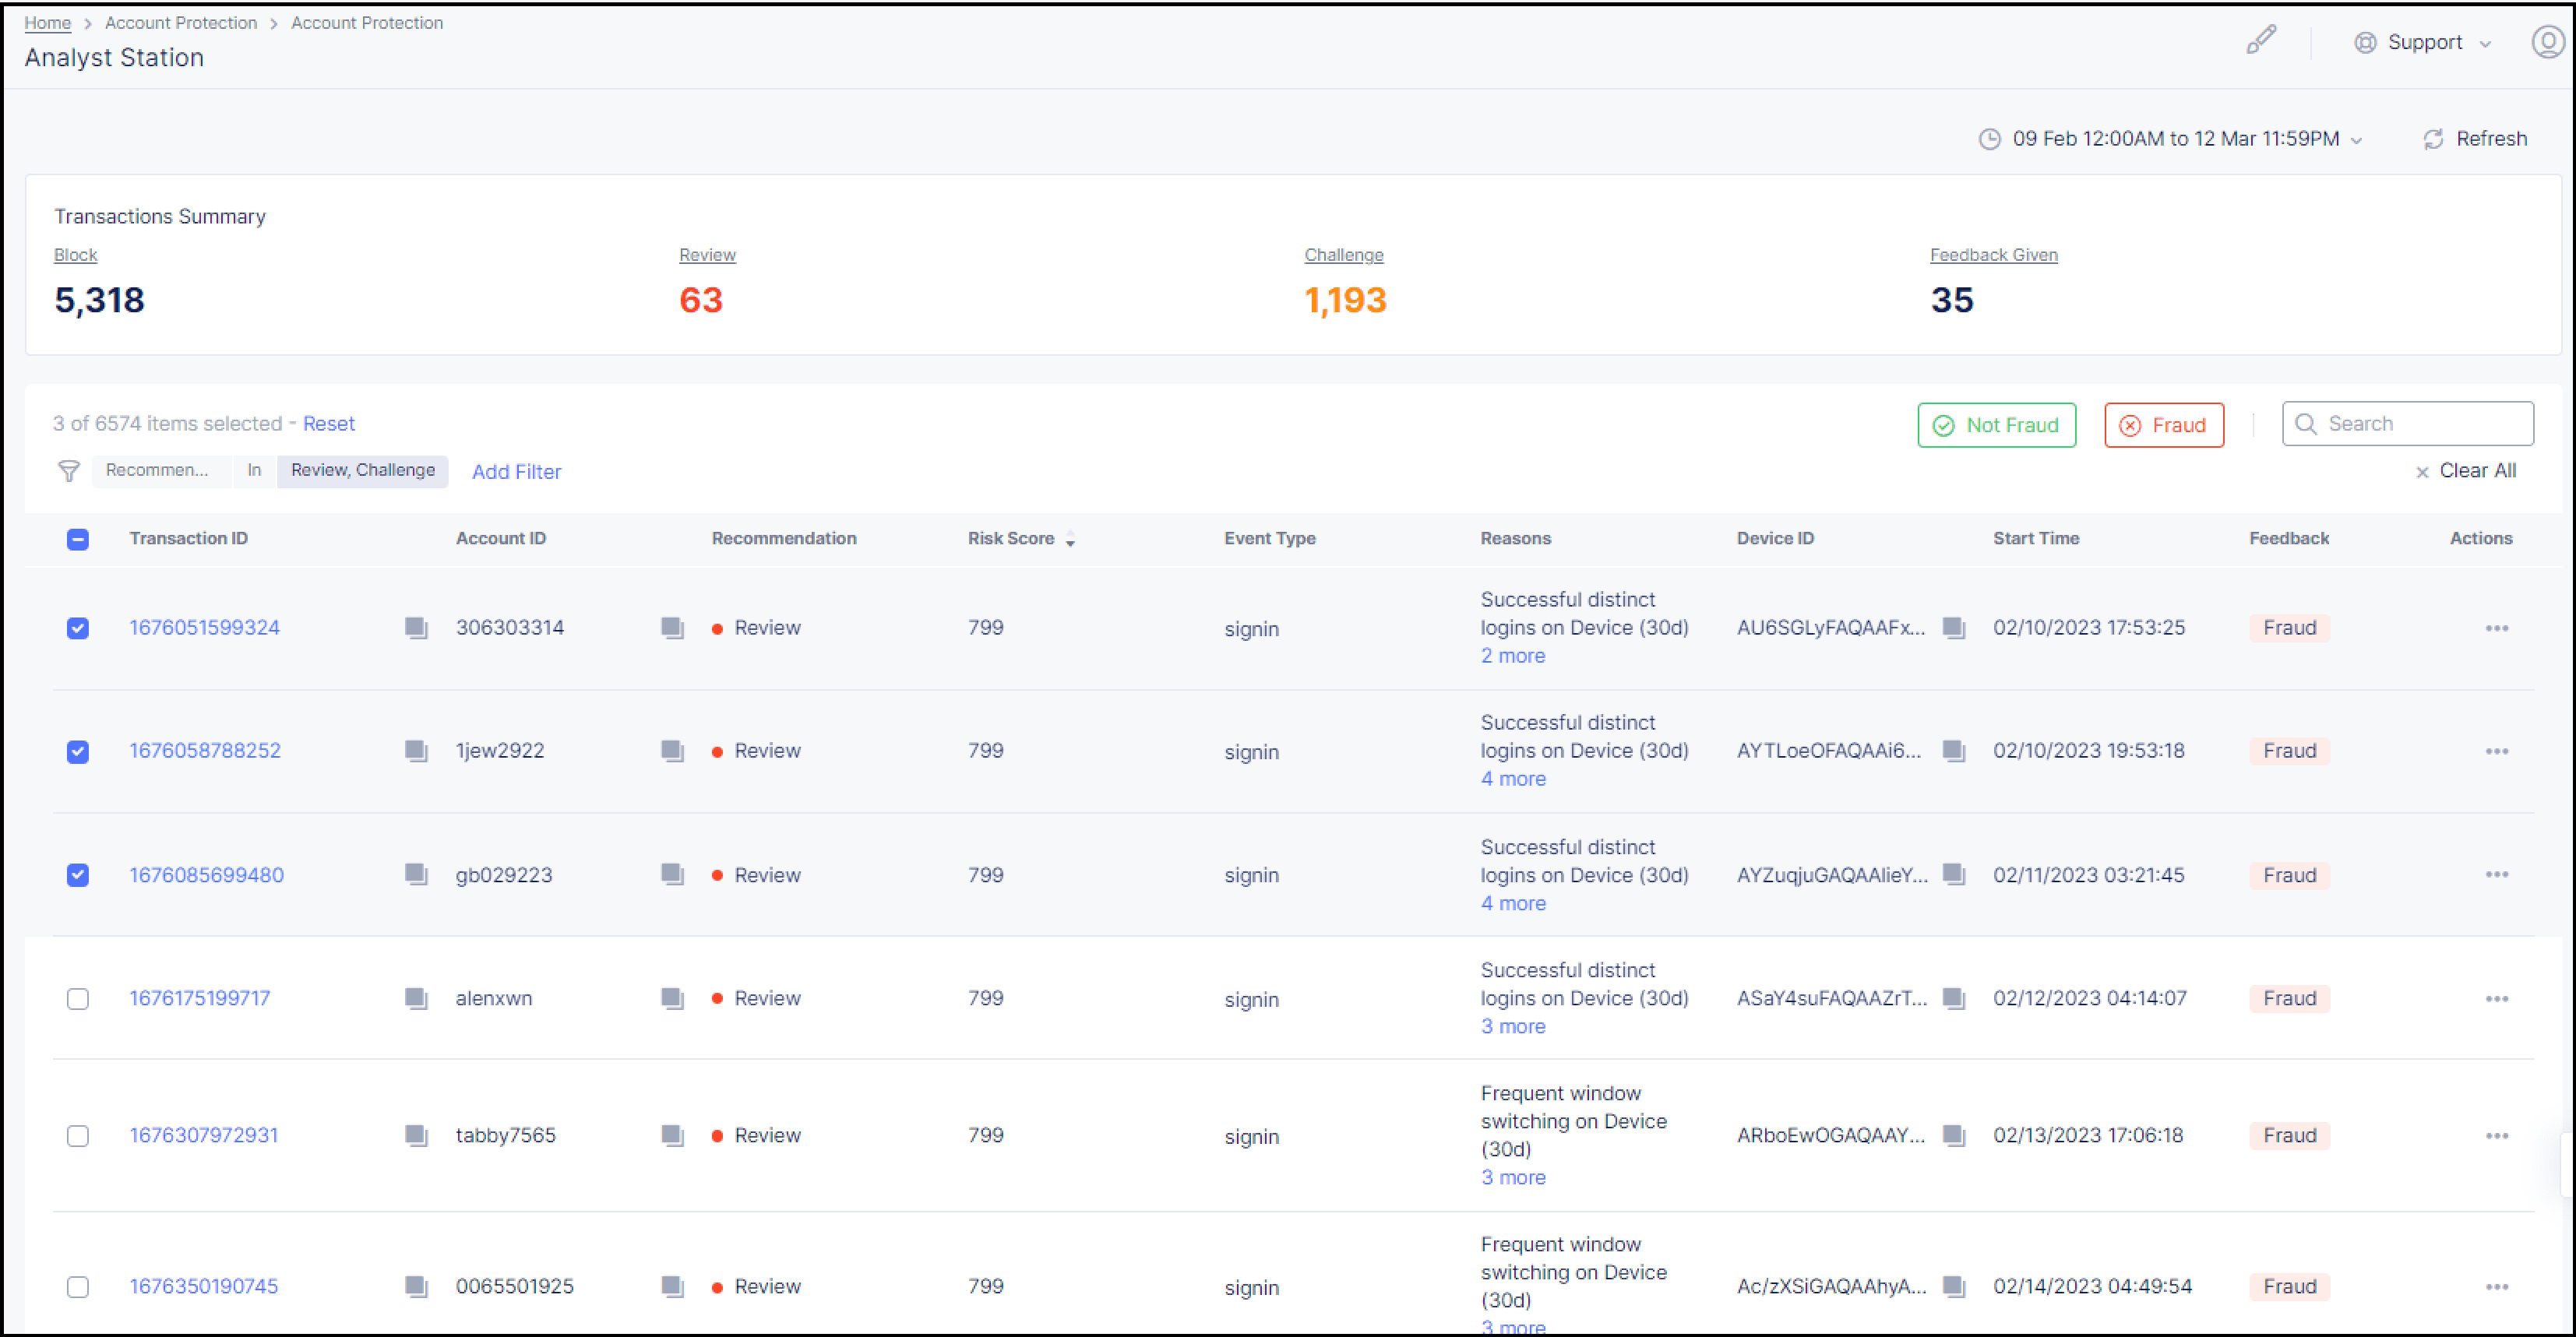
Figure: Select Multiple Transactions
-
Click the Fraud or Not Fraud button in the upper right section of the Transactions List. The Label Transactions window appears.
-
In the comment section, add a comment explaining why you decided to mark these transactions as fraud or not fraud.
Note: If you are marking transactions as fraud, you may want to also block the associated Account IDs and/or Device IDs, as explained below.
-
Click Label Fraud or Label Not Fraud.

Blocking an Account ID or Device ID
If you marked a transaction as fraud, you can also block the associated Account ID and/or Device ID of that transaction from future transactions with your system for a time-period that you define.
To block an Account ID and/or Device ID:
-
Choose the Fraud option for the transaction(s), as described in the previous sections.
-
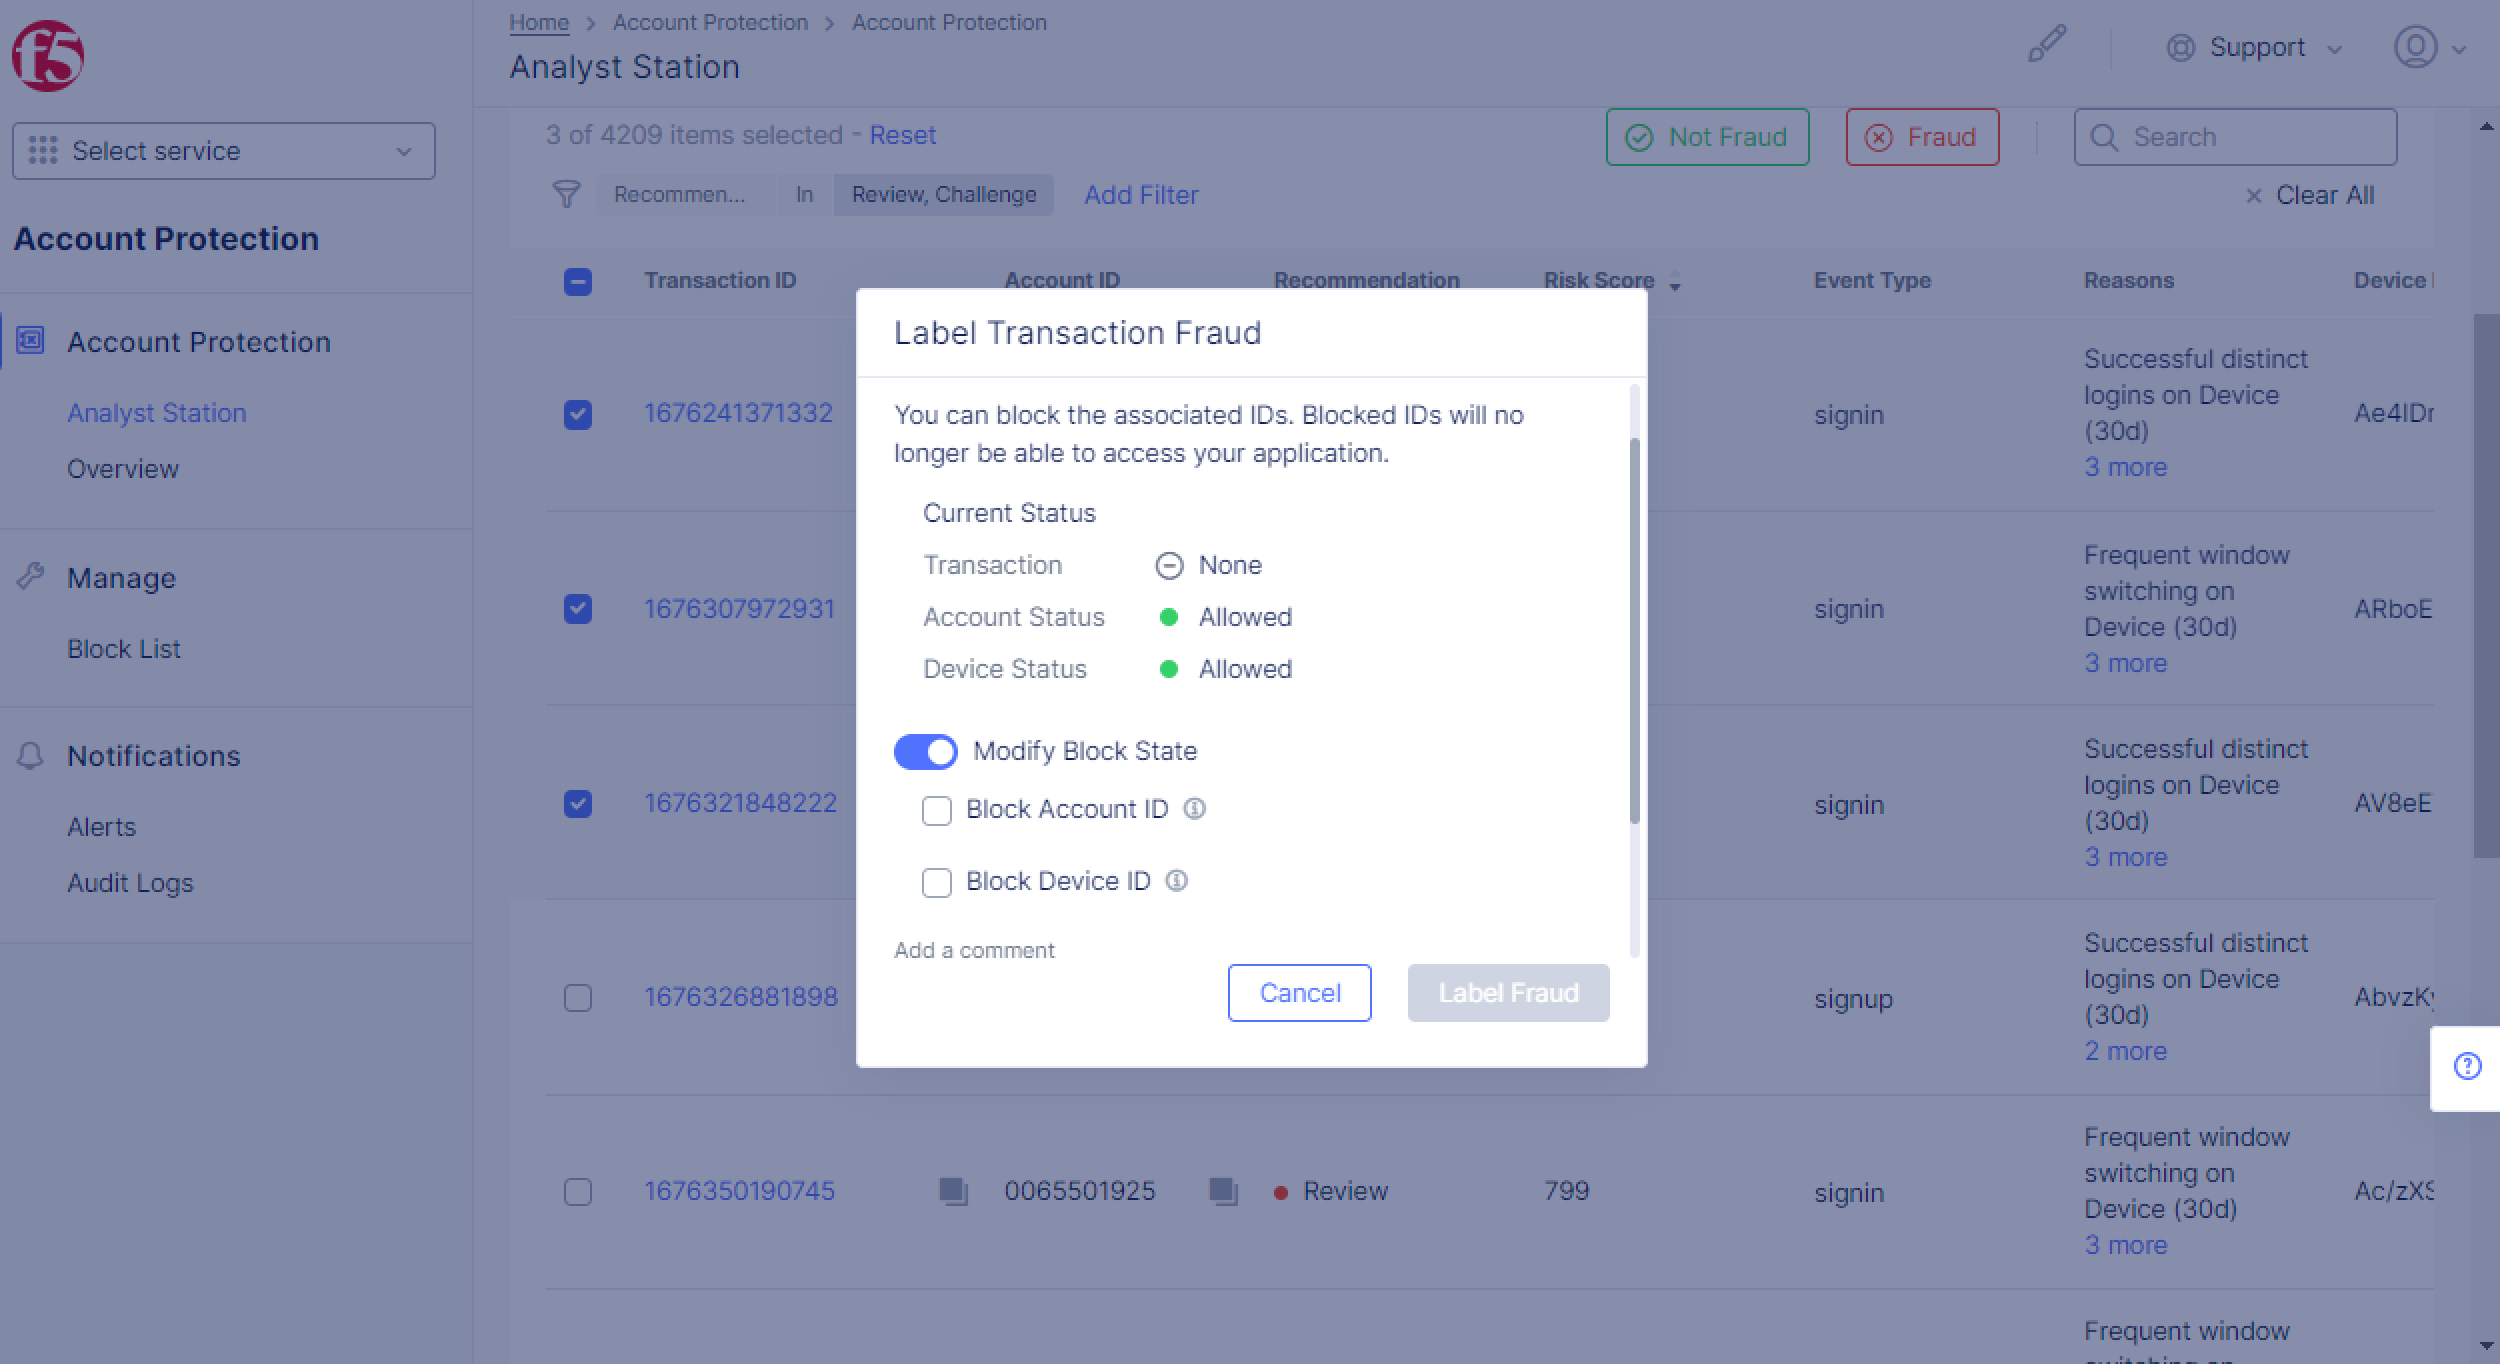
In the Label Transaction Fraud window, enable Modify Block State. Options for blocking the Account ID and Device ID appear, as shown below.

Figure: Enable Modify Block State
-
Click the check box next to Block Account ID and/or Block Device ID. When you click the check box, the default blocking period of 30 days appears, as shown below.
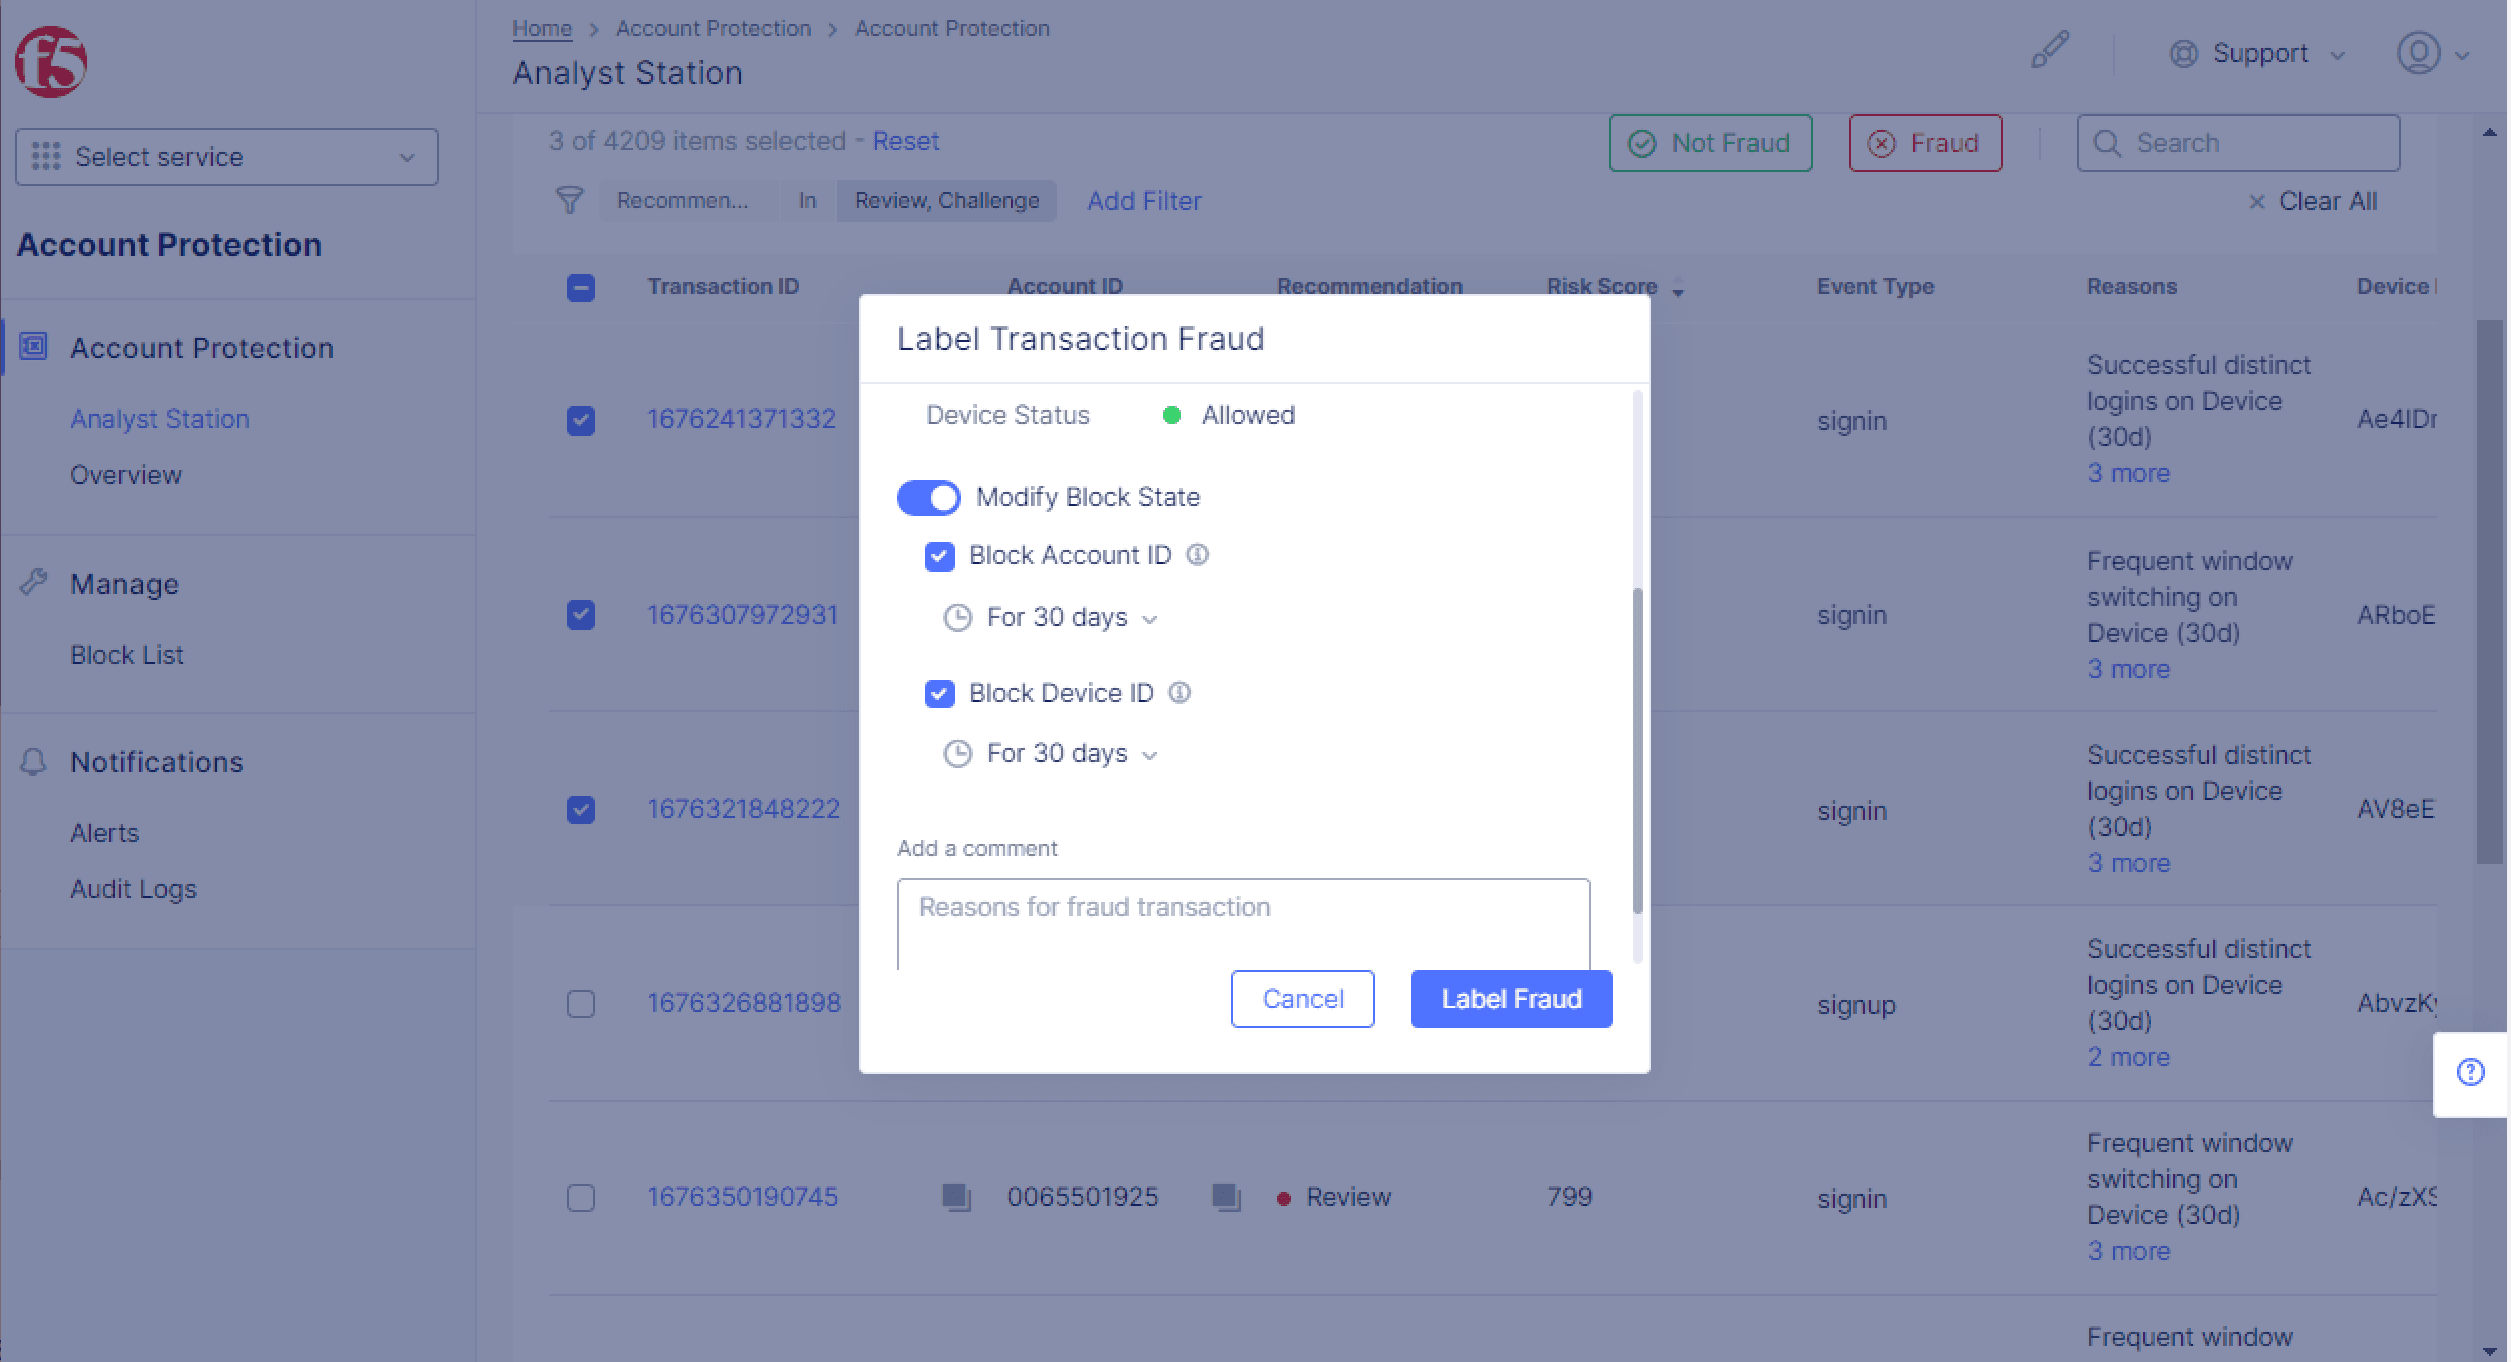
Figure: Activate Blocking
You can change this by clicking For 30 days and selecting the blocking period that you want from the list, or even set your own blocking period by clicking Custom.
-
Click Label Fraud.

The transaction(s) now appears in the Block List, under Manage in the left-side menu.
Viewing Blocked Account IDs and Device IDs
You can see a list of the blocked Account IDs and Device IDs by clicking Block List under Manage in the left-side menu. By default, only IDs that were blocked in last 24 hours are displayed. You can change this to the last 7 days, 15 days, or 90 days from the time-period drop-down list.
To view recent activity for an Account ID or Device ID in the Block List, click on the ID.
Unblock an Account ID or Device ID from the Block List
You can remove a blocked Account ID or Device ID from the Block List so that it will no longer be blocked from making transactions with your system.
To remove a blocked ID from the Block List:
-
Click Block List under Manage in the left-side menu.
-
In the Block List, go to the Actions column and click the 3 dots in the row of the ID that you want to unblock. The Unblock/Edit pop-up appears, as shown below.

Figure: Remove a Blocked ID
-
In the Unblock/Edit pop-up, click Unblock. The Unblock ID(s) window appears.
-
Click Unblock in the Unblock ID(s) window.

The Account ID or Device ID is now removed from the Block List and is no longer blocked from making transactions with your system.
Unblock Multiple Account IDs and/or Device IDs from the Block List
Account Protection also provides you with an option to remove multiple Blocked Account IDs and/or Device IDs from the Block List in one action.
To remove multiple blocked IDs from the Block List:
-
Click Block List under Manage in the left-side menu.
-
In the Block List, click the check box to the left of the IDs that you want to remove.
-
Click Unblock in the upper right section of the Block List. The Unblock ID(s) window appears.
-
Click Unblock in the Unblock ID(s) window.
The Account IDs and/or Device IDs are now removed from the Block List and are no longer blocked from making transactions with your system.
Change the Expiration Date and/or Comment on a Blocked ID
You can change the expiration date for when a blocked ID will cease to be blocked and also change the comment on a blocked ID.
To change the expiration date and/or comment on a blocked ID:
-
Click Block List under Manage in the left-side menu.
-
In the Block List, go to the Actions column and click the 3 dots in the row of the ID that you want to unblock. The Unblock/Edit pop-up appears.
-
In the Unblock/Edit pop-up, click Edit. The Edit Items window appears.
-
Change the expiration date and/or the comment, and click Save Changes.
Change the Expiration Date and/or Comment on Multiple Blocked IDs
Account Protection also provides you with an option to change the expiration date and/or comment for multiple blocked IDs in one action. If you do this, the new expiration date and/or comment will be applied on all the IDs you select.
To change the expiration date and/or comment on multiple blocked IDs:
-
Click Block List under Manage in the left-side menu.
-
In the Block List, click the check box to the left of the IDs that you want to modify.
-
Click Edit in the upper right section of the Block List. The Edit Items window appears.
-
Change the expiration date and/or the comment, and click Save Changes.
Block an Account ID or Device ID while in the Block List
To block an Account ID or Device ID directly from the Block List:
-
Copy the Account ID or Device ID that you want to block.
-
Click Block List under Manage in the left-side menu.
-
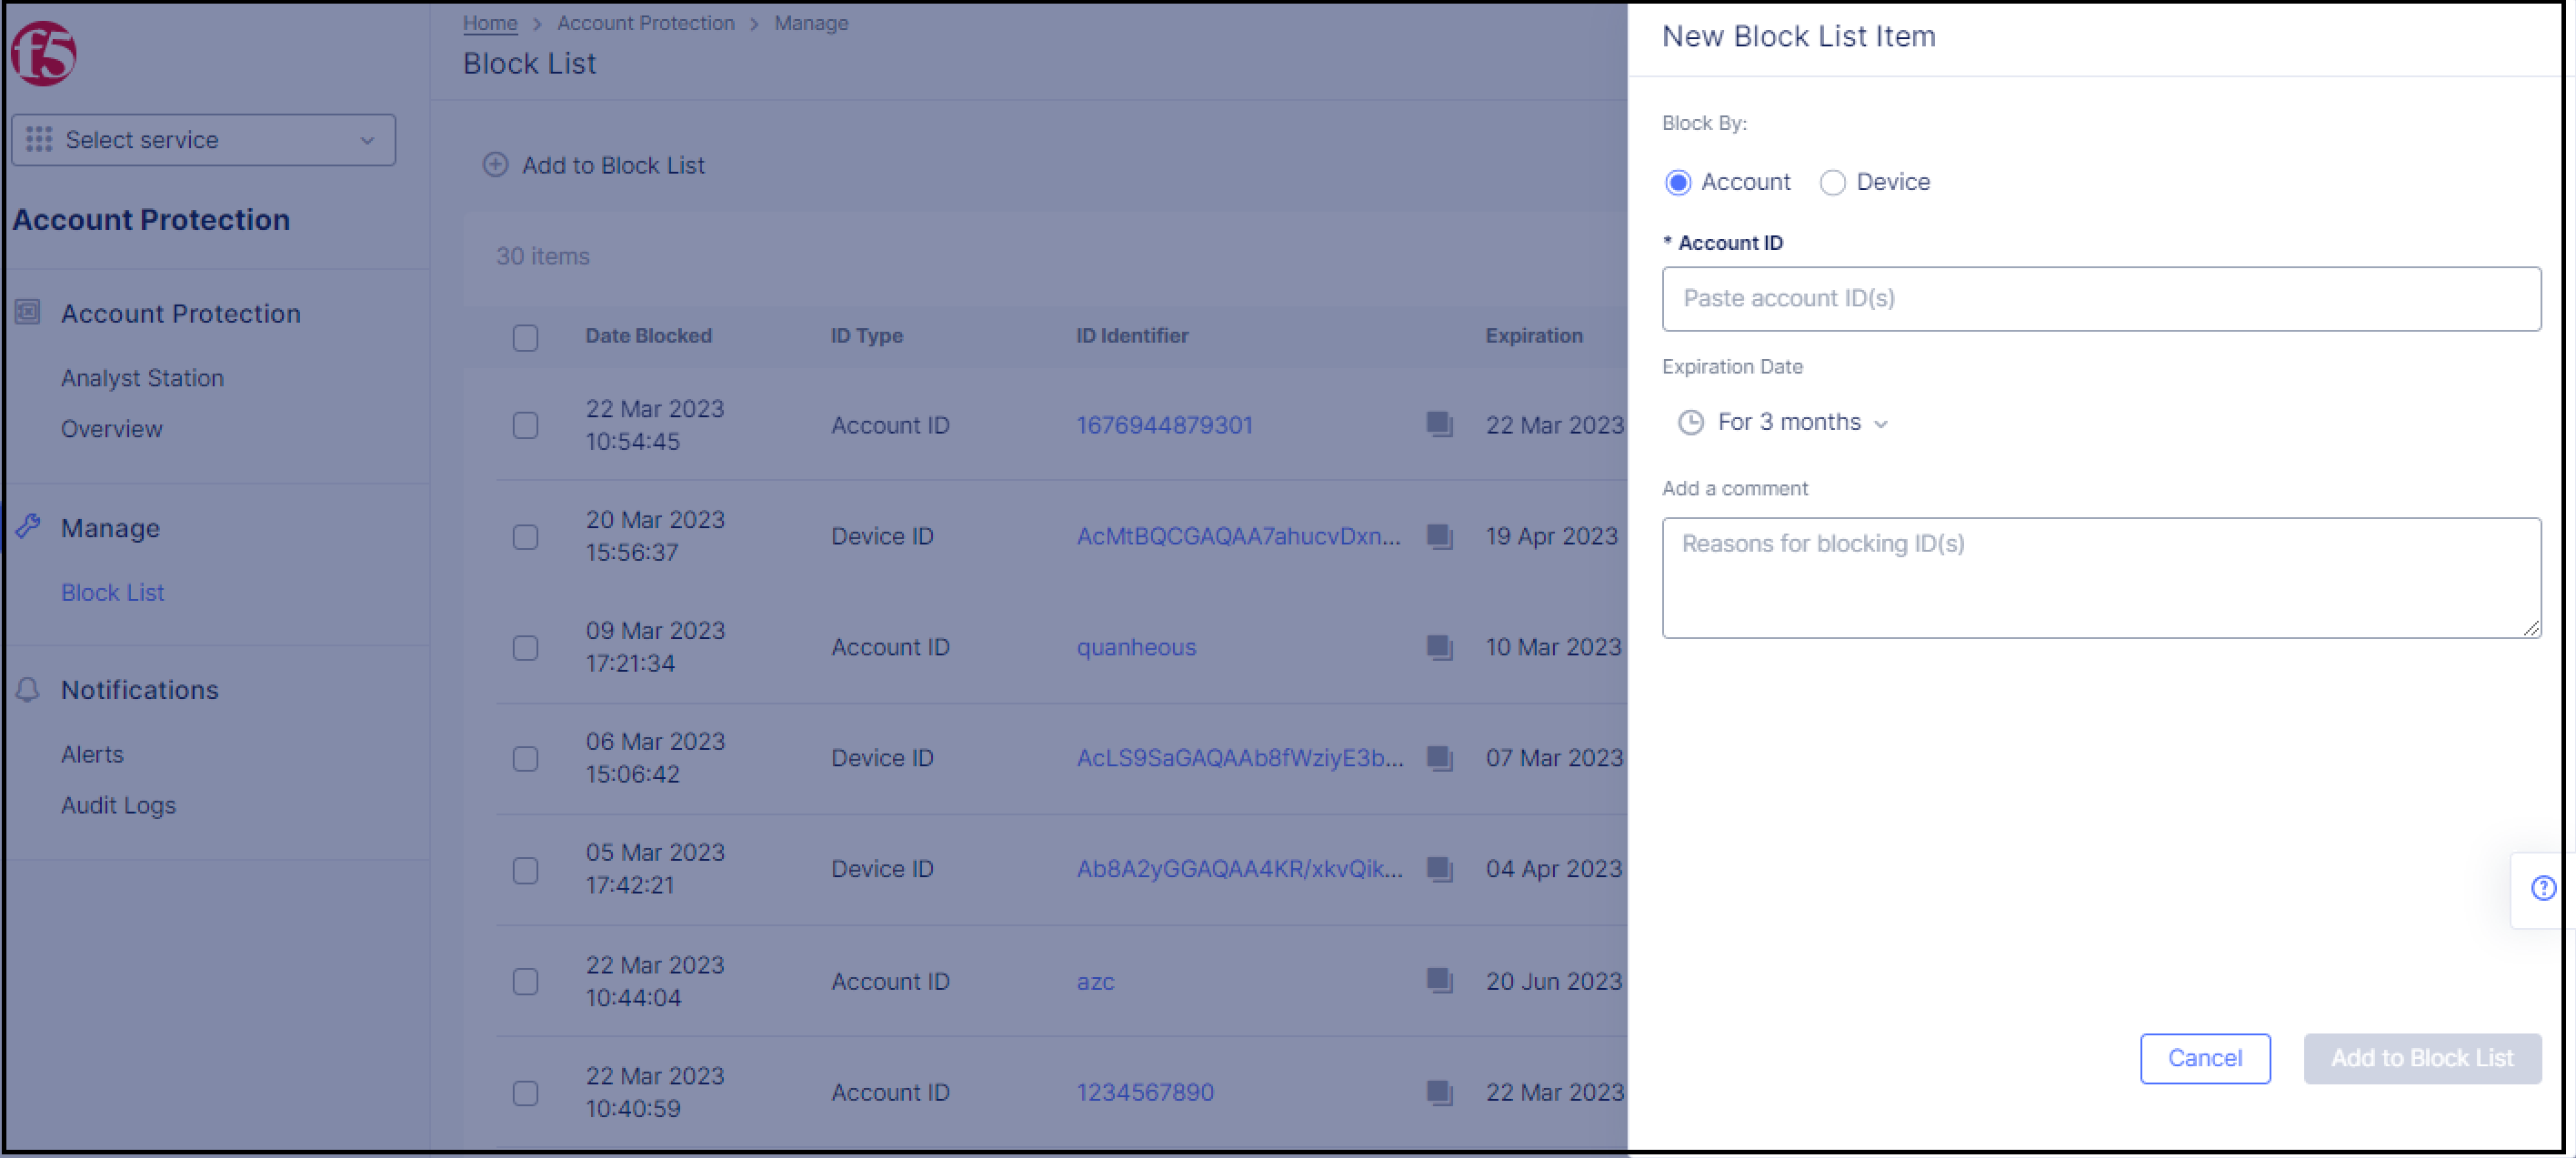
In the upper left section of the Block List, click Add to Block List. The New Block List Item window appears on the right.
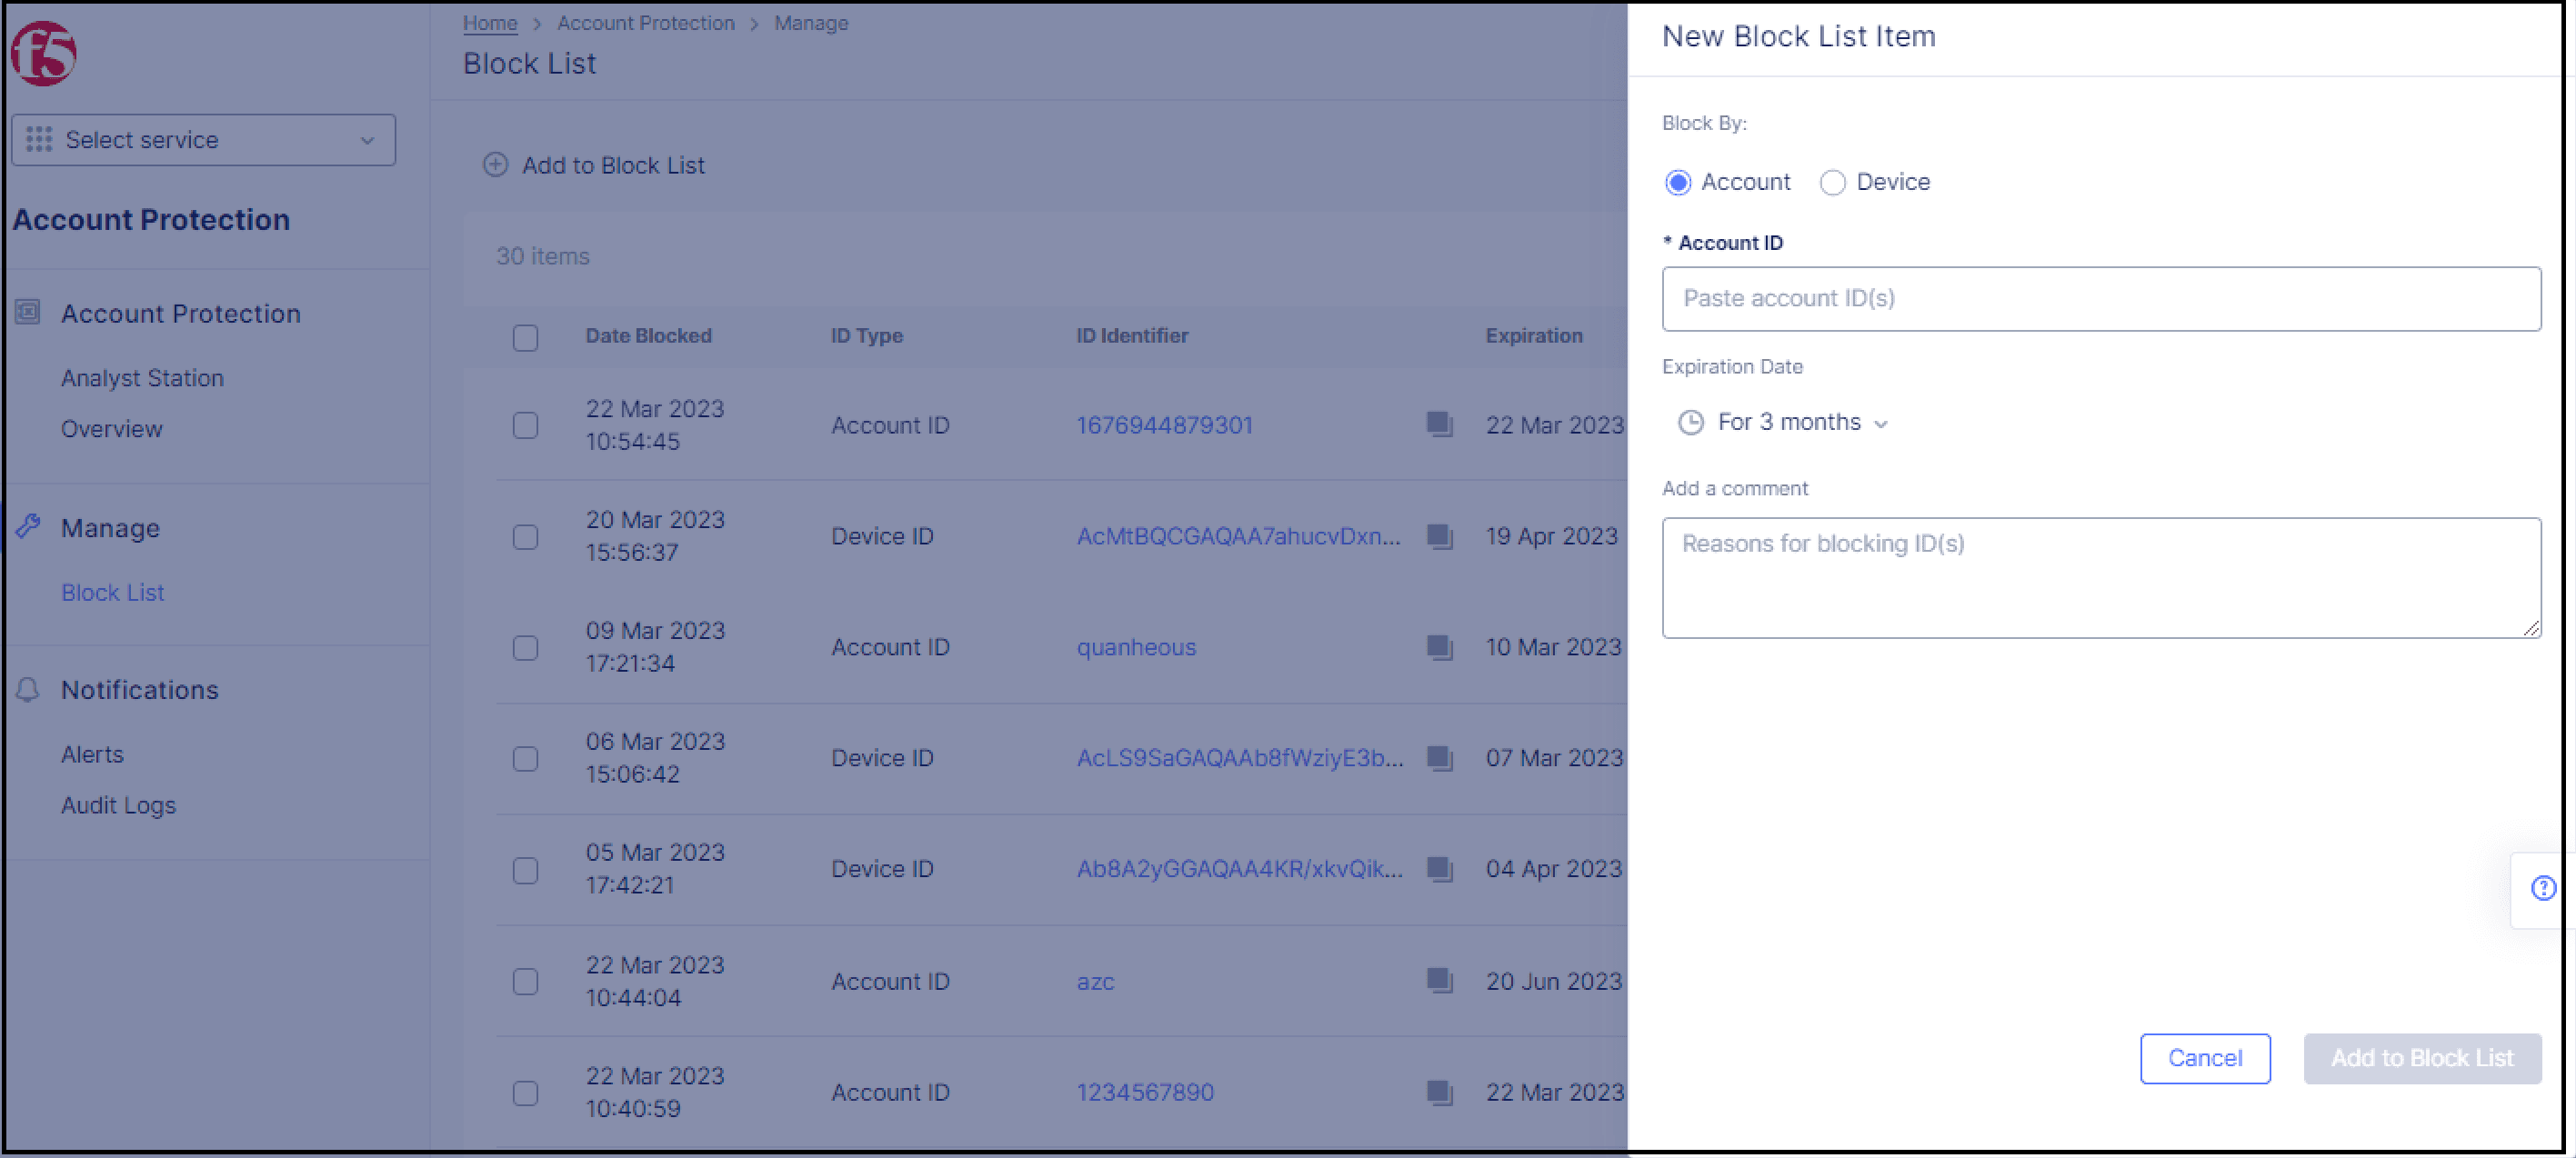
Figure: Adding an ID to the Block List
-
At Block By, select either Account or Device.
-
At Account ID or Device ID, paste the ID in the text box.
-
Choose an expiration date, or leave the default of 3 months.
-
Add a comment.
-
Click Add to Block List.
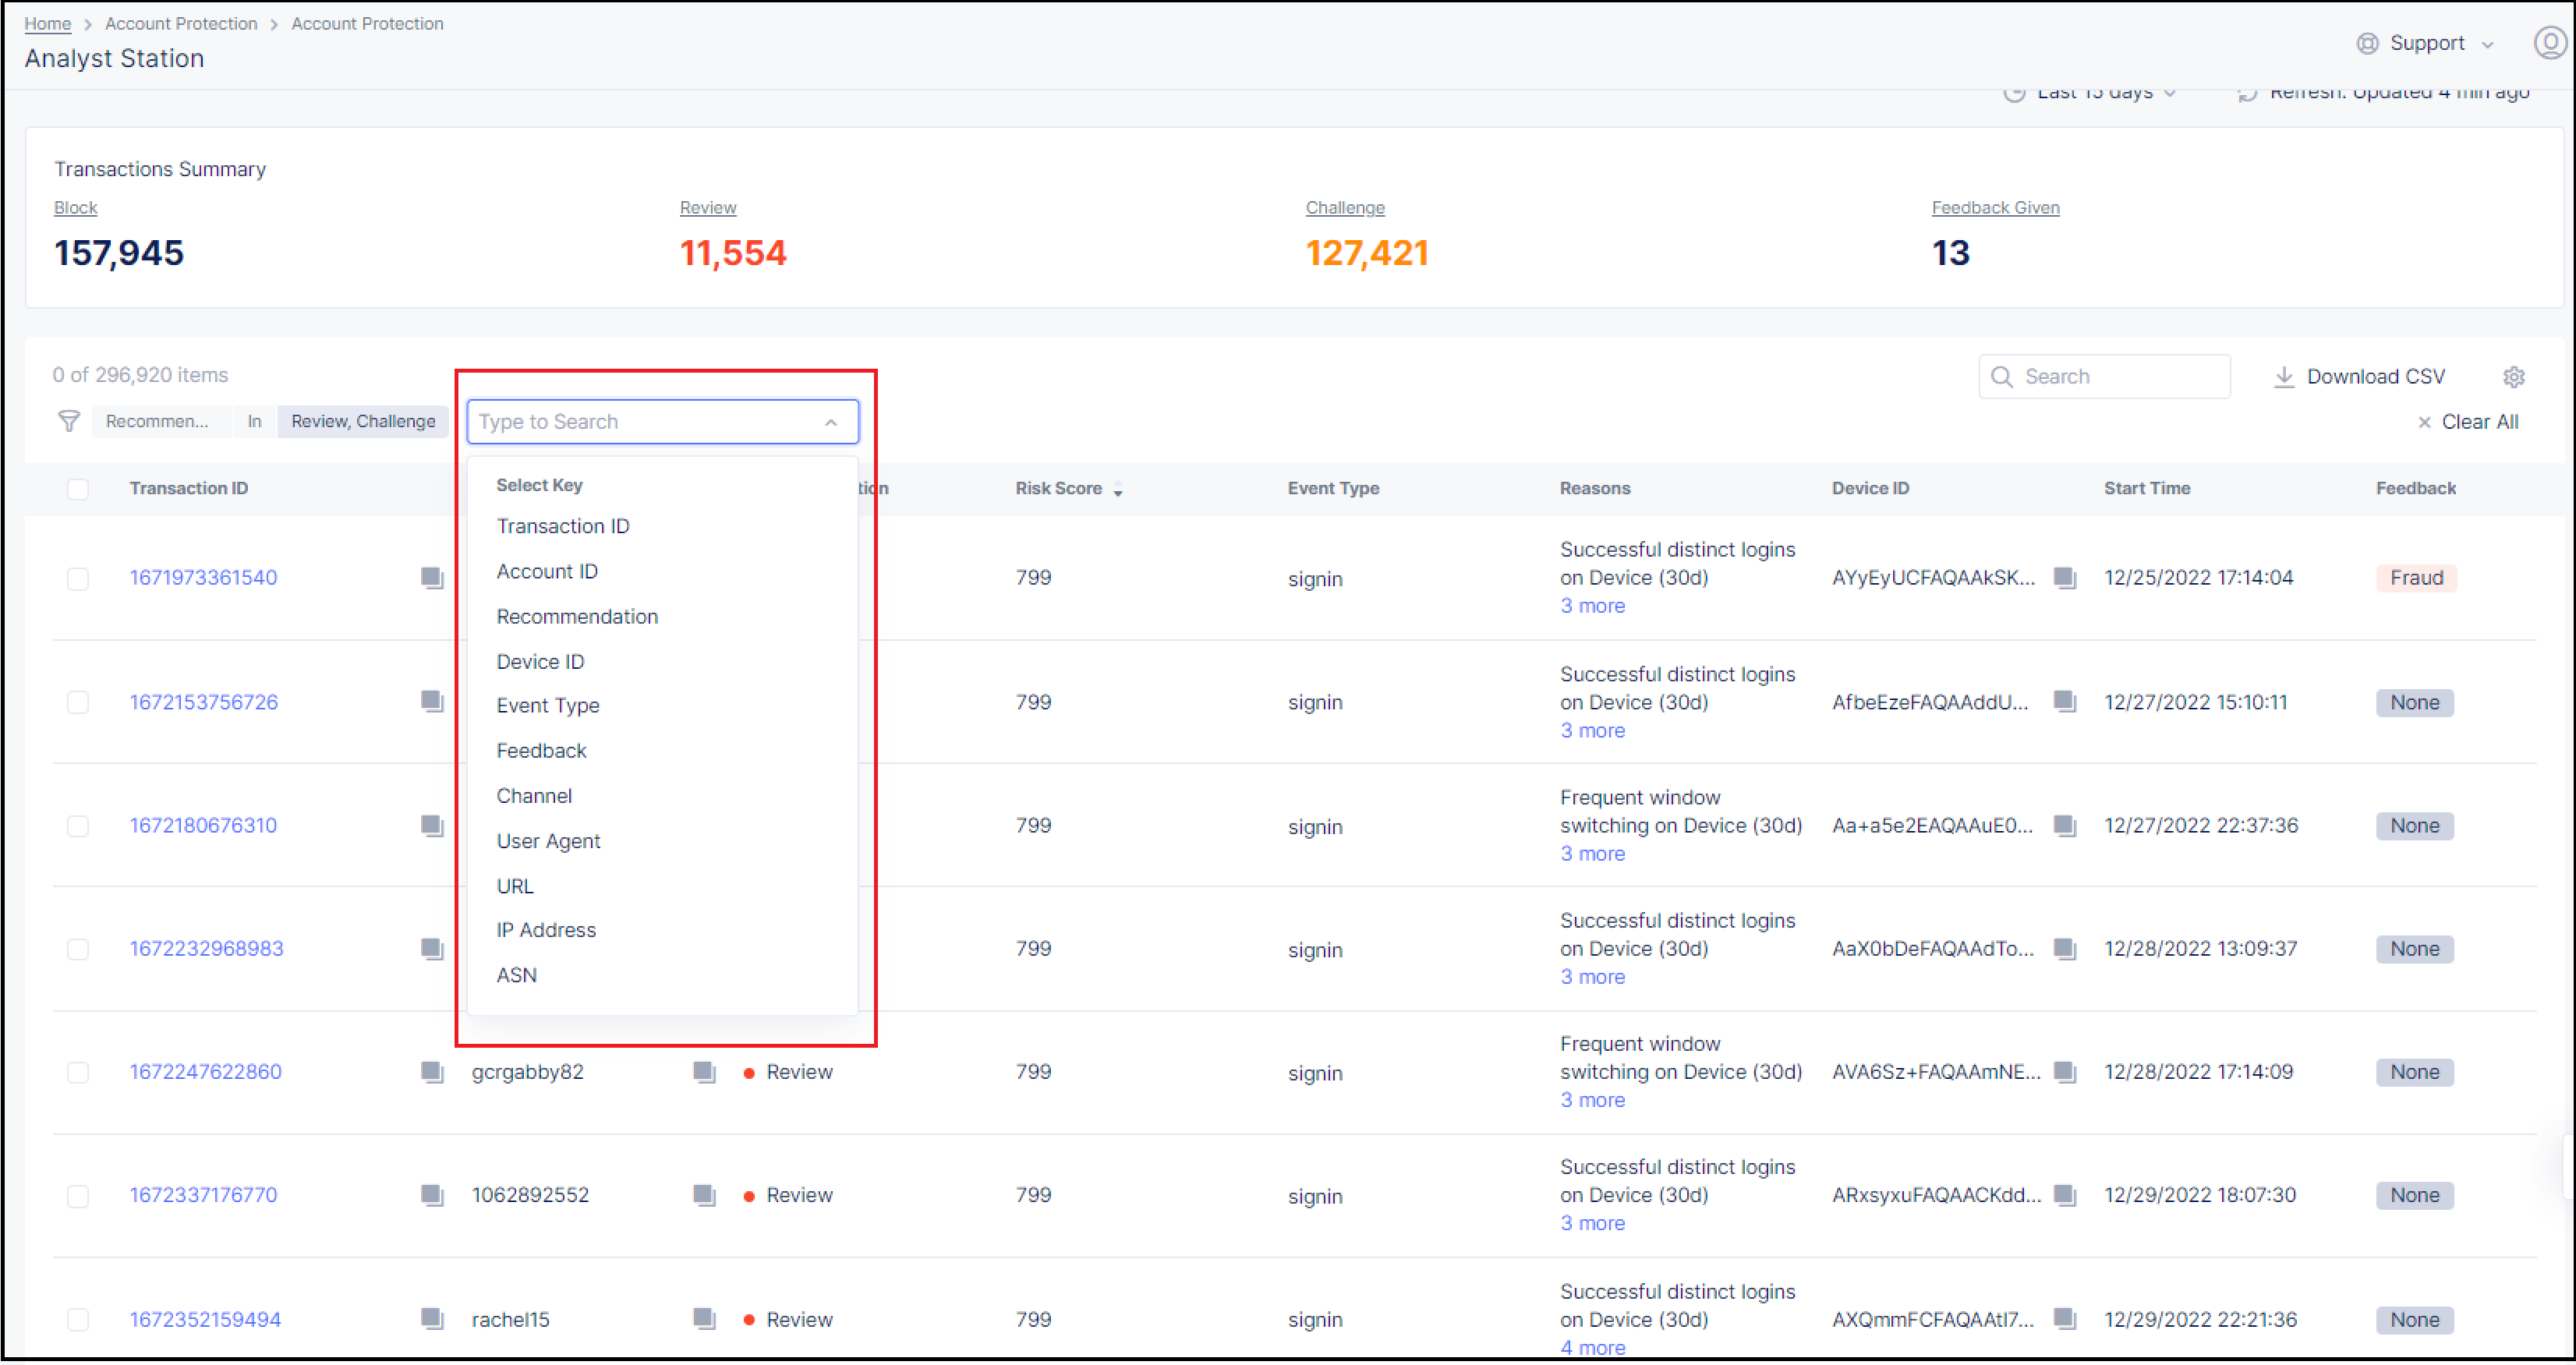
Filtering the Transactions List
You can use the filter settings in Analyst Station to focus your investigation on specific types of transactions according to the following categories: Transaction ID, Account ID, Recommendation, Device ID, Event Type, Feedback, Channel, User Agent, URL, IP Address, and ASN.
To filter the Transactions List:
-
In the Transactions List, click
Add Filter.A list of filter options appears.

Figure: Filter Options
-
Select the filter option you want, the relevant operator, and the value you want to use for filtering.
The Transactions List is now filtered according to the criteria you set.
Filtering the Transactions List from the Transactions Summary
From the Transactions Summary, you can easily filter the Transactions List according to the Recommendation or Feedback status. For example, if you click Review in the Transactions Summary, the Transactions List is filtered to show only transactions with the Review recommendation, as shown below.
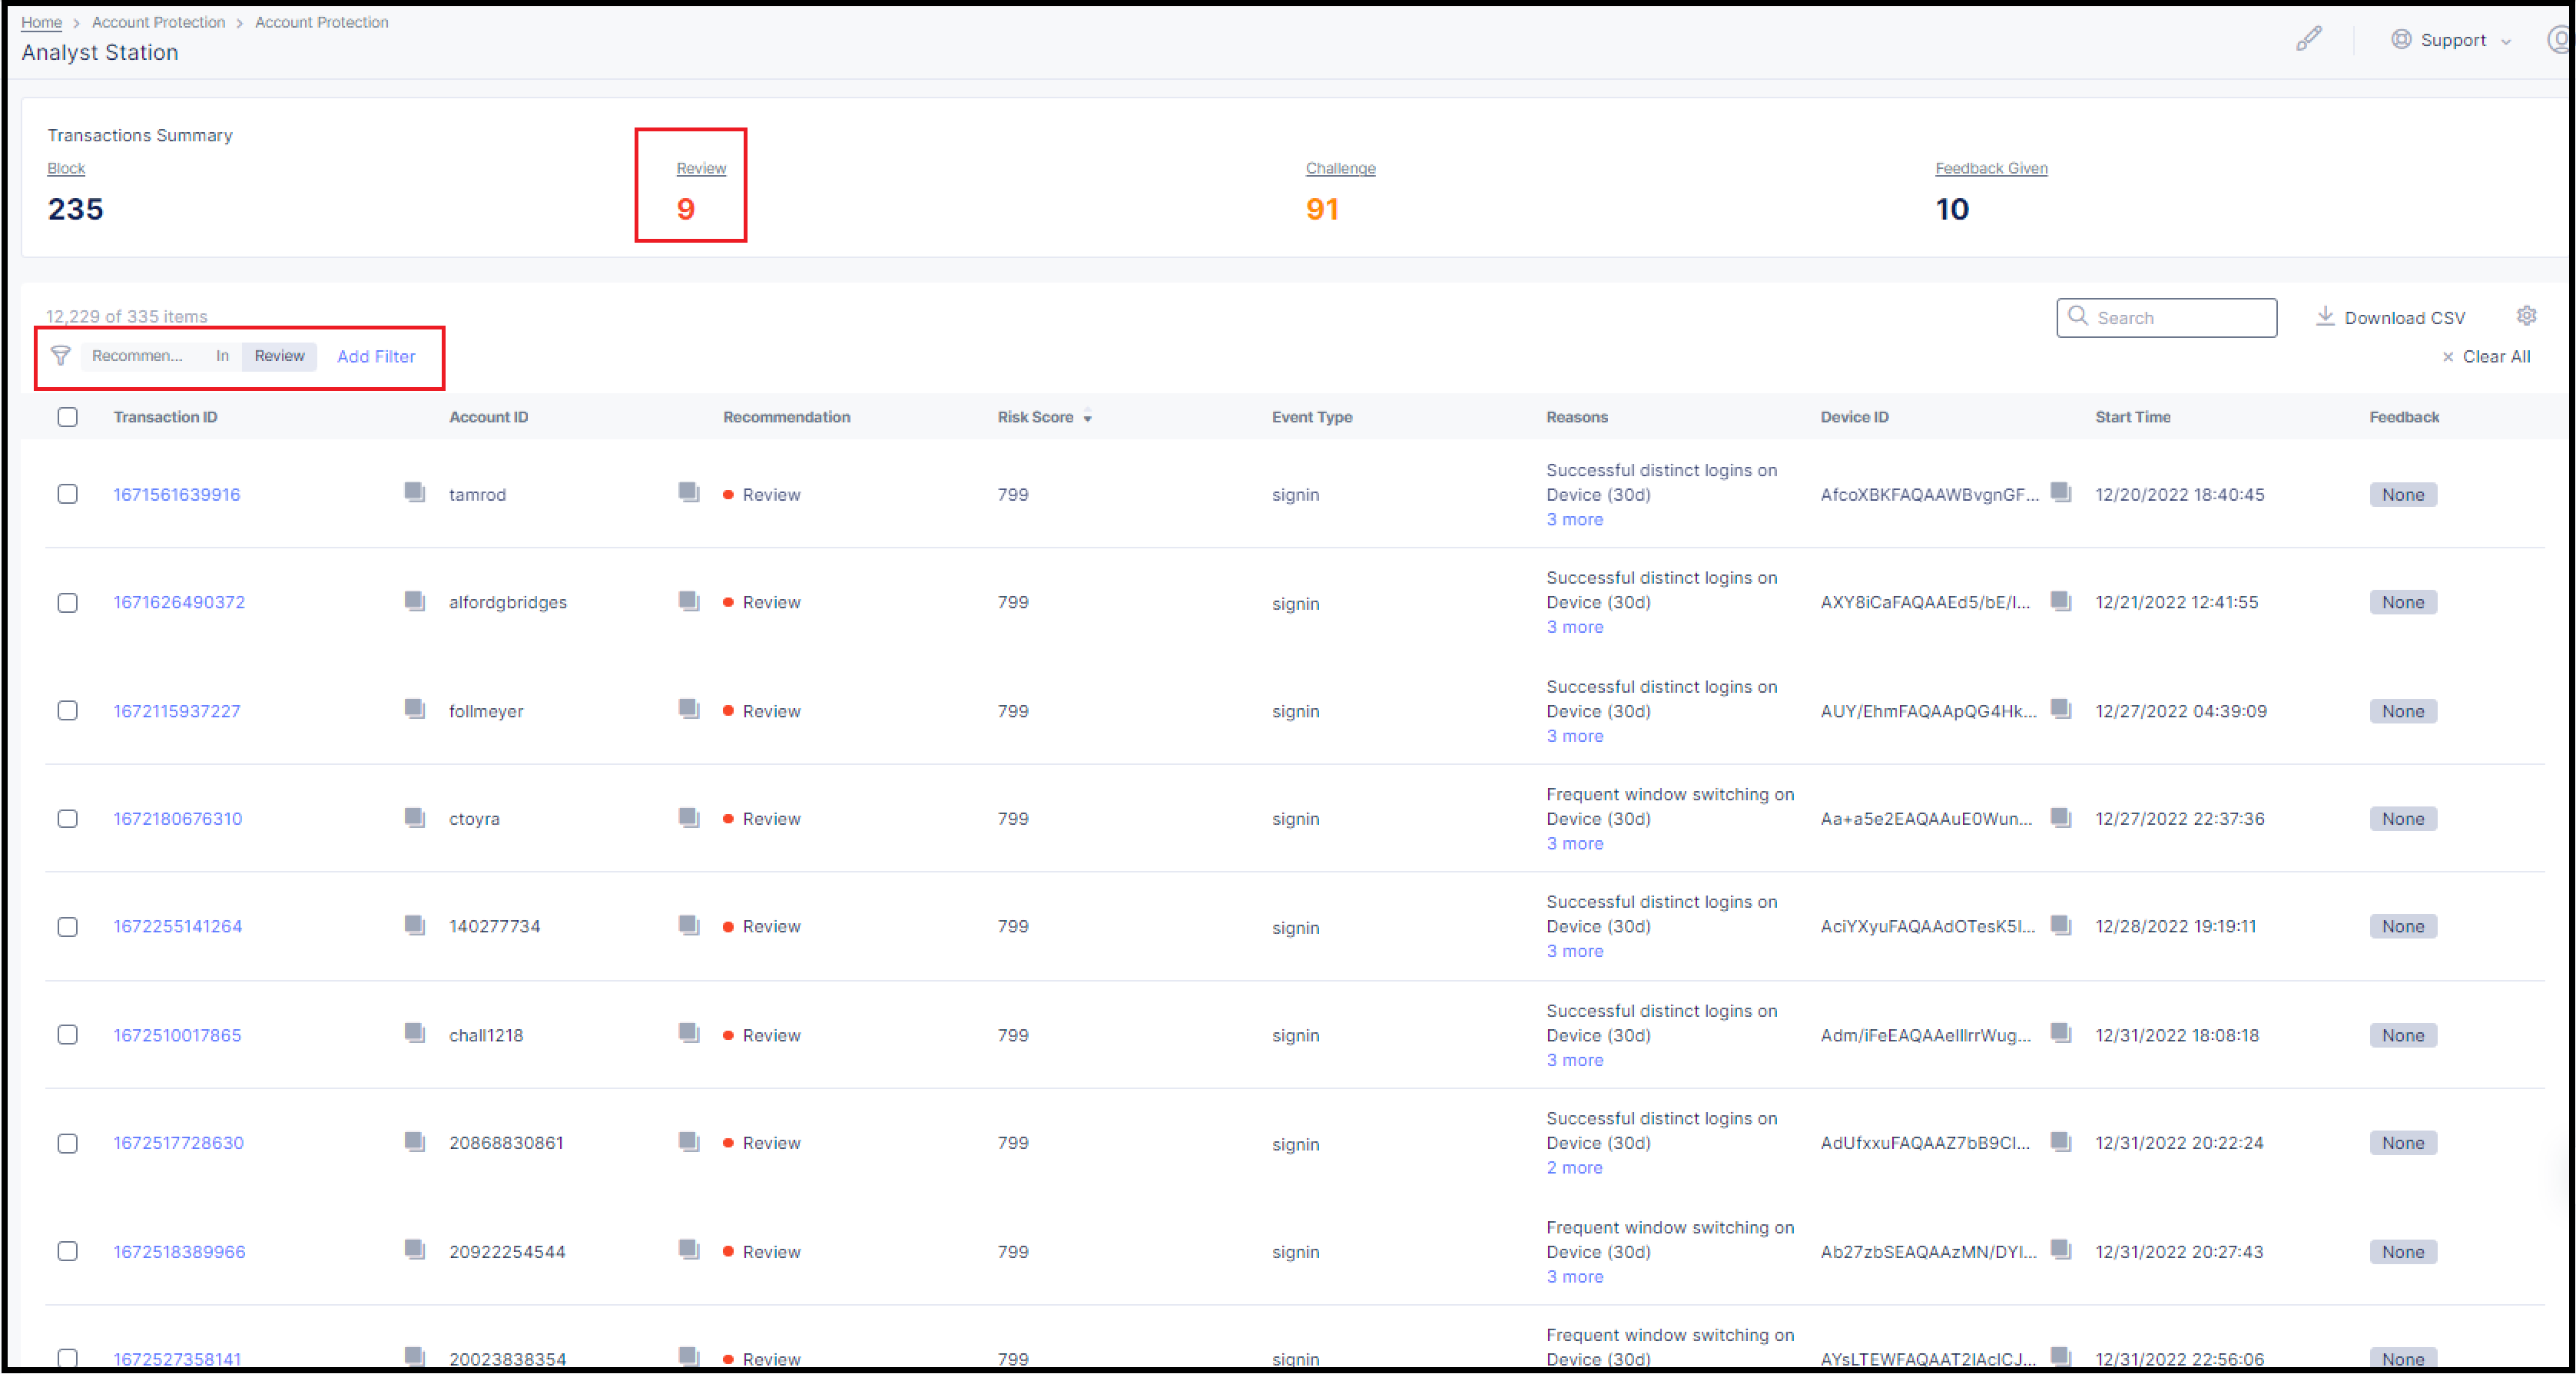
Figure: Filtering from Transactions Summary
Notes on Filtering Transactions
- If you click Clear All on the right side of the dashboard, the filter returns to it’s default values (Recommendation = Review or Challenge).
- If you change the default filter settings and then remove your changes by clicking X (see below), the filter returns to its default values.
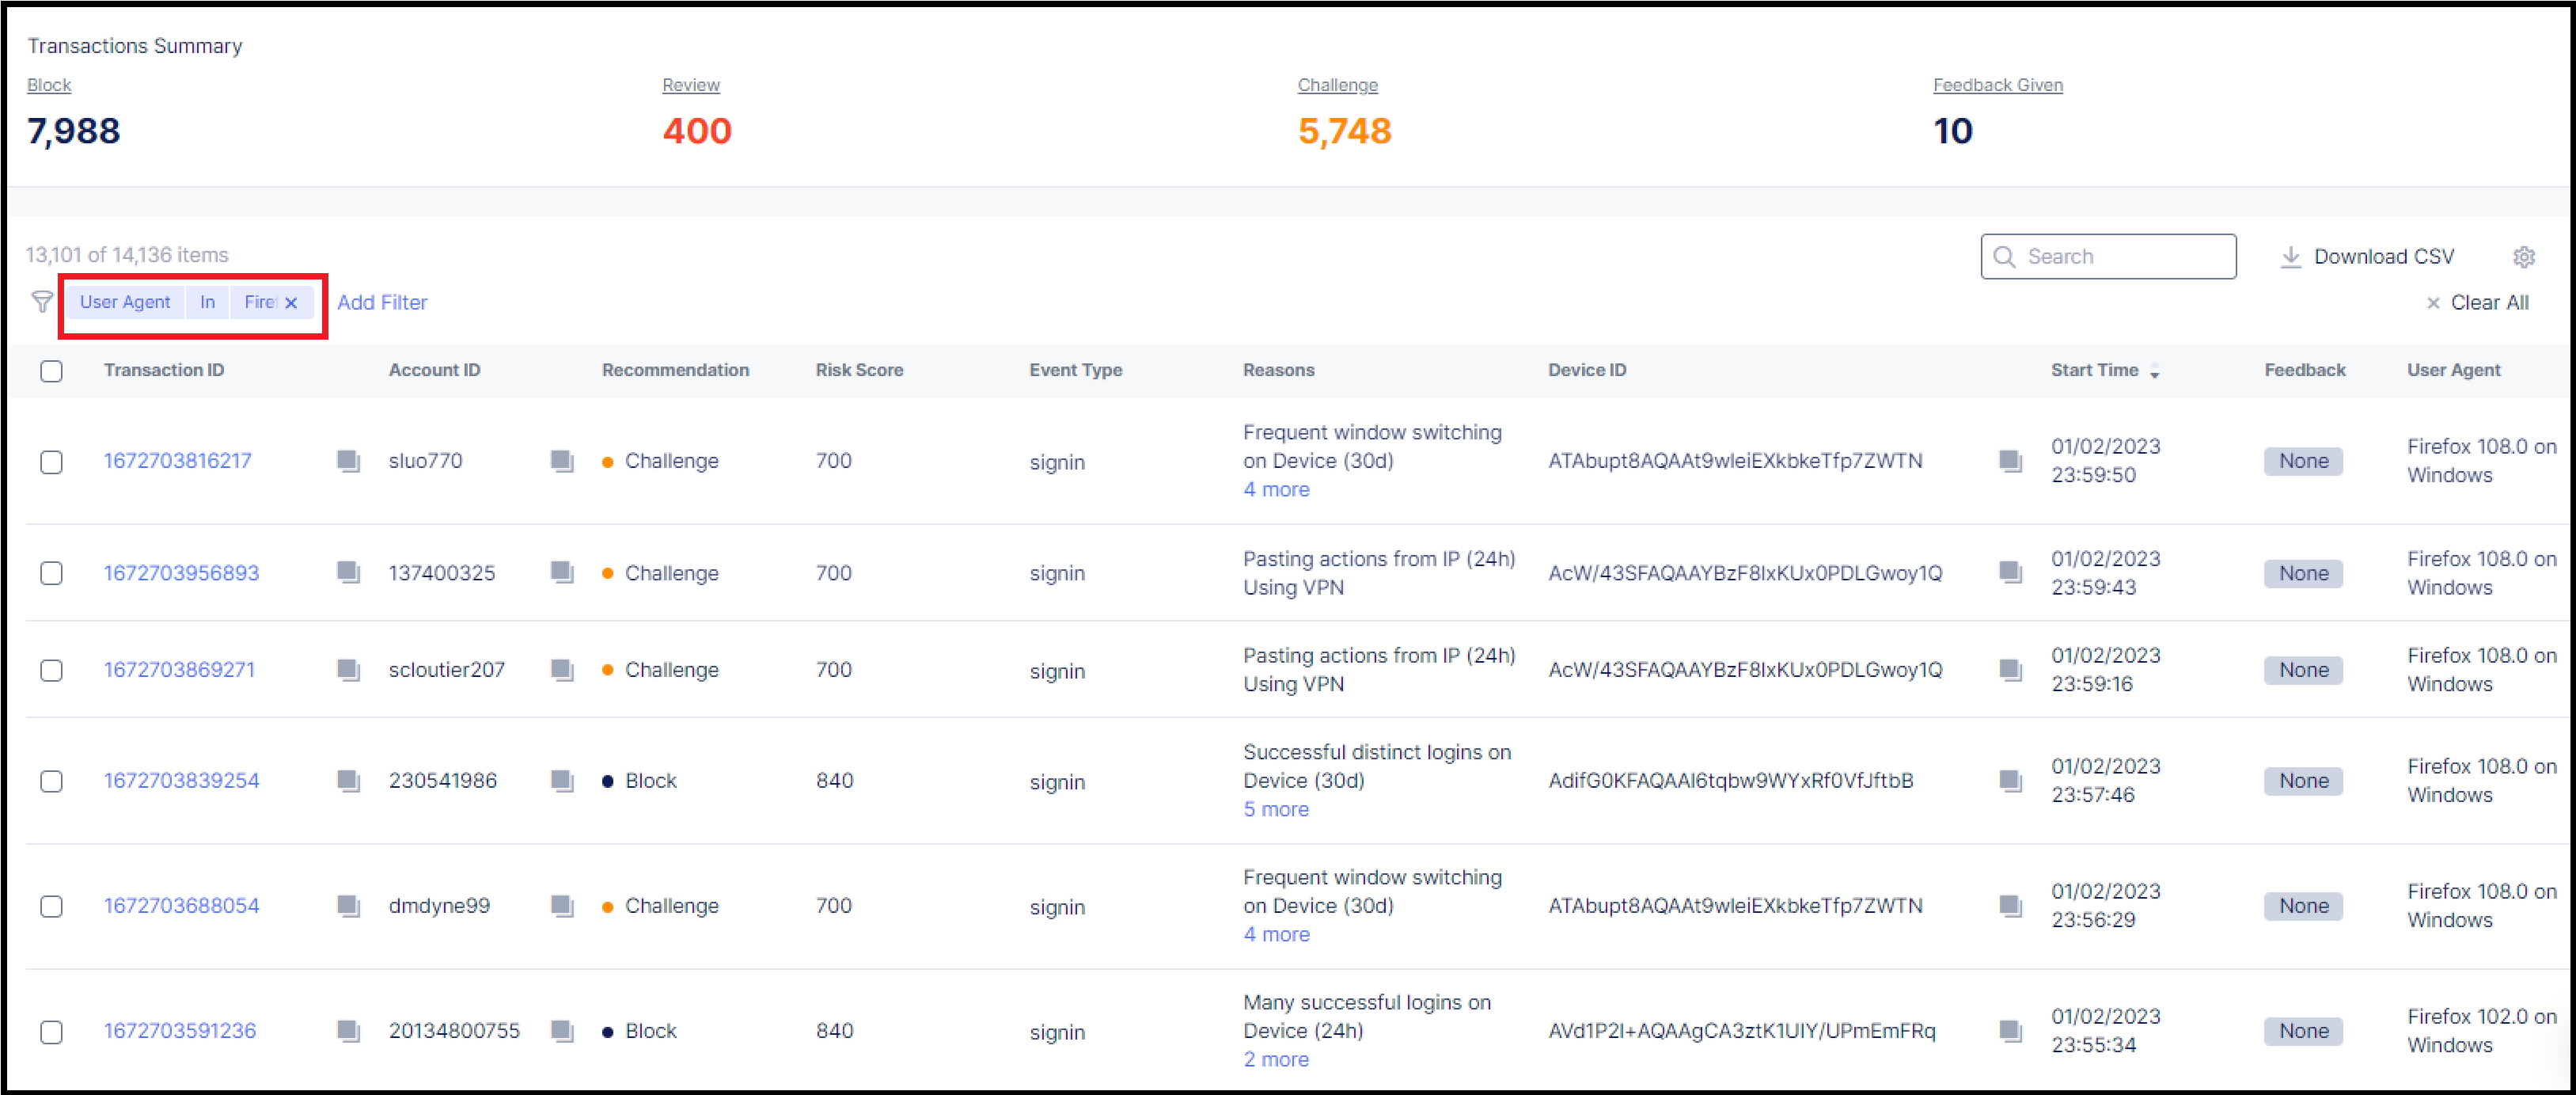
Figure: Remove Filter Settings
- If you use the search box to find transactions, the filter settings change to Recommendation = Review or Block or Allow or Challenge.
Using Sorting and Search to Find Transactions
You can use sorting and search functionality in the Transactions List to find a specific transaction or a set of transactions.
Find Transactions by Sorting
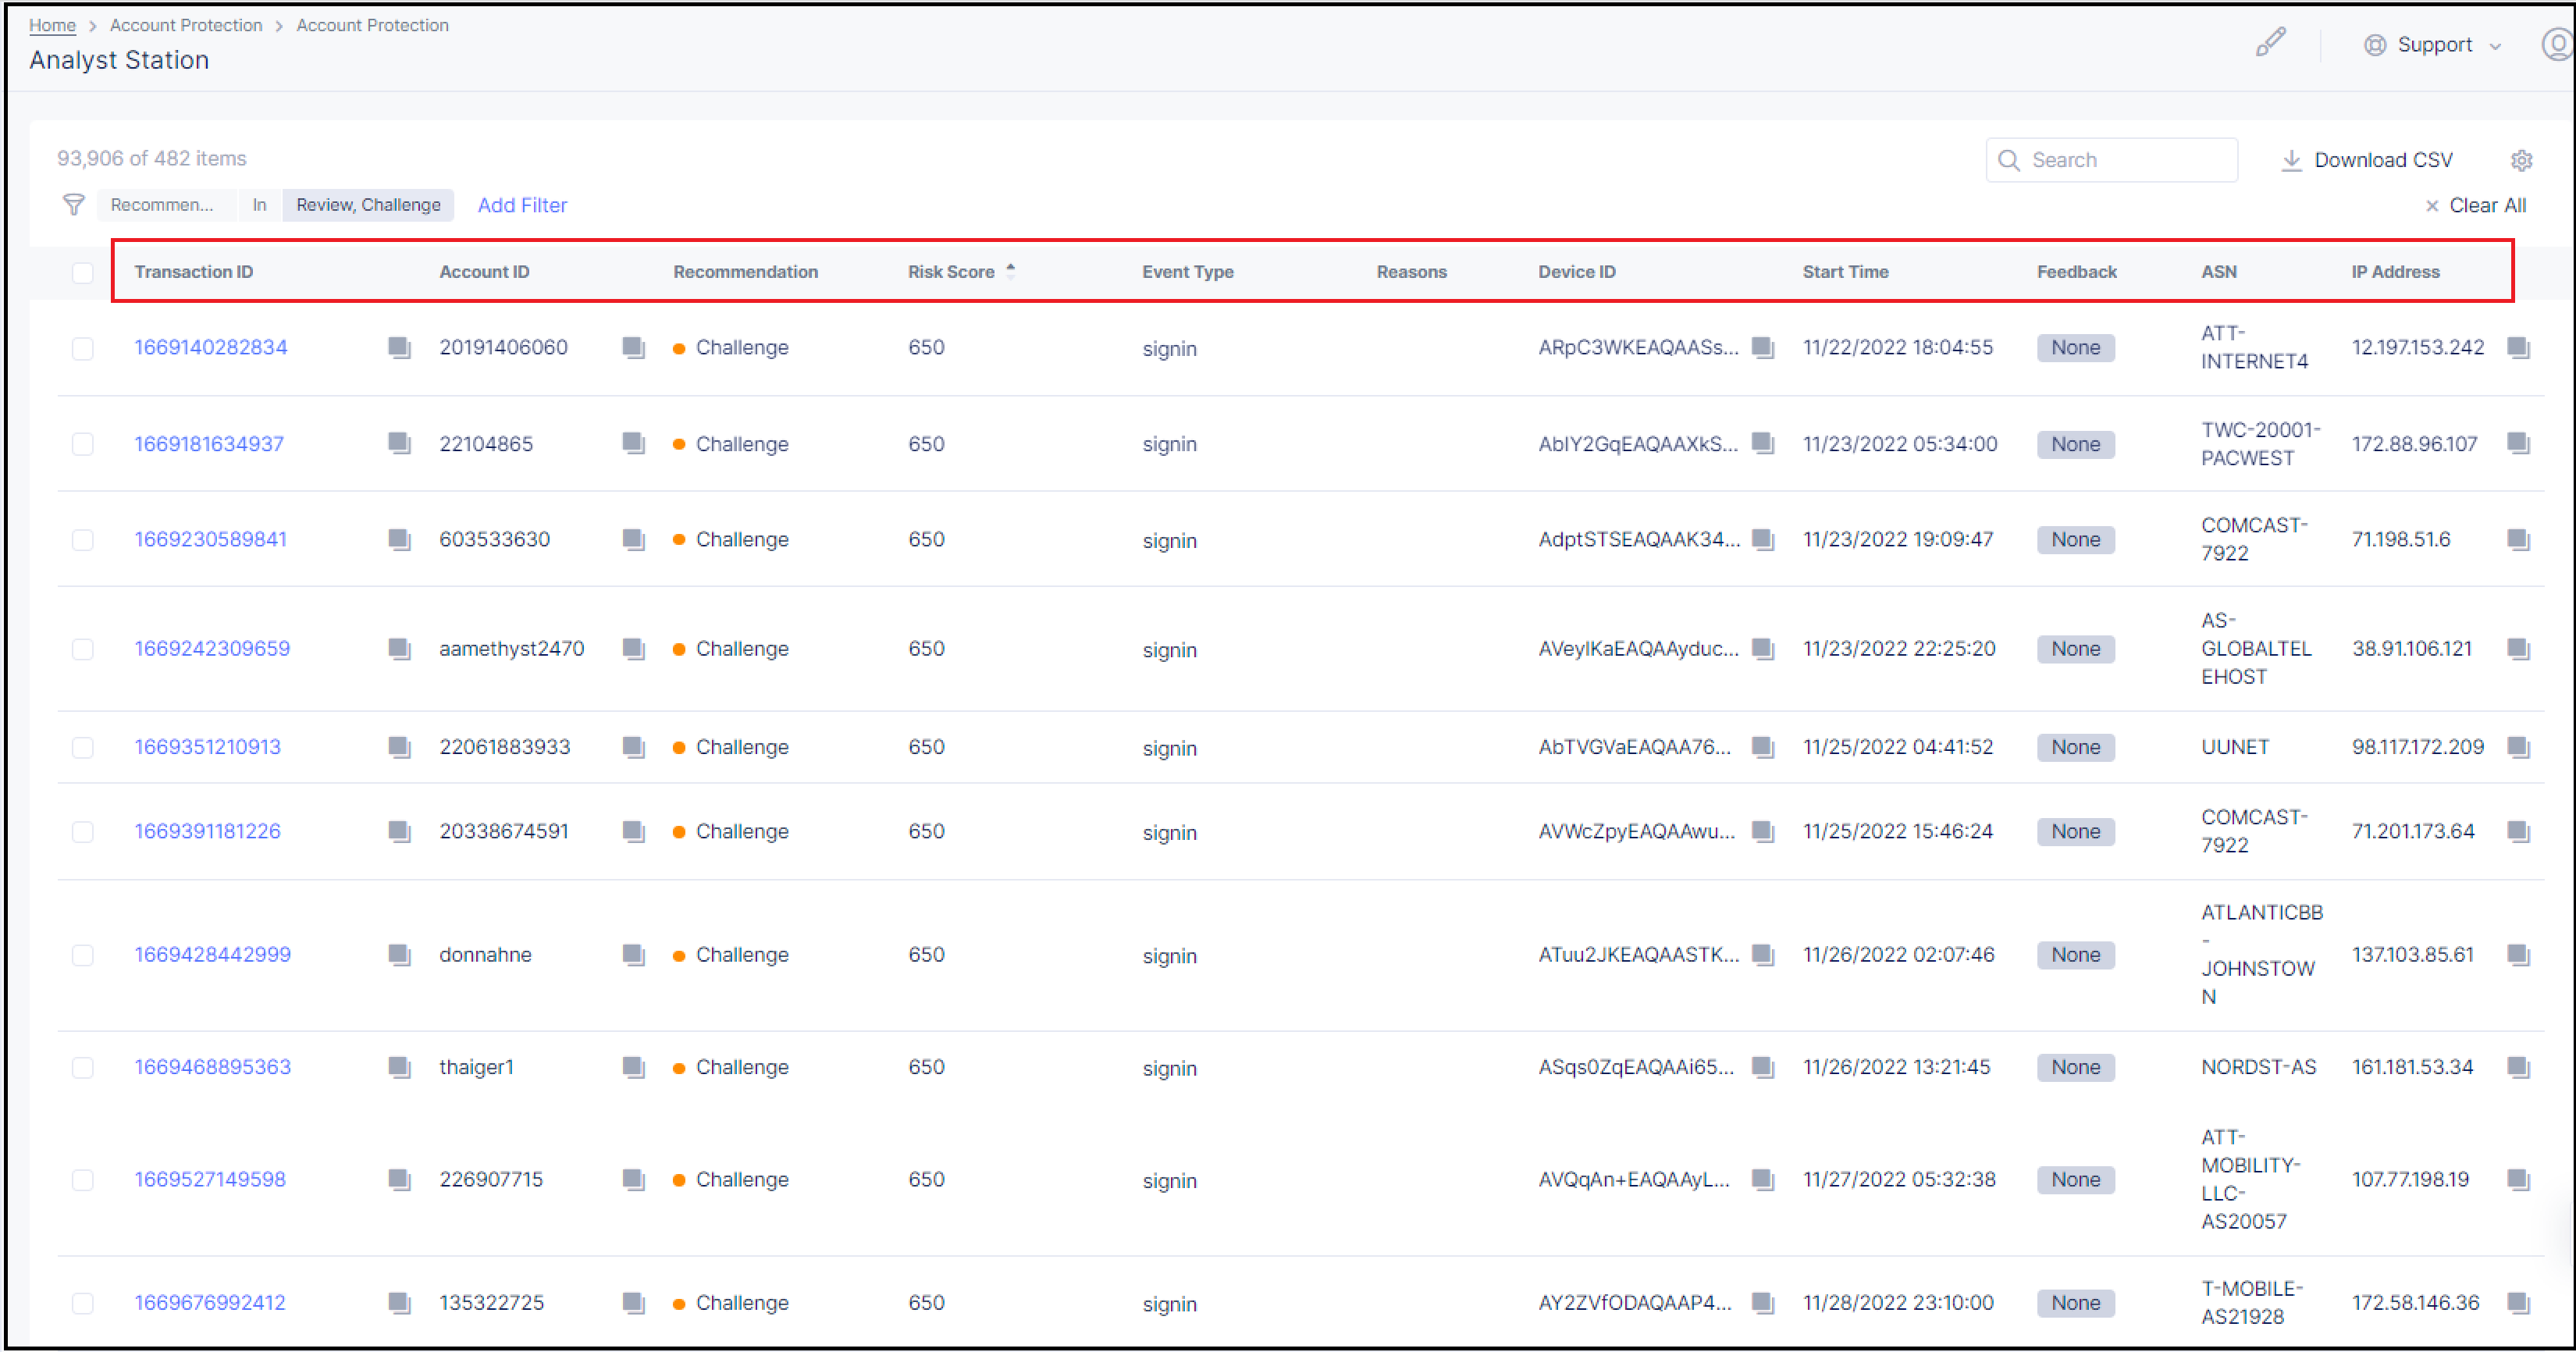
You can sort transactions by clicking on one of the following column names in the Transactions List:
- Account ID: Displays transactions from the lowest to highest ID number, or vice versa.
- Risk Score: Displays transactions from the lowest to highest risk score, or vice versa.
- Event Type: Displays transactions listed in alphabetical order according to the event type, or reverse alphabetical order according to the event type.
- Start Time: Displays transactions from the earliest to latest start time, or vice versa.
- ASN: Displays transactions listed in alphabetical order according to the ASN, or reverse alphabetical order according to the ASN.
- IP Address: Displays transactions from the lowest to highest IP address, or vice versa.
Find Transactions by Searching
Analyst Station’s search feature can be used to find transactions by means of the Transaction ID, Account ID, Device ID, or IP Address. An exact ID or IP Address must be entered in the search box to obtain results.
This feature can be very useful for finding a group of transactions that share the same Account ID, Device ID, or IP Address.
Note: When using the search feature in Analyst Station, you can search for transactions that have been detected by Account Protection within the past 90 days by selecting Last 90 Days from the Time Period drop-down list.
To find transactions with the search feature:
Step 1: Select the copy box next to the ID or IP Address that you want to search for.
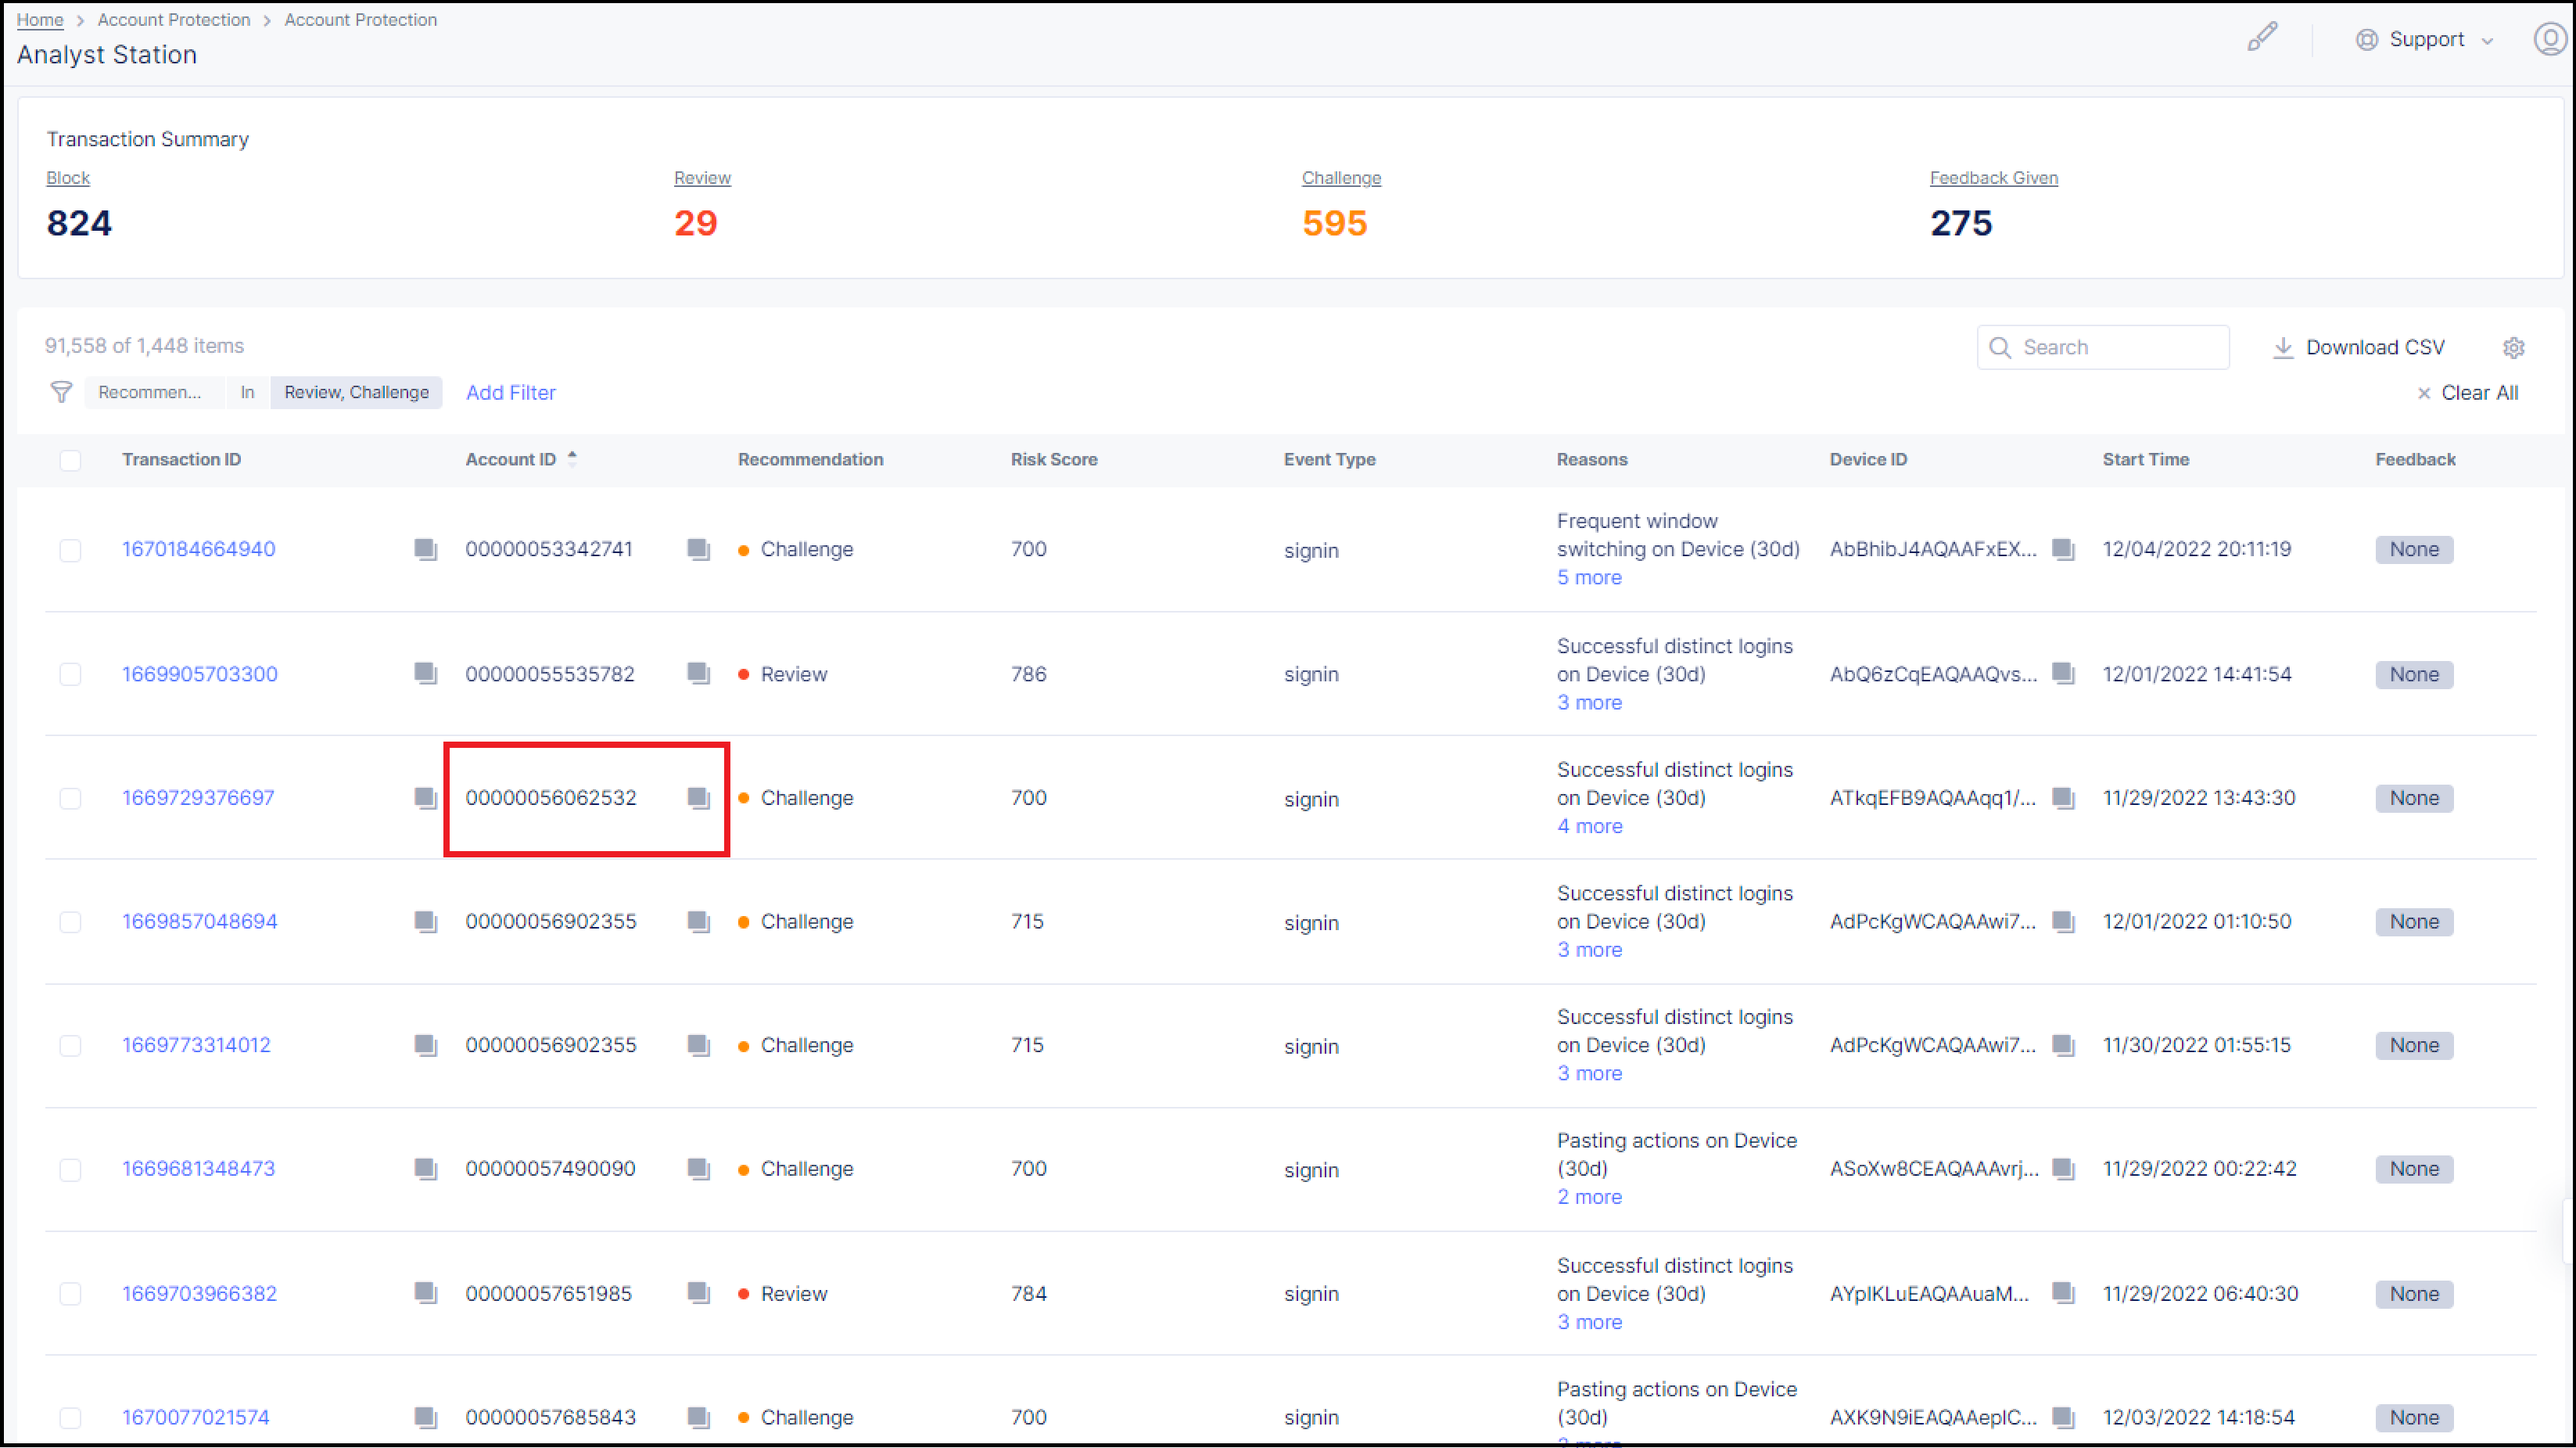
Figure: Select the copy box
Step 2: Paste the ID/IP Address in the search box.
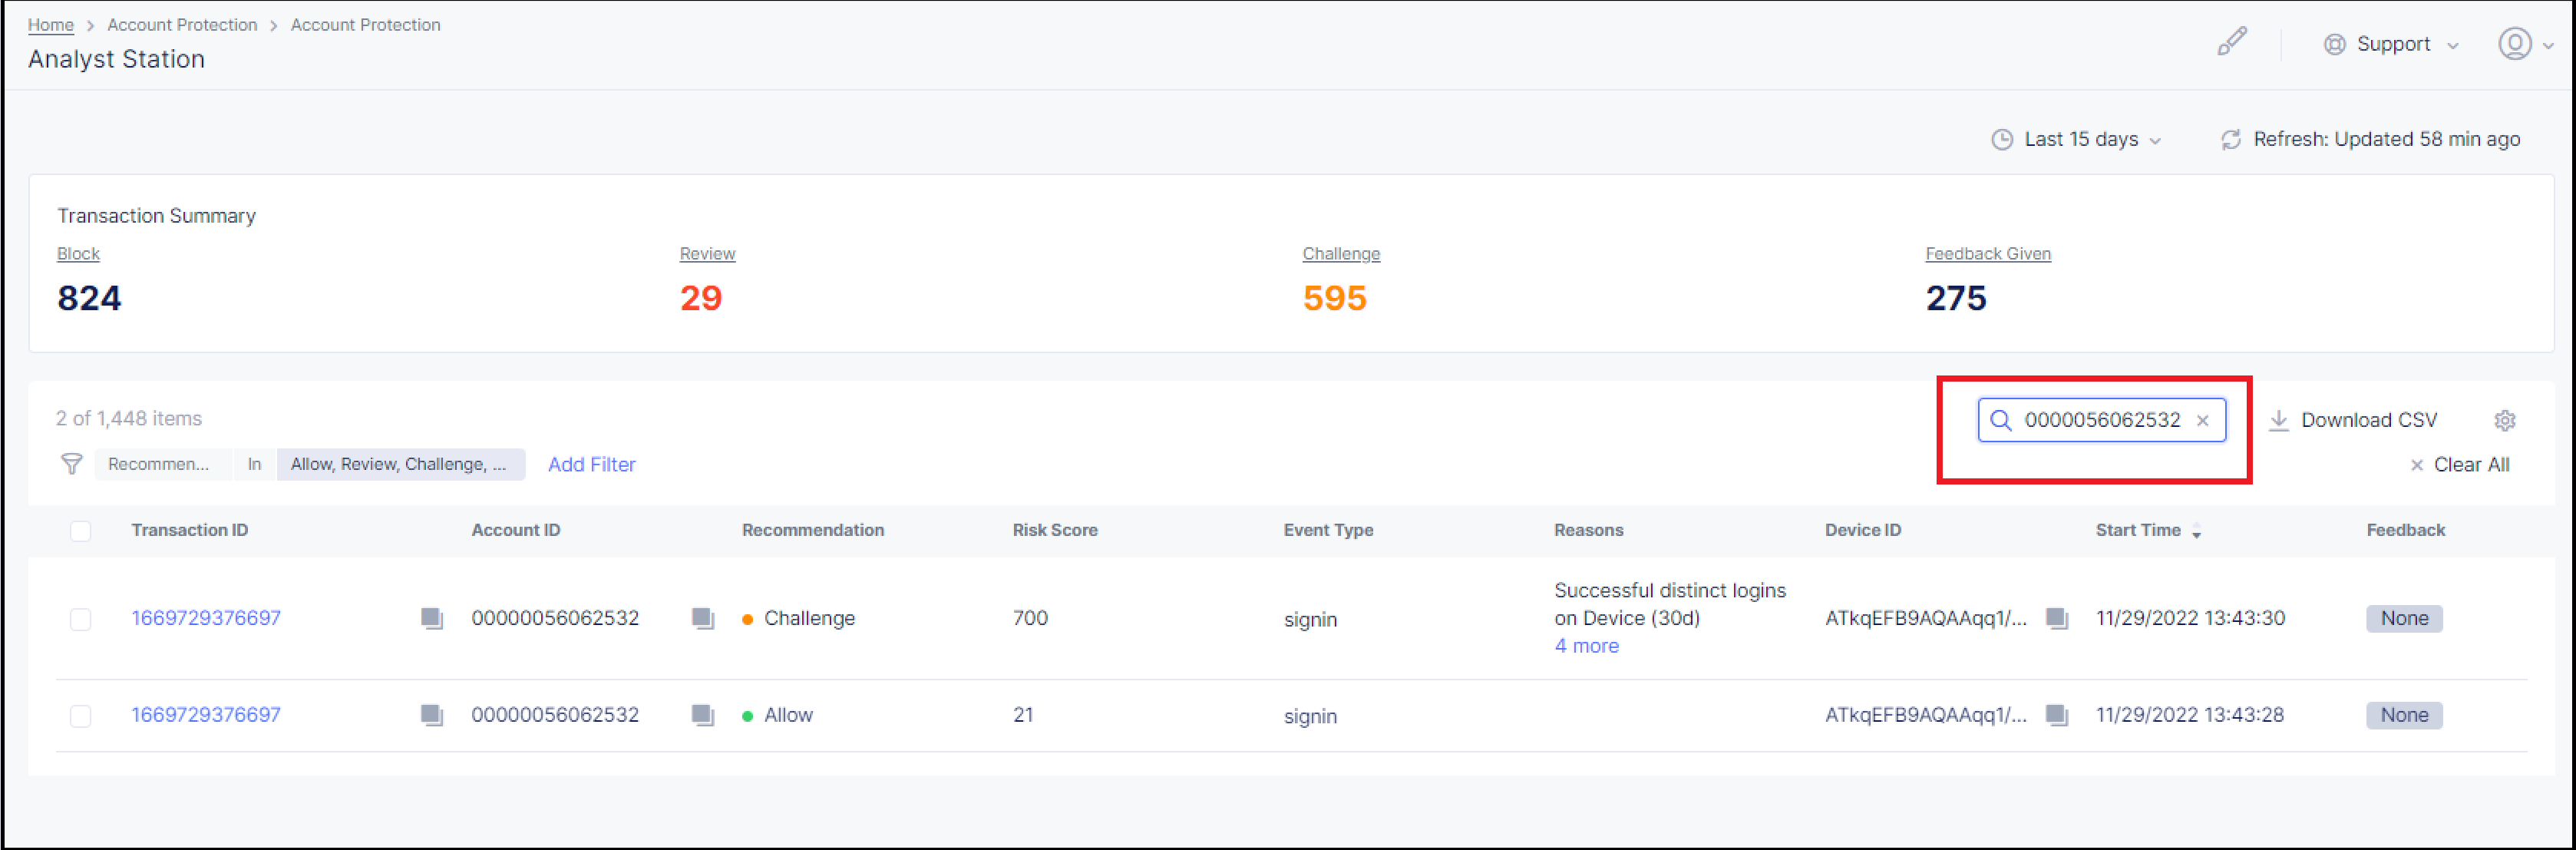
Figure: Paste in the Search Box
The Transactions List now displays only those transactions with the ID or IP Address you put in the search box.
Customizing the Information Displayed in the Transactions Summary
You can customize the type of information displayed in the Transactions Summary by clicking on the Settings icon in the upper right corner of the screen. When you do this, a list of different types of transaction information appears.
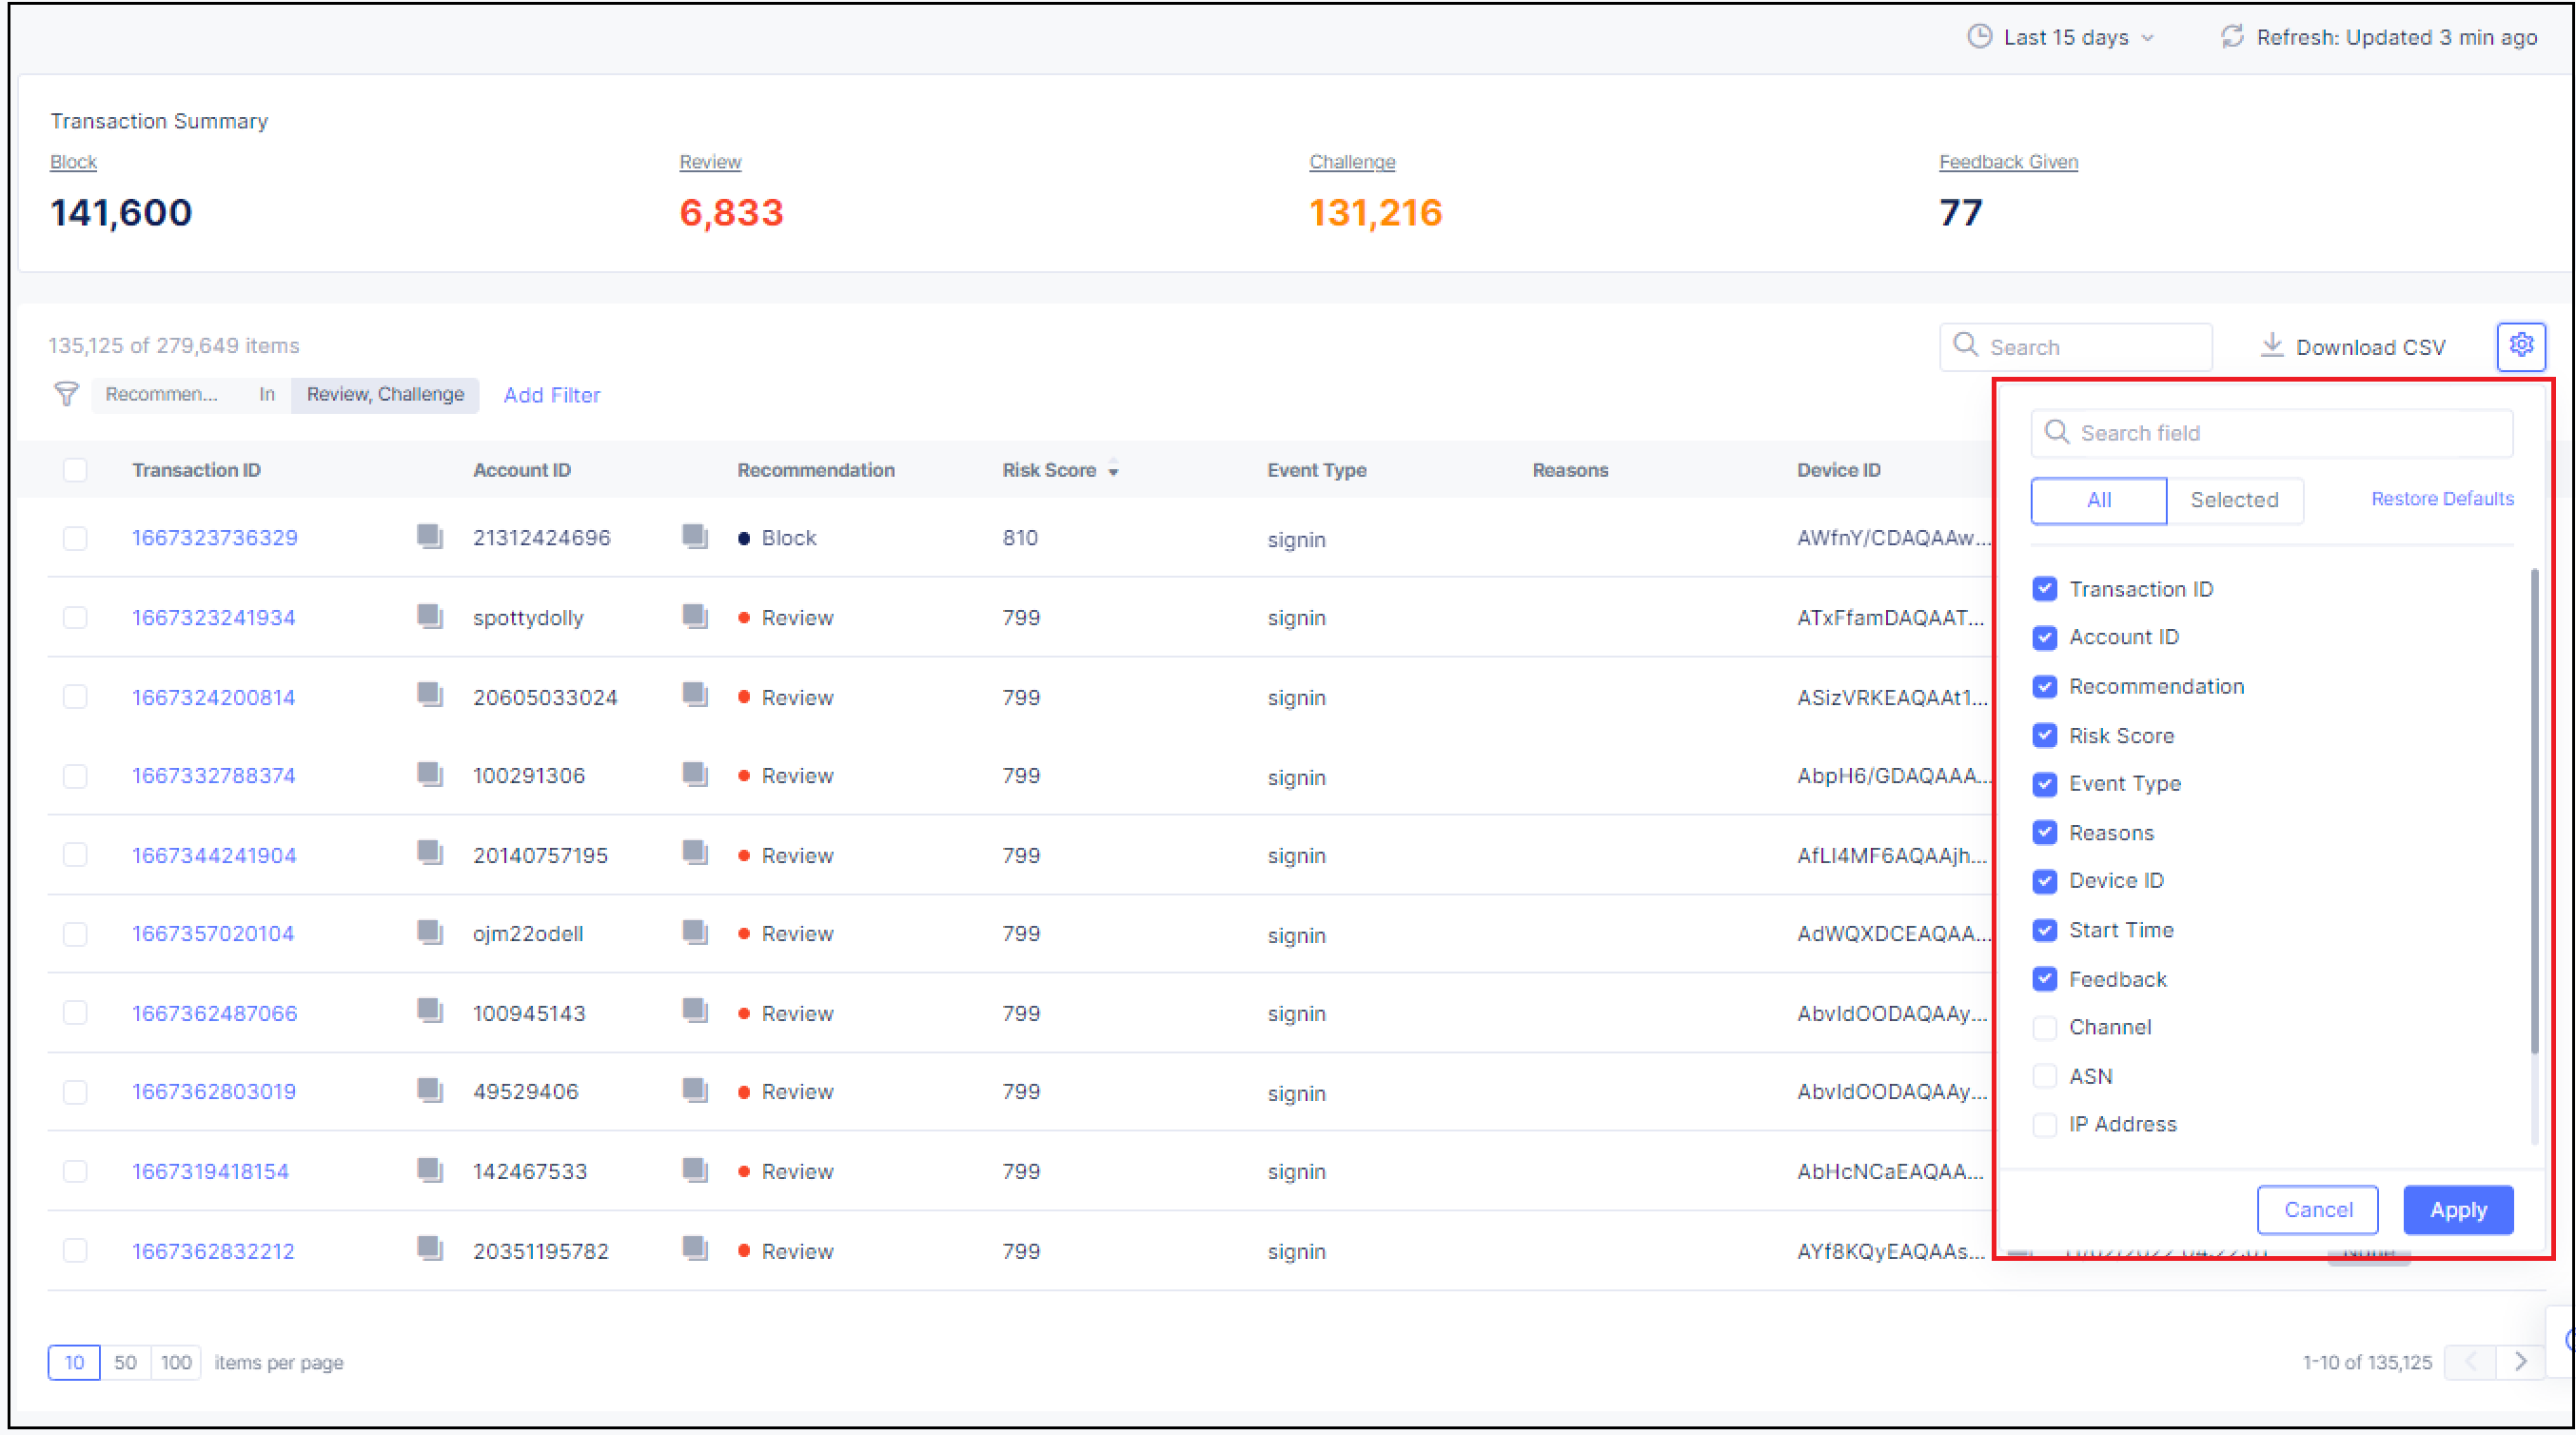
Figure: Transaction Information Display Options
Add or remove display options and then click Apply.
Changing the Time Period for Display of Transactions Summary Data
By default, the Transactions Summary lists data on transactions that were detected by Account Protection within the last 24 hours. However, this time period can be changed so that data is listed for transactions detected in the last 7 days or 15 days.
To change the time period for the display of Transactions Summary data:
-
Click
Last 24 Hoursin the upper right corner of the Transactions Summary. -
From the drop-down list, select either
Last 7 DaysorLast 15 Days.The Transactions Summary data is then listed according to the time period you chose.
On this page:
- Objective
- Prerequisites
- Accessing Account Protection
- Understanding the Recommendations that Account Protection Assigns to Transactions
- System Overview
- Viewing Transaction Details
- Marking a Transaction as Fraud or Not Fraud
- Marking Multiple Transactions as Fraud or Not Fraud
- Blocking an Account ID or Device ID
- Viewing Blocked Account IDs and Device IDs
- Unblock an Account ID or Device ID from the Block List
- Unblock Multiple Account IDs and/or Device IDs from the Block List
- Change the Expiration Date and/or Comment on a Blocked ID
- Change the Expiration Date and/or Comment on Multiple Blocked IDs
- Block an Account ID or Device ID while in the Block List
- Filtering the Transactions List
- Filtering the Transactions List from the Transactions Summary
- Notes on Filtering Transactions
- Using Sorting and Search to Find Transactions
- Find Transactions by Sorting
- Find Transactions by Searching
- Customizing the Information Displayed in the Transactions Summary
- Changing the Time Period for Display of Transactions Summary Data